Gainspan GS1011MIP Low Power Wi-Fi Module User Manual
Gainspan Corporation Low Power Wi-Fi Module
Gainspan >
User Manual
User Manual:
Serial to Wi-Fi Evaluation Kit
PRELIMINARY PAGE 1 OF 12 CONFIDENTIAL
INTRODUCTION
HE GAINSPAN GS1011MXX EVALUATION KIT offers a quick and easy way to evaluate the GainSpan
GS1011M ultra-low-power wireless module and embedded platform software for Wi-Fi® networks
based on the GS1011 SOC ultra-low-power Wi-Fi System-On-Chip.
The default firmware pre-loaded on the Evaluation kit is the serial to Wi-Fi application. The GS1011M
can be used as transparent bridge to carry serial (UART) traffic over an 802.11 wireless link. The quick
start guide provides the steps required to construct the serial to Wi-Fi bridge.
GAINSPAN EVALUATION KIT COMPONENTS
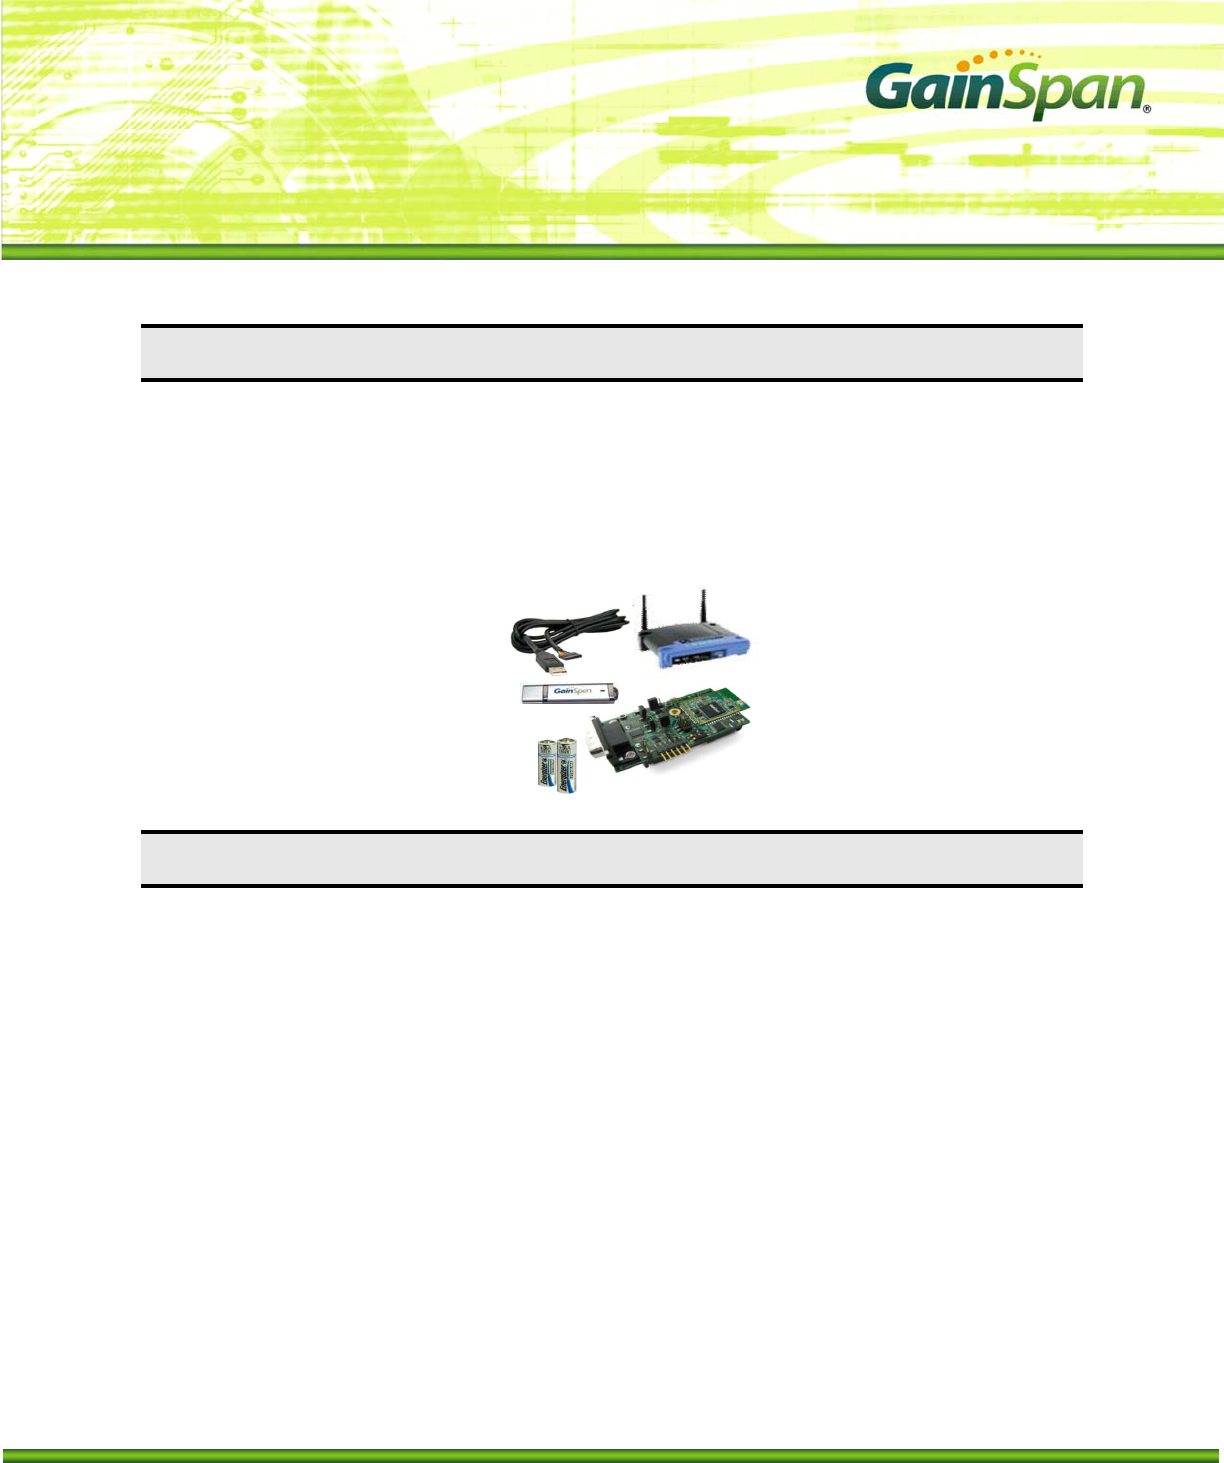
The GS-SOC Evaluation Kit includes the following items:
► GS1011M based Evaluation Board (GS1011MxP-EVB or GS1011MEE-DB)
► Power Source (Battery or 3.3V DC adapter)
► Serial Cable (USB to UART or DB9)
► Standard Wi-Fi ® Wireless Access Point.
► GainSpan USB Flash Drive,which includes:
Product Documentation including
Evalkit_Setup.exe
Java Environment Installer
SW Utilities (Wireshark, TeraTerm and Sim Term terminal software)
► This Manual
Copyright © 2009 by GainSpan Corporation. All rights reserved.
GainSpan and GainSpan logo are trademarks or registered trademarks of GainSpan Corporation.
Other trademarks are the property of their owners.Specifications, features, and availability are subject to change without notice.
T
Serial to Wi-Fi Start Up Guide
PRELIMINARY PAGE 2 OF 12 CONFIDENTIAL
EVALUATION BOARD DETAILS
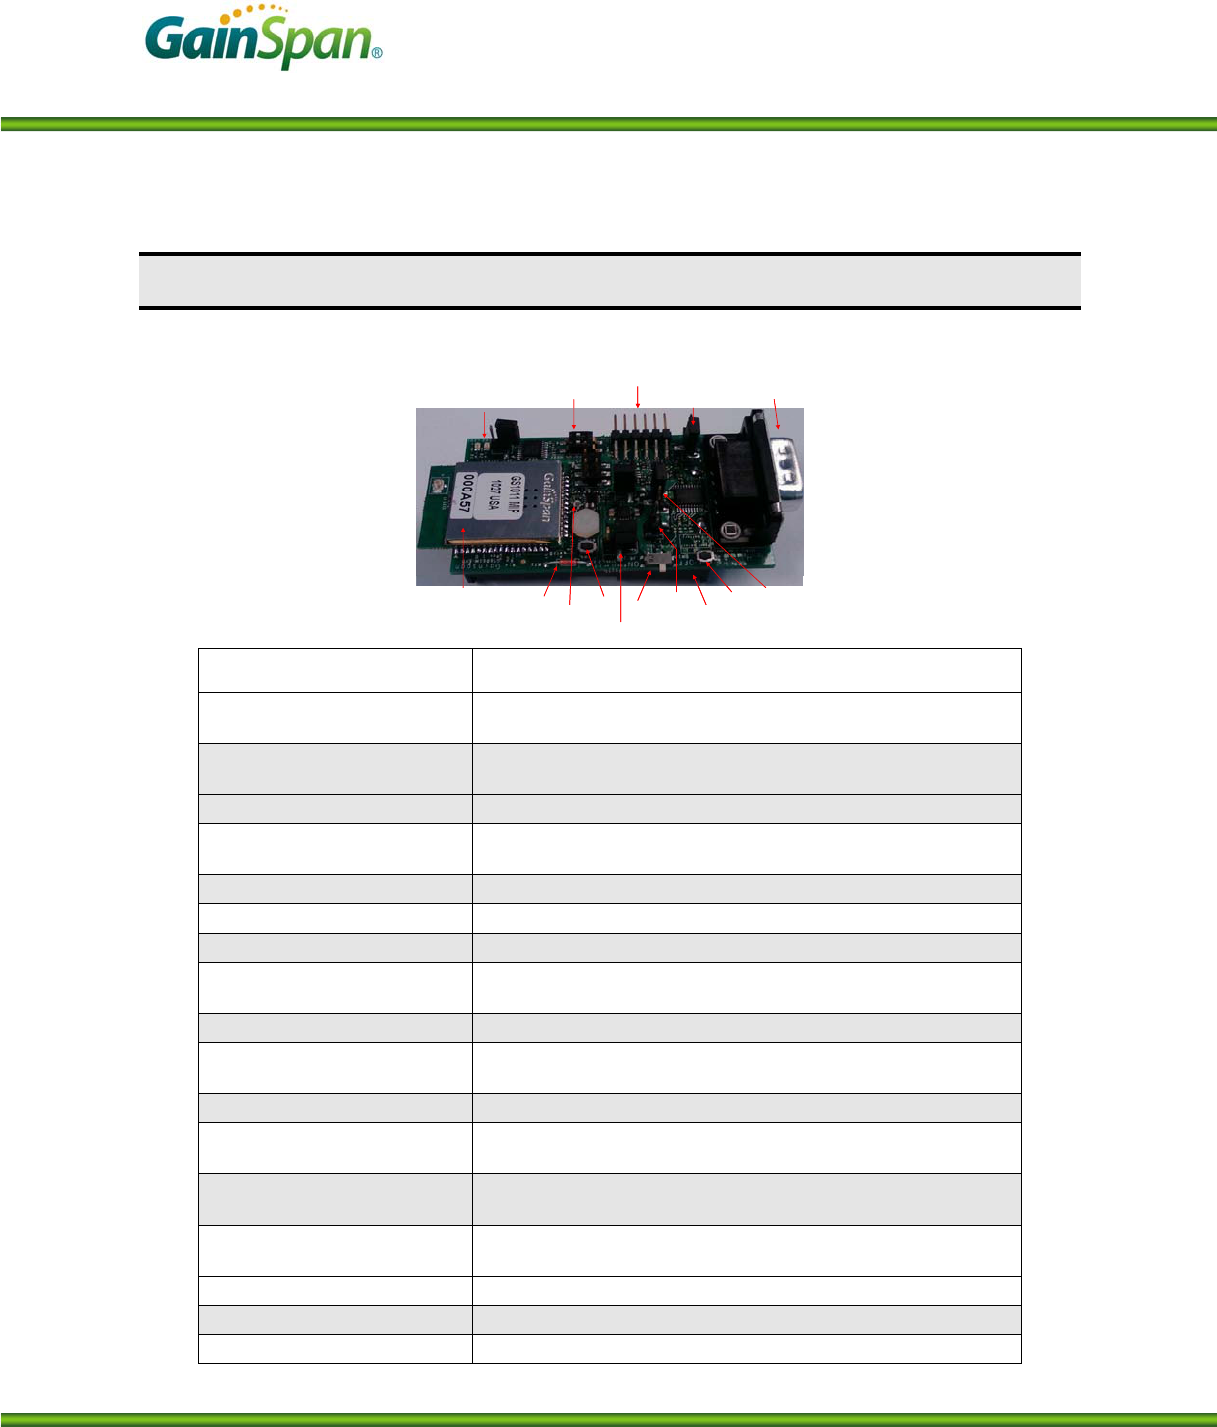
This section describes the various interfaces and jumper settings for the GS1011MxP-EVB board.
6-pin UART
Connector
GS1011MxP
Module Temperature
Sensor Light
Sensor
Alarm
Switch On/Off
Switch
Power
Supply
Header
WPS
Switch
RS232
DB9
Connector
Serial Select
Jumper
Program
Switch
LEDs
Power
Source
Select
Battery
Holder
Power Mode
6-pin UART
Connector
GS1011MxP
Module Temperature
Sensor Light
Sensor
Alarm
Switch On/Off
Switch
Power
Supply
Header
WPS
Switch
RS232
DB9
Connector
Serial Select
Jumper
Program
Switch
LEDs
Power
Source
Select
Battery
Holder
Power Mode
Feature Description
RF Module GS1011MIP – Internal PA and PCB antenna or
GS1011MEP – External PA and PCB antenna
RF Output Power (Typical) 9 dBm with GS1011MIP
18 dBm with GS1011MEP
Antenna Type On-board PCB Trace (GS1011MxP)
I/O Port (J1 or J2) J1: 6-pin serial UART ( 3.3V TTL) or
J2: RS232 DB9 Connector
LED 2 LED’s to indicate state
WPS Switch (SW2) Push button for Wi-Fi Protected Setup
Alarm Switch (SW4) Push button for Alarm and configuration
Program Switch (SW3) RUN: Normal Operation (default)
PROGRAM: For programming the GS1011M module:
On/Off Switch (SW1) Power on/off switch
Serial Select Jumper ( J4) 1-2 : RS232 Interface (DB9)
2-3: 6-pin UART (default)
Sensors Temperature and Light
Power Source Select (J9) 1-2: Ext Lab DC power supply
2-3: Battery (default)
Battery Two 1.5V AA Battery (Alkaline or Lithium)
Lithium is recommended for longer battery life
Power Mode (J8) 1-2: Always On (Power is always on)
2-3: Standby Mode (Power is turned off to the board during standby state) - default
Power Measurement Jumper (J8) Jumper to facilitate measurement of current consumption for module
Power Supply Header Jumper posts for connecting Lab DC power supply
Power Source Range 2.7V to 3.6V

Serial to Wi-Fi Start Up Guide
PRELIMINARY PAGE 3 OF 12 CONFIDENTIAL
INSTALLATION STEPS FOR EVALUATION KIT SOFTWARE
The USB key in the evaluation kit contains multiple SW components that can be installed for
evaluating the various applications on the evaluation board.
System Requirements: PC with Windows XP Service Pack 2 or Windows Vista. with at least one Ethernet port, and a PC with a serial
or USB port. (A single PC can provide both the serial and Ethernet connections, if desired.)
Install Java Runtime Environment
If you have Java Runtime Environment (JRE) Version 6 Update 14 or later, you should be able to
run the GSDemo GUI application that are installed as part of the Eval kit installation. If not, you
can download the current version of JRE from
http://www.java.com/en/download/manual.jsp
or run jre-6uXY-windows-i586-p-s.exe from the USB flash drive received with your
Evaluation Kit, where XY may vary depending on the update provided.
Install Serial Terminal Software
Install the Tera Term serial terminal software (teraterm_utf8-4.58.exe). If you already have tera
term or use a different terminal software, then you can skip this step.
Evaluation Kit Software Installation
Installs the Serial to Wi-Fi application binaries, GSDemo GUI for the temperature and light sen-
sor application and drivers required for serial configuration.
Run evalkit_setup.exe from the USB flash drive. This starts the InstallShield Wizard. Perform
a “Typical” installation, using all default settings. This creates and populates the
C:\GainSpan\EvalKit\X.X.X directory.
Note: Directory names and organization may differ slightly from one release to another; If you
have already installed earlier versions of GainSpan software, the most recent release will be add-
ed in a separate folder.
Copy Sim_terminal.exe from the USB key to the EvalKit directory created in this step. The sim
terminal is a serial terminal with --- TCP/UDP client available from GainSpan. Note that Simple
Terminal requires the .NET framework, 2.0 or above; You can download that .net framework
from http://www.microsoft.com/downloads/en/default.aspx
USB/UART Cable Driver Installation
Note: If using RS232 (DB9) cable, then this step can be skipped
If USB to UART cable provided with the kit is used, then install the driver for this cable from
C:\GainSpan\S2wEvalKit\1_1_2\drivers\usb_uart directory that was created previous step. The
file is labeled CDM 2.02.04.
Serial to Wi-Fi Start Up Guide
PRELIMINARY PAGE 4 OF 12 CONFIDENTIAL
SERIAL TO WI-FI SETUP AND START UP INSTRUCTIONS
Below are the steps required to run the serial to Wi-Fi application.
1. Once the software installation is completed, power the Wi-Fi Access Point (AP). The access point
have been pre-configured with the following parameters:
a. SSID = “GainSpanDemo
b. Channel = 6
c. DHCP = Enabled
d. Security = Open
e. IP Address = 192.168.3.1
Note: If user wants to use a different AP than the one provided with the kit, user can use any standard
Wi-Fi (802.11 b/g/n) AP, they should just ensure that the AP settings match the parameters above.
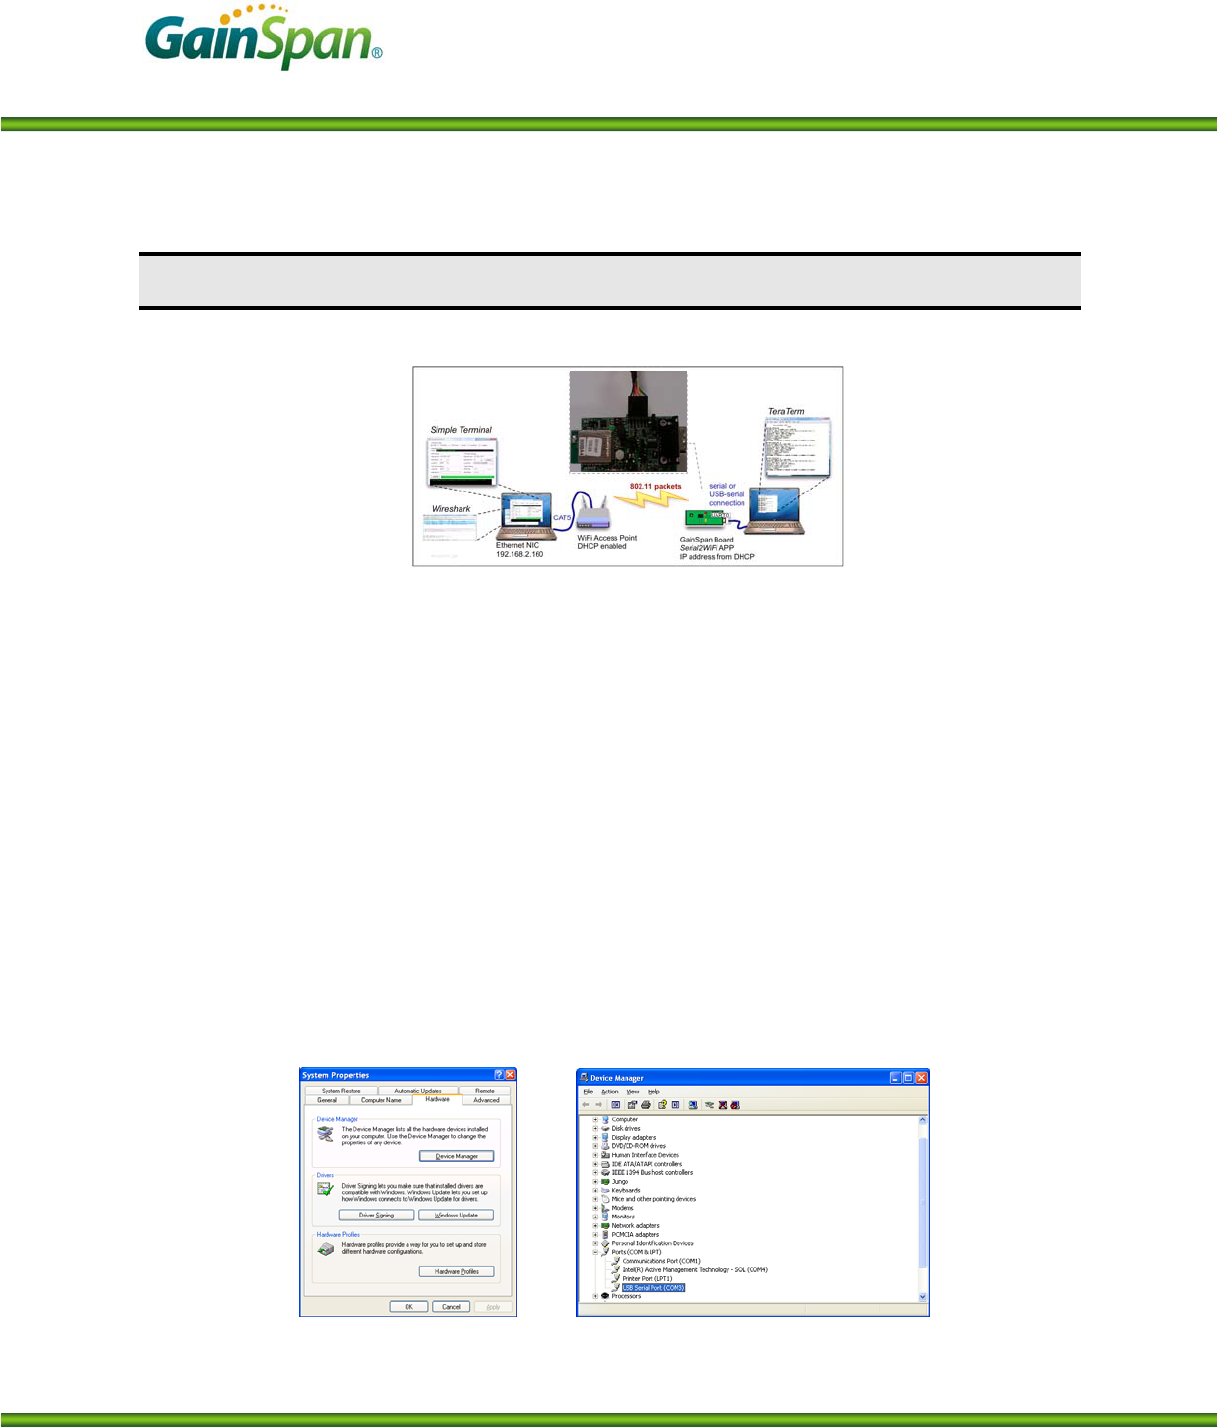
2. Plug the serial cable provided directly into a serial communications port of the PC if one is
available, or into a USB-to-serial converter. Since USB converters can enumerate to any one of a
number of COM ports, it is necessary to find the COM port of the serial port or USB converter being
used to communicate with the board. Open the Device Manager (Figure 1): Start → Settings →
Control Panel → System → Hardware → Device Manager. The USB Serial Port is listed under Ports
(COM & LPT), as shown below.
Figure 1: System Properties pane with Device Manager Button
Serial to Wi-Fi Start Up Guide
PRELIMINARY PAGE 5 OF 12 CONFIDENTIAL
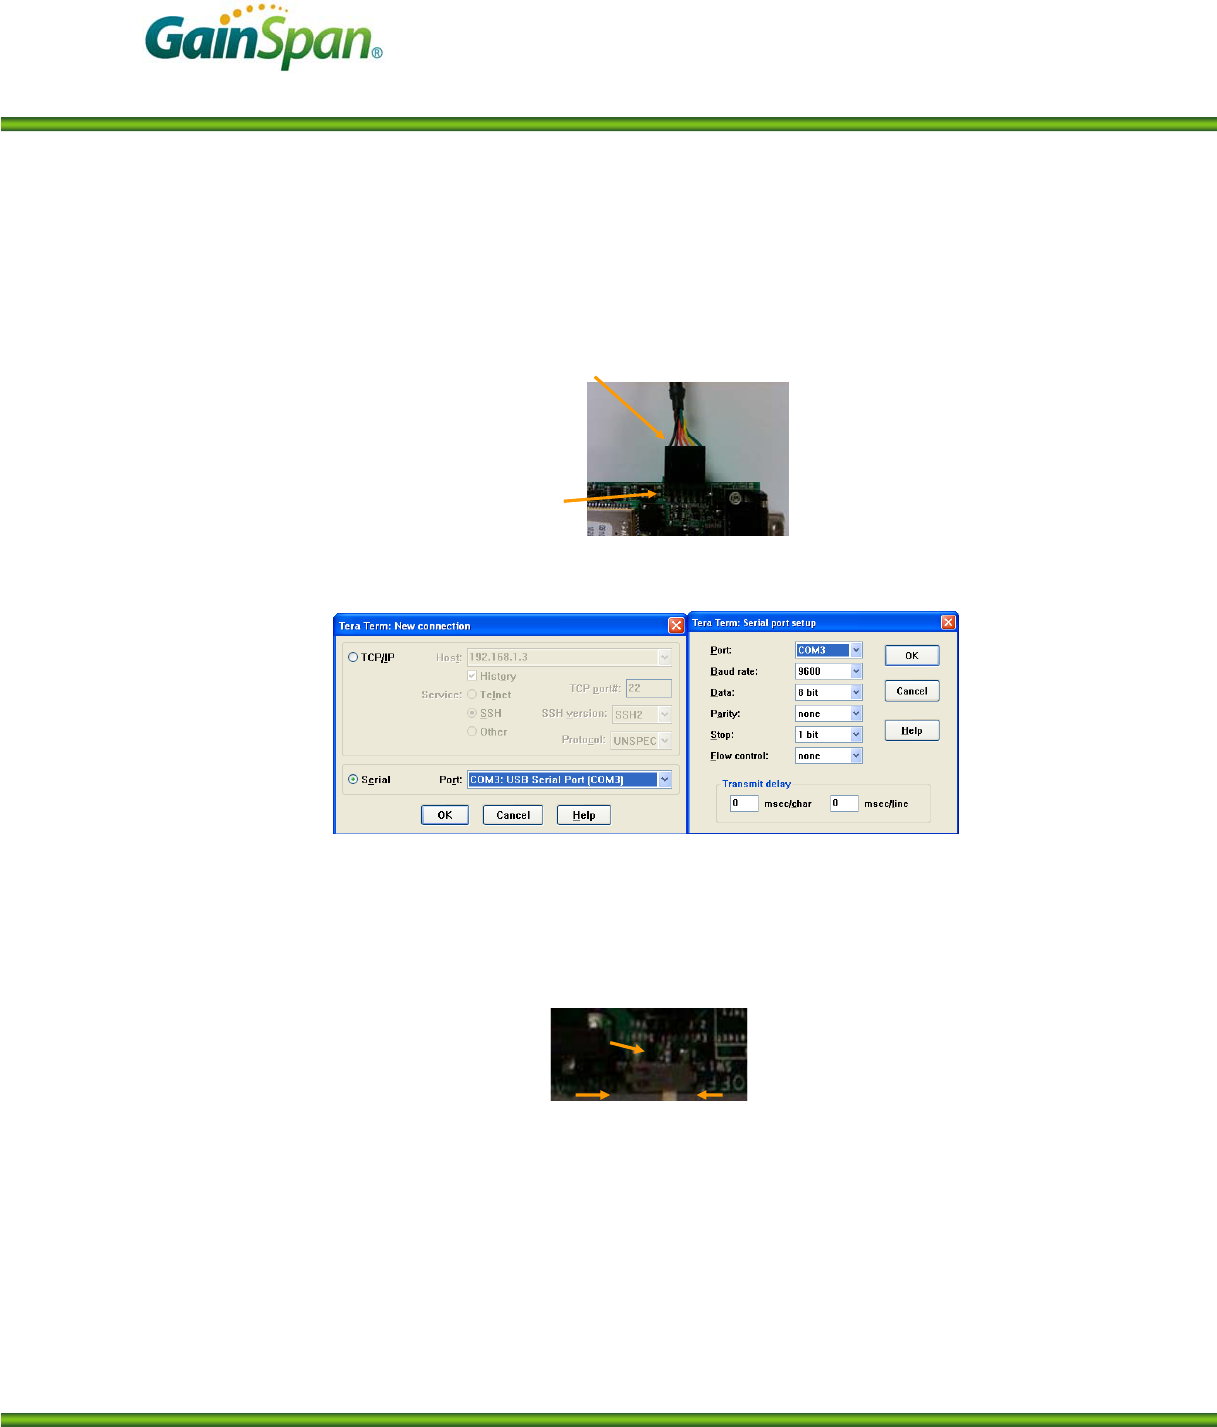
2. Connect the Serial Cable provided with the kit to either the 6-pin UART connector as shown be-
low or to the DB9 connector depending on the type of cable that is being used.
Black Wire
Indicates
Pin 1
Pin 1
Black Wire
Indicates
Pin 1
Pin 1
3. Launch the Tera-Term Application. Select serial port connection, and select the serial port identi-
fied in step 2. Set the port settings as shown below.
4. Install the batteries provided with the kit into the battery holder.
NOTE: Make sure the power switch (SW1) is in the OFF position. Make sure that the battery’s
positive (+) terminal aligns with the battery holder’s positive (+) terminal indicator before inser-
tion. Improper placement of the battery may damage the evaluation board.
SW1
On Off
SW1
On Off
5. Power on the Evaluation board by switching the power switch SW1 to the “ON” position. Tera-
Term will display “Serial to WiFi App” for an internal PA board (GS1011MIP-EVB) or “Serial
to WiFi App-Ext. PA” for an external PA board (GS1011MEP-EVB or GS1011MEE-DB).
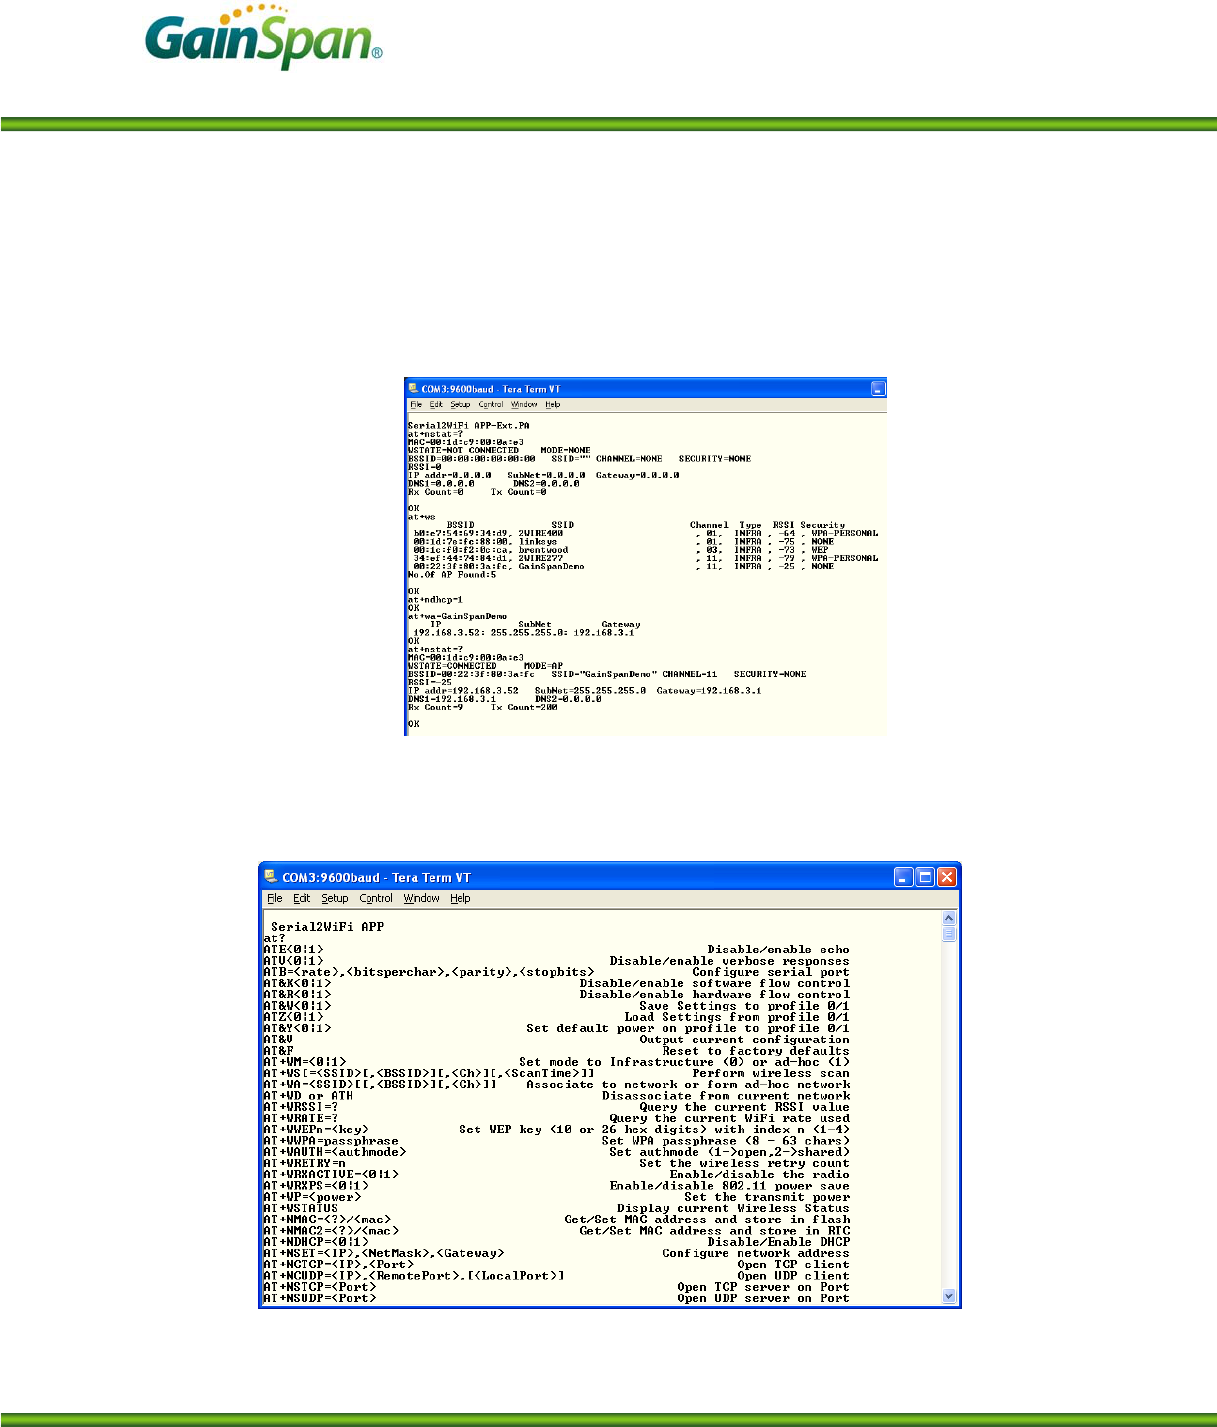
6. By default the board will not have a network setup. To look at the network stat type “at+nstat=?
In the tera-term window. To look for available wireless networks and associate with one, below
are the steps
a. To scan for available Wi-Fi access points, type “at+ws” on the Tera-Term screen
Serial to Wi-Fi Start Up Guide
PRELIMINARY PAGE 6 OF 12 CONFIDENTIAL
b. To associate with the GainSpanDemo AP, first enable DHCP client, by typing
“at+ndhcp=1” and then type “at+wa=GainSpanDemo”. The evaluation board will re-
ceive an IP address from the Access Point DHCP server.
c. Type at+nstat=? To show the current status of the network connection.
7. Type “AT?” This will list all the supported AT command set so you can develop your applica-
tion using either HOST MCU through the serial interface or HOST PC using the Serial Terminal
Application. See the Serial to Wi-Fi Adapter guide and command reference guide for details on
all the AT command set and a quick list of AT commands respectively.
Serial to Wi-Fi Start Up Guide
PRELIMINARY PAGE 7 OF 12 CONFIDENTIAL
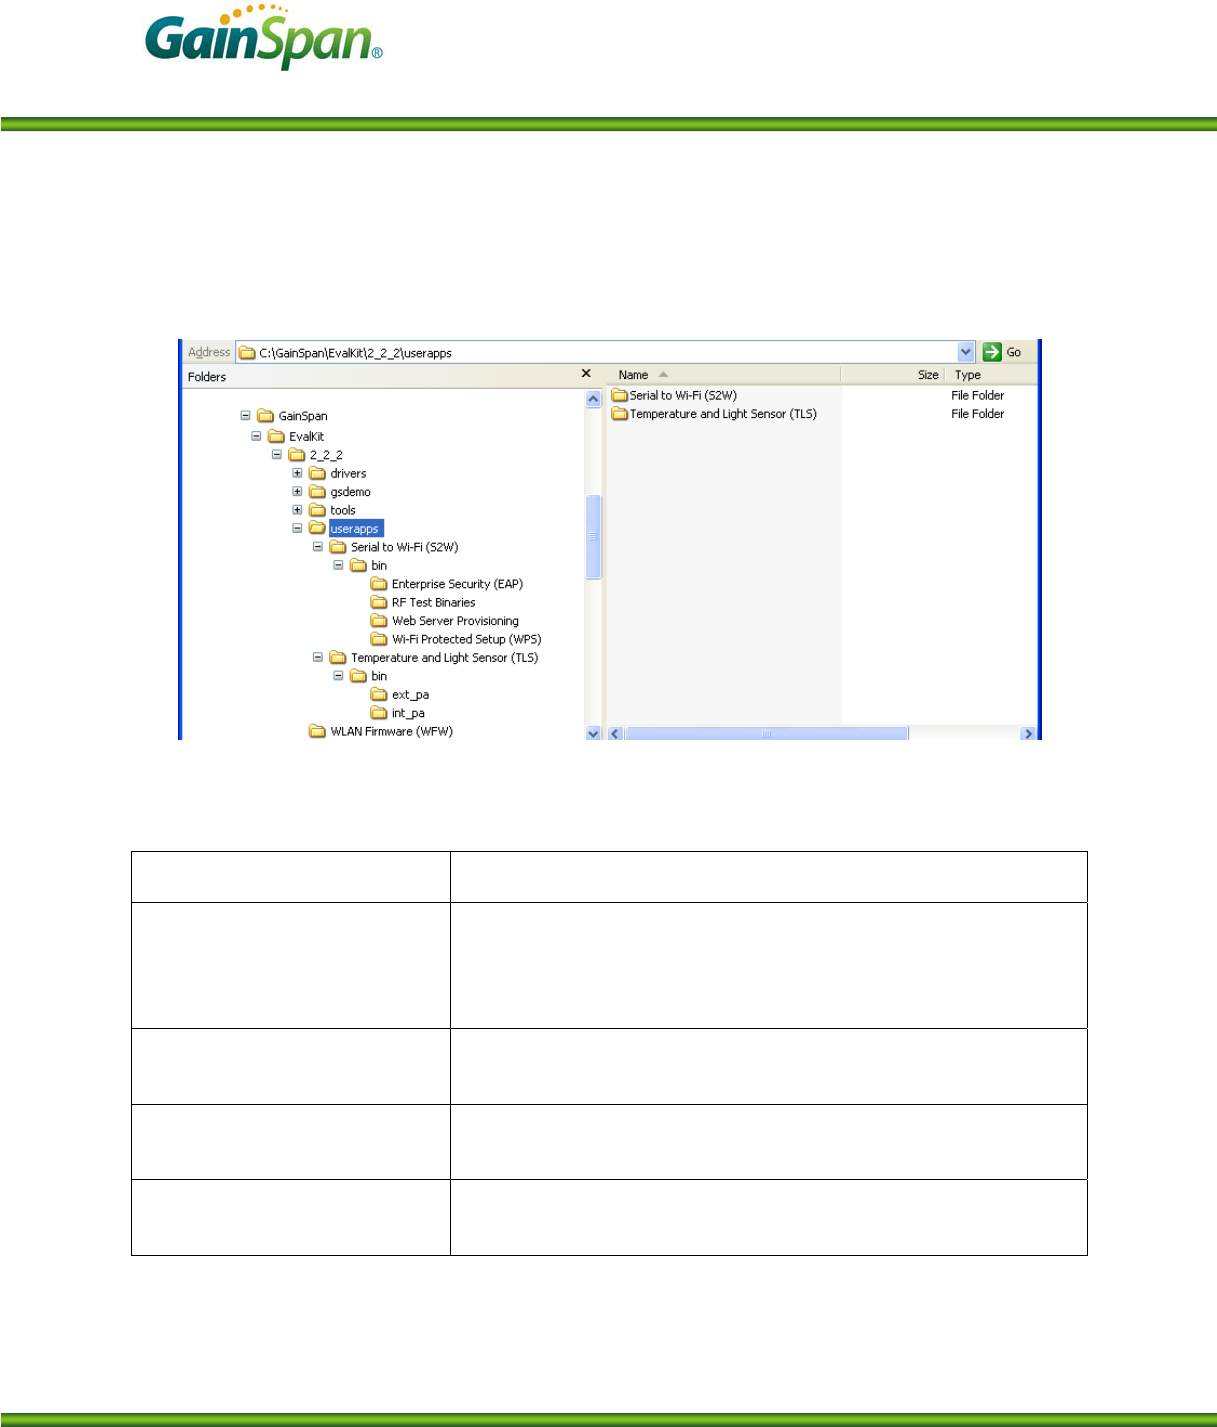
The evaluation kit installer loads various software components including the WLAN firmware and user
application binaries for evaluation. The two main types of application binaries installed are Serial to Wi-
Fi and Temperature and Light Sensor Application. The directory structure looks like the figure below.
The Serial to Wi-Fi Application contains multiple example applications. Below is a list of the binaries
and a short description for each
Directory Description
Web Server Provisioning Application with AT command to support embedded WebServer and
Web pages for provisioning. This is the default binary loaded on all
the evaluation boards. The directory also contains binaries for testing
firmware update. (See App Note 39 for Web provisioning steps)
Wi-Fi Protected Setup (WPS) Application with support for AT command to evaluate Wi-Fi Pro-
tected Setup. (See App Note 39 for WPS steps)
RF Test Binaries Application with support for AT command to do RF testing i.e confi-
guring radio for FCC modes like continuous transmission
Enterprise Security (EAP) Application with support for AT commands for Enterprise EAP types
– EAP-TLS, EAP-TTLS, EAP-FAST
The Temperature and light sensor application (TLS) is not a serial to Wi-Fi application, but a different
reference application that utilizes the GEPS API’s to develop a sensor device. It uses SNMP for configu-
ration and communicates with the GSDemo PC GUI application that is installed by the kit. The TLS di-

Serial to Wi-Fi Start Up Guide
PRELIMINARY PAGE 8 OF 12 CONFIDENTIAL
rectory includes binaries for two types of modules. For details on how to setup and run the TLS applica-
tion see the Temperature and Light Sensor and GSDemo User Manual.
Directory Description
Ext_pa TLS application binaries for supporting External PA Module. If
board contains a GS1011MEP or GS1011MEE module, then down-
load this binary set into the module
Int_pa TLS application binaries for supporting Internal PA Module. If
board contains a GS1011MIP module, then download this binary set
into the module
► “GS1011M Evaluation Start Up Guide GS1011-EVK-SG
► Serial to Wi-Fi Bridge Application Note – AN-025 (For UDP/TCP data transfer)
► Provisioning in Serial to Wi-Fi using Web and WPS Application Note –AN039
► “Serial to Wi-Fi Adapter Application Programming Guide”, GS-S2WF-APG
► “Serial to Wi-Fi Command Reference” GS-S2WF-CR
► Temperature Light Sensor and GSDemo User Manual

Serial to Wi-Fi Start Up Guide
PRELIMINARY PAGE 9 OF 12 CONFIDENTIAL
REGULATORY NOTES
Federal Communication Commission Interference Statement
This equipment has been tested and found to comply with the limits for a Class B digital device, pursuant
to Part 15 of the FCC Rules. These limits are designed to provide reasonable protection against harmful
interference in a residential installation. This equipment generates uses and can radiate radio frequency
energy and, if not installed and used in accordance with the instructions, may cause harmful interference
to radio communications. However, there is no guarantee that interference will not occur in a particular
installation. If this equipment does cause harmful interference to radio or television reception, which can
be determined by turning the equipment off and on, the user is encouraged to try to correct the interfe-
rence by one of the following measures:
- Reorient or relocate the receiving antenna.
- Increase the separation between the equipment and receiver.
- Connect the equipment into an outlet on a circuit different from that to which the receiver is connected.
- Consult the dealer or an experienced radio/TV technician for help.
FCC Caution: To assure continued compliance, (example - use only shielded interface cables when con-
necting to computer or peripheral devices). Any changes or modifications not expressly approved by the
party responsible for compliance could void the user's authority to operate this equipment.
This device complies with Part 15 of the FCC Rules. Operation is subject to the following two conditions:
(1) This device may not cause harmful interference, and (2) this device must accept any interference re-
ceived, including interference that may cause undesired operation.
IMPORTANT NOTE:
FCC & IC Radiation Exposure Statement:
This equipment complies with FCC & IC radiation exposure limits set forth for an uncontrolled environ-
ment. This equipment should be installed and operated with minimum distance 20cm between the radiator
& your body. This transmitter must not be co-located or operating in conjunction with any other antenna
or transmitter. This device is intended only for OEM integrators under the following conditions:
1) The antenna must be installed such that 20 cm is maintained between the antenna and users, and
2) The transmitter module may not be co-located with any other transmitter or antenna.
As long as 2 conditions above are met, further transmitter test will not be required. However, the
OEM integrator is still responsible for testing their end-product for any additional compliance require-
ments required with this module installed (for example, digital device emissions, PC peripheral require-
ments, etc.).
IMPORTANT NOTE: In the event that these conditions cannot be met (for example certain laptop confi-
gurations or co-location with another transmitter), then the FCC & IC authorizations are no longer consi-
dered valid and the FCC & IC IDs cannot be used on the final product. In these circumstances, the OEM

Serial to Wi-Fi Start Up Guide
PRELIMINARY PAGE 10 OF 12 CONFIDENTIAL
integrator will be responsible for re-evaluating the end product (including the transmitter) and obtaining
separate FCC & IC authorizations.
End Product Labeling
This transmitter module is authorized only for use in device where the antenna may be installed such that
20 cm may be maintained between the antenna and users (for example access points, routers, wireless
ADSL modems, and similar equipment). The final end product must be labeled in a visible area with the
following: “Contains FCCID: XXXXXXX & IC: XXXXXXX”.
IC Certification — Canada
The labeling requirements for Industry Canada are similar to those of the FCC. A visible label on the out-
side of the final product must display the IC labeling. The user is responsible for the end product to comp-
ly with IC ICES-003 (Unintentional radiators)
Manual Information That Must be Included
The user’s manual for end users must include the following in-formation in a prominent location.
IMPORTANT NOTE:
To comply with FCC & IC RF exposure compliance requirements, the antenna used for this transmitter
must be installed to provide a separation distance of at least 20 cm from all persons and must not be co-
located or operating in conjunction with any other antenna or transmitter.
Other notes:
GainSpan modules have been built or under development for near body exposure applications. The 20cm
statement is a standard note because absorption rate testing (commonly known as SAR or Specific ab-
sorption rate) is not modularly transferable for FCC/IC. Thus, if a radio is being used against the body,
the end user is still responsible to test for regulatory near body exposure testing (for USA, please refer to
the following):
• FCC Part 1.1037
• FCC Part 2.1091 Mobile Devices
• FCC Part 2.1093 Portable Devices
• FCC Part 15.247 (b) (4)

Serial to Wi-Fi Start Up Guide
PRELIMINARY PAGE 11 OF 12 CONFIDENTIAL
LIMITATIONS
THIS DEVICE AND ASSOCIATED SOFTWARE ARE NOT DESIGNED, MANUFACTURED OR
INTENDED FOR USE OR RESALE FOR THE OPERATION OF APPLICATION IN A HAZARDOUS
ENVIRONMENT, OR REQUIRING FAIL-SAFE PERFORMANCE, OR IN WHICH THE FAILURE
OF PRODUCTS COULD LEAD DIRECTLY TO DEATH, PERSONAL INJURY, OR SEVERE PHYS-
ICAL OR ENVIRONMENTAL DAMAGE (COLLECTIVELY, "HIGH RISK APPLICATIONS"). YOU
AGREE AND ACKNOWLEDGE THAT YOU HAVE NO LICENSE TO, AND SHALL NOT (AND
SHALL NOT ALLOW A THIRD PARTY TO) USE THE TECHNOLOGY IN ANY HIGH RISK A
PLICATIONS, AND LICENSOR SPECIFICALLY DISCLAIMS ANY WARRANTY REGARDING,
AND ANY LIABILITY ARISING OUT OF, HIGH RISK APPLICATIONS.

Serial to Wi-Fi Start Up Guide
PRELIMINARY PAGE 12 OF 12 CONFIDENTIAL
Version Date Remarks
0.9 Aug 10 Initial Release
GainSpan Corporation • 125 South Market Street, Suite 400 • San Jose, CA 95113 • U.S.A.
+1 (408) 673-2900 • info@GainSpan.com • www.GainSpan.com