Gantner Electronic GEA1160017A RFID Payment Terminal for Vending Machines User Manual GAT Vending 6100 BA
Gantner Electronic GmbH RFID Payment Terminal for Vending Machines GAT Vending 6100 BA
Manual
GAT Vending 6100 BA
RFID Payment Terminal for Vending Machines
Installation, Configuration, Operation
Document Version 1.21

GAT Vending 6100 BA
www.gantner.com
HB_GAT-VENDING6100BA--EN_121
3
Copyright 2017 by GANTNER Electronic GmbH, Schruns (Austria).
All rights are reserved. Operating instructions, manuals and software are protected by copyright ©. Copying, duplication,
translation, installation in any electronic medium or machine-readable form in whole or in part is prohibited. The sole exception is
represented by creation of a back-up copy of software for own use as a safeguard, so far as this is technically possible and
recommended by us. Any infringement will render the party committing such infringement liable to compensation payment.
Liability
Any claims against the manufacturer based on the hardware or software products described in this manual shall depend
exclusively on the conditions of the guarantee. Any further-reaching claims are excluded, and in particular the manufacturer
accepts no liability for the completeness or accuracy of the contents of this manual. The right is reserved to make alterations, and
alterations may be made at any time without prior notice being given.
Trademarks
Attention is drawn at this point to the symbols and registered trademarks used in this manual. All product or company names
mentioned herein are used only for identification and explanatory purposes. These terms are used depending on the applicable
description and may include the trademarks or registered trademarks of their respective companies.
Contact
For general inquiries of further information on this product, see the contact information below.
Contact address of manufacturer
GANTNER Electronic GmbH
Montafonerstrasse 8
A - 6780 Schruns/Austria
Tel.: +43 5556 73784 - 0
Fax: +43 5556 73784 - 8010
Email: info@gantner.com
Website: www.gantner.com
FCC Label
This device complies with Part 15 of the FCC Rules.
Operation is subject to the following two conditions: (1) this
device must not cause harmful interference, and (2) this
device must accept any interference received, including
interference that may cause undesired operation.

GAT Vending 6100 BA
4
HB_GAT-VENDING6100BA--EN_121
www.gantner.com
General Warning and Safety Instructions
Dear Customer,
We congratulate you on selecting a product (appliance or software) from GANTNER Electronic GmbH. Our aim is to ensure our
product operates with safety and to your complete satisfaction. To achieve this aim, please take this opportunity to familiarize
yourself with the following guidelines:
1. The installation, commissioning, operation, and maintenance of the product must be carried out in accordance with the
technical conditions of operation as described in the corresponding product documentation.
2. Before installing, commissioning, operating, or maintaining the product, it is essential to read the corresponding chapter of this
manual and observe the instructions and information therein.
3. If there are some points which are not entirely clear, please do not take a chance. All queries can be clarified by your
GANTNER representative or by ringing the GANTNER support hotline.
4. Where not otherwise specifically documented, the appropriate installation, commissioning, operation and maintenance of the
product is the customer’s responsibility.
5. Directly on receipt of the goods, inspect both the packaging and the product itself for any signs of damage. Also check that the
delivery is complete and includes all accessories, documentation, auxiliary devices, etc.
6. If the packaging or product has been damaged in transport, or should you suspect that it may have a fault, the product must
not be put into service. Contact your GANTNER representative who will resolve the problem as quickly as possible.
7. The installation, commissioning, and servicing of our products must be performed by suitably trained personnel. In particular,
electrical connections must only be made by correspondingly qualified specialists. Always observe the relevant installation
regulations in accordance with the national Electrical Engineers Association (e.g., ÖVE [Austrian], VDE [Germany]).
8. Where not otherwise stated, installation and maintenance work on our products must be carried out when disconnected from
the power supply. This applies in particular to appliances that are normally supplied by low-voltage current.
9. It is prohibited to alter the products or remove protective shields and covers.
10. Do not attempt to repair a product after a defect, failure, or damage is detected. In addition, do not put the product back into
operation. In such cases, it is essential to contact your GANTNER representative or the GANTNER support hotline.
11. GANTNER Electronic GmbH accepts no responsibility for any injuries or damage caused as a result of improper use.
12. Although care is taken and we are continuously aiming for improvement, we cannot completely exclude the possibility of errors
appearing in our documentation. GANTNER Electronic GmbH therefore accepts no responsibility for the completeness or the
accuracy of this manual. The right is reserved to make alterations at any time without prior notice.
13. Should you discover any fault with the product or in its accompanying documentation, or you have any suggestions for
improvement, you may confidently inform your GANTNER representative or GANTNER Electronic GmbH directly.
14. We especially look forward to hearing from you if you just want to tell us that everything is functioning perfectly.
We wish you a successful experience with our product and look forward to welcoming you again as a customer soon.

GAT Vending 6100 BA
Contents
www.gantner.com
HB_GAT-VENDING6100BA--EN_121
5
CONTENTS
1 INTRODUCTION ........................................................................................................................ 7
1.1 About this Manual ..................................................................................................................................... 7
1.2 Chapter Overview ..................................................................................................................................... 7
1.3 Document Format ..................................................................................................................................... 7
1.4 Terminology .............................................................................................................................................. 8
1.5 Contact and Inquiries ................................................................................................................................ 8
2 DEVICE OVERVIEW .................................................................................................................. 9
2.1 Components and Accessories .................................................................................................................. 9
2.2 GAT Vending 6100 BA Functional Description ....................................................................................... 10
2.3 Supported Data Carriers ......................................................................................................................... 10
3 INSTALLATION ....................................................................................................................... 11
3.1 General Information ................................................................................................................................ 11
3.2 Installation in Vending Machines with Standard Cutouts ....................................................................... 11
3.3 Installation in Vending Machines without Standard Cutouts .................................................................. 14
3.4 Attaching the GAT Vending 6100 BA to the Mounting Plate .................................................................. 15
3.5 Detaching the GAT Vending 6100 BA from the Mounting Plate ............................................................. 16
4 ELECTRICAL CONNECTIONS ................................................................................................ 17
4.1 MDB Connection ..................................................................................................................................... 17
4.2 Ethernet Connection ............................................................................................................................... 18
5 STARTUP AND CONFIGURATION ......................................................................................... 19
5.1 Starting the GAT Vending 6100 BA ........................................................................................................ 19
5.2 System Settings ...................................................................................................................................... 21
5.2.1 Service Menu ....................................................................................................................................... 21
5.2.2 Communication Settings ...................................................................................................................... 22
5.2.3 Reader Settings ................................................................................................................................... 23
5.2.4 Time and Date Settings ........................................................................................................................ 23
5.2.5 Display Settings ................................................................................................................................... 24
5.2.6 Reset Factory Settings ......................................................................................................................... 24
5.3 Configuration Settings ............................................................................................................................ 25
5.3.1 Direct Configuration ............................................................................................................................. 25
5.3.2 Project Configuration ............................................................................................................................ 28
5.3.3 Display Texts ........................................................................................................................................ 30
5.3.4 List of Configuration Settings ............................................................................................................... 33
6 OPERATION ............................................................................................................................ 37
6.1 Communication ....................................................................................................................................... 37
6.1.1 Online Mode ......................................................................................................................................... 37
6.1.2 Online and Emergency Mode............................................................................................................... 37
6.1.3 Offline Mode ......................................................................................................................................... 38
6.2 Control and Display Elements ................................................................................................................ 39
6.2.1 Display .................................................................................................................................................. 39
6.2.2 LED Status Bar..................................................................................................................................... 40
6.2.3 Sound Signals ...................................................................................................................................... 40
6.3 Purchasing a Product ............................................................................................................................. 41
6.4 Troubleshooting ...................................................................................................................................... 42
6.4.1 Error: Certificate error .......................................................................................................................... 42

GAT Vending 6100 BA
Contents
6
HB_GAT-VENDING6100BA--EN_121
www.gantner.com
6.4.2 Error: Out of service ............................................................................................................................ 42
6.4.3 Error: No connection to vending machine ........................................................................................... 42
7 TECHNICAL INFORMATION ................................................................................................... 43
7.1 Technical Data ....................................................................................................................................... 43
7.2 Dimensions ............................................................................................................................................ 44

GAT Vending 6100 BA
Introduction
www.gantner.com
HB_GAT-VENDING6100BA--EN_121
7
1
INTRODUCTION
1.1 About this Manual
This manual describes the mechanical installation, electrical connection, and the configuration and commissioning
of the GAT Vending 6100 BA with a vending machine. The basic operation of the GAT Vending 6100 BA for the end
user is also described.
The installation and operation of the vending machine to which the GAT Vending 6100 BA is connected is not
included in this manual. Please refer to the documentation of the respective vending machine for further information.
A description of the commands required to integrate the GAT Vending 6100 BA with custom software applications is
also available in a separate document.
1.2 Chapter Overview
Chapter "1. Introduction" contains general information about this manual and the conventions (terminology and
formatting) used therein.
Chapter "2. Device Overview" provides an overview of the GAT Vending 6100 BA. Here is a general functional
description, the intended use or application of the device and the components and accessories delivered with the
GAT Vending 6100 BA.
Chapter "3. Installation" includes instructions on how the GAT Vending 6100 BA is mounted onto a vending
machine. The installation procedure of the device in addition to the important measurement and installation
diagrams are available here.
Chapter "4". Electrical Connections" describes how the GAT Vending 6100 BA is connected electrically (data
interface, power supply) to the vending machine.
Chapter "5. Startup and Configuration" describes the startup process of the GAT Vending 6100 BA. Also available
in this section is a description of the system and configuration settings, which determine how the terminal
communicates with the network and how the terminal interacts with the user respectively.
Chapter "6. Operation" describes the general operation of the GAT Vending 6100 BA. The differences between the
various operating modes are also explained in this section.
In chapter "7. Technical Information", all the relevant technical information for the GAT Vending 6100 BA is
available.
1.3 Document Format
The following format is used in this manual to display important but not safety-critical information:
Information text Information text Information text Information text Information text Information text
Information text Information text Information text.

GAT Vending 6100 BA
Introduction
8
HB_GAT-VENDING6100BA--EN_121
www.gantner.com
Instructions, which must be executed by the user, and the results of these instructions are formatted as follows:
► Instruction for user Instruction for user Instruction for user Instruction for user Instruction for user
Instruction for user Instruction for user.
o Instruction result Instruction result Instruction result Instruction result Instruction result Instruction
result Instruction result Instruction result Instruction result.
1.4 Terminology
Several key terms are used in this manual and are defined below.
Computer / PC:
These terms refer to all desktop and laptop computers running a Microsoft® Windows® operating system.
Data Carrier:
A data carrier is a form of identification media that is used by staff and visitors in a facility for identification. Data
carriers are available in a variety of different forms such as plastic wristbands and chip cards. Data carriers are also
available to suit different RFID technologies (LEGIC®, MIFARE®, ISO 15693).
FID (Company ID) and Site Key:
The FID and site key are unique numbers assigned to every facility installation. The site key is a combination of the
FID and the read and write keys. The site key is used in MIFARE® and ISO 15693 systems and is encoded in every
data carrier and device used in the facility thereby ensuring that data carriers from one installation cannot be used in
other installations.
GAT Config Manager:
GANTNER developed PC software that is used to configure GANTNER devices such as the GAT Vending 6100 BA.
A separate manual is available and integrated into the software. While the software is open, click on the “Help”
drop-down menu and select “How Do I”.
RFID (Radio-Frequency Identification):
Identification over a short distance using radio frequency. An RFID data carrier is used to identify users in
GANTNER systems.
User / Guest / Visitor:
These general terms all refer to a person in a facility who uses the vending machine and GAT Vending 6100 BA.
1.5 Contact and Inquiries
For all inquiries concerning the GAT Vending 6100 BA please get in touch with your GANTNER representative /
distributor or directly with one of the GANTNER Technology branch offices. The office addresses, phone and fax
numbers are listed on the inner side of the cover.
GAT Vending 6100 BA
Device Overview
www.gantner.com
HB_GAT-VENDING6100BA--EN_121
9
2
DEVICE OVERVIEW
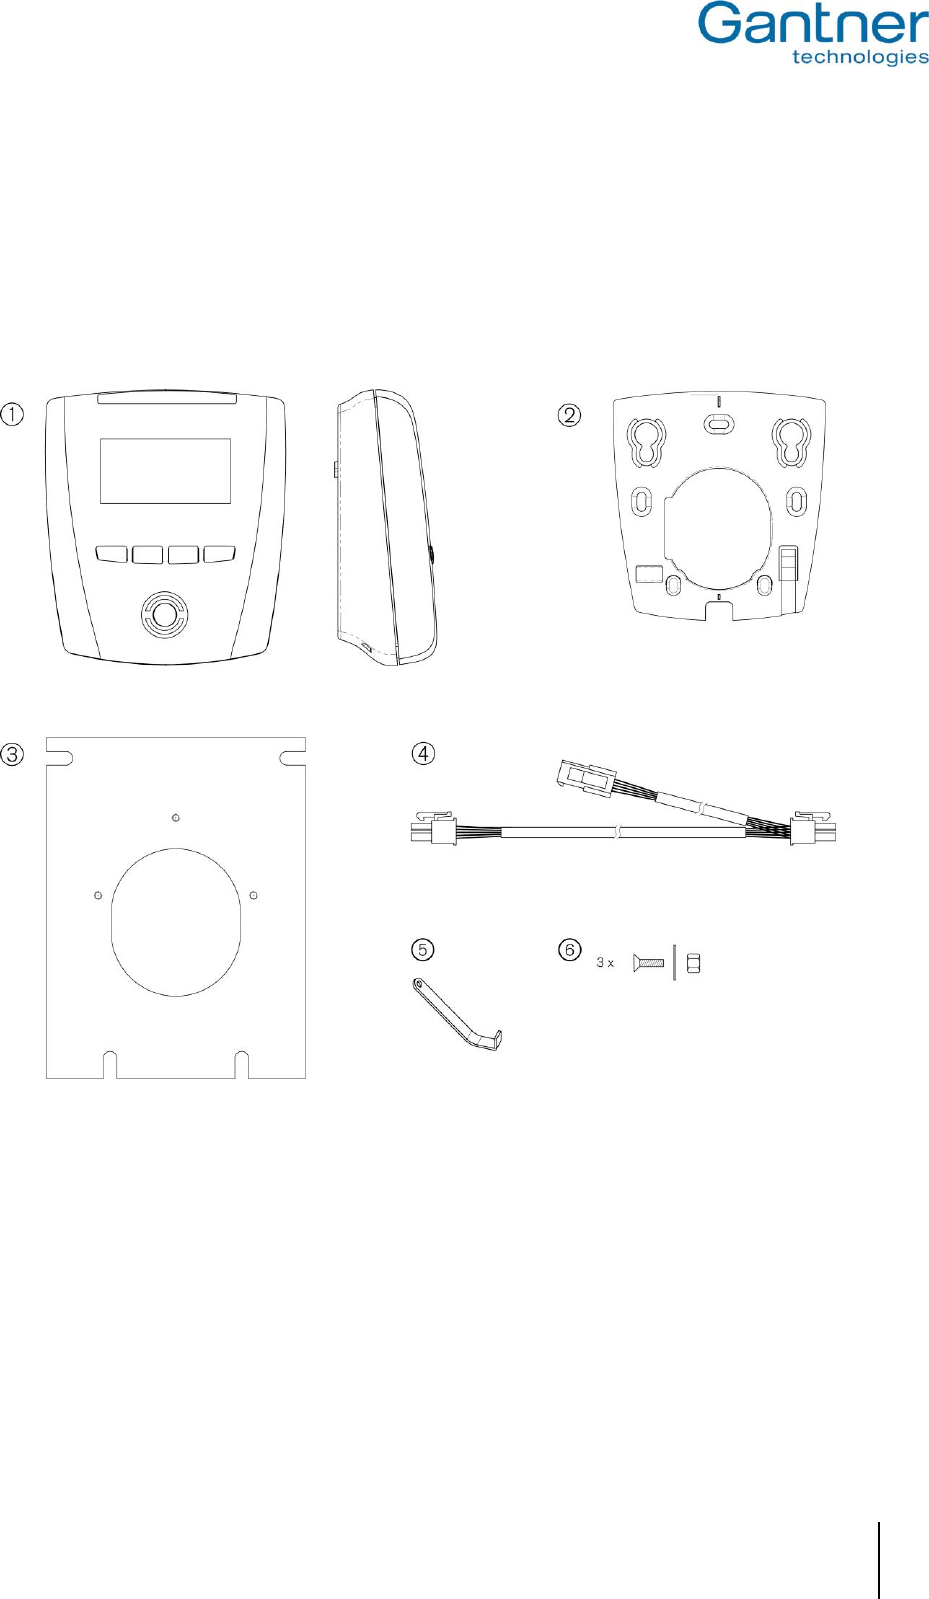
2.1 Components and Accessories
The following components are supplied with the GAT Vending 6100 BA or, where indicated, available to order as an
accessory.
1 ....... GAT Vending 6100 BA
2 ....... Plastic mounting plate (included with the GAT Vending 6100 BA)
3 ....... Aluminium mounting plate (available as an accessory – Part No.: 905127)
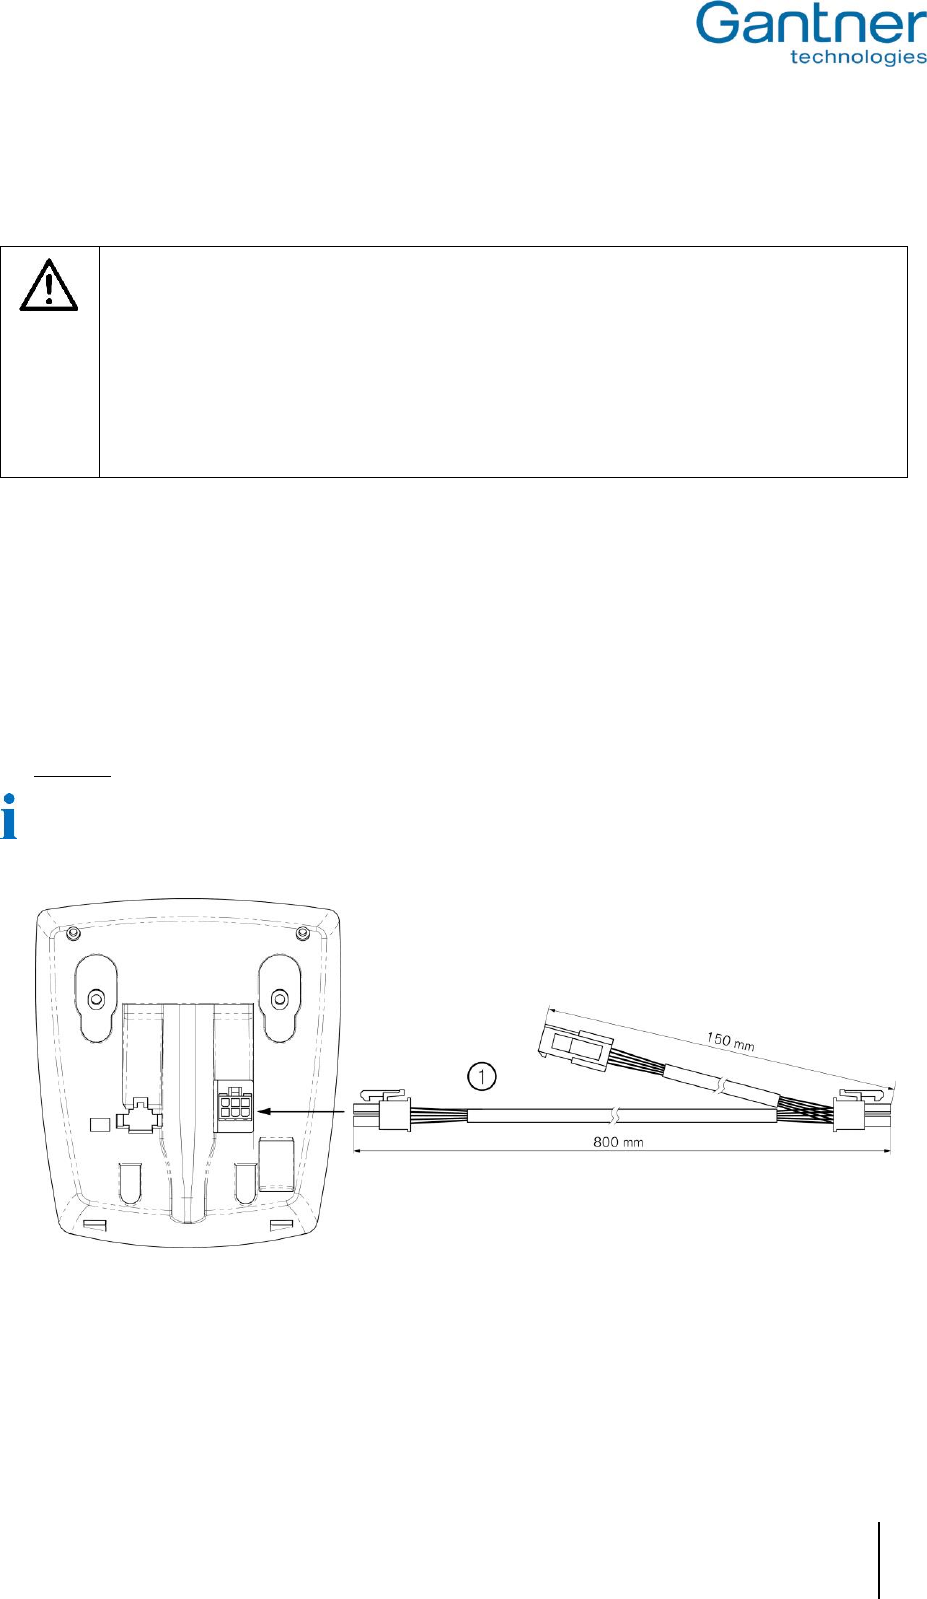
4 ....... GAT Vending MDB Kabel (included with the GAT Vending 6100 BA)
5 ....... GAT Reader WK to open the housing (included with the GAT Vending 6100 BA)
6 ....... Mounting hardware for plastic mounting plate – 3 x M3 x 8 mm bolts, nuts and washers (included with the GAT Vending
6100 BA)
Figure 2.1 – GAT Vending 6100 BA components

GAT Vending 6100 BA
Device Overview
10
HB_GAT-VENDING6100BA--EN_121
www.gantner.com
2.2 GAT Vending 6100 BA Functional Description
The GAT Vending BA 6100 BA is a read / write terminal for cashless payment at vending machines. The
identification of facility guests by the GAT Vending 6100 BA is done using contactless RFID data carriers (Radio
Frequency Identification). The cost of the purchased product is either debited directly from the guest’s data carrier
(offline mode - data carrier operates as an electronic wallet) or from the guest’s account (online mode).
Four function keys are provided on the GAT Vending 6100 BA for general operation and product choice. The
information display can be configured to show specific application messages and symbols.
Communication between the GAT 6100 Vending BA and the vending machines occurs via the MDB interface
(standard interface for vending machines). In addition to the MDB interface, an Ethernet interface is provided by the
GAT Vending 6100 BA for connection to the network or where available, directly to the vending machine.
2.3 Supported Data Carriers
To purchase products from the vending machine, facility guests are identified by the GAT Vending 6100 BA using
contactless RFID data carriers. A frequency of13.56 MHz is used. The following types of data carrier are supported
by the GAT Vending 6100 BA. However, please note that depending on the type of data carrier in use, not all
operating modes are available (see section “6. Operation”).
- LEGIC Prime (online and offline mode)
- LEGIC Advant (online and offline mode)
- MIFARE® Classic (online mode)
- MIFARE DESFire® (online mode)
- ISO 15693 (online and emergency mode)
In addition to supporting the data carriers listed above, the GAT Vending 6100 BA can also identify NFC-enabled
devices such as tags or smartphones.
GAT Vending 6100 BA
Installation
www.gantner.com
HB_GAT-VENDING6100BA--EN_121
11
3
INSTALLATION
3.1 General Information
There are two methods for installing the GAT Vending 6100 BA.
- For vending machines with standard EVA cutouts, the aluminum mounting plate can be ordered as an accessory
(Part No. 905127) and used to mount the terminal.
- For vending machines without standard EVA cutouts, corresponding holes must be drilled into the front side of
the vending machine.
The aluminium mounting plate is not absolutely mandatory for installation.
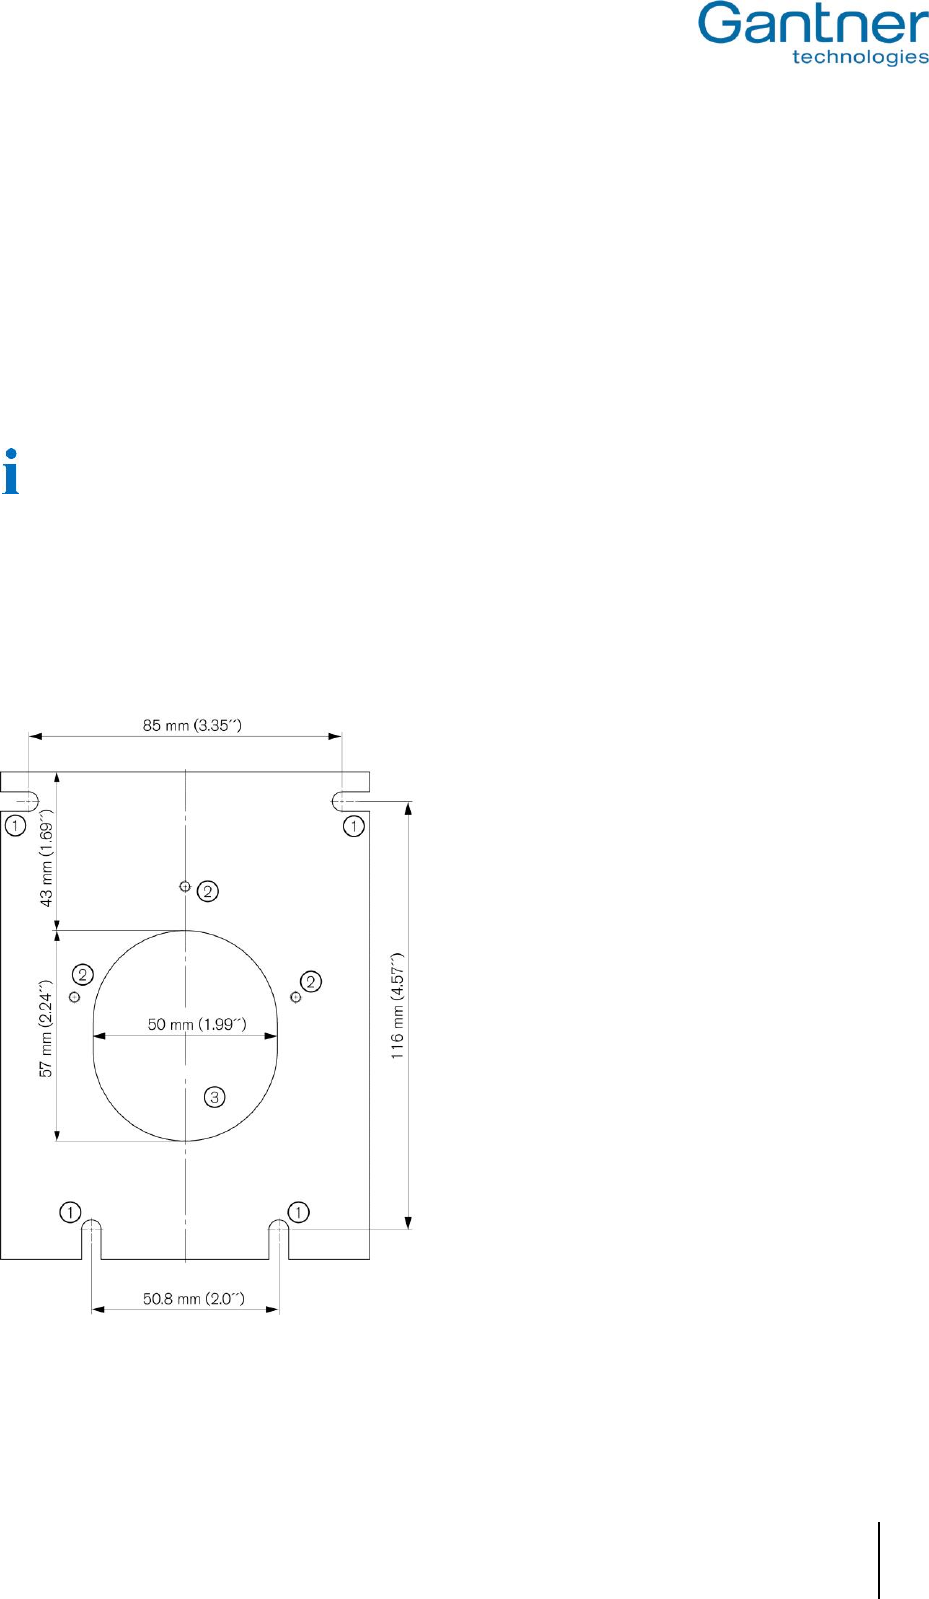
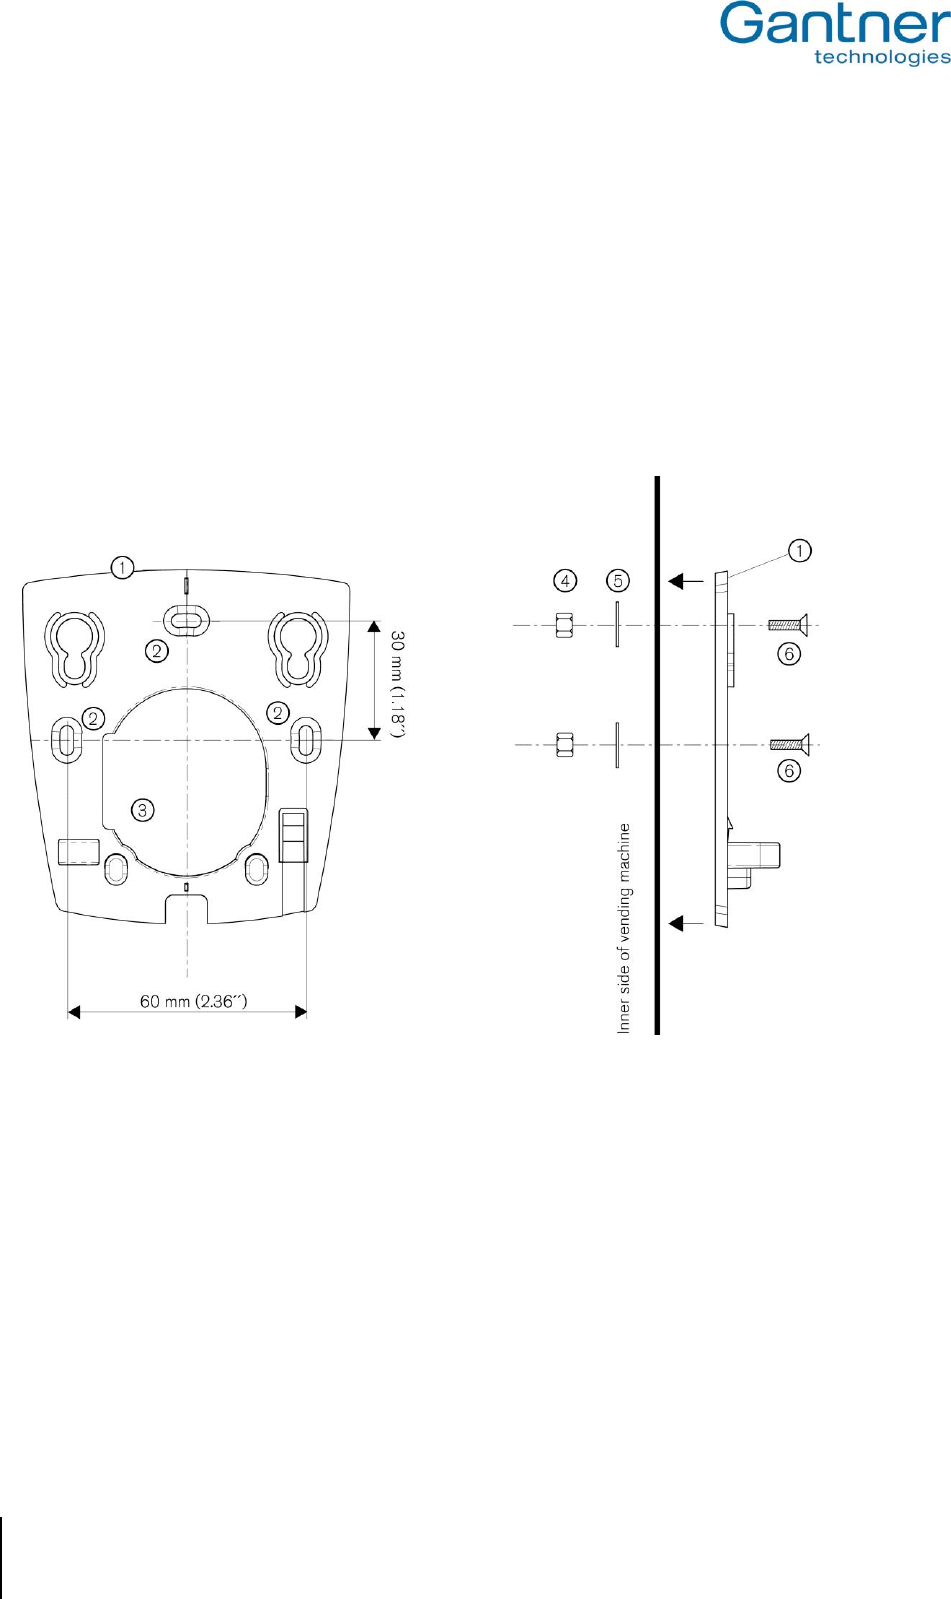
3.2 Installation in Vending Machines with Standard Cutouts
Vending machines are often provided with a cutout for attaching a payment unit such as the GAT Vending 6100 BA.
A standard EVA (European Vending Association) dimension is usually used for this cutout. For vending machines
with a standard EVA cutout, the GAT Vending 6100 BA can be mounted using the aluminium mounting plate.
1 ....... Cutouts for mounting the aluminum mounting plate onto a vending machine
2 ....... Holes for attaching the plastic mounting plate to the aluminium mounting plate
3 ....... Opening for cable access
Figure 3.1 – Aluminium mounting plate

GAT Vending 6100 BA
Installation
12
HB_GAT-VENDING6100BA--EN_121
www.gantner.com
To install the GAT Vending 6100 BA in vending machines with standard EVA cutouts, proceed with the following
instructions and accompanying diagrams.
► Position the aluminium mounting plate next to the cutout on the inside of the vending machine in the correct
orientation as shown in Figure 3.2.
► Attach the aluminium mounting plate to the vending machine using four bolts, washers and nuts (not included
with the aluminium mounting plate).
1 ....... 4 x nuts (not included with the aluminum mounting plate)
2 ....... 4 x washers (not included with the aluminum mounting plate)
3 ....... Aluminum mounting plate
4 ....... Wall (front side) of the vending machine
5 ....... 4 x bolts (not included with the aluminum mounting plate)
Figure 3.2 - Installation of the aluminum mounting plate for vending machines with standard EVA cutouts
GAT Vending 6100 BA
Installation
www.gantner.com
HB_GAT-VENDING6100BA--EN_121
13
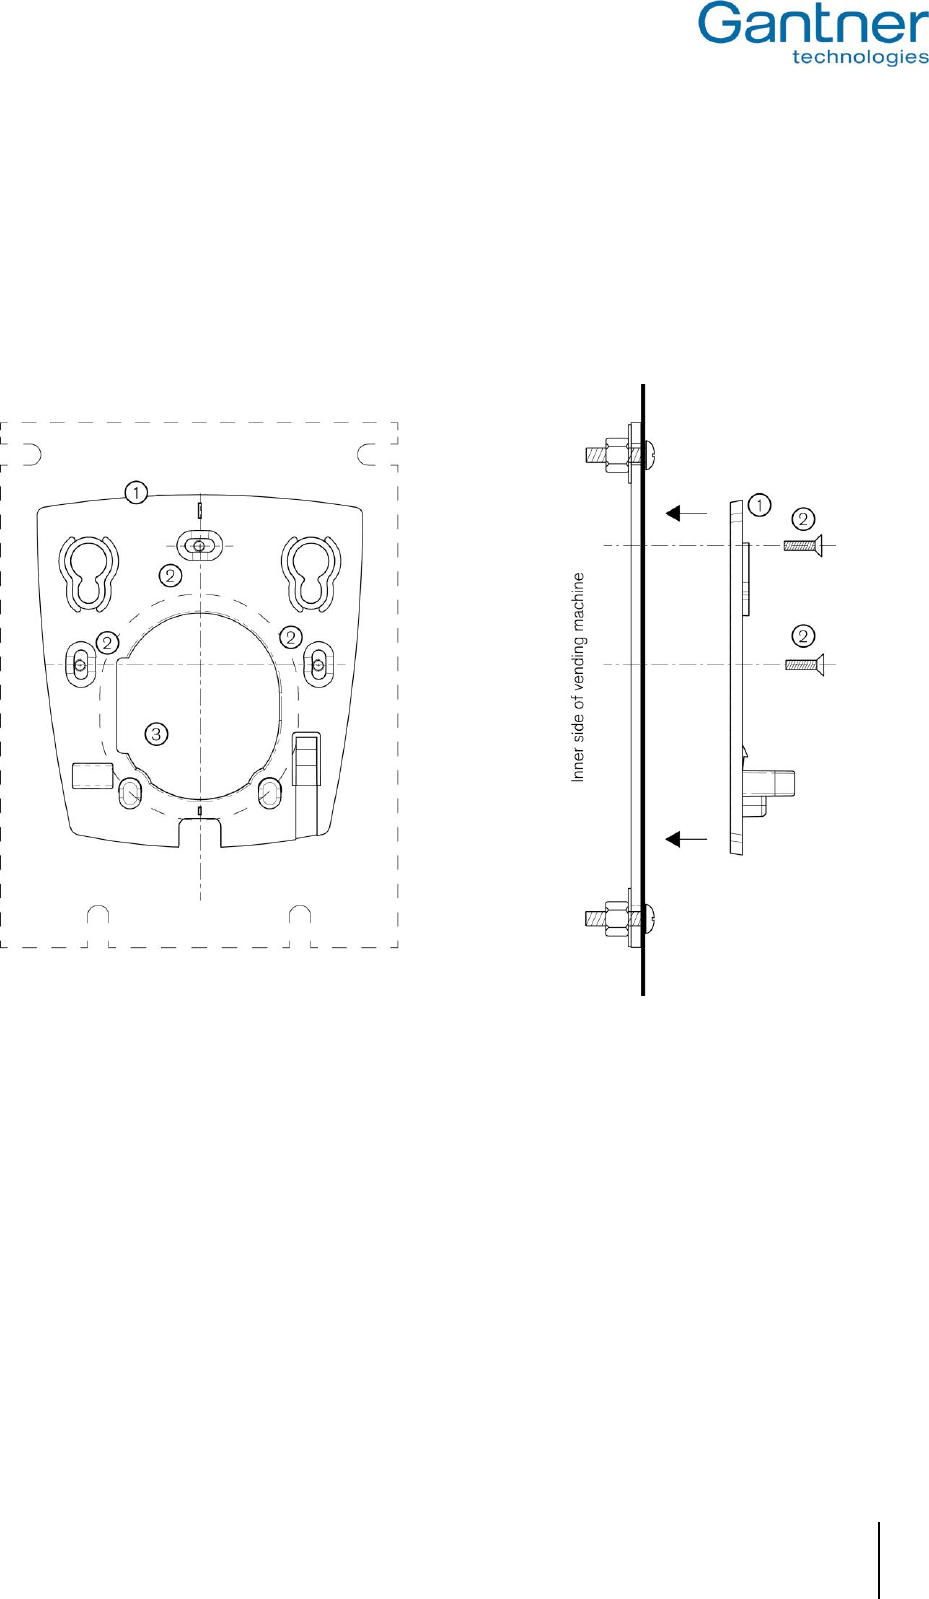
► Position the plastic mounting plate next to the previously attached aluminum mounting plate on the outside of
the vending machine in the correct orientation as shown in Figure 3.3.
► Attach the plastic mounting plate to the aluminium mounting plate on the front of the vending machine using
three M3 x 8 mm bolts (included with the plastic mounting plate). The bolts are attached directly to the threaded
holes in the aluminium mounting plate (2 in Figure 3.1).
► Ensure the plastic mounting plate is firmly attached and the screws are tightened.
1 ....... Plastic mounting plate
2 ....... 3 M3 x 8 mm bolts (included with the GAT Vending 6100 BA)
3 ....... Opening for cable access
Figure 3.3 – Attaching the plastic mounting plate to the aluminium mounting plate
GAT Vending 6100 BA
Installation
14
HB_GAT-VENDING6100BA--EN_121
www.gantner.com
3.3 Installation in Vending Machines without Standard Cutouts
► Position the plastic mounting plate on the outside of the vending machine in the correct orientation as shown in
Figure 3.4.
► Mark the positions of the three mounting holes (2 in Figure 3.4).
► Drill the three mounting holes in the outer wall of the vending machine.
► Attach the plastic mounting plate to the front of the vending machine using the three M3 x 8 mm bolts and
accompanying nuts and washers that are included with the GAT Vending 6100 BA.
► Ensure the plastic mounting plate is firmly attached and the bolts are tightened.
1 ....... Plastic mounting plate
2 ....... 3 x mounting holes
3 ....... Opening for cable access
4 ....... 3 x M3 nuts
5 ....... 3 x washers
6 ....... 3 x M3 x 8 mm bolts
Figure 3.4 - Installation of the plastic mounting plate for vending machines without standard EVA cutouts
GAT Vending 6100 BA
Installation
www.gantner.com
HB_GAT-VENDING6100BA--EN_121
15
3.4 Attaching the GAT Vending 6100 BA to the Mounting Plate
After the connection cabling is connected to the GAT Vending 6100 BA (see "4. Electrical Connections"), the GAT
Vending 6100 BA is attached to the mounting plate as follows.
► Align the GAT Vending 6100 BA onto the mounting plate so that both holding screws (3) go through the
openings in the mounting plate and both hooks on the mounting plate also align with the corresponding
openings in the GAT Vending 6100 BA.
► Slide the GAT Vending 6100 BA downwards until the device sits centered and flush on the mounting plate.
o When the GAT Vending 6100 BA is attached correctly, the mounting plate security hook (3) locks into
place on the GAT Vending 6100 BA and the device is held securely.
When the GAT Vending 6100 BA is correctly attached it can only be removed using the GAT Reader WK
special tool (see next section).
1 ....... Plastic mounting plate
2 ....... Holding screws
3 ....... Security hook
Figure 3.5 – Attaching the GAT Vending 6100 BA
GAT Vending 6100 BA
Installation
16
HB_GAT-VENDING6100BA--EN_121
www.gantner.com
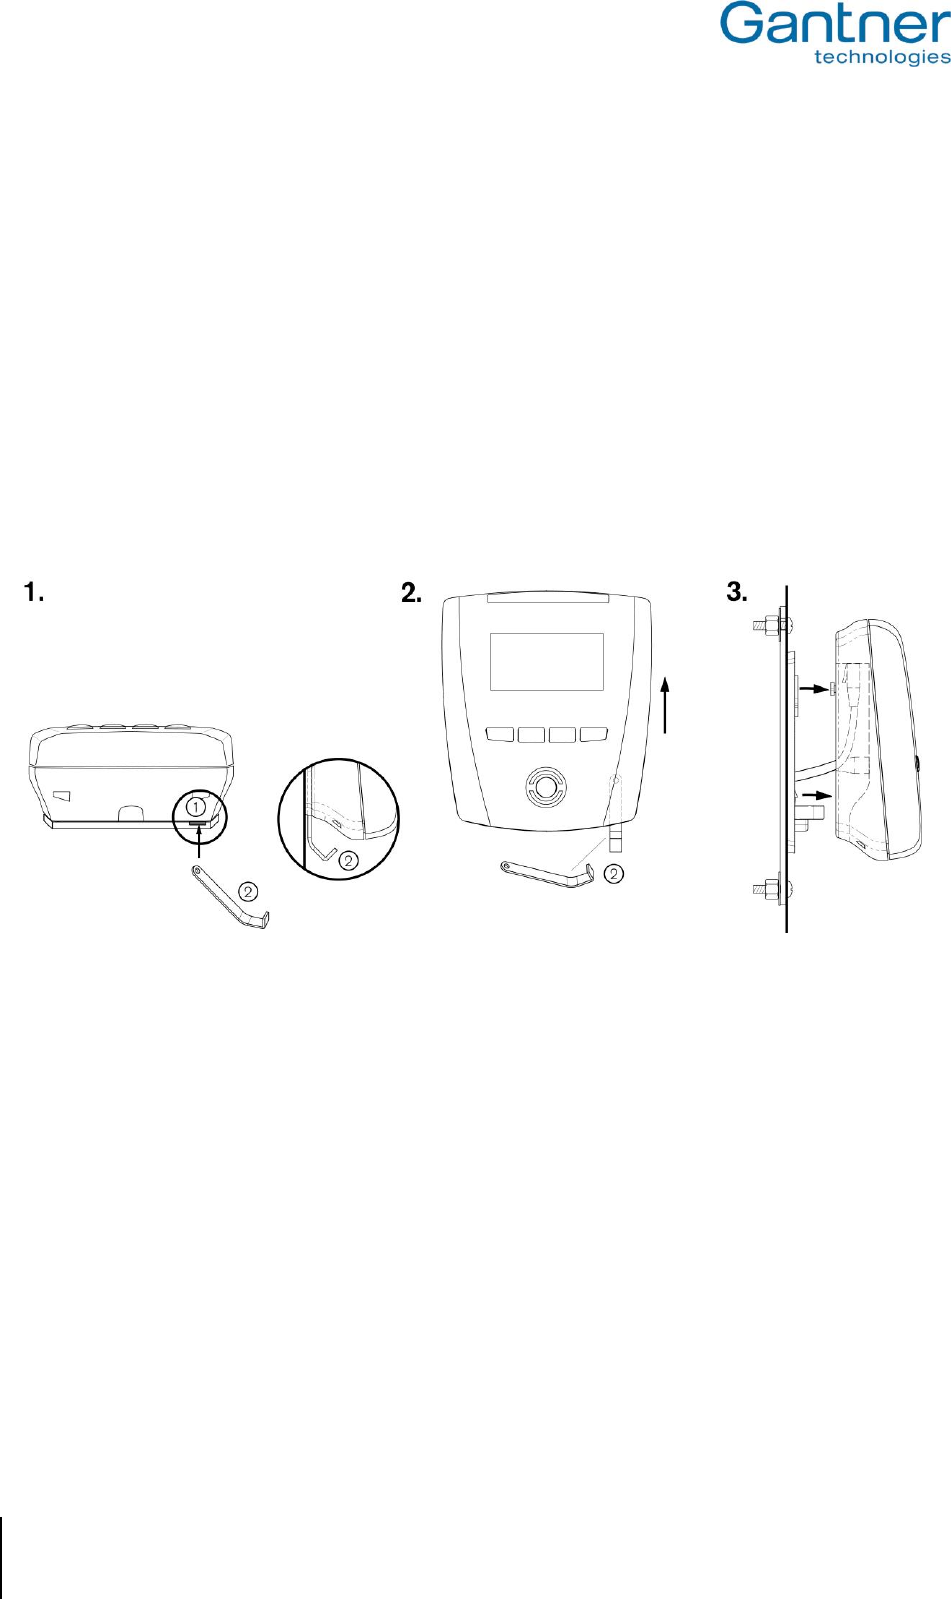
3.5 Detaching the GAT Vending 6100 BA from the Mounting Plate
To detach the GAT Vending 6100 BA from the mounting plate, the supplied GAT Reader WK special tool is
required. The procedure for detachment is as follows.
► Insert the "GAT Reader WK" special tool (2) with its long side from underneath into the opening (1) until the
hook is released. Keep the GAT Reader WK in this position.
► Slide the GAT Vending 6100 BA upwards.
► Lift the GAT Vending 6100 BA away from the plastic mounting plate. Ensure the connection cable is not
damaged.
► Disconnect the connection cable from the RJ 45 plug.
o The GAT Vending 6100 BA can now be removed.
1 ....... Opening for access to the securing hook
2 ....... GAT Reader WK
Figure 3.6 – Detaching the GAT Vending 6100 BA from the plastic mounting plate
GAT Vending 6100 BA
Electrical Connections
www.gantner.com
HB_GAT-VENDING6100BA--EN_121
17
4
ELECTRICAL CONNECTIONS
Safety Warning for the GAT Vending 6100 BA
Due to its SELV (Safety Extra Low Voltage Supply) design, the GAT Vending 6100 BA provides
extra protection against electrical shock. However, be aware that vending machines operate at
higher voltages so it is essential to always turn off the power supply of the vending machine before
connecting the GAT Vending 6100 BA. Never open the GAT Vending 6100 BA housing when
voltage is applied. Please also refer to the documentation of the vending machine and follow the
instructions therein.
4.1 MDB Connection
The MDB connection is a standardized machine interface that allows the connection of currency changers and
validators to the vending machine. The GAT Vending 6100 BA uses the MDB interface to communicate with the
vending machine.
► Insert the long end of the MDB connection cable (supplied with the GAT Vending 6100 BA) into the
corresponding connector on the back part of the GAT Vending 6100 BA housing.
Attention: Switch off the vending machine before connecting the GAT Vending 6100 BA to the MDB bus.
The MDB plug of the connection cable can only be inserted into the socket in the correct orientation.
1 ....... MDB connection cable
Figure 4.1 – Connection of the MDB interface
The GAT Vending 6100 BA is supplied with a DC power source in the range of 20 to 35 V (according to MDB
standard). To ensure that the GAT Vending 6100 BA operates correctly, the LPS that limits the power input is
protected by a Surface Mount Fuse (Fast Blow type).
GAT Vending 6100 BA
Electrical Connections
18
HB_GAT-VENDING6100BA--EN_121
www.gantner.com
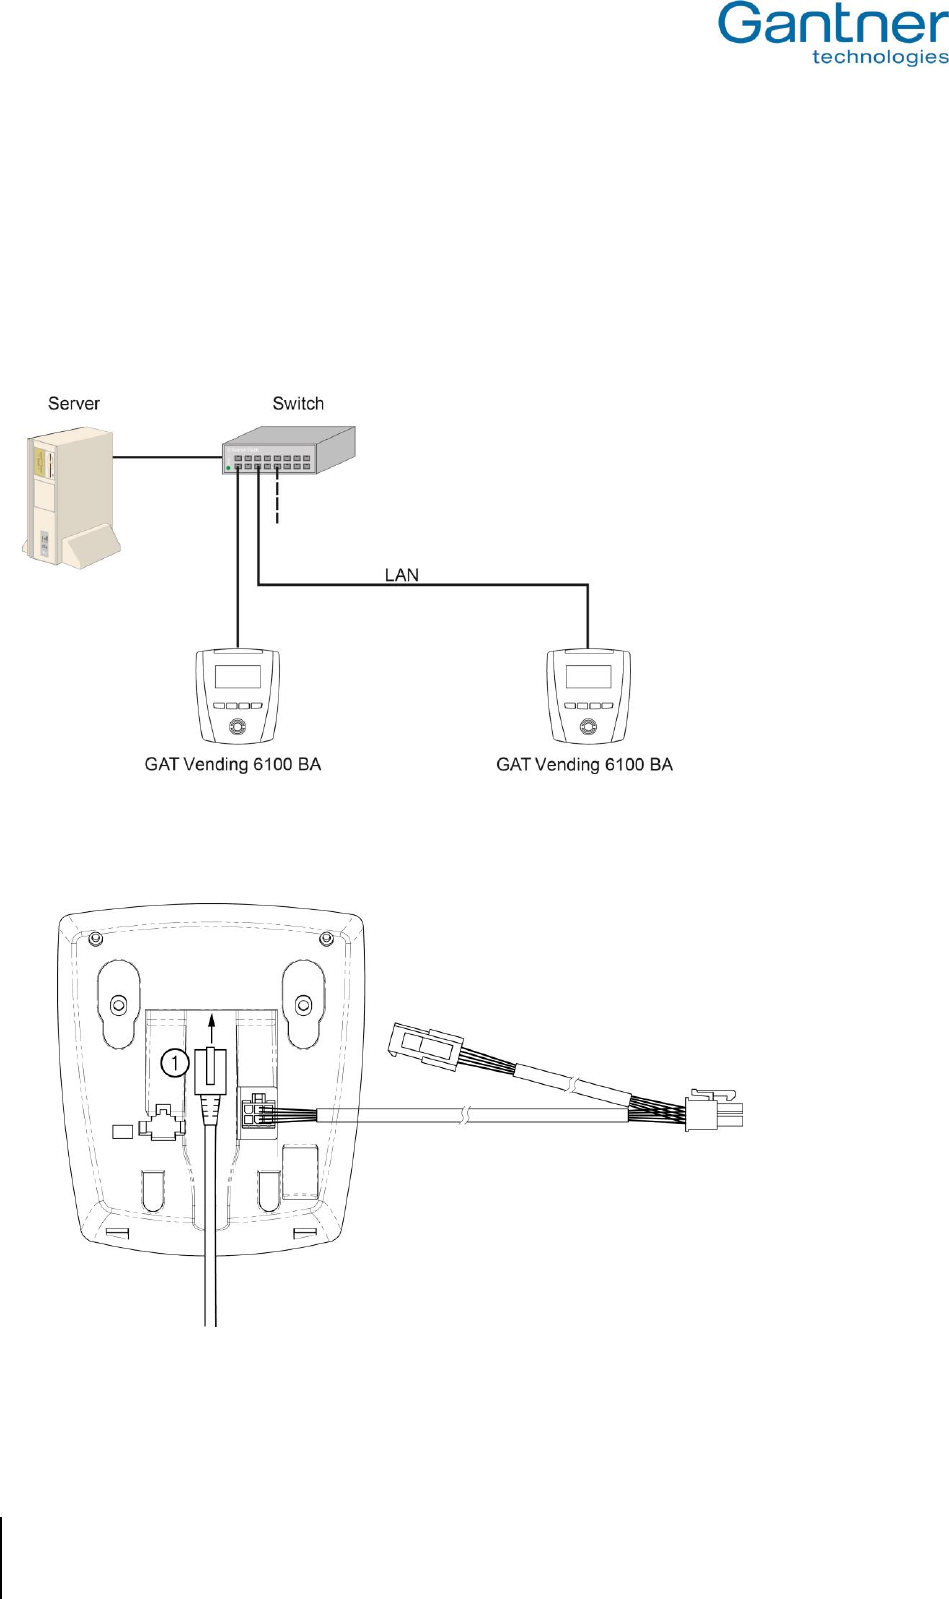
4.2 Ethernet Connection
The GAT Vending 6100 BA has one Ethernet connection, which is available via the RJ45 socket on the rear part of
housing. A direct Ethernet connection to the GAT Vending 6100 BA is only required for configuration.
To connect via Ethernet, one network cable with a minimum specification of CAT 5 (STP) is required. The GAT
Vending 6100 BA supports data rates of 10 to 100 Mbit/s. It is recommended to provide a separate port at the
switch or patch panel for each GAT Vending 6100 BA terminal.
Figure 4.2 - Ethernet network
► Connect the Ethernet cable to the RJ 45 port on the back part of the GAT Vending 6100 BA housing.
1 ....... Ethernet cable
Figure 4.3 – Ethernet connection
GAT Vending 6100 BA
Startup and Configuration
www.gantner.com
HB_GAT-VENDING6100BA--EN_121
19
5
STARTUP AND CONFIGURATION
Ensure the installation process and electrical connections have been carried out as described in the previous
chapters. The GAT Vending 6100 BA starts automatically when power is applied to the device.
For the configuration of the GAT Vending 6100 BA, the difference between the system settings and the
configuration settings must be clarified. The system settings affect how the device communicates with the
network and the configuration settings affect how the device operates and interacts with the user.
5.1 Starting the GAT Vending 6100 BA
The startup process begins when power is supplied to the GAT Vending 6100 BA. The GANTNER logo and the
currently installed software version ("BL-Vers.") is displayed. The status LEDs flash green and red alternately and
the terminal searches for a connection to the vending machine and network.
Figure 5.1 – Start screen of the GAT Vending 6100 BA
The startup process takes up to one minute after which the terminal displays the current system settings.

GAT Vending 6100 BA
Startup and Configuration
20
HB_GAT-VENDING6100BA--EN_121
www.gantner.com
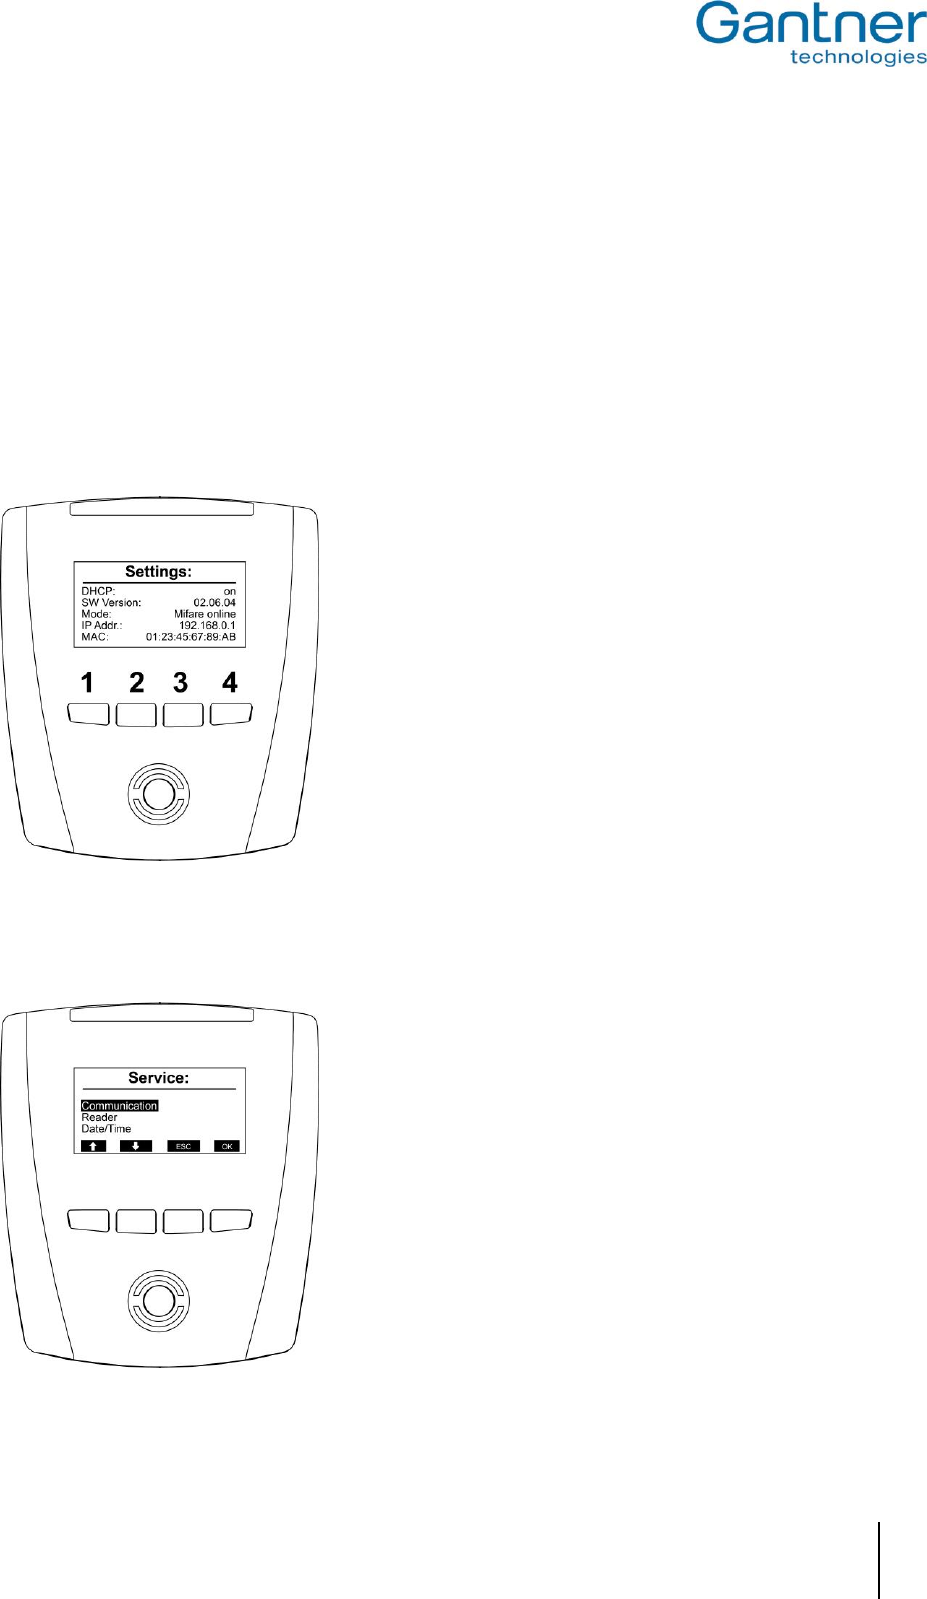
Figure 5.2 – System settings of the GAT Vending 6100 BA
The system settings can be accessed and configured via the service menu (see "5.2.1. Service Menu "). If the user
does not actively open the service menu at the terminal, the GAT Vending 6100 BA continues to startup before
entering into idle mode. The main screen is displayed and the RFID reading field flashes blue.
Figure 5.3 – Main screen (example)
GAT Vending 6100 BA
Startup and Configuration
www.gantner.com
HB_GAT-VENDING6100BA--EN_121
21
5.2 System Settings
The system settings of the GAT Vending 6100 BA can be configured directly on-site via the service menu of the
terminal. Alternatively, some of the settings can be defined via the network using GAT Config Manager software.
5.2.1 Service Menu
The service menu can be accessed during startup of the GAT Vending 6100 BA when the device settings (see
Figure 5.2) are shown on the display. While the device settings are displayed, the function keys on the front of the
device must be pressed in the following sequence: 1 - 1 - 4 - 4 - 2 - 3.
Figure 5.4 - Keys for activating the service menu
After pressing the keys in the correct sequence, the service menu is displayed:
Figure 5.5 - Service menu of the GAT Vending 6100 BA
GAT Vending 6100 BA
Startup and Configuration
22
HB_GAT-VENDING6100BA--EN_121
www.gantner.com
Navigation within the service menu is done by pressing the corresponding keys. The current function for each key is
shown at the bottom of the display and this can change depending on the menu. However, as a general guide:
► Keys 1 and 2 control movement up and down respectively.
► Key 3 is the "ESC" key and used to exit the menu.
► Key 4 is the "OK" key and used for confirmation.
“ESC” and “OK” are used to return to the previous menu where "ESC" discards changes to the settings and "OK"
saves any changes made. To exit the service menu, press Key 3 ("ESC") and confirm in the next screen with "Yes".
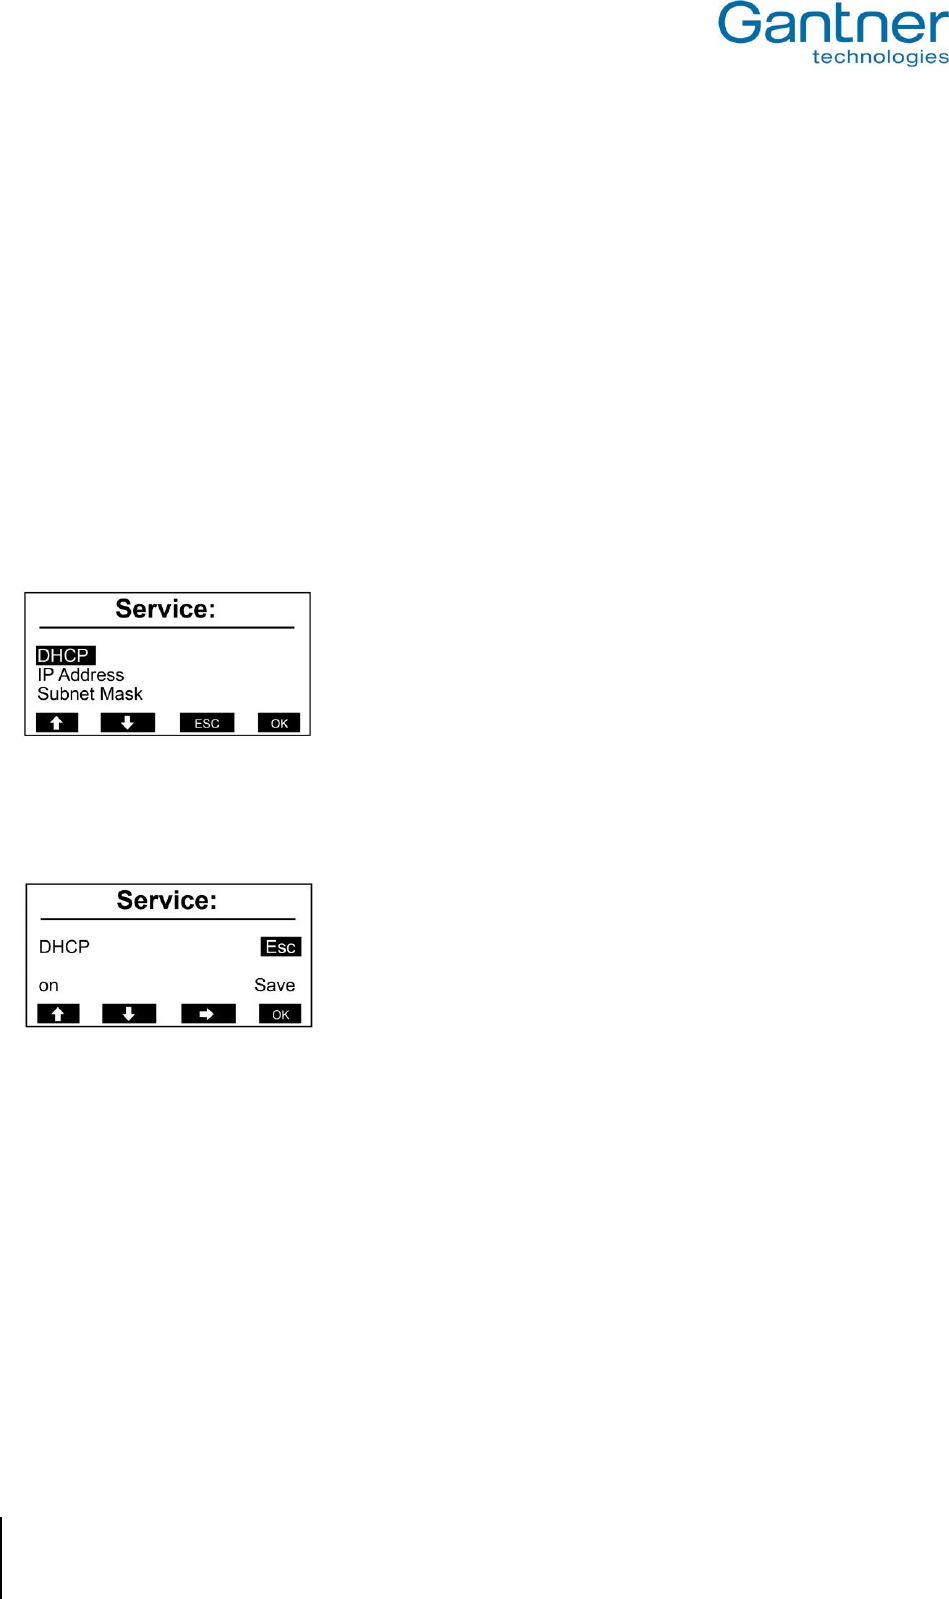
5.2.2 Communication Settings
► Select the "Communication" menu item in the service menu and press key 4 "OK".
o The communication menu opens.
Figure 5.6 - Communication menu
Moving the cursor onto a menu item and pressing "OK" displays the settings for the menu item. The DHCP settings
are shown below as an example.
Figure 5.7 - DHCP settings
Using key 3 "", you can move the cursor to select an option. For example, move the cursor to "on" and you can
change from "on" to "off" using keys 1 "" and 2 "". This process applies for all the settings in the service menu.
The following settings can be made:
- DHCP: Set to "on" if a DHCP server is used in the network. In this case, the remaining settings (IP
address, subnet mask, gateway, DNS) are set automatically by the DHCP server.
- IP Address: If a DHCP server is not used for automatic IP assignment, enter the IP address of the GAT
Vending 6100 BA.
- Subnet Mask: Definition of the network prefix.
- Default Gateway: IP address of the default gateway.
- Primary DNS: IP address of the primary DNS (domain name server).
- Secondary DNS: IP address of the secondary DNS (domain name server).
- Device Name: Network name for the GAT Vending 6100 BA. Standard is "GA" + part number (6 digits) + serial
number (7 digits) of the device.
GAT Vending 6100 BA
Startup and Configuration
www.gantner.com
HB_GAT-VENDING6100BA--EN_121
23
- MAC Address: The hardware MAC address of the GAT Vending 6100 BA. This cannot be changed.
5.2.3 Reader Settings
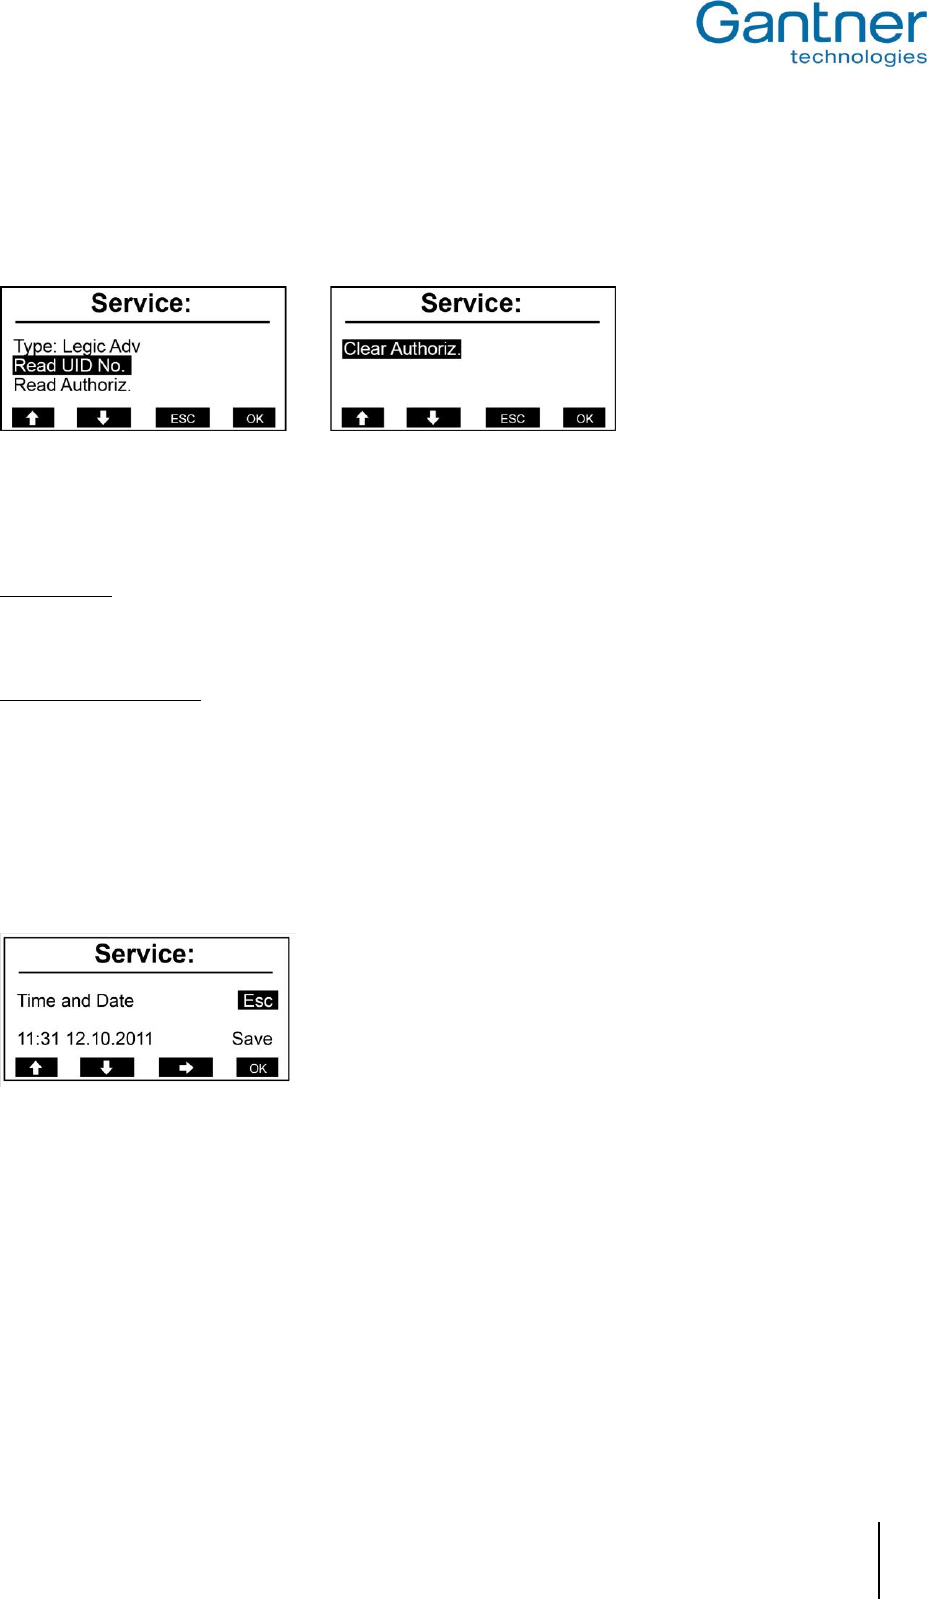
Different settings for the RFID reader of the GAT Vending 6100 BA are available in this menu.
Figure 5.8 - Reader settings menu
The RFID reader type of the GAT Vending 6100 BA is shown on the first line (here "Legic Adv"). The following
functions are available in this menu:
Read UID No.
Via this function, the unique number (UID) of a data carrier, which is held next to the reading field of the GAT
Vending 6100 BA while the function is open, is read and displayed.
Read/Clear Authorization
These functions are only available for LEGIC readers. The functions allow you to view (read) or delete (clear) the
authorization data stored in the internal LEGIC reader.
5.2.4 Time and Date Settings
During operation, the GAT Vending 6100 BA displays the current time and date. For accuracy, it is important that
these settings are correct. To change the time and date, select the "Date/Time" menu item from the service menu.
Figure 5.9 - Time and date settings of the GAT Vending 6100 BA
► Select the value to change using key 3 "".
► Change the number, where the cursor is positioned, using keys 1 "" and 2 "".
► Confirm with key 4 "OK".
GAT Vending 6100 BA
Startup and Configuration
24
HB_GAT-VENDING6100BA--EN_121
www.gantner.com
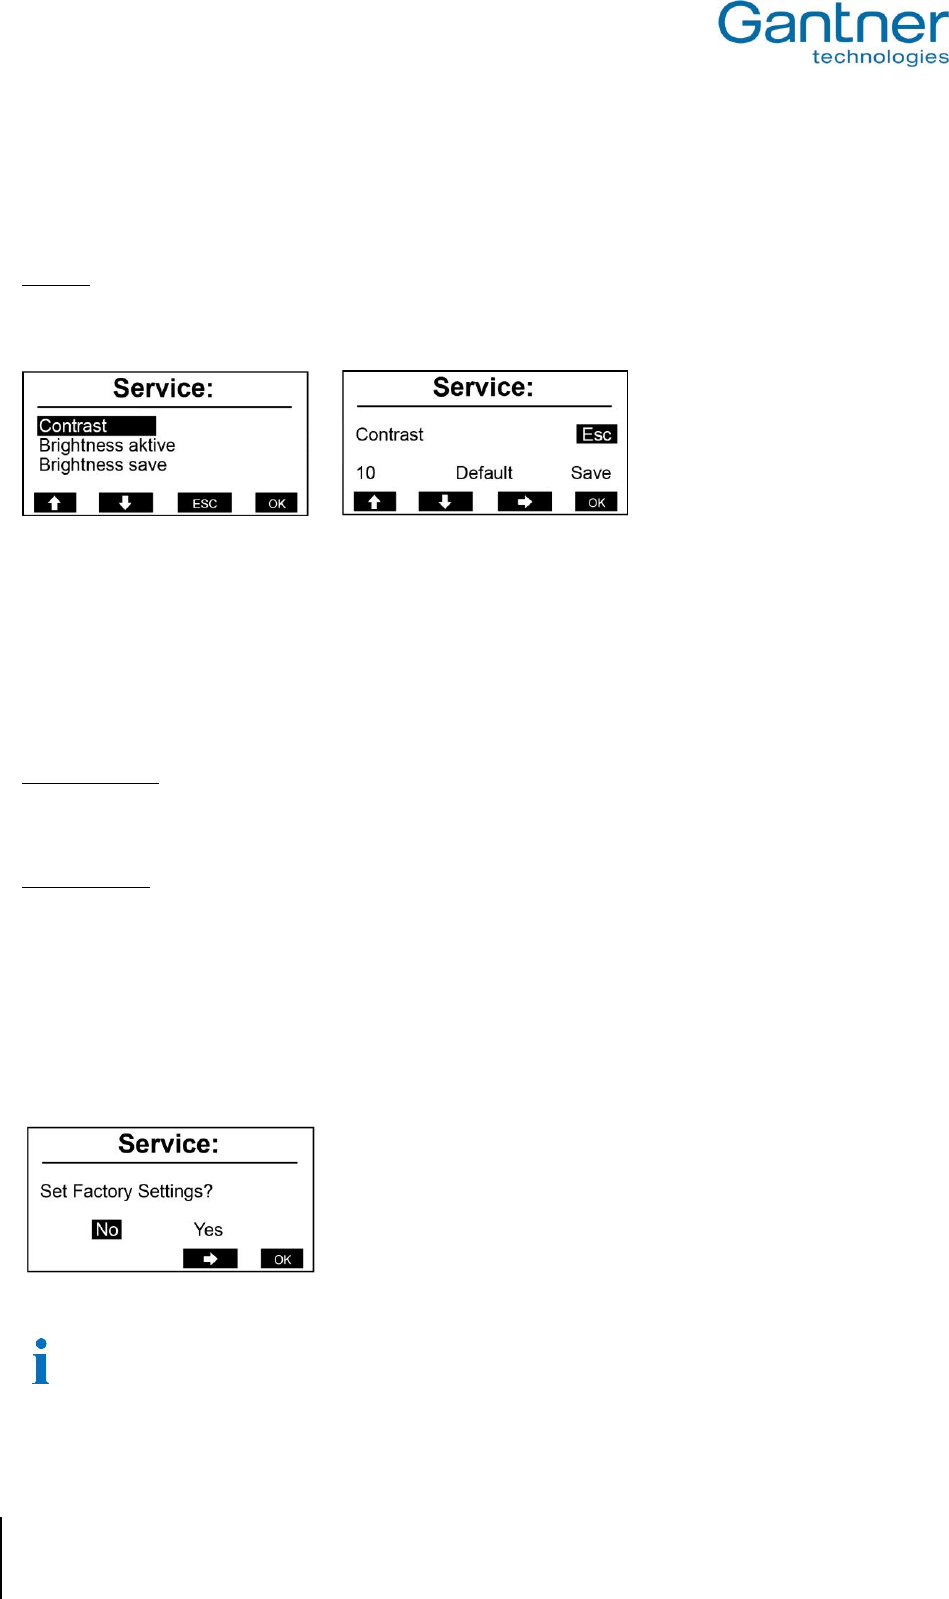
5.2.5 Display Settings
Different settings for the display of the GAT Vending 6100 BA are available in this menu.
Contrast
The contrast between black and white on the display of the GAT Vending 6100 BA can be adjusted.
► Select "Display” and then the “Contrast” menu item.
Figure 5.10 - Setting the contrast of the GAT Vending 6100 BA
► Change to the contrast value using key 3 "".
► Change the value using keys 1 "" and 2 "".
o The contrast is instantly adjusted and can be seen directly while changing the value. Selecting "Default"
restores the contrast value to the factory setting.
► Confirm the contrast setting with key 4 "OK".
Brightness active
This function adjusts the brightness of the backlit display for when the device is operating in standard mode. The
brightness level ranges from 0 – 80.
Brightness save
This function adjusts the brightness of the backlit display for when the device is operating in energy saving mode.
The brightness level ranges from 0 – 80.
5.2.6 Reset Factory Settings
With the "Factory Settings" menu item, the system settings of the GAT Vending 6100 BA can be reset to their
default values, as they were upon leaving the factory.
Figure 5.11 - Factory settings
After restoring the factory settings, the TCP/IP communication settings must be reconfigured to enable
communication with the GAT Vending 6100 BA.
GAT Vending 6100 BA
Startup and Configuration
www.gantner.com
HB_GAT-VENDING6100BA--EN_121
25
5.3 Configuration Settings
The configuration settings are the device functions that determine how the GAT Vending 6100 BA interacts with the
user. These settings can be viewed and modified using "GAT Config Manager" PC software. This section provides
an overview on how to define the configuration settings with GAT Config Manager.
A user guide is available when you install GAT Config Manager. The user guide contains detailed information
about the functionality and use of the software.
In order to configure a GAT Vending 6100 BA, you must know the communication settings such as the IP address
and port number (default 8208) for TCP/IP configuration. To find this information see section "5.2. System Settings".
Configuration Options
There are two ways to configure a GAT Vending 6100 BA with GAT Config Manager.
- Direct configuration: A connection to the GAT Vending 6100 BA must be established by entering all the
communication settings required for a manual connection.
- Project configuration: A project is created where the GAT Vending 6100 BA and its communication settings are
defined once. Configuring the device is then done simply by clicking on the “Configure device” option in the
project. One project can contain multiple devices.
To begin configuring a device first start GAT Config Manager via the start menu within Windows®. The default
location of the software is "Programs > Gantner Electronic GmbH > GAT Config Manager".
5.3.1 Direct Configuration
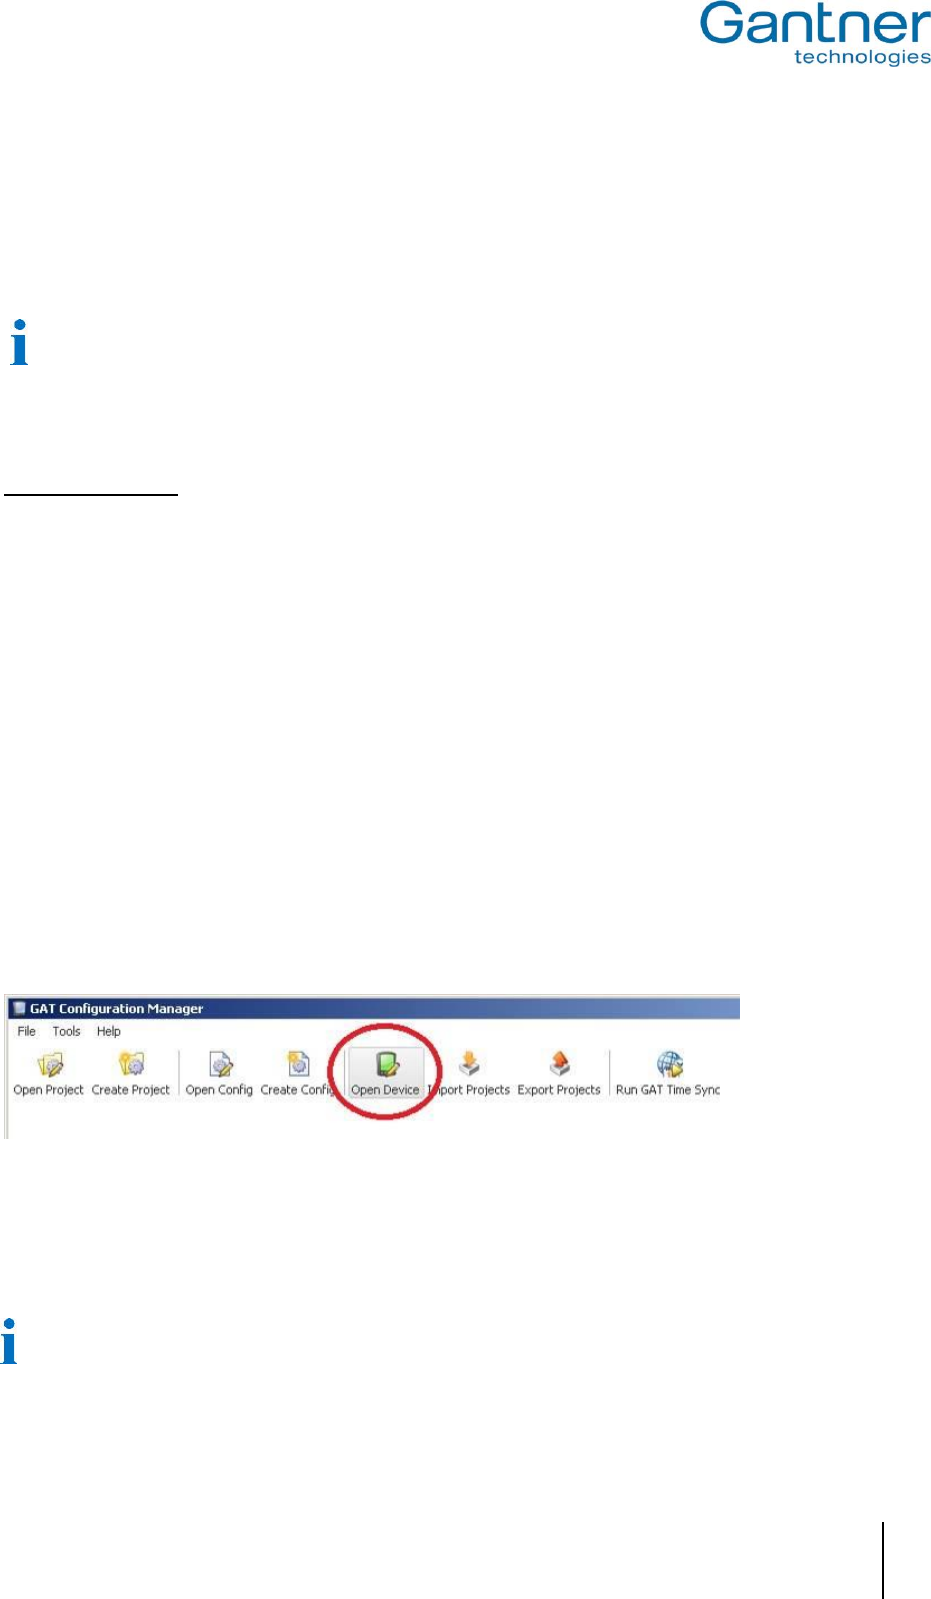
After opening GAT Config Manager, complete the following steps to directly configure a GAT Vending 6100 BA.
► Click on the "Open Device" icon at the top of the program.
o The device configuration wizard opens.
Figure 5.12 - Open device for direct configuration
o The wizard requests the information required to connect to the GAT Vending 6100 BA.
► Go to the next page of the wizard by clicking “Next”.
To return to a previous page click “Previous” and to close the wizard click “Cancel”. The "Finish" button
becomes available when the wizard has received all the necessary information.
GAT Vending 6100 BA
Startup and Configuration
26
HB_GAT-VENDING6100BA--EN_121
www.gantner.com
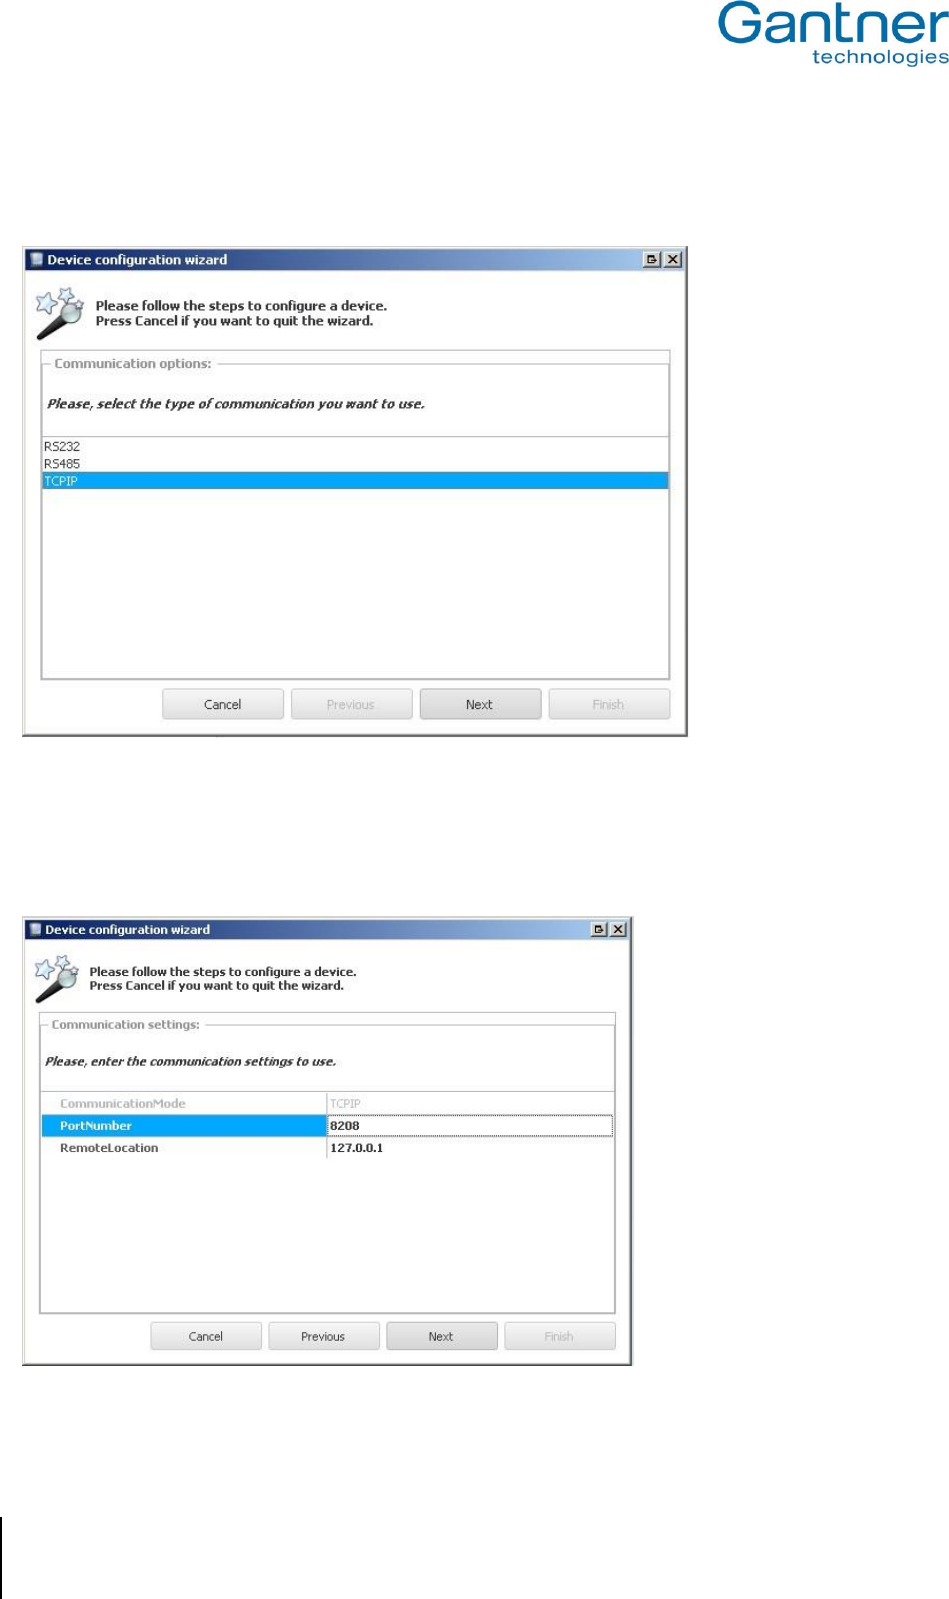
► Select the communication type. Choose “TCPIP” for the GAT Vending 6100 BA.
► Click on “Next”.
Figure 5.13 - Open device for direct configuration (Wizard step 1)
► Enter the IP address and port number of the GAT Vending 6100 BA.
► Click on “Next”.
Figure 5.14 - Open device for direct configuration over TCP/IP (Wizard step 2)
GAT Vending 6100 BA
Startup and Configuration
www.gantner.com
HB_GAT-VENDING6100BA--EN_121
27
Figure 5.15 - Ready to start configuration (Wizard step 3)
► Press "Start configuration".
o GAT Config Manager connects to the GAT Vending 6100 BA and after a short pause, uploads and
displays the current configuration of the device.
Figure 5.16 – Configuration window of the GAT Vending 6100 BA
GAT Vending 6100 BA
Startup and Configuration
28
HB_GAT-VENDING6100BA--EN_121
www.gantner.com
The configuration settings of the GAT Vending 6100 BA are organized into several categories. The directory on the
left (1) lists the different configuration categories.
► Click on a category and the settings for this category can be viewed and adjusted in the field to the right (2).
o A short description of the setting is shown at the bottom of the window (3).
An overview of all the GAT Vending 6100 BA configuration settings is available in section “5.3.4 List of
Configuration Settings”. More information on the operation of GAT Config Manager is available in a separate
manual.
5.3.2 Project Configuration
Complete the following steps to configure the GAT Vending 6100 BA via a project in GAT Config Manager.
► Click on the “Create Project” icon (2 in Figure 5.17) to start a new project.
► When a project for the GAT Vending 6100 BA already exists, click on the “Open Project” icon (1 in Figure 5.17)
to open the existing project.
Figure 5.17 - GAT Config Manager – project setup
► Once a project is established, click on the “Scan Device” icon (1 in Figure 5.18).
o The software scans the network and displays a list of all connected GANTNER devices.
► Select the GAT Vending 6100 BA requiring configuration from the list. Use information such as the IP and MAC
address to identify the correct device.
o The selected device is highlighted in blue as shown in Figure 5.18.
► Click on “OK” (2 in Figure 5.18)
o The selected device is added to the “Devices” list (3 in Figure 5.18).
GAT Vending 6100 BA
Startup and Configuration
www.gantner.com
HB_GAT-VENDING6100BA--EN_121
29
Figure 5.18 – Network scan to add a device
The main project window displays all the information that has been entered into GAT Config Manager. Click on the
GAT Vending 6100 BA in the “Devices” list and information about the selected device is shown to the right of the
project tree. Here you can view the predefined device and network settings.
Figure 5.19 – Project window
GAT Vending 6100 BA
Startup and Configuration
30
HB_GAT-VENDING6100BA--EN_121
www.gantner.com
To configure the display texts of the GAT Vending 6100 BA, click on the "Display Texts" tab. Here you can edit each
individual message that is displayed on the selected terminal (see "5.3.3. Display Texts").
Click on the "(2) Configure" button to view and adjust the configuration settings of the GAT Vending 6100 BA. The
existing configuration is uploaded from the terminal and displayed in the configuration window. See Figure 5.16 in
the previous section for more information on the configuration window.
5.3.3 Display Texts
The texts that are shown on the display of a GAT Vending 6100 BA can be edited in GAT Config Manager.
Complete the following steps to edit the display texts.
► In the project window, select the GAT Vending 6100 BA from the project tree.
► Click on the "Display Texts" tab.
o GAT Config Manager loads the data from the device and displays them in the project window.
Figure 5.20 – Display texts
GAT Vending 6100 BA
Startup and Configuration
www.gantner.com
HB_GAT-VENDING6100BA--EN_121
31
In the “Key” column of Figure 5.20, the type of message is identified and in the “Value” column, the text can be
entered. Each separate line of text is shown on a separate line of the display. The maximum length of 1 text line is
21 characters. If a line of text does not fit on the display of the GAT Vending 6100 BA using the standard font size,
the GAT Vending 6100 BA automatically uses a smaller font size to display the entire text line.
The GAT Vending 6100 BA can only display text from Windows® code page 1252 (Western European), 1251
(Cyrillic), 1257 (Baltic) and 1255 (Hebrew). Text in any other format is shown as "*" on the display.
In the following table, each cell in the “Example” column represents one line of text. A blank cell represents a
blank line on the display of the GAT Vending 6100 BA. Examples with two cells mean that only two lines of text
can be entered in GAT Config Manager.
Definition of the texts:
Identifier
Definition
Example
Idle
Displayed during standard online operation to instruct the
user to hold their data carrier next to the reading field.
Your data
carrier please
ConfigMode
Is shown when the host computer is the communication
master, e.g., when a configuration file is loaded from or to
the GAT Vending 6100 BA
Loading
configuration
CardAgain
Is shown when the user must present their data carrier to
be read by the terminal again.
Again your
data
carrier
please
Card_Read
Is shown when the user must present their data carrier to
be read by the terminal.
Your data
carrier please
Allow
Is shown when the user’s product selection is allowed
and being dispensed.
Dispensing
product
Deny
Is shown when the data carrier is not read correctly by
the GAT Vending 6100 BA or the data carrier is invalid.
Dispensing
not allowed
OutOfService
For online mode, this message is shown when
communication to the server/host is interrupted.
Out of
service
RemoveCard
Is shown when the GAT Vending 6100 BA reads the
same data carrier more than once without it being
removed first.
Please remove
data carrier
WaitPermission
After the terminal has read a data carrier and sent a
request to the host, this message is shown while the
terminal waits for a response from the host.
Please
wait
Certificate_Error
Is shown when the data carrier is not read correctly by
the GAT Vending 6100 BA or the data carrier is invalid.
Certificate
error
inactive
Is shown when the GAT Vending 6100 BA does not
receive a response from the vending machine.
No master
connection
disabled
Is shown when the GAT Vending 6100 BA is deactivated
by the vending machine.
Device
disabled
session_Idle
Is shown when the GAT Vending 6100 BA displays the
user’s account balance.
Credit:
Euro
insufficient_Funds
Is shown when the user’s account balance is not enough
to meet the price of their product selection.
Insufficient
funds

GAT Vending 6100 BA
Startup and Configuration
32
HB_GAT-VENDING6100BA--EN_121
www.gantner.com
Vend_Failed
Is shown when the vending machine fails to deliver the
user’s selected product.
Vending
failed
Always_Idle
This message is shown while the GAT Vending 6100 BA
waits for the user to select a product.
Choose
product
Bookings_Lock
For online + emergency mode. Shown when the memory
capacity of the GAT Vending 6100 BA is reached.
Booking
memory full
offl_cashback
For offline mode. This message is shown when the user
must present their data carrier so the GAT Vending 6100
BA can credit money to the user’s account.
Card please
chargeback
offl_refund_OK
For offline mode. This message is shown when the GAT
Vending 6100 BA has credited money to the user’s data
carrier account.
Credit
refund ok
Table 5.1 – Display texts of the GAT Vending 6100 BA
GAT Vending 6100 BA
Startup and Configuration
www.gantner.com
HB_GAT-VENDING6100BA--EN_121
33
5.3.4 List of Configuration Settings
The following table lists all the configuration settings available for the GAT Vending 6100 BA in GAT Config
Manager. A brief description and the format (where applicable) for each setting are shown in the table. Make sure to
enter data in the indicated format for settings such as time definitions, etc.
Options
Description
Format
Default
Communication
Ethernet
Port number
Port used for communication with the device
Integer
8000
MAC address
The MAC address of the device (cannot be changed)
Integer
DHCP enabled
If enabled, will use the IP settings from a DCHP server
Boolean
True
Static IP address
IP address of the device if DHCP is disabled
IPv4 add.
192.168.1.37
Static subnet mask
Subnet mask of the device (if DHCP is disabled)
IPv4 add.
255.255.255.0
Static primary DNS
Primary DNS address of the device (if DHCP disabled)
IPv4 add.
192.168.1.13
Static secondary DNS
Secondary DNS address of the device (if DHCP disabled)
IPv4 add.
192.168.1.11
Static default gateway
Default gateway of the device (if DHCP is disabled)
IPv4 add.
192.168.1.6
NetBIOS name
NetBIOS name of the device
Text
GW + Part No.
+ Serial No.
Dynamic IP address
IP address got from the DHCP Server
IPv4 add.
0.0.0.0
Dynamic subnet mask
Subnet mask got from the DHCP Server
IPv4 add.
0.0.0.0
Dynamic default gateway
Default gateway got from the DHCP Server
IPv4 add.
0.0.0.0
100 MBit Ethernet enabled
Option to enable 100 MBit Ethernet link, 10 MBit if
disabled
Boolean
true
Port Debug
UDP port to assist service technicians with fault diagnosis
Integer
Ident Message Timeout
Timeout setting for the commands "Card Ident Request"
and "Product Vending Request"
Integer
Protocol
Communication mode
Operating mode of the device. Select between
“Online”, “Online + Emergency” or “Offline”
Menu
Online
Hardware
Display
Contrast
Contrast of the display. Range: 0 – 63. 0: Set to default
Integer
Brightness active mode
Brightness of the display when the device is in
standard operation mode. Range: 0 - 80
Integer
Brightness active mode
Brightness of the display when the device is in energy
saving mode. Range: 0 - 80
Integer
Energy save delay
Idle time in milliseconds before the device switches to
energy saving mode.
Integer
Application
General
Sound signals enabled
Turn on/off sound signals emitted after user activity
Boolean
true
Time format
Format used to display time values on the device.
Select “0 – 24”, “AM / PM” or “Disable”
Menu
0 - 24
Use alternative font
Select to use the alternative font for displaying text
Boolean
False
Font loaded
Description of the currently loaded font data
Device License
License to enable special features of the device
Hex
0000…
Disable Secure UID
Option to disable the Secure UID
Boolean
False
Data handling
Locker 1
Read
Option to read data from the first locker segment of the
data carrier and send to host
Boolean
False
Locker 2
Read
Option to read data from the second locker segment of
the data carrier and send to host
Boolean
False
GAT Vending 6100 BA
Startup and Configuration
34
HB_GAT-VENDING6100BA--EN_121
www.gantner.com
User
Read
Option to read data from the user segment of the data
carrier and send to host
Boolean
false
Cash 1
Read
Option to read data from the first cash segment of the
data carrier and send to host
Boolean
False
Cash 2
Read
Option to read data from the second cash segment of
the data carrier and send to host
Boolean
False
Access
Read
Option to read data from the access segment of the
data carrier and send to host
Boolean
False
Third party
Read
Option to read data from the third party segment of the
data carrier and send to host
Boolean
False
Timeouts
Ident timeout
Timeout in milliseconds for input after a data carrier is
identified (read)
Integer
30000
Product draw timeout
Timeout in milliseconds for feedback from vending
machine after product selection
Integer
60000
Idle timeout
Timeout in milliseconds for product selection
Integer
15000
Feedback screen
Timeout in milliseconds for all feedback screens
Integer
3000
Cashless Device
Mainly for service technicians.
Default currency code
Define the default currency code
Integer
Country code
Define the country code
Integer
Scale factor
Define the scale factor for cash values
Integer
Decimal places
Define the number of decimal places for cash values
Integer
2
Force single vend
Option to cancel vending session after each
transaction. Required for vending machines that start
multiple vending transactions
Boolean
False
Use VMC display
Option to show GAT Vending 6100 BA text on the
vending machine’s display (where possible)
Boolean
False
Online request
Option to perform an online request for every product.
The host can individually allow special products or
send online prices
Boolean
False
MDB address
Select the cashless device number in use at the
vending machine. “Cashless Device 1” or Cashless
Device 2”
Menu
Cashless
Device 1
Verify age
Option to activate age checking functionality, as far as
the information is available
Boolean
False
Check card available
Option to end vending session when data carrier is
removed from the RFID reading field
Boolean
False
Auto reset timeout
Reset MDB bus after terminal is set to inactive mode
for x seconds. 0 = disable auto reset function
Integer
Bus Timeout Factor
Factor to increase the timeout for MDB communication
for slow answers (1 = 5 ms, 2 = 10 ms, 3 = 15 ms, 4 =
20 ms, 5 = 25 ms)
Integer
VMC Status
Read-only data. Mainly for service technicians. VMC = Vending Machine Controller
VMC connection
VMC connection
VMC feature level
VMC feature level
VMC feature bits
VMC feature bits
VMC manufacturer
VMC manufacturer
VMC serial number
VMC serial number
VMC model number
VMC model number
VMC SW version
VMC software version
GAT Vending 6100 BA
Startup and Configuration
www.gantner.com
HB_GAT-VENDING6100BA--EN_121
35
Emergency Mode
Funds
Simulated account balance (in cents) for every data
carrier in emergency mode
Integer
8000
Payment type
Select the price setting: “Default Price”, “Price List”,
“Discount Group”, “Discount”, “Surcharge”
Menu
Default Price
Discount/Surcharge [%]
Define a percentage price discount / surcharge
Integer
0
User group
Define the user group
Integer
0
Pricelist/Disc grp
Define the pricelist / discount group
Integer
0
Emergency revalue
Option to allow revaluing in emergency mode
Boolean
False
Pseudo always idle
Option to simulate a valid card with emergency mode
settings. The user must present their data carrier only
once per vending transaction.
Boolean
False
Unknown cash value
Option to send the “Cash value not determined” value
when emergency values are used (0xFFFF). Not
supported by many vending machines.
Boolean
False
Offline Mode
Cash segment NB
GANTNER cash segment to read account data from
Integer
1
Comm. Gateway
Enable Comm Gateway
Option to enable the communication gateway
Boolean
False
Reader
Read Mifare
Option to read MIFARE data carriers
Boolean
True
Read Legic Prime
Option to read LEGIC Prime data carriers
Boolean
True
Read Legic Advant
Option to read LEGIC Advant data carriers
Boolean
False
Read ISO 15693
Option to read ISO 15693 data carriers
Boolean
False
Read FeliCa UID
Option to read the UID of FeliCa data carriers
Boolean
False
Read Inside Secure UID
Option to read the UID of Inside Secure data carriers
Boolean
False
Read ISO 14443B UID
Option to read the UID of ISO 14443B data carriers
Boolean
False
LEGIC
Options for reading LEGIC data carriers.
Company ID
Company ID for the device. All data carriers must have
the same company ID to be used with the device
Hex
9999
Subsite
Additional key for division of site keys
Hex
00
Subsite enabled
Option to check the subsite keys of data carriers
Boolean
False
SSC
Data carrier segment ID for SSC (cash segment)
Hex
1A
MIFARE
Options for reading MIFARE data carriers.
Site key
Site key of the device. All data carriers must have the
same site key to be used at the device
Hex
73E0818B…
Subsite
Additional key for division of site keys
Hex
00
Enable subsite
Option to check the subsite keys of data carriers
Boolean
False
Position Locker 1
Indicates the data carrier segment for locker 1 data
Integer
4
Position Locker 2
Indicates the data carrier segment for locker 2 data
Integer
5
ISO
Options for reading of ISO 15693 data carriers.
Site key
Site key of the device. All data carriers must have the
same site key to be used at the device
Hex
73E0818B…
Subsite
Additional key for division of site keys
Hex
00
Subsite enabled
Option to check the subsite keys of data carriers
Boolean
False
Position FID
Indicates the data carrier segment for general data
Integer
13
Position Locker 2
Indicates the data carrier segment for certificate data
Integer
15
Position Locker 1
Indicates the data carrier segment for locker 1 data
Integer
19
Position Locker 2
Indicates the data carrier segment for locker 2 data
Integer
23
Third Party
Segment ID
Segment ID for third party data on the data carrier
Integer
Data start
Start of the third party data segment
Integer
Data length
Length of the third party data segment
Integer
GAT Vending 6100 BA
Startup and Configuration
36
HB_GAT-VENDING6100BA--EN_121
www.gantner.com
Mifare Classic
Sector number
Sector number of the MIFARE Classic third party segment
Integer
1
Site key
Site key of the MIFARE Classic third party segment
Hex
73E0818B…
Read key
Read key of the MIFARE Classic third party segment
Menu
Key A
Mifare DESFire
Key set
Number of the read key
Integer
Read key number
Number of the write key
Integer
Application ID
ID of the target DESFire application
Text
Encryption mode
Select the type of encryption mode
Menu
FileNum
File number to read data from
Integer
FileCommMode
File communication mode:
“Plain”, “Maced”, “Enciphered”
Menu
FileType
Type of file:
“Standard” , “Backup”
Menu
ISO
Block number
Block number position for ISO data
Integer
13
LEGIC
Search string
“Address” of LEGIC segment on data carrier
Hex
Search string length
Length of string for LEGIC data carrier segment
Integer
6
Read only parameter
Production
Production Data
Production data for the device (set at manufacturer)
Hardware Version
Hardware Version of the Device Hardware
Serial Number
Serial number of the device
Software Version
Software Version of the Application
Table 5.2 - Configuration settings for the GAT Vending 6100 BA
For online mode
If the host computer only requires the unique number of a data carrier, deleting all reading options makes the
process faster as the data carrier does not need to be read.

GAT Vending 6100 BA
Operation
www.gantner.com
HB_GAT-VENDING6100BA--EN_121
37
6
OPERATION
Explained in this chapter are the different operating modes of the GAT Vending 6100 BA and the process required
to purchase a product from a vending machine. As there are many different types of vending machine available, a
range of operating conditions are possible. Therefore, a standard operation is described here and please also refer
to the user manual of the vending machine for more detailed information.
6.1 Communication
For configuration and general operation, the GAT Vending 6100 BA communicates with a server/host computer. To
enable communication, the terminal uses certain protocols that are described in separate manuals. For standard
operation of the device, it is not necessary to know the details of these protocols. The GANTNER developed
software package, GAT DIRECT.Connect, provides a convenient method for configuring and operating the GAT
Vending 6100 BA. Refer to the GAT DIRECT.Connect documentation for more information on this solution.
6.1.1 Online Mode
Online mode is the standard operating mode for the GAT Vending 6100 BA. In online mode, when a data carrier is
read the terminal sends the information over the network to the server/host and waits for a response. The server
evaluates the information then sends commands and data back to the GAT Vending 6100 BA to control the vending
operation.
Master and Slave
During online operation, the GAT Vending 6100 BA is in master mode and the server/host computer is in slave
mode. The GAT Vending 6100 BA periodically asks the host if it needs to switch to master mode (e.g., to upload a
configuration to the GAT Vending 6100 BA). If the host changes to master mode, the GAT Vending 6100 BA will
change to slave mode. If no commands are received from the host after a certain time, the GAT Vending 6100 BA
automatically changes back to master mode.
When the GAT Vending 6100 BA is operating in online mode and communication to the server/host is lost, the GAT
Vending 6100 BA automatically switches to out of operation mode. In out of operation mode, the terminal and
connected vending machine are not able to be used until communication to the server/host is reestablished.
6.1.2 Online and Emergency Mode
When the GAT Vending 6100 BA is operating in “online and emergency mode” and communication to the
server/host is lost, the GAT Vending 6100 BA automatically switches from online mode to emergency mode. There
are a range of configurable options that control how the terminal behaves while in emergency mode, and these
allow vending operation to continue while communication is interrupted.
For example, the “Funds” configuration setting allows a temporary account balance to be set for every valid data
carrier. When a valid data carrier is read by the GAT Vending 6100 BA while the terminal is in emergency mode, the
user is able to purchase a product and the price is deducted from the emergency mode account. As soon as
communication is restored, the GAT Vending 6100 BA returns to the standard online mode of operation and sends
the emergency mode transaction data to the host. Any guest who used the vending machine during emergency
mode will have the cost of the purchase(s) debited from their online account.

GAT Vending 6100 BA
Operation
38
HB_GAT-VENDING6100BA--EN_121
www.gantner.com
6.1.3 Offline Mode
In offline mode, the GAT Vending 6100 BA operates autonomously and does not connect to a server/host for data
evaluation and control. All information required to complete a vending transaction, such as the user’s account
balance, is stored on the data carrier.
Offline mode is only valid for LEGIC data carriers with a GANTNER cash segment.
In offline mode, the terminal reads the data carrier and displays the user’s account balance. The user selects a
product and must present their data carrier again to confirm the selection. The updated account balance is written
onto the LEGIC data carrier and displayed on the terminal while the product is being dispensed.
GAT Vending 6100 BA
Operation
www.gantner.com
HB_GAT-VENDING6100BA--EN_121
39
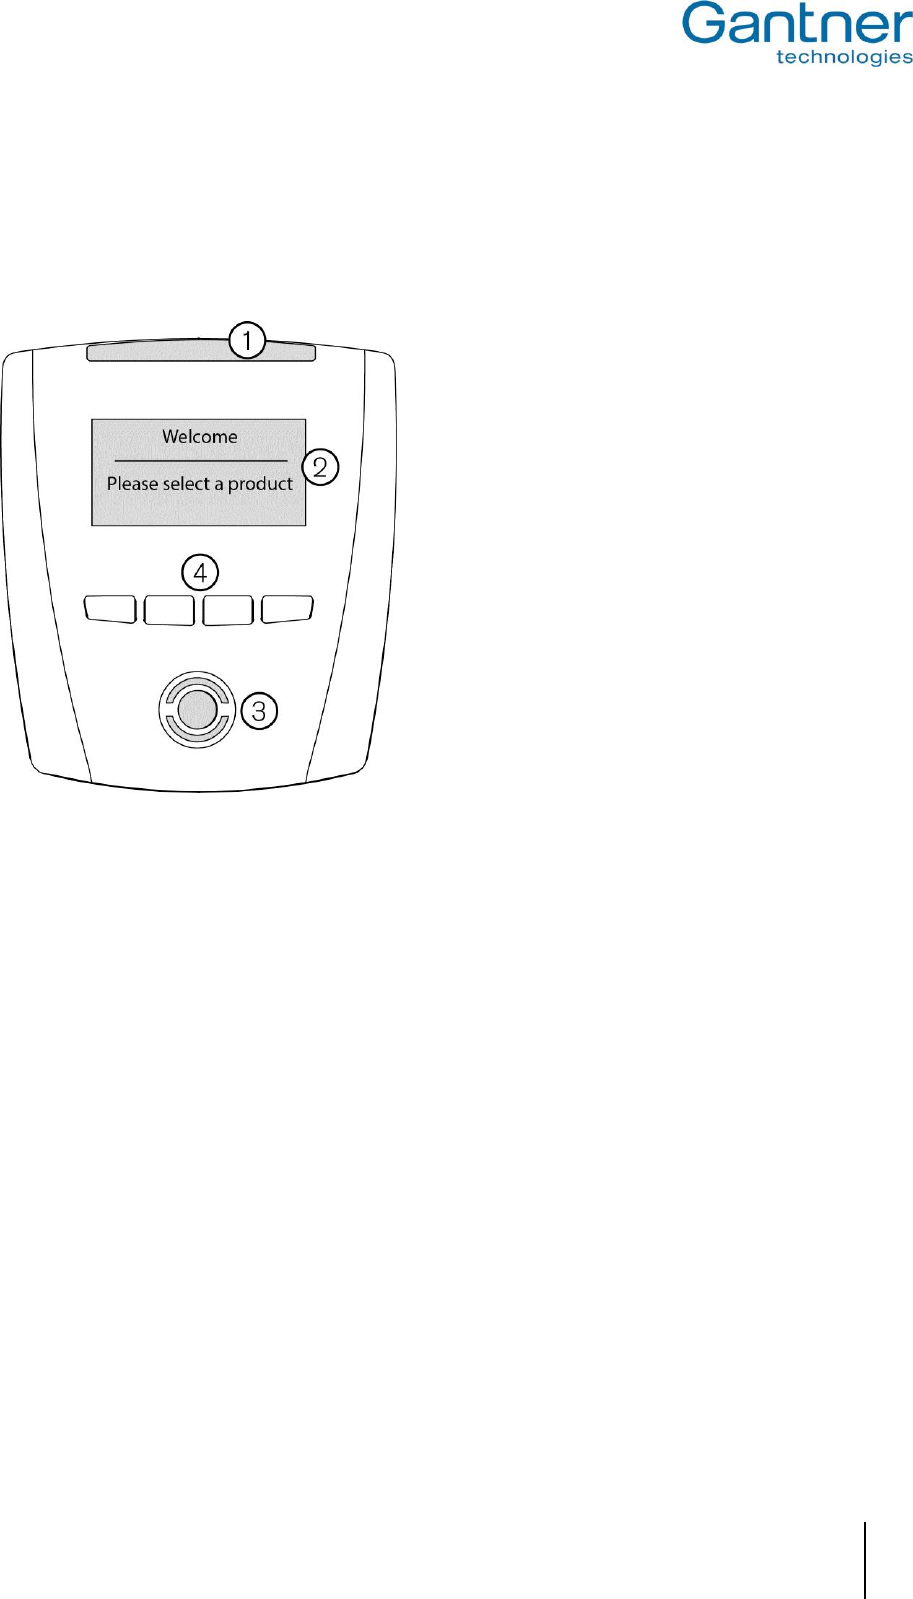
6.2 Control and Display Elements
For user guidance, the GAT Vending 6100 BA is equipped with various control and display elements. This includes
an LCD display, LEDs integrated into the RFID reading field and status bar, and a tone generator for acoustic
signaling. Four function keys are also provided for menu navigation and product selection.
1 ....... LED status bar
2 ...... Display
3 ...... Reading field LED
4 ...... Function keys
Figure 6.1 – Control and display elements of the GAT Vending 6100 BA
6.2.1 Display
The GAT Vending 6100 BA has a graphical, monochrome display that can display four lines of text. The display is
used to show instructions and messages relating to the user’s current activity as well as additional information such
as the user’s account balance. The display texts and the language can be individually configured using GAT Config
Manager software (see "5. Startup and Configuration").
GAT Vending 6100 BA
Operation
40
HB_GAT-VENDING6100BA--EN_121
www.gantner.com
6.2.2 LED Status Bar
To indicate the current state of operation or to warn of an error, the LED status bar is designed to emit different
colors (red or green) and styles (solid or blinking). The following table defines the LED status bar signaling.
Signal
Definition
Solid red
- No connection to the vending machine.
- No connection to server/host. Terminal in out of operation mode.
Solid green
- Data carrier read
Flashing red
- Vending transaction declined
- Vending machine failed to dispense product
Flashing green
- Vending transaction approved
- Vending machine dispensing product
No LED signal
- Terminal idle
- Terminal deactivated
Table 6.1 – Signals of the LED status bar
6.2.3 Sound Signals
To indicate the current state of operation or to warn of an error, the tone generator of the GAT Vending 6100 BA
emits different sounds. The following table defines the acoustic signaling.
Signal
Definition
1 x beep
- Data carrier read
2 x beeps
- Vending transaction declined
- Connection broken
- Error
3 x beeps (rising in pitch)
- User account credited (offline mode)
3 x beeps (descending in pitch)
- User account debited (offline mode)
Table 6.2 – Definition of the sound signals

GAT Vending 6100 BA
Operation
www.gantner.com
HB_GAT-VENDING6100BA--EN_121
41
6.3 Purchasing a Product
The standard procedure for purchasing and dispensing a product at a vending machine controlled by the GAT
Vending 6100 BA is as follows:
► The GAT Vending 6100 BA displays a message inviting the user to read their data carrier. The LED status bar
illuminates red and the RFID reader illuminates blue.
► Hold your data carrier next to the RFID reader.
o The GAT Vending 6100 BA displays your current account balance.
For offline mode, the account balance is stored on the LEGIC data carrier and for online mode, the account
balance is stored on the server.
► Remove your data carrier from the reading field of the GAT Vending 6100 BA.
o The default configuration allows you 10 seconds to select a product (see next step).
► Now select the product you want to purchase from the vending machine. Refer to the vending machine
documentation for more information on this step.
► For offline mode, hold the data carrier again next to the RFID reader of the GAT Vending 6100 BA.
o The cost of the purchase is deducted from your data carrier account and the updated balance is
displayed.
► For online mode, your data carrier does not need to be read again by the GAT Vending 6100 BA.
o The deduction takes place online and the updated account balance is displayed.
► Remove the purchased product from the vending machine.

GAT Vending 6100 BA
Operation
42
HB_GAT-VENDING6100BA--EN_121
www.gantner.com
6.4 Troubleshooting
If an error or a fault occurs with the GAT Vending 6100 BA, the terminal indicates this state via its display, beeper
and status LEDs. The following information assists to identify errors.
The text shown on the display can be modified. The texts shown below are the default texts as described in
section” 5.3.3 Display Texts”.
6.4.1 Error: Certificate error
Display: "Certificate error"
LED status bar: Flashing red
Beeper: 2 x beeps
Possible causes: Data carrier not read correctly by the GAT Vending 6100 BA, data carrier invalid (site key
incorrect)
6.4.2 Error: Out of service
Display: "Out of service"
LED status bar: Solid red
Beeper: 2 x beeps
Possible causes: Occurs when the GAT Vending 6100 BA is operating in online mode and the connection to the
host/server is broken.
6.4.3 Error: No connection to vending machine
Display: "No master connection"
LED status bar: Solid red
Beeper: 2 x beeps
Possible causes: Occurs when the GAT Vending 6100 BA does not receive any data from the vending machine

GAT Vending 6100 BA
Technical Data
www.gantner.com
HB_GAT-VENDING6100BA--EN_121
43
7
TECHNICAL INFORMATION
7.1 Technical Data
Permitted input voltage UDC: 20 to 35 V (MDB)
Max. current consumption: 200 mA
Max. transmission power: 200 mW
Protection: Surface Mount Fuse AVX F0805B2R00FSTR (2A / 63V, Fast Blow type),
ensures that the GAT Vending 6100 BA operates within the LPS limits.
Frequency of reading field: 13.56 MHz
Reader type: LEGIC Advant (reads all LEGIC, MIFARE® und ISO 15693 data carriers)
Supported data carriers: - LEGIC Prime
- LEGIC Advant
- MIFARE® Classic
- MIFARE DESFire®
- ISO 15693
Control elements: - 4 function keys
- RFID reader
Interface elements: - Graphical black & white display (LCD) with white LED backlight,
resolution 128 x 64 pixels, visible display area = 50 mm x 25 mm
- RFID reader (illuminated)
- Acoustic signal
- LED status bar with LED segments in different colors
Host interface: Ethernet 10/100 MBit/s
Vending machine interface: MDB with standard 6-pin connector
Housing material: - Front part: Plastic PMMA
- Back part: Plastic PC-ABS
Dimensions: 93 mm x 107 mm x 39 mm (3.66´´ x 4.2´´ x 1.54´´)
Permitted ambient temperature: 0 °C to +50 °C (32 °F to 122 °F)
Permitted storage temperature: -10 °C to +60 °C (14 °F to 140 °F)
Relative humidity: 20 to 80%, non-condensing
Protection type: IP 54
Protection class: III
Weight: Approx. 200 g (0.44 lbs.)
Environment class based on VdS 2110: II (conditions in indoor areas)
GAT Vending 6100 BA
Technical Data
44
HB_GAT-VENDING6100BA--EN_121
www.gantner.com
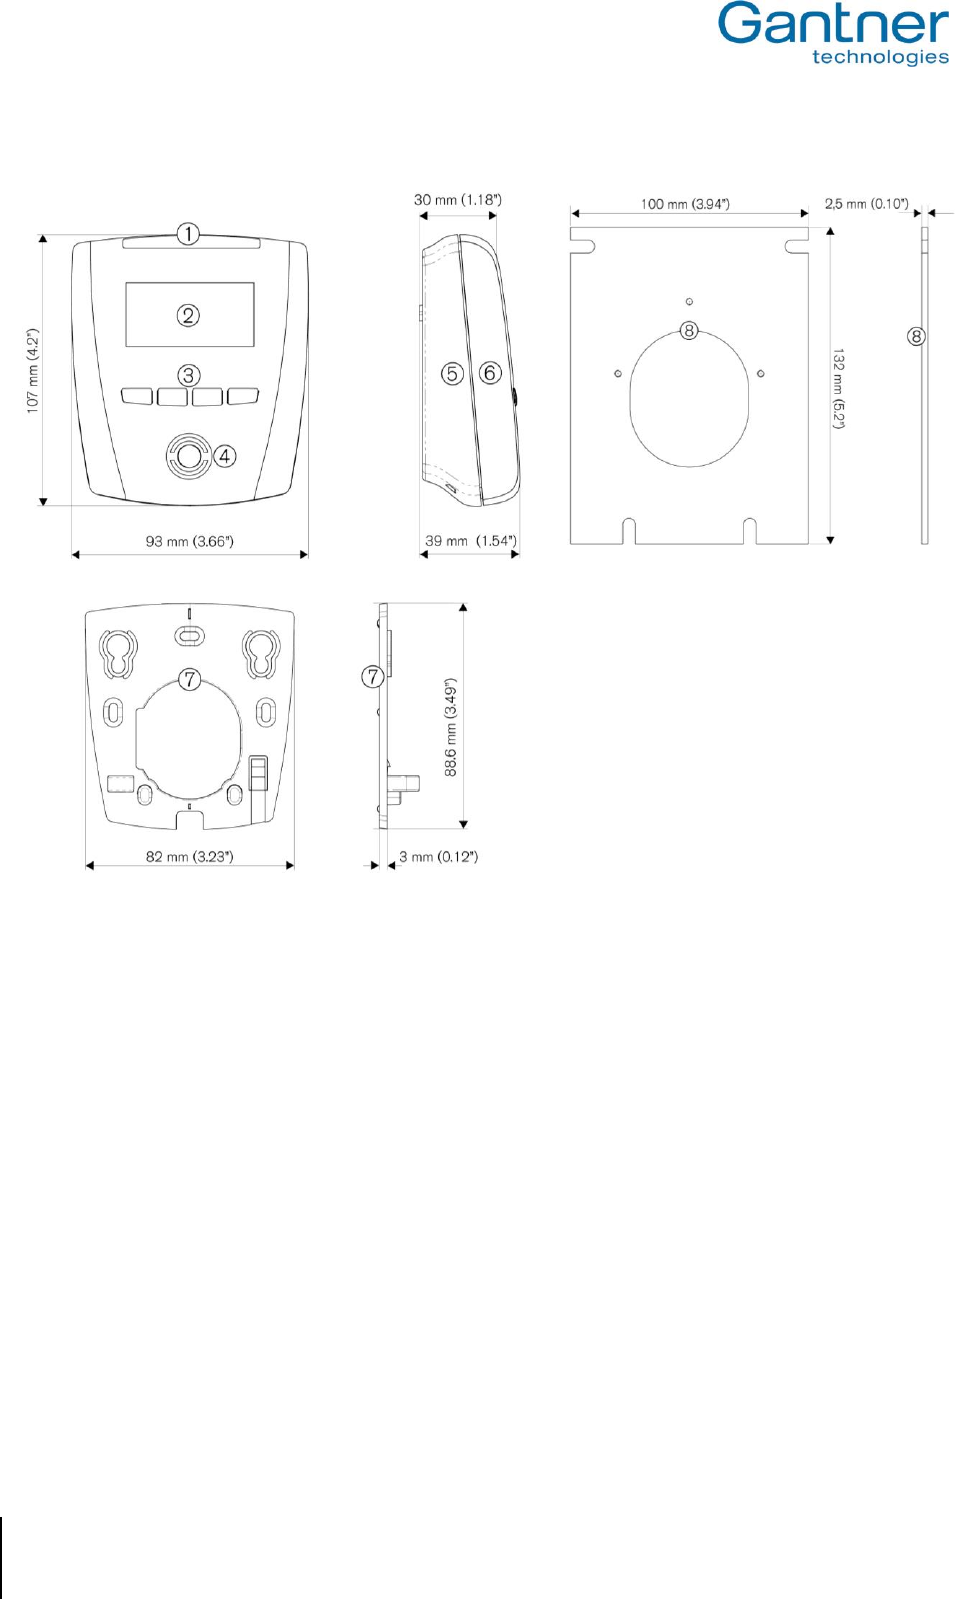
7.2 Dimensions
1 ....... LED status bar
2 ....... Display (LCD)
3 ....... Function keys
4 ....... Illuminated, round scan field
5 ....... Device back part
6 ....... Device front part
7 ....... Plastic mounting plate
8 ....... Aluminium mounting plate (accessory)
GAT Vending 6100 BA
Technical Data
www.gantner.com
HB_GAT-VENDING6100BA--EN_121
45
This product is herewith confirmed to comply with the requirements set out in the Council Directives on the Approximation of
the laws of the Member States relating to Electromagnetic Compatibility Directive 2004/108/EG.
This product is in conformity with the following EC directives, including all applicable amendments:
- 1999/5/EC (R&TTE directive)
- 2011/65/EU (Restriction of the use of certain hazardous substances in electrical and electronic equipment)
The GAT Vending 6100 BA was developed and fabricated under the quality management standard ISO 9001 and GANTNER Electronic
GmbH is also certified according to standard ISO 14001.
The WEEE symbol on GANTNER products and their packaging indicates that the corresponding material must not be disposed of
with normal household waste. Instead such marked waste equipment must be disposed of by handing it over to a designated
electronic waste recycling facility. Separating and recycling this waste equipment at the time of disposal will help to conserve natural
resources and ensure that it is recycled in a manner that protects human health and the environment. Please contact your local
authority for further details of your nearest electronic waste recycling facility.
GANTNER is committed to meeting or exceeding the requirements of the RoHS directive (2011/65/EU). The RoHS directive
requires that manufacturers eliminate or minimize the use of lead, mercury, hexavalent chromium, cadmium, polybrominated
biphenyls and polybrominated diphenyl ethers in electrical and electronic equipment sold in the EU after July 1, 2006.
FCC INFORMATION (U.S.A.)
This equipment has been tested and found to comply with the limits for a Class A digital device, pursuant to part 15 of the FCC Rules.
These limits are designed to provide reasonable protection against harmful interference when the equipment is operated in a commercial
environment. This equipment generates, uses, and can radiate radio frequency energy and, if not installed and used in accordance with
the instruction manual, cause harmful interference to radio communications.
Operation of this equipment in residential area is likely to cause harmful interference in which case the user will be required to correct the
interference at his own expense.
FCC Warning Statement
[Any] changes or modifications not expressly approved by the party responsible for compliance could void the user's authority to operate
the equipment.
FCC Label
This device complies with Part 15 of the FCC Rules. Operation is subject to the following two conditions: (1) this device must not cause harmful
interference, and (2) this device must accept any interference received, including interference that may cause undesired operation.
INDUSTRY CANADA INFORMATION
This device complies with Industry Canada’s licence-exempt RSSs. Operation is subject to the following two conditions:
(1) This device may not cause interference; and
(2) This device must accept any interference, including interference that may cause undesired operation of the device.
Le présent appareil est conforme aux CNR d’Industrie Canada applicables aux appareils radio exempts de licence. L’exploitation est
autorisée aux deux conditions suivantes :
1) l’appareil ne doit pas produire de brouillage;
2) l’appareil doit accepter tout brouillage radioélectrique subi, même si le brouillage est susceptible d’en compromettre le fonctionnement.
_
Note:
This manual is valid from April 18th, 2017. It is subject to change.
Amendments can be made without prior notice at any time.

GAT Vending 6100 BA
Technical Data
46
HB_GAT-VENDING6100BA--EN_121
www.gantner.com

48
HB_GAT-VENDING6100BA--EN_121
www.gantner.com
Part No.: 533625 www.gantner.com
GANTNER Electronic GmbH GANTNER Electronic GmbH Deutschland GANTNER Electronics Pty Ltd Australia
Montafonerstraße 8 Industriestraße 40F 3/105a Vanessa Street, Kingsgrove
6780 Schruns 44894 Bochum NSW 2208 Sydney
Austria Germany Australia
T: +43 (0)5556 73784-0 T: +49 (0)234 58896-0 T: +61 (0)2 9011 8114
F: +43 (0)5556 73784-8000 F: +49 (0)234 58896-11 F: +61 (0)2 8209 1708
info@gantner.com info-de@gantner.com info-aus@gantner.com
GANTNER Electronics Ltd. UK GANTNER Electronic GmbH Middle East
16 The Havens, Ransomes Europark P.O. Box 62702, Office 1604, Aspect Tower (Executive Towers group)
Ipswich, Suffolk, IP3 9SJ Business Bay, Sheikh Zayed Road, Dubai, U.A.E.
United Kingdom T: +971 (0)4 451 7794
T: +44 (0)1245 697588 F: +971 (0)4 451 7795
Tech. Line: +44 (0)1480 212627 M: +971 (0)50 6504082
info-uk@gantner.com info-me@gantner.com