Gantner Electronic GEA1160018A GAT NET.Writer 7000 F/ISO User Manual GAT NET Writer 7000 F ISO
Gantner Electronic GmbH GAT NET.Writer 7000 F/ISO GAT NET Writer 7000 F ISO
Manual
www.gantner.com
HB_GAT-NETWRITER-7000-FISO-US_12
1
GAT NET.Writer 7000 F/ISO
MIFARE® and ISO 15693 Read / Write Station
Installation, Configuration, Operation
Document Version 1.2
GAT NET.Writer 7000 F/ISO
www.gantner.com
HB_GAT-NETWRITER-7000-FISO-US_12
3
Copyright 2017 by GANTNER Electronic GmbH, Schruns (Austria).
Operating instructions, manuals and software are protected by copyright. All rights are reserved. Copying, duplication, translation,
installation in any electronic medium or machine-readable form in whole or in part is prohibited. The sole exception is represented
by creation of a back-up copy of software for own use as a safeguard, so far as this is technically possible and recommended by us.
Any infringement will render the party committing such infringement liable to compensation payment.
Liability
Any claims against the manufacturer based on the hardware or software products described in this manual shall depend exclusively
on the conditions of the guarantee. Any further-reaching claims are excluded, and in particular the manufacturer accepts no liability
for the completeness or accuracy of the contents of this manual. The right is reserved to make alterations, and alterations may be
made at any time without prior notice being given.
Trademarks
Attention is drawn at this point to markings and registered trademarks used in this manual. All product and company names, which
are mentioned in this manual, are only used for identification and explanation purposes. Some of these names may be trademarks
or registered trademarks of the corresponding company.
Contact
The contact information for questions regarding this product or for general enquiries is listed below:
Contact address of manufacturer:
GANTNER Electronic GmbH
Montafonerstrasse 8
6780 Schruns, Austria
Phone: +43 5556 73784 - 441
Fax: +43 5556 73784 - 8020
Email: info@gantner.com
Website: www.gantner.com
FCC Label
This WEEE symbol on GANTNER products and their packaging indicates that the corresponding material must
not be disposed of with normal household waste. Instead such marked waste equipment must be disposed of by
handing it over to a designated electronic waste recycling facility. Separating and recycling this waste equipment
at the time of disposal will help to conserve natural resources and ensure that it is recycled in a manner that
protects human health and the environment. Please contact your local authority for further details of your nearest
electronic waste recycling facility.
This device complies with Part 15 of the FCC Rules.
Operation is subject to the following two conditions: (1) this
device must not cause harmful interference, and (2) this
device must accept any interference received, including
interference that may cause undesired operation.

GAT NET.Writer 7000 F/ISO
4
HB_GAT-NETWRITER-7000-FISO-US_12
www.gantner.com
General Warning and Safety Instructions
Dear Customer,
We congratulate you on selecting a product (appliance or software) from GANTNER Electronic GmbH. Our aim is to ensure our
product operates with safety and to your complete satisfaction. To achieve this aim, please take this opportunity to familiarize
yourself with the following guidelines:
1. The installation, commissioning, operation, and maintenance of the product must be carried out in accordance with the technical
conditions of operation as described in the corresponding product documentation.
2. Before installing, commissioning, operating, or maintaining the product, it is essential to read the corresponding chapter of this
manual and observe the instructions and information therein.
3. If there are some points which are not entirely clear, please do not take a chance. All queries can be clarified by your GANTNER
representative or by ringing the GANTNER support hotline.
4. Where not otherwise specifically documented, the appropriate installation, commissioning, operation and maintenance of the
product is the customer’s responsibility.
5. Directly on receipt of the goods, inspect both the packaging and the product itself for any signs of damage. Also check that the
delivery is complete and includes all accessories, documentation, auxiliary devices, etc.
6. If the packaging or product has been damaged in transport, or should you suspect that it may have a fault, the product must not
be put into service. Contact your GANTNER representative who will resolve the problem as quickly as possible.
7. The installation, commissioning, and servicing of our products must be performed by suitably trained personnel. In particular,
electrical connections must only be made by correspondingly qualified specialists. Always observe the relevant installation
regulations in accordance with the national Electrical Engineers Association (e.g., ÖVE [Austrian], VDE [Germany]).
8. Where not otherwise stated, installation and maintenance work on our products must be carried out when disconnected from
the power supply. This applies in particular to appliances that are normally supplied by low-voltage current.
9. It is prohibited to alter the products or remove protective shields and covers.
10. Do not attempt to repair a product after a defect, failure, or damage is detected. In addition, do not put the product back into
operation. In such cases, it is essential to contact your GANTNER representative or the GANTNER support hotline.
11. GANTNER Electronic GmbH accepts no responsibility for any injuries or damage caused as a result of improper use.
12. Although care is taken and we are continuously aiming for improvement, we cannot completely exclude the possibility of errors
appearing in our documentation. GANTNER Electronic GmbH therefore accepts no responsibility for the completeness or the
accuracy of this manual. The right is reserved to make alterations at any time without prior notice.
13. Should you discover any fault with the product or in its accompanying documentation, or you have any suggestions for
improvement, you may confidently inform your GANTNER representative or GANTNER Electronic GmbH directly.
14. We especially look forward to hearing from you if you just want to tell us that everything is functioning perfectly.
We wish you a successful experience with our product and look forward to welcoming you again as a customer soon.

GAT NET.Writer 7000 F/ISO
Table of Contents
www.gantner.com
HB_GAT-NETWRITER-7000-FISO-US_12
5
TABLE OF CONTENTS
1 INTRODUCTION .............................................................................................................. 7
1.1 About this Manual ..................................................................................................................................... 7
1.2 Contact & Inquiries ................................................................................................................................... 7
2 GENERAL INFORMATION ............................................................................................. 9
2.1 Functional Description .............................................................................................................................. 9
2.2 Terminology ............................................................................................................................................ 10
2.3 RFID Technology .................................................................................................................................... 11
2.4 Measurements ........................................................................................................................................ 12
3 ELECTRICAL CONNECTIONS ..................................................................................... 13
3.1 USB Connection ..................................................................................................................................... 13
3.2 Ethernet Connection ............................................................................................................................... 13
3.3 Power Connection .................................................................................................................................. 14
4 CONFIGURATION AND OPERATION .......................................................................... 15
4.1 USB Communication Mode .................................................................................................................... 15
4.1.1 USB Port Energy Saving Function ....................................................................................................... 15
4.2 Ethernet Communication Mode .............................................................................................................. 16
4.3 Setup for Configuration in GAT Config Manager .................................................................................... 17
4.4 View the GAT NET.Writer 7000 F/ISO Configuration Settings ............................................................... 18
4.5 Upload Configuration Settings to the GAT NET.Writer 7000 F/ISO ....................................................... 19
4.6 Configuration Settings of the GAT NET.Writer 7000 F/ISO ................................................................... 20
4.6.1 Sound Signals ...................................................................................................................................... 20
4.6.2 LED Brightness .................................................................................................................................... 20
4.6.3 RF Standards ....................................................................................................................................... 20
4.6.4 Automatic Reading of Data Carrier UID ............................................................................................... 21
4.6.5 Automatic Reading of Locker Segment Data ....................................................................................... 21
4.6.6 USB Communication Mode Setting ..................................................................................................... 21
4.6.7 Prefix / Postfix Settings ........................................................................................................................ 21
4.6.8 UID Format ........................................................................................................................................... 23
4.7 Configuration Settings Table .................................................................................................................. 23
4.8 Restart the GAT NET.Writer 7000 F/ISO ............................................................................................... 26
4.9 Reset the GAT NET.Writer 7000 F/ISO to Default (Factory) Configuration ........................................... 26
4.10 Uploading Firmware to the GAT NET.Writer 7000 F/ISO ....................................................................... 27
4.10.1 Standard Procedure ............................................................................................................................. 27
4.10.2 Uploading Firmware via Bootloader Mode ........................................................................................... 27
4.11 Software Integration ................................................................................................................................ 28
4.11.1 GAT DIRECT.Connect ......................................................................................................................... 28
5 TECHNICAL DATA ........................................................................................................ 29
5.1 GAT NET.Writer 7000 F/ISO .................................................................................................................. 29
6 APPENDIX ..................................................................................................................... 31
6.1 Scan Code List – English Keyboard ....................................................................................................... 31

GAT NET.Writer 7000 F/ISO
Table of Contents
6
HB_GAT-NETWRITER-7000-FISO-US_12
www.gantner.com

GAT NET.Writer 7000 F/ISO
Introduction
www.gantner.com
HB_GAT-NETWRITER-7000-FISO-US_12
7
1 INTRODUCTION
1.1 About this Manual
This manual provides information on the functionality and connectivity of the GAT NET.Writer 7000 F/ISO and
includes an overview of how to configure the device using GAT Config Manager software. There is a separate
manual available for GAT Config Manager, which explains in greater detail all functions associated with the
software.
In chapter “2 GENERAL INFORMATION", general information about the GAT NET.Writer 7000 F/ISO, the RFID
technologies supported by the device and key terms used in this manual can be found.
Chapter “3 ELECTRICAL CONNECTIONS" describes how the GAT NET.Writer 7000 F/ISO is connected to a
computer and how to supply power to the device.
Chapter “4 CONFIGURATION AND OPERATION" describes the different communication modes of the GAT
NET.Writer 7000 F/ISO. How to configure the GAT NET.Writer 7000 F/ISO using GAT Config Manager, the various
configuration settings and software integration are also explained in this section.
Chapter "5 TECHNICAL DATA" contains the relevant technical information for the GAT NET.Writer 7000 F/ISO.
Chapter "6.1 Scan Code List – English Keyboard” contains a list of scan codes for an English keyboard layout that
can be added as prefix / postfix data.
1.2 Contact & Inquiries
If you have any questions concerning the GAT NET.Writer 7000 F/ISO please get in touch with your local
GANTNER representative or directly with one of the GANTNER Technology branch offices. The addresses, phone
and fax numbers are listed on the inner side of the manual cover.

GAT NET.Writer 7000 F/ISO
Introduction
8
HB_GAT-NETWRITER-7000-FISO-US_12
www.gantner.com
GAT NET.Writer 7000 F/ISO
General Information
www.gantner.com
HB_GAT-NETWRITER-7000-FISO-US_12
9
2 GENERAL INFORMATION
2.1 Functional Description
The GAT NET.Writer 7000 F/ISO allows users to read and write information (data) from and to data carriers. Data
carriers using MIFARE® and ISO 15693 technology are supported by the device. The data carrier reading platform
can accommodate data carrier media of all shapes and sizes and there is also a card slot designed to hold RFID
cards of standard ISO, i.e., credit card, size.
The compact and robust housing is intended to sit on a desk, or similar workstation, in a central location where the
reading / writing of data carriers can be conveniently performed. In most instances the GAT NET.Writer 7000 F/ISO
will be integrated with RFID system management software and operated by employees of a facility. Common tasks
for employees using the GAT NET.Writer 7000 F/ISO include:
Assigning data carriers to customers / members / employees.
Modifying and deleting information stored on data carriers.
Reading of lost data carrier information to determine the assigned owner.
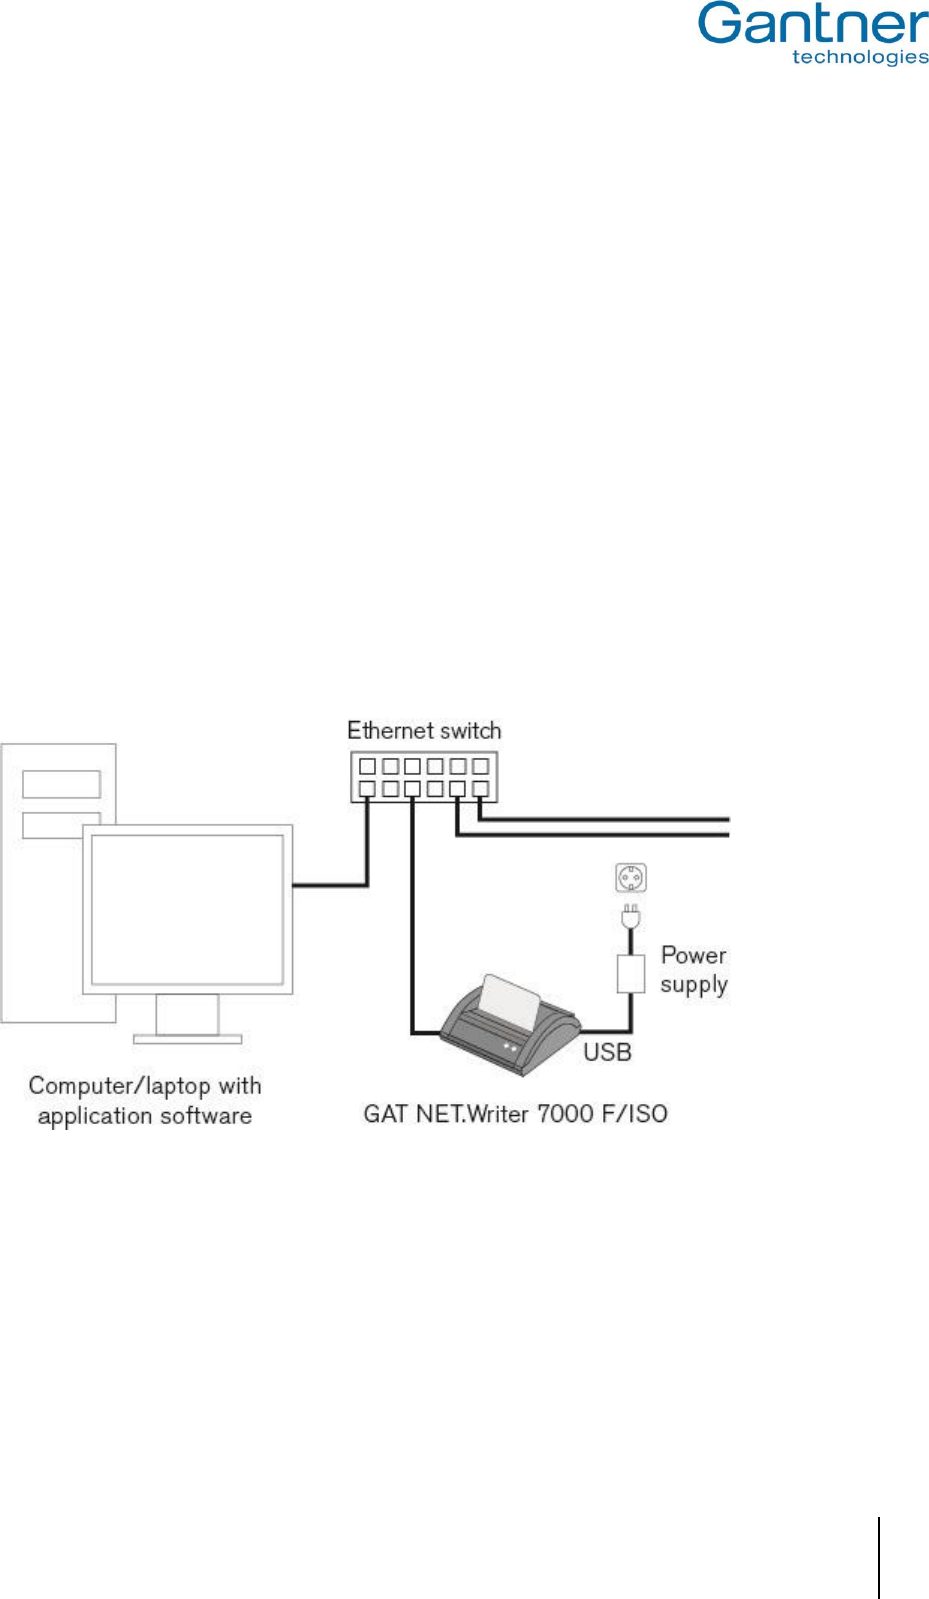
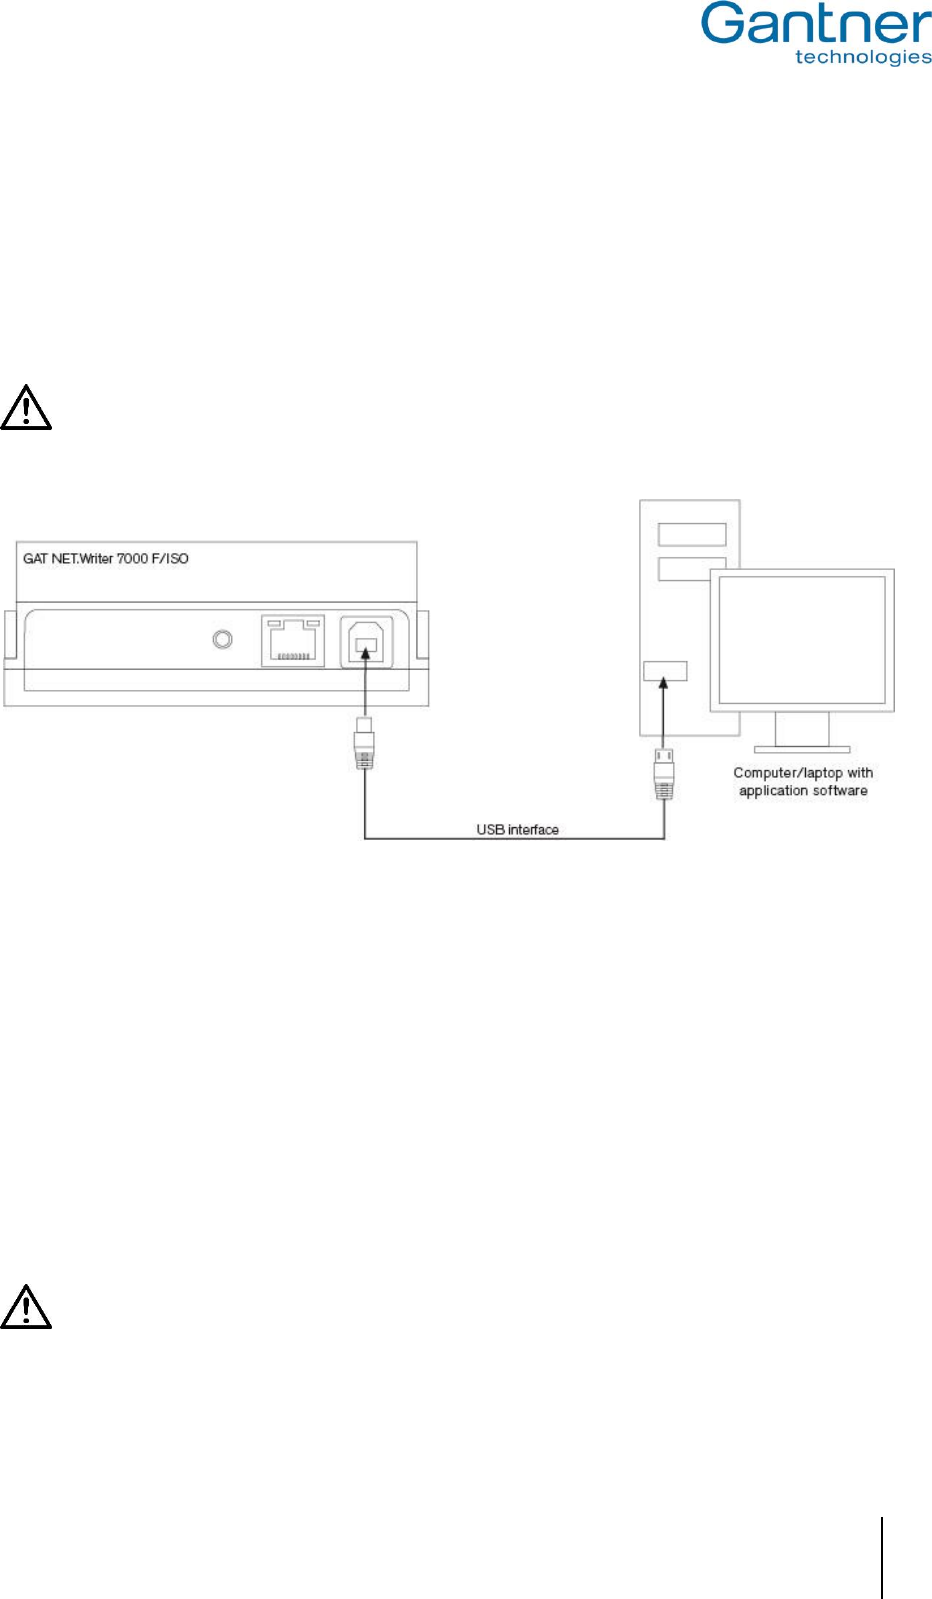
The GAT NET.Writer 7000 F/ISO connects to a computer through its integrated USB or Ethernet port and the
appropriate cabling required for these connections. The device offers the possibility to communicate with a
computer via Ethernet (Figure 2.1 ) or USB (Figure 2.2) interface.
Figure 2.1 – Communication via Ethernet interface
GAT NET.Writer 7000 F/ISO
General Information
10
HB_GAT-NETWRITER-7000-FISO-US_12
www.gantner.com
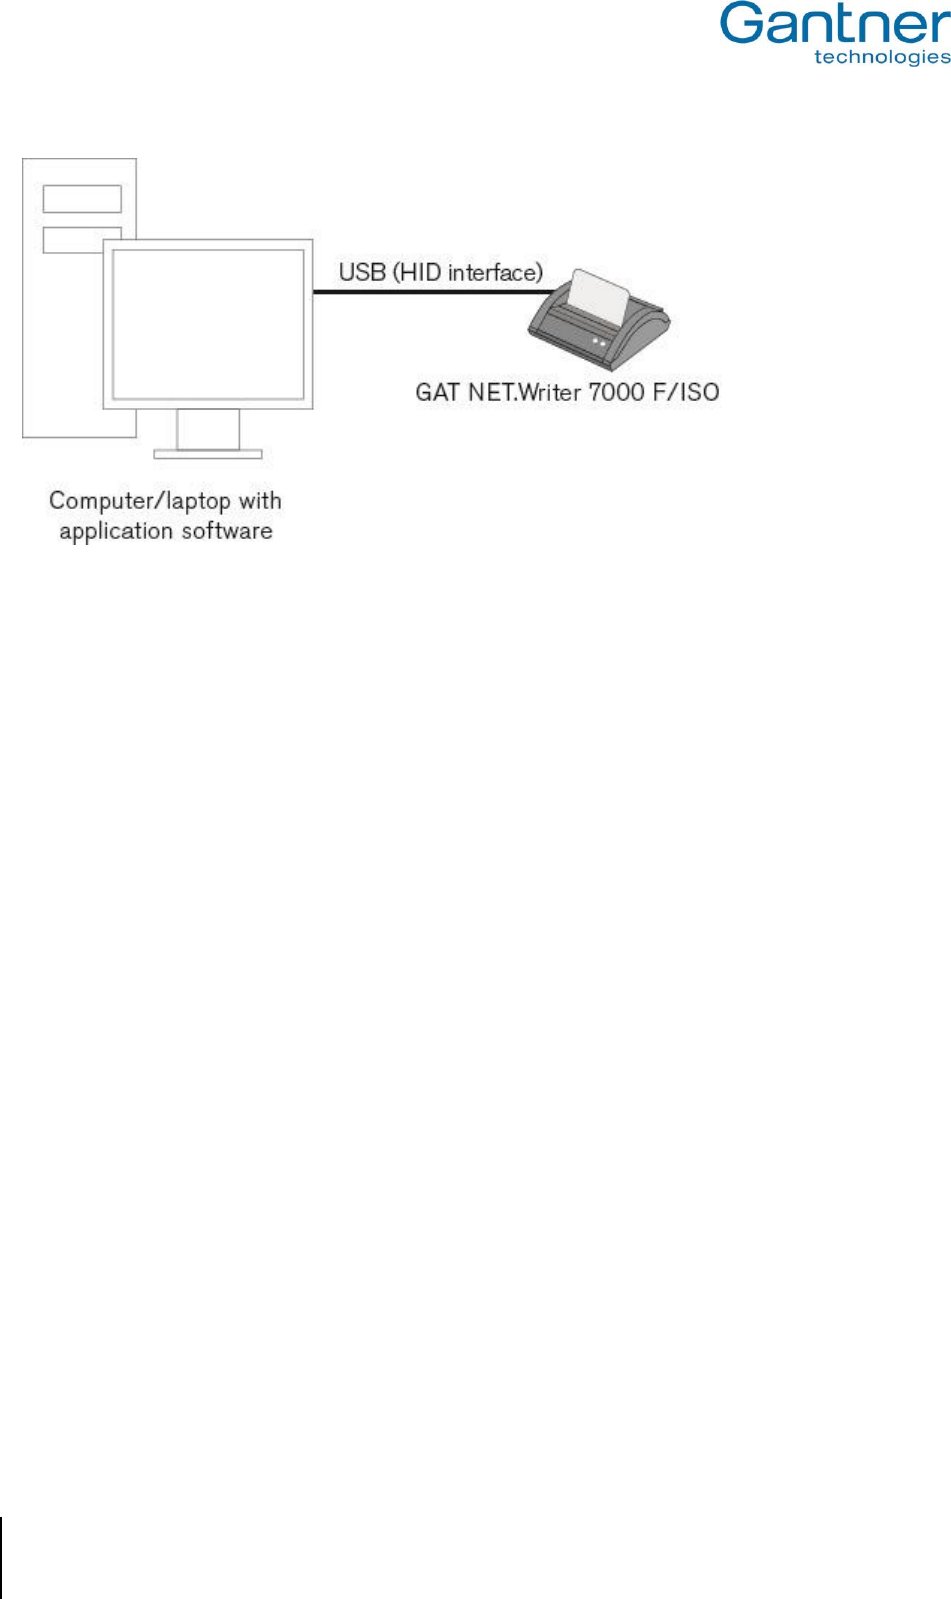
Figure 2.2 – Communication via USB interface
Power for the GAT NET.Writer 7000 F/ISO is always supplied through the USB port. More information on the Ethernet,
USB and power connections is described in “3. ELECTRICAL CONNECTIONS”.
Once physically connected to a computer, the GAT NET.Writer 7000 F/ISO configuration settings can be viewed and
changed via the TCP/IP interface using GAT Config Manager software (see section “4. CONFIGURATION AND
OPERATION”).
After setup is complete, the device can be used directly with GANTNER developed software or integrated with third-
party software via GAT DIRECT.Connect (see “4.11. Software Integration”).
2.2 Terminology
Several key terms are used often in this manual and are defined below.
PC / Computer
These terms refer to all desktop and laptop computers running a Microsoft Windows operating system.
Data Carrier
A data carrier is a form of identification media that is used by staff and visitors in a facility for identification. Data
carriers are available in a variety of different forms such as plastic wristbands and chip cards. Data carriers are also
available to suit different RFID technologies (LEGIC, MIFARE®, ISO 15693).
Device / Station / Terminal
These general terms are used interchangeably in this manual to refer to the GAT NET.Writer 7000 F/ISO and other
GANTNER products used in a facility for identification (e.g., GAT Access 6xxx) or to activate a service (e.g., GAT
Time 6xxx).
GAT Config Manager
GANTNER developed PC software that is used to configure GANTNER devices such as the GAT NET.Writer 7000
F/ISO. A separate manual is available and integrated into the software. While the software is open, click on the
“Help” drop-down menu and select “How Do I”.

GAT NET.Writer 7000 F/ISO
General Information
www.gantner.com
HB_GAT-NETWRITER-7000-FISO-US_12
11
Locker
The term "locker" is used to generally describe all possible locker applications that can be fitted with a GANTNER
electronic lock. Examples include, a changing room locker, a depot or a private box.
RFID (Radio-Frequency Identification)
Identification over a short distance using radio frequency. An RFID data carrier is used as identification media in
GANTNER systems.
User / Visitor
The general terms "user" and "visitor" refer to the people in a facility who use data carriers and GANTNER devices.
Users of the GAT NET.Writer 7000 F/ISO in a typical installation are usually employees of the facility.
2.3 RFID Technology
Identification of users by GANTNER devices within a facility is done via RFID (radio-frequency identification)
technology using a frequency of 13.56 MHz. There are three different technologies available. Different letter(s) are
added to GANTNER model identifiers to notify of the technology that the device supports:
"B": LEGIC
"F": MIFARE®
"ISO": ISO 15693
The GAT NET.Writer 7000 F/ISO can operate with data carriers using MIFARE® and ISO 15693 technologies. It is
necessary for all devices and data carriers in a facility to use the same technology. The information in this manual is
applicable for the following RFID technologies that are supported by the GAT NET.Writer 7000 F/ISO.
MIFARE® (manufacturer NXP/Infineon)
Classic
DESFire®
Ultralight®
ISO 15693
The GAT NET.Writer 7000 F/ISO is able to read and write ISO 15693 data carriers.
In addition to the different RFID technologies, data carriers are available in a variety of shapes and sizes. The GAT
NET.Writer 7000 F/ISO is designed to accept these different types of data carrier media on its RFID reading
platform.
GAT NET.Writer 7000 F/ISO
General Information
12
HB_GAT-NETWRITER-7000-FISO-US_12
www.gantner.com
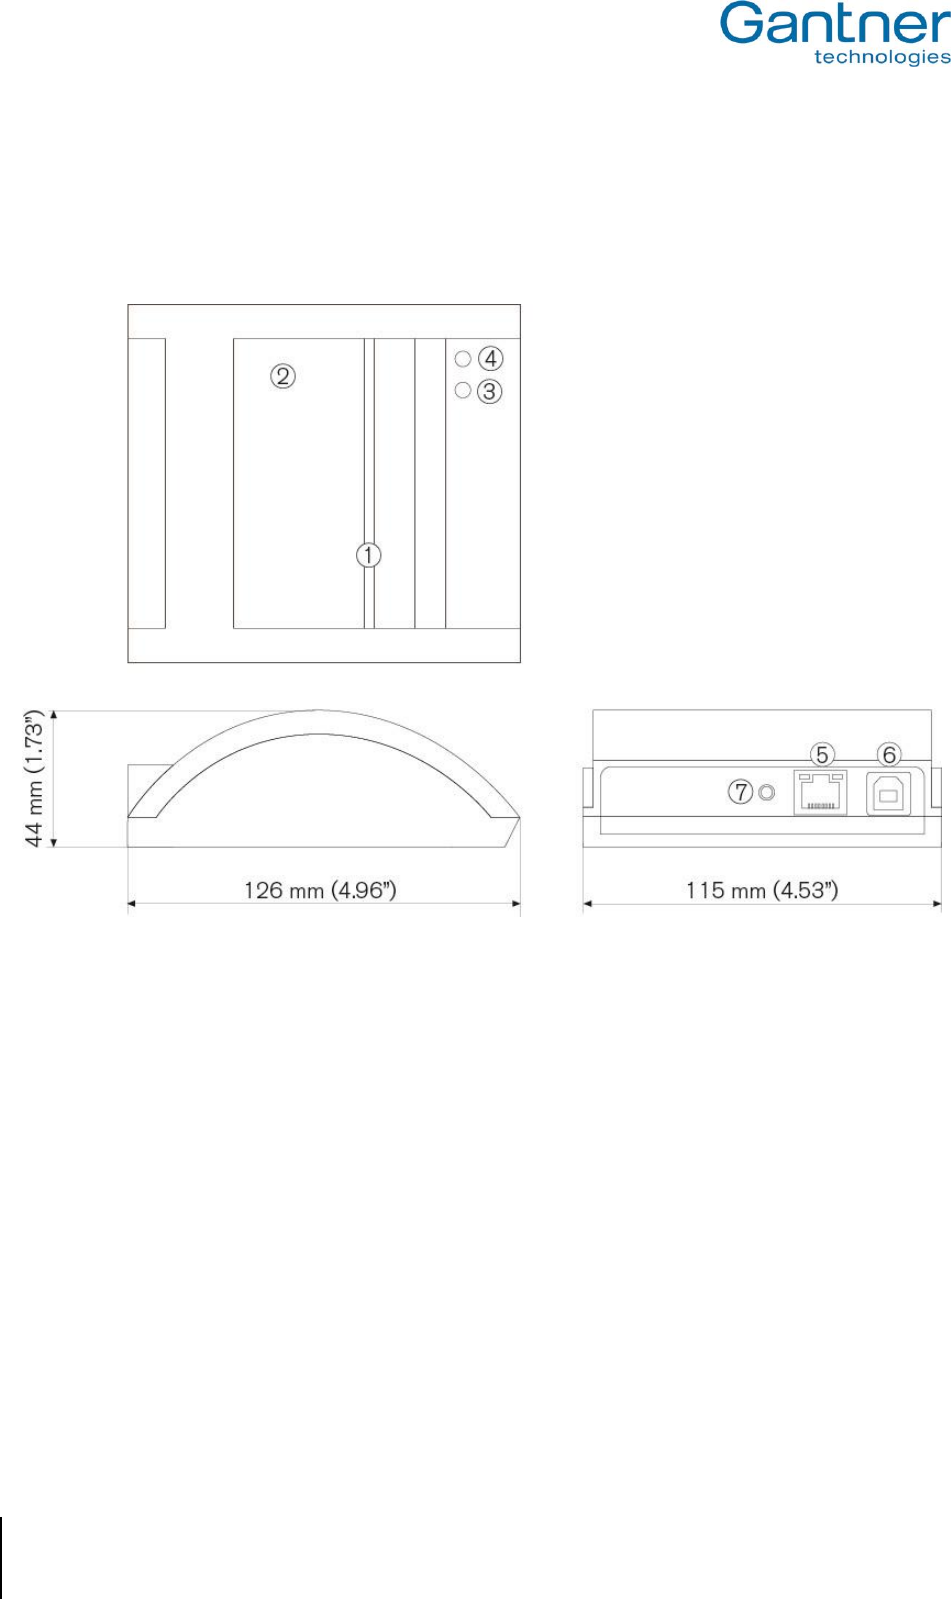
2.4 Measurements
The dimensions and main components of the GAT NET.Writer 7000 F/ISO are shown in Figure 2.3 below.
1. Card slot
5. Ethernet socket
2. Data carrier reading platform
6. USB socket
3. LED “red“
7. Reset button
4. LED “green“
Figure 2.3 – GAT NET.Writer 7000 F/ISO measurements
GAT NET.Writer 7000 F/ISO
Electrical Connections
www.gantner.com
HB_GAT-NETWRITER-7000-FISO-US_12
13
3 ELECTRICAL CONNECTIONS
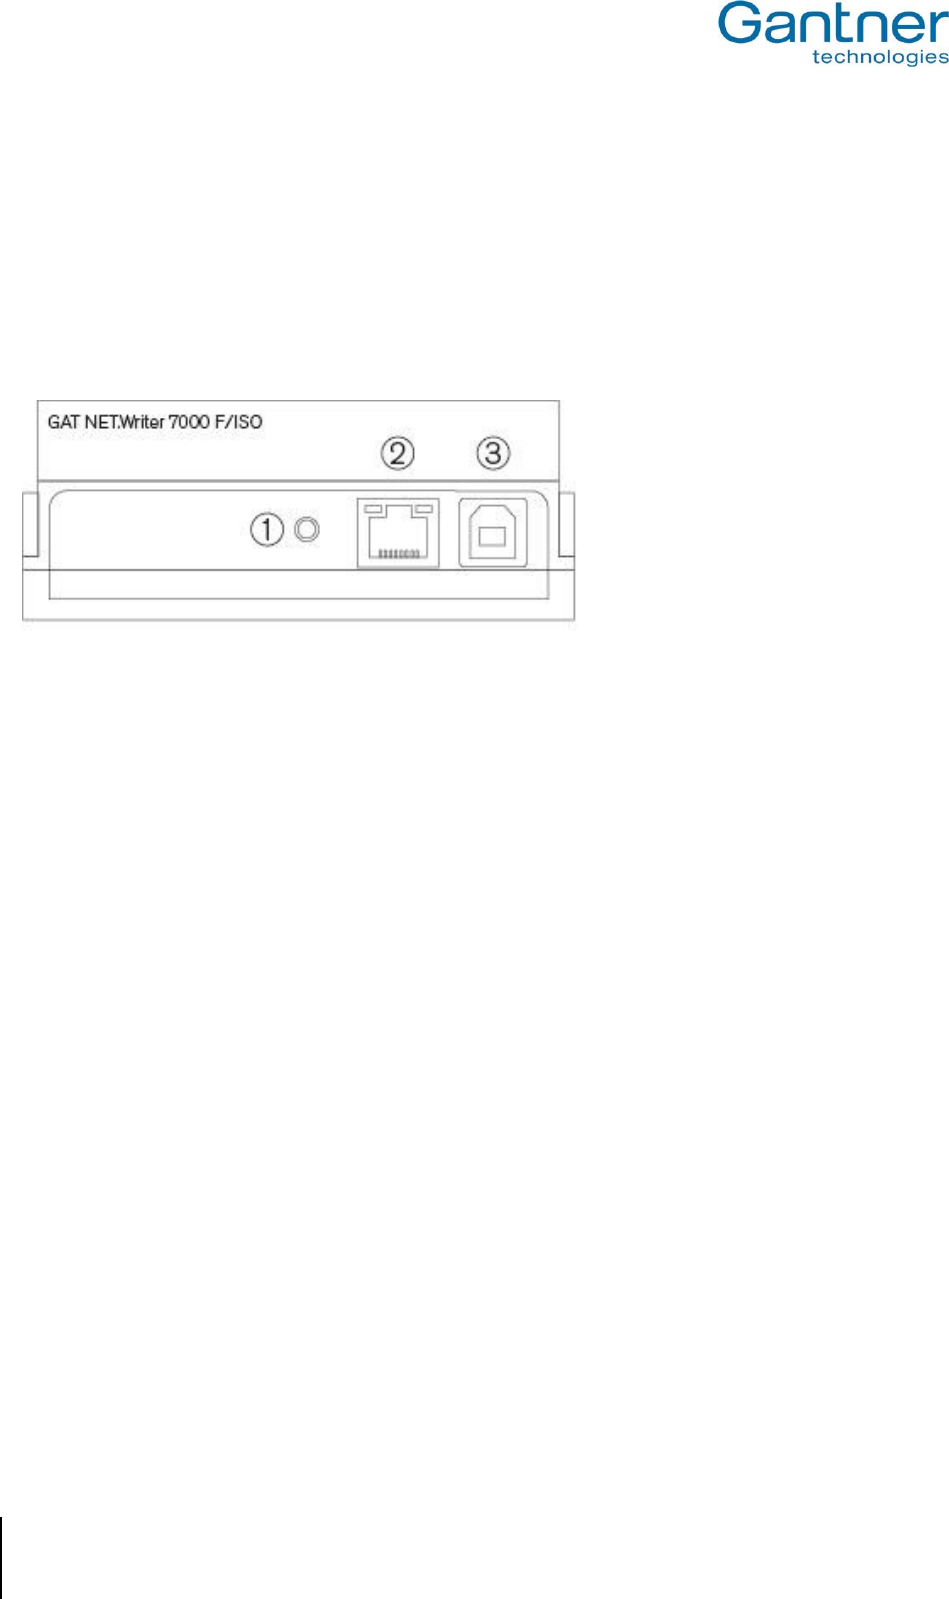
3.1 USB Connection
A USB type ‘B’ connection is provided at the rear of the GAT NET.Writer 7000 F/ISO (6 in Figure 2.3 ). A USB cable
is connected from the USB type ‘B’ port on the device to the USB type ‘A’ port of a computer as shown in Figure 3.1
.
The maximum USB cable length between the GAT NET.Writer 7000 F/ISO and a computer is 5 m (16.40
ft). A 1.8 m (5.90 ft) USB cable is included with the device.
Figure 3.1 – USB connection
After connecting the GAT NET.Writer 7000 F/ISO to the computer, the device is automatically recognized as an HID
(Human Interface Device = input device). HID drivers are included with all major computer operating systems
(Windows, Mac OSX, and Linux). The GAT NET.Writer 7000 F/ISO is ready to use once the “Enable Keyboard
Mode” setting has been activated in GAT Config Manager (see section “4.6.6. USB Communication Mode Setting”)
See section “4.1. USB Communication Mode” for more information on communicating via USB.
3.2 Ethernet Connection
An Ethernet connection port is provided at the rear of the GAT NET.Writer 7000 F/ISO (5 in Figure 2.3 ). An
Ethernet patch cable with an RJ 45 plug is used to plug into this connection. The patch cable is then connected to
the network, and computer(s) respectively, via an Ethernet switch as shown in Figure 3.2 .
CAT 5 cable or a higher standard must be used for all Ethernet connections.

GAT NET.Writer 7000 F/ISO
Electrical Connections
14
HB_GAT-NETWRITER-7000-FISO-US_12
www.gantner.com
Figure 3.2 – Ethernet connection
See section “4.2. Ethernet Communication Mode” for more information on communicating via Ethernet.
3.3 Power Connection
Power for the GAT NET.Writer 7000 F/ISO is always supplied through the USB port (6 in Figure 2.3 ), regardless of
whether the device is using the USB or Ethernet interface for communication.
When the GAT NET.Writer 7000 F/ISO is using the USB interface for communication, power is supplied from the
computer to the GAT NET.Writer 7000 F/ISO via the USB cable as shown in Figure 3.1 An additional power supply
is not required in this case.
When the GAT NET.Writer 7000 F/ISO is using the Ethernet interface for communication, an additional power
source must be connected to the USB port on the GAT NET.Writer 7000 F/ISO. There are two options for this
power source:
1. Connect the USB cable from the GAT NET.Writer 7000 F/ISO to the power supply (option 1 in Figure 3.2 ).
Connect the power supply to a 110 VAC power outlet. A 1.8 m (5.90 ft) USB cable and power supply are
included with the device.
2. Connect the USB cable from the GAT NET.Writer 7000 F/ISO to the USB port of a computer (option 2 in
Figure 3.2 ).
GAT NET.Writer 7000 F/ISO
Configuration and Operation
www.gantner.com
HB_GAT-NETWRITER-7000-FISO-US_12
15
4 CONFIGURATION AND OPERATION
4.1 USB Communication Mode
When using the USB interface to communicate with a computer, the GAT NET.Writer 7000 F/ISO functions as an
input device (e.g., a keyboard) and one-way communication between the station and the computer is available. The
unique number (UID) of a data carrier is read by the GAT NET.Writer 7000 F/ISO and sent to the computer (host)
where it is handled in the same way as standard keyboard input data.
Note: The default (factory) setting for the GAT NET.Writer 7000 F/ISO is to operate in Ethernet communication
mode. See section “4.6.6. USB Communication Mode Setting” for information on how to change this setting.
When operating in USB mode, the GAT NET.Writer 7000 F/ISO can send prefix or postfix data with the UID of a
data carrier. The specified data is added to the front (prefix) or end (postfix) of the UID and sent by the GAT
NET.Writer 7000 F/ISO when a data carrier is read. A common use of this function is to send an “ENTER”
command as postfix data along with the UID, thereby placing the cursor on the following line after the UID is
displayed on the computer screen. See section “4.6.7. Prefix / Postfix Settings” for more information.
USB communication mode also offers the possibility to send the UID number in decimal or hexadecimal format. See
section “4.6.8. UID Format” for more information.
See section “3.1. USB Connection” for information on how to connect to a computer via USB.
4.1.1 USB Port Energy Saving Function
Most computer operating systems include a function that switches the USB port off to save energy after a defined
period of inactivity. If this function is enabled for the USB port where the GAT NET.Writer 7000 F/ISO is connected,
the GAT NET.Writer 7000 F/ISO will not operate if the USB port is deactivated.
When the USB port is activated again by the computer, the first data carrier read by the GAT NET.Writer 7000
F/ISO may be delayed by approximately 5 seconds as the GAT NET.Writer 7000 F/ISO must initialize the USB
connection again. The UID of the next data carrier read by the GAT NET.Writer 7000 F/ISO will be sent instantly to
the computer as normal.
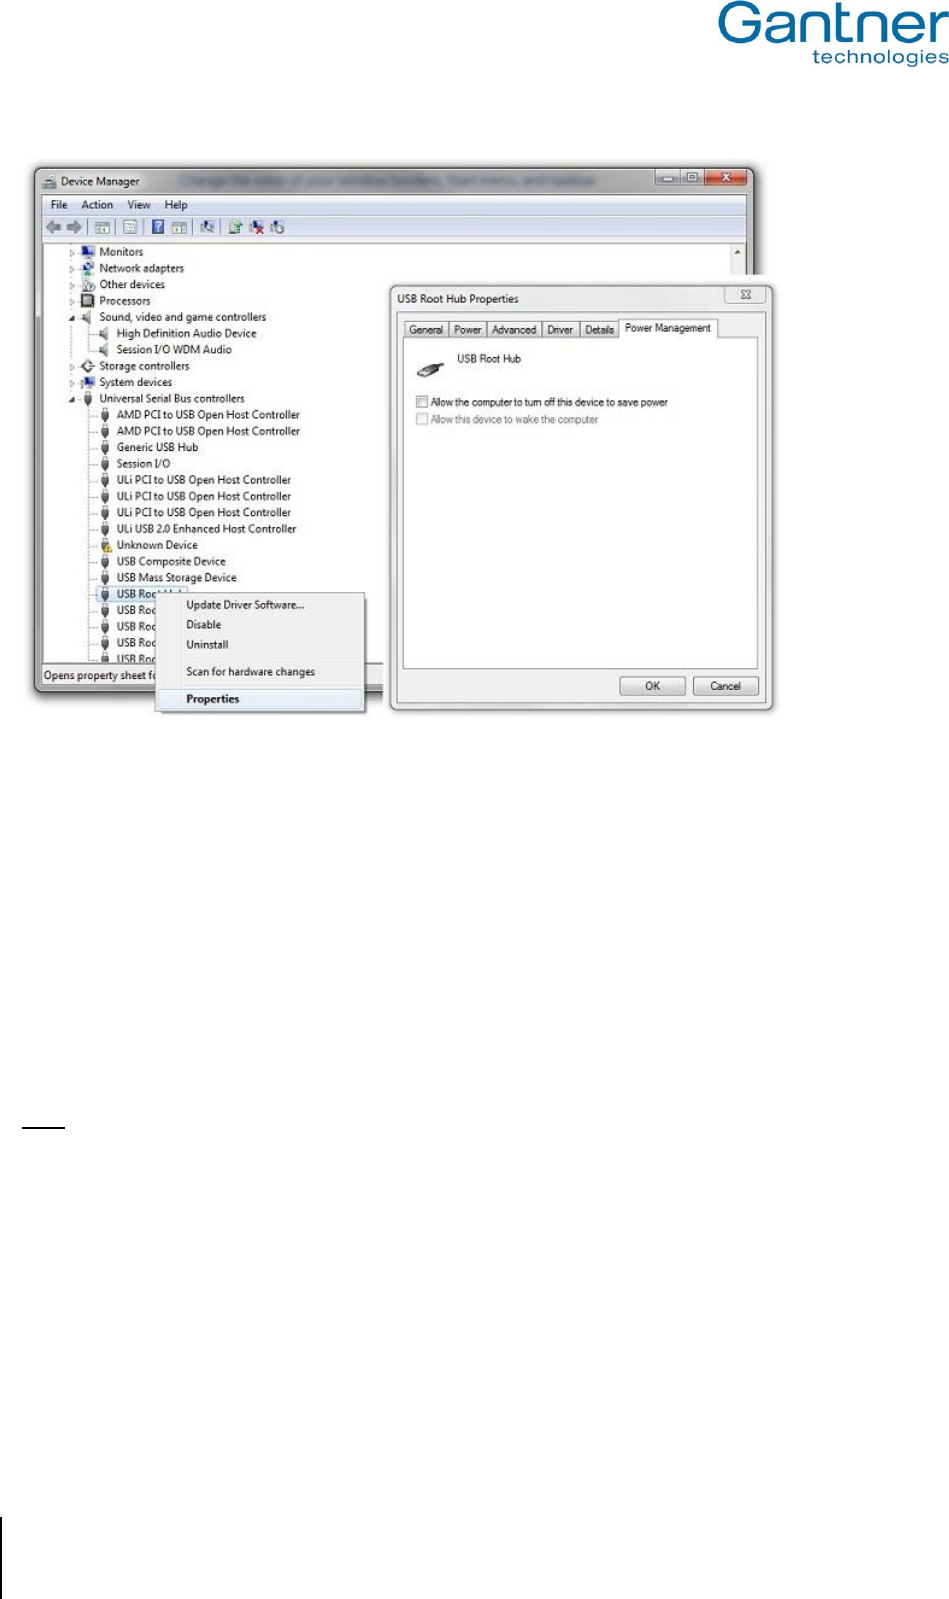
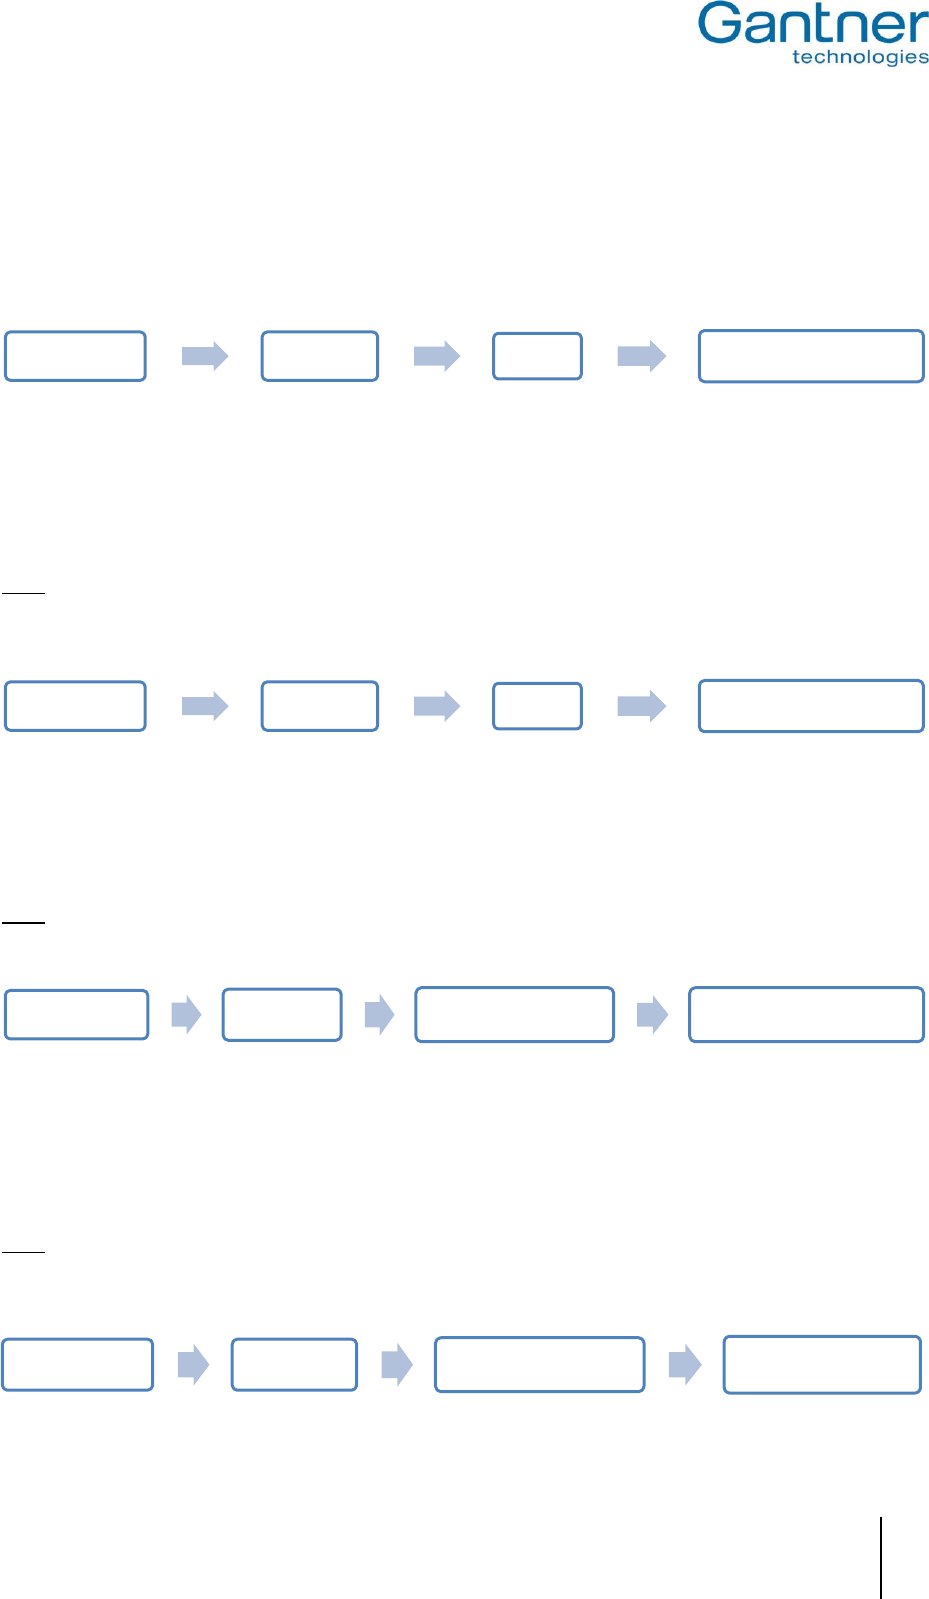
The USB port energy saving function can be disabled in Windows operating systems and is found here:
Right-click on the USB port where the GAT NET.Writer 7000 F/ISO is connected and select “Properties” from the
drop-down menu as shown in Figure 4.1
In the “Power Management” tab, you can configure the “Allow the computer to turn off this device to save power”
option as required.
Start Control Panel Device Manager Universal Serial Bus
controllers
GAT NET.Writer 7000 F/ISO
Configuration and Operation
16
HB_GAT-NETWRITER-7000-FISO-US_12
www.gantner.com
Figure 4.1 – Configuring USB port energy saving function
4.2 Ethernet Communication Mode
When using Ethernet to communicate with a computer, two-way data transmission between the GAT NET.Writer
7000 F/ISO and the computer is possible. As in USB mode, the GAT NET.Writer 7000 F/ISO can read data carrier
information and send the data to a computer. Information, such as device configuration settings, can also be sent
from the computer to the GAT NET.Writer 7000 F/ISO.
The GAT NET.Writer 7000 F/ISO can be configured so that when a data carrier is placed on the RFID reading
platform, the data carrier’s UID is automatically read and sent to the computer. See section “4.6.4. Automatic
Reading of Data Carrier UID” for more information on how to configure this function.
Note: The automatic UID reading function is configurable when the GAT NET.Writer 7000 F/ISO is operating in
Ethernet communication mode. In USB communication mode this function is permanently activated.
Ethernet communication mode also offers the possibility to automatically send data stored on the data carrier in
locker segments 1 and 2. See section “4.6.5. Automatic Reading of Locker Segment Data”.
See section “3.2. Ethernet Connection” for information on how to connect to a computer via Ethernet.
GAT NET.Writer 7000 F/ISO
Configuration and Operation
www.gantner.com
HB_GAT-NETWRITER-7000-FISO-US_12
17
4.3 Setup for Configuration in GAT Config Manager
After the electrical connections for the GAT NET.Writer 7000 F/ISO are complete, configuration settings can be set
using GAT Config Manager configuration software.
Configuration of the GAT NET.Writer 7000 F/ISO via GAT Config Manager is only possible using the
Ethernet (TCP/IP) connection. See section “3.2. Ethernet Connection” for more information on the Ethernet
connection.
Even if you intend to operate the device using only the USB connection, you must still connect to a computer using
the Ethernet connection to change settings relating to how the device functions in USB mode.
Note: There is a separate manual with detailed information on each function available in GAT Config Manager. To
access the manual while the software is open, click on the “Help” drop-down menu and select “How Do I”.
Complete the following steps to begin configuring the GAT NET.Writer 7000 F/ISO with GAT Config Manager.
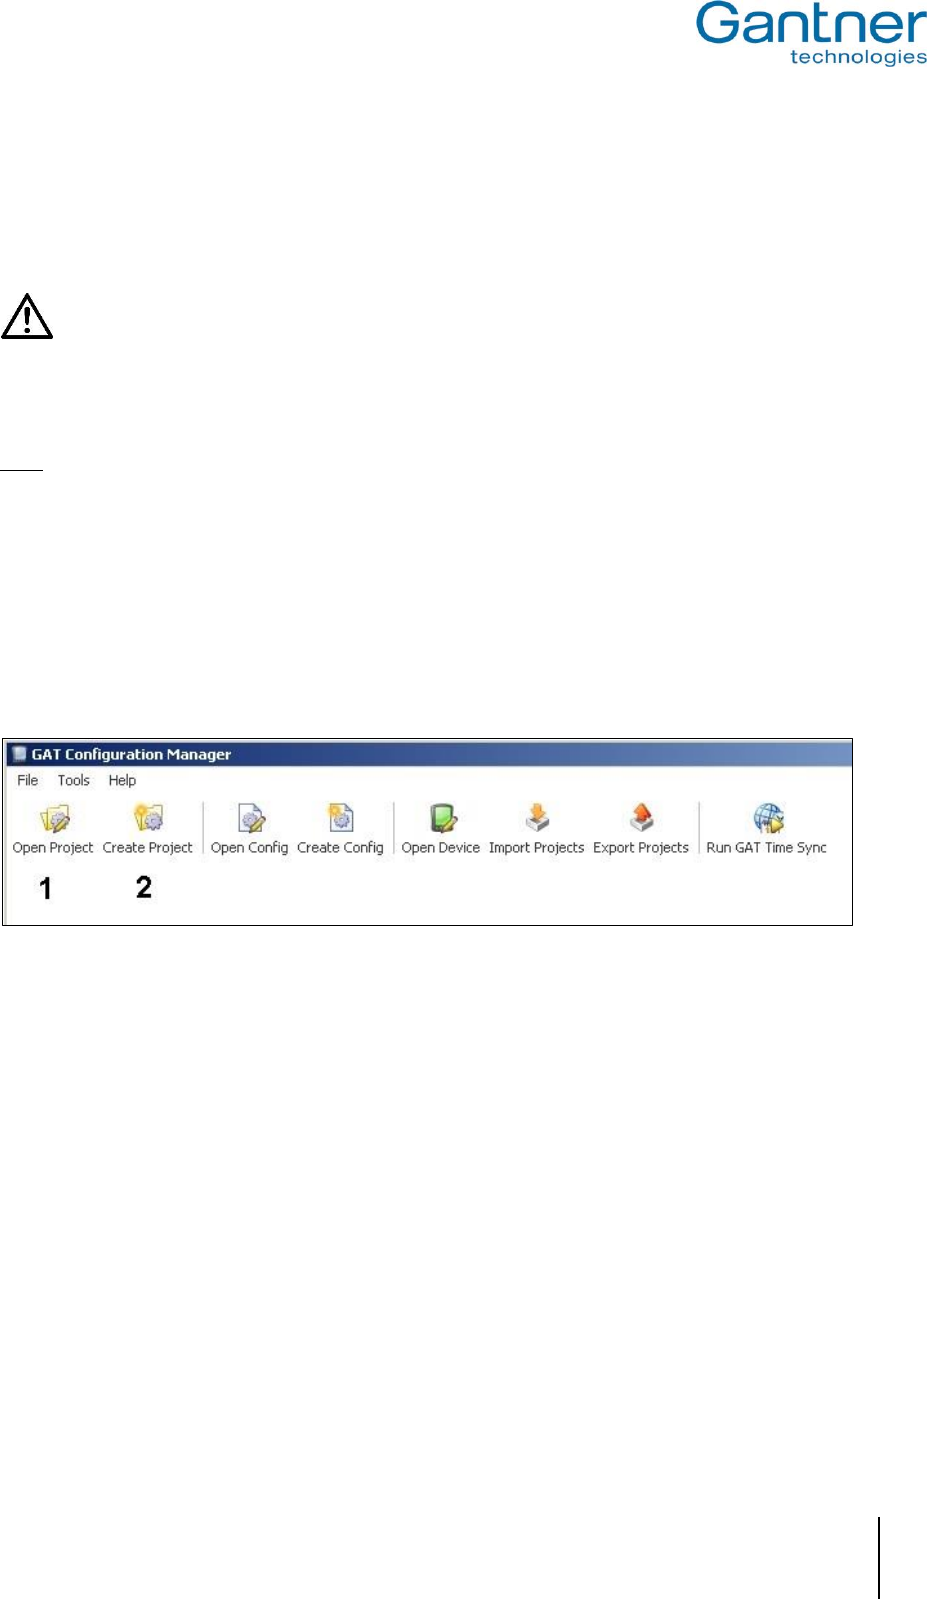
After installing the software, open GAT Configuration Manager via "Start" -> "All Programs" -> "GANTNER
Electronic GmbH" -> "GAT Config Manager" -> "GAT Config Manager".
o The default start window of GAT Config Manager is displayed.
Click on the “Open Project” icon (1 in Figure 4.2) to find an existing project. Alternatively, click on the “Create
Project” icon (2 in Figure 4.2) to start a new project.
Figure 4.2– GAT Config Manager - project setup
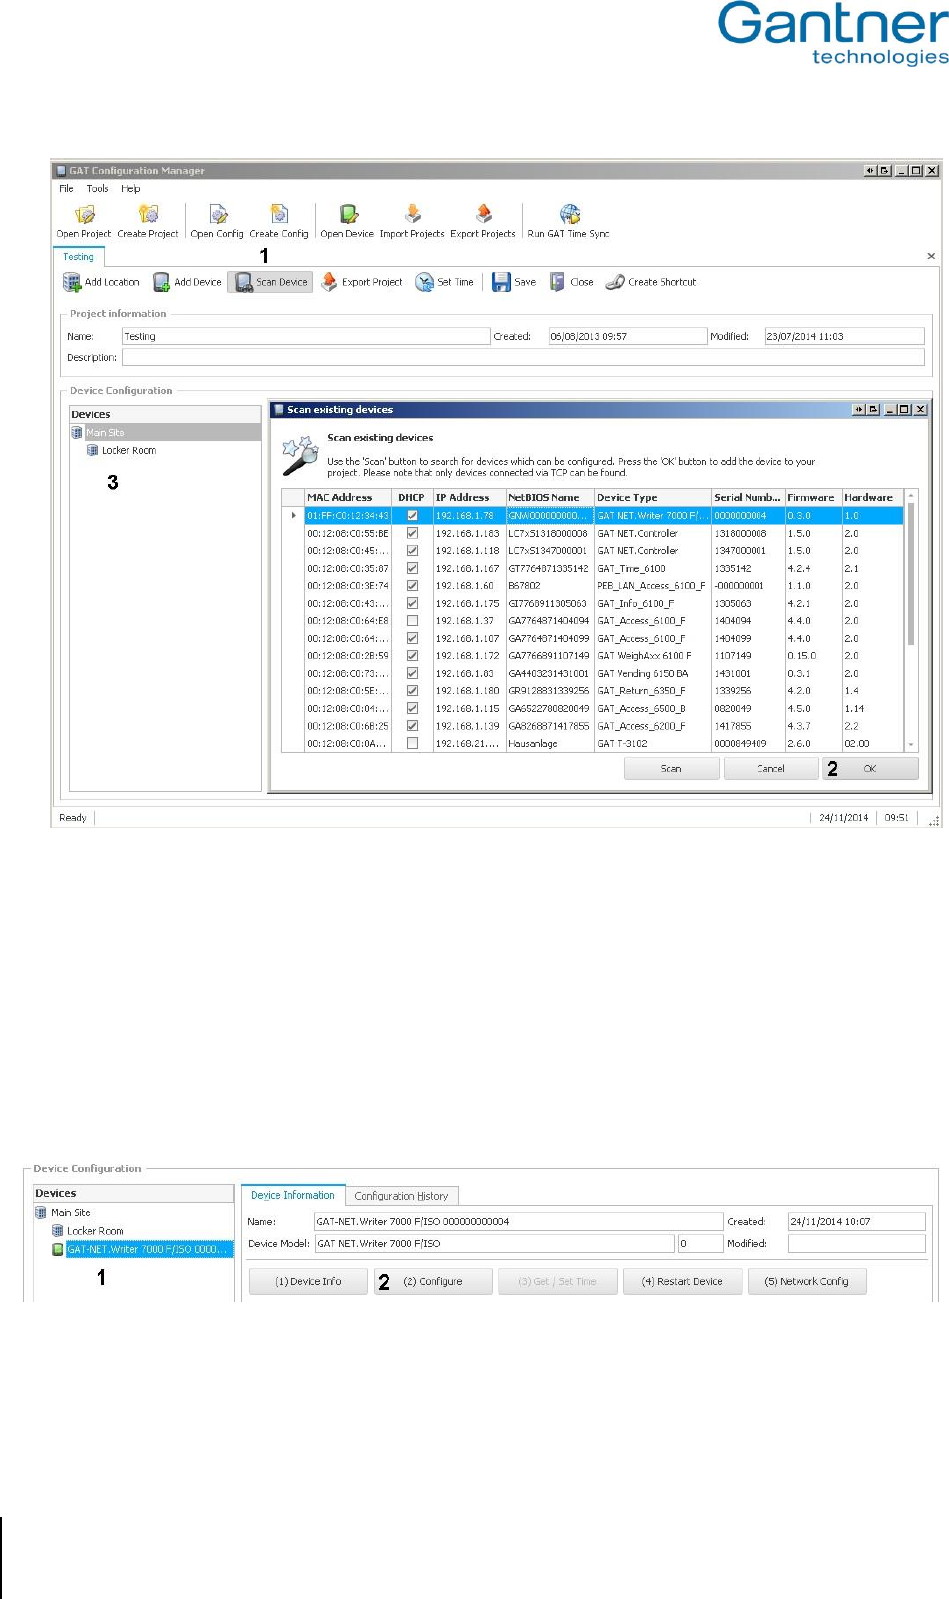
Once a project is established, click on the “Scan Device” icon (1 in Figure 4.3 ).
o The software will scan the network and display a list of all connected GANTNER devices.
Select your GAT NET.Writer 7000 F/ISO from the list. Use device details such as the IP address or MAC
address to identify the correct device.
o The selected device is highlighted in blue as shown in Figure 4.3 .
Click on “OK” (2 in Figure 4.3 ).
o The selected device is added to the “Devices” list (3 in Figure 4.3 ).
GAT NET.Writer 7000 F/ISO
Configuration and Operation
18
HB_GAT-NETWRITER-7000-FISO-US_12
www.gantner.com
Figure 4.3 – GAT Config Manager - scan devices
4.4 View the GAT NET.Writer 7000 F/ISO Configuration Settings
Once a project is established in GAT Config Manager and your GAT NET.Writer 7000 F/ISO has been added to the
“Devices” list, you can now view and adjust the configuration settings of the device. Complete the following steps to
view the configuration settings.
Select the GAT NET.Writer 7000 F/ISO from the “Devices” tree (1 in Figure 4.4 ).
o The GAT NET.Writer 7000 F/ISO is highlighted in blue.
Figure 4.4 – View configuration settings
Click on the “(2) Configure” button (2 in Figure 4.4 ).
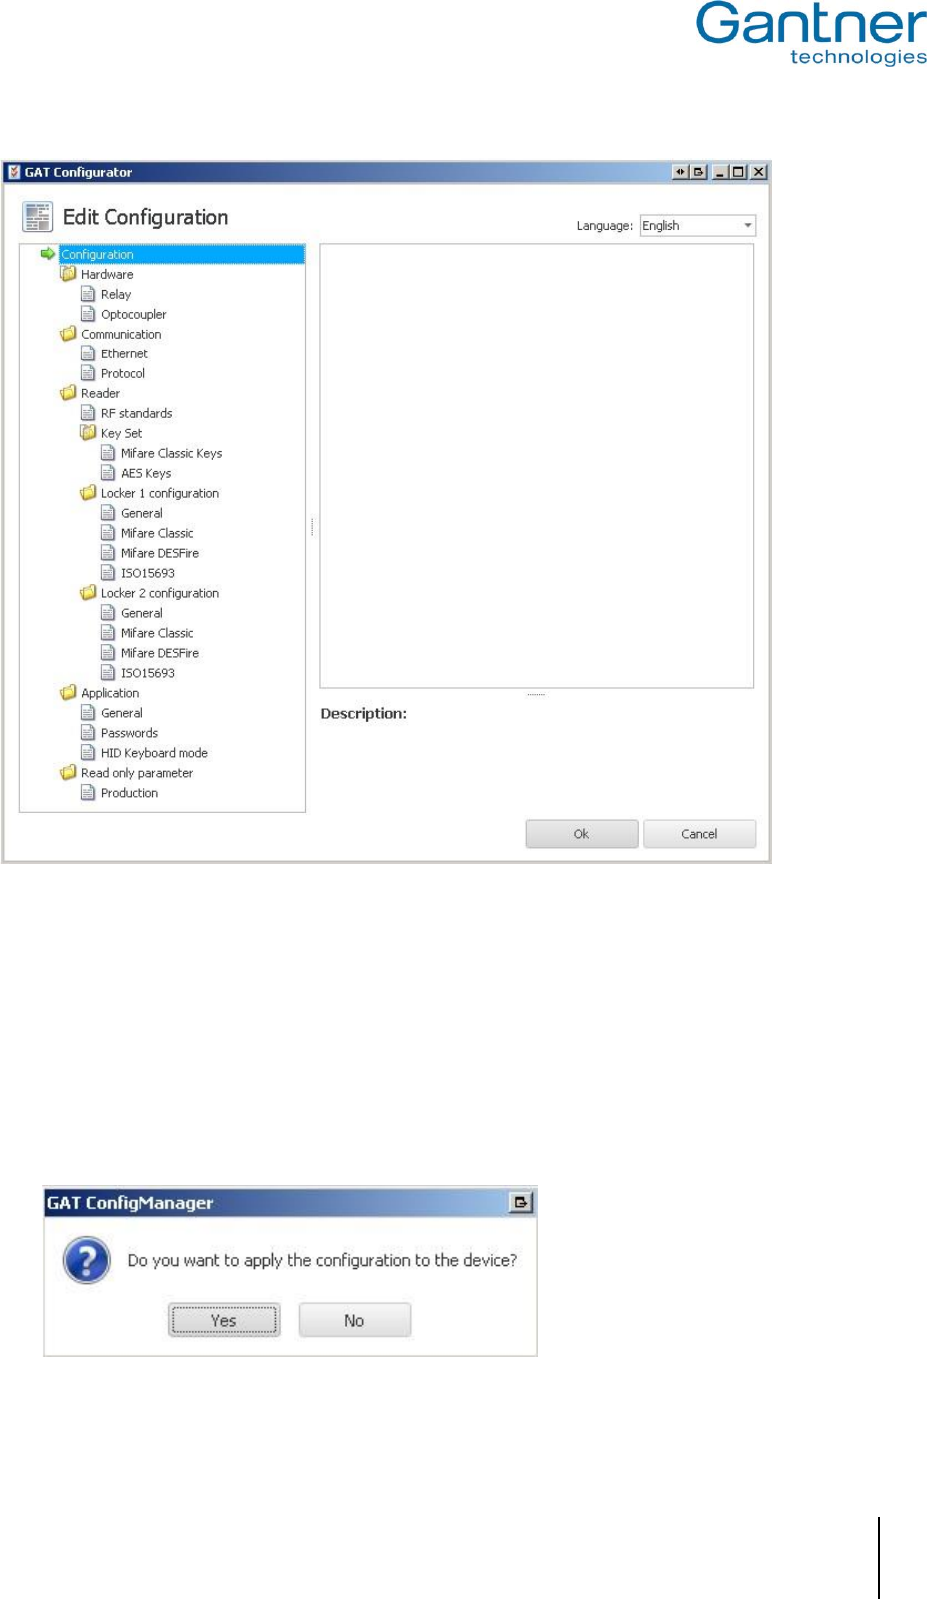
o The GAT Configurator window opens (Figure 4.5 ).
GAT NET.Writer 7000 F/ISO
Configuration and Operation
www.gantner.com
HB_GAT-NETWRITER-7000-FISO-US_12
19
Figure 4.5 – GAT Configurator window
4.5 Upload Configuration Settings to the GAT NET.Writer 7000 F/ISO
When you are finished configuring the GAT NET.Writer 7000 F/ISO settings in GAT Config Manager, it is important
to finalize the configuration by uploading the file to the device. Complete the following steps to upload the
configuration.
Click on “OK” in the GAT Configurator Window (Figure 4.5 ).
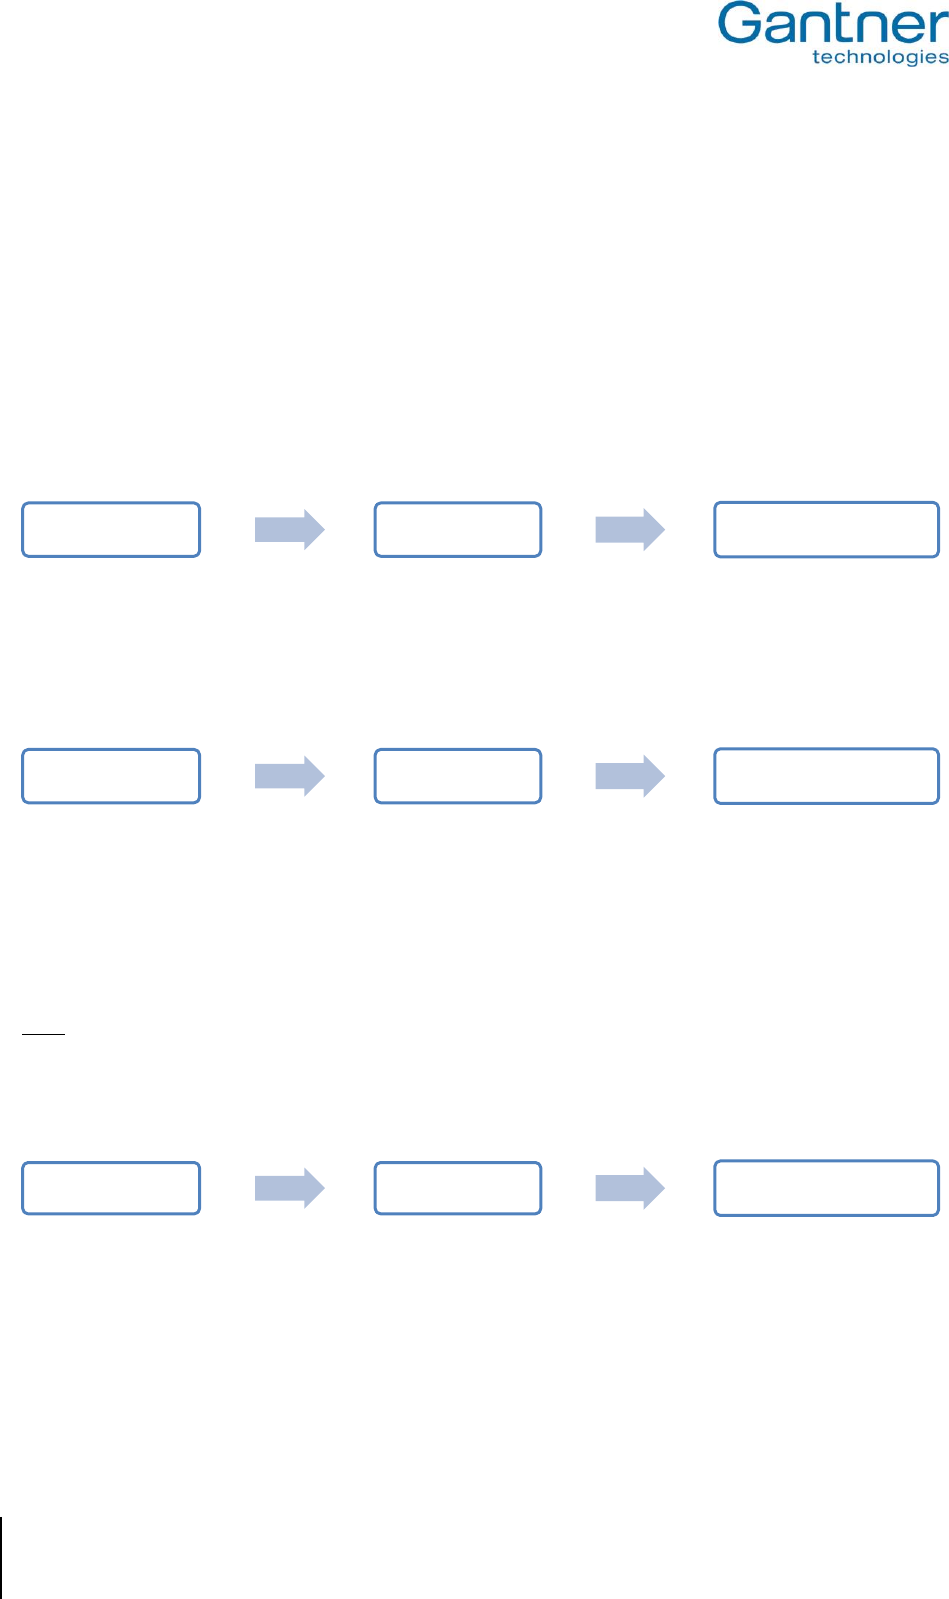
o The confirm upload window opens (see below).
Click “Yes” to apply the configuration to the device.
o The new configuration settings will be uploaded to the GAT NET.Writer 7000.
GAT NET.Writer 7000 F/ISO
Configuration and Operation
20
HB_GAT-NETWRITER-7000-FISO-US_12
www.gantner.com
4.6 Configuration Settings of the GAT NET.Writer 7000 F/ISO
The configuration settings of the GAT NET.Writer 7000 F/ISO that can be adjusted in GAT Config Manager are
explained in this section. For most applications, the majority of configuration settings will not need to be changed
from their factory (default) values.
The main configuration settings are explained in detail in the following sections. A list and brief explanation of every
configuration setting available for the GAT NET.Writer 7000 F/ISO can be found in section “4.7. Configuration
Settings Table”.
4.6.1 Sound Signals
The GAT NET.Writer 7000 F/ISO has an integrated beeper that signals when data carrier read / write activity takes
place. This setting can be found here:
Select / deselect the “Enable Sound Signals” option to turn the function on / off.
4.6.2 LED Brightness
The brightness level of the two LEDs that signal when device activity occurs can be adjusted. This setting can be
found here:
The default setting for this function is 100, which represents full brightness. Enter a value between 0 and 100 in the
“LED brightness” field to adjust the LED brightness.
4.6.3 RF Standards
The GAT NET.Writer 7000 F/ISO can operate with data carriers that use ISO 15693 and ISO 14443A (MIFARE)
technology.
Note: The default setting for the GAT NET.Writer 7000 F/ISO is to operate with both ISO 15693 and ISO 14443A
(MIFARE) data carriers.
The setting for the GAT NET.Writer 7000 F/ISO to operate with ISO 14443A (MIFARE) data carriers cannot be
changed. The setting for the GAT NET.Writer 7000 F/ISO to operate with ISO 15693 data carriers can be adjusted
and is found here:
Select / deselect the “ISO 15693” option to turn the setting on / off.
Configuration Hardware Enable Sound Signals
Configuration Hardware LED Brightness
Configuration Reader RF Standards
GAT NET.Writer 7000 F/ISO
Configuration and Operation
www.gantner.com
HB_GAT-NETWRITER-7000-FISO-US_12
21
4.6.4 Automatic Reading of Data Carrier UID
This function automatically sends the UID of a data carrier to a computer when the data carrier is placed on the
GAT NET.Writer 7000 F/ISO.
The setting can be found here:
Select / deselect the “Enable Card Autoread” option to turn the function on / off.
4.6.5 Automatic Reading of Locker Segment Data
This function allows data stored on the data carrier in locker segments 1 and 2 to be automatically sent to the
computer when the data carrier is placed on the GAT NET.Writer 7000 F/ISO.
Note: This function is only available when the GAT NET.Writer 7000 F/ISO is operating in Ethernet (TCP/IP)
communication mode.
This data is usually the number of the locker locked by the data carrier. The setting can be found here:
Select “Locker 1”, “Locker 2”, “Locker 1 + 2”, or “None” from the drop-down menu.
4.6.6 USB Communication Mode Setting
This setting activates or deactivates USB Communication Mode. See “4.1. USB Communication Mode”.
Note: The default setting for the GAT NET.Writer 7000 F/ISO is to operate in Ethernet Communication Mode.
The setting can be found here:
Select / deselect the “Enable Keyboard Mode” option to turn USB Communication Mode on / off.
4.6.7 Prefix / Postfix Settings
The prefix and postfix settings allow you to add data to the front (prefix) or end (postfix) of the UID. The specified
additional data will be added to the UID and displayed when the data carrier is read.
Note: This setting is only available when the GAT NET.Writer 7000 F/ISO is operating in USB Communication
Mode. See “4.1. USB Communication Mode”.
The setting can be found here:
Configuration Application General Enable Card Autoread
Configuration Application General Autoread Segment
Configuration Application HID Keyboard mode Enable Keyboard Mode
Configuration Application HID Keyboard mode Prefix / Postfix

GAT NET.Writer 7000 F/ISO
Configuration and Operation
22
HB_GAT-NETWRITER-7000-FISO-US_12
www.gantner.com
The prefix/postfix data can be entered in the correct field as scan codes. The format for the scan code is
<mod,code>. “Mod” can be one of the following keys:
1 … Left CTRL
2 … Left Shift
4 … Left Alt
“Code” is the HID scan code of the desired key. For example:
<2,34> = % (Left Shift and 5)
<0,40> = % () and ENTER
The following figure shows the settings required to send an “ENTER” command after the UID number.
Figure 4.6 – “ENTER” postfix settings
Scan codes depend on the keyboard layout. The examples shown in this document are valid for an English keyboard
layout. A complete list of scan codes for an English keyboard layout is available in section “6.1. Scan Code List –
English Keyboard”.
Note: If the GAT NET.Writer is used in HID mode, the transmitted data is not displayed correctly when the shift key
is pressed in at the same time on the keyboard. A pressed caps-lock key is recognized by the GAT NET.Writer
7000 F/ISO for many country-specific keyboard settings. Certainly for German country settings, it is necessary
to activate the 'German shift lock' parameter in the GAT NET.Writer 7000 F/ISO configuration.
GAT NET.Writer 7000 F/ISO
Configuration and Operation
www.gantner.com
HB_GAT-NETWRITER-7000-FISO-US_12
23
4.6.8 UID Format
The UID of a data carrier can be sent from the GAT NET.Writer 7000 F/ISO in decimal or hexadecimal format. The
default setting is to display the UID in decimal format.
Note: This setting is only available when the GAT NET.Writer 7000 F/ISO is operating in USB Communication
Mode. See “4.1. USB Communication Mode”.
The setting can be found here:
Select “UID dec” or “UID hex” from the drop-down menu.
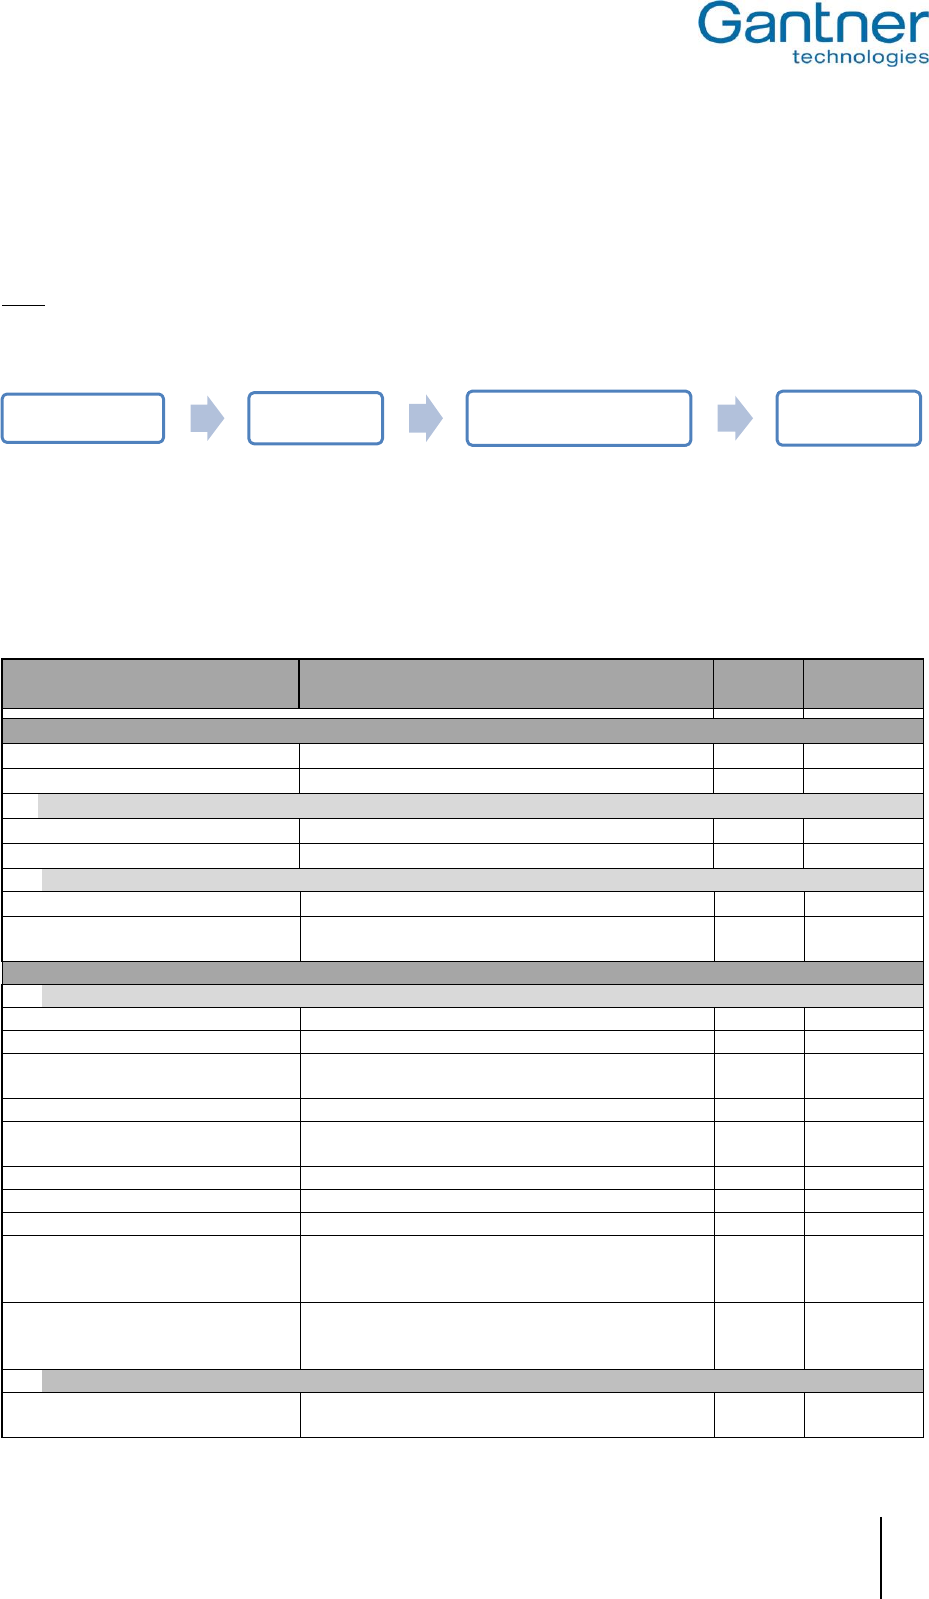
4.7 Configuration Settings Table
The following table lists all the configuration settings available for the GAT NET.Writer 7000 F/ISO in GAT Config
Manager.
Options
Description
Format
Default
Hardware
Enable sound signals
Enable the integrated beeper
Boolean
True
LED brightness
Level (0 – 100) to determine the brightness of the LEDs
Integer
100
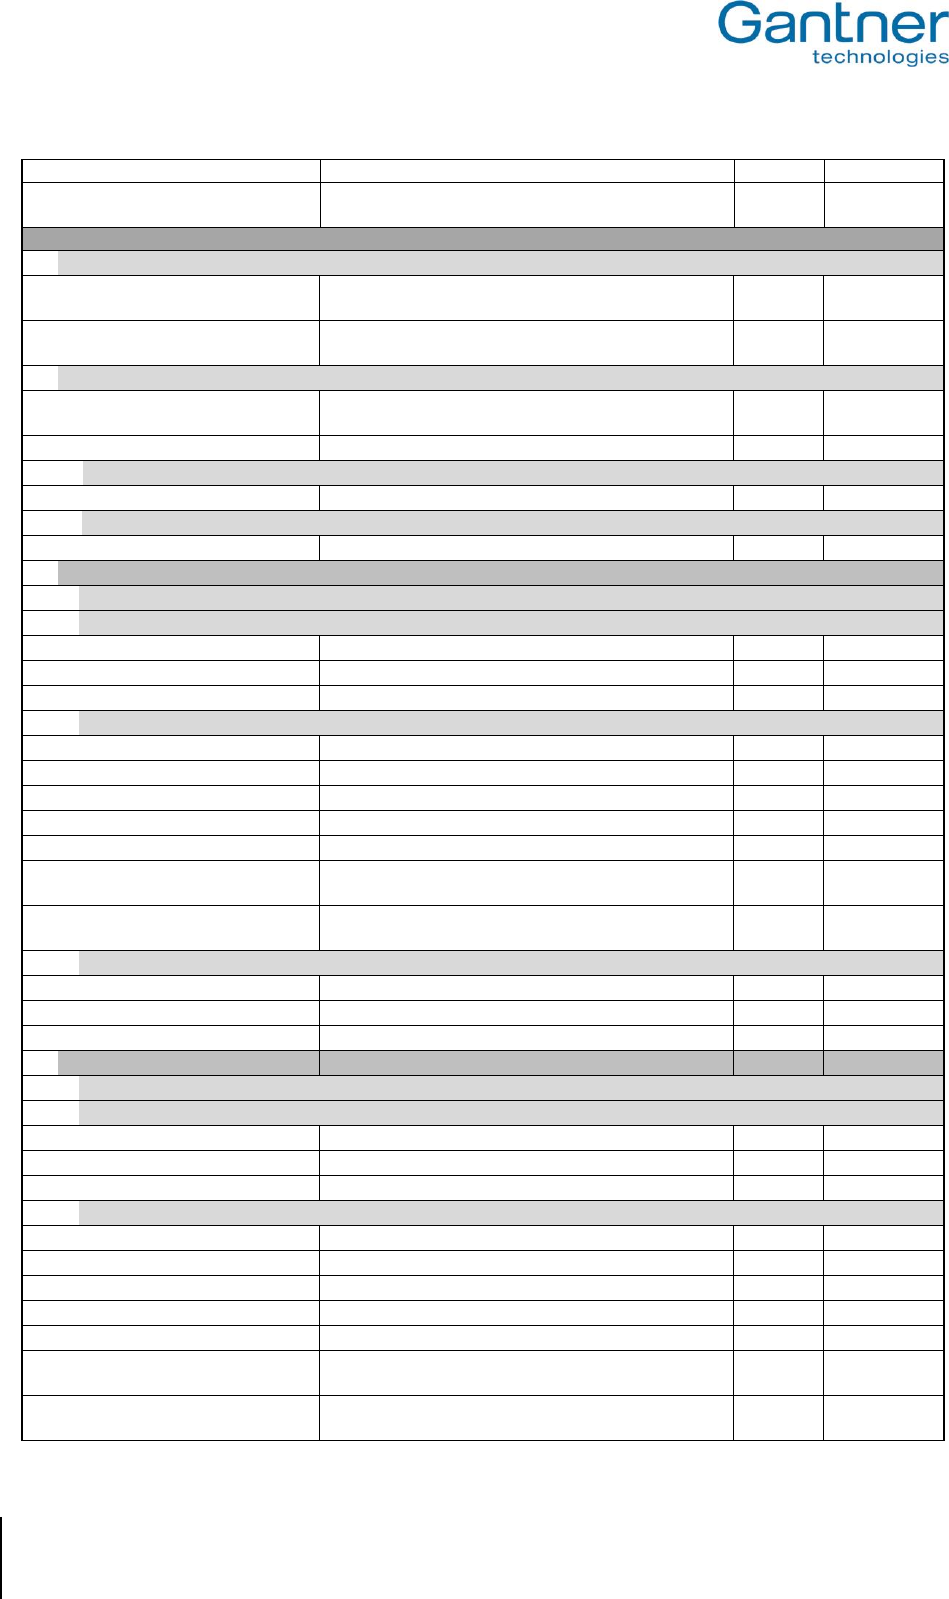
Relay
Output for activation of additional hardware
Function
Transparent – all actions set by the host
List option
Transparent
Pulse
Duration (in ms) for how long the relay is activated
Integer
0
Optocoupler
Status input for feedback
Function
Transparent – Only report events to host
List option
Transparent
Trigger
An event is triggered if the optocoupler input signal
matches the configured setting
Boolean
Disable
Communication
Ethernet
Port number
Port used to communicate with the device
Integer
8000
MAC address
The MAC address of the device (cannot be changed)
Integer
DHCP enabled
When set to “True”, the device is assigned its IP settings
from a DHCP server
Boolean
True
Static IP address
IP address of the device (if DHCP is disabled)
IPv4 add.
0.0.0.0
Static subnet mask
Subnet mask of the device (if DHCP is disabled)
IPv4 add.
255.255.255.
0
Static default gateway
Default gateway of the device (if DHCP is disabled)
IPv4 add.
0.0.0.0
Static DNS 1
Primary DNS address of the device (if DHCP disabled)
IPv4 add.
0.0.0.0
Static DNS 2
Secondary DNS address of the device (if DHCP disabled)
IPv4 add.
0.0.0.0
NetBIOS name
NetBIOS name of the device
Text
GW + Part
No. + Serial
No.
Mode
Ethernet Communication Mode:
“Auto negotiate","100 MBit full duplex","100 MBit half
duplex","10 MBit full duplex","10 MBit half duplex"
List option
Auto
negotiate
Protocol
TCPAck Timeout
Ethernet Detail: Force to send “Acknowledge” packets
after this timeout
Integer
1000
Configuration Application HID Keyboard mode Mode
GAT NET.Writer 7000 F/ISO
Configuration and Operation
24
HB_GAT-NETWRITER-7000-FISO-US_12
www.gantner.com
Host Command Timeout
Maximum command response time for device requests
Integer
1000
Time Sync IP
If this is set, the device accepts time sync packets only
from this host
IP add.
0.0.0.0
Reader
RF Standards
ISO 15693
Enable device to function with data carriers using ISO
15693 technology
Boolean
False
ISO 14443A
Enable device to function with data carriers using
MIFARE (ISO 14443A) technology. Cannot be disabled.
Boolean
True
Key Set
Site key
Site key of the device. All data carriers must have the
same site key to operate with the device.
Hex
9999
Key Set
DESFire AES Keys, encrypted
Hex
MIFARE Classic Keys
Mf Key 1 - 6
Data for MIFARE Classic keys 1 to 6
Integer
AES Keys
AES Key 1 - 6
Data for AES keys 1 to 6
Integer
Locker 1 Configuration
General
MIFARE Classic
Options for reading MIFARE Classic data carriers
Sector Num
The segment where UID data is stored
Integer
4
Read Key
Select the Read Key (Key A or Key B)
List option
Write Key
Select the Write Key (Key A or Key B)
List option
MIFARE DESFire
Options for reading MIFARE DESFire data carriers
Read Key Num
Number of the read key
Integer
Write Key Num
Number of the write key
Integer
Application ID
ID of the target DESFire application
Text
Encryption Mode
Select the type of encryption mode
List option
File Num
File number to read data from
Integer
File Comm Mode
File communication mode:
“Plain”, “Maced”, “Enciphered”
List option
File Type
Type of file:
“Standard” , “Backup”
List option
ISO 15693
Options for reading ISO 15693 data carriers
General Block Num
The segment where general data is stored
Integer
13
Certificate Block Num
The segment where certificate data is stored
Integer
15
Locker Block Num
The segment where locker data is stored
Integer
19
Locker 2 Configuration
General
MIFARE Classic
Options for reading MIFARE Classic data carriers
Sector Num
The segment where UID data is stored
Integer
4
Read Key
Select the Read Key (Key A or Key B)
List option
Write Key
Select the Write Key (Key A or Key B)
List option
MIFARE DESFire
Options for reading MIFARE DESFire data carriers
Read Key Num
Number of the read key
Integer
Write Key Num
Number of the write key
Integer
Application ID
ID of the target DESFire application
Text
Encryption Mode
Select the type of encryption mode
List option
File Num
File number to read data from
Integer
File Comm Mode
File communication mode:
“Plain”, “Maced”, “Enciphered”
List option
File Type
Type of file:
“Standard” , “Backup”
List option
GAT NET.Writer 7000 F/ISO
Configuration and Operation
www.gantner.com
HB_GAT-NETWRITER-7000-FISO-US_12
25
ISO 15693
Options for reading of ISO 15693 data carriers
General Block Num
The segment where general data is stored
Integer
13
Certificate Block Num
The segment where certificate data is stored
Integer
15
Locker Block Num
The segment where locker data is stored
Integer
23
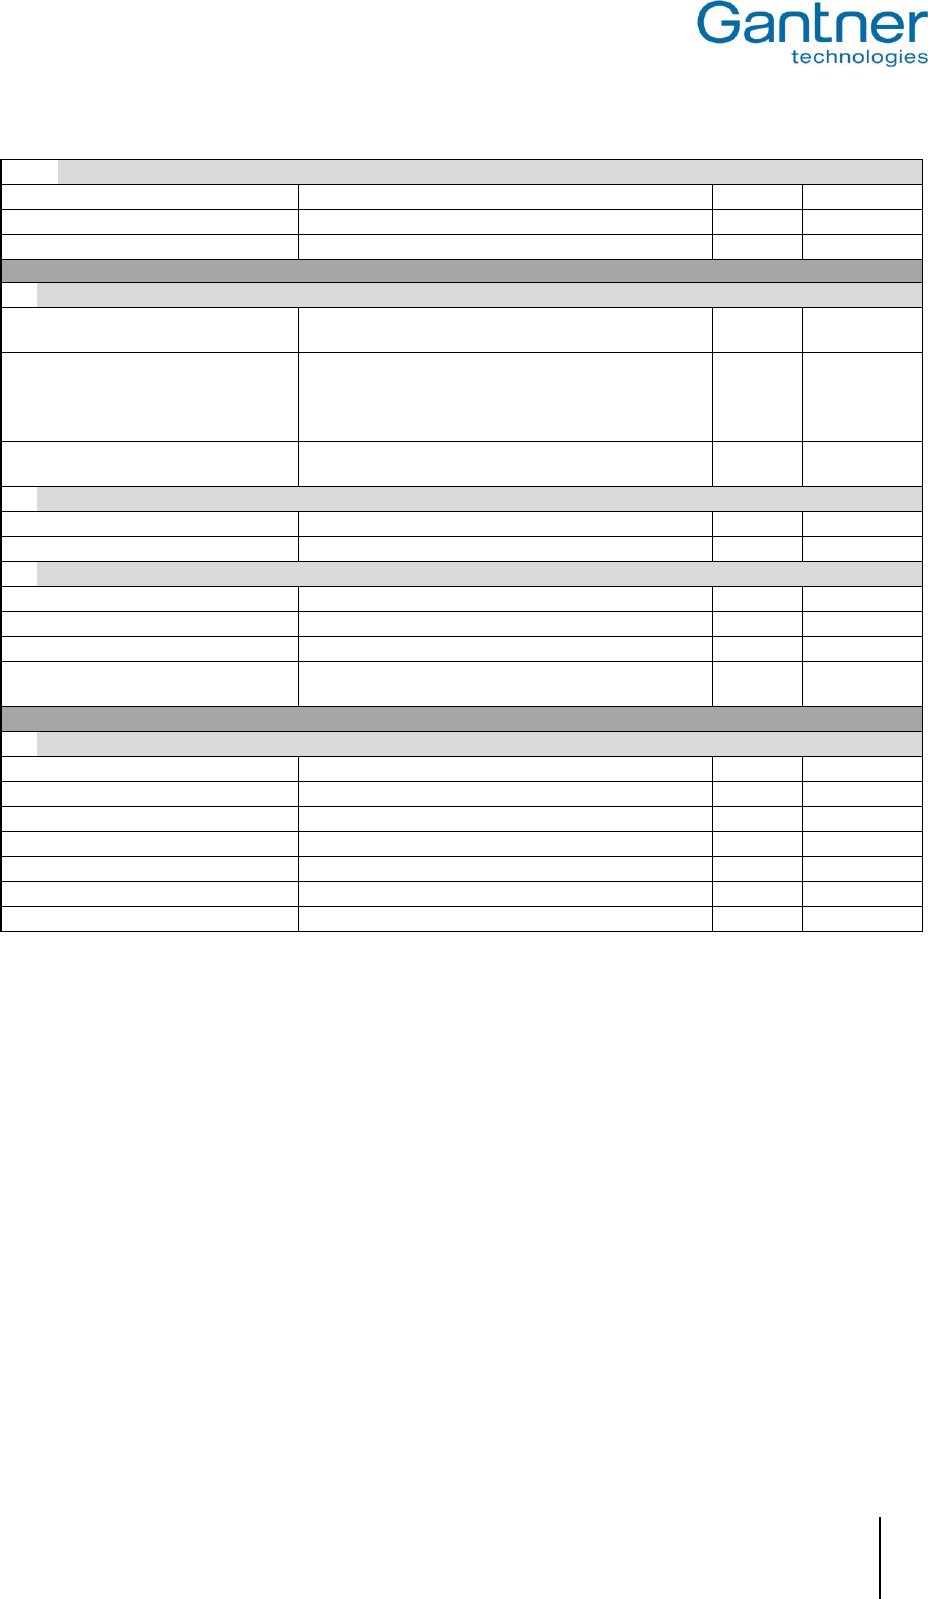
Application
General
Enable Card Autoread
Turn on / off function to automatically read data carrier
information
Boolean
False
Autoread Segment
None – Do not send any locker segment data
Locker 1 – Send locker 1 segment data
Locker 2 – Send locker 2 segment data
Locker 1 + 2 – Send locker 1 + 2 segment data
List option
None
Config Card Index
Index of the last used configuration card
(reserved for future use)
Integer
0
Passwords
Enable Login
Turn on / off the login function
Boolean
False
Password Login
Password required to log into the device
Text
HID Keyboard Mode
Enable Keyboard Mode
Turn on / off keyboard mode function
Boolean
False
Prefix
Field to add prefix data to the start of the UID
Text
Postfix
Field to add postfix data to the end of the UID
Text
Mode
UID dec – Display data carrier UID in decimal format
UID hex – Display data carrier UID in hexadecimal format
List option
UID dec
Read only parameter
Production
Production Data
Production data for the device (set during manufacture)
Text
Article Num
Article number of the device
Integer
Serial Num
Serial number of the device
Integer
Hardware Vers
Hardware version of the device
Integer
Manufacturer Num
Manufacturer number of the device
Integer
Production Year
Production year of the device
Integer
Production Week
Production week of the device
Integer
GAT NET.Writer 7000 F/ISO
Configuration and Operation
26
HB_GAT-NETWRITER-7000-FISO-US_12
www.gantner.com
4.8 Restart the GAT NET.Writer 7000 F/ISO
In certain situations, for instance, after an error or network problem, it is helpful to restart the GAT NET.Writer 7000
F/ISO. Restarting means that the software application in the device is restarted. All device settings remain as
before. Complete the following steps to restart the GAT NET.Writer 7000 F/ISO.
Keep the RESET button (1 in Figure 4.7 ) pressed in for 5 seconds.
o The device will restart.
Figure 4.7 – Reset button
4.9 Reset the GAT NET.Writer 7000 F/ISO to Default (Factory) Configuration
The GAT NET.Writer 7000 F/ISO will operate exactly as at the time of delivery after resetting the device to the
default configuration. All existing device settings will be lost. Complete the following steps to reset the GAT
NET.Writer 7000 F/ISO.
Disconnect the power supply from the GAT NET.Writer 7000 F/ISO.
Reconnect the power supply while holding the RESET button (1 in Figure 4.7 ) pressed in.
Keep the RESET button pressed in for approximately 12 seconds.
o The red LED starts flashing.
Release the RESET button.
Press the RESET button again.
Keep the RESET button pressed in for approximately 12 seconds.
o The GAT NET.Writer 7000 F/ISO is now reset to the default configuration.

GAT NET.Writer 7000 F/ISO
Configuration and Operation
www.gantner.com
HB_GAT-NETWRITER-7000-FISO-US_12
27
4.10 Uploading Firmware to the GAT NET.Writer 7000 F/ISO
4.10.1 Standard Procedure
The standard procedure for uploading firmware to the GAT NET.Writer 7000 F/ISO is via GAT Config Manager
software. Complete the following steps to upload firmware to the GAT NET.Writer 7000 F/ISO:
Start GAT Config Manager.
Follow the instructions in section “4.3. Setup for Configuration in GAT Config Manager”.
Right-click on the GAT NET.Writer 7000 F/ISO and select “Update Firmware” from the drop-down menu.
o The device update wizard opens.
Select a firmware file from the list or locate the firmware file on your computer via the “Select local update
package” button.
Click on “Next”.
o The wizard uploads the firmware file to the GAT NET.Writer 7000 F/ISO.
4.10.2 Uploading Firmware via Bootloader Mode
In some instances the standard procedure for uploading firmware to the GAT NET.Writer 7000 F/ISO may not
function as required. In this case, the GAT NET.Writer 7000 F/ISO can be put into bootloader mode and the
firmware uploaded while in this mode. Complete the following steps to upload firmware to the GAT NET.Writer 7000
F/ISO via bootloader mode:
Disconnect the power supply from the GAT NET.Writer 7000 F/ISO.
Reconnect the power supply while holding the RESET button (1 in Figure 4.7 ) pressed in.
Press the RESET button twice.
o The device enters bootloader mode.
Follow the “4.9.1. Standard Procedure” instructions to upload firmware into the device.
To exit bootloader mode, disconnect the power supply or send a restart command from a software application.

GAT NET.Writer 7000 F/ISO
Configuration and Operation
28
HB_GAT-NETWRITER-7000-FISO-US_12
www.gantner.com
4.11 Software Integration
4.11.1 GAT DIRECT.Connect
The GAT NET.Writer 7000 F/ISO can be integrated and used with software applications that manage RFID
systems. These applications are typically used to control access terminals, information terminals and the RFID data
carriers that operate with these system components.
GANTNER has developed an integration tool called GAT DIRECT.Connect that uses the programming language
independent JavaScript Object Notation (JSON) format. By using GAT DIRECT.Connect, software developers are
able to integrate the GAT NET.Writer 7000 F/ISO (and other GANTNER products) into their software, irrespective of
the programming language used.
Further information on GAT DIRECT.Connect is available in this document (DK_GAT-DIRECTConnect-Short-
Description-EN), or by contacting your GANTNER representative.

GAT NET.Writer 7000 F/ISO
Technical Data
www.gantner.com
HB_GAT-NETWRITER-7000-FISO-US_12
29
5 TECHNICAL DATA
5.1 GAT NET.Writer 7000 F/ISO
Nominal voltage UDC: 5 V
Power supply: Via USB interface
Power consumption: max. 350 mA
Supported RFID Technologies: - MIFARE® Classic, MIFARE DESFire®, and MIFARE Ultralight®
- ISO 15693
RFID frequency: 13.56 MHz
Connections: - USB: Type B socket
- Ethernet: RJ45 socket
Interface type: - USB interface, Version 1.1
- Ethernet TCP/IP
Communication interface: - USB: HID interface
- TCP/IP: JSON
Display elements: 2 status LEDs and 1 acoustic signal generator
Housing material: Plastic ABS
Dimensions: 126 x 115 x 44 mm (4.96 x 4.53 x 1.73 inches)
Permitted ambient temperature: 0 °C to +60 °C (+32 °F to +140 °F)
Protection type: IP 40
Protection class: III
Weight: Approx. 175 g (6.17 oz.)
Environment class based on VdS 2110: I (conditions in indoor areas)

GAT NET.Writer 7000 F/ISO
Technical Data
30
HB_GAT-NETWRITER-7000-FISO-US_12
www.gantner.com

GAT NET.Writer 7000 F/ISO
Appendix
www.gantner.com
HB_GAT-NETWRITER-7000-FISO-US_12
31
6 APPENDIX
6.1 Scan Code List – English Keyboard
0x00
Reserved (no event indicated)
0x30
Keyboard ] and }
0x01
0x01 Keyboard ErrorRollOver
0x31
Keyboard \ and |
0x02
Keyboard POSTFail
0x32
Keyboard Non-US # and ~
0x03
Keyboard ErrorUndefined
0x33
Keyboard ; and :
0x04
Keyboard a and A
0x34
Keyboard ' and "
0x05
Keyboard b and B
0x35
Keyboard Grave Accent and Tilde
0x06
Keyboard c and C
0x36
Keyboard, and <
0x07
Keyboard d and D
0x37
Keyboard . and >
0x08
Keyboard e and E
0x38
Keyboard / and ?
0x09
Keyboard f and F
0x39
Keyboard Caps Lock
0x0A
Keyboard g and G
0x3A
Keyboard F1
0x0B
Keyboard h and H
0x3B
Keyboard F2
0x0C
Keyboard i and I
0x3C
Keyboard F3
0x0D
Keyboard j and J
0x3D
Keyboard F4
0x0E
Keyboard k and K
0x3E
Keyboard F5
0x0F
Keyboard l and L
0x3F
Keyboard F6
0x10
Keyboard m and M
0x40
Keyboard F7
0x11
Keyboard n and N
0x41
Keyboard F8
0x12
Keyboard o and O
0x42
Keyboard F9
0x13
Keyboard p and P
0x43
Keyboard F10
0x14
Keyboard q and Q
0x44
Keyboard F11
0x15
Keyboard r and R
0x45
Keyboard F12
0x16
Keyboard s and S
0x46
Keyboard PrintScreen
0x17
Keyboard t and T
0x47
Keyboard Scroll Lock
0x18
Keyboard u and U
0x48
Keyboard Pause
0x19
Keyboard v and V
0x49
Keyboard Insert
0x1A
Keyboard w and W
0x4A
Keyboard Home
0x1B
Keyboard x and X
0x4B
Keyboard PageUp
0x1C
Keyboard y and Y
0x4C
Keyboard Delete Forward
0x1D
Keyboard z and Z
0x4D
Keyboard End
0x1E
Keyboard 1 and !
0x4E
Keyboard PageDown
0x1F
Keyboard 2 and @
0x4F
Keyboard RightArrow
0x20
Keyboard 3 and #
0x50
Keyboard LeftArrow
0x21
Keyboard 4 and $
0x51
Keyboard DownArrow
0x22
Keyboard 5 and %
0x52
Keyboard UpArrow
0x23
Keyboard 6 and ^
0x53
Keypad Num Lock and Clear
0x24
Keyboard 7 and &
0x54
Keypad /
0x25
Keyboard 7 and &
0x55
Keypad *
0x26
Keyboard 9 and (
0x56
Keypad -
0x27
Keyboard 0 and )
0x57
Keypad +
0x28
Keyboard Return (ENTER)
0x58
Keypad ENTER
0x29
Keyboard ESCAPE
0x59
Keypad 1 and End
0x2A
Keyboard DELETE (Backspace)
0x5A
Keypad 2 and Down Arrow
0x2B
Keyboard Tab
0x5B
Keypad 3 and PageDn
0x2C
Keyboard Spacebar
0x5C
Keypad 4 and Left Arrow
0x2D
Keyboard - and (underscore)
0x5D
Keypad 5
0x2E
Keyboard = and +
0x5E
Keypad 6 and Right Arrow
0x2F
Keyboard [ and {
0x5F
Keypad 7 and Home
0x60
Keypad 8 and Up Arrow
0x7D
Keyboard Paste
0x61
Keypad 9 and PageUp
0x7E
Keyboard Find
0x62
Keypad 0 and Insert
0x7F
Keyboard Mute
0x63
Keypad . and Delete
0x80
Keyboard Volume Up
0x64
Keyboard Non-US \ and |
0x81
Keyboard Volume Down
0x65
Keyboard Application
0x82
Keyboard Locking Caps Lock
0x66
Keyboard Power
0x83
Keyboard Locking Num Lock
0x67
Keypad =
0x84
Keyboard Locking Scroll Lock
0x68
Keyboard F13
0x85
Keypad Comma
0x69
Keyboard F14
0x86
Keypad Equal Sign
0x6A
Keyboard F15
0x87
Keyboard International1
0x6B
Keyboard F16
0x88
Keyboard International2

GAT NET.Writer 7000 F/ISO
Appendix
32
HB_GAT-NETWRITER-7000-FISO-US_12
www.gantner.com
0x6C
Keyboard F17
0x89
Keyboard International3
0x6D
Keyboard F18
0x8A
Keyboard International4
0x6E
Keyboard F19
0x8B
Keyboard International5
0x6F
Keyboard F20
0x8C
Keyboard International6
0x70
Keyboard F21
0x8D
Keyboard International7
0x71
Keyboard F22
0x8E
Keyboard International8
0x72
Keyboard F23
0x8F
Keyboard International9
0x73
Keyboard F24
0x90
Keyboard LANG1
0x74
Keyboard Execute
0x91
Keyboard LANG2
0x75
Keyboard Help
0x92
Keyboard LANG3
0x76
Keyboard Menu
0x93
Keyboard LANG4
0x77
Keyboard Select
0x94
Keyboard LANG5
0x78
Keyboard Stop
0x95
Keyboard LANG6
0x79
Keyboard Again
0x96
Keyboard LANG7
0x7A
Keyboard Undo
0x97
Keyboard LANG8
0x7B
Keyboard Cut
0x98
Keyboard LANG9
0x7C
Keyboard Copy
FCC INFORMATION (U.S.A.)
Note: This equipment has been tested and found to comply with the limits for a Class B digital device, pursuant to part 15 of the
FCC Rules. These limits are designed to provide reasonable protection against harmful interference in a residential
installation. This equipment generates, uses, and can radiate radio frequency energy and, if not installed and used in
accordance with the instructions, may cause harmful interference to radio communications. However, there is no
guarantee that interference will not occur in a particular installation. If this equipment does cause harmful interference to
radio or television reception, which can be determined by turning the equipment off and on, the user is encouraged to try
to correct the interference by one or more of the following measures:
- Reorient or relocate the receiving antenna.
- Increase the separation between the equipment and receiver.
- Connect the equipment into an outlet on a circuit different from that of which the receiver is connected.
- Consult the dealer or an experienced radio/TV technician for help.
FCC Warning Statement
[Any] changes or modifications not expressly approved by the party responsible for compliance could void the user's authority to
operate the equipment.
(CANADA)
This device complies with Industry Canada’s licence-exempt RSSs. Operation is subject to the following two conditions:
(1) This device may not cause interference; and
(2) This device must accept any interference, including interference that may cause undesired operation of the device.
Le présent appareil est conforme aux CNR d’Industrie Canada applicables aux appareils radio exempts de licence. L’exploitation
est autorisée aux deux conditions suivantes :
1) l’appareil ne doit pas produire de brouillage;
2) l’appareil doit accepter tout brouillage radioélectrique subi, même si le brouillage est susceptible d’en compromettre le onctionnement.
Note:
This manual is valid from February 16th, 2017. It is subject to change.
Amendments can be made without prior notice at any time.

PartNo.:
622628
www.gantner.com
GANTNER Electronic GmbH GANTNER Electronic GmbH Deutschland GANTNER Electronics Pty Ltd Australia
Montafonerstraße 8 Industriestraße 40F 3/105a Vanessa St, Kingsgrove
6780 Schruns, Austria 44894 Bochum, Germany NSW 2208, Australia
T: +43 5556 73784-0 T: +49 234 58896-0 T: +61 2 9011 8114
F: +43 5556 73784-8000 F: +49 234 58896-11 F: +61 2 8209 1708
info@gantner.com info-de@gantner.com info-aus@gantner.com
GANTNER Electronics Ltd. UK GANTNER Electronic GmbH Middle East
16 The Havens, Ransomes Europark P.O. Box 62702, Office 1604, Aspect Tower
Ipswich, Suffolk, IP3 9SJ Business Bay, Sheikh Zayed Road, Dubai, UAE
United Kingdom T: +971 4 451 7794
T: +44 1245 697 588 F: +971 4 451 7795
Tech. Line: +44 1480 212 627 M: +971 50 650 4082
info-uk@gantner.com info-me@gantner.com
Part No: 597130 www.gantner.com