Garmin Canada AMP231 Monitor/Recorder User Manual USER GUIDE AMP231 Activity Monitoring System Rev0B
DynaStream Innovations Inc. Monitor/Recorder USER GUIDE AMP231 Activity Monitoring System Rev0B
Manual
Copyright ©2006. Dynastream Innovations Inc.

Copyright ©2006. Dynastream Innovations Inc.
Features
Objective and accurate calculations of step count, activity class, distance, speed, and
caloric expenditure.
LCD screen displays immediate information and feedback.
Wireless download to your computer using ANT, the worldwide 2.4-GHz radio frequency.*
Breakdown of daily or weekly activity into 10-minute intervals.*
Versatile text output for further analysis of data.*
*Available with AMP USB Stick and AMP Ware
Components
The AMP 231 Monitoring System offers valid, objective activity data in real time display and
stores this data for further analysis. The system includes the monitoring pod, ankle sleeve,
USB stick, AMP Ware application and documentation.
AMP Activity Monitoring Pod
The pod is the central device that monitors, records, and displays activity data. It features
an easy-to-use four-button interface and a large LCD screen to provide immediate feedback.
AMP Ankle Sleeve
Made from washable, medical-grade, hypoallergenic materials, the comfortable sleeve
stabilizes the pod on the ankle for optimal measurements.
AMP USB Stick
The small USB stick uses the ANT wireless communication protocol to upload the data from
the pod to your computer.
AMP Ware
The AMP Ware software application controls the data uploads to your computer. The data
is formatted in a comma delimited text file for easy import into your preferred analysis
software.
AMP Documentation
The AMP Activity Monitoring System is supported by this User Guide, the AMP Quick Start
Guide, the Help files included on your AMP Ware CD, and information on the Dynastream
website (www.dynastream.com).
<<graphic – photo of complete system: pod, sleeve, USB stick, CD, help booklet? >>
Copyright ©2006. Dynastream Innovations Inc.
AMP Activity Monitoring Pod
The AMP Activity Monitoring Pod is the central device that monitors, records, and displays
daily activity.
Power On and Off
To turn the pod on or off, hold down the UP button for 2 seconds. AMP displays briefly as
the monitor powers up before moving to the three main modes. Note that the pod can be
turned off only when there is no active monitoring session. Powering off the pod will not
erase previously collected data.
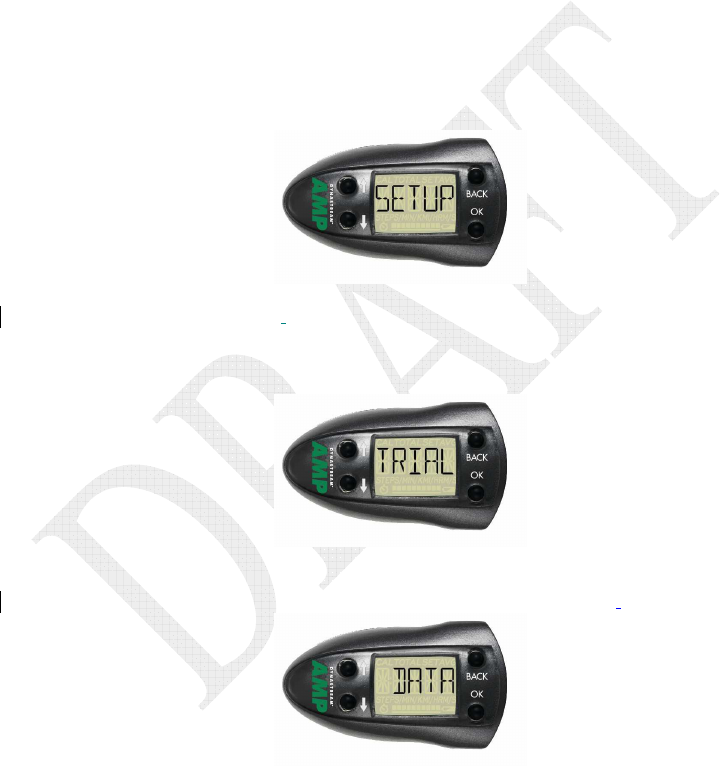
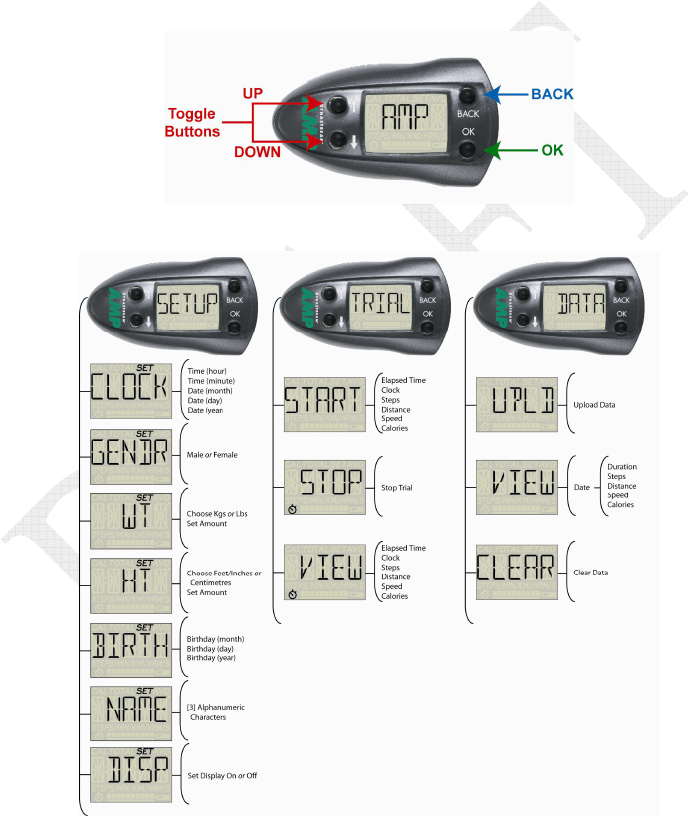
Modes
The SETUP mode allows you to configure your AMP Activity Monitoring Pod.
Use the TRIAL mode to manage a monitoring session. Data collected during a monitoring
session includes the amount of time spent in each of three activity classes (Inactive, Active,
and Locomotion), number of steps taken, caloric expenditure, distance traveled, and
locomotion speed.
Use the DATA mode to manage the collected data. View activity measurements from
previous days, upload data to your computer, or clear the collected data.
Copyright ©2006. Dynastream Innovations Inc.
Basic Navigation
To navigate the menus on your AMP Activity Monitoring Pod:
Use the arrow buttons to navigate through the menus and to adjust settings up or down.
Use the OK button to choose a mode (SETUP, TRIAL, DATA) or a menu item (under each
mode). The OK button is also used to accept and save a change. Changes are shown as
flashing text.
Press BACK to return to the previous menu level without saving changes.
Menus
Copyright ©2006. Dynastream Innovations Inc.
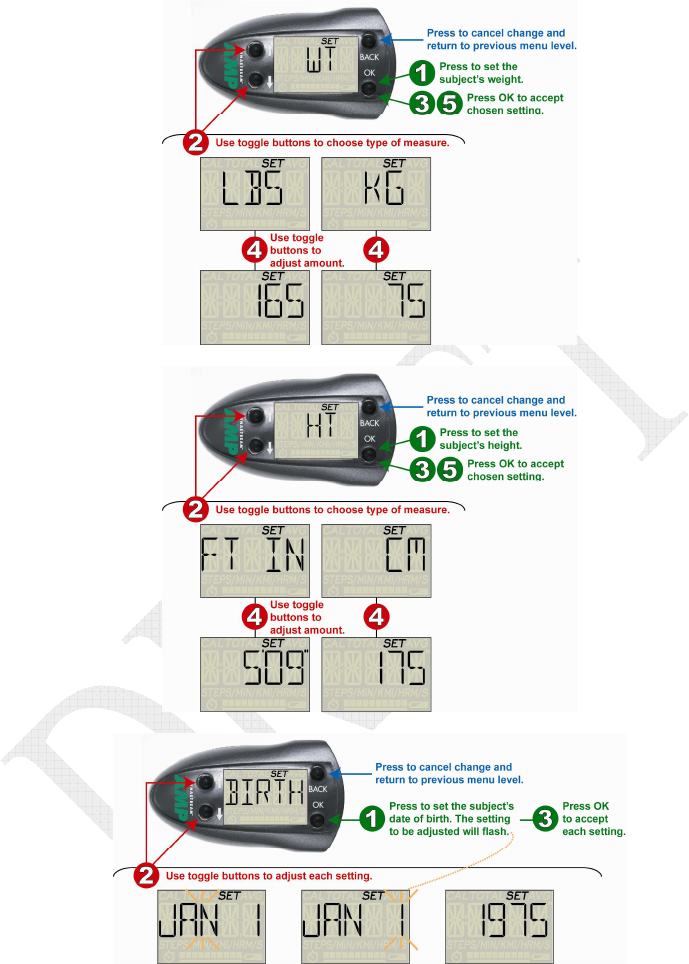
Setup
Date/time and user information must be entered before starting a trial. Once the monitor is
powered on, press the arrow buttons to scroll to SETUP mode. Press OK to enter the SETUP
mode to customize your pod. Use the arrow buttons to change settings. Press OK to accept
a setting and move to the next setting. You can also use the arrow buttons to move directly
to specific settings.
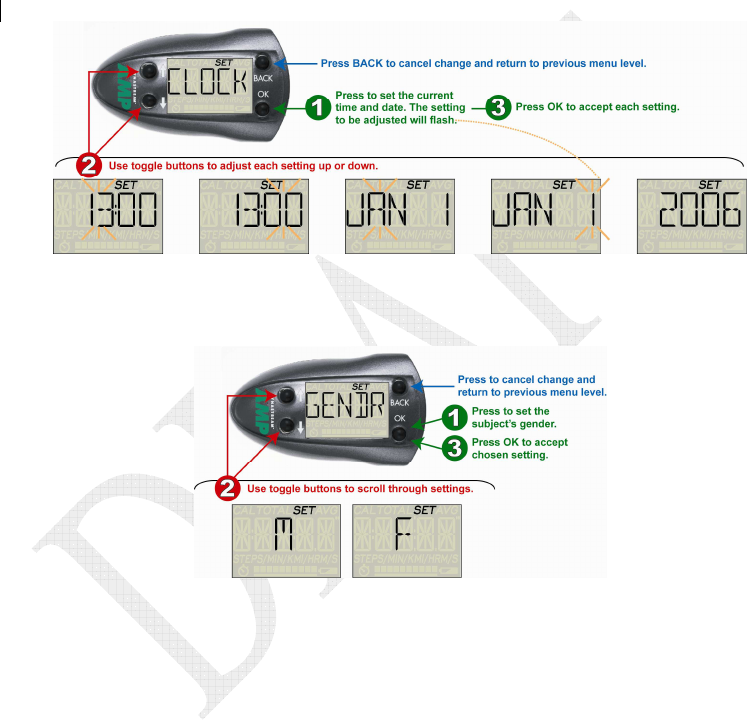
Clock
Set the current date and time in 24-hour format.
User Information
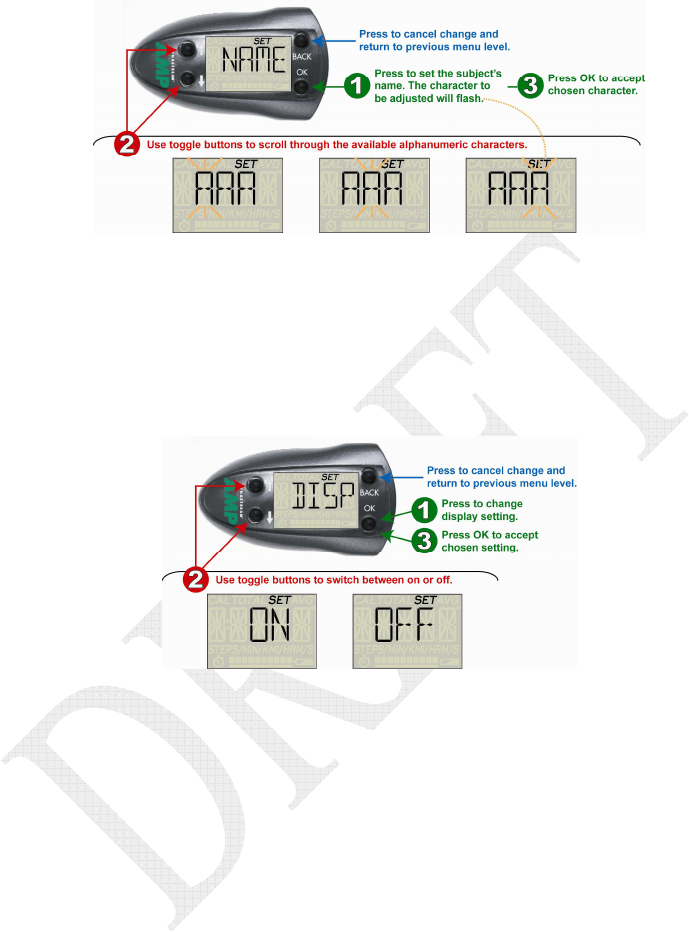
Enter settings for the user, including the gender, weight, height, birthday, and name/ID
(optional). Weight and height can be entered in either metric or imperial measure.
Copyright ©2006. Dynastream Innovations Inc.
Copyright ©2006. Dynastream Innovations Inc.
Display
The LCD display can be set to ON or OFF to enable or hide viewing of data during a trial.
Viewable data includes the elapsed time since start of trial, number of steps, caloric
expenditure, distance travelled, locomotion speed, and current time. If the Display setting is
turned off, only the elapsed time (ELAP) and current time (CLOCK) screens are available.
Elapsed time is displayed in hours, minutes and seconds (hh:mm:ss) until ten hours; after
ten hours, elapsed time is displayed in days and hours (0D10).
Sleep Mode
During a trial, the LCD goes into sleep mode after five minutes without a button press. From
sleep mode, the first button press will simply “wake up” the monitor; the press will not be
recognized as UP/DOWN/BACK/OK. If a trial is not running, the pod will shut down after
five minutes without a button press.
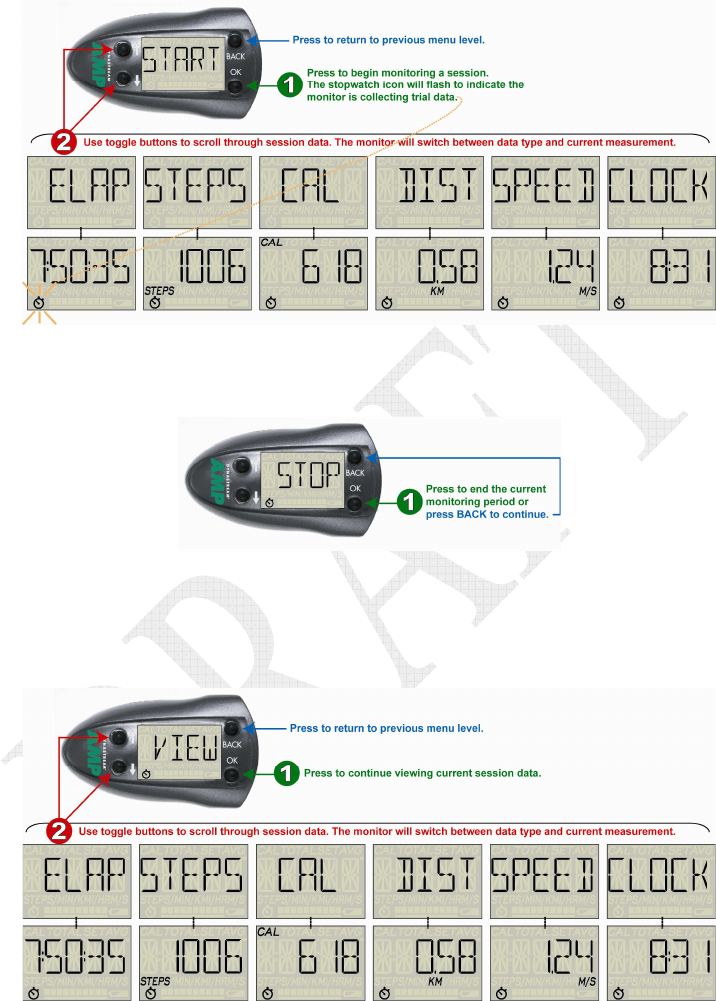
Trial
Use the TRIAL mode to gather activity data. The pod records the elapsed time since start of
trial, number of steps, energy expenditure, distance, and speed. Initially elapsed time is
displayed in hours, minutes and seconds (hh:mm:ss); after ten hours elapsed time is
displayed in days and hours (0D10). The pod also records the amount of time spent in each
of three activity classes (Inactive, Active, and Locomotion). Activity-class data is available in
the downloaded *.csv file.
Start Trial
Use START to begin a monitoring session. The device must be properly configured (see
SETUP mode) before starting a trial. Starting a session with the Display setting turned on
makes the session data available for viewing; use the toggle buttons to scroll through data
types. If the Display setting is turned off, only the elapsed time (ELAP) and current time
(CLOCK) screens are available.
Copyright ©2006. Dynastream Innovations Inc.
Stop Trial
Use STOP to end a monitoring session. Once started, a trial will continue until STOP is
pressed. The pod will not power off until a trial is stopped.
View Trial
Use the VIEW menu to view updated data for the current monitoring session. This menu is
automatically entered when a new session is started. If you have backed out to a different
menu, navigate to VIEW and press OK to return to viewing the current session data. Use the
arrow buttons to navigate through the viewable data.
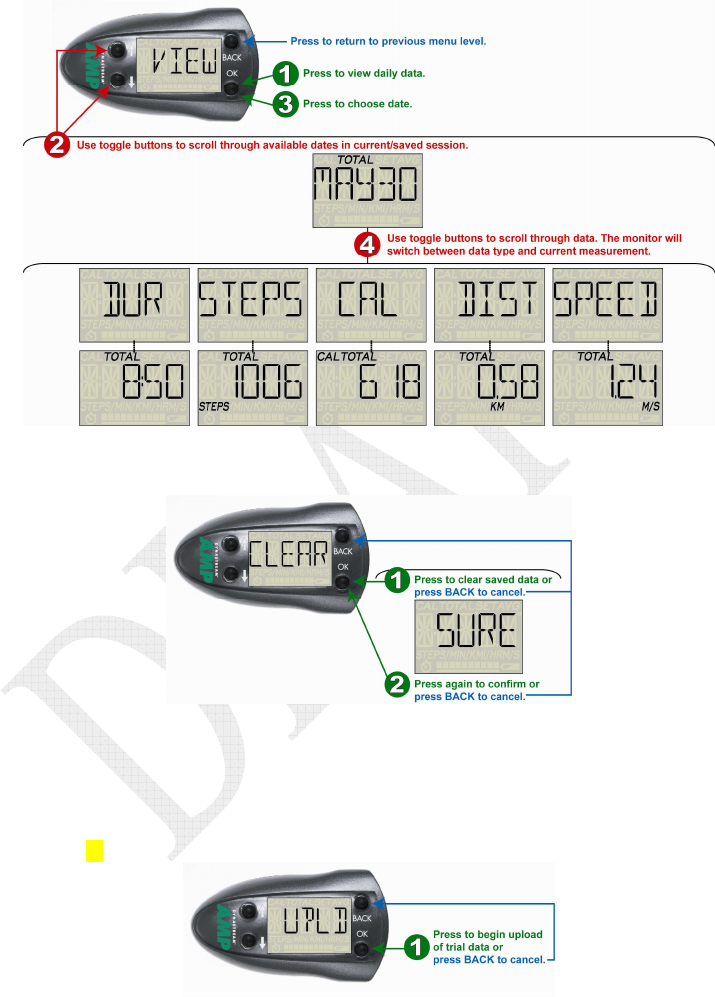
Data
Use the DATA mode to view, upload, and erase user data. Further analysis of data may be
performed after downloading it to your computer.
Copyright ©2006. Dynastream Innovations Inc.
View
View data from previous days gathered during a monitoring session.
Clear
Erase data gathered during a monitoring session.
Upload
Upload data to your computer via the AMP USB Stick. The UPLD display flashes until the
upload is complete. If the pod is unable to find the USB Stick after 30 seconds, the upload
will be cancelled. Data cannot be uploaded until the AMP USB Stick drivers and the AMP
Ware application are installed and running properly. For further instructions, see Using AMP
Ware, page xx.
AMP Ankle Sleeve

Copyright ©2006. Dynastream Innovations Inc.
The ankle sleeve is used to position the pod on the user’s ankle. The pod is inserted nose
down into the pocket on the ankle sleeve. The sleeve is placed around the user’s ankle with
the pod to the back of the ankle and the pocket facing up. The strap should be tightened so
the sleeve fits snugly, but comfortably. The firm fit is required to prevent the sleeve from
sliding or side-to-side motion.
Ankle sleeves are available in three sizes to fit children age 6 to adults.
<<graphic – photo/illustration of 1] pod in sleeve and 2] sleeve on ankle >>

Copyright ©2006. Dynastream Innovations Inc.
Taking Care of Your AMP Activity Monitoring Pod and Ankle Sleeve
The pod should be stored with the battery removed (see Replacing the Battery, below, for
instructions on removing the battery). The ankle sleeve can be washed in warm water with
a mild detergent and hung to dry.
Replacing the Battery
The pod uses one AAA battery, which is estimated to last more than seven days. When the
battery is low, the battery icon will flash. As the battery gets weaker, the icon will turn solid.
Power off the monitor before replacing the battery. The battery hatch is located on the flat
end of the pod and can be opened by turning the cap counter-clockwise with a coin. Insert
the battery with the positive end first. Data collected to this point will not be lost. However,
date and time settings must be updated before a new session is started.
<<graphic – battery hatch >>
AMP USB Stick and AMP Ware
The AMP USB Stick enables the AMP Activity Monitoring Pod to wirelessly upload data to
your computer using the supplied AMP Ware application.
Use the accompanying AMP 231 CD to install the AMP USB Stick drivers and the AMP Ware
application.
Computer System Requirements
Computer type PC with USB port and CD-Rom
Operating system
Windows® 2000, Windows ® XP
Processor speed Minimum Pentium 266
Available RAM 64 MB
Available hard disk space 100 MB
<<graphic? USB stick photo, amp ware splash screen, etc.>>
Using AMP Ware
Follow the basic installation instructions to install the AMP USB Stick drivers and AMP
Ware.
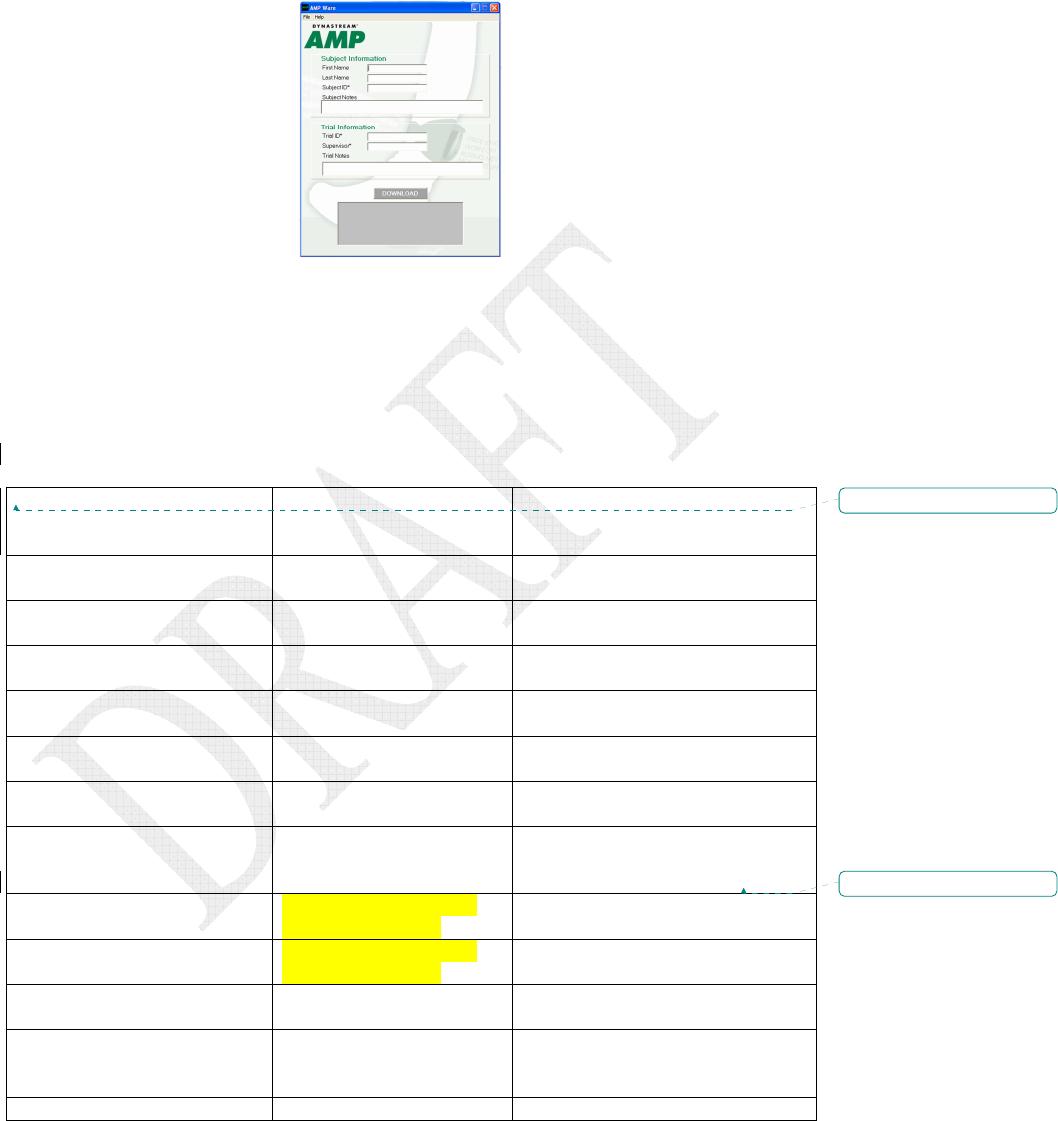
When AMP Ware is launched, the following session information screen will appear. The
User ID# and Trial ID# fields must be filled in prior to data transfer. All other fields are
optional. Optional fields are saved as notes in the data file. With the appropriate fields filled
in, ensure that the USB stick into an available USB port on your computer, set the AMP
Activity Monitoring Pod to the upload mode (see Data – Upload, page xx), and click on
Download to begin the data transfer.
Copyright ©2006. Dynastream Innovations Inc.
Trial Data
Trial data is downloaded to a comma delimited text file (*.csv). The file includes the
optional information entered through the AMP Ware application; the user information
entered when configuring the pod; the totals of the data measurements viewed on the pod;
and time spent in each of the three activity classes as calculated by the pod.
Data File
The following chart details the data fields of a downloaded *.csv file.
DATA ELEMENT
(TEXT STRING APPEARS IN
FILE)
DATA FORMAT NOTES
Subject ID Alphanumeric string
Max length =
Required data, obtained through
AMP Ware application.
Subject Notes Alphanumeric string
Max length =
Data is optional.
Trial ID Alphanumeric string
Max length =
Required data, obtained through
AMP Ware application.
Trial Notes Alphanumeric string
Max length =
Data is optional, obtained
through AMP Ware.
Supervisor Alphanumeric string
Max length =
Data is optional, obtained
through AMP Ware.
Pod Name Alphanumeric string
Length = 3
Data is optional, obtained from
the pod.
Name Alphanumeric string
Max length =
Data is optional, obtained
through AMP Ware, format is
First Name+#+Last Name.
Height Alphanumeric string (?)
Imperial or Metric?
Required data, obtained from
Activity Monitoring Pod.
Weight Alphanumeric string (?)
Imperial or Metric?
Required data, obtained from
pod.
Gender Alphanumeric string
Length = 1
Required data, obtained from
pod, either “M” or “F”.
Birthday Alphanumeric string
Max length = 10
Required data, obtained from
pod, format is day/month/year,
no zero padding
Etc.
Formatted: All caps
Formatted: Not Highlight

Copyright ©2006. Dynastream Innovations Inc.
AMPWare Version AFW0.002
SW Version AFG0.030+0000
HW Version 3.4
Start time Time in class
Date Time of Day Inactive Active Locomotion Total Cal Total Steps
Locomotion Steps Total Distance Locomotion Distance Locomotion Ave
Speed Notes
Activity Classes
Every second of the monitoring session is classified into one of three activity classes:
Inactive, Active, and Locomotion.
Inactive Class
Time spent sitting, lying, or standing still is accumulated into the Inactive Class. To be
classified as Inactive the wearer must not take any steps for at least 20 seconds.
Active Class
Time spent "up and about" is accumulated into the Active Class. Typical indoor movement
activities in the Active class are preparing a meal, cleaning the house, or short trips around
the office.
Locomotion Class
Time spent "walking somewhere" is accumulated into the Locomotion Class. The wearer
must take at least 20 consecutive steps for the activity to register in the Locomotion Class.
Examples include going for a walk, walking in a shopping mall, or walking across a parking
lot. Speed is calculated for locomotion within this class.
FAQS
How do I know if the pod is collecting data?
· The flashing clock icon at the bottom of the screen on the pod flashes during data
collection. If this icon is flashing, then you know data are being collected. If this icon is not
visible then the pod is not collecting data.
· The pod shows the elapsed time since the start of the trial. Initially elapsed time is
displayed in minutes and seconds (mm:ss), then hours and minutes (hh:mm), then days
and hours (e.g. 3d04 for three days and four hours).
How do I stop data collection?
· Use STOP under the TRIAL menu.
If I accidentally press a button during data collection, will it affect the data or stop the trial?
· No, button presses will navigate through menus/data; only STOP under the TRIAL
menu will stop the trial.
Can the pod be worn in the shower, in the rain, or in the bath?

Copyright ©2006. Dynastream Innovations Inc.
· The AMP pod is tested to 1 atm for 24 hours so it will not be damaged by showering
or bathing, although the ankle sleeve may be uncomfortable when wet.
What happens if the battery runs out during data collection?
· If the battery has run out, the pod display will be blank. The data collected before the
battery ran out is still saved in the pod. To download the data, replace the battery as
instructed in Section 2.2, then upload the data as usual.
· Always replace used batteries immediately.
· Use a fresh battery for each 7-day trial.
Once I have collected data, can I wait to download it until later?
· Yes, the data is saved on the pod until it is cleared.
Once I have downloaded data from the pod, can I download it again later?
· Yes, however, you cannot start a new trial until the data is cleared off the pod.
Why can’t I install the USB drivers and AMP Ware application?
· In order to install new hardware you need to have administrator privileges on the
computer. If you are working on an institutional computer you may not have the necessary
permissions. In order to install the drivers you may need to contact the IT coordinator.
AMP Ware Error Messages
<<chart – message number/error/solution>>

Copyright ©2006. Dynastream Innovations Inc.
Troubleshooting
AMP Activity Monitoring Pod and Ankle Sleeve
Possible Problem #1
Solution
Possible Problem #2
Solution
Etc. …
AMP USB Stick and AMP Ware
Possible Problem #1
During downloading, the AMP Link can’t connect with the pod (“No Connection” message).
Solution
Ensure that the pod is in the upload mode (displays UPLD). Follow the tips below for
“Connection lost” during downloading.
Possible Problem #2
During downloading, the pod establishes a connection but then the connection is lost during
downloading (“Connection lost” message).
Solution
Move the pod closer to the link.
Make sure that there are no other pods nearby in upload mode.
Turn off other sources of RF such as cell phones or PDAs, and move the link away from the
computer monitor.
Try downloading again.
Additional help can be found on-line at www.dynastream.com.

Copyright ©2006. Dynastream Innovations Inc.
Warranty
Warranty blurb to come…
Specifications and Regulatory Information
Size (max dimensions): 73 x 41 x 25 mm (L x W x H)
Weight: 35 g
Strap: Detachable elastic ankle strap, 320-520 mm (L)
Power: Single user-replaceable AAA battery
Battery life: Minimum 1 week of constant use
Storage temp: -40°C to +85°C
Operating temp: -10°C to +40°C
User-interface: 4-button LCD screen
Water resistance: 1 ATM for 24 hrs
Available data and accuracy: Step Count: > 98%
Speed and distance: > 95%
Time in Activity Classes (Inactive, Active, Locomotion)
Caloric expenditure
RF frequency/protocol: 2.4 GHz / Dynastream ANT protocol
Communication range: > 1 m (receiver dependent)
Regulatory compliance: FCC, IC, and CE ready
FCC Compliance
This device complies with part 15 of the FCC Rules. Operation is subject to the following two
conditions: (1) This device may not cause harmful interference, and (2) this device must
accept any interference received, including interference that may cause undesired
operation.
NOTE: This equipment has been tested and found to comply with the limits for a Class B
digital device, pursuant to Part 15 of the FCC Rules. These limits are designed to provide
reasonable protection against harmful interference in a residential installation. This
equipment generates, uses and can radiate radio frequency energy and, if not installed and
used in accordance with the instructions, may cause harmful interference to radio
communications. However, there is no guarantee that interference will not occur in a
particular installation. If this equipment does cause harmful interference to radio or
television reception, which can be determined by turning the equipment off and on, the
user is encouraged to try to correct the interference by one or more of the following
measures:
- Reorient or relocate the receiving antenna.
- Increase the separation between the equipment and receiver.
- Connect the equipment into an outlet on a circuit different from that to which the receiver
is connected.

Copyright ©2006. Dynastream Innovations Inc.
- Consult the dealer or an experienced radio/TV technician for help.
Changes or modifications not expressly approved by the party responsible for compliance
could void the product warranty and the user’s authority to operate this equipment under
Part 15 regulations.