Garmin Canada USBL USB link transmitter User Manual pcv10 infoPOWER
DynaStream Innovations Inc. USB link transmitter pcv10 infoPOWER
UserManual.wiki
>
Garmin Canada
>
USBL User Manual
Manual
Navigation menu
Upload a User Manual
Namespaces
Wiki Guide
HTML
PDF
Info
Views
User Manual
Discussion / Help
Navigation
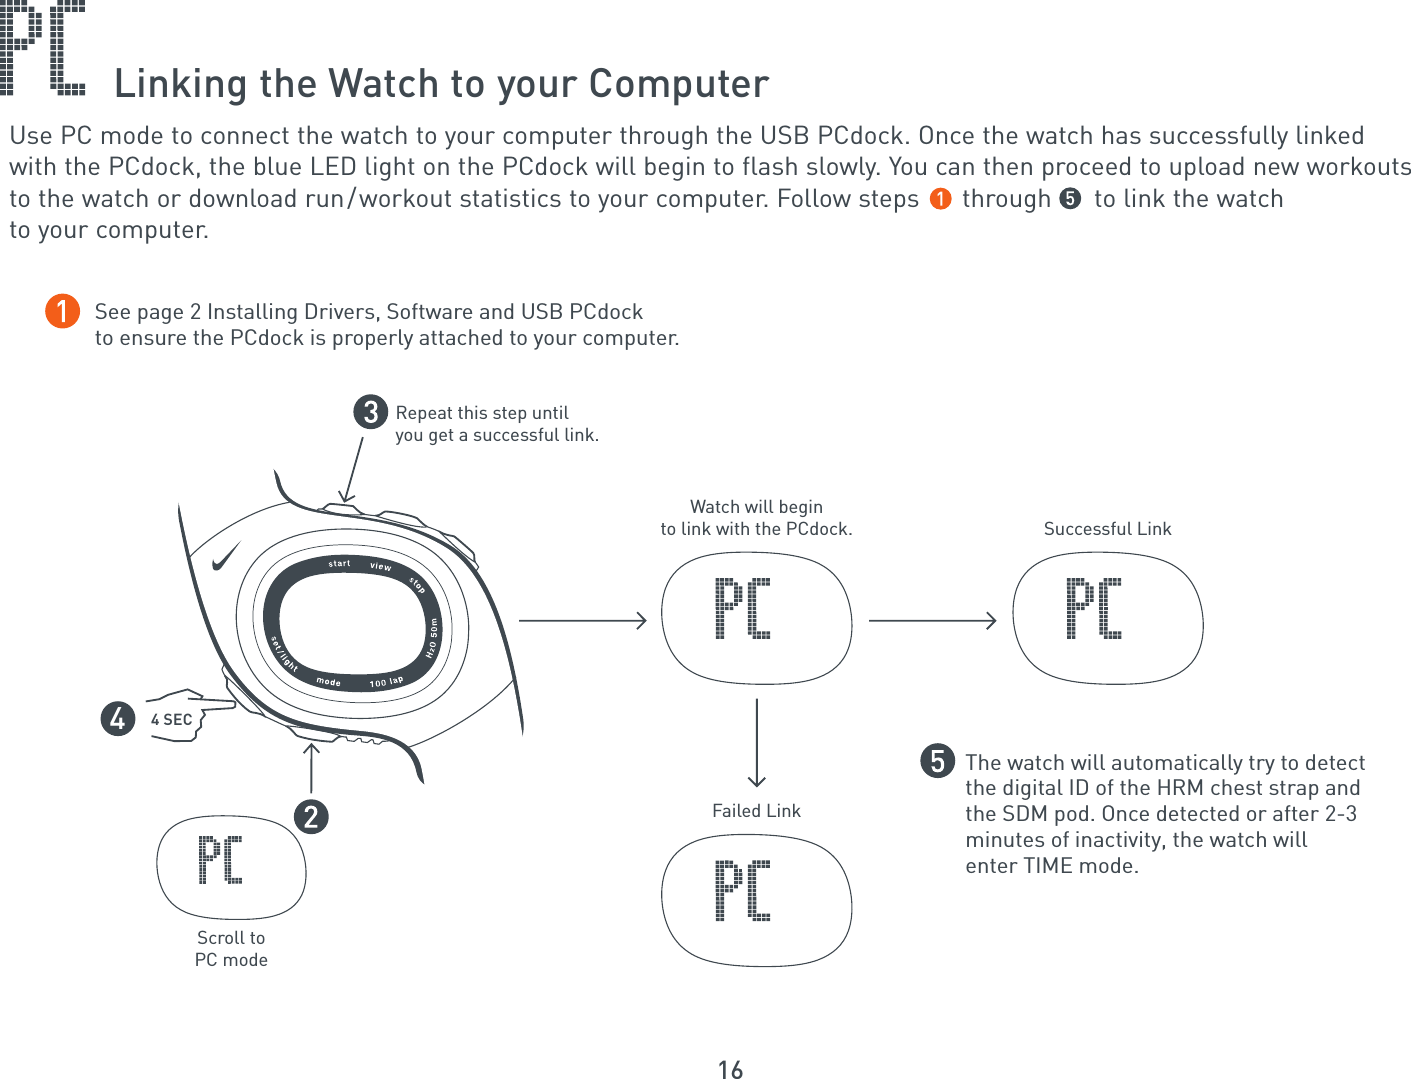
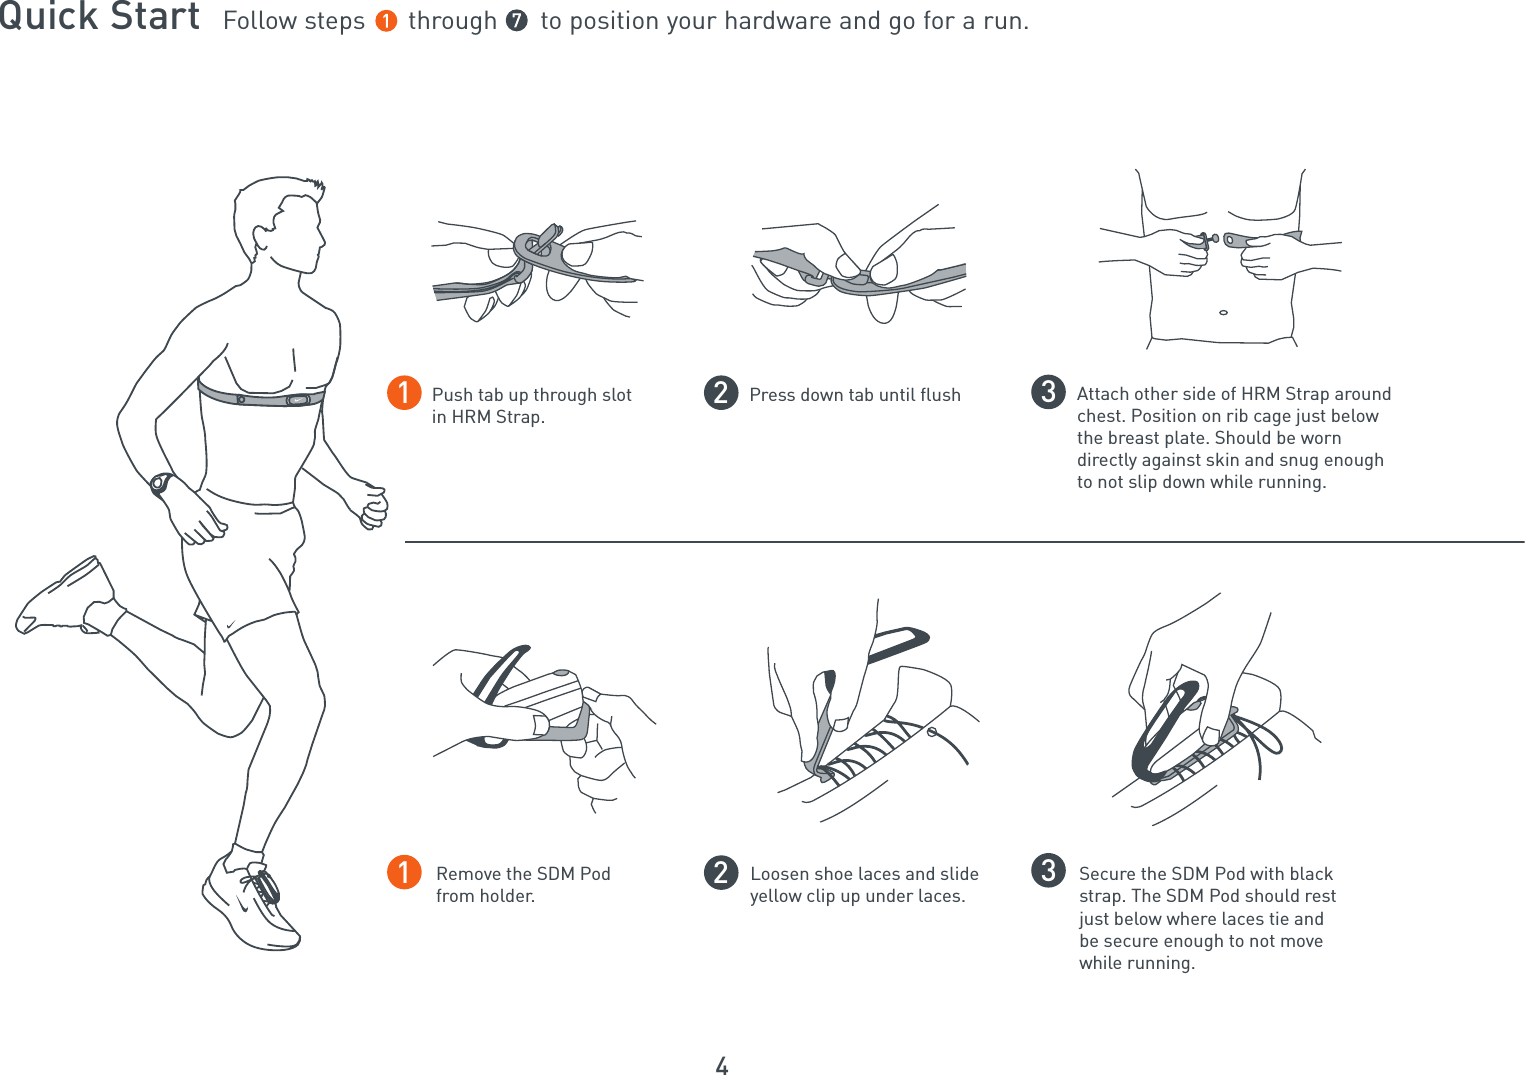
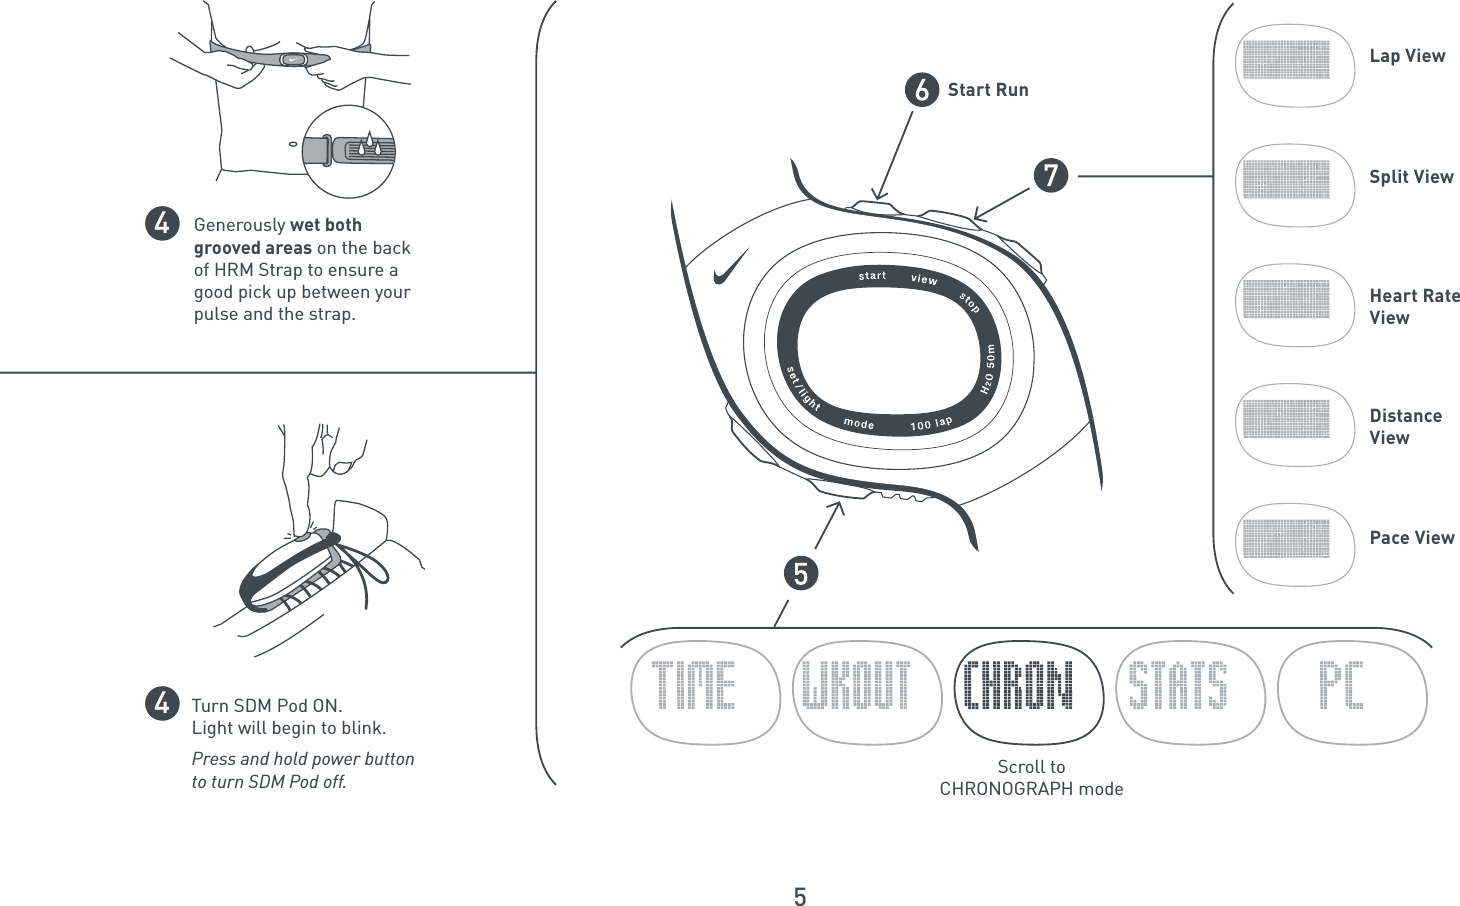
![Information is Power(text to come)triax pcv10 features• (text to come)•HRM StrapYour Heart Rate Monitor [HRM] Strap enables the Watch to display heart rate information. The HRM Strap will function automatically if worn correctly and is within a few meters of the watch. When worn directly against the skin, two electrodes detect the electrical impulses in your heart and transmit that data to the Watch as your heart rate.ATTENTION: Anyone beginning an exercise regimen for the first time (especially users of pacemakers or other implanted devices) should consult their physician or health professional before using the heart rate monitor.SDM PodYour Speed Distance Monitor [SDM] Pod measures the acceleration and deceleration of your foot 100 times each second. SDM Pod calculates your speed and distance even when your stride length or speed changes. Be sure to calibrate for best results.](https://usermanual.wiki/Garmin-Canada/USBL/User-Guide-290269-Page-1.png)

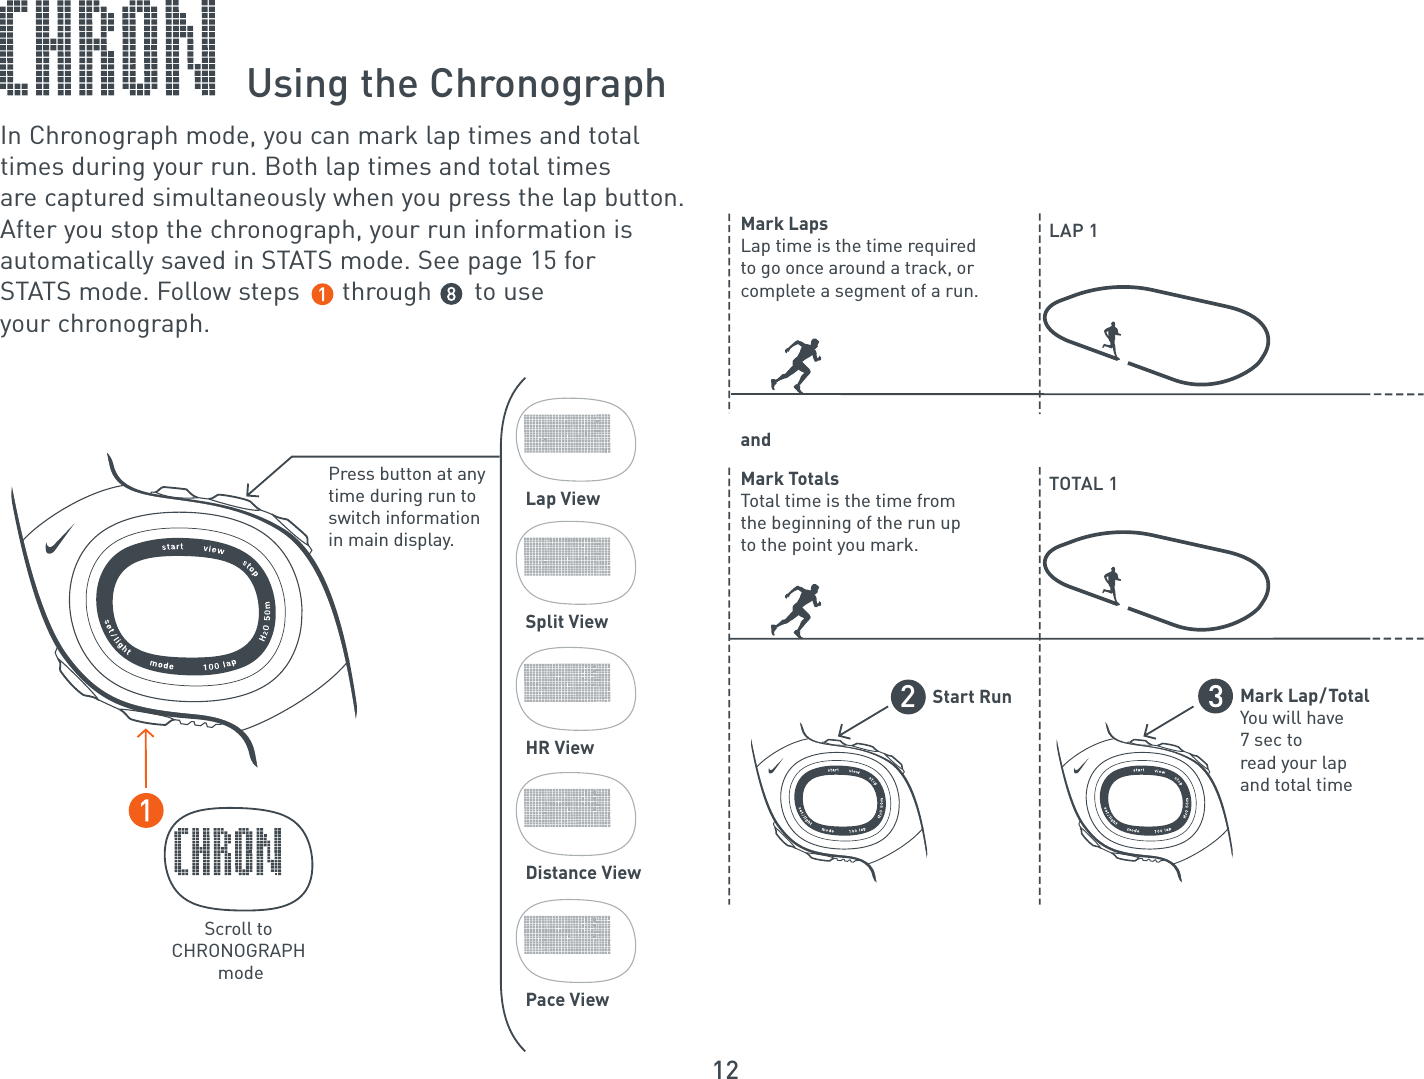
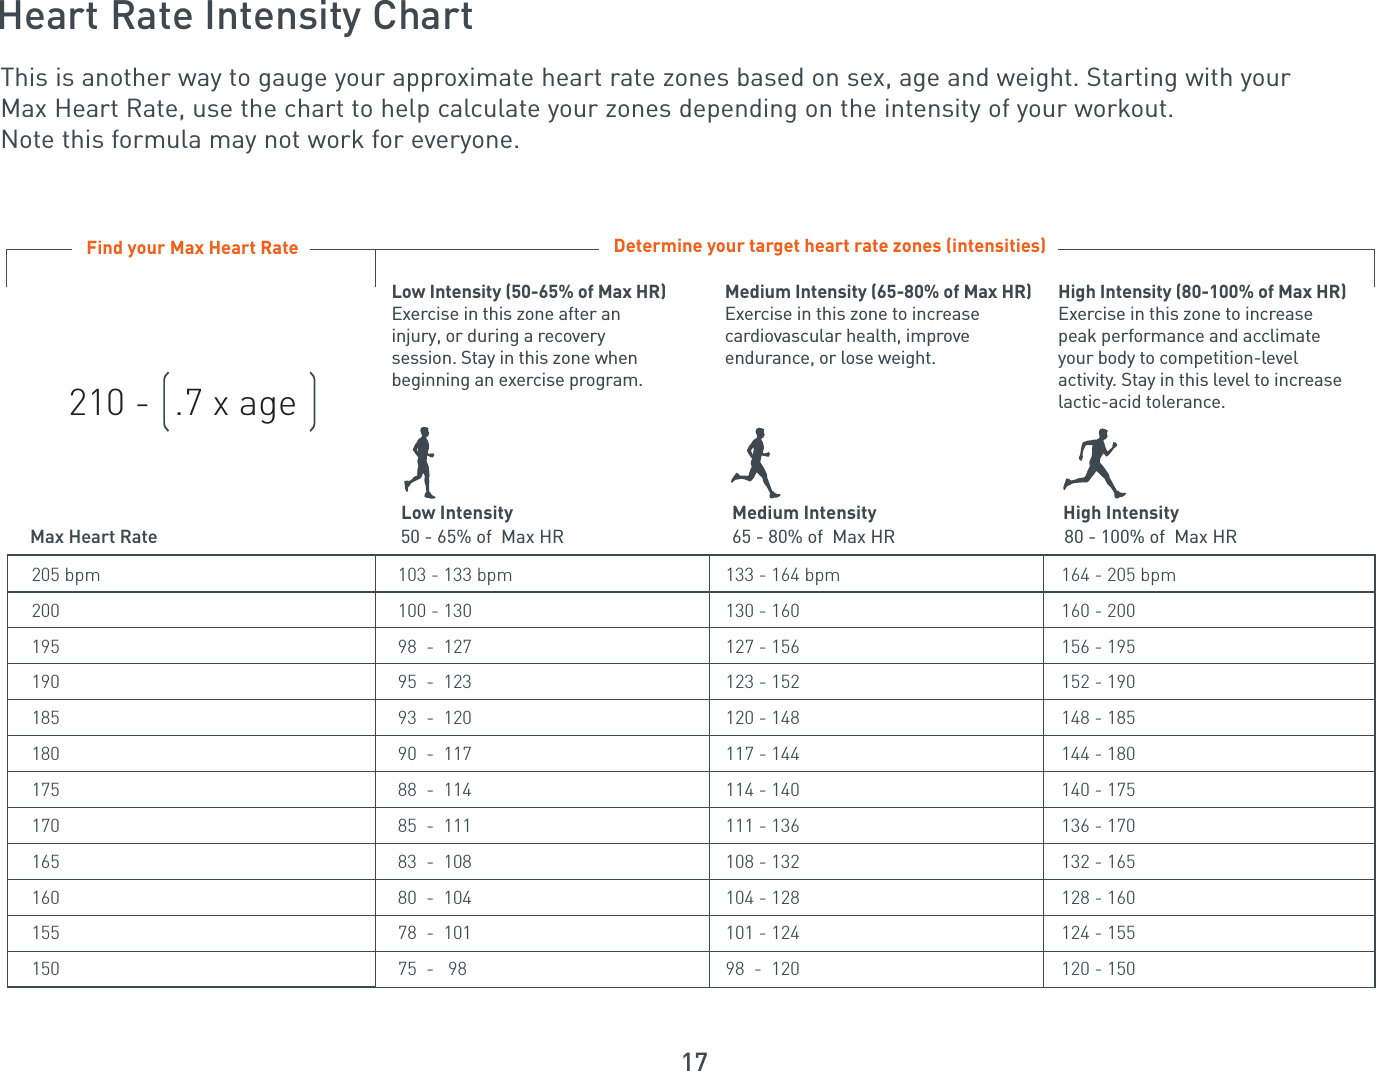
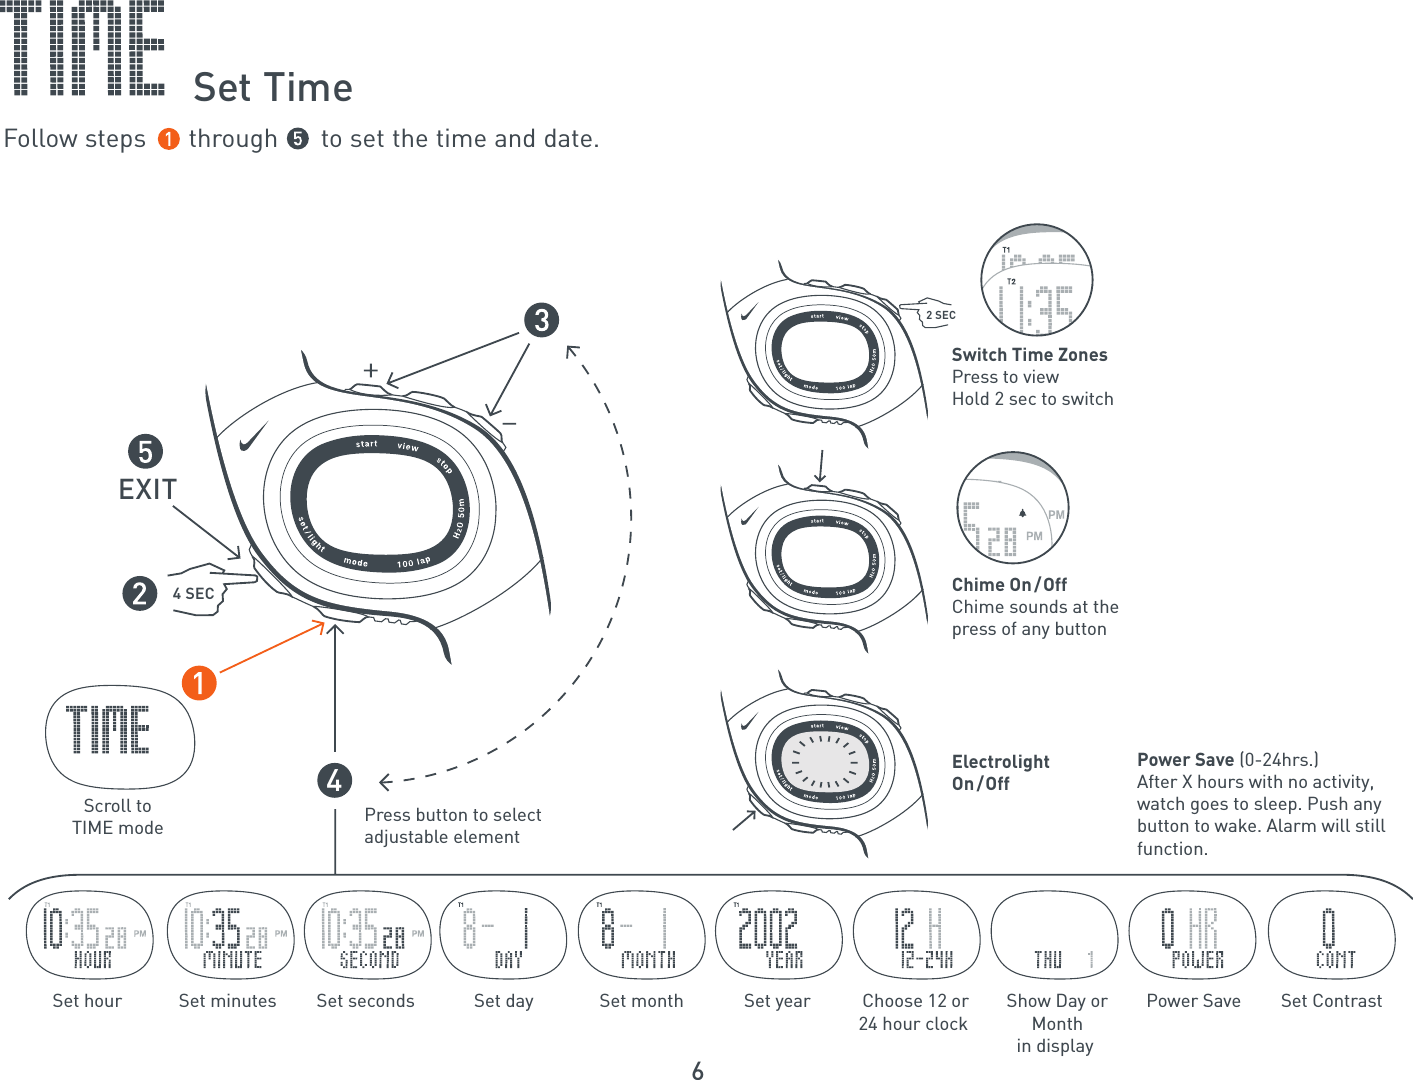
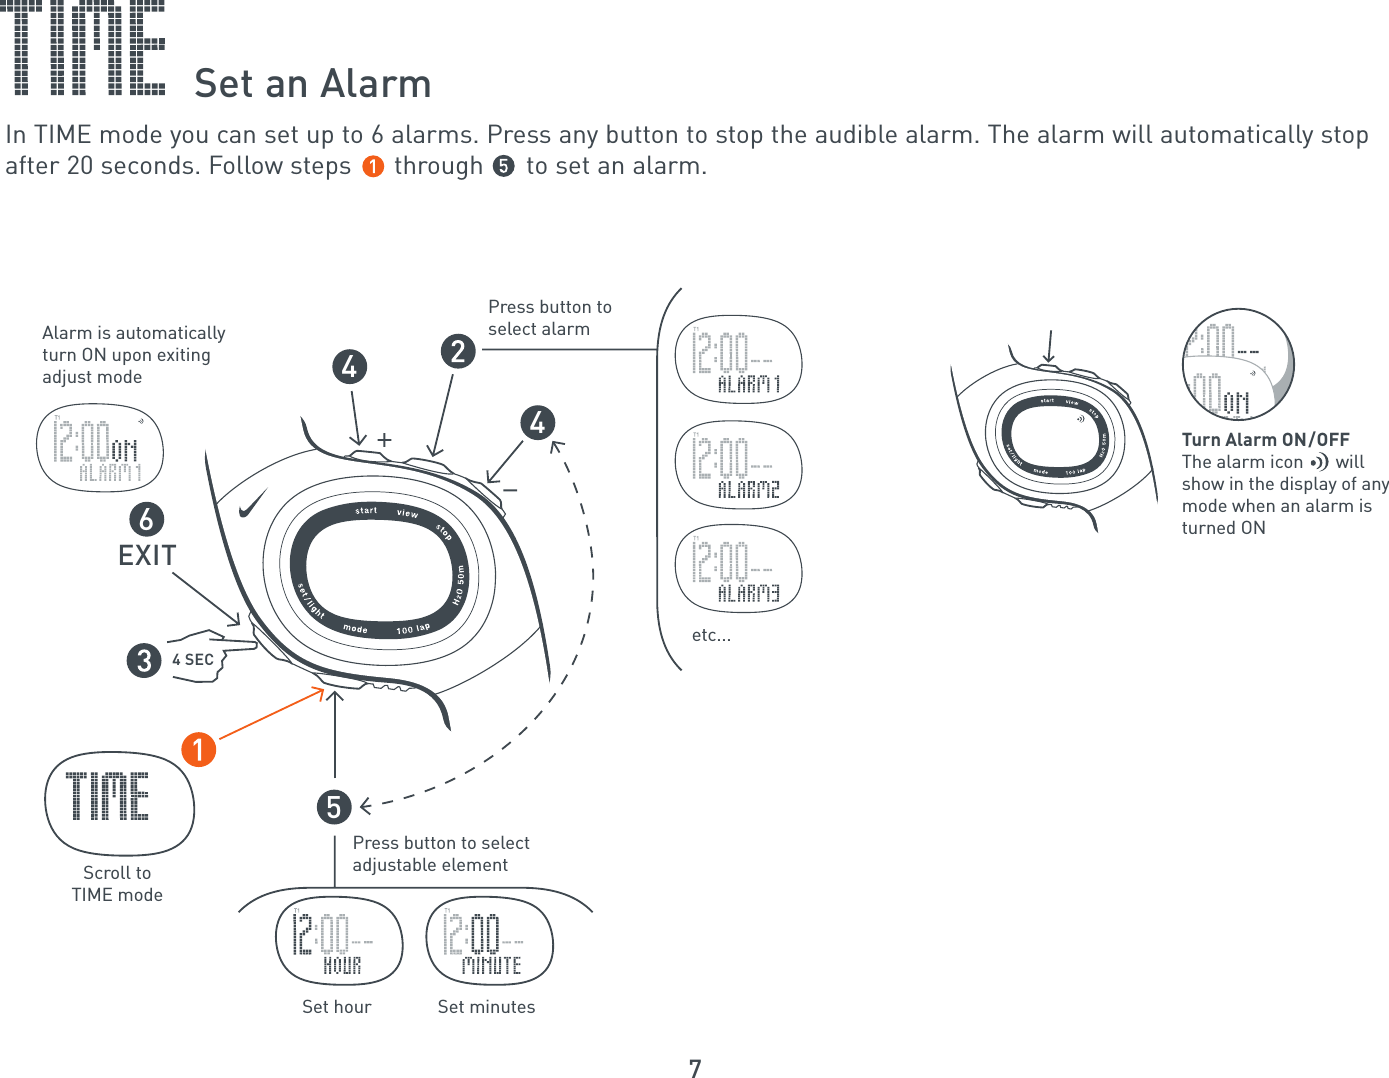
![3ContentsQuick Start . . . . . . . . . . . . . . . . . . . . . . . . . . . . . . . . . . . . . . . . . . . . . . . . . . . . . . . . . . . . . . . . . . . . . . . . . . . . . . . . . . . . . 4TIME modeSet Time . . . . . . . . . . . . . . . . . . . . . . . . . . . . . . . . . . . . . . . . . . . . . . . . . . . . . . . . . . . . . . . . . . . . . . . . . . . . . . . . . . . . . . . . 6Set an Alarm . . . . . . . . . . . . . . . . . . . . . . . . . . . . . . . . . . . . . . . . . . . . . . . . . . . . . . . . . . . . . . . . . . . . . . . . . . . . . . . . . . . . . 7WORKOUT modeProgramming Workouts . . . . . . . . . . . . . . . . . . . . . . . . . . . . . . . . . . . . . . . . . . . . . . . . . . . . . . . . . . . . . . . . . . . . . . . . . . . . 8Activate a Programmed Workout . . . . . . . . . . . . . . . . . . . . . . . . . . . . . . . . . . . . . . . . . . . . . . . . . . . . . . . . . . . . . . . . . . . . . 9Calibrating the Speed Distance Monitor [SDM] Pod . . . . . . . . . . . . . . . . . . . . . . . . . . . . . . . . . . . . . . . . . . . . . . . . . . . . . . 10Adjusting your Offset . . . . . . . . . . . . . . . . . . . . . . . . . . . . . . . . . . . . . . . . . . . . . . . . . . . . . . . . . . . . . . . . . . . . . . . . . . . . . . 11CHRONOGRAPH modeUsing the Chronograph . . . . . . . . . . . . . . . . . . . . . . . . . . . . . . . . . . . . . . . . . . . . . . . . . . . . . . . . . . . . . . . . . . . . . . . . . . . . 12Setting the Chronograph Auto-Lap . . . . . . . . . . . . . . . . . . . . . . . . . . . . . . . . . . . . . . . . . . . . . . . . . . . . . . . . . . . . . . . . . . . 14STATS modeReview Stored Runs/Workouts . . . . . . . . . . . . . . . . . . . . . . . . . . . . . . . . . . . . . . . . . . . . . . . . . . . . . . . . . . . . . . . . . . . . . . 15PC modeLinking the Watch to your Computer . . . . . . . . . . . . . . . . . . . . . . . . . . . . . . . . . . . . . . . . . . . . . . . . . . . . . . . . . . . . . . . . . . 16Heart Rate Chart . . . . . . . . . . . . . . . . . . . . . . . . . . . . . . . . . . . . . . . . . . . . . . . . . . . . . . . . . . . . . . . . . . . . . . . . . . . . . . . . . 17Running Pace Chart . . . . . . . . . . . . . . . . . . . . . . . . . . . . . . . . . . . . . . . . . . . . . . . . . . . . . . . . . . . . . . . . . . . . . . . . . . . . . . . 18Troubleshooting . . . . . . . . . . . . . . . . . . . . . . . . . . . . . . . . . . . . . . . . . . . . . . . . . . . . . . . . . . . . . . . . . . . . . . . . . . . . . . . . . . 19Water Resistance . . . . . . . . . . . . . . . . . . . . . . . . . . . . . . . . . . . . . . . . . . . . . . . . . . . . . . . . . . . . . . . . . . . . . . . . . . . . . . . . . 20Mode Limits . . . . . . . . . . . . . . . . . . . . . . . . . . . . . . . . . . . . . . . . . . . . . . . . . . . . . . . . . . . . . . . . . . . . . . . . . . . . . . . . . . . . . 20Material Specifications . . . . . . . . . . . . . . . . . . . . . . . . . . . . . . . . . . . . . . . . . . . . . . . . . . . . . . . . . . . . . . . . . . . . . . . . . . . . . 20FCC Compliance . . . . . . . . . . . . . . . . . . . . . . . . . . . . . . . . . . . . . . . . . . . . . . . . . . . . . . . . . . . . . . . . . . . . . . . . . . . . . . . . . . 20Battery . . . . . . . . . . . . . . . . . . . . . . . . . . . . . . . . . . . . . . . . . . . . . . . . . . . . . . . . . . . . . . . . . . . . . . . . . . . . . . . . . . . . . . . . . 21Warranty . . . . . . . . . . . . . . . . . . . . . . . . . . . . . . . . . . . . . . . . . . . . . . . . . . . . . . . . . . . . . . . . . . . . . . . . . . . . . . . . . . . . . . . . 22Service Centers . . . . . . . . . . . . . . . . . . . . . . . . . . . . . . . . . . . . . . . . . . . . . . . . . . . . . . . . . . . . . . . . . . . . . . . . . . . . . . . . . . 22Index . . . . . . . . . . . . . . . . . . . . . . . . . . . . . . . . . . . . . . . . . . . . . . . . . . . . . . . . . . . . . . . . . . . . . . . . . . . . . . . . . . . . . . . . . . . 23This document with updates is available online at www.nike.com /manuals](https://usermanual.wiki/Garmin-Canada/USBL/User-Guide-290269-Page-4.png)

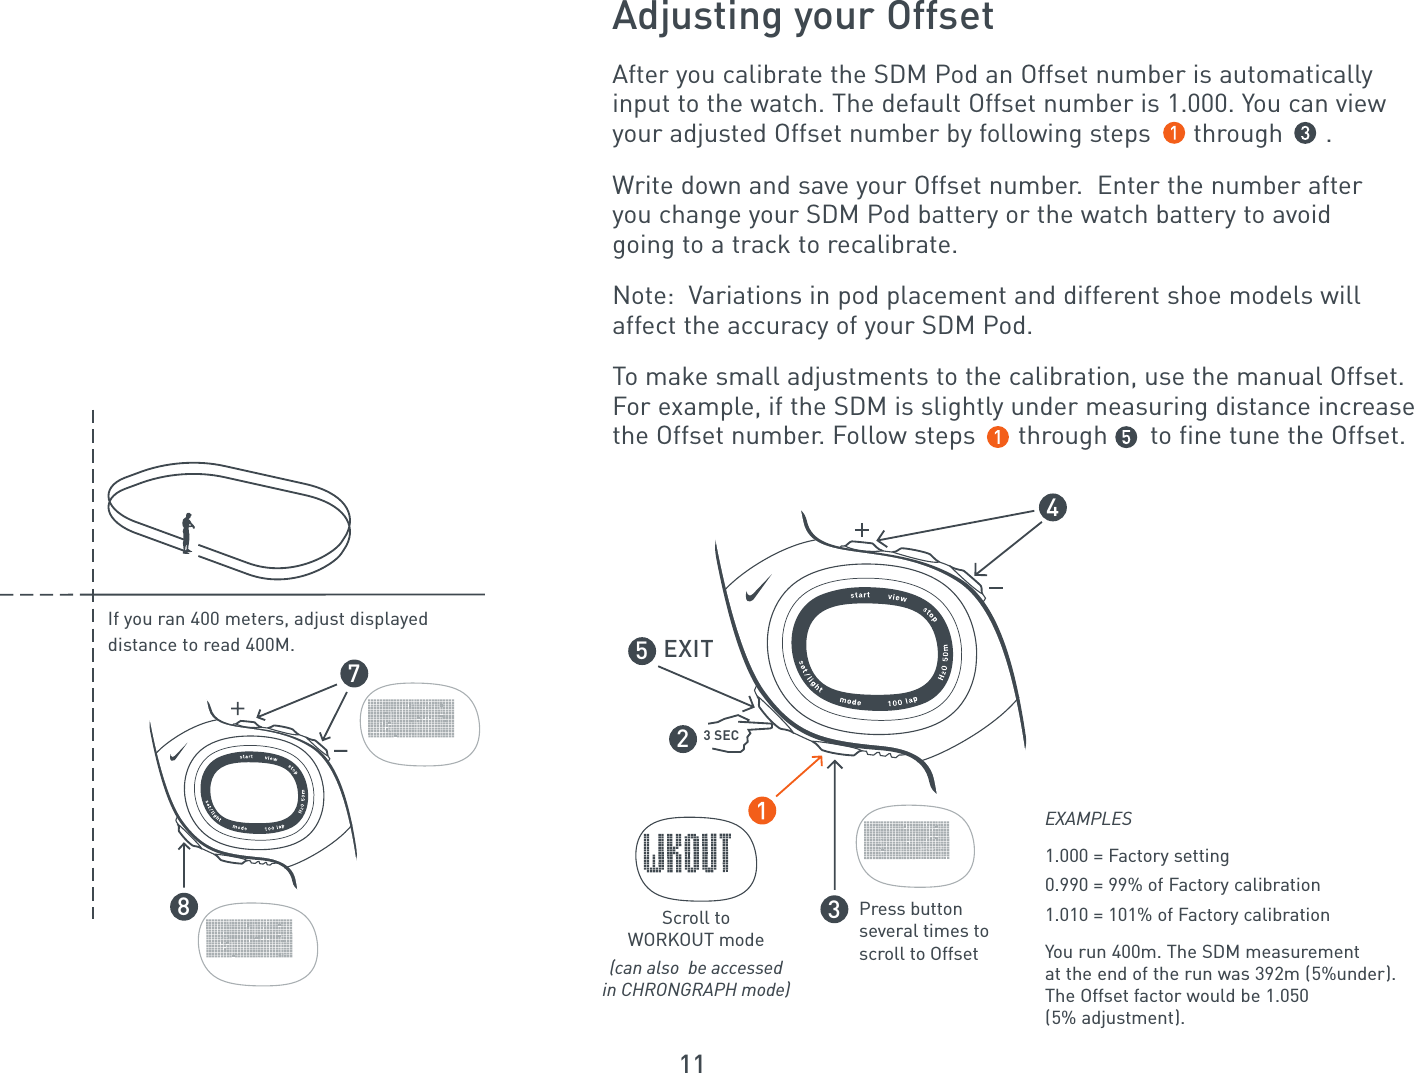
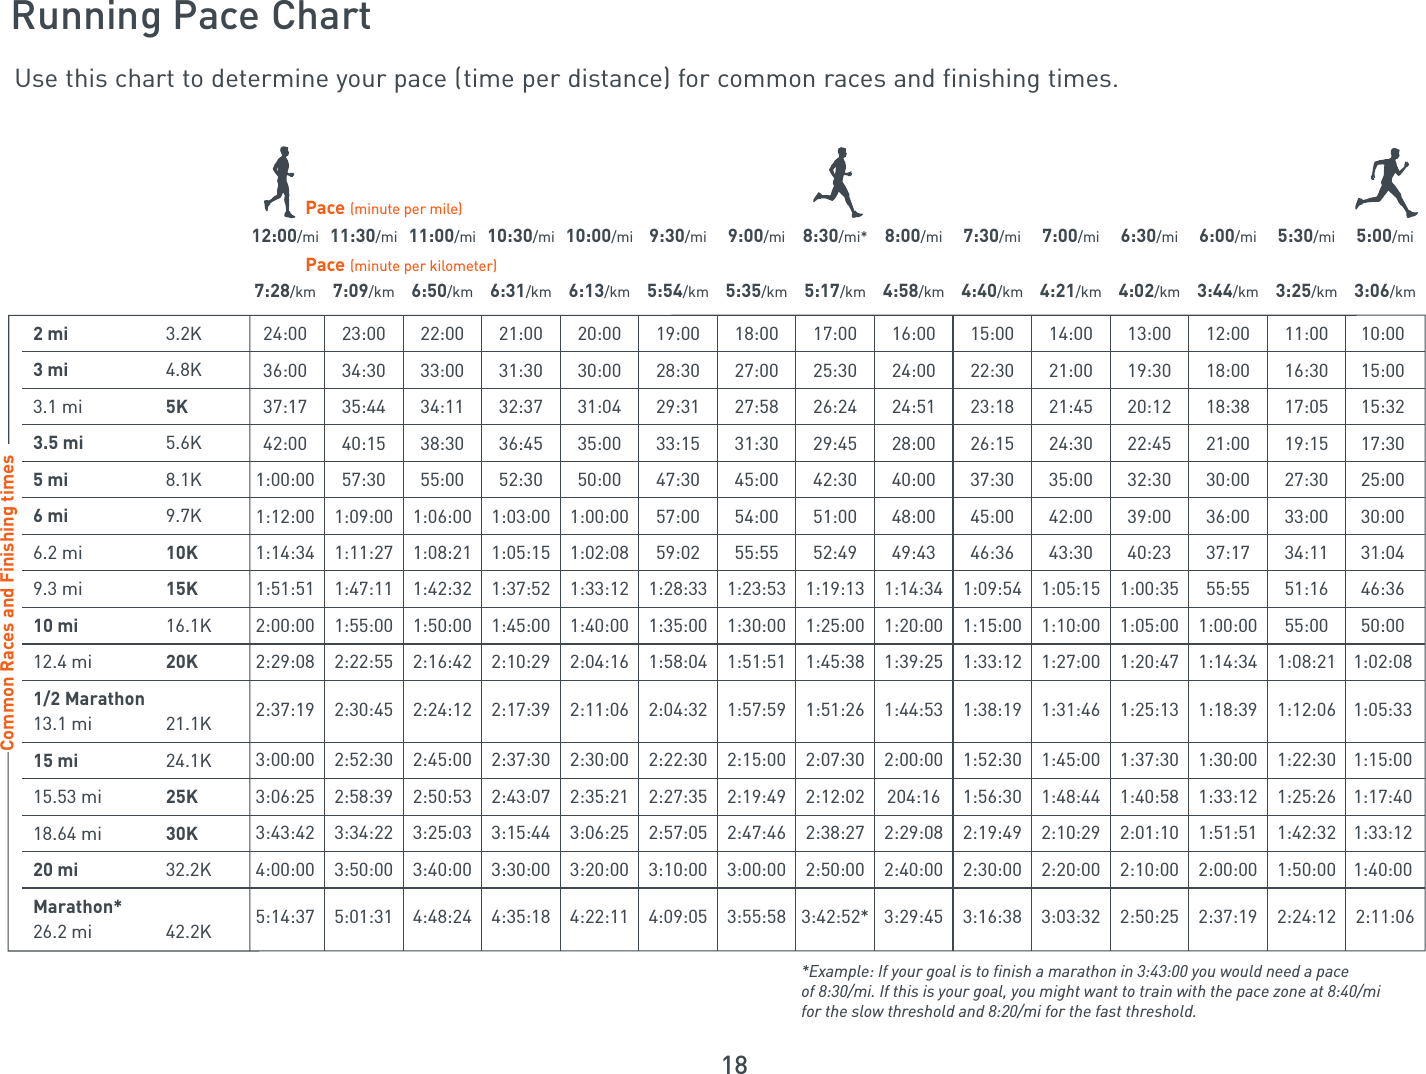
![10Calibrating the Speed Distance Monitor [SDM] PodOnce calibarated, your SDM Pod is over 97% accurate. Use either WORKOUT mode or CHRONOGRAPH mode to calibrate the SDM Pod. Calibrate your SDM Pod by running 400-800 meters on a marked track, then adjust the watch to exact distance. You will need to calibrate the SDM Pod each time you replace the watch battery. Follow steps through to automatically caliibrate your SDM Pod.Scroll toWORKOUT modeTurn SDMPod ONorScroll toCHRONOGRAPH mode3 SECPress button several times to scroll to Calibrate3456Run at your usual pace on the inside lane.Complete 1-2 laps (400-800 meters).Go to a 400 meter marked track.400 meter](https://usermanual.wiki/Garmin-Canada/USBL/User-Guide-290269-Page-11.png)