Garmin 01364 LOW POWER COMMUNICATIONS TRANSMITTER User Manual 2
Garmin International Inc LOW POWER COMMUNICATIONS TRANSMITTER Users Manual 2
Garmin >
Contents
- 1. Users Manual 1
- 2. Users Manual 2
Users Manual 2
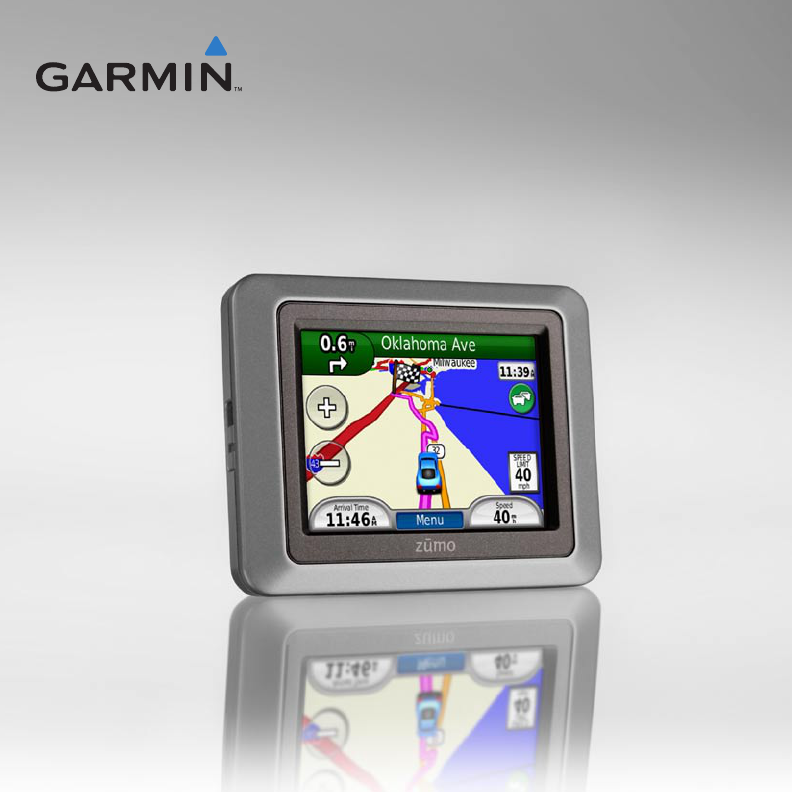
zumo® 200 series
quick start manual
for use with the zūmo 220
January 2009 190-01144-01 Rev. A Printed in Taiwan
2
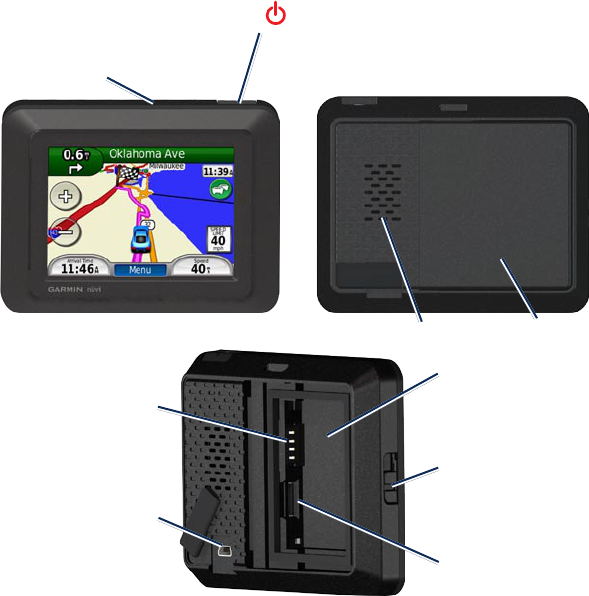
Your zūmo
Serial number
under the battery
Mini-USB
connector under
the weather cap microSD
™
card slot
under the battery
Release key: Slide
up to open the
battery cover.
Battery
contacts
Power button:
Press and hold to turn on/off the zūmo.
Press quickly to adjust the backlight
brightness.
Speaker
GPS antenna
Battery cover
3
Important Information
‹
Warning
See the Important Safety and Product
Information guide in the product box for
product warnings and other important
information.
‹
Warning
This product contains a lithium-ion battery.
To prevent personal injury or device
damage, remove the device from the
vehicle when exiting or store it out of direct
sunlight.
‹
Warning
Before mounting the zūmo, see the Important
Safety and Product Information guide
for information about laws pertaining to
windshield mounting.
Getting Started
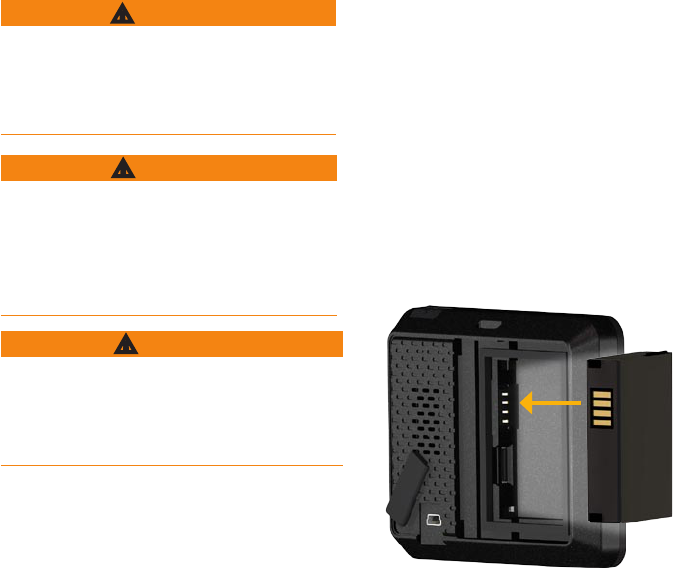
Install the zūmo Battery
1. Locate the lithium-ion battery that came
in the product box.
2. Slide the release key up to open the
battery cover on the back of the zūmo.
3. Locate the metal contacts on the end of
the lithium-ion battery.
4. Insert the battery so that the metal
contacts on the battery match up with
the metal contacts inside the battery
compartment.
5. Press the battery into place.
6. Slide the battery cover back on until it
clicks into place.
4
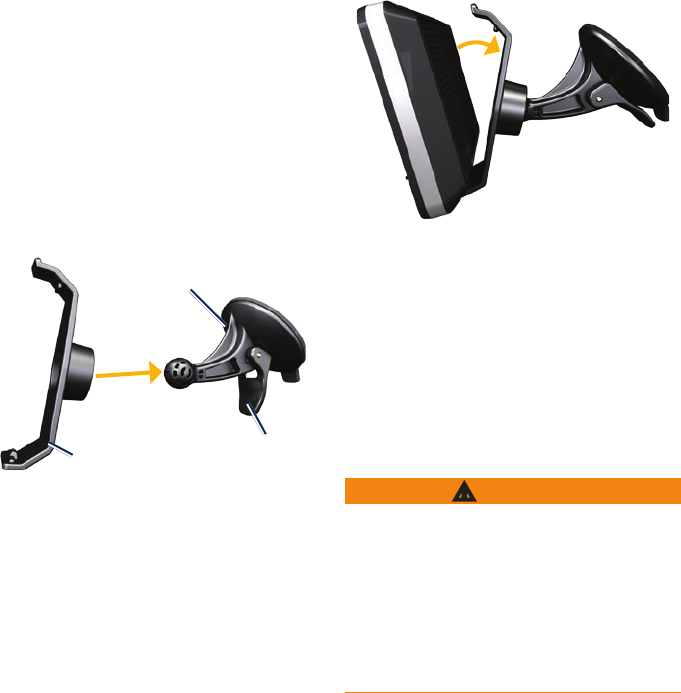
Mount Your zūmo in an
Automobile
1. Pull back the weather cap from the mini-
USB connector located on the back of
your zūmo.
2. Plug the vehicle power cable into the
mini-USB connector.
3. Snap the cradle onto the suction cup
arm.
Cradle
Lever
Suction cup
arm
4. Remove the clear plastic from the suction
cup. Clean and dry your windshield and
the suction cup with a lint-free cloth.
5. Place the suction cup on the windshield.
6. Flip the lever back, toward the
windshield.
7. Fit the bottom of your zūmo into the
cradle.
8. Tilt the zūmo back until it snaps into
place.
9. Plug the other end of the vehicle power
cable into a power outlet in your vehicle.
Your zūmo should turn on automatically if
it is plugged in and the vehicle is running.
Mount Your zūmo on the
Motorcyle
‹
Warning
Incorrectly wiring the power cable with
bare wire leads can result in damage to the
vehicle or the battery and can cause bodily
injury. Garmin strongly recommends having
an experienced installer with the proper
knowledge of electrical systems install the
unit.
5
Step 1: Connect Power to the
zūmo
Select a suitable and secure location to
mount the zūmo on your motorcycle, based
on available power sources and safe cable
routing.
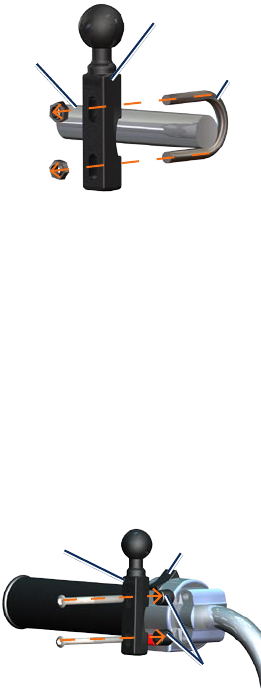
Step 2: Install the Handlebar
Base
The zūmo includes parts for two handlebar
installation solutions. Custom mounts can
require additional hardware (www.ram-
mount.com).
A) To install the U-bolt and handlebar
base:
1. Place the U-bolt around the handlebar,
and thread the ends through the
handlebar base.
2. Tighten the nuts to secure the base. Do
not overtighten.
NOTE: The recommended torque is 50 lbf-
in. Do not exceed torque of 80 lbf-in.
Handlebar
base
Handlebar
U-bolt
B) To install the handlebar base to the
clutch/brake clamp bracket:
NOTE: Both 1/4 in. standard and M6 bolts
are included. Match the size of the factory
bolts on your clutch/brake clamp bracket.
1. Remove the two factory bolts on your
clutch/brake clamp bracket.
2. Thread the new bolts through the
handlebar base, spacers, and clamp
bracket.
3. Tighten the bolts to secure the base.
Clutch/brake
clamp bracket
Handlebar
base
Spacers
6
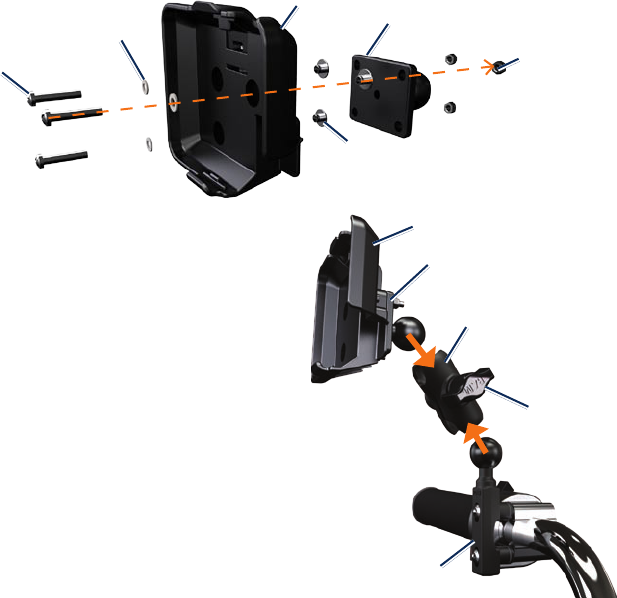
Base plate
Cradle
Panhead screws
Washers
Spacers
Nuts
Step 3: Attach the Base Plate to
the zūmo Mount
1. Thread the M4 × 40 mm panhead screws
through the washers, cradle, spacers,
and base plate.
2. Tighten the nuts to secure the base
plate.
Step 4: Attach the Base Plate to
the Handlebar Base
1. Align the ball of the handlebar base and
the ball of the base plate with the double-
socket arm.
2. Tighten the knob slightly.
3. Adjust for better viewing and operation.
4. Tighten the knob to secure the mount.
Cradle
Base plate
Double-socket arm
Knob
Handlebar base
7
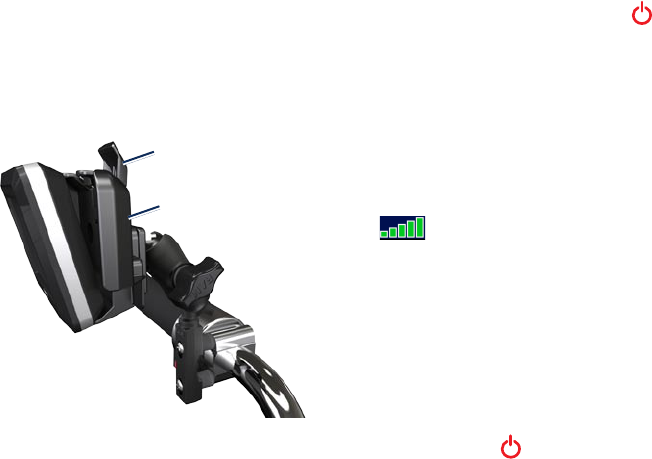
Step 5: Install Your zūmo in the
Mount
1. Fit the bottom of your zūmo into the
cradle.
2. Tilt the zūmo back until it snaps into
place.
Cradle
Release button
Remove Your zūmo from Either
Mount
1. Press the release tab on the top of the
mount to release the zūmo.
2. Lift out the zūmo.
3. Place the weather cap on the cradle
(motorcycle mount only).
Congure the zūmo
To turn on your zūmo, press and hold .
Follow the on-screen instructions.
Acquire Satellites
Go outdoors to an open area, out of garages,
and away from tall buildings. Stop your
vehicle, and turn on the zūmo. Acquiring
satellite signals may take a few minutes.
The bars indicate satellite strength.
When the bars are green, the zūmo has
acquired satellites signals. Now you can
select a destination and navigate to it.
Resetting the zūmo
If the zūmo stops functioning, turn the
zūmo off and on again. If this does not
help, press and hold for 10 seconds. The
zūmo should operate normally. You can also
remove the battery, and then reinstall it.
8
Using the Menu Page
➊➋ ➌
➍
➎
➏ ➐
➑➒
➊
GPS satellite strength.
➋
Bluetooth headset status.
NOTE: Pages appear differently based on
your usage mode and settings.
➌
Touch to change usage mode.
➍
Battery status.
➎
Current time. Touch to change time
settings.
➏
Touch to nd a destination.
➐
Touch to view the map.
➑
Touch to adjust the volume.
➒
Touch to use the tools such as settings,
Where Am I?, Help, and routes.
Finding Points of Interest
1. Touch Where To? > Points of Interest.
2. Select a category.
3. Select a destination, and touch go!.
To search by name, touch Where To? >
Points of Interest > Spell Name.
To search in a different area, touch Where
To? > Near.
Using the Go! Page
➊➋
➌➍
➊
Touch to view the route on the map.
➋
Touch to start navigating the route.
➌
Touch to view this location and
surrounding areas on the map.
➍
Touch to save this location to your
Favorites.
9
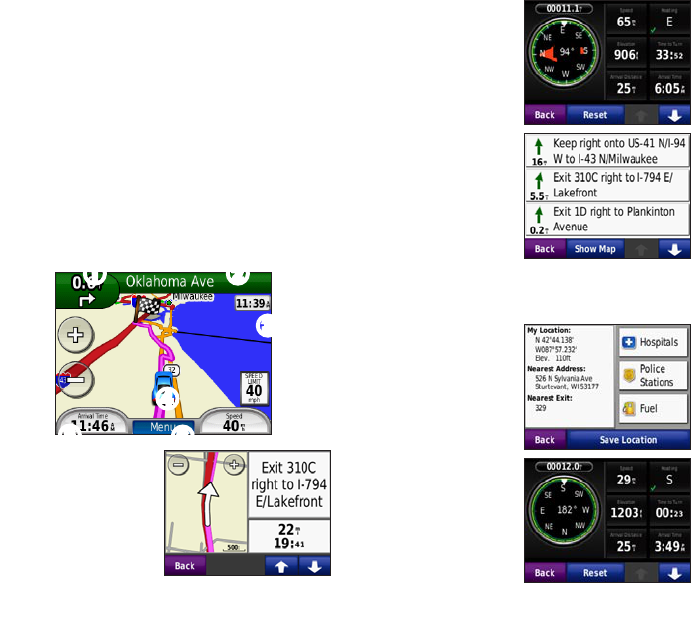
Using the Map Page
Your route is marked with a magenta line.
As you travel, your zūmo guides you to
your destination with voice prompts, arrows
on the map, and directions at the top of
the map. A checkered ag marks your
destination. If you depart from the original
route, your zūmo recalculates the route and
provides new directions.
➊ ➋
➎➏
➍
➌
➊
Touch to view
the next turn
(navigating on
road).
➊
Touch to view
the compass
(navigating off
road).
➋
Touch the text
bar to view the
turn list.
➌
Touch to zoom
in and out.
➍
Touch the
vehicle icon to
view the Where
Am I? page.
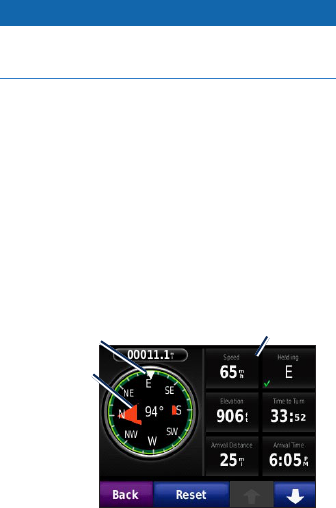
➎
Touch to
view the trip
computer.
➏
Touch to view
the Menu page.
10
Taking a Detour
If the road ahead is closed, you can take a
detour.
NOTE: Detour is not available when
navigating off road.
1. With a route active, touch Menu.
2. Touch Detour.
The zūmo attempts to nd an alternate route
that avoids the current road or the next road
on your turn list, and then returns to your
original route. If the route you are currently
navigating is the only reasonable option, the
zūmo might not calculate a detour.
Adding a Stop to Your Route
1. With a route active, touch Menu >
Where To?.
2. Search for the extra stop.
3. Touch go!.
4. Touch Add as Via Point to add this stop
before your destination.
OR
Touch Set as new Destination to make
this your new nal destination.
Tip
To add more than one stop, edit the current
route. Touch Where To? > Custom Routes.
Navigating Off Road
When you choose a destination while the
off road feature is enabled, the zūmo plots a
straight line to the destination.
1. Touch Tools > Settings > Navigation.
2. Under Route Preference, touch Off
Road.
Direction to
destination
Customizable
data elds
Heading
11
Pairing your Bluetooth®
Headset
You can listen to zūmo audio with your
Bluetooth headset. The rst time you use
two devices together, you must “pair” them.
Your Bluetooth headset and the zūmo must
be turned on and be within 10 meters of
each other. After the initial pairing, the two
devices can connect automatically each time
you turn them on.
1. Touch Tools > Settings > Bluetooth.
2. Enable Bluetooth technology on your
zūmo.
3. Under connections, touch Add or
Change.
4. Enable Find Me/Discoverable/Visible
mode on your headset.
5. Touch OK on the zūmo.
6. Select your headset, and touch OK.
7. Enter the Bluetooth PIN for your headset,
if necessary, and touch Done.
8. Touch OK.
Using TracBack®
Touch Where To? > TracBack to view your
recent track. Touch Save to save the track to
your Favorites. Touch Go! to retrace your
recent path of travel.
Securing Your zūmo
1. Touch Tools > Settings > Security >
Garmin Lock.
2. Enter a 4-digit PIN and drive to a security
location.
NOTE: If you forget your PIN and your
security location, you must send your zūmo
to Garmin to get it unlocked. You must also
send a valid product registration or proof of
purchase.
Charging Your nüvi
Charge your nüvi for at least 4 hours before
using on battery power.
Connect the vehicle power cable.
Connect the USB cable (included in
some packages).
Connect an AC adapter (optional
accessory).
•
•
•
12
Product Registration
Help us better support you by completing
our online registration today! Connect to our
Web site at http://my.garmin.com. Keep the
original sales receipt, or a photocopy, in a
safe place.
Contact Garmin
Contact Garmin if you have any questions
while using your zūmo. In the USA, go
to www.garmin.com/support, or contact
Garmin USA by phone at (913) 397-8200 or
(800) 800-1020.
In the UK, contact Garmin (Europe) Ltd. by
phone at 0808 2380000.
In Europe, go to www.garmin.com
/support and click Contact Support for
in-country support information, or contact
Garmin (Europe) Ltd. by phone at +44 (0)
870.8501241.
More Information
For more information about your zūmo,
touch Tools > Help. You can download the
latest version of the owner’s manual from
www.garmin.com. For information about
accessories, go to http://buy.garmin.com or
contact your Garmin dealer.
© 2009 Garmin Ltd. or its subsidiaries
Garmin
®
, zūmo
®
, and TracBack
®
are trademarks of
Garmin Ltd. or its subsidiaries, registered in the USA
and other countries. Garmin Lock
™
is a trademark of
Garmin Ltd. or its subsidiaries. These trademarks may
not be used without the express permission of Garmin.
microSD
™
is a trademark of the SD Card Association.
Other trademarks and trade names are those of their
respective owners.