Garmin 01848 LOW POWER TRANSMITTER User Manual USERS MANUAL
Garmin International Inc LOW POWER TRANSMITTER USERS MANUAL
Garmin >
Contents
- 1. USERS MANUAL 1
- 2. USERS MANUAL 2
- 3. USERS MANUAL
- 4. USER MANUAL 2
USERS MANUAL
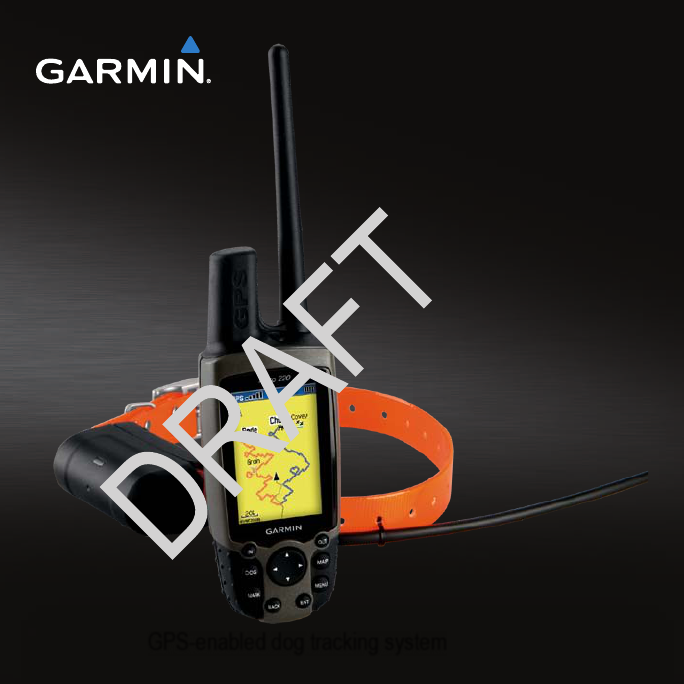
Astro® X20
owner’s manual
GPS-enabled dog tracking system

© 2011 Garmin Ltd. or its subsidiaries
All rights reserved. Under the copyright laws, this manual may not be copied, in whole or in part, without the
written consent of Garmin. Garmin reserves the right to change or improve its products and to make changes
in the content of this manual without obligation to notify any person or organization of such changes or
improvements. Go to www.garmin.com for current updates and supplemental information concerning the use
of this product.
Garmin®, the Garmin logo, Astro®, City Navigator®, and TracBack®, registered in the USA and other
countries. BaseCamp™ and myGarmin™ are trademarks of Garmin Ltd. or its subsidiaries. These trademarks
may not be used without the express permission of Garmin.
Windows® is a registered trademark of Microsoft Corporation in the United States and/or other countries.
Mac® is a registered trademark of Apple Computer, Inc. Other trademarks and trade names are those of their
respective owners.
Astro X20 and DC40 Owner’s Manual 3
Introduction
See the Important Safety and Product
Information guide in the product
box for product warnings and other
important information.
notice
Do not attempt to track your dog using
the Astro® and the DC 40 until you
have completed the following tasks.
1. Install batteries in the Astro.
2. Charge the DC 40.
3. Turn on the devices.
4. Acquire satellites.
5. Calibrate the compass.
6. Attach the DC 40 to your dog.
7. Start a new hunt.
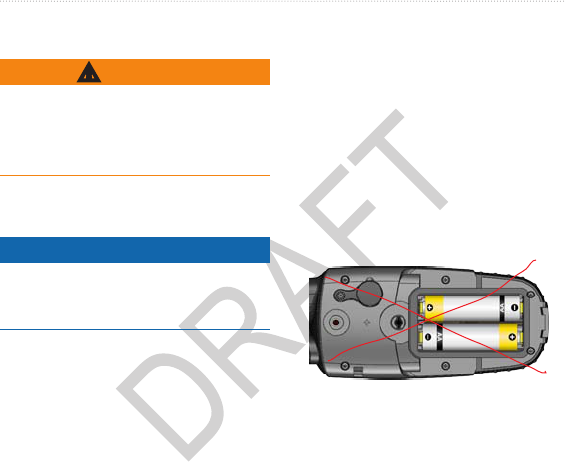
The Astro operates on two AA batteries
(not included). Use alkaline, NiMH, or
lithium batteries.
1. Remove the battery cover by
turning the D-ring 1/4 turn
counterclockwise and pulling up.
2. Insert the batteries, observing
polarity.
3. Replace the battery cover.
Charge the DC 40 completely before
using it on a hunt. Charging a depleted
DC 40 battery takes 4½ hours.
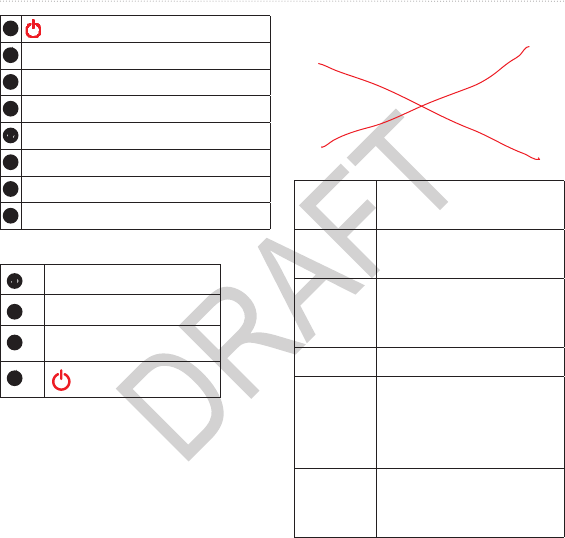
4 Astro X20 and DC40 Owner’s Manual
Introduction
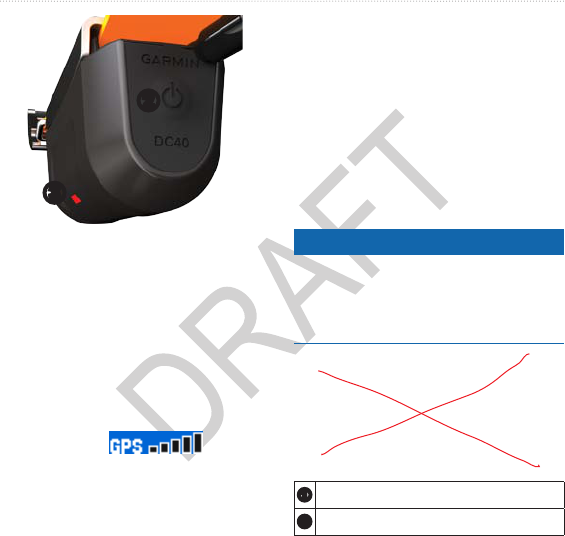
1. Connect the power cable
➊
to an
appropriate electrical source.
➊
➋
2. Slide the charging clip
➋
onto the
DC 40.
3. Charge the DC 40 completely.
The blue LED ashes when the
DC 40 is charging. The blue LED
is solid when the DC 40 is fully
charged.
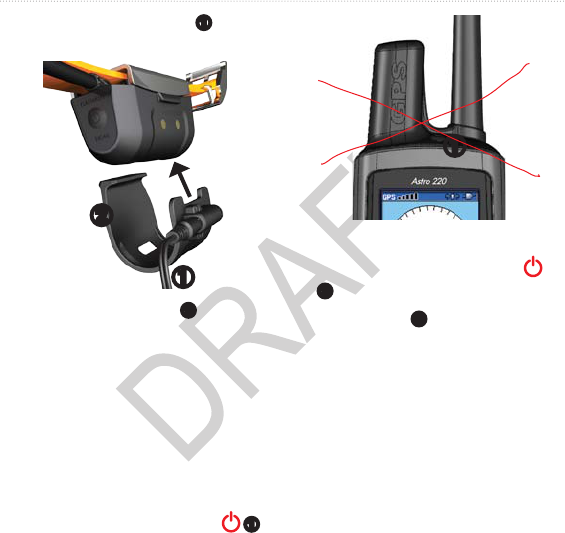
1. On the Astro, press and hold
➊
.
➊
2. Follow the on-screen instructions.
3. On the DC 40, press and hold
➋
.
The red LED
➌
ashes (single
blink) when the DC 40 is on and
searching for satellite signals.
TIP: Turn on the DC 40 and let it
acquire satellites before you put it
on your dog.
Astro X20 and DC40 Owner’s Manual 5
Introduction
➋
➌
Before you can track your dog using
the Astro and the DC 40, both devices
must acquire GPS satellite signals.
Acquiring satellite signals can take a
few minutes.
1. Go outdoors to an open area, away
from tall buildings and trees.
2. Wait for the bars on
the Astro to turn black.
The bars indicate satellite strength.
3. Wait for the DC 40 to acquire
satellite signals.
The red LED ashes (single blink)
when the DC 40 is searching for
satellite signals. The red LED
double blinks at each pulse when
the DC 40 has acquired satellite
signals.
notice
Avoid using a high-powered radio
(greater than 5 watts) in close
proximity to the Astro. It may cause
irreversible damage to the Astro.
➊
GPS antenna
➋
VHF antenna
6 Astro X20 and DC40 Owner’s Manual
Introduction
➌
Power key
➍
Display
➎
Keypad
➏
Belt clip button
➐
Wrist strap slot
➑
USB port (under weather cap)
➒
Battery compartment
➓
microSD card tray under batteries
➊
VHF antenna
➋
Collar
➌
GPS antenna
➍
Power key
Press to view the Dog
Tracker page.
Press to mark your
current location.
Press to cancel data
entry or return to the
previous menu or page.
Press to view the map.
Press to open the menu
for the active page.
Press twice to open the
main menu.
()
Press to select options
and acknowledge
messages.
Astro X20 and DC40 Owner’s Manual 7
Introduction
Press to view or scroll
through options and to
move the map pointer.
Press to zoom in on the
map.
Press to zoom out on
the map.
1. Press and quickly release .
2. Use the Rocker to adjust the
brightness levels.
TIP: You can also press and
quickly release to cycle through
the brightness levels.
3. Press ENTER to select a brightness
level and close the menu.
Use the keys on the
device.
Use the to select
an option or an item in a
list, and press .
The location on a page
where data is entered
or an option appears. A
highlighted eld appears
yellow.
A bar that appears on
the right side of a list that
is too long to t on the
screen. Use the
to scroll through a list.
Press or to scroll
a set of items.
The original factory
settings. You can
customize the settings,
but you can always
revert back to the factory
settings by selecting
.
8 Astro X20 and DC40 Owner’s Manual
Introduction
The small arrows indicate
that you should select a
series of items in order,
for example, “Select
> .”
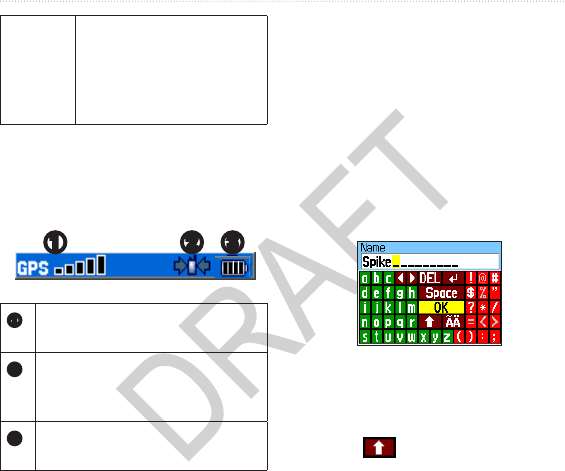
The status bar at the top of each Astro
page provides status information.
➋ ➌➊
➊
Indicates the satellite signal
strength.
➋
Blinks when the device detects
a signal (for example, a DC 40)
on the channel it is receiving.
➌
Indicates the remaining battery
power.
When an on-screen message appears,
you can press ENTER to acknowledge
the message and close the window.
Messages also indicate temporary
conditions, such as “Calculating
Route.” The message window closes as
soon as the process is complete.
A keyboard appears when you enter
text.
• Use the Rocker to select a
character, and press ENTER.
• Select DEL to backspace.
• Select to shift.
• Select OK to save the text and
close the keyboard.
Astro X20 and DC40 Owner’s Manual 9
Tracking Your Dog
NOTE: The DC 40 does not transmit
its location to the Astro, and the
Astro does not indicate the location
of the DC 40, until both devices have
acquired satellite signals.
The DC 40 that was packaged with
your Astro was linked with the Astro
at the factory. If you are using a
DC 40 that you purchased separately,
follow the instructions for adding
a new dog on page 13 to establish
communications with the Astro.
1. Press DOG > ENTER.
2. Select Go To.
3. Follow the magenta line on the
map.
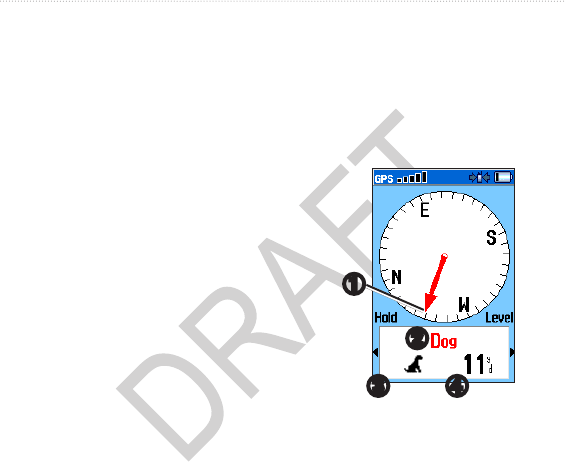
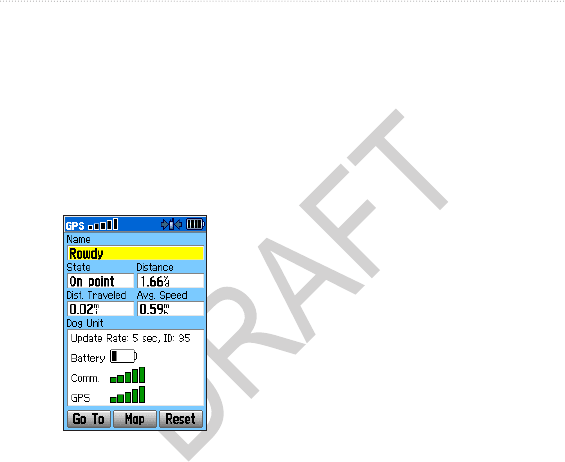
1. Press DOG to view the Dog
Tracker page.
The direction to the dog and
distance of the dog from the Astro
appears.
➋
➌ ➍
➊
10 Astro X20 and DC40 Owner’s Manual
Tracking Your Dog
➊
Dog pointer (direction to
the dog)
➋
Dog name
➌
Dog status icon (page 10)
➍
Distance to the dog
2. If you have additional dogs, use the
Rocker to scroll through the list of
dogs.
The Astro can keep track of ten
dogs.
3. Press ENTER to view the Dog Info
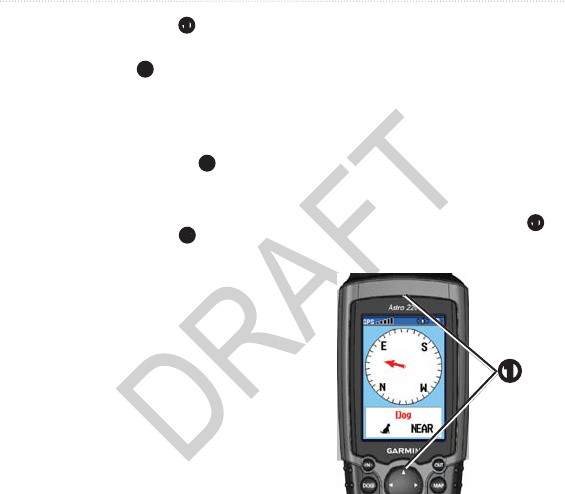
page.
The dog you are tracking is identied
and the dog pointer indicates its
direction from you. The dog pointer is
most accurate when you are holding
the Astro level and the dog is farther
than 30 feet (9.1 meters) away. At less
than that distance, “NEAR” appears
instead of a distance and the dog
pointer is shortened.
NOTE: When you are close to the dog,
the dog pointer may be inaccurate.
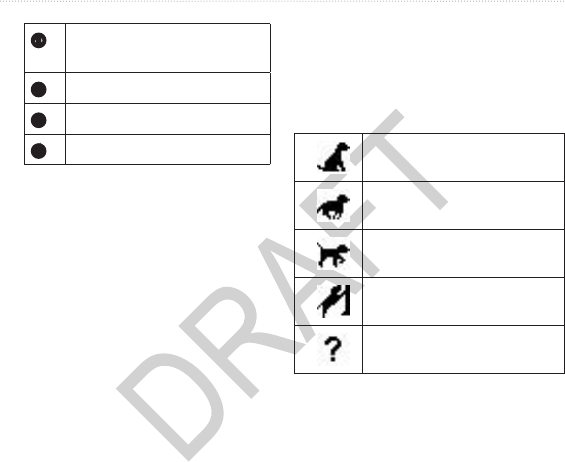
Sitting
Running
On Point
Treed
Unknown*
*The unknown status icon indicates
that the DC 40 has not acquired a
satellite signal and that the Astro
cannot determine the location of the
dog.
Astro X20 and DC40 Owner’s Manual 11
Tracking Your Dog
The Astro assigns a default name, such
as Dog or Dog 1, to every dog (DC 40)
linked to it.
1. Press DOG > ENTER.
The Dog Info page appears.
2. Select Name.
The on-screen keyboard appears.
3. Enter the name of the dog.
You can identify the dog type so that
the appropriate dog status symbols
appear.
1. Press DOG > ENTER.
2. Press MENU.
3. Select Change Dog Unit Type.
4. Select a type.
Press MAP to follow your dog on
the map.
12 Astro X20 and DC40 Owner’s Manual
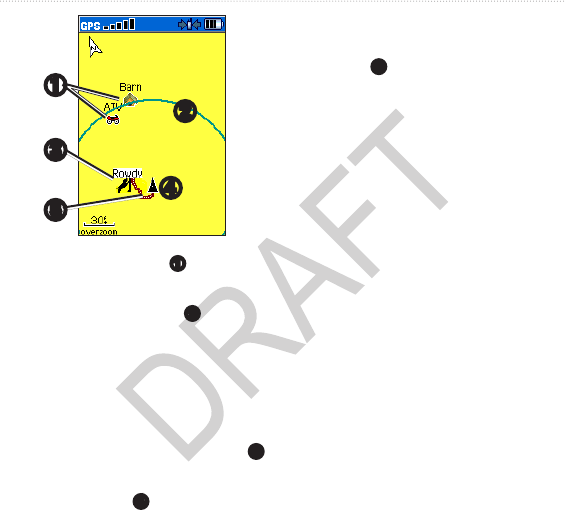
Tracking Your Dog
➍
➋
➎
➌
➊
• Marked locations
➊
appear on
the map.
• The accuracy circle
➋
is the
area where your GPS location
data is poor. The smaller the
circle, the more precise your
location.
• The dog location appears with a
status icon and the dog name
➌
.
• Your location is indicated by the
map pointer
➍
.
• The track of the dog’s
movements appears as a red
line
➎
.
When the map orientation is Track Up,
objects on the map appear to rotate
around your position. As you move,
the entire map reorients in the direction
you are facing. To stabilize the objects,
set the orientation to North Up
(page 43).

Astro X20 and DC40 Owner’s Manual 13
Tracking Your Dog
The Astro can track up to ten dogs
with DC 40 collars. If you purchase
additional DC 40 devices, you can link
them to the Astro. To link, the Astro
must be close enough to the DC 40 to
touch it, or you must know the DC 40
ID number.
1. Press DOG > MENU.
2. Select Dog List > <Add New>.
3. Follow the on-screen instructions.
By default, the new dog is named
“Dog” and an ID number is
randomly assigned.
Each dog you track has its own ID
number. If two dogs within range of
the Astro have the same ID, the Astro
warns you of a conicting ID signal.
Follow the on-screen instructions to
resolve the conict.
When possible, you should allow the
Astro to automatically assign IDs. If
necessary, you can manually assign a
new ID number to a dog.
You must assign a new ID number to
the dog and change the update rate.
1. Press DOG > MENU.
2. Select Show Info.
3. Press MENU.
4. Select Change Comm. Settings.
5. Select an unassigned and
nonconicting ID.
6. Change the update rate.
Both 30-second and two-minute
rates reduce battery drain, but they
create a less-detailed dog track and
collected statistics.
7. Bring the Astro within a few feet of
the DC 40.
8. Follow the on-screen instructions.

14 Astro X20 and DC40 Owner’s Manual
Tracking Your Dog
1. On the Dog Tracker page, press
MENU
2. Select Dog List.
3. Select a dog in the list.
4. Select Remove.
You can use the Collar Lock feature to
PIN protect your dog’s ID signal. Other
Astro users must enter the PIN in order
to track your dog. Other Astro users
can still add your dog by physically
touching the Astro to the DC 40.
1. Press DOG > ENTER > MENU.
2. Select Change Collar Lock PIN.
3. Enter a unique PIN.
NOTE: If you forget the PIN, the
Collar Lock feature can be overridden
by physically touching the Astro to the
DC 40.
• Turn on the DC 40 and allow it to
acquire satellites before you put the
DC 40 on your dog.
This allows the DC 40 to acquire
satellite signals much faster.
• Bring extra batteries for your Astro
(page 62).
• Use a fully charged DC 40. A
fully charged DC 40 operates for
approximately 17 hours when using
ve-second interval reporting.
• Use line-of-sight radio
communication (page 12).
• The Astro can track up to ten dogs
with DC 40 collars. Only three dogs
can be viewed at one time on the
Dog Tracker page. To reduce the
text size, press MENU, and select
Small Numbers.
Astro X20 and DC40 Owner’s Manual 15
Locations
• Go to www.garmin.com/products
/astro for more information and
www.garmin.com/astro for a
tutorial.
If you are moving the dogs during a
hunt and you do not want to record
the transportation of the dogs, you can
pause the tracking of all dogs.
1. Press DOG > MENU.
2. Select Pause All Tracking.
You can select Resume when you
are ready to continue the hunt.
1. Press DOG > ENTER.
2. Select Reset.
The Astro and DC 40 use radio
signals to communicate. Objects in
the path of radio signals degrade the
quality of the signals. Keeping an
unobstructed line of sight between
your Astro and your dog’s DC 40
produces the best communication
signal. Obstructed radio waves result
in a poor signal. To achieve the best
line-of-sight conditions, move to the
highest elevation point in your area (for
example, on the top of a hill).
Best
Good

16 Astro X20 and DC40 Owner’s Manual
Locations
Locations are landmarks that you
record and store in your Astro.
1. From the main menu, select Start
New Hunt.
2. Follow the on-screen instructions.
After the hunt, you can navigate back
to your vehicle.
1. Press MARK.
2. Select New or choose a default
location name such as Truck or
Camp.
3. Select OK.
You can mark a covey location and
enter the estimated number of birds
ushed and the number of birds taken.
1. Press MARK.
2. Select Covey.
3. Enter the number of birds ushed.
4. Enter the number of birds taken.
5. Select OK > OK.
1. Press MAP.
2. Move the map pointer to a location.
3. Press ENTER.
If the location does not contain map
information, the following message
appears: “No map information at
this point. Do you want to mark a
location here?”
4. Select Yes or Save.

Astro X20 and DC40 Owner’s Manual 17
Locations
1. From the main menu, select Go To
Marked Location.
2. Select a marked location.
TIP: For navigation settings, see
page 45.
1. From the main menu, select
Advanced > Find > Marked
Locations.
2. Select a marked location.
3. Select an attribute (such as the
name).
4. Enter the new information.
1. From the main menu, select
Advanced > Find > Marked
Locations.
2. Select a marked location.
3. Select Map to show the marked
location on the map.
4. Press ENTER to place a MOVE
marker next to the marked location.
5. Move the marked location to a new
location on the map.
6. Press ENTER.
1. From the main menu, select
Advanced > Find > Marked
Locations.
2. Select a marked location.
3. Select Delete.
You can change the position of a
marked location. For example, if you
move your vehicle, you can change the
location to your current position.

18 Astro X20 and DC40 Owner’s Manual
Locations
1. From the main menu, select
Advanced > Find > Marked
Locations.
2. Select a marked location.
3. Press MENU.
4. Select Reposition Here.
The position changes to your
current location.
You can average a marked location
for more accuracy. When averaging,
the Astro takes several readings at the
same location and uses the average
value to provide more accuracy.
1. Press MARK.
2. Select New > Avg to begin
averaging.
3. When the Estimated Accuracy eld
reaches the level of accuracy you
want, select Save > OK.
You can create a new location by
projecting the distance and bearing
from a marked location to a new
location.
1. From the main menu, select
Advanced > Find > Marked
Locations.
2. Select a marked location.
3. Press MENU.
4. Select Project Location.
5. Enter the bearing and distance to
the projected location.
Astro X20 and DC40 Owner’s Manual 19
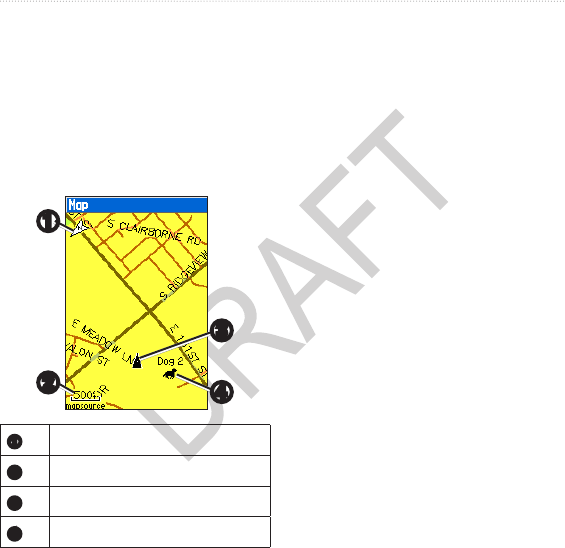
Map
The Astro has a preloaded basemap
that includes cities, highways, exit
information, and lake and river
outlines. The example shows enhanced
map detail using City Navigator®. Go
to www.garmin.com.
➍
➊
➋
➌
➊
Map orientation arrow
➋
Map scale
➌
Your current location
➍
Dog location
Press IN and OUT to change the
map scale.
When you zoom in, the accuracy
of your location is indicated by
an accuracy circle. The smaller
the circle, the more precise your
location.
1. Press MAP > MENU.
2. Select an option:
• Select Data Fields (page 20).
• Select Guidance Text to display
navigation information above
the map.
• Select Setup Map to customize
your map preferences
(pages 43–44).
• Select Turn Declutter On to
hide items on the map that block
road details.
20 Astro X20 and DC40 Owner’s Manual
Map
You can display up to four data elds
at the top of the map to provide travel
and navigational information.
1. Press MAP > MENU.
2. Select Data Fields.
3. Select the number of data elds.
4. Press MENU.
5. Select Change Data Fields.
6. Select a eld.
A list of data eld options appears
(page 49).
7. Select an option.
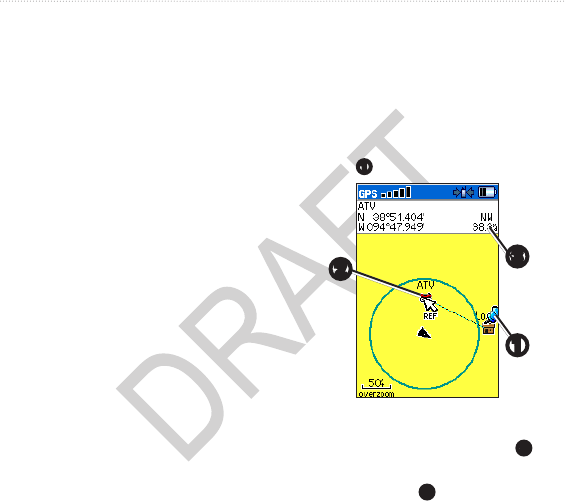
You can measure the distance between
two points.
1. Press MAP > MENU.
2. Select Measure Distance.
An arrow appears at your current
location.
3. Move the arrow to the point you
want to measure from, and press
ENTER.
A push pin marks the beginning
point
➊
.
➋➌
➊
4. Move the arrow to another point.
REF marks the ending point
➋
.
The distance between the two
points appears
➌
.

Astro X20 and DC40 Owner’s Manual 21
Find Features
You can use the Find menu to search
for marked locations, cities, and exits
included in the basemap. Additional
categories appear if you have optional,
compatible detailed maps loaded on
the device. When you open a category,
the list contains items near your current
location or the map pointer (if active).
1. From the main menu, select
Advanced > Find > Marked
Locations.
2. Select a marked location.
3. Select Go To.
1. From the main menu, select
Advanced > Find.
2. Select the type of item you want to
nd.
3. Press MENU.
4. Select Find by Name.
5. Enter the name of the location.
You can select OK when the Find
list contains a match.
6. Select an option:
• Select Save to save the item as
a location.
• Select Map to display the item
as a location on the map.
• Select Go To to navigate a route
to the location.
1. Find a location.
2. Press MENU.
3. Select Find Near Here.
4. Select a category.

22 Astro X20 and DC40 Owner’s Manual
Find Features
The list displays locations near the
original location.
1. Find a location.
2. Press MENU.
3. Select Change Reference.
The map opens.
4. Move the map pointer to a location
on the map.
5. Press ENTER to show a list of
items near the map location.
Go to my.garmin.com for details
and instructions for downloading
geocache locations from the
Internet.
1. From the main menu, select
Advanced > Find > Geocache.
2. Select a geocache.
3. Select Go To to navigate to the
geocache location.
When a geocache is found, the
Astro marks the cache as found,
logs an entry into the calendar, and
shows the nearest cache.
1. From the main menu, select
Advanced > Find > Cities.
A list of cities near your current
location appears.
2. Select a city from the list.
1. From the main menu, select
Advanced > Find > Exits.
A list of exits near your current
location appears.
2. Select an exit.
The exit description, a list of
services near the exit, and the
distance and bearing from the exit
to the highlighted service appear.

Astro X20 and DC40 Owner’s Manual 23
GPS Applications
3. Select a service from the list.
1. From the main menu, select
Advanced > Find > Recent Finds.
2. Select an item.
You can use optional City Navigator
maps to search for addresses,
intersections, and other locations.
The detailed maps contain millions of
points of interest, such as restaurants,
hotels, and auto services. Go to
www.garmin.com.
1. From the main menu, select
Advanced > Find > Addresses.
If your device has acquired satellite
signals, the <ENTER Region>
eld is populated with your current
region.
2. Enter the city, street number, and
street name.
Matches appear as you select
characters in the name.
3. Select the address from the list.
1. From the main menu, select
Advanced > Find.
2. Select an option to view points of
interest near your current location:
• Select All Points of Interest.
• Select a POI category.
3. Press MENU to narrow your
search.
4. Select an item from the list.
Press MENU > Stop Navigation.

24 Astro X20 and DC40 Owner’s Manual
GPS Applications
GPS Applications provides options
for conguring the following GPS
functions:
• Trip computer (page 24)
• Compass (page 24)
• Altimeter (page 27)
• Tracks (page 29)
• Routes (page 32)
• Highway (page 35)
• Proximity alarms (page 35)
• Turn preview (page 36)
• Active route (page 36)
• Satellite (page 37)
The trip computer displays your current
speed, average speed, maximum
speed, trip odometer, and other helpful
statistics.
1. From the main menu, select
Advanced > GPS Applications >
Trip Computer.
2. Press MENU.
3. Select Reset.
4. Select the items you want to reset
or delete.
5. Select Apply.
From the main menu, select
Advanced > GPS Applications >
Compass.
• Hold the compass level when
navigating to ensure maximum
accuracy.
• Turn toward the direction of the
bearing pointer until the arrow
is pointing toward the top of the
compass.

Astro X20 and DC40 Owner’s Manual 25
GPS Applications
➌
➋
➊
• The compass provides navigation
data
➊
such as current speed and
estimated arrival time.
• The compass ring
➋
moves to
indicate North orientation.
• When navigating to a destination,
the bearing pointer
➌
points to
your destination, regardless of the
direction you are moving. When
the bearing pointer points toward
the top of the compass, you are
traveling directly toward your
destination.
This is most useful if you are
navigating on water or where there
are no major obstacles in your path. It
also helps you avoid hazards to either
side of the course, such as shoals or
submerged rocks.
1. From the main menu, select
Advanced > GPS Applications >
Compass.
2. Press MENU.
3. Select Course Pointer.
➋
➊
➌
➍
26 Astro X20 and DC40 Owner’s Manual
GPS Applications
• The course pointer
➊
indicates your relationship to
a course line
➋
leading to the
destination.
• The course pointer provides an
indication of drift (right or left)
according to the scale
➌
.
• The scale refers to the distance
between dots on the course
deviation indicator
➍
.
• The course line to your
destination is based on your
original starting point.
4. Move back to the “course line to
destination” to compensate for
deviation and to get back on course.
You can point the device at an object
in the distance, such as a water tower,
lock in the direction, and then navigate
to the object.
1. From the main menu, select
Advanced > GPS Applications >
Compass.
2. Press MENU.
3. Select Sight ‘N Go.
The bearing pointer points to the
top of the compass.
4. Hold the device at eye level and
line up the two sighting marks
➊
with a distant object.
➊
5. Select Lock Direction.

Astro X20 and DC40 Owner’s Manual 27
GPS Applications
6. Select an option:
• Select Set Course to navigate to
the distant object.
• Select Project Location
(page 18).
• Select Re-Sight to set course on
a different object.
notice
Calibrate the electronic compass
outdoors. Do not stand near objects that
inuence magnetic elds, such as cars,
buildings, or overhead power lines.
You should calibrate the compass after
moving long distances, experiencing
temperature changes, or changing the
batteries.
1. Press DOG > MENU.
2. Select Calibrate Compass > Start.
3. Follow the on-screen instructions.
1. From the main menu, select
Advanced > GPS Applications >
Altimeter.
Your current elevation
➊
and the
rate of your ascent or descent
➋
appear.
➋➊
➌
➍
2. Press MENU.
3. Select Plot Over Time or Plot
Over Distance
➌
.

28 Astro X20 and DC40 Owner’s Manual
GPS Applications
This option is only available when
you are plotting elevation.
After you set the elevation plot, you
can adjust the zoom ranges
➍
(page 28).
1. From the main menu, select
Advanced > GPS Applications >
Altimeter.
2. Press MENU.
3. Select View Pressure Plot.
Select individual points on an elevation
plot or a pressure plot to view the
elevation (or pressure) reading, the
time of day, and the date when the
point was recorded.
1. From the main menu, select
Advanced > GPS Applications >
Altimeter.
2. Press left or right on the Rocker
to display crosshairs and scroll the
crosshairs across the plot.
3. Press ENTER.
The point appears on the map with
location coordinates, the compass
bearing, and the distance from your
current location.
4. Press MARK to save the point as a
location.
5. Navigate to the location (page 21).
1. From the main menu, select
Advanced > GPS Applications >
Altimeter.
2. Press MENU.
3. Select Zoom Ranges.

Astro X20 and DC40 Owner’s Manual 29
GPS Applications
4. Set the zoom range on the vertical
axis.
5. Set the zoom range on the
horizontal axis.
1. From the main menu, select
Advanced > GPS Applications >
Altimeter.
2. Press MENU.
3. Select Reset.
4. Select the items you want to reset
or delete.
5. Select Apply.
1. Go to a location where the elevation
or barometric pressure is known.
2. From the main menu, select
Advanced > GPS Applications >
Altimeter.
3. Press MENU.
4. Select Calibrate Altimeter.
5. Follow the on-screen instructions.
A track is a recording of your path
and of the path of your dog. The track
log contains information about points
along the recorded path, including
time, location, and elevation for each
point.
1. From the main menu, select
Advanced > GPS Applications >
Tracks > Setup.
2. Select an option:
• Select Wrap When Full to
replace the oldest data with new
data when the track log is full.
• Select a Record Method:
◦Select Distance, and enter a
distance interval.
◦Select Time, and enter a
time interval.

30 Astro X20 and DC40 Owner’s Manual
GPS Applications
◦Select Auto to specify the
interval of frequency.
Recording points more often
creates a more accurate
track, but lls up the track
log faster.
• Select Color to change the color
of the active track.
From the main menu, select
Advanced > GPS Applications >
Tracks > Save > Yes.
You can rename the track, view the
track distance, view the calculated area,
and change the units for the calculated
area. You can also change the color
for the track on the map. Changing
the color of a dog’s saved track also
changes the dog pointer color on the
Dog Tracker page.
1. From the main menu, select
Advanced > GPS Applications >
Tracks > Save > No.
The entire track appears on the
map.
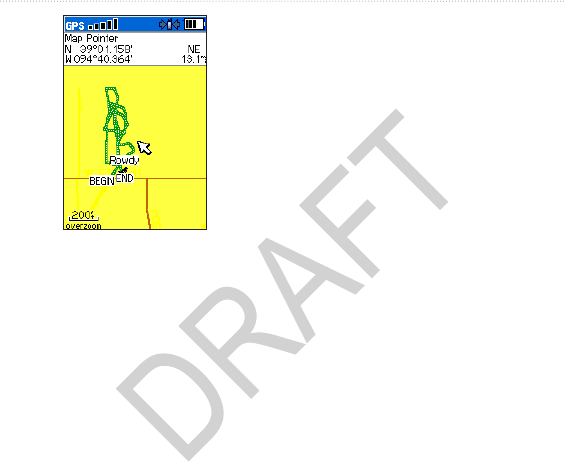
2. Move the map pointer to the
beginning point.
3. Press ENTER.
4. Move the map pointer to the ending
point.
5. Press ENTER.
From the main menu, select
Advanced > GPS Applications >
Tracks > Save > Yes > Map.
The track appears on the map.
Astro X20 and DC40 Owner’s Manual 31
GPS Applications
After you save a track, you have a
record of the path you traveled and a
track altitude prole.
1. From the main menu, select
Advanced > GPS Applications >
Tracks.
2. Select a saved track.
3. Press MENU.
4. Select Prole.
The beginning and the end of the
track are marked by a ag.
5. Press left or right on the Rocker to
scroll across the track prole.
While scrolling, press ENTER to
show the point on the map.
6. Press up or down on the Rocker to
set the zoom range.
Using Digital Elevation Models (DEM)
maps, you can create a track elevation
prole that includes elevation data. Go
to www.garmin.com/cartography
/ontheTrail for more information about
US Topo maps.
You can use TracBack® with a saved
track to navigate back to a point on the
track.
1. From the main menu, select
Advanced > GPS Applications >
Tracks > TracBack.
2. Move the map pointer to a point on
the track.

32 Astro X20 and DC40 Owner’s Manual
GPS Applications
3. Press ENTER.
4. Select an option:
• Select Follow Road to navigate
back to the selected point using
available roadways.
• Select Follow Track to retrace
your original path of travel.
1. From the main menu, select
Advanced > GPS Applications >
Tracks.
2. Select a saved track.
3. Select Map.
4. Move the map pointer to a location
on the track.
5. Press MARK.
6. Select New.
7. If necessary, edit the location
information.
8. Select OK.
1. From the main menu, select
Advanced > GPS Applications >
Tracks.
2. Press MENU.
3. Select Area Calculation.
4. When you are nished, select Stop.
5. If necessary, select Area to change
the units of measure.
6. Select Save.
From the main menu, select
Advanced > GPS Applications >
Tracks > Clear > Yes.
A route is a sequence of points or saved
locations that leads you to your nal
destination.
Astro X20 and DC40 Owner’s Manual 33
GPS Applications
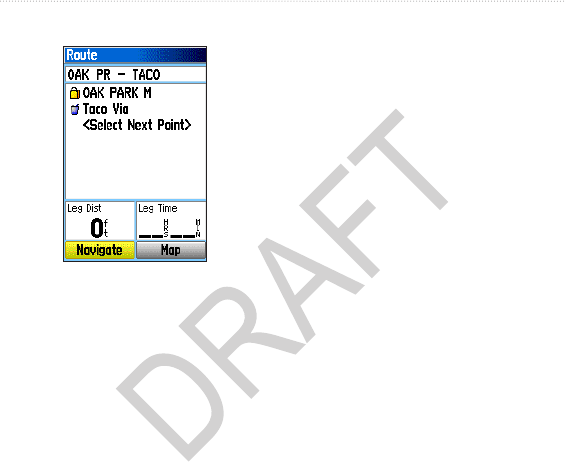
1. From the main menu, select
Advanced > GPS Applications >
Routes > New.
2. Select <Select Next Point>.
3. Select a category.
4. Select the rst point on the route.
5. Select Use.
6. Repeat steps 2 through 5 to add
more points to the route.
1. From the main menu, select
Advanced > GPS Applications >
Routes.
2. Select a route.
3. Select Navigate.
Press MENU > Stop Navigation.
1. From the main menu, select
Advanced > GPS Applications >
Routes.
2. Select a route.
3. Complete an action:
• Select the name, and enter the
new information.
• Select a point on the route.
You can review, insert, remove,
change, or move the point.
• Press MENU for more route
options.

34 Astro X20 and DC40 Owner’s Manual
GPS Applications
1. From the main menu, select
Advanced > GPS Applications >
Routes.
2. Select a route.
3. Press MENU.
4. Select Delete Route.
1. From the main menu, select
Advanced > GPS Applications >
Routes.
2. Press MENU.
3. Select Delete All Routes.
1. From the main menu, select
Advanced > GPS Applications >
Routes.
2. Press MENU.
3. Select Off Road Transition.
4. Select the method to use when
advancing to the next point in your
route.
• Select Auto to advance to
the next point in your route
automatically.
• Select Distance and enter a
radius.
When you are within that
specied distance, you are
routed to the next point in your
route.
• Select Manual to control the
navigation to each point in your
route.
You can press OUT to begin
routing to the next point in your
route. You can press IN to route
to the previous point.
Astro X20 and DC40 Owner’s Manual 35
GPS Applications
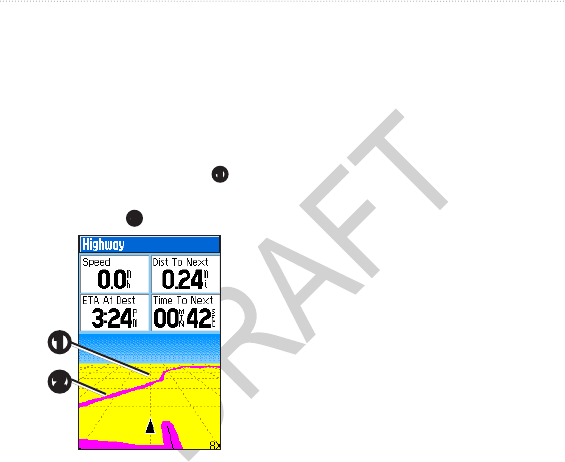
1. From the main menu, select
Advanced > GPS Applications >
Highway.
Your course is a center line
➊
down
the middle of the map. Your route is
a magenta line
➋
.
➋
➊
2. If necessary, press IN or OUT to
zoom in or out on the map.
You can dene an alarm radius around
a marked location. A tone sounds when
you enter the designated radius.
1. From the main menu, select
Advanced > GPS Applications >
Proximity.
2. Select an empty line.
3. Select a category.
4. Select a marked location.
5. Select Use.
6. Enter a value for the proximity
radius.
1. From the main menu, select
Advanced > GPS Applications
> Proximity > Proximity Alarm
Tones.
2. Select a tone for each alarm.

36 Astro X20 and DC40 Owner’s Manual
GPS Applications
NOTE: Speed alerts can be
downloaded using POI Loader
(page 56).
3. Select Proximity Alarms to
activate the alarm.
1. From the main menu, select
Advanced > GPS Applications >
Proximity.
2. Press MENU.
3. Select Remove All.
You must be navigating a route on
roads to display the turn preview
information.
1. From the main menu, select
Advanced > GPS Applications >
Turn Preview.
2. Scroll through all of the turn
previews.
You can preview a list of turns and
route instructions.
You must be navigating a route on
roads to display the list.
1. From the main menu, select
Advanced > GPS Applications >
Active Route.
2. Select an item in the list.
The turn preview appears.
Astro X20 and DC40 Owner’s Manual 37
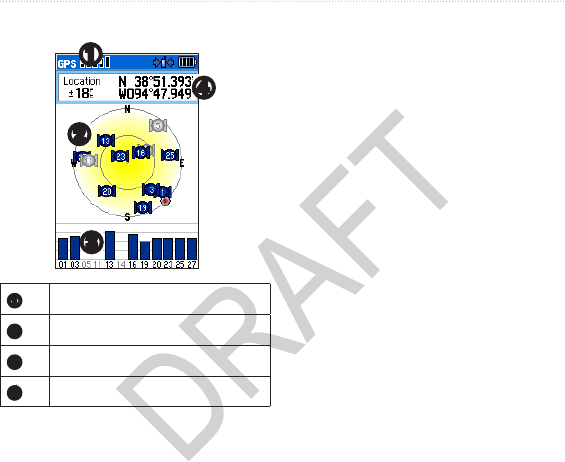
Accessories
➌
➍
➋
➊
➊
GPS receiver status
➋
Satellite locations
➌
Satellite signal strength
➍
Your current location
1. From the main menu, select
Advanced > GPS Applications >
Satellite.
2. Press MENU.
3. Select an option:
• Select Use With GPS Off to
turn the GPS on and off.
• Select Track Up—to display
the page with North toward the
top of the screen or with your
current track toward the top of
the screen.
• Select Multicolor to display
the page in multicolor or single
color.
• Select New Location if you
have moved the device more
than 600 miles and you are
having trouble acquiring
satellite signals.
• Select GPS Elevation to view
your current elevation.

38 Astro X20 and DC40 Owner’s Manual
Accessories
The calendar can record locations
on specic days and provide sunrise,
sunset, and hunting-almanac
information.
1. From the main menu, select
Advanced > Accessories >
Calendar.
2. Select a day.
3. Press MENU.
4. Select Add Point.
5. Select a category.
6. Select a location.
7. Select Use to place the location on
the day page.
The Astro has a standard calculator and
a scientic calculator.
1. From the main menu, select
Advanced >Accessories >
Calculator.
2. Complete an action:
• Use the standard calculator.
• Press MENU, and select
Scientic to use the scientic
calculator functions.

Astro X20 and DC40 Owner’s Manual 39
Accessories
1. From the main menu, select
Advanced > Accessories >
Stopwatch.
2. If necessary, press MENU to set
how the stopwatch records laps.
3. Select an option:
• Select Lap by Button Press to
manually end the lap each time.
• Select Lap by Distance to
automatically mark the lap at a
specic distance.
Press MENU, and select Set
Lap Distance to enter a value.
You can view the time of sunrise,
sunset, moonrise, and moonset, and the
relative positions of the sun and moon.
1. From the main menu, select
Advanced > Accessories > View
Sunrise/Sunset.
2. Select an option:
• Select Date to change the date.
• Select Location to change the
location.
• Select Time to view positions of
the sun and moon at a different
time.

40 Astro X20 and DC40 Owner’s Manual
Accessories
You can view the predicted best times
for hunting and shing for a specic
date and location.
1. From the main menu, select
Advanced > Accessories > View
Hunting Almanac.
2. Select an option:
• Select Date to change the date.
• Select Location to change the
location.
From the main menu, select Advanced
> Accessories > Games.
The Astro contains six games: Memory
Race, Virtual Maze, GekoSmak,
Nibbons, Gekoids, and Beast Hunt.
Some games use GPS during the game.
Most games contain a tutorial.

Astro X20 and DC40 Owner’s Manual 41
Customizing Your Device
From the main menu, select Advanced
> Settings > System.
• GPS
◦ Normal—GPS is on.
◦ Battery Saver—see page 63.
◦ GPS Off
◦ Demo Mode—GPS is off.
• WAAS/EGNOS—enables Wide
Area Augmentation System
(WAAS) in the USA, or European
Geostationary Navigation Overlay
Service (EGNOS).
• Battery Type—allows you to select
the type of battery you are using.
• Text Language—sets the text
language on the device.
• External Power Lost—sets the
device to stay on or turn off when
external power is removed.
• Proximity Alarms—enables all
proximity alarms.
1. From the system settings, press
MENU.
2. Select Restore Defaults.
You can view the unit ID and software
version.
1. From the system settings, press
MENU.
2. Select Software Version.
1. From the main menu, select
Advanced > Settings > Dog List.
2. Select a dog.
3. Select an option:

42 Astro X20 and DC40 Owner’s Manual
Customizing Your Device
• Select Move and change the
order of the dog list.
• Select Remove to delete a dog
from the list.
1. From the main menu, select
Advanced > Settings > Dog
Alerts.
2. Select an option:
• On-Point Alert—indicates that
the dog is on-point.
• Treed Alert—indicates that the
dog has treed quarry and has
conned its own movements to
a small area for 60 seconds.
• GPS Lost Alert—indicates that
the dog’s DC 40 has lost GPS
satellite signals.
• Lost Communication Alert—
indicates that the Astro is not
receiving signals from the
DC 40.
From the main menu, select Advanced
> Settings > Display.
• Display Mode
◦ Daytime
◦ Nighttime
◦ Auto—automatically switches
to night mode at sunset and to
day mode at sunrise.
• Daytime Color Scheme—sets the
color scheme used in day mode.
• Nighttime Color Scheme—sets the
color scheme used in night mode.
• Backlight Timeout—see page 64.
• Backlight Level—see page 64.
You can customize tones for messages,
keys, turn warnings, and alarms.
1. From the main menu, select
Advanced > Settings > Tones.
Astro X20 and DC40 Owner’s Manual 43
Customizing Your Device
2. Select a tone for each audible type.
You can move, add, or delete items in
the main menu.
1. From the main menu, select
Advanced > Settings > Main
Menu.
2. Select a menu item.
3. Select an option:
• Select Move and change the
order of the list.
• Select Insert to add a new item
to the list.
• Select Remove to delete an item
from the list.
1. From the main menu, select
Advanced > Settings > Map.
2. Use the Rocker to select a map
setup category: General, Tracks,
Points, Text, Information, or
Marine.
• Orientation
◦ North Up—displays North at
the top of the map.
◦ Track Up—displays your
current heading at the top of the
map.
• Below—sets the map scale for
Track Up. At scales above the
setting, the map orientation
switches to North Up.
• Auto Zoom—automatically selects
the appropriate zoom level for
optimal use on your map. When
Off is selected, you must zoom in
or out manually.

44 Astro X20 and DC40 Owner’s Manual
Customizing Your Device
• Detail—allows you to select the
amount of map data displayed on
the device.
NOTE: Higher detail settings may
cause the map to redraw slowly.
• Lock On Road—locks the position
pointer to the nearest road.
• Saved Tracks—sets the maximum
zoom at which saved tracks are
shown.
• Track Log—sets the maximum
zoom at which active track logs are
shown.
• Track Points—sets the maximum
number of track points used to
record a track.
• Go To Line—allows you to select
either a bearing line or a course line
(page 31) to navigate a track.
You can customize the maximum zoom
level for map points, marked locations,
street labels, and land cover.
You can customize the text size for the
descriptions of map items.
You can view the list of optional
detailed maps.
• Select a check box to enable a
detailed map.
• Press MENU to select options for
hiding or showing maps.
If you are using optional marine charts
or marine maps, you can customize
how the map displays the marine
features.
• Marine Colors—enables marine

Astro X20 and DC40 Owner’s Manual 45
Customizing Your Device
colors on the map.
• Spot Soundings—enables spot
soundings that indicate depth
measurements on the map.
• Light Sectors—sets navigational
light locations to On, Off, or Auto
(the location appears when the map
pointer passes over it).
• Symbol Set—allows you to
select the map symbol set:
Auto, GARMIN, NOAA, or
International.
From the main menu, select Advanced
> Settings > Routing.
• Guidance Method—allows you
to select a guidance method for
calculating your route.
◦ Prompted—asks you to select a
routing method before the route
is calculated.
◦ Follow Road—creates a route
that overlays the roads on the
map.
◦ Off Road—creates a point-to-
point route.
• Follow Road Method
◦ Prompted—asks you to select
a follow-road method before the
route is calculated.

46 Astro X20 and DC40 Owner’s Manual
Customizing Your Device
◦ Faster Time—calculates routes
that are faster to drive but can
be longer in distance.
◦ Shorter Distance—calculates
routes that are shorter in
distance but can take more time
to drive.
• Next Turn Pop-up—enables
messages with turn information
during your route.
• Follow Road Options
◦ Off Route Recalculation—sets
how the device recalculates if
you depart from the original
route.
◦ Calculation Method—sets how
quickly or accurately the device
calculates a route.
◦ Calculate Routes for—allows
you to select your vehicle type
or transportation type in order
to calculate the most practical
route.
◦ Avoid—allows you to select
road types to avoid during your
route.
From the main menu, select Advanced
> Settings > Geocache.
• Find or Found—allows you to
select a symbol for caches.
• Calendar Entry When Found—
makes an entry on the calendar
when a cache is found.
From the main menu, select Advanced
> Settings > Marine Alarms.
• Anchor Drag Alarm—sets an
alarm to sound when you exceed a
specied drift distance.
• Off Course Alarm—sets an alarm
to sound when you are off course
by a specied distance.

Astro X20 and DC40 Owner’s Manual 47
Customizing Your Device
From the main menu, select Advanced
> Settings > Time.
• Time Format— allows you to
select a 12-hour or a 24-hour
display time.
• Time Zone—allows you to select
the time zone for the device.
You can select Other to enter a
Universal Time Coordinate (UTC)
offset.
• UTC Offset—species the offset
from UTC (when Time Zone is
Other).
• Daylight Saving Time—enables
daylight saving time for the
selected time zone.
From the main menu, select Advanced
> Settings > Units.
NOTE: Do not change the position
format or the map datum coordinate
system unless you are using a map or
chart that species a different position
format.
• Position Format—sets the position
format in which a given location
reading appears.
• Map Datum—sets the coordinate
system on which the map is
structured.
• Distance/Speed—sets the unit of
measure for distance and speed.
• Elevation (Vert. Speed)—sets the
unit of measure for your rate of
ascent or descent.
• Depth—sets the unit of measure
for depth.
• Pressure—sets the unit of measure
for gauge and atmospheric pressure.

48 Astro X20 and DC40 Owner’s Manual
Customizing Your Device
You can specify the type of heading
display and the type of North reference
used to calculate a heading.
NOTE: Unless you have a good
understanding of headings and North
referencing, use the default values.
From the main menu, select Advanced
> Settings > Heading.
• Display—sets the units used to
calculate a heading.
• North Reference—provides
headings based on a true, magnetic,
grid, or a specic user value.
• Switch to compass heading when
below—sets the speed to switch
to a compass heading when you
exceed the specied time.
• for more than—sets the time to
switch to a compass heading.
From the main menu, select Advanced
> Settings > Altimeter.
• Auto Calibration—enables the
device to correct elevation readings
using the GPS receiver.
• Barometer Mode
◦ Variable Elevation—sets the
device to function for normal
use, where your changing
elevation displays.
◦ Fixed Elevation—allows you
to use the device as a barometer.
NOTE: Use this feature when
you plan to remain stationary.
Trip data is not recorded when
Fixed Elevation is on.
Astro X20 and DC40 Owner’s Manual 49
Customizing Your Device
1. From the map, trip computer,
compass, altimeter, or highway
page, press MENU.
2. Select Change Data Fields.
3. Select a data eld.
4. Select an option.
Accuracy Of
GPS
The margin of
error for your
exact location. For
example, your GPS
location is accurate
to within +/- 12 feet.
Ambient
Pressure
The uncalibrated
environmental
pressure.
Ascent -
Average
The average vertical
distance of ascent.
Ascent -
Maximum
The maximum
ascent rate in feet/
meters per minute.
Ascent - Total The total elevation
distance ascended.
Barometer The calibrated
current pressure.
Bearing The direction from
your current location
to a destination.
Course The direction from
your starting location
to a destination.
Descent -
Average
The average vertical
distance of descent.
Descent -
Maximum
The maximum
descent rate in feet/
meters per minute.
Descent - Total The total elevation
distance descended.
Distance To
Dest.
The distance to your
nal destination.
Distance To
Next
The remaining
distance to the next
point on the route.

50 Astro X20 and DC40 Owner’s Manual
Customizing Your Device
Elevation The altitude of your
current location
above or below sea
level.
Elevation -
Maximum
The highest
elevation reached.
Elevation -
Minimum
The lowest elevation
reached.
ETA At
Destination
The estimated
time of day you will
reach your nal
destination.
ETA At Next The estimated time
of day you will reach
the next point on the
route.
Glide Ratio The ratio of
horizontal distance
traveled to the
change in vertical
distance.
Glide Ratio To
Dest.
The glide ratio
required to
descend from your
current position
and elevation to
the destination
elevation.
Heading The direction you
are moving.
Location (lat/
lon)
Displays the current
position in the
default position
format regardless
of the selected
settings.
Location
(selected)
Displays the current
position in the
selected position
format.
Odometer A running tally of
distance traveled for
all trips.

Astro X20 and DC40 Owner’s Manual 51
Customizing Your Device
Off Course The distance to
the left or the right
by which you have
strayed from the
original path of
travel.
Pointer The data eld
arrow points in the
direction of the next
point or turn.
Speed The current rate of
speed at which you
are moving since
last reset.
Speed -
Maximum
The maximum
speed reached
since last reset.
Speed - Moving
Avg.
The average speed
of the device while
moving since last
reset.
Speed - Overall
Avg.
Your average speed
since last reset.
Sunrise The time of sunrise
based on your GPS
position.
Sunset The time of sunset
based on your GPS
position.
Temperature -
Water
The temperature of
the water. Requires
a connection to
a NMEA 0183
temperature-
capable device to
acquire data.
Time of Day The current time
of day based on
your time settings
(format, time zone,
and daylight saving
time).
Time to
Destination
The estimated
time needed to
reach your nal
destination.

52 Astro X20 and DC40 Owner’s Manual
Customizing Your Device
Time to Next The estimated time
needed until you
reach the next point
on the route.
To Course The direction in
which you must
move to return to
the route.
Trip Odometer A running tally of the
distance traveled
since the last reset.
Trip Time -
Moving
A running tally of
time since the last
reset.
Trip Time -
Stopped
The time spent not
moving since the
last reset.
Trip Time - Total A running tally of
distance traveled
since the last reset.
Turn The angle of
difference (in
degrees) between
the bearing to your
destination and your
current course. L
means turn left. R
means turn right.
Velocity Made
Good
The speed at which
you are closing on
a destination along
a route.
Vertical Speed Your rate of altitude
gain or loss over
time.
Vert. Speed to
Dest.
The measurement
of your rate of
ascent or descent
to a predetermined
altitude.
Waypoint at
Dest.
The last point on
a route to your
destination.

Astro X20 and DC40 Owner’s Manual 53
Appendix
Waypoint at
Next
The next point on
your route.

54 Astro X20 and DC40 Owner’s Manual
Appendix
Contact Garmin Product Support if you
have any questions about this product.
• In the USA, go to www.garmin
.com/support, or contact Garmin
USA by phone at (913) 397.8200 or
(800) 800.1020.
• In the UK, contact Garmin (Europe)
Ltd. by phone at 0808 2380000.
• In Europe, go to www.garmin.com
/support and click Contact
Support for in-country support
Help us better support you by
completing our online registration
today.
• Go to http://my.garmin.com.
• Keep the original sales receipt, or a
photocopy, in a safe place.
Go to http://my.garmin.com to
access the latest services for your
Garmin products.
• Subscribe to online services for
Points of Interest (POIs) and
other useful items.
• Unlock optional maps.
• Download geocaches to your
device.
Go to http://buy.garmin.com,
or contact your Garmin dealer
for information about optional
accessories, preloaded map data
cards, accessories, and replacement
parts.

Astro X20 and DC40 Owner’s Manual 55
Appendix
You must provide your own Phillips
screwdriver to replace the DC 40
collar.
1. Carefully cut the zip tie that secures
the VHF antenna to the collar.
2. Remove the two screws on the back
plate of the DC 40.
3. Lift off the mounting plate.
4. Remove the old collar.
5. Align the new collar with the
DC 40.
The buckle should be on the side
opposite of the power button.
6. Replace the mounting plate and
screws.
7. Replace the zip tie that secures the
VHF antenna to the collar.
Trim the zip tie and any sharp
edges.
Before you can replace the VHF
antenna, you must detach the DC 40
from the collar (page 51).
1. Remove the weather cap and screw
from the VHF antenna.
2. Remove the old VHF antenna.
3. Align the new VHF antenna with
the DC 40.
4. Replace the screw and the weather
cap.
5. Replace the mounting plate and
screws.
6. Replace the zip tie that secures the
VHF antenna to the collar.
Trim the zip tie and any sharp
edges.

56 Astro X20 and DC40 Owner’s Manual
Appendix
notice
When replacing the fuse, do not lose
any of the small pieces and make
sure they are put back in the proper
position. The vehicle power cable
does not work unless it is assembled
correctly.
If your device does not charge in your
vehicle, you may need to replace the
fuse located at the tip of the vehicle
adapter.
1. Use a coin to push down the
sliver tip, and turn the coin
counterclockwise, one-quarter turn.
2. Remove the end piece, the silver
tip, and the fuse.
3. Install a 1 A fast blow fuse of the
same size.
4. Replace the silver tip and the end
piece.
NOTE: The device is not compatible
with Windows® 95, 98, Me, or NT. It is
also not compatible with Mac® OS 10.3
and earlier.
The device supports the following le
types:
• Files from BaseCamp™. Go to
www.garmin.com.
• GPI custom POI les from the
Garmin POI Loader. Go to www
.garmin.com/products/poiloader.
You can purchase microSD memory
cards from an electronics supplier, or
purchase preloaded map data cards
from your Garmin dealer. In addition
to map and data storage, the memory
cards can be used to store les such as
images, cartridges, geocaches, routes,
locations, and custom POIs.
Astro X20 and DC40 Owner’s Manual 57
Appendix
1. Remove the battery cover by
turning the D-ring 1/4 turn
counterclockwise and pulling up.
2. Slide up and pull out the metal
cover
➊
.
3. Align the metal contacts, and place
the memory card
➋
in the slot
➌
.
➊
➋
➌
4. Push in and slide down the metal
cover.
5. Replace the batteries and the
battery cover.
1. Slide up and pull out the metal
cover.
2. Remove the card from the slot.
3. Push in and slide down the metal
cover.
notice
To prevent corrosion, thoroughly
dry the mini-USB port, the weather
cap, and the surrounding area before
charging or connecting to a computer.
1. Connect the USB cable to a USB
port on your computer.
2. Pull up the weather cap from the
mini-USB port.
3. Plug the small end of the USB
cable into the mini-USB port.
4. From the main menu, select Setup?
> System.
5. Press MENU.

58 Astro X20 and DC40 Owner’s Manual
Appendix
6. Select Mass Storage Mode.
Your device and memory card
(optional) appear as removable
drives in My Computer on
Windows computers and as
mounted volumes on Mac
computers.
Before you download data to the
memory card, you can check the
available storage space on the card.
1. From the main menu, select Setup?
> System.
2. Press MENU.
3. Select View Card Info.
Before you can transfer les, you must
connect the device to your computer
(page 57). To transfer map data to a
memory card, you may need to load
USB drivers from www.garmin
.com.
1. Browse your computer for the le.
2. Select the le.
3. Select Edit > Copy.
4. Open the “Garmin” or memory card
drive/volume.
5. Select Edit > Paste.
The dog tracks saved on your Astro
are detailed enough for most users to
view the movements of their dog. The
DC 40 stores more-detailed tracks of
the dog’s movements. You can use the
Astro to transfer these tracks to the
BaseCamp software (www.garmin.
com) on your computer.
Astro X20 and DC40 Owner’s Manual 59
Appendix
1. Open BaseCamp.
2. Connect the Astro to a computer
using the USB cable provided.
3. Turn on the Astro.
4. Turn on the DC 40, and place it
within 12 inches of the Astro.
5. Press DOG > ENTER > MENU.
6. Select Transfer Dog Unit Track.
7. Wait until the track data is buffered
on your Astro and “Ready to
communicate with PC” appears.
8. Follow the BaseCamp instructions
for transferring les.
9. Select OK when you have nished
transferring the tracks.
notice
Your device memory contains
important system les and folders that
should not be deleted.
Before you can delete les, you must
connect the device to your computer
(page 57).
1. Open the “Garmin” drive or
volume.
2. If necessary, open a folder or
volume.
3. Select the les.
4. Press the Delete key on your
keyboard.
1. Complete an action:
• For Windows computers, click
the eject icon in your
system tray.
• For Mac computers, drag the
volume icon to the Trash .
2. Disconnect the device from your
computer.
Before you can update the software,
you must connect the Astro to your

60 Astro X20 and DC40 Owner’s Manual
Appendix
computer (page 57).
NOTE: Updating the software does not
erase any of your data or settings.
1. Go to www.garmin.com
/webupdater.
2. Follow the on-screen instructions.
NOTE: To avoid data corruption,
do not turn off the Astro during data
transfer.
Before you can update the software,
you must connect the Astro to your
computer (page 57). The DC 40 uses
your Astro as a wireless transfer device
when transferring software updates and
detailed dog tracks.
1. Turn on the DC 40, and place it
within 12 inches of the Astro.
2. Go to www.garmin.com
/webupdater.
3. Follow the on-screen instructions.
NOTE: To avoid data corruption,
do not turn off the Astro or the
DC 40 during data transfer.
4. On the Astro, press DOG >
ENTER > MENU.
5. Select Upgrade Dog Unit.
6. Follow the on-screen instructions.
notice
Avoid chemical cleaners and solvents
that can damage plastic components.
1. Use a cloth dampened with a mild
detergent solution.
2. Wipe it dry.
1. Use a soft, clean, lint-free cloth.
2. If necessary, use water, isopropyl
alcohol, or eyeglass lens cleaner.
Astro X20 and DC40 Owner’s Manual 61
Appendix
3. Apply the liquid to the cloth, and
gently wipe the screen with the
cloth.
notice
The Astro and DC 40 are water
resistant to IEC 60529 IPX7. They
can withstand immersion in 1 meter
of water for 30 minutes. Prolonged
submersion can cause damage to the
devices. After immersion, be certain
to wipe and air dry the devices before
using or charging.
notice
Do not store the Astro or DC 40 where
prolonged exposure to temperature
extremes may occur, because
permanent damage may result.
Water
resistance
Water resistant to
IEC 60529 IPX7
Battery type Two 1.5 volt AA
batteries (alkaline,
NiMH, or lithium)
Battery life Up to 24 hours,
typical usage (page
60)
Operating
temperature
range
From -4°F to 158°F
(from -20°C to 70°C)
See battery
information on page
x.
Water
resistance
Water resistant to
IEC 60529 IPX7
Battery type Internal
rechargeable
lithium-ion battery
62 Astro X20 and DC40 Owner’s Manual
Appendix
Battery life From 17 to 48 hours.
Recharging takes
approximately 4½
hours.
Operating
temperature
range
From -4°F to 140°F
(from -20°C to 60°C)
Charging
temperature
range
From 32°F to 113°F
(from 0°C to 45°C)
MURS
(Multiuse
Radio
Service)
frequency
151.82 MHz
151.88 MHz
151.94 MHz
154.57 MHz
154.60 MHz
VHF range Up to 7 miles (11.2
km) - line of sight
Output power 2 watts
See the Important Safety and Product
Information on pages 62–73 for
product warnings and other important
information.
The temperature rating for the device
may exceed the usable range of some
batteries. Alkaline batteries can rupture
at high temperatures. Alkaline batteries
lose a signicant amount of their
capacity as temperature decreases. Use
lithium batteries when operating the
device in below-freezing conditions.
1. Remove the battery cover by
turning the D-ring 1/4 turn
counterclockwise and pulling up.
2. Insert the batteries, observing
polarity.

Astro X20 and DC40 Owner’s Manual 63
Appendix
3. Replace the battery cover.
1. From the main menu, select
Advanced > Settings > System >
Battery Type.
2. Select Alkaline, Lithium, or
Rechargeable NiMH.
When you do not plan to use the
Astro for several months, remove the
batteries. Stored data is not lost when
batteries are removed.
The normal long-term decrease in
the charging capacity of lithium-
ion batteries can be accelerated by
exposure to elevated temperatures.
Storing a fully charged battery for
more than three months in a location
that exposes it to high temperatures
(above 70°F or 21°C) can signicantly
reduce its recharging capacity.
• Before storage, charge the
battery to approximately 50% of
capacity and store it in a cool, dry
location where temperatures are
not expected to exceed typical
household levels.
• Do not store a fully depleted battery
because it may not recharge after an
extended period of storage.
• After storage, fully charge the
battery again before using the
DC 40.
From the main menu, select
Advanced > Settings > System >
GPS > Battery Saver.

64 Astro X20 and DC40 Owner’s Manual
Appendix
Extensive use of screen backlighting
can signicantly reduce battery life.
You can adjust the backlight brightness
and decrease the backlight timeout to
maximize battery power.
1. Quickly press .
2. Adjust the brightness.
From the main menu, select
Advanced > Settings > Display >
Backlight Timeout.
1. Press DOG > MENU.
2. Select Show Info.
3. Press MENU.
4. Select Change Comm. Settings.
5. Change the update rate.
Both 30-second and two-minute
rates reduce battery drain, but they
create a less-detailed dog track and
collected statistics.
6. Bring the Astro within a few feet of
the DC 40.
7. Follow the on-screen instructions.
© 2011 Garmin Ltd. or its subsidiaries
Garmin International, Inc.
1200 East 151st Street, Olathe, Kansas 66062, USA
Garmin (Europe) Ltd.
Liberty House, Hounsdown Business Park, Southampton, Hampshire, SO40 9LR UK
Garmin Corporation
No. 68, Zhangshu 2nd Road, Xizhi Dist., New Taipei City, 221, Taiwan (R.O.C.)
www.garmin.com
June 2011 190-01340-00 Rev. 1 Printed in Taiwan