manual
nüvi
®
2575R/ 2575
quick start manual
2 nüvi 2575R/ 2575 Quick Start Manual
Connecting the Device to
Vehicle Power
WARNING
This product contains a lithium-ion
battery. To prevent the possibility of
personal injury or product damage
caused by battery exposure to extreme
heat, remove the device from the
vehicle when exiting or store it out of
direct sunlight.
Charge your device before using it on
battery power.
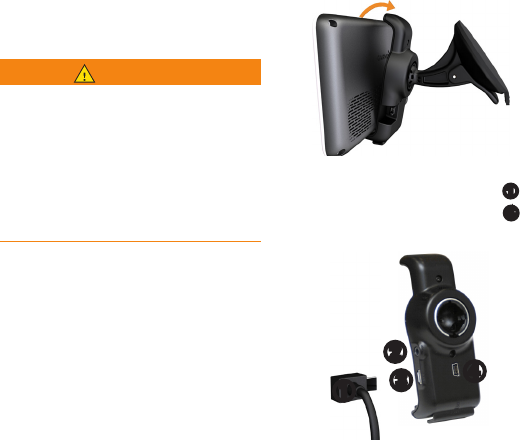
1. Fit the bottom of your device into
the mount.
2. Tilt your device back until it snaps
into place.
3. Plug the vehicle power cable
➊
into the mini-USB connector
❹
on the mount.
➊
➋
➌➍
4. Plug the other end of the vehicle
power cable into a power outlet in
your vehicle.
nüvi 2575R/ 2575 Quick Start Manual 3
5. Ifyouareusingatrafcreceiver
, connect the external antenna to
thetrafcreceiverandsecureitto
the windshield using the suction
cups.
6. There is an optional choice for
video in connector
➋
, connecting
rear view camera and driving
recorder connector
➌
.
After the device has been connected
to vehicle power, the following
occurs.
• The device turns on.
• The device acquires satellite
signals. When at least one of the
bars is green, your device has
acquired satellite signals.
• NOTE: The device may need a
clear view of the sky to acquire
satellite signals.
• The device charges as you drive.
in the status bar indicates the
status of the internal battery.
Mounting Your Device
1. Remove the clear plastic from the
suction cup.
2. Clean and dry your windshield
and the suction cup with a lint-
free cloth.
3. Press the suction cup to the
windshield.
4. Whilepressing,iptheleverback
toward the windshield.
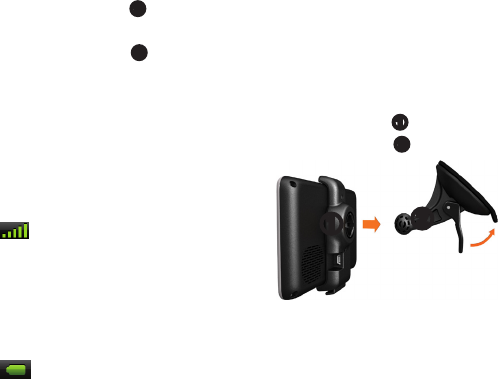
5. Snap the mount
➊
onto the
suction cup arm
➋
.
➊➋
4 nüvi 2575R/ 2575 Quick Start Manual
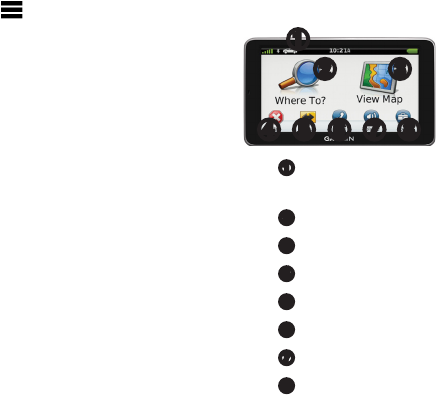
Device Overview
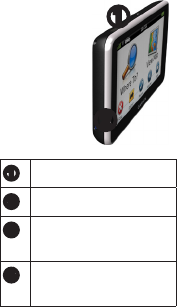
➊
➋
➊
Power key
➋
microSD
™
card slot
➌
Analogue television
receiver
➍
External TV
antenna connector
Using the Power Key
1. Press and quickly release the
Power key to view additional
options.
2. Select an option:
• To adjust screen brightness,
touch and drag the scroll bar.
• To turn off your device, touch
Off.
• To reset the device, hold the
Power key for 10 seconds.
• To exit the menu, press and
release the Power key.
About Points of Interest
The detailed maps loaded in your
device contain points of interest,
such as restaurants, hotels, and auto
services.
Finding a Point of Interest by
Category
1. From the Main menu, touch
Where To? > Points of Interest.
2. Select a category.
3. If necessary, select a subcategory.
4. Select a destination.
5. Touch Go!.
nüvi 2575R/ 2575 Quick Start Manual 5
Touch > Save on this page to
save the location to a Favorites
folder on the device. Use the
Favorites folder to save the
location of your workplace, home,
and other common destinations.
6. If necessary, select an option:
• Touch Drive to calculate a
route you will navigate by
driving.
• Touch Walk to calculate a
route you will navigate by
walking.
• Touch Public Transit to
calculate a route that combines
public transit and walking.
NOTE: You must have
cityXplorer™ maps loaded to
navigate using public transit.
Go to www.garmin.com to
purchase cityXplorer maps.
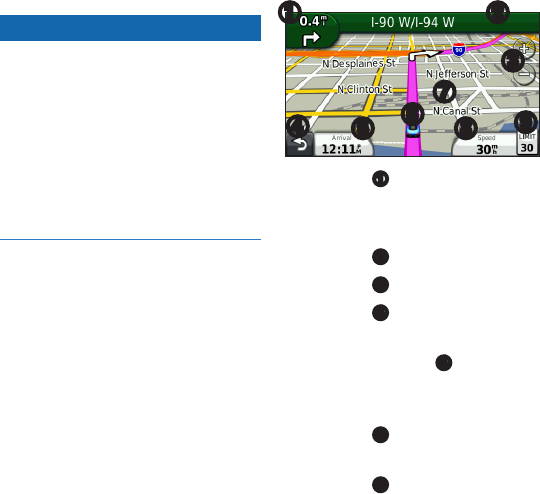
Using the Main Menu
➊
➋ ➌
➍ ➐ ➑➎ ➏
• Touch
➊
to select a transportation
mode.
• Touch
➋
tondadestination.
• Touch
➌
to view the map.
• Touch
➍
to stop a route.
• Touch
➎
to detour a route.
• Touch
➏
to watch TV
• Touch
➐
to adjust the volume.
• Touch
➑
to open the menu of
tools and settings.
6 nüvi 2575R/ 2575 Quick Start Manual
Your Route on the Map
NOTICE
The speed limit icon feature is for
information only and does not replace
the driver’s responsibility to abide
by all posted speed limit signs and to
use safe driving judgment at all times.
Garmin will not be responsible for
anytrafcnesorcitationsthatyou
may receive for failing to follow all
applicabletrafclawsandsigns.
Your route is marked with a magenta
line on the map. If you depart from
the original route, your device
recalculates the route. A speed limit
icon could appear as you travel on
major roadways.
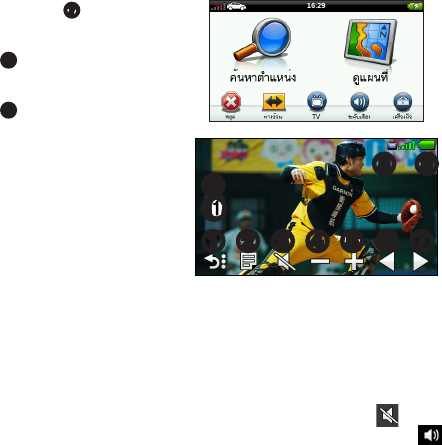
Using the Map Functions
➊ ➋
➌
➍➎➏
➐
➑➒
• Touch
➊
to view the next turn.
If a view of a junction exists,
the junction view appears.
• Touch
➋
to view the turn list.
• Touch
➌
to zoom in and out.
• Touch
➍
to return to the Main
menu.
• Touch and hold
➍
from any
screen to return to the Main
menu.
• Touch
➎
to change the data
eld.
• Touch
➏
to view the Where
Am I? page.
nüvi 2575R/ 2575 Quick Start Manual 7
• Touch and drag
➐
to view a
different area of the map.
• Touch
➑
to view trip
information.
• Touch
➒
to change the speed
limit if the speed limit shown
on the map is incorrect.
Portable Entertainment
nuvi 2575 is not only a GPS
navigator. It builds in Analogue TV
function, providing you an ultimate
recreational experience. You’ll never
feel bored on the road.
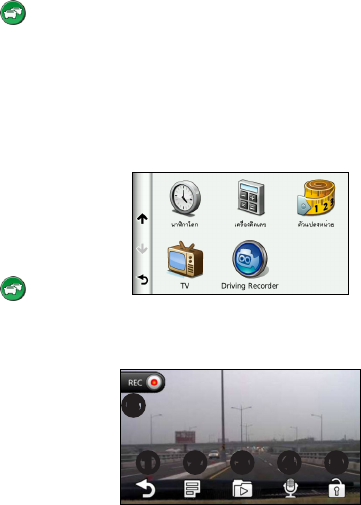
Analogue TV
Touch TV at main menu to enter
television mode.
➊
➋
➌
➍
➎
➏
➐
➑
➒
➓
➓
1. Exit menu: back to navigation
page but not stop playing TV
2. Select region: select your current
location
3. Mute button: cease volume
Touch 3, when showing means
mute. Touch 3 again, showing
means volume on.
4. Volume down: lower down
volume

8 nüvi 2575R/ 2575 Quick Start Manual
5. Volume up: raise volume
6. Channel down
7. Channel up
Touch and to change
channel
8. TV signal: showing analogue TV
signal strength
9. Battery: showing battery power
remaining
10. Close TV function: close TV
function and back to navigation
page
11. Exit to navigation: go back to
navigation page
About Trafc
NOTICE
Garmin is not responsible for the
accuracyortimelinessofthetrafc
information.
TheFMTrafcMessageChannel
(TMC)trafcsubscriptionis
automatically enabled and does not
require an additional subscription
purchase to activate. The FM TMC
trafcreceiverisavailableinretail
shops
Forinformationabouttrafcreceivers
and coverage areas, go to www
.garmin.com/trafc.
nüvi 2575R/ 2575 Quick Start Manual 9
Manually Avoiding Trafc on
Your Route
1. From the map, touch .
2. Touch Trafc On Route.
3. If necessary, touch the arrows to
viewothertrafcdelaysonyour
route.
4. Touch Avoid.
Viewing the Trafc Map
Thetrafcmapshowscolor-coded
trafcowanddelaysonnearby
roads.
1. From the map, touch .
2. Touch Trafc Map to view the
trafcincidentsonamap.
Driving Recorder
(Optional Item)
An optional subscription, Driving
Recorder, is available at retail shop.
Contact your local distributor for
more information.
Touch Tool→ Driving Recorder to
start.
Recordthetrafcorscenerywhile
driving.
➋
➌
➍
➎
➏
➊
10 nüvi 2575R/ 2575 Quick Start Manual
1. Touch
➊
to go back to menu page
2. Touch
➋
for Video Quality,
Format and Software Update
setting.
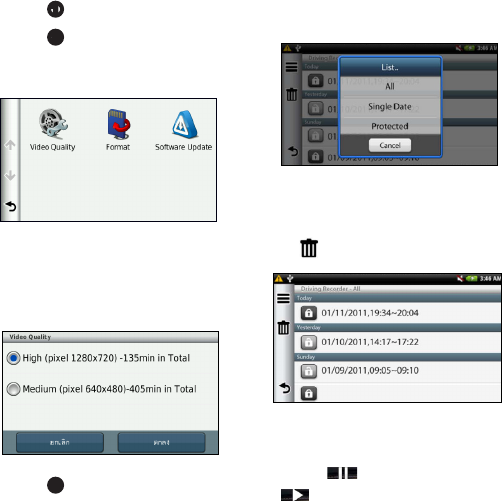
System default provides Video
Quality setup in High (pixel
1280x720) and Medium (pixel
640x480) to choose.
3. Touch
➌
for playback
3-1 Category
YoucanlistrecordedlebyAll,
Single Date or Protected.
3-2 Delete record
Selecttheleyouwishtodelete,
touch and delete.
3-3 Changing Status from Play and
Pause
Touch to pause and touch
to play.

nüvi 2575R/ 2575 Quick Start Manual 11
4. Touch
➍
to choose recording
voice or not means not to
record voice; means to record
voice.
5. Touch
➎
tosavetheleandthe
currentrecordedlewillnotbe
rewritten.
6. When
➏
showing on the screen,
represents system starts video
recording.
Hands-free Features
Pairing Your Phone
Hands-free calling is available on
some nüvi models. Before you can
pair, your phone and the device must
be turned on and within 33 ft. (10 m)
of each other.
1. Enable the Bluetooth® component
on your phone.
2. Touch Tools > Settings >
Bluetooth.
3. Touch Bluetooth > Enabled >
Save.
4. Touch Add Phone > OK.
5. Select your phone, and touch OK.
6. Enter the Bluetooth PIN (1234)
for your device in your phone.
Power Cables
Your device can be powered by the
following ways:
• Vehicle power cable
• USB cable (optional accessory)
• AC adapter (optional accessory)
Federal Communications Commission (FCC)
Statement
15.21
Youarecautionedthatchangesormodications
not expressly approved by the part responsible
for compliance could void the user’s authority to
operate the equipment.
15.105(b)
This equipment has been tested and found to
comply with the limits for a Class B digital
device, pursuant to part 15 of the FCC rules.
These limits are designed to provide reasonable
protection against harmful interference in a
residential installation. This equipment generates,
uses and can radiate radio frequency energy and,
if not installed and used in accordance with the
instructions, may cause harmful interference
to radio communications. However, there is no
guarantee that interference will not occur in a
particular installation. If this equipment does
cause harmful interference to radio or television
reception, which can be determined by turning the
equipment off and on, the user is encouraged to
try to correct the interference by one or more of
the following measures:
-Reorient or relocate the receiving antenna.
-Increase the separation between the equipment
and receiver.
-Connect the equipment into an outlet on a
circuit different from that to which the receiver
is connected.
-Consult the dealer or an experienced radio/TV
technician for help.
This device complies with Part 15 of the FCC
Rules. Operation is subject to the following two
conditions:
1) this device may not cause harmful interference,
and
2) this device must accept any interference
received, including interference that may cause
undesired operation of the device.

FCC RF Radiation Exposure Statement:
This equipment complies with FCC radiation
exposure limits set forth for an uncontrolled
environment.Endusersmustfollowthespecic
operating instructions for satisfying RF exposure
compliance. This transmitter must not be co-
located or operating in conjunction with any other
antenna or transmitter.
Garmin
®
, the Garmin logo, and nüvi
®
are
trademarks of Garmin Ltd. or its subsidiaries,
registered in the USA and other countries.
cityXplorer
™
, myTrends
™
, and nüMaps
Guarantee
™
are trademarks of Garmin Ltd. or its
subsidiaries. These trademarks may not be used
without the express permission of Garmin. The
Bluetooth
®
word mark and logos are owned by
the Bluetooth SIG, Inc., and any use of such name
by Garmin is under license. Mac
®
is a trademark
of Apple Computer, Inc., registered in the U.S.
and other countries. microSD
™
is a trademark of
SD-3C, LLC.
© 2011 Garmin Ltd. or its subsidiaries
January 2011 Part Number 190-01252-01 Rev. B Printed in Taiwan