Garmin 02187 LOW POWER TRANSMITTER User Manual
Garmin International Inc LOW POWER TRANSMITTER
Garmin >
Contents
- 1. User Manual 1
- 2. User Manual 2
User Manual 2
GHC™ 20
Owner’s Manual
March 2013 190-01610-00_0A Printed in Taiwan
DRAFT

All rights reserved. Under the copyright laws, this manual may not be copied, in whole or in part, without the written consent of Garmin. Garmin reserves the right to change or improve its products and
to make changes in the content of this manual without obligation to notify any person or organization of such changes or improvements. Go to www.garmin.com for current updates and supplemental
information concerning the use of this product.
Garmin® and the Garmin logo are trademarks of Garmin Ltd. or its subsidiaries, registered in the USA and other countries. GHC™ and Shadow Drive™ are trademarks of Garmin Ltd. or its subsidiaries.
These trademarks may not be used without the express permission of Garmin.
NMEA®, NMEA 2000, and the NMEA 2000 logo are registered trademarks of the National Marine Electronics Association.
DRAFT
Introduction
WARNING
See the Important Safety and Product Information guide in the product box for
product warnings and other important information.
You are responsible for the safe and prudent operation of your vessel. The
autopilot is a tool that will enhance your capability to operate your boat. It does
not relieve you from the responsibility of safely operating your boat. Avoid
navigational hazards and never leave the helm unattended.
Always be prepared to promptly regain manual control of your boat.
Learn to operate the autopilot on calm and hazard-free open water.
Use caution when operating the autopilot near hazards in the water, such as
docks, pilings, and other boats.
The autopilot system continuously adjusts the steering of your boat to maintain a
constant heading. In addition to the basic heading-hold functionality, the system
allows manual steering and several modes of automatic-steering functions and
patterns.
Operate the autopilot system using the helm control device. Using the helm
control, you engage and steer, set up, and customize the autopilot system.
To install the autopilot system, including the helm control, refer to the installation
instructions for each device.
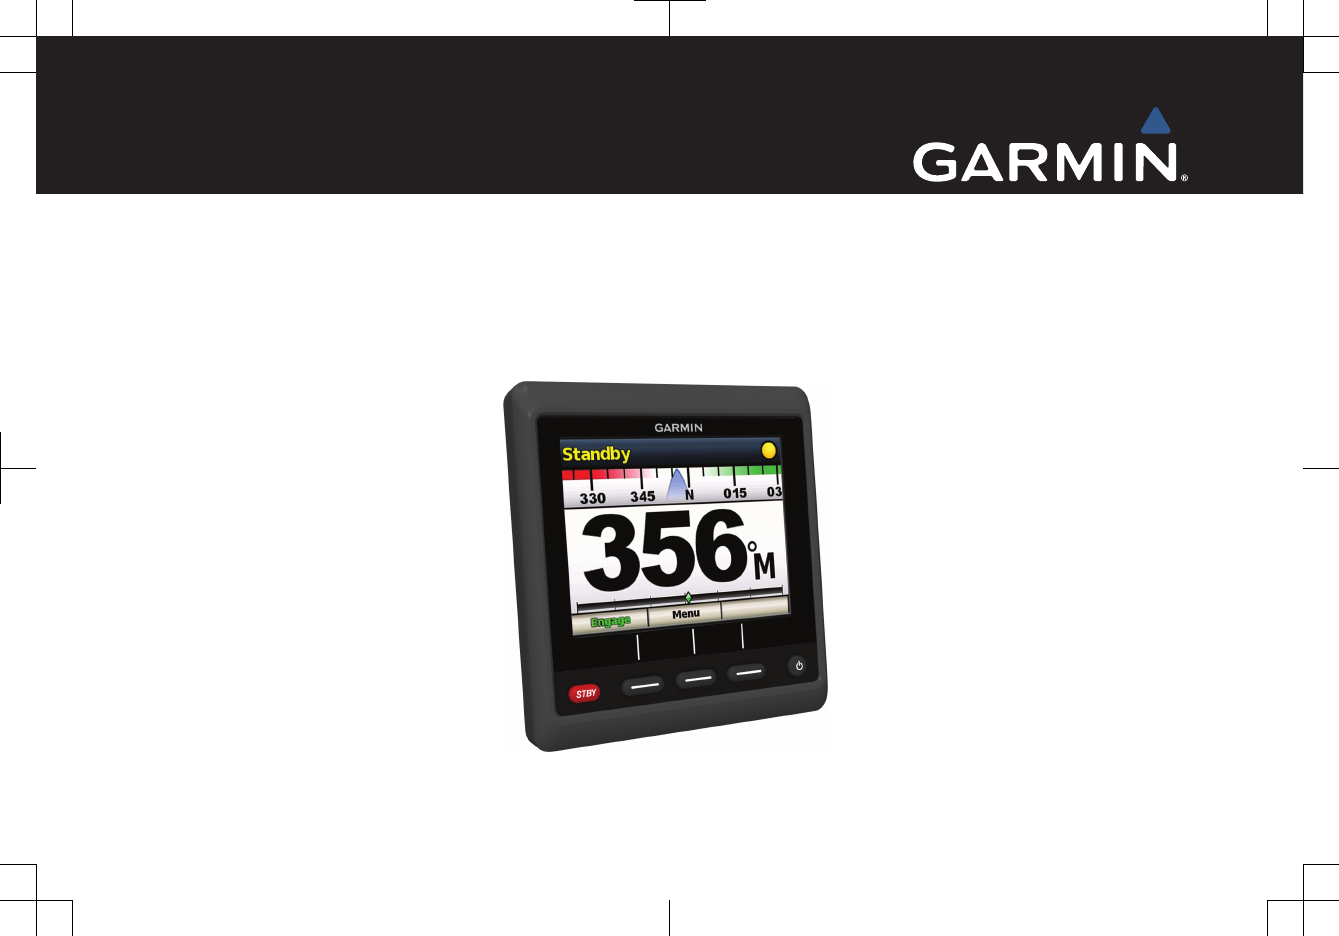
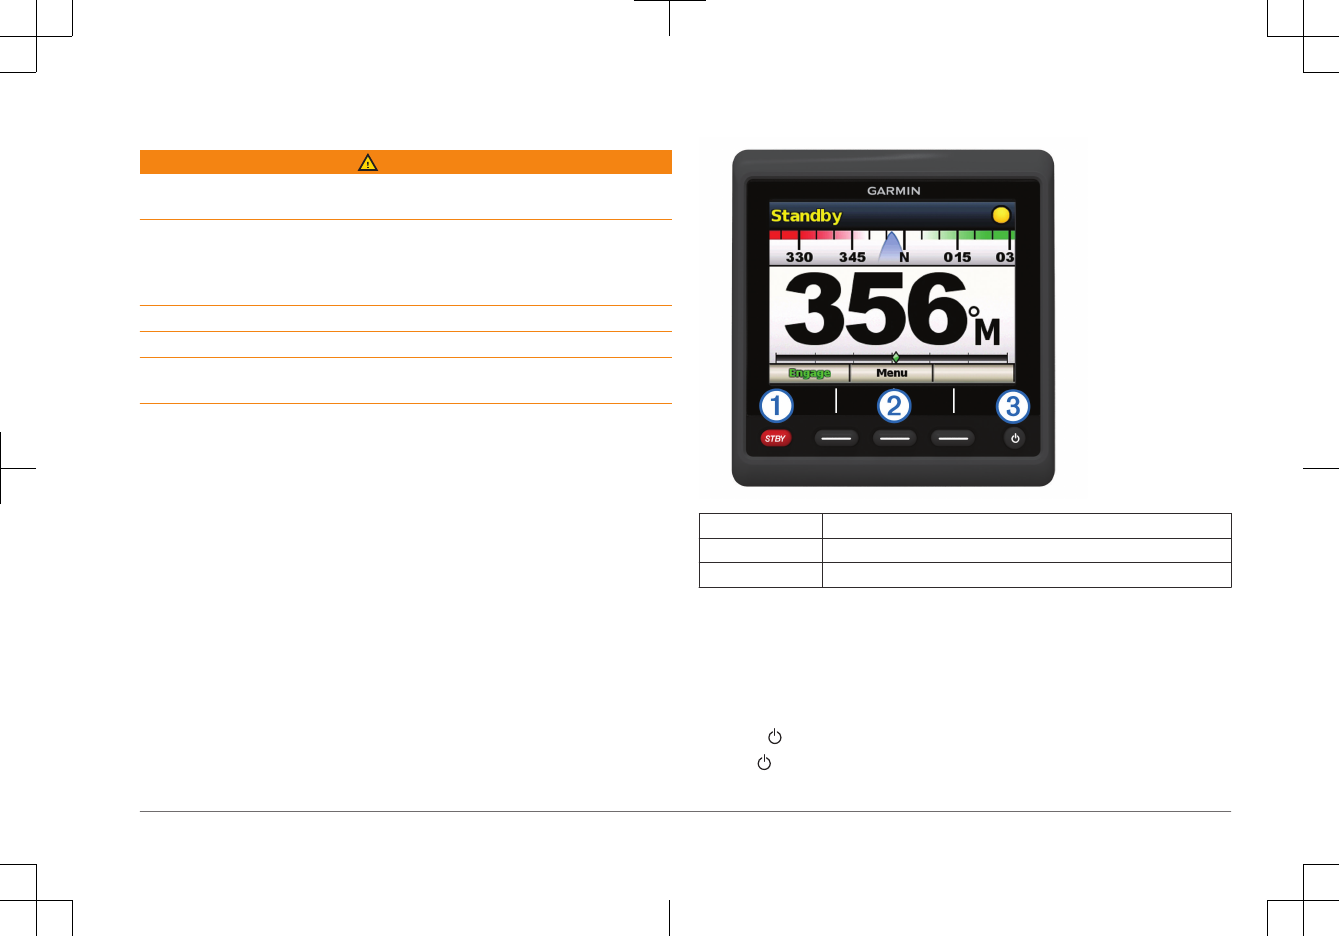
Device Overview
ÀStandby key
ÁSoft keys
ÂPower key
Tips and Shortcuts
•Select STBY to place the autopilot in standby mode and return to the heading
screen.
• Select Menu from any main screen to access additional settings about that
screen.
• Select to adjust the backlight.
• Hold to turn the chartplotter off.
Introduction 1
DRAFT

Heading Screen
The heading screen displays the status of the autopilot and the heading screen.
Standby Mode
CAUTION
The autopilot does not steer the boat in standby mode. You are responsible for
controlling the helm, when in standby mode.
In standby mode, you can engage the autopilot, adjust settings, or specify the
transmission direction (page 2) of your boat (forward or reverse) by using the
soft keys.
"Standby" appears in yellow and a yellow icon displays in the upper-right corner
of the screen when the device is in standby mode.
Powerboat Autopilot Operation
Heading Hold
You can engage the autopilot heading hold function to maintain your current
heading without steering the helm.
Engaging the Autopilot
When you engage the autopilot, the autopilot takes control of the helm and steers
the boat to maintain your heading.
From the heading screen, select Engage.
"Heading Hold" appears in green at the top of the heading screen. A green
icon appears in the upper-right corner of the screen when the device is in
heading hold. This icon helps you determine the status of the autopilot and
can be seen on every screen on the device. Your heading shows in the
center of the heading screen.
Heading Adjustment
When the autopilot is engaged, you can adjust the heading using the keys on the
helm control or using the helm if your autopilot is equipped with Shadow Drive™
technology.
Adjusting the Heading with the Helm
NOTE: When you manually maintain a specific heading for a few seconds, the
autopilot resumes control of the new heading.
With the autopilot engaged, manually steer the boat.
A yellow marker and the numerical display on the center of the heading
screen indicate the intended heading.
Adjusting the Heading with the Keys
You can steer your boat using the keys at the bottom of the helm control.
With the autopilot engaged, select an option.
• Select 1°> 10°>> or <<10° <1° to use rudder steering mode. Rudder
steering mode turns the boat in 1° increments, and steers the boat when
you hold a key.
• Hold 1°> 10°>> or <<10° <1° to use step steering mode. Step steering
mode turns the boat in 10° increments.
Direction Control
When your boat is properly equipped, you can control the drive direction of the
boat (forward or reverse) using the helm control.
Enabling Direction Control
1Select Menu > Setup > User Autopilot Setup > Direction Control.
2Select Enabled.
Using Direction Control
Before you can use direction control, you must enable the direction control
functionality (page 2).
When traveling in standby mode, select Direction.
2 Heading Screen
DRAFT
Steering Patterns
WARNING
You are responsible for the safe operation of your boat. Do not begin a pattern
until you are certain that the water is clear of obstacles.
The autopilot can steer the boat in preset patterns for fishing, and it can also
perform other specialty maneuvers such as U-turns and Williamson turns. You
can use the autopilot to begin pattern steering.
Pattern steering is not based on GPS, and it can be used without a GPS device
connected to the autopilot.
Zigzag Pattern
The zigzag pattern steers the boat from port to starboard and back, over a
specified time and angle, across your current heading.
Setting Up the Zigzag Pattern
You can modify the amplitude and period of the zigzag pattern. The default
values are 30° and 1.5 minutes.
1Select Menu > Pattern Steering > Zigzag > Setup > Zigzag Amplitude.
2Select or to set the amplitude in increments of 5°.
3Select Done.
4Select Setup > Zigzag Period.
5Select or to set the period.
6Select Done.
Following a Zigzag Pattern
1Select Menu > Pattern Steering > Zigzag.
2Select Engage.
Circles Pattern
The circles pattern steers the boat in a continuous circle, in a specified direction,
and at a specified time interval.
Setting Up the Circles Pattern
1Select Menu > Pattern Steering > Circles > Time.
2Select or to set the time.
3Select Done.
Following the Circles Pattern
1Select Menu > Pattern Steering > Circles > Engage..
2Select an option:
• Select to begin a clockwise turn.
• Select to begin a counter-clockwise turn.
U-Turn Pattern
The u-turn pattern turns the boat around 180° and maintains the new heading.
There are no settings to adjust the u-turn pattern.
Following the U-Turn Pattern
1Select Menu > Pattern Steering > U-Turn > Engage.
2Select an option:
• Select to begin a starboard turn.
• Select to begin a port turn.
Williamson Turn
The Williamson turn pattern turns the boat around with the intent of running
alongside the location where the Williamson turn pattern was initiated. There are
no settings to adjust the Williamson turn pattern.
The Williamson turn pattern can be used in man overboard situations.
Following the Williamson Turn Pattern
WARNING
The Williamson turn pattern is not determined by GPS and is affected by wind,
current, and speed. Be ready to adjust the throttle and take the helm to avoid
harm to a person in the water.
Powerboat Autopilot Operation 3
DRAFT
CAUTION
The boat must be below planing speed when using this pattern.
1Select Menu > Pattern Steering > Williamson Turn > Engage.
2Select an option:
•Select to begin a starboard turn.
• Select to begin a port turn.
Cancelling a Steering Pattern
• Physically steer the boat.
• Select <<10° <1° or 1°> 10°>>.
• Select STBY.
GPS Steering Patterns
WARNING
You are responsible for the safe operation of your boat. Do not begin a GPS
pattern until you are certain that the water is clear of obstacles.
The autopilot can steer the boat along a route defined by your GPS device or in
preset patterns based on a GPS location (waypoint). To use GPS steering, you
must have a compatible GPS device connected to the autopilot using NMEA
2000® or NMEA® 0183. GPS steering patterns are based on a GPS waypoint to
which you are actively navigating using your optional GPS device. This waypoint
is called the active waypoint.
Following a GPS Steering Route
The autopilot can steer the boat according to a route defined on a compatible
GPS device.
1Create and navigate a route on your GPS device.
2Select Menu > GPS Steering > Follow Route.
Cancelling a GPS Steering Pattern
• Physically steer the boat.
• Select <<10° <1° or 1°> 10°>>.
• Select STBY.
Route To
NOTE: The autopilot must be connected to a NMEA 2000 or NMEA 0183
compatible chartplotter to use Route To.
When you use the Route To feature, the autopilot steers the boat according to a
route defined on your chartplotter.
Following a Route To Pattern
Before you can begin following a Route To pattern, you must define a route on
your chartplotter. Refer to the owner’s manual included with your chartplotter for
information on how to define a route.
Select Menu > GPS Steering > Route To.
Orbit Pattern
The orbit pattern steers the boat in a continuous circle around the active
waypoint. The size of the circle is defined by your distance from the active
waypoint when you begin the orbit pattern.
Following an Orbit Pattern
1Select Menu > GPS Steering > Orbit > Engage.
2Select an option:
• Select to begin a clockwise turn.
• Select to begin a counter-clockwise turn.
Cloverleaf Pattern
The cloverleaf pattern steers the boat to repeatedly pass over an active waypoint.
When you begin the cloverleaf pattern, the autopilot drives the boat toward the
active waypoint and begins the cloverleaf pattern.
Setting Up the Cloverleaf Pattern
You can adjust the distance from the waypoint at which the autopilot turns your
boat for another pass over the waypoint. The default setting turns the boat at a
range of 1000 ft. (300 m) from the active waypoint.
4 Powerboat Autopilot Operation
DRAFT
1Select Menu > GPS Steering > Cloverleaf > Length.
2Select or to set the range.
3Select Done.
Following the Cloverleaf Pattern
1Select Menu > GPS Steering > Cloverleaf > Engage.
2Select an option:
• To begin a starboard turn, select .
• To begin a port turn, select .
Search Pattern
The search pattern steers the boat in increasingly larger circles outward from the
active waypoint, forming a spiral pattern. When you begin the search pattern, the
autopilot drives the boat to the active waypoint and begins the pattern.
Setting Up the Search Pattern
You can adjust the distance between each circle in the spiral. The default
distance between circles in 50 ft. (20 m).
1Select Menu > GPS Steering > Search > Spacing.
2Select or to set the distance.
3Select Done.
Following the Search Pattern
1Select Menu > GPS Steering > Search > Engage .
2Select an option:
• To begin a starboard turn, select .
• To begin a port turn, select .
Sailboat Autopilot Operation
CAUTION
When engaged, the autopilot controls only the rudder. You and your crew remain
responsible for the sails while the autopilot is engaged.
In addition to heading hold, you can use the autopilot to maintain a wind hold.
You can also use the autopilot to control the rudder while tacking and gybing.
Wind Hold
You can set the autopilot to maintain a specific bearing relative to the current
wind angle. Your device must be connected to a NMEA 2000 or NMEA 0183
compatible wind sensor to perform a wind hold or a wind-based tack or gybe.
Engaging Wind Hold
NOTE: You must have a wind sensor installed before you can engage wind
hold.
When the autopilot is in standby mode, select Wind Hold.
Engaging Wind Hold from Heading Hold
NOTE: You must have a wind sensor installed before you can engage wind
hold.
With heading hold engaged, select Menu > Wind Hold.
Adjusting the Wind Hold Angle with the Autopilot
You can adjust the wind hold angle on the autopilot when wind hold is engaged.
• To adjust the wind hold angle in increments of 1°, select <<10° <1° or 1°>
10°>>.
• To adjust the wind hold angle in increments of 10°, hold <<10° <1° or 1°>
10°>>.
Sailboat Autopilot Operation 5
DRAFT
Tack and Gybe
You can set the autopilot to perform a tack or gybe while heading hold or wind
hold is engaged.
Tacking and Gybing from Heading Hold
1Engage heading hold (page 2).
2Select Menu > Tack/Gybe.
3Select or to choose a direction.
The autopilot steers your boat through a tack or gybe, and the "Tacking"
displays on the heading screen until the maneuver is complete.
Tacking and Gybing from Wind Hold
1NOTE: You must have a wind sensor installed before you can engage wind
hold.
Engage wind hold (page 5).
2Select Menu > Tack/Gybe.
3Select Tack or Gybe.
The autopilot steers your boat through a tack or gybe, and the wind hold
screen shows the compass and wind gauges with yellow highlights that
indicate the direction and progress of the tack or gybe.
Route To in the Sailboat Autopilot
CAUTION
Garmin recommends using route to only under motor power. Using route to while
under sail can cause an unexpected gybe, risking damage to your sailboat.
Unattended sails and rigging can be damaged or cause injury to any crew or
passengers during an unexpected gybe maneuver.
Device Configuration
User Autopilot Settings
Select Menu > Setup > User Autopilot Setup.
Power Mode: Sets the device power mode to normal or economy mode.
Economy power mode allows you to set the percentage of power used to run
the autopilot.
Power Saver: Sets the percentage of power used to run the autopilot when the
device is in economy power mode.
Direction Control: Sets the transmission direction of your boat (forward or
backward).
Configuring the Remote Control
You can connect one optional remote control to a the helm control.
Select Menu > Setup > Remote.
Searching for a Remote Control
1Select Menu > Setup > Remote.
2Select Search for Remote.
Assigning Remote Button Actions
CAUTION
If you assign a pattern to a button on the remote control, remember that you are
responsible for the safe operation of your boat. Do not begin a pattern until you
are certain the water is clear of obstacles.
NOTE: If you assign Direction Control to a button on the remote, the autopilot
must be in standby mode to change the direction (forward or reverse).
1Select Menu > Setup > Remote.
2Select a remote button you want to assign an action to.
6 Device Configuration
DRAFT

3Select a button action.
4If necessary, repeat steps 2 and 3 for the remaining buttons.
Display Settings
Select Menu > Setup > Displayto open the display settings.
Color Mode: Sets the device to display day or night colors.
Configure Colors: Sets the color configuration for each color mode. For day
color mode, you can select a full color or high contrast color configuration. For
night color mode, you can select a full color, red and black, or green and
black color configuration.
Backlight: Sets the backlight level.
Network Sharing: Allows you to share color mode, color configuration, and
backlight settings with other devices across the NMEA 2000 network.
System Settings
Select Menu > Setup > System.
Units: Sets the units of measure.
Heading: Sets the reference used in calculating heading information.
Variance: Adjusts the variance from true north. This setting is only available
when the heading is set to True.
Beeper: Sets if and when audible sounds are used.
Auto Power: Automatically turns on the autopilot when it is connected to a
NMEA 2000 network.
GHC Low Volt. Alarm: Sounds an alarm when the autopilot is receiving low
voltage.
Language: Sets the on-screen language.
Operating Mode: Allows you to set the operating mode to normal or store demo
mode.
System Information: Allows you to view software information.
Factory Defaults: Resets the unit to factory defaults.
Device Configuration 7
DRAFT

DRAFT

DRAFT
www.garmin.com/support
913-397-8200
1-800-800-1020
0808 238 0000
+44 870 850 1242 1-866-429-9296 +43 (0) 820 220 230
+32 2 672 52 54 +45 4810 5050 +358 9 6937 9758 + 331 55 69 33 99
+49 (0)1805-427646-880 + 39 02 36 699699 0800 - 023 3937
035 - 539 3727 + 47 815 69 555
00800 4412 454
+44 2380 662 915 + 35 1214 447 460 + 34 902 007 097 + 46 7744 52020
Garmin International, Inc.
1200 East 151st Street
Olathe, Kansas 66062, USA
Garmin (Europe) Ltd.
Liberty House, Hounsdown Business Park
Southampton, Hampshire, SO40 9LR UK
Garmin Corporation
No. 68, Zhangshu 2nd Road, Xizhi Dist.
New Taipei City, 221, Taiwan (R.O.C.)
© 2013 Garmin Ltd. or its subsidiaries
DRAFT