Garmin 02228 GPS dog tracking collar User Manual
Garmin International Inc GPS dog tracking collar
Garmin >
Users Manual
4.75"
4.75"
4.75"
9.5"
Trimmed dimensions Trimmed and bound dimensions
Binding Cover
Spread layout
Cover Cover
Dimensions and drawings for reference only. Drawings are not to scale.
TITLE
SIZE PART NO: REV:
SCALE Sheet Of
CONFIDENTIAL
This drawing and the specications contained herein are the property
of Garmin Ltd. or its subsidiaries and may not be reproduced or used
in whole or in part as the basis for manufacture or sale of products
without written permission.
Garmin Ltd. or its subsidiaries
C/O Garmin International, Inc.
1200 E. 151st Street
Olathe, Kansas 66062 U.S.A.
Initials Date Astro 320 with DC 50 Quick Start Manual
Drawn By: JAH 05/07/13 A190-01628-01 1
N/A 1 13
Electronic Archive Contents
File Name File Contents
Astro320_DC50_QSM_EN_Spec.indd InDesign CS4, Document specication sheet
Astro320_DC50_QSM_EN.pdf Portable Document Format, manual for online posting and CD-ROM
SPECIFICATION
CONTROL
DRAWING
Revisions
Rev. Date Description ECO No.
105/07/13 Experimental Release (Pilot Run) – – – –
Specications
1. Description Product documentation, Astro 320 with DC 50 Quick Start Manual
2. Size Trimmed: Width = 9.5" Height = 4.75". Finished, Folded: Width = 4.75", Height = 4.75".
3. Tolerance ±0.0787" (±2 mm)
4. Pagination 12 pages
5. Material 120-lb coated. Approved Equivalents Allowed.
6. Finish Matte.
7. Color 4-color process.
8. Bindery Saddle-stitched. Approved Equivalents Allowed.
9. Folds N/A
10. Languages English
11. Notes This part shall comply with Garmin Banned & Restricted Substances (GPN 001-00211-00).
Astro® 320 with DC™ 50
Quick Start Manual
May 2013 190-01628-01_01 Printed in Taiwan
DRAFT
Introduction
WARNING
See the Important Safety and Product
Information guide in the product box for
product warnings and other important
information.
Setting Up the Astro System
Before you can use all the features of the
DC 50 device, you should update your
Astro to the latest software version. See
the Astro 320 with DC 50 Owner's
Manual.
You must set up the Astro handheld
device and the DC 50 dog collar device
before you can use the devices.
1Install batteries in the handheld device
(page 4).
2Charge the dog collar device
(page 5).
3Turn on the devices (page 5).
4If necessary, add the dog collar device
to the handheld device (page 6).
5Acquire satellite signals (page 6).
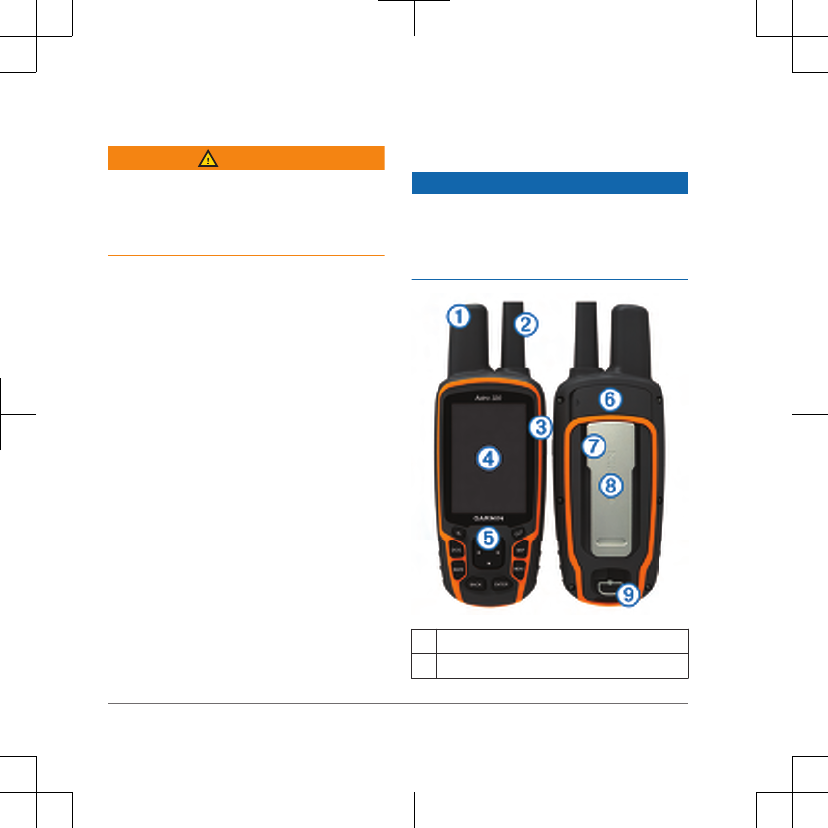
Device Overviews
Astro
NOTICE
Avoid using a high-powered radio (greater
than 5 watts) in close proximity to the
Astro. It may cause irreversible damage to
the Astro.
ÀGPS antenna
ÁVHF antenna
2
DRAFT
Â
Power key
ÃDisplay
ÄKeypad
ÅUSB port (under weather cap)
ÆmicroSD™ card slot (under battery door)
ÇMounting spine
ÈBattery cover D-ring
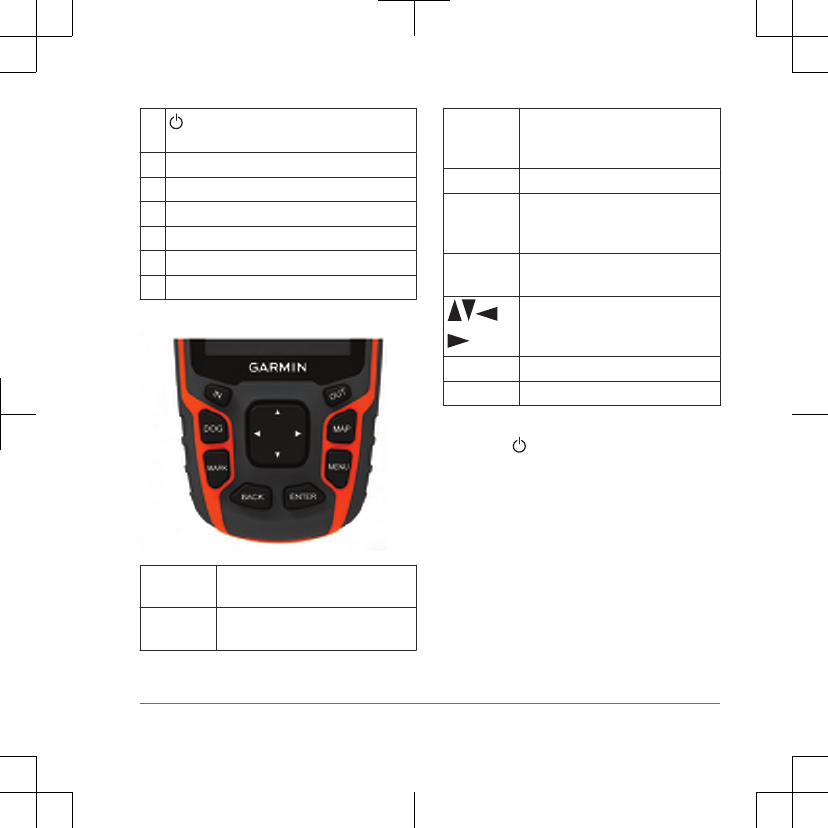
Keypad
DOG Select to view the dog tracking
page.
MARK Select to mark your current
location.
BACK Select to cancel data entry or
return to the previous menu or
page.
MAP Select to view the map.
MENU Select to open the menu for the
active page. Select twice to
open the main menu.
ENTER Select to select options and
acknowledge messages.
Select to view or scroll through
options and to move the map
pointer.
IN Select to zoom in on the map.
OUT Select to zoom out on the map.
Locking the Keypad
1Select .
2Select OUT.
3
DRAFT
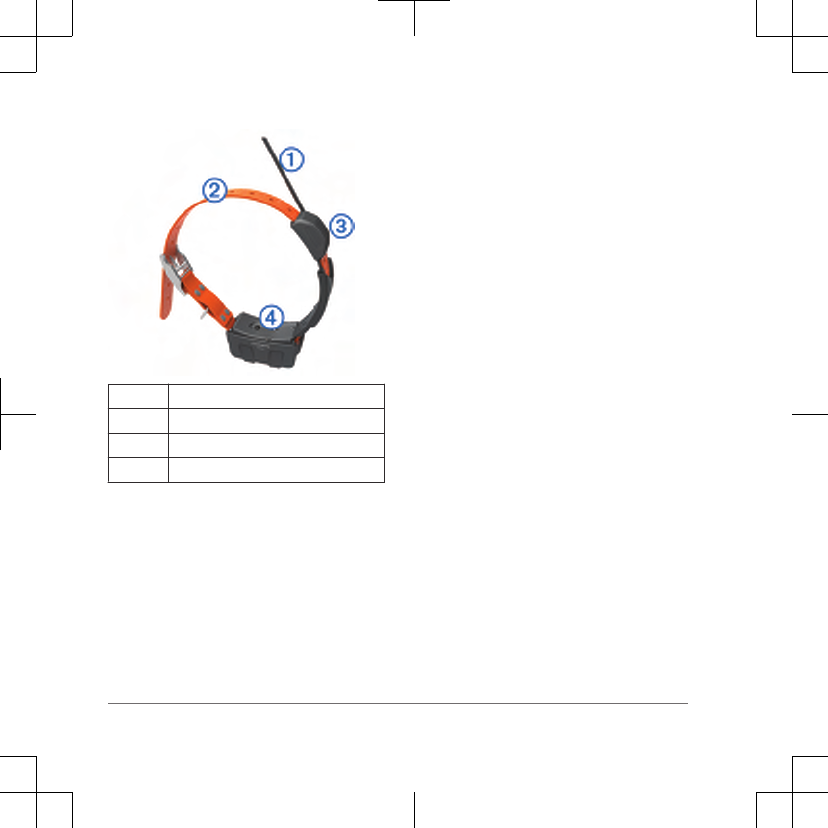
DC 50
ÀVHF antenna
ÁCollar
ÂGPS antenna
ÃPower key
Getting More Information
You can find more information about this
product on the Garmin® website.
• Go to www.garmin.com/astro.
• Go to www.garmin.com/outdoor.
• Go to http://buy.garmin.com, or
contact your Garmin dealer for more
information about optional accessories
and replacement parts.
Getting the Owner's Manual
You can get the latest owner's manual
from the web.
1Go to www.garmin.com/support.
2Select Manuals.
3Follow the on-screen instructions to
select your product.
Registering Your Device
Help us better support you by completing
our online registration today.
• Go to http://my.garmin.com.
• Keep the original sales receipt, or a
photocopy, in a safe place.
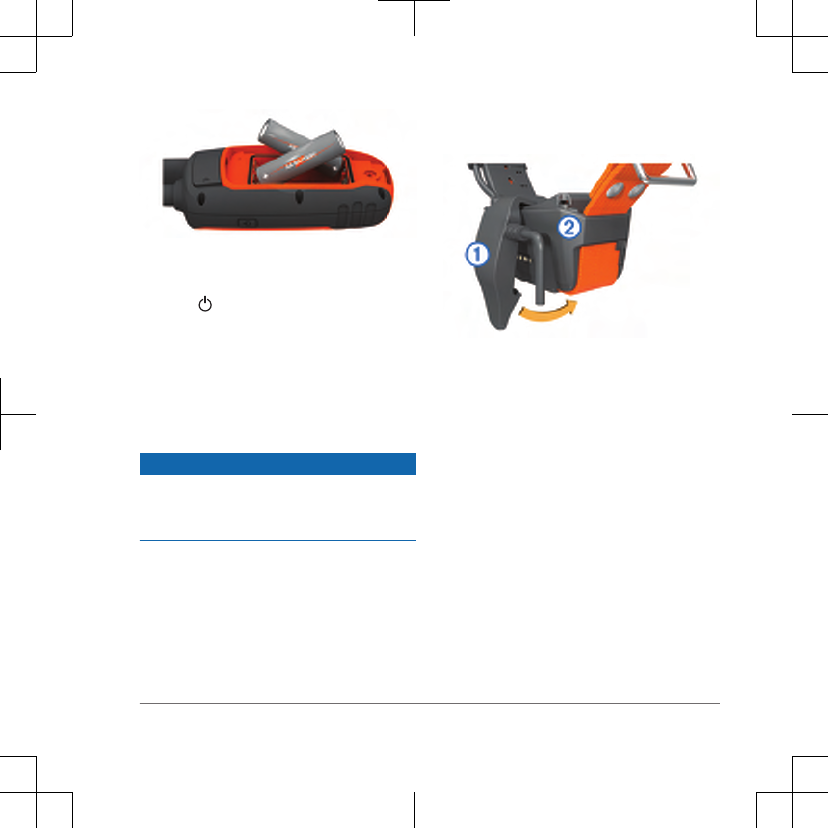
Installing Batteries
The handheld device operates on two AA
batteries (not included). Use NiMH or
lithium batteries for best results.
1Turn the D-ring counter-clockwise,
and pull up to remove the cover.
2Insert two AA batteries, observing
polarity.
4
DRAFT
3Replace the battery cover, and turn
the D-ring clockwise.
4Hold .
5Select Setup > System > Battery
Type.
6Select Alkaline, Lithium, or
Rechargeable NiMH.
Charging the Dog Collar Device
NOTICE
To prevent corrosion, thoroughly dry the
contacts on the collar and the surrounding
area before connecting the charging clip.
You should fully charge the battery before
you use the device for the first time.
Charging a fully depleted battery takes
about five hours. The device will not
charge when outside the temperature
range of 32° to 113°F (0° to 45°C).
1Snap the charging clip À onto the
device Á.
2Plug the power cable into a power
source.
The status LED is solid red when the
collar is charging.
3After the status LED turns solid green,
remove the charging clip from the
collar.
Turning On the Devices
• On the handheld device, hold the
power key until the LCD display turns
on.
•On the dog collar device, hold the
power key until the status LED flashes
and the collar beeps.
5
DRAFT
Acquiring Satellite Signals
Both the collar and handheld device must
acquire satellite signals before you put the
collar on your dog. Acquiring satellites
can take a few minutes.
1Go outdoors to an open area.
2Turn on both devices (page 5).
3Select the power key on the handheld
device.
shows the GPS signal strength.
When the collar has acquired satellite
signals, the status LED flashes a double-
blink or triple-blink in green.
Adding a Dog
The handheld device can track up to 10
dogs with dog collar devices. If you
purchase additional dog collar devices,
you can link them to the handheld device.
To link, the handheld device must be
close enough to the dog collar device to
touch it, or you must know the dog collar
device ID number.
1Select DOG.
2Select Add Dog.
3Follow the on-screen instructions.
By default, the new dog is named
“Dog” and an ID number is randomly
assigned.
An error message could appear if
there is a conflict with the ID number
of another dog.
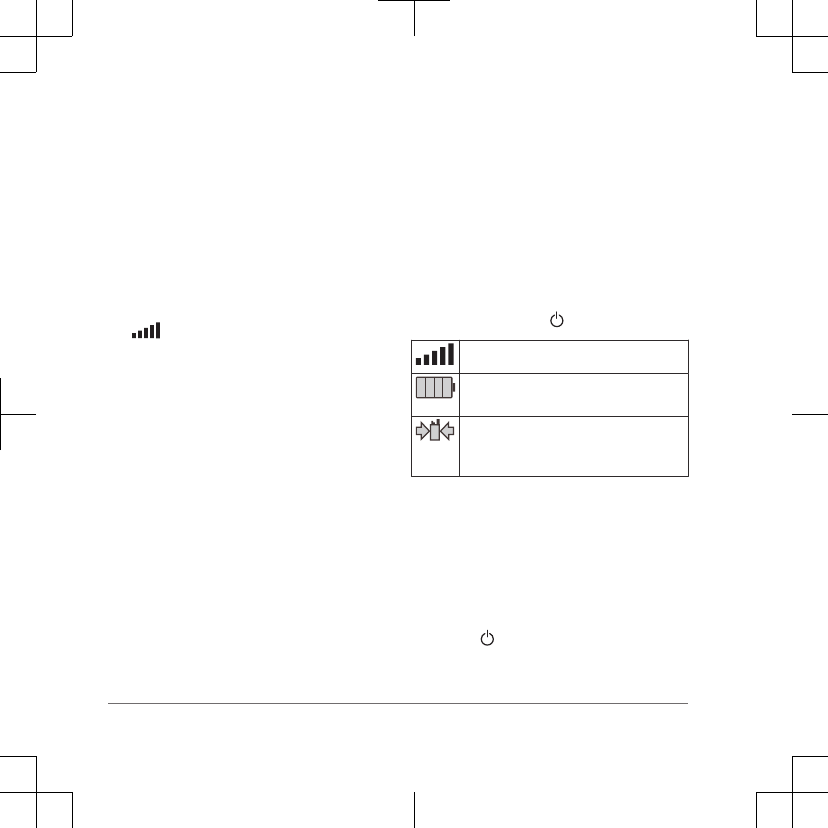
Status Information
Satellite signal and battery status
information is provided on the main menu
and when you select .
Indicates the satellite signal strength.
Indicates the remaining battery
power.
Blinks when the device detects a
signal (for example, a dog collar
device) on the channel it is receiving.
Adjusting the Backlight Brightness
NOTE: The backlight brightness may be
limited when the remaining capacity in the
batteries is low.
Extensive use of screen backlighting can
significantly reduce battery life.
1Select .
2Use the rocker to adjust the
brightness levels.
6
DRAFT
TIP: You can also select to cycle
through the brightness levels.
3Select ENTER to select a brightness
level and close the menu.
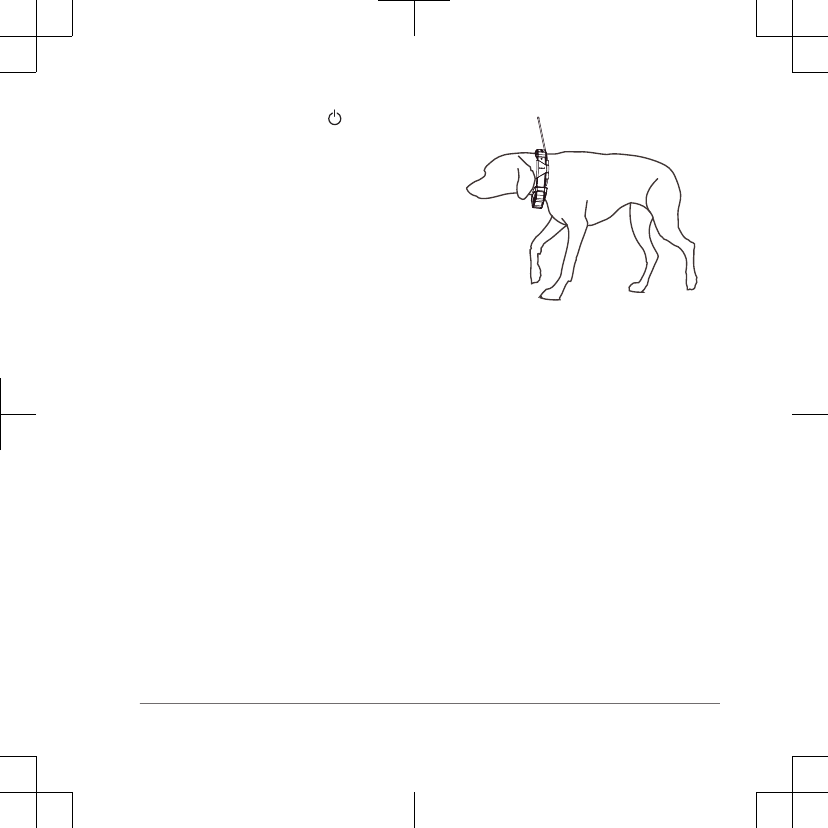
Fitting the Collar on Your Dog
Before you put the collar on the dog, pair
the handheld device and collar (page 6),
and acquire satellite signals (page 6).
1Position the collar with the VHF whip
antenna pointing up, the GPS antenna
facing up, and the LEDs facing
forward.
2Place the collar around the middle of
the dog's neck.
3Tighten the strap so it is snug around
the dog's neck.
NOTE: The collar should fit tightly and
should not be able to rotate or slide on
the dog's neck. The dog must be able
to swallow food and water normally.
You should observe your dog's
behavior to verify that the collar is not
too tight.
4If the strap is too long, cut off the
excess, leaving at least 3 inches (7.62
cm) to spare.
Marking Your Vehicle Location
You can mark the location of your vehicle
so you can navigate back to your vehicle
after a hunt.
1From the main menu, select Start
New Hunt.
2Follow the on-screen instructions.
Communication with the Collar
The handheld device and dog collar
device use radio signals to communicate.
Objects in the path of radio signals
degrade the quality of the signals.
Keeping an unobstructed line of sight
7
DRAFT
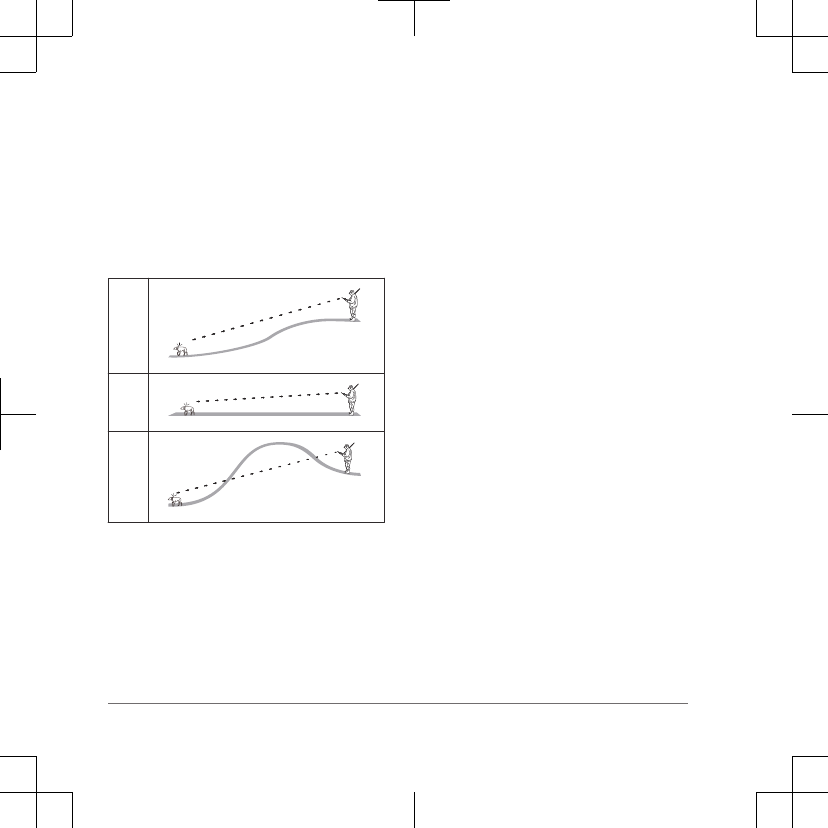
between your handheld device and your
dog’s dog collar device produces the best
communication signal. Obstructed radio
waves result in a poor signal. To achieve
the best line-of-sight conditions, you
should move to the highest elevation point
in your area (for example, on the top of a
hill).
Best
Good
Poor
Calibrating the Compass
NOTE: You must calibrate the electronic
compass outdoors. Do not stand near
objects that influence magnetic fields,
such as cars, buildings, or overhead
power lines.
The device has a 3-axis electronic
compass. You should calibrate the
compass after moving long distances,
experiencing temperature changes, or
changing the batteries.
1Select DOG > MENU.
2Select Calibrate Compass > Start.
3Follow the on-screen instructions.
Garmin BaseCamp™ BaseStation
To get the most from your Garmin device,
you can download BaseCamp software.
Go to www.garmin.com/basecamp. You
can view and organize your maps,
waypoints, routes, and tracks and send
them to your device. You can also use the
BaseStation feature to view the location of
your dogs on your computer in real time.
Tips
• Turn on the dog collar device and
allow it to acquire satellites before you
put the dog collar device on your dog.
This allows the dog collar device to
acquire satellite signals much faster.
• Bring extra AA batteries for your
handheld device.
8
DRAFT

• Use a fully charged dog collar device.
A fully charged dog collar device
operates for approximately 21 hours
when using five‑second interval
reporting.
• Use line-of-sight radio communication
(page 7).
• From the dog tracking page, select
MENU > Small Numbers to reduce
the text size.
This allows you to view more dogs at
one time on the dog tracking page.
Optional Accessories
Optional accessories, such as mounts,
maps, fitness accessories, and
replacement parts, are available at
http://buy.garmin.com or from your
Garmin dealer.
Troubleshooting
My handheld device is not responding
If your handheld device stops responding,
you can reset the device.
NOTE: This does not erase any of your
data or settings.
1Remove the batteries.
2Reinstall the batteries (page 4).
My dog collar devices have conflicting
IDs
Each dog you track has its own ID
number. If two dogs within range of the
handheld device have the same ID, the
handheld device warns you of a
conflicting ID signal. Follow the on-screen
instructions to resolve the conflict.
When possible, you should allow the
handheld device to automatically assign
IDs. If necessary, you can manually
assign a new ID number to a dog.
Contacting Garmin Product Support
• Go to www.garmin.com/support and
click Contact Support for in-country
support information.
• In the USA, call (913) 397.8200 or
(800) 800.1020.
• In the UK, call 0808 2380000.
• In Europe, call +44 (0) 870.8501241.
9
DRAFT

DRAFT

DRAFT
www.garmin.com/support
913-397-8200
1-800-800-1020
0808 238 0000
+44 870 850 1242 1-866-429-9296 +43 (0) 820 220 230
+32 2 672 52 54 +45 4810 5050 +358 9 6937 9758 + 331 55 69 33 99
+49 (0)180 6 427646 + 39 02 36 699699 0800 - 023 3937
035 - 539 3727 + 47 815 69 555
00800 4412 454
+44 2380 662 915 + 35 1214 447 460 + 34 93 275 44 97 + 46 7744 52020
Garmin International, Inc.
1200 East 151st Street
Olathe, Kansas 66062, USA
Garmin (Europe) Ltd.
Liberty House, Hounsdown Business Park
Southampton, Hampshire, SO40 9LR UK
Garmin Corporation
No. 68, Zhangshu 2nd Road, Xizhi Dist.
New Taipei City, 221, Taiwan (R.O.C.)
Garmin®, the Garmin logo, and Astro® are trademarks of Garmin
Ltd. or its subsidiaries, registered in the USA and other countries.
ANT+™, BaseCamp™, and DC™ are trademarks of Garmin Ltd. or
its subsidiaries. These trademarks may not be used without the
express permission of Garmin.
microSD™ and the microSD logo are trademarks of SD-3C, LLC.
Other trademarks and trade names are those of their respective
owners.
© 2013 Garmin Ltd. or its subsidiaries
DRAFT

Part Information
Item Attribution 1 of 1 Item: 190-01628-01 Rev:1 IR#047242 Creation Date: 07-May-2013 03:43 PM CST
GPN: 190-01628-01
Description: Astro 320 with DC50 Quick Start Manual
Part Type: Manuals / Printed Literature
Lifecycle Phase: Experimental
Rev: 1 IR#047242
Item Attribution
Document Review Required:
Item Notes:
Preferred Rating:
ESD Sensitive:
Moisture Sensitive:
Limited Shelf Life:
Magnetic Sensitive:
Federal Communication Commission Interference Statement
This equipment has been tested and found to comply with the limits for a Class B digital device, pursuant to Part 15 of the FCC Rules. These
limits are designed to provide reasonable protection against harmful interference in a residential installation.
This equipment generates, uses and can radiate radio frequency energy and, if not installed and used in accordance with the instructions, may
cause harmful interference to radio communications. However, there is no guarantee that interference will not occur in a particular installation. If
this equipment does cause harmful interference to radio or television reception, which can be determined by turning the equipment off and on,
the user is encouraged to try to correct the interference by one of the following measures:
. Reorient or relocate the receiving antenna.
. Increase the separation between the equipment and receiver.
. Connect the equipment into an outlet on a circuit different from that to which the receiver is connected.
. Consult the dealer or an experienced radio/TV technician for help.
FCC Caution: To assure continued compliance, any changes or modifications not expressly approved by the party responsible for compliance
could void the user's authority to operate this equipment. (Example - use only shielded interface cables when connecting to computer or
peripheral devices).
This device complies with Part 15 of the FCC Rules. Operation is subject to the following two conditions:
(1) This device may not cause harmful interference, and (2) This device must accept any interference received, including interference that may
cause undesired operation.