Garmin 02337 Low Power Communication Device User Manual Manual
Garmin International Inc Low Power Communication Device Manual
Garmin >
Contents
- 1. Manual
- 2. ISPI
Manual
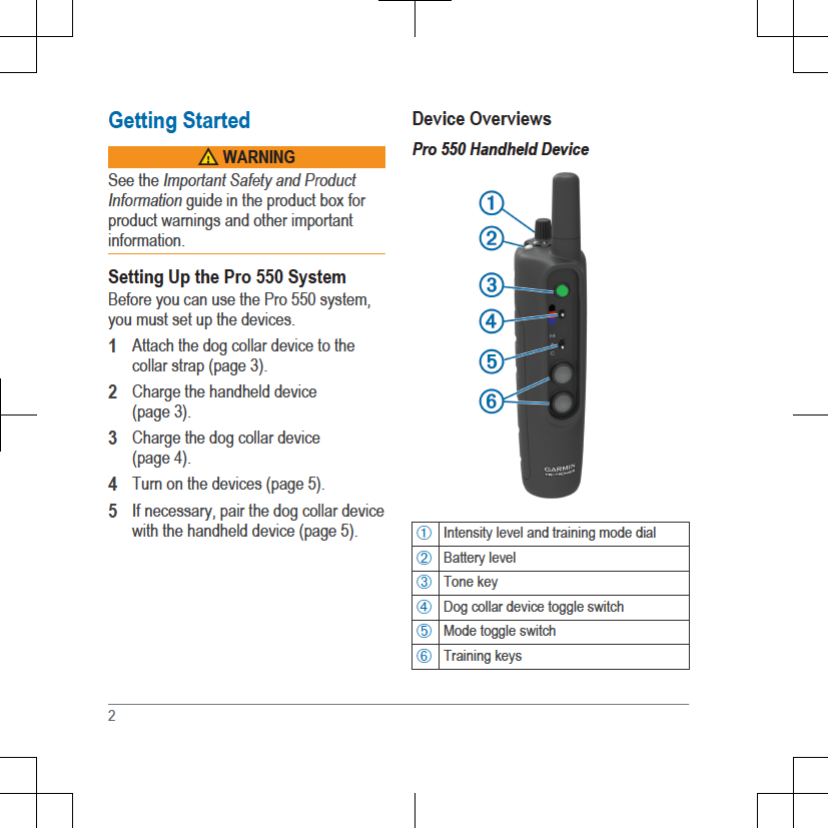
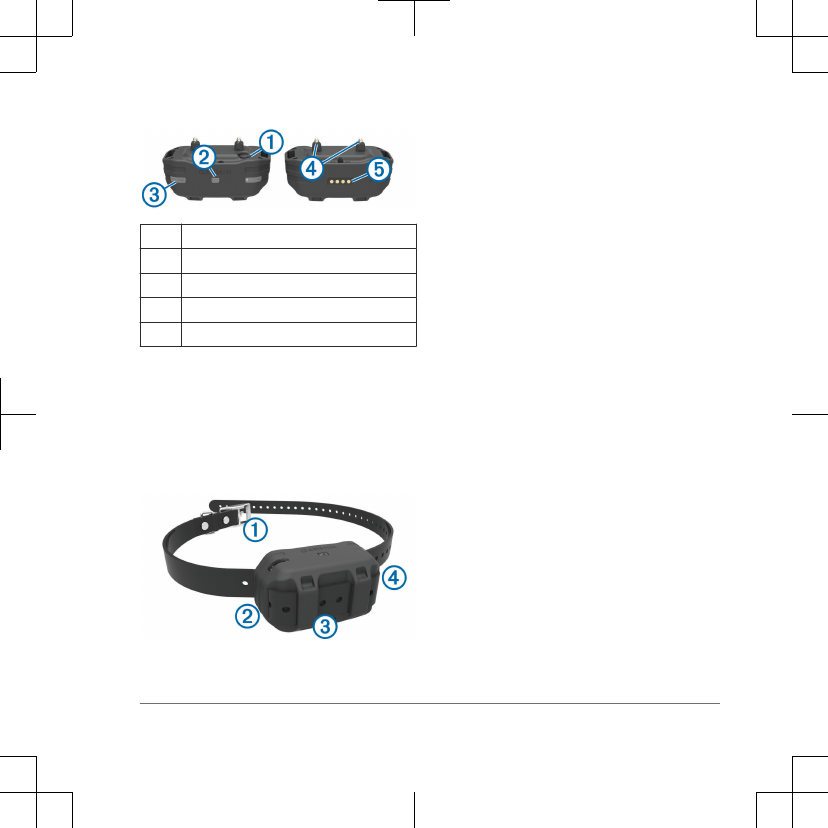
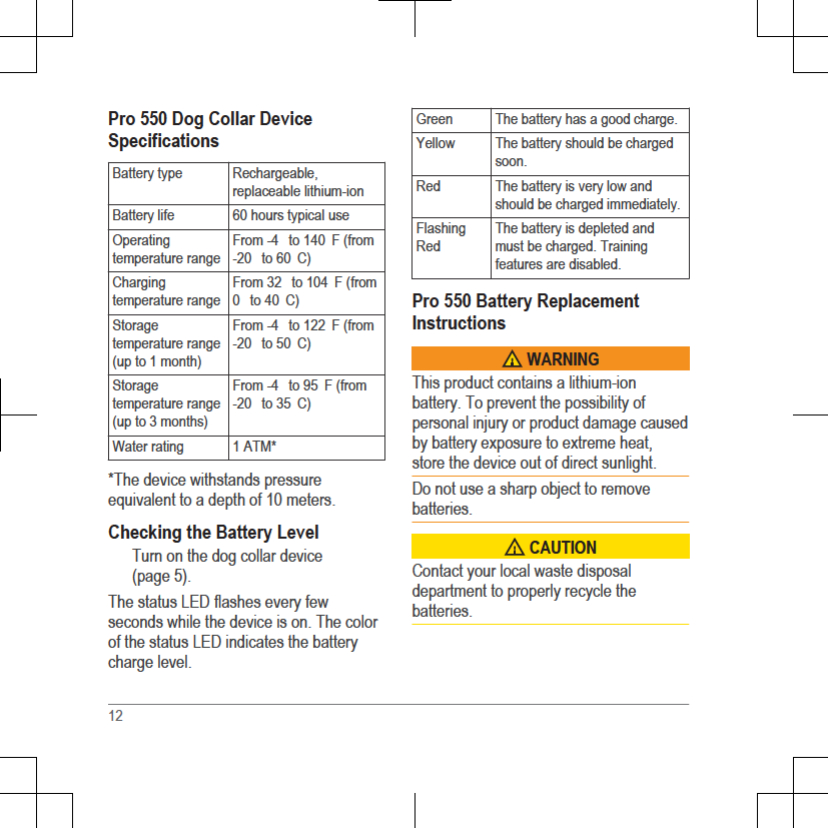
Pro 550 Dog Device
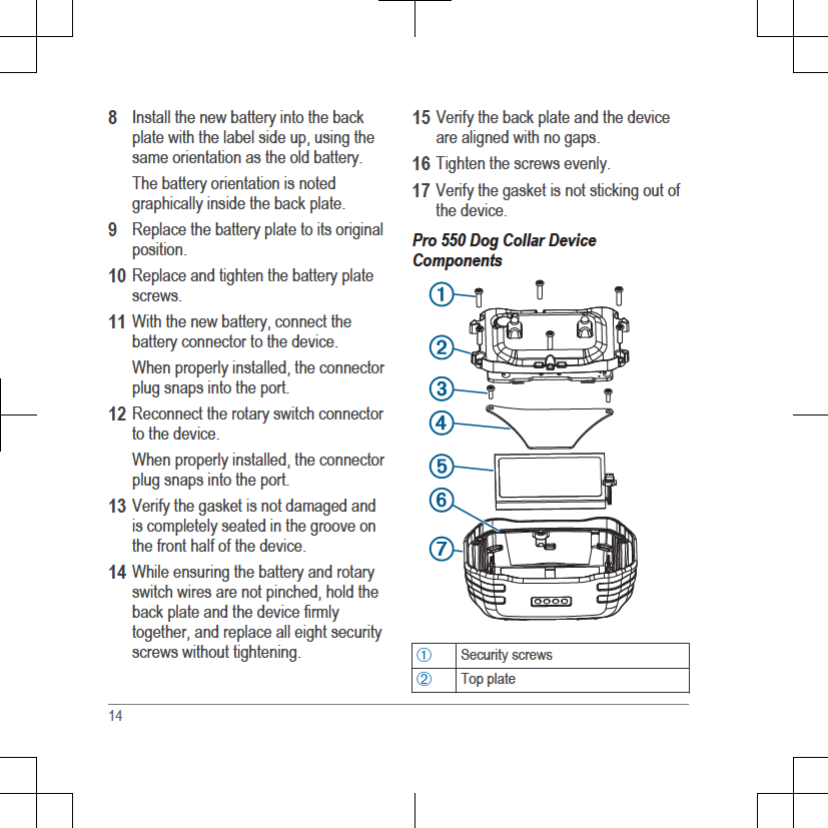
ÀPower key
ÁStatus LED
ÂLights
ÃContact points
ÄCharging clip contacts
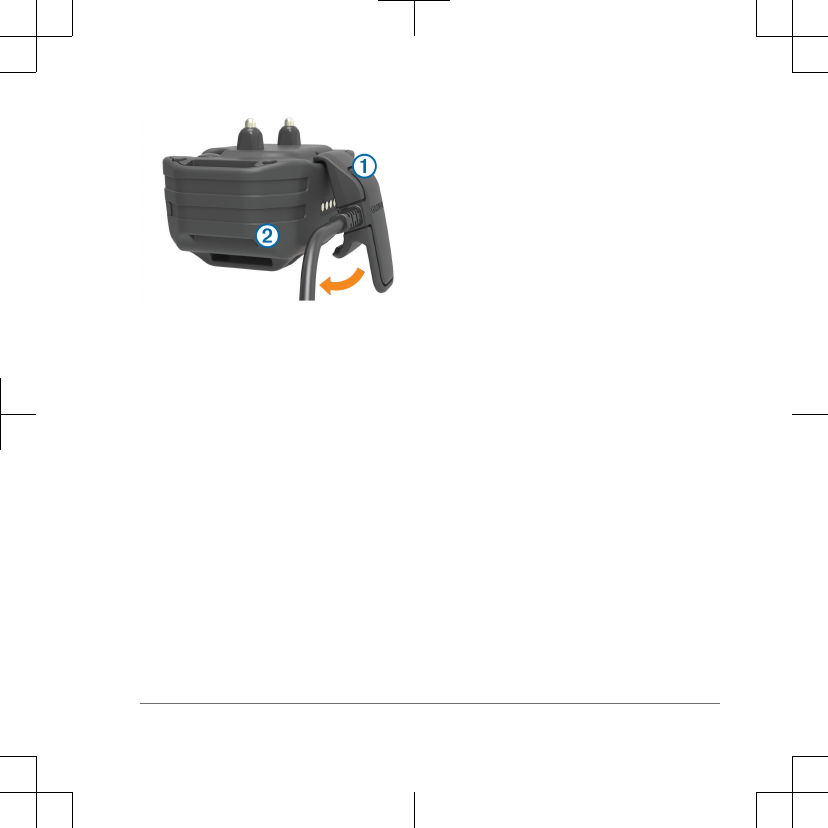
Attaching the Dog Collar Device to
the Collar Strap
1With the buckle À facing outward,
insert the end of the collar strap
through the slot Á on the collar
device.
2Pull most of the collar strap through
the two slots  on the dog device.
3Insert the end of the collar strap
through the slot à on the opposite
side of the device.
4Pull the strap until it is tight across the
front of the device.
Charging the Handheld Device
You should fully charge the battery before
you use the device for the first time or
whenever the battery is low (page 12). It
is normal for the battery to discharge in
approximately 7 to 10 weeks when the
device is not in use. Charging a fully
depleted battery takes about 2 hours.
NOTE: The device will not charge when it
is outside the temperature range of 32° to
104°F (0° to 40°C).
1Lift the weather cap À.
3
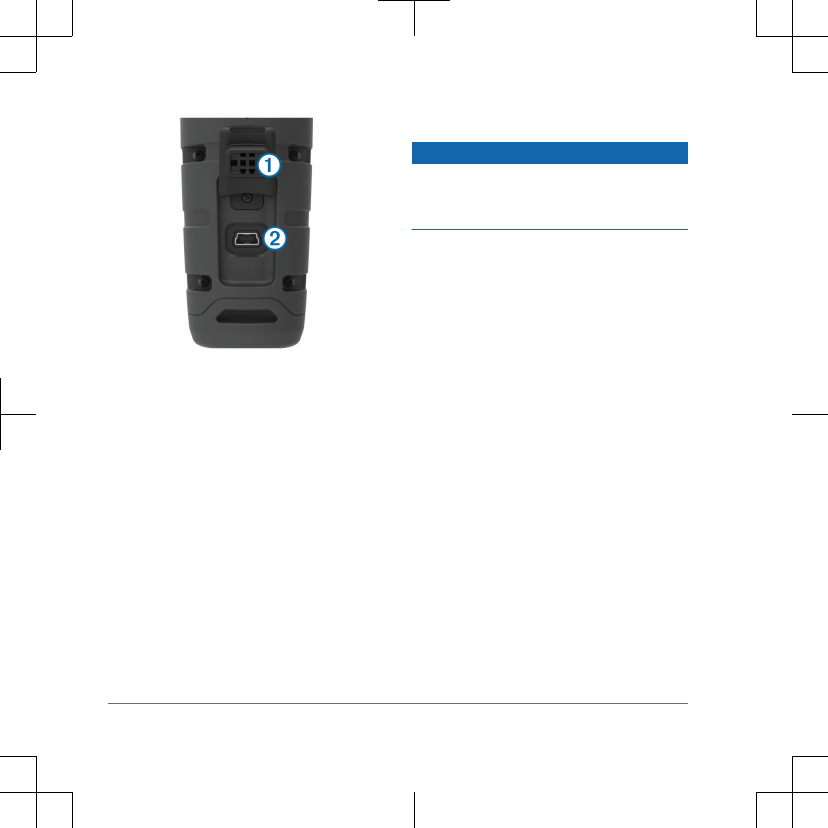
2Plug the small end of the power cable
into the mini-USB port Á on the
device.
3Plug the other end of the power cable
into an appropriate power source.
The status LED is solid red when the
device is charging.
4After the status LED turns solid green,
unplug the power cable from the
device.
Charging the Collar
NOTICE
To prevent corrosion, thoroughly dry the
contacts on the collar and the surrounding
area before connecting the charging clip.
You should fully charge the battery before
you use the device for the first time or
whenever the battery is low (page 12). It
is normal for the battery to discharge in
approximately 7 to 10 weeks when the
device is not in use. Charging a fully
depleted battery takes about 2 hours.
NOTE: The device will not charge when
outside the temperature range of 32° to
104°F (0° to 40°C).
1Snap the charging clip À onto the
device Á.
4
2Plug the power cable into a power
source.
The status LED is solid red when the
collar is charging.
3After the status LED turns solid green,
remove the charging clip from the
collar.
Turning On the Dog Collar Device
• On the dog collar device, hold the
power key until the status LED turns
green and the collar beeps to turn it
on in training mode.
• On the dog collar device, hold the
power key until the status LED turns
blue to turn on the BarkLimiter™
feature (page 10).
• On the dog collar device, hold the
power key until the status LED turns
yellow to enter pairing mode
(page 5).
Turning Off the Device
1On the dog collar device, hold the
power key until the red LED appears.
2Release the power key.
The dog collar device beeps to
confirm powering off.
NOTE: If the device is powered off in
BarkLimiter mode, the LED flashes
the number of corrected barks before
powering off (page 10).
Dog Collar Device
You can use up to 3 dog collar devices
with a single handheld device.
Each dog collar device must be paired
with the handheld device before it can be
used. During the pairing process, each
dog collar device is associated with a
different color on the handheld device.
Pairing a Dog Collar Device with the
Handheld Device
NOTE: If your handheld device and dog
collar device were included in the same
5

1Select the correct contact point length
for your dog's coat type:
• For dogs with thicker coats, use
the longer contact points.
• For dogs with shorter coats, use
the shorter contact points.
2If necessary, use the included wrench
to remove the contact points.
3Twist the contact points into the collar.
4Tighten with the included wrench, but
do not overtighten.
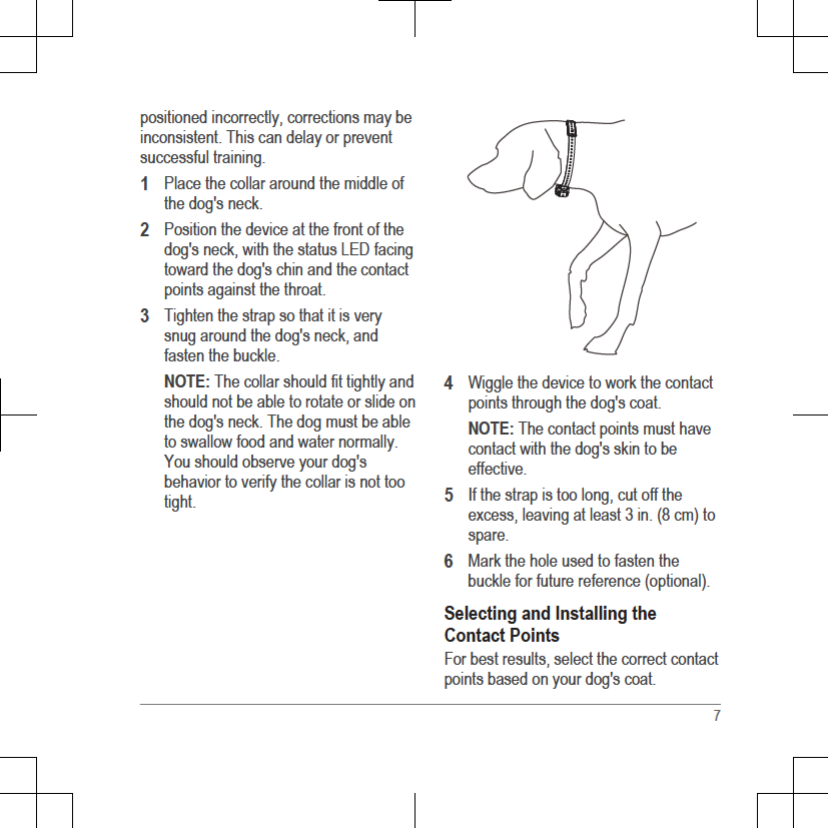
When you put the collar on the dog, make
sure the contact points are tight against
the neck.
Training Intensities and Methods
You can use several methods to train
your dog. The Pro 550 system provides 7
stimulation intensity levels, which increase
sequentially from 1 to 7.
Momentary stimulation: Applies a brief
stimulation when you press the
training key, regardless of how long
the key is depressed.
Continuous stimulation: Applies
stimulation to the dog the entire time
you press the training key, for a
maximum of 8 seconds. Your
stimulations should typically be much
shorter than 8 seconds.
Tone: Activates an audible tone instead
of stimulation. A tone can be used as
either a positive or negative training
cue, depending on your training
program.
Vibration: Applies vibration instead of
stimulation to the dog the entire time
you press the training key, for a
maximum of 8 seconds. The
effectiveness of vibration may vary
based on the dog's temperament and
experience.
Training Key Functions
The Pro 550 system provides several training modes, which assign different
combinations of momentary stimulation, continuous stimulation, and tone to the training
8
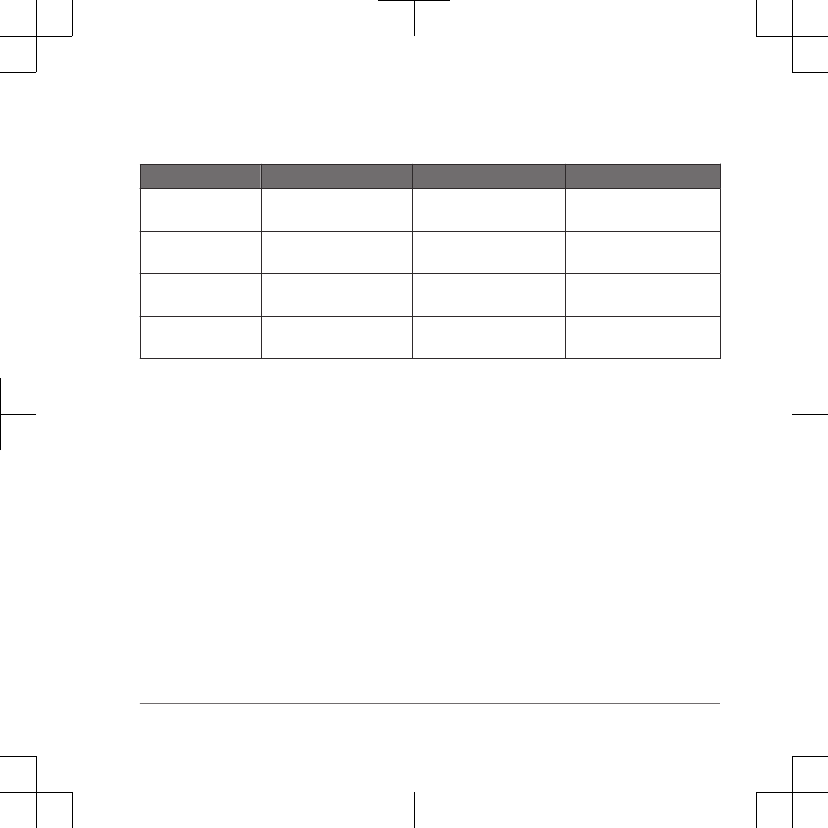
keys. The three vertical letters next to the mode toggle switch correspond to the training
key functions, from top to bottom.
Key Momentary (M) Accessory (A) Continuous (C)
Tone key Tone Accessory (for example,
a beeper)
Tone
Top training key Momentary stimulation
(medium)
Light on Continuous stimulation
(medium)
Bottom training key Momentary stimulation
(low)
Light off Continuous stimulation
(low)
Both training keys Momentary stimulation
(high)
Not Applicable Continuous stimulation
(high)
Choosing the Correct Intensity
Level
1Set the intensity to the lowest level
(page 10).
2Select a training key.
3Observe the dog for a reaction, such
as a head shake, neck movement, or
just a change in expression.
Sometimes dogs will vocalize due to
the surprise of the electrical
stimulation. If the dog vocalizes more
than once, the intensity level is too
high for beginning training.
4If there is no reaction, increase the
intensity level by one level until the
dog has a slight but recognizable
reaction to the stimulation.
The intensity level that causes a slight but
recognizable reaction is your dog's
baseline level for beginning collar training.
You do not need to, and should not, apply
this intensity selection test again.
After you begin training, the dog’s
performance guides your intensity
selection. As the dog advances in
training, you may need to change the
level depending upon the training
situation.
9

Changing the Intensity Level
You can select a different intensity level
for each dog collar device.
1Select a dog collar device (page 6).
2Adjust the intensity dial to increase or
decrease the intensity level.
BarkLimiter
When the dog collar device is active and
properly fitted on the dog, it detects and
corrects barks automatically. The dog
collar device starts at the lowest intensity
level and increases the intensity level
gradually until the dog stops barking.
When the dog is quiet, the intensity
decreases over time.
The status LED flashes briefly when the
dog collar device detects motion or
corrects a bark.
Green, amber,
or red flash
Motion was detected, and no
correction was applied.
Blue flash A bark was detected, and a
correction was applied.
NOTE: A green, amber, or red flash
denotes how much charge is left in the
dog device battery, ranging from high to
low.
Enabling the BarkLimiter Feature
On the dog collar device, hold the
power key until the LED flashes blue.
Bark Odometer™
When you turn off the device, the LED
flashes red and green to report the
number of times the device detected a
bark since it was last turned on. This can
help you track your dog's barking
behavior.
Red flash 10 barks
Green flash 1 bark
For example, one red flash followed by
four green flashes indicates the device
detected 14 barks.
Zero flashes indicates the device detected
zero barks.
Checking the Bark Odometer
1Remove the device from the dog.
2Position the device so that you can
see the status LED.
3Hold the power key until the status
LED turns red, and release.
4Count the red and green flashes.
10

Using the Light
You can use the light feature on your
device to verify pairing, help locate your
dog, and provide safety for your dog at
night.
1Select a dog collar device (page 6).
2Move the mode toggle switch to A.
3Select the top training key to turn the
light on.
4Select the bottom training key to turn
the light off.
Beeper Device
The Pro 550 system works with optional
accessories, including a beeper device.
The beeper device emits high-volume
sounds to provide information about the
location and status of your dogs. You can
operate the beeper device remotely using
the Pro 550 system. For more information
or to purchase accessories, go to
http://buy.garmin.com.
Device Information
Pro 550 Handheld Device
Specifications
Battery type Rechargeable,
replaceable lithium-
ion
Battery life 60 hours typical use
Operating
temperature range
From -4 to 140 F
(from -20 to 60 C)
Charging temperature
range
From 32 to 104 F
(from 0 to 40 C)
Storage temperature
range (less than 1
month)
From -4 to 122 F
(from -20 to 50 C)
Storage temperature
range (less than 3
months)
From -4 to 104 F
(from -20 to 40 C)
Storage temperature
range (less than 1
year)
From -4 to 68 F
(from -20 to 20 C)
Water rating IEC 60529 IPX7*
Wireless range 1 mi. (1.6 km)
*The device withstands incidental
exposure to water of up to 1 meter for up
to 30 minutes.
11

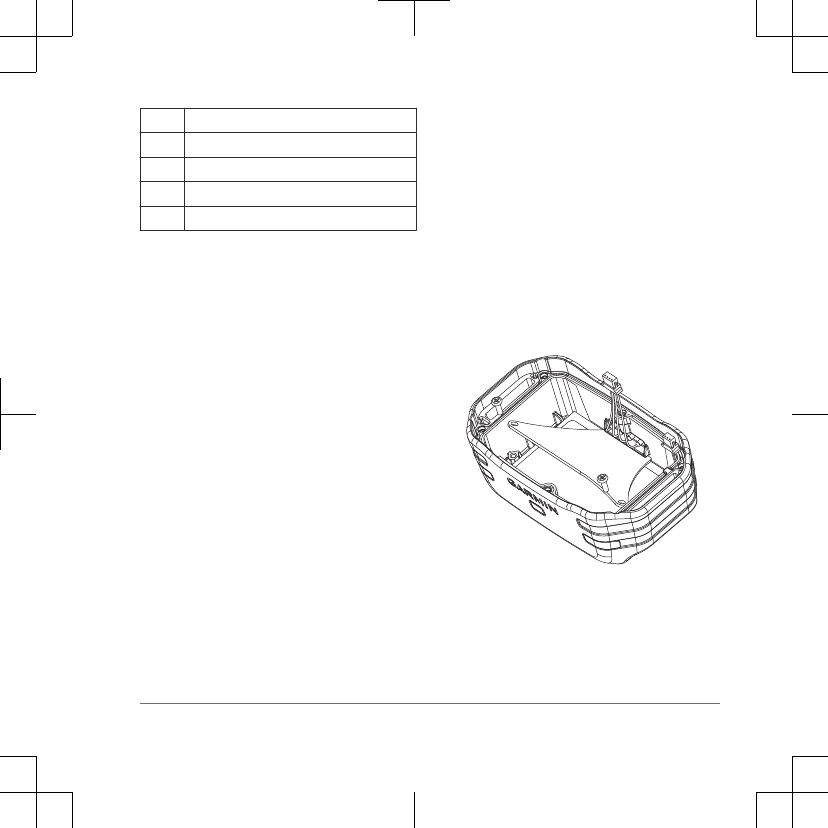
ÂBattery plate screws
ÃBattery plate
ÄBattery
ÅGasket
ÆFront enclosure
Replacing the Pro 550 Dog Collar
Device Battery
Before you replace the battery, you must
remove all dirt, water, and debris from the
device. You also need a small Phillips
screwdriver and the security screwdriver
included with the battery replacement kit.
You can purchase a replacement battery
at http://buy.garmin.com. You should use
only an official Garmin replacement part.
1Remove the six screws from the top
plate, and remove the top plate.
2Remove the two screws from the
battery plate, and remove the battery
plate.
3Grip the battery connector wires close
to the connector, and pull the
connector parallel to the circuit board
to disconnect the battery connector
from the device.
4Remove the battery.
The battery fits tightly. It may be
necessary to pry the battery out of the
back plate using a non-sharp, non-
metal object.
5Install the new battery into the front
enclosure with the label side of the
battery facing up, and the leading
edge of the battery placed under the
charging contact ledge of the device.
6Replace the battery plate, and replace
and tighten the two screws.
7Verify the gasket is not damaged and
is completely seated in the groove.
8With the new battery, connect the
battery connector to the device.
15

When properly installed, the connector
plug snaps into the port.
9Replace the front plate, and replace
and tighten the six screws to secure
the front plate.
10 Verify the gasket is not sticking out of
the device.
Getting More Information
You can find more information about this
product on the Garmin website.
• Go to www.garmin.com/outdoor.
• Go to www.garmin.com
/learningcenter.
• Go to http://buy.garmin.com, or
contact your Garmin dealer for
information about optional accessories
and replacement parts.
Registering Your Device
Help us better support you by completing
our online registration today.
• Go to http://my.garmin.com.
• Keep the original sales receipt, or a
photocopy, in a safe place.
16