Contents
- 1. User manual (statement).pdf
- 2. User manual.pdf
User manual.pdf
Fusion™ MS-UD/AV650 Quick Start Manual
Getting Started
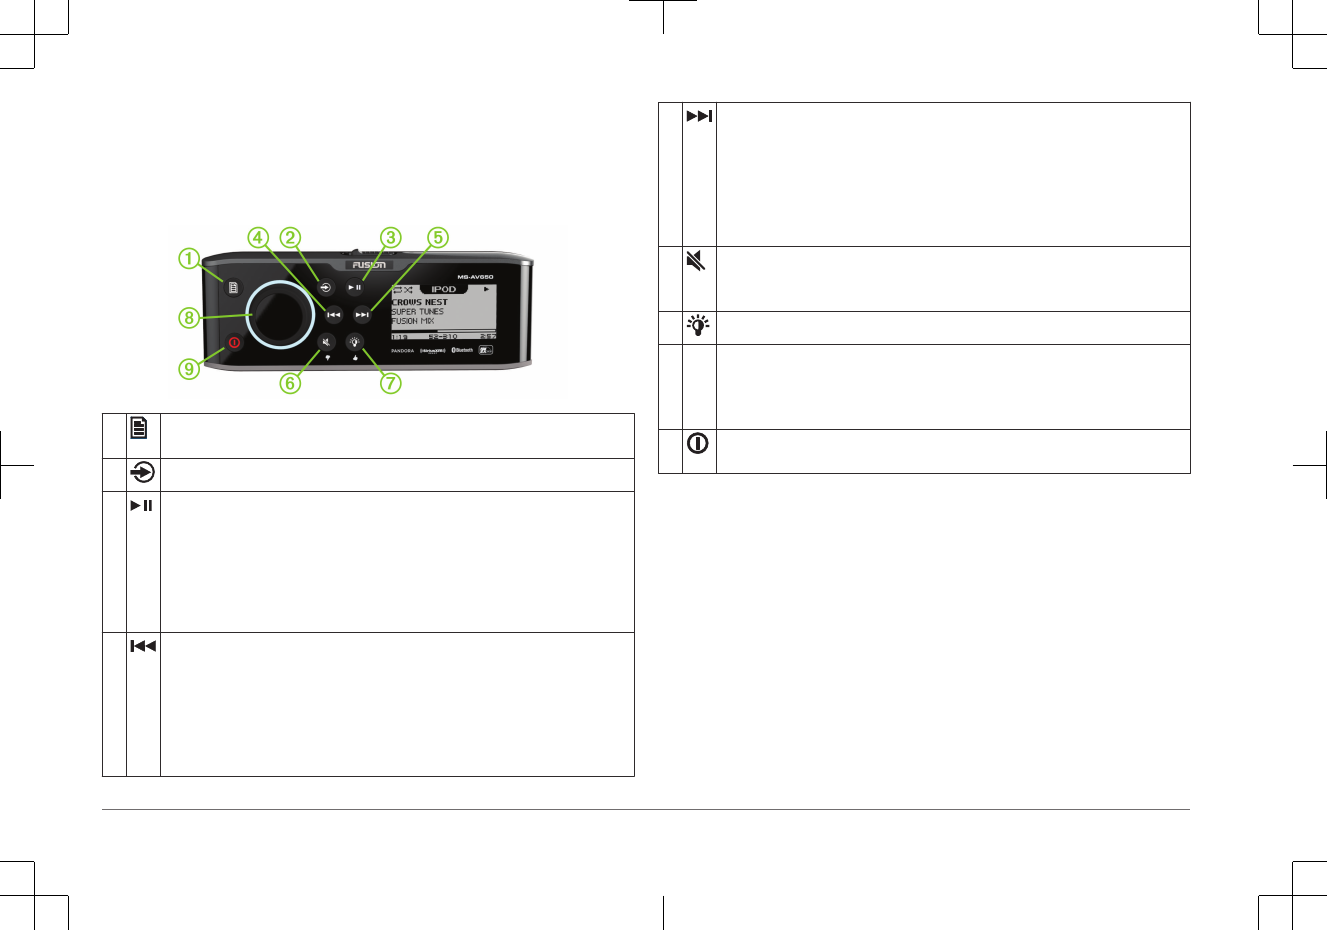
Stereo Controls
À• Select to open a menu.
• Select to return to the previous screen or menu.
ÁSelect to cycle the available sources.
• Select to pause or resume.
• AM, FM source:
◦ Select to cycle through the tuning modes: auto, manual, and presets
(when two or more presets are saved).
◦ Hold to save this station as a preset.
• SIRIUSXM source: Select to cycle through the tuning modes (auto and
presets), when you have at least one preset channel.
Õ Select to skip to the previous track, when using an applicable source.
• Hold to rewind the current track, when using an applicable source.
• AM, FM source:
◦ Select to tune to the previous station.
◦ Hold for faster tuning (manual mode only).
• Aux: Select to decrease the gain for the connected source.
• SIRIUSXM source: Select to return to the previous channel.
Ä• Select to skip to the next track, when using an applicable source.
• Hold to fast forward the current track, when using an applicable source.
• AM, FM source:
◦ Select to tune to the next station.
◦ Hold for faster tuning (manual mode only).
• AUX1, AUX2 source: Select to increase the gain for the connected source.
• SIRIUSXM source: Select to advance to the next channel.
Å• Select to mute the audio output.
• Select to un-mute the muted audio output.
The volume continues at the previously set level.
ÆSelect to adjust the screen and dial brightness.
ÇDial • Turn to adjust the volume.
• Press and hold for at least one second to adjust the subwoofer levels.
• Turn to move through the menus or adjust a setting.
• Press to select the highlighted option.
È• Select to turn on the stereo.
• Hold to turn off the stereo.
Using the Dial to Select Items
You can use the dial to highlight and select items on the screen.
• Turn the dial to select an item on the screen.
• Press the dial to select the highlighted option.
Stereo Screen
The information displayed on the stereo screen varies depending on the source
selected. This example shows the stereo playing a track on an iPhone® mobile
digital device.
2Quick Start Manual
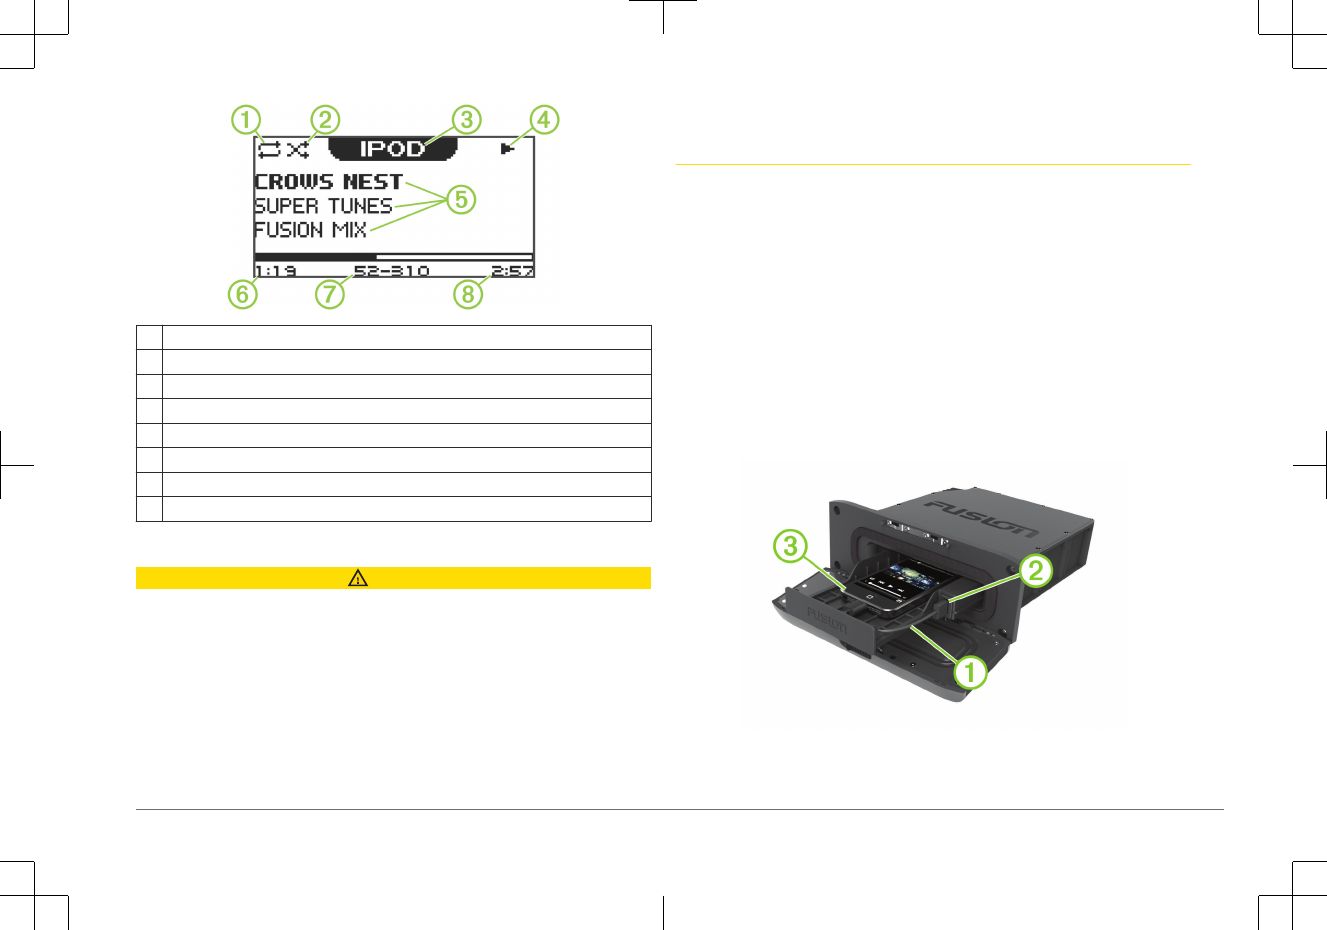
ÀRepeat status icon
ÁShuffle status icon
ÂSource
ÃPlay or pause
ÄTrack details (if available)
ÅElapsed time
ÆCurrent track number out of total number of tracks in the playlist (if available)
ÇTrack duration
Connecting Media Players
CAUTION
You may need to remove the media player from a sleeve or case to fit inside
the dock.
Insert the media player with display facing up.
Never force the media player into the dock.
Be careful when removing the media player from the dock, because the
surfaces may be warm.
Always disconnect your media player from the stereo when not in use and do
not leave in your vessel. This helps reduce risk of theft and damage from
extreme temperatures.
Do not remove the media player or use your stereo in a distracting manner
while operating the vessel. Check and obey all marine laws in association with
use.
The stereo accepts a variety of media players, including smartphones and
other mobile devices. You can connect a compatible media player using a
Bluetooth® wireless connection or a USB connection to the integrated docking
station (UD models only), the USB cable on the back of the stereo, or to an
optional UNI-Dock™ external media dock.
Connecting a Media Player Using the Dock (UD Models only)
You can connect a compatible media player using the universal dock built into
the UD models.
1Slide the button on the top of the stereo, and pull down to open the door.
2Slide out the device tray.
3Insert the adapter cable À into the USB port Á.
NOTE: You can connect a USB flash drive directly to the USB port.
4Connect the adapter cable to the media player Â, and place it in the
device tray.
Quick Start Manual 3
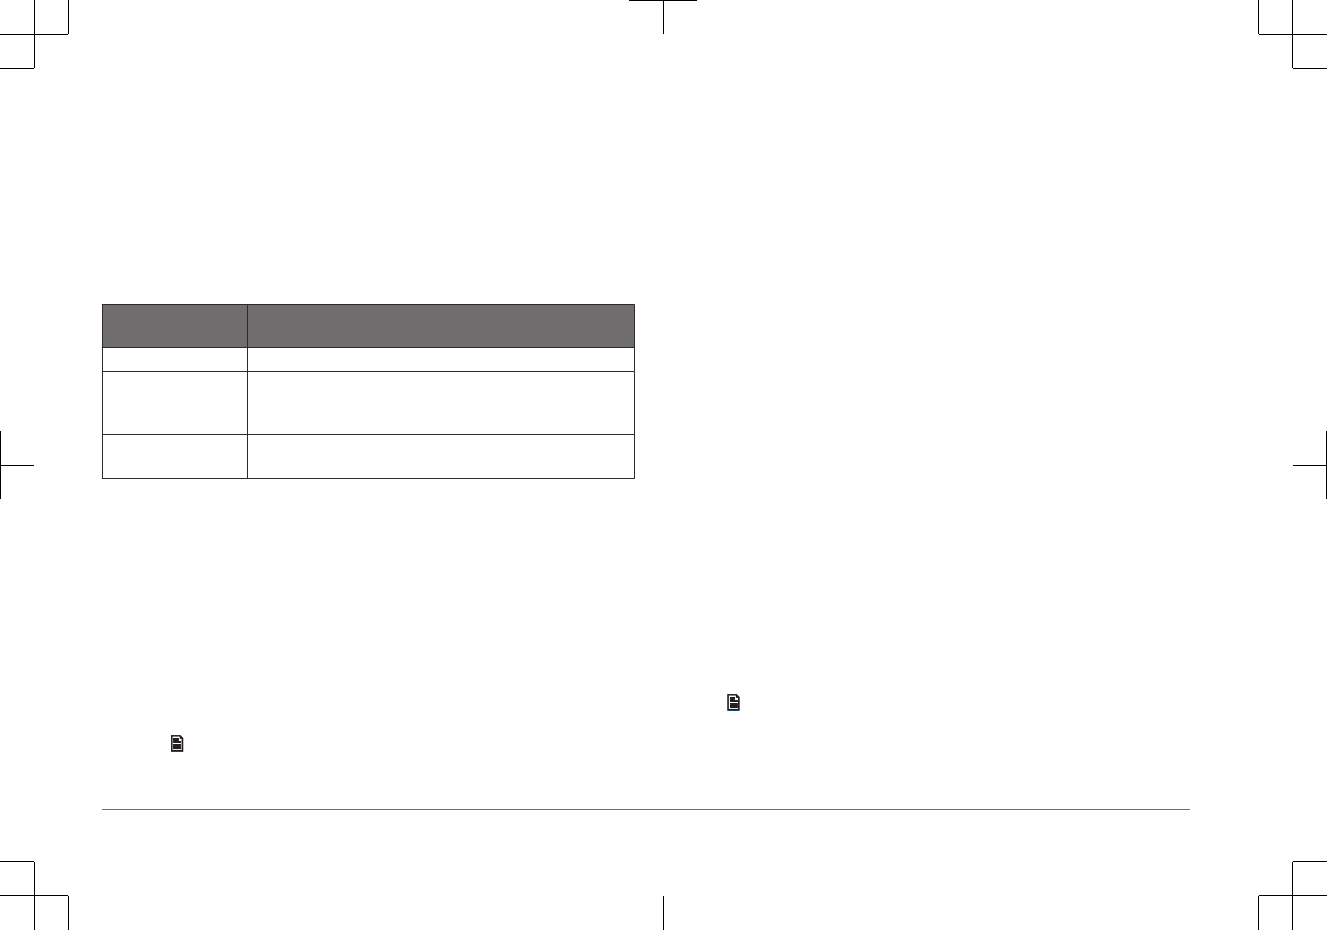
5Slide in the device tray, and close the door.
Media Player Compatibility
If you have a UD model, you can use the included adapter cables to connect
popular media players to the internal docking station. If you have an AV model,
you can use the USB cables that came with your media player to connect the
player to the stereo.
Only media players with ports on the bottom, not on the sides, fit in the docking
station. Media players larger than 144 × 71 × 13 mm (5.67 × 2.80 × 0.52 in.) do
not fit in the docking station.
Cable Connector in
Dock
Devices
Micro-USB connector Supported media players. See www.fusionentertainment.com.
Apple® 30-pin
connector
Apple iPhone 4s, iPhone 4, iPhone 3G, and iPhone 3GS.
iPod touch® (2nd, 3rd, and 4th generation), iPod classic®, and
iPod nano® (4th, 5th, and 6th generation).
Apple Lightning™
connector
Apple iPhone 6, iPhone 5s, iPhone 5c, and iPhone 5.
iPod touch (5th generation) and iPod nano (7th generation).
You also can connect a FAT32- or NTFS-formatted USB flash drive directly to the
USB port.
Connecting a USB Device Using the USB Cable
You can connect a USB device to the USB cable on the back of the stereo.
1Locate the USB cable on the back of the stereo.
2Connect the USB device to the USB port.
Connecting a Compatible Bluetooth Device
You can play media from a compatible Bluetooth device using the Bluetooth
wireless connection.
1Select the Bluetooth source.
2Select > DISCOVERABLE to make the stereo visible to your compatible
Bluetooth device.
3Enable Bluetooth on your compatible Bluetooth device.
4Bring the compatible Bluetooth device within 10 m (33 ft.) of the stereo.
5On your compatible Bluetooth device, search for Bluetooth devices.
6Select the stereo from the list of detected devices.
7Follow the on-screen instructions to pair and connect to the discovered
stereo.
When pairing, your smartphone or media player may ask you to confirm a
code on the stereo. The stereo does not display a code, but it does connect
correctly when you confirm the message on the Bluetooth device.
To prevent interruption to audio streaming over Bluetooth wireless, turn off the
DISCOVERABLE setting after pairing a Bluetooth device to the stereo.
Bluetooth Range Information
The stereo and Bluetooth wireless devices have a range of 10 m (33 ft.). For
optimal performance, the Bluetooth wireless device should also have a clear line
of sight to the stereo.
Inserting a DVD or CD
NOTE: For best results, before you insert the disc, make sure the disc is not
scratched or damaged. If necessary, clean and dry the disc with a clean, soft,
lint-free cloth. Avoid touching the surface of the disc and avoid exposure to direct
sunlight.
DVD and CD playback is available on AV models only.
1Slide the button on the top of the stereo, and pull down to open the door.
2Insert the disc with the label facing up.
3Close the door.
Setting the DVD Region
You must select the DVD region in order to play a DVD.
1Select > SETTINGS > DVD REGION.
2Select the region.
4Quick Start Manual
Playing Media
Selecting a Source
1Select .
2Select an option:
• Turn the dial to highlight a source.
• Select repeatedly to highlight a source.
3Press the dial to select the source.
Setting the Tuner Region
You must select the region you are presently in to receive AM, FM, and
SiriusXM® stations properly.
NOTE: SiriusXM is not available in all regions.
1Select > SETTINGS > TUNER REGION.
2Select your present region.
Changing the Radio Station
1Select an applicable source, such as FM.
2Select repeatedly to cycle through the tuning mode:
• Select AUTO to scan and stop on the next available station.
• Select MANUAL to select a station manually.
• Select PRESETS to select a saved station preset.
3Select or to tune to the station.
SiriusXM Satellite Radio
Only SiriusXM brings you more of what you love to listen to, all in one place.
Get over 140 channels, including commercial-free music plus the best sports,
news, talk, comedy and entertainment. Welcome to the world of satellite radio.
A SiriusXM Vehicle Tuner and subscription are required. For more information,
go to www.siriusxm.com.
SiriusXM Satellite Radio service is available in the 48 contiguous United
States and the District of Columbia, and with coverage limitations in Puerto
Rico.
Controlling Pandora® Radio with the Stereo
You can control Pandora using the stereo instead of your mobile device. While
you are controlling Pandora using the stereo, you cannot control Pandora
using your mobile device.
1Connect to the mobile device using a USB or Bluetooth connection.
2Select > PANDORA.
3Select ENABLE CONTROL to fill the radio button.
4If necessary, select an option:
• To pause the stations, select .
• To skip to the next track, select .
• To tell Pandora you like this track and would like more tracks similar to
this played on this station, select .
• To tell Pandora not to play this track, select .
Controlling Pandora Radio with Your Mobile Device
1Connect to the mobile device using a USB or Bluetooth connection.
2Open the Pandora app on the mobile device.
3Begin playing a station on the mobile device.
4Control the playback with your mobile device.
Adjusting the Volume
1Use the dial to adjust the volume.
2If necessary, press the dial to switch between zones.
TIP: To control all zones at the same time, press the dial until all zones are
highlighted.
Quick Start Manual 5