Contents
- 1. User manual (statement).pdf
- 2. User manual.PDF
User manual.PDF
DRAFT
All rights reserved. Under the copyright laws, this manual may not be copied, in whole or in part, without the written consent of Garmin. Garmin reserves the
right to change or improve its products and to make changes in the content of this manual without obligation to notify any person or organization of such
changes or improvements. Go to www.garmin.com for current updates and supplemental information concerning the use of this product.
Garmin®, the Garmin logo, and the Fusion™
logo are trademarks of Garmin Ltd. or its subsidiaries, registered in the USA and other countries. Fusion, FUSION-
Link™
, True-Marine™
, and UNI-Dock™
are trademarks of Garmin Ltd. or its subsidiaries. These trademarks may not be used without the express permission of
Garmin.
Android™
is a trademark of Google Inc. Apple®, the Apple logo, iPod®, iPod touch®, iPod classic®, iPod nano®, iPhone®, and Lightning™
are trademarks of Apple
Inc., registered in the U.S. and other countries. Bluetooth® word mark and logos are owned by the Bluetooth SIG, Inc. and any use of such marks by Garmin is
under license. HDMI® is a registered trademark of HDMI Licensing, LLC. NMEA®, NMEA 2000®, and the NMEA 2000 logo are registered trademarks of the
National Marine Electronics Association. Pandora® and the Pandora trade dress are trademarks or registered trademarks of Pandora Media, Inc. Used with
permission. SiriusXM® and all related marks and logos are trademarks of SiriusXM Radio Inc. Wi‑Fi® is a registered mark of Wi-Fi Alliance Corporation. Other
trademarks and trade names are those of their respective owners.
Made for iPhone 6 Plus, iPhone 6, iPhone 5s, iPhone 5c, iPhone 4s, iPhone 4, iPod touch (3rd through 5th generation), iPod classic, and iPod nano (4th
through 7th generation).
"Made for iPod and iPhone" means that an electronic accessory has been designed to connect specifically to an iPod or an iPhone respectively, and has been
certified by the developer to meet Apple performance standards. Apple is not responsible for the operation of this device or its compliance with safety and
regulatory standards. Please note that the use of this accessory with an iPhone may affect wireless performance.

DRAFT
Table of Contents
Getting Started............................................................... 1
What's In the Box........................................................................ 1
Stereo Controls........................................................................... 1
Using the Dial to Select Items................................................ 1
Entering Text..........................................................................1
Stereo Screen............................................................................. 1
Media Player Connection............................................................1
Media Player Compatibility.................................................... 2
Connecting a Media Player Using the Dock.......................... 2
Connecting a USB Device Using the USB Cable.................. 2
Connecting an Auxiliary Device............................................. 2
Selecting a Source......................................................................2
Adjusting the Volume.................................................................. 2
Adjusting the Tones............................................................... 2
Speaker Zones.......................................................................2
Infrared Remote Control............................................................. 3
Bluetooth Device Playback........................................... 3
Connecting a Compatible Bluetooth Device............................... 3
Bluetooth Range Information................................................. 4
Selecting a Different Bluetooth Source....................................... 4
Bluetooth Source Settings.......................................................... 4
DVD and CD Playback.................................................... 4
Inserting a DVD or CD................................................................ 4
Setting the DVD Region..............................................................4
Playing a DVD or CD.................................................................. 4
Ejecting a DVD........................................................................... 4
USB, MTP, and Apple Device Playback........................ 4
Setting a Song to Repeat........................................................... 4
Shuffling Songs...........................................................................4
MTP File Information.................................................................. 4
Pandora Service............................................................. 5
Downloading the Pandora Application........................................ 5
Controlling Pandora Radio with the Stereo................................ 5
Controlling Pandora Radio with Your Mobile Device.................. 5
Radio............................................................................... 5
Setting the Tuner Region............................................................ 5
Changing the Radio Station........................................................ 5
Presets........................................................................................5
Saving a Channel as a Preset............................................... 5
Removing Presets..................................................................6
Playing Audio from a TV using the HDMI® Audio
Return Chanel................................................................. 6
SiriusXM Satellite Radio................................................ 6
Enabling the SiriusXM Source.................................................... 6
Locating the SiriusXM Radio ID.................................................. 6
Activating a SiriusXM Subscription............................................. 6
Selecting a Category.................................................................. 6
Parental Controls........................................................................ 6
Enabling the Parental Controls.............................................. 6
Locking a Channel................................................................. 6
Clearing All Locked Channels................................................ 6
Changing the Parental Control Passcode.............................. 6
SiriusXM Troubleshooting...........................................................7
General Settings............................................................. 7
Appendix......................................................................... 7
Registering Your Fusion MS-UD/AV750.....................................7
True-Marine™ Products............................................................. 7
FUSION-Link.............................................................................. 7
Audio Control with NMEA 2000.................................................. 8
Optional Wired Remote Controls................................................ 8
Ethernet and Wireless Support................................................... 8
Troubleshooting.......................................................................... 8
The stereo does not respond to key presses......................... 8
The stereo keeps locking up when connected to an Apple
device.....................................................................................8
The stereo is not finding my Apple device when it is
connected in the dock............................................................ 8
My Apple device has gone into thermal protection mode...... 8
My MTP device is unresponsive............................................ 8
The stereo does not find all of my music files on my MTP
device.....................................................................................8
My Bluetooth audio is interrupted by short breaks................. 8
The stereo does not display all song information from my
Bluetooth source.................................................................... 8
Specifications..............................................................................8
Index.............................................................................. 10
Table of Contents i
DRAFT
Getting Started
What's In the Box
• Two Mounting plates
• Mounting hardware
◦ Four 8-gauge, self-tapping screws
◦ Four M4 machine screws
• Power and speaker wiring harnesses
• RCA splitter
• Micro-USB to USB cable (UD models only)
• Lightning™
connector to USB cable (UD models only)
• Apple® 30-pin to USB cable (UD models only)
• Remote control (AV models only)
• Two AAA batteries (AV models only)
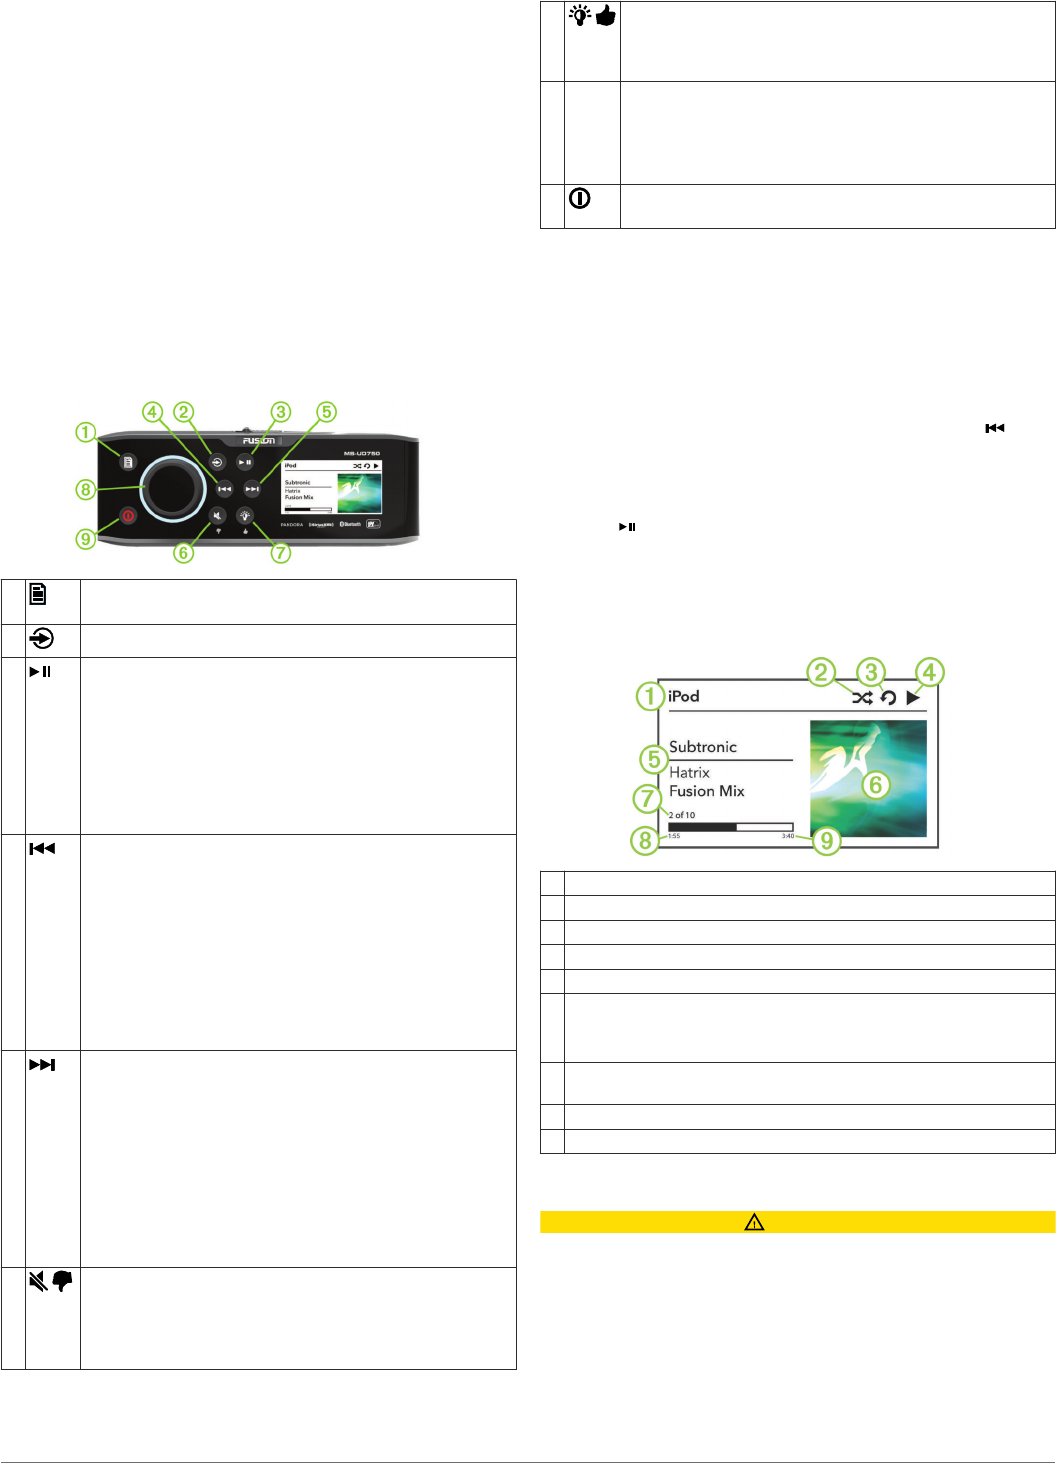
Stereo Controls
À• Select to open a menu.
• Select to return to the previous screen or menu.
ÁSelect to cycle the available sources.
• Select to pause or resume.
• AM, FM source:
◦ Select to cycle through the tuning modes: auto,
manual, and presets (when two or more presets are
saved).
◦ Hold to save this station as a preset.
• SIRIUSXM source: Select to cycle through the tuning
modes (auto and presets), when you have at least one
preset channel.
Õ Select to skip to the previous track, when using an
applicable source.
• Hold to rewind the current track, when using an
applicable source.
• AM, FM source:
◦ Select to tune to the previous station.
◦ Hold for faster tuning (manual mode only).
• AUX1, AUX2 source: Select to decrease the gain for the
connected source.
• SIRIUSXM source: Select to return to the previous
channel.
Ä• Select to skip to the next track, when using an applicable
source.
• Hold to fast forward the current track, when using an
applicable source.
• AM, FM source:
◦ Select to tune to the next station.
◦ Hold for faster tuning (manual mode only).
• AUX1, AUX2 source: Select to increase the gain for the
connected source.
• SIRIUSXM source: Select to advance to the next
channel.
Å • Select to mute the audio output.
• Select to unmute the muted audio.
The volume continues at the previously set level.
• Pandora®: Press and hold to tell Pandora not to play this
track.
Æ • Select to adjust the screen and dial brightness.
• Pandora: Press and hold to tell Pandora you like this
track and would like more tracks similar to this played on
this station.
ÇDial • Turn to adjust the volume.
• Press and hold for at least one second to adjust the
subwoofer levels.
• Turn to move through the menus or adjust a setting.
• Press to select the highlighted option.
È• Select to turn on the stereo.
• Hold to turn off the stereo.
Using the Dial to Select Items
You can use the dial to highlight and select items on the screen.
• Turn the dial to select an item on the screen.
• Press the dial to select the highlighted option.
Entering Text
You can enter text to change names or other specific fields on
this device.
1In a settings field that allows you to enter text, select to
erase the existing characters.
2Use the dial to choose a letter, and press the dial to select it.
3Add additional letters to finish entering the name.
4Select to save the new text.
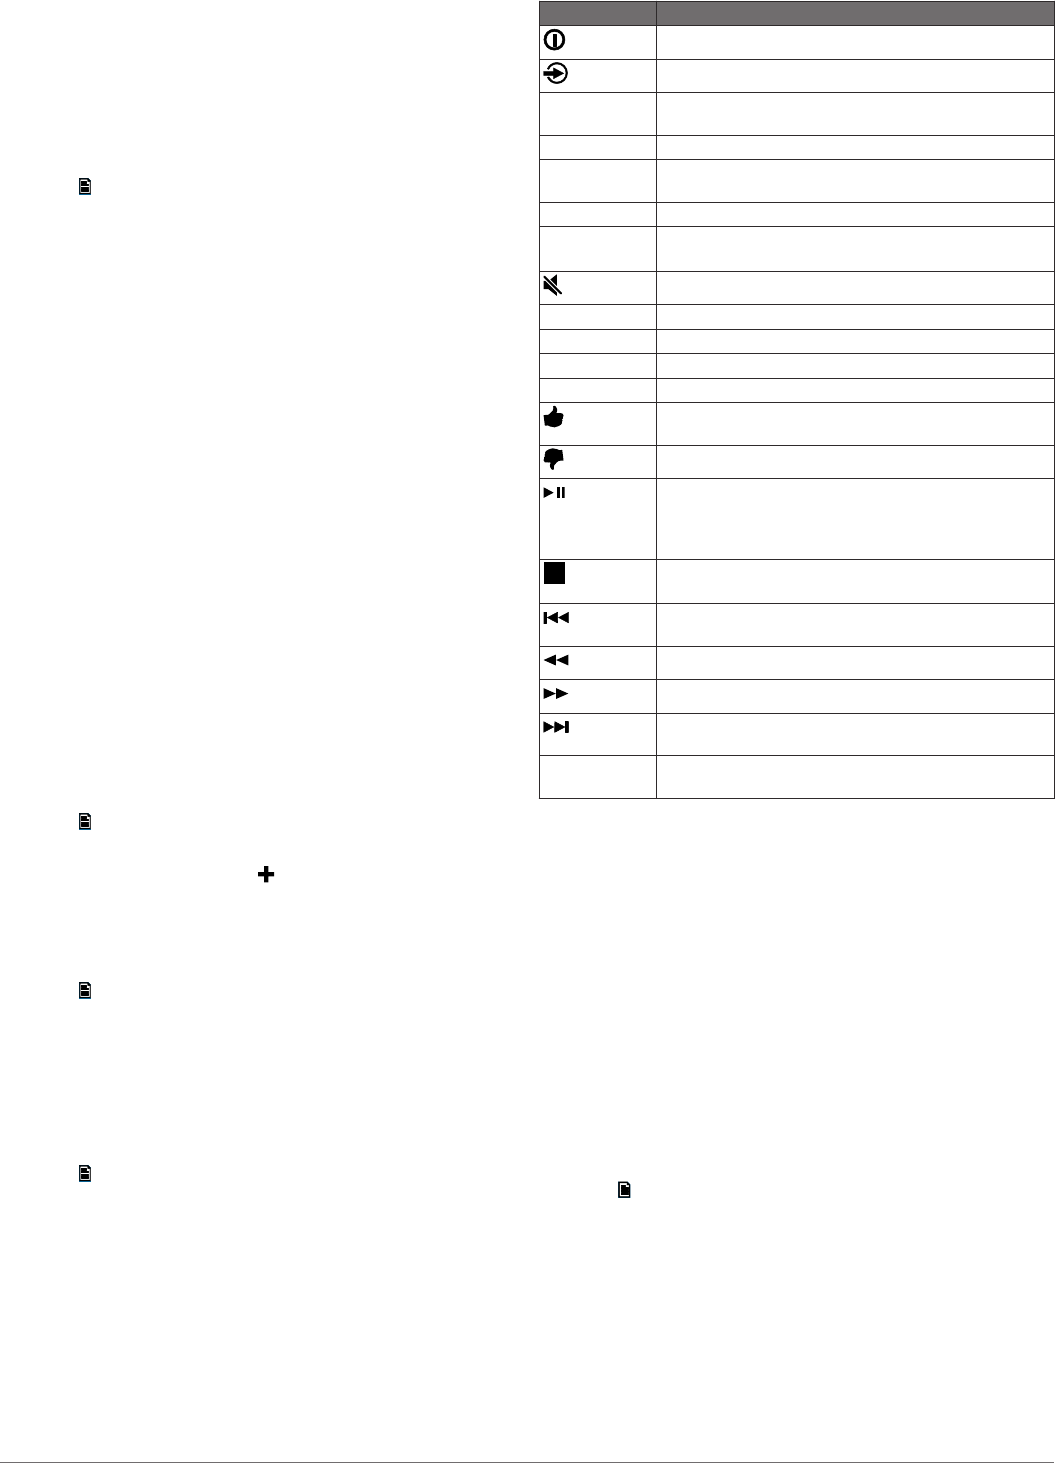
Stereo Screen
The information displayed on the stereo screen varies
depending on the source selected. This example shows the
stereo playing a track on an iPhone® mobile digital device.
ÀSource
ÁShuffle status icon
ÂRepeat status icon
ÃPlay status icon
ÄTrack details (if available)
ÅAlbum art (if available from a compatible USB source)
NOTE: Album art is not displayed when playing tracks from a
device connected using Bluetooth®.
ÆCurrent track number out of total number of tracks in the playlist (if
available)
ÇElapsed time
ÈTrack duration
Media Player Connection
CAUTION
You may need to remove the media player from a sleeve or
case to fit inside the dock.
Insert the media player with the display facing up.
Never force the media player into the dock.
Be careful when removing the media player from the dock,
because the surfaces may be warm.
Always disconnect your media player from the stereo when not
in use and do not leave it in your vessel. This helps reduce the
risk of theft and damage from extreme temperatures.
Getting Started 1
DRAFT
Do not remove the media player or use your stereo in a
distracting manner while operating the vessel. Check and obey
all marine laws in association with use.
The stereo accepts a variety of media players, including
smartphones and other mobile devices. You can connect a
compatible media player using a Bluetooth wireless connection
or a USB connection to the integrated docking station (UD
models only), to the USB cable on the back of the stereo, or to
an optional UNI-Dock™
external media dock.
NOTE: If you connect an Apple media player to the USB port on
the stereo, you must either disable Bluetooth on the media
player, or unpair the Bluetooth connection from the stereo to
avoid possible media-playback issues.
Media Player Compatibility
If you have a UD model, you can use the included adapter
cables to connect popular media players to the internal docking
station or the connector on the back of the stereo. If you have an
AV model, you can use the USB cables that came with your
media player to connect the player to the connector on the back
of the stereo.
Only media players with ports on the bottom, not on the sides, fit
in the docking station. Media players larger than 144 × 71 ×
13 mm (5.67 × 2.80 × 0.52 in.) do not fit in the docking station.
Cable Connector
in Dock
Devices
Micro-USB
connector
Supported media players. See
www.fusionentertainment.com.
Apple 30-pin
connector
Apple iPhone 4s, and iPhone 4.
iPod touch® (3rd and 4th generation), iPod
classic®, and iPod nano® (4th through 6th
generation).
Apple Lightning
connector
Apple iPhone 6, iPhone 5s, iPhone 5c, and
iPhone 5.
iPod touch (5th generation) and iPod nano (7th
generation).
You also can connect a FAT32- or NTFS-formatted USB flash
drive directly to the USB port.
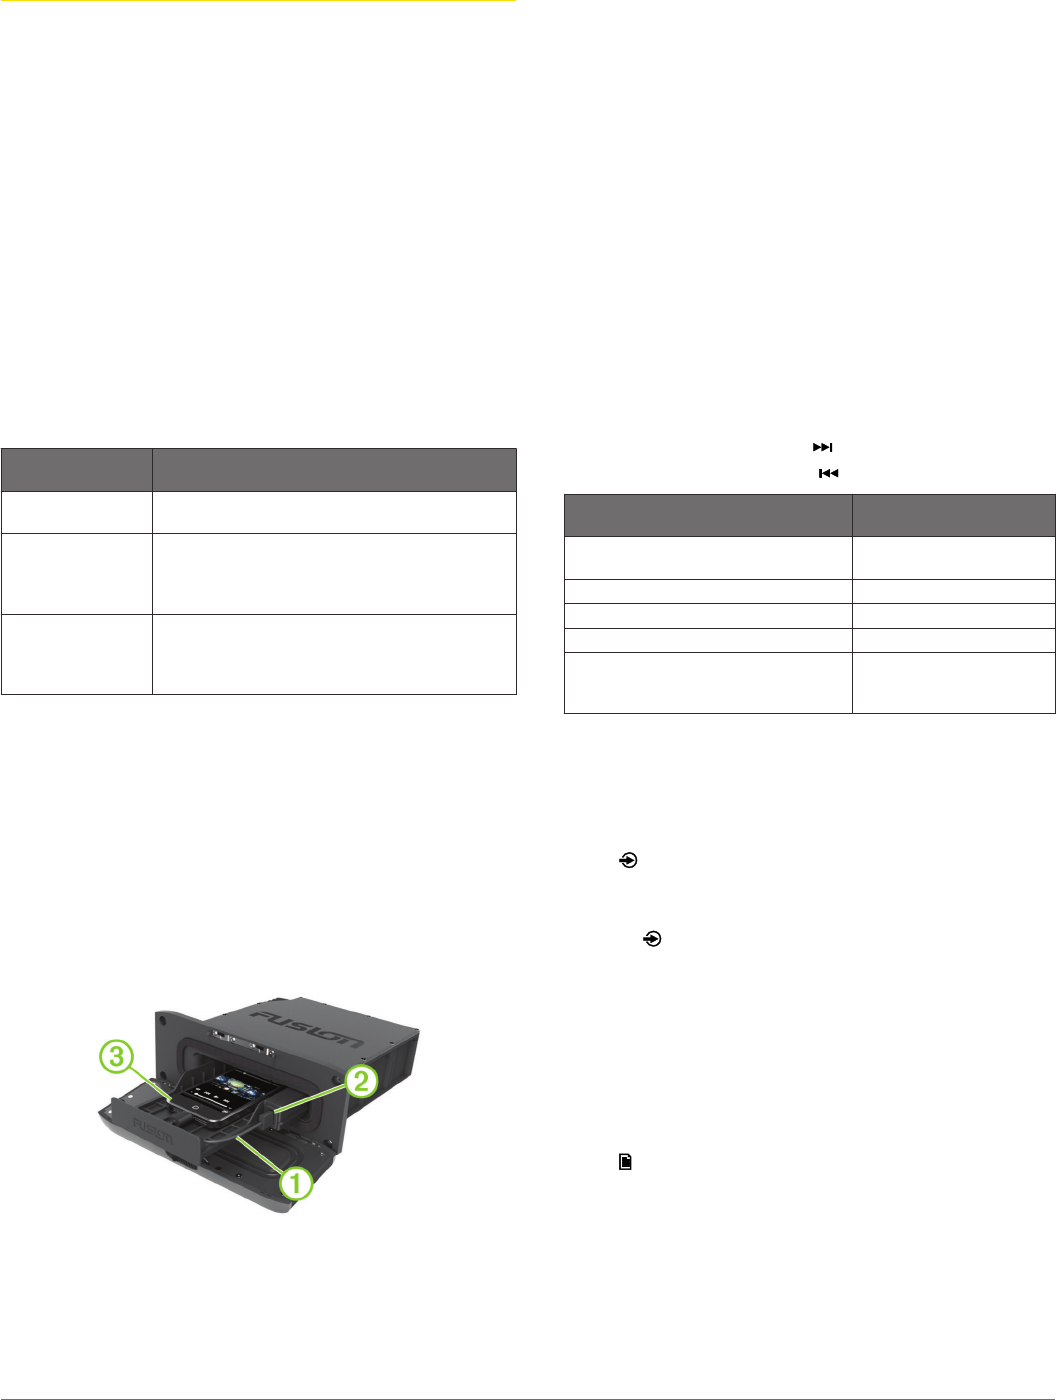
Connecting a Media Player Using the Dock
You can connect a compatible media player using the universal
dock built into the UD models.
1Slide the button on the top of the stereo, and pull down to
open the door.
2Slide out the device tray.
3Insert the adapter cable À into the USB port Á.
NOTE: You can connect a USB flash drive directly to the
USB port.
4Connect the adapter cable to the media player Â, and place
it in the device tray.
NOTE: If you are connecting an Android™
device to the
stereo, you should unlock the device before connecting the
adapter cable.
5Slide in the device tray, and close the door.
Connecting a USB Device Using the USB Cable
You can connect a USB device to the USB cable on the back of
the stereo.
1Locate the USB cable on the back of the stereo.
2Connect the USB device to the USB port.
Connecting an Auxiliary Device
You can connect various auxiliary devices to the stereo, such as
TVs, DVD players, game consoles, and media players. These
devices have either RCA connectors, a line output, or
headphone output jack.
1Locate the auxiliary cable on the back of the stereo.
2If necessary, connect an RCA to 3.5 mm adapter cable to the
auxiliary device.
3Connect the auxiliary device to the RCA connectors on the
stereo.
Adjusting the Gain for the Auxiliary Device
You can adjust the gain for the connected auxiliary device to
achieve a volume level similar to that of other media sources.
You can adjust the gain in 1 dB increments.
1Select an auxiliary source.
2Select an option:
• To increase the gain, select .
• To decrease the gain, select .
Auxiliary Device Recommended Gain
Setting(dB)
Portable media player with headphone
output
from -9 dB to -6 dB
CD/DVD player with line output -6 dB
Portable media player with line output 0 dB
Game console with line output 0 dB
Older audio/visual equipment with line
output (for example, VHS or cassette
deck)
from 6 dB to 9 dB
NOTE: To achieve the best audio quality when using a
portable media player with headphone output, it may be
necessary to adjust the volume control on the media player,
instead of adjusting the gain.
Selecting a Source
1Select .
2Select an option:
• Turn the dial to highlight a source.
• Select repeatedly to highlight a source.
3Press the dial to select the source.
Adjusting the Volume
1Use the dial to adjust the volume.
2If necessary, press the dial to switch between zones.
TIP: To control all zones at the same time, press the dial until
all zones are highlighted.
Adjusting the Tones
1Select > Settings > Tone.
2Use the dial to adjust the level.
3Press the dial to switch to a different tone.
Speaker Zones
You can group speakers in one area into speaker zones. You
can then control the audio level of the zones individually. For
example, you might want the audio quieter in the cabin and
louder on deck.
2 Getting Started
DRAFT
Zones 1 and 2 are powered by the on-board, Class D amplifier.
To use the four line outputs and the four subwoofer outputs, you
must connect external amplifiers.
You can set the balance, volume limit, subwoofer level, and
name for each of the available zones. Up to two pairs of
speakers can be connected per zone in parallel to increase the
amplifier output.
Setting up Speaker Zones
1Select > Settings > Zone.
2Select a zone.
3Select one or more options:
NOTE: Not all options are available for all zones.
•
• To disable the zone and remove it from the audio level
pages, select Enabled to clear the check box. When a
zone is disabled, you cannot change any of the settings
for that zone.
•
• To link zones 1 and 2, select Link to Zone 1 to fill the
check box.
• To adjust the right and left speaker balance of this zone,
select Balance, and use the dial to set the balance.
• To limit the maximum volume output of this zone, select
Volume Limit, and use the dial to set the limit.
• To set the subwoofer level for this zone, select Sub Level,
and use the dial to set the level.
TIP: To open the subwoofer level from any screen, press
and hold the dial for three seconds.
• To give the zone a specific name, select Name (Entering
Text).
•
• To allow the volume of this zone to be controlled by
another amplifier or stereo and provide a fixed line level
output, select Volume Control to clear the check box.
Linking Zones
1Select > Settings > Zone > Zone 2.
2Select Link to Zone 1 to fill the button.
When zones 1 and 2 are linked, appears between zones 1
and 2 on the volume screen.
Disabling the Internal Amplifiers
When you use external amplifiers for zones 1 and 2, you can
disable the internal amplifiers to reduce power consumption.
1Select > Settings > Zone.
2Select Amps On to clear the button.
Adjusting the Subwoofer Filter
You can use the subwoofer filter setting to control the subwoofer
cutoff frequency, which can enhance the blend of the sound
produced by the speakers and the subwoofer. Audio signals
above the selected frequency are not passed to the subwoofer.
The setting applies to all subwoofer outputs.
1Select > Settings > Zone > Subwoofer Filter.
2Select a frequency.
3Press the dial to save the selection.
Infrared Remote Control
You can use the infrared (IR) remote control to control the AV
stereo. The remote buttons function similarly to the device
buttons. The result of a button press varies based on the active
media source.
NOTE: The remote is included only with AV models.
Button Function
Turns the device on and off.
Cycles the available sources.
DSP Displays the CD track, DVD chapter, and title you are
watching or listening to on the connected TV.
ZOOM Zooms in on the DVD picture.
SUB-T Cycles through the available subtitle languages for the
DVD.
DVD Opens the DVD setup menu on the connected TV.
MNU • Opens the navigation menu.
• DVD source: Opens the menu in the connected TV.
Mutes and unmutes the audio.
Arrows Moves through the menus and settings.
SEL Selects the highlighted option or setting.
RPT Repeats the current selection.
RDM Plays tracks or chapters in a random order.
Tells Pandora you like this track and would like more
tracks similar to this played on this station.
Tells Pandora not to play this track.
• Pauses or resumes the current track, when using an
applicable source.
• Cycles through the tuning modes (auto, manual, and
presets), when using an applicable source.
Press once to stop the play.
Press twice to return to the beginning.
Skips to the previous channel, preset, or track, when
using an applicable source.
Skips back (rewinds) in the track or chapter.
Skips ahead (fast forward) in the track or chapter.
Skips to the next channel, preset, or track, when using
an applicable source.
Numeric
buttons
Allows you to enter numbers and numeric information,
such as specific track numbers.
Bluetooth Device Playback
You can pair the stereo to up to eight Bluetooth media devices.
You can control the playback using the keys, but you cannot
browse the music collection. You should select the song or
playlist on the media device.
The availability of song information such as song title, artist
name, and track duration depends on the capability of the media
player and music application. Album cover artwork and the
shuffle and repeat status icons are not supported over Bluetooth
wireless technology.
Connecting a Compatible Bluetooth Device
You can play media from a compatible Bluetooth device using
the Bluetooth wireless connection.
1Select the Bluetooth source.
2Select > Discoverable to make the stereo visible to your
compatible Bluetooth device.
3Enable Bluetooth on your compatible Bluetooth device.
4Bring the compatible Bluetooth device within 10 m (33 ft.) of
the stereo.
5On your compatible Bluetooth device, search for Bluetooth
devices.
6On your compatible Bluetooth device, select the stereo from
the list of detected devices.
7On your compatible Bluetooth device, follow the on-screen
instructions to pair and connect to the discovered stereo.
Bluetooth Device Playback 3

DRAFT
When pairing, your compatible Bluetooth device may ask you
to confirm a code on the stereo. The stereo does not display
a code, but it does connect correctly when you confirm the
message on the Bluetooth device.
8If your compatible Bluetooth device does not immediately
connect to the stereo, repeat steps 1 through 7.
To prevent interruption to audio streaming over Bluetooth
wireless, you can turn off the Discoverable setting after pairing a
Bluetooth device to the stereo.
Bluetooth Range Information
The stereo and Bluetooth wireless devices have a range of 10 m
(33 ft.). For optimal performance, the Bluetooth wireless device
should also have a clear line of sight to the stereo.
Selecting a Different Bluetooth Source
When you have more than one Bluetooth device paired to the
stereo, you can select a different source when needed. You can
connect the stereo to up to eight Bluetooth devices.
1With the BT source selected, select .
2Select a Bluetooth device.
Bluetooth Source Settings
With the Bluetooth source selected, select .
Discoverable: Allows the stereo to be visible to Bluetooth
devices. You can turn off this setting to prevent possible
interruption to audio after pairing a Bluetooth device to the
stereo.
Remove Device: Removes the Bluetooth device from the
stereo. To listen to audio from this Bluetooth device again,
you must pair the device again.
DVD and CD Playback
DVD and CD playback is available only on AV models.
Inserting a DVD or CD
NOTE: For best results, before you insert the disc, make sure
the disc is not scratched or damaged. If necessary, clean and
dry the disc with a clean, soft, and lint-free cloth. Avoid touching
the surface of the disc, and avoid exposure to direct sunlight.
1Slide the button on the top of the stereo, and pull down to
open the door.
2Insert the disc with the label facing up.
3Close the door.
The source automatically changes to the DVD source.
Setting the DVD Region
You must select the DVD region in order to play a DVD.
1Select > DVD Region.
2Select the region.
Playing a DVD or CD
Before you can play a DVD or CD, you must insert the disc.
Before you can play a DVD, you must select the DVD region.
1With the DVD source selected, select on the included IR
remote control.
2Use the IR remote control to control the playback.
NOTE: Aim the remote at the stereo to control playback.
View the selections on the connected TV.
Ejecting a DVD
1Slide the button on the top of the stereo, and pull down to
open the door.
2Press on the inside of the door.
USB, MTP, and Apple Device Playback
You can connect various USB media players and smartphones
to the stereo. For example, you can connect an Android
smartphone, a USB flash drive, or a compatible Apple device.
How you access the USB source depends on what type of
media player is connected. The stereo is designed to be used
with one USB connection at a time. You must disconnect one
USB device before connecting another.
NOTE: If you connect an Apple media player to the USB port on
the stereo, you must either disable Bluetooth on the media
player, or unpair the Bluetooth connection from the stereo to
avoid possible media-playback issues.
Media Player Source Selections
Android device MTP
Apple device IPOD
USB flash drive USB
MP3 media player USB
You can browse the music collection on the USB source using
the categories the device supports, such as songs, albums, and
artists on MTP and Apple devices.
NOTE: The USB source does not support library browsing. You
can browse the folder structure.
You can also browse the files according to the folder structure
on your media player. For example, from the IPOD source, you
can select > Albums.
The availability of song information such as song title, artist
name, track duration, and album cover artwork depends on the
capability of the media player and music application.
NOTE: Different operating systems and media players provide
different levels of support for MTP. Go to
www.fusionentertainment.com for device compatibility
information.
Setting a Song to Repeat
The repeat feature is available on the IPOD, MTP, and USB
sources.
1With an applicable source selected, select .
2When using the IPOD source, select iPod settings.
3Select Repeat.
4Select an option:
• To repeat all songs in the current selection, select All.
• To repeat the current selection, select One.
Shuffling Songs
The shuffle feature is available on the IPOD, MTP, and USB
sources.
1With an applicable source selected, select .
2When using the IPOD source, select iPod settings.
3Select Shuffle.
MTP File Information
After you connect the MTP device, the stereo downloads the full
list of song names from the device and creates a song title
index. This process must be completed before music playback
can begin. For devices with large music collections, this may
take several minutes. The song count appears during this
process. You can use other sources while this process is
underway.
For best results, the music folders on an MTP device should not
contain more than 300 files each. Exceeding 300 files per folder
4 DVD and CD Playback

DRAFT
can cause the MTP device to become unresponsive and reset
the connection to the device.
Music files must be located in a folder using one of these
names. The folder must be located in the root directory of the
MTP device.
• My Music
• My_Music
• mobile
• Music
These guidelines also apply to memory cards installed in the
MTP device.
Pandora Service
Pandora is free personalized radio that offers effortless and
endless music enjoyment and discovery. Pandora integration
requires a compatible mobile device with the Pandora
application installed. For more information on compatible mobile
devices visit www.pandora.com/everywhere/mobile.
NOTE: Pandora is currently available in the United States,
Australia, and New Zealand.
Downloading the Pandora Application
Before you can use the Pandora service on your device, you
must download and install the Pandora app to your smartphone.
1On your compatible smartphone, open the application store
and search for Pandora.
2Install the Pandora app.
See the owner's manual for your smartphone or mobile media
device for more information.
Controlling Pandora Radio with the Stereo
You can control Pandora radio using the stereo instead of your
Apple mobile device. While you are controlling Pandora using
the stereo, you cannot control Pandora using your mobile
device.
Stereo control of Pandora radio is available only on Apple
mobile devices.
1Open the Pandora app on the Apple mobile device.
2Connect an Apple mobile device using a USB connection,
and select the IPOD source.
NOTE: For the best results, you must connect an Apple
mobile device using a USB connection instead of a Bluetooth
connection when controlling Pandora with the stereo.
3Select an option:
• If Pandora controls are visible on the stereo, proceed to
step 6.
• If Pandora controls are not visible on the stereo, proceed
to step 4.
4Select > Pandora.
5Select Pandora Control to select the check box.
6If necessary, select an option on the stereo:
• To pause the stations, select .
• To skip to the next track, select .
• To tell Pandora you like this track and would like more
tracks similar to this played on this station, select .
• To tell Pandora not to play this track, select .
• To change to a different station, select , and select the
station.
• To add a new station, select > Add Station, and select
the station.
• To delete a station, select > Delete Station, and select
the station.
• To shuffle all Pandora stations, select > Shuffle.
If you want to control Pandora with your mobile device again,
select > Pandora > Pandora Control to clear the check box.
Controlling Pandora Radio with Your Mobile
Device
1Open the Pandora app on the mobile device.
2Connect to the mobile device using a USB or Bluetooth
connection.
NOTE: For the best results, you must connect an Apple
mobile device using a USB connection instead of a Bluetooth
connection when playing music from Pandora.
You must connect anAndroid device using a Bluetooth
connection to play music from Pandora.
3Select an option:
• If Pandora controls are visible on the mobile device,
proceed to step 6.
• If Pandora controls are not visible on the mobile device,
proceed to step 4.
4Select > Pandora.
5Select Pandora Control to clear the check box.
6Begin playing a station on the mobile device.
7Control the playback with your mobile device.
Radio
To listen to AM or FM radio, you must have a suitable marine
AM/FM antenna properly connected to the stereo and be within
range of a broadcasting station.
To listen to SiriusXM® radio, you must have the appropriate
equipment and subscriptions (SiriusXM Satellite Radio).
For instructions on connecting an AM/FM antenna or SiriusXM
Connect Vehicle Tuner, see the stereo installation instructions.
Setting the Tuner Region
You must select the region you are presently in to receive AM,
FM, and SiriusXM (USA only) stations properly.
NOTE: SiriusXM is not available in all regions.
1Select > Settings > Tuner Region.
2Select your present region.
Changing the Radio Station
1Select an applicable source, such as FM.
2Select repeatedly to cycle through the tuning mode:
• Select Auto to scan and stop on the next available station.
• Select Manual to select a station manually.
• Select Presets to select a saved station preset.
3Select or to tune to the station.
Presets
You can save your favorite AM stations, FM stations, or
SiriusXM channels as presets for easy access. You can save up
to 15 presets for each radio band.
Saving a Channel as a Preset
1With an applicable source selected, tune the stereo to a
channel.
2Select > Presets.
3Select Save Current or Add Preset.
Pandora Service 5

DRAFT
TIP: You can quickly save the selected channel as a preset by
holding .
Removing Presets
1With an applicable source selected, select > Presets >
Remove Preset.
2Select an option:
• To remove one preset, select the preset.
• To remote all presets, select Remove All Presets.
Playing Audio from a TV using the
HDMI® Audio Return Chanel
Before you can use the HDMI Audio Return Channel (ARC)
source, you must connect an ARC-compatible cable to the
stereo and to the ARC-enabled HDMI port of an ARC-
compatible a television. Refer to the installation instructions for
your stereo and the owner's manual of your television for more
information.
NOTE: The Fusion MS-AV750 supports ARC.
1On the television connected to the stereo, select the source
that you want to hear through the stereo.
2On the stereo, select > ARC.
SiriusXM Satellite Radio
Only SiriusXM brings you more of what you love to listen to, all
in one place. Get over 140 channels, including commercial-free
music plus the best sports, news, talk, comedy and
entertainment. Welcome to the world of satellite radio. A
SiriusXM Vehicle Tuner and subscription are required. For more
information, go to www.siriusxm.com.
SiriusXM Satellite Radio service is available in the 48
contiguous United States and the District of Columbia, and with
coverage limitations in Puerto Rico.
Enabling the SiriusXM Source
You must enable the SiriusXM source before you can listen to
SiriusXM Satellite Radio.
Select > Settings > Tuner Region > USA.
Locating the SiriusXM Radio ID
You must have the radio ID of your SiriusXM Connect Tuner
before you can activate your SiriusXM subscription. You can
locate the SiriusXM Radio ID on the back of the SiriusXM
Connect Tuner or its packaging, or by tuning your stereo to
channel 0.
With the SiriusXM source selected, select > Channels >
All Channels > 000 Radio ID.
The SiriusXM Radio ID does not include the letters I, O, S, or F.
Activating a SiriusXM Subscription
Before you can activate the SiriusXM subscription, you must
have the Radio ID (Locating the SiriusXM Radio ID).
1With the SiriusXM source selected, tune to channel 1.
You should be able to hear the preview channel. If not, check
the SiriusXM Connect Tuner and antenna installation and
connections, and try again.
2Tune to channel 0 to locate the Radio ID.
3Contact SiriusXM listener care by phone at (866) 635-2349 or
go to www.siriusxm.com/activatenow to subscribe in the
United States. Contact SiriusXM by phone at (877) 438-9677
or go to www.siriusxm.ca/activatexm to subscribe in Canada.
4Provide the Radio ID.
The activation process usually takes 10 to 15 minutes, but
can take up to an hour. For the SiriusXM Connect Tuner to
receive the activation message, it must be turned on and
receiving the SiriusXM signal.
5If the service is not activated within the hour, go to
http://care.siriusxm.com/refresh or contact SiriusXM by phone
at 1-855-MYREFRESH (697-3373).
Selecting a Category
You can control which categories of channels are available
when using the Category tuning method.
1With the SiriusXM source selected, select > Category.
2Select a category.
Parental Controls
The parental control feature allows you to limit access to any
SiriusXM channels, including those with mature content. When
the parental control feature is enabled, you must enter a
passcode to tune to the locked channels. You can also change
the 4-digit passcode.
Enabling the Parental Controls
1With the SIRIUSXM source selected, select > Parental.
2Select Unlock to select the check box.
3Enter the passcode.
NOTE: The default passcode is 0000.
After you lock channels and set up the parental controls, you
must select Unlock again to lock the channels.
Locking a Channel
1With the SIRIUSXM source selected, select > Parental >
Unlock.
2Enter the passcode.
3Select > Parental > Lock/Unlock.
4Select the channels to restrict.
5Select > Parental > Unlock.
You cannot access the locked channels. Locked channels can
be accessed when in parental mode only.
Clearing All Locked Channels
1With the SIRIUSXM source selected, select > Parental >
Unlock.
2Enter the passcode.
3Select > Parental > Clear All Locked.
Changing the Parental Control Passcode
1With the SIRIUSXM source selected, select > Parental >
Unlock.
2Enter the passcode.
3Select > Parental > Change Pin.
4Follow the on-screen instructions.
TIP: You can reset the passcode to 0000 by holding for 15
seconds.
6 Playing Audio from a TV using the HDMI® Audio Return Chanel

DRAFT
SiriusXM Troubleshooting
Advisory Description Resolutions
Check Antenna The radio has detected a fault with the SiriusXM
antenna. The antenna cable may be disconnected or
damaged.
• Verify that the antenna cable is connected to the SiriusXM Connect
Vehicle Tuner.
• Inspect the antenna cable for damage and kinks. Replace the antenna
if the cable is damaged. SiriusXM products are available at your local
car audio retailer, or at www.shop.siriusxm.com.
Check Tuner The stereo is having difficulty communicating with the
SiriusXM Connect Vehicle Tuner. The tuner may be
disconnected or damaged.
Verify that the SiriusXM Connect Vehicle Tuner cable is connected
securely to the stereo.
No Signal The SiriusXM Connect Vehicle Tuner is having
difficulty receiving the SiriusXM satellite signal.
• Verify that your vessel is outdoors with a clear view of the sky.
• Verify that the SiriusXM antenna is mounted securely to the vessel.
• Remove obstructions above or next to the SiriusXM antenna.
• Inspect the cable antenna for damage and kinks. Replace the antenna
if the cable is damaged. SiriusXM products are available at your local
car audio retailer or at www.shop.siriusxm.com.
• Consult the SiriusXM Connect Vehicle Tuner installation manual for
more information on antenna installation.
Subscription
Updated
The radio has detected a change in your SiriusXM
subscription status.
• Select any button to clear the message.
• Go to www.siriusxm.com or call 866-635-2349 with questions about
your subscription
Channel Not
Available
The channel you requested is not a valid SiriusXM
channel, or the channel that you were listening to is
no longer available. You may see this message briefly
the first time you connect a new SiriusXM Connect
Vehicle Tuner.
Go to www.siriusxm.com for more information about the SiriusXM
channel lineup.
Channel Not
Subscribed
The channel you requested is not included in your
SiriusXM subscription package, or the channel you
were listening to is no longer included in your
SiriusXM subscription package.
Go to www.siriusxm.com or call 866-635-2349 for more information about
your subscription package or to subscribe to the channel.
Channel Locked The channel you requested is locked by the parental
control feature.
Refer to the parental control section in the manual to unlock channels.
General Settings
Select > Settings.
NOTE: When a check box is filled, the option is on. When the
box is clear, the option is off.
Tone: Adjusts the bass, middle, and treble tones.
Zone: Enables you to configure the speaker zones.
Key Sound: Enables and disables audible key tones.
Language: Sets the language on the device.
Searching: Enables Fusion Alpha Search Technology (FAST),
which allows you to quickly search for tracks by letter or
number. You can select a number to enable the FAST menu
if your music device contains more than the selected number
of items.
Power Save: Enables and disables the LCD backlight after one
minute of inactivity to save battery power.
NRX200 Power: Turns off the power the stereo provides to the
wired remote controls not on a NMEA 2000® network. If the
remote control is connected to a NMEA 2000 network, you
must disable this option.
Tel Mute: Sets the behavior of the mute function when the
device is connected to a hands-free mobile phone. When a
call is received, the device can either mute the audio or
broadcast the call through the AUX2 input. Refer to your
hands-free kit instructions.
Tuner Region: Sets the region used by the FM, AM, and
SiriusXM source.
Ser Device Name: Sets a name for this stereo (Entering Text).
Album Artwork: Shows or hides the album cover artwork.
Update: Updates the stereo, updates the connected remote
controls, or resets all settings to the factory defaults.
About: Shows the software versions of the stereo, FUSION-
Link™
, and connected remote.
IP Address: Changes the IP address to static or DHCP.
Appendix
Registering Your Fusion MS-UD/AV750
Help us better support you by completing our online registration
today.
• Go to www.fusionentertainment.com.
• Keep the original sales receipt, or a photocopy, in a safe
place.
True-Marine™ Products
True-Marine products are subjected to rigorous environmental
testing under harsh marine conditions to surpass industry
guidelines for marine products.
Any product that bears the True-Marine stamp of assurance has
been designed for simplicity of use and combines the most
advanced marine technologies to deliver an industry leading
entertainment experience. All True-Marine products are
supported by the Fusion 3-year worldwide limited consumer
warranty. You can be assured Fusion stands by its products and
takes pride in delivering True-Marine quality products for your
vessel.
FUSION-Link
FUSION-Link technology allows you to fully control compatible
Fusion entertainment systems on compatible multi-function
displays installed at the helm, flybridge, or navigation station of
the vessel. This provides you with integrated entertainment
control and a less cluttered console.
The partnered multi-function display becomes the portal on
which all audio on the vessel is controlled, no matter where on
the vessel the stereo is installed. The FUSION-Link equipped
General Settings 7

DRAFT
stereo can be installed out of sight if space is an issue and users
need to access the stereo only to replace removable media.
FUSION-Link technology operates over existing industry-
standard networks including Ethernet, NMEA 2000, Bluetooth
wireless technology, and Wi‑Fi® wireless technology.
For a list of FUSION-Link capable products from companies that
are partnering with Fusion, go to www.fusionentertainment.com.
Audio Control with NMEA 2000
NMEA 2000 is the most popular marine standard for data
communication within vessels. It has become the standard for
sending navigation and engine management data within
vessels. Fusion introduces an industry-first product by
incorporating NMEA 2000 functionality in its audio remote
control devices. This enables the user to monitor a series of
available NMEA® sentences.
Go to www.fusionentertainment.com for a full list of supported
NMEA sentences.
Optional Wired Remote Controls
The stereo can be controlled by compatible Fusion wired remote
controls installed in the audio zones throughout the vessel.
Operating the entertainment system from the remote control is
similar to operating it from the main stereo.
The wired remote controls can operate over an existing NMEA
2000 network, so wiring the remotes directly to the stereo is not
necessary. The standard Fusion remote control network can
connect Fusion wired remote controls to stereos in vessels
without a NMEA 2000 network by connecting the remote directly
to the WIRED REMOTE NMEA 2000 connector on the stereo.
The remote control can also serve as an NMEA display showing
NMEA navigation data or vessel performance data from other
NMEA devices on an existing NMEA 2000 network.
Ethernet and Wireless Support
You can connect a wireless Ethernet router to the entertainment
system to control the audio with Wi‑Fi. You can download free
apps from the Apple App StoreSM for Apple devices. Android
apps are available through Google Play™
.
For more information, see www.fusionentertainment.com.
Troubleshooting
The stereo does not respond to key presses
• Press and hold the power button to reset the stereo.
The stereo keeps locking up when connected to an
Apple device
• Press and hold the power button to reset the stereo.
• Reset the Apple device. Go to www.apple.com for more
information.
• Make sure you have the latest version of iTunes® and the
latest operating software on your Apple device.
The stereo is not finding my Apple device when it is
connected in the dock
• Make sure you have the latest version of iTunes and the
latest operating software on your Apple device.
• Reset the Apple device. Go to www.apple.com for more
information.
• Contact your Fusion dealer or send an email to Fusion from
www.fusionentertainment.com.
My Apple device has gone into thermal protection
mode
CAUTION
The temperature of the internal dock in the stereo is slightly
higher than the ambient temperature outside the stereo. The
Apple device shuts down when the operating temperature is
exceeded. In addition, using the Apple device in a low charged
state increases the heat generated while it is charging. For more
information, go to www.apple.com.
• Carefully remove the Apple device from the stereo and allow
it to cool down before using it again.
• When the Apple device is low on battery charge, charge the
Apple device.
My MTP device is unresponsive
For best results, the music folders on an MTP device should not
contain more than 300 files each. Exceeding 300 files per folder
can cause the Android device to become unresponsive and
reset the connection to the device.
NOTE: Different operating systems and media players provide
different levels of support for MTP. Refer to
www.fusionentertainment.com for device compatibility
information.
The stereo does not find all of my music files on my
MTP device
Music files must be located in a folder using one of these
names. The folder must be located in the root directory of the
media player.
• My Music
• My_Music
• mobile
• Music
My Bluetooth audio is interrupted by short breaks
• Ensure the media player is not covered or obstructed.
Bluetooth technology performs best with line-of-sight
operation.
• Bring the media player within 10 m (33 ft.) of the stereo.
• Turn off the Discoverable setting after pairing a Bluetooth
device to the stereo.
The stereo does not display all song information from
my Bluetooth source
The availability of song information such as song title, artist
name, track duration, and album cover artwork depends on the
capability of the media player and music application.
Album cover artwork and shuffle and repeat status icons are not
supported by Bluetooth technology.
Specifications
General
Weight 0.88 kg (1.96 lb.)
Water resistance IPX5
Operating temperature range From -5 to 50°C (from 23 to 122°F)
Storage temperature range From -20 to 70°C (from -4 to 158°F)
Input voltage From 10.8 to 16 Vdc
NMEA 2000 LEN 1 (50 mA)
Compass-safe distance 15 cm (5.9 in.)
On-board, Class D Amplifier
Output music power per channel 70 W max. x 4 at 2 Ohms
Total output music power 280 W max.
Current (standby with ignition off) < 3 mA
8 Appendix

DRAFT
On-board, Class D Amplifier
Current (max) 15 A
Current (muted) < 900 mA
Tuner Europe and
Australasia
USA Japan
FM radio
frequency
range
87.5–108 MHz 87.5–
107.9 MHz
70–90 MHz
FM Frequency
step
50 kHz 200 kHz 50 kHz
AM radio
frequency
range
522–1620 kHz 530–1710 kHz 522–1620 kHz
AM Frequency
step
9 kHz 10 kHz 9 kHz
Appendix 9

DRAFT
Index
A
AM 5
amplifier 3
Android device 1, 4, 8
Apple device 1, 4, 8
auxiliary input 2
B
backlight 1
bass 2
Bluetooth devices 3, 4
D
device
keys 1
registration 7
DVD 4
E
Ethernet 8
F
FM 5
FUSION-Link 7
G
gain 2
H
HDMI, audio return channel 6
I
iPod 1, 4, 8. See device
K
keys 1
tone 7
L
language 7
M
media player, connecting 2
menu key 1
MTP 4, 8
MTP device 4
N
NMEA 2000 8
P
Pandora radio 5
power key 1
presets 5, 6
product registration 7
R
radio
AM 5
FM 5
SiriusXM 6, 7
registering the device 7
remote control 3, 8
repeat 4
S
shuffle 4
SiriusXM 5
parental controls 6
Satellite Radio 6, 7
source 1, 2
speaker zones 2, 3
subwoofer 3
T
thumbs down 5
thumbs up 5
time
format 7
setting 7
tone 2
treble 2
U
USB 1, 2, 4
flash drive 4
V
volume 3
adjusting 2
W
Wi‑Fi technology 8
10 Index