Contents
- 1. User manual (statement)_rev.pdf
- 2. User manual.pdf
User manual.pdf

DRAFT
®
Fusion® Fusion MS-RA70/MS-RA70N Owner's
Manual
Owner’s Manual
December 2015 190-01946-00_01
DRAFT
All rights reserved. Under the copyright laws, this manual may not be copied, in whole or in part, without the written consent of Garmin. Garmin reserves the
right to change or improve its products and to make changes in the content of this manual without obligation to notify any person or organization of such
changes or improvements. Go to www.garmin.com for current updates and supplemental information concerning the use of this product.

DRAFT
Table of Contents
Getting Started............................................................... 1
What's In the Box........................................................................ 1
Stereo Controls........................................................................... 1
Using the Dial to Select Items................................................ 1
Selecting a Source................................................................. 1
Entering Text..........................................................................1
Adjusting the Backlight Brightness and Contrast................... 1
Stereo Screen............................................................................. 1
Media Player Connection............................................................1
USB Device Compatibility...................................................... 1
Connecting a USB Device..................................................... 2
Adjusting the Volume.................................................................. 2
Adjusting the Tones............................................................... 2
Speaker Zones.......................................................................2
Bluetooth Device Playback........................................... 2
Connecting a Compatible Bluetooth Device............................... 2
Bluetooth Range Information................................................. 2
Selecting a Different Bluetooth Source....................................... 2
Bluetooth Source Settings.......................................................... 2
Radio............................................................................... 3
Setting the Tuner Region............................................................ 3
Changing the Radio Station........................................................ 3
Presets........................................................................................3
Saving a Channel as a Preset............................................... 3
Removing Presets..................................................................3
General Settings (RA70)................................................ 3
Appendix......................................................................... 3
Registering Your Fusion MS-RA70/MS-RA70N......................... 3
True-Marine™ Products............................................................. 3
FUSION-Link.............................................................................. 3
Audio Control with NMEA 2000.................................................. 3
Optional Wired Remote Controls................................................ 3
Troubleshooting.......................................................................... 4
The stereo does not respond to key presses......................... 4
The stereo keeps locking up when connected to an Apple
device.....................................................................................4
The stereo is not finding my Apple device when it is
connected in the dock............................................................ 4
The stereo does not find all of my music files on my MTP
device.....................................................................................4
My Bluetooth audio is interrupted by short breaks................. 4
The stereo does not display all song information from my
Bluetooth source.................................................................... 4
Specifications..............................................................................4
Stereo Dimension Drawings....................................................... 4
Front Dimensions................................................................... 4
Side Dimensions.................................................................... 4
Top Dimensions..................................................................... 4
Index................................................................................ 5
Table of Contents i
DRAFT
DRAFT
Getting Started
What's In the Box
• DIN mounting plate
• Four 8-gauge, self-tapping screws
• Power and speaker wiring harness
• Auxiliary-in, line-out, and subwoofer-out wiring harness
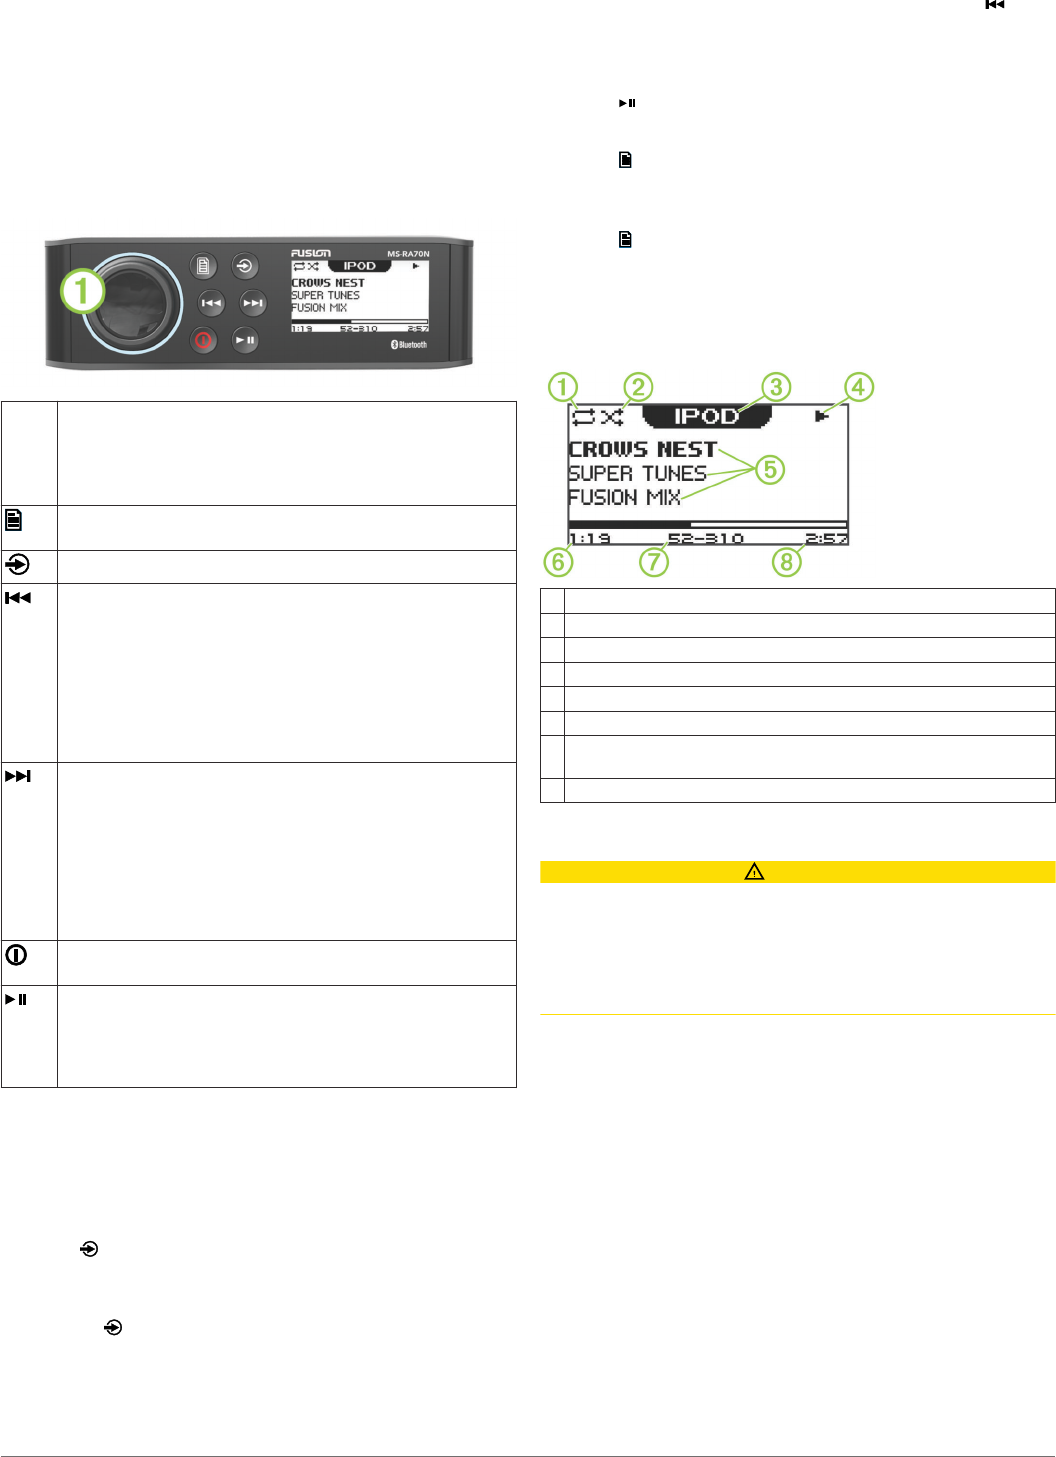
Stereo Controls
Dial À• Turn to adjust the volume.
• Press to switch between zones.
• Hold for at least one second to adjust the subwoofer levels.
• Turn to move through the menus or adjust a setting.
• Press to select the highlighted option.
• Select to open a menu.
• Select to return to the previous screen or menu.
Select to change the source (Selecting a Source, page 1).
• Select to skip to the previous track, when using an applicable
source.
• Hold to rewind the current track, when using an applicable
source.
• AM or FM source:
◦ Select to tune to the previous station.
◦ Hold for faster tuning (manual mode only).
• AUX source: Select to decrease the gain for the connected
source.
• Select to skip to the next track, when using an applicable
source.
• Hold to fast forward the current track, when using an
applicable source.
• AM or FM source:
◦ Select to tune to the next station.
◦ Hold for faster tuning (manual mode only).
• AUX source: Select to increase the gain for the connected
source.
• Select to turn on the stereo.
• Hold to turn off the stereo.
• Select to pause or resume.
• AM or FM source:
◦ Select to cycle through the tuning modes (auto or manual)
and presets (when two or more presets are saved).
◦ Hold to save this station as a preset.
Using the Dial to Select Items
You can use the dial to highlight and select items on the screen.
• Turn the dial to select an item on the screen.
• Press the dial to select the highlighted option.
Selecting a Source
1Select .
2Select an option:
• Turn the dial to highlight a source.
• Select repeatedly to highlight a source.
3Press the dial to select the source.
Entering Text
You can enter text to change some settings field values on this
device.
1In a settings field that allows you to enter text, select to
erase the existing characters.
2Use the dial to choose a letter, and press the dial to select it.
3Add additional letters to finish entering the text.
4Select to save the new text.
Adjusting the Backlight Brightness and Contrast
1Select > SETTINGS > LCD.
2Press the dial to select brightness or contrast.
3Adjust the brightness or contrast.
4Select to exit the menu.
Stereo Screen
The information displayed on the stereo screen varies
depending on the source selected. This example shows the
stereo playing a track on an iPhone® mobile digital device.
ÀRepeat status icon
ÁShuffle status icon
ÂSource
ÃPlay status icon
ÄTrack details (if available)
ÅElapsed time
ÆCurrent track number out of total number of tracks in the playlist (if
available)
ÇTrack duration
Media Player Connection
CAUTION
Always disconnect your media player from the stereo when not
in use and do not leave it in your vessel. This helps reduce the
risk of theft and damage from extreme temperatures.
Do not remove the media player or use your stereo in a
distracting manner while operating the vessel. Check and obey
all marine laws in association with use.
The stereo accepts a variety of media players, including
smartphones and other mobile devices. You can connect a
compatible media player using a Bluetooth® wireless connection,
a USB connection to the USB port on the back of the stereo, or
to an optional UNI-Dock external media dock.
NOTE: If you connect an Apple® media player to the USB port
on the stereo, you must either disable Bluetooth on the media
player, or unpair the Bluetooth connection from the stereo to
avoid possible media-playback issues.
USB Device Compatibility
You can use the USB cable that came with your media player to
connect the media player to the USB connector on the back of
the stereo.
The stereo is compatible with Apple devices that use a
Lightning™
connector on the USB cable, such as the iPhone 6.
The stereo is compatible with media players and other USB
mass storage devices that contain music in MP3, M4A, and AAC
formats. A connected USB mass storage device must be
formatted using the NTFS or FAT32 file system.
Getting Started 1

DRAFT
Connecting a USB Device
You can connect a USB device to the USB port on the stereo.
1Locate the USB port on the back of the stereo.
2Connect the USB device to the USB port.
3Select the USB source.
Adjusting the Volume
1Use the dial to adjust the volume.
2If necessary, press the dial to switch between zones.
TIP: To control all zones at the same time, press the dial until
all zones are highlighted.
Adjusting the Tones
1Select > SETTINGS > TONE.
2Use the dial to adjust the level.
3Press the dial to switch to a different tone.
Speaker Zones
You can group speakers in one area into speaker zones. This
enables you to control the audio level of the zones individually.
For example, you could make the audio quieter in the cabin and
louder on deck.
Up to two pairs of speakers can be connected per zone, in
parallel, to increase the amplifier output.
Zones 1 and 2 are powered by the on-board, Class D amplifier.
To use the three line outputs and the three subwoofer outputs,
you must connect external amplifiers.
You can set the balance, volume limit, subwoofer level, and
name for each zone.
Setting up Speaker Zones
1Select > SETTINGS > ZONE.
2Select a zone.
3Select one or more options:
NOTE: Not all options are available for all zones.
• To disable the zone and remove it from the audio level
pages, select ENABLED to clear the option button. When
a zone is disabled, you cannot change any of the settings
for that zone.
• To link zones 1 and 2, select LINK TO ZONE 1 to fill the
option button.
• To adjust the right and left speaker balance of this zone,
select BALANCE, and use the dial to set the balance.
• To limit the maximum volume output of this zone, select
VOLUME LIMIT, and use the dial to set the limit.
• To set the subwoofer level for this zone, select SUB
LEVEL, and use the dial to set the level.
TIP: To open the subwoofer level from any screen, press
and hold the dial for three seconds.
• To give the zone a specific name, select SET ZONE
NAME (Entering Text, page 1).
• To allow the volume of this zone to be controlled by
another amplifier or stereo and provide a fixed line level
output, select VOLUME CONTROL to clear the option
button.
Linking Zones
1Select > SETTINGS > ZONE > ZONE 2.
2Select LINK TO ZONE 1 to fill the button.
When zones 1 and 2 are linked, appears between zones 1
and 2 on the volume screen.
Adjusting the Subwoofer Filter
You can use the subwoofer filter setting to control the subwoofer
cutoff frequency, which can enhance the blend of the sound
produced by the speakers and the subwoofer. Audio signals
above the selected frequency are not passed to the subwoofer.
The setting applies to all subwoofer outputs.
1Select > SETTINGS > ZONE > SUBWOOFER FILTER.
2Select a frequency.
3Press the dial to save the selection.
Bluetooth Device Playback
You can pair the stereo to up to eight Bluetooth media devices.
You can control the playback using the keys, but you cannot
browse the music collection. You should select the song or
playlist on the media device.
The availability of song information such as song title, artist
name, and track duration depends on the capability of the media
player and music application. Album cover artwork and the
shuffle and repeat status icons are not supported over Bluetooth
wireless technology.
Connecting a Compatible Bluetooth Device
You can play media from a compatible Bluetooth device using
the Bluetooth wireless connection.
1Select the Bluetooth source.
2Select > DISCOVERABLE to make the stereo visible to
your compatible Bluetooth device.
3Enable Bluetooth on your compatible Bluetooth device.
4Bring the compatible Bluetooth device within 10 m (33 ft.) of
the stereo.
5On your compatible Bluetooth device, search for Bluetooth
devices.
6On your compatible Bluetooth device, select the stereo from
the list of detected devices.
7On your compatible Bluetooth device, follow the on-screen
instructions to pair and connect to the discovered stereo.
When pairing, your compatible Bluetooth device may ask you
to confirm a code on the stereo. The stereo does not display
a code, but it does connect correctly when you confirm the
message on the Bluetooth device.
8If your compatible Bluetooth device does not immediately
connect to the stereo, repeat steps 1 through 7.
To prevent interruption to audio streaming over Bluetooth
wireless, you can turn off the DISCOVERABLE setting after
pairing a Bluetooth device to the stereo.
Bluetooth Range Information
The stereo and Bluetooth wireless devices have a range of 10 m
(33 ft.). For optimal performance, the Bluetooth wireless device
should also have a clear line of sight to the stereo.
Selecting a Different Bluetooth Source
When you have more than one Bluetooth device paired to the
stereo, you can select a different source when needed. You can
connect the stereo to up to eight Bluetooth devices.
1With the BLUETOOTH source selected, select .
2Select a Bluetooth device.
Bluetooth Source Settings
With the BLUETOOTH source selected, select .
DISCOVERABLE: Allows the stereo to be visible to Bluetooth
devices. You can turn off this setting to prevent possible
interruption to audio after pairing a Bluetooth device to the
stereo.
REMOVE DEVICE: Removes the Bluetooth device from the
stereo. To listen to audio from this Bluetooth device again,
you must pair the device again.
2 Bluetooth Device Playback

DRAFT
Radio
To listen to AM or FM radio, you must have a suitable marine
AM/FM antenna properly connected to the stereo and be within
range of a broadcasting station. For instructions on connecting
an AM/FM antenna, see the stereo installation instructions.
Setting the Tuner Region
You must select the region you are in to receive AM and FM
stations properly.
1Select > SETTINGS > TUNER REGION.
2Select the region you are in presently.
Changing the Radio Station
1Select an applicable source, such as FM.
2Select repeatedly to cycle through the tuning mode:
• Select AUTO to scan and stop on the next available
station.
• Select MANUAL to select a station manually.
• Select PRESETS to select a saved station preset.
3Select or to tune to the station.
Presets
You can save your favorite AM stations, FM stations, or
SiriusXM® channels as presets for easy access. You can save
up to 15 presets for each radio band.
Saving a Channel as a Preset
1With an applicable source selected, tune the stereo to a
channel.
2Select > PRESETS.
3Select SAVE CURRENT or ADD PRESET.
TIP: You can quickly save the selected channel as a preset by
holding .
Removing Presets
1With an applicable source selected, select > PRESETS >
REMOVE PRESET.
2Select an option:
• To remove one preset, select the preset.
• To remote all presets, select REMOVE ALL PRESETS.
General Settings (RA70)
Select > SETTINGS.
NOTE: When an option button is filled, the option is on. When
the button is clear, the option is off.
TONE: Adjusts the bass, middle, and treble tones.
ZONE: Enables you to configure the speaker zones.
LCD: Enables you to adjust the backlight brightness and
contrast settings (Adjusting the Backlight Brightness and
Contrast, page 1).
POWER SAVE: Enables and disables the LCD backlight after
one minute of inactivity to save battery power.
LANGUAGE: Sets the language on the device.
TUNER REGION: Sets the region used by the FM, AM, and
SiriusXM source.
TEL MUTE: Sets the behavior of the mute function when the
device is connected to a hands-free mobile phone. When a
call is received, the device can either mute the audio or
broadcast the call through the AUX2 input. See your hands-
free kit instructions.
SET DEVICE NAME: Sets a name for this stereo (Entering Text,
page 1).
UPDATE: Updates the stereo, updates the connected remote
controls, or resets all settings to the factory defaults.
ABOUT: Shows the software versions of the stereo, FUSION-
Link™
, and connected remote.
Appendix
Registering Your Fusion MS-RA70/MS-
RA70N
Help us better support you by completing our online registration
today.
• Go to www.fusionentertainment.com .
• Keep the original sales receipt, or a photocopy, in a safe
place.
True-Marine™ Products
True-Marine products are subjected to rigorous environmental
testing under harsh marine conditions to surpass industry
guidelines for marine products.
Any product that bears the True-Marine stamp of assurance has
been designed for simplicity of use and combines advanced
marine technologies to deliver an industry leading entertainment
experience. All True-Marine products are supported by the
Fusion 3-year worldwide limited consumer warranty.
FUSION-Link
FUSION-Link technology allows you to fully control compatible
Fusion entertainment systems on compatible multi-function
displays installed at the helm, flybridge, or navigation station of
the vessel. This provides you with integrated entertainment
control and a less cluttered console.
The partnered multi-function display becomes the portal on
which all audio on the vessel is controlled, no matter where on
the vessel the stereo is installed. The FUSION-Link equipped
stereo can be installed out of sight if space is an issue and users
need to access the stereo only to replace removable media.
FUSION-Link technology offered on this device operates over
existing industry-standard NMEA 2000® networks.
For a list of FUSION-Link capable products from companies that
are partnering with Fusion, go to www.fusionentertainment.com .
Audio Control with NMEA 2000
NMEA 2000 is the most popular marine standard for data
communication within vessels. It has become the standard for
sending navigation and engine management data within
vessels. Fusion introduces an industry-first product by
incorporating NMEA 2000 functionality in its audio remote
control devices. This enables the user to monitor a series of
available NMEA® sentences.
Go to www.fusionentertainment.com for a full list of supported
NMEA sentences.
Optional Wired Remote Controls
The stereo can be controlled by compatible Fusion wired remote
controls installed in the audio zones throughout the vessel.
Operating the entertainment system from the remote control is
similar to operating it from the main stereo.
The wired remote controls operate over an existing NMEA 2000
network, so all remotes connected to the same NMEA 2000 as
the stereo can control the stereo.
The remote control can also serve as an NMEA display showing
NMEA navigation data or vessel performance data from other
NMEA devices on an existing NMEA 2000 network.
Radio 3
DRAFT
Troubleshooting
The stereo does not respond to key presses
• Press and hold the power button to reset the stereo.
The stereo keeps locking up when connected to an
Apple device
• Press and hold the power button to reset the stereo.
• Reset the Apple device. Go to www.apple.com for more
information.
• Make sure you have the latest version of iTunes® and the
latest operating software on your Apple device.
The stereo is not finding my Apple device when it is
connected in the dock
• Make sure you have the latest version of iTunes and the
latest operating software on your Apple device.
• Reset the Apple device. Go to www.apple.com for more
information.
• Contact your Fusion dealer or send an email to Fusion from
www.fusionentertainment.com .
The stereo does not find all of my music files on my
MTP device
Music files must be located in a folder using one of these
names. The folder must be located in the root directory of the
media player.
• My Music
• My_Music
• mobile
• Music
My Bluetooth audio is interrupted by short breaks
• Ensure the media player is not covered or obstructed.
Bluetooth technology performs best with line-of-sight
operation.
• Bring the media player within 10 m (33 ft.) of the stereo.
• Turn off the DISCOVERABLE setting after pairing a
Bluetooth device to the stereo.
The stereo does not display all song information from
my Bluetooth source
The availability of song information such as song title, artist
name, track duration, and album cover artwork depends on the
capability of the media player and music application.
Album cover artwork and shuffle and repeat status icons are not
supported by Bluetooth technology.
Specifications
General
Weight 556 g (19.6 oz.)
Water resistance IEC 60529 IPX6 (front), IEC 60529 IPX3
(rear)
Operating temperature range From 0 to 55°C (from 32 to 131°F)
Storage temperature range From -20 to 70°C (from -4 to 158°F)
Input voltage From 10.8 to 16 Vdc
NMEA 2000 LEN 1 (50 mA)
Compass-safe distance 15 cm (5.9 in.)
On-board, Class AB Amplifier
Output music power per channel 50 W max. x 4 channels at 4 Ohms
per channel
Total output music power 200 W max.
Current (standby) less than 3 mA
On-board, Class AB Amplifier
Current (max.) 15 A
Current (muted) less than 900 mA
Tuner Europe and
Australasia
USA Japan
FM radio
frequency
range
87.5 to
108 MHz
87.5 to
107.9 MHz
70 to 90 MHz
FM Frequency
step
50 kHz 200 kHz 50 kHz
AM radio
frequency
range
522 to
1620 kHz
530 to
1710 kHz
522 to 1620 kHz
AM Frequency
step
9 kHz 10 kHz 9 kHz
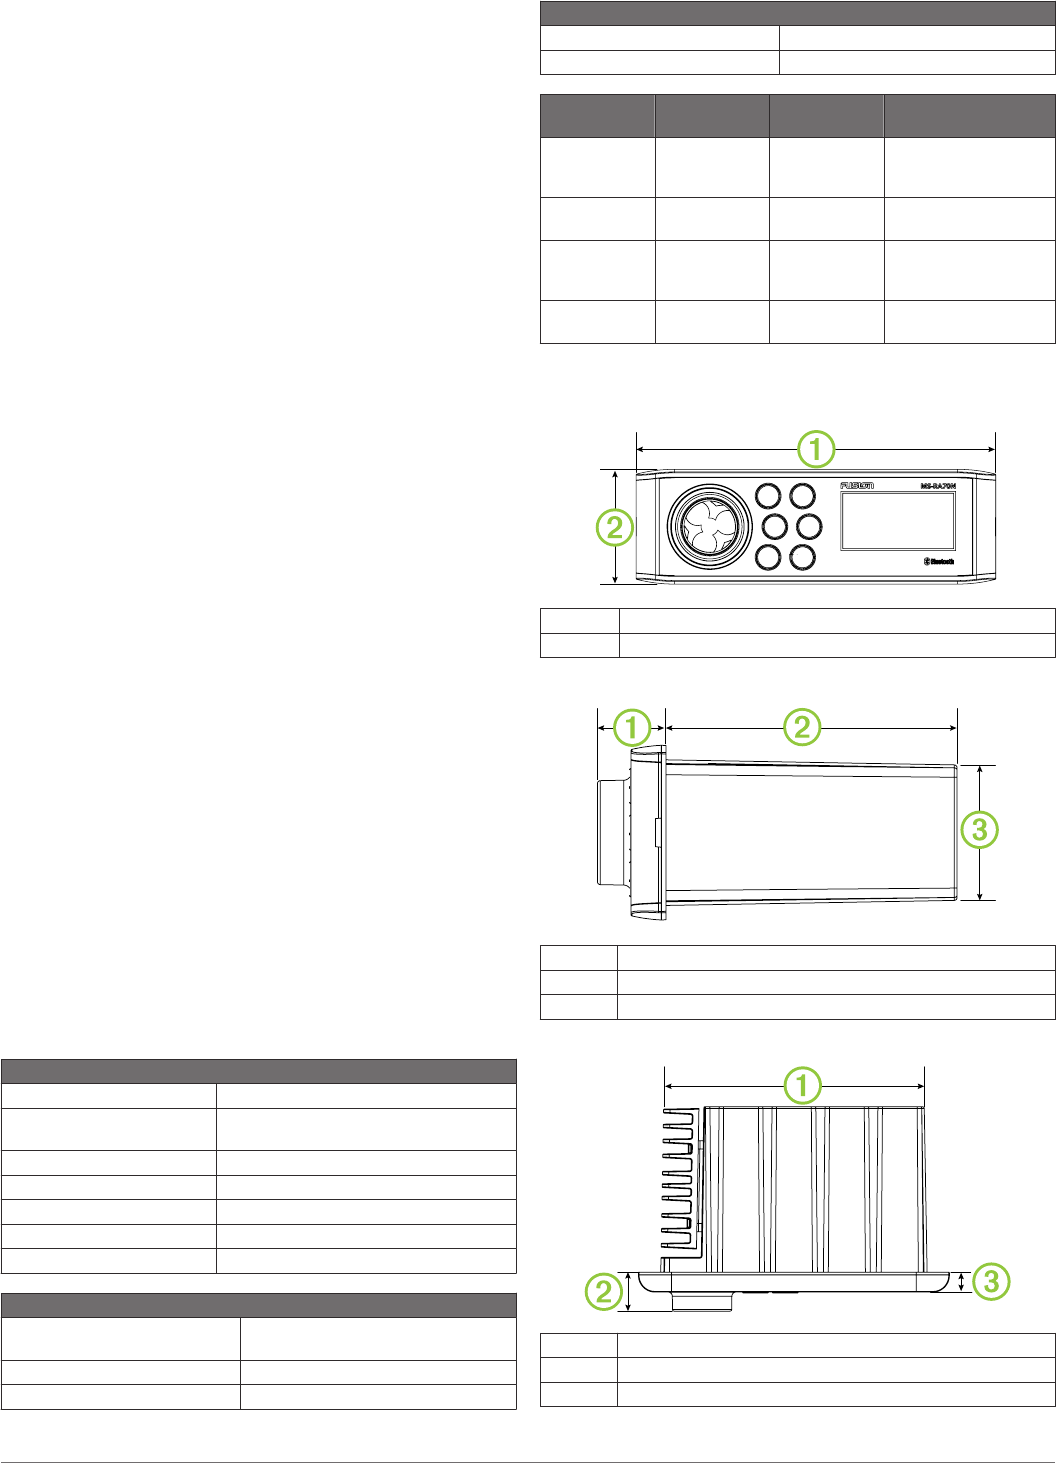
Stereo Dimension Drawings
Front Dimensions
À188 mm (7.40 in.)
Á60 mm (2.36 in.)
Side Dimensions
À23.5 mm (0.93 in.)
Á100 mm (3.94 in.)
Â50 mm (1.97 in.)
Top Dimensions
À161 mm (6.34 in.)
Á23.5 mm (0.93 in.)
Â12 mm (0.47 in.)
4 Appendix

DRAFT
Index
A
AM 3
Android device 4
Apple device 1, 4
B
backlight 1
bass 2
Bluetooth devices 2
D
device 1
keys 1
registration 3
F
FM 3
FUSION-Link 3
K
keys 1, 3
L
language 3
M
media player 1
menu key 1
MTP 4
N
NMEA 2000 3
P
power key 1
presets 3
product registration 3
R
radio
AM 3
FM 3
registering the device 3
remote control 3
S
SiriusXM 3
source 1
speaker zones 2
subwoofer 2
T
time
format 3
setting 3
tone 2, 3
treble 2
U
USB 1, 2
V
volume 2
adjusting 2
Index 5

DRAFT
www.garmin.com/support
+43 (0) 820 220230 + 32 2 672 52 54
0800 770 4960 1-866-429-9296
+385 1 5508 272
+385 1 5508 271
+420 221 985466
+420 221 985465
+ 45 4810 5050 + 358 9 6937 9758
+ 331 55 69 33 99 + 39 02 36 699699
(+52) 001-855-792-7671 0800 0233937
+47 815 69 555 00800 4412 454
+44 2380 662 915
(+35) 1214 447 460 +386 4 27 92 500
0861 GARMIN (427 646)
+27 (0)11 251 9999 +34 93 275 44 97
+ 46 7744 52020 +886 2 2642-9199 ext 2
0808 238 0000
+44 (0) 870 8501242
+49 (0) 89 858364880
zum Ortstarif - Mobilfunk
kann abweichen
913-397-8200
1-800-800-1020
© 2015 Garmin Ltd. or its subsidiaries