Garmin 03198 Digital Transmission System 2412-2462 MHz User Manual
Garmin International Inc Digital Transmission System 2412-2462 MHz
Garmin >
Contents
- 1. User Manual
- 2. User Manual-1
- 3. User Manual 2
- 4. User Manual-2
User Manual-1
ECHOMAP™ PLUS 60/70/90 SERIES
Quick Start Manual
Introduction
WARNING
See the Important Safety and Product Information guide in
the product box for product warnings and other important
information.
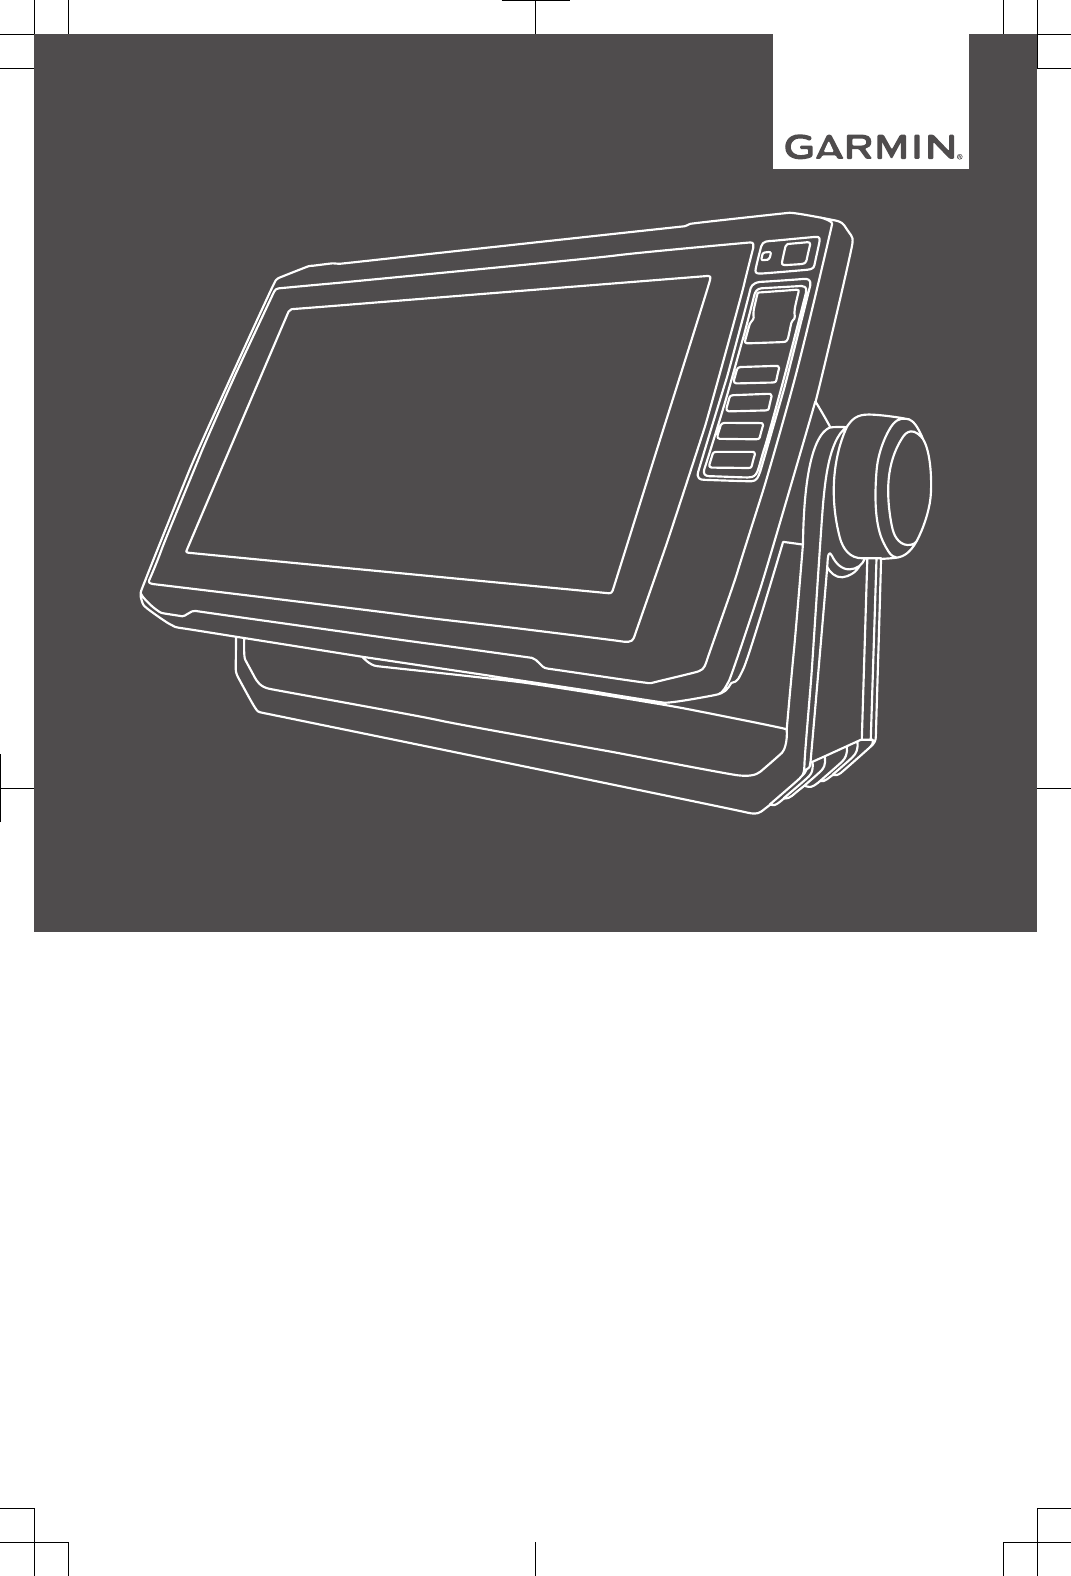
ECHOMAP Plus 60 Front View
ÀPower key
ÁAutomatic backlight sensor
ÂKeys
ÃmicroSD® memory card slot
NOTICE
Each time you place the device in the cradle, you should
make sure the device is firmly secured in the cradle, the
cables are fully pushed into the device and cradle, and the
locking bracket is snapped firmly closed. There is an
audible click when the locking bracket is installed correctly.
If the cables are not fully seated and the device is not firmly
secured, it can lose power or stop working. The device can
also fall out of the cradle and become damaged if it is not
firmly secured.
Device Keys
Turns on and off the device when held.
Opens a shortcut menu to backlight, color mode, and
sonar transmission when quickly pressed and
released.
Scrolls through the brightness levels when pressed
repeatedly.
Zooms out of a chart or view.
Zooms in to a chart or view.
Scrolls, highlights options, and moves the cursor.
SELECT Acknowledges messages and selects options.
BACK Returns to the previous screen.
MARK Saves the present location as a waypoint.
HOME Returns to the Home screen.
Takes a screenshot when held.
MENU Opens a menu of options for the page, when
applicable.
Closes a menu, when applicable.
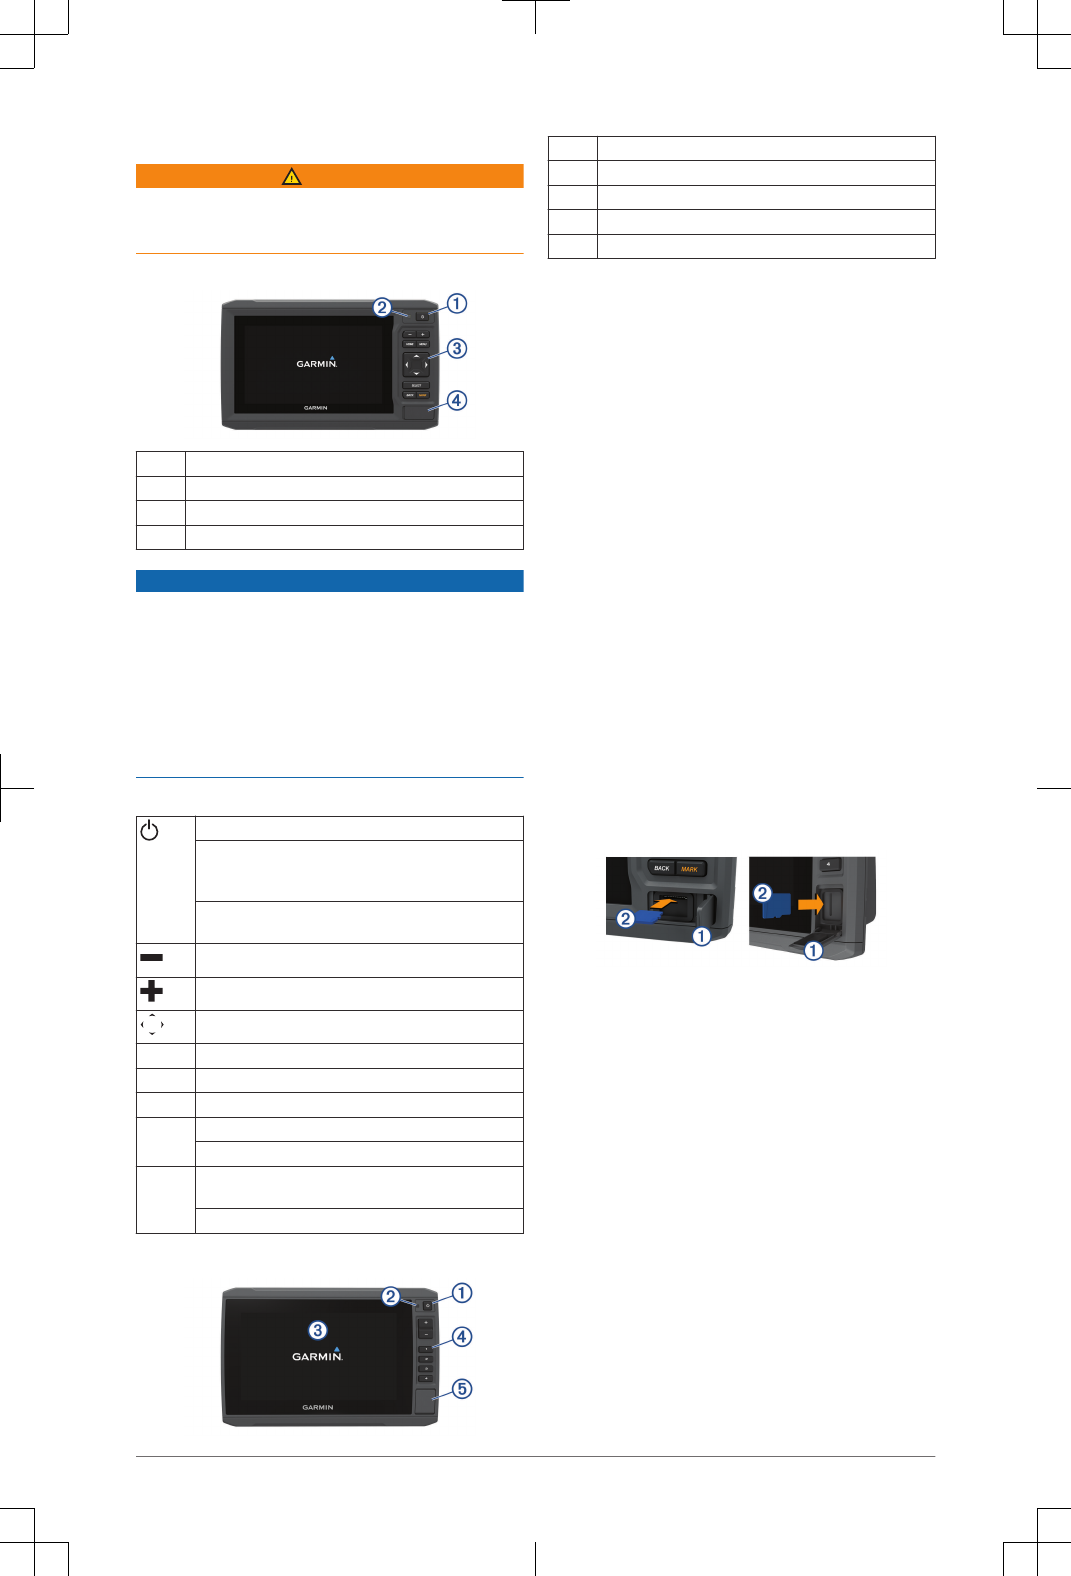
ECHOMAP Plus 70/90 Front View
ÀPower key
ÁAutomatic backlight sensor
ÂTouchscreen
ÃShortcut keys
ÄmicroSD memory card slot
Assigning a Shortcut Key
You can quickly open commonly used screens by
assigning a shortcut key. You can create a shortcut to
screens such as sonar screens and charts.
1Open a screen.
2Hold a shortcut key, and select OK.
TIP: The shortcut is also saved to the Frequently Used
category with the shortcut key number.
Getting the Owner's Manual
Go to www.garmin.com/manuals/ECHOMAPPlus60
-70-90.
Inserting Memory Cards
You can use optional memory cards with the chartplotter.
Map cards allow you to view high-resolution satellite
imagery and aerial reference photos of ports, harbors,
marinas, and other points of interest. You can use blank
memory cards to record Garmin Quickdraw™ Contours
mapping, record sonar (with a compatible transducer),
transfer data such as waypoints and routes to another
compatible chartplotter or a computer, and use the
ActiveCaptain™ app.
This device supports up to a 32 GB memory card,
formatted to FAT32.
1Open the access flap or door À on the front of the
chartplotter.
2Insert the memory card Á.
3Press the card in until it clicks.
4Close the door.
Getting Started with the ActiveCaptain App
NOTE: The ActiveCaptain feature is only available on
models that have Wi‑Fi® technology.
You can connect a mobile device to the ECHOMAP Plus
device using the ActiveCaptain app. The app provides a
quick and easy way for you to interact with your
chartplotter and complete such tasks as sharing data,
registering, and updating the device software and maps.
1From the ECHOMAP Plus device, select
ActiveCaptain.
2From the ActiveCaptain page, select Wi-Fi Network >
Wi-Fi > On.
3Enter a name and password for this network.
4From the application store on your mobile device,
install and open the ActiveCaptain app.
2 Quick Start Manual
5Bring the mobile device within 32 m (105 ft.) of the
ECHOMAP Plus device.
6From your mobile device settings, open the Wi-Fi
connections page and connect to the Garmin® device,
using the name and password you entered in the
Garmin device.
For more information about the ActiveCaptain app and
features, see the Owner's Manual at www.garmin.com
/manuals/ECHOMAPPlus60-70-90 or watch a video at
www.garmin.com/ActiveCaptainVideo.
Acquiring GPS Satellite Signals
The device may need a clear view of the sky to acquire
satellite signals. The time and date are set automatically
based on the GPS position.
1Turn on the device.
2Wait while the device locates satellites.
It may take 30 to 60 seconds to acquire satellite
signals.
When the device acquires satellite signals, appears at
the top of the Home screen.
If the device loses satellite signals, disappears and a
flashing question mark appears over on the chart.
For more information about GPS, go to www.garmin.com
/aboutGPS.
Adjusting the Backlight
1Select Settings > System > Display > Backlight.
2Adjust the backlight.
TIP: From any screen, press repeatedly to scroll
through the brightness levels. This can be helpful when
the brightness is so low you cannot see the screen.
Adjusting the Color Mode
1Select Settings > System > Display > Color Mode.
TIP: Select > Color Mode from any screen to
access the color settings.
2Select an option.
Customizing the Home Screen
You can add items to and rearrange items on the Home
screen.
1From the Home screen, select Customize Home.
2Select an option:
• To rearrange an item, select Rearrange, select the
item to move, and select the new location.
• To add an item to the Home screen, select Add,
and select the new item.
• To remove an item you have added to the Home
screen, select Remove, and select the item.
Garmin Support Center
Go to support.garmin.com for help and information, such
as product manuals, frequently asked questions, videos,
software updates, and customer support.
Sonar Fishfinder
When properly connected to a compatible transducer, your
ECHOMAP Plus device can be used as a fishfinder.
For more information about which transducer is best for
your needs, go to www.garmin.com/transducers.
Different sonar views can help you view the fish in the
area. The sonar views available vary depending on the
type of transducer and sounder module connected to the
chartplotter. For example, you can view Garmin ClearVü™
sonar screens only if you have a compatible Garmin
ClearVü transducer connected.
There are four basic styles of sonar views available: a full-
screen view, a split-screen view that combines two or more
views, a split-zoom view, and a split-frequency view that
displays two different frequencies. You can customize the
settings for each view in the screen. For example, if you
are viewing the split-frequency view, you can separately
adjust the gain for each frequency.
If you do not see an arrangement of sonar views to suit
your needs, you can create a custom combination screen.
Traditional Sonar View
There are several full-screen views available, depending
on the transducer that is connected.
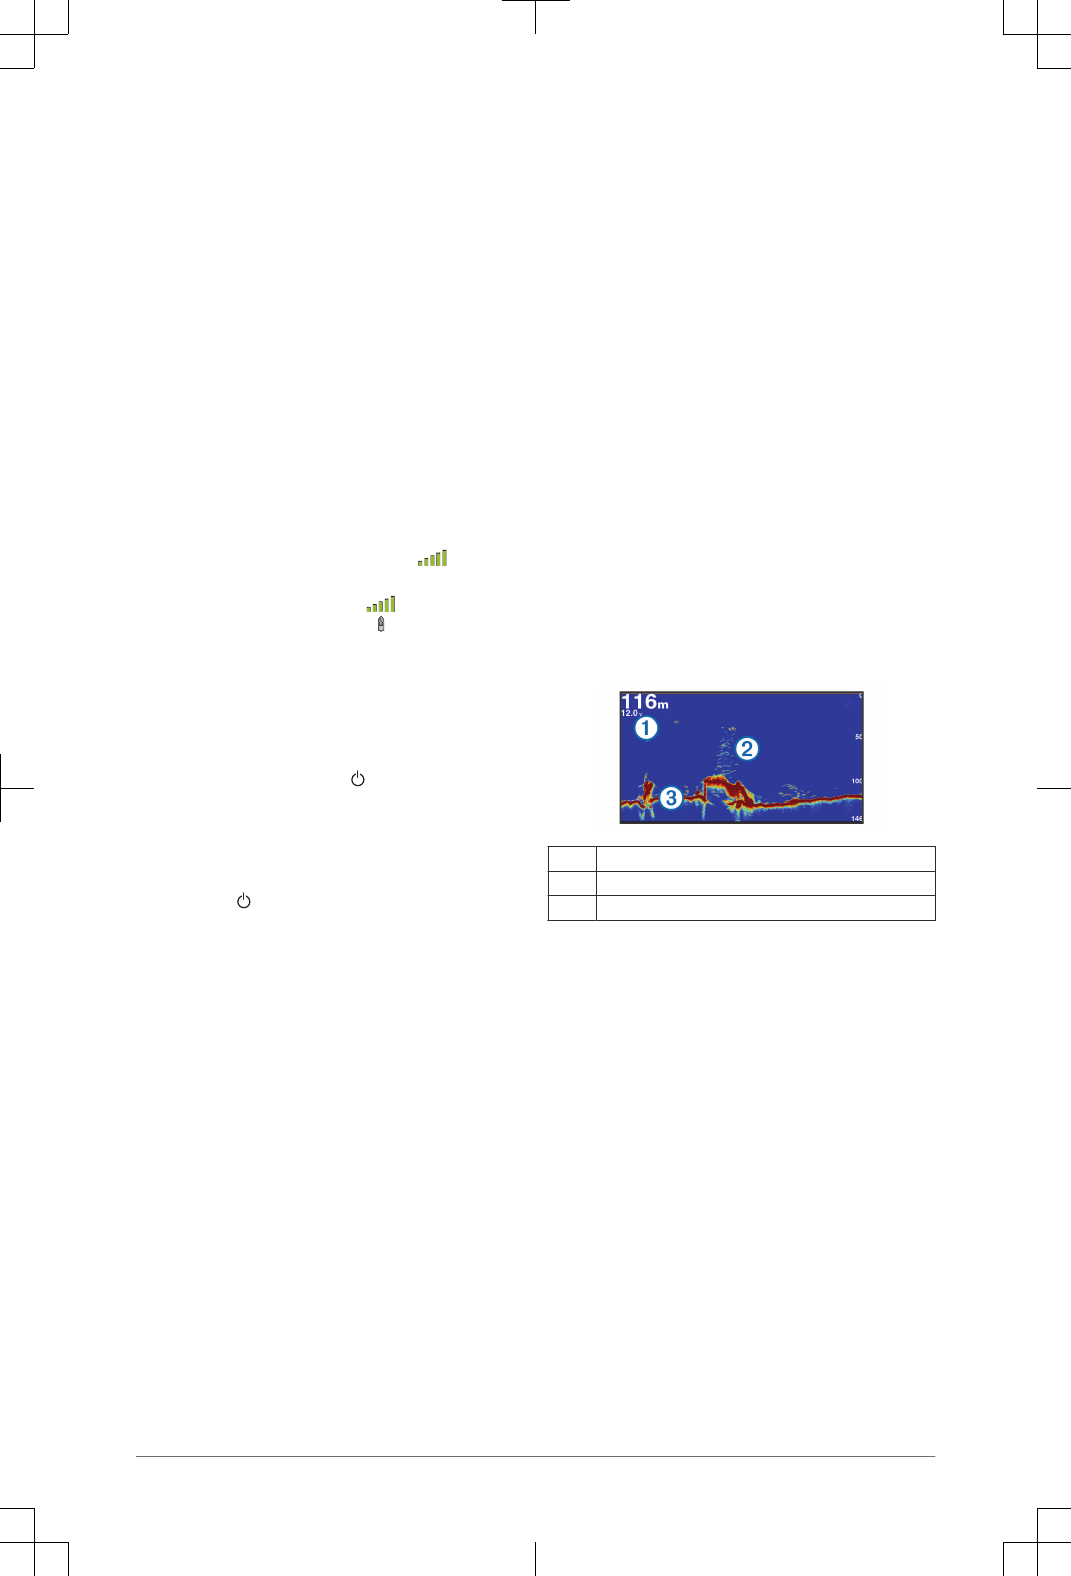
The full-screen Traditional sonar view shows a large image
of the sonar readings from a transducer. The range scale
along the right side of the screen shows the depth of
detected objects as the screen scrolls from the right to the
left.
ÀDepth information
ÁSuspended targets or fish
ÂBottom of the body of water
Selecting the Transducer Type
If you are connecting a transducer that was not included
with the device, you may need to set the transducer type to
make the sonar function properly. Before connecting the
transducer, you should select the transducer type. The
transducer name should be listed on the label on the
transducer cable, near the connector.
This device is compatible with a range of accessory
transducers, including Garmin ClearVü transducers, which
are available at www.garmin.com/transducers.
1Select Settings > My Vessel > Transducer Type.
2Select an option:
• If you have a 200/77 kHz, dual-beam transducer,
select Dual Beam (200/77 kHz).
• If you have a 200/50 kHz, dual-frequency
transducer, select Dual Frequency (200/50 kHz).
• If you have another type of transducer, select it
from the list.
Creating a Waypoint on the Sonar Screen
1From a sonar view, select MENU > Pause Sonar.
2Select a location.
Quick Start Manual 3

3Select New Waypoint or SELECT.
4If necessary, edit the waypoint information, such as the
waypoint name.
Navigation
Navigation Chart and Fishing Chart
The Fishing Chart provides a detailed view with more
bottom detail and fishing content. This chart is optimized
for use when fishing.
The Navigation Chart is optimized for navigation. You can
plan a course, view map information, and use the chart as
a navigational aid.
Marking Your Present Location as a Waypoint
From any screen, select MARK.
Creating a Waypoint at a Different Location
1Select Nav Info > Waypoints > Create Waypoint.
2Select an option:
• To create the waypoint by entering position
coordinates, select Enter Coordinates, and enter
the coordinates.
• To create the waypoint using a chart, select Use
Chart, select the location, and select SELECT.
Marking an MOB or SOS Location
Select MARK > Man Overboard.
An international man overboard (MOB) symbol marks the
active MOB point and the chartplotter sets a direct course
back to the marked location.
Navigating to a Point on the Chart
1From the Navigation chart or Fishing chart, select a
location.
2If necessary, select SELECT.
3Select Navigate To.
4Select an option:
• To navigate directly to the location, select Go To.
• To create a route to the location, including turns,
select Route To.
• To use Auto Guidance, select Auto Guidance.
NOTE: Auto Guidance is available with premium
charts, in some areas.
5Review the course indicated by the magenta line.
NOTE: When using Auto Guidance, a gray segment
within any part of the magenta line indicates that Auto
Guidance cannot calculate part of the Auto Guidance
line. This is due to the settings for minimum safe water
depth and minimum safe obstacle height.
6Follow the magenta line, steering to avoid land, shallow
water, and other obstacles.
Creating and Navigating a Route From Your
Present Location
You can create and immediately navigate a route on the
Navigation chart or the Fishing chart. This method does not
save the route or the waypoint data.
1From the Navigation chart or Fishing chart, select a
destination.
2Select Navigate To > Route To.
3Select the location of the last turn before the
destination.
4Select Add Turn.
5If necessary, repeat to add turns, working backward
from the destination to the present location of your
vessel.
The last turn you add should be the first turn you make,
starting from your present location. It should be the turn
closest to your vessel.
6If necessary, select MENU.
7Select Navigate Route.
8Review the course indicated by the magenta line.
9Follow the magenta line, steering to avoid land, shallow
water, and other obstacles.
Stopping Navigation
From the Navigation chart or Fishing chart, select
MENU > Stop Navigation.
Mapping a Body of Water Using the
Garmin Quickdraw Contours Feature
Before you can use the Garmin Quickdraw Contours
feature, you must have sonar depth, your GPS position,
and a memory card with free space.
1From a chart view, select MENU > Quickdraw
Contours > Start Recording.
2When recording is complete, select MENU >
Quickdraw Contours > Stop Recording.
3Select Manage > Name, and enter a name for the
map.
4 Quick Start Manual


support.garmin.com
© 2017 Garmin Ltd. or its subsidiaries
Garmin® and the Garmin logo are trademarks of Garmin Ltd. or its subsidiaries, registered in the USA and other countries. ECHOMAP™, Garmin
ClearVü™, and Garmin Quickdraw™ are trademarks of Garmin Ltd. or its subsidiaries. These trademarks may not be used without the express
permission of Garmin.
The microSD® logo is a trademark of SD-3C, LLC.
Printed in Taiwan
September 2017
190-02243-01_0A