Garmin 03260 Low Power Transmitter 2402-2480 MHz User Manual
Garmin International Inc Low Power Transmitter 2402-2480 MHz
Garmin >
Contents
- 1. User Manual 1
- 2. User Manual
User Manual
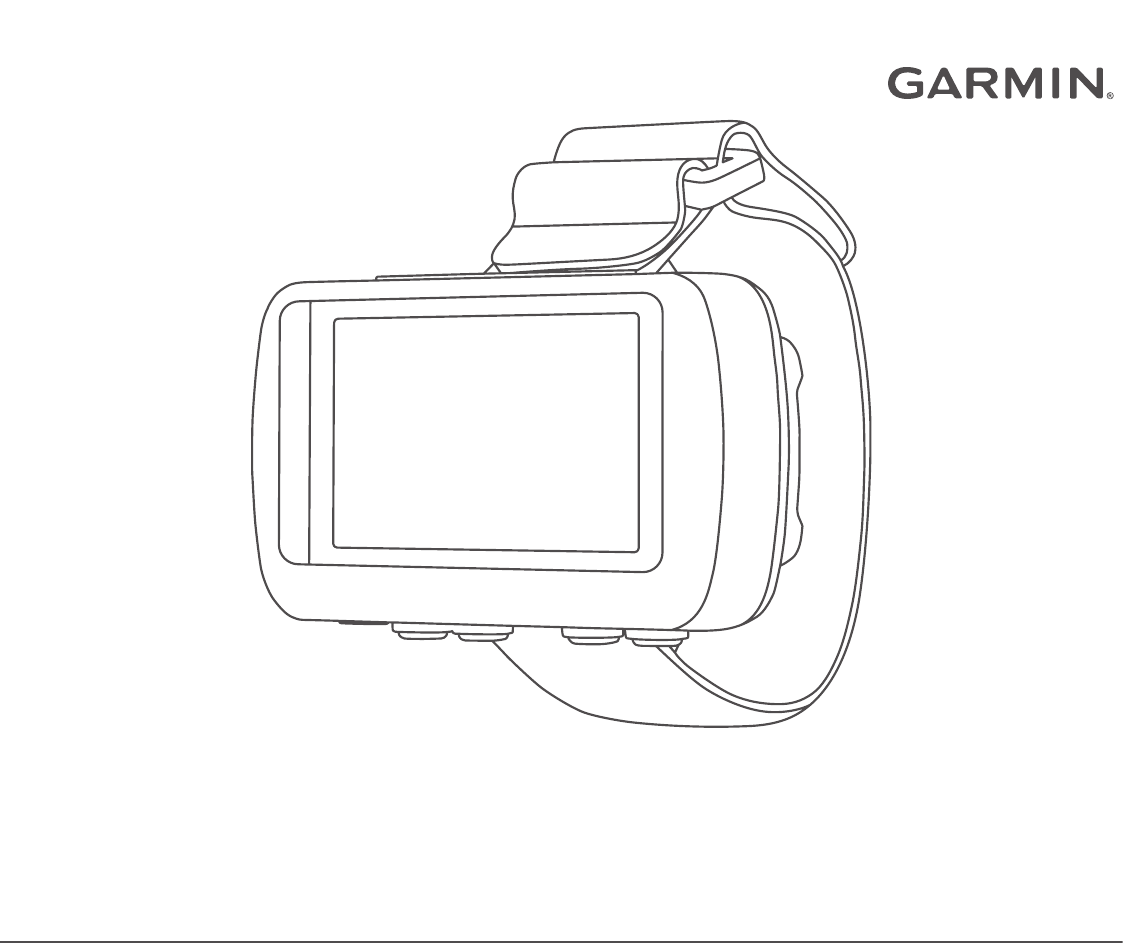
FORETREX® 601/701 BALLISTIC EDITION
Owner’s Manual
© 2017 Garmin Ltd. or its subsidiaries
All rights reserved. Under the copyright laws, this manual may not be copied, in whole or in part, without the written consent of Garmin. Garmin reserves the right to change or improve its
products and to make changes in the content of this manual without obligation to notify any person or organization of such changes or improvements. Go to www.garmin.com for current updates
and supplemental information concerning the use of this product.
Garmin®, the Garmin logo, ANT+®, Foretrex®, TracBack®, and VIRB® are trademarks of Garmin Ltd. or its subsidiaries, registered in the USA and other countries. Garmin Connect™, Garmin
Express™, QuickFit™ and tempe™ are trademarks of Garmin Ltd. or its subsidiaries. These trademarks may not be used without the express permission of Garmin.
Applied Ballistics® and Applied Ballistics Elite® are registered trademarks of Applied Ballistics, LLC. Apple® and Mac® are trademarks of Apple Inc., registered in the U.S. and other countries. The
Bluetooth® word mark and logos are owned by the Bluetooth SIG, Inc. and any use of such marks by Garmin is under license. Windows® is a registered trademark of Microsoft Corporation in the
United States and other countries. Other trademarks and trade names are those of their respective owners.
This product is ANT+® certified. Visit www.thisisant.com/directory for a list of compatible products and apps.

Table of Contents
Introduction.....................................................................1
Device Overview......................................................................... 1
Installing the Batteries................................................................ 1
Long-Term Storage................................................................ 1
Attaching the Wrist Strap............................................................ 1
Keys............................................................................................ 1
Turning On the Device........................................................... 1
Acquiring Satellite Signals..................................................... 1
Using the Backlight................................................................ 1
Main Pages................................................................................. 1
Status Icons........................................................................... 2
Map Page...............................................................................2
About the Compass............................................................... 2
Applied Ballistics.................................................................... 2
Using the Countdown Timer....................................................... 2
VIRB® Remote........................................................................... 2
Controlling a VIRB Action Camera.........................................2
Waypoints, Routes, and Tracks.................................... 2
Waypoints................................................................................... 2
Creating a Waypoint.............................................................. 3
Navigating to a Waypoint....................................................... 3
Measuring the Distance Between Two Waypoints................ 3
Editing a Waypoint................................................................. 3
Projecting a Waypoint............................................................ 3
Deleting a Waypoint............................................................... 3
Deleting All Waypoints........................................................... 3
Viewing Celestial Data and Almanacs................................... 3
Viewing the Nearest Waypoints............................................. 3
Routes........................................................................................ 3
Creating and Navigating a Route........................................... 3
Viewing Saved Routes........................................................... 3
Deleting All Routes................................................................ 3
Tracks......................................................................................... 3
Recording a Track..................................................................3
Navigating a Saved Track...................................................... 3
Using the Pan and TracBack® Feature................................. 3
Viewing Track Details............................................................ 4
Editing the Name of a Track.................................................. 4
Clearing the Active Track....................................................... 4
Deleting a Track..................................................................... 4
Deleting All Tracks................................................................. 4
Customizing Your Device.............................................. 4
Adjusting the Backlight Timeout................................................. 4
Map Settings............................................................................... 4
Map Detail Settings................................................................ 4
Compass Settings.......................................................................4
Calibrating the Compass........................................................4
Customizing the Data Fields.................................................. 4
Elevation Settings....................................................................... 4
Calibrating the Barometric Altimeter...................................... 4
Trip Computer Settings............................................................... 4
Resetting the Trip Computer.................................................. 4
Applied Ballistics Settings........................................................... 4
Customizing the Range Card Fields...................................... 5
Editing the Range Increment................................................. 5
Setting the Base Range......................................................... 5
Changing the Target.............................................................. 5
Editing the Name of a Target................................................. 5
Changing the Profile.............................................................. 5
Adding a Profile......................................................................5
Editing the Name of a Profile................................................. 5
Editing Bullet Properties.........................................................5
Editing Gun Properties........................................................... 5
Clearing the Drop Scale Factor Table....................................5
Editing the Muzzle Velocity and Temperature Table............. 6
Clearing the Muzzle Velocity and Temperature Table........... 6
Deleting a Profile....................................................................6
Menu Page Options.................................................................... 6
Device Settings...................................................................... 6
Jumpmaster........................................................................... 7
Connected Features....................................................... 7
Pairing a Smartphone with Your Device..................................... 7
Optional Fitness Accessories....................................... 7
Pairing Your ANT+ Sensors....................................................... 7
Tips for Pairing ANT+ Accessories with Your Garmin Device.... 7
tempe.......................................................................................... 7
Device Information......................................................... 7
Specifications..............................................................................7
Viewing Device Information........................................................ 8
Viewing Satellites........................................................................8
Device Care................................................................................ 8
Cleaning the Device............................................................... 8
Data Management...................................................................... 8
Connecting the Device to Your Computer............................. 8
Transferring Files to Your Device.......................................... 8
Deleting Files......................................................................... 8
Disconnecting the USB Cable................................................8
Receiving Data Wirelessly..................................................... 8
Sending a Route Wirelessly................................................... 8
Sending a Waypoint Wirelessly............................................. 8
Troubleshooting............................................................. 9
Product Updates......................................................................... 9
Setting Up Garmin Express................................................... 9
Improving GPS Satellite Reception............................................ 9
Maximizing Battery Life...............................................................9
My device is in the wrong language........................................... 9
Resetting the Device...................................................................9
Restoring All Default Settings..................................................... 9
Appendix......................................................................... 9
Data Fields..................................................................................9
Applied Ballistics Glossary of Terms........................................ 10
Index.............................................................................. 12
Table of Contents i
Introduction
WARNING
See the Important Safety and Product Information guide in the
product box for product warnings and other important
information.
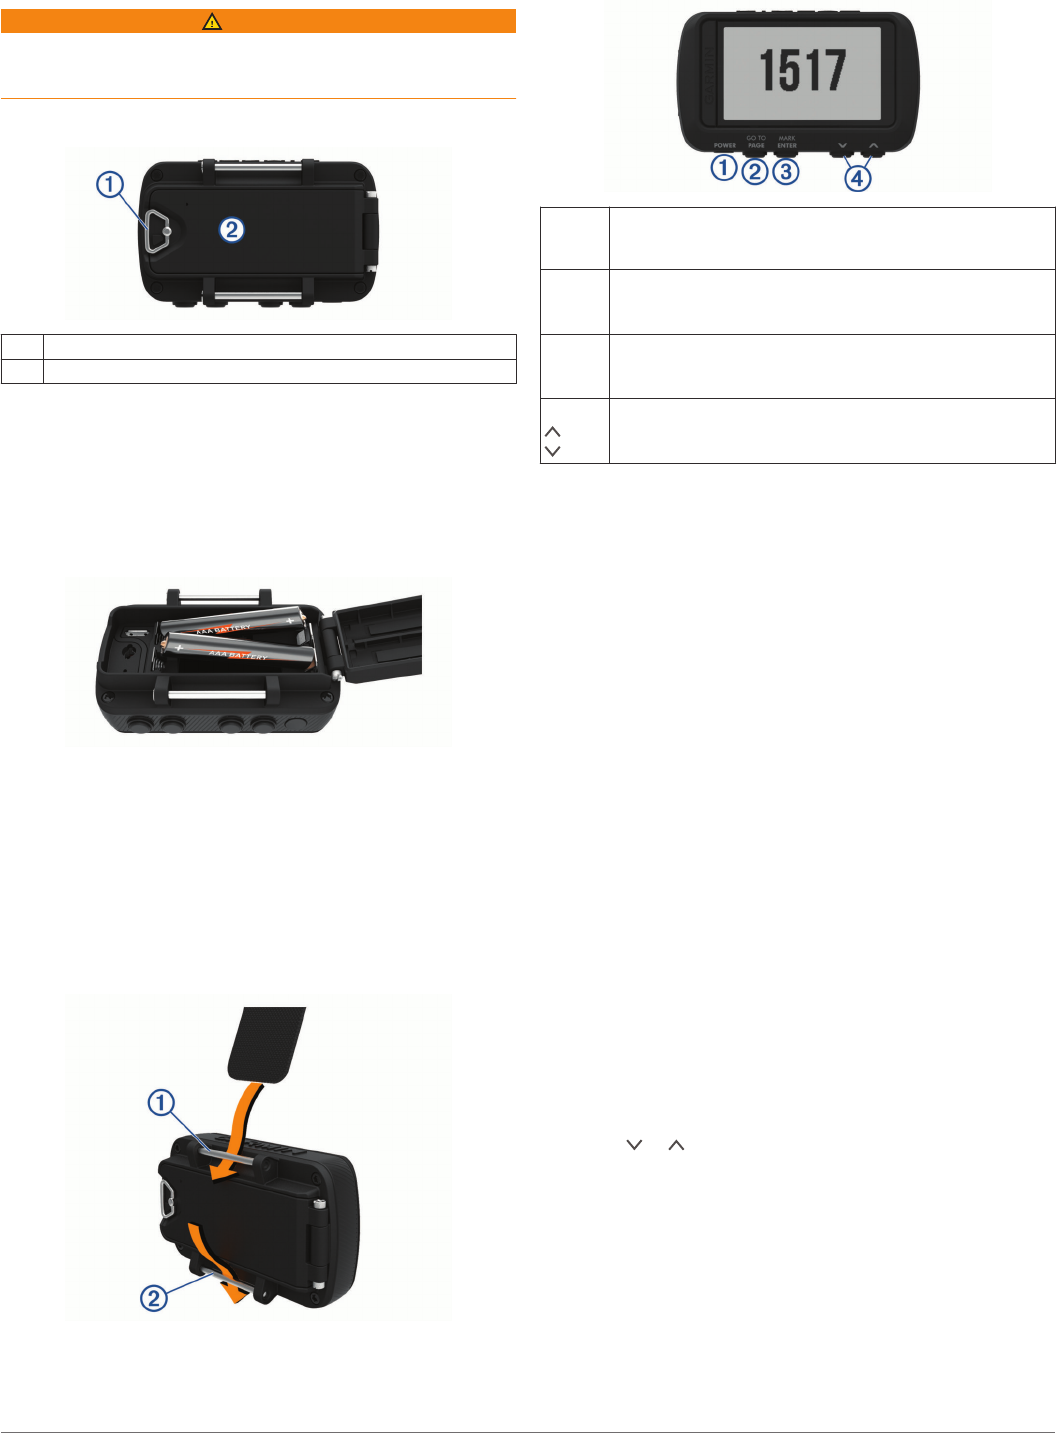
Device Overview
ÀBattery cover D-ring
ÁMicro-USB port (under battery cover)
Installing the Batteries
You can use alkaline, NiMH, or lithium AAA batteries. Use NiMH
or lithium batteries for best results.
1Loosen the fabric strap that covers the battery door.
2Turn the D-ring counter-clockwise, and pull up to open the
battery door.
3Insert two AAA batteries, observing polarity.
NOTE: You should verify the gasket and battery
compartment are free of debris.
4Close the battery door, and turn the D-ring clockwise.
Long-Term Storage
When you do not plan to use the device for several months,
remove the batteries. Stored data is not lost when batteries are
removed.
Attaching the Wrist Strap
1Insert the strap behind the pin À at the top of the device.
2Pull the strap length through to the end.
3Insert the strap behind the pin Á at the bottom of the device.
4If necessary, attach the strap extender to the wrist strap.
Keys
À
POWER
Hold to turn the device on and off, enter night vision mode,
and enter watch mode.
Select to turn the backlight on and off.
Á
PAGE
GOTO
Select to scroll through the main pages in sequence.
Hold to navigate to a waypoint.
Â
ENTER
MARK
Select to open the menu for the page.
Hold to mark a waypoint.
ÃSelect to scroll through menus and pages.
Select to zoom out or zoom in on the map page.
Turning On the Device
Hold POWER.
The first time you turn on the device, you will select the
device language.
Acquiring Satellite Signals
Before you can use GPS navigation features, you must acquire
satellite signals.
When you turn on your navigation device, the GPS receiver
must collect satellite data and establish the current location. The
time required to acquire satellite signals varies based on several
factors, including how far you are from the location where you
last used your navigation device, whether you have a clear view
of the sky, and how long it has been since you last used your
navigation device. The first time you turn on your navigation
device, it may take several minutes to acquire satellite signals.
1Turn on the device.
2Wait while the device locates satellites.
It may take 30 to 60 seconds to acquire satellite signals.
3If necessary, go to an open area, away from tall buildings and
trees.
Using the Backlight
1Select POWER.
The backlight turns on for 30 seconds.
2Select POWER to turn off the backlight.
Main Pages
You can select PAGE to scroll through the main pages. You can
select ENTER to open the settings menu for each page. You
can select or to scroll through menus and pages and zoom
in and out.
Map page: The map page shows your position and heading on
the map (Map Page, page 2).
As you travel, the position icon moves and leaves a track log
(trail). Waypoint names and symbols appear on the map. The
device automatically rotates the map as you move so that
waypoints always appear above your position.
Compass page: The compass page guides you to your
destination by displaying a compass and bearing pointer.
When navigating, the compass page displays the name of
the location, the distance to the final destination, the speed of
Introduction 1
travel, and a direction arrow in the compass ring. You can
follow the arrow to navigate.
Elevation page: The elevation page shows your elevation.
Trip computer: The trip computer displays your current speed,
average speed, maximum speed, trip odometer, and other
helpful statistics.
Menu page: The menu contains settings for waypoints, tracks,
and routes, as well as other setup options.
The menu page also displays the current time and date at the
top of the screen.
Applied Ballistics® page: This feature offers customized aiming
solutions for long-range shooting (Applied Ballistics,
page 2).
NOTE: This feature is available only on the Foretrex 701
device.
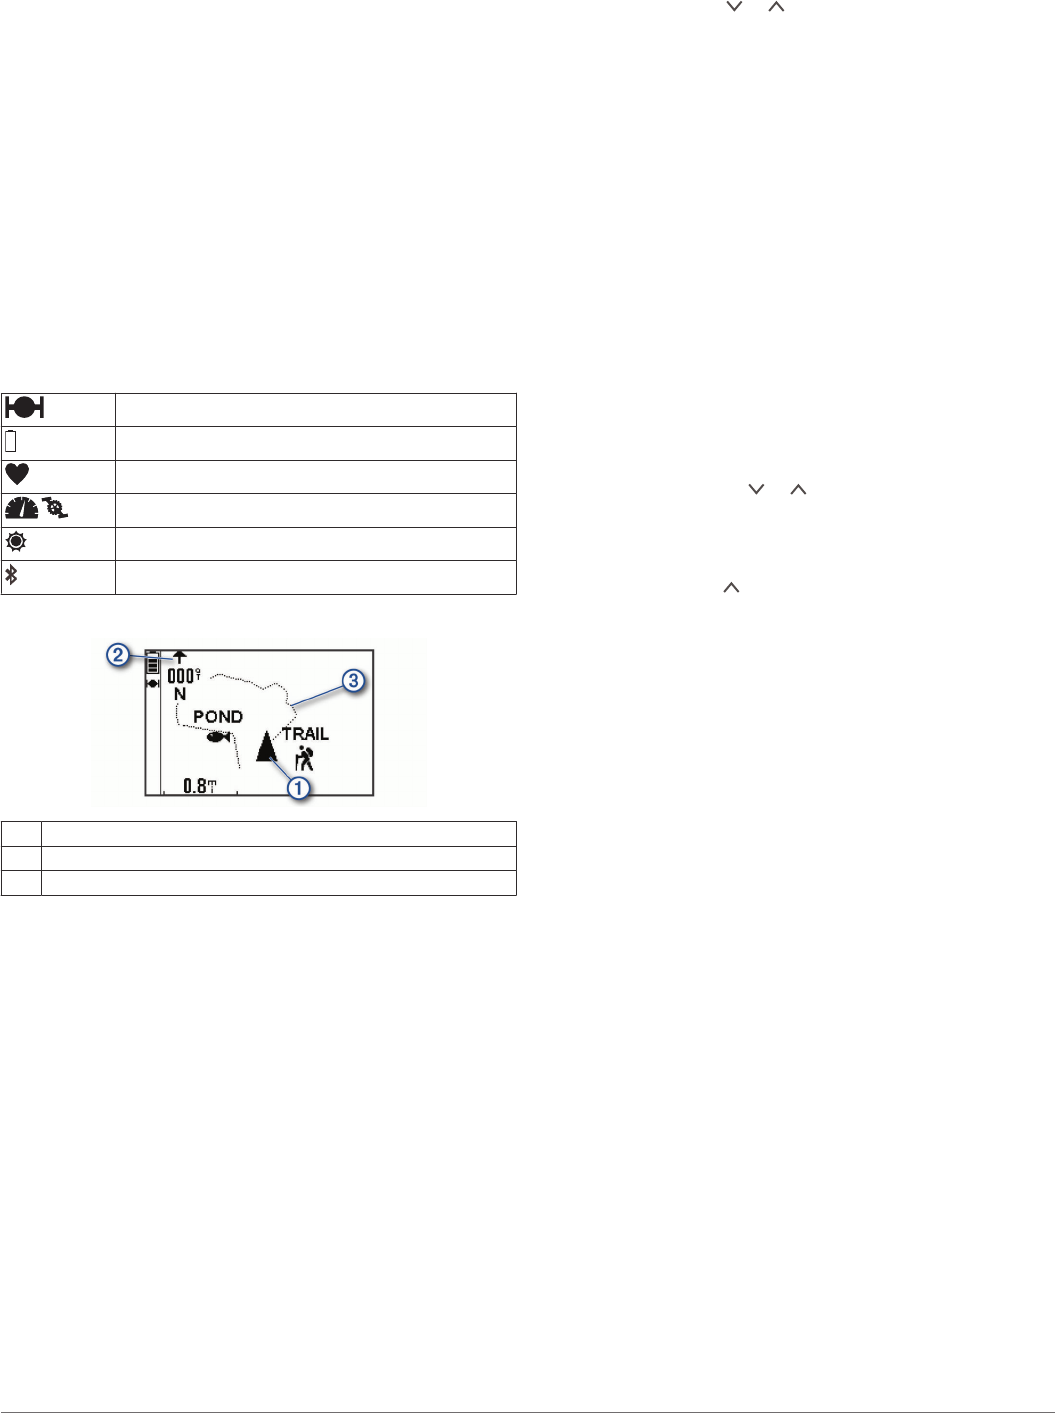
Status Icons
Status icons appear on the main pages. A flashing icon means
the device is searching for a signal. A solid icon means the
signal was found or the sensor is connected.
GPS status
Battery level
Heart rate monitor status
Speed and cadence sensor status
tempe™ sensor status
Bluetooth® technology status
Map Page
ÀDisplays your position on the map.
ÁDisplays the direction you are heading.
ÂDisplays your track log.
About the Compass
The electronic compass is similar to a magnetic compass when
you are stationary or walking. If you maintain a higher speed,
such as traveling in an automobile, the compass uses GPS
signals to determine your direction.
NOTE: When navigating, you should hold the compass level to
ensure maximum accuracy.
Applied Ballistics
NOTE: This feature is available only on the Foretrex 701 device.
The Applied Ballistics feature offers customized aiming solutions
for long-range shooting based on your rifle characteristics, bullet
caliber, and various environmental conditions. You can enter
parameters including wind, temperature, humidity, range, and
firing direction.
This feature provides the information you need to fire long-range
projectiles, including elevation holdover, windage, velocity, and
time of flight. It also includes custom drag models for your bullet
type. Go to appliedballisticsllc.com for more details about this
feature.
Quickly Editing Shooting Conditions
You can edit the range, direction of fire, and wind information.
1From the Applied Ballistics page, select ENTER > QUICK
EDIT.
TIP: You can select or to edit each value, and select
ENTER to move to the next field.
2Look directly into the wind to accurately set the DOF and
wind direction.
3Set the DOF using the compass value.
When you edit the DOF field, the wind direction updates
automatically. You can manually edit the wind direction if
needed.
4Set the wind direction to 12 O'CLOCK.
5Set the DOF to your actual direction of fire (either manually or
by using the compass).
The device automatically updates the wind direction based
on your new DOF.
6Select PAGE to save your settings.
Using the Countdown Timer
Before you can start the countdown timer, you must enable the
timer page (Device Settings, page 6), and set timer
preferences (Timer Settings, page 6).
1From the timer page, select ENTER to start the countdown
timer.
NOTE: You can select or to change the time interval.
2Select ENTER to stop the countdown timer.
NOTE: When the time reaches 00:00, you can select ENTER
to use the timer as a stopwatch and start counting up.
3If necessary, select to reset the countdown timer to the
original time interval.
VIRB® Remote
The VIRB remote function allows you to control your VIRB
action camera using your device. Go to www.garmin.com/VIRB
to purchase a VIRB action camera.
Controlling a VIRB Action Camera
Before you can use the VIRB remote function, you must enable
the remote setting on your VIRB camera. See the VIRB Series
Owner's Manual for more information.
1Turn on your VIRB camera.
2From the menu page on your Foretrex device, select
CONNECT > VIRB REMOTE PAGE > ON to enable the
remote control page.
3Select PAGE to scroll to the remote control page.
4Wait while the device connects to your VIRB camera.
5Select an option:
• To take a photo, select TAKE PHOTO.
• To record video, select START RECORDING.
The video counter appears on the Foretrex screen.
• To stop recording video, select STOP RECORDING.
Waypoints, Routes, and Tracks
Waypoints
Waypoints are locations you record and store in the device.
Waypoints can mark where you are, where you are going, or
where you have been. You can add details about the location,
such as name, elevation, and depth.
You can add a .gpx file that contains waypoints by transferring
the file to the GPX folder (Transferring Files to Your Device,
page 8).
2 Waypoints, Routes, and Tracks

Creating a Waypoint
You can save your current location as a waypoint.
1Hold MARK.
2If necessary, select or to change the symbol, elevation,
latitude, or longitude.
3Select OK?.
Navigating to a Waypoint
1Hold GOTO.
2Select a waypoint.
Stopping Navigation
From the map or compass page, select ENTER > STOP
NAVIGATION.
Measuring the Distance Between Two Waypoints
You can measure the distance between two locations.
1From the map page, select ENTER > MEASURE
DISTANCE.
2Select FROM:, and select a starting waypoint.
3Select TO:, and select an ending waypoint.
4Select ESTIMATED SPEED:.
5Select ENTER to select a digit.
6Select or to edit the speed.
7Select OK?.
The total distance between the two points and the estimated
travel time appear.
Editing a Waypoint
1From the menu page, select WAYPOINTS > LIST ALL.
2Select a waypoint.
3Select or to scroll through the symbol, elevation,
latitude, and longitude.
4Select ENTER to edit the symbol, elevation, latitude, or
longitude.
5Select an option:
• To change the symbol, select the waypoint symbol from
the list.
• To change the elevation, latitude, or longitude, follow the
on-screen instructions.
Projecting a Waypoint
You can create a new location by projecting the distance and
bearing from a marked location to a new location.
1From the menu page, select WAYPOINTS > LIST ALL.
2Select a waypoint.
3Select OPTIONS > PROJECT.
4Enter the distance.
5Enter the bearing.
6Select OK?.
Deleting a Waypoint
1From the menu page, select WAYPOINTS > LIST ALL.
2Select a waypoint.
3Select DELETE > YES.
Deleting All Waypoints
From the menu page, select SETUP > RESET > DELETE
ALL WAYPOINTS > YES.
Viewing Celestial Data and Almanacs
You can view daily almanac information for the sun and moon,
and hunting and fishing.
1From the menu page, select WAYPOINTS > LIST ALL.
2Select a waypoint.
3Select OPTIONS.
4Select an option:
• To view the predicted best dates and times for hunting
and fishing at your current location, select HUNT/FISH.
• To view the sunrise, sunset, moonrise, moonset, and
moon phase for a specific date, select SUN/MOON.
5If necessary, select ENTER to view a different day.
Viewing the Nearest Waypoints
You can view a list of waypoints nearest to your current location.
From the menu page, select WAYPOINTS > NEAREST.
Routes
A route is a sequence of waypoints or locations that leads you to
your final destination.
Creating and Navigating a Route
1From the menu page, select ROUTES > CREATE NEW.
2Select ENTER to view the list of saved waypoints.
3Select a waypoint to add to the route.
4Repeat steps 2 and 3 until the route is complete.
5Select FOLLOW.
6Select a starting point for navigation.
Navigation information appears.
Viewing Saved Routes
1From the menu page, select ROUTES > LIST ALL.
2Select a route.
Deleting All Routes
From the menu page, select ROUTES > DELETE ALL >
YES.
Tracks
A track is a recording of your path. The track log contains
information about points along the recorded path, including time,
location, and elevation for each point.
Recording a Track
The device records a track log automatically while you are
moving. You can save tracks and navigate to them at another
time.
1From the menu page, select TRACKS > SAVE TRACK.
2Select or to set a beginning point.
3Select ENTER.
4Select or to set an ending point.
5Select ENTER.
6If necessary, select ENTER to edit the track name.
Navigating a Saved Track
1From the menu page, select TRACKS > LIST SAVED.
2Select a track.
3Select NAVIGATE.
Using the Pan and TracBack® Feature
While navigating, you can use the TracBack feature to navigate
back to the beginning of your activity. This can be helpful when
finding your way back to camp or the trail head.
1From the menu page, select TRACKS > PAN &
TRACBACK.
2To pan the track log, select or .
3Select ENTER to veiw additional options.
Waypoints, Routes, and Tracks 3

4Select an option:
• To begin navigating the current track, select GO.
• To mark a waypoint, select MARK.
• To zoom in and out using or , select ZOOM.
• To navigate back to the beginning of your activity, select
TRACBACK.
Viewing Track Details
1From the menu page, select TRACKS > LIST SAVED.
2Select a track.
3Select an option.
• To view the track on the map, select SHOW MAP.
• To view an elevation plot of the track, select ELEVATION.
Editing the Name of a Track
1From the menu page, select TRACKS > LIST SAVED.
2Select a track.
3Select RENAME.
Clearing the Active Track
From the menu page, select TRACKS > CLEAR TRACK >
YES.
Deleting a Track
1From the menu page, select TRACKS > LIST SAVED.
2Select a track.
3Select DELETE > YES.
Deleting All Tracks
From the menu page, select TRACKS > DELETE ALL
SAVED > YES.
Customizing Your Device
Adjusting the Backlight Timeout
You can decrease the backlight timeout to maximize the battery
life.
1From the menu page, select SETUP > DISPLAY > LIGHT
TIMEOUT.
2Select or to adjust the length of time before the
backlight turns off.
Map Settings
From the map page, select ENTER.
PAN TRACK LOG: Allows you to use or to pan the track
log and view additional options. From the track log page, you
can select ENTER to go to a waypoint, mark a waypoint, or
zoom in and out.
CLEAR TRACK LOG: Deletes the recorded track log.
MEASURE DISTANCE: Allows you to measure the distance
between two waypoints (Measuring the Distance Between
Two Waypoints, page 3).
MAP DETAIL: Sets map preferences (Map Detail Settings,
page 4).
HIDE STATUS INFO: Allows you to hide and show the status
icons on the map page, such as battery level and GPS
status.
Map Detail Settings
From the map page, select ENTER > MAP DETAIL.
MAP ORIENTATION: Adjusts how the map is shown on the
page. The NORTH UP option shows north at the top of the
page. The TRACK UP option shows your current direction of
travel toward the top of the page.
ACTIVE TRACK: Shows or hides the active track on the map.
WAYPOINTS: Shows or hides waypoints on the map.
Compass Settings
From the compass page, select ENTER.
CALIBRATE COMPASS: Calibrates the electronic compass
(Calibrating the Compass, page 4).
CHANGE FIELDS: Allows you to customize the data fields on
the compass page (Customizing the Data Fields, page 4).
Calibrating the Compass
The device has a 3-axis electronic compass. You should
calibrate the compass after moving long distances, experiencing
temperature changes, or changing the batteries.
1From the compass page, select ENTER > CALIBRATE
COMPASS > START.
2Follow the on-screen instructions.
Customizing the Data Fields
You can customize the data fields displayed on the compass,
trip computer, and Applied Ballistics pages.
1Select a page with data fields.
2Select ENTER > CHANGE FIELDS.
3Select the data field to replace.
4Select the new data field.
Elevation Settings
From the elevation page, select ENTER.
PLOT OVER TIME: Allows you to view elevation changes over a
period of time.
PLOT OVER DIST: Allows you to view elevation changes over a
distance.
ZOOM ELEVATION: Allows you to change the elevation scale.
VIEW POINTS: Enables data points on the elevation page.
Calibrating the Barometric Altimeter
You can manually calibrate the barometric altimeter if you know
the correct elevation or the correct barometric pressure.
1Go to a location where the elevation or barometric pressure
is known.
2From the menu page, select SETUP > ALTIMETER >
CALIBRATE ALTIMETER.
3Follow the on-screen instructions.
Trip Computer Settings
From the trip computer page, select ENTER.
CHANGE FIELDS: Allows you to customize the data fields on
the trip computer page (Customizing the Data Fields,
page 4).
RESET TRIP DATA: Resets the trip and elevation data
(Resetting the Trip Computer, page 4).
Resetting the Trip Computer
For accurate information, reset the trip and elevation information
before beginning a trip.
From the menu page, select SETUP > RESET > RESET
TRIP DATA > YES.
Applied Ballistics Settings
NOTE: This feature is available only on the Foretrex 701 device.
From the Applied Ballistics page, select ENTER.
RANGE CARD: Allows you to view elevation and windage for
various ranges based on user input parameters. You can
change fields (Customizing the Range Card Fields,
page 5), edit the range increment (Editing the Range
4 Customizing Your Device

Increment, page 5), and set the base range (Setting the
Base Range, page 5).
QUICK EDIT: Allows you to quickly edit the range, direction of
fire, and wind information (Quickly Editing Shooting
Conditions, page 2).
NOTE: When you change the direction of fire, the wind
direction updates automatically. The wind direction can be
edited independently of the direction of fire.
ENVIRONMENT: Allows you to customize atmospheric
conditions for your current environment. You can enter
custom values, use the pressure value from the internal
sensor in the device, or use the temperature value from a
connected tempe sensor.
TARGET: Allows you to customize long-range shooting
conditions for your current target. You can change the
selected target, and customize conditions for up to ten
targets (Changing the Target, page 5).
PROFILE: Allows you to customize gun (Editing Gun Properties,
page 5) and bullet properties (Editing Bullet Properties,
page 5) for your current profile. You can change the
selected profile (Changing the Profile, page 5) and add
additional profiles (Adding a Profile, page 5).
CHANGE FIELDS: Allows you to customize the data fields on
the Applied Ballistics page (Customizing the Data Fields,
page 4).
SETUP: Allows you to select the output and input units of
measure for the Applied Ballistics page.
Customizing the Range Card Fields
1From the Applied Ballistics page, select ENTER > RANGE
CARD > ENTER > CHANGE FIELDS.
2Select or to scroll through the available fields.
3Select ENTER to save your selection and move to the next
field.
4Select PAGE to save your changes.
Editing the Range Increment
1From the Applied Ballistics page, select ENTER > RANGE
CARD > ENTER > RANGE INCREMENT.
2Follow the on-screen instructions.
Setting the Base Range
1From the Applied Ballistics page, select ENTER > RANGE
CARD > ENTER > BASE RANGE.
2Follow the on-screen instructions.
Changing the Target
1From the Applied Ballistics page, select ENTER > TARGET >
TARGET > CHANGE TARGET.
2Select a target.
The long-range shooting conditions for the selected target
appear.
Editing the Name of a Target
From the Applied Ballistics page, select ENTER > TARGET >
TARGET > EDIT NAME.
Changing the Profile
1From the Applied Ballistics page, select ENTER > PROFILE
> PROFILE.
2Select a profile.
3Select CHANGE PROFILE.
The gun and bullet properties for the selected profile appear.
Adding a Profile
You can add a .pro file that contains profile information by
transferring the file to the AB folder on the device (Transferring
Files to Your Device, page 8).
1From the Applied Ballistics page, select ENTER > PROFILE
> PROFILE > + PROFILE.
2Select an option:
• To customize the bullet properties, select BULLET
PROPERTIES (Editing Bullet Properties, page 5).
• To customize the gun properties, select GUN
PROPERTIES (Editing Gun Properties, page 5).
Editing the Name of a Profile
1From the Applied Ballistics page, select ENTER > PROFILE
> PROFILE.
2Select a profile.
3Select EDIT NAME.
Editing Bullet Properties
1From the Applied Ballistics page, select ENTER > PROFILE
> BULLET PROPERTIES.
2Select an option:
• To automatically enter bullet properties from the Applied
Ballistics bullet database, select BULLET DATABASE,
and select the bullet caliber, manufacturer, bullet, and
drag curve from the available options.
NOTE: You can select the caliber of your bullet to search
a list of bullets within that caliber. Not all bullet names
match the actual bullet caliber. For example, a 300 Win
Mag is a .308 caliber bullet.
• To manually enter bullet properties if your bullet is not in
the bullet database, select or to scroll through each
field, and select ENTER to edit the values.
NOTE: You can find this information on your bullet
manufacturer's website.
Editing Gun Properties
1From the Applied Ballistics page, select ENTER > PROFILE
> GUN PROPERTIES.
2Select or to scroll through each field, and select ENTER
to edit the values.
3Select an option:
• To calibrate the muzzle velocity, select CALIBRATE
MUZZLE VELOCITY, enter the range and true drop, and
select USE.
NOTE: Garmin® recommends you calibrate the muzzle
velocity prior to the drop scale factor. Calibrating the
muzzle velocity provides a more accurate solution in the
supersonic range for your specific firearm.
• To calibrate the drop scale factor, select CALIBRATE
DSF, enter the range and true drop, and select USE.
NOTE: Calibrating the drop scale factor provides a more
accurate solution in the transonic range for your specific
firearm.
The drop scale factor table is populated after calibrating the
muzzle velocity and drop scale factor.
4Select VIEW DSF TABLE to review the drop scale factor
table based on Mach speeds and calibrated drop scale factor
values.
5Select MV-TEMP TABLE to review muzzle velocity
adjustments based on the ambient temperature.
Clearing the Drop Scale Factor Table
The drop scale factor table is populated after you calibrate the
muzzle velocity and drop scale factor. If necessary, you can
reset the table values to zero.
From the Applied Ballistics page, select ENTER > PROFILE
> GUN PROPERTIES > VIEW DSF TABLE > ENTER >
CLEAR DSF TABLE.
Customizing Your Device 5

Editing the Muzzle Velocity and Temperature Table
1From the Applied Ballistics page, select ENTER > PROFILE
> GUN PROPERTIES > MV-TEMP TABLE > ENTER >
EDIT.
2Select or to scroll through each field.
3Select ENTER to edit the values.
Clearing the Muzzle Velocity and Temperature Table
The muzzle velocity and temperature table is populated after
you calibrate the muzzle velocity and drop scale factor. If
necessary, you can reset the table values to zero.
From the Applied Ballistics page, select ENTER > PROFILE
> GUN PROPERTIES > MV-TEMP TABLE > ENTER >
CLEAR MV-TEMP.
Deleting a Profile
1From the Applied Ballistics page, select ENTER > PROFILE
> PROFILE.
2Select a profile.
3Select DELETE PROFILE.
Menu Page Options
WAYPOINTS: Allows you to create a new waypoint, list all
waypoints, or view the nearest waypoint to your location.
TRACKS: Allows you to manage your saved tracks.
ROUTES: Allows you to create a new route, list all routes, and
delete all routes.
SETUP: Allows you to customize the device (Device Settings,
page 6).
CONNECT: Allows you to connect to compatible Garmin devices
and ANT+® sensors (Optional Fitness Accessories,
page 7).
PHONE: Allows you to pair a smartphone with your device
(Pairing a Smartphone with Your Device, page 7).
GPS: Displays the satellite signal strength or the satellite sky
view (Viewing Satellites, page 8).
JUMPMASTER: Allows you to select the jump type
(Jumpmaster, page 7).
Device Settings
From the menu page, select SETUP.
APPLIED BALLISTICS: Allows you to customize the
atmospheric conditions for your environment, shooting
conditions for your target, gun and bullet properties for your
profile, and the output and input units of measure for the
Applied Ballistics page (Applied Ballistics Settings, page 4).
NOTE: This feature is available only on the Foretrex 701
device.
TIME: Sets the device to display time in a 12-hour, 24-hour, or
military format, and sets the time zone for the device. You
can use the AUTOMATIC option to set the time zone
automatically based on your GPS position.
TIMER: Enables the timer page and allows you to set timer
preferences (Timer Settings, page 6).
DISPLAY: Adjusts the backlight timeout and display contrast.
UNITS: Sets the position format, map datum, and units of
measure used on the device.
HEADING: Sets the compass display setting and north
reference, and allows you to manually calibrate the compass
(Calibrating the Compass, page 4). You can use the AUTO
option to automatically calibrate the compass. You can use
the OFF option to turn off the compass.
SYSTEM: Sets system preferences (System Settings,
page 6).
TRACKS: Sets track preferences (Tracks Settings, page 6).
ROUTES: Allows you to select AUTO or DISTANCE for route
leg transition.
MAP: Sets map preferences (Map Settings, page 6).
ALTIMETER: Enables auto calibration, and allows you to
manually calibrate the altimeter (Calibrating the Barometric
Altimeter, page 4).
RESET: Allows you to reset trip data (Resetting the Trip
Computer, page 4), delete all waypoints (Deleting All
Waypoints, page 3), and restore the device to factory default
settings (Restoring All Default Settings, page 9).
ABOUT FORETREX: Allows you to view device information,
such as the unit ID, software version, regulatory information,
and license agreement (Viewing Device Information,
page 8).
Timer Settings
From the menu page, select SETUP > TIMER.
SHOW TIMER PAGE?: Enables the timer page.
COUNT DOWN FROM:: Sets the time increment for the
countdown timer. You can use the COUNT UP setting to use
the timer as a stopwatch.
WHEN EXPIRED:: Sets the timer to stop, count up, or repeat
when the time expires.
EXPIRED TONE:: Sets the audible alert that sounds when the
time expires.
INTERVAL TONE:: Sets the audible alert that sounds when the
interval time expires.
System Settings
From the menu page, select SETUP > SYSTEM.
GPS MODE: Sets the satellite system to GPS, GPS +
GLONASS, GPS + GALILEO, ULTRATRAC, or DEMO (GPS
off). Using the ULTRATRAC option records track points and
sensor data less frequently.
WAAS: Enables the system to use Wide Area Augmentation
System/European Geostationary Navigation Overlay Service
(WAAS/EGNOS) data.
BEEPER: Enables the beeper to sound for key tones and
messages or messages only.
BATTERY: Allows you to change the type of AAA battery you
are using.
LANGUAGE: Sets the text language on the device.
SPANNER: Allows you to use the device USB port with most
NMEA 0183-compliant mapping programs by creating a
virtual serial port.
OWNER INFO: Allows you to enter owner information, such as
your name, and set it to appear when the device turns on.
Tracks Settings
From the menu page, select SETUP > TRACKS.
RECORDING: Enables track recording.
RECORD INTERVAL: Sets the track log recording method and
rate. Use the DISTANCE option to enter the distance
between recorded track points. Use the TIME option to enter
the time between recorded track points. Use the AUTO
option to automatically record track points based on the
selected resolution level. A higher resolution records points
more frequently and creates a more detailed track, but fills
the track log faster.
WRAP WHEN FULL: Indicates whether track points are
overwritten when the device memory is full.
Map Settings
From the menu page, select SETUP > MAP.
MAP ORIENTATION: Adjusts how the map is shown on the
page. The NORTH UP option shows north at the top of the
6 Customizing Your Device

page. The TRACK UP option shows your current direction of
travel toward the top of the page.
AUTO ZOOM: Automatically sets the zoom level for optimal use
of your map. When turned off, you must zoom in or out
manually.
GO TO LINE: Allows you to select BEARING or COURSE.
Jumpmaster
WARNING
The jumpmaster feature is for use by experienced skydivers
only. The jumpmaster feature should not be used as a primary
skydiving altimeter. Failure to input the appropriate jump related
information can lead to serious personal injury or death.
The jumpmaster feature follows military guidelines for
calculating the high altitude release point (HARP). The device
detects automatically when you have jumped to begin navigating
toward the desired impact point (DIP) using the barometer and
electronic compass.
Jump Types
The jumpmaster feature allows you to set the jump type to one
of three types: HAHO, HALO, or Static. The jump type selected
determines what additional setup information is required. For all
jump types, drop altitudes and opening altitudes are measured
in feet above ground level (AGL).
HAHO: High Altitude High Opening. The jumpmaster jumps from
a very high altitude and opens the parachute at a high
altitude. You must set a DIP and a drop altitude of at least
1,000 feet. The drop altitude is assumed to be the same as
the opening altitude. Common values for a drop altitude
range from 12,000 to 24,000 feet AGL.
HALO: High Altitude Low Opening. The jumpmaster jumps from
a very high altitude and opens the parachute at a low altitude.
The required information is the same as the HAHO jump
type, plus an opening altitude. The opening altitude must not
be greater than the drop altitude. Common values for an
opening altitude range from 2,000 to 6,000 feet AGL.
STATIC: The wind speed and direction are assumed to be
constant for the duration of the jump. The drop altitude must
be at least 1,000 feet.
Connected Features
Connected features are available for your Foretrex device when
you connect the device to a compatible smartphone using
Bluetooth wireless technology. Some features require you to
install the Garmin Connect™ Mobile app on the connected
smartphone. Go to www.garmin.com/apps for more information.
Phone notifications: Displays phone notifications and
messages on your Foretrex device.
Software Updates: Allows you to update your device software.
Pairing a Smartphone with Your Device
To use the connected features of the Foretrex device, it must be
paired directly through the Garmin Connect Mobile app, instead
of from the Bluetooth settings on your smartphone.
1Bring your compatible smartphone within 10 m (33 ft.) of your
device.
2From the menu page on your device, select PHONE > PAIR
PHONE.
3From the app store on your smartphone, install and open the
Garmin Connect Mobile app.
4Follow the instructions in the app to complete the pairing
process.
Optional Fitness Accessories
You can use optional fitness accessories including a heart rate
monitor or a cadence sensor with your device. These
accessories use ANT+ wireless technology to send data to the
device.
Before you can use the fitness accessory with your device, you
must install the accessory according to the instructions included
with the accessory.
Pairing Your ANT+ Sensors
Before you can pair, you must put on the heart rate monitor or
install the sensor.
Pairing is the connecting of ANT+ wireless sensors, for example,
connecting a heart rate monitor with your device.
1Bring the device within 3 m (10 ft.) of the sensor.
NOTE: Stay 10 m (30 ft.) away from other ANT+ sensors
while pairing.
2From the menu page, select CONNECT.
3Select your sensor.
4Select SEARCH FOR NEW.
When the sensor is paired with your device, the sensor status
changes from SEARCHING to CONNECTED.
Tips for Pairing ANT+ Accessories with Your
Garmin Device
• Verify that the ANT+ accessory is compatible with your
Garmin device.
• Before you pair the ANT+ accessory with your Garmin
device, move 10 m (32.9 ft.) away from other ANT+
accessories.
• Bring the Garmin device within range 3 m (10 ft.) of the ANT+
accessory.
• After you pair the first time, your Garmin device automatically
recognizes the ANT+ accessory each time it is activated. This
process occurs automatically when you turn on the Garmin
device and only takes a few seconds when the accessories
are activated and functioning correctly.
• When paired, your Garmin device receives data from only
your accessory, and you can go near other accessories.
tempe
The tempe is an ANT+ wireless temperature sensor. You can
attach the sensor to a secure strap or loop where it is exposed
to ambient air, and therefore, provides a consistent source of
accurate temperature data. You must pair the tempe with your
device to display temperature data from the tempe.
Device Information
Specifications
Battery type Two 1.5 volt AAA batteries (alkaline, NiMH,
or lithium)
Battery life 48 hrs.
Water rating IEC 60529 IPX7*
Operating temperature
range
From -20° to 70°C (from -4° to 158°F)
Wireless frequencies/
protocols
ANT+ 2.4 GHz @ 3 dBm nominal
Bluetooth 2.4 GHz @ 3 dBm nominal
*The device withstands incidental exposure to water of up to 1 m
for up to 30 min. For more information, go to www.garmin.com
/waterrating.
Connected Features 7
Viewing Device Information
You can view the unit ID, software information, and regulatory
information.
1From the menu page, select SETUP > ABOUT FORETREX.
2Select .
Viewing Satellites
The satellite page shows your current location, GPS accuracy,
satellite locations, and signal strength. For more information
about GPS, go to www.garmin.com/aboutGPS.
1From the menu page, select GPS.
The bars represent the strength of each satellite signal
received (the number of satellites appears below each bar).
White bars indicate that the device is still collecting data.
Solid bars indicate the device has acquired satellite signals.
2Select ENTER to switch to sky view.
The location of the satellites from which you are receiving a
signal appears.
Device Care
NOTICE
Before you attempt to replace the battery, carefully read the
instructions in the owner's manual.
Avoid extreme shock and harsh treatment, because it can
degrade the life of the product.
Thoroughly rinse the device with fresh water after exposure to
chlorine, salt water, sunscreen, cosmetics, alcohol, or other
harsh chemicals. Prolonged exposure to these substances can
damage the case.
Do not use a sharp object to clean the device.
Avoid chemical cleaners, solvents, and insect repellents that can
damage plastic components and finishes.
Always wipe the device dry after cleaning or use, and store it in
a cool, dry place.
Do not store the device where prolonged exposure to extreme
temperatures can occur, because it can cause permanent
damage.
Cleaning the Device
1Wipe the device using a cloth dampened with a mild
detergent solution.
2Wipe it dry.
After cleaning, allow the device to dry completely.
TIP: For more information, go to www.garmin.com/fitandcare.
Data Management
NOTE: The device is not compatible with Windows® 95, 98, Me,
Windows NT®, and Mac® OS 10.3 and earlier.
Connecting the Device to Your Computer
You can use the Foretrex device as a USB mass storage device
by connecting it to your computer with a USB cable.
1Turn the D-ring counter-clockwise, and pull up to open the
rear cover.
2Plug the small end of the USB cable into the USB port on the
device.
3Plug the large end of the USB cable into a computer USB
port.
4Select YES to enter mass storage mode.
Your device appears as a removable drive in My Computer
on Windows computers and as a mounted volume on Mac
computers.
Transferring Files to Your Device
1Connect the device to your computer.
On Windows computers, the device appears as a removable
drive or a portable device. On Mac computers, the device
appears as a mounted volume.
NOTE: Some computers with multiple network drives may not
display device drives properly. See your operating system
documentation to learn how to map the drive.
2On your computer, open the file browser.
3Select a file.
4Select Edit > Copy.
5Open the portable device, drive, or volume for the device.
6Browse to a folder.
7Select Edit > Paste.
The file appears in the list of files in the device memory.
Deleting Files
NOTICE
If you do not know the purpose of a file, do not delete it. Your
device memory contains important system files that should not
be deleted.
1Open the Garmin drive or volume.
2If necessary, open a folder or volume.
3Select a file.
4Press the Delete key on your keyboard.
NOTE: If you are using an Apple® computer, you must empty
the Trash folder to completely remove the files.
Disconnecting the USB Cable
If your device is connected to your computer as a removable
drive or volume, you must safely disconnect your device from
your computer to avoid data loss. If your device is connected to
your Windows computer as a portable device, it is not necessary
to safely disconnect the device.
1Complete an action:
• For Windows computers, select the Safely Remove
Hardware icon in the system tray, and select your device.
• For Apple computers, select the device, and select File >
Eject.
2Disconnect the cable from your computer.
Receiving Data Wirelessly
Before you can receive data wirelessly, you must be within 3 m
(10 ft.) of a compatible Garmin device.
Your device can receive waypoints and routes when connected
with a compatible Garmin device.
From the menu page, select CONNECT > RECEIVE
WIRELESSLY.
When a compatible Garmin device is found, the status
changes from CONNECTING to RECEIVING DATA. When
data is received, the status changes to TRANSFER
COMPLETE.
Sending a Route Wirelessly
Before you can send a route wirelessly, you must be within 3 m
(10 ft.) of a compatible Garmin device.
1From the menu page, select ROUTES > LIST ALL.
2Select a route.
3Select SEND.
Sending a Waypoint Wirelessly
Before you can send a waypoint wirelessly, you must be within
3 m (10 ft.) of a compatible Garmin device.
1From the menu page, select WAYPOINTS > LIST ALL.
8 Device Information

2Select a waypoint.
3Select OPTIONS > SEND.
Troubleshooting
Product Updates
On your computer, install Garmin Express™ (www.garmin.com
/express). On your smartphone, install the Garmin Connect
Mobile app.
This provides easy access to these services for Garmin devices:
• Software updates
• Data uploads to Garmin Connect
• Product registration
Setting Up Garmin Express
1Connect the device to your computer using a USB cable.
2Go to www.garmin.com/express.
3Follow the on-screen instructions.
Improving GPS Satellite Reception
• Frequently sync the device to your Garmin Connect account:
◦ Connect your device to a computer using the USB cable
and the Garmin Express application.
◦ Sync your device to the Garmin Connect Mobile app using
your Bluetooth enabled smartphone.
While connected to your Garmin Connect account, the device
downloads several days of satellite data, allowing it to quickly
locate satellite signals.
• Take your device outside to an open area away from tall
buildings and trees.
• Remain stationary for a few minutes.
Maximizing Battery Life
You can do several things to extend the life of the batteries.
• Use premium batteries.
• Reduce the backlight timeout (Device Settings, page 6).
• Turn off the beeper (System Settings, page 6).
• Turn off the compass when not in use (Device Settings,
page 6).
My device is in the wrong language
You can change the device language selection if you have
accidently selected the wrong language on the device.
1From the menu page, select three times.
2Select ENTER.
3Select five times.
4Select ENTER.
5Select four times.
6Select ENTER.
7Select your language.
Resetting the Device
You can reset the device if it stops responding. This does not
erase any of your data or settings.
Hold POWER for 10 seconds.
Restoring All Default Settings
You can reset all settings back to the factory default settings.
From the menu page, select SETUP > RESET > RESTORE
DEFAULTS > YES.
Appendix
Data Fields
AMB PRESS: The uncalibrated ambient pressure.
AVG ASCENT: The average vertical distance of ascent since
the last reset.
AVG DESCNT: The average vertical distance of descent since
the last reset.
BAROMETER: The calibrated current pressure.
BEARING: The direction from your current location to a
destination. You must be navigating for this data to appear.
CADENCE: Cycling. The number of revolutions of the crank
arm. Your device must be connected to a cadence accessory
for this data to appear.
COURSE: The direction from your starting location to a
destination. Course can be viewed as a planned or set route.
You must be navigating for this data to appear.
ELEVATION: The altitude of your current location above or
below sea level.
FINAL DEST: The last point on the route or course.
FINAL DIST: The remaining distance to the final destination.
You must be navigating for this data to appear.
FINAL ETA: The estimated time of day when you will reach the
final destination (adjusted to the local time of the destination).
You must be navigating for this data to appear.
FINAL ETE: The estimated time remaining until you reach the
final destination. You must be navigating for this data to
appear.
GLIDE RATIO: The ratio of horizontal distance traveled to the
change in vertical distance.
GR DEST: The glide ratio required to descend from your current
position to the destination elevation. You must be navigating
for this data to appear.
HEADING: The direction you are moving.
HEART RATE: Your heart rate in beats per minute (bpm). Your
device must be connected to a compatible heart rate monitor.
MAX ASCENT: The maximum rate of ascent in feet per minute
or meters per minute since the last reset.
MAX DESCNT: The maximum rate of descent in meters per
minute or feet per minute since the last reset.
MAX ELEVTN: The highest elevation reached since the last
reset.
MAX SPEED: The highest speed reached since the last reset.
MAX TEMPE: The maximum temperature recorded in the last
24 hours from a compatible temperature sensor.
MIN ELEVTN: The lowest elevation reached since the last reset.
MIN TEMPE: The minimum temperature recorded in the last
24 hours from a compatible temperature sensor.
MOV'N AVG: The average speed while moving for the current
activity.
MOV'N TIME: The total time moving for the current activity.
NEXT DEST: The next point on the route. You must be
navigating for this data to appear.
NEXT DIST: The remaining distance to the next waypoint on the
route. You must be navigating for this data to appear.
NEXT ETA: The estimated time of day when you will reach the
next waypoint on the route (adjusted to the local time of the
waypoint). You must be navigating for this data to appear.
NEXT ETE: The estimated time remaining until you reach the
next point in your route. You must be navigating for this data
to appear.
Troubleshooting 9

ODOMETER: A running tally of the distance traveled for all trips.
This total does not clear when resetting the trip data.
OFF COURSE: The distance to the left or right by which you
have strayed from the original path of travel. You must be
navigating for this data to appear.
OVER'L SPD: The average speed for the current activity,
including both moving and stopped speeds.
SPEED: The current rate of travel.
STOP TIME: A running tally of the time spent not moving since
the last reset.
SUNRISE: The time of sunrise based on your GPS position.
SUNSET: The time of sunset based on your GPS position.
TEMPERATURE: The temperature of the air. Your body
temperature affects the temperature sensor. Your device
must be connected to a tempe sensor for this data to appear.
TIME: The time of day based on your current location and time
settings (format, time zone, daylight saving time).
TO COURSE: The direction in which you must move to get back
on the route. You must be navigating for this data to appear.
TOTAL TIME: A running tally of the total time spent moving and
not moving since the last reset.
TOT ASCENT: The total elevation distance ascended during the
activity or since the last reset.
TOT DESCNT: The total elevation distance descended during
the activity or since the last reset.
TRIP ODOM: A running tally of the distance traveled since the
last reset.
TURN: The angle of difference (in degrees) between the bearing
to your destination and your current course. L means turn
left. R means turn right. You must be navigating for this data
to appear.
VERT SPEED: The rate of ascent or descent over time.
VMG: The speed at which you are making progress into the
wind.
VSPD DEST: The rate of ascent or descent to a predetermined
altitude. You must be navigating for this data to appear.
Applied Ballistics Glossary of Terms
NOTE: The Applied Ballistics feature is available only on the
Foretrex 701 device.
Shooting Solution Fields
DOF: The direction of fire, with north at 0° and east at 90°. Input
field.
TIP: You can use the compass to set this value by pointing
the top of the device toward the direction of fire. The current
compass value appears in the DOF field. You can select
ENTER to use this value. You can manually enter a value by
selecting or .
NOTE: The DOF is used only for calculating the Coriolis
effect. If shooting at a target less than 1,000 yards away, this
input field is optional.
ELEVATION: The vertical portion of the aiming solution,
displayed in MIL (milliradian) or MOA (minute of angle).
RNG: The distance to the target, displayed in YDS (yards) or M
(meters). Input field.
W 1/2: The wind speed 1, wind speed 2, and wind direction. For
example, if the wind direction is 9 O'CLOCK, the wind is
blowing left to right as viewed by the shooter. Input field.
NOTE: The wind speed 2 field is optional. Using both wind
speed 1 and wind speed 2 is not an effective way to account
for different wind speeds at different distances between you
and the target. Using these fields is a way to bracket the wind
values and calculate minimum and maximum windage values
for the solution.
WINDAGE 1: The horizontal portion of the aiming solution
based on the wind speed 1 and wind direction, displayed in
MIL (milliradian) or MOA (minute of angle).
WINDAGE 2: The horizontal portion of the aiming solution
based on the wind speed 2 and wind direction, displayed in
MIL (milliradian) or MOA (minute of angle).
Additional Output Fields
AERO JUMP: The amount of the elevation solution attributed to
aerodynamic jump. Aerodynamic jump is the vertical
deflection of the bullet due to a crosswind.
COS INCL: The cosine of the inclination angle to target.
DROP: The total drop the bullet experiences along its flight path.
H COR EFFECT: The horizontal Coriolis effect. The horizontal
Coriolis effect is the amount of the windage solution
attributed to the Coriolis effect. This is always calculated by
the device, though the impact may be minimal if not shooting
at extended range.
LEAD: The horizontal correction needed to hit a target moving
left or right at a given speed.
TIP: When you enter the speed of your target, the device
factors the necessary windage required into the total windage
value on the Applied Ballistics page.
MAX ORD: The maximum ordinance. The maximum ordinance
is the maximum height above the axis of the barrel that a
bullet will reach along its flight path.
MAX ORD RNG: The range at which the bullet will reach its
maximum ordinance.
REM ENERGY: The remaining energy of the bullet at target
impact, displayed in foot-pounds (ft. lbf) of force or joules.
SPIN DRIFT: The amount of the windage solution attributed to
the spin drift (gyroscopic drift). For example, in the northern
hemisphere, a bullet shot out of a right-hand twist barrel will
always deflect slightly to the right as it travels.
TOF: The time of flight, which indicates the time required for a
bullet to reach its target at a given range.
V COR EFFECT: The vertical Coriolis effect. The vertical
Coriolis effect is the amount of the elevation solution
attributed to the Coriolis effect. This is always calculated by
the device, though the impact may be minimal if not shooting
at extended range.
VEL MACH: The estimated velocity of the bullet when it impacts
the target, displayed as a factor of mach speed.
VELOCITY: The estimated velocity of the bullet when it impacts
the target.
Environment Fields
AMB/STN PRESSURE: The ambient pressure (or station
pressure). Ambient pressure is not adjusted to represent sea
level (barometric) pressure. Ambient pressure is required for
the ballistics shooting solution. Input field.
TIP: You can manually enter this value, or you can select the
USE CURRENT PRESSURE option to use the pressure
value from the internal sensor in the device.
HUMIDITY: The percentage of moisture in the air. Input field.
LATITUDE: The horizontal location on the Earth's surface.
Negative values are below the Equator. Positive values are
above the equator. This value is used to calculate the vertical
and horizontal Coriolis drift. Input field.
TIP: You can select the USE CURRENT POSITION option to
use the GPS coordinates from your device.
NOTE: The LATITUDE is used only for calculating the
Coriolis effect. If shooting at a target less than 1,000 yards
away, this input field is optional.
TEMPERATURE: The temperature at your current location.
Input field.
10 Appendix

TIP: You can manually enter the temperature, or you can use
the temperature value from a connected tempe sensor.
WIND DIRECTION: The direction from which the wind is
coming. For example, a 9 O'CLOCK wind blows from your left
to right. Input field.
WIND SPEED 1: The wind speed used in the shooting solution.
Input field.
WIND SPEED 2: An optional, additional wind speed used in the
shooting solution. Input field.
TIP: You can use two wind speeds to calculate a windage
solution that contains a high and low value. The actual
windage to apply for the shot should fall in this range.
Target Fields
DIRECTION OF FIRE: The direction of fire, with north at 0° and
east at 90°. Input field.
NOTE: The DIRECTION OF FIRE is used only for calculating
the Coriolis effect. If shooting at a target less than 1,000
yards away, this input field is optional.
INCLINATION: The angle of inclination of the shot. A negative
value indicates a downhill shot. A positive values indicates an
uphill shot. The shooting solution multiplies the vertical
portion of the solution by the cosine of the inclination angle to
calculate the adjusted solution for an uphill or downhill shot.
Input field.
RANGE: The distance to the target, displayed in YDS (yards) or
M (meters). Input field.
SPEED: The speed of a moving target, display in mph or km/h.
A negative value indicates a target moving left. A positive
value indicates a target moving right. Input field.
Profile Fields, Bullet Properties
BALLISTIC COEFFICIENT: The manufacturer's ballistic
coefficient for your bullet. Input field.
TIP: When you use one of the Applied Ballistics custom drag
curves, the ballistic coefficient will display a value of 1.000.
BULLET DIAMETER: The bullet diameter measured in inches.
Input field.
NOTE: The diameter of the bullet may vary from the common
name of the round. For example, a 300 Win Mag is
actually .308 inches in diameter.
BULLET LENGTH: The length of the bullet, in inches. Input
field.
BULLET WEIGHT: The bullet weight measured in grains. Input
field.
DRAG CURVE: The Applied Ballistics custom drag curve, or the
G1 or G7 standard projectile models. Input field.
NOTE: Most long range rifle bullets are closer to the G7
standard.
Profile Fields, Gun Properties
HORIZONTAL SIGHT SCALE FACTOR: A linear multiplier that
accounts for horizontal scaling. Not all rifle scopes track
perfectly, so the ballistics solution requires a correction to
scale according to a particular rifle scope. For example, if a
turret is moved 10 MILS but the impact is 9 MILS, the sight
scale is 0.9. Input field.
MUZZLE VELOCITY: The speed of the bullet as it leaves the
muzzle. Input field.
NOTE: This field is required for accurate calculations by the
shooting solution. If you calibrate the muzzle velocity, this
field may be updated automatically for a more accurate firing
solution.
OUTPUT UNITS: The output units of measure. MIL (milliradian)
is 3.438 inches at 100 yards. MOA (minute of angle) is 1.047
inches at 100 yards.
SIGHT HEIGHT: The distance from the center axis of the rifle
barrel to the center axis of the scope. Input field.
TIP: You can easily determine this value by measuring from
the top of the bolt to the center of the windage turret, and
adding half of the diameter of the bolt.
TWIST RATE: The distance it takes for the rifling of your barrel
to make one full rotation. Rifle twist is often provided by the
gun or barrel manufacturer. Input field.
VERTICAL SIGHT SCALE FACTOR: A linear multiplier that
accounts for vertical scaling. Not all rifle scopes track
perfectly, so the ballistics solution requires a correction to
scale according to a particular rifle scope. For example, if a
turret is moved 10 MILS but the impact is 9 MILS, the sight
scale is 0.9. Input field.
ZERO HEIGHT: An optional modification to impact elevation at
zero range. This is often used when adding a suppressor or
using a subsonic load. For example, if you add a suppressor
and your bullet impacts the target 1 inch higher than
expected, your ZERO HEIGHT is 1 inch. You must set this to
zero when you remove the suppressor. Input field.
ZERO OFFSET: An optional modification to impact windage at
zero range. This is often used when adding a suppressor or
using a subsonic load. For example, if you add a suppressor
and your bullet impacts the target 1 inch to the left of the
expected impact, your ZERO OFFSET is -1 inch. You must
set this to zero when you remove the suppressor. Input field.
ZERO RANGE: The range at which the rifle was zeroed. Input
field.
Profile Fields, Gun Properties, Calibrate Muzzle Velocity
ENTER RANGE: The distance from the muzzle to the target.
Input field.
TIP: You should enter a value as close as possible to the
range suggested in the shooting solution. This is the range
where the bullet slows to Mach 1.2 and begins to enter the
transonic range.
ENTER TRUE DROP: The drop in MIL or MOA at the target.
Input field.
Profile Fields, Gun Properties, Calibrate Drop Scale Factor
ENTER RANGE: The range from which you are shooting. Input
field.
TIP: This range should be within 90% of the recommended
range suggested in the shooting solution. Values that are
less than 80% of the recommended range will not provide a
valid adjustment.
ENTER TRUE DROP: The drop in MIL or MOA of the bullet
when fired at range. Input field.
Appendix 11

Index
A
accessories 7
almanac
hunting and fishing times 3
sunrise and sunset times 3
altimeter 4
ANT+ sensors, pairing 7
B
backlight 1, 4
ballistics 2
barometer 4
battery 7, 8
installing 1
maximizing 4, 9
storage 1
Bluetooth technology 7
C
calendar 3
calibrating, altimeter 4
cleaning the device 8
compass 1, 2, 4
calibrating 4
computer, connecting 8
countdown timer 2
customizing the device 4
D
data, transferring 8
data fields 4, 5
deleting, all user data 8
E
elevation 1, 4
F
files, transferring 8
G
Garmin Connect 7
Garmin Express 9
updating software 9
GPS 1
satellite page 8
settings 6
signal 9
H
hunting and fishing times 3
I
icons 2
J
jumpmaster 7
K
keys 1, 8
L
locations
editing 3
saving 3
M
main menu 1
maps 1, 2
settings 4, 6
measuring distance 3
N
navigation, stopping 3
P
pairing
ANT+ sensors 7
smartphone 7
power key 1
R
resetting, device 9
resetting the device 9
routes 3
creating 3
deleting 3
navigating 3
S
satellite page 8
satellite signals 9
acquiring 1
settings 2, 4–6, 9
sharing data 8
smartphone
applications 7
pairing 7
software
license 8
updating 9
version 8
specifications 7
storing data 8
sunrise and sunset times 3
T
tempe 7
temperature 7
timer 6
countdown 2
tones 2
TracBack 3
tracks 3, 4
deleting 4
editing 4
navigating 3
settings 6
training 7
transferring, files 8
trip computer 4
trip information 1, 4
trip planner. See routes
troubleshooting 9
U
unit ID 8
USB
connector 1
disconnecting 8
user data, deleting 8
V
VIRB remote 2
W
WAAS 6
water resistance 7
water resistence 8
waypoints 2, 3
deleting 3
editing 3
navigating 3
projecting 3
saving 3
wrist strap 1
12 Index

support.garmin.com
July 2017
190-02239-00_0A