Garmin F4AGGB00 LOW POWER TRANSMITTER (2400-2483.5 MHz) User Manual
Garmin International Inc LOW POWER TRANSMITTER (2400-2483.5 MHz)
Garmin >
Contents
- 1. User Manual 1
- 2. Users Manual 2
Users Manual 2

Approach® S6 Owner's Manual
Getting Started
WARNING
See the Important Safety and Product Information guide in
the product box for product warnings and other important
information.
When using the device the first time, complete these tasks.
1Register your device (page 15).
2Update your device software and courses (page 15).
3Charge the device (page 1).
4Turn on the device (page 3).
5Start a round (page 5).
Charging the Device
WARNING
This device contains a lithium-ion battery. See the
Important Safety and Product Information guide in the
product box for product warnings and other important
information.
The charging cradle contains a magnet. Under certain
circumstances, magnets may cause interference with some
medical devices, including pacemakers and insulin pumps.
Keep the charging cradle away from such medical devices.

NOTICE
The charging cradle contains a magnet. Under certain
circumstances, magnets may cause damage to some
electronic devices, including hard drives in laptop
computers. Use caution when the charging cradle is near
electronic devices.
To prevent corrosion, thoroughly dry the contacts and the
surrounding area before charging or connecting to a
computer.
1Plug the USB cable into a USB port on your computer.
2Align the charger posts with the contacts on the back
of the device, and press the charger À until it clicks.
3Charge the device completely.
2
Turning on the Approach
NOTE: The time of day and date are set automatically
when you are outdoors. You can also set it manually
(page 12).
1Hold .
2Go play a game of golf (page 5).
Touchscreen Tips
The device touchscreen is different than most mobile
devices. The touchscreen is designed so you can operate it
with your finger tip or while wearing gloves. The
touchscreen is optimized to prevent accidental touches
while you play.
NOTE: You must press firmly in order to select items and
change pages. You should practice using the touchscreen
before you play.
• Tap the touchscreen to scroll through the pages.
• Select > Lock Screen to lock the screen from the
hole view, layup and dogleg, shot measurement, or
odometer screen.
• Tap the touchscreen and swipe left to exit power save
mode or to unlock the screen.
• Tap the touchscreen to confirm messages.
• Tap the top and bottom of the touchscreen to scroll
through menus.
• Make each touchscreen selection a separate action.
3
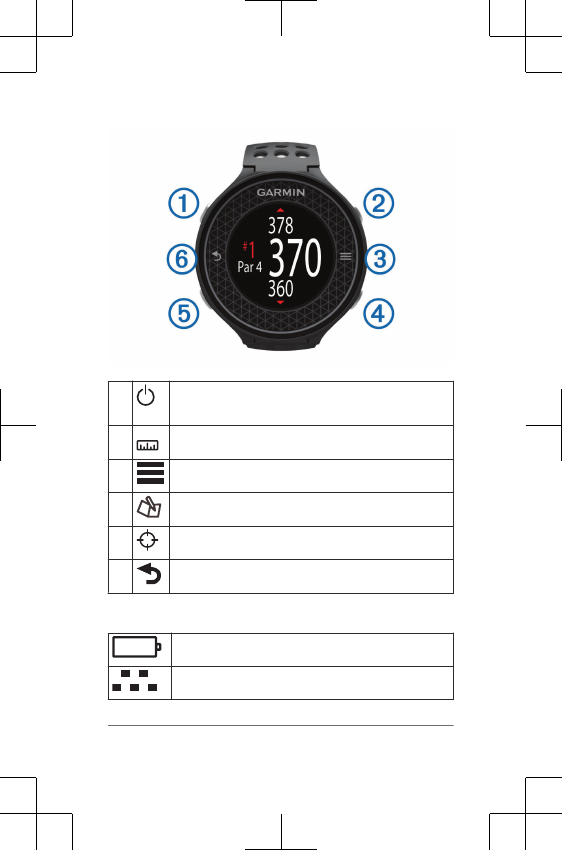
Keys
ÀSelect to turn on the backlight.
Hold to turn the device on and off.
ÁSelect to measure a shot.
ÂSelect to open the menu for the current screen.
ÃSelect to enter your score for the hole.
ÄSelect to view the course.
ÅSelect to return to the previous screen.
Icons
Battery is low.
Odometer is measuring distance and time.
4
Alarm is on.
Bluetooth is on.
Playing Golf
You cannot start playing golf until the device acquires
satellite signals, which may take 30–60 seconds.
1Select > Start Round.
2Select a course from the list.
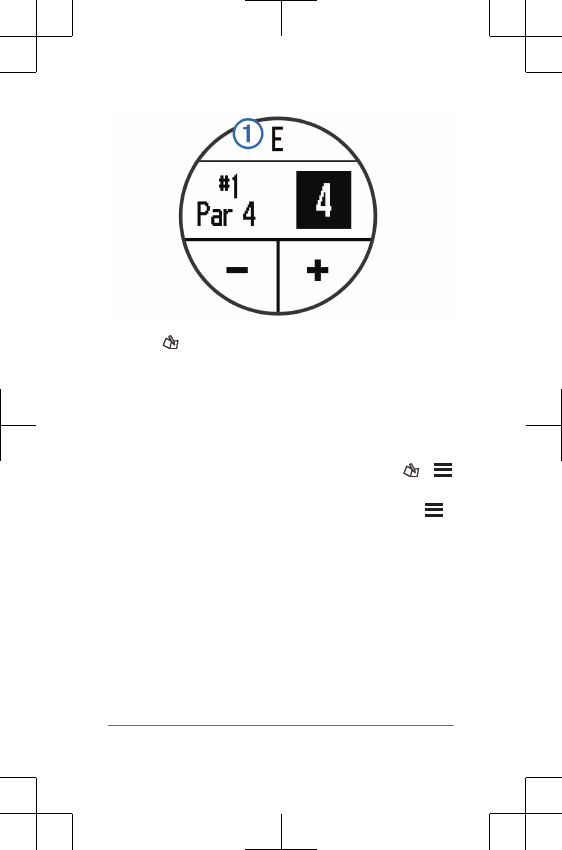
Hole View
The device shows the current hole you are playing, and
automatically transitions when you move to a new hole.
NOTE: By default, the device calculates the distance to the
front, middle, and back of the green. If you know the
location of the pin, you can set it more precisely using
course view (page 6).
ÀCurrent hole number
ÁDistance to the back of the green
5
ÂDistance to the middle of the green
ÃDistance to the front of the green
ÄPar for the hole
Next hole
Previous hole
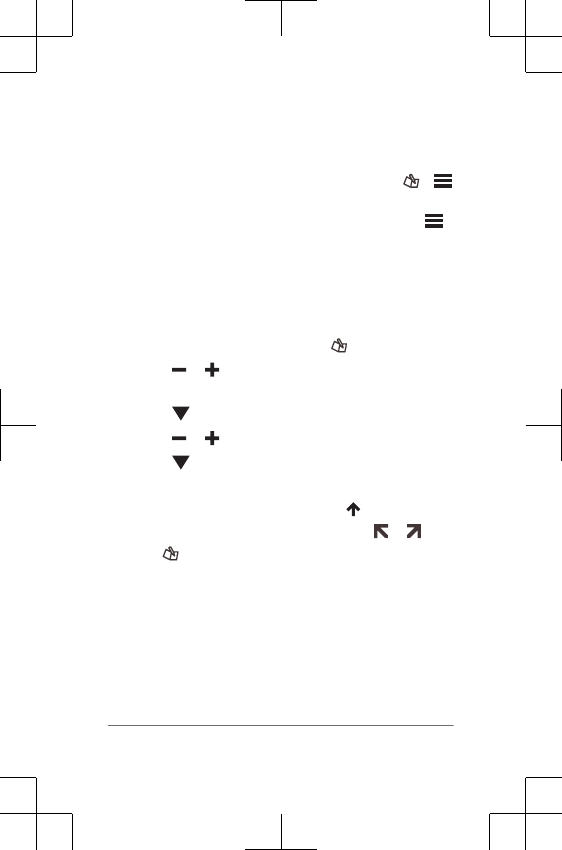
Viewing the Course
While playing a game, you can take a closer look at the
course and view any location and distance on the course
map.
1Begin playing a game (page 5).
2Select .
The course is shown based on driver distance.
NOTE: Driver distance is determined during user
setup.
3Select an option:
• To view a location within your driver distance, drag
the distance arc to the location.
• To view a location outside your driver distance or
from the rough, select , and drag the distance
arc to the location.
The new arc location is shown.
Viewing the Green
While playing a game, you can take a closer look at the
green and move the pin location.
1Begin playing a game (page 5).
2Select .
3Select .
6
4Drag to move the pin location.
The distances on the hole view screen are updated to
reflect the new pin location. The pin location is saved
for only the current round.
Measuring a Shot
You can measure the distance of a shot at any time.
1Select .
2Walk to your ball.
The distance automatically resets when you move to
the next hole. You can hold to reset the distance at
any time.
Viewing Layup and Dogleg Distances and Saved
Locations
You can view a list of layup and dogleg distances for par 4
and 5 holes. Saved locations also appear on this list.
From the hole view screen (page 5), select the middle
of the screen.
NOTE: Distances and locations are removed from the
list as you pass them.
Keeping Score
Before you begin keeping score, you must start a round
(page 5).
1From the hole view screen (page 5), select .
2If necessary, select > Change Par to change par
for the hole.
3Select or to set the score.
Your total score À is updated.
7
4Hold to view a list of the scores for all holes.
From this list, you can select any hole to change the
score for that hole.
Setting the Scoring Method
You can change the method the device uses to keep score.
1Select an option:
• If you are currently playing a round, select >
> Setup Scoring.
• If you are not currently playing a round, select
> Setup > Scoring.
2Select a scoring method.
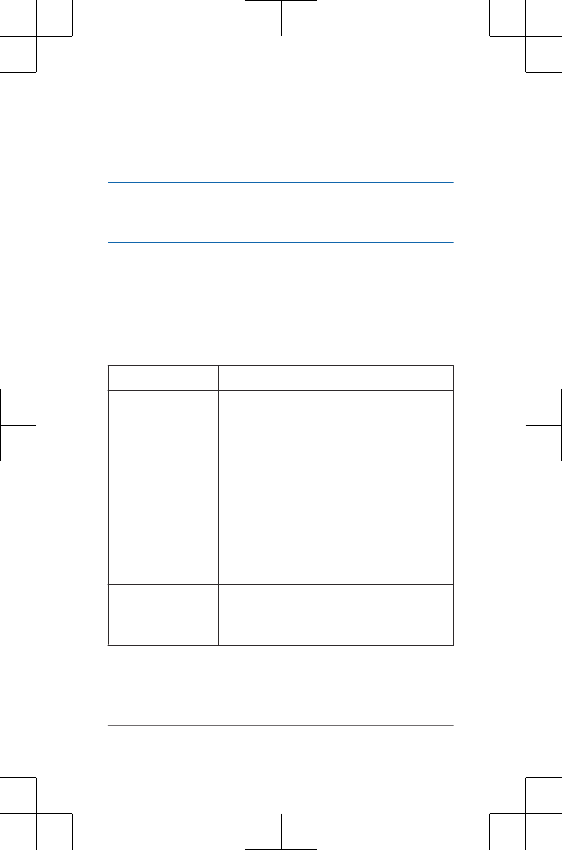
About Stableford Scoring
When you select the Stableford scoring method (page 8),
points are awarded based on the number of strokes taken
relative to par. At the end of a round, the highest score
wins. The device awards points as specified by the United
States Golf Association.
NOTE: The scorecard for a Stableford scored game shows
points instead of strokes.
8
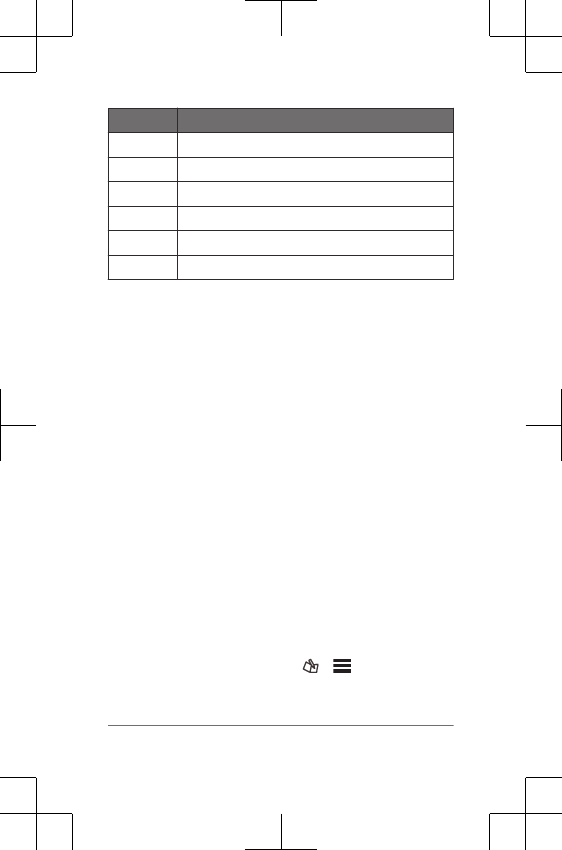
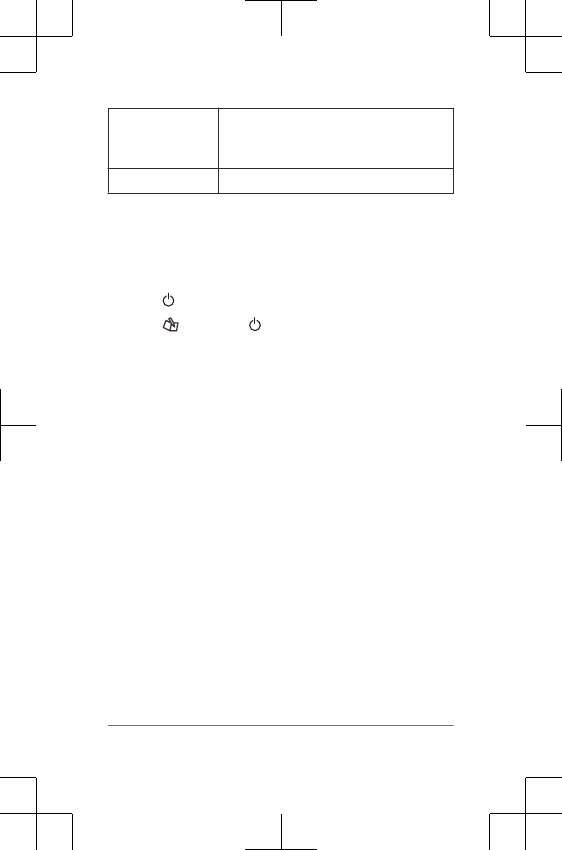
Points Strokes Taken Relative to Par
0 2 or more over
1 1 over
2 Par
3 1 under
4 2 under
5 3 under
Viewing Scorecards on a Computer
You can view all saved scorecards on your computer.
1Connect the device to a USB port on your computer
using the charging cradle.
2The device appears as a removable drive in My
Computer on Windows® computers, and as a mounted
volume on Mac® computers.
3Open ScorecardViewer.html to view your scorecards.
Handicap Scoring
You can set a handicap for the hole.
Enabling Handicap Scoring
1Select Setup > Scoring > Scoring Handicap.
2Select On.
Setting the Hole Handicap
Before you can score using handicaps, you must enable
handicap scoring (page 9).
The device displays the default handicap for the hole if it is
available. You can set the hole handicap manually.
1While playing a game, select > > Change
Handicap.
2Enter the hole handicap.
9
Tracking Statistics
You can enable features for tracking your own statistics.
1Select an option:
• If you are currently playing a round, select >
> Stat Tracking.
• If you are not currently playing a round, select
> Setup > Stat Tracking.
2Select On.
Recording Statistics
Before you can record statistics, you must enable statistics
tracking.
1From the hole view screen, select .
2Select or to set the number of strokes taken.
Your total score is updated.
3Select .
4Select or to set the number of putts taken.
5Select .
6Select an option:
• If your ball hit the fairway, select .
• If your ball missed the fairway, select or .
7Hold to view a list of the scores for all holes.
8If necessary, select a hole to change the score for that
hole.
Your statistics are recorded on your scorecard (page 9).
Saving a Location
While playing a round, you can save up to five locations on
each hole.
1Stand in the location you want to save.
10
NOTE: You cannot save a location that is far from the
currently selected hole.
2Select > Save Location.
3Select a label for the location.
Using the Odometer
You can use the odometer to record the time and distance
traveled. The odometer automatically starts and stops
when you start or end a round, but you can also start and
stop it manually.
1Select > Odometer to view or start the odometer.
2Select an option:
• Select > Turn Off to stop the odometer.
• Select > Reset to reset the time and distance
to zero.
Phone Notifications
NOTE: Phone notifications require an Apple® iPhone®
equipped with Bluetooth® 4.0 wireless technology and
iOS® 7 or later.
When your phone receives messages, it sends notifications
to your device.
Enabling Bluetooth Notifications
NOTE: Enabling Bluetooth notifications reduces battery life
while in watch mode (page 14).
1Select > Setup > Bluetooth.
2Select an option:
• To enable notifications at all times, select On.
• To enable notifications only while playing, select
While Playing.
11
3On your phone, enable Bluetooth wireless technology.
When your device receives a notification, it displays a
message. You can select the message to open the
notification.
Viewing Notifications
Before you can view notifications, you must enable
Bluetooth notifications.
1Select > Notifications.
2Select a notification.
3Select or to scroll through the contents of the
notification.
Customizing Your Device
Settings
Select > Setup to customize device settings and
features.
Tones: Turns audible tones on or off.
Display: Sets the background color to black or white
(page 13).
Scoring: Sets the scoring method (page 8).
Stat Tracking: Turns statistics tracking on or off (page 10).
Time: Sets the time to automatic or manual (page 12).
Format: Sets the time format to 12- or 24-hour.
Language: Sets the language.
Units: Sets to measure distance in yards or meters.
Setting the Time Manually
By default, the time is set automatically when the device
acquires satellite signals.
1Select > Setup > Time > Manual.
12
2Select and to set the hour and minute.
3Select AM or PM.
Setting the Alarm
1Select > Alarm > Setup Alarm.
2Select and to set the hour and minute.
3Select AM or PM.
4Select Once, Daily, or Weekdays.
Changing the Display Color
You can change the background color on the device.
1Select > Setup > Display.
2Select an option:
• Select White to display black text on a white
background.
• Select Black to display white text on a black
background.
Appendix
Device Care
NOTICE
Avoid extreme shock and harsh treatment, because it can
degrade the life of the product.
Avoid pressing the keys under water.
Do not use a sharp object to clean the device.
Never use a hard or sharp object to operate the
touchscreen, or damage may result.
Avoid chemical cleaners, solvents, and insect repellents
that can damage plastic components and finishes.
13
Thoroughly rinse the device with fresh water after exposure
to chlorine, salt water, sunscreen, cosmetics, alcohol, or
other harsh chemicals. Prolonged exposure to these
substances can damage the case.
Do not store the device where prolonged exposure to
extreme temperatures can occur, because it can cause
permanent damage.
Cleaning the Device
1Wipe the device using a cloth dampened with a mild
detergent solution.
2Wipe it dry.
Specifications
Battery type Lithium-ion
Battery life Watch only: 4 months
Watch with Bluetooth notifications:
15 hours
Playing golf: 8 hours
NOTE: The actual battery life of a fully
charged battery depends on how much
time you use GPS, the backlight, and
power save mode. Exposure to
extremely cold temperatures also
reduces battery life.
Operating
temperature
range
From -4ºF to 140ºF (from -20ºC to
60ºC)
14
Charging
temperature
range
From 40ºF to 104ºF (from 5ºC to 40ºC)
Water rating 5 ATM*
*The device withstands pressure equivalent to a depth of
50 meters.
Clearing User Data
NOTE: This deletes all user-entered data.
1Hold to turn off the device.
2Hold , and select .
3Select Yes.
Getting More Information
• Go to www.garmin.com/intosports.
• Go to www.garmin.com/learningcenter.
• Go to http://buy.garmin.com, or contact your Garmin®
dealer for information about optional accessories and
replacement parts.
Registering Your Device
Help us better support you by completing our online
registration today.
• Go to http://my.garmin.com.
• Keep the original sales receipt, or a photocopy, in a
safe place.
Updating Software and Courses
Before you can update your device software, you must
download and install Garmin CourseView Updater on your
computer. Go to www.garmin.com/courses for more
information.
15
1Connect the device to the charging cradle.
2Connect the USB end of the charging cradle to a USB
port on your computer.
3Start CourseView Updater.
4Follow the on-screen instructions.
Software License Agreement
BY USING THE DEVICE, YOU AGREE TO BE BOUND BY
THE TERMS AND CONDITIONS OF THE FOLLOWING
SOFTWARE LICENSE AGREEMENT. PLEASE READ
THIS AGREEMENT CAREFULLY.
Garmin Ltd. and its subsidiaries (“Garmin”) grant you a
limited license to use the software embedded in this device
(the “Software”) in binary executable form in the normal
operation of the product. Title, ownership rights, and
intellectual property rights in and to the Software remain in
Garmin and/or its third-party providers.
You acknowledge that the Software is the property of
Garmin and/or its third-party providers and is protected
under the United States of America copyright laws and
international copyright treaties. You further acknowledge
that the structure, organization, and code of the Software,
for which source code is not provided, are valuable trade
secrets of Garmin and/or its third-party providers and that
the Software in source code form remains a valuable trade
secret of Garmin and/or its third-party providers. You agree
not to decompile, disassemble, modify, reverse assemble,
reverse engineer, or reduce to human readable form the
Software or any part thereof or create any derivative works
based on the Software. You agree not to export or re-
export the Software to any country in violation of the export
16

control laws of the United States of America or the export
control laws of any other applicable country.
17


Garmin®, the Garmin logo, and Approach® are trademarks of Garmin
Ltd. or its subsidiaries, registered in the USA and other countries. These
trademarks may not be used without the express permission of Garmin.
Windows® is a registered trademark of Microsoft Corporation in the
United States and other countries. Apple®, iOS®, iPhone®, and Mac®
are registered trademarks of Apple Computer, Inc. The Bluetooth® word
mark and logos are owned by Bluetooth SIG, Inc. and any use of such
marks by Garmin is under license. Other trademarks and trade names
are those of their respective owners.
© 2014 Garmin Ltd. or its subsidiaries
www.garmin.com/support
March 2014
190-01703-00_01
Printed in Taiwan