Garmin GARVHF12 Fixed Mount Class D DSC VHF Marine Radio User Manual
Garmin International Inc Fixed Mount Class D DSC VHF Marine Radio
Garmin >
Contents
- 1. User Manual
- 2. User manual amendment
User Manual
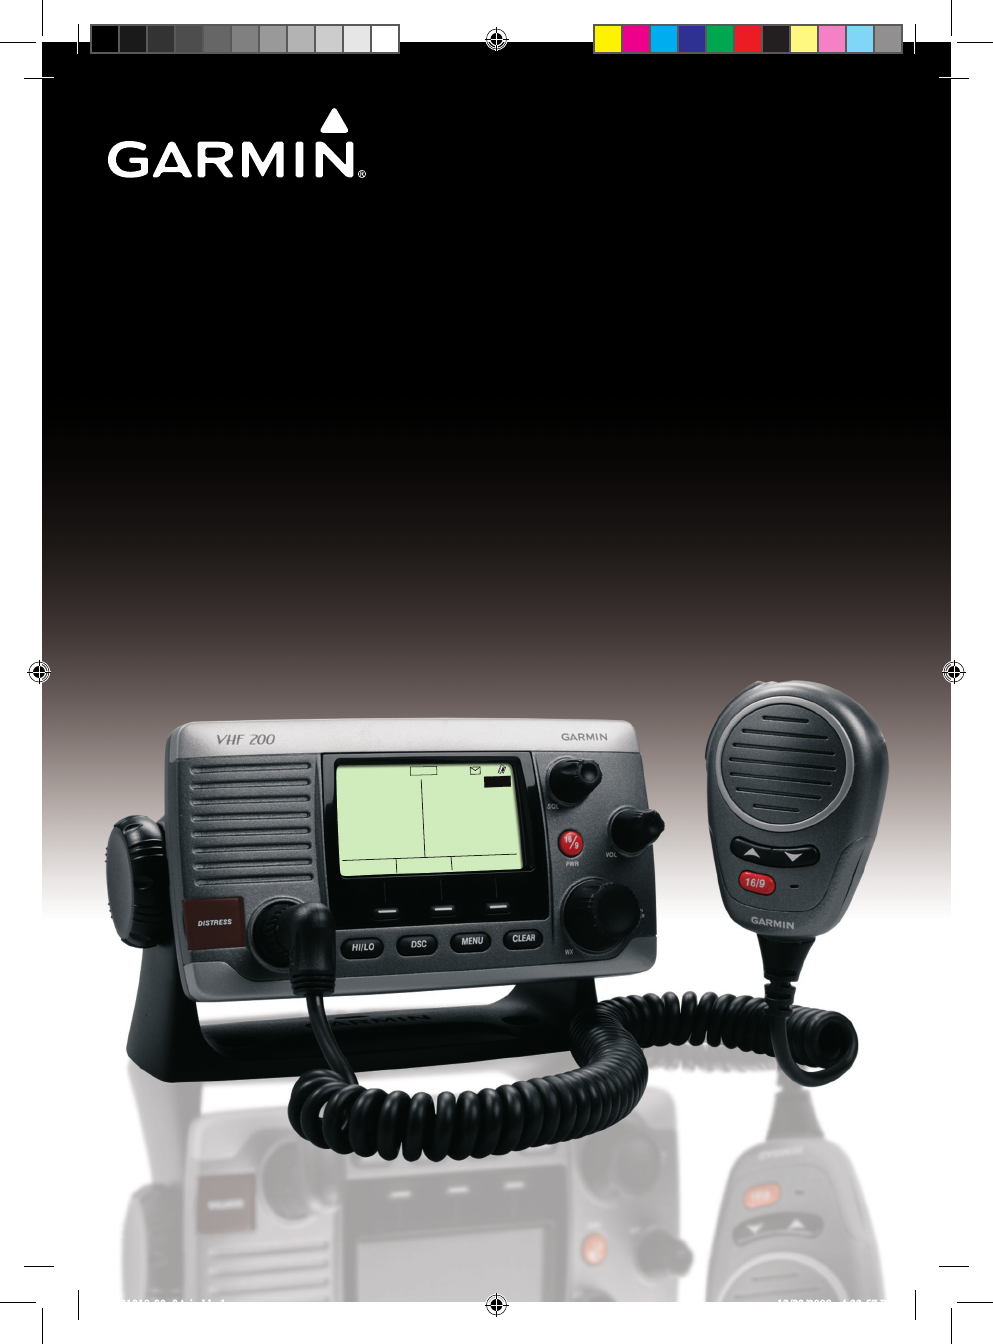
VHF 100/200 Series
owner’s manual
USA
DISTRESS
WATCH PA SCAN
“‰°Š‹.Œ‘’’ƒ
ˆ‰Š°‹Œ.‘’“’†
ˆ‰:‹ŒPM UTC
LOCAL
25W
16
190-01019-00_0A.indd 1 12/23/2008 4:22:57 PM

© 2008 Garmin Ltd. or its subsidiaries
Garmin International, Inc.
1200 East 151st Street,
Olathe, Kansas 66062, USA
Tel. (913) 397.8200 or (800)
800.1020
Fax (913) 397.8282
Garmin (Europe) Ltd.
Liberty House
Hounsdown Business Park,
Southampton, Hampshire, SO40 9RB UK
Tel. +44 (0) 870.8501241 (outside the UK)
0808 2380000 (within the UK)
Fax +44 (0) 870.8501251
Garmin Corporation
No. 68, Jangshu 2nd Road,
Shijr, Taipei County, Taiwan
Tel. 886/2.2642.9199
Fax 886/2.2642.9099
December 2008 Part Number 190-01019-00 Rev. A Printed in China
All rights reserved. Except as expressly provided herein, no part of this manual may be reproduced, copied,
transmitted, disseminated, downloaded or stored in any storage medium, for any purpose without the express
prior written consent of Garmin. Garmin hereby grants permission to download a single copy of this manual
onto a hard drive or other electronic storage medium to be viewed and to print one copy of this manual or of
any revision hereto, provided that such electronic or printed copy of this manual must contain the complete
text of this copyright notice and provided further that any unauthorized commercial distribution of this
manual or any revision hereto is strictly prohibited.
Information in this document is subject to change without notice. Garmin reserves the right to change
or improve its products and to make changes in the content without obligation to notify any person or
organization of such changes or improvements. Visit the Garmin Web site (www.garmin.com) for current
updates and supplemental information concerning the use and operation of this and other Garmin products.
Garmin
®
and the Garmin logo are trademarks of Garmin Ltd. or its subsidiaries, registered in the USA and
other countries. GHS
™
is a trademark of Garmin Ltd. or its subsidiaries. These trademarks may not be used
without the express permission of Garmin.
United States Power Squadrons
®
is a registered trademark of United States Power Squadrons. NMEA 2000
®
and the NMEA 2000 logo are registered trademarks of the National Maritime Electronics Association.
190-01019-00_0A.indd 2 12/23/2008 4:22:57 PM

VHF 100/200 Series Owner’s Manual i
Introduction
Introduction
The VHF 100 and VHF 200 series radios equip you with the ability to communicate on
all International, USA, and Canadian marine channels, as well as preset private channels.
They also allow monitoring of ten WX (weather) channels. The VHF 100, VHF 200, and
GHS™ 10 are for use in North America, while the VHF 100i, VHF 200i, and GHS 10i are
for use in Europe and throughout the world.
The VHF 100 and VHF 200 series radios have many enhanced features, including those
listed in the following table.
VHF 100 VHF 100i VHF 200 VHF 200i
Auto power on ● ● ● ●
Full Class D Digital Selective Calling (DSC) ● ● ● ●
Position tracking to track up to three other
boats ● ● ● ●
Transmits position requests ● ● ● ●
Local receiver mode to improve receiver
performance in busy port environments ● ● ● ●
Up to 25 watts of transmit power, selectable
between 1 watt and 25 watts ● ● ● ●
Dedicated key for easy, one-touch access
to Channels 16/9 ●Channel 16
only ●Channel 16
only
NMEA 0183 interface capabilities ● ● ● ●
NMEA 2000
®
interface capabilities ● ●
Additional capabilities with NMEA 2000
compatible Garmin chartplotters and
Garmin autopilot system
● ●
Hard-wired speaker and microphone ● ●
Relocatable speaker and microphone ● ●
Supports one GHS 10 or one GHS 10i
full-function, wired microphone ● ●
Hailer and foghorn output at 20 watts with
automatic and manual foghorn signals and
adjustable, base fog frequencies
● ●
Two-way hailer functionality for listening
back when connected to a compatible horn
speaker
● ●
Intercom capabilities ● ●
Receives NOAA weather alerts ● ●
ATIS support ● ●
190-01019-00_0A.indd 1 12/23/2008 4:22:57 PM
ii VHF 100/200 Series Owner’s Manual
Introduction
VHF 100 VHF 100i VHF 200 VHF 200i
Private channel customization
(pre-set by your Garmin
®
dealer) ● ●
Multilingual user interface: English, French,
Italian, German, and Spanish ● ●
Manual Conventions
In this manual, when you are instructed to select an item using the Channel knob, turn the
channel knob to highlight the item, and the press the Channel knob to select the item.
Small arrows (>) in the text indicate that you should use the Channel knob to select
each item in order. For example, if the text indicates “select COMMUNICATIONS >
PROTOCOL,” you should complete these steps:
1. Turn the Channel knob to highlight COMMUNICATIONS, and then press the Channel
knob to select COMMUNICATIONS.
2. Turn the Channel knob to highlight PROTOCOL, and then press the Channel knob to
select PROTOCOL.
VHF 100/200 Series and GHS 10 Series Instructions
This manual provides instructions for the following units:
North American Models International Models
VHF 100 VHF 100i
VHF 200 VHF 200i
GHS 10 GHS 10i
Unless otherwise noted, the instructions for the VHF 100/200 Series radios and the GHS 10
Series handsets are the same.
190-01019-00_0A.indd 2 12/23/2008 4:22:57 PM

VHF 100/200 Series Owner’s Manual iii
Introduction
Table of Contents
Introduction ...............................................................................................................i
Manual Conventions ............................................................................................................ ii
Getting Started .........................................................................................................1
Transceiver Front Panel ....................................................................................................... 1
Microphone and GHS 10 Series Handsets .......................................................................... 2
Transceiver and Handset Display ........................................................................................ 3
Tips ...................................................................................................................................... 4
Basic Operation .......................................................................................................5
Turning the Radio On and Off .............................................................................................. 5
Adjusting the Radio Volume ................................................................................................. 5
Adjusting the Volume on a GHS 10 or a GHS 10i ................................................................ 5
Adjusting the Squelch on the Radio ..................................................................................... 5
Adjusting the Squelch on a GHS 10 or a GHS 10i ...............................................................5
Selecting Channels .............................................................................................................. 5
Scanning and Saving Channels ........................................................................................... 6
Monitoring Multiple Channels ...............................................................................................7
Reprogramming the Second-Priority Channel ..................................................................... 8
Using 16/9 Mode .................................................................................................................. 8
Switching Between 1 W and 25 W Transmitting Modes ......................................................8
Adjusting the Local/Distant Receiving Sensitivity ................................................................ 9
Using the Intercom ............................................................................................................... 9
Using the Hailer ................................................................................................................. 10
Using the Foghorn ............................................................................................................. 10
Listening to NOAA Weather Broadcasts and Enabling Weather Alerts ............................. 12
Automatic Transmitter Identication System (ATIS) ........................................................... 13
Digital Selective Calling (DSC) .............................................................................15
Entering Your MMSI Number .............................................................................................15
Viewing Your MMSI Number .............................................................................................. 16
DSC Distress Calls ............................................................................................................ 16
Placing Calls ...................................................................................................................... 18
Receiving Calls .................................................................................................................. 21
Position Tracking ................................................................................................................ 22
Working with the Call Logs ................................................................................................ 24
Using the Directory ............................................................................................................ 26
Adding and Modifying Group Entries ................................................................................. 26
Conguring DSC Settings .................................................................................................. 27
Advanced Operation .............................................................................................29
NMEA 0183 and NMEA 2000 .............................................................................................29
Modifying the Operating Settings ....................................................................................... 31
190-01019-00_0A.indd 3 12/23/2008 4:22:57 PM

iv VHF 100/200 Series Owner’s Manual
Introduction
Appendix ................................................................................................................35
Alarms and Messages ....................................................................................................... 35
Channel Lists ..................................................................................................................... 36
Specications ..................................................................................................................... 46
Warnings and Safety Notices ............................................................................................. 49
Important Product Information ........................................................................................... 49
Caring for the Unit .............................................................................................................. 52
Index .......................................................................................................................53
190-01019-00_0A.indd 4 12/23/2008 4:22:57 PM
VHF 100/200 Series Owner’s Manual 1
Getting Started
Getting Started
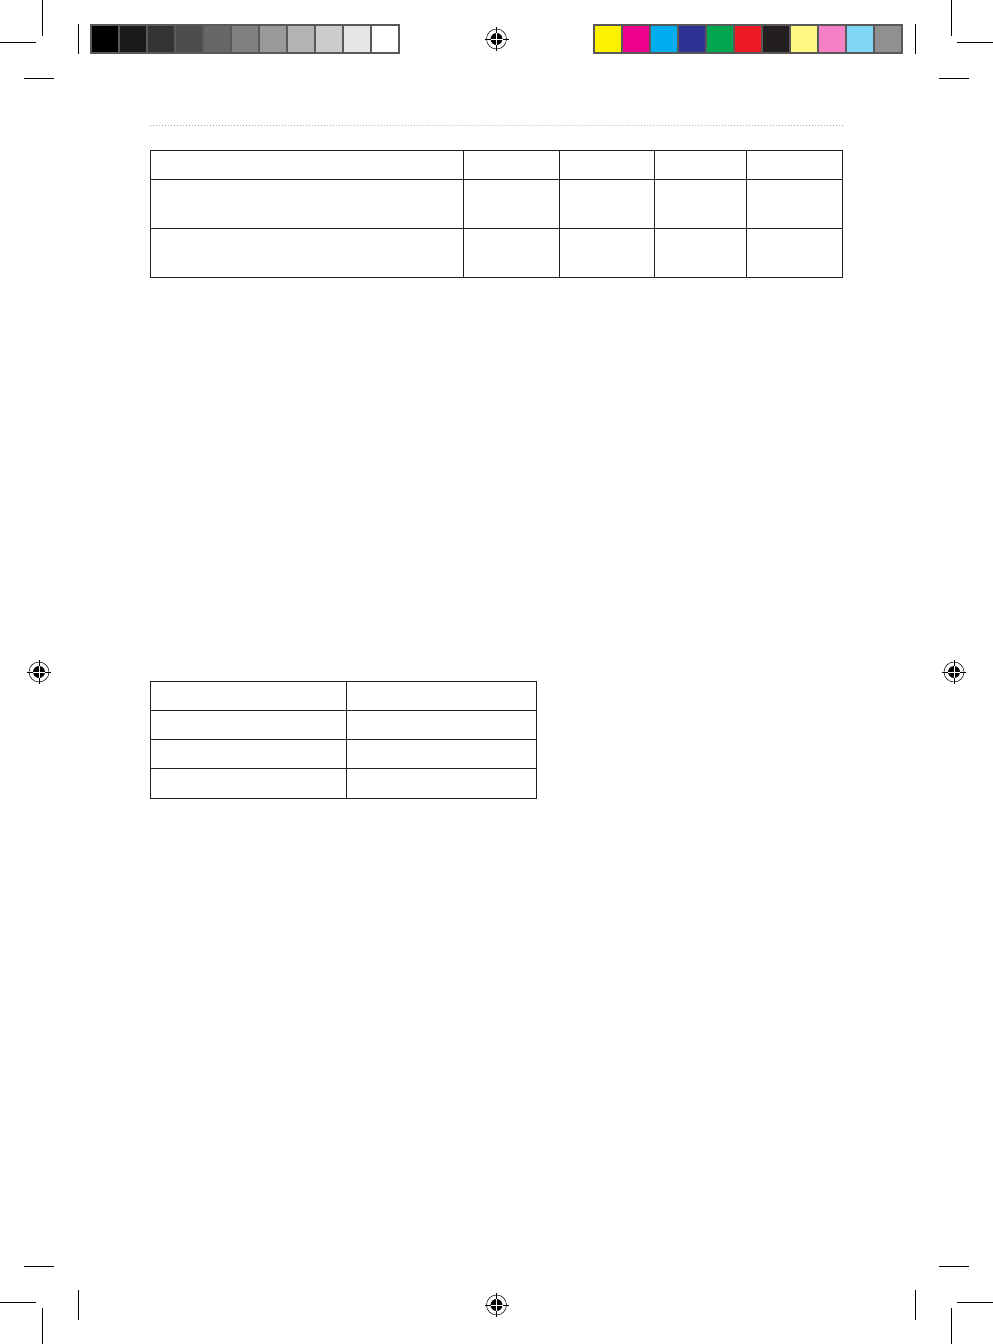
Transceiver Front Panel
USA
16
DISTRESS
WATCH PA SCAN
“‰°Š‹.Œ‘’’ƒ
ˆ‰Š°‹Œ.‘’“’†
ˆ‰:‹ŒPM UTC
W25
DISTRESS
HI/LO DSC MENU CLEAR
Squelch
Volume
PWR or
16/9
Channel
DISTRESS—press to start a DSC distress call if you have programmed your radio with an
MMSI number.
Squelch—rotate to adjust the squelch level.
Volume—rotate to adjust the volume.
PWR or 16/9—press and hold this key to turn the radio on and off. When the radio is on,
press and release this key to toggle the radio between Channel 16, your second-priority
channel, and your original channel.
Channel—rotate to change the channel on the radio, or press to select a menu item. When
on the Home screen, press to access WX (weather) channels (VHF 100 and VHF 200 only).
HI/LO—press to select between local and distant receive settings or to bypass 1 W
transmission power for some channels.
DSC—press to display a menu of DSC options. Press again to return to the Home screen.
MENU—press to display a menu of conguration options. Press again to return to the
Home screen.
CLEAR—press to return to the previous screen when you are in the menu options. This key
also cancels or mutes an incoming DSC call.
190-01019-00_0A.indd 1 12/23/2008 4:22:58 PM
2 VHF 100/200 Series Owner’s Manual
Getting Started
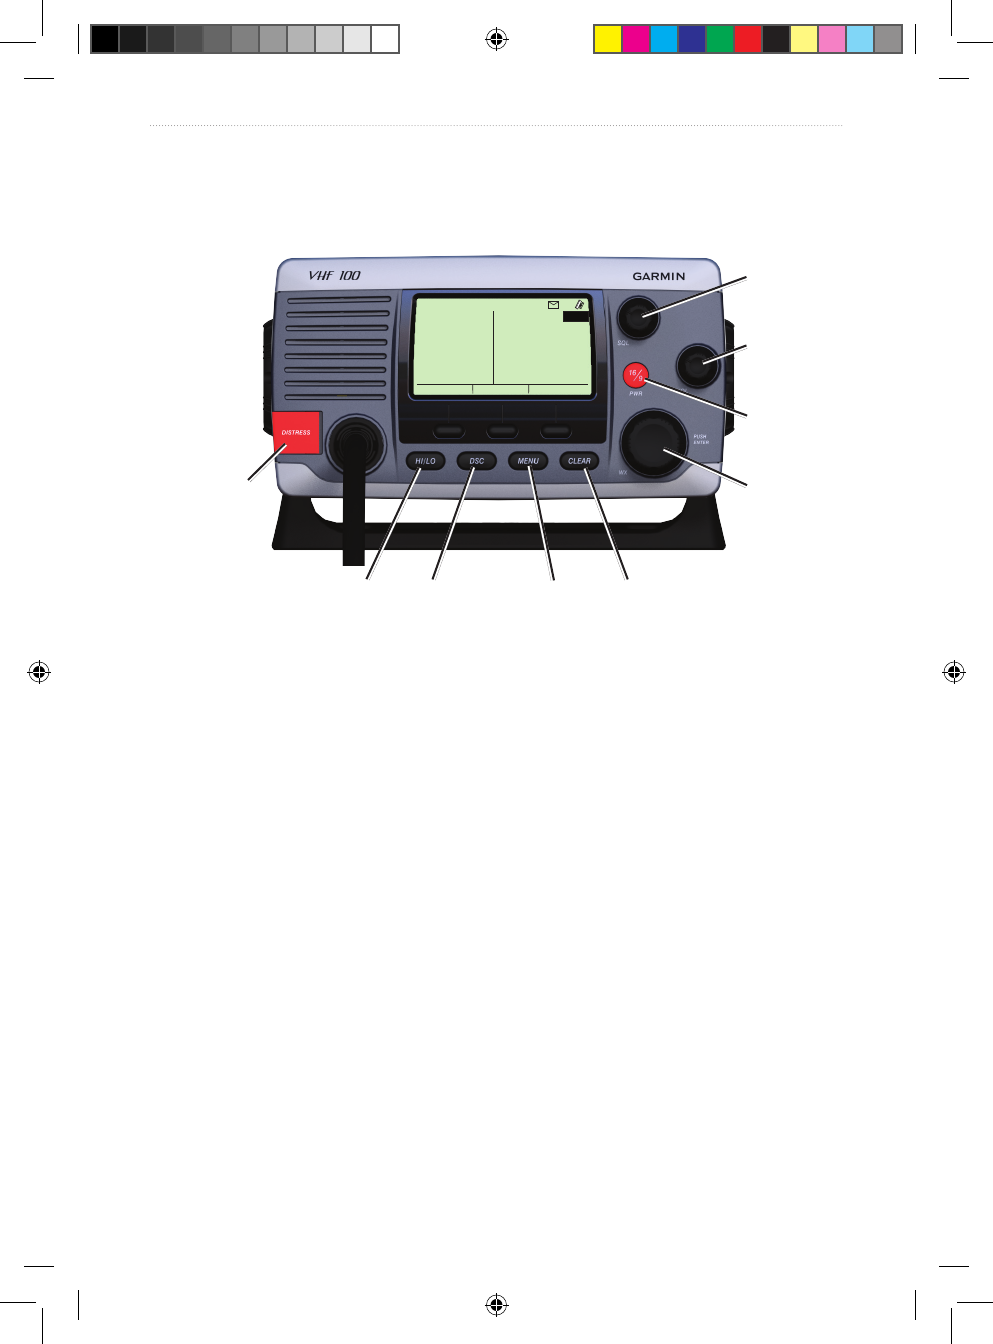
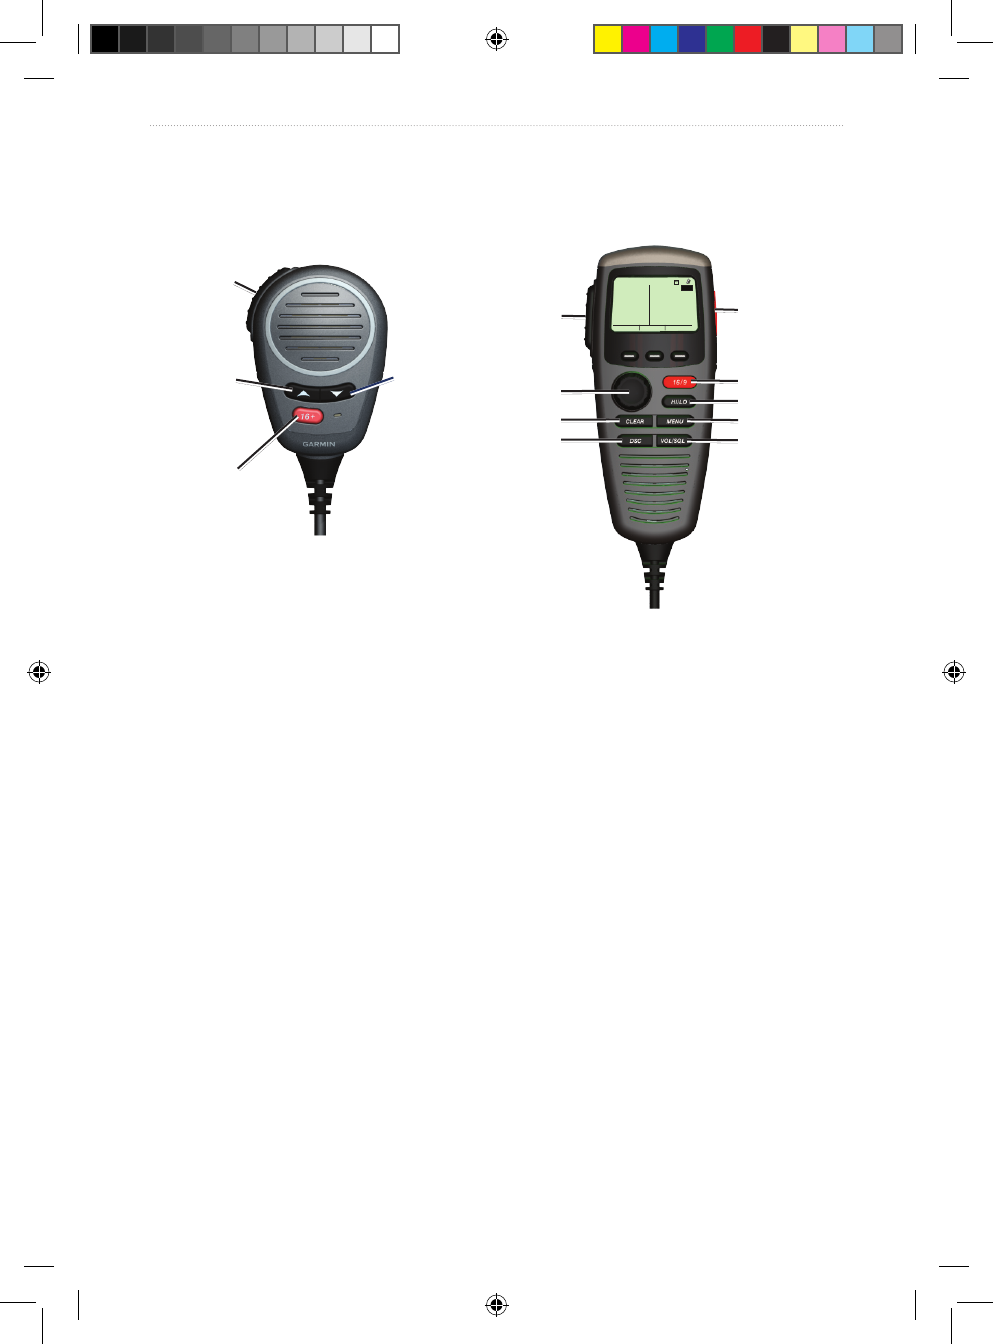
Microphone and GHS 10 Series Handsets
With the exception of adjusting the volume and the squelch, the handset works the same as
the radio.
PTT
Up arrow
16+ or 16/9
Down arrow
PTT
Channel
CLEAR
DSC
16+ or 16/9
HI/LO
MENU
Volume/
Squelch
USA
16
DISTRESS
WATCH PA SCAN
“‰°Š‹.Œ‘’’ƒ
ˆ‰Š°‹Œ.‘’“’†
ˆ‰:‹ŒPM UTC
W25
DISTRESS
PTT (Push-to-talk)—press to exit the current menu and return to the Home screen to begin
broadcasting.
DISTRESS (GHS 10 and GHS 10i)—press to start a DSC distress call if you have
programmed your radio with an MMSI number.
Up and Down Arrows (Microphone)—press to change the channel on the radio.
Channel—rotate to change the channel on the radio, or press to select a menu item. When
on the Home screen, press to access WX (weather) channels (GHS 10 only).
CLEAR—press to return to the previous screen when you are in the menu options. This key
also cancels or mutes an incoming DSC call.
DSC—press to display a menu of DSC options. Press again to return to the Home screen.
16+ (VHF 100i/200i; GHS 10i) or 16/9 (VHF 100/200; GHS 10)—press and release to
toggle between Channel 16, your second-priority channel, and your original channel.
HI/LO—press to select between local and distant receive settings or to bypass 1 W
transmission power for some channels.
MENU—press to display a menu of conguration options. Press again to return to the
Home screen.
Volume/Squelch—press to toggle the function of the Channel knob to adjust the volume
and squelch levels.
190-01019-00_0A.indd 2 12/23/2008 4:23:00 PM
VHF 100/200 Series Owner’s Manual 3
Getting Started
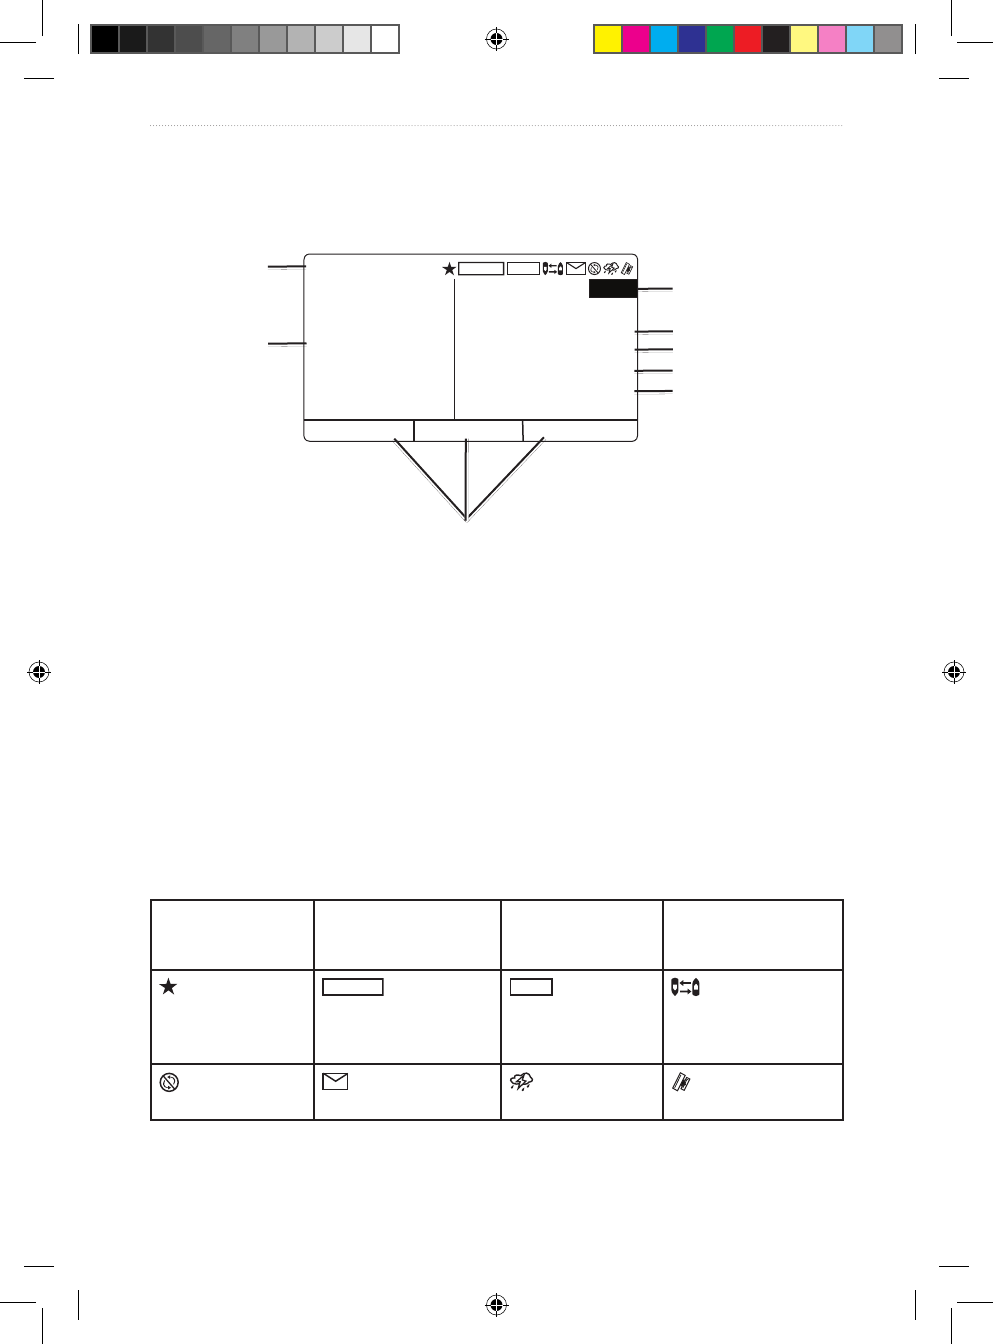
Transceiver and Handset Display
The Home screen is the most-viewed screen in the system. It displays all of your current
information, such as the current channel, the frequency band, and the channel name.
Frequency band
Latitude
Time
Speed Over Ground/
Course Over Ground
System-status
icons
Channel Longitude
Soft keys
USA
16
DISTRESS
WATCH PA SCAN
“‰°Š‹.Œ‘’’ƒ
ˆ‰Š°‹Œ.‘’“’†
ˆ‰:‹Œ UTC
””MPH ˆ’”°T
–
TX
W25
RX
ATIS
1W
LOCAL
Channel—current working channel.
Frequency band—current frequency band: International, Canadian, or USA.
Latitude, Longitude, and Time—current latitude, longitude, and time are displayed if
the transceiver is connected to a GPS device. If the transceiver is not connected to a GPS
device, you can manually enter the position and the time that you entered the position data.
Speed Over Ground (SOG)/Course Over Ground (COG)—current SOG or COG is
displayed if the transceiver is connected to a GPS device.
Soft keys—used to select items. The function of these keys changes depending on what you
are doing.
System-status icons—see the following table.
RX
Squelch level is
broken by reception
of an incoming signal
TX
Transmitting
W25
Transmitting at
25 watts
1W
Transmitting at
1 watt
Saved channel
LOCAL
Receiver mode
for areas with radio
frequency interference
(such as harbors)
ATIS
ATIS enabled Position tracking
enabled
Auto channel
changing disabled
Incoming or missed
DSC call
Weather alert External GPS
connected
190-01019-00_0A.indd 3 12/23/2008 4:23:02 PM

4 VHF 100/200 Series Owner’s Manual
Getting Started
Tips
Keep the following tips in mind when using your radio or handset:
Press and release the PTT key at any time during a series of steps to return to the Home
screen.
Press the CLEAR key to view the previous screen.
Select OK to save your changes and return to the Home screen.
Select ab when entering data to return to a previous character.
•
•
•
•
190-01019-00_0A.indd 4 12/23/2008 4:23:02 PM
VHF 100/200 Series Owner’s Manual 5
Basic Operation
Basic Operation
Turning the Radio On and Off
IMPORTANT: To use the DSC capabilities of your radio, you must rst enter an MMSI
number. See page 15 for more information.
To turn on the radio, press and hold the 16/9 key. If you have not entered a Mobile Maritime
Safety Identity (MMSI) number, you must press the CLEAR key to access the Home
screen. To turn off the radio, press and hold the 16/9 key.
TIP: For information on enabling auto power-on, see page 31.
Adjusting the Radio Volume
To turn up the radio volume, turn the Volume knob clockwise.
To turn down the radio volume, turn the Volume knob counterclockwise.
TIP: To set the appropriate volume level, rst turn the squelch level to off, and then adjust the
volume. See below for more information on adjusting the squelch level.
Adjusting the Volume on a GHS 10 or a GHS 10i
1. Press the VOL/SQL key until the screen displays “CURRENT VOLUME.”
2. Turn the Channel knob on the handset to adjust the level.
Adjusting the Squelch on the Radio
The squelch control allows you to suppress unwanted static when receiving.
1. When receiving, rotate the Squelch knob counterclockwise until you hear audio.
2. Rotate the Squelch knob clockwise until there is no background noise.
Adjusting the Squelch on a GHS 10 or a GHS 10i
1. Press the VOL/SQL key until the screen displays “CURRENT SQUELCH”.
2. When receiving, rotate the Volume knob counterclockwise until you hear audio.
3. Rotate the Volume knob clockwise until there is no background noise.
Selecting Channels
Turn the Channel knob clockwise or counterclockwise to change channels.
To change channels using the microphone, press the up or down arrow key. To scroll
quickly through the channels, press and hold the up or down arrow key.
See page 36 for lists of International, Canadian, and USA channels.
•
•
•
•
190-01019-00_0A.indd 5 12/23/2008 4:23:02 PM
6 VHF 100/200 Series Owner’s Manual
Basic Operation
Transmitting with the Radio or the Handset
1. Select the appropriate channel.
2. Check to ensure that the channel is clear before transmitting. The Federal
Communications Commission (FCC) and international regulations require that you not
obstruct the communications of others.
3. Press the PTT key on the microphone or the handset to transmit on the current channel.
The
TX
icon is displayed at the top of the screen.
4. Speak your message and release the PTT key.
NOTE: Five minutes is the maximum amount of time for transmission. After you have pressed
PTT key for ve minutes, PTT is disabled until you release the PTT key.
Bypassing the LO (1 W) Transmission Power Setting
In the USA frequency band, transmissions on Channels 13 and 67 are required to be low-
power (1 watt) by default. You can bypass this power setting by pressing the 25W soft key
during transmission.
1. If you are on USA Channels 13 or 67, when you press the PTT key, the screen displays
a message to press 25W to bypass the 1 W transmission requirement.
2. Press and hold the 25W soft key to broadcast on HI. The radio bypasses the 1 W
transmission requirement when you are pressing the 25W soft key.
Scanning and Saving Channels
Scanning All Channels
When you scan channels, the radio searches for channels that are broadcasting. If a channel
is broadcasting, the radio pauses on that channel until the broadcast stops. After four
seconds of inactivity on the channel, the radio resumes scanning.
1. Select SCAN > ALL.
2. Choose from the following options:
SKIP—this option is displayed if active channels are detected. When you select
this option, the system resumes the scan and does not include that channel in
subsequent passes.
+CH16—Channel 16 is scanned every other channel (for example: 21, 16, 22, 16,
and so on). “ALL SCAN +CH16” is displayed on the screen.
-CH16—Channel 16 is scanned in its normal order (for example, 14, 15, 16, 17, and
so on). “ALL SCAN” is displayed on the screen.
EXIT—returns you to Home screen. The system ends the current scan and continues
to receive on the channel where you ended the scan.
•
•
•
•
190-01019-00_0A.indd 6 12/23/2008 4:23:02 PM
VHF 100/200 Series Owner’s Manual 7
Basic Operation
Saving Channels
You can save any channel other than the WX (weather) channels to the transceiver memory.
You can scan your saved channels separately from scanning all of the channels that radio
receives. There is no limit to the number of channels you can save.
To save a channel:
1. Select SCAN.
2. Turn the Channel knob to access different channels.
3. To save a channel, select SAV CH. A star on the top of the screen denotes a saved
channel.
To remove the saved status from a channel:
1. Select SCAN.
2. Turn the Channel knob to access different channels.
3. Select SAV CH.
Scanning Saved Channels
1. Select SCAN.
2. Select SAVED.
NOTE: This scan does not include Channel 16 unless you saved Channel 16 to memory.
However, you can select +16 to scan Channel 16 every other channel (for example: 21, 16,
32, 16). When this setting is active, the soft key displays -16. Select -16 to scan your saved
channels in their normal order (for example, 08, 10, 11, 14).
Monitoring Multiple Channels
Select WATCH to monitor priority channels and the currently selected channel for
broadcasting activity. Channel 16 is the rst-priority channel on your radio. Channel 9 is the
default second-priority channel, but you can select another channel as your second-priority
channel. For more information on reprogramming the second-priority channel, see page 8.
Monitoring Two Channels (Dual Watch)
Dual watch allows you to cycle between monitoring the current channel you have selected
and Channel 16.
1. Select WATCH.
2. Select DUAL. “DUAL WATCH”, the currently selected channel, and Channel 16 are
displayed on the screen—for example, “DUAL WATCH CH: 75 + 16”.
3. To exit Dual watch, select EXIT.
190-01019-00_0A.indd 7 12/23/2008 4:23:02 PM

8 VHF 100/200 Series Owner’s Manual
Basic Operation
Monitoring Three Channels (Tri Watch)
Tri watch allows you to cycle between monitoring the current channel you have selected,
Channel 16, and your second-priority channel.
1. Select WATCH.
2. Select TRI. “TRI WATCH”, the currently selected channel, Channel 16, and your second-
priority channel are displayed on the screen—for example,
“TRI WATCH CH: 75 + 16 + 9”.
3. To exit Tri watch, select EXIT.
Reprogramming the Second-Priority Channel
You can program your radio to recognize a channel other than Channel 9 as your second-
priority channel.
1. Select MENU.
2. Select CHANNEL > 2ND PRIORITY.
3. Turn the Channel knob or use the up and down arrows on the microphone or handset to
change the channel displayed on the screen.
4. When the correct channel is displayed, select OK.
Using 16/9 Mode
16/9 is a priority operation that is activated by pressing the 16/9 key on the transceiver or
the microphone. Pressing the 16/9 key stops the current operation and changes your current
working channel to Channel 16 on the rst press, your second-priority channel on the
second press, and your original channel on the third press. Entering this mode changes the
transmit power to HI (25 W), and leaving this mode restores the previous setting.
1. Press the 16/9 key to immediately switch to Channel 16 and change the transmit power
to HI (25 W). To transmit on LO power in 16/9 mode, press the HI/LO key, and then
select 1W. The radio displays
1W
on the screen to indicate low-power transmission.
2. Press the 16/9 key again to switch to your second-priority channel.
3. Press the 16/9 key a third time to return to your previous current working channel and
the previous transmit power setting.
Switching Between 1 W and 25 W Transmitting Modes
You can control the transmitting power of the radio. There are two options: LO (1 W) and
HI (25 W). LO is typically used for local transmissions, while HI is typically used for
distance and distress transmissions.
NOTE: When you press the 16/9 key, the radio switches to HI power. While in 16/9 mode,
Channel 16 and the second-priority channel (Channel 9 by default) automatically transmit on
HI power. However, you can switch to LO power in 16/9 mode.
190-01019-00_0A.indd 8 12/23/2008 4:23:02 PM

VHF 100/200 Series Owner’s Manual 9
Basic Operation
When two signals are broadcast on the same frequency, a VHF radio only receives the
stronger of the two signals. Other than distress calls, transmit using the lowest power
setting that allows you to communicate. This reduces the possibility of your transmissions
interfering with the transmissions of disinterested parties.
In the USA frequency band, transmissions on Channels 13 and 67 are required to be low-
power (1 watt) by default. You can bypass this power setting by pressing the 25W soft key
during transmission.
To switch between LO and HI transmitting power:
1. Press the HI/LO key.
2. Select 1W or 25W to toggle between LO and HI transmit power modes.
TIP: The radio returns to the Home screen automatically two seconds after changing the
1 W/25 W mode. You can also select OK to return to the Home screen.
Adjusting the Local/Distant Receiving Sensitivity
You can control the receiving sensitivity of the radio. If you are experiencing noise in high-
trafc areas or areas with electromagnetic interference (caused by cell-phone towers, for
example), set the receiving sensitivity to Local to decrease the sensitivity of the receiver. In
remote areas and in open water, set the receiving sensitivity to Distant to ensure that you are
using the maximum range of the receiver.
The
LOCAL
icon is displayed on the screen when set to Local receiving sensitivity.
1. Press the HI/LO key.
2. Select LOCAL/DIST to toggle between local and distant modes.
Using the Intercom
Intercom operation only applies to the VHF 200 series radios and GHS 10 series handsets.
The intercom is part of the Public Address (PA) system of your radio. With an optional
GHS 10 or GHS 10i handset, you can use the radio and handset stations as an intercom
system for two-way communication. You can use the radio to initiate communication with a
handset station, and you can use a handset to initiate communication with the radio.
TIP: When the radio is in intercom mode, it does not receive trafc from your current channel.
Initiating an Intercom Call
1. Select PA > INTRCM.
2. Select a device from the list. Selecting ALL will transmit to every station. The other party
must press the PTT key on the receiving unit to accept the call.
3. Press and hold the PTT key and speak your message.
190-01019-00_0A.indd 9 12/23/2008 4:23:02 PM

10 VHF 100/200 Series Owner’s Manual
Basic Operation
4. Release the PTT key and listen for a response.
5. When you and the other party have nished talking, select EXIT to return to the Home
screen.
Receiving an Intercom Call
1. The screen indicates which station is calling. Press and release the PTT key to accept
the call.
2. When the other party has nished talking, press and hold the PTT key and speak your
message.
3. When you and the other party have nished talking, select EXIT to return to the Home
screen.
Using the Hailer
Hailer operation is only available with the VHF 200 Series. You must provide and install an
optional hailer horn on the deck or tower to use this feature. See the VHF 100/200 Series
Installation Instructions for installation information.
The hailer, which is part of the PA system of your radio, allows you to make on-boat or
ship-to-shore announcements. The hailer allows for two-way communication: you can
address the ship using the radio or handset, and sounds received through the horn can be
heard through the radio speaker. For vessels with enclosed cabins, this allows you to hear
what is happening on deck.
NOTE: When the radio is in hailer mode, it does not receive trafc from your current channel.
To operate the hailer:
1. Select PA > HAILER. Sounds received through the horn can be heard through the radio
speaker.
2. Press and hold the PTT key and speak your announcement.
3. Turn the Channel knob or select the up and down arrows to adjust the horn volume.
4. Release the PTT key to listen.
5. Select EXIT to return to the Home screen.
Using the Foghorn
Foghorn operation is only available with the VHF 200 Series. You must provide and install
an optional hailer horn on the deck or tower to use this feature. See the VHF 100/200 Series
Installation Instructions for installation information.
The foghorn is part of the PA system of your radio. You can sound the foghorn through
a hailer horn or an external speaker. Your radio can sound the horn automatically using
standard, pre-dened patterns, or you can sound the horn manually.
190-01019-00_0A.indd 10 12/23/2008 4:23:02 PM
VHF 100/200 Series Owner’s Manual 11
Basic Operation
Similar to the hailer, when you are manually operating the foghorn, sounds received through
the horn can be heard through the radio speaker between soundings.
Automatically Sounding the Foghorn
1. Select PA > FOG.
2. Select AUTO from the list.
3. Select an item from the following options. The radio alternates between sounding the
pattern of tones or rings and receiving radio trafc.
UNDERWAY
•
STOPPED
•
SAILING/FISHING
•
RESTRICT/TOW
•
UNDER TOW
•
PILOT
•
AT ANCHOR
•
AGROUND
•
4. Turn the Channel knob to adjust the volume of the horn.
5. Select EXIT to turn off the automatic soundings and return to the Home screen.
Manually Sounding the Foghorn
NOTE: When you manually sound the horn, the radio will not alternate to receive radio trafc
between horn soundings.
To sound the fog horn:
1. Select PA > FOG.
2. Select MANUAL from the list. Sounds received through the horn can be heard through
the radio speaker.
3. Press the PTT key on the microphone or handset to sound the horn. The horn will stop
when you release the PTT key.
4. Turn the Channel knob to adjust the volume of the horn.
5. Select EXIT to return to the Home screen.
Adjusting the Sound Frequency of the Foghorn
You can increase or decrease the sound frequency of the foghorn. The pitch of the tone
will rise with an increase in the frequency, and will fall with a decrease in frequency. The
minimum setting is 200 Hz and the maximum setting is 850 Hz. The default setting is 350
Hz. Regulations dictate the correct frequency of foghorns. Typically, these regulations
correlate the required foghorn frequency with the size of the vessel.
1. Select the MENU key.
2. Select FOG FREQUENCY.
3. Use the Channel knob to adjust the frequency in 50 Hz increments.
190-01019-00_0A.indd 11 12/23/2008 4:23:02 PM
12 VHF 100/200 Series Owner’s Manual
Basic Operation
4. Select ACCEPT to save your changes and return to the Home screen. Select CANCEL
to disregard the changes and return to the previous screen.
Listening to NOAA Weather Broadcasts and Enabling
Weather Alerts
There are 10 WX (weather) channels that are pre-programmed into your radio to monitor
weather broadcasts from the National Oceanic and Atmospheric Organization (NOAA). WX
channels are listen-only channels.
These broadcasts are in a continuous loop and are updated regularly. Because the NOAA
weather centers broadcasting the information are regional, the weather information will be
relevant to your broadcast area.
NOTE: This functionality is not available with the VHF 100i or VHF 200i. NOAA broadcasts
on the WX channels are only available in the USA and certain regions in Canada.
Accessing WX (Weather) Mode
1. While viewing the Home screen, press the Channel knob. “WX” is displayed to indicate
that you are listening to WX frequencies.
2. Turn the Channel knob to change the channel.
3. Select EXIT to return to the Home screen. The radio returns to the channel you were
listening to before you entered WX mode.
Enabling WX (Weather) Alerts
You can enable your radio to continually monitor NOAA weather alerts. If the radio detects
an incoming weather alert, it will automatically tune to the WX channel that is broadcasting
the alert. The radio will not receive WX alerts if the transmitter is active.
NOTE: When you enable weather alerts, the radio only monitors the last monitored weather
channel.
1. Press the Channel knob to access WX mode.
2. Select ALERT.
3. Select EXIT or press the Channel knob to return to the Home screen.
The icon indicates that WX alerts are enabled.
Disabling WX (Weather) Alerts
1. Press the Channel knob to access WX mode.
2. Select ALERT.
3. Select EXIT to return to the Home screen.
190-01019-00_0A.indd 12 12/23/2008 4:23:02 PM

VHF 100/200 Series Owner’s Manual 13
Basic Operation
Automatic Transmitter Identication System (ATIS)
ATIS is a vessel identication system that can be used on certain inland waterways in
certain countries throughout Europe. Your Garmin dealer can program your VHF 100i,
VHF 200i, or GHS 10i to use ATIS if you plan to use your radio on waterways that are
within the bounds of the Regional Arrangement Concerning the Radiotelephone Service
on Inland Waterways (the Basel Agreement). The use of ATIS is prohibited outside the
European inland waterways covered by the Basel Agreement.
When you enable ATIS, a data signal identifying your station is sent at the end of every
transmission. Data identifying your position is not sent; however, your position is calculated
through the method of triangulation by coastal stations receiving your transmissions.
To enable ATIS, enter your ATIS identication number (see below), and then turn on ATIS
(see page 14). Contact your Garmin dealer to determine your ATIS identication number
and to learn about ATIS requirements for your region.
Your radio disables the following functions when you enable ATIS:
Digital Selective Calling (DSC)
Dual watch and Tri watch
Channel scanning
The following International channels are restricted to transmit on low-power (1 watt) when
you enable ATIS: 6, 8, 10, 11, 12, 13, 14, 71, 72, 74, and 77.
Entering Your ATIS Identication Number
1. Press the MENU key.
2. Select ATIS > MY ATIS ID.
3. For each number in the sequence, turn the Channel knob clockwise to increase the
number, and counterclockwise to decrease the number.
4. Press the Channel knob to accept the number and move to the next number in the
sequence.
5. Select ACCEPT when you have entered your ATIS number. The radio prompts you
reenter your number.
6. Enter your ATIS ID number again, and press ACCEPT. If the ATIS ID numbers you
entered do not match, the screen displays “ATIS ID NUMBERS DO NOT MATCH”.
Select RETRY and enter the numbers again.
•
•
•
190-01019-00_0A.indd 13 12/23/2008 4:23:03 PM

14 VHF 100/200 Series Owner’s Manual
Basic Operation
Viewing Your ATIS ID Number
1. Press the MENU key.
2. Select ATIS > MY ATIS ID.
3. Select OK to return to the previous screen, or press the MENU key to return to the Home
screen.
Turning ATIS Functionality On and Off
1. Press the MENU key.
2. Select ATIS > ATIS.
3. Select ON or OFF. When ATIS is enabled, the
ATIS
icon is displayed on the screen.
4. Select OK to save your changes and return to the Home screen. Press the MENU key to
return to the Home screen without saving your changes.
190-01019-00_0A.indd 14 12/23/2008 4:23:03 PM
VHF 100/200 Series Owner’s Manual 15
Digital Selective Calling
Digital Selective Calling (DSC)
DSC is a key component of the Global Maritime Distress and Safety System (GMDSS).
DSC provides VHF radios with the ability to place and receive digital calls directly with
other vessels and shore stations, including the USA and Canadian Coast Guards. Your radio
includes full Class D DSC capabilities.
If you have a GPS device connected to the transceiver, your latitude and longitude and the
current time are transmitted when you send a distress call or other type of DSC call. If you
have manually entered your position information, your latitude, longitude, and time of entry
are transmitted with the call. Having your location automatically transmitted prevents you
from needing to identify your location in an emergency situation.
Channel 70 is reserved exclusively for DSC calls, and your radio uses a dedicated receiver
to maintain a constant watch on Channel 70. You do not need to change the channel to make
a DSC call, since your radio automatically changes to Channel 70 to transmit a DSC call.
Your radio sends the DSC data over Channel 70 in less than one second, and then tunes to
the appropriate channel for voice communications.
IMPORTANT: To use the DSC capabilities of your radio, you must rst enter a Mobile
Maritime Safety Identity (MMSI) number. An MMSI number identies each DSC radio, like a
telephone number.
The icon is displayed when you have an incoming or missed DSC call.
Entering Your MMSI Number
The Mobile Maritime Safety Identity (MMSI) number is a nine-digit code that acts as a
DSC self-identication number, and is required in order to use the DSC capabilities of your
radio. You can obtain an MMSI number from the telecommunications authority or ship
registry for your country. In the USA, you can obtain an MMSI number from the following
sources:
Federal Communications Commission (FCC)—assignments are recognized
internationally
BoatU.S., Sea Tow, or United States Power Squadrons
®
—assignments are for USA
waters only
After obtaining your MMSI number, you must program the number into your radio to
enable DSC.
IMPORTANT: Use caution when entering your MMSI number, because you can only enter it
once. If you need to change your MMSI number after entering it, you must take the radio your
Garmin dealer for reprogramming.
•
•
190-01019-00_0A.indd 15 12/23/2008 4:23:03 PM

16 VHF 100/200 Series Owner’s Manual
Digital Selective Calling
To enter your MMSI number:
1. Press the MENU key.
2. Select DSC > MY MMSI.
3. For each number in the sequence, turn the Channel knob clockwise to increase the
number, and counterclockwise to decrease the number. Press the Channel knob to
move to the next number in the sequence. Select ab to return to a previous character.
4. Select ACCEPT when you have entered your MMSI number. The radio prompts you
conrm your entry.
5. Enter your MMSI number again, and select ACCEPT. If the MMSI numbers you entered
do not match, the screen displays “MMSI NUMBERS DO NOT MATCH”. Select RETRY
and repeat the process. If you do not want to enter your MMSI number at this time,
select CANCEL.
Viewing Your MMSI Number
1. Press the MENU key.
2. Select DSC > MY MMSI.
3. Select OK to return to the previous screen, or press the MENU key to return to the Home
screen.
DSC Distress Calls
When you make a DSC distress call, your call is transmitted to all DSC-capable radios
within receiving range. Your current GPS position (latitude and longitude) and the
current time are included in the transmission if you have a GPS device connected to your
transceiver. If you have manually entered your position information with the time, that
data is transmitted with the call. For information on manually updating your position
information, see page 27.
NOTE: Familiarize yourself with the standard distress-call format and protocol to ensure that
your calls are clear and effective.
Sending an Undesignated Distress Call
When you send an undesignated distress call, the nature of your emergency is not
transmitted to the receiving stations. Sending an undesignated distress call is a shorter and
quicker procedure that can save you time during an emergency.
1. Lift the spring-loaded door, and press and hold the DISTRESS key for at least three
seconds. The transceiver beeps, and the screen displays “DISTRESS CALL COUNTING
DOWN”. The channel pane counts down the seconds from 3 to 1.
2. The radio automatically sounds an alarm, switches to Channel 70, and transmits your
call on HI (25 W) power. You can press any key to turn off the alarm sound.
190-01019-00_0A.indd 16 12/23/2008 4:23:03 PM

VHF 100/200 Series Owner’s Manual 17
Digital Selective Calling
3. After transmitting your distress call, the radio automatically tunes to Channel 16 on
HI (25 W) power. Press the PTT key on the microphone or handset and speak your
message. The radio waits for an acknowledgement (ACK) on Channel 70 from a listening
station.
Sending a Designated Distress Call
When you send a designated distress call, the nature of your emergency is transmitted to the
receiving stations.
1. Lift the spring-loaded door and press the DISTRESS key.
2. Use the Channel knob to select the type of distress call:
UNDESIGNATED
FIRE
FLOODING
COLLISION
GROUNDING
CAPSIZING
SINKING
ADRIFT
ABANDONING
PIRACY
MAN OVERBOARD
NOTE: To exit this screen without sending a designated distress call, press the CLEAR key to
return to the Home screen, or press the 16/9 key to tune to Channel 16.
3. Press and hold the DISTRESS key for at least three seconds.
4. The transceiver beeps, and the screen displays “DISTRESS CALL COUNTING DOWN”.
The channel pane counts down the seconds from 3 to 1.
5. The radio automatically sounds an alarm, switches to Channel 70, and transmits your
call on HI (25 W) power. You can press any key to turn off the alarm sound.
6. After transmitting your distress call, the radio automatically tunes to Channel 16 on HI
(25 W) power. Press the PTT key on the microphone or GHS 10 handset and speak your
message. The radio waits for an acknowledgement (ACK) from a listening station.
Waiting for a Distress Call Acknowledgement
If the radio does not receive a distress call acknowledgement, the radio retransmits the
distress call at a random time between 3.5 and 4.5 minutes. This process is repeated
continually until the radio receives an acknowledgement.
•
•
•
•
•
•
•
•
•
•
•
190-01019-00_0A.indd 17 12/23/2008 4:23:03 PM

18 VHF 100/200 Series Owner’s Manual
Digital Selective Calling
Receiving a distress call acknowledgement:
1. When the radio receives a distress call acknowledgment, the radio beeps and the screen
displays “DISTRESS ACK”. Press any key to turn off the beeping.
2. Select ] to view additional information. If the MMSI of the station transmitting the
ACK signal is an entry in your directory, the name associated with the MMSI number is
indicated on the screen. If not, the screen displays the MMSI number.
3. Select ACCEPT.
Stopping Automatic Retransmission of Distress Calls
To stop the radio from automatically retransmitting a distress call, select CANCEL.
The radio remains tuned to Channel 16. Selecting CANCEL does not communicate to
other stations that you no longer have an emergency. Selecting CANCEL only stops the
automatic repetition of the call. For information on revoking a distress call, see below.
Revoking a Distress Call
A DSC distress call is not transmitted until you press and hold the DISTRESS key for at
least three seconds. However, if you inadvertently make a DSC distress call or are no longer
in distress, it is important to cancel the call immediately by transmitting a voice message to
All Stations on Channel 16.
1. Select CANCEL to cancel the distress alert.
2. Press the 16/9 key. The radio tunes to the Channel 16.
3. Press the PTT key on the microphone or handset and speak a voice message to cancel
the false distress alert. The following is an example of an appropriate cancellation
message:
“All Stations, All Stations, All Stations, this is ________ (vessel name), MMSI number
________, Position ________ North (or South), ________ West (or East). Cancel my
distress alert of ________ (date and time). This is ________ (vessel name), MMSI number
________, Out.”
Placing Calls
Placing Individual Calls
1. Press the DSC key.
2. Select INDIVIDUAL.
3. Select from the following options to select the place from which the MMSI number is
retrieved:
MANUAL—a screen is displayed that allows you to enter the MMSI number manually.
Select a number and move to the next character. When you have entered the correct
MMSI number, select ACCEPT.
DIRECTORY—the directory is displayed. Select an entry.
•
•
190-01019-00_0A.indd 18 12/23/2008 4:23:03 PM

VHF 100/200 Series Owner’s Manual 19
Digital Selective Calling
RECENT CALLS—a screen is displayed that allows you to select from your recent
calls. Select an entry.
4. After you have selected the vessel or entered the MMSI number manually, select the
channel on which you want to communicate. The radio transmits this request with your
call. See below for information on selecting a channel.
5. Select CALL.
The radio transmits the call on Channel 70 and returns to the current working channel. The
radio listens for an acknowledgement on Channel 70 while staying on the working channel.
After an acknowledgement is received, the radio automatically tunes to the channel you
selected.
Placing Group Calls
You can contact a group of specic vessels, such as a sailing club or otilla, by making a
group call. Before placing a call to a group, ensure that the MMSI number of the group is
entered into the memory. For more information on entering a group, see page 26.
1. Press the DSC key.
2. Select GROUP > CALL.
3. Select an entry.
4. After you have selected the group, select the channel on which you want to
communicate. The radio will transmit this request with your call. See below for
information on selecting a channel.
5. Select CALL. The radio transmits the call on Channel 70 and tunes to the channel you
selected.
Selecting the Channel for Individual Calls or Group Calls
When placing an individual or group call, you can select from the following channels on
which you want to communicate. The radio transmits this request with your call.
USA: 6, 8 ,9 ,10 ,13 ,16, 17, 67, 68, 69, 71, 72, 73, or 77
Canadian and International: All of the channels listed previously, plus Channel 15
In most cases, the selection of a DSC channel is limited to those channels that are available
in all frequency bands. When selecting the channel, select CUSTOM to select a different
channel than the ones listed above. If you select a custom channel, be aware that the station
you are calling may not be able to comply with the specied channel. Ensure that you select
a channel that is appropriate for communication.
•
•
•
190-01019-00_0A.indd 19 12/23/2008 4:23:03 PM

20 VHF 100/200 Series Owner’s Manual
Digital Selective Calling
Placing All-Ships Calls
All-ships calls are transmitted to all stations within receiving distance of your radio. You can
make two types of all-ships calls:
Safety calls are used to broadcast signicant navigational or weather-related information.
Urgency calls are used to communicate situations about the safety of a vessel or person
when danger is not imminent. Discerning whether a situation warrants a distress call or
an urgency call is the responsibility of the captain.
To place an all-ships call:
1. Press the DSC key.
2. Select ALL SHIPS.
3. Select SAFETY or URGENCY to indicate the reason for your call.
4. Select CALL. The radio transmits the call on Channel 70 and then automatically
switches to Channel 16.
Placing Position Request Calls
Position data received from stations that respond to position request calls is sent over the
NMEA network, so that you can track the vessels on your Garmin chartplotter, for example.
For more information on NMEA 0183 and NMEA 2000, see page 29.
1. Press the DSC key.
2. Select POS. REQUEST.
3. Select from the following options to select the place from which the MMSI number is
retrieved:
MANUAL—a screen is displayed that gives you the ability to enter the MMSI number
manually. Select a number and move to the next character. When you have entered
the correct MMSI number, select ACCEPT.
DIRECTORY—the directory is displayed. Select an entry.
4. Select ACCEPT when you have entered your MMSI number.
5. Select CALL. The radio transmits the call on Channel 70, and then switches to your
current working channel. The screen displays “POS REQUEST WAITING FOR
ACKNOWLEDGE”.
•
•
•
•
190-01019-00_0A.indd 20 12/23/2008 4:23:03 PM

VHF 100/200 Series Owner’s Manual 21
Digital Selective Calling
Receiving Calls
Receiving Distress Calls and Distress Relay Calls
The radio sends data relative to the call over the NMEA network based on how you have
MMSI ltering congured. See page 30 for more information.
1. When receiving a distress call or a distress relay call, the screen displays the
“DISTRESS” or “DISTR RELAY” and information about the call (for example, the MMSI
number and the nature of the distress). Select ] to view additional information.
2. If necessary, select OK to tune to Channel 16. See page 28 for more information on
conguring the auto channel-change setting. If you select CANCEL, the radio does not
change channels and continues to receive on the current channel.
3. Select OK to return to the Home screen on the new channel.
Receiving All-Ships Urgency Calls
1. When receiving an all-ships urgency call, “ALL SHIPS” is displayed on the screen.
“URGENCY” is shown as the type of call. If the channel request is for an invalid channel,
“INVALID REQUEST” is displayed on the screen.
2. If necessary, select OK to switch to Channel 16. See page 28 for more information on
conguring the auto channel change setting. If you select CANCEL, the radio does not
change channels and continues to receive on the current channel.
3. Select OK to return to the Home screen on the new channel.
Receiving All-Ships Safety Calls
1. When receiving an all-ships safety call, “ALL SHIPS” is displayed on the screen.
“SAFETY” is shown as the type of call. Select OK to change the channel. If you select
CANCEL, the radio does not change channels and continues to receive on the current
channel.
2. Select OK to return to the Home screen on the new channel.
Receiving Individual Routine Calls
1. When receiving an individual routine call, “INDIVIDUAL” is displayed on the screen.
“ROUTINE” is shown as the type of call. If the channel request is for an invalid channel,
“INVALID REQUEST” is displayed on the screen.
2. If the channel request is for a valid channel, select OK to change channels. If you select
CANCEL, the radio does not change channels and continues to receive on the current
channel.
190-01019-00_0A.indd 21 12/23/2008 4:23:03 PM

22 VHF 100/200 Series Owner’s Manual
Digital Selective Calling
Receiving Position Request Calls
You can congure your radio reply automatically to incoming position requests, to prompt
you to review and approve the incoming requests before replying, or to ignore incoming
requests (see page 28 for more information).
If you enable automatic position replies, the screen displays “SENDING POSITION
CALLING” and sends your position when receiving a position request. After the call has
been transmitted successfully, the screen displays “POSITION SENT”.
When receiving a position request, “POS. REQUEST FROM [VESSEL NAME or MMSI
NUMBER]” is displayed on the screen. If GPS data is available, press OK to send the
position reply. If GPS data is not available, the screen displays “NO GPS DATA. UNABLE
TO COMPLY”.
Receiving Position Send Calls
When receiving a position send call (position report), “POS. SEND FROM [VESSEL
NAME or MMSI NUMBER]” is displayed on the screen with the position data. Select OK
to return to the Home screen.
Receiving Group Calls
1. When receiving a group call, “GROUP ROUTINE” is displayed on the screen. The radio
prompts you to change to the requested channel. If the channel request is for an invalid
channel, “INVALID REQUEST” is displayed on the screen.
2. Select OK to change the working channel.
3. Select OK to return to the Home screen on the new channel.
Position Tracking
When you enable position tracking, your radio uses interval position-request calls to track
up to three vessels. Regulations allow transmission of one position-request call every ve
minutes. You can call up to three vessels that your radio will alternate calling at ve-minute
intervals. If a vessel does not respond to ve consecutive position-request calls, the vessel is
removed from the position-tracking list.
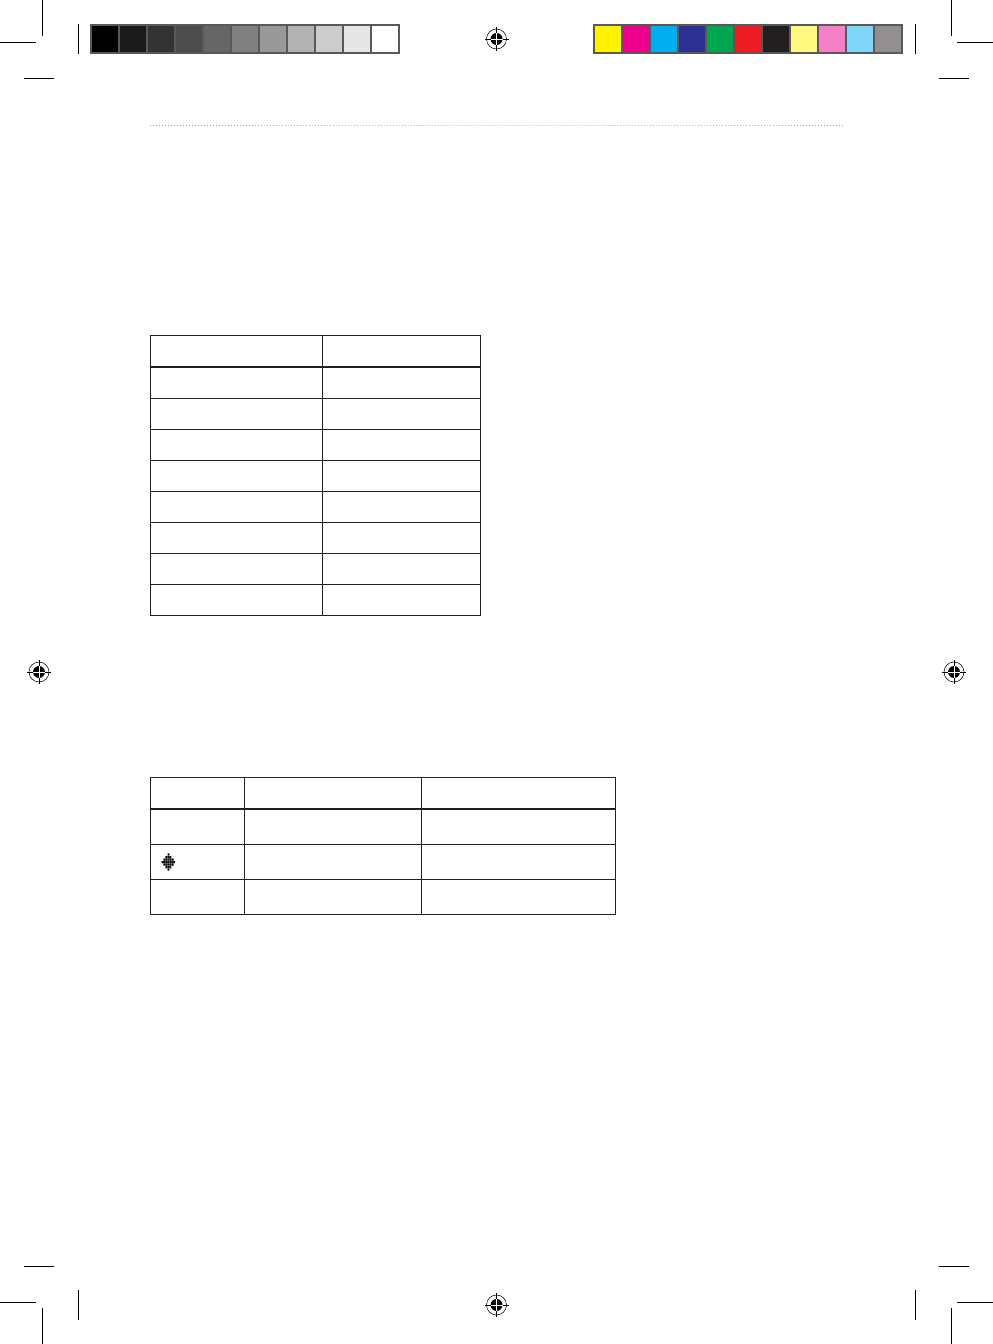
The following timetable shows the polling sequence when you have three vessels in the
position-tracking list. The radio continues to send position-request calls until you stop
position tracking by selecting EXIT.
Time 0 minutes 5 minutes 10 minutes 15 minutes 20 minutes
Vessel Polled Ship 1 Ship 2 Ship 3 Ship 1 Ship 2
190-01019-00_0A.indd 22 12/23/2008 4:23:03 PM

VHF 100/200 Series Owner’s Manual 23
Digital Selective Calling
Position data received from stations that respond to position-request calls is sent over the
NMEA network, so that you can track the vessels using your Garmin chartplotter. For more
information on NMEA 0183 and NMEA 2000, see page 29.
Selecting the Vessels and Activating the Call
1. Press the DSC key.
2. Select POS. TRACKING > ADD ENTRY. You can have no more than three vessels on
the position tracking list at one time. If you select ADD ENTRY and the radio sounds a
triple error beep, you must delete an entry before adding another.
3. Select the vessels from the directory.
4. Select BEGIN TRACKING. The icon is displayed to indicate that position tracking is
in progress.
5. Select EXIT to stop position tracking.
Viewing and Deactivating Vessels on the Position Tracking List
1. Press the DSC key.
2. Select POS. TRACKING.
3. To view the vessels on the list, select VESSELS.
4. To congure the radio to keep a vessel on the list, but to not call that vessel for position
tracking information, select the vessel.
5. Select OFF.
Editing Vessel Information in the Position Tracking List
1. Press the DSC key.
2. Select POS. TRACKING > EDIT ENTRY.
3. Select the vessel.
4. Turn the Channel knob to change a character in the MMSI or Name eld. Press the
Channel knob to select the character and move to the next character in the eld.
5. Select ACCEPT to save your changes. Select CANCEL to return to the previous screen.
Deleting a Vessel from the Position Tracking List
1. Press the DSC key.
2. Select POS. TRACKING > DELETE.
3. Select the vessel.
4. Select YES to delete the vessel from the list. Select NO to return to the previous screen
without deleting.
190-01019-00_0A.indd 23 12/23/2008 4:23:03 PM
24 VHF 100/200 Series Owner’s Manual
Digital Selective Calling
Working with the Call Logs
For every DSC call that your radio receives, the calling station, type of call, and date and
time of the call are recorded in the call logs. The latitude and longitude of the calling station
are also recorded if they are transmitted with a call.
There are three categories for calls that are logged: distress, position, and other. The
following table indicates where each type of call is located in the call logs.
Call Type Call Log
Distress Distress
Distress relay Distress
Distress ACK Distress
Position send Position
Position request Position
Group Other
All Ships Other
Individual Other
If you have entered the calling station in your directory, the name of the station is displayed
in the list of calls. If not, the MMSI number is displayed. A symbol indicating the station
type may be displayed to the left of the station name or MMSI number. The following table
indicates the meaning of these symbols and the MMSI number format for different station
types.
Symbol Meaning MMSI Number Format
$
Ship station xxxxxxxxx
Group call 0xxxxxxxx
&
Coastal station 00xxxxxxx
Viewing the Calls Stored in the Call Logs
1. Press the DSC key.
2. Select CALL LOG > DISTRESS LOG, POSITION LOG, or OTHER LOG.
3. Select the call. Information about the call is displayed on the screen. Select ] to scroll
and view all of the information.
190-01019-00_0A.indd 24 12/23/2008 4:23:03 PM

VHF 100/200 Series Owner’s Manual 25
Digital Selective Calling
Placing a Call from a Call Log
All calls placed from the call log are individual routine calls.
1. Press the DSC key.
2. Select CALL LOG > DISTRESS LOG, POSITION LOG, or OTHER LOG.
3. Select the MMSI number or the station name.
4. Select CALL. The screen indicates individual routine as the call type.
5. Select the channel on which you want to communicate. The radio transmits this request
with your call. See page 19 for information on selecting a channel.
6. Select CALL.
Saving a Vessel to the Directory from a Call Log
1. Press the DSC key.
2. Select CALL LOG > DISTRESS LOG, POSITION LOG, or OTHER LOG.
3. Select the MMSI number. Select a station name if you want to edit the name in the
directory.
4. Select SAVE.
5. To edit the name, turn the Channel knob to change the character. Press the Channel
knob to select the character and move to the next character in the name. Select ab to
return to a previous character. You can enter up to 10 characters.
6. Select ACCEPT to save your changes. Select CANCEL to exit the edit screen without
saving your changes.
Deleting a Call Log Entry
1. Press the DSC key.
2. Use the Channel knob to select CALL LOG > POSITION LOG, DISTRESS LOG, or
OTHER LOG.
3. Use the Channel knob to select the MMSI number or station.
4. Select ].
5. Select DELETE.
6. Select YES to delete the call. Select NO to cancel this action and return to the previous
screen.
190-01019-00_0A.indd 25 12/23/2008 4:23:03 PM

26 VHF 100/200 Series Owner’s Manual
Digital Selective Calling
Using the Directory
Viewing the Directory
1. Press the DSC key.
2. Select DIRECTORY.
3. Select a station name in your directory.
4. Press the CLEAR key to return to the previous screen. Press the MENU key to return to
the Home screen.
Adding an Individual Entry to the Directory
1. Press the DSC key.
2. Select DIRECTORY > ADD ENTRY.
3. Enter the MMSI number.
4. Enter a name. You can enter up to 10 characters.
5. Select ACCEPT to save your changes to the directory. Select BACK to return to the
previous screen without saving your changes. Press the MENU key at any time to return
to the Home screen.
Editing an Individual Entry in the Directory
1. Press the DSC key.
2. Select DIRECTORY > EDIT ENTRY.
3. Select an entry in the directory.
4. Change the characters in the MMSI eld or the Name eld.
5. Select ACCEPT to save your changes to the directory. Select BACK to return to the
previous screen without saving your changes. Press the MENU key to return to the
Home screen.
Deleting an Individual Entry from the Directory
1. Press the DSC key.
2. Select DIRECTORY > DELETE.
3. Select the entry to delete.
4. Select YES to delete the entry. Select NO to quit the action and return to the directory
list. Press the CLEAR key at any time to return to the previous screen without saving
your changes. Press the MENU key to return to the Home screen.
Adding and Modifying Group Entries
Adding a Group
1. Press the DSC key.
2. Select GROUP > ADD ENTRY.
3. Enter the MMSI number.
190-01019-00_0A.indd 26 12/23/2008 4:23:03 PM

VHF 100/200 Series Owner’s Manual 27
Digital Selective Calling
4. Enter a name.
5. Select ACCEPT to save your changes. Select CANCEL to return to the previous screen
without saving the changes. Press the MENU key to return to the Home screen.
Editing a Group
1. Press the DSC key.
2. Select GROUP > EDIT ENTRY.
3. Change the characters in the MMSI eld or the Name eld.
4. Select ACCEPT to save your changes. Select CANCEL to return to the previous screen
without saving the changes. Press the MENU key to return to the Home screen.
Deleting a Group
1. Select the DSC key.
2. Select GROUP > DELETE.
3. Select YES to delete the entry. Select NO to quit the action and return to the previous
screen.
Conguring DSC Settings
Manually Entering Position Information
If you do not have a GPS device connected to your radio, manually enter your position and
time of entry so that this information will be transmitted with DSC calls. When you enter
the position and time manually, “MANUAL POS” is displayed on the screen.
Your radio has two alarms to indicate that you need to update your position data:
When the position data you entered manually is over four hours old, the radio beeps and
displays “DATA IS OVER 4 HOURS OLD” on the screen.
After 23.5 hours, manually-entered position data is considered invalid. The radio
displays “DATA IS INVALID” on the screen. The radio will not transmit position data
that is more than 23.5 hours old.
See page 35 for more information on GPS alarms.
When you manually enter your position with the time, the time remains xed at the value
you specify. The radio updates the time only if you connect a GPS device to the radio.
To enter position information:
1. Press the MENU key.
2. Select SYSTEM > MANUAL GPS.
3. For each number in the sequence, turn the Channel knob clockwise to increase the
number, and counterclockwise to decrease the number. When entering a direction
character, rotate the channel knob to switch between N or S and E or W.
•
•
190-01019-00_0A.indd 27 12/23/2008 4:23:04 PM

28 VHF 100/200 Series Owner’s Manual
Digital Selective Calling
Conguring the Automatic Channel Change Setting
This setting determines whether the radio automatically tunes to Channel 16 when receiving
the following types of calls:
Distress
Distress relay
All-ships urgency
Under certain conditions, you may want to disable automatic channel changing, such as
when you need to continually monitor a channel to maintain uninterrupted communication
with another vessel. When disabled, the icon is displayed on the screen.
1. Press the MENU key.
2. Select DSC > AUTO CHANGE CH.
3. Select from the following options:
ON—when a qualifying call is received, the radio automatically turns the channel to
Channel 16.
OFF—when a qualifying call is received, a message is displayed that prompts you to
accept or decline the changing of channels.
4. Press the MENU key to return to the Home screen.
Conguring the Automatic Position Reply Setting
You can congure the way your radio responds to incoming position requests.
1. Press the MENU key.
2. Select DSC > POSITION REPLY.
3. Select from the following options:
AUTO—the radio automatically and immediately sends position information to all
position inquiries.
MANUAL—the radio sends position information only after you review and approve
the request.
OFF—the radio does not send position information or notify you when a position
inquiry has been received.
4. Press the MENU key to return to the Home screen.
•
•
•
•
•
•
•
•
190-01019-00_0A.indd 28 12/23/2008 4:23:04 PM
VHF 100/200 Series Owner’s Manual 29
Advanced Operation
Advanced Operation
NMEA 0183 and NMEA 2000
When you connect your radio to a NMEA 0183 network or a NMEA 2000 network (VHF
200/200i only), the following data can be transferred:
The radio can transfer received DSC distress and position information to any compatible
chartplotter.
The radio can receive GPS position. GPS position can be displayed on the Home screen
and is transmitted with DSC calls. The icon is displayed when GPS data is available,
and blinks when GPS data is not present. When GPS data is not present, the radio will
signal for you to enter your position manually every four hours.
For supported NMEA 0183 sentences and NMEA 2000 PGNs, see page 48. For more
information on connecting your radio to a NMEA network, see the VHF 100/200 Series
Installation Instructions.
Additional Functionality with Other Garmin Devices
Your VHF 100/200 series radio has additional capabilities when connected with other
Garmin devices.
NOTE: Your Garmin chartplotter may require a free software upgrade to use the functionality
listed in this section.
When you connect your radio to a Garmin chartplotter using NMEA 0183 or
NMEA 2000, your chartplotter can keep track of the current and previous positions of
the contacts in the radio directory.
TIP: Try using position tracking on up to three contacts to automate this process.
When your VHF 200 or VHF 200i is connected to a NMEA 2000 network with another
Garmin chartplotter, you can use the chartplotter interface to set up an individual routine
call.
As an additional safety measure, when your VHF 200 or VHF 200i is connected to a
NMEA 2000 network and you initiate a man-overboard distress call from your radio,
your Garmin chartplotter will display the man-overboard screen and prompt you to
navigate to the man-overboard point. If you have a Garmin autopilot system connected
to the network, it will prompt you to start a Williamson’s turn to the man-overboard
point.
•
•
•
•
•
190-01019-00_0A.indd 29 12/23/2008 4:23:04 PM

30 VHF 100/200 Series Owner’s Manual
Advanced Operation
Selecting NMEA 0183 or NMEA 2000
Because only the VHF 200, VHF 200i, GHS 10, and GHS 10i are NMEA 2000-compatible,
this setting is only available on those units. This setting indicates whether you are connected
to a NMEA 0183 or NMEA 2000 network. The radio can only communicate over one
network type at a time.
1. Press the MENU key.
2. Select COMMUNICATIONS > PROTOCOL.
3. Select NMEA2000 or NMEA0183.
MMSI (Vessel) Filtering over a NMEA Network
Your radio can send call-related data over NMEA 0183 or NMEA 2000 when it receives
distress calls, acknowledgements to position request calls, and other position-send calls. You
can lter the MMSI numbers (vessels) for which your radio sends this data in three ways:
any MMSI number (all vessels), no MMSI numbers (no vessels), or select MMSI numbers
(vessels selected from your directory).
When you congure the radio to send data for select vessels, and you receive a distress call,
an acknowledgement to a position request call, or other position-send call from an MMSI
number not in your directory, your radio does not send NMEA data for that call. For more
information about NMEA output from your radio, see page 48.
Conguring MMSI Filtering for Select Vessels
1. Press the MENU key.
2. Select COMMUNICATIONS > DSC OUTPUT > SELECT VESSELS. You can also select
ALL VESSELS to send data when you receive a call from any MMSI number, or select
NO VESSELS to not send data for any MMSI number.
3. Select the vessel in your directory.
4. Select from the following options:
ON—the radio will send call-related data over your NMEA network when you receive
a distress call, an acknowledgement to a position request call or other position send
call from this vessel.
OFF—the radio will not send data for this vessel.
•
•
190-01019-00_0A.indd 30 12/23/2008 4:23:04 PM

VHF 100/200 Series Owner’s Manual 31
Advanced Operation
Modifying the Operating Settings
Modifying the Backlight and Contrast Settings
1. Press the MENU key.
2. Select SYSTEM > DISPLAY > BACKLIGHT or CONTRAST.
3. Turn the Channel knob to adjust the backlight or contrast. “MAX” represents the
maximum setting, and the number 1 represents the minimum setting.
4. Select CANCEL to disregard your changes and return to the previous screen. Select OK
to save your changes and return to the Home screen.
Modifying the Beeper Setting
You can change the volume of the beeper tone that sounds when you press keys or the
Channel knob, or you can turn the beeper tone off.
1. Press the MENU key.
2. Select SYSTEM > BEEPER.
3. Select from the following options:
OFF—the radio does not beep when you press keys, or when you press the Channel
knob.
QUIET or LOUD—set the beeper volume level.
Turning the Auto Power-On Setting On or Off
1. Press the MENU key.
2. Select SYSTEM > AUTO POWER-ON.
3. Select ON or OFF.
Conguring Whether Latitude and Longitude are Displayed on the
Home Screen
You can display the latitude and longitude on the home screen if you have a GPS device
connected to your radio, or if you enter position data manually.
1. Press the MENU key.
2. Select SYSTEM > NUMBERS > LAT/LONG.
3. Select from the following options:
AUTO—latitude and longitude information is displayed on the Home screen.
HIDE—latitude and longitude information is not displayed on the Home screen.
•
•
•
•
190-01019-00_0A.indd 31 12/23/2008 4:23:04 PM
32 VHF 100/200 Series Owner’s Manual
Advanced Operation
Conguring Course Over Ground/Speed Over Ground (COG/SOG)
Information Displayed on the Home Screen
You can display COG and SOG on the home screen if you have a GPS device connected to
your radio.
1. Press the MENU key.
2. Select SYSTEM > NUMBERS > COG/SOG.
3. Select from the following options:
AUTO—COG/SOG information is displayed on the Home screen.
HIDE—COG/SOG information is not displayed on the Home screen.
Conguring Whether the Time is Displayed on the Home Screen
You can congure whether the time is displayed on the Home screen. The radio updates the
time only if you connect a GPS device to the radio. When you manually enter your position
with the time, the time remains xed at the value you specify. This time of entry is always
displayed on the Home screen, even if you hide the time.
1. Press the MENU key.
2. Select SYSTEM > NUMBERS > TIME.
3. Select from the following options:
AUTO—time information is displayed on the Home screen.
HIDE—time information is not displayed on the Home screen.
Conguring the Time Format
1. Press the MENU key.
2. Select SYSTEM > UNITS > TIME > FORMAT.
3. Select 12 Hour, 24 Hour, or UTC.
Conguring the Time Offset
If you prefer to have your unit display the time in local time rather than Universal
Coordinated Time (UTC), you need to indicate the local time offset from UTC time. When
you make an adjustment for local time, “LOC” is displayed after the time instead of “UTC”
on the Home screen.
NOTE: The time sent when you make a DSC call is always sent in UTC format.
To congure the UTC offset:
1. Press the MENU key.
2. Select SYSTEM > UNITS > TIME > OFFSET.
3. Turn the Channel knob to enter an offset number in increments of 0.5 hours. You can set
the offset to a maximum of +/- 13 hours.
•
•
•
•
190-01019-00_0A.indd 32 12/23/2008 4:23:04 PM

VHF 100/200 Series Owner’s Manual 33
Advanced Operation
4. Select from the following options:
OK—save your changes and return to the previous screen.
CANCEL—remove your changes.
Modifying the Speed Unit of Measurement
You can adjust the unit of measure that is displayed for the speed calculation throughout
the radio. The Speed Over Ground (SOG) on the Home screen will be displayed in the
measurement you select here.
1. Press the MENU key.
2. Select SYSTEM > UNITS > SPEED.
3. Select from the following options:
KNOTS—change the unit of measure to knots.
MPH—change the unit of measure to miles per hour.
KPH—change the unit of measure to kilometers per hour.
Modifying the Heading Display
You can modify the heading to display either true or magnetic calculations. This heading
measurement is displayed throughout the radio including Course Over Ground (COG) on
the Home screen.
1. Press the MENU key.
2. Select SYSTEM > UNITS > HEADING.
3. Select from the following options:
TRUE—change the calculation to reect true north.
MAGNETIC—change the calculation to reect magnetic north.
Selecting the Frequency Band
You can switch between the USA, International, or Canadian frequency bands. For a list of
channels available in each frequency band, see pages 36–43.
1. Press the MENU key.
2. Select MENU > CHANNEL > FREQUENCY BAND.
3. Use the Channel knob to select USA, INTERNATIONAL, or CANADA.
Changing the Language
For the VHF 200, VHF 200i, GHS 10, and GHS 10i, you can congure whether the text on
the screen is displayed in English, French, Italian, German, or Spanish.
1. Press the MENU key.
2. Select LANGUAGE.
3. Select the system language.
•
•
•
•
•
•
•
190-01019-00_0A.indd 33 12/23/2008 4:23:04 PM

34 VHF 100/200 Series Owner’s Manual
Advanced Operation
Changing the Channel Names
Channel names are displayed on the Home screen using nine characters. If the name is
longer than nine characters, the full name scrolls across the top of the screen and then
switches to the short name. You can change the nine-character name of the channel to reect
a local meaning.
1. Press the MENU key.
2. Select CHANNEL > NAME.
3. Select the channel you want to edit.
4. To edit the default name, turn the Channel knob to change the character. Press the
Channel knob to select the character and move to the next character in the word. You
can enter a maximum of nine characters for a channel name.
5. Select any of the following options to perform various functions:
Press ab to return to a previous character.
CANCEL—return to the previous screen without saving your changes.
6. When you have completed renaming the channel, select ACCEPT.
Restoring Factory Settings
You can restore the radio to utilize the factory default settings. When you perform this
action, any changes you have made to the radio settings are lost, and the call logs are
deleted. The directory and group entries are retained.
1. Press the MENU key.
2. Select SYSTEM > SYSTEM INFO.
3. Select RESET.
4. Select from the following options:
YES—restart the radio and restore it to the original factory default settings.
NO—return to the previous screen.
Testing the System Operation
1. Press the MENU key.
2. Select SYSTEM > SYSTEM INFO.
3. Select TEST. A list of test items is displayed.
4. If necessary, use the arrow keys to scroll through the information.
•
•
•
•
190-01019-00_0A.indd 34 12/23/2008 4:23:04 PM

VHF 100/200 Series Owner’s Manual 35
Appendix
Appendix
Alarms and Messages
The radio may generate the following alarms or system messages.
Battery Alarm
If the radio detects a voltage greater than 15.8 Vdc or less than 10 Vdc, “HIGH VOLTAGE”
or “LOW VOLTAGE” is displayed on the screen. Check the wiring if any of these
conditions occur.
Main in Use
When the primary VHF 200 or VHF 200i unit is being used, “MAIN IN USE” is displayed
on the screen of all remote GHS 10 or GHS 10i handsets. The screen returns to normal three
seconds after the last input on the primary station.
Remote handset stations cannot interrupt the primary radio unit. However, remote handset
stations can interrupt the operation of other handset stations.
WX (Weather Alert)
If you set the WX alarm and an incoming weather alert is detected, the radio automatically
tunes to the WX channel that is broadcasting the alert. See page 12 for more information on
weather alerts.
GPS Data Alarm
When GPS data from a NMEA network or position data you entered manually is over four
hours old, the alarm tone beeps and “DATA IS OVER 4 HOURS OLD” is displayed on the
screen.
Select IGNORE to disregard the alarm and to turn off the alarm beeping. When you take
no action after three minutes, IGNORE is selected automatically.
Select SET to enter a new position. See page 27 for more information on manually
entering position data.
Invalid GPS Data Alarm
When GPS data from a NMEA network or position data you entered manually is over 23.5
hours old, “DATA IS INVALID” is displayed on the screen. The radio will not transmit
position data that is more than 23.5 hours old.
Select IGNORE to discard the old position data. The screen displays “NO GPS INFO”
on the Home screen. When you take no action after three minutes, IGNORE is selected
automatically.
•
•
•
190-01019-00_0A.indd 35 12/23/2008 4:23:04 PM
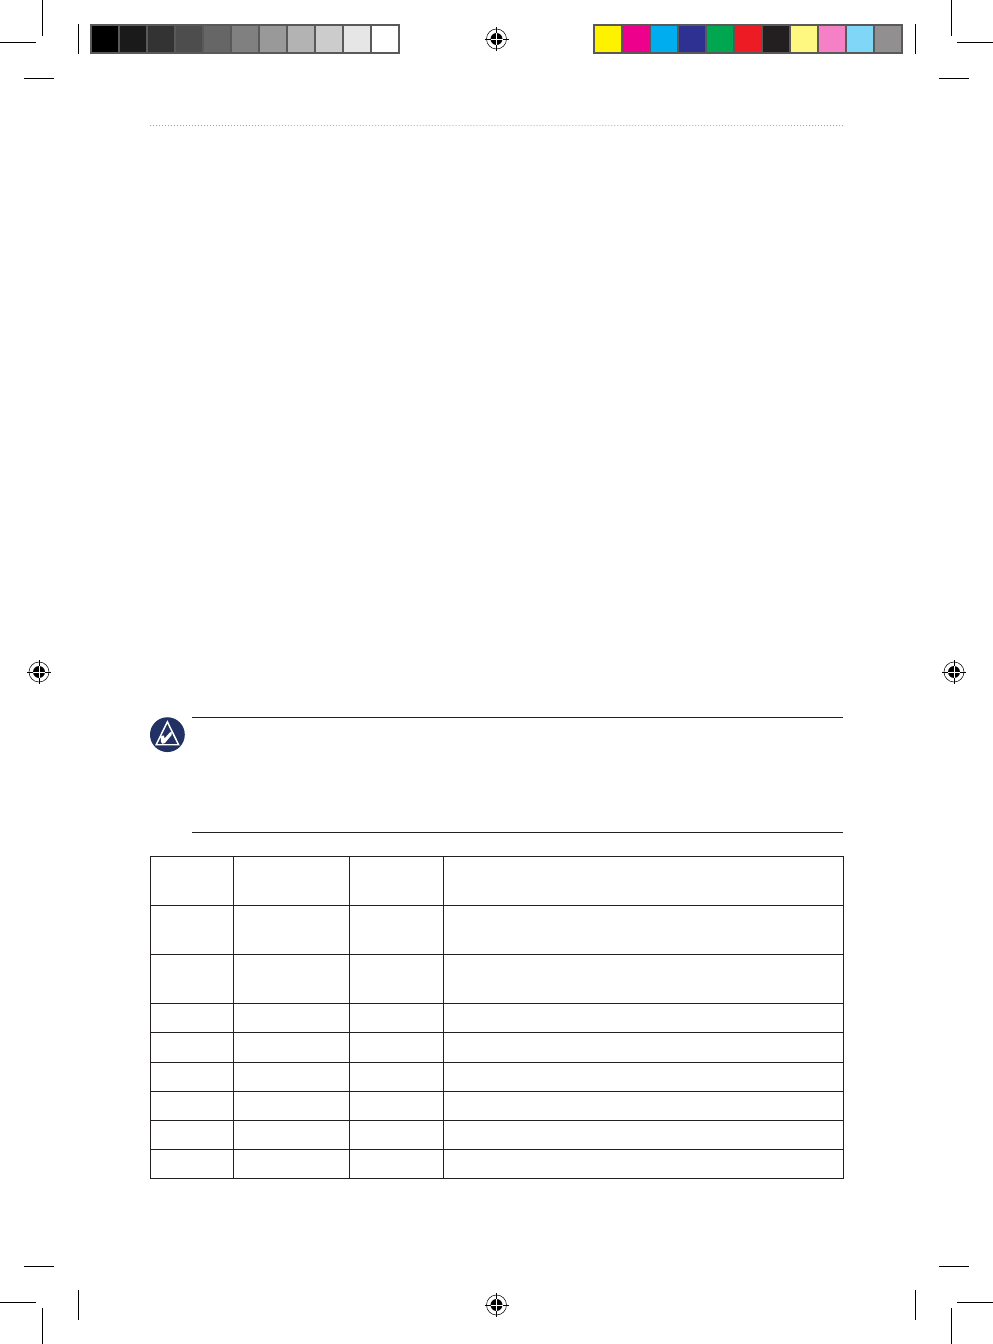
36 VHF 100/200 Series Owner’s Manual
Appendix
Select SET to enter a new position. See page 27 for more information on manually
entering position data.
Position Tracking
After ve consecutive failed attempts to request position information from a vessel, “NO
POS FOR [VESSEL NAME]” is displayed on the screen.
Select RETRY to reattempt the position request.
Select REMOVE to discontinue calling the vessel. When you take no action after three
minutes, REMOVE is selected automatically.
Channel Lists
The USA, Canadian, and International channel lists provided in this Appendix are for
reference only. It is the responsibility of the radio operator to ensure that channels are used
correctly according to local regulations.
USA Channels
For the latest information on USA channels, visit www.navcen.uscg.gov/marcomms
/vhf.htm. Also visit the Federal Communications Commission’s Marine VHF Radio
Channels page at http://wireless.fcc.gov/services/index.htm?job=service
_bandplan&id=ship_stations. The FCC page does not include frequency information, but
has more complete information on the use of the channels.
IMPORTANT: Boaters primarily should use channels listed as non-commercial. Use Channel
16 to call other stations or for distress alerting. Use Channel 13 to contact a ship when there is
danger of collision. All ships of length 20 m or greater are required to guard VHF Channel 13,
in addition to VHF Channel 16, when operating within USA territorial waters. Users may be
ned by the FCC for improper use of these channels.
Channel
Number
Transmission
MHz
Receiving
MHz
User
01A 156.050 156.050 Port operations and commercial, VTS. Available only in
the New Orleans and lower Mississippi areas.
05A 156.250 156.250 Port operations or VTS in the Houston, New Orleans,
and Seattle areas.
6 156.300 156.300 Intership safety
07A 156.350 156.350 Commercial
8 156.400 156.400 Commercial (Intership only)
9 156.450 156.450 Boater Calling. Commercial and non-commercial.
10 156.500 156.500 Commercial
11 156.550 156.550 Commercial. VTS in selected areas.
•
•
•
190-01019-00_0A.indd 36 12/23/2008 4:23:04 PM
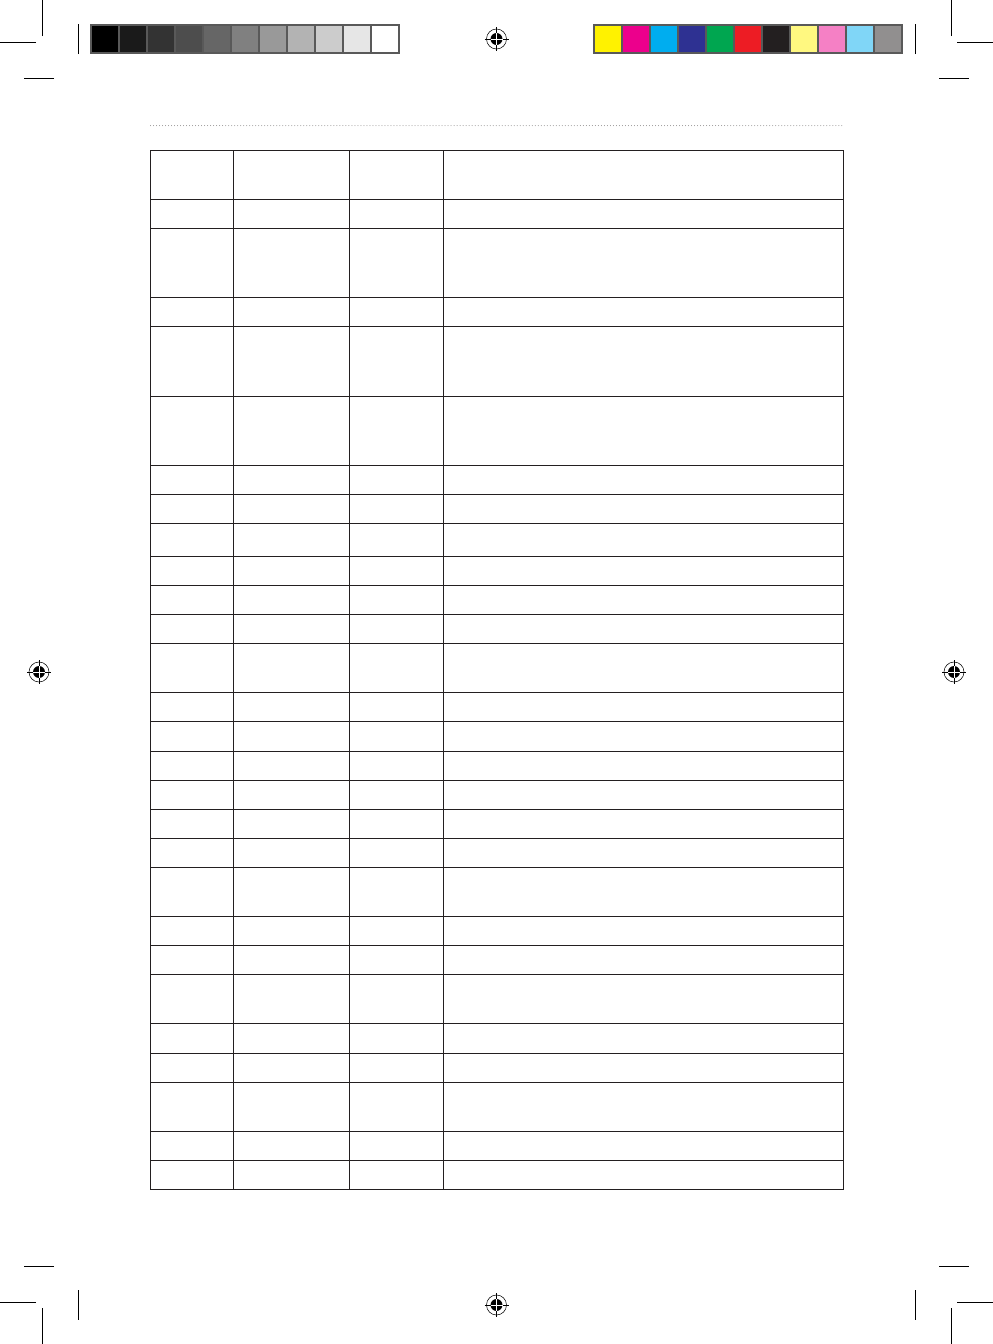
VHF 100/200 Series Owner’s Manual 37
Appendix
Channel
Number
Transmission
MHz
Receiving
MHz
User
12 156.600 156.600 Port operations. VTS in selected areas.
13 156.650 156.650 Intership navigation safety (bridge-to-bridge).
Ships greater than 20 meters in length maintain a
listening watch on this channel in US waters.
14 156.700 156.700 Port operations. VTS in selected areas.
15 -- 156.750 Environmental (receive only). Used by Class C
Emergency Position Indicating Radio Beacons
(EPIRBs).
16 156.800 156.800 International distress, safety, and calling. Ships required
to carry radio, USCG, and most coast stations maintain
a listening watch on this channel.
17 156.850 156.850 State control
18A 156.900 156.900 Commercial
19A 156.950 156.950 Commercial
20 157.000 161.600 Port operations (duplex)
20A 157.000 157.000 Port operations
21A 157.050 157.050 USA Coast Guard only
22A 157.100 157.100 Coast Guard Liaison and Maritime Safety Information
Broadcasts. Broadcasts are announced on Channel 16.
23A 157.150 157.150 USA Coast Guard only
24 157.200 161.800 Public correspondence (Marine Operator)
25 157.250 161.850 Public correspondence (Marine Operator)
26 157.300 161.900 Public correspondence (Marine Operator)
27 157.350 161.950 Public correspondence (Marine Operator)
28 157.400 162.000 Public correspondence (Marine Operator)
63A 156.175 156.175 Port operations and commercial, VTS. Available only in
the New Orleans and lower Mississippi areas.
65A 156.275 156.275 Port operations
66A 156.325 156.325 Port operations
67 156.375 156.375 Commercial. Used for Bridge-to-bridge communications
in lower Mississippi River. Intership only.
68 156.425 156.425 Non-Commercial
69 156.475 156.475 Non-Commercial
70 156.525 156.525 Digital Selective Calling
(voice communications not allowed)
71 156.575 156.575 Non-Commercial
72 156.625 156.625 Non-Commercial (Intership only)
190-01019-00_0A.indd 37 12/23/2008 4:23:04 PM
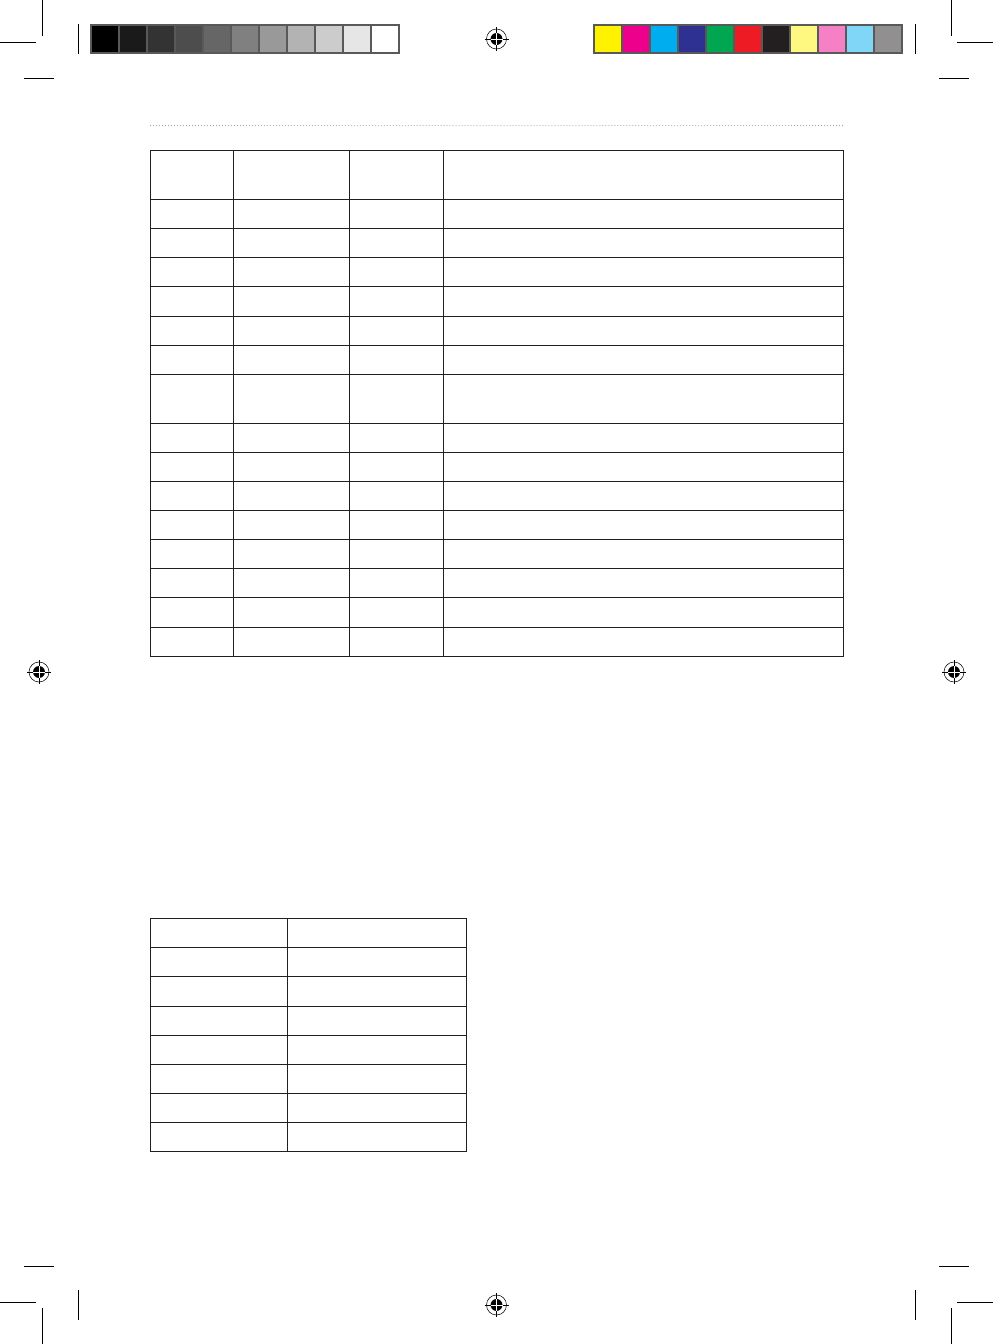
38 VHF 100/200 Series Owner’s Manual
Appendix
Channel
Number
Transmission
MHz
Receiving
MHz
User
73 156.675 156.675 Port Operations
74 156.725 156.725 Port Operations
77 156.875 156.875 Port Operations (Intership only)
78A 156.925 156.925 Non-Commercial
79A 156.975 156.975 Commercial. Non-Commercial in the Great Lakes only.
80A 157.025 157.025 Commercial. Non-Commercial in the Great Lakes only.
81A 157.075 157.075 USA Government only. Environmental protection
operations.
82A 157.125 157.125 USA Government only
83A 157.175 157.175 USA Coast Guard only
84 157.225 161.825 Public Correspondence (Marine Operator)
85 157.275 161.875 Public Correspondence (Marine Operator)
86 157.325 161.925 Public Correspondence (Marine Operator)
87 157.375 161.975 Public Correspondence (Marine Operator)
88 157.425 162.025 Public Correspondence only near Canadian border.
88A 157.425 157.425 Commercial, Intership only
The letter “A” indicates simplex use of the ship station transmit side of an international
duplex channel, and that operations are different than international operations on that
channel. “A” channels are generally only used in the USA, and use is normally not
recognized or allowed outside the USA.
The letter “B” indicates simplex use of the coast station transmit side of an international
duplex channel. The USA does not currently use “B” channels for simplex communications
in this band.
WX (Weather) Channels
Channel Frequency (MHz)
WX1 162.55
WX2 162.4
WX3 162.475
WX4 162.425
WX5 162.45
WX6 162.5
WX7 162.525
190-01019-00_0A.indd 38 12/23/2008 4:23:04 PM

VHF 100/200 Series Owner’s Manual 39
Appendix
Canadian Channels
Channel
Number
Transmission
MHz
Receiving
MHz
Area of
Operation
User
01 156.050 160.650 PC Public correspondence
02 156.100 160.700 PC Public correspondence
03 156.150 160.750 PC Public correspondence
04A 156.200 156.200 PC Intership, Ship/Shore, and Safety:
Canadian Coast Guard search and rescue
04A 156.200 156.200 EC Intership, Ship/Shore, and Commercial:
Commercial shing only.
05A 156.250 156.250 Ship Movement
06 156.300 156.300 All areas Intership, Commercial, Non-commercial,
and Safety: May be used for search and
rescue communications between ships
and aircraft.
07A 156.350 156.350 All areas Intership, Ship/Shore, and Commercial
08 156.400 156.400 WC, EC Intership, Commercial, and Safety: Also
assigned for operations in the Lake
Winnipeg area.
09 156.450 156.450 AC Intership, Ship/Shore, Commercial,
Non-commercial, and Ship Movement:
May be used to communicate with aircraft
and helicopters in predominantly maritime
support operations.
10 156.500 156.500 AC, GL Intership, Ship/Shore, Commercial,
Non-commercial, Safety, and Ship
Movement: May also be used for
communications with aircraft engaged
in coordinated search and rescue and
antipollution operations.
11 156.550 156.550 PC, AC, GL Intership, Ship/Shore, Commercial,
Non-commercial, and Ship Movement:
Also used for pilotage purposes.
12 156.600 156.600 WC, AC, GL Intership, Ship/Shore, Commercial,
Non-commercial, and Ship Movement:
Port operations and pilot information and
messages.
13 156.650 156.650 All areas Intership, Commercial, Non-commercial,
and Ship Movement: Exclusively for
bridge-to-bridge navigational trafc.
Limited to 1 watt maximum power.
190-01019-00_0A.indd 39 12/23/2008 4:23:05 PM

40 VHF 100/200 Series Owner’s Manual
Appendix
Channel
Number
Transmission
MHz
Receiving
MHz
Area of
Operation
User
14 156.700 156.700 AC, GL Intership, Ship/Shore, Commercial,
Non-commercial, and Ship Movement:
Port operations and pilot information and
messages.
15 156.750 156.750 All areas Intership, Ship/Shore, Commercial,
Non-commercial, and Ship Movement:
All operations limited to 1 watt maximum
power. May also be used for on-board
communications.
16 156.800 156.800 All areas International Distress, Safety, and Calling
17 156.850 156.850 All areas Intership, Ship/Shore, Commercial,
Non-commercial, and Ship Movement:
All operations limited to 1 watt maximum
power. May also be used for on-board
communications.
18A 156.900 156.900 All areas Intership, Ship/Shore, and Commercial:
Towing on the Pacic Coast.
19A 156.950 156.950 All areas
except PC
Intership and Ship/Shore: Canadian
Coast Guard only.
19A 156.950 156.950 PC Intership and Ship/Shore: various
Government departments.
20 157.000 161.600 All areas Ship/Shore, Safety, and Ship Movement:
Port operations only with 1 watt maximum
power.
21A 157.050 157.050 All areas Intership and Ship/Shore: Canadian
Coast Guard only.
21B - 161.650 All areas Safety: Continuous Marine Broadcast
(CMB) service.
22A 157.100 157.100 All areas Intership, Ship/Shore, Commercial, and
Non-commercial: For communications
between Canadian Coast Guard and non-
Canadian Coast Guard stations only.
23 157.150 161.750 PC Ship/Shore and Public Correspondence:
Also in the inland waters of British
Columbia and the Yukon.
24 157.200 161.800 All areas Ship/Shore and Public Correspondence
25 157.250 161.850 PC Ship/Shore and Public Correspondence:
Also assigned for operations in the Lake
Winnipeg area.
25B - 161.850 AC Safety: Continuous Marine Broadcast
(CMB) service.
190-01019-00_0A.indd 40 12/23/2008 4:23:05 PM

VHF 100/200 Series Owner’s Manual 41
Appendix
Channel
Number
Transmission
MHz
Receiving
MHz
Area of
Operation
User
26 157.300 161.900 All areas Ship/Shore, Safety, and Public
Correspondence
27 157.350 161.950 AC, GL, PC Ship/Shore and Public Correspondence
28 157.400 162.000 PC Ship/Shore, Safety, and Public
Correspondence
28B - 162.000 AC Safety: Continuous Marine Broadcast
(CMB) service.
60 156.025 160.625 PC Ship/Shore and Public Correspondence
61A 156.075 156.075 PC Intership and Ship/Shore: Canadian
Coast Guard only.
61A 156.075 156.075 EC Intership, Ship/Shore, and Commercial:
Commercial shing only.
62A 156.125 156.125 PC Intership and Ship/Shore: Canadian
Coast Guard only.
62A 156.125 156.125 EC Intership, Ship/Shore, and Commercial:
Commercial shing only.
64 156.225 160.825 PC Ship/Shore and Public Correspondence
64A 156.225 156.225 EC Intership, Ship/Shore, and Commercial:
Commercial shing only.
65A 156.275 156.275 Intership, Ship/Shore, Commercial,
Non-commercial, and Safety: Search and
rescue and antipollution operations on the
Great Lakes. Towing on the Pacic Coast.
Port operations only in the St. Lawrence
River areas with 1 watt maximum power.
Pleasure craft in the inland waters of
Alberta, Saskatchewan and Manitoba
(excluding Lake Winnipeg and the Red
River).
66A 156.325 156.325 Intership, Ship/Shore, Commercial, Non-
commercial, Safety, and Ship Movement:
Port operations only in the St. Lawrence
River/Great Lakes Areas with 1 watt
maximum power.
67 156.375 156.375 EC Intership, Ship/Shore, and Commercial:
Commercial shing only.
67 156.375 156.375 All areas
except EC
Intership, Ship/Shore, Commercial,
Non-commercial, and Safety: May also
be used for communications with aircraft
engaged in coordinated search and
rescue and antipollution operations.
190-01019-00_0A.indd 41 12/23/2008 4:23:05 PM
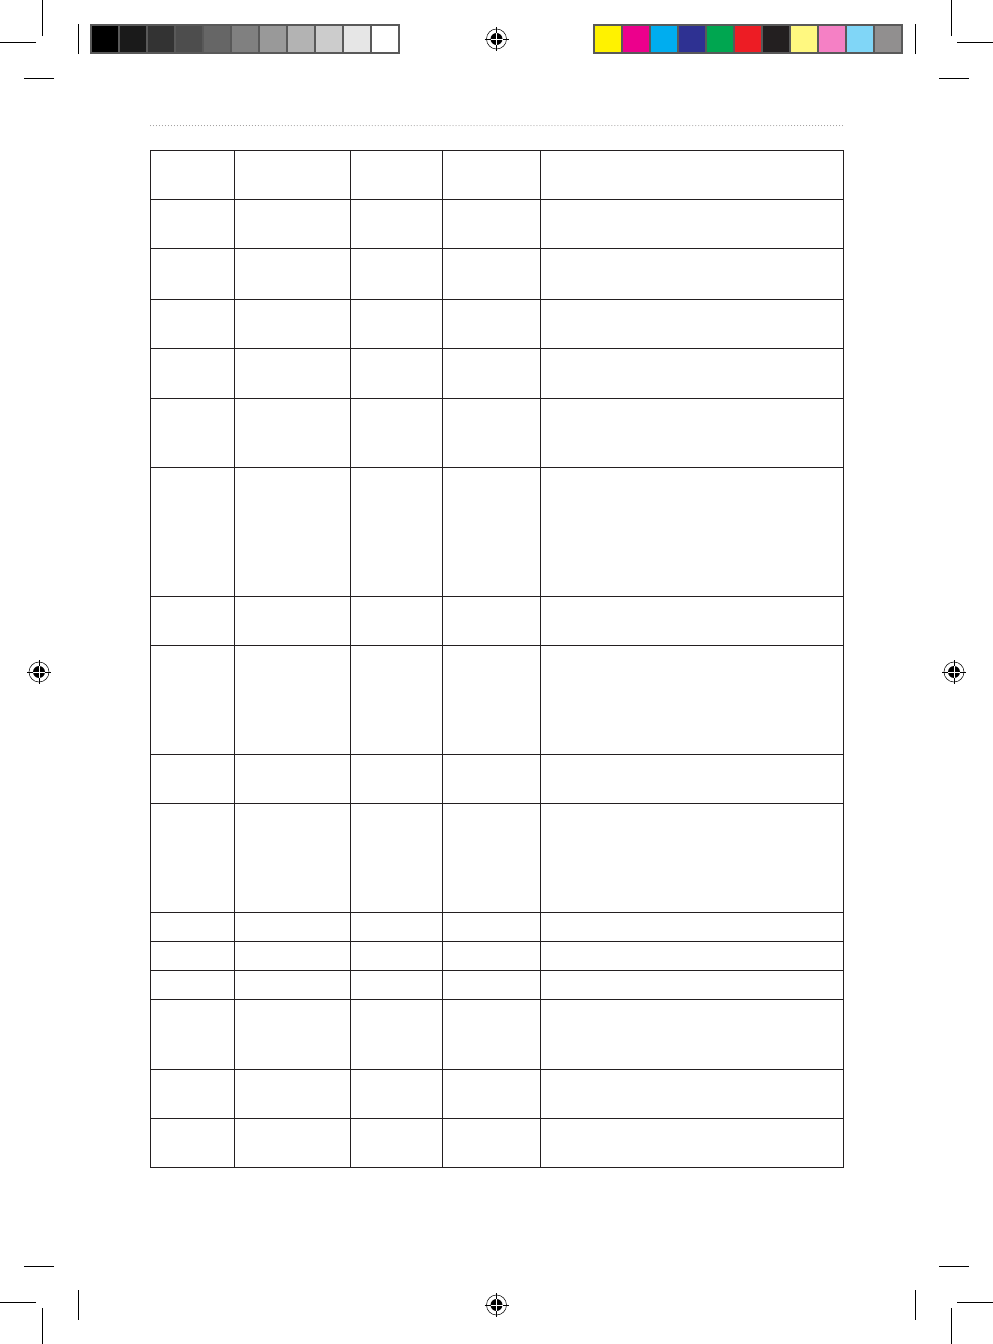
42 VHF 100/200 Series Owner’s Manual
Appendix
Channel
Number
Transmission
MHz
Receiving
MHz
Area of
Operation
User
68 156.425 156.425 All areas Intership, Ship/Shore, and Non-
commercial: For marinas and yacht clubs.
69 156.475 156.475 All areas
except EC
Intership, Ship/Shore, Commercial and
Non-commercial
69 156.475 156.475 EC Intership, Ship/Shore, and Commercial:
Commercial shing only.
71 156.575 156.575 PC Intership, Ship/Shore, Commercial, Non-
commercial, Safety, and Ship Movement
71 156.575 156.575 Intership, Ship/Shore, and Non-
commercial: For marinas and yacht clubs
on the East Coast and on Lake Winnipeg.
72 156.625 156.625 EC, PC Intership, Commercial, and Non-
commercial: May be used to
communicate with aircraft and helicopters
in predominantly maritime support
operations. For marinas and yacht clubs
on the East Coast and on Lake Winnipeg.
73 156.675 156.675 EC Intership, Ship/Shore, and Commercial:
Commercial shing only
73 156.675 156.675 All areas
except EC
Intership, Ship/Shore, Commercial,
Non-commercial, and Safety: May also
be used for communications with aircraft
engaged in coordinated search and
rescue and antipollution operations.
74 156.725 156.725 EC, PC Intership, Ship/Shore, Commercial,
Non-commercial, and Ship Movement.
77 156.875 156.875 Intership, Ship/Shore, Safety, and Ship
Movement: Pilotage on Pacic Coast.
Port operations only in the St. Lawrence
River/Great Lakes areas with 1 watt
maximum power.
78A 156.925 156.925 EC, PC Intership, Ship/Shore and Commercial
79A 156.975 156.975 EC, PC Intership, Ship/Shore and Commercial
80A 157.025 157.025 EC, PC Intership, Ship/Shore and Commercial
81A 157.075 157.075 Intership and Ship/Shore: Canadian
Coast Guard use only in the St. Lawrence
River/Great Lakes areas.
81A 157.075 157.075 PC Intership, Ship/Shore, and Safety:
Canadian Coast Guard antipollution.
82A 157.125 157.125 PC Intership, Ship/Shore, and Safety:
Canadian Coast Guard use only.
190-01019-00_0A.indd 42 12/23/2008 4:23:05 PM
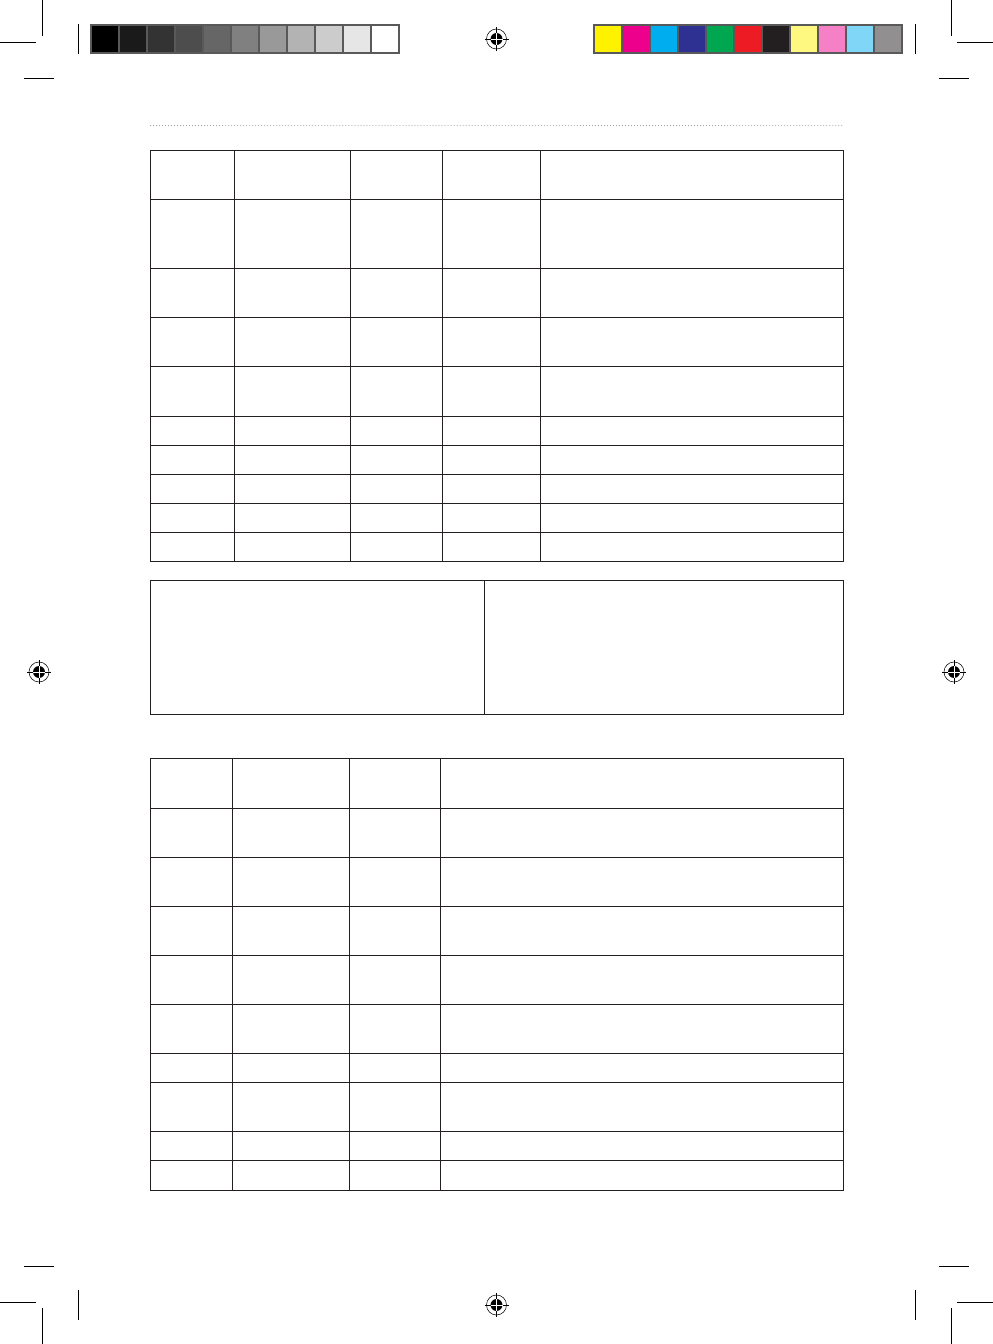
VHF 100/200 Series Owner’s Manual 43
Appendix
Channel
Number
Transmission
MHz
Receiving
MHz
Area of
Operation
User
82A 157.125 157.125 Intership and Ship/Shore: Canadian
Coast Guard use only in the St. Lawrence
River/Great Lakes areas.
83 157.175 161.775 PC Ship/Shore and Safety: Canadian Coast
Guard use only.
83A 157.175 157.175 EC Intership and Ship/Shore: Canadian Coast
Guard and other Government agencies.
83B - 161.775 AC, GL Safety: Continuous Marine Broadcast
(CMB) Service.
84 157.225 161.825 PC Ship/Shore and Public Correspondence
85 157.275 161.875 AC, GL, NL Ship/Shore and Public Correspondence
86 157.325 161.925 PC Ship/Shore and Public Correspondence
87 157.375 161.975 AC, GL, NL Ship/Shore and Public Correspondence
88 157.425 162.025 AC, GL, NL Ship/Shore and Public Correspondence
Key
PC: Pacic Coast
EC (East Coast): includes NL, AC, GL and Eastern
Arctic areas
WC (West Coast): Pacic Coast, Western Arctic and
Athabasca-Mackenzie Watershed areas
NL: Newfoundland and Labrador
AC: Atlantic Coast, Gulf, and St. Lawrence River up to
and including Montreal
GL: Great Lakes (including St. Lawrence above
Montreal)
All areas: includes East and West Coast areas
International Channels
Channel
Number
Transmission
MHz
Receiving
MHz
User
01 156.050 160.650 Public Correspondence, Port Operations, and Ship
Movement
02 156.100 160.700 Public Correspondence, Port Operations, and Ship
Movement
03 156.150 160.750 Public Correspondence, Port Operations, and Ship
Movement
04 156.200 160.800 Public Correspondence, Port Operations, and Ship
Movement
05 156.250 160.850 Public Correspondence, Port Operations, and Ship
Movement
06 156.300 156.300 Intership
07 156.350 160.950 Public Correspondence, Port Operations, and Ship
Movement
08 156.400 156.400 Intership
09 156.450 156.450 Intership, Port Operations, and Ship Movement
190-01019-00_0A.indd 43 12/23/2008 4:23:05 PM

44 VHF 100/200 Series Owner’s Manual
Appendix
Channel
Number
Transmission
MHz
Receiving
MHz
User
10 156.500 156.500 Intership, Port Operations, and Ship Movement
11 156.550 156.550 Port Operations and Ship Movement
12 156.600 156.600 Port Operations and Ship Movement
13 156.650 156.650 Intership Safety, Port Operations, and Ship Movement
14 156.700 156.700 Port Operations and Ship Movement
15 156.750 156.750 Intership and On-board Communications at 1 watt only
16 156.800 156.800 Distress, Safety, and Calling
17 156.850 156.850 Intership and On-board Communications at 1 watt only
18 156.900 161.500 Public Correspondence, Port Operations, and Ship
Movement
19 156.950 161.550 Public Correspondence, Port Operations, and Ship
Movement
20 157.000 161.600 Public Correspondence, Port Operations, and Ship
Movement
21 157.050 161.650 Public Correspondence, Port Operations, and Ship
Movement
22 157.100 161.700 Public Correspondence, Port Operations, and Ship
Movement
23 157.150 161.750 Public Correspondence, Port Operations, and Ship
Movement
24 157.200 161.800 Public Correspondence, Port Operations, and Ship
Movement
25 157.250 161.850 Public Correspondence, Port Operations, and Ship
Movement
26 157.300 161.900 Public Correspondence, Port Operations, and Ship
Movement
27 157.350 161.950 Public Correspondence, Port Operations, and Ship
Movement
28 157.400 162.000 Public Correspondence, Port Operations, and Ship
Movement
60 156.025 160.625 Public Correspondence, Port Operations, and Ship
Movement
61 156.075 160.675 Public Correspondence, Port Operations, and Ship
Movement
62 156.125 160.725 Public Correspondence, Port Operations, and Ship
Movement
63 156.175 160.775 Public Correspondence, Port Operations, and Ship
Movement
190-01019-00_0A.indd 44 12/23/2008 4:23:05 PM

VHF 100/200 Series Owner’s Manual 45
Appendix
Channel
Number
Transmission
MHz
Receiving
MHz
User
64 156.225 160.825 Public Correspondence, Port Operations, and Ship
Movement
65 156.275 160.875 Public Correspondence, Port Operations, and Ship
Movement
66 156.325 160.925 Public Correspondence, Port Operations, and Ship
Movement
67 156.375 156.375 Intership, Port Operations, and Ship Movement
68 156.425 156.425 Port Operations and Ship Movement
69 156.475 156.475 Intership, Port Operations, and Ship Movement
70 - - Reserved for DSC
71 156.575 156.575 Port Operations and Ship Movement
72 156.625 156.625 Intership
73 156.675 156.675 Intership
74 156.725 156.725 Port operations and Ship movement
75 156.775 156.775 Port operations and Ship movement
76 156.825 156.825 Port operations and Ship movement
77 156.875 156.875 Intership
78 156.925 161.525 Public correspondence, Port Operations, and Ship
Movement
79 156.975 161.575 Public correspondence, Port Operations, and Ship
Movement
80 157.025 161.625 Public correspondence, Port Operations, and Ship
Movement
81 157.075 161.675 Public correspondence, Port Operations, and Ship
Movement
82 157.125 161.725 Public correspondence, Port Operations, and Ship
Movement
83 157.175 161.775 Public correspondence, Port Operations, and Ship
Movement
84 157.225 161.825 Public correspondence, Port Operations, and Ship
Movement
85 157.275 161.875 Public correspondence, Port Operations, and Ship
Movement
86 157.325 161.925 Public correspondence, Port Operations, and Ship
Movement
87 157.375 157.375 Port Operations and Ship Movement
88 157.425 157.425 Port Operations and Ship Movement
190-01019-00_0A.indd 45 12/23/2008 4:23:05 PM

46 VHF 100/200 Series Owner’s Manual
Appendix
Specications
VHF 100/100i and VHF 200/200i Specications
General
Dimensions:
Flush-Mounted: (W × H × D) 7.16 × 3.86 × 6.42 in. (18.2 × 9.8 × 16.3 cm)
Bracket-Mounted: (W × H × D) 7.56 × 4.65 × 6.42 in. (19.2 × 11.8 × 16.3 cm)
Weight:
VHF 100/100i Transceiver and Microphone: 45.86 oz. (1.30 kg)
VHF 200/200i Transceiver: 38.45 oz. (1.09 kg)
VHF 200/200i Microphone: 9.42 oz. (0.267 kg)
Temperature Range: from 14ºF to 122ºF (from -10ºC to 50ºC)
Compass-safe Distance: 20 in. (500 mm)
Waterproof: IEC 60529 IPX7 (Immersion in 1 meter of water for 30 minutes)
Antenna Connector: S0-239 (50 Ω)
Speaker Microphone Audio Power: 94 dBA
Digital Selective Calling: Class D
Frequency Bands: All USA, Canadian, and International marine channels; 10 NOAA
weather channels
Channel Spacing: 25 kHz
Modulation:
FM: 16K0G3E
DSC: 16K0G2B
Frequency Stability: ± 10 ppm
Oscillate Mode: PLL
Power
Operating Voltage: 12.0 Vdc
Current Drain:
Standby: 350 mA
Receive: 600 mA
Transmit: 6.0 A at HI power (25 W); 2.0 A at LO power (1 W)
Maximum Antenna Gain: 0 dB
Antenna Port Impedance: 50 Ω
190-01019-00_0A.indd 46 12/23/2008 4:23:05 PM

VHF 100/200 Series Owner’s Manual 47
Appendix
Audio Output Power:
Internal Speaker: 1 W (with 4 Ω at 10% distortion)
Optional External Speaker (VHF 200/200i only): 4 W (4 Ω/Max)
VHF 200/200i Auxiliary Components:
Hailer Output Power: 20 W at 4 Ω
NMEA Port Impedance: 330 Ω
External Speaker Impedance: 4 Ω
Hailer Horn Impedance: 4 Ω
Transmitter
Modulation System: Variable reactance frequency modulation
Transmitter Protection: Open/short circuit of antenna
Frequency Error: 10 ppm
Maximum Frequency Deviation: ± 5 KHz
Modulation Distortion ±3 KHz: less than or equal to 10%
Adjacent Channel Power: more than 70 dB
Spurious/Harmonic Emissions: less than -36 dBm
Transmitter Output (at 13.6 Vdc): 25 W (HI); 1 W (LO)
FM Hum and Noise Level: less than 40 dB
Duty Cycle: 5% Transmit; 5% Receive; 90% Standby
Microphone Type: Eletret
Compliance: Part 15 of the FCC interference limits for Class B digital devices FOR HOME
OR OFFICE USE
Receiver
Receiver Type: Double conversion superheterodyne
Frequency Range: 156.050 MHz to 163.275 MHz (including WX channels)
12 dB SINAD Sensitivity: 0.28 µV Typical
FM Hum and Noise Level: less than 40 dB
Audio Distortion: less than 10%
Squelch sensitivity @ 12dB SINAD:
At Tight: less than 1 µV
At Threshold: less 0.28 µV
Spurious Response: more than 70 dB
Adjacent Channel Selectivity: more than 70 dB
190-01019-00_0A.indd 47 12/23/2008 4:23:05 PM
48 VHF 100/200 Series Owner’s Manual
Appendix
Adjacent Channel Rejection: more than 70 dB
Intermodulation Rejection Ratio: more than 70 dB
Residual Noise Level: more than 0 dB unsquelched
NMEA
NMEA 0183 IN Sentences Supported (NMEA 0183 version 3.01)
Sentence Denition
GGA Global Positioning System Fix Data
GLL Geographic Position - Latitude/Longitude
GNS GNSS Fix Data
RMA Recommended Minimum Specic Loran-C Data
RMB Recommended Minimum Navigation Information
RMC Recommended Minimum Specic GNSS Data
NMEA 0183 OUT Sentences Supported (NMEA 0183 version 3.01)
Sentence Denition
DSC DSC Information
DSE Expanded DSC
NMEA 2000 PGN Information (VHF 200/200i only)
Receive Transmit
059392 ISO Acknowledgement 059392 ISO Acknowledgement
059904 ISO Request 060928 ISO Address Claim
060928 ISO Address Claim 126208 NMEA Request/Command/Ack
126208 NMEA Request/Command/Ack 126464 PGN List
129026 COG/SOG, Rapid Update 126996 Product Information
129029 GNSS Position Data 129799 Radio Frequency/Mode/Power
129808 DSC Call Information
GHS 10 and GHS 10i Specications
Dimensions: 6.34 × 2.82 × 1.69 in. (16.1 × 7.16 × 4.28 cm)
Weight: 12.35 oz. (350 g)
190-01019-00_0A.indd 48 12/23/2008 4:23:06 PM
VHF 100/200 Series Owner’s Manual 49
Appendix
Temperature Range: from 14ºF to 122ºF (from -10ºC to 50ºC)
Compass-safe Distance: 20 in. (500 mm)
Waterproof: IEC 60529 IPX7 (Immersion in 1 meter of water for 30 minutes)
Warnings and Safety Notices
WARNING: This product, its packaging, and its components contain chemicals known to the State of
California to cause cancer, birth defects, or reproductive harm. This Notice is provided in accordance with
California’s Proposition 65. See www.garmin.com/prop65 for more information.
CAUTION: To prevent possible damage to your radio, the antenna must be connected to the radio before
transmitting. This ensures that the power output to the antenna port dissipates properly when transmitting.
Electromagnetic Energy Exposure and Antenna Mounting
Your VHF radio generates and radiates radio frequency (RF) electromagnetic energy (EME). Failure to observe
these guidelines may expose persons to RF radiation absorption exceeding the maximum permissible exposure
(MPE).
The antenna should be installed such that a distance of 59 in. (1.5 m) is maintained between the antenna and all
persons.
WARNING: Radio operators with cardiac pacemakers, life-support machines, or electrical medical
equipment should not be exposed to excessive radio-frequency elds.
WARNING: Operate the device in accordance with the instructions supplied.
WARNING: The device complies with internationally recognized standards covering human exposure to
electromagnetic elds from radio devices.
WARNING: Do not use an antenna with a gain greater than 0 dB.
Safe Compass Distance
Ensure that you install your VHF radio at least 20 in. (500 mm) from any compass. Test your compass to verify
that it operates correctly when the radio is operating.
Important Product Information
Licensing Requirements
Many countries and administrations require a ships radio license and the user to be in possession of a suitable
radio operators license before transmitting equipment can be used for maritime use. Contact your local
administration for details.
Responsibilities of the User
All users are responsible for observing the regulations of their government and the regulations of foreign
governments. Breaches of such regulations are subject to severe penalties. The transmitting frequencies in your
radio are reserved for maritime use; any frequency you use for transmission must be specically included on
your ships license. A special license is required to operate from land; this includes when your boat is in a trailer.
190-01019-00_0A.indd 49 12/23/2008 4:23:06 PM

50 VHF 100/200 Series Owner’s Manual
Appendix
The use of ATIS is prohibited outside the European inland waterways covered by the Basel Agreement.
Industry Canada Compliance
This device complies with Industry Canada Standard RSS-182 and ICES-003.
FCC Compliance
This device complies with part 15 of the FCC Rules. Operation is subject to the following two conditions:
(1) this device may not cause harmful interference, and (2) this device must accept any interference received,
including interference that may cause undesired operation.
This equipment has been tested and found to comply with the limits for a Class B digital device, pursuant to part
15 of the FCC rules. These limits are designed to provide reasonable protection against harmful interference
in a residential installation. This equipment generates, uses, and can radiate radio frequency energy and may
cause harmful interference to radio communications if not installed and used in accordance with the instructions.
However, there is no guarantee that interference will not occur in a particular installation. If this equipment does
cause harmful interference to radio or television reception, which can be determined by turning the equipment
off and on, the user is encouraged to try to correct the interference by one of the following measures:
Reorient or relocate the receiving antenna.
Increase the separation between the equipment and the receiver.
Connect the equipment into an outlet that is on a different circuit from the GPS unit.
Consult the dealer or an experienced radio/TV technician for help.
This product does not contain any user-serviceable parts. Repairs should only be made by an authorized Garmin
service center. Unauthorized repairs or modications could result in permanent damage to the equipment, and
void your warranty and your authority to operate this device under Part 15 regulations.
Wireless Device Country Approvals for the VHF 100i and VHF 200i
Regulatory markings have been applied to the device signifying that this device has been approved for use in
Europe, Australia, and New Zealand.
Declaration of Conformity (DoC)
Hereby, Garmin, declares that the VHF 100i, VHF 200i, and GHS 10i are in compliance with the essential
requirements and other relevant provisions of Directive 1999/5/EC.
To view the full Declaration of Conformity, see the Garmin Web site for your Garmin product:
www.garmin.com/products/VHF100i/ for the VHF 100i, www.garmin.com/products/VHF200i/ for the VHF
200i, and www.garmin.com/products/GHS10i/ for the GHS 10i. Click Manuals, and then select the Declaration
of Conformity link.
CE Notication
CE Notied Body number (0168) valid for the VHF 100i and VHF 200i only.
0168
California Electronic Waste Recycling Act of 2003
The California Electronic Waste Recycling Act of 2003 requires the recycling of certain electronics. For more
information on the applicability to this product, see www.erecycle.org.
•
•
•
•
190-01019-00_0A.indd 50 12/23/2008 4:23:06 PM

VHF 100/200 Series Owner’s Manual 51
Appendix
Water Immersion
The unit is waterproof to IEC Standard 60529 IPX7. It can withstand immersion in 1 meter of water for 30
minutes. Prolonged submersion can cause damage to the unit. After submersion, be certain to wipe and air dry
the unit before reuse.
Limited Warranty
This Garmin product is warranted to be free from defects in materials or workmanship for one year from the
date of purchase. Within this period, Garmin will, at its sole option, repair or replace any components that fail in
normal use. Such repairs or replacement will be made at no charge to the customer for parts or labor, provided
that the customer shall be responsible for any transportation cost. This warranty does not cover failures due to
abuse, misuse, accident, or unauthorized alteration or repairs.
This product is intended to be used only as a travel aid and must not be used for any purpose requiring precise
measurement of direction, distance, location, or topography. Garmin makes no warranty as to the accuracy or
completeness of map data in this product.
THE WARRANTIES AND REMEDIES CONTAINED HEREIN ARE EXCLUSIVE AND IN LIEU OF ALL
OTHER WARRANTIES EXPRESS, IMPLIED, OR STATUTORY, INCLUDING ANY LIABILITY ARISING
UNDER ANY WARRANTY OF MERCHANTABILITY OR FITNESS FOR A PARTICULAR PURPOSE,
STATUTORY OR OTHERWISE. THIS WARRANTY GIVES YOU SPECIFIC LEGAL RIGHTS, WHICH
MAY VARY FROM STATE TO STATE.
IN NO EVENT SHALL GARMIN BE LIABLE FOR ANY INCIDENTAL, SPECIAL, INDIRECT, OR
CONSEQUENTIAL DAMAGES, WHETHER RESULTING FROM THE USE, MISUSE, OR INABILITY
TO USE THIS PRODUCT OR FROM DEFECTS IN THE PRODUCT. Some states do not allow the exclusion
of incidental or consequential damages, so the above limitations may not apply to you. Garmin retains the
exclusive right to repair or replace the unit or software or offer a full refund of the purchase price at its sole
discretion. SUCH REMEDY SHALL BE YOUR SOLE AND EXCLUSIVE REMEDY FOR ANY BREACH OF
WARRANTY.
To obtain warranty service, contact your local Garmin authorized dealer or call Garmin Product Support for
shipping instructions and an RMA tracking number. Securely pack the unit and a copy of the original sales
receipt, which is required as the proof of purchase for warranty repairs. Write the tracking number clearly on the
outside of the package. Send the unit, freight charges prepaid, to any Garmin warranty service station.
Online Auction Purchases: Products sold through online auctions are not eligible for rebates or other special
offers from Garmin. Online auction conrmations are not accepted for warranty verication. To obtain warranty
service, an original or copy of the sales receipt from the original retailer is required. Garmin will not replace
missing components from any package purchased through an online auction.
International Purchases: A separate warranty is provided by international distributors for units purchased
outside the United States. This warranty is provided by the local in-country distributor and this distributor
provides local service for your unit. Distributor warranties are only valid in the area of intended distribution.
Units purchased in the United States or Canada must be returned to the Garmin service center in the United
Kingdom, the United States, Canada, or Taiwan for service.
Contact Garmin
Contact Garmin Product Support if you have any questions while using your VHF 100/200 series radio. In the
USA, go to www.garmin.com/support, or contact Garmin USA by phone at (913) 397.8200 or (800) 800.1020.
In the UK, contact Garmin (Europe) Ltd. by phone at 0808 2380000.
In Europe, go to www.garmin.com/support and click Contact Support for in-country support information, or
contact Garmin (Europe) Ltd. by phone at +44 (0) 870.8501241.
190-01019-00_0A.indd 51 12/23/2008 4:23:06 PM

52 VHF 100/200 Series Owner’s Manual
Appendix
Caring for the Unit
The case is constructed of high quality materials and does not require user maintenance, except cleaning.
Cleaning the Case
Clean the unit’s outer casing (except for the screen) using a cloth dampened with a mild detergent solution and
then wipe dry. Avoid chemical cleaners and solvents that may damage plastic components.
Cleaning the Screen
The unit’s lens is textured to reduce glare, and is sensitive to skin oils, waxes and abrasive cleaners. Cleaners
containing ammonia, alcohol, abrasives, or anti-grease detergents will harm the anti-reective coating. It is
important to clean the lens using an eyeglass lens cleaner (that is specied as safe for anti-reective coatings)
and a clean, lint-free cloth.
190-01019-00_0A.indd 52 12/23/2008 4:23:06 PM

VHF 100/200 Series Owner’s Manual 53
Index
Index
Symbols
16/9 mode 8
1 W power transmission 8
25 W power transmission 8
A
alarms
battery 35
GPS data 35
invalid GPS data 35
WX (weather alert) 35
ATIS 13
disabled functions with 13
disabling 14
enabling 14
entering identication number 13
viewing identication number 13
autopilot capabilities 29
auto power-on 31
B
backlight level 31
beeper volume 31
bypassing 1 W transmission power 6
C
call logs
deleting entries 25
placing calls from 25
saving vessels to directory 25
types of 24
viewing stored calls 24
CE notication 50
channel changing, automatic 28
channel monitoring
Dual watch 7
Tri watch 8
channels
Canadian 39
changing names of 34
International 43
removing saved status 7
saving 7
scanning all 6
scanning saved 7
selecting 5
USA 36
WX (weather) 38
chartplotter capabilities 29
cleaning
case 52
screen 52
compass distance 49
contrast level 31
Course Over Ground
displaying 32
on Home screen 3
D
Declaration of Conformity 50
directory
adding entries 26
deleting entries 26
editing entries 26
viewing 26
distant/local reception
sensitivity adjustment 9
distress calls 16–18
receiving acknowledgement 18
revoking 18
sending designated 17
sending undesignated 16
stopping automatic transmission 18
waiting for acknowledgement 17
Dual watch 7
E
electromagnetic energy exposure 49
190-01019-00_0A.indd 53 12/23/2008 4:23:06 PM

54 VHF 100/200 Series Owner’s Manual
Index
F
factory settings, restoring 34
FCC compliance 50
features i–ii
foghorn 10–12
frequency, adjusting 11
sounding, automatic 11
sounding, manual 11
frequency band, selecting
33
G
Garmin
contact information 51
GHS 10 series handsets
controls 2
display 3
groups
adding 26
deleting 27
editing 27
receiving calls from 22
H
hailer, using 10
handset
controls 2
display 3
heading display, modifying 33
HI power transmission 8
I
icons, system status 3
Industry Canada compliance 50
intercom 9–10
initiating call 9
receiving call 10
L
language, changing 33
latitude and longitude
displaying 31
on Home screen 3
local/distant reception
sensitivity adjustment 9
LO power transmission 8
M
microphone controls 2
MMSI ltering over NMEA network 30
conguring 30
MMSI number
entering 15–16
formats 24
obtaining 15
viewing 16
monitoring multiple channels 7
N
NMEA
feature overview 29
NMEA 0183 sentences 48
NMEA 2000 PGNs 48
selecting NMEA 0183 or NMEA 2000 30
sending call-related data over network 30
NOAA weather broadcasts 12
P
placing calls
all-ships safety 20
all-ships urgency 20
group 19
individual 18
position request 20
selecting the channel for 19
position information
entering manually 27
position replies
automatic setting 28
position tracking 22–23
activating calls 23
editing vessel information 23
removing vessels from list 23
selecting vessels 23
power 5
auto power-on 31
battery alarm 35
R
radio
controls 1
display 3
features i–ii
front panel 1
testing 34
190-01019-00_0A.indd 54 12/23/2008 4:23:06 PM

VHF 100/200 Series Owner’s Manual 55
Index
receiving calls
all-ships safety calls 21
all-ships urgency 21
distress 21
distress relay 21
group 22
individual routine 21
position request 22
position send 22
receiving sensitivity 9
S
safety notices 49
saving channels 7
scanning
all channels 6
saved channels 7
screen
backlight level 31
contrast level 31
second-priority channel, reprogramming 8
selecting channels 5
soft keys 3
specications
GHS 10 series 48
Speed Over Ground
displaying 32
on Home screen 3
speed unit of measurement, modifying
modifying 33
squelch
adjusting with handset 5
adjusting with radio 5
location on handset 2
location on radio 1
system messages
main in use 35
position tracking 36
T
testing the radio 34
time
changing format 32
conguring offset 32
displaying 32
on Home screen 3
transceiver
display 3
front panel 1
transmitting
with handset 6
with radio 6
transmitting power
adjusting 8–9
Tri watch 8
U
UTC offset 32
V
volume
adjusting with handset 5
adjusting with radio 5
location on handset 2
location on radio 1
W
warning notices 49
warranty 51
water immersion 51
weather
accessing channels 12
alerts 12, 35
channel list 38
disabling alerts 12
enabling alerts 12
tuning to weather channels 12
WX. See weather
190-01019-00_0A.indd 55 12/23/2008 4:23:06 PM

190-01019-00_0A.indd 56 12/23/2008 4:23:06 PM

190-01019-00_0A.indd 57 12/23/2008 4:23:06 PM
© 2008 Garmin Ltd. or its subsidiaries
Garmin International, Inc.
1200 East 151st Street, Olathe, Kansas 66062, USA
Garmin (Europe) Ltd.
Liberty House, Hounsdown Business Park, Southampton, Hampshire, SO40 9RB UK
Garmin Corporation
No. 68, Jangshu 2nd Road, Shijr, Taipei County, Taiwan
www.garmin.com
December 2008 Part Number 190-01019-00 Rev. A Printed in China
This equipment is for use worldwide, including the following European countries:
AT DK DE IT MT SK GB CH
BE EE GR LV NL SI IS BG
CY FI HU LT PL ES LI RO
CZ FR IE LU PT SE NO TR
190-01019-00_0A.indd 58 12/23/2008 4:23:06 PM