Garmin Edge 510 Quick Start Guide
742-M-Edge-510-Manual-Quick-Start-Manual 742-m-edge-510-manual-quick-start-manual
Garmin-Edge-510-Quick-Start-Guide-785294 garmin-edge-510-quick-start-guide-785294
Edge 510 - Quick Start Manual Edge_510_QSM_EN Free User Guide for Garmin GPS, Manual - page1
2015-05-27
: Garmin Garmin-Edge-510-Quick-Start-Guide-722412 garmin-edge-510-quick-start-guide-722412 garmin pdf
Open the PDF directly: View PDF ![]() .
.
Page Count: 8
- Introduction
- History
- ANT+ Sensors
- Customizing the Device
- Troubleshooting
Edge® 510
Quick Start Manual
December 2012 190-01531-01_0B Printed in Taiwan
Introduction
WARNING
See the Important Safety and Product Information guide in the
product box for product warnings and other important
information.
Always consult your physician before you begin or modify any
exercise program.
Getting Started
When using your device the first time, you should complete
these tasks to set up the device and learn about the basic
features.
1Install your device using the standard mount (page 2) or
the out-front mount (page 2).
2Turn on the device (page 3).
3Locate satellites (page 3).
4Go for a ride (page 4).
5Charge the device (page 2).
6Register the device (page 6).
7Upload your ride to Garmin Connect™ (page 4).
8Get the owner's manual (page 6).
Charging the Device
NOTICE
To prevent corrosion, thoroughly dry the mini-USB port, the
weather cap, and the surrounding area before charging or
connecting to a computer.
The device is powered by a built-in lithium-ion battery that you
can charge using a standard wall outlet or a USB port on your
computer.
NOTE: The device will not charge when outside the
temperature range of 32° to 113°F (0° to 45°C).
1Pull up the weather cap À from the mini-USB port Á.
2Plug the small end of the USB cable into the mini-USB port.
3Plug the USB end of the cable into the AC adapter or a
computer USB port.
4Plug the AC adapter into a standard wall outlet.
When you connect the device to a power source, the device
turns on.
5Charge the device completely.
A fully charged battery can run for up to 15 hours before it must
be recharged.
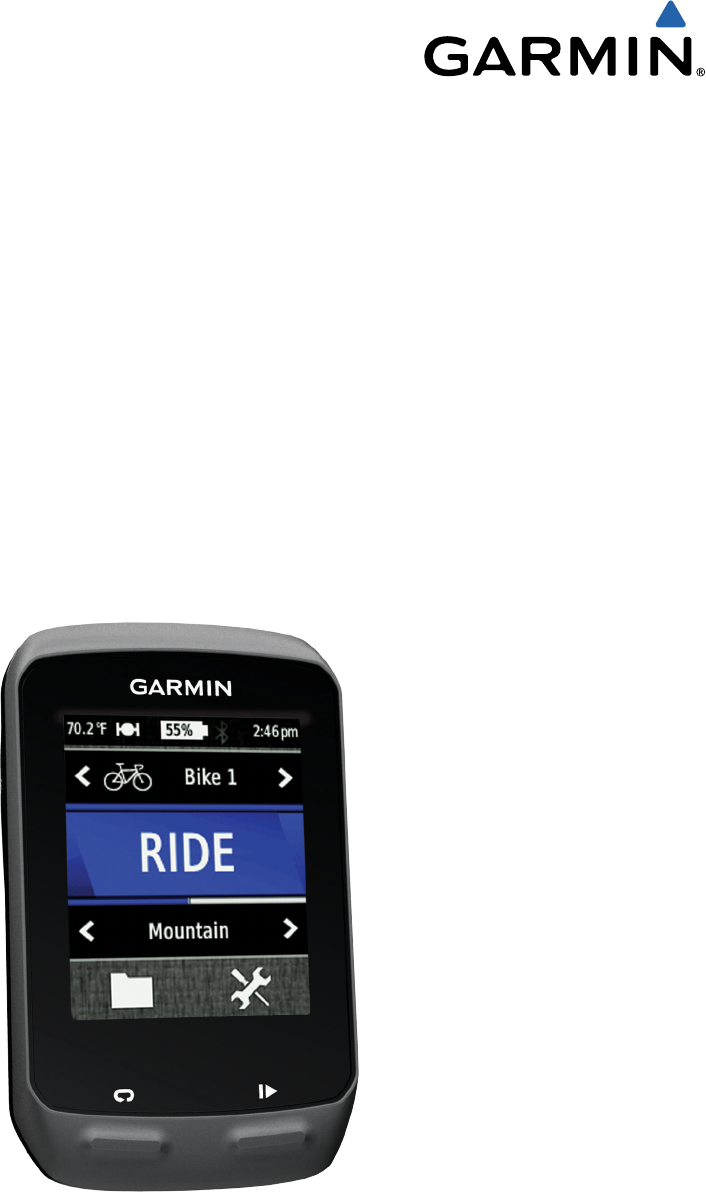
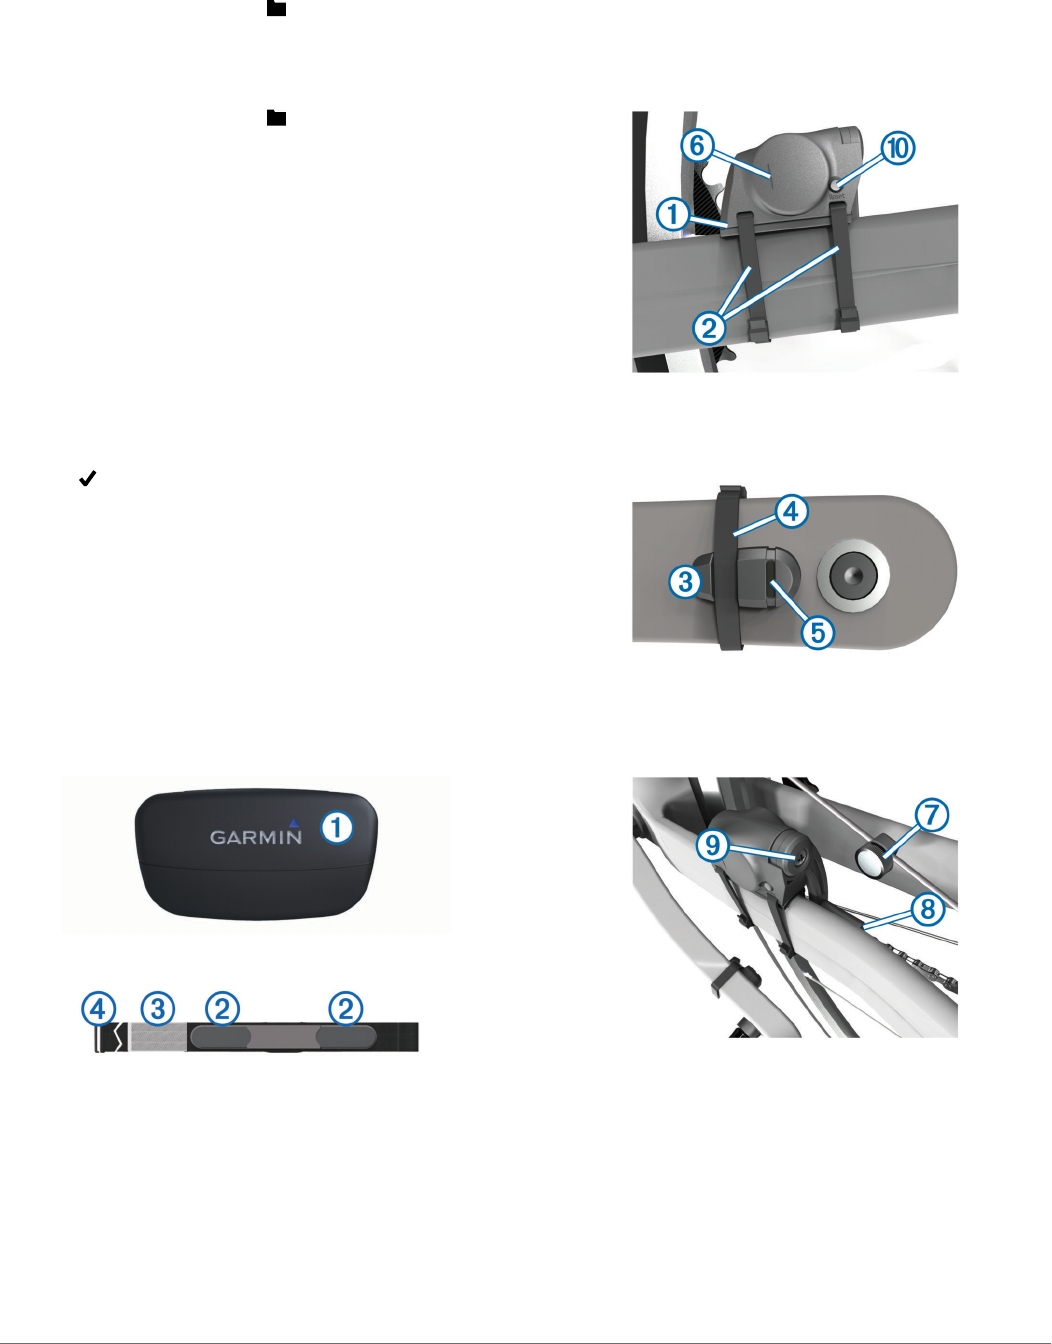
Installing the Standard Mount
For the best GPS reception, position the bike mount so the front
of the Edge is oriented toward the sky. You can install the bike
mount on the stem or the handlebars.
1Select a secure location to mount the Edge where it does not
interfere with the safe operation of your bike.
2Place the rubber disk À on the back of the bike mount.
The rubber tabs align with the back of the bike mount so it
stays in place.
3Place the bike mount on the bike stem.
4Attach the bike mount securely using the two bands Á.
5Align the tabs on the back of the Edge with the bike mount
notches Â.
6Press down slightly and turn the Edge clockwise until it locks
into place.
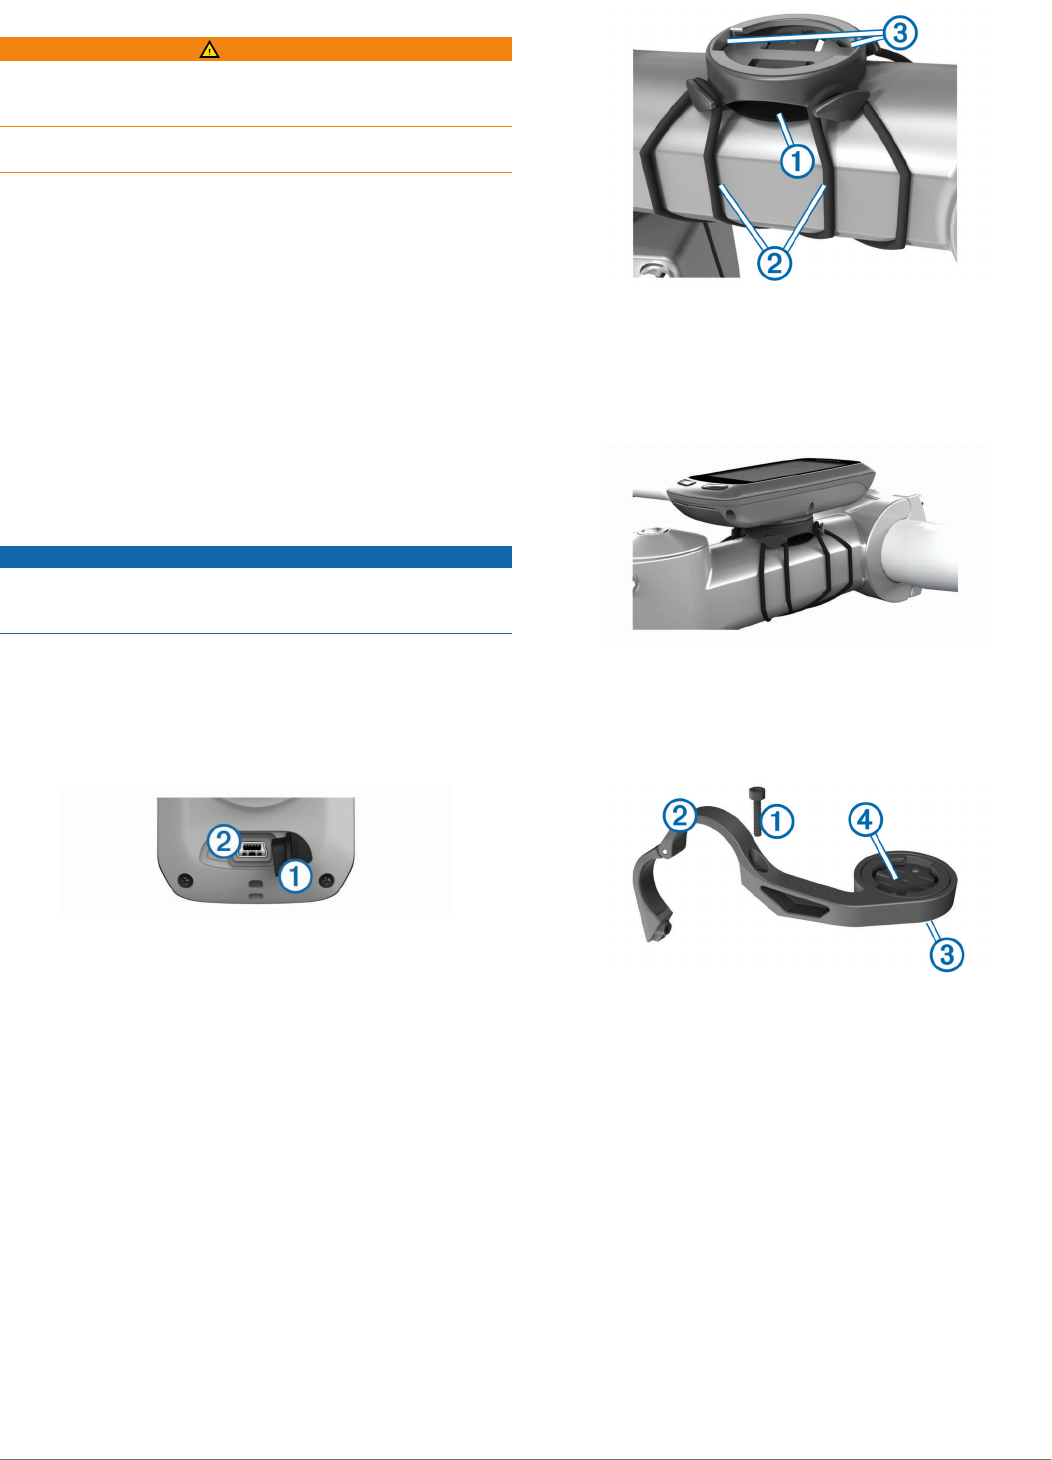
Installing the Out-Front Mount
1Select a secure location to mount the Edge where it does not
interfere with the safe operation of your bike.
2Use the hex key to remove the screw À from the handlebar
connector Á.
3If you want to change the orientation of the mount, remove
the two screws on the back side of the mount Â, rotate the
connector Ã, and replace the screws.
4If the handlebar diameter is 26 mm, place the rubber pad
around the handlebar.
5Place the handlebar connector around the rubber pad or
handlebar (31.8 mm diameter).
6Replace the screw.
NOTE: Garmin® recommends a torque specification of 7 lbf-
in. (0.8 N-m). Check the tightness of the screw periodically.
7Align the tabs on the back of the Edge with the bike mount
notches Ä.
2
8Press down slightly and turn the Edge clockwise until it locks
into place.
Releasing the Edge
1Turn the Edge clockwise to unlock the device.
2Lift the Edge off the mount.
Turning On the Device
The first time you turn on the device, you are prompted to
configure system settings and profiles (page 6).
1Hold .
2Follow the on-screen instructions.
3If your device included a heart rate monitor and a GSC™ 10,
activate the ANT+™ sensors during configuration.
For more information about ANT+ sensors, see page 5.
Keys
ÀSelect to turn the backlight on and off.
Hold to turn the device on and off.
ÁSelect to mark a new lap.
ÂSelect to start and stop the timer.
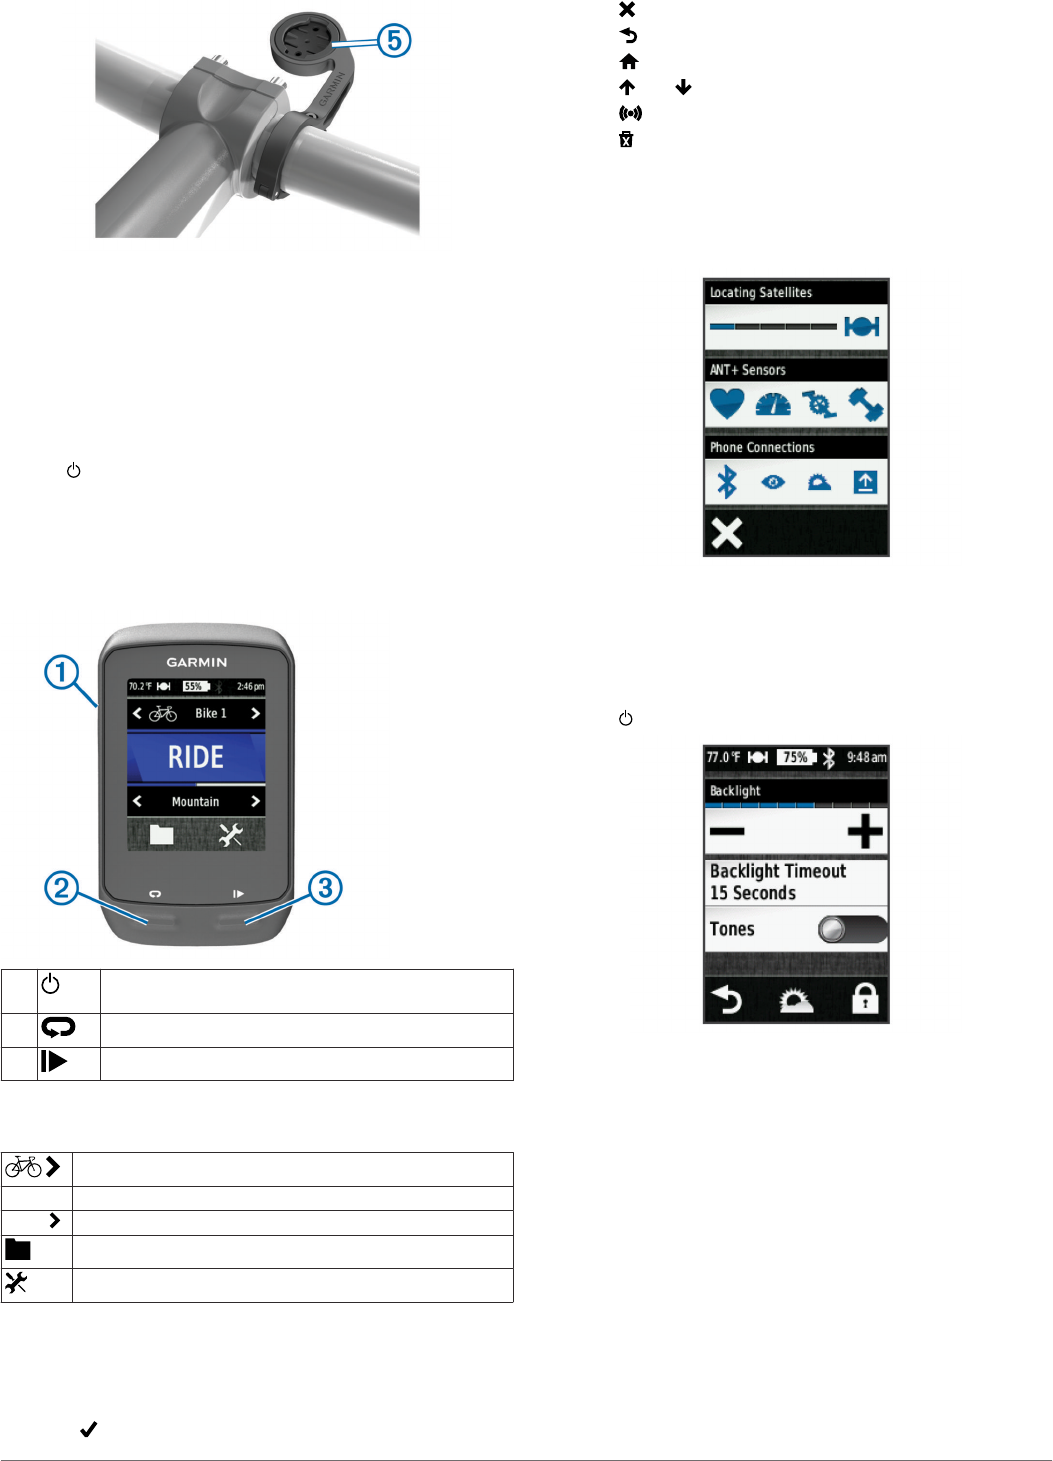
Home Screen Overview
The home screen gives you quick access to all the features of
the Edge.
Select to change your bike profile.
RIDE Select to go for a ride.
Road Select to change your activity profile.
Select to manage your history, courses, and workouts.
Select to view the setup menu.
Using the Touchscreen
• When the timer is running, tap the screen to view the timer
overlay.
The timer overlay allows you to use the settings and search
features during a ride.
• Select to save your changes and close the page.
• Select to close the page and return to the previous page.
• Select to return to the previous page.
• Select to return to the home screen.
• Select and to scroll.
• Select to view the connections page.
• Select to delete an item.
Viewing the Connections Page
The connections page displays the status of the satellite
signals, ANT+ sensors, and your smartphone.
From the home screen, select the status bar at the top of the
page.
The connections page appears. A flashing icon means the
device is searching. You can select any icon to change the
settings.
Using the Backlight
• At any time, select anywhere on the screen to turn on the
backlight.
• Select to adjust the backlight brightness and timeout.
Acquiring Satellite Signals
Before you can use the GPS tracking and navigation features,
you must acquire satellite signals.
The device may need a clear view of the sky to acquire satellite
signals. The time and date are set automatically based on the
GPS position.
1Go outdoors to an open area.
The front of the device should be oriented toward the sky.
2From the home screen, select RIDE.
3Wait while the device locates satellites.
It may take 30–60 seconds to locate satellite signals.
TIP: Do not begin moving until the timer page appears
(page 4).
3
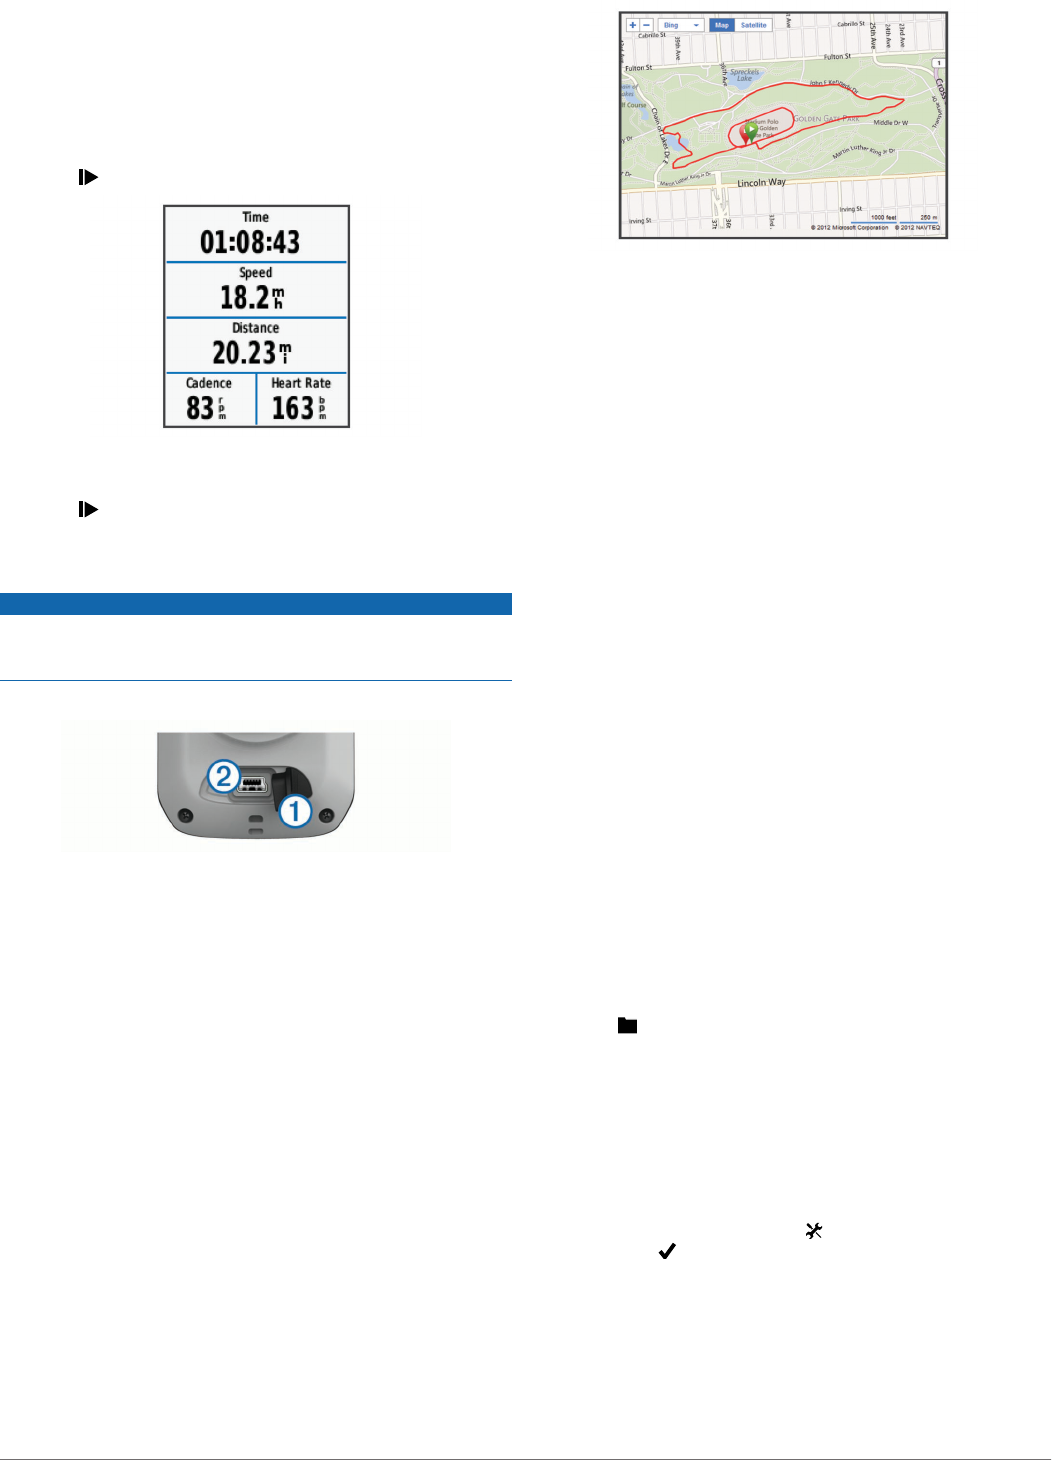
Going for a Ride
Before you can record speed and distance, you must locate
satellite signals (page 3) or pair your device with an optional
ANT+ sensor.
NOTE: History is recorded only while the timer is running.
1From the home screen, select RIDE.
2Wait while the device locates satellites.
3Select to start the timer.
4Swipe the screen for additional data pages.
5If necessary, tap the screen to view the timer overlay.
6Select to stop the timer.
7Select Save.
Sending Your Ride to Garmin Connect
NOTICE
To prevent corrosion, thoroughly dry the mini-USB port, the
weather cap, and the surrounding area before charging or
connecting to a computer.
1Pull up the weather cap À from the mini-USB port Á.
2Plug the small end of the USB cable into the mini-USB port.
3Plug the large end of the USB cable into a computer USB
port.
4Go to www.garminconnect.com/start.
5Follow the on-screen instructions.
Garmin Connect
Garmin Connect gives you a simple way to store and track your
activities, analyze your data, and share with others. To sign up
for a free account, go to www.garminconnect.com/start.
Store your activities: After you complete and save an activity
with your device, you can upload that activity to Garmin
Connect and keep it as long as you want.
Analyze your data: You can view more detailed information
about your activity, including an overhead map view, pace
and speed charts, and customizable reports.
Share your activities: You can email your activities to others,
or post links to your activities on your favorite social
networking sites.
Connected Features
The Edge has several connected features for your compatible
Bluetooth®-enabled smartphone. For more information about
how to use your Edge, go to www.garmin.com/intosports/apps.
NOTE: Your Edge must be connected to your Bluetooth-
enabled smartphone to take advantage of these features.
LiveTrack: Allows friends and family to follow your races and
training activities in real time. You can invite followers using
email or social media, allowing them to view your live data on
a Garmin Connect tracking page.
Activity upload to Garmin Connect: Automatically sends your
activity to Garmin Connect as soon as you finish recording
the activity.
Course and workout downloads from Garmin Connect:
Allows you to search for activities on Garmin Connect using
your smartphone and send them to your device so that you
can repeat them as a course or workout.
Social media interactions: Allows you to automatically post an
update to your favorite social media website when you
upload an activity to Garmin Connect.
Weather updates: Sends real-time weather conditions and
alerts to your device.
Following a Course From the Web
Before you can download a course from Garmin Connect, you
must have a Garmin Connect account (page 4).
1Connect the device to your computer.
2Go to www.garminconnect.com.
3Create a new course or select an existing course.
4Select Send to Device.
5Disconnect the device, and turn it on.
6Select > Courses.
7Select the course.
8Select RIDE.
Locations
You can record and store locations in the device.
Saving Your Location
You can save your present location, such as your home or
parking spot.
From the home screen, select > System > GPS > Mark
Location > .
History
History includes time, distance, calories, speed, lap data,
elevation, and optional ANT+ sensor information.
NOTE: History is not recorded while the timer is stopped or
paused.
4
When the device memory is full, a message appears. The
device does not automatically delete or overwrite your history.
Upload your history to Garmin Connect periodically to keep
track of all your ride data.
Viewing Your Ride
1From the home screen, select > Rides.
2Select Last Ride or All Rides.
3Select an option.
Deleting History
1From the home screen, select > Delete.
2Select an option:
• Select All Rides to delete all saved activities from the
history.
• Select Old Rides to delete activities recorded more than
one month ago.
• Select All Totals to reset all distance and time totals.
NOTE: This does not delete any saved activities.
• Select All Courses to delete all courses you have saved
or transferred to the device.
• Select All Workouts to delete all workouts you have
saved or transferred to the device.
• Select All Personal Records to delete all personal
records saved to the device.
NOTE: This does not delete any saved activities.
3Select .
ANT+ Sensors
Your device can be used with wireless ANT+ sensors. For more
information about compatibility and purchasing optional
sensors, go to http://buy.garmin.com.
Putting On the Heart Rate Monitor
NOTE: If you do not have a heart rate monitor, you can skip this
task.
You should wear the heart rate monitor directly on your skin,
just below your breastplate. It should be snug enough to stay in
place during your activity.
1Snap the heart rate monitor module À onto the strap.
2Wet both electrodes Á on the back of the strap to create a
strong connection between your chest and the transmitter.
3If the heart rate monitor has a contact patch Â, wet the
contact patch.
4Wrap the strap around your chest, and connect the strap
hook à to the loop.
The Garmin logo should be right-side up.
5Bring the device within range (3 m) of the heart rate monitor.
After you put on the heart rate monitor, it is on standby and
ready to send data.
TIP: If the heart rate data is erratic or does not appear, you may
have to tighten the strap on your chest or warm up for 5–10
minutes.
Installing the GSC 10
NOTE: If you do not have a GSC 10, you can skip this task.
Both magnets must be aligned with their respective indication
lines for the Edge to receive data.
1Place the GSC 10 on the rear chain stay (on the side
opposite the drive train).
2If necessary, place the flat rubber pad À or the triangle-
shaped rubber pad between the GSC 10 and the chain stay
for stability.
3Loosely attach the GSC 10 using two cable ties Á.
4Attach the pedal magnet  to the crank arm using the
adhesive mount and a cable tie Ã.
The pedal magnet must be within 5 mm of the GSC 10. The
indication line Ä on the pedal magnet must line up with the
indication line Å on the GSC 10.
5Unscrew the spoke magnet Æ from the plastic piece.
6Place the spoke in the groove of the plastic piece, and
tighten it slightly.
The spoke magnet can face away from the GSC 10 if there is
not enough room between the sensor arm and the spoke.
The spoke magnet must line up with the indication line Ç on
the sensor arm.
7Loosen the screw È on the sensor arm.
8Move the sensor arm to within 5 mm of the spoke magnet.
You can also tilt the GSC 10 closer to either magnet to
improve alignment.
9Select Reset É on the GSC 10.
5

The LED turns red, then green.
10Pedal to test the sensor alignment.
The red LED blinks each time the pedal magnet passes the
sensor. The green LED blinks each time the spoke magnet
passes the sensor arm.
NOTE: The LED blinks for the first 60 passes after a reset.
Select Reset again if you require additional passes.
11When everything is aligned and working correctly, tighten the
cable ties, the sensor arm, and the spoke magnet.
Garmin recommends that the torque is 1.9 to 2.4 lbf-in. (0.21
to 0.27 N-m) to ensure a water tight seal on the GSC 10
sensor arm.
Training with Power Meters
• Go to www.garmin.com/intosports for a list of third-party
ANT+ sensors that are compatible with your device.
• For more information, see your owner's manual.
Customizing the Device
Profiles
The Edge has several ways for you to customize the device
including profiles. Profiles are a collection of settings that
optimize your device based on how you are using it. For
example, you can create different settings and views for training
and mountain biking.
When you are using a profile and you change settings such as
data fields or units of measurement, the changes are saved
automatically as part of the profile.
Bike Profiles: You can create bike profiles for each bike you
own. The bike profile includes optional ANT+ sensors, bike
weight, wheel size, odometer value, and crank length.
Activity Profiles: You can create activity profiles for each type
of biking. For example, you can have a profile for training,
racing, and mountain biking. The activity profile includes
customized data pages, alerts, training zones (such as heart
rate and speed), training settings (such as Auto Pause and
Auto Lap), and navigation settings.
User Profile: You can update your gender, age, weight, height,
and lifetime athlete settings. The device uses this information
to calculate accurate ride data.
Customizing the Data Pages
You can customize data pages for each activity profile (page 6).
1From the home screen, select > Activity Profiles.
2Select a profile.
3Select Training Pages.
4Select a data page.
5If necessary, enable the data page.
6Select the number of data fields you want to see on the
page.
7Select .
8Select a data field to change it.
9Select .
Troubleshooting
Registering Your Device
Help us better support you by completing our online registration
today.
• Go to http://my.garmin.com.
• Keep the original sales receipt, or a photocopy, in a safe
place.
Resetting the Device
If the device stops responding, you may need to reset it. This
does not erase any of your data or settings.
Hold for 10 seconds.
The device resets and turns on.
Clearing User Data
You can restore all of the device settings to the factory default
values.
NOTE: This deletes all user-entered information, but it does not
delete your history.
1Turn off the device.
2Place your finger on the top left corner of the touchscreen.
3While holding your finger on the touchscreen, turn on the
device.
4Select .
Locking the Touchscreen
You can lock the screen to prevent inadvertent screen touches.
1Select .
2Select .
Unlocking the Touchscreen
1Select .
2Select .
Getting More Information
You can find more information about this product on the Garmin
website.
• Go to www.garmin.com/intosports.
• Go to www.garmin.com/learningcenter.
• Go to http://buy.garmin.com, or contact your Garmin dealer
for information about optional accessories and replacement
parts.
Getting the Owner's Manual
You can get the latest owner's manual from the web.
1Go to www.garmin.com/support.
2Select Manuals.
3Follow the on-screen instructions to select your product.
Temperature Readings
The device may display temperature readings that are higher
than the actual air temperature if the device is placed in direct
sunlight, held in your hand, or is charging with an external
battery pack. Also, the device will take some time to adjust to
significant changes in temperature.
6

www.garmin.com/support
913-397-8200
1-800-800-1020
0808 2380000
+44 870 850 1242 1-866-429-9296 43 (0) 3133 3181 0
00 32 2 672 52 54 00 45 4810 5050 00 358 9 6937 9758 00 331 55 69 33 99
0180 5 / 42 76 46 - 880 00 39 02 3669 9699 0800-0233937 815 69 555
00800 4412 454
+44 2380 662 915 00 35 1214 447 460 00 34 902 007 097 00 46 7744 52020
Garmin International, Inc.
1200 East 151st Street
Olathe, Kansas 66062, USA
Garmin (Europe) Ltd.
Liberty House, Hounsdown Business Park
Southampton, Hampshire, SO40 9LR UK
Garmin Corporation
No. 68, Zhangshu 2nd Road, Xizhi Dist.
New Taipei City, 221, Taiwan (R.O.C.)
Edge®, Garmin®, and the Garmin logo are trademarks of
Garmin Ltd. or its subsidiaries, registered in the USA and
other countries. ANT+™, Garmin Connect™, and GSC™ are
trademarks of Garmin Ltd. or its subsidiaries. These
trademarks may not be used without the express permission
of Garmin.
The Bluetooth® word mark and logos are owned by the
Bluetooth SIG, Inc. and any use of such marks by Garmin is
under license. Other trademarks and trade names are those of
their respective owners.
© 2012 Garmin Ltd. or its subsidiaries
