Garmin Fenix 2 Quick Start Manual
Garmin-Garmin-Watch-Fnix-2-Users-Manual-217428 garmin-garmin-watch-fnix-2-users-manual-217428
Garmin-Fenix-2-Quick-Start-Manual-785787 garmin-fenix-2-quick-start-manual-785787
Garmin-Fenix-2-Quick-Start-Guide-722772 garmin-fenix-2-quick-start-guide-722772
fnix2 a2c61a11-6cff-45d2-b205-ab1a970cb8b7 Garmin Watch fnix 2 User Guide |
Fenix 2 - Quick Start Guide fenix_2_QSM_EN Free User Guide for Garmin GPS, Manual - page2
2015-08-11
: Garmin Garmin-Fenix-2-Quick-Start-Manual-785325 garmin-fenix-2-quick-start-manual-785325 garmin pdf
Open the PDF directly: View PDF ![]() .
.
Page Count: 4
fēnix™ 2 Quick Start Manual
Getting Started
WARNING
See the Important Safety and Product Information guide in the
product box for product warnings and other important
information.
Charging the Device
NOTICE
To prevent corrosion, thoroughly dry the contacts and the
surrounding area before charging or connecting to a computer.
The device is powered by a built-in lithium-ion battery that you
can charge using a standard wall outlet or a USB port on your
computer.
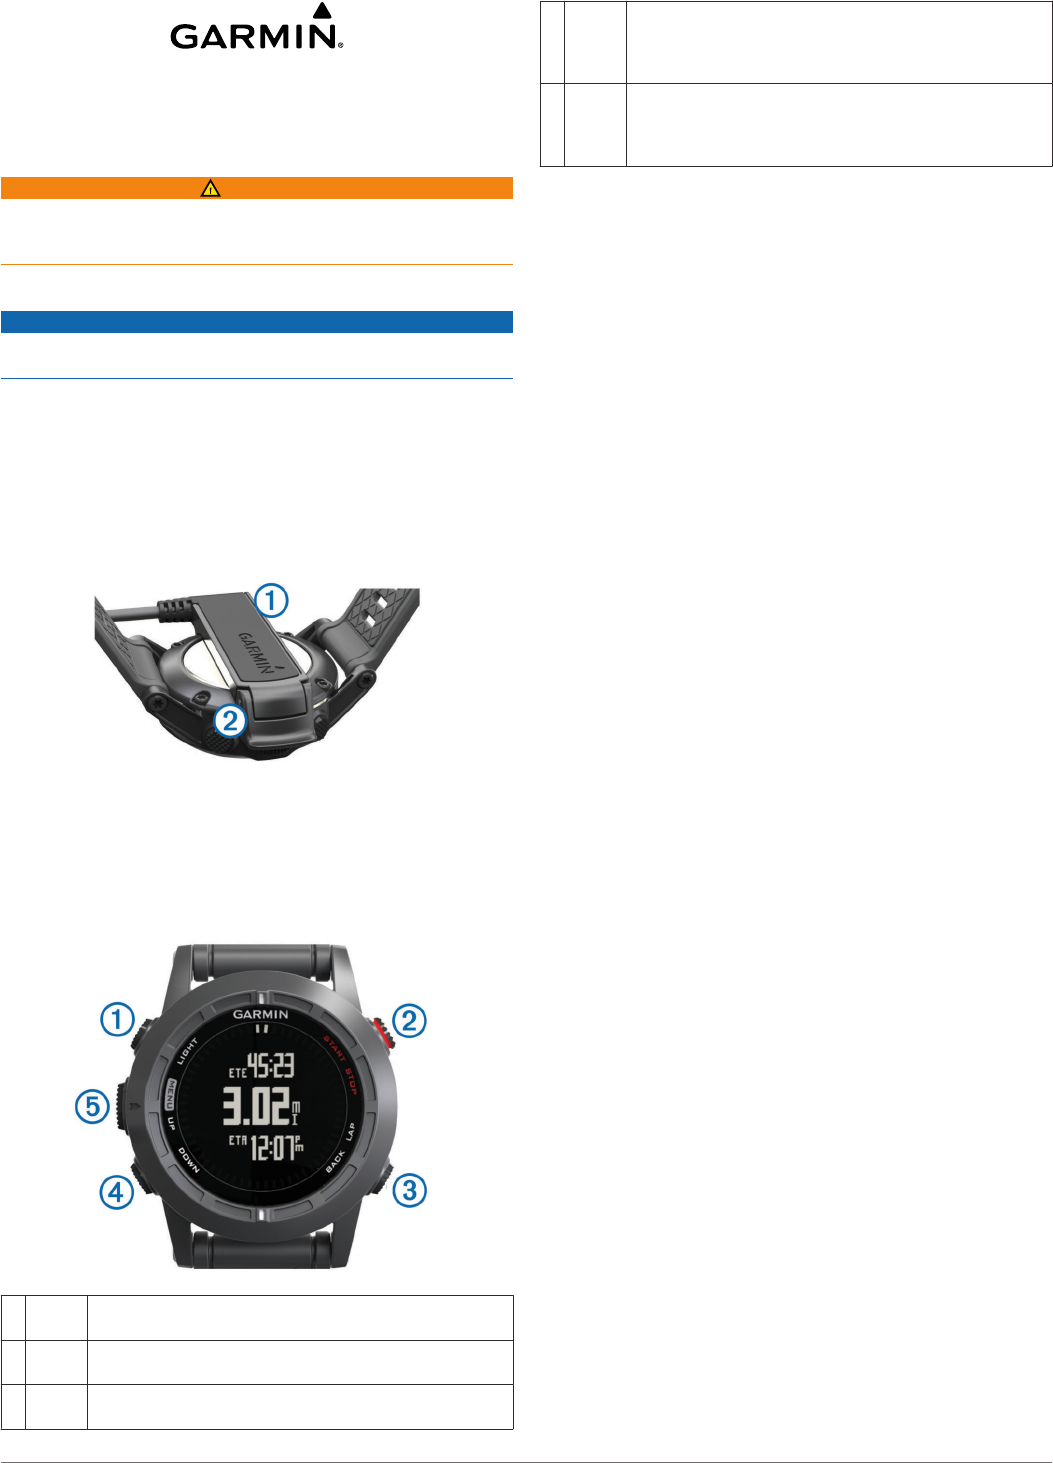
1Plug the USB end of the cable into the AC adapter or a
computer USB port.
2Plug the AC adapter into a standard wall outlet.
3Align the left side of the charging cradle À with the groove on
the left side of the device.
4Align the hinged side of the charger Á with the contacts on
the back of the device.
When you connect the device to a power source, the device
turns on.
5Charge the device completely.
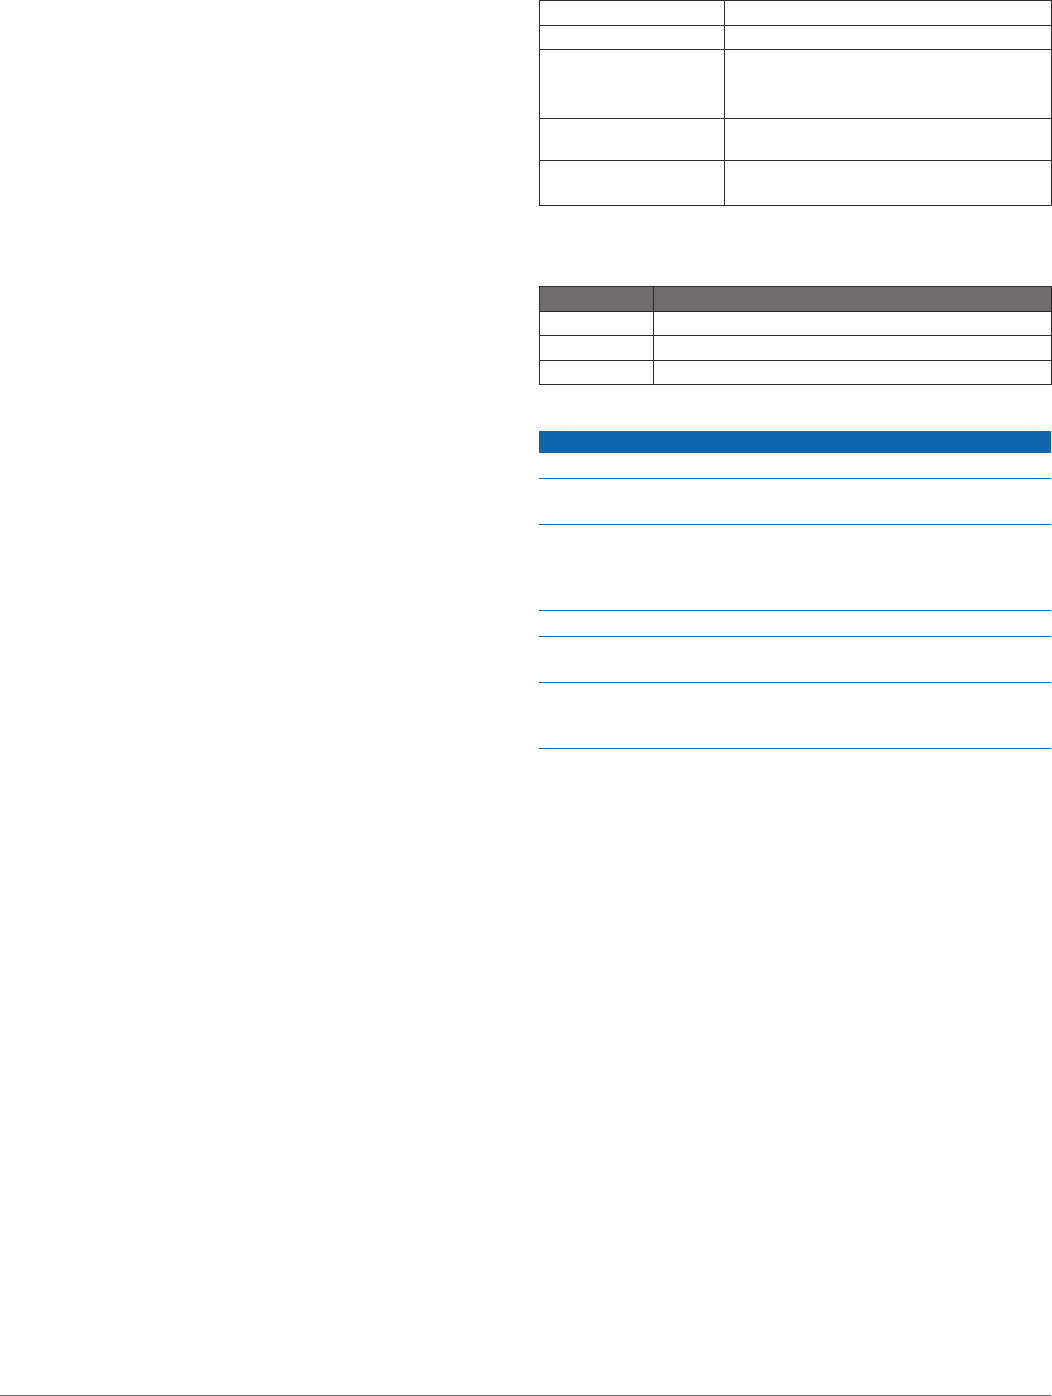
Keys
ÀLIGHT Select to turn the backlight on and off.
Hold to turn the device on and off or to lock the keys.
ÁSTART
STOP
Select to start or stop an activity.
Select to choose an option in a menu.
ÂBACK
LAP
Select to return to the previous page.
Select to record a lap or a rest during an activity.
ÃDOWN Select to scroll through the data pages, options,
messages, and settings.
Select to read a long message or notification.
Hold to mark a waypoint.
ÄUP
MENU
Select to scroll through the data pages, options,
messages, and settings.
Select to dismiss a short message or notification.
Hold to view the main menu.
Viewing the Data Pages
Customizable data pages allow you to quickly access real-time
data from internal and connected sensors. When you start an
activity, additional data pages appear.
From the time of day page or any data page, select UP or
DOWN to cycle through the data pages.
Locking the Keys
You can lock the keys to prevent inadvertent key presses.
1Select the data page you want to view while the keys are
locked.
2Hold LIGHT for two seconds, and select Lock to lock the
keys.
3Hold LIGHT for two seconds to unlock the keys.
Activities
Your device can be used for a variety of outdoor, athletic, and
fitness activities. When you start an activity, the device displays
and records sensor data about your activity. You can save
activities and share them with the Garmin Connect™
community.
The device functions differently depending on your activity. For
example, data pages, recorded data, and menu options may
appear differently based on your activity.
Starting an Activity
When you start an activity that requires GPS, GPS turns on
automatically. When you stop the activity, GPS turns off, and
the device returns to low-power mode.
1Select START.
2Select an activity.
3If necessary, follow the on-screen instructions to enter
additional information.
4If necessary, wait while the device connects to your ANT+™
sensors.
5If the activity requires GPS, go outside, and wait while the
device locates satellites.
6Select START to start the timer.
NOTE: The device does not record your activity data until
you start the timer.
Stopping an Activity
NOTE: Some options are not available for some activities.
1Select STOP.
2Select an option:
• To reset your activity, select Reset.
This resets the timer and clears all recorded data since
you started the activity.
• To record a lap, select Lap.
• To follow your track back to the starting point of your
activity, select TracBack.
• To resume your activity, select Resume.
• To save the activity and return to low-power mode, select
Save.
• To discard the activity and return to low-power mode,
select Discard.
February 2014 190-01730-01_0B Printed in Taiwan

• To suspend your activity and resume at a later time,
select Resume Later.
Navigating to a Destination
You can navigate to waypoints, tracks, routes, geocaches,
POIs, and GPS coordinates. You can also navigate using
TracBack® or Sight 'N Go.
1Select START > Navigate.
2Select a type of destination.
3Follow the on-screen prompts to select a destination.
The device displays information about your next waypoint.
4Select UP or DOWN to view additional navigation data pages
(Viewing the Data Pages).
Going for a Run
Before you go for a run, you should charge the device
completely (Charging the Device). Before you can use an ANT+
sensor for your run, the sensor must be paired with your device
(Pairing ANT+ Sensors).
1Put on your ANT+ sensors, such as a foot pod or heart rate
monitor (optional).
2Select START > Run.
3Select an option:
• To use paired ANT+ sensors, wait for the device to
connect to the sensors.
• To skip searching for ANT+ sensors, select Skip.
4Go outside, and wait while the device locates satellites.
The timer screen appears.
5Select START to start the timer.
6Go for a run.
7Select LAP to record laps (optional).
8Select UP and DOWN to view additional data pages
(optional).
9After you complete your run, select STOP > Save to save the
run.
A summary appears.
Tracks
A track is a recording of your path. The track log contains
information about points along the recorded path, including
time, location, and elevation for each point.
The device records a track automatically during any activity that
uses GPS. When you save an activity that uses GPS, the
device saves the track as part of the activity. You can create a
track file from the activity to navigate it later. You can view
tracks using BaseCamp™ and BaseCamp Mobile.
Going for a Hike
Before you go for a hike, you should charge the device
completely (Charging the Device).
1Select START > Hike.
2Wait while the device locates satellites.
3Start hiking.
The device records a track while you hike.
4When you want to take a break or pause the device from
tracking, select STOP > Resume Later.
The device saves the status of your hike and enters low
power mode.
5Select START > Resume to resume tracking.
6After you complete your hike, select STOP > Save to save
your hike data.
Waypoints
Waypoints are locations you record and store in the device.
Creating a Waypoint
You can save your current location as a waypoint.
1Hold DOWN.
2Select an option:
• To save the waypoint without changes, select Save.
• To make changes to the waypoint, select Edit, make
changes to the waypoint, and select Save.
Bluetooth® Connected Features
The fēnix 2 device has several Bluetooth connected features for
your compatible smartphone. Some features require you to
install Garmin Connect Mobile or BaseCamp Mobile on your
smartphone. Go to www.garmin.com/apps for more information.
Phone notifications: Displays phone notifications and
messages on your fēnix 2 device.
LiveTrack: Allows friends and family to follow your races and
training activities in real time. You can invite followers using
email or social media, allowing them to view your live data on
a Garmin Connect tracking page.
Activity uploads to Garmin Connect: Automatically sends
your activity to Garmin Connect as soon as you finish
recording the activity.
Activity review in BaseCamp Mobile: Allows you to send
activities to your smartphone running the BaseCamp Mobile
app. You can view the activities, including the track and
sensor data, in the app.
Cloud backup in BaseCamp Mobile: Allows you to back up
saved activities to your Garmin® Cloud account using
BaseCamp Mobile.
Adventure downloads: Allows you to browse adventures in the
BaseCamp Mobile app and send them to your device.
Pairing Your Smartphone with Your fēnix 2 Device
NOTE: The device cannot connect to ANT+ sensors while
Bluetooth wireless technology is turned on.
1Bring your smartphone within 10 m (33 ft.) of your fēnix 2
device.
2On the fēnix 2 device, hold MENU.
3Select Settings > Bluetooth.
4Complete an action:
• If this is the first time you have paired a phone with your
device, select OK.
• If you have already paired another phone with your
device, select Pair Mobile Device.
2
5On your smartphone, go to the Bluetooth settings menu, and
search for nearby devices.
See the smartphone owner's manual for more information.
6Select your fēnix 2 device from the list of nearby devices.
A passkey appears on the fēnix 2 screen.
7On your smartphone, enter the passkey.
8On your fēnix 2 device, select Always On, In Activity, or
Not in Activity, and select OK.
The device turns Bluetooth wireless technology on and off
automatically based on your selection.
9Select Show or Hide to show or hide smartphone
notifications on the fēnix 2 screen.
10Go to www.garmin.com/apps, and download the Garmin
Connect Mobile app or the BaseCamp Mobile app to your
smartphone (optional).
Garmin Connect
You can connect with your friends on Garmin Connect. Garmin
Connect gives you the tools to track, analyze, and share your
data. You can record the events of your active lifestyle including
golf games, hikes, runs, adventures, and more. To sign up for a
free account, go to www.garminconnect.com/.
Using Garmin Connect
You can upload all of your activity data to Garmin Connect for
comprehensive analysis. With Garmin Connect, you can view a
map of your activity, and share your activities with friends.
1Connect the device to your computer using the USB cable.
2Go to www.garminconnect.com/start.
3Follow the on-screen instructions.
ANT+ Sensors
Your device can be used with wireless ANT+ sensors. For more
information about compatibility and purchasing optional
sensors, go to http://buy.garmin.com.
Pairing ANT+ Sensors
Before you can pair ANT+ sensors, Bluetooth wireless
technology must be turned off (Pairing Your Smartphone with
Your fēnix 2 Device).
The first time you connect a sensor to your device using ANT+
wireless technology, you must pair the device and sensor. Once
paired, the device connects to the sensor automatically when
you start an activity and the sensor is active and within range.
NOTE: If a heart rate monitor was bundled with your device, the
included heart rate monitor is already paired with your device.
1If you are pairing a heart rate monitor, put on the heart rate
monitor.
The heart rate monitor does not send or receive data until
you put it on.
2Bring the device within 3 m (10 ft.) of the sensor.
NOTE: Stay 10 m (33 ft.) away from other ANT+ sensors
while pairing.
3Hold MENU.
4Select Settings > Sensors.
5Select your sensor.
6Select New Search.
When the sensor is paired with your device, the sensor
status changes from Searching to Connected. Sensor data
appears in the data page loop or a custom data field.
Device Information
Specifications
Battery type 500 mAh Lithium-ion battery
Battery life Up to 5 weeks
Water resistance Water resistant (50 m)
NOTE: The watch is designed for surface
swimming.
Operating temperature
range
From -20º to 50ºC (from -4º to 122ºF)
Radio frequency/
protocol
2.4 GHz ANT+ wireless technology
Bluetooth Smart device
Battery Information
The actual battery life depends on how much you use GPS,
device sensors, optional wireless sensors, and the backlight.
Battery Life Mode
16 hours Normal GPS mode
50 hours UltraTrac GPS mode with one-minute polling interval
Up to 5 weeks Watch mode
Device Care
NOTICE
Do not use a sharp object to clean the device.
Avoid chemical cleaners, solvents, and insect repellents that
can damage plastic components and finishes.
Thoroughly rinse the device with fresh water after exposure to
chlorine, salt water, sunscreen, cosmetics, alcohol, or other
harsh chemicals. Prolonged exposure to these substances can
damage the case.
Avoid pressing the keys under water.
Avoid extreme shock and harsh treatment, because it can
degrade the life of the product.
Do not store the device where prolonged exposure to extreme
temperatures can occur, because it can cause permanent
damage.
Getting More Information
You can find more information about this product on the Garmin
website.
• Go to www.garmin.com/outdoor.
• Go to www.garmin.com/learningcenter.
• Go to http://buy.garmin.com, or contact your Garmin dealer
for information about optional accessories and replacement
parts.
Getting the Owner's Manual
You can get the latest owner's manual from the web.
1Go to www.garmin.com/support.
2Select Manuals.
3Follow the on-screen instructions to select your product.
Support and Updates
Garmin Express™ provides easy access to these services for
Garmin devices. Some services may not be available for your
device.
• Product registration
• Product manuals
• Software updates
• Map updates
• Vehicles, voices, and other extras
Setting Up Garmin Express
1Connect the device to your computer using a USB cable.
2Go to www.garmin.com/express.
3

3Follow the on-screen instructions.
Garmin International, Inc.
1200 East 151st Street
Olathe, Kansas 66062, USA
Garmin (Europe) Ltd.
Liberty House, Hounsdown Business Park
Southampton, Hampshire, SO40 9LR UK
Garmin Corporation
No. 68, Zhangshu 2nd Road, Xizhi Dist.
New Taipei City, 221, Taiwan (R.O.C.)
Garmin® and the Garmin logo are trademarks of Garmin Ltd. or its subsidiaries, registered in the USA and other countries. ANT+™,
BaseCamp™, fēnix™, Garmin Connect™, and TracBack® are trademarks of Garmin Ltd. or its subsidiaries. These trademarks may not
be used without the express permission of Garmin.
The Bluetooth® word mark and logos are owned by the Bluetooth SIG, Inc. and any use of such marks by Garmin is under license.
Other trademarks and trade names are those of their respective owners.
© 2014 Garmin Ltd. or its subsidiaries www.garmin.com/support
