Gateway Gcm 4 Users Manual MP3 Photo Jukebox User Guide
GCM-4 to the manual 82cd1815-e004-4eff-b7bf-5c7f168f2b20
2015-02-05
: Gateway Gateway-Gcm-4-Users-Manual-403286 gateway-gcm-4-users-manual-403286 gateway pdf
Open the PDF directly: View PDF ![]() .
.
Page Count: 112 [warning: Documents this large are best viewed by clicking the View PDF Link!]
- Contents
- Chapter 1: Checking Out Your Jukebox
- Chapter 2: Getting Started
- Chapter 3: Playing Music
- Chapter 4: Viewing Photos
- Chapter 5: Settings and Options
- Chapter 6: Maintenance and Troubleshooting
- Chapter 7: Safety and Legal Notices
Gateway MP3 Photo Jukebox
GCM-4
User Guide
i
Contents
Chapter 1: Checking Out Your Jukebox . . . . . . 1
Package contents . . . . . . . . . . . . . . . . . . . . . . . . . . . . . . . . 1
System requirements . . . . . . . . . . . . . . . . . . . . . . . . . . . . . 2
Front . . . . . . . . . . . . . . . . . . . . . . . . . . . . . . . . . . . . . . . . . . 3
Top . . . . . . . . . . . . . . . . . . . . . . . . . . . . . . . . . . . . . . . . . . . 5
Bottom . . . . . . . . . . . . . . . . . . . . . . . . . . . . . . . . . . . . . . . . . 6
Left . . . . . . . . . . . . . . . . . . . . . . . . . . . . . . . . . . . . . . . . . . . 7
Back . . . . . . . . . . . . . . . . . . . . . . . . . . . . . . . . . . . . . . . . . . 8
Accessories . . . . . . . . . . . . . . . . . . . . . . . . . . . . . . . . . . . . . 9
Specifications . . . . . . . . . . . . . . . . . . . . . . . . . . . . . . . . . . . 9
Chapter 2: Getting Started . . . . . . . . . . . . . . . . . 11
Charging the battery . . . . . . . . . . . . . . . . . . . . . . . . . . . . . 11
Turning on your jukebox . . . . . . . . . . . . . . . . . . . . . . . . . . 15
Plugging in the headphones . . . . . . . . . . . . . . . . . . . . . . . 16
Using the control buttons . . . . . . . . . . . . . . . . . . . . . . . . . 17
Using the menu buttons . . . . . . . . . . . . . . . . . . . . . . . 17
ii
Using the playback buttons . . . . . . . . . . . . . . . . . . . 18
Locking control buttons . . . . . . . . . . . . . . . . . . . . . . . 19
Playing music . . . . . . . . . . . . . . . . . . . . . . . . . . . . . . . . . 20
Adjusting volume . . . . . . . . . . . . . . . . . . . . . . . . . . . 22
Viewing photos . . . . . . . . . . . . . . . . . . . . . . . . . . . . . . . . 23
Chapter 3: Playing Music . . . . . . . . . . . . . . . . . . 25
Playing songs . . . . . . . . . . . . . . . . . . . . . . . . . . . . . . . . . 25
Viewing the Now Playing screen . . . . . . . . . . . . . . . 27
Setting advanced playing modes . . . . . . . . . . . . . . . . . . 28
Setting the equalizer . . . . . . . . . . . . . . . . . . . . . . . . . 28
Setting shuffle mode . . . . . . . . . . . . . . . . . . . . . . . . . 28
Setting repeat mode . . . . . . . . . . . . . . . . . . . . . . . . . 29
Disabling expired music messages . . . . . . . . . . . . . 30
Viewing the music visualization . . . . . . . . . . . . . . . . 31
Creating playlists . . . . . . . . . . . . . . . . . . . . . . . . . . . . . . . 32
Creating a jukebox playlist . . . . . . . . . . . . . . . . . . . . 32
Creating a Windows Media Player playlist . . . . . . . . 34
Editing playlists . . . . . . . . . . . . . . . . . . . . . . . . . . . . . . . . 36
Adding a track or album to a jukebox playlist . . . . . 36
iii
Deleting a track from a playlist . . . . . . . . . . . . . . . . . 36
Deleting a playlist . . . . . . . . . . . . . . . . . . . . . . . . . . . . 37
Getting more music . . . . . . . . . . . . . . . . . . . . . . . . . . . . . 39
Installing the software . . . . . . . . . . . . . . . . . . . . . . . . 39
Creating files for your jukebox . . . . . . . . . . . . . . . . . . 40
Moving files to your jukebox . . . . . . . . . . . . . . . . . . . 49
Chapter 4: Viewing Photos . . . . . . . . . . . . . . . . 53
Viewing a photo . . . . . . . . . . . . . . . . . . . . . . . . . . . . . . . . 53
Copying photos to your jukebox . . . . . . . . . . . . . . . . . . . . 54
Copying photos from your computer . . . . . . . . . . . . . 54
Copying photos from your digital camera . . . . . . . . . 55
Copying photos from your card reader . . . . . . . . . . . 58
Organizing photos . . . . . . . . . . . . . . . . . . . . . . . . . . . . . . . 60
Creating a photo folder . . . . . . . . . . . . . . . . . . . . . . . 60
Moving a photo into a folder . . . . . . . . . . . . . . . . . . . 61
Deleting a photo . . . . . . . . . . . . . . . . . . . . . . . . . . . . . 62
Working with slideshows . . . . . . . . . . . . . . . . . . . . . . . . . 63
Creating slideshows . . . . . . . . . . . . . . . . . . . . . . . . . . 63
Editing slideshows . . . . . . . . . . . . . . . . . . . . . . . . . . . 64
iv
Playing slideshows . . . . . . . . . . . . . . . . . . . . . . . . . . 65
Playing a picture show . . . . . . . . . . . . . . . . . . . . . . . 66
Getting more photos . . . . . . . . . . . . . . . . . . . . . . . . . . . . 67
Creating text notes . . . . . . . . . . . . . . . . . . . . . . . . . . . . . 68
Chapter 5: Settings and Options . . . . . . . . . . . 71
Setting the backlight . . . . . . . . . . . . . . . . . . . . . . . . . . . . 71
Setting the clock and calendar . . . . . . . . . . . . . . . . . . . . 72
Accessing the settings shortcut menu . . . . . . . . . . . . . . 72
Resetting the jukebox to its defaults . . . . . . . . . . . . . . . . 73
Chapter 6: Maintenance and Troubleshooting 75
Troubleshooting . . . . . . . . . . . . . . . . . . . . . . . . . . . . . . . . 75
Technical support . . . . . . . . . . . . . . . . . . . . . . . . . . . . . . 80
Maintaining your jukebox . . . . . . . . . . . . . . . . . . . . . . . . 81
Cleaning . . . . . . . . . . . . . . . . . . . . . . . . . . . . . . . . . . 81
Replacing the battery . . . . . . . . . . . . . . . . . . . . . . . . 82
Maintaining battery life . . . . . . . . . . . . . . . . . . . . . . . 84
Updating the firmware . . . . . . . . . . . . . . . . . . . . . . . . . . . 84
vi
1
Chapter 1: Checking Out Your
Jukebox
Package contents
Your package includes:
■Gateway GCM-4 MP3 Photo Jukebox
■Ear bud stereo headphones
■USB 2.0 connector cables (2)
■AC power adapter
■Soft cover carrying case
■Quick start poster
■This user guide
■Software installation CD
■Battery (installed)
2
System requirements
To connect to your jukebox, your computer must have the following
minimum requirements:
■Microsoft® Windows® XP (Service Pack 1)
■Microsoft Windows Media® Player 10
■Intel® Pentium III 333 MHz processor
■80 MB available hard drive space
■128 MB memory
3
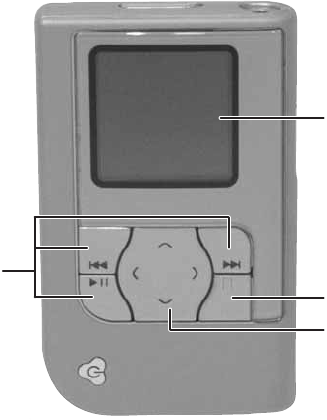
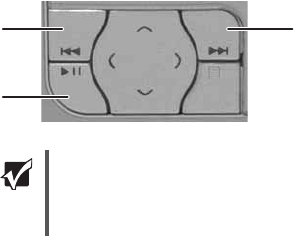
Front
Playback control
buttons
LCD panel
Menu control
button
Option menu
button

4
Component Description
LCD panel Displays menus, music visualizations, and digital photos. For more
information, see “Playing music” on page 20 and “Viewing photos”
on page 23.
Playback
control buttons Control audio playback. The play/pause button doubles as a power
button. For more information, see “Using the playback buttons” on
page 18 and “Turning on your jukebox” on page 15.
Menu control
button Lets you select menus and choices within menus. For more
information, see “Using the menu buttons” on page 17.
Option menu
button Displays the choices or options of the currently highlighted menu
item. For more information, see “Using the menu buttons” on
page 17.
5
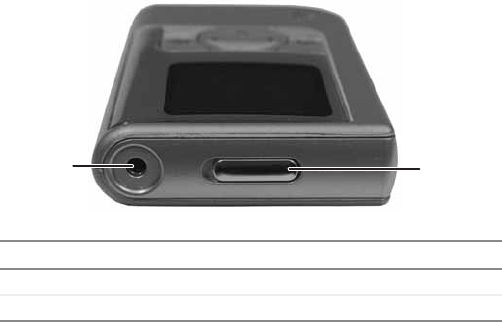
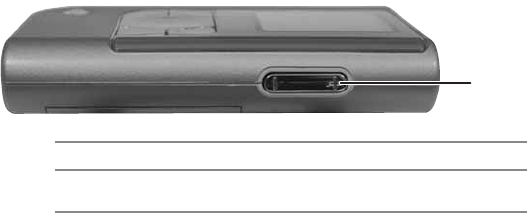
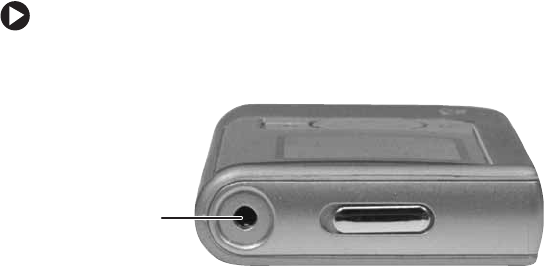
Top
Component Description
Headphone jack Plug headphones or amplified speakers into this jack.
Control lock Slide to lock all jukebox control buttons.
Headphone
jack Control lock
6
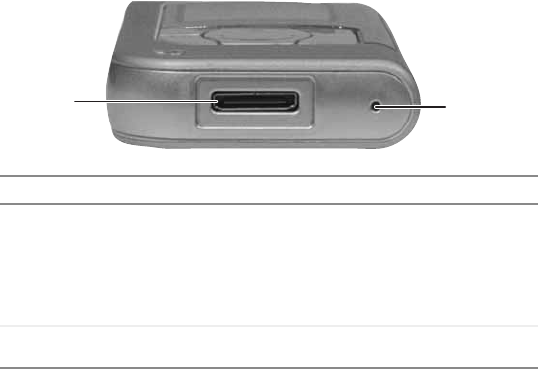
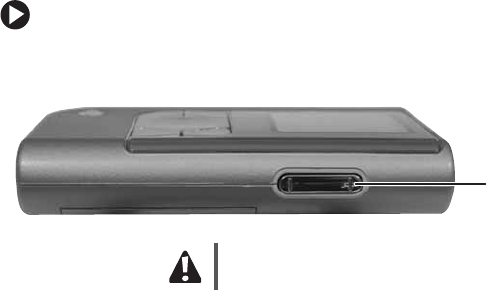
Bottom
Component Description
USB/docking
connector Connect the USB combo cable to this connector and to the
USB port on your computer for moving music or photos to
your jukebox. You can also connect the camera USB cable
for downloading photos directly from your digital camera. For
more information, see “Charging the battery” on page 11,
“Moving files to your jukebox” on page 49, and “Copying
photos from your digital camera” on page 55.
Reset button Press with a straightened paper clip or pin to reset your
jukebox.
USB/docking
connector Reset button
7
Left
Control Description
Volume Press the + side (top) of the button to increase volume,
and press the – side (bottom) to decrease volume.
Volume button
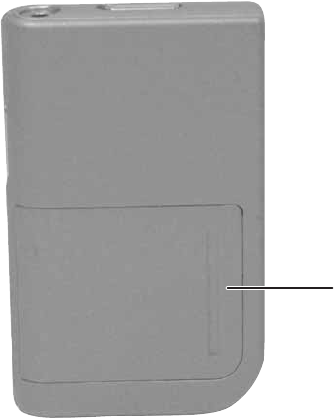
8
Back
Battery cover

9
Accessories
Accessories are available on Gateway’s Web site at
www.gateway.com/photojukeboxextras .
Specifications
■Dimensions: 2.3×3.8×0.7inches (59×96×17mm)
■Display: 128 × 128 pixels, 16-bit (65,536 colors), TFT Transflective,
1.6-inch
■Battery: 820 mAh, rechargeable Li-ion, prismatic, 3.7V, removable
■Hard drive: 4 GB, 1 inch, Compact Flash Type II
■Memory: 32 MB SDRAM, 1 MB flash
■Power: input 100~240VAC, 50-60 Hz (normal), output 5V 1.6A
■Compatible media: MP3, WMA, AAC (non-Fairplay DRM), WAV,
JPG/JPEG
■Data transfer rate: Up to 480 Mbps using USB 2.0
■Audio jacks: Audio line out (headphones)
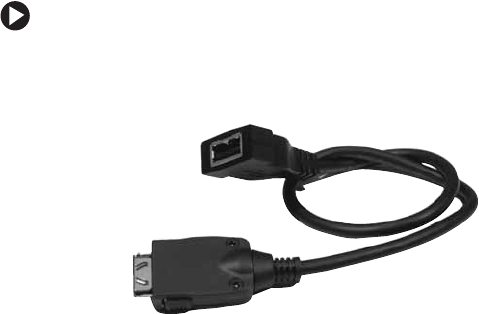
■Camera interface cable: USB 2.0, 22-pin
■Combo cable: USB 2.0, 22-pin
10

11
Chapter 2: Getting Started
To use your jukebox, you need to:
1Charge the battery
2Install and set up software on your computer
Charging the battery
Fully charge the battery for three hours before using your jukebox for the
first time. However, it is not necessary to fully charge the battery each time.
You can charge the battery by connecting the jukebox either to the
AC power adapter (fastest) or to a USB port on the computer.
The battery icon in the upper right corner of the screen indicates the
remaining battery charge.
12
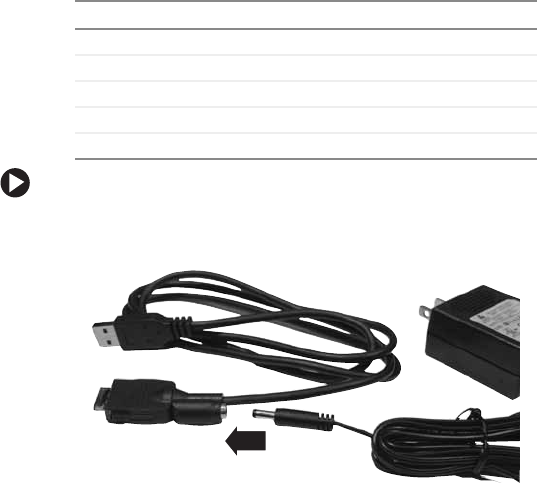
To charge the battery:
1Connect the USB combo cable to the AC power adapter, then plug
the power adapter into an AC power outlet.
If the power icon is... the battery is...
Green Full
Yellow Medium
Red Low
Red with an exclamation point Critically low
A power plug Charging
13
- OR -
Connect the USB combo cable to the computer.
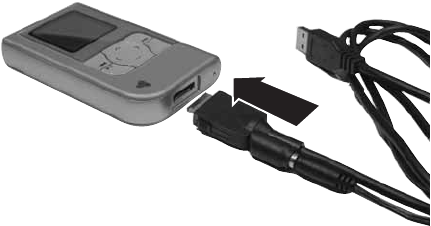
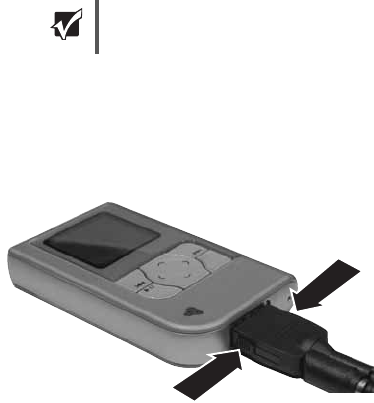
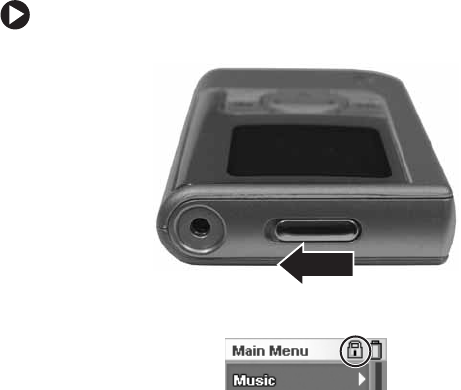
2Plug the combo cable into the jukebox. Make sure that the top of
the plug (the side with the arrows) is facing the same way as the front
of the jukebox.
14
3If you are charging your jukebox from the computer’s USB cable, turn
your jukebox off. If your jukebox is on, it cannot charge from the
computer’s USB cable.
If the jukebox is on, the power cord icon appears in the upper right
corner of the display. The keypad’s backlight turns on while the
battery charges, then turns off when the battery is fully charged.
4When your jukebox battery is finished charging, press in on the
plug’s two side buttons, then pull the plug out of the jukebox.
Important If you are charging your jukebox from the AC power adapter,
you can leave your jukebox on as it charges, but it will take
longer to charge.
15
Turning on your jukebox
To turn on your jukebox:
■Press the power button. The jukebox turns on, and the Main Menu
opens after a few seconds.
To turn off your jukebox:
■Press and hold the power button until the display turns off (about
two seconds).
Tips & Tricks To avoid turning the jukebox on accidentally, use the control
lock. For more information, see “Locking control buttons” on
page 19.
Power button
16
Plugging in the headphones
You can plug headphones or speakers into your jukebox.
To plug in headphones or speakers:
■Plug the headphone or speaker plug into the headphone jack on the
top of your jukebox.
Headphone/
speaker jack
17
Using the control buttons
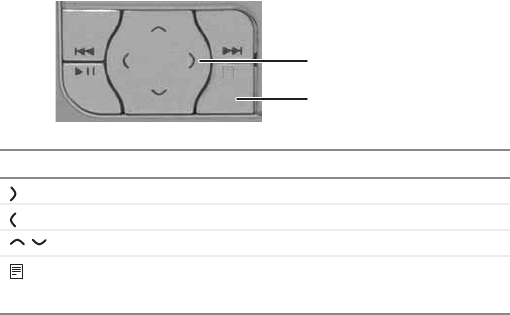
Using the menu buttons
The menu buttons let you open menus and change settings.
For more information about jukebox menus, see “Chapter 5: Settings and
Options” on page 71.
Press this... To...
(right arrow) Select the current option or open the next menu.
(left arrow) Open the previous menu.
(up and down arrows) Select the menu choices and change settings.
(option menu button) Display the choices or options of the currently
highlighted menu item and create playlists, turn
on shuffle mode, or create slideshows.
Option menu button
Menu control button
18
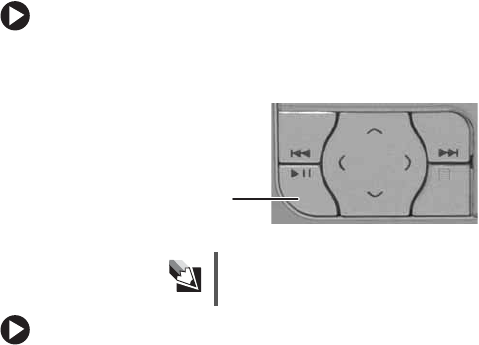
Using the playback buttons
During playback, use the playback control buttons to skip to the next track,
skip to a previous track, or pause the playback or slideshow. Holding down
the previous track or next track buttons acts as rewind and fast forward,
respectively.
Important If the jukebox does not respond when you press a button, it
may be pausing for several seconds while loading the next file.
If the jukebox does not respond after waiting for several
seconds, press the reset button. For the location of the reset
button, see “Bottom” on page 6.
Previous track
Play/pause
Next track
19
Locking control buttons
You can lock your jukebox so its buttons are not accidentally pressed.
To lock all jukebox buttons:
■Move the control lock to the Locked position (where red is showing).
When the buttons are locked, a lock icon appears on the screen.

20
Playing music
To play music:
1Plug in the headphones and turn on your jukebox. The Main Menu
opens.
2Press or to highlight Music, then press to open the Music
menu.
3Press or to highlight Playlists, Artists, Albums, Genres, All Music,
or Now Playing, then press to open the submenu.
4Continue to select the submenus (such as playlist number and artist
name), then press when your final selection is made to play the
music. Information about the song and play mode appears on the
screen.
You can also:
■Create a playlist
■Change equalizer settings
■Change shuffle or repeat settings
For more information, see “Chapter 3: Playing Music” on page 25.

21
Pre-loaded music
Your jukebox contains pre-loaded music for your enjoyment and to help
you learn about using your jukebox. Pre-loaded music includes player-
exclusive content from three artists—Renato Grinberg, Mac Lopez, and
Lee Johnson.
Renato Grinberg Tracks included
Born and raised in Brazil, Renato Grinberg is a refined
guitarist and composer who blends the popular
Brazilian acoustic guitar style with contemporary jazz
and pop music. His work includes three solo albums:
■Without Frontiers
■Caetano, Sem Palavras
■So Far...So Close
Tracks from his CD
Without Frontiers
:
1 Sem Compromisso
2 Do Outro Lado
3 Sem Fronteiras
Learn more about this artist at
www.renatogrinberg.com.
Mac Lopez with Lee Johnson Tracks included
Born and raised in Southern California, Mac Lopez is
a well-regarded Native American flute performer and
composer of Shoshone heritage. His work includes
four CD compilations:
■Footprints of Our Ancestors
■Wind Messengers (with Lee Johnson)
■Keepers of the Moon
■Story of the Redtail Hawk (his latest release)
Tracks from their CD
Wind Messengers
:
1 Wind Messengers
2 The Hawk and the Raven
3 Waterfall Song
Learn more about these artists at
www.whirlwindstudios.com.
22
Adjusting volume
To adjust volume:
■Press the + side (top) of the volume button to increase volume, and
press the – side (bottom) to decrease volume.
Caution Setting the volume too high can damage the
headphones.
Volume button

23
Viewing photos
So you can view photos on your jukebox right away, the jukebox contains
pre-loaded photographs, courtesy of the employees of Gateway.
To view photos:
1Turn on your jukebox. The Main Menu opens.
2Press or to highlight Pictures, then press to open the Pictures
menu.
3Press or to highlight a folder, then press to open the folder.
4Press or to highlight a photo, then press to view the photo.
To view other photos in the same folder as the photo being viewed,
press or .
5To return to the Main Menu, press several times until the Main
Menu opens.
You can also:
■Create new folders and slideshows
■Copy, paste, or delete photos
■Change slideshow settings such as time interval and transition type
For more information, see “Chapter 4: Viewing Photos” on page 53.
24

25
Chapter 3: Playing Music
Playing songs
To play music:
1Plug in the headphones and turn on your jukebox. The Main Menu
opens.
2Press or to highlight Music, then press to open the Music
menu.
3Press or to highlight any of the options below, then press to
open the submenu. When you see the list of songs, highlight the song
you want to play, then press .
■Playlists
■Artists
■Albums
■Genres
■All Music
■Now Playing
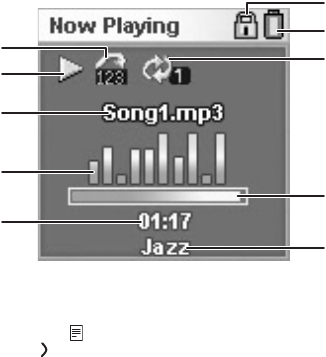
26
Information about the song and play modes appears on the
Now Playing screen.
4If at any point you want to add a song or an entire category to a
jukebox-only playlist, highlight the song, artist, album, or other
category, press to open the option menu, highlight Add to Playlist,
then press .
Battery meter
Shuffle
Lock indicator
Play mode
Elapsed track time
Track title
Equalizer
visualization
Equalizer setting
Elapsed track time
Repeat mode

27
Viewing the Now Playing screen
After moving within menus, you can quickly return to the Now Playing
screen from any screen.
To return to the Now Playing screen:
1Press . The options menu opens.
2Press or to highlight Now Playing, then press to open the
Now Playing screen.

28
Setting advanced playing modes
Setting the equalizer
To set the equalizer:
1From the Main Menu, press or to highlight Settings, then
press to open the Settings menu.
2Highlight Audio, then press to open the Audio Setting menu.
3Highlight EQ, then press to open the EQ Mode menu.
4Highlight the equalizer setting you want to use, then press to select
it. The equalizer setting immediately becomes active.
Setting shuffle mode
To set the shuffle mode:
1From the Main Menu, press or to highlight Settings, then
press to open the Settings menu.
2Highlight Audio, then press to open the Audio Setting menu.

29
3Highlight Shuffle, then press to open the Shuffle Mode menu.
4Highlight ON or OFF, then press to change the setting. The shuffle
mode immediately becomes active.
Setting repeat mode
To set the repeat mode:
1From the Main Menu, press or to highlight Settings, then
press to open the Settings menu.
2Highlight Audio, then press to open the Audio Setting menu.
3Highlight Repeat Mode, then press to open the Repeat Mode menu.
4Highlight the repeat mode you want to use, then press to select
it. The repeat mode immediately becomes active.
Tips & Tricks To access the shuffle mode setting while in the
Now Playing
screen, press , then select Shuffle.

30
Disabling expired music messages
If you use a music service where music can be played for a limited amount
of time (such as Napster To Go), the music will eventually become disabled
on your jukebox. When you try to play a disabled track on your jukebox,
you get the message “To play this track, you must sync your device to
your PC.”
Although re-syncing with your computer will quickly enable you to access
the track again, you may want to disable the expiration warning message
if it is too distracting.
To disable messages for disabled music:
1From the Main Menu, press or to highlight Settings, then
press to open the Settings menu.
2Highlight Expired Song Message, then press to open the Expired
Song Message menu.
3Highlight Disabled, then press to select it. When you attempt to
play a disabled track, the jukebox does not play it and gives you no
warning message.
31
Viewing the music visualization
While music is playing, you can choose to display a visualization of the
sound. The visualization is similar to visualizations you may see in
Windows Media Player on your computer.
To view the music visualization:
1In the Now Playing screen, press to open the options menu.
2Highlight Visual, then press . The Visual menu opens.
3Highlight OFF, then press to change the setting to ON. The
visualization turns on.
4To turn the visualization off, in the same menu highlight ON, then
press to change the setting to OFF.
Tips & Tricks To increase battery life while playing music, turn off
visualizations.

32
Creating playlists
You can create playlists in Windows Media Player or you can create them
on the jukebox. Both types of playlists are readily available to use on your
jukebox.
Creating a jukebox playlist
To create a playlist on your jukebox:
1Press or to highlight Music, then press to open the Music
menu.
2Press or to highlight any of the options below, then press to
open the submenu.
■Playlists
■Artists
■Albums
■Genres
■All Music
■Now Playing
3Highlight the artist, album, genre, or individual song you want to
add to the playlist, then press to open the options menu.

33
4Press or to highlight Add to Device Playlist, then press . The
Add to Device Playlist menu opens, and <New Playlist> is highlighted.
5Press . The Name Playlist menu opens, and <Name Playlist> is
highlighted.
6Press to highlight the default new playlist name, then press to
select it. The new jukebox playlist is created, and you are done.
- OR -
Press . The menu for naming your playlist opens.
7Press or to highlight the first character of your playlist, then
press to select the next character.
8Continue selecting characters until the naming is complete, then
press twice (enter two spaces) to complete the naming. Done is
highlighted.
9Press . The new Jukebox playlist is created, and you are done.
Tips & Tricks Each new Jukebox playlist you create can be found in
the
Device Playlist
folder.
34
Creating a Windows Media Player playlist
To create a playlist in Windows Media Player:
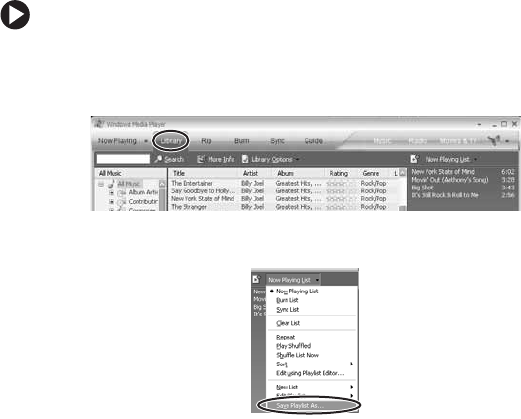
1In Windows Media Player on your computer, click the Library tab,
then click and drag the files to add to your playlist from the library
list to the playlist window on the right.
2Click Now Playing List, then click Save Playlist As.

36
Editing playlists
Adding a track or album to a jukebox playlist
To add to a playlist:
1On your jukebox, press or to highlight Music, then press to
open the Music menu.
2Highlight Playlists, Artists, Albums, Genres, All Music, or Now Playing,
then press to open the submenu.
3In the submenu, highlight the item (a particular artist, album, genre,
or song), then press to open the options menu.
4Highlight Add to Playlist, then press . A list of playlists opens.
5Highlight the playlist to add the item to, then press . The item is
added to the playlist.
Deleting a track from a playlist
To delete a track from a playlist:
1On your jukebox, press or to highlight Music, then press to
open the Music menu.
2Highlight Playlists, then press .

37
3Highlight Device Playlists (created on your Jukebox) or PC Playlists
(created in Windows Media Player), then press .
4Highlight the playlist containing the track you want to delete, then
press .
5Highlight the track you want to delete, then press to open the
options menu.
6Highlight Delete Song, then press . The prompt “Remove song
from playlist?” appears.
7Press to delete the song, or press to cancel.
Deleting a playlist
To delete a playlist:
1On your jukebox, press or to highlight Music, then press to
open the Music menu.
2Highlight Playlists, then press .
3Highlight Device Playlists (created on your Jukebox) or PC Playlists
(created in Windows Media Player), then press .
4Highlight the playlist you want to delete, then press to open the
options menu.

38
5Highlight Delete Playlist, then press . The prompt “Delete Playlist?”
appears.
6Press to delete the song, or press to cancel.

39
Getting more music
Installing the software
To copy music and digital photo files to your jukebox from your computer,
you must first install Windows Media Player 10 on your computer.
To install the software:
1Insert the Gateway MP3 Photo Jukebox Installation CD into your
computer’s CD or DVD drive, then follow the on-screen instructions.
2After the installation is finished, click Finish, then restart your
computer.
Tips & Tricks Even if you already have Windows Media Player 10 installed
on your computer, you may want to install the version on the
jukebox installation CD because it contains the Napster To Go
plugin and the jukebox’s firmware update utility.
Tips & Tricks If you are unable to locate your installation CD, you can
download Windows Media Player 10 from
www.microsoft.com/windows/windowsmedia/player/
download/download.aspx

40
Creating files for your jukebox
Before you connect your jukebox to your computer, you should have some
digital music and photo files ready on the computer. After files are ready,
you can copy them to your jukebox.
■To create digital music files, you need to either copy (rip) them from
a CD or buy them from an online digital music service, such as
Napster. For more information, see “Ripping music files” on page 40
or “Buying digital music files” on page 43.
■To create digital photos, you must either take them with a digital
camera and transfer the files to your computer or scan photographic
prints and negatives using a scanner. For more information, see your
camera’s or scanner’s documentation.
Ripping music files
To rip music tracks from a CD:
1Insert the music CD into your computer’s CD or DVD drive.
2Click Start, All Programs, Accessories, Entertainment, then click
Windows Media Player. Windows Media Player opens.

41
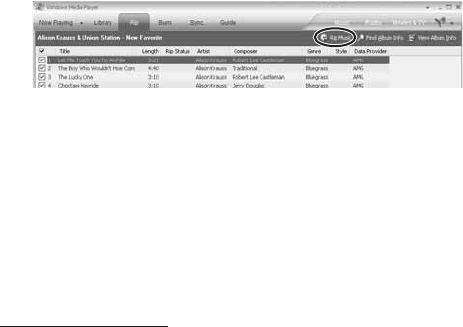
3Click the Rip tab. The list of tracks on your music CD appears. If your
computer is connected to the Internet, the album and tracks are listed
by name.
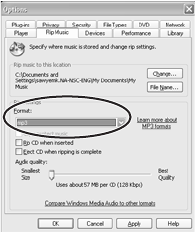
4Right-click the title bar, click Tools, then click Options.
5Click the Rip Music tab.
42
6Click the Format box, click MP3 or WMA, then click OK. You only
have to select the format once, so the next time you rip music, you
do not need to perform this step.
43
7Click the check box next to each track you want to copy, then click
Rip Music. The tracks are copied to your computer and are added to
your Media Player Library.
Buying digital music files
You can buy digital music from several online music services. To play music
from these services on your jukebox, you must buy music in MP3 or WMA
format.
Plays For Sure is a Microsoft program that ensures compatibility between
compatible media players and participating music providers. Your jukebox
is compatible with Plays For Sure, so you know that the music you buy
from a Plays For Sure music provider will work on your jukebox. For a
complete list of participating Plays For Sure music providers, see
www.playsforsure.com.

44
Napster
With the Napster To Go™ online music service, you can transfer an
unlimited amount of music to your jukebox for a low monthly free. Fill
your player, listen to all the music, then fill it up again from your choice
of over a million tracks. Napster is a Plays For Sure music provider.
To download music from Napster To Go:
1Click the Store icon (the multicolored butterfly) in the upper right
corner of Windows Media Player, then click Napster. The Registration
screen opens.
2Click Not a Registered User if this is your first time accessing
Napster To Go.
3Click the Redeem Napster Card or Promo Code link in the upper
right corner.
45
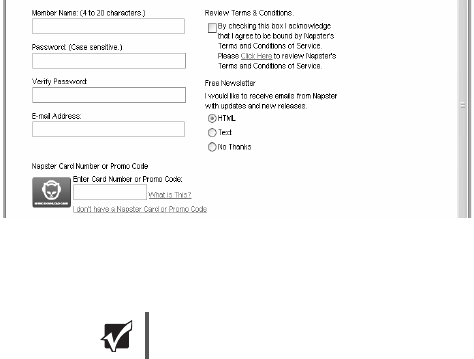
4Type your member name, a password, and your e-mail address, then
type your Promo Code (found on a card in your jukebox’s shipping
box) in the space provided.
5Click to select the Review Terms & Conditions check box, then click
Next Step.
6Type your billing information, then click Submit.
Important If you cancel at any time before the end of your trial period,
you will not be charged.
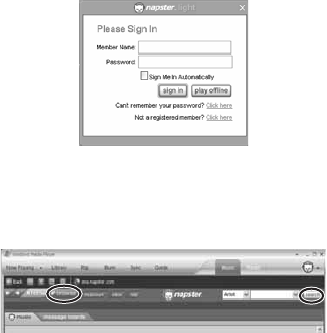
46
7Type the member name and password you chose, then click Sign In.
8Find some music you would like to download. By clicking the Search
boxes in the upper right corner, you can search by artist, track, or
album. You can also click Browse to access Napster's browse features.
9When you locate the track you want, click to select it, then click
Download on the bottom left. You can use the SHIFT or CTRL key to
select multiple tracks.
10 To check for your newly downloaded tracks, click the Library tab.
47
Synchronizing your jukebox with your computer
Preparing files for synchronizing
Before you move your files to your jukebox, you should set them up in
Media Player so they can be automatically synced with (copied to) your
jukebox the next time you connect it to your computer. Manual syncing
only synchronizes your jukebox with your computer when you tell it to.
Automatic syncing synchronizes your jukebox with your computer each
time you connect your jukebox. To sync playlists that were created in
Windows Media Player 10, you must use automatic syncing.
To prepare files for syncing with your jukebox:
1Click Start, All Programs, Accessories, Entertainment, then click
Windows Media Player. Windows Media Player opens.
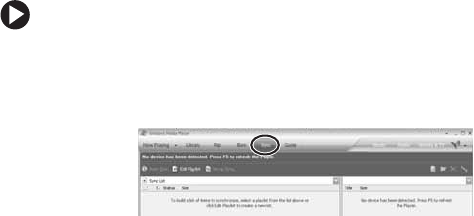
2Click the Sync tab.
48
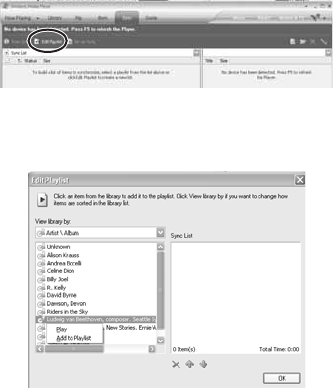
3Click Edit Playlist.
4In the Edit Playlist dialog box, right-click the album or artist you want
to add to the Sync List, then click Add to Playlist.
- OR -

49
Click the album to open its list of tracks, then click each track you
want to add to the Sync List.
5Click OK when you have finished adding tracks to the Sync List.
Moving files to your jukebox
Your jukebox can play any WMA, MP3, or WAV file, and any playlist, that
appears in the Windows Media Player music library.
To move files to your jukebox:
1Click Start, All Programs, then click Windows Media Player.
Windows Media Player opens.
2Click the Sync tab.
3Turn on your jukebox.
4Plug the power adapter into a power outlet, then plug the other end
of the power adapter into the USB combo cable.

50
5Plug the USB combo cable into the jukebox, then plug the other end
of the combo cable into a USB port on your computer.
51
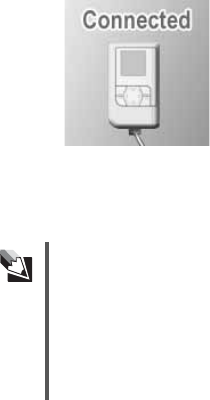
Your computer recognizes the attached player, and “Connected,”
appears on the jukebox display. When syncing is done, you see a
message “Safe to Disconnect.”
On your computer, the Device Setup dialog box opens.
6Click Manual or Automatic, then click Finish. Your sync settings are
saved.
Tips & Tricks Automatic syncing is necessary to move playlists to your
jukebox. If you select Automatic, your jukebox and Media
Player automatically sync each time you connect your jukebox
to the computer.
During automatic syncing:
■Tracks added to playlists are copied to the appropriate
Media Player playlists on your jukebox.
■Media Player playlists you deselect on your computer are
removed from your jukebox.

52
7Click the Sync tab, then click Start Sync. The files are moved to your
jukebox.
8Unplug the USB cable from the computer. Your jukebox restarts. If
your jukebox is finished charging, you can also unplug the combo
cable from the jukebox.
9To unplug the combo cable from the jukebox, press in on the plug’s
two side buttons, then pull the plug out of the jukebox.

53
Chapter 4: Viewing Photos
Your jukebox can display digital photos saved in the standard (baseline or
static) JPG/JPEG format. Progressive or interlaced images are not viewable.
Digital cameras save images in the supported standard JPG/JPEG format,
and most photo editing software saves in the standard format by default.
Viewing a photo
To view photos:
1Turn on your jukebox. The Main Menu opens.
2Highlight Pictures, then press to open the Pictures menu.
3Highlight a photo folder, then press to open the folder.
4Highlight a photo, then press to view the photo. To view other
photos in the same folder as the photo being viewed, press or .
5To return to the Main Menu, press several times until the Main
Menu opens.

54
Copying photos to your jukebox
Copying photos from your computer
You can transfer any digital image from your computer to your jukebox.
To copy photos from your computer to your jukebox:
1Turn on your jukebox, then connect it to the computer using the
USB combo cable.
2On your computer, right-click the Start button on the Windows
taskbar, then click Explore. Windows Explorer opens.
3Open the folder on your computer containing photos, then click the
photo you want to copy to your jukebox. To select multiple photos,
press and hold the SHIFT or CTRL key while clicking.
4Click Edit, then click Copy.
5Click My Computer, then double-click Gateway MP3 Photo Jukebox.
6Double-click the Data folder, then double-click the Photos folder.
7Right-click inside the Photos folder, then click Paste. The photos are
copied to your jukebox.
Tips & Tricks To copy photos from your jukebox to the computer, use the
same procedure, but in Windows Explorer you must
copy
from
the jukebox and
paste
to the computer.
55
Copying photos from your digital camera
You can also transfer photos directly from your camera to your jukebox.
This feature is convenient for emptying your camera’s memory card when
you have no access to a computer for permanent storage.
To copy photos from your camera to your jukebox:
1Turn on your digital camera.
2Connect one end of your camera’s USB cable to the camera, then
connect the other end to the jukebox’s USB camera interface cable.
56
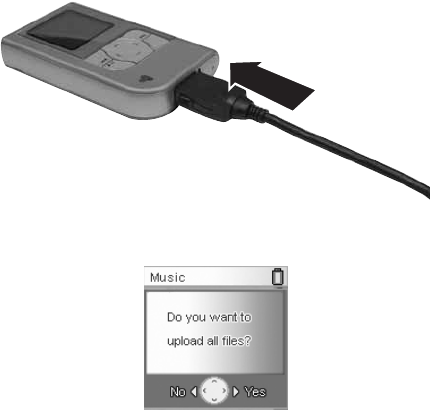
3Turn on your jukebox, then connect the USB camera interface cable
to your jukebox.
Your jukebox detects the camera and asks to upload all files.

57
4Press or to highlight Yes, then press to start copying the files
to your jukebox. Copying may take several minutes.
5After the copying is complete, unplug your jukebox and camera from
the USB cable.
After verifying that the files have been copied to your jukebox, you
can erase them from your camera.
Important ■To determine whether a camera is supported for direct file
copying to your jukebox, see
www.gateway.com/photojukebox. If your camera is not
listed, use a memory card reader to transfer images to the
jukebox. For more information, see “Copying photos from
your card reader” on page 58.
■If your jukebox battery is low, the jukebox cannot copy files
from your camera and a USB Disabled icon appears in the
lower right corner of the screen.

58
Copying photos from your card reader
You can transfer photos from a USB memory card reader by connecting
the reader’s USB cable to your jukebox’s USB camera interface cable.
To copy photos from your memory device to your jukebox:
1Connect an approved card reader’s USB cable to the jukebox’s USB
camera interface cable.
2If you are using a memory card reader, insert your memory card.
3Connect the cable to your jukebox. Your jukebox detects the memory
device and asks if you want to upload all files.
Important To determine whether your memory card reader is supported
for direct file copying to your jukebox, see
www.gateway.com/photojukebox. If your reader is not listed,
you may need to first copy the photos to a computer, then copy
the photos from the computer to your jukebox.
Important If your jukebox battery is low, the jukebox cannot copy files
from your card reader.

59
4Press or to highlight Yes, then press to start copying the files
to your jukebox. Copying may take several minutes.
5After the copying is complete, unplug your jukebox and memory
device from the USB cable.
After verifying that the files have been copied to your jukebox, you
can erase them from your memory device.

60
Organizing photos
Creating a photo folder
To create a photo folder:
1From the Main Menu, highlight Pictures, then press to open the
Pictures menu.
2Press to open the options menu, highlight New Folder,
then press . The New Folder menu opens.
3Highlight <Name Folder> or the default new folder name, then
press .
4If you selected the default folder name, the new folder is created and
you are done.
- OR -
If you selected <Name Folder>, the Select first character menu opens.
5Highlight the first character of your folder name, then press .
Continue selecting characters until the naming is complete, then
press . The new folder is created.

61
Moving a photo into a folder
To move a photo into a folder:
1From the Main Menu, press or to highlight Pictures, then
press to open the Pictures menu.
2Highlight a photo folder, then press to open the folder.
3Highlight a photo, then press to open the options menu.
4Highlight Cut, then press . The file is deleted from that folder.
5Press to return to the folder menu, highlight the target folder, then
press to open that folder.
6Press to open the options menu, highlight Paste, then press .
The photo is pasted into that folder.
Tips & Tricks You can also copy (instead of cut) a photo from a folder, and
you can cut and paste a folder into another folder.

62
Deleting a photo
To delete a photo:
1From the Main Menu, press or to highlight Pictures, then
press to open the Pictures menu.
2Highlight a photo folder, then press to open the folder.
3Highlight the photo you want to delete, then press to open the
options menu.
4Highlight Delete Photo, then press to delete the photo or
press to cancel.

63
Working with slideshows
Creating slideshows
A slideshow includes all photos within the folder you selected.
To create a slideshow:
1From the Main Menu, highlight Pictures, then press to open the
Pictures menu.
2Highlight a photo folder, then press to open the folder.
3Highlight any photo, then press to open the options menu.
4Highlight New Slideshow, then press . The Select Music menu opens.
5Highlight the music you want to play as background or none, then
press . The New Slideshow menu opens.
6Highlight <Name Slideshow> or the default new slideshow name,
then press .
Important Regardless of which photo you select, all photos within that
photo’s folder are added to the slideshow.

64
7If you selected the default slideshow name, the new slideshow is
created and you are done.
- OR -
If you selected <Name Slideshow>, the Select first character menu
opens.
8Highlight the first character of your slideshow name, then press .
Continue selecting characters until the naming is complete, then
press . The new slideshow is created.
Editing slideshows
Deleting a slideshow
To delete a slideshow:
1From the Main Menu, highlight Slideshows, then press to open the
List menu.
2Highlight the slideshow you want to delete, then press to open
the options menu.
3Highlight Delete Slideshow, then press . The “Delete Slideshow?”
prompt appears.
4Press to delete the slideshow, or press to cancel. The photos
themselves are not deleted.

65
Setting slideshow options
To set slideshow options:
1From the Main Menu, highlight Slideshows, then press to open the
List menu.
2Highlight the slideshow you want to change settings for, then
press to open the options menu.
3Highlight Time Interval to change the time between slide transitions,
or highlight Transition to change the type of slide transitions, then
press .
4Highlight the settings you want, then press to save your changes.
Playing slideshows
To play a slideshow:
1From the Main Menu, highlight Slideshows, then press to open the
List menu.
2Highlight the slideshow you want to watch, then press to start the
slideshow.

66
Playing a picture show
A picture show is a quick way of viewing the photos in a folder.
To start a picture show:
1From the Main Menu, highlight Pictures, then press to open the
Pictures menu.
2Highlight a photo folder, then press to open the folder.
3Highlight any photo, then press to open the options menu.
4Highlight Start Picture Show, then press . The photos appear on
your jukebox screen.

67
Getting more photos
Your jukebox can display any digital image in JPG format. Sources for your
digital images may include:
■Digital cameras
See your camera documentation for information on how to transfer
files from the camera to the computer. You can also transfer photos
directly from the camera to your jukebox. For more information, see
“Copying photos from your digital camera” on page 55.
■Desktop scanners
See your scanner documentation for information on how to scan and
save images, and the file formats it can save.
■Graphics programs
See your graphics program’s documentation for information on the
file formats it can save.
■Internet
You can download most images you see in your Internet Web browser
by right-clicking the image, then clicking Save As.
Tips & Tricks For viewing on the jukebox, a digital image does not need to
be any larger than 128 pixels wide or tall. Photos larger than
2048 × 1536 will cause delays before viewing.

68
Creating text notes
You can even use your jukebox as a reference pad by saving text as an
image. This example uses Microsoft Paint, but you can use any image
editing software.
69
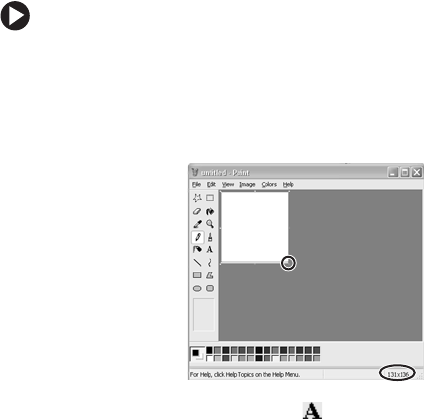
To create a text note:
1Click Start, All Programs, Accessories, then click Paint. Microsoft
Paint opens.
2Click the square at the lower-right corner of the drawing area, then
drag it until the status bar shows the drawing area dimensions of
128x110.
3Click the text tool button , then type the text you want.
4Save the image as a JPG, then transfer it to your jukebox. For more
information on transferring files, see “Copying photos from your
computer” on page 54.
70

71
Chapter 5: Settings and Options
Setting the backlight
You can change the length of time the backlight stays on after you press
a button.
To set the backlight time:
1From the Main Menu, press or to highlight Settings, then
press to open the Settings menu.
2Highlight Backlight, then press to open the Backlight menu.
3Highlight the length of time you want the backlight to stay on, then
press to select it.
Tips & Tricks Increased backlight time decreases battery charge.

72
Setting the clock and calendar
Your jukebox keeps track of the current time and date.
To set clock and calendar:
1From the Main Menu, press or to highlight Settings, then
press to open the Settings menu.
2Highlight Time, then press to open the Date & Time menu.
3Press and to select the time or date fields, then press or
to change the value in the selected field.
Accessing the settings shortcut menu
In the Now Playing screen, you can access the most commonly changed
settings.
To access the settings shortcut menu:
1In the Now Playing screen, press to open the options menu.
2Highlight an option (EQ, Visual, Shuffle, or Repeat Mode), then
press to open the respective menu.

73
Resetting the jukebox to its defaults
You can reset all custom settings in your jukebox to return it to its factory
configuration.
To reset the jukebox to its defaults:
1From the Main Menu, press or to highlight Settings, then
press to open the Settings menu.
2Highlight Reset, then press . The prompt “Do you want to reset
all?” appears.
3Press to reset the jukebox, or press to cancel.
74
75
Chapter 6: Maintenance and
Troubleshooting
This chapter describes how to solve common issues you may experience
with your jukebox.
Troubleshooting
Buttons do not work
Make sure that the control lock is not in the LOCK position. Check for a
lock icon on the screen. If the control lock is in the LOCK position, move
it to the UNLOCK position. For more information, see “Locking control
buttons” on page 19.
Files cannot be transferred
■Make sure that the USB cable is connected correctly to your computer
and jukebox. For more information, see “Moving files to your
jukebox” on page 49.
■Make sure that the AC power adapter is plugged into your jukebox
and a power outlet and that your jukebox is turned on.

76
Firmware update fails
If the firmware update utility is unable to update your jukebox firmware,
you need to reinstall your jukebox’s original firmware.
To reinstall your jukebox’s original firmware:
1Turn on your jukebox and connect it to your computer using the
USB combo cable.
2Click Start, All Programs, Gateway MP3 Photo Jukebox, then click
Firmware Utility.
3Click Re-install. The jukebox’s original firmware is reinstalled.
Caution Before updating or troubleshooting your jukebox firmware,
make sure that your music and photo files are backed up.
77
4You can also click:
■Recover. Use this when files on the jukebox seem to disappear,
although you have not deleted them. The Recover option
attempts to fix the database on the jukebox so that files will
no longer disappear.
■Format (disk maintenance). Use this when Recover does not fix
the problem. The Format option backs up and re-formats the
Music, Pictures, PPL, Playlists, and Upload folders on the
jukebox’s hard drive. After the drive is re-formatted, the
backed–up data is restored to the jukebox. The Format process
takes much longer than the Recover process.
5After the update is finished, disconnect the jukebox from the
computer.
I hear no sound
■Adjust the volume level by pressing the volume buttons on your
jukebox.
■Make sure that the headphones are plugged in all the way.
78
JPG/JPEG photos do not display
Your jukebox can display digital photos saved in the standard (baseline or
static) JPG/JPEG format. Progressive or interlaced images are not viewable.
Digital cameras save images in the supported standard JPG/JPEG format,
and most photo editing software saves in the standard format by default.
Re-save the images in photo editing software, and make sure the file is saved
in the default (baseline or static) format.
Jukebox does not turn on
Make sure that the battery still has power. For more information, see
“Charging the battery” on page 11.
Jukebox does not appear in Windows Media Player
■Disconnect the jukebox from your computer, then reconnect it.
■Disconnect the jukebox from your computer, turn off the jukebox,
turn it back on, then reconnect it to your computer.
■Make sure that you have Windows Media Player version 10 installed.
You can install version 10 from the installation CD.
■Check your version of Microsoft Windows XP. Your computer must
have Service Pack 1 installed for Windows Media Player 10 to work
correctly.
79
Transferred music does not play
If you transfer music with Windows Explorer instead of Windows Media
Player, the jukebox will not recognize the music. To transfer music to your
jukebox, you must use Windows Media Player.
When I try to play a song, I get the message “To play this track,
you must sync your device to your PC.”
If you use a music service where music can be played for a limited amount
of time (such as Napster To Go), the music will eventually “expire” on your
jukebox. Re-sync with your computer to access the track again. For more
information on syncing with your computer, see “Moving files to your
jukebox” on page 49.

80
Technical support
For technical support, go to the Gateway Support Web site at
support.gateway.com .
For more information about your jukebox, go to
www.gateway.com/photojukebox .

81
Maintaining your jukebox
Cleaning
■Do not drop your jukebox or place heavy objects on it.
■Do not let liquids come into contact with your jukebox. If this
happens, wipe the jukebox with a dry cloth.
■Do not leave the jukebox where it will be subjected to prolonged
exposure to direct sunlight, extreme temperatures (such as inside a
parked automobile), moisture, vibration, excessive dust, and sand.
■Avoid areas with strong magnetic fields.
■Do not use thinner, alcohol, or benzene when cleaning the jukebox.
■To avoid electrical shock, do not disassemble the case. If your jukebox
needs service, contact Gateway at support.gateway.com .
■Do not use the headphones with the unit while driving, cycling, or
operating any motorized vehicle. This could create a traffic hazard
and is illegal in many areas. It could also be dangerous to play music
at a high volume while walking, especially at pedestrian crossings.
■Prolonged use of headphones at high volume may cause hearing
damage or ringing in your ears.
82
Replacing the battery
For extended listening time without recharging, you can install a spare
battery. With an extra battery or two, you can increase the jukebox play
time from 8-10 hours to 16-20 or 24-30 hours. To buy additional batteries,
see www.gateway.com/photojukeboxextras .
To replace the battery:
1Turn off the jukebox.
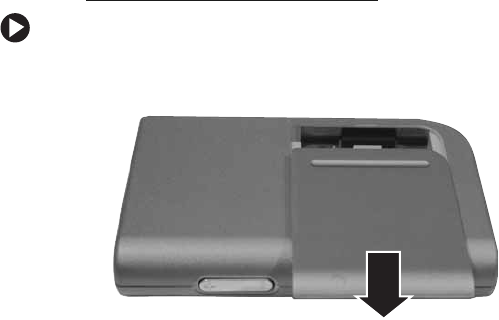
2Turn the jukebox over, then slide off the battery cover.
83
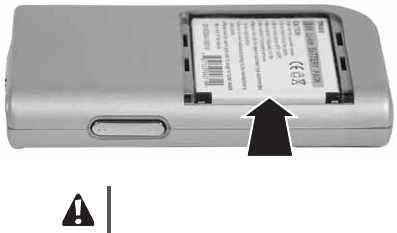
3Press the battery toward the far side of the jukebox, then lift the
battery out of the jukebox.
4Insert the replacement battery into the battery bay, making sure the
contacts on the battery align with the contacts in the battery bay.
5Replace the battery cover.
Caution Never shake the jukebox to remove the battery. Shaking the
jukebox will damage its hard drive.
84
Maintaining battery life
Over time, your battery may take much longer to charge, and it may hold
that charge for a shorter time. If this happens with your jukebox’s battery,
you should buy a replacement from
www.gateway.com/photojukeboxextras .
Updating the firmware
You can periodically update your jukebox’s firmware for the most recent
improvements to performance and functionality. Check Gateway’s
technical support Web site at support.gateway.com for the latest firmware
updates and firmware update utilities.
Tips & Tricks To increase battery life while playing music, turn off
visualizations. For instructions, see “Viewing the music
visualization” on page 31.
Caution Before updating your jukebox firmware, make sure that your
music and photo files are backed up.

85
To update your jukebox firmware:
1Turn on your jukebox and connect it to your computer using the
USB combo cable.
2Go to support.gateway.com, then find the support page for the
MP3 Photo Jukebox GCM-4.
3Follow the support page’s instructions for downloading the most
recent firmware and saving it to your computer. Take note of where
the firmware update file is saved to.
4On the Windows taskbar, right-click Start, then click Explore.
Windows Explorer opens.
5Open the folder you saved the firmware update to, then double-click
the firmware update file. The jukebox firmware utility opens.
6Click Update. The program updates your jukebox firmware.
7After the update is finished, disconnect the jukebox from the
computer.
If you experience difficulty updating your jukebox firmware, see the
troubleshooting steps for “Firmware update fails” on page 76.
86

87
Chapter 7: Safety and Legal Notices
Important safety information
■Do not drop your jukebox or leave it under heavy objects.
■Do not allow liquids to come into contact with your jukebox. If this happens wipe the jukebox
with a dry cloth.
■Do not leave the jukebox where it will be subjected to prolonged exposure to direct sunlight,
extreme temperatures (such as inside a parked automobile) moisture, vibration, excessive dust,
and sand.
■Avoid areas with strong magnetic fields.
■Do not use thinner, alcohol, or benzene when cleaning the jukebox.
■To avoid electrical shock, do not disassemble the case. If your jukebox needs service, contact
Gateway at: support.gateway.com .
■Do not use the headphones with the unit while driving, cycling, or operating any motorized
vehicle. This could create a traffic hazard and is illegal in many areas. It could also be dangerous
to play music at a high volume while walking, especially at pedestrian crossings.
■Prolonged use of headphones at high volume may cause temporary or permanent hearing
damage.
88
Regulatory compliance statements
FCC
This equipment has been tested and found to comply with the limitations for a Class B digital
device, pursuant to Part 15 of the FCC rules and regulations. These limitations are designed to
provide reasonable protection against harmful interference within a residential installation.
This equipment generates, uses, and can radiate radio frequency energy and, if not installed and
used in accordance with the instructions, may cause harmful interference to radio
communications. However, there is no guarantee that interference will not occur in a particular
installation.
If this equipment does cause harmful interference to radio and/or television reception, which can
be determined by turning the equipment off and on, the user is encouraged to try to correct the
interference by one or more of the following measures:
■Reorient or relocate the receiving antenna.
■Increase the separation between the equipment and the receiver.
■Connect the equipment to an outlet on a circuit different from the one to which the receiver is
connected.
■Consult the dealer or an experienced radio and/or television technician for assistance.
FCC declaration of conformity
Responsible party:
Gateway Companies, Inc.
610 Gateway Drive, North Sioux City, SD 57049
(605) 232-2000 Fax: (605) 232-2023
Product:
■Gateway GCM-4
This device complies with Part 15 of the FCC Rules. Operation of this product is subject to the
following two conditions: (1) this device may not cause harmful interference, and (2) this device
must accept any interference received, including interference that may cause undesired operation.

89
California Proposition 65 Warning
Caution Changes or modifications not expressly approved by Gateway
could void the FCC compliance and negate your authority to
operate the product.
Warning This product contains chemicals, including lead, known to the
State of California to cause cancer and/or birth defects or
reproductive harm.

90
Notices
Copyright © 2005 Gateway, Inc.
All Rights Reserved
7565 Irvine Center Drive
Irvine, CA 92618 USA
All Rights Reserved
This publication is protected by copyright and all rights are reserved. No part of it may be
reproduced or transmitted by any means or in any form, without prior consent in writing from
Gateway.
The information in this manual has been carefully checked and is believed to be accurate. However,
changes are made periodically. These changes are incorporated in newer publication editions.
Gateway may improve and/or change products described in this publication at any time. Due to
continuing system improvements, Gateway is not responsible for inaccurate information which
may appear in this manual. For the latest product updates, consult the Gateway Web site at
www.gateway.com. In no event will Gateway be liable for direct, indirect, special, exemplary,
incidental, or consequential damages resulting from any defect or omission in this manual, even if
advised of the possibility of such damages.
In the interest of continued product development, Gateway reserves the right to make
improvements in this manual and the products it describes at any time, without notices or
obligation.
Trademark Acknowledgments
Gateway and the black-and-white spot design are trademarks or registered trademarks of
Gateway, Inc.
Intel and Pentium are registered trademarks of Intel Corporation. Microsoft, MS, MS-DOS, and
Windows are trademarks or registered trademarks of Microsoft Corporation. All other product
names mentioned herein are used for identification purposes only, and may be the trademarks or
registered trademarks of their respective companies.
91
Warranty
GATEWAY LIMITED WARRANTY AGREEMENT
This Agreement applies to Gateway and eMachines branded
products and services purchased by you from Gateway, Inc.
or any of its subsidiaries or affiliates (“Gateway”) or a
Gateway-authorized reseller (“Reseller”), unless you enter
into a separate written agreement with Gateway. THIS
AGREEMENT APPLIES TO YOU UNLESS YOU NOTIFY
GATEWAY IN WRITING THAT YOU DO NOT AGREE TO
THIS AGREEMENT WITHIN 15 DAYS AFTER YOU RECEIVE
THIS AGREEMENT AND YOU RETURN YOUR PRODUCT
OR CANCEL SERVICES UNDER EITHER GATEWAY’S OR
THE RESELLER’S REFUND POLICY, AS APPLICABLE. THIS
AGREEMENT CONTAINS A DISPUTE RESOLUTION
CLAUSE. PLEASE SEE SECTION 5 BELOW.
1. PC Technical Support. Gateway will provide technical
support for PC products for ninety (90) days from the date
of purchase by the original end user. Please note that when
contacting Gateway via telephone, long distance and other
92
charges may apply, depending upon your calling area. The
scope of technical support consists of helping you reinstall
the factory-installed operating system and software and
restore it to the original factory configuration. In addition,
for thirty (30) days from the date of purchase by the original
end user Gateway will assist you with (i) installation of any
network operating system (“NOS”) purchased from
Gateway; (ii) configuration of the NOS software so that it
works with the networked Gateway computers you
purchased; (iii) setup of the NOS software so that it is fully
integrated with other products you purchased from
Gateway; and (iv) troubleshooting issues associated with the
NOS software and assistance with NOS error messages.
Gateway provides technical support via on-line, telephone,
and other methods. Gateway may change the means
through which it provides technical support at any time.
Gateway does not guarantee that software will be free from
errors, either in isolation or in combination with hardware.
93
2. Product Limited Warranty. Gateway warrants that its
products will be free from defects in materials and
workmanship for ninety (90) days from the date of purchase
by the original end user. During the warranty period,
Gateway will, at its option: (1) provide replacement parts
necessary to repair the product, (2) repair the product or
replace it with a comparable product, or (3) refund the
amount you paid for the product, LESS DEPRECIATION,
upon its return. You must assist Gateway in diagnosing
issues with your product and follow Gateway’s warranty
processes. You must obtain warranty service from Gateway.
Gateway will not reimburse you for service performed by
others. You may be required to deliver your product to and
from an authorized service facility at your expense.
Replacement parts and products will be new or serviceably
used, comparable in function and performance to the
original part, and warranted for the remainder of the
original warranty period or, if longer, 90 days after they are
shipped to you. If Gateway asks you to return defective parts
or products, you must do so within 7 days after you receive
94
the replacement parts or products. Gateway will charge you
for replacement parts or products if you fail to do so. If you
live outside the United States, the details of your warranty
service may vary as described below. THIS LIMITED
WARRANTY DOES NOT COVER MISUSE OR MINOR
IMPERFECTIONS WITHIN DESIGN SPECIFICATIONS OR
THAT DO NOT MATERIALLY ALTER FUNCTIONALITY.
GATEWAY DOES NOT WARRANT AND IS NOT
RESPONSIBLE FOR DAMAGES CAUSED BY MISUSE, ABUSE,
ACCIDENTS, VIRUSES, UNAUTHORIZED SERVICE OR
PARTS, OR THE COMBINATION OF GATEWAY OR
EMACHINES BRANDED PRODUCTS WITH OTHER
PRODUCTS. THIS LIMITED WARRANTY DOES NOT COVER
SOFTWARE, NON-GATEWAY BRANDED, OR NON-
EMACHINES BRANDED PRODUCTS. ANY WARRANTY
APPLICABLE TO SOFTWARE, NON-GATEWAY BRANDED,
OR NON-EMACHINES BRANDED PRODUCTS IS PROVIDED
BY THE ORIGINAL MANUFACTURER.
95
3. Services and Service Limited Warranty. The terms of
services provided to you by Gateway consist of this
Agreement and the additional terms stated in separate
services descriptions provided by Gateway. For a period of
90 days after services are performed, Gateway warrants that
services provided by it were performed in a professional and
workmanlike manner. You should back up all files before
services are performed and remove any data from parts or
products returned to Gateway. GATEWAY IS NOT
RESPONSIBLE FOR ANY LOSS OF YOUR DATA.
4. Disclaimer of Warranties; Limitation of Liability. EXCEPT
FOR THE WARRANTIES EXPRESSED IN THIS AGREEMENT,
GATEWAY DISCLAIMS ALL OTHER WARRANTIES, EITHER
EXPRESS OR IMPLIED, INCLUDING IMPLIED WARRANTIES
OF MERCHANTABILITY OR FITNESS FOR A PARTICULAR
PURPOSE, OTHER THAN THOSE WARRANTIES IMPLIED BY
AND INCAPABLE OF EXCLUSION, RESTRICTION OR
MODIFICATION UNDER APPLICABLE LAW. THE TERM OF
ANY IMPLIED WARRANTIES THAT CANNOT BE
96
DISCLAIMED ARE LIMITED TO THE TERM OF THIS
AGREEMENT. GATEWAY’S AND YOUR MAXIMUM
LIABILITY TO THE OTHER IS LIMITED TO THE PURCHASE
PRICE YOU PAID FOR PRODUCTS OR SERVICES PLUS
INTEREST AS ALLOWED BY LAW. NEITHER YOU NOR
GATEWAY IS LIABLE TO THE OTHER IF YOU OR IT ARE
UNABLE TO PERFORM DUE TO EVENTS YOU OR IT ARE
NOT ABLE TO CONTROL, SUCH AS ACTS OF GOD, OR FOR
PROPERTY DAMAGE, PERSONAL INJURY, LOSS OF USE,
INTERRUPTION OF BUSINESS, LOST PROFITS, LOST DATA
OR OTHER CONSEQUENTIAL, PUNITIVE OR SPECIAL
DAMAGES, HOWEVER CAUSED, WHETHER FOR BREACH
OF WARRANTY, CONTRACT, TORT (INCLUDING
NEGLIGENCE), STRICT LIABILITY OR OTHERWISE, OTHER
THAN THOSE DAMAGES THAT ARE INCAPABLE OF
LIMITATION, EXCLUSION OR RESTRICTION UNDER
APPLICABLE LAW. THIS AGREEMENT GIVES YOU SPECIFIC
LEGAL RIGHTS, AND YOU MAY ALSO HAVE OTHER
RIGHTS THAT VARY FROM JURISDICTION TO
JURISDICTION. SOME JURISDICTIONS DO NOT ALLOW
97
LIMITATIONS ON HOW LONG AN IMPLIED WARRANTY
LASTS OR THE EXCLUSION OR LIMITATION OF
INCIDENTAL OR CONSEQUENTIAL DAMAGES, SO THE
ABOVE LIMITATIONS OR EXCLUSIONS MAY NOT APPLY
TO YOU.
5. Dispute Resolution. You and Gateway agree that any
Dispute between You and Gateway will be resolved
exclusively and finally by arbitration administered by the
National Arbitration Forum (NAF) and conducted under its
rules, except as otherwise provided below. You and Gateway
will agree on another arbitration forum if NAF ceases
operations. The arbitration will be conducted before a single
arbitrator, and will be limited solely to the Dispute between
You and Gateway. The arbitration, or any portion of it, will
not be consolidated with any other arbitration and will not
be conducted on a class-wide or class action basis. The
arbitration shall be held at any reasonable location near
your residence by submission of documents, by telephone,
online or in person whichever method of presentation You
98
choose. If You prevail in the arbitration of any Dispute with
Gateway, Gateway will reimburse You for any fees you paid
to NAF in connection with the arbitration. Any decision
rendered in such arbitration proceedings will be final and
binding on the parties, and judgment may be entered
thereon in any court of competent jurisdiction. Should
either party bring a Dispute in a forum other than NAF, the
arbitrator may award the other party its reasonable costs and
expenses, including attorneys' fees, incurred in staying or
dismissing such other proceedings or in otherwise enforcing
compliance with this dispute resolution provision. You
understand that, in the absence of this provision, You would
have had a right to litigate disputes through a court,
including the right to litigate claims on a class-wide or class-
action basis, and that You have expressly and knowingly
waived those rights and agreed to resolve any Disputes
through binding arbitration in accordance with the
provisions of this paragraph. This arbitration provision shall
be governed by the Federal Arbitration Act, 9 U.S.C. Section
1, et seq. For the purposes of this provision, the term
99
“Dispute” means any dispute, controversy, or claim arising
out of or relating to (i) this Agreement, its interpretation,
or the breach, termination, applicability or validity thereof,
(ii) the related order for, purchase, delivery, receipt or use
of any product or service from Gateway, or iii) any other
dispute arising out of or relating to the relationship between
You and Gateway; the term “Gateway” means Gateway, Inc.,
its parents, subsidiaries, affiliates, directors, officers,
employees, beneficiaries, agents, assigns, component
suppliers (both hardware and software), and/or any third
party who provides products or services purchased from or
distributed by Gateway; and the term “You” means you, or
those in privity with you, such as family members or
beneficiaries. Information may be obtained from the NAF
on line at www.arb-forum.com, by calling 800-474-2371 or
writing to P.O. Box 50191, Minneapolis, MN 55405.
6. General. You may not assign this Agreement without
Gateway’s written consent. Gateway may assign this
Agreement and/or any associated service plan without your
100
consent and without notice to you. If Gateway does assign
this Agreement and/or any associated service plan, the
assignee will assume all obligations to you, Gateway will be
released of all obligations, and you agree to look solely to
the assignee for the performance of all obligations under
this Agreement and/or any associated service plan. Gateway,
Inc. and its subsidiaries and affiliates are intended
beneficiaries of this Agreement. If there is any inconsistency
between this Agreement and any other agreement included
with or relating to products or services purchased from
Gateway, this Agreement shall govern. This Agreement may
not be modified, altered or amended without the written
agreement of Gateway. Any additional or altered terms shall
be null and void, unless expressly agreed to in writing by
Gateway. If any term of this Agreement is illegal or
unenforceable, the legality and enforceability of the
remaining provisions shall not be affected or impaired. This
Agreement shall be interpreted under the laws of the State
of South Dakota, without giving effect to conflicts of law
rules.
101
Privacy Notice. Gateway respects our customers’ right to
privacy and will take all appropriate steps to keep your
personal information confidential. You can review
Gateway’s Privacy Policy on our web site. The Privacy Policy
also explains how you can update your information and
elect not to receive email marketing solicitations from
Gateway. In addition, Gateway obtains customer
information from other companies that provide products
and services to our customers. By purchasing, registering for
or using other companies’ products and services that are
distributed by Gateway, you agree that these companies may
transfer your customer information to Gateway. Gateway
will maintain and use your customer information in
accordance with its Privacy Policy.
For Residents of Canada: This Agreement is subject to the
applicable provisions of Canadian consumer protection
laws that cannot be derogated from by private agreement.
You confirm your request that this Agreement and all
documents related directly or indirectly thereto be drafted
102
in the English language. Vous reconnaissez avoir requis que
la présente convention ainsi que tous les documents qui s’y
rattachent directement ou indirectenent soient rédigés en
langue anglaise.
For All International Customers: You must comply with all
applicable export laws and regulations if you export the
product from the United States. Gateway does not accept
for return any products purchased from a reseller. The
standard warranty stated above also applies to Gateway
products shipped to a country outside the United States,
provided that customers outside the United States may be
responsible for paying all freight charges incurred in
shipping, importing/exporting and receiving replacement
products and parts and for arranging and paying for the
shipment of any defective part(s) back to the Gateway. All
international customers are responsible for all customs
duties, VAT and other associated taxes and charges.
103
Please send correspondence about this Agreement to:
Gateway
Customer Service Department
610 Gateway Drive
Attn: Warranty Services
North Sioux City, SD 57049
Current information on technical support and warranty
policies, phone numbers and other service information is
available on our Web sites:
www.gateway.com
www.emachines.com

MAN GCM-4 MP3 USR GDE R2 01/05
