Ge Appliances Ge752 Users Manual Gek_91584d
ge752 3b063b6b-2b86-424f-8cea-3d2ac288d1aa GE Drill GE752 User Guide |
2015-01-23
: Ge-Appliances Ge-Appliances-Ge752-Users-Manual-255120 ge-appliances-ge752-users-manual-255120 ge-appliances pdf
Open the PDF directly: View PDF ![]() .
.
Page Count: 82

GEK–91584D
VERTICAL DRILLING MOTOR
TYPE GE752
CONTENTS
Page
INTRODUCTION 2. . . . . . . . . . . . . . . . . . . . . . . . . . . . .
GENERAL DESCRIPTION 2. . . . . . . . . . . . . . . . . . . .
DATA 4. . . . . . . . . . . . . . . . . . . . . . . . . . . . . . . . . . . . . . .
SPECIAL TOOLS AND EQUIPMENT 8. . . . . . . . . . .
GROUNDING INSTRUCTIONS 8. . . . . . . . . . . . . . . .
GROUNDING PROCEDURES 9. . . . . . . . . . . . . . .
OVERHAUL 9. . . . . . . . . . . . . . . . . . . . . . . . . . . . . . . . .
LUBRICATION 9. . . . . . . . . . . . . . . . . . . . . . . . . . . . . . .
GREASE TUBES AND PIPE PLUGS 9. . . . . . . . .
INSPECTION 10. . . . . . . . . . . . . . . . . . . . . . . . . . . . . . .
MONTHLY 10. . . . . . . . . . . . . . . . . . . . . . . . . . . . . . . .
SEMI–ANNUALLY 13. . . . . . . . . . . . . . . . . . . . . . . . .
BASIC REPAIRS 13. . . . . . . . . . . . . . . . . . . . . . . . . . . .
BRUSH REPLACEMENT 13. . . . . . . . . . . . . . . . . . .
BRUSHHOLDER REPLACEMENT 13. . . . . . . . . .
BRUSHHOLDER CLEARANCE
ADJUSTMENT 14. . . . . . . . . . . . . . . . . . . . . . . . . .
COMMUTATOR RESURFACING 14. . . . . . . . . . . .
BASIC OVERHAUL 19. . . . . . . . . . . . . . . . . . . . . . . . .
TESTING BEFORE DISASSEMBLY 19. . . . . . . . .
TABLE 2. DRAWING REFERENCE 20. . . . . . . . . .
DISASSEMBLY 20. . . . . . . . . . . . . . . . . . . . . . . . . . .
CLEANING 30. . . . . . . . . . . . . . . . . . . . . . . . . . . . . . .
INSPECTION AND TEST OF
DISASSEMBLED MOTOR 31. . . . . . . . . . . . . . . . . . .
BEARING INSPECTION 31. . . . . . . . . . . . . . . . . . .
ARMATURE 31. . . . . . . . . . . . . . . . . . . . . . . . . . . . . .
COMMUTATOR 32. . . . . . . . . . . . . . . . . . . . . . . . . . .
ARMATURE SHAFT INSPECTION 32. . . . . . . . . .
MOTOR FRAME 32. . . . . . . . . . . . . . . . . . . . . . . . . .
BRUSHHOLDERS 35. . . . . . . . . . . . . . . . . . . . . . . . .
REPAIR 35. . . . . . . . . . . . . . . . . . . . . . . . . . . . . . . . . . . .
LUBRICATION OF BOLTS 35. . . . . . . . . . . . . . . . .
Revisions are indicated by margin bars.
CONTENTS (CONT’D)
Page
BRUSHHOLDER SLEEVE REPLACEMENT 36. .
ARMATURE 37. . . . . . . . . . . . . . . . . . . . . . . . . . . . . .
TABLE 3. STANDARD BOLT TORQUE
VALUES 37. . . . . . . . . . . . . . . . . . . . . . . . . . . . . . . .
TEST AFTER REPAIR (Armature) 44. . . . . . . . . . .
MOTOR FRAME FIELD COIL
REPLACEMENT 45. . . . . . . . . . . . . . . . . . . . . . . . .
TEST AFTER REPAIR
(Coiled Frame Without Armature) 55. . . . . . . . . .
TABLE 4. VARNISH VISCOSITY CHART
FOR DIPPING COILED FRAME 55. . . . . . . . . . . . .
VARNISH TREATMENT (ARMATURE) 56. . . . . . .
BALANCING ARMATURE 56. . . . . . . . . . . . . . . . . .
REASSEMBLY 56. . . . . . . . . . . . . . . . . . . . . . . . . . . .
BRUSHHOLDER CLEARANCE
ADJUSTMENT 65. . . . . . . . . . . . . . . . . . . . . . . . . .
BRUSH INSTALLATION 65. . . . . . . . . . . . . . . . . . . .
HUB MOUNTING 66. . . . . . . . . . . . . . . . . . . . . . . . .
TESTING AFTER OVERHAUL 67. . . . . . . . . . . . . . .
TESTING SERIES MACHINES
(Models 5GE752AUP, AUT) 67. . . . . . . . . . . . . . .
TESTING SHUNT MACHINES
(Models 5GE752UP and US) 68. . . . . . . . . . . . . .
REMOVING ARMATURE
LOCKING ARRANGEMENT 69. . . . . . . . . . . . . . . . . .
LOCKING THE ARMATURE FOR SHIPMENT 69. .
SHIPPING 69. . . . . . . . . . . . . . . . . . . . . . . . . . . . . . . . . .
HANDLING 69. . . . . . . . . . . . . . . . . . . . . . . . . . . . . . .
CLEANING AND SLUSHING 69. . . . . . . . . . . . . . .
SKIDDING 70. . . . . . . . . . . . . . . . . . . . . . . . . . . . . . .
PROTECTION 70. . . . . . . . . . . . . . . . . . . . . . . . . . . .
ARMATURES 70. . . . . . . . . . . . . . . . . . . . . . . . . . . . .
PREPARATION OF BOX 70. . . . . . . . . . . . . . . . . . .
BOXING THE ARMATURE 71. . . . . . . . . . . . . . . . .
STORAGE 71. . . . . . . . . . . . . . . . . . . . . . . . . . . . . . . . .
PLACING INTO STORAGE 71. . . . . . . . . . . . . . . . .
REMOVING FROM STORAGE 72. . . . . . . . . . . . .
Copyright 1992, 1993, 2005 General Electric Company. All rights reserved. This copyrighted document may be reproduced free of charge by
General Electric Company customers (OEM’s) and their customers, if such reproduction is used exclusively in connection with equipment used in
those customers’ internal operations.
These instructions do not purport to cover all details or variations in equipment nor to provide for every possible contingency to be met in connection with installation, operation, or mainte-
nance. Should further information be desired or should particular problems arise which are not covered sufficiently for the user’s purposes, the matter should be referred to the General
Electric Company. Any applicable Federal, State or local regulations or company safety or operating rules must take precedence over any instructions given in this material. GE has no
obligation to keep the material up to date after the original publication.
THERE ARE NO WARRANTIES OF ACCURACY, MERCHANTABILITY OR FITNESS FOR PARTICULAR PURPOSE.
Verify numbers for parts, tools, or material by using the Renewal Parts or Tool Catalogs, or contact your General Electric repre-
sentative for assistance.
Do not order from this publication.
GEK–91584D, Vertical Drilling Motor, Type GE752
2
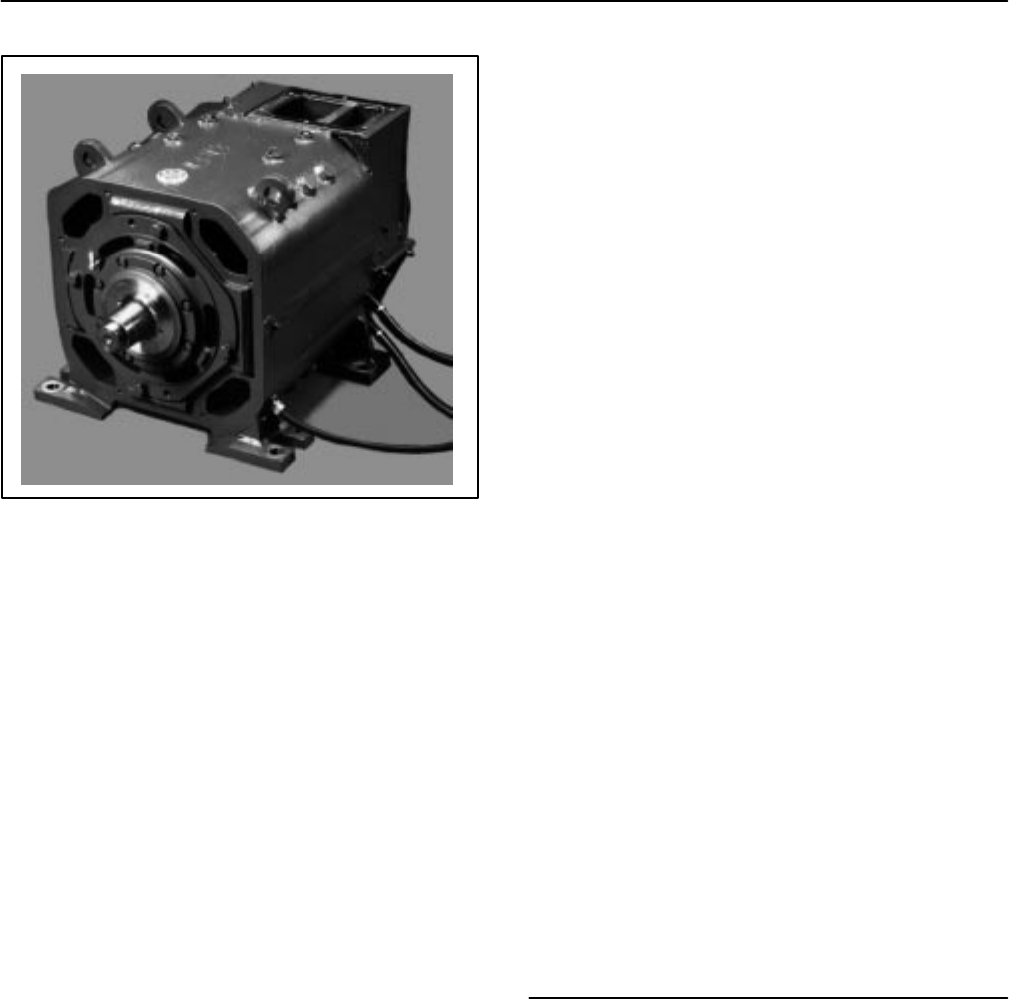
FIG. 1. GE752 VERTICAL DRILLING MOTOR.
E–39088.
INTRODUCTION
GE752 drilling motors designed for vertical opera-
tion, Fig. 1, are available in GE’s UP, AUP, US and AUT
series. This instruction provides inspection, mainte-
nance and basic overhaul procedures for all of these
motors. See Table I (page 3) for the models covered.
These motors have a ball bearing and a reinforced
framehead at the commutator end to support the arma-
ture shaft vertically. They also have a shaft extension at
the commutator end for installation of a brake. Mounting
feet are precision machined to align with the rotational
ovals of the motor.
Refer to GEK–64271C for coverage of GE752 mod-
els designed for horizontal operation.
GENERAL DESCRIPTION
GE752 motors are used by the oil and gas industry to
power offshore and land–based drill rigs. Designed for
vertical operation, they are d–c machines which require
a nominal 750 volt d–c power source.
With suitable switching, they will operate equally well
in either rotational direction. The following provides a
listing of basic features.
The GE752UP and US models are of the “Shunt”
class of motors which means they are separately ex-
cited with shunt wound fields.
The GE752AUP and AUT models are of the “Series”
class of motors which means they are self excited with
series wound fields.
GE752UP and AUP motors are original design mo-
tors introduced in 1983. GE752US and AUT motors are
Hi–Torque motors with:
1. A new shallow slot design and split conductor ar-
rangement reduce heat generating eddy cur-
rents. Kapton insulation and new slot design
allow more copper cross–section and allow the
field windings and armature to operate at in-
creased power levels.
2. The spiral groove commutator provides better
commutator and brush cooling, better commuta-
tion ability, and increased brush life.
3. An additional six exhaust openings in the motor
drive end framehead and revised air flow pas-
sage increases air flow and the motor’s ability to
transfer generated heat.
*Kapton is a registered trademark of E.I. duPont de
Nemours & Co.

Vertical Drilling Motor, Type GE752, GEK–91584D
3
TABLE 1. MODEL DIFFERENCES
Motor Model Differences Superseded By
752UP1 This is a shunt motor with the following distinctions:
– Has internal greasing tubes for both drive end (pinion end)
and commutator–end bearings
– Has a double–ended shaft.
752UP2 Same as UP1 except:
– Has armored cable
– Has no grease tubes at commutator end
Motor Model Differences Superseded By
752UP3 Same as UP2 except:
– Has a single grease tube at drive end which is part of the
framehead/bearing assembly for ease of armature
disassembly.
752UP3A Same as UP3 except:
– Has class H Kapton wrapped exciting coils
752UP4 Same as UP3A except:
– Has an ABS certified shaft.
752UP5 Same as UP3A except:
– Has a thermal sensor embedded in each of its exciting and
commutating coils.
752UP6 Same as UP3A except:
– Has an improved commutator–end bearing assembly and an
ABS–certified armature shaft.
752US1 This is a shunt motor with the following distinctions:
– Same as UP3 except:
– Has an AG type armature with an AF commutator and
a standard AUP flash ring.
– Has AG type commutating coils and poles with brazed
instead of bolted connections.
– Has air vents in the drive–end framehead
– Has a frame specially machined for mounting the
customer gearbox at the drive end.
– Has a different drive–end grease arrangement.
– Has rubber hardtop brushes instead of regular duplex
brushes.
752US2 Same as US1 except:
– Has an improved commutator–end bearing assembly and an
ABS–certified armature shaft.
752AUP1 This is a series motor with the following distinctions:
– Has internal greasing tubes for both drive end and
commutator–end bearings
– Has a double–ended shaft.
752AUP2 Same as AUP1 except:
– Has armored cable
– Has no grease tubes at commutator end
– Mounting feet have dowel holes for vertical mounting.
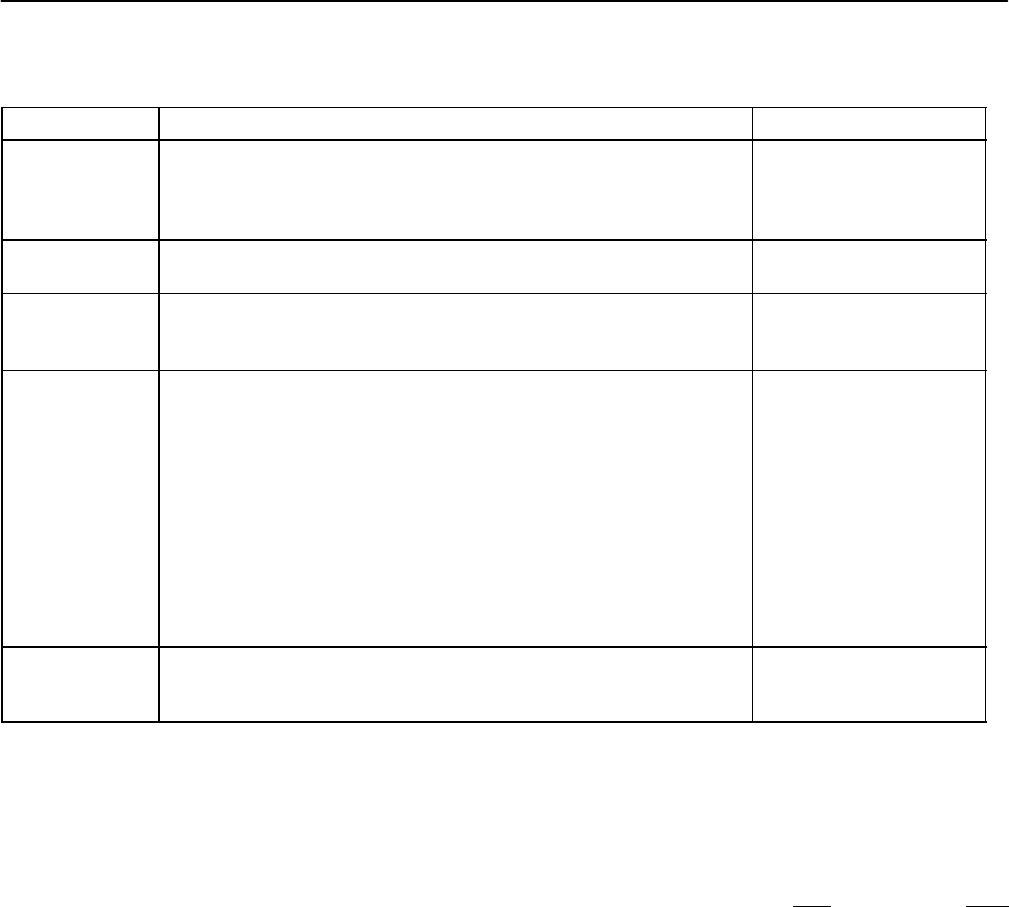
GEK–91584D, Vertical Drilling Motor, Type GE752
4
TABLE 1 (Cont’d) MODEL DIFFERENCES
Motor Model Differences Superseded By
752AUP3 Same as AUP2 except:
– Has a single grease tube at drive end which is
part of framehead/bearing assembly for ease of
armature disassembly.
752AUP4 Same as AUP3 except:
– Has improved insulation for higher temperatures.
752AUP5 Same as AUP4 except:
– Has an improved commutator–end bearing assembly and an
ABS–certified armature shaft.
752AUT1 This is a series motor with the following distinctions:
– Same as 752AUP3 except:
– Has an AG type armature with an AF commutator and
a standard AUP flash ring.
– Has AG type commutator coils and poles with brazed
instead of bolted connections.
– Has air vents in the drive–end framehead
– Has a frame specially machined for mounting the
customer gearbox at the drive end.
– Has a different drive–end grease arrangement.
– Has rubber hardtop brushes instead of regular duplex
brushes.
752AUT2 Same as AUT1 except:
– Has an improved commutator–end bearing assembly and an
ABS–certified armature shaft.
DATA
Max. Permissible Speed (rpm) 1800. . . . . . . . . . . . . . . . . . . . . . . . . . . . . . . . . . . . . . . . . . . . . . . . . . . . . . . . . . . . . . . . . . .
Max. Permissible Vibration (Commutator End) (in.) 0.002. . . . . . . . . . . . . . . . . . . . . . . . . . . . . . . . . . . . . . . . . . . . . . . . .
“Resistance at 25 C (Ohms): Min. Max.
Armature
Model 752UP 0.00912 0.00949. . . . . . . . . . . . . . . . . . . . . . . . . . . . . . . . . . . . . . . . . . . . . . . . . . . . . . . . . .
Model 752AUP 0.00912 0.00949. . . . . . . . . . . . . . . . . . . . . . . . . . . . . . . . . . . . . . . . . . . . . . . . . . . . . . . . .
Model 752US 0.00749 0.00800. . . . . . . . . . . . . . . . . . . . . . . . . . . . . . . . . . . . . . . . . . . . . . . . . . . . . . . . . .
Model 752AUT 0.00749 0.00800. . . . . . . . . . . . . . . . . . . . . . . . . . . . . . . . . . . . . . . . . . . . . . . . . . . . . . . . .
Exciting Field (With Cables)
Model 752UP 1.25 1.33. . . . . . . . . . . . . . . . . . . . . . . . . . . . . . . . . . . . . . . . . . . . . . . . . . . . . . . . . .
Model 752UP (After 3/88) 1.13 1.22. . . . . . . . . . . . . . . . . . . . . . . . . . . . . . . . . . . . . . . . . . . . . . . .
Model 752AUP 0.00512 0.00558. . . . . . . . . . . . . . . . . . . . . . . . . . . . . . . . . . . . . . . . . . . . . . . . . . . . . . . . .
Model 752US 1.13 1.22. . . . . . . . . . . . . . . . . . . . . . . . . . . . . . . . . . . . . . . . . . . . . . . . . . . . . . . . . .
Model 752AUT 0.00486 0.00535. . . . . . . . . . . . . . . . . . . . . . . . . . . . . . . . . . . . . . . . . . . . . . . . . . . . . . . . .
Commutating Field (With Cables)
Model 752UP 0.00508 0.00540. . . . . . . . . . . . . . . . . . . . . . . . . . . . . . . . . . . . . . . . . . . . . . . . . . . . . . . . . .
Model 752UP (After 3/88) 0.00439 0.00534. . . . . . . . . . . . . . . . . . . . . . . . . . . . . . . . . . . . . . . . . . . . . . . .
Model 752AUP 0.00439 0.00477. . . . . . . . . . . . . . . . . . . . . . . . . . . . . . . . . . . . . . . . . . . . . . . . . . . . . . . . .
Model 752US 0.00432 0.00480. . . . . . . . . . . . . . . . . . . . . . . . . . . . . . . . . . . . . . . . . . . . . . . . . . . . . . . . . .
Model 752AUT 0.00432 0.00480. . . . . . . . . . . . . . . . . . . . . . . . . . . . . . . . . . . . . . . . . . . . . . . . . . . . . . . . .

Vertical Drilling Motor, Type GE752, GEK–91584D
5
DATA (Cont’d)
Carbon Brushes
Type T900. . . . . . . . . . . . . . . . . . . . . . . . . . . . . . . . . . . . . . . . . . . . . . . . . . . . . . . . . . . . . . . . . . . . . . . . . . . . . . . . . . . . . .
Size (in.) 3/4 x 2–1/4 x 2. . . . . . . . . . . . . . . . . . . . . . . . . . . . . . . . . . . . . . . . . . . . . . . . . . . . . . . . . . . . . .
Minimum Brush Length (length at which brush becomes inoperative) (in.) 1–3/32. . . . . . . . . . . . . . . . . . . . . . . . .
(brush is measured on the longest side)
Spring Pressure on Brush, Preset (lb.) 10–12. . . . . . . . . . . . . . . . . . . . . . . . . . . . . . . . . . . . . . . . . . . . . . . . . . . . . . . .
Brushholder
Clearance to Commutator (in.) 1/16–3/32. . . . . . . . . . . . . . . . . . . . . . . . . . . . . . . . . . . . . . . . . . . . . . . . . . . . . . . . . . . .
Clamp Bolt Torque (lb.–ft.) 225–250. . . . . . . . . . . . . . . . . . . . . . . . . . . . . . . . . . . . . . . . . . . . . . . . . . . . . . . . . . . . . . . . .
Commutator
Side Mica Thickness (in.) 0.060. . . . . . . . . . . . . . . . . . . . . . . . . . . . . . . . . . . . . . . . . . . . . . . . . . . . . . . . . . . . . . . . . . . .
Slot Depth (in.) 0.047. . . . . . . . . . . . . . . . . . . . . . . . . . . . . . . . . . . . . . . . . . . . . . . . . . . . . . . . . . . . . . . . . . . . . . . . . . . . .
Undercutting Saw:
Width (in.) 0.063. . . . . . . . . . . . . . . . . . . . . . . . . . . . . . . . . . . . . . . . . . . . . . . . . . . . . . . . . . . . . . . . . . . . . . . . . . . .
Diameter (in.) 1.000. . . . . . . . . . . . . . . . . . . . . . . . . . . . . . . . . . . . . . . . . . . . . . . . . . . . . . . . . . . . . . . . . . . . . . . . . .
Diameter: (in.)
New 16.625. . . . . . . . . . . . . . . . . . . . . . . . . . . . . . . . . . . . . . . . . . . . . . . . . . . . . . . . . . . . . . . . . . . . . . . . . . . . . . . . .
Worn (minimum permissible) 15.375. . . . . . . . . . . . . . . . . . . . . . . . . . . . . . . . . . . . . . . . . . . . . . . . . . . . . . . . . . . .
Riser Width (minimum permissible) (in.) 0.625. . . . . . . . . . . . . . . . . . . . . . . . . . . . . . . . . . . . . . . . . . . . . . . . . . . . . . .
Dust Groove: (in.)
Width 0.250. . . . . . . . . . . . . . . . . . . . . . . . . . . . . . . . . . . . . . . . . . . . . . . . . . . . . . . . . . . . . . . . . . . . . . . . . . . . . . . . .
Depth 0.125. . . . . . . . . . . . . . . . . . . . . . . . . . . . . . . . . . . . . . . . . . . . . . . . . . . . . . . . . . . . . . . . . . . . . . . . . . . . . . . . .
Commutator (Cont’d)
Concentricity – New Commutator (in.)
Total Indicated Runout, TIR 0.001. . . . . . . . . . . . . . . . . . . . . . . . . . . . . . . . . . . . . . . . . . . . . . . . . . . . . . . . . . . . . .
Variation of Indicator Runout within (in.)
any Group of 20 Bars 0.0004. . . . . . . . . . . . . . . . . . . . . . . . . . . . . . . . . . . . . . . . . . . . . . . . . . . . . . . . . . . . . . . . . .
Variation of Indicator Reading between (in.)
any Two Adjacent Bars 0.0001. . . . . . . . . . . . . . . . . . . . . . . . . . . . . . . . . . . . . . . . . . . . . . . . . . . . . . . . . . . . . . . .
Concentricity – Used Commutator (in.)
(Resurface if runout exceeds 0.010 TIR
or 0.003 within any group of 6 bars):
After Resurfacing, TIR (in.) 0.001. . . . . . . . . . . . . . . . . . . . . . . . . . . . . . . . . . . . . . . . . . . . . . . . . . . . . . . . . .
Bar–To–Bar Test (500 v) Voltage
Variation Bar–To–Bar +/– 5%. . . . . . . . . . . . . . . . . . . . . . . . . . . . . . . . . . . . . . . . . . . . . . . . . . . . . . . . . . . . . . . . . .
Armature Balance
Commutator End 12 grams (0.42 oz.). . . . . . . . . . . . . . . . . . . . . . . . . . . . . . . . . . . . . . . . . . . . . . . . . . . . . . . . . . . . . . .
Drive End 10 grams (0.35 oz.). . . . . . . . . . . . . . . . . . . . . . . . . . . . . . . . . . . . . . . . . . . . . . . . . . . . . . . . . . . . . . . . . . . . .
Armature Bearings Min. Max.
Diametral Clearance, Assembled (In.)
Drive End 0.005 0.009. . . . . . . . . . . . . . . . . . . . . . . . . . . . . . . . . . . . . . . . . . . . . . . . . . . . . . . . .
Commutator End 0.0005 0.0035. . . . . . . . . . . . . . . . . . . . . . . . . . . . . . . . . . . . . . . . . . . . . . . . . . .
Runout Measured from Shaft to Outer Race (in.):
Drive End 0.004. . . . . . . . . . . . . . . . . . . . . . . . . . . . . . . . . . . . . . . . . . . . . . . . . . . . . . . . . . . . . . . . . . . . . . . . . . . . .
Commutator End 0.003. . . . . . . . . . . . . . . . . . . . . . . . . . . . . . . . . . . . . . . . . . . . . . . . . . . . . . . . . . . . . . . . . . . . . . .

GEK–91584D, Vertical Drilling Motor, Type GE752
6
DATA (Cont’d)
Pole Bore Diameter (measured at center of pole) (in.)
Motors: Min. Max.
Exciting Poles (Shunt models) 19.606 19.640. . . . . . . . . . . . . . . . . . . . . . . . . . . . . . . . . . . . . . .
Exciting Poles (Series models) 19.613 19.640. . . . . . . . . . . . . . . . . . . . . . . . . . . . . . . . . . . . . . .
Commutating Poles (Both Shunt and Series models) 19.956 19.998. . . . . . . . . . . . . . . . . . . .
Impedance Test Voltage Drop
(Coiled Frame Without Armature): Min. Max.
Exciting Field (With Cables)
Model 752UP (0.5 Amps @ 60 Hz) 59.0 66.6. . . . . . . . . . . . . . . . . . . . . . . . . . . . . . . . . . . . . . . .
Model 752AUP (24 Amps @ 60 Hz) 13.1 15.6. . . . . . . . . . . . . . . . . . . . . . . . . . . . . . . . . . . . . . .
Model 752US (0.5 Amps @ 60 Hz)* 59.0 66.6. . . . . . . . . . . . . . . . . . . . . . . . . . . . . . . . . . . . . . .
Model 752AUT (24 Amps @ 60 Hz) 13.1 15.6. . . . . . . . . . . . . . . . . . . . . . . . . . . . . . . . . . . . . . .
Commutating Field (With Cables)
Model 752UP (24 Amps @ 60 Hz) 7.3 8.5. . . . . . . . . . . . . . . . . . . . . . . . . . . . . . . . . . . . . . . .
Model 752AUP (24 Amps @ 60 Hz) 7.2 8.5. . . . . . . . . . . . . . . . . . . . . . . . . . . . . . . . . . . . . . .
Model 752US (24 Amps @ 60 Hz)** 7.3 8.1. . . . . . . . . . . . . . . . . . . . . . . . . . . . . . . . . . . . . . .
Model 752AUT (24 Amps @ 60 Hz) 7.7 8.5”. . . . . . . . . . . . . . . . . . . . . . . . . . . . . . . . . . . . . . .
Lubrication* – Armature Bearings
Grease Capacities (oz.):
Drive End 39.1. . . . . . . . . . . . . . . . . . . . . . . . . . . . . . . . . . . . . . . . . . . . . . . . . . . . . . . . . . . . . . . . . . . . . . . . . . . . . . .
Commutator End 31.8. . . . . . . . . . . . . . . . . . . . . . . . . . . . . . . . . . . . . . . . . . . . . . . . . . . . . . . . . . . . . . . . . . . . . . . . .
Lubricant GE–D6A2C10*. . . . . . . . . . . . . . . . . . . . . . . . . . . . . . . . . . . . . . . . . . . . . . . . . . . . . . . . . . . . . . . . . . . . . .
**See Grease Specification at the end of the DATA table.
Weights (lb.) (approx.)
Complete 6720. . . . . . . . . . . . . . . . . . . . . . . . . . . . . . . . . . . . . . . . . . . . . . . . . . . . . . . . . . . . . . . . . . . . . . . . . . . . . . . . . . .
Armature Only 2100. . . . . . . . . . . . . . . . . . . . . . . . . . . . . . . . . . . . . . . . . . . . . . . . . . . . . . . . . . . . . . . . . . . . . . . . . . . . . .
High–Potential Test
60 Hz, a–c, to ground for one minute (All Windings) (volts):
New or Rewound Armature 3500. . . . . . . . . . . . . . . . . . . . . . . . . . . . . . . . . . . . . . . . . . . . . . . . . . . . . . . . . . . . . . .
Reconditioned 2000. . . . . . . . . . . . . . . . . . . . . . . . . . . . . . . . . . . . . . . . . . . . . . . . . . . . . . . . . . . . . . . . . . . . . . . . . .
Megger Test Minimum Megohmmeter
Reading (megohms)
Shunt Models
A1–A2 1.4. . . . . . . . . . . . . . . . . . . . . . . . . . . . . . . . . . . . . . . . . . . . . . . . . . . . . . . . . . . . . . . . . . . . . . . . . . . . . . .
F1–F2 0.3. . . . . . . . . . . . . . . . . . . . . . . . . . . . . . . . . . . . . . . . . . . . . . . . . . . . . . . . . . . . . . . . . . . . . . . . . . . . . . .
Series Models
A1–A2 1.4. . . . . . . . . . . . . . . . . . . . . . . . . . . . . . . . . . . . . . . . . . . . . . . . . . . . . . . . . . . . . . . . . . . . . . . . . . . . . . .
F1–F2 1.4. . . . . . . . . . . . . . . . . . . . . . . . . . . . . . . . . . . . . . . . . . . . . . . . . . . . . . . . . . . . . . . . . . . . . . . . . . . . . . .
* With Commutating Poles (CP) out.
**Excitation Field in.

Vertical Drilling Motor, Type GE752, GEK–91584D
7
DATA (Cont’d)
Motor Ratings* Continuous
Max. HP
Shunt (UP)
Volts 750. . . . . . . . . . . . . . . . . . . . . . . . . . . . . . . . . . . . . . . . . . . . . . . . . . . . . . . . . . . . . . . . . . . . . . . . . . . . . . . . . . . .
Armature Amps 1050. . . . . . . . . . . . . . . . . . . . . . . . . . . . . . . . . . . . . . . . . . . . . . . . . . . . . . . . . . . . . . . . . . . . . . . . .
Field Amps 57. . . . . . . . . . . . . . . . . . . . . . . . . . . . . . . . . . . . . . . . . . . . . . . . . . . . . . . . . . . . . . . . . . . . . . . . . . . . . . .
RPM 1050. . . . . . . . . . . . . . . . . . . . . . . . . . . . . . . . . . . . . . . . . . . . . . . . . . . . . . . . . . . . . . . . . . . . . . . . . . . . . . . . . .
Horsepower 1000. . . . . . . . . . . . . . . . . . . . . . . . . . . . . . . . . . . . . . . . . . . . . . . . . . . . . . . . . . . . . . . . . . . . . . . . . . . .
Series (AUP)
Volts 750. . . . . . . . . . . . . . . . . . . . . . . . . . . . . . . . . . . . . . . . . . . . . . . . . . . . . . . . . . . . . . . . . . . . . . . . . . . . . . . . . . . .
Armature Amps 1050. . . . . . . . . . . . . . . . . . . . . . . . . . . . . . . . . . . . . . . . . . . . . . . . . . . . . . . . . . . . . . . . . . . . . . . . .
Field Amps 100%. . . . . . . . . . . . . . . . . . . . . . . . . . . . . . . . . . . . . . . . . . . . . . . . . . . . . . . . . . . . . . . . . . . . . . . . . . . .
RPM 975. . . . . . . . . . . . . . . . . . . . . . . . . . . . . . . . . . . . . . . . . . . . . . . . . . . . . . . . . . . . . . . . . . . . . . . . . . . . . . . . . . .
Horsepower 1000. . . . . . . . . . . . . . . . . . . . . . . . . . . . . . . . . . . . . . . . . . . . . . . . . . . . . . . . . . . . . . . . . . . . . . . . . . . .
*
NOTE: With 2800 SCFM air flow.
Motor Ratings** Continuous Continuous Intermittent
Max. HP Max. Torque Duty Cycle
Shunt (US)
Volts 750 650 750. . . . . . . . . . . . . . . . . . . . . . . . . . . . . . . . . . . . . . . . . . . . . .
Armature Amps 1185 1250 1435. . . . . . . . . . . . . . . . . . . . . . . . . . . . . . . . . . .
Field Amps* 60 60 60. . . . . . . . . . . . . . . . . . . . . . . . . . . . . . . . . . . . . . .
RPM 1040 900 1065. . . . . . . . . . . . . . . . . . . . . . . . . . . . . . . . . . . . . . . . . . . .
Torque 5705 5995 6745. . . . . . . . . . . . . . . . . . . . . . . . . . . . . . . . . . . . . . . . . . .
Horsepower 1130 1030 1365. . . . . . . . . . . . . . . . . . . . . . . . . . . . . . . . . . . . . .
Series (AUT)
Volts 750 570 750. . . . . . . . . . . . . . . . . . . . . . . . . . . . . . . . . . . . . . . . . . . . . .
Armature Amps 1150 1250 1400. . . . . . . . . . . . . . . . . . . . . . . . . . . . . . . . . . .
Field Strength 100% 100% 100%. . . . . . . . . . . . . . . . . . . . . . . . . . . . . . . . . . . .
RPM 965 700 920. . . . . . . . . . . . . . . . . . . . . . . . . . . . . . . . . . . . . . . . . . . . .
Torque 5900 6620 7530. . . . . . . . . . . . . . . . . . . . . . . . . . . . . . . . . . . . . . . . . . .
Horsepower 1085 880 1320. . . . . . . . . . . . . . . . . . . . . . . . . . . . . . . . . . . . . .
**NOTE: With 2800 SCFM air flow and ABS temperature rise standards, 155
C over 40
C ambient.
Grease Specification
D6A2C10 grease is a lithium soap base grease with added antioxidant. It contains an oil of heavy viscosity and is
especially suitable for high speed, high temperature open or shielded bearings in drilling motors.
Specifications:
Worked Consistency, 77 F, MM/10 220–240. . . . . . . . . . . . . . . . . . . . . . . . . . . . . . . . . . . . . . . . . . . . . . . . . . . . .
Dropping Point, Degrees F (Min) 380. . . . . . . . . . . . . . . . . . . . . . . . . . . . . . . . . . . . . . . . . . . . . . . . . . . . . . . . . . .
Mineral Oil Viscosity At 100 F, SSU 475–525. . . . . . . . . . . . . . . . . . . . . . . . . . . . . . . . . . . . . . . . . . . . . . . . . . . .
Free Alkali, Percent (Max) 0.50. . . . . . . . . . . . . . . . . . . . . . . . . . . . . . . . . . . . . . . . . . . . . . . . . . . . . . . . . . . . . . . . .
Free Acid, Percent (Max) Nil. . . . . . . . . . . . . . . . . . . . . . . . . . . . . . . . . . . . . . . . . . . . . . . . . . . . . . . . . . . . . . . . . . .
Color Amber. . . . . . . . . . . . . . . . . . . . . . . . . . . . . . . . . . . . . . . . . . . . . . . . . . . . . . . . . . . . . . . . . . . . . . . . . . . . . . . . .
Base (With Antioxidant) Lithium. . . . . . . . . . . . . . . . . . . . . . . . . . . . . . . . . . . . . . . . . . . . . . . . . . . . . . . . . . . . . . . .
Oxidation Resistance Time To Reach 20 psi Drop At 210 F, Hr. (Min) 1000. . . . . . . . . . . . . . . . . . . . . . . . . .
Corrosion Must Pass. . . . . . . . . . . . . . . . . . . . . . . . . . . . . . . . . . . . . . . . . . . . . . . . . . . . . . . . . . . . . . . . . . . . . . . . .
Approved Vendor Shell Oil. . . . . . . . . . . . . . . . . . . . . . . . . . . . . . . . . . . . . . . . . . . . . . . . . . . . . . . . . . . . . . . . . . . . .
Brand Name Cyprina RA. . . . . . . . . . . . . . . . . . . . . . . . . . . . . . . . . . . . . . . . . . . . . . . . . . . . . . . . . . . . . . . . . . . . . .
GEK–91584D, Vertical Drilling Motor, Type GE752
8
SPECIAL TOOLS
AND EQUIPMENT
CAUTION: This machine is of open splash–proof
construction. It is force–ventilated and requires
an ample supply of cooling air. The cooling air
should not contain combustible gases. If it is
applied in an environment which may contain
combustible gases, an adequate supply of non–
contaminated cooling air must be provided.
The following items are required to maintain, repair
and overhaul the motors:
Part
Megohmmeter (or “Megger”*)
600 volts 111X910 or equivalent. . . . . . . . . . . . . . . .
Voltmeter Simpson Multimeter, Model 260. . . . . . . . . . or equivalent
Puller Tools 41E903423G1. . . . . . . . . . . . . . . . . . . . . . .
Commutator Grinder 427C592G1. . . . . . . . . . . . . . . . .
Resurfacing Stones:
Medium Grade 8828492P11. . . . . . . . . . . . . . . . . . .
Finish Grade 8828492P8. . . . . . . . . . . . . . . . . . . . . .
Brush–Seater Stone (White) 106X98. . . . . . . . . . .
Lifting Eye P9945894P8. . . . . . . . . . . . . . . . . . . . . . . . . .
Crows–Foot Pressing Tool 41C685430G1. . . . . . . . . .
Ball and Socket Tool 41C685080G1. . . . . . . . . . . . . . .
Guide Pins, Three (3) Recommended
for Armature Asm. In Frame 6717114P1. . . . . . . .
Spanner Wrench 8843522G1. . . . . . . . . . . . . . . . . . . . .
Spring Scale (for brush–spring
pressure check) 0–20 lb. capacity. . . . . . . . . . . . . .
Hub Assembly Gauge 41D790941G1. . . . . . . . . . . . . .
Hub Puller (Less Pump) 41B535703G1. . . . . . . . . . . .
Pump (For Above) 8843947G1. . . . . . . . . . . . . . . . . . . .
*Tradename of James G. Biddle Co.
GROUNDING INSTRUCTIONS
Grounding motor frames is required to safeguard
personnel from electric shock in event of an insulation
failure in the machine.
WARNING: Failure to properly ground electrical
equipment may expose personnel to a potentially
hazardous condition in which serious or fatal in-
jury from electrical shock is possible.
Grounding conductors must be provided between
the machine frame and the supporting structure to avoid
hazardous potential difference between the machine
frame and the adjacent surface on which a person may
be standing while touching the machine.
NOTE: This type of ground connection is re-
ferred to in electrical standards as “equipment
grounding” or “enclosure grounding” which is
not to be confused with “system” or “circuit”
grounding. Drilling drive systems normally do
not have intentional circuit ground connec-
tions, except through high impedance detec-
tors.
Grounding conductors must be provided on drilling
units on which the construction of the unit and/or the in-
stallation of the machines do not inherently insure posi-
tive grounding of the equipment. Examples are those
portable (modular) platform rigs and land rigs which do
not already have ground cables to all machinery struc-
tures. Offshore rigs with equipment fastened to the
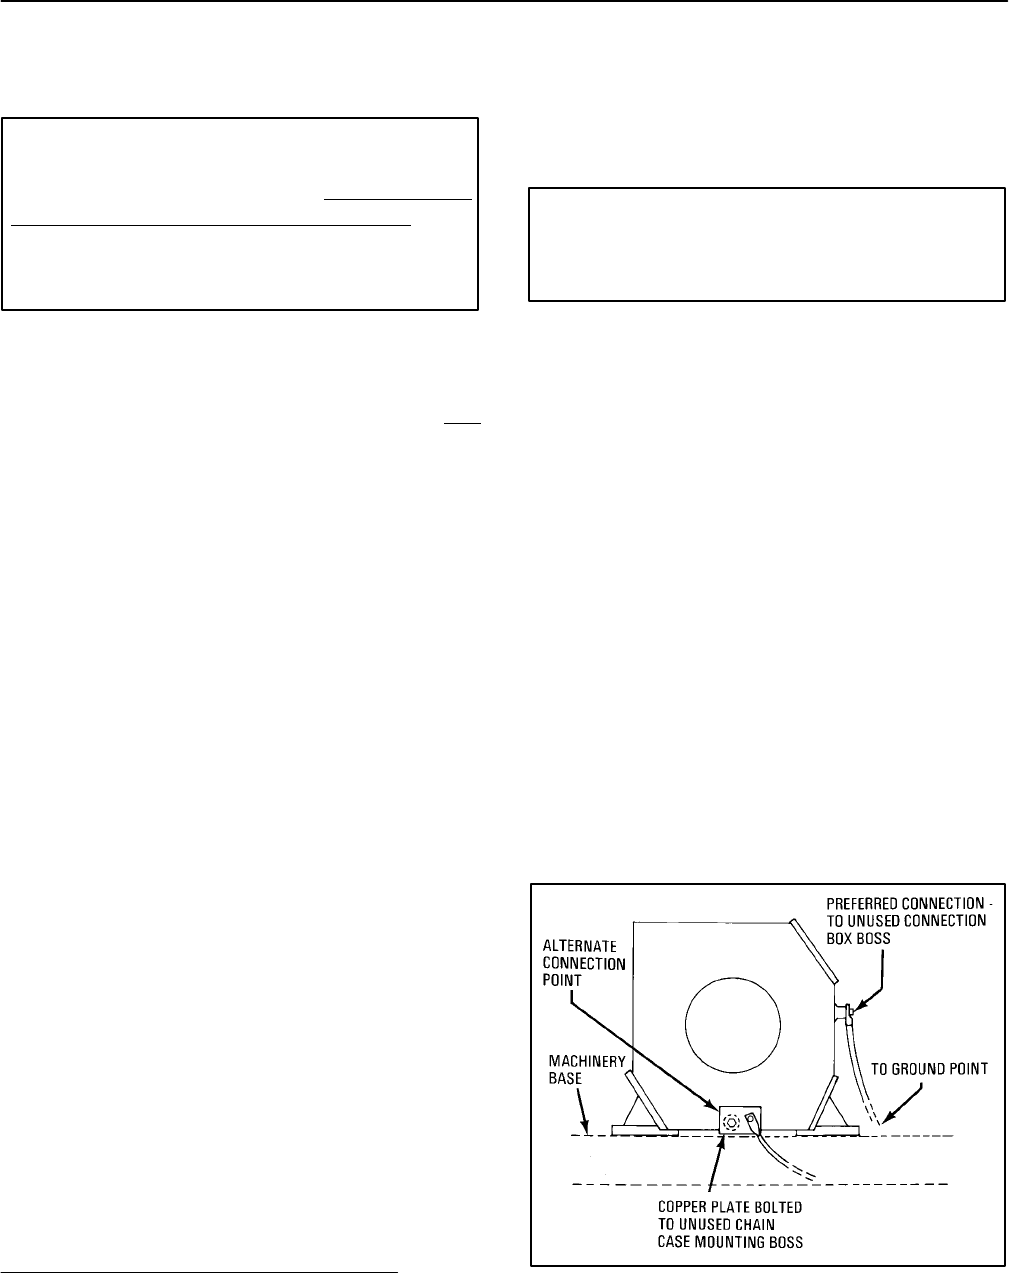
FIG. 2. DRILLING MOTOR – FRAME GROUNDING
CABLE CONNECTIONS. E–28717.

Vertical Drilling Motor, Type GE752, GEK–91584D
9
decks by bolting or welding should not require additional
grounding. (References: ABS Rules for Building and
Classing Steel Vessels, Section 35.9.6, and IEEE Stan-
dard 45–1977, Recommended Practice for Electrical In-
stallations on Shipboard, Section 21.4.)
GROUNDING PROCEDURES (Fig. 2)
Most GE drilling machines have extra tap blocks on
the frame for mounting of the connection boxes. One of
these may be used for attaching the grounding cable. If
one is not available, use the lower chain case mounting
boss on the end opposite the drive end in accordance
with Step 2.
1. To attach the ground cable to a tap block, obtain
a 0.75–10 bolt with length of 1.0 to 1.5 in. and a
lockwasher. Also obtain a cable lug to fit the
ground cable and large enough for the 0.75 di-
ameter bolt.
2. To attach the cable to the chain case boss, obtain
a 1.25–7 bolt with length of 1.0 to 1.75 in. and a
lockwasher. Prepare a copper plate at least 1/8
in. thick with a 1.25 in. diameter hole for bolting to
the chain case boss, and with enough extra area
for holes to attach a cable lug. Drill hole(s) in
plate for cable lug. Clean all paint, rust and oil
from the chain case boss and bolt the copper
plate to the chain case boss.
3. Prepare a ground conductor* long enough to run
from the motor frame to an existing ground con-
ductor system or to a suitable equipment ground
point as defined by the National Electrical Code
Article 250 or other applicable regulation. Check
that the system ground detector is also con-
nected to the Common ground point for the rig
and make connection if necessary.
4. Install terminal lugs on cable. Remove paint, rust
and oil from the surfaces to which the cables are
to be attached and bolt the lugs securely to these
surfaces.
*Use 4/0 size or larger copper cable for GE752 ma-
chines. (Reference: National Electrical Code, 1978
Edition, Table 250–95.)
5. Use a digital ohmmeter to check that the bolted
connections are solid, low resistance connec-
tions from the cable conductor to the ground
point and to the motor frame. The meter reading
should be 0.2 ohms or less.
OVERHAUL
Overhaul intervals will depend on the severity of ser
vice seen by the machine. However, General Electric
Co. recommends that an overhaul be performed every
18,000 hours (approximately every two years) on all
machines subjected to normal operation.
The motor should be removed, disassembled,
cleaned, inspected and reconditioned as necessary (in-
cluding varnish treatment of armature and fields). Motor
bearings should be repacked with grease. See the
DATA section for grease type and quantity.
LUBRICATION
Periodic lubrication is required on all GE752 drilling
machines designed for vertical operation between
scheduled overhaul periods. Every six months or 2500
hours, whichever comes first, apply approximately 2 oz.
of grease at each end.
GREASE TUBES AND PIPE PLUGS
The following lists grease tube and pipe plug configu-
rations for all models covered in this publication:
1. UP1 and AUP1 — Four grease tubes with pipe
plugs, two at each end.
2. UP2 and AUP2 — Two grease tubes with pipe
plugs, one at each end.
3. UP3, UP3A, UP4, UP5, UP6, AUP3, AUP4,
AUP5 – One grease tube with a pipe plug at the
drive end, one pipe plug only at the commutator
end.
4. US1, US2, AUT1, AUT2 – One pipe plug only at
each end.
Pipe plugs are provided on bearing caps and on the
ends of all grease tubes to prevent the ingress of dirt or
other contamination.
Remove the pipe plugs and install grease fittings to
facilitate lubrication. Replace the pipe plugs after adding
lubricant. See the DATA section for recommended
grease type.
GEK–91584D, Vertical Drilling Motor, Type GE752
10
INSPECTION
MONTHLY
Inspect the exterior of the machine, including cables,
for damage.
Covers, Seals, Latches
Clean the outside of the machine and remove the in-
spection covers. Use clean, dry compressed air and
blow the dirt and carbon dust from the interior of the ma-
chine.
WARNING: When using compressed air for clean-
ing purposes, flying debris and particles may
present a hazard to personnel in the immediate
area. Personnel should be provided with, and
trained in the use of, personal protective equip-
ment as specified by applicable federal or state
safety regulations.
Check exterior covers to be sure felt seals are intact.
If seals are missing or covers are damaged, replace
seals or covers as necessary. Make sure covers fit prop-
erly and cover latches work properly.
Brushholders (Fig. 5)
Satisfactory operation of the drilling motor requires
the brushholders to be in good condition. Of particular
importance is the inside dimension of the carbonways.
Operation may also be impaired by brushholders which
have been mechanically damaged or sustained dam-
age as the result of motor flashovers.
Inspect the brushholders for damage. If they require
replacement, refer to BASIC REPAIRS, Brushholder
Replacement section for instructions.
When new, brushholder carbonways should mea-
sure 0.753 +/–0.002 in x 2.2575 +/–0.0025 in. If or when
the 0.753 in. dimension exceeds 0.765 in., the brushhol-
der should be scrapped. If it falls between 0.758 and
0.765 in., the carbonway can be restored to its proper
dimension according to the following instructions:
1. Remove the brushholder. Position it as shown in
Fig. 3 and tap the metal ridge with a hammer.
FIG. 3. RESIZING BRUSHHOLDER
CARBONWAYS. E–11281.
Start at one end and work along the ridge to the
other end.
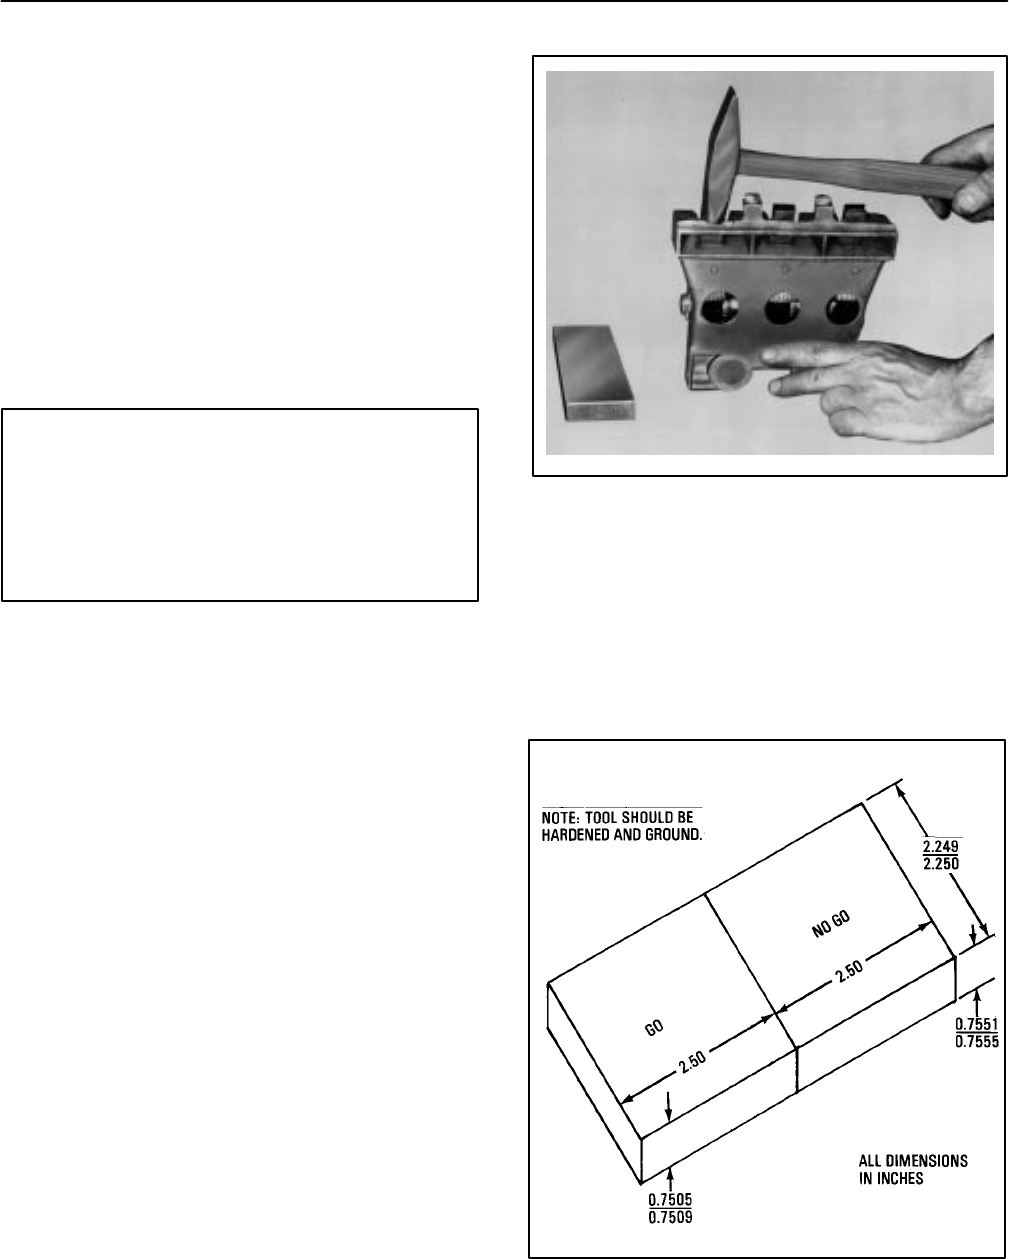
2. Check progress frequently by means of a “Go/
No–Go” gage made to the dimensions shown in
Fig. 4.
FIG. 4. BRUSHHOLDER CARBONWAY
GAGE. E–11283A.
Vertical Drilling Motor, Type GE752, GEK–91584D
11
3. Continue tapping as described in Step 1 until the
0.753 dimension falls between 0.751 and 0.755.
4. If, due to excessive pounding, the inside dimen-
sion becomes less than 0.751 in., file back to size
with a fine mill file.
Additional repairs can be made to restore damaged
brushholder bodies. Brushholder damage is fairly typi-
cal when flashovers have occured, resulting in some
burning or melting of metal at the corners of the brush-
holder. Metal thus removed can be restored according
to the following instruction, unless more than 1/4 in.
buildup of metal is required in the affected area, in which
case the brushholder should be scrapped. Proceed as
follows:
1. Thoroughly clean the affected area by wire
brushing, and grind off any metal flow resulting
from a flashover.
2. Apply a suitable brazing flux such as
GE–A10B15 to the area to be built up.
3. Insert a carbon brush into the brushholder to pre-
vent the brazing material from flowing into the
carbonway.
4. Using a brazing torch and a 1/16 in. diameter
brass brazing rod, puddle in sufficient metal to
restore the metal that had been removed.
5. Check the carbonway for size with the “Go/No–
Go” gage after the brushholder has cooled to
room temperature.
6. Resize as required using the preceding method.
Brushholder Sleeves
Use a clean, lintless cloth and wipe dirt and grease
from the Teflon* brushholder sleeves, Fig. 5. If neces-
sary, use a cleaner such as MEK (methyl ethyl ketone)
to clean the sleeves. Inspect sleeves for cracks and thin
spots caused by flashovers. Replace any damaged
brushholder or one having a damaged sleeve.
WARNING: MEK is a volatile solvent. The fumes
should not be inhaled. Use only in a well–venti-
lated area and take adequate precautions to pro-
tect eyes, skin and hands.
NOTE: Never paint these sleeves. Periodically
wipe them clean with a dry cloth or a cloth
dipped in an approved non–oily cleaning sol-
vent.
Inspect the brushholder cables and make sure all
terminal bolts and all brushholder clamp bolts are tight.
Brush Spring Pressure
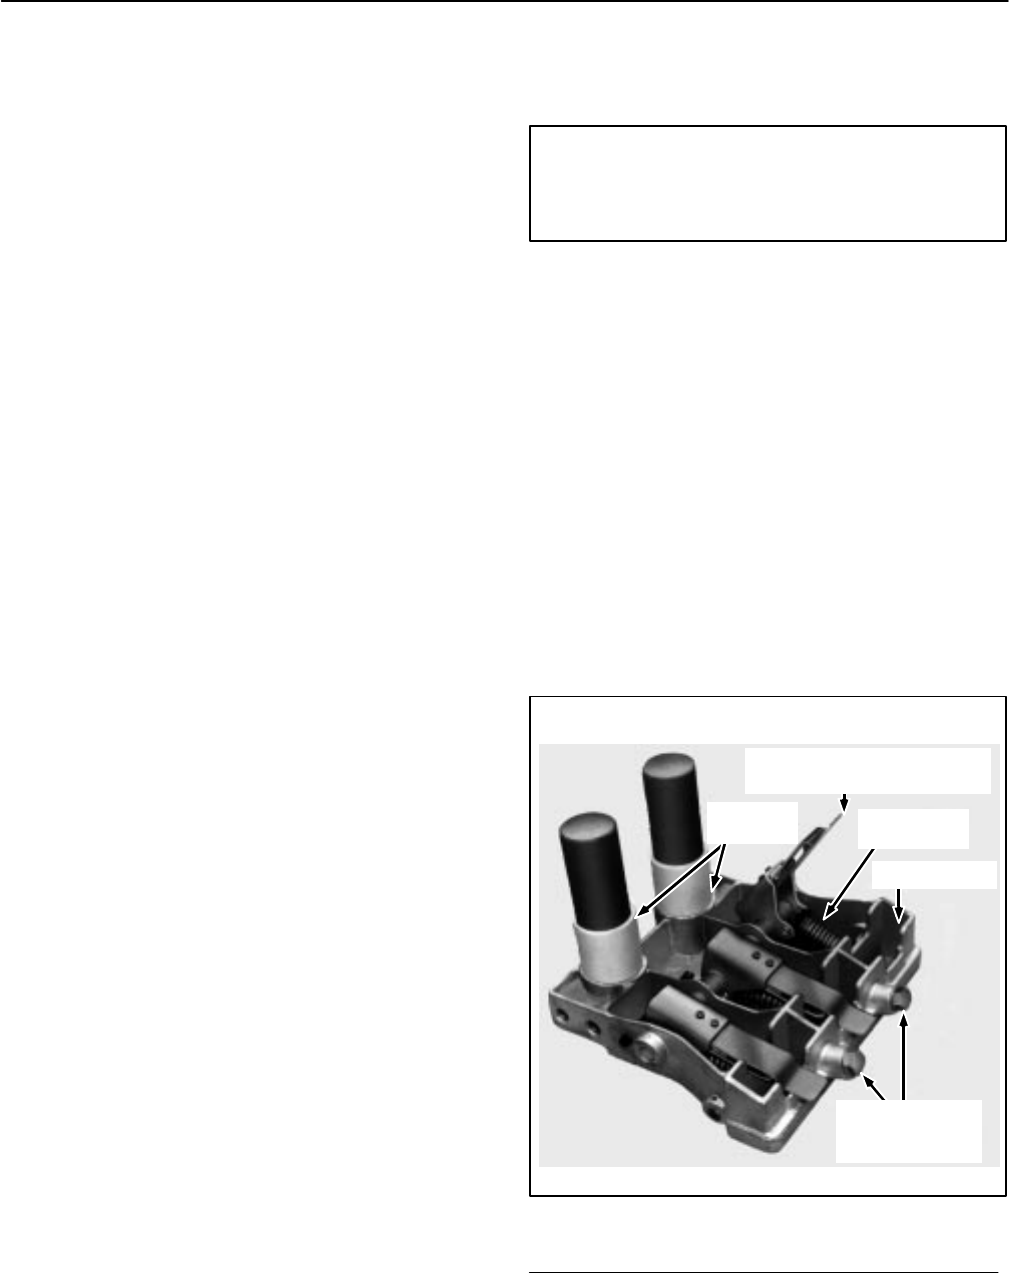
Lift the brush pressure fingers to the “toggled–up”
position, Fig. 5, and check for free movement of the
spring assembly.
Inspect the brush springs for obvious failure or dam-
age. Check brush–spring pressure by comparing spring
pressure with a spring known to be good. Refer to the
DATA section for brush spring–pressure value.
FIG. 5. BRUSH SPRING ARRANGEMENT.
E–18963.
TEFLON
SLEEVES
BRUSH PRESSURE FINGER
(IN TOGGLED–UP POSITION)
PRESSURE
SPRING
CARBONWAY
BRUSH–SHUNT
TERMINAL
SCREWS
*Product of E.I. duPont de Nemours Company.
GEK–91584D, Vertical Drilling Motor, Type GE752
12
Brushes
Brush wear is determined by measuring actual brush
length from the top of the carbon. Lift the brush spring,
remove the brush and measure brush length on the
longest side.
NOTE: If brush replacement is not required, be
sure that brushes are of sufficient length to last
until the next inspection.
If one or more brushes are worn to or near the mini-
mum length listed in the DATA section it is generally rec-
ommended that all twelve brushes be replaced at the
same time.
WARNING: To avoid possible electrical shock or
injury from rotating equipment, do not remove or
replace brushes while equipment is energized or
rotating.
If brushes are to be replaced, see the BASIC RE-
PAIRS, Brush Replacement section for brush installa-
tion instructions.
If brushes are not to be replaced, the following brush
inspection should be made:
CAUTION: When replacing brushes, use only the
GE recommended grade. Mixing of brush grades
in the same motor or changing brushes to anoth-
er grade may seriously affect commutation, sur-
face film, commutator and brush life. See the
DATA section for brush grade.
1. Inspect all brushes to be sure they are not
chipped or broken. Make sure brush shunts are
not frayed or broken. Replace any brush which
shows damage of any kind.
NOTE: Chipped, burned or rough–faced
brushes may indicate the commutator needs
resurfacing.
2. Move the brushes up and down in their carbon-
ways to be sure brushes slide freely.
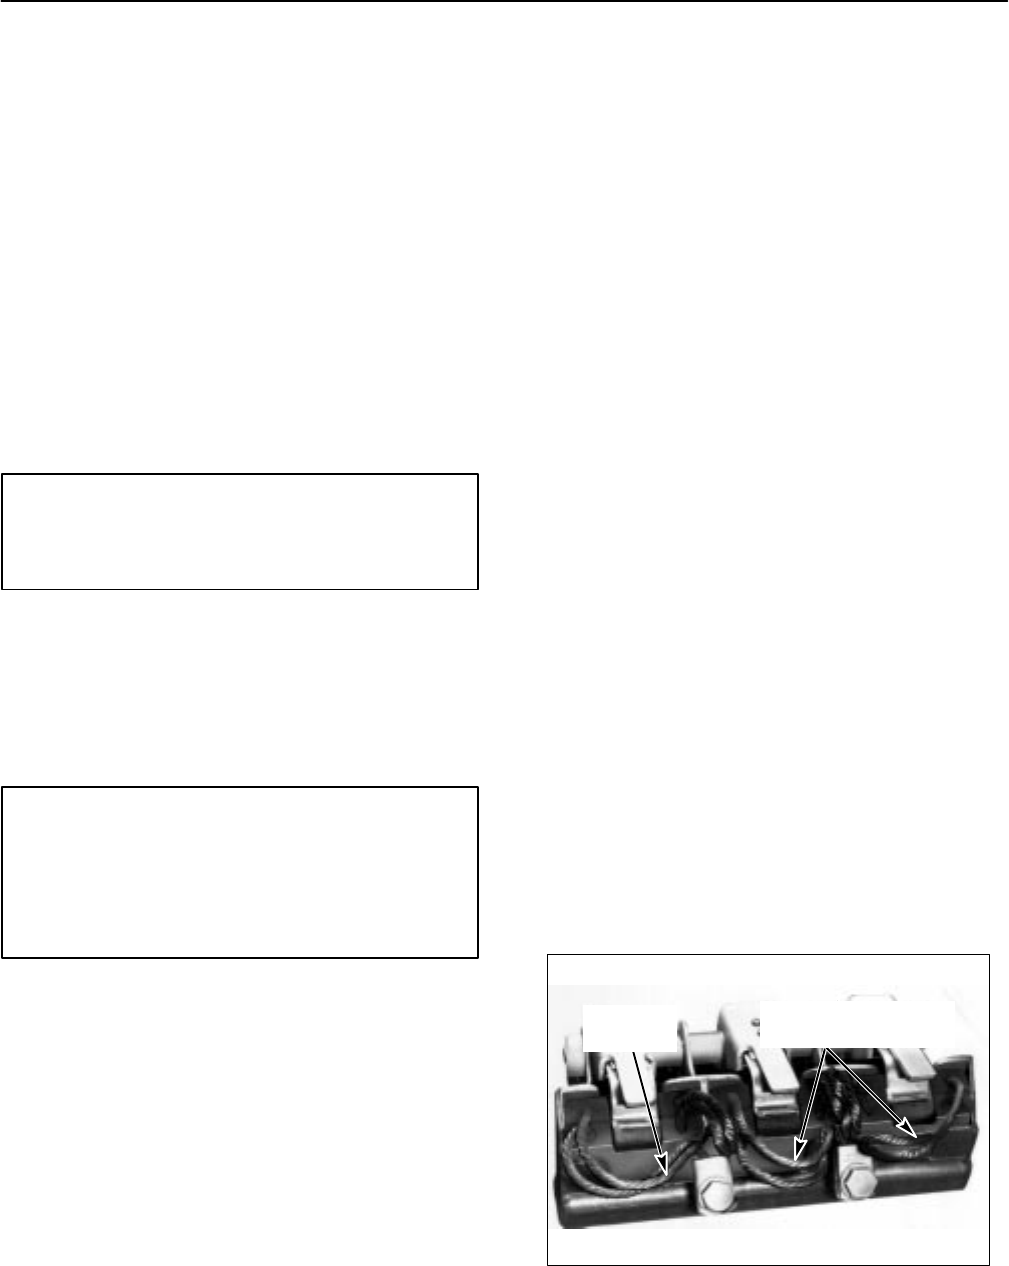
3. Check brush shunts to be sure they are not
twisted or out of position, Fig. 6. Make sure all
brush–shunt terminal connections and all brush-
holder cable connections are tight.
Commutator
Inspect the commutator for possible flashover dam-
age. The commutator should be clean, smooth, glossy
and free of high mica, high bars, flat spots or rough sur-
faces.
If there are indications that the commutator is out–
of–round (as evidenced by variations in width of the
ridge between brush paths), check the concentricity of
the commutator with a dial indicator. Condemning limits
for concentricity are listed in the DATA section.
If the commutator requires grinding, refer to Com-
mutator Resurfacing in the BASIC REPAIRS section of
this manual for instructions.
Creepage Band
Clean the creepage band (located on the commuta-
tor cap) with a clean cloth dipped in an approved sol-
vent. Inspect the band for possible flashover damage.
Make sure the creepage band is tight on the commu-
tator cap.
Flash Ring
Examine the flash ring for possible flashover dam-
age. Wipe the flash ring clean. Keep ring free of dirt and
varnish.
KEEP SHUNTS CLEAR
OF LEVER ARMS
BRUSH
SHUNTS
FIG. 6. CORRECT POSITION OF BRUSH
SHUNTS. E–22568.

Vertical Drilling Motor, Type GE752, GEK–91584D
13
Insulation
Measure the insulation resistance with a meg– ohm-
meter (Megger) to determine the condition of the insula-
tion. If reading is low, make a further inspection to deter-
mine if insulation failure or excessive moisture is caus-
ing the low megohmmeter reading. Correct the cause of
low readings before returning the motor to service.
Inspect all accessible parts of the field coil insulation
for cracking and evidence of overheating.
Power Cables
Inspect the power cables for signs of excessive heat-
ing, poor insulation or mechanical damage. Assure all
terminals are tight. Replace any cables which show low
insulation resistance or will not stand 75% above rated
voltage.
Mounting Bolts
Check all mounting bolts to assure tightness.
SEMI–ANNUALLY
1. Perform inspection operations listed under
Monthly section.
2. Refer to the DATA section for the Brushholder
Clearance dimension, and check the clearance
between the brushholders and the commutator
surface.
If clearance adjustment is required, refer to the BA-
SIC REPAIRS, Brushholder Clearance Adjustment sec-
tion for instructions.
BASIC REPAIRS
BRUSH REPLACEMENT
NOTE: Brush spring pressure is pre–set and
non–adjustable for the brushholders used on
these machines. Any brushholder that is dam-
aged or has a low spring pressure should be re-
placed before installing new brushes. Spring
pressure can be measured with a 20–lb. spring
scale pulling radially on the brush pressure fin-
ger over the center of each brush. See the DATA
section for limits.
1. Remove the commutator inspection covers.
2. Disconnect the brush shunt from the terminal
screw, Fig. 5, located on the brushholder body.
3. Lift the pressure finger away from the brush to
the toggled–up position. Remove the brush.
4. Use dry, compressed air and blow the carbon
dust from the carbonway.
WARNING: When using compressed air for clean-
ing purposes, flying debris and particles may
present a hazard to personnel in the immediate
area. Personnel should be provided with, and
trained in the use of, personal protective equip-
ment as specified by applicable federal or state
safety regulations.
5. Insert a new brush and make sure it slides freely
in the carbonway.
6. Carefully lower the pressure finger on the brush.
Do not allow the finger to snap down on the
brush; this could damage the brush.
7. Bolt the brush shunt terminals to the brushhol-
der(s). Arrange the brush shunt strands so they
clear the pressure fingers, Fig. 6, and tighten the
terminal screw(s). Make sure brush shunts are
not positioned under the pressure fingers. Check
and tighten all brushholder cable connections.
8. Seat the new brushes with a white seater stone.
CAUTION: When replacing brushes, use the GE
recommended grade. Mixing of brush grades in
the same motor or changing brushes to another
grade will seriously affect commutation, surface
film, commutator and brush life. See the DATA
section for brush grade.
BRUSHHOLDER REPLACEMENT
Removal
1. Remove brushes from the brushholders and
cover the commutator with heavy paper.
2. Disconnect the cable from the brushholder(s) in-
volved.

GEK–91584D, Vertical Drilling Motor, Type GE752
14
3. Remove bolt, washer and brushholder clamp.
Lift the brushholder out of the frame.
Installation
1. Position the brushholder in the frame with the
brushholder studs resting in the clamp surfaces
of the brushholder support.
2. Install bolt and washer. Tighten bolt but do not
torque until the brushholder–to–commutator
clearance has been established. Refer to Brush-
holder Clearance Adjustment section for instruc-
tions to adjust brushholder clearance.
3. After brushholder clearance has been set, con-
nect the brushholder cable and remove protec-
tive paper from commutator surface.
4. Check brushes to insure they exceed the mini-
mum brush length dimension and are free of any
damage. If they are long enough and are not
damaged, they can be re–used. If not, replace
with new brushes.
BRUSHHOLDER CLEARANCE
ADJUSTMENT
Refer to the DATA section for the brushholder–to–
commutator clearance dimension and adjust brushhol-
der as follows:
1. Remove the brushes.
CAUTION: Do not allow the brushholder to
touch, bump or rest on the commutator.
2. Insert a fiber gauge (equal in thickness to the
clearance dimension) between the commutator
and the brushholder. (Loosen brushholder first if
below minimum allowable clearance.)
Do NOT use a metallic gauge.
3. Loosen the brushholder support bolt and move
the brushholder against the fiber gauge so clea-
rance–to–commutator is the same as the gauge
thickness.
4. Torque bolt to 225–250 ft.–lb. and recheck the
brushholder clearance gap.
COMMUTATOR RESURFACING
Prior to resurfacing, consider the following:
1. The brush surface diameter of the commutator
must not be less than the minimum permissible
diameter, listed in the DATA section, after resur-
facing operations are completed.
2. The commutator can be resurfaced by sanding,
stoning or grinding. Choose the method to be
used based on the condition of the commutator.
NOTE: Outside power will be required to oper-
ate the motor for the following commutator–re-
surfacing procedure.
1. A second person must be at the auxiliary
power (welder) control station, ready to
shut off power in case of an emergency
during the grinding operation.
2. The grinding operator should wear
goggles and a dust mask when resurfac-
ing or blowing out the commutator.
3. To avoid electrical shock, do not touch
any part of the machine interior during
grinding operations.
WARNING: For the safety of personnel during
resurfacing operations, the following safety
precautions must be adhered to:
Preparation For Operating Series Model
Machines For Commutator Resurfacing
1. Break the coupling (if applicable) so the machine
can be operated from a d–c welding set or other
outside d–c power source.
2. Lift all the brushes except two of opposite polarity
(adjacent brushholders) which are necessary to
operate the motor.
3. Connect the machine to an outside source of
controlled d–c power; such as a 3–5 kw, 100 vdc
welding set which is capable of driving it at a
speed of 900–1000 rpm.
4. Refer to Fig. 7 for diagram of connections to run
a series machine from a welding set. Connect

Vertical Drilling Motor, Type GE752, GEK–91584D
15
FIG. 7. DIAGRAM OF CONNECTIONS TO RUN
A SERIES MACHINE FROM A WELDING SET.
E–28718.
leads so machine will operate as a series motor,
and the armature will rotate counterclockwise
(viewed from the commutator end).
Preparation For Operating Shunt Model
Machines For Commutator Resurfacing
1. Break the coupling (if applicable) so the machine
can be run from a d–c power source.
2. Lift all brushes except two of opposite polarity
(adjacent brushholders) which are necessary to
operate the motor.
3. Connect the machine to an outside source of
controlled d–c power, Fig. 8.
4. Apply power as follows:
a. Increase the field supply (0–50 v) to 32.0 volts
at 25 amps.
b. Increase the armature supply (0–150 v) to
150 volts.
c. Slowly decrease the field supply to bring the
speed up to 1000 rpm.
FIG. 8. CONNECTIONS TO RUN A SHUNT
MACHINE FROM A D–C POWER SOURCE.
E–23930A.
NOTE: When shutting down, increase the field
supply to maximum, and then turn off the arma-
ture supply. After the armature supply has been
shut off, shut down the field supply.
Sanding Procedure
If the commutator is dirty, blackened or slightly
rough, resurface it by sanding with 00 sandpaper, or fin-
er, as follows:
1. Attach the fine sandpaper to a wooden block
shaped to fit the commutator, Fig. 9.
2. Run the machine at approximately 1000 rpm and
hold the block against the commutator with a
light, even pressure. Move the block back and
forth longitudinally to clean the commutator.
3. Use clean, dry compressed air, to remove dust
and sand.
Hand Stoning Procedure
If the commutator surface is mildly grooved,
threaded or burned, and only a small amount of copper
has to be removed to correct the trouble, use a hand
stone. Hand stoning will not correct an out–of–round
commutator. See “Fixture Grinding” section.
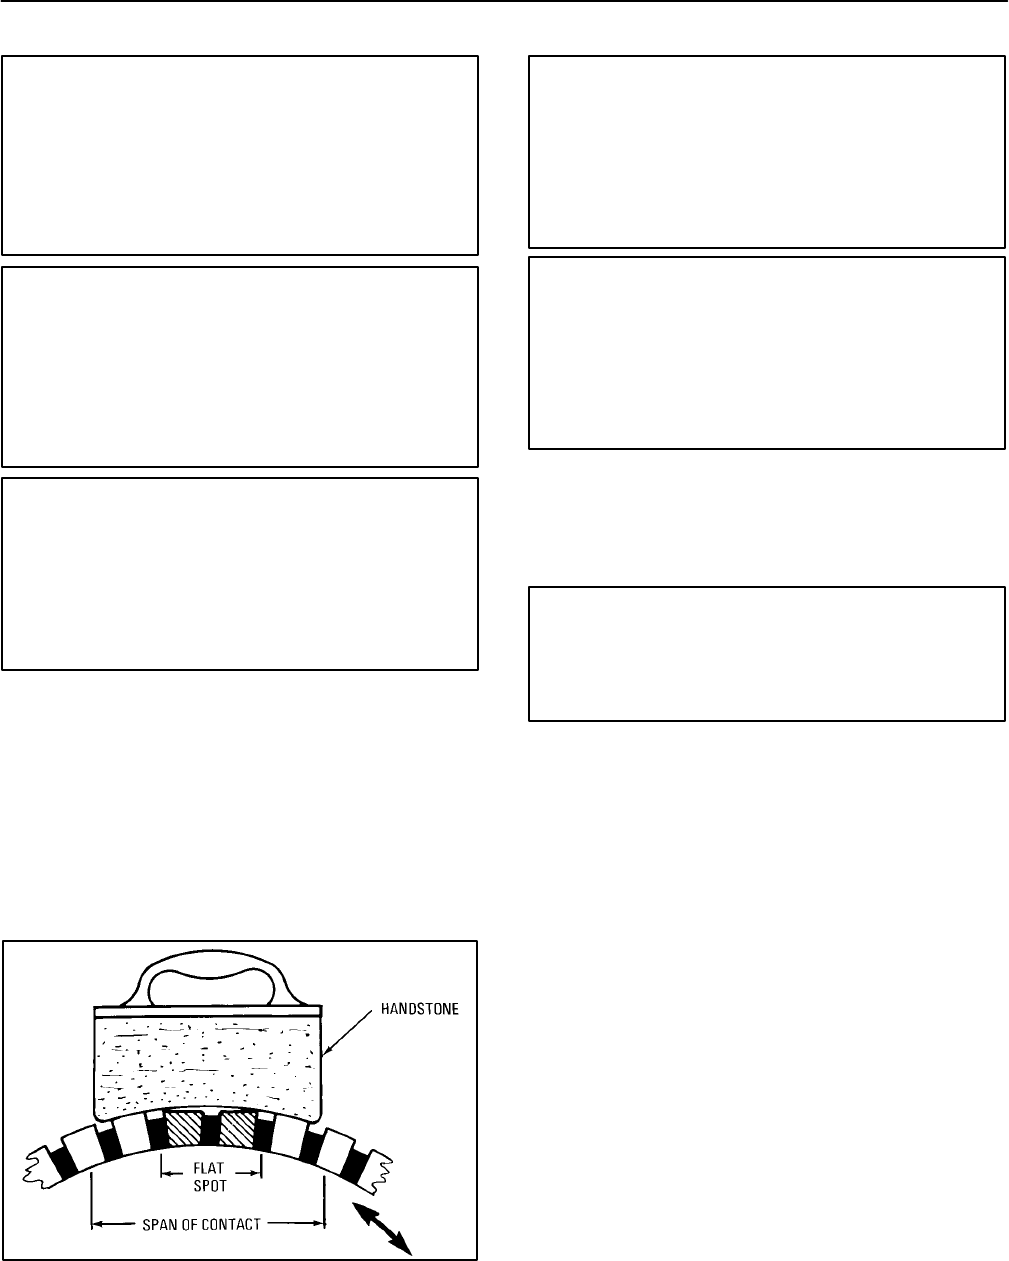
1. Use a fine–grade stone ground to fit the commu-
tator curvature, Fig. 10. It should also be of suffi-
cient width to bridge any flat spots; otherwise,
the stone will ride in and out of the flat and will not
correct it.
2. Remove one brushholder for access to the com-
mutator.
WOOD BLOCK
SHAPED TO
COMMUTATOR
FINE
SANDPAPER
WOOD SCREW
AND WASHER
FIG. 9. METHOD OF SANDING COMMUTATOR.
E–18149.
GEK–91584D, Vertical Drilling Motor, Type GE752
16
CAUTION: Never use an emery cloth on this or
any commutator. The abrasive particles on
emery cloth scratch the commutator surface
and lodge in the groves between commutator
segments. The condition creates the possibil-
ity of an eventual flashover which could seri-
ously damage the machine.
WARNING: Do not come into close proximity
of an energized motor during the cleaning pro-
cess. The armature commutator and brush rig-
ging have a high electrical charge which could
cause serious injury or death. Always use a
hose tip that is an electrical non–conductor
when cleaning with air.
WARNING: When using compressed air for
cleaning purposes, flying debris and particles
may present a hazard to personnel in the im-
mediate area. Personnel should be provided
with, and trained in the use of, personal pro-
tective equipment as specified by applicable
federal or state safety regulations.
3. Run the motor at approximately 1000 rpm.
4. Hold the stone firmly against the commutator
surface, and with even pressure, move the stone
back and forth longitudinally across the commu-
tator surface.
5. Blow away dust and sand with clean, dry, com-
pressed air.
FIG. 10. PROPER SHAPE OF
HANDSTONE. E–8779A.
WARNING: Do not come into close proximity
of an energized motor during the cleaning pro-
cess. The armature commutator and brush rig-
ging have a high electrical charge which could
cause serious injury or death. Always use a
hose tip that is an electrical non–conductor
when cleaning with air.
WARNING: When using compressed air for
cleaning purposes, flying debris and particles
may present a hazard to personnel in the im-
mediate area. Personnel should be provided
with, and trained in the use of, personal pro-
tective equipment as specified by applicable
federal or state safety regulations.
Fixture Grinding
Perform fixture–grinding operations to correct a
commutator that is grooved, threaded or out–of–round.
CAUTION: Be sure there is enough material on
the commutator so grinding will not decrease
the commutator diameter below the minimum
permissible diameter listed in the DATA sec-
tion.
Refer to SPECIAL TOOLS AND EQUIPMENT sec-
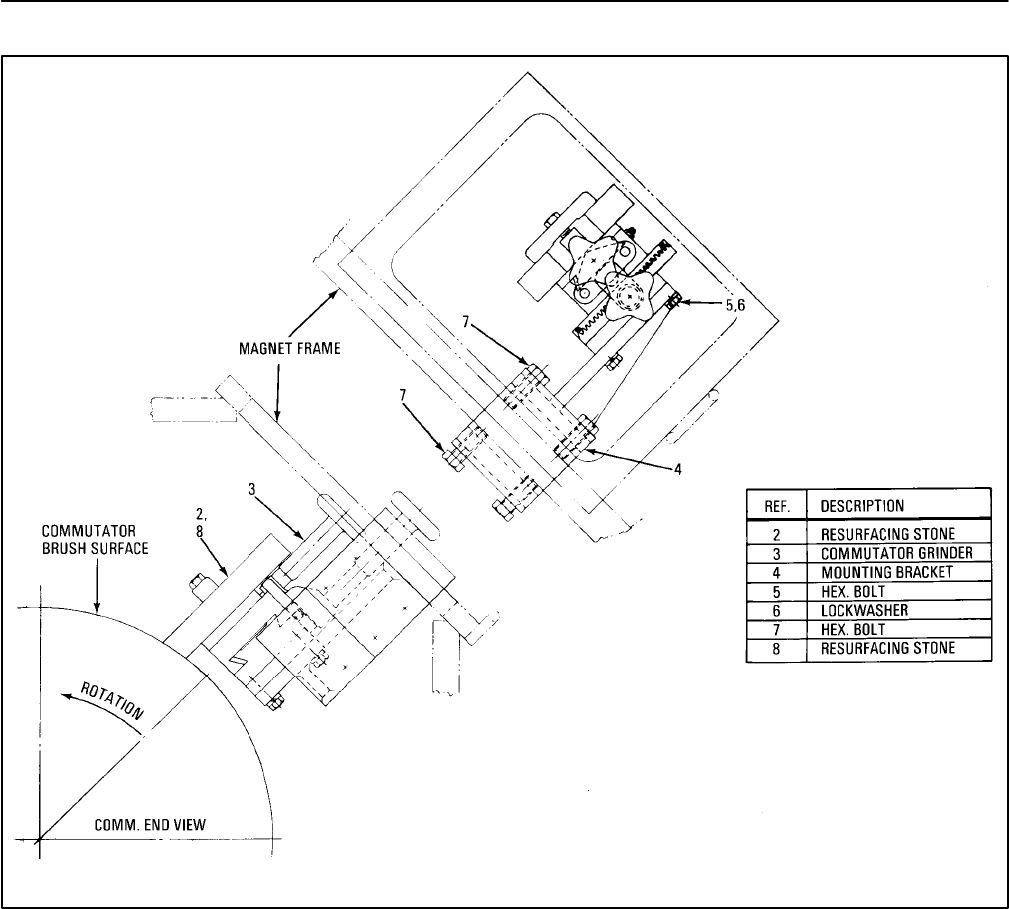
tion for commutator grinder part number. See Fig. 11 for
grinder nomenclature.
Grinder Installation
NOTE: Inspect the grinder before installing it to
be sure it is reasonably clean. Make sure the tra-
verse slides are free of accumulated dirt and
copper chips; otherwise, the carriage may bind
during the grinding operation.
1. Remove the inspection covers from the ma-
chine.
2. Remove the most accessible brushholder, and
clamp the grinder mounting bracket to the frame.
3. Remove the brushes from one brushholder adja-
cent to grinder in a CCW direction.
4. Install old brushes in remaining brushholders.
5. Bolt the grinder to the mounting bracket.
Vertical Drilling Motor, Type GE752, GEK–91584D
17
FIG. 11. COMMUTATOR GRINDER. E–18249.
NOTE: For most applications, finish–grade
resurfacing stones are recommended. Medium
grade stones can be used for rough grinding a
deeply grooved or threaded commutator, or a
commutator with deep flat spots, followed by fi-
nish–grade stones for the final grinding. If new
stones will be used, they should be contoured
on a Carborundum wheel to approximate the
curvature of the commutator.
Install the stones in the grinder so the entire surface
of the commutator will be resurfaced when the carriage
is traversed from side–to–side. Proceed with alignment
of the grinder as follows:
Install the resurfacing stones in the grinder and pro-
ceed as follows:
1. Traverse the carriage to one end of the commu-
tator and check the clearance between the com-
mutator surface and one stone with a feeler
gauge or a fiber strip (approximately 0.030 in.
thick). Traverse the carriage to the other end of
the commutator and check the clearance under
the same stone. The clearance should be the
same at both ends. If clearance is not equal at
both ends, adjust the mounting bracket by
means of the set screws to obtain equal clear-
ance at both ends.
GEK–91584D, Vertical Drilling Motor, Type GE752
18
2. Turn the feed control to back the stones away
from the commutator before starting the ma-
chine.
NOTE: If possible, use some method of collect-
ing the copper chips and abrasive dust pro-
duced by the grinding operation. For example,
use a vacuum cleaning device with the suction
wand set just behind the trailing edge of the
stones.
Grinding
1. Apply power to the machine and gradually in-
crease speed to 900–1000 rpm.
NOTE: Do not grind the commutator to a depth
where no mica undercut remains, or to a diame-
ter which is smaller than the minimum permis-
sible diameter listed in the DATA section.
2. Begin grinding by radially feeding the stones
lightly against the commutator. Then, slowly
move the carriage back and forth longitudinally
across the surface. When the cutting action of
the stone ceases, again feed the stone lightly
against the commutator and continue grinding.
Use care to make a light cut and to avoid chatter.
Cutting action should take place at the trailing
edge of the stones. Heavy cuts will cause exces-
sive copper drag.
3. Grind the commutator to obtain a uniformly
smooth surface, but do not remove any more
copper than necessary.
4. Lighten the cutting pressure on the stones near
the end of the grinding operation. If medium–
grade stones were used, stop the motor, change
to finish–grade stones and repeat Steps 1, 2, 3
and 4. After the final cut, traverse the stones
back and forth without changing the feed until
cutting action ceases.
5. Remove power from the machine.
6. Check commutator runout with a dial indicator.
Refer to the DATA section for concentricity limits.
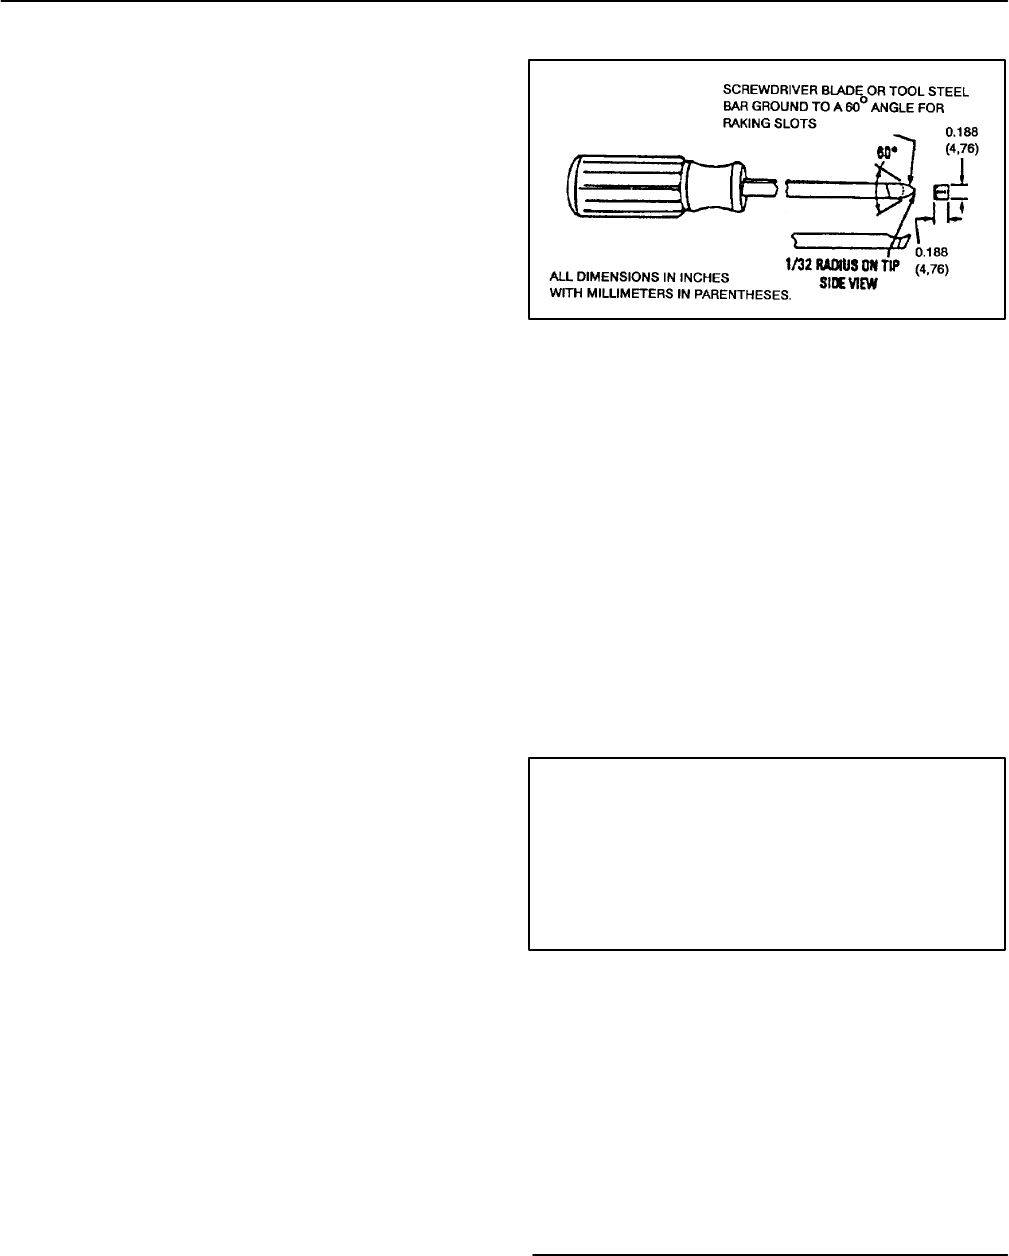
FIG. 12. COMMUTATOR SLOT RAKING TOOL.
E–19771A.
7. If necessary, continue grinding to meet concen-
tricity values listed in the DATA section.
8. Remove the grinder.
9. See Fig. 12 for slot raking tool. Rake the commu-
tator slots to remove projecting mica fins or cop-
per whiskers.
10. Run the machine again at 1000 rpm and polish
the commutator with 00 sandpaper, crocus cloth
or 400A Triemite* paper. The abrasive sheet
should be mounted on a wooden block curved to
fit the surface of the commutator.
CAUTION: Never use an emery cloth on this or
any commutator. The abrasive particles on
emery cloth scratch the commutator surface
and lodge in the grooves between commuta-
tor segments. This condition creates the pos-
sibility of an eventual flashover which could
seriously damage the machine.
11. Blow the dust from the commutator and the inte-
rior of the motor with dry, compressed air. Hold
the air nozzle one to two inches from the surface
of the commutator and sweep nozzle longitudi-
nally to dislodge copper chips and mica dust.
12. Air cure the commutator. See the following sec-
tion for air curing instructions.
*Product of Minnesota Mining and Manufacturing
Co.

Vertical Drilling Motor, Type GE752, GEK–91584D
19
WARNING: When using compressed air for
cleaning purposes, flying debris and particles
may present a hazard to personnel in the im-
mediate area. Personnel should be provided
with, and trained in the use of, personal pro-
tective equipment as specified by applicable
federal or state safety regulations.
Air Curing Commutator
After the commutator has been sanded, stoned or
ground and blown clean, it should be air cured as fol-
lows:
1. Rotate the armature slowly with the same source
of power used for sanding, stoning or grinding.
2. Use a rubber air–hose with the nozzle removed
and sweep the commutator surface with 70 psi
air pressure.
WARNING: Observe all the following safety
precautions to avoid injury.
1. Remove all metal fittings from the air hose
or, if impossible to remove, insulate the
fitting.
2. Be certain an operator is stationed at the
power–supply control to quickly remove
power from the machine should an emer-
gency arise.
3. Wear rubber–insulated gloves and
goggles while air curing. Stand on an in-
sulated platform.
4. Avoid contact with the cable terminals.
WARNING: Do not come into close proximity
of an energized motor during the cleaning pro-
cess. The armature commutator and brush rig-
ging have a high electrical charge which could
cause serious injury or death. Always use a
hose tip that is an electrical non–conductor
when cleaning with air.
3. Increase the machine speed to approximately
900 rpm and blow air on the commutator until the
sparking stops.
4. Increase the speed until full speed is reached (do
not exceed 1000 rpm) and continue to blow air on
the commutator until all sparking stops.
5. Stop the machine.
6. Disconnect external power supply to machine.
Make all necessary mechanical and electrical
changes to restore the machine to service.
7. Use a clean cloth and wipe off the brushholders,
creepage band and accessible surfaces in the
commutator chamber.
8. Brushholder Clearance – Install the brushholder
previously removed and check and adjust as re-
quired the brushholder–to–commutator clear-
ance on all brushholders. See previous Brush-
holder Replacement and Brushholder Clearance
Adjustment sections for instructions to install the
brushholder, and to adjust brushholder clear-
ance.
9. Installing Brushes – Refer to BASIC REPAIRS,
Brush Replacement section, and install
serviceable or new brushes per instructions
listed.
10. Vacuum interior of commutator chamber.
BASIC OVERHAUL
NOTE: Be sure to use the correct drawings for
the machine being overhauled. Refer to Table 2
on page 20 to determine the correct drawing.
It is recommended that a basic overhaul be per-
formed every two years, or 18,000 hours. The time inter-
val between overhauls may vary, depending on the con-
dition of the machine and the severity of service.
The following basic overhaul procedures include in-
structions to disassemble, clean, inspect, repair, reas-
semble and test the machine.
TESTING BEFORE DISASSEMBLY
Perform the following tests prior to disassembly of
the machine:
GEK–91584D, Vertical Drilling Motor, Type GE752
20
TABLE 2. DRAWING REFERENCE
GE752
Model
Inst.
Book
Longi–
tudinal
Puller Tools
Comm. Pinion
End End
Arm.
Shaft
Connection
Diagram Coiled
Frame As-
sembly
Bearing Grease
Distribution
Drive Comm.
End End
Arm.
Locking
Arrange-
ment Outline
AUP1 Fig. 15 Fig. 16 Fig. 17 Fig. 20 Fig. 22 Fig. 29 Fig. 34 Fig. 38 Fig. 43 Fig. 48
AUP2 Fig. 15 Fig. 16 Fig. 17 ––– Fig. 22 Fig. 29 Fig. 34 Fig. 38 Fig. 43 Fig. 48
AUP3 Fig. 15 Fig. 16 Fig. 17 ––– Fig. 22 Fig. 29 Fig. 35 Fig. 38 Fig. 43 Fig. 48
AUP4 Fig. 15 Fig. 16 Fig. 17 ––– Fig. 22 Fig. 29 Fig. 35 Fig. 38 Fig. 43 Fig. 48
AUP5 Fig. 15 Fig. 16 Fig. 17 ––– Fig. 22 Fig. 29 Fig. 35 Fig. 39 Fig. 43 Fig. 48
AUT1 Fig. 18 Fig. 16 Fig. 17 ––– Fig. 24 Fig. 32 Fig. 36 Fig. 38 Fig. 43 Fig. 49
AUT2 Fig. 18 Fig. 16 Fig. 17 ––– Fig. 24 Fig. 32 Fig. 36 Fig. 39 Fig. 43 Fig. 49
UP1 Fig. 15 Fig. 16 Fig. 17 Fig. 20 Fig. 21 Fig. 30 Fig. 34 Fig. 38 Fig. 43 Fig. 48
UP2 Fig. 15 Fig. 16 Fig. 17 ––– Fig. 21 Fig. 30 Fig. 34 Fig. 38 Fig. 43 Fig. 48
UP3 Fig. 15 Fig. 16 Fig. 17 ––– Fig. 21 Fig. 30 Fig. 35 Fig. 38 Fig. 43 Fig. 48
UP3A Fig. 15 Fig. 16 Fig. 17 ––– Fig. 21 Fig. 30 Fig. 35 Fig. 38 Fig. 43 Fig. 48
UP4 Fig. 15 Fig. 16 Fig. 17 ––– Fig. 21 Fig. 30 Fig. 35 Fig. 38 Fig. 43 Fig. 48
UP5 Fig. 15 Fig. 16 Fig. 17 ––– Fig. 21 Fig. 30 Fig. 35 Fig. 38 Fig. 43 Fig. 48
UP6 Fig. 15 Fig. 16 Fig. 17 ––– Fig. 21 Fig. 30 Fig. 35 Fig. 39 Fig. 43 Fig. 48
US1 Fig. 18 Fig. 16 Fig. 17 ––– Fig. 23 Fig. 31 Fig. 36 Fig. 38 Fig. 43 Fig. 49
US2 Fig. 18 Fig. 16 Fig. 17 ––– Fig. 23 Fig. 31 Fig. 36 Fig. 39 Fig. 43 Fig. 49
Megohmmeter Test
Lift the brushes and perform a megohmmeter test on
the armature windings and field coils to determine the
condition of the insulation. A reading of less than 2
megohms indicates poor insulation, dirt accumulation or
excessive moisture.
Bar–To–Bar Resistance Test
Test for open or short–circuited armature coils.
1. Pass a regulated d–c current through the arma-
ture coils.
2. Read the voltage drop between the commutator
bars with a millivoltmeter. if the reading varies
more than +/– 5% from the average value, a de-
fective or short–circuited coil is indicated.
DISASSEMBLY
Armature Removal From Frame
Models UP, AUP
Before turning the machine from horizontal to verti-
cal (or vice–versa), attach the armature locking ar-
rangement to prevent the armature from moving axially.
Remove the armature locking arrangement before op-
erating the machine.
See Table 2 to determine the correct armature lock-
ing arrangement drawing.
Refer to the longitudinal drawing, Fig. 15, and puller
tool drawings, Figs. 16 and 17.
1. Clean the outside of the frame.
2. Remove the hubs from the shaft if not already re-
moved.
3. Remove the commutator covers. Disconnect
and remove all brushes and brushholders. Wrap
Vertical Drilling Motor, Type GE752, GEK–91584D
21
3
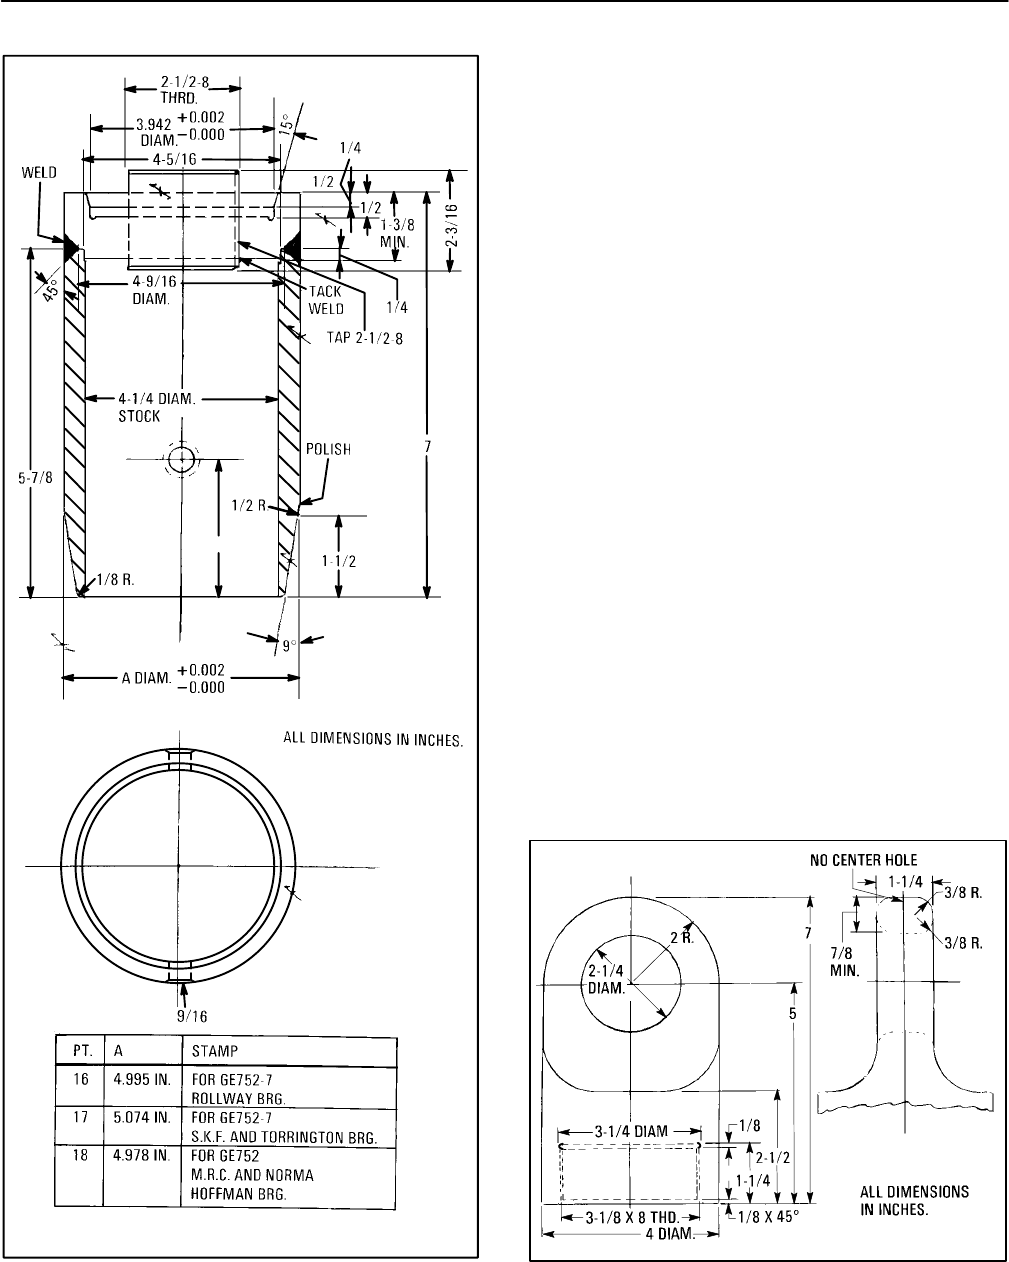
FIG. 13. COMMUTATOR–END BEARING PILOT.
E–18150.
heavy paper around the commutator for protec-
tion during handling.
4. Remove grease tubes from the commutator–
end bearing cap:
a. On UP1 and AUP1 models, there are two
grease tubes (19, 20).
b. On UP2 and AUP2 models, there is one
grease tube (19).
c. On all other models, only a pipe plug is pro-
vided in the bearing cap.
5. Install puller (Part 6751547G4) and pull sleeve
(42) from the shaft at the commutator end. The
sleeve has four tapped holes for applying the
puller. Apply heat to the sleeve with a torch while
pulling to facilitate removal.
6. Remove bolts and washers (52) and remove
bearing cap (4) and gasket (57) from the frame
head.
7. Make sure the armature locking arrangement is
securely installed. Turn the machine on end on a
stand (commutator–end down) and level it so the
armature can be lifted vertically out of the frame
without damaging the bearings, commutator or
brushholders. Remove the armature locking ar-
rangement.
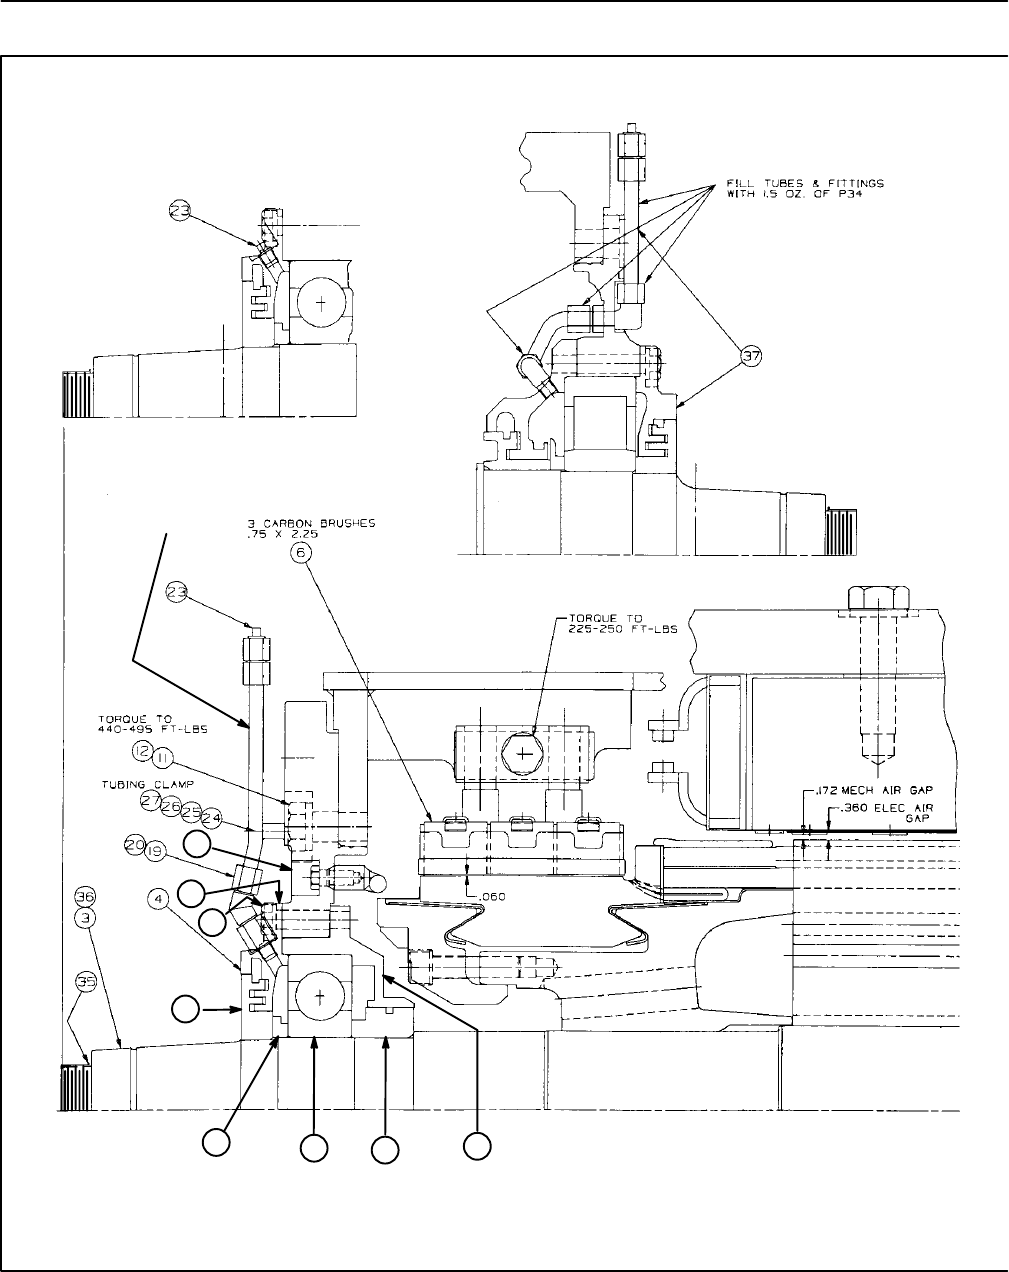
FIG. 14. ARMATURE LIFTING BAIL. E–23932.
GEK–91584D, Vertical Drilling Motor, Type GE752
22
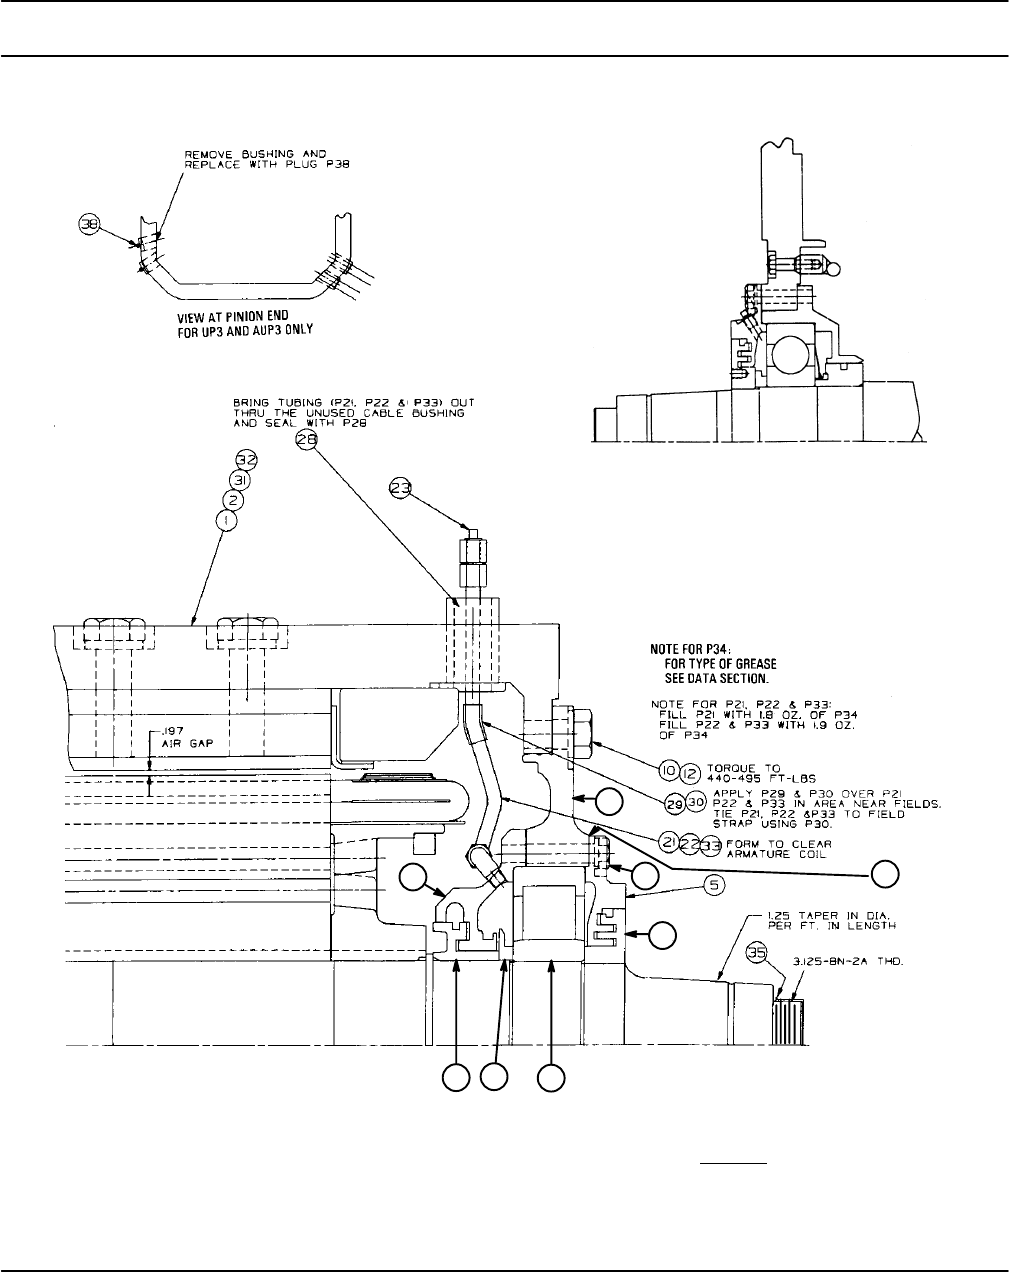
FIG. 15. LONGITUDINAL SECTION (41D732922 CHG. N). E–28621D.
56
57
52
42
43 44 45 46
VIEW OF COMMUTATOR END FOR
VIEW OF PINION END FOR ALL
MODELS EXCEPT UP1, UP2, AUP1
AND AUP2
THIS GREASE TUBE CONFIGURATION
ALL OTHER MODELS
ALL MODELS EXCEPT UP1, UP2, AUP1 AND AUP2
IS APPLICABLE TO MODELS UP1, UP2
AUP1 AND AUP2 ONLY. SEE VIEW ABOVE FOR
Vertical Drilling Motor, Type GE752, GEK–91584D
23
FIG. 15. LONGITUDINAL SECTION (41D732922 CHG. N). E–28621D.
55
54
53
47
51
50 49 48
MODELS
SEE TABLE 2, PAGE 20
VIEW OF COMMUTATOR END
FOR UP6 AND AUP5
NOTE: UP1 AND AUP1
MODELS HAVE 2 TUBE ASSEMBLIES,
UP2 AND AUP2 HAVE ONE.
GEK–91584D, Vertical Drilling Motor, Type GE752
24
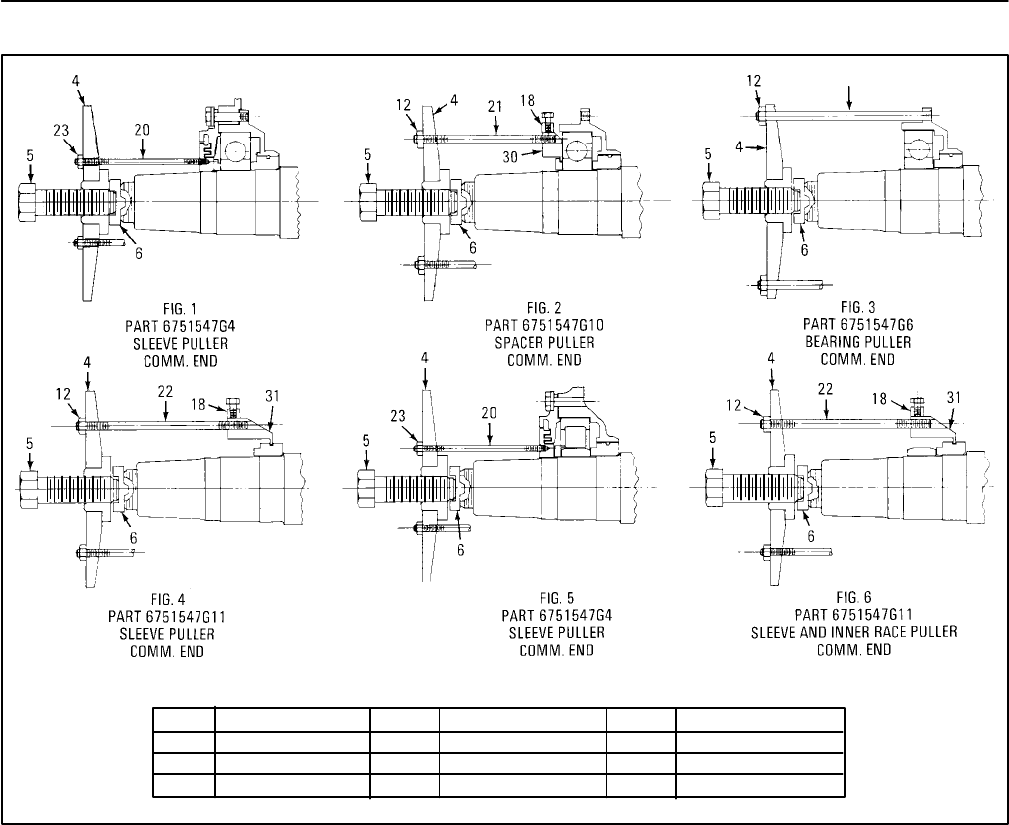
FIG. 15. LONGITUDINAL SECTION (41D732922 CHG. N). E–28621D.
REF. DESCRIPTION
1 COILED FRAME
2 COILED FRAME
3 ARMATURE AND BEARING ASSEMBLY
4 OUTER BEARING CAP
5 OUTER BEARING CAP
6 CARBON BRUSH
7 COVER (TOP INSPECTION)
8 COVER (BOTTOM INSPECTION)
9 COVER (HAND HOLE)
10 BOLT (FRAMEHEAD), N22P39032, 1.00–8 X 2.00
11 BOLT (FRAMEHEAD), N22P39036, 1.00–8 X 2.25
12 LOCKWASHER, N405P50P, 1.00 MEDIUM
13 BOLT (COVER) N22P29014B13, 0.50–13 X 0.88
14 LOCKWASHER, N405P45P, 0.50 MEDIUM
15 NAMEPLATE
16 ESCUTCHEON PIN, N532P1106, NO. 12 X 0.38
17 MONOGRAM
18 ESCUTCHEON PIN, N532P1108, NO. 12 X 0.50
19 TUBING
20 TUBING
21 TUBING (SEE NOTE)
22 TUBING (SEE NOTE)
23 PIPE PLUG, N5700P31, 1/4
24 SPACER, 1/4 EXST. PIPE 3/4 LG.
25 CLAMP
26 BOLT, N22P21020B13, 0.25–20 X 1.25
27 LOCKWASHER, N405P41P, 0.25 MEDIUM
28 SEALER, RTV 108
29 1ST TAPING, 12.00 (IT–1/2L), 41A239176P112
30 2ND TAPING, 24.00 (IT–1/2L), 41A239176P18
31 COILED FRAME
32 COILED FRAME
33 TUBING (SEE NOTE)
34 GREASE (SEE NOTE)
35 CAP
36 ARMATURE AND BEARING ASSEMBLY
37 BEARING ASSEMBLY (PE) (SEE NOTE)
38 PLUG
39 COVER (TOP INSPECTION)
40 COVER (BOTTOM INSPECTION)
41 COVER (HAND HOLE)
42 SLEEVE
43 SPACER
44 BALL BEARING
45 SLEEVE
46 BEARING HOUSING
47 SLEEVE
48 ROLLER BEARING
49 FLINGER
50 SLEEVE
51 BEARING HOUSING
52 BOLTS AND WASHERS
53 BOLTS AND WASHERS
54 GASKET
55 FRAMEHEAD
56 FRAMEHEAD
57 GASKET
Vertical Drilling Motor, Type GE752, GEK–91584D
25
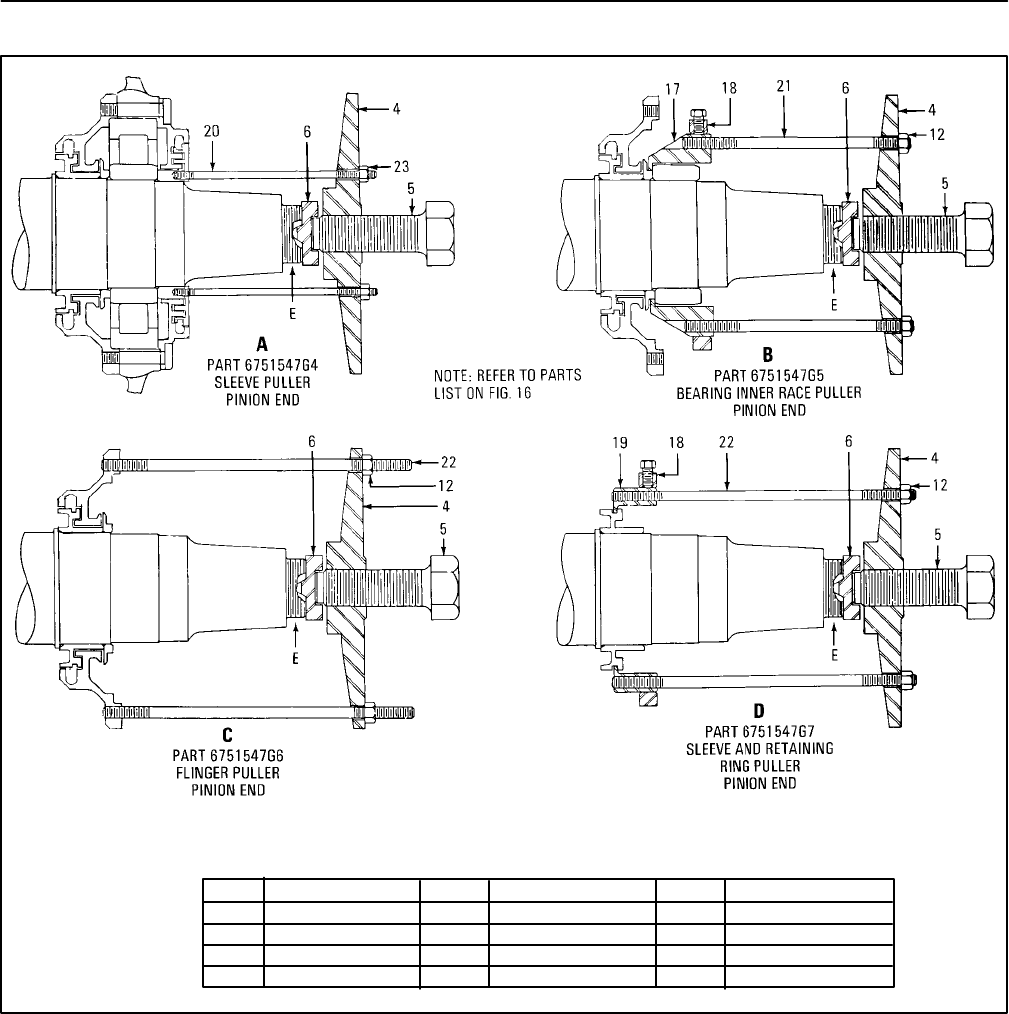
FIG. 16. PULLER TOOLS (41D731569 CHG. 0). E–14383C.
REF DESCRIPTION REF DESCRIPTION REF DESCRIPTION
4 CLAMP PLATE 12 NUT, 5/8–11 21 STUD
5 BOLT 18 RING 22 STUD
6 PRESSURE CAP 20 STUD 23 NUT, 7/16–14
8. Reach into the drive–end of the motor and dis-
connect grease tubes.
a. On UP1 and AUP1 models, disconnect two
grease tubes (21 and 22) from the inner bear-
ing cap (51). Pull these tubes out through
their hole in the frame. The sealing RTV in the
hole will separate with sufficient force.
b. On UP2 and AUP2 models, disconnect one
grease tube (21) from the inner bearing cap
(51). Pull this tube out through its hole in the
frame. The sealing RTV in the hole will sepa-
rate with sufficient force.
c. On all other models, only one grease tube is
used, connected between the inner bearing
cap and the framehead. Remove this tube.
9. Place three 0.125 in. spacers (wedge shaped)
around the armature in the air gap between the
armature and the fields to maintain a vertical atti-
tude of the armature and to prevent the armature
from contacting the fields.
10. Remove bolts (10) and lockwashers (12) from
the framehead (55). Insert bolts into the jackout
holes in the framehead.
11. Install a lifting bail, Fig. 14, onto the end of the
shaft.
12. Line up the hoist cable with the centerline of the
armature before engaging the hook in the lifting
bail on the end of the shaft. Engage the hook and
lift slightly. With sufficient strain on the hoist
cable to take the weight of the armature off the
GEK–91584D, Vertical Drilling Motor, Type GE752
26
REF DESCRIPTION REF DESCRIPTION REF DESCRIPTION
4 CLAMP PLATE 17 CLAMP 21 STUD
5 BOLT 18 RING 22 STUD
6 PRESSURE CAP 19 CLAMP 23 NUT, 7/16–14
12 NUT, 5/8–11 20 STUD
FIG. 17. PULLER TOOLS. E–18155A.
framehead, jack the drive–end framehead loose,
and lift the complete armature assembly out of
the frame. DO NOT DAMAGE THE COMMUTA-
TOR.
13. Move the armature to a suitable fixture for further
bearing disassembly or repair.
14. Install puller (Part 6751547G4) and pull sleeve
(47) from the shaft at the drive end. Heat may be
applied.
15. Remove bolts and lockwashers (53) from bear-
ing cap (5). Remove the bearing cap and gasket
(54).

Vertical Drilling Motor, Type GE752, GEK–91584D
27
16. Remove the framehead. It will come with the
bearing outer race and bearing rollers.
17. Pull the inner bearing race off the drive end of the
shaft with puller (Part 6751547G5).
18. Remove flinger (49) and inner bearing cap (51)
with puller (Part 6751547G6) by inserting the
four puller bolts into tapped holes in the inner
bearing cap.
19. If necessary, remove inner sleeve (50) with puller
(Part 6751547G7).
20. Press the outer bearing race and rollers from the
framehead with an arbor press.
NOTE: Before pressing the drive–end outer
bearing race out of the framehead, observe and
record the number on the face of the race which
is opposite the arrow on framehead. After re-
moval, mark the date (with electric pencil) un-
der this number to indicate that this position
has been used. Reassemble the bearing with
another number opposite the arrow. If the bear-
ing has not been previously marked, etch Nos.
1, 2, 3 and 4 (spaced 90 degrees apart) on the
face of race with an electric pencil. Locate No. 1
opposite the arrow on the framehead and mark
it with the date.
21. Install puller (Part 6751547G10) and pull spacer
(43) from the commutator end of shaft.
22. Install puller (Part 6751547G6) and pull bearing
housing (46) with bearing (44) from the shaft.
23. Press ball bearing (44) from bearing housing
(46) using an arbor press.
24. If applied, remove the nilos ring (4), Fig. 39, from
the bearing and discard.
25. If applied, remove the seal ring (5), Fig. 39, from
the sleeve and discard.
26. Install puller (Part 6751547G11) and pull sleeve
(45) from the shaft.
27. If it is necessary to remove the commutator end
framehead (56), place the frame commutator
end up and remove bolts (11) and lockwashers
(12). Use bolts in the framehead jackout holes
to break the fit and remove the framehead.
Armature Removal From Frame
CAUTION: When lifting the armature out of the
frame, proceed slowly so that no damage will
occur to the armature end–windings, bear-
ings, bearing fits or the commutator.
Models US1, AUT
Before turning the machine from horizontal to verti-
cal (or vice–versa), attach the armature locking ar-
rangement to prevent the armature from moving axially.
Remove the armature locking arrangement before op-
erating the machine.
See Table 2 to determine the correct armature lock-
ing arrangement drawing.
Refer to the longitudinal drawing, Fig. 18, and puller
tool drawings, Figs. 16 and 17.
1. Clean the outside of the frame, using com-
pressed air, a steam–jenny or cleaning solvents,
to remove accumulated dirt.
2. Remove the coupling hub from the shaft, if not al-
ready removed.
3. Remove the commutator covers. Disconnect
and remove all brushes, and wrap heavy paper
around the commutator for protection during
handling.
4. Install puller tool (Part 6751547G4) and pull the
sleeve (6) from the commutator end of the shaft.
5. Remove bolts (10) which hold the bearing cap
and the bearing housing to the commutator–end
framehead. Remove the bearing cap (8) and
gasket (11).
6. Turn the machine on end on a stand, commuta-
tor end down, and level it so that the armature
can be lifted vertically out of the frame without
damaging the bearings, commutator or brush-
holders.
7. Screw three guide pins into the commutator–end
bearing housing (3) to help guide the armature
out of the frame.
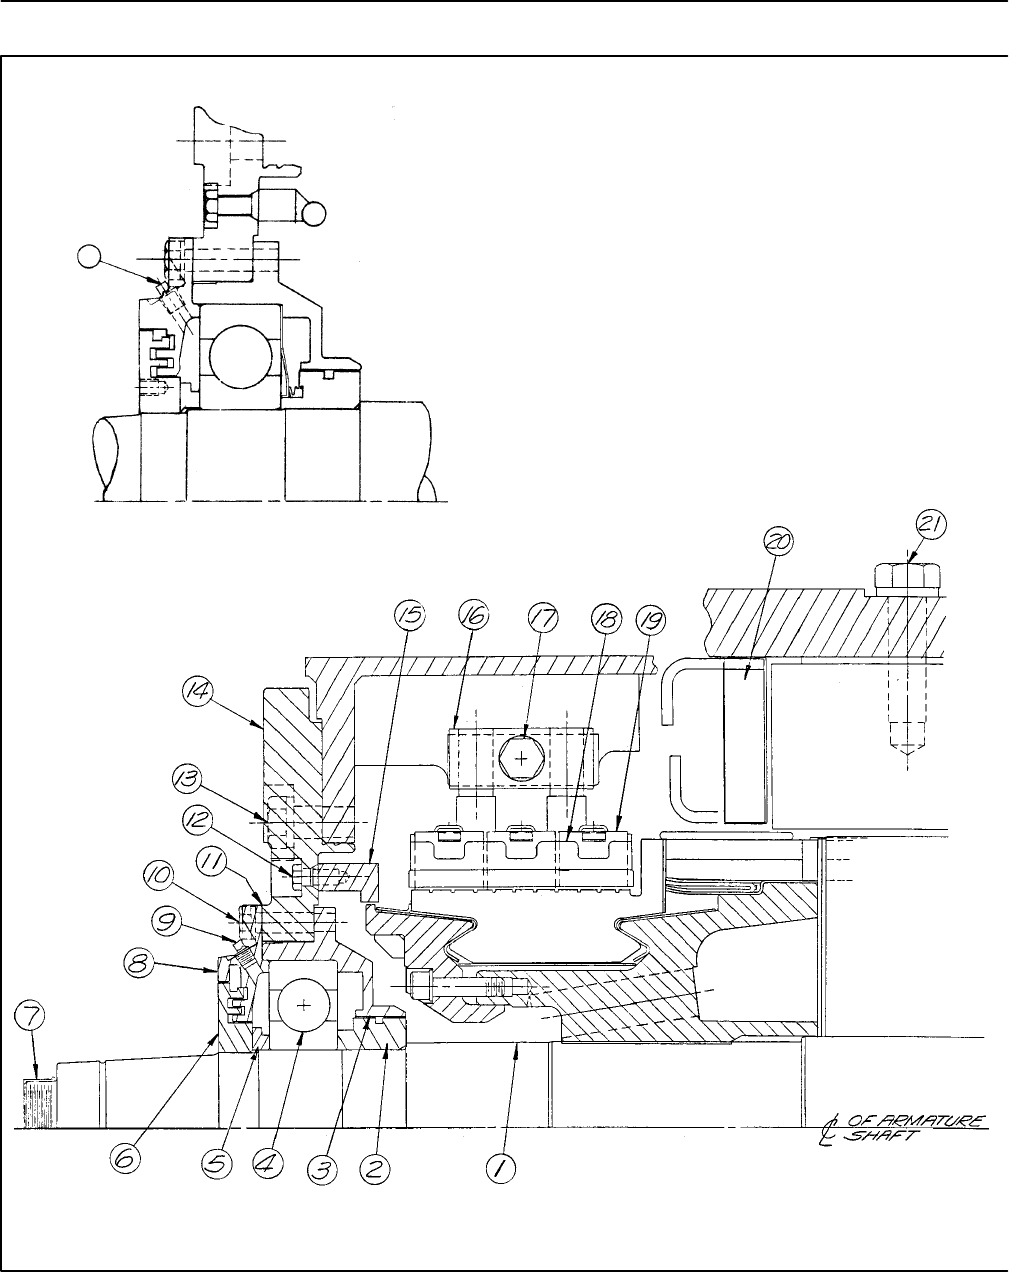
GEK–91584D, Vertical Drilling Motor, Type GE752
28
FIG. 18. LONGITUDINAL SECTION (41D735357, CHG. A). E–37949B
VIEW OF COMMUTATOR END
9
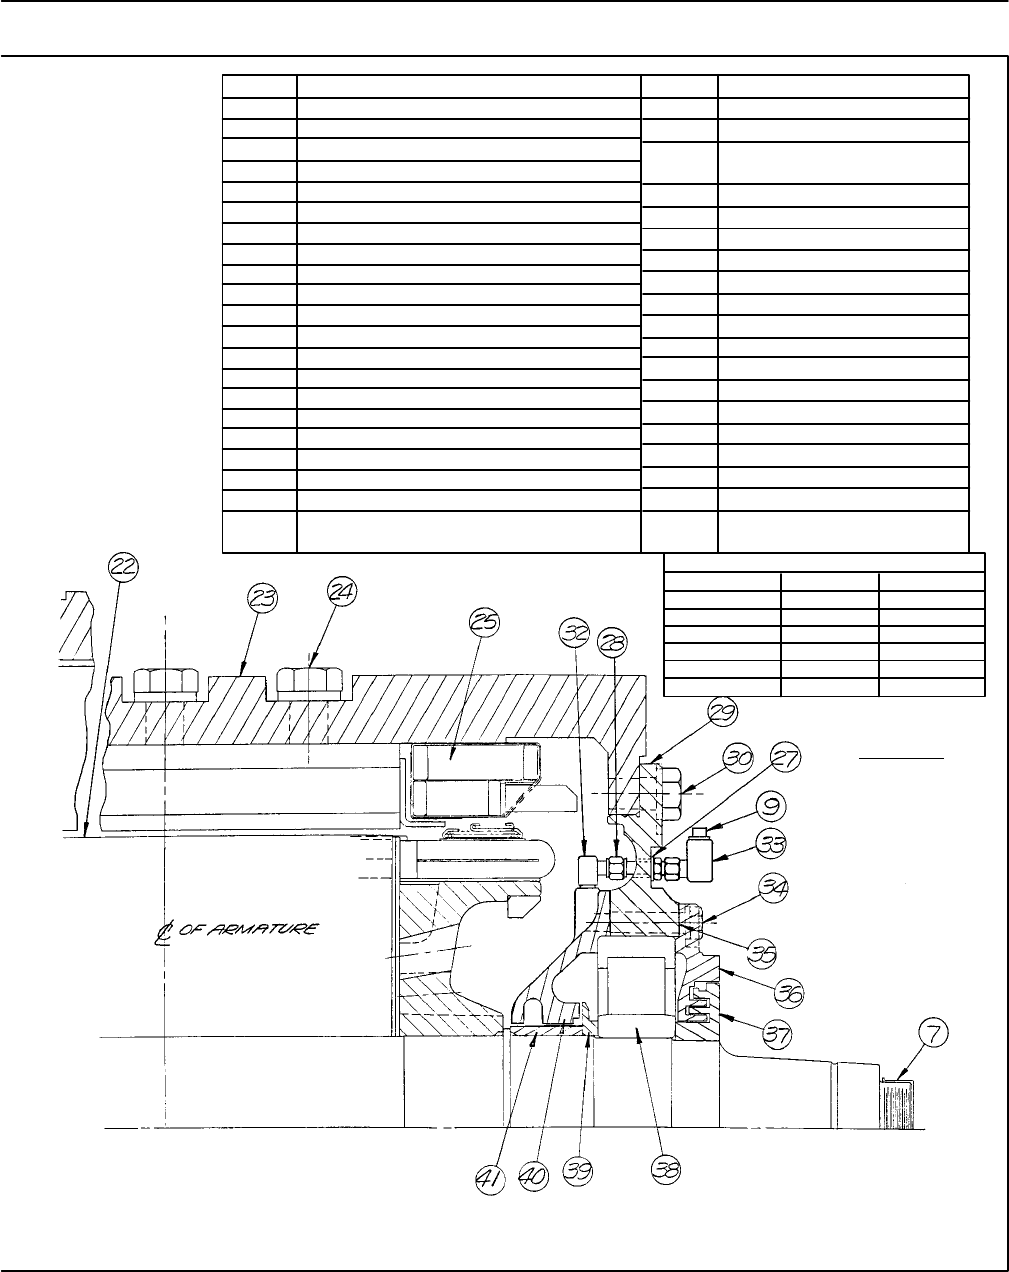
Vertical Drilling Motor, Type GE752, GEK–91584D
29
TORQUE TABLE
PART NO. SIZE LBS. FT.
1 .50–13 55–60
10,34 .625–11 110–120
17 .875–9 240–260
13,30 1.00–8 440–495
24 1.25–7 900–995
21 1.25–12 435–483
REF. DESCRIPTION
1 SHAFT
2 SLEEVE
3 BEARING HOUSING
4 BALL BEARING
5 SPACER
6 SLEEVE
7 CAP
8 BEARING CAP (OUTER)
9 PIPE PLUG
10 BOLT AND LOCKWASHER
11 GASKET
12 BOLT
13 BOLT AND LOCKWASHER
14 FRAME HEAD
15 FLASH RING
16 BRUSH HOLDER CLAMP
17 BOLT AND LOCKWASHER
18 BRUSH HOLDER
19 CARBON BRUSH
20 COMMUTATING FIELD COIL
21 COMMUTATING POLE BOLT AND
HARDENED WASHER
REF. DESCRIPTION
22 ARMATURE
23 MAGNET FRAME
24 EXCITING POLE BOLT AND
HARDENED WASHER
25 EXCITING FIELD COIL
27 WASHER
28 FITTING
29 FRAME HEAD
30 BOLT AND LOCKWASHER
31 GASKET
32 FITTING
33 FITTING
34 BOLT AND LOCKWASHER
35 GASKET
36 BEARING CAP (OUTER)
37 SLEEVE
38 ROLLER BEARING
39 FLINGER
40 BEARING CAP (INNER)
41 SLEEVE
FIG. 18. LONGITUDINAL SECTION (41D735357, CHG. A). E–37949B.
MODELS
SEE TABLE 2

GEK–91584D, Vertical Drilling Motor, Type GE752
30
8. Screw a lifting bail, Fig. 14, on the drive end of the
shaft.
9. Remove drive–end framehead bolts (30) and in-
sert three jack screws in the threaded holes pro-
vided in the framehead.
10. Line up the hoist cable with the centerline of the
armature before engaging the hook in the lifting
bail on the end of the shaft. Engage the hook and
lift slightly. With sufficient strain on the hoist
cable to take the weight of the armature off the
framehead, jack the drive–end framehead loose,
and lift the complete armature assembly out of
the frame. DO NOT DAMAGE THE COMMUTA-
TOR.
CAUTION: Special precautions should be taken to
avoid damage to the armature end–windings,
bearings or bearing fits, and the commutator
when lifting the armature in the vertical position
or turning the armature to a horizontal position.
11. Place the armature horizontally in an armature
saddle for bearing disassembly.
12. At the drive end, remove the lubricating tube as-
sembly (9, 33, 32 and 28) from the framehead.
13. Using puller tool (Part 6751547G4), pull the out-
er sleeve (37) from the drive end of the shaft. The
sleeve has tapped holes for applying the puller.
Heat may be applied.
14. Remove bolts (34), and then remove outer bear-
ing cap (36) and gasket (35).
15. Slide framehead (29) off the shaft together with
the outer race and rollers of bearing (38). The in-
ner race will remain on the shaft.
16. Pull the inner bearing race off the shaft with puller
(Part 6751547G5).
17. Remove flinger (39) and inner bearing cap (40)
with puller (Part 6751547G6) by inserting the
four puller bolts into the tapped holes in inner
bearing cap (40).
18. Press the outer bearing race and rollers from the
framehead with an arbor press.
NOTE: Before pressing the drive–end outer
bearing race out of the framehead, observe and
record the number on the face of the race which
is opposite the arrow on the framehead. After
removal, mark the date (with electric pencil) un-
der this number to indicate that this position
has been used. Reassemble the bearing with
another number opposite the arrow. If the bear-
ing has not been previously marked, etch Nos.
1, 2, 3 and 4 (spaced 90 degrees apart) on the
face of race with an electric pencil. Locate No. 1
opposite the arrow on the framehead and mark
it with the date.
19. Install puller tool (Part 6751547G10) and pull
spacer (5) from the commutator end of the shaft.
20. Install puller tool (Part 6751547G6) and pull
bearing (4) and bearing housing (3) from the
commutator end of the shaft.
21. Press the bearing from the framehead with an
arbor press.
22. If applied, remove the nilos ring (4), Fig. 39, from
the bearing and discard.
23. If applied, remove the seal ring (5) Fig. 39, from
the sleeve and discard.
24. Install puller tool (Part 6751547G11) and pull
sleeve (2) from the commutator end of the shaft.
25. If necessary to remove the commutator
framehead (14), turn the frame commutator end
up and remove bolts and lockwashers (13). Use
bolts in the framehead jack–out holes to break
the fit and remove.
CLEANING
The two recommended methods for cleaning are
steam cleaning and vapor degreasing.
CAUTION: Do not use caustic soda solution
on the armature or coiled frame.
Steam Cleaning
(Recommended for both insulated and metal parts)
1. Use steam in combination with a commercial
non–caustic cleaner.
Vertical Drilling Motor, Type GE752, GEK–91584D
31
2. Suspend the part in a position accessible from all
directions to a direct flow of steam from the hose.
3. Rinse all residue from parts with a mixture of
clean steam and water.
4. Bake insulated parts for at least 8 hours at 150
C (302 F) to remove all moisture.
Vapor Degreasing
(Recommended for metal parts)
1. Bring the cleaning solution to a boil, and allow the
vapor line in the tank to rise to the condenser
coils at the top of the tank.
2. Keep the vaporized cleaning solution at about
120 C (248 F).
3. Lower the part to be cleaned into the vapor–la-
den atmosphere, so the vapor will condense on
the part.
4. To speed the removal of heavy dirt accumula-
tions, spray hot solution directly from the tank
onto the part being cleaned. The temperature of
the solution must be kept below its boiling point.
5. Remove the cleaned part from the degreaser.
Drain and cool the part.
Anti–Friction Bearings/Shaft
Tapers/Bearing Fits
Use a cleaning solution that leaves an oil film to pro-
tect finished surfaces from rust. Kerosene, petroleum
spirits or other petroleum–base cleaners provide limited
protection for these surfaces.
INSPECTION AND TEST OF
DISASSEMBLED MOTOR
BEARING INSPECTION
1. Clean the bearings. See Cleaning section.
2. Inspect for broken or cracked races, broken or
cracked rollers and balls, broken, cracked or dis-
torted retainers, scored, pitted, scratched or
chipped races, and for indication of excessive
wear on rollers and balls. Replace the bearing if
any of these conditions is found.
3. Look for evidence of smearing caused by inade-
quate lubrication, and corrosion pitting (usually
at roller spacing) caused by moisture or other
corrosive agent. Replace the bearing if any of
these conditions are found.
4. Inspect bearing outer races for indentations
caused by dirt or foreign material having gone
through the bearing. If the indentations are small
and few in quantity, the bearing can be used. If
the indentations are large and numerous, this
may be an indication the rollers or cone are start-
ing to spall out. Examine the rollers and cone
carefully for spalled areas. Replace the bearings
if spalled areas are found.
5. Dip good bearing parts in a light mineral oil
(SAE–10) heated to 90 C (194 F) to avoid cor-
rosion before reassembly.
6. If a bearing will not be mounted immediately,
wrap it in an oil–proof paper.
CAUTION: Do not interchange bearing parts of
different manufacture or mix new and used
bearing parts.
Perform the following inspection and tests to deter-
mine the condition of the armature, coiled motor frame
and brushholders.
After the inspection and test procedures have been
completed and all defects or damage noted, refer to the
REPAIR section for the correct repair procedure.
ARMATURE
Handle the armature carefully during overhaul oper-
ations to avoid damage to the core, banding, end turns,
shaft fits and commutator. Support the armature in a
saddle to protect the commutator and to coil the ends.
Keep the commutator covered with heavy paper.
Armature Test
1. With the armature at room temperature, 25 C
(77 F), use a 500 or 1000 vdc megohmmeter
and make a dielectric test of the armature insula-

GEK–91584D, Vertical Drilling Motor, Type GE752
32
tion. A reading of one megohm or higher should
be obtained. If necessary, perform additional
cleaning and baking operations to obtain this val-
ue before proceeding.
NOTE: If additional cleaning and baking opera-
tions do not increase the resistance value of the
insulation, it may be necessary to replace the
creepage band and rewind the armature.
2. Measure and record armature resistance. See
the DATA section for values.
3. If there are no armature coils grounded, perform
a bar–to–bar comparison test to check for open
or short–circuited armature coils.
a. Pass a regulated d–c current through the ar-
mature coils.
b. Read the voltage drop between the commu-
tator segments with a millivoltmeter. If the
reading varies more than plus or minus 5%, a
defective or short–circuited coil is indicated. If
the armature fails the bar–to–bar test, the ar-
mature must be rewound.
If the armature will not be rewound, proceed
to inspect the following items.
Insulation
Inspect the insulation of armature coils for cracks,
physical damage, burns and deterioration. If minor re-
pairs are required, refer to Fig. 19 for insulation details.
Glass Band, Commutator End
Inspect the glass bands for split, frayed or loose con-
dition.
Wire Band, Drive End
Inspect the wire band for physical damage, loose tie
clips or broken wire.
Creepage Band
Inspect the surface of the Teflon creepage band for
possible flashover damage. Tap the band lightly and
check for movement of the band to determine if loose. If
the band is loose or has deep burns, replace it. See RE-
PAIR section for instructions.
COMMUTATOR
Check the commutator for threading, pitting, groov-
ing, burns, flat spots, high bars and copper drag.
Check the commutator to make sure that it is not
out–of–round. See the DATA section for concentricity
limits.
Resurfacing
For the resurfacing procedure for a commutator, see
REPAIR, Armature section.
Refer to the DATA section for the minimum permissi-
ble commutator diameter dimension and check the di-
ameter of the commutator.
NOTE: If the brush surface diameter will be less
than the minimum permissible diameter after
resurfacing operations are performed, the com-
mutator must be replaced.
Tightening
If the commutator is loose (has high bars), see the
“REPAIR, Commutator Tightening” section for instruc-
tions to tighten the commutator.
ARMATURE SHAFT INSPECTION
Armature shaft bearing fit dimensions can be
checked and compared to armature shaft drawings pro-
vided in Fig. 20. If the bearing fit dimensions are not
within stated tolerances the shaft must be replaced or
repaired. Refer to Table 2 to determine the correct shaft
drawing for the machine being repaired.
MOTOR FRAME
1. Check the connection strap insulation for dam-
age, signs or burning, cracks or discoloration.
2. Check the insulation on the coils for damage,
signs of burning, cracks or discoloration.
3. Check the lead cables for damage, overheating
and signs of deterioration.
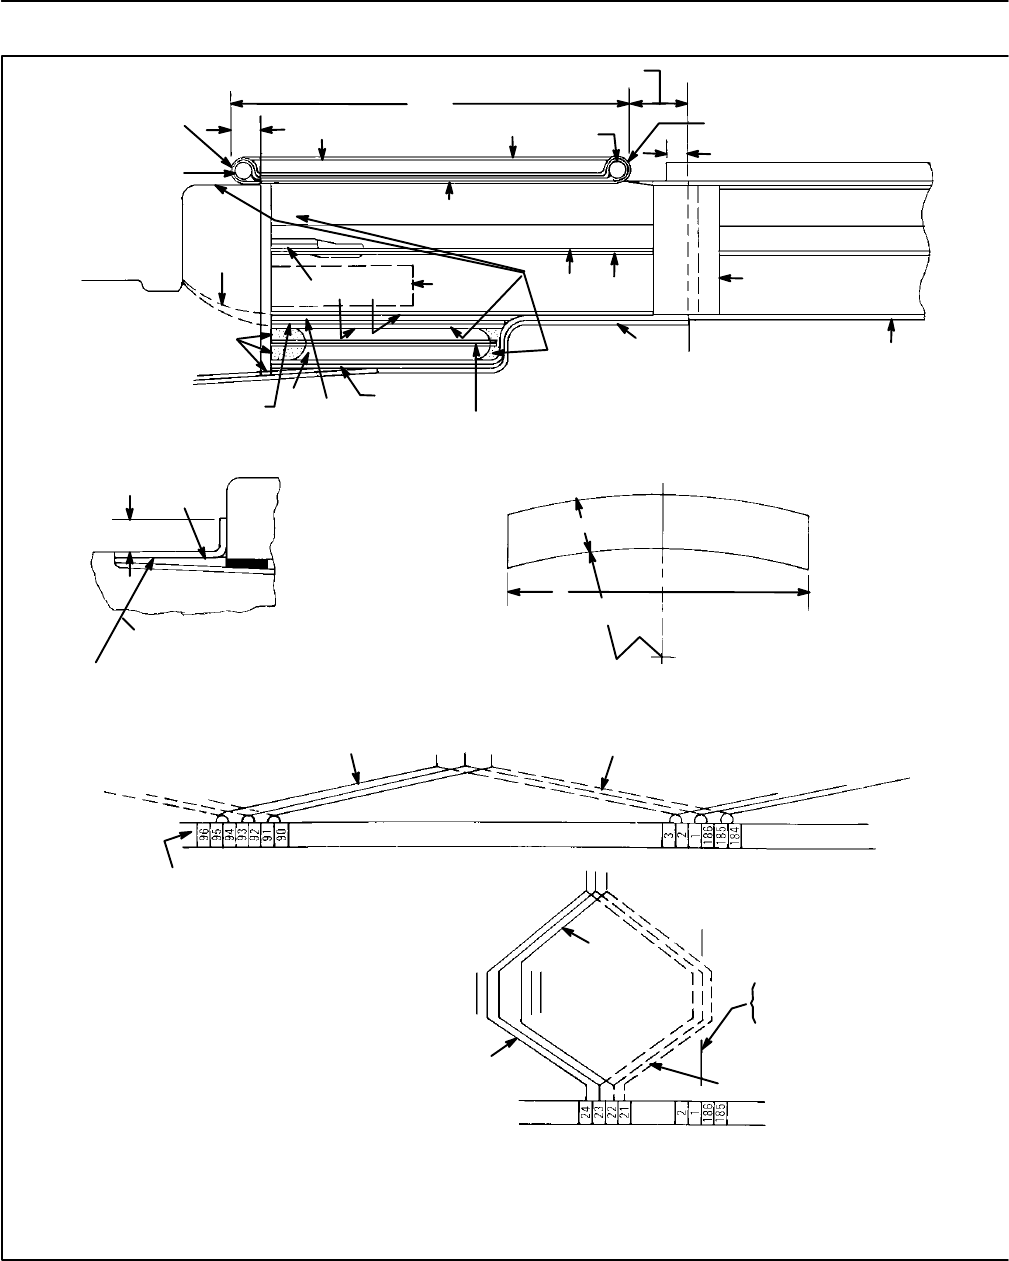
Vertical Drilling Motor, Type GE752, GEK–91584D
33
49
48,77
37 61 60,78 49
17,
71
32
70 867 9,65
6,
66
32 352,
76
11
13
3329
7,
69
5,
68
16
1
ASSEMBLE AROUND
BUTTED JOINT OF PT48
ASSEMBLE IN LINE
WITH NO. 1 SLOT
3/4 LAPPED
P70 TO BE APPLIED
OVER P68 TO LEVEL
THE SURFACE
28 ACTIVE TURNS AT
400 50 LB. TENSION
OVER TOP OF EQUALIZERS
EXTEND A THIN COATING
OF PT32 OVER TOP OF
EQUALIZERS BOTH DECKS
1/4
4–1/4
3/4 REF.
+
–
ASSEMBLE AROUND
BUTTED JOINT OF PT48
1/4
NOTE FOR P54:
MATL: 41B537080P1
ALT. MATL: 41A230144P3
NOTE FOR P57:
MATL: 41A230144P40
3/8
REF.
53
57
54
3
5/8
11–1/4 R. 29
TOP COILS BOTTOM COILS
EQUALIZER CONNECTIONS
COMM. SEGMENTS
TO #183
TO #185
TO #1
TO #96 TO #94
TO #92
NUMBERED SEGMENTS ARE FOR
PURPOSE OF INDICATING SPAN OF
EQUALIZER CONNECTIONS AND DO
NOT NECESSARILY CORRESPOND
TO NUMBERED SEGMENTS IN
MAIN CONNECTION DIAGRAM.
30 MAIN WINDING
CONNECTIONS
C
LSLOT #1
ON MICAC
L
SLOT #16
TOP COILS
SLOT #15
ORPHAN
COIL
SLOT #1
BOTTOM COILS
NOTE FOR P62:
APPLY TO SIDES OF CORE SLOT
ON PINION END ONLY.
INSTALL P11.
NOTE FOR P47:
ENCLOSE ONE IDENTIFICATION C–SIZE
PRINT OF 41D730423 IN EACH
CARTON OF SUPPLY INSUL.
NOTE FOR P32:
TAPE OVER RISERS WITH 3/4 WIDE A2L14B GLASS TAPE
LEAVING 1/4 IN. OF RISERS EXPOSED ON THE CORE END. FILL
BETWEEN ARMATURE LEADS BEHIND RISERS AND OVER
BACK 1/4 IN. OF RISER. WRAP OVER PUTTY WITH A16B39B
MYLAR TAPE AND BAKE AS PART OF THE PREHEAT PERIOD
FOR INSTALLING P37.
NOTE FOR P37 (C.E. BINDING):
APPLY THE P37 PERMANET CE BINDING (COLD TAPE TO HOT
125–135 C ARMATURE)
APPLY 77 ACTIVE TURNS OF P37 AT 500 25 LB. TENSION.
+
–
FIG. 19 ARMATURE INSULATION (41D731545 CHG. F). E–18156A.

GEK–91584D, Vertical Drilling Motor, Type GE752
34
APPLY 35 ACTIVE TURNS OF P38 AT 600 20 LB. TENSION
12 18,19,20,75
11
62
1
26
14 15
355
12
4
27
39
38 SEE NOTE
2–5/8 +1/8
–0
25
4–7/8 MAX.
5 REQ’D.
1–1/16 1/16
+
–
39
PT26 TO BE APPLIED
OVER COILS TO LEVEL
THE SURFACE
SATURATE P2 THOROUGHLY
WITH P56
FIRST TURN
2ND DECK
LAST TURN
3RD DECK
FIRST TURN
(LOWER DECK)
LAST TURN
(LOWER DECK)
A
B
A
B
TOP BAND
28
SECTION A–A
LAST TURN
3RD DECK 41
27 SECTION B–B
2ND AND 3RD DECK
CONTINUOUS WIRE
28
NOTE FOR TEMPORARY BINDING:
APPLY TEMPORARY BINDING. 6 TOTAL PASSES WITH 0.102
DIAM. B4Y19B AT 800 LB. TENSION. BAKE IN A 150 C OVEN
FOR 4 HOURS.
NOTE FOR P38 (P.E. BINDING):
APPLY THE P38 PERMANET BINDING.
APPLY 37 ACTIVE TURNS OF P38 AT 650 20 LB. TENSION
AS THE 1ST DECK.
+
–
AS THE 2ND DECK.
APPLY 34 ACTIVE TURNS OF P38 AT 550 20 LB. TENSION
AS THE 3RD DECK
+
–+
–
THE 2ND AND 3RD DECK MUST BE A CONTINUOUS BAND.
REF. DESCRIPTION REF. DESCRIPTION
1 HEAD INSUL. P.E. 40 BINDING CLIP
2 HEAD INSUL. P.E. 41 TIE CLIP
3 FILLER 42 METHOD OF FASTENING
4 ARMATURE COIL BINDING WIRE (P.E.)
5 INSUL. OVER EQUALIZERS 43 METHOD OF SWAGING
6 INSUL. IN EQUALIZER LOOP COMM. RISERS
7 INSUL. OVER EQUALIZER 44 CORE INSUL.
8 EQUALIZER 45 WINDING INSUL.
9 HEAD INSUL. C E 46 BINDING AND BINDING INSUL.
10 SLOT STRIP BOT 47 IDENTIFICATION PRINT
11 U PIECE AT SLOT ENDS 48 BINDING BASE
12 SLOT WEDGE 49 JOINT INSUL.
13 WINDING INSUL. C E 50 PAD
14 INSUL. IN LOOP P.E. 51 SLOT WEDGE
15 INSUL. IN LOOP 52 SLOT STRIP BOTTOM
16 FILLER STRIP 53 TAPE
17 FILLER 54 TEFLON BAND
18 SLOT STRIP (UNDER WEDGE) 55 TEFLON GLASS TAPE
19 FILLER STRIP 56 VARNISH
20 FILLER STRIP 57 TEFLON BAND
21 SLOT STRIP CENTER 58 EQUALIZER
22 RADIUS SPACER C.E. TOP 59 FILLER FOR COMM.
AND BOTTOM STRING BAND
23 BINDER OVER COMM. MICA 60 BINDING BASE
24 SEAL OVER COMM. 61 MYLAR TAPE
MICA AND STRING BAND 62 CEMENT
25 BINDING INSUL. P.E. 63 CEMENT
26 FILLER P.E. 64 CORE INSUL.
27 BINDING BASE 65 HEAD INSUL.
28 TIE CLIP 66 INSUL. IN EQUALIZER LOOP
29 RADIUS SPACER (C.E. BOTT.) 67 BAND FOR EQUALIZERS
30 DIAGRAM 68 INSUL. OVER EQUALIZERS
31 SHIM (IN RISER SLOT) 69 INSUL. OVER EQUALIZERS
32 FILLER PUTTY 70 FILLER
33 WINDING INSUL. C.E. 71 FILLER
34 FILLER FOR COMM. 72 WINDING INSULATION
STRING BAND 73 ASBESTOS ROPE
35 FILLER FOR COMM. 74 ARMATURE COIL
STRING BAND 75 FILLER STRIP
36 BINDING BASE 76 SLOT STRIP BOTTOM
37 BANDING 77 BINDING BASE
38 BINDING WIRE 78 BINDING BASE
39 BINDING CLIP P.E.
FIG. 19. ARMATURE INSULATION (41D731545 CHG. F). E–18156A.
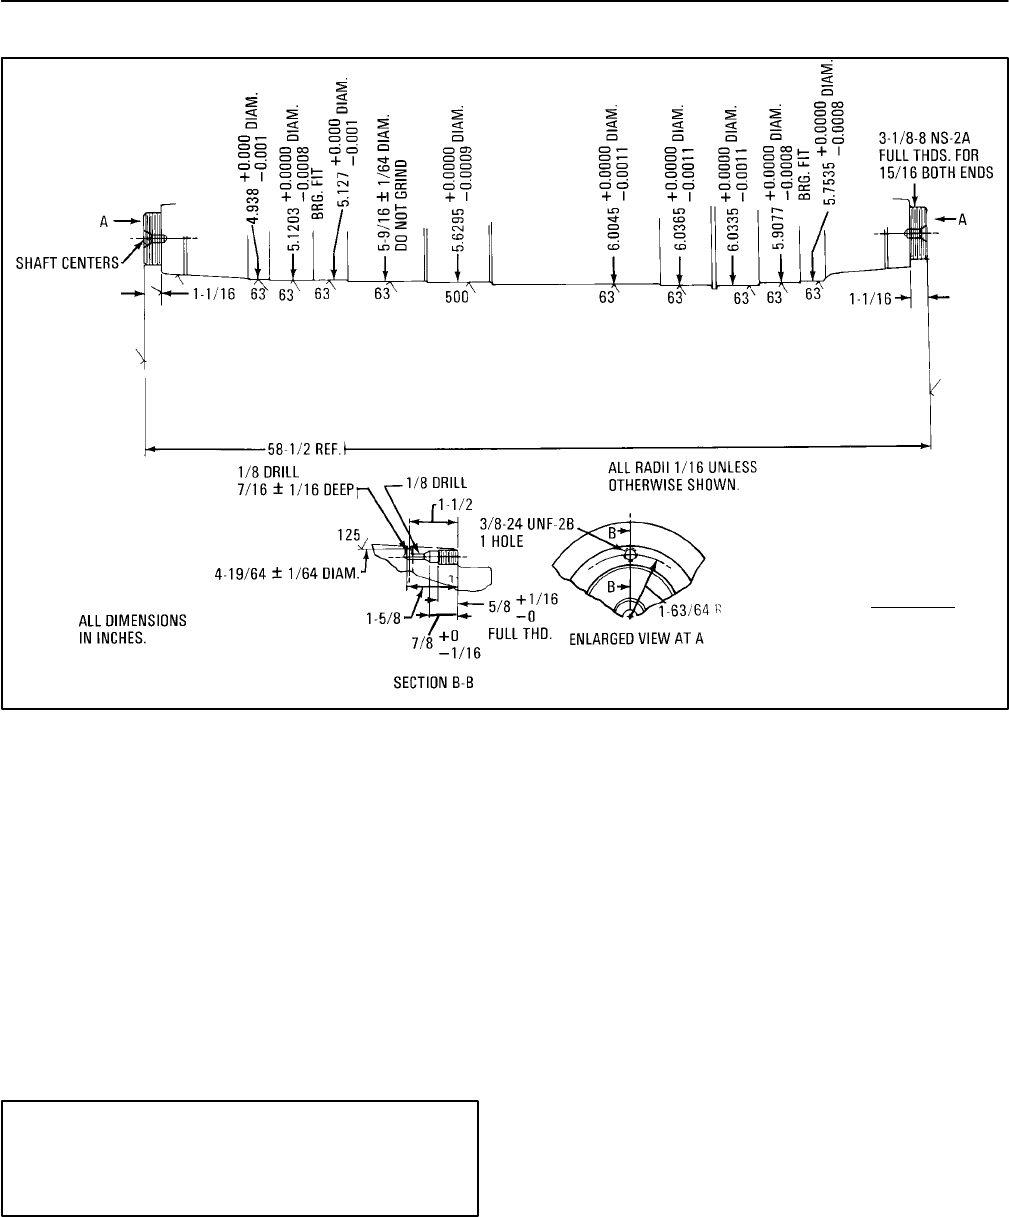
Vertical Drilling Motor, Type GE752, GEK–91584D
35
FIG. 20. ARMATURE SHAFT (334B336 CHG. D). E–39091A.
MODELS
SEE TABLE 2
4. Conduct a 500 volt megohmmeter test on the
coils. A reading of 20 megohms or more is ac-
ceptable.
5. See Figs. 21 thru 24 and measure and record
commutating and exciting–coil resistance. Re-
fer to Table 2 to determine the correct connection
diagram for the machine being repaired.
6. High–potential test the field coils to ground.
WARNING: Electric shock can cause serious
injury or death. Strict safety precautions must
be taken and observed by personnel conduct-
ing a high–potential test.
Apply a high–potential test of 2000 volts, 60 Hz for
one minute.
BRUSHHOLDERS
1. Inspect the brushholder for flashover damage,
cracks and burned or pitted areas.
2. Check the brush springs to be sure they move
freely and do not bind.
3. Insert a new brush in the carbonway and move it
up and down in the carbonway to be sure it
moves freely.
REPAIR
LUBRICATION OF BOLTS
The threads and washer faces of bolts and nuts
should be lubricated to obtain maximum clamping force
(at the nominal or at a recommended torque value)
when bolts and nuts are installed at reassembly. Lubri-
cate all bolts.
Use a High Pressure Lubricant such as; graphite in
oil (1 part graphite to 5 parts machine oil by volume), Lu-
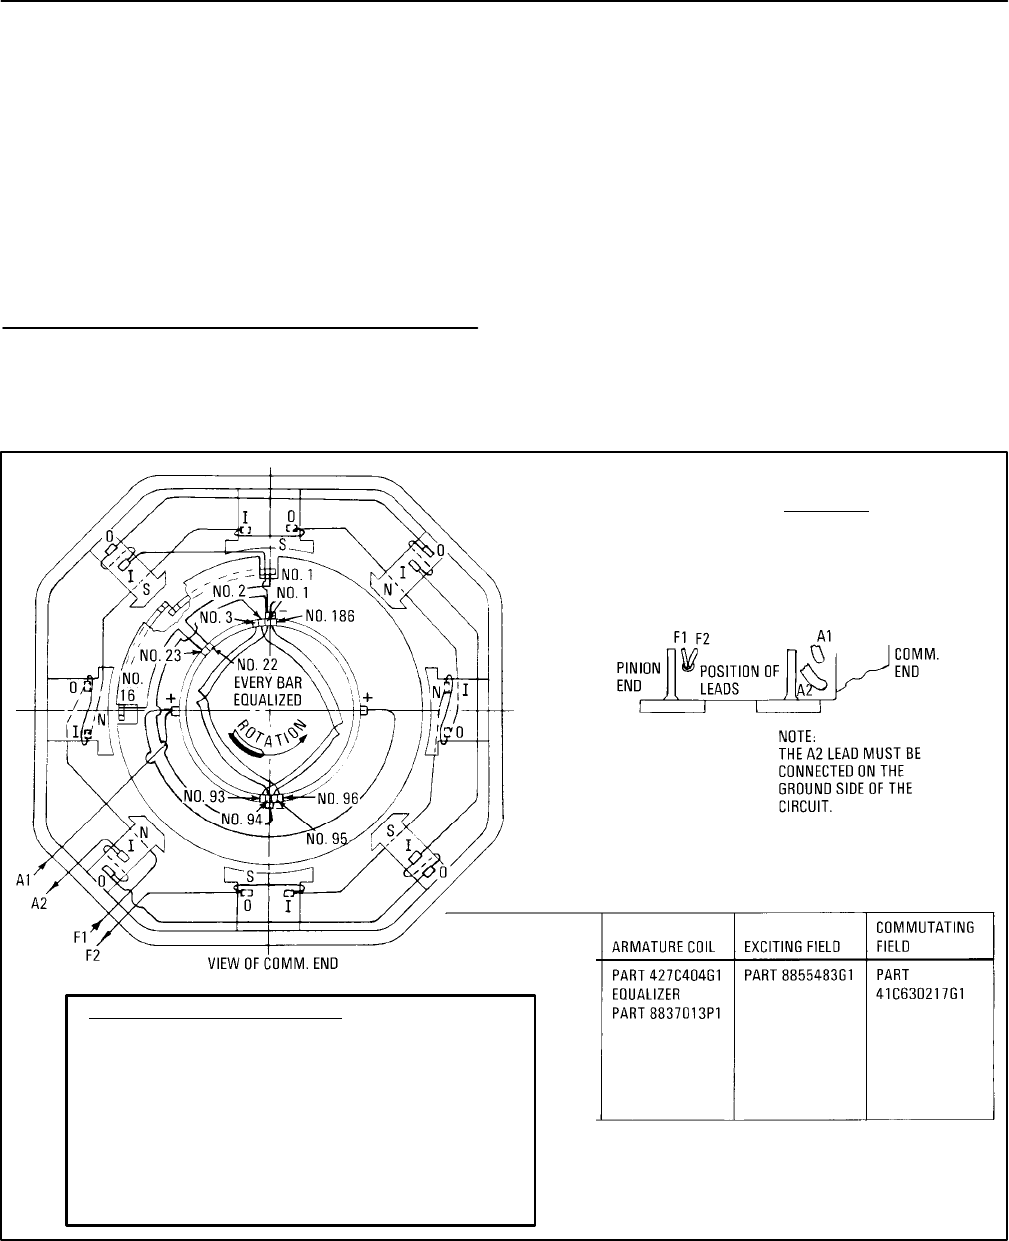
GEK–91584D, Vertical Drilling Motor, Type GE752
36
briplate* (Part 147X1614), Molykote** (Part 147X1143),
Dag*** (Part 147X1613), or anti–seize compound (Part
147X1640) to lubricate bolts.
NOTE: Threads and washer–contact surfaces
must be clean before lubricant is applied.
Where specific torque values are not listed in these
instructions, refer to Table 3 for standard bolt torque val-
ues of lubricated bolts.
*Product of Fisk Bros. Refining Co., Newark, N.J.
**Registered trademark of Dow Corning Corp.
***Acheson Colloids Co., Port Huron, Mich.
BRUSHHOLDER SLEEVE REPLACEMENT
1. Remove the damaged Teflon sleeve from the
brushholder stud. To remove sleeve, heat the
brushholder in an oven to 150 C (302 F) then
peel or cut sleeve from the stud.
2. Thoroughly clean the surface of the stud and re-
move any carbon or dirt build–up.
3. Heat a new Teflon sleeve in a 150 C (302 F)
oven for 15 minutes.
4. Using adequate hand protection, immediately
assemble the hot sleeve on the stud.
FIG. 21. CONNECTION DIAGRAM (493A210 CHG. 4). E–39092B.
UP1
UP2
UP3
MODELS
SEE TABLE 2
TO CHANGE MOTOR DIRECTION:
TO RUN CCW VIEWED FROM COMMUTATOR END,
CONNECT: F1 TO POSITIVE
F2 TO NEGATIVE
A1 TO POSITIVE
A2 TO NEGATIVE
TO RUN CW VIEWED FROM COMMUTATOR END,
CONNECT: F1 TO NEGATIVE
F2 TO POSITIVE
A1 TO POSITIVE
A2 TO NEGATIVE
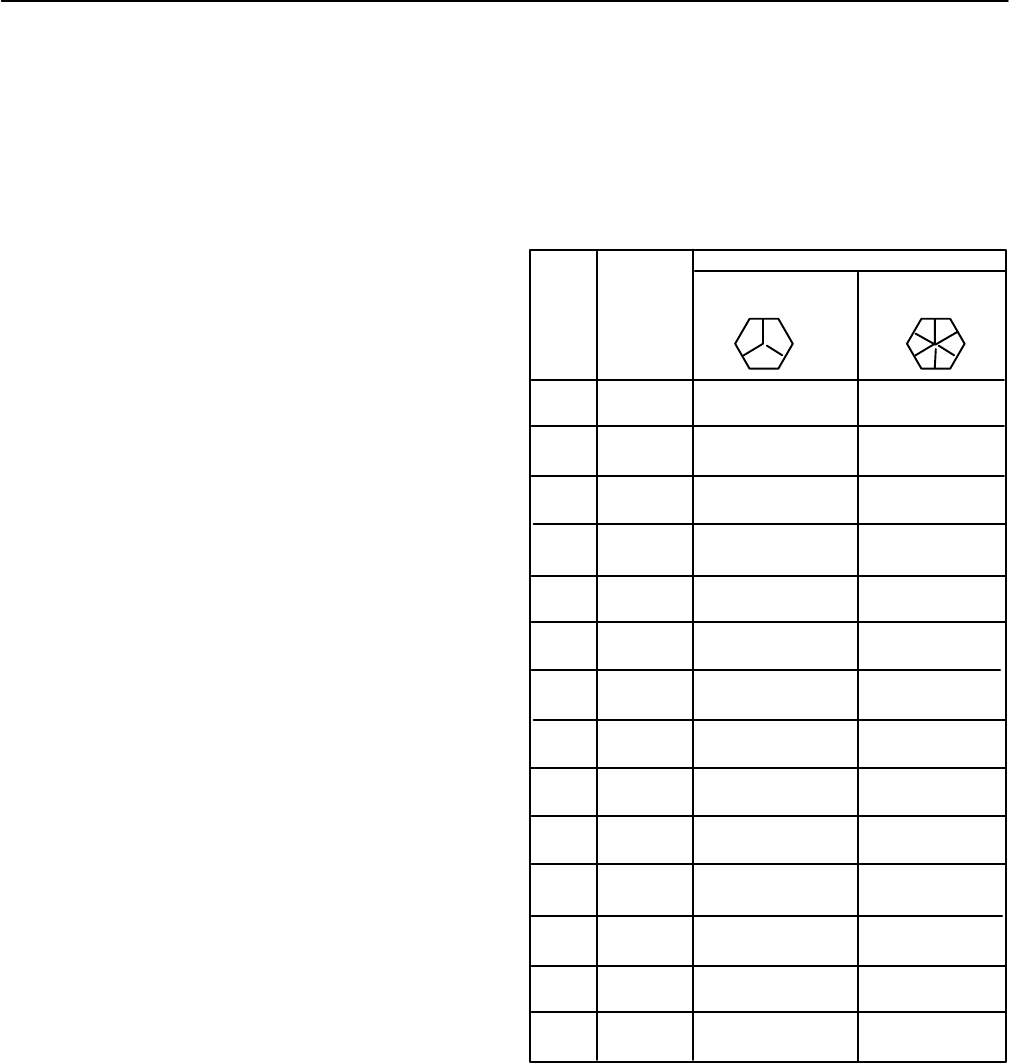
Vertical Drilling Motor, Type GE752, GEK–91584D
37
ARMATURE
Creepage Band Replacement
Because of its superior adhesion qualities, the Teflon
creepage band on the outer end of the commutator
should be applied using the “hot bond” process. A copy
of this process is included in each Teflon Band Kit, Part
No. 76518, which can be ordered from the following ad-
dress:
General Electric Company
Insulating Materials Product Section
One Campbell Road
Schenectady, NY 12345
Attn: Customer Service
NOTE: The Teflon band is not included in the
kit, but can be ordered through normal Renewal
Parts channels.
Inspect the Band
1. There should be no gaps at the joint or between
the edge of the Teflon band and the copper bars.
2. The band surface must be smooth, free of var-
nish and bonded to the underlay material. There
must not be any bubbles under the Teflon or
buckling of the band.
3. The surface must be free of damage including
scratches and cuts.
Rewinding Armature
The armature must be rewound if any coils are
shorted or grounded.
Riser Width
During the rewinding procedure, the TIG welds on
the commutator risers are machined to break the arma-
ture coil connections. Machining reduces the width of
the risers 1/32 to 1/16 in. each time, which in turn de-
creases the current–carrying capacity of the risers.
If the calculated width of the risers (after machining)
will be less than the Minimum Permissible Riser Width
listed in the DATA section, a new commutator must be
installed before new armature coils are assembled.
TABLE 3
STANDARD BOLT TORQUE VALUES
USE THE TORQUE VALUES IN THIS TABLE AS A GUIDE TO IN-
SURE SATISFACTORY TIGHTENING OF BOLTS AND NUTS
WHERE A SPECIFIC VALUE IS NOT GIVEN IN THE INSTRUC-
TIONS.
*INCLUDES SOCKET HEAD SCREWS.
1/4 20 5–8 10–12
28 5–8 10–12
5/16 18 12–15 18–21
24 12–15 20–23
3/8 16 20–25 30–36
24 25–28 34–40
7/16 14 35–40 50–56
20 40–45 60–65
1/2 13 55–60 80–90
20 60–70 95–105
9/16 12 75–80 110–123
18 90–100 130–145
5/8 11 105–115 152–169
18 125–140 185–205
3/4 10 185–205 285–315
16 220–245 340–370
7/8 9 300–330 440–490
14 340–380 510–565
1 8 440–490 685–735
12 530–570 790–8665
1–1/8 7 620–690 935–1040
12 750–830 1115–1240
1–1/4 7 890–990 1250–1360
12 1040–1160 1600–1750
1–3/8 6 1160–1290 1745–1940
12 1420–1580 2125–2360
1–1/2 6 1570–1740 2300–2600
12 1800–2000 2600–3020
THREADS
PER
INCH
TORQUE VALUES (LB./FT.)
MEDIUM CARBON
(SAE GRADE 5) ALLOY STEEL
(SAE GRADE 8)*
BOLT
DIAM.
E–38274
(For Lubricated Bolts)
Diameter
Refer to the DATA section for the Minimum Permissi-
ble Commutator Diameter dimension. If the commutator
brush–surface diameter will be less than the minimum
permissible diameter after resurfacing operations are
performed, replace the commutator before the new ar-
mature coils are assembled.

GEK–91584D, Vertical Drilling Motor, Type GE752
38
NOTE: Before rewinding the armature, first
check the shaft pinion and bearing fits to deter-
mine whether or not shaft replacement is re-
quired. See Table 2 to determine the correct
shaft drawings.
The armature can be rewound using a GE Co. Sup-
ply Kit, Part 41D730545G8, and the information
supplied in the kit.
NOTE: After the armature is rewound, the arma-
ture coil leads must be TIG welded to the com-
mutator risers, the armature must be Vacuum
Pressure Impregnated, and the commutator
must be cleaned and polished.
Commutator Tightening
If the commutator requires tightening, commutator
assembly pressure can be restored at overhaul by per-
forming a commutator tightening procedure; however, it
is necessary that spin–seasoning and resurfacing oper-
ations be performed after the commutator is tightened.
Before proceeding to tighten a loose commutator, it
must first be determined whether or not the brush–sur-
face diameter of the commutator will be larger than the
minimum permissible diameter after the commutator is
resurfaced.
If the brush–surface diameter is calculated to be
smaller (after resurfacing) than the minimum
permissible diameter, listed in the DATA section, the
commutator must be replaced.
After a long period of service, the mica insulation
may relax, due to temperature cycling, and relieve com-
mutator assembly pressure. This could result in a loose
commutator (with raised bars), or an out–of–round com-
mutator.
The assembly pressure can be restored by tighten-
ing the commutator bolts. This must be done before un-
dertaking any resurfacing operation on the commutator.
Procedure
1. Chip the weld from the commutator bolt heads to
free bolts from the cap.
2. Torque the commutator bolts by one of the fol-
lowing methods.
Hydraulic Press (Preferred Method)
1. Clean the front face of the cap and the segments,
Fig. 25. Remove ONE bolt at a time, and lubri-
cate the bolt threads and under the bolt head.
See Lubrication of Bolts section. Follow the se-
quence shown on Fig. 27 for bolt removal. Reas-
semble bolt and tighten to the initial breakaway
torque value.
2. Using a depth micrometer, measure the distance
(X in Fig. 25) between the face of the cap and the
segments at four points, 90 degrees apart. The
face of the cap and the segments should be par-
allel within 0.020 in. If necessary, tighten the ap-
propriate cap bolts to obtain this parallel relation-
ship between the face of cap and the segments.
3. Place the armature in a vertical press. Position
ball and socket tool (Part 41C685080G1) and
crow–foot pressing fixture (Part 41C685430G1)
on the commutator, and apply 70 tons pressure
at the diameter shown on Fig. 26.
4. Tighten the commutator bolts to 145 lb.–ft.
torque in a crisscross sequence, Fig. 27. Tighten
the bolts twice in this sequence, then tighten
bolts once–around at 145 lb.–ft. torque.
NOTE: The specified torque values have no sig-
nificance unless the bolts are lubricated.
5. Check the dimension between cap face and seg-
ments at four locations, 90 degrees apart, to as-
sure surfaces are still parallel within 0.020 in.
Torque Wrench (Acceptable Method)
In the absence of a suitable press, bolts may be tight-
ened with a torque wrench adjusted to apply the indi-
cated torque to each bolt.
1. Clean the front face of the cap and the segments.
Using a depth micrometer, measure the distance
(X in Fig. 25) between the face of the cap and the
segments at four points, 90 degrees apart. The
face of the cap and the segments should be par-
allel within 0.020 in.

Vertical Drilling Motor, Type GE752, GEK–91584D
39
If necessary, tighten the appropriate cap bolts to
obtain this parallel relationship between the face
of the cap and the segments.
2. Remove ONE bolt. Clean and lubricate the bolt
threads under the bolt head. Reassemble bolt,
and torque to 97 lb.–ft.
3. Repeat Step 2 for remaining bolts, following the
crisscross tightening sequence shown on Fig.
27.
4. Repeat the tightening sequence increasing the
torque by 10% each time until a FINAL value of
145 lb.–ft. torque for all bolts is obtained.
5. Check the dimension between face of cap and
segments to assure these surfaces are parallel
within 0.020 in.
NOTE: Do not tack–weld the bolts to the com-
mutator cap before spin seasoning or resurfac-
ing operations are performed.
Refer to following sections for instructions to spin
season and resurface the commutator.
Spin Seasoning
(Commutator Assembled On Armature)
A commutator seasoning cycle is required after com-
mutator tightening operations have been performed.
Prior to spin–seasoning, dynamically balance the ar-
mature to within 12 grams on the commutator end and
10 grams on the drive end. Refer to longitudinal section
for balance weight locations (see Table 2 to determine
the correct drawing).
To spin season the commutator, place the armature
in a spin–seasoning stand and proceed as follows:
1. Heat the commutator to 155–165 C (312–330
F) in 60 minutes at 2940 rpm. Spin at 155–165
C (312–330 F) for 60 minutes at 2940 rpm. Cool
to 50 C (122 F) maximum in 30 minutes at
2940 rpm.
2. Allow the commutator to cool, and grind cold.
See “Commutator Resurfacing” section.
3. Heat the commutator to 155–165 C (312–330
F) in 60 minutes at 2940 rpm. Spin at 155–165
C (312–330 F) for 30 minutes at 2940 rpm. Cool
to 50 C (112 F) maximum in 30 minutes at
2940 rpm. Repeat for a total of 2 cycles.
4. Heat the commutator to 140–150 C (284–302
F) in 60 minutes at 2940 rpm, and check commu-
tator smoothness at 2940 rpm.
5. Allow the commutator to cool, and grind cold.
See the “Commutator Resurfacing” section.
Check commutator runout per the information in
the DATA section. If the commutator is rough or
has high bars, repeat the pressing, tightening,
spin–seasoning and resurfacing procedures un-
til the runout is within the limits specified in the
DATA section.
6. Tack–weld the bolts to the commutator cap with
bronze welding rod, GE–B50E37.
7. Refer to the “Test After Repair (Armature)” sec-
tion for the test voltage, and perform a High–Po-
tential test on the armature windings.
Commutator Resurfacing
Prior to turning or grinding the commutator, be cer-
tain there is sufficient stock so the commutator will not
be turned or ground below the minimum permissible di-
ameter.
Refer to the DATA section for the minimum permissi-
ble commutator diameter dimension.
If the brush surface diameter will be less than the
minimum permissible diameter after the resurfacing op-
erations are performed, the commutator must be re-
placed.
Grinding
1. Prior to grinding, true the shaft centers with re-
spect to the bearing fits by scraping.
2. Place the armature in a lathe equipped with a
grinding attachment or in a grinding machine.
Check the concentricity of the bearing fits. The
TIR should not exceed 0.001 in.
3. Cover the armature windings to prevent entry of
grinding dust and chips.
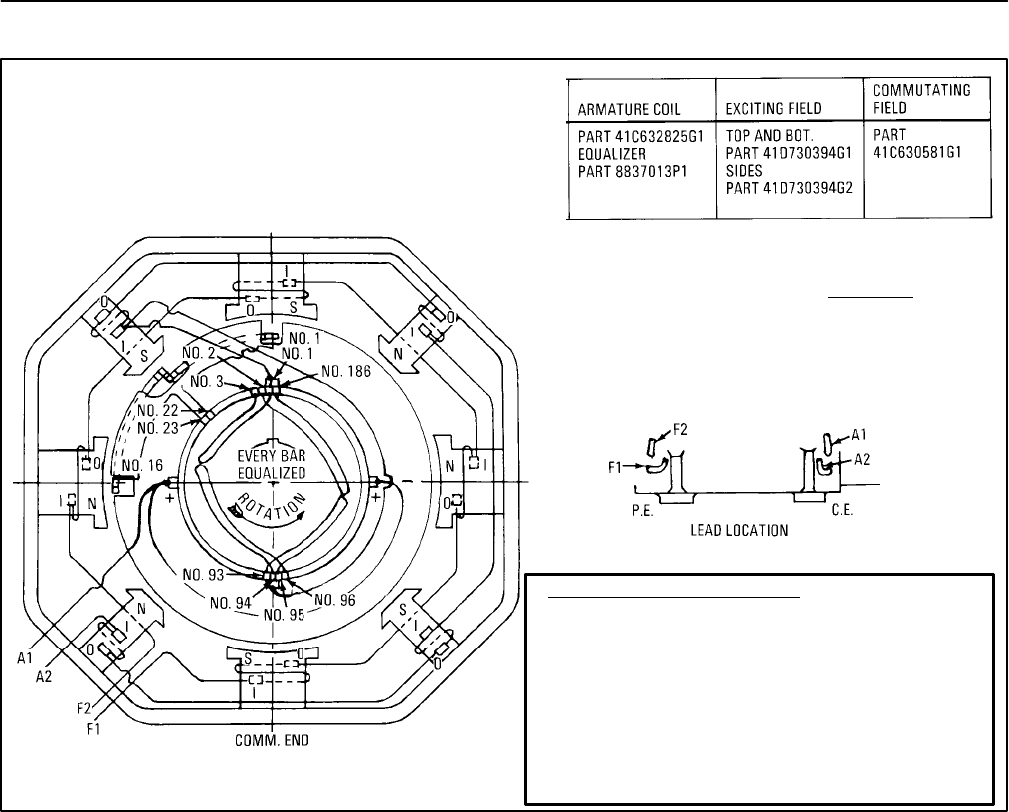
GEK–91584D, Vertical Drilling Motor, Type GE752
40
FIG. 22. CONNECTION DIAGRAM (41A237276 CHG. 0). E–39093A.
MODELS
SEE TABLE 2
TO CHANGE MOTOR DIRECTION:
TO RUN CCW VIEWED FROM COMMUTATOR END,
CONNECT: F1 TO POSITIVE
F2 TO NEGATIVE
A1 TO POSITIVE
A2 TO NEGATIVE
TO RUN CW VIEWED FROM COMMUTATOR END,
CONNECT: F1 TO NEGATIVE
F2 TO POSITIVE
A1 TO POSITIVE
A2 TO NEGATIVE
TO CHANGE MOTOR DIRECTION:
TO RUN CCW VIEWED FROM COMMUTATOR END,
CONNECT: F1 TO POSITIVE
F2 TO NEGATIVE
A1 TO POSITIVE
A2 TO NEGATIVE
TO RUN CW VIEWED FROM COMMUTATOR END,
CONNECT: F1 TO NEGATIVE
F2 TO POSITIVE
A1 TO POSITIVE
A2 TO NEGATIVE
4. Grind the commutator and check commutator
runout with a dial indicator. The maximum com-
mutator runout is 0.001 in.
5. Perform the undercutting, raking and polishing
operations.
Turning
If the surface of the commutator is badly worn,
burned or scarred, turn the commutator in a lathe as fol-
lows:
1. True the shaft centers with respect to the bearing
fits by scraping. Place the armature in a lathe and
check the concentricity of the bearing fits. The
TIR should not exceed 0.001 in.
2. Cover the windings to keep out chips.
3. Set the cutting tool for turning copper, and set
lathe speed to give a commutator surface speed
of 300 feet per minute. Refer to the DATA section
for dust groove dimensions.
4. Make clean, smooth cuts to remove just enough
copper to renew the commutator surface. Do not
allow the cutting tool to chatter.
5. After turning operations have been completed,
check commutator runout with a dial indicator.
The maximum runout is 0.001 in.
6. Perform the undercutting, raking and polishing
operations.
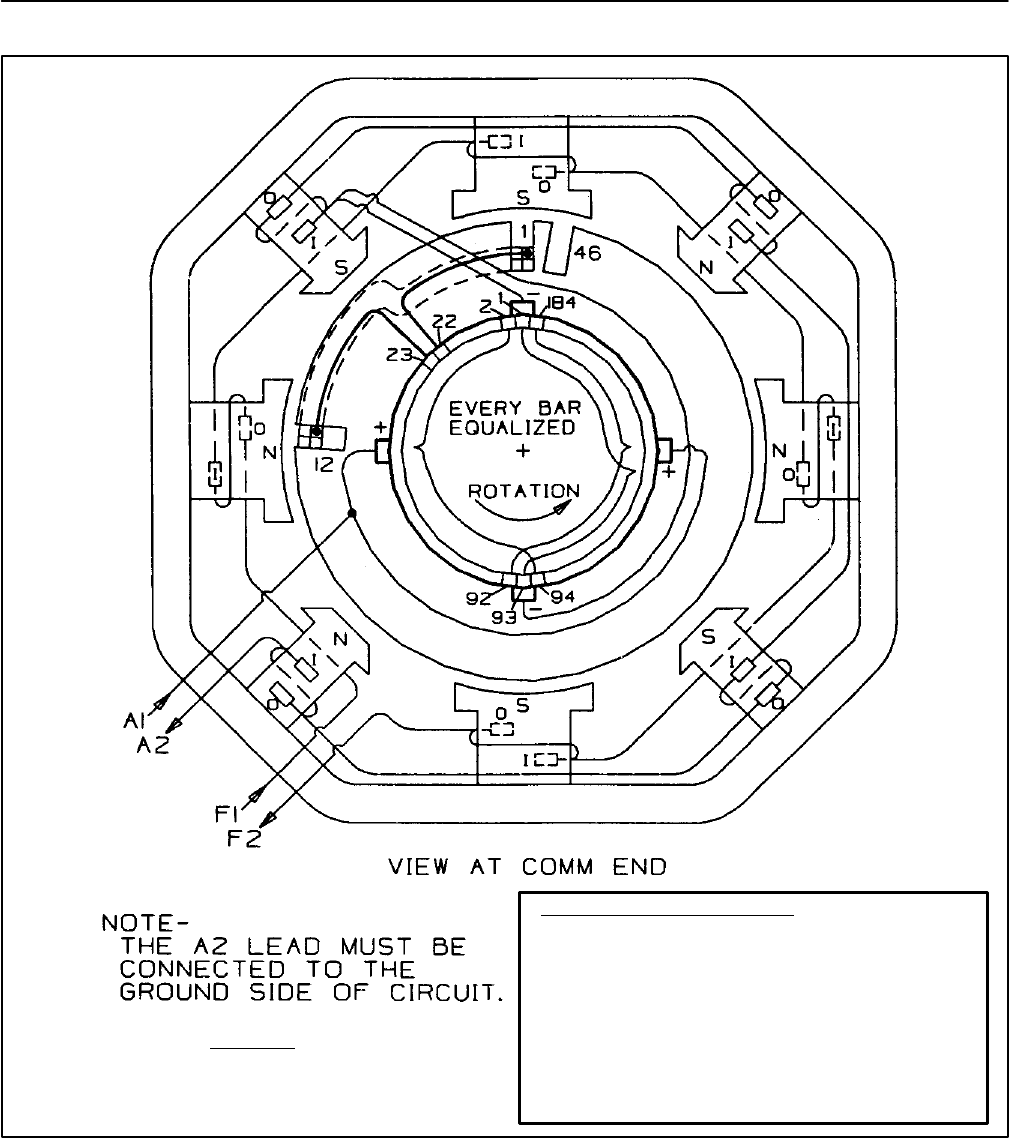
Vertical Drilling Motor, Type GE752, GEK–91584D
41
FIG. 23. CONNECTION DIAGRAM (41A330278, CHG. 0). E–38055B.
MODELS
SEE TABLE 2
TO CHANGE MOTOR DIRECTION:
TO RUN CCW VIEWED FROM COMMUTATOR END,
CONNECT: F1 TO POSITIVE
F2 TO NEGATIVE
A1 TO POSITIVE
A2 TO NEGATIVE
TO RUN CW VIEWED FROM COMMUTATOR END,
CONNECT: F1 TO NEGATIVE
F2 TO POSITIVE
A1 TO POSITIVE
A2 TO NEGATIVE
Undercutting
See Fig. 28 for a diagram of proper undercut.
A sharp hacksaw blade may be used but caution
must be observed since a dull blade or saw produces
small cracks in the mica into which dirt or moisture may
accumulate and cause a breakdown in the insulation be-
tween the commutator segments.
With practice, hand–held power undercutters can be
used. Follow the tool manufacturer’s instructions and
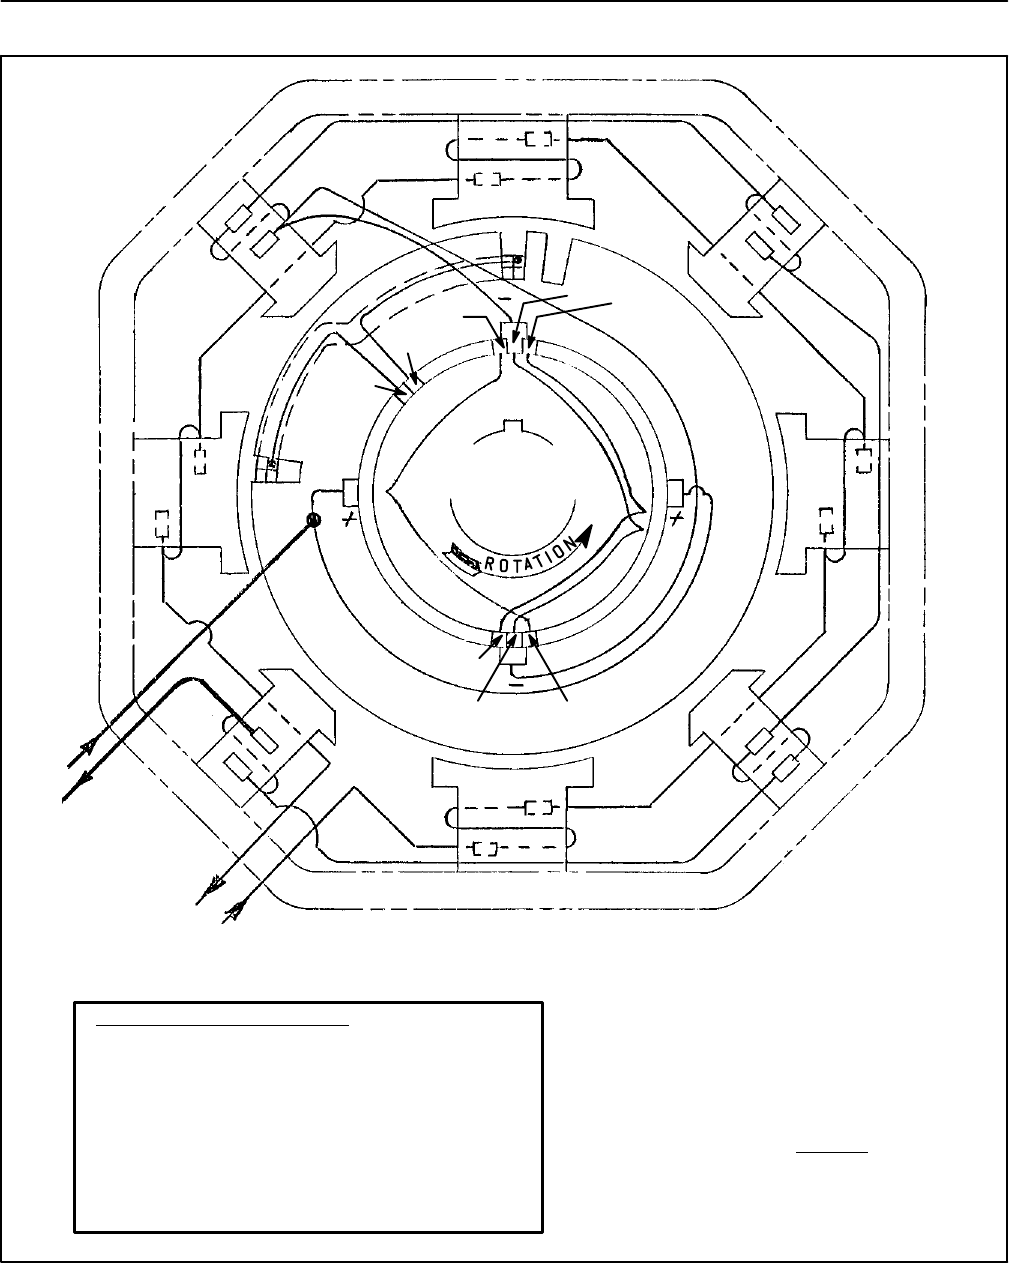
GEK–91584D, Vertical Drilling Motor, Type GE752
42
FIG. 24. CONNECTION DIAGRAM (41A330179, CHG. A). E–37950A
I
O
N
#1
#46
S
#2 #184
#22
#23
#12
#92
#93 #94
–
–
I
–
–
I
–
–
I
–
–
I
–
–
I
–
–
I
–
–
I
–
–
O
O
OOO
O
O
N
NN
S
S
S
#1
EVERY BAR
EQUALIZED
VIEW AT COMMUTATOR END
A1
A2
F1
F2
MODEL
SEE TABLE 2
TO CHANGE MOTOR DIRECTION:
TO RUN CCW VIEWED FROM COMMUTATOR END,
CONNECT: F1 TO POSITIVE
F2 TO NEGATIVE
A1 TO POSITIVE
A2 TO NEGATIVE
TO RUN CW VIEWED FROM COMMUTATOR END,
CONNECT: F1 TO NEGATIVE
F2 TO POSITIVE
A1 TO POSITIVE
A2 TO NEGATIVE
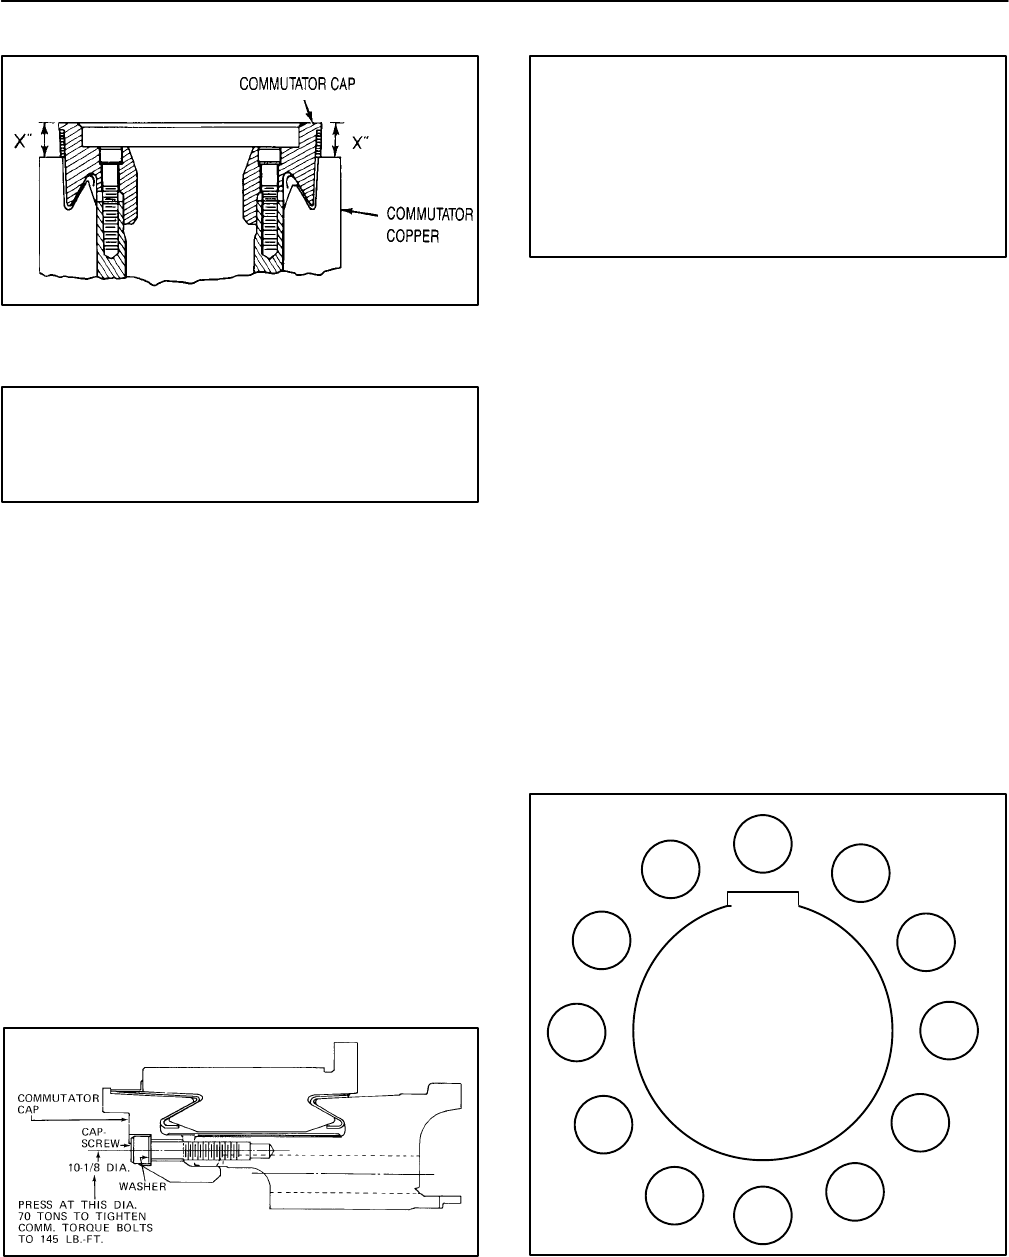
Vertical Drilling Motor, Type GE752, GEK–91584D
43
FIG. 25. COMMUTATOR TIGHTENING.
E–4270B.
WARNING: During resurfacing operations,
eye protection and a respirator should be
worn to protect personnel from dust and fly-
ing particles.
use slot guides and depth gauges for accurate, uniform
cuts. Make a few practice passes over a scrap commu-
tator to get the “feel” of the tool. Care must be taken to
prevent the power undercutter from jumping out of the
slot and across the commutator surface. The high–
speed operation of the blade will quickly gouge the com-
mutator.
1. After a commutator has been resurfaced, the
mica between the bars should be undercut to a
depth of 0.047 in. Undercutting should be done
with a sharp–edged tool with a cutting width of
0.063 in.
2. Blow loose material off the commutator with dry,
compressed air.
FIG. 26. COMMUTATOR PRESSING
DIAMETER. E–18140
WARNING: When using compressed air for
cleaning purposes, flying debris and particles
may present a hazard to personnel in the im-
mediate area. Personnel should be provided
with, and trained in the use of, personal pro-
tective equipment as specified by applicable
federal or state safety regulations.
Raking
Resurfacing usually leaves particles and slivers of
copper hanging on the bar edges or lodged in the under-
cut slots. These must be removed before the motor is
placed in service, or the particles may bridge the side
mica and cause a flashover.
1. Brush out dirt and copper whiskers attached to
the trailing edge of the bars with a stiff–bristle
brush; preferably one with nylon bristles. A new
paint brush or stencil brush with the bristles cut
short for added stiffness may also be satisfacto-
ry. If stoning and undercutting have produced
considerable dragging of copper from the edges
of the bars, use a raking tool to remove the cop-
per fins and ragged edges. Use the tool to rake
the bar edges with the point inserted in the slot so
that sides of the V rake the trailing edge of the
bar. If the tool is ground with flat sides and used
with moderate pressure as a raking tool, it will re-
move ragged copper fins and break the sharp
15
9
3
7
11
2
10
4
8
6
12
FIG. 27. COMMUTATOR BOLT TIGHTENING
SEQUENCE. E–4502.
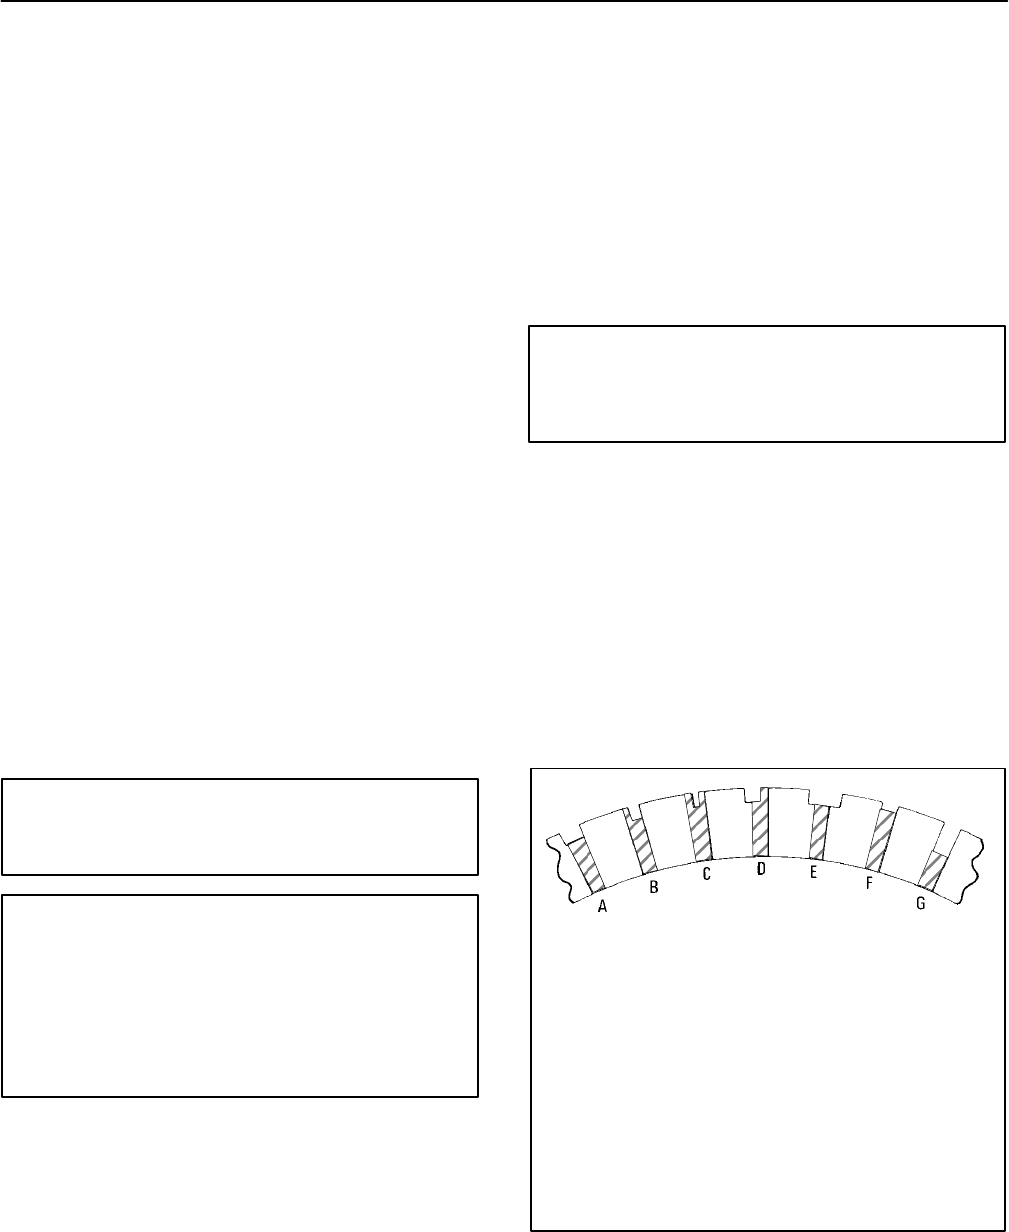
GEK–91584D, Vertical Drilling Motor, Type GE752
44
edges of the bars. See Fig. 12 for an illustration
of the tool. Another method of removing copper
fins is to rake the slots with a piece of fiberboard
approximately 0.045 in. thick.
2. After slots have been raked with fiberboard or a
raking tool, sand the commutator with fine sand-
paper to remove small pieces of copper sticking
from edges of slots.
3. Thoroughly clean the armature core and com-
mutator with dry, compressed air to remove cop-
per and dust.
1. If the commutator is discolored or smudged, pol-
ishing with canvas, crocus cloth, fine (4/0) sand-
paper or 400A Triemite paper is usually suffi-
cient.
Abrasive paper should be mounted on a wooden
block curved to fit the surface of the commutator.
2. Blow loose material off the commutator with dry,
compressed air.
3. Check commutator concentricity with a dial indi-
cator. Refer to the DATA section for runout limits.
4. Cover the commutator with heavy paper or felt to
protect it from damage.
WARNING: Personal injury may result if prop-
er eye protection is not worn when cleaning
with compressed air.
CAUTION: Never use an emery cloth on this or
any commutator. The abrasive particles on
emery cloth scratch the commutator surface
and lodge in the grooves between commuta-
tor segments. This condition creates the pos-
sibility of an eventual flashover which could
seriously damage the machine.
TEST AFTER REPAIR (Armature)
High Potential Test
Apply test voltage between the commutator (with all
segments shorted) and the shaft.
Used Armature
Apply a high–potential test voltage of 2000 volts, 60
Hz for one minute.
Rewound Armature
Apply a high–potential test voltage of 3500 volts, 60
Hz for one minute.
NOTE: Measure leakage current to ground dur-
ing test 3–85.0 milliamps.
WARNING: Electric shock can cause serious
or fatal injury. To avoid such injury, personnel
should take and observe proper precautions
during the high–potential testing.
Resistance Measurement
Refer to the DATA section for armature the resis-
tance value and measure armature resistance.
NOTE: Insulation Processing (Armature VPI)
After the armature has been cleaned and re-
paired or rewound, it must be vacuum pressure
impregnated. See the Varnish Treatment, “Vac-
uum Pressure Impregnation” section for fur-
ther required processing of the armature.
A. MICA PROPERLY UNDERCUT.
B. UNDERCUTTING TOOL TOO NARROW, LEAVING FIN
AT ONE SIDE OF SLOT.
C.UNDERCUTTING TOOL VERY NARROW, LEAVING
FINS AT BOTH SIDES OF SLOT.
D.SLOT IMPROPERLY INDEXED, PART OF BAR CUT
AWAY AND FIN OF MICA LEFT.
E. TOOL TOO WIDE, PART OF BAR CUT AWAY.
F. UNDERCUTTING TOO SHALLOW, SERVICE LIFE
SHORTENS BEFORE NEXT UNDERCUTTING.
G.UNDERCUTTING TOO DEEP, POCKET COLLECTS
CARBON AND COPPER DUST, SHORT CIRCUITING
BARS.
FIG. 28. COMMON MISTAKES IN
UNDERCUTTING COMMUTATOR SLOTS.
E–5024A.
Vertical Drilling Motor, Type GE752, GEK–91584D
45
MOTOR FRAME FIELD COIL
REPLACEMENT
Refer to Table 2, Page 20, to determine the correct
coiled frame assembly drawing for the machine being
repaired.
Coil Removal
1. Remove terminal insulation and disconnect coil
leads. Use a gas torch or brazing tongs to sepa-
rate brazed connections. When using brazing
tongs use low voltage and high a–c current to
heat coil connections.
WARNING: Safety glasses and leather gloves
must be worn at all times during brazing oper-
ations to protect personnel from physical
harm.
NOTE: If a gas torch is used, coil insulation
must be protected from heat by a non–flam-
mable heat absorbent.
1. Pack absorbent around the insulation near
the connection and over adjacent coils.
2. Make sure all exposed insulation is covered
with a thick layer of absorbent, then heat and
separate the coil connections.
2. Heat the coiled frame in an oven at 150 C (302
F) for four hours to soften the varnish so pole
bolts can be removed.
Remove the pole bolts and the coil–pole assem-
bly from the magnet frame.
3. Mark any shims for reassembly with the corre-
sponding pole when the coil(s) is installed in the
frame.
Coil Installation
Procedure for New Coil–Pole Assembly
NOTE: Install any exciting coils and braze their
connections before installing commutating
coils.
1. Before installing any coil and pole, clean the pole
contact surface on the frame and the pole piece
mounting surface.
2. Install the new pole and coil in the frame with any
shims that were on the damaged coil. Use new
washers under bolt heads. Lubricate the bolt
heads, threads and washers and draw the pole
bolts moderately tight.
3. Refer to Table 2, Page 20, to determine the cor-
rect coiled frame assembly drawings. All coil
connections must be brazed with silver solder,
GE–B20A6. Use two pieces of solder (0.010 x 1
in. x 1 in.) between terminal surfaces and braze
terminals as follows:
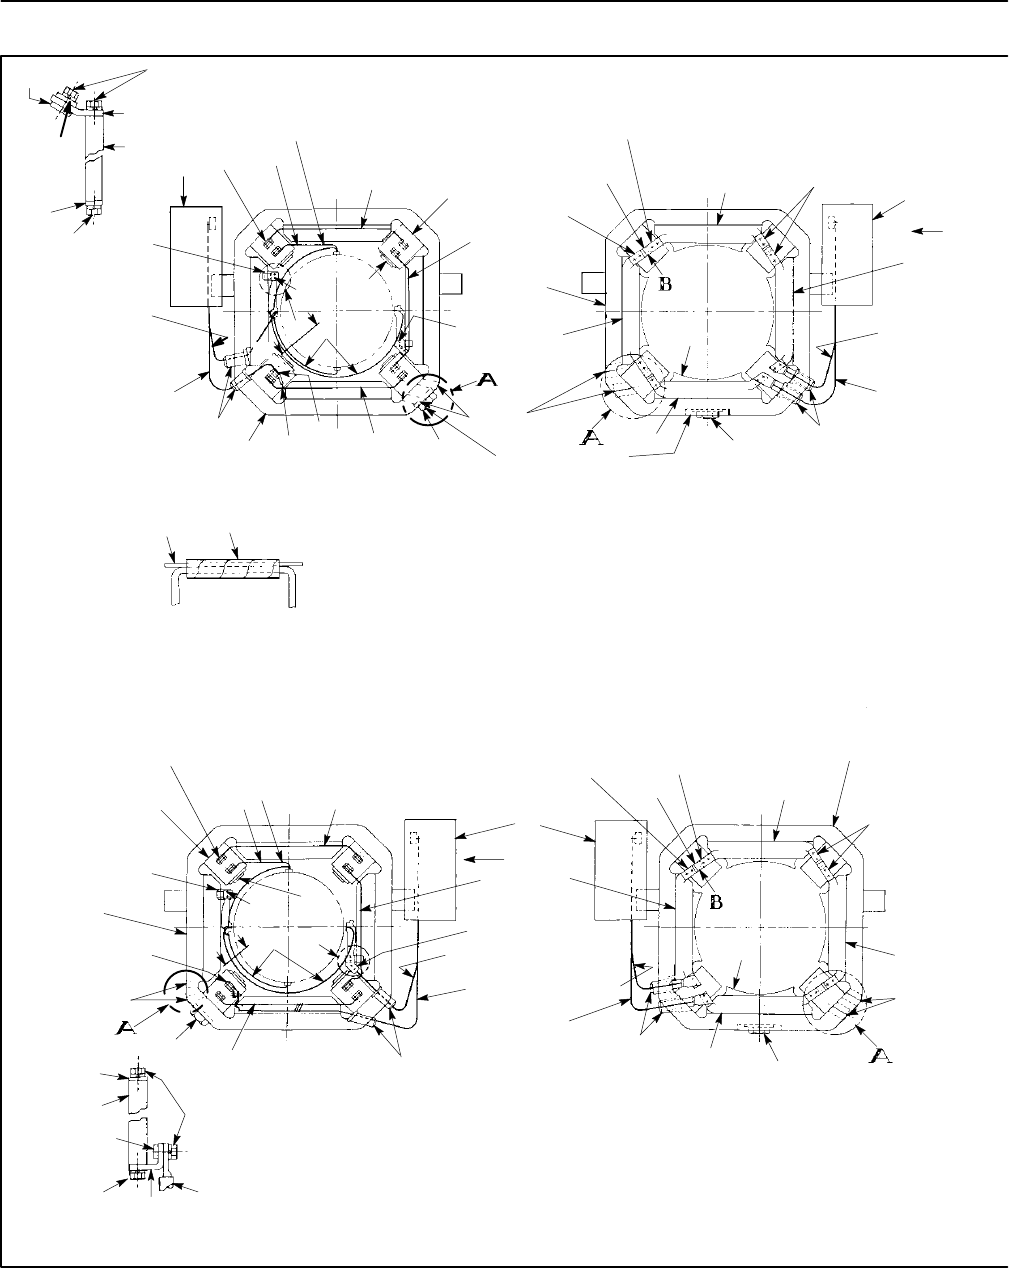
GEK–91584D, Vertical Drilling Motor, Type GE752
46
17 15,16
29
37
15,16
10
11,
45
VIEW AT Z OF
BRUSH HOLDER
CONNECTION
15,
16,
17 7
18,
19
54
6
30
62
33,
35
8
16,
17,
54
31
1
22,
49
A2
12,46
A1
11,45
29
26
28
10
15,16
ZE
E
APPLY ONE COAT OF P23
AFTER ALL P18 & P19 TAPINGS.
VIEW OF COMM. END
18,19
9
15,
16,
17
224 SEE NOTE
26
D
3
13,50
F2
13,50
F1
22,
49
32,35,74
2
62
3
1
27
FILL C’BORES
WITH P25
(24 PLACES) VIEW OF PINION END
20 21
BEFORE ASSEMBLING
CONNECTIONS INSULATE
9 O’CLOCK CABLE SUPPORT
AS SHOWN WITH P20 TAPED
WITH P21 (COMM. END)
INSULATE EXCITING & COMMUTATING FIELD COIL
TERMINALS BY FILLING ALL CAVATIES & COVERING
ALL BOLT HEADS WITH P24 THEN INSULATE ENTIRE
TERMINAL ASSEMBLY WITH P18 & P19 AND THOROUGHLY
BRUSH WITH P23.
15,
16,
17
7
18,
19 5
26
6
18,19,24,30
11,47
A1 12,48
A2
22,
49
8
33,35
62
31
1
29
4
15,16 28
10 YEE
D
VIEW OF COMM. END
10
37
17
15,16 30 11,47
15,16,18,19,24
VIEW AT Y OF
BRUSH HOLDER
CONNECTION
18,19 9
15,
16,
17
2
1
24 SEE NOTE
3
62
32,35,74
2
22,
49
13,50
F2
13,50
F1
3
VIEW OF PINION END
27
FIG. 29. COILED FRAME ASSEMBLY (41D732353 CHG. N). E–39094A.
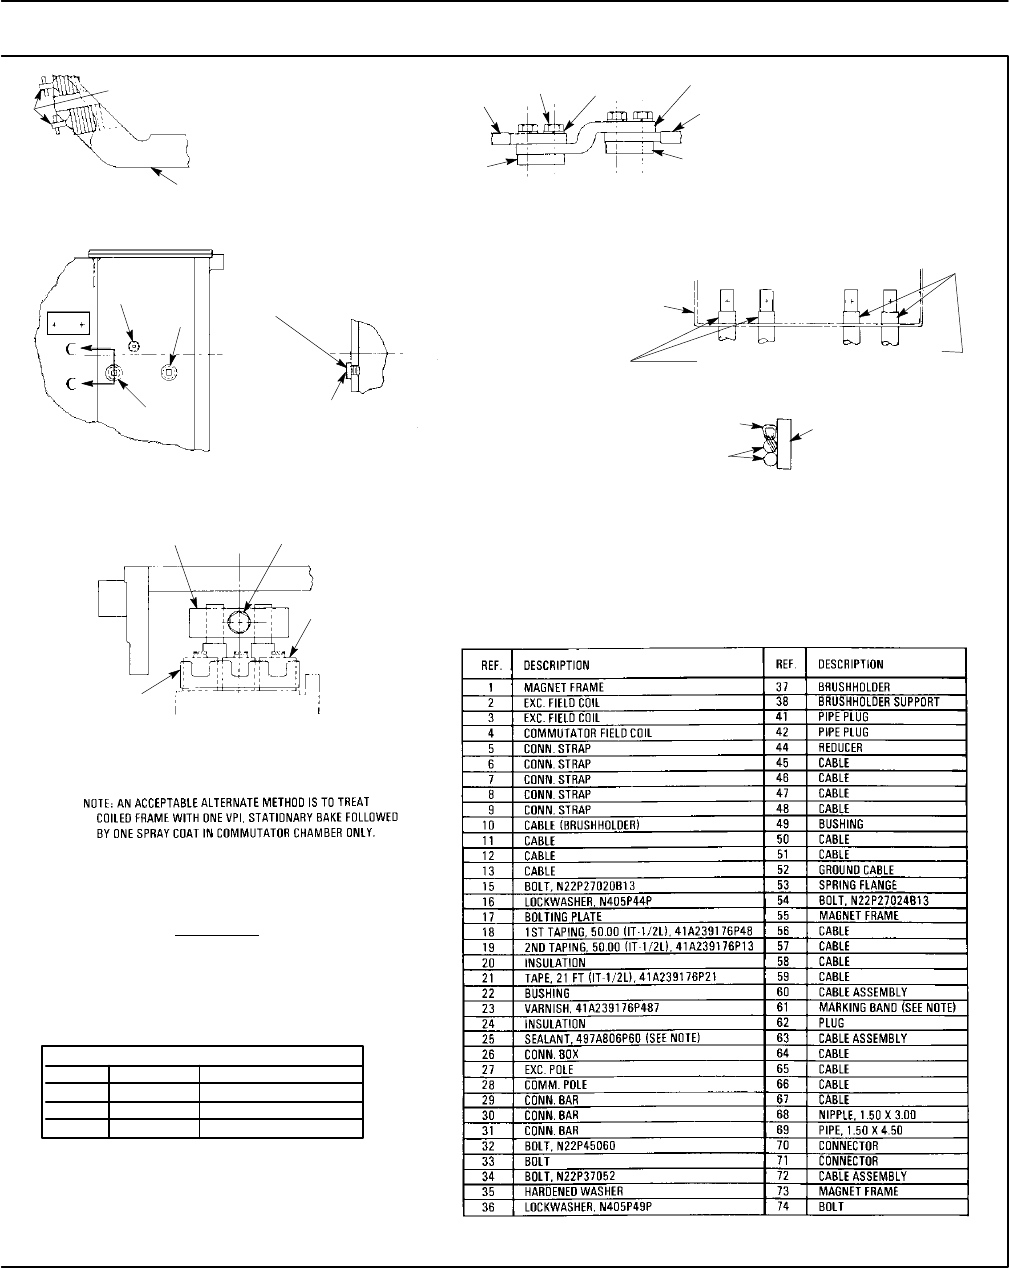
Vertical Drilling Motor, Type GE752, GEK–91584D
47
62
1
VIEW AT A ENLARGED (TYPICAL)
ASSEMBLE FLUSH TO TOP OF INSIDE
WALL WITHIN .25 & TIGHEN UNTIL
PLUG IS EXPANDED & TIGHT IN HOLE
+
–2,
315 16 9
2,3
17
17
VIEW AT B ENLARGED (TYPICAL)
41
42
42,44
SIDE VIEW OF COMM. CHAMBER
SHOWING PLUGS ON SIDE
OPPOSITE CONNECTION BOX.
42,44
P44 FOR PRESSURE SWITCH USAGE
ON CONNECTION BOX SIDE ONLY.
IF NO PRESSURE SWITCH IS
REQUIRED, PLUG HOLE WITH P42
SECTION C–C
CONN. BOX
GROUND ARMOR WITH P52
(G3 & G4 ONLY)
VIEW AT D
STAPLE
10
MAG. FRAME
WALL
SECTION E–E
ATTACH BRUSH HOLDER CABLES
AGAINST INSIDE WALL OF MAG. FRAME
38
34,
36
CARBON
BRUSH
37
VIEW SHOWING
BRUSH HOLDER ASSEMBLY
NOTE FOR P61: ATTACH MARKING BAND (P61) TO
EACH END OF CABLE PTS. 11,12,13,45,46,47,48,
50,56,57,58,64,65,67 & STAMP WITH APPROPRIATE
MARKINGS AT ASSEMBLY.
TORQUE TABLE
PART SIZE TORQUE LB.–FT.
32–74 1.25–7 900–1000
33 1.25–12 435–483
34 .875–9 115–125
LUBRICATE BOLTS
FIG. 29. COILED FRAME ASSEMBLY (41D732353 CHG. N). E–39094A.
MODELS
SEE TABLE 2, PAGE 20
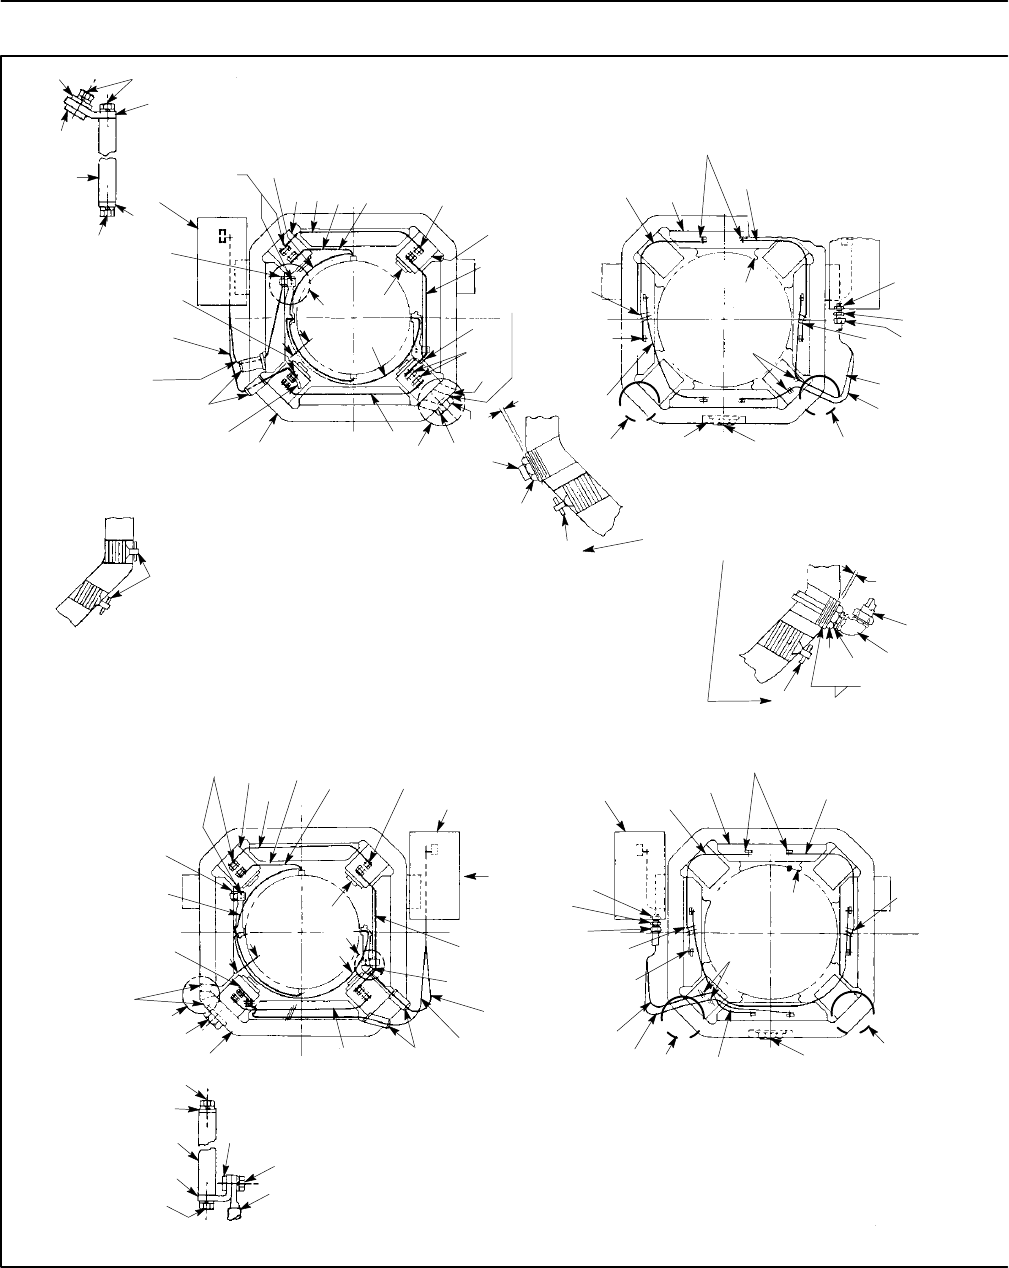
GEK–91584D, Vertical Drilling Motor, Type GE752
48
11,13
50
18
8,60
33
6
11,
13
VIEW AT Z OF
BRUSH HOLDER
CONNECTION
11,13 62,
26 3516,
17 25 SEE NOTE
2
4
48
18
75
39,
41
75
46
35
49
21,64
8 A1,
60
9 A2,
61
13,18,66
50
28
Z
F
F
D
37
6
VIEW OF COMM. END
FILL C’BORES
WITH P25
(24 PLACES)
.19 +
–.06
30
51
75
VIEW OF PINION END
ENLARGED VIEW AT B
FILL C’BORES
WITH P25
(24 PLACES)
71
24 SEE NOTE
7
58
57
22 59
10 F1
45 F2
38,41,76
7
12,14,15
22
AB
22
36
ENLARGED VIEW AT D
75 ASSEMBLE FLUSH TO TOP OF
INSIDE WALL WITHIN .25
AND TIGHTEN UNTIL PLUG IS
EXPANDED AND TIGHT IN HOLE
+
–
.19 +
–.06
29
31
32
30
.12
75
ENLARGED VIEW AT A
ASSEMBLE FLUSH TO TOP OF
INSIDE WALL WITHIN .25
AND TIGHTEN UNTIL PLUG IS
EXPANDED AND TIGHT IN HOLE
+
–
11,
13 2,
26
3
516,
17 25 SEE NOTE
4
16,17,24,48
8 A1,
62
9 A2,
63
21,
64
4635
39,41
75
49
6
50
6
37
11,
13,
18
D
E
Y
F
F
28
VIEW OF COMM. END
11,13
6
38
48
11,13
18
11,13
8,62
VIEW AT Y OF
BRUSH HOLDER
CONNECTION
28 7
1
24 SEE NOTE
7
22
38,41,76
7
45 F2
10 F1
12,14,15
22
59
57
58 36
22
AB
NOTE FOR P74:
ATTACH MARKING BAND (P74) TO EACH END
OF CABLE PTS. 8,9,60,61,62,63,68,69,76,77,78,
81,82,83. STAMP WITH APPROPRIATE MARKING
AT ASSEMBLY.
VIEW OF PINION END
FIG. 30. COILED FRAME ASSEMBLY (41D732345 CHG. V). E–39095A.
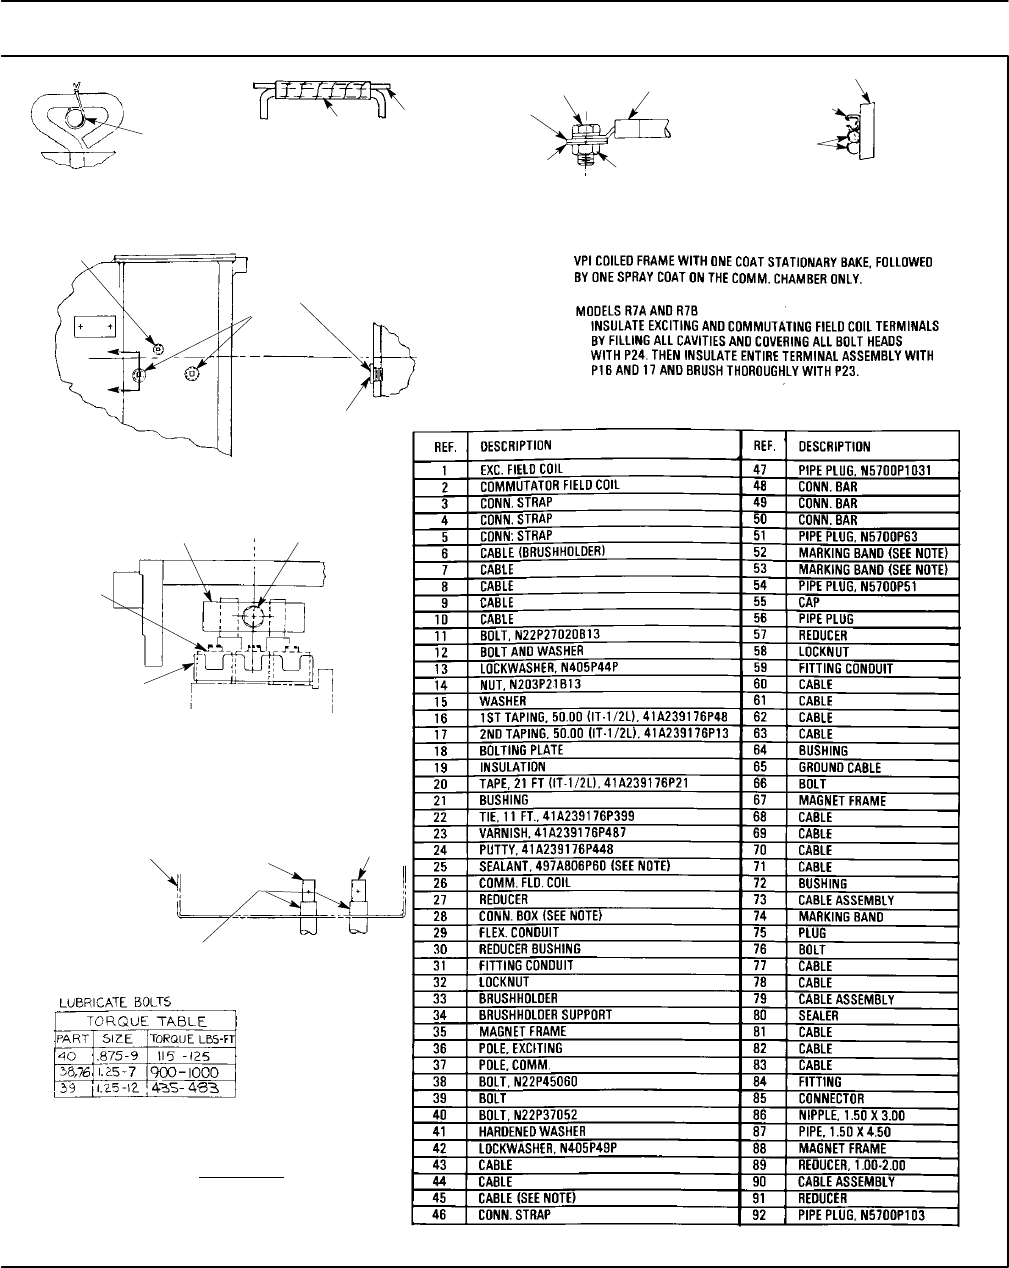
Vertical Drilling Motor, Type GE752, GEK–91584D
49
22
VIEW SHOWING METHOD
OF ASSEMBLING CABLES
THRU STAPLES.
(PINION END)
20 19
BEFORE ASSEMBLING
CONNECTIONS, INSULATE
CABLE SUPPORTS AS SHOWN
WITH P19 TAPED WITH P20
(COMM. END)
MAG. FRAME
WALL
STAPLE
6
SECTION F–F
ATTACH BRUSH HOLDER
CABLES AGAINST INSIDE
WALL OF MAG. FRAME.
12 7,10,45
14
15
COIL TERM.
OR
CABLE TERM.
VIEW SHOWING METHOD
OF CONNECTING SHUNT
CABLES.
54
51
27,
51
P27 FOR PRESSURE SWITCH
USAGE ON OPPOSITE SIDE
ONLY, IF NO PRESSURE SWITCH
REQUIRED PLUG HOLE WITH P51
SECTION C–C
SIDE VIEW OF COMM. CHAMBER
SHOWING PLUGS OPPOSITE SIDE
OF CONNECTION BOX.
C
C
CARBON
BRUSH
34
40,
42
33
VIEW SHOWING BRUSH HOLDER ASSEMBLY
NOTE FOR P10 AND P15:
INSTALL P10 AND P45 WITH LARGER
TERMINAL ON EXC. COIL CONNECTION.
NOTE FOR P52 AND P53:
INSTALL P52 AND P53 ON CONNECTION
BOX END OF P10 AND P45.
61,64
60,
63
A2 A1
CONNECTION
BOX
VIEW AT E
GROUND A1 AND A2
CABLES WITH P65
(G3 AND G4)
FIG. 30. COILED FRAME ASSEMBLY (41D732345 CHG. V). E–39095A.
MODELS
SEE TABLE 2, PAGE 20
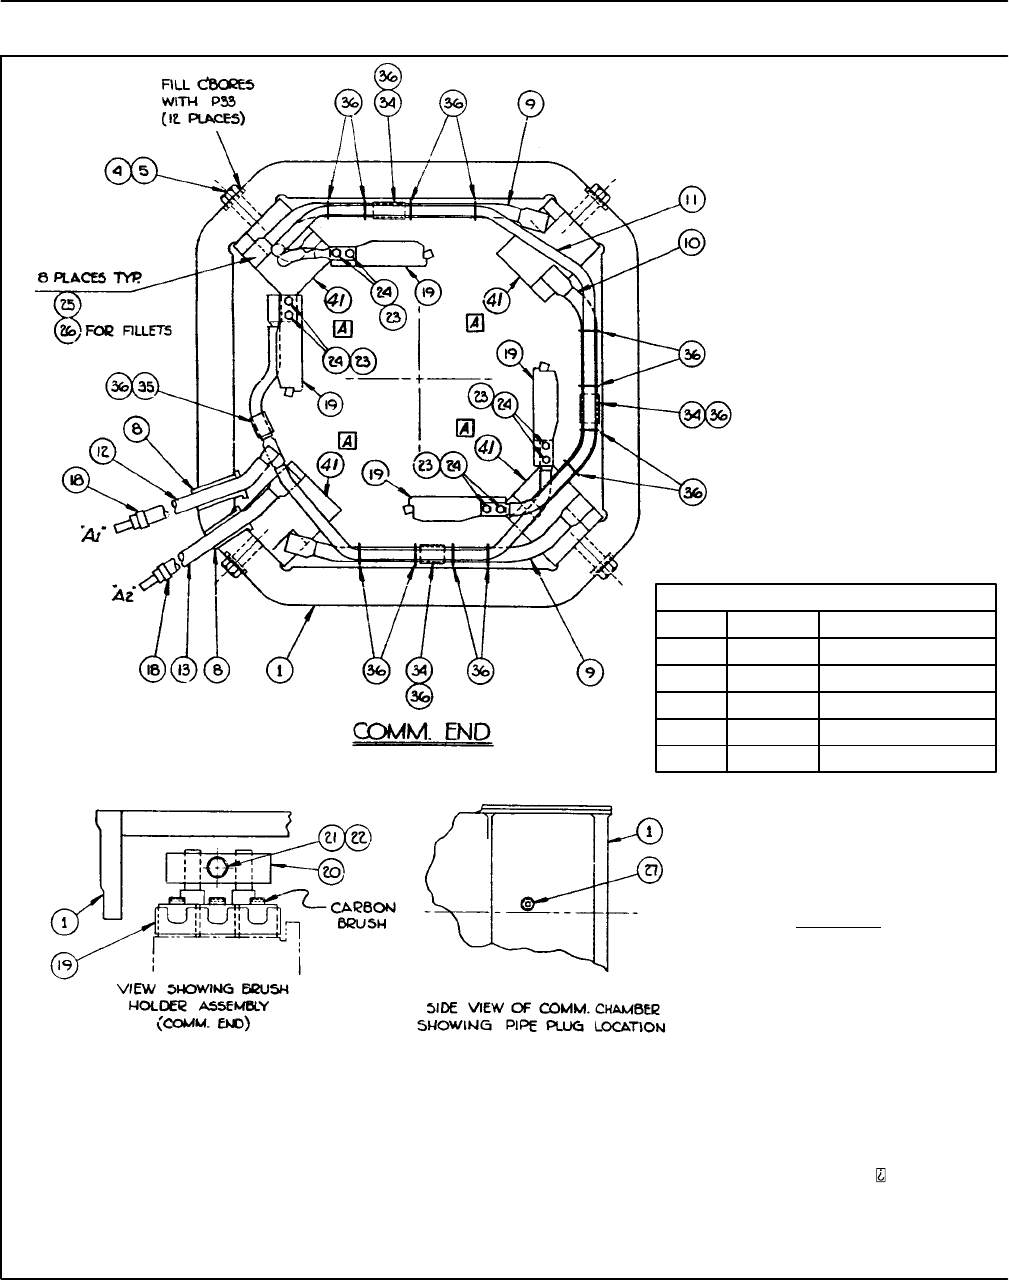
GEK–91584D, Vertical Drilling Motor, Type GE752
50
FIG. 31. COILED FRAME ASSEMBLY (41D735440, CHG. A). E–38056B
NOTE FOR PARTS 37,38,39:
INSULATE EXCITING AND COMMUTATING FIELD COIL TERMINALS BY FILLING ALL CAVITIES
AND COVERING ALL BOLT HEADS WITH P37 THEN INSULATE ENTIRE TERMINAL ASSEMBLY
WITH 1T–1/2 L. OF P38 AND 1T–1/2 L. OF P39.
NOTE FOR P40:
ASSEMBLE P40 FLUSH TO TOP OF INSIDE WALL OF MAGNET FRAME WITHIN .25 AND
TIGHTEN UNTIL PLUG P40 IS EXPANDED AND TIGHT IN HOLE (1–PLACE SEE ENLARGED VIEW
@ ”A”).
V.P.I. COILED FRAME, ONE COAT STATIONARY BAKE, FOLLOWED BY ONE SPRAY COAT ON
THE COMM. CHAMBER.
TORQUE TABLE
PART SIZE TORQUE LBS.–FT.
4 1.25–12 435–483
6 1.25–7 900–995
21 .875–9 240–260
23 .4375–14 25–35
28 .25–20 6–8
MODEL US1
MODELS
SEE TABLE 2, PAGE 20
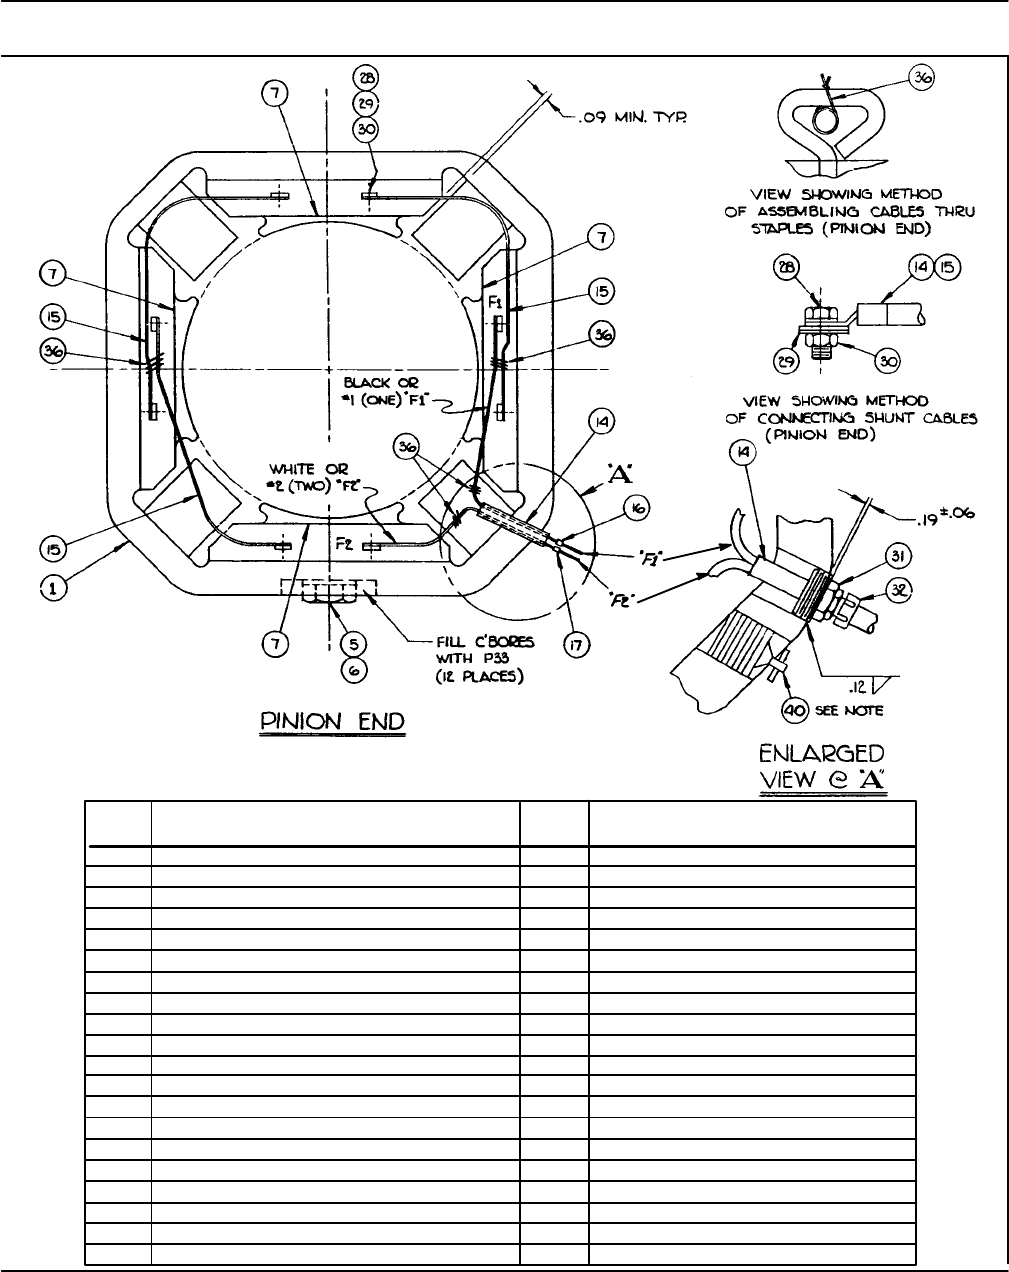
Vertical Drilling Motor, Type GE752, GEK–91584D
51
FIG. 31. COILED FRAME ASSEMBLY (41D735440, CHG. A). E–38056B.
REF. DESCRIPTION
1 MAGNET FRAME
4 BOLT(NON–MAGNETIC), 1 1/4–12X4
5 HARD WASHER, 1 1/4
6 BOLT, 1 1/4–7X3 3/4
7 EXCITING COIL AND POLE
8 BUSHING
9 CABLE
10 CABLE
11 CABLE
12 CABLES
13 CABLES
14 CABLE
15 CABLE
16 MARKER
17 MARKER
18 TAG
19 BRUSHHOLDER ASSEMBLY
20 BRUSHHOLDER SUPPORT
21 BOLT, 7/8–9X3 1/4
22 LOCKWASHER, 7/8
REF. DESCRIPTION
23 BOLT, 7/16–14X1
24 LOCKWASHER, 7/16
25 BRAZING STRIP, 1X1
26 BRAZING ROD
27 PIPE PLUG, 1/2 NPT
28 BOLT/WASHER, 1/4–20X1/2
29 BELL WASHER, 1/4
30 NUT, 1/4–20
31 REDUCER
32 FITTING
33 SEALER #1473, SILMATE
34 PAD
35 PAD
36 TWINE
37 PUTTY
38 1ST TAPING
39 2ND TAPING
40 PLUG
41 COMMUTATOR POLE AND COIL
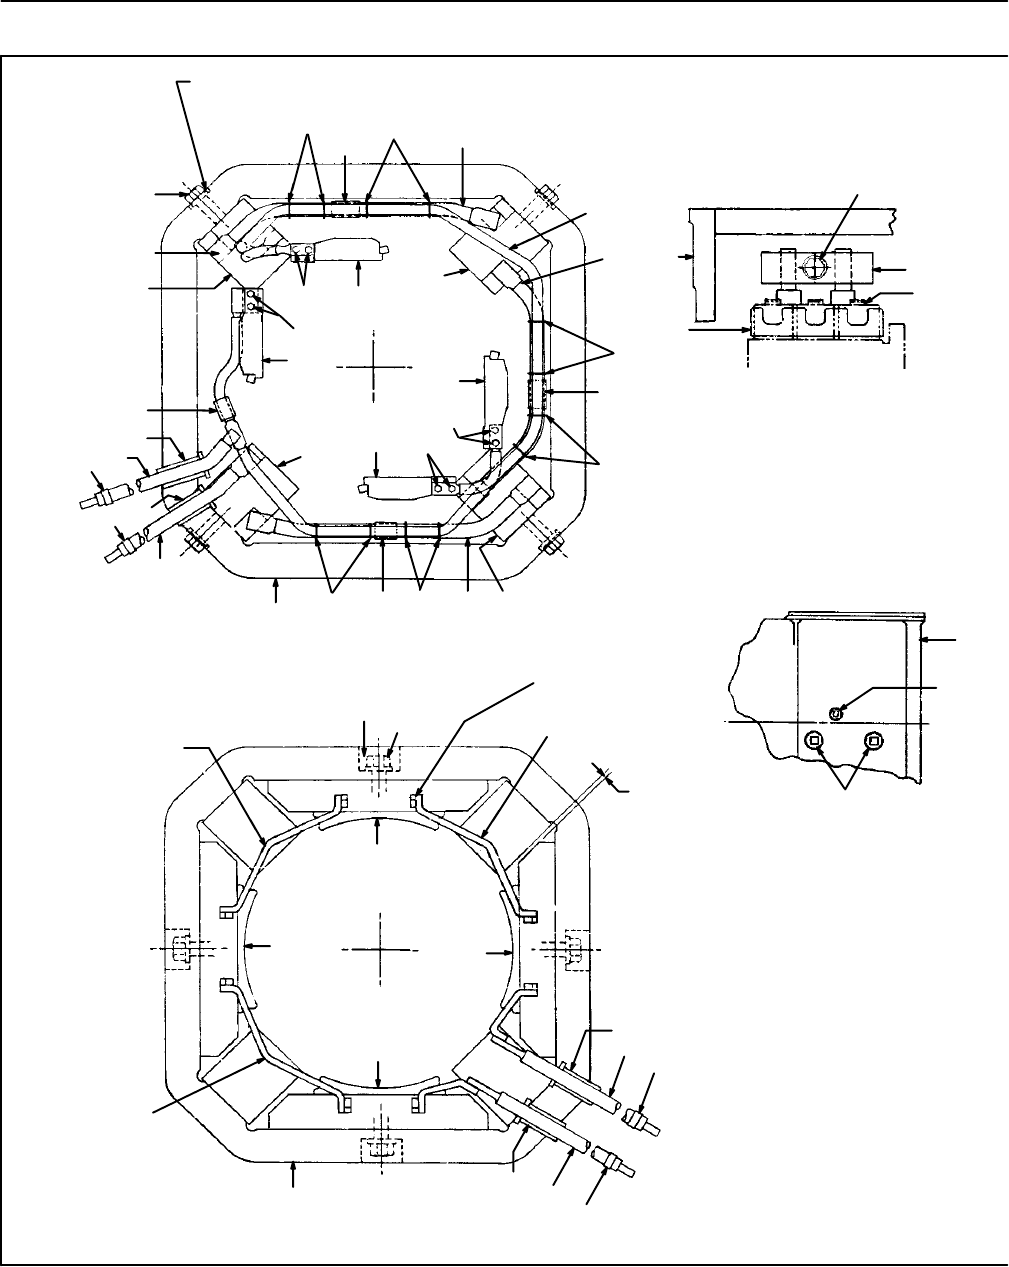
GEK–91584D, Vertical Drilling Motor, Type GE752
52
FIG. 32. COILED FRAME ASSEMBLY (41D735343, CHG. C). E–37951C
FILL C’BORES WITH P31
(12–PLACES)
38 36,
38 15
17
16
36,38
1,
39
24
19
32
18
37,38
11
20,21
8,
9
8,9
22,
23
38
38
38
1538
36,
38
38
32
24
7,10
FOR FILLETS
8–PLACES
TYPICAL 20,
21
11
8,9
8,9 11 20,21
20,
21
11
COMMUTATOR END
A1
A2
FILL C’BORES WITH P31
(12–PLACES)
22,
23 FOR FILLETS
8–PLACES
TYPICAL
28
6,
7
.09 MIN. TYP.
24
29 32
PINION END
F1
F2
28
32
29
24
1,
39
28
3,4,5
2,
4,
5
3,4,5
2,
4,
5
1,39
13,
14
12
11
CARBON
BRUSH
VIEW SHOWING BRUSH
HOLDER ASSEMBLY
(COMMUTATOR END)
1,39
25
26
SIDE VIEW OF COMMUTATOR
CHAMBER SHOWING PIPE PLUG
LOCATIONS (BOTH SIDES)
Vertical Drilling Motor, Type GE752, GEK–91584D
53
FIG. 32. COILED FRAME ASSEMBLY (41D735343, CHG. C). E–37951C
+
–5
NOTE FOR PTS. 33, 34, AND 35
INSULATE EXCITING AND COMMUTATING FIELD COIL TERMINALS BY
FILLING ALL VAVITIES WITH P33 THEN INSULATE ENTIRE TERMINAL
ASSEMBLY WITH 2T–1/2L. OF P34 AND 2T–1/2L. OF P35.
V.P.I. COILED FRAME ONE COAT. STATIONARY BAKE, SPRAY PAINT
THE COMMUTATOR CHAMBER INNER SURFACES AND THE FRAME
EXTERIOR. DO NOT SPRAY THE EXCITING AND COMMUTATING COILS.
REF. DESCRIPTION
1 MAGNET FRAME
2 EXCITING COIL
3 EXCITING COIL
4 EXCITING POLE
5 SPRING COLLAR
6 BOLT 1 1/4–7 X 3 3/4
7 HARDENED WASHER 1 1/4
8 COMMUTATING COIL
9 COMMUTATING POLE
10 BOLT 1 1/4–12 X 4
11 BRUSH HOLDER ASSEMBLY
12 BRUSH HOLDER SUPPORT
13 BOLT 7/8–9 X 3 1/4 N22P37052
14 LOCKWASHER 7/8 N405P49P
15 CABLE
16 CABLE
17 CABLE
18 CABLES
19 CABLES
REF. DESCRIPTION
20 BOLT 7/16–14 X 1 N22P27016B13
21 LOCKWASHER 7/16 N405P44P
22 BRAZING STRIP 1 X 1
23 ROD
24 BUSHING
25 PIPE PLUG 1/2 NPT N5700P51
26 PIPE PLUG 3/4 NPT N5700P63
28 CONNECTION STRAP
29 CABLES
31 SEALER NO. 1473 SILMATE 497A806P60
32 TAG
33 PUTTY 41A239176P443
34 1 ST TAPING 41D735343P34
35 2 ND TAPING 41D735343P35
36 PAD
37 PAD
38 CORD 41D735343P38
39 MAGNET FRAME
TORQUE TABLE
PART SIZE TORQUE LBS. FT.
6 1.25–7 900–995
10 1.25–12 435–483
13 .875–9 240–260
20 .4375–14 30
MODELS
SEE TABLE 2, PAGE 20

GEK–91584D, Vertical Drilling Motor, Type GE752
54
NOTE: If a gas torch is used, coil insulation
must be protected from heat by a non–flam-
mable heat absorbent.
1. Pack absorbent around the insulation near
the connection and over adjacent coils.
2. Make sure all exposed insulation is covered
with a thick layer of absorbent, then heat and
separate the coil connections.
2. Heat the coiled frame in an oven at 150 C (302
F) for four hours to soften the varnish so pole
bolts can be removed.
Remove the pole bolts and the coil–pole assem-
bly from the magnet frame.
3. Mark any shims for reassembly with the corre-
sponding pole when the coil(s) is installed in the
frame.
Coil Installation
Procedure for New Coil–Pole Assembly
NOTE: Install any exciting coils and braze their
connections before installing commutating
coils.
1. Before installing any coil and pole, clean the pole
contact surface on the frame and the pole piece
mounting surface.
2. Install the new pole and coil in the frame with any
shims that were on the damaged coil. Use new
washers under bolt heads. Lubricate the bolt
heads, threads and washers and draw the pole
bolts moderately tight.
3. Refer to Table 2, Page 20, to determine the cor-
rect coiled frame assembly drawings. All coil
connections must be brazed with silver solder,
GE–B20A6. Use two pieces of solder (0.010 x 1
in. x 1 in.) between terminal surfaces and braze
terminals as follows:
Brazing Coil Terminals
Braze the coil terminals by one of the following meth-
ods:
Machine Brazing
1. The recommended brazing current is 10,800
amperes at 1.6 volts. With silver–solder brazing
strips inserted between connections, clamp the
brazing tongs on the connection and braze the
joint. If necessary, add additional solder to fill the
joint and form a level surface.
2. Braze all exciting–coil connections before install-
ing the commutating coils.
Gas Torch Brazing
1. Pack the coil insulation with non–flammable heat
absorbent material; e.g., interwoven glass cloth.
2. Insert the brazing strips and use a C–clamp or vi-
se–grip pliers to clamp the connection surfaces
tightly together.
3. Use a torch tip with a 0.1 in. orifice and adjust the
torch to obtain a slightly reduced flame. As the
brazing strips melt, add more solder to fill the
joint and form a level surface.
4. Remove heat absorbent packing from insulation.
Use dry, compressed air and blow out the inside
of the frame.
WARNING: Personal injury may result if prop-
er eye protection is not worn when cleaning
with compressed air.
5. Torque the pole bolts to the values listed in Table
3, Page 37, Standard Bolt Torque Values.
6. Check the polarity of the field poles:
Energize the field circuit with a battery and check
pole polarity with a compass, Fig. 33.
7. Insulate the connections with silicone putty and
wrap connections with Mylar film (30). Apply
glass tape and extend each taping 1/2 in. beyond
the bare area of the connection. Brush the con-
nections with air–drying alkyd varnish GE–8001.
8. Install and connect any cables previously re-
moved.
NOTE: Do not flood–dip the coiled frame before
the cables are installed and the connections are
insulated.
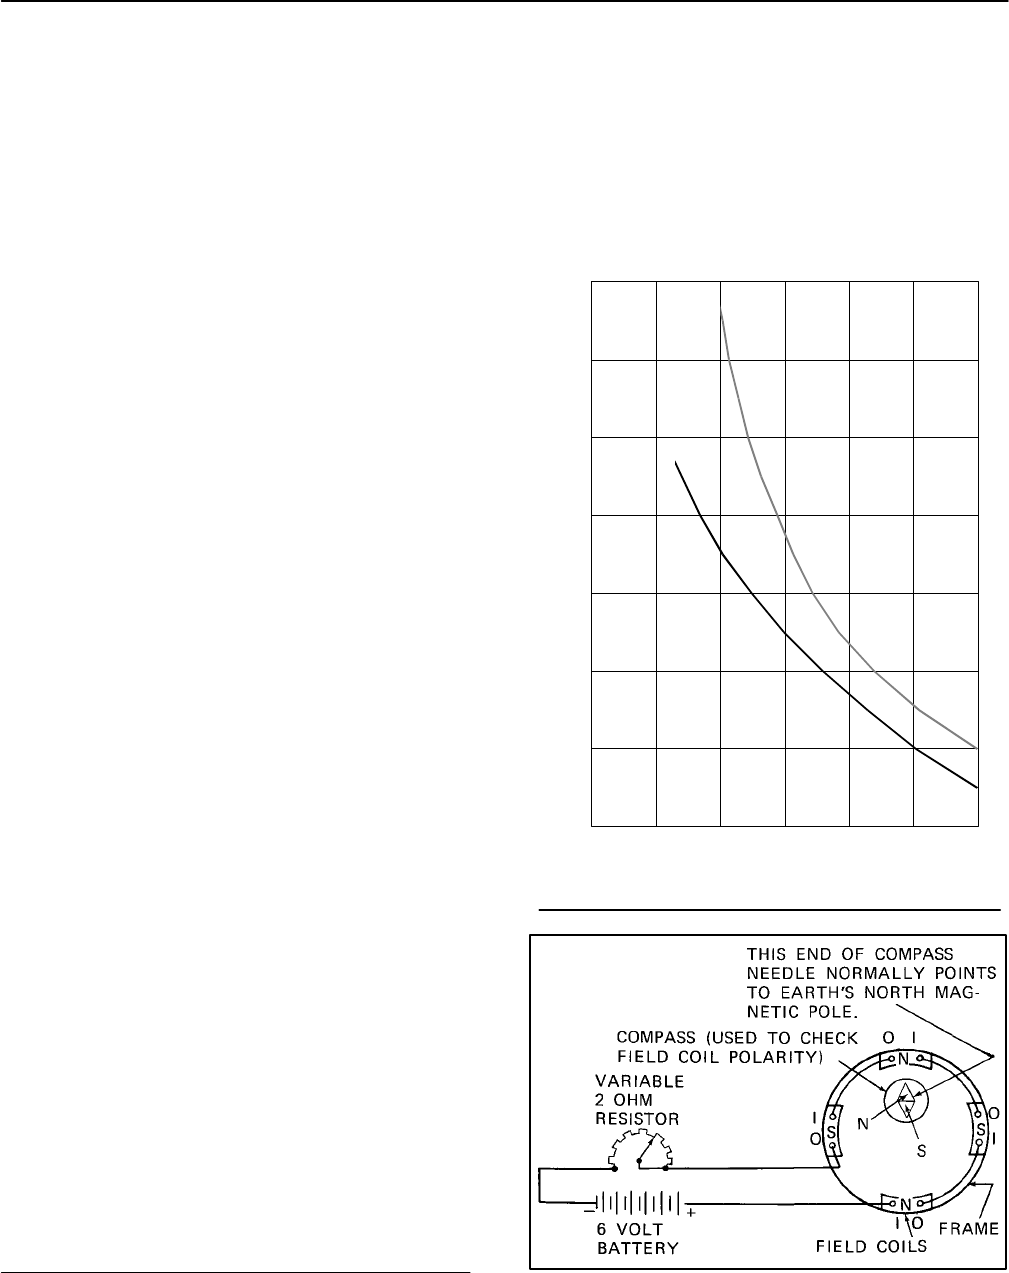
Vertical Drilling Motor, Type GE752, GEK–91584D
55
Flood Dipping Coiled Frame
After field coils have been repaired or replaced and
electrical tests completed, insulate the coiled frame by
flood dipping in GE–8001 varnish. See Table 4, Page
55, for varnish viscosity limits.
Varnish may be thinned, as necessary, with Solves-
so* No. 100 thinner. Agitate varnish for 15 minutes be-
fore dipping frame.
1. Be sure all coil connections are made and insu-
lated, and all cables and ties for cables and con-
nection straps are in place. Tie cable ends above
the varnish level.
2. Coat all machine–fit surfaces with GE–271 black
varnish or stripping compound and plug bolt
holes with dummy bolts.
3. Heat the coiled frame to 40–80 C (104–176 F)
and dip the frame drive end down (with all coil
connections covered) for at least 15 seconds.
Drain and remove the frame from the varnish. Al-
low the frame to drain for at least 5 minutes in a
vertical position, drive end down.
4. Bake the frame in a pre–heated oven at 150 C
(302 F) for 30 minutes, minimum.
5. Clean the varnish from machined surfaces and
unplug the tapped holes.
TEST AFTER REPAIR
(Coiled Frame Without Armature)
1. Pass 24.0 amperes(60 Hz current) through the
exciting (series) field and read the voltage drop.
Minimum Volts 13.1. . . . . . . . . . . . . . . . . . . . . .
Maximum Volts 15.6. . . . . . . . . . . . . . . . . . . . . .
2. Pass 24.0 amperes (60 Hz current) through the
commutating (CP) field and read the voltage
drop.
For Non–Magnetic retainers:
*Standard Oil Co. of Pa.
0
10
20
30
40
50
60
70
0 102030405060
TABLE 4
VARNISH VISCOSITY CHART FOR
DIPPING COILED FRAME
NOTE: When necessary, use Solvesso No. 100 to thin var-
nish.
GE NO. 8001 VARNISH
NO. 3 ZAHN CUP
TIME – SECONDS
TEMP. DEGREES C
FIG. 33. FIELD COIL POLARITY CHECK. E–888A.
GEK–91584D, Vertical Drilling Motor, Type GE752
56
Minimum Volts 7.3. . . . . . . . . . . . . . . . . . . . . . .
Maximum Volts 8.5. . . . . . . . . . . . . . . . . . . . . . .
For Magnetic retainers:
Minimum Volts 0.7. . . . . . . . . . . . . . . . . . . . . . .
Maximum Volts 12.4. . . . . . . . . . . . . . . . . . . . . .
High–Potential Test
Frame With Used Coils
Apply a high–potential test voltage of 2000 volts, 60
Hz for one minute.
Frame With All New Coils
Apply a high–potential test voltage of 3500 volts, 60
Hz for one minute.
Measure leakage current to ground during this test.
5.0 milliamps is maximum.
WARNING: Electric shock can cause serious
or fatal injury. To avoid such injury, personnel
should take and observe proper precautions
during the high–potential testing.
Resistance Measurement
Refer to the DATA section for values and measure
the resistance of the exciting and commutating fields.
VARNISH TREATMENT (ARMATURE)
Vacuum Pressure Impregnation (VPI)
After all repairs have been completed, the armature
must be vacuum pressure impregnated in GE–702C
polyester varnish.
Refer to GEK–101183 for VPI procedure.
Following the VPI processing, the armature must be
given a varnish immersion treatment.
NOTE: Do NOT clean previously protected ma-
chined surfaces, threads and tapped holes be-
fore varnish treating the armature.
Varnish Immersion Treatment After VPI
(Armature)
The following immersion process must be performed
on the armature assembly after the VPI process.
1. Preheat the armature in an oven at 140 C for at
least five hours.
2. The temperature of the armature must not be
less than 90 C, or above 120 C, before im-
mersing. Immerse the armature in a vertical po-
sition (commutator end up) in the varnish (GE
Spec. No. A15B53A) for at least one minute.
NOTE: One minute is the minimum time to in-
sure adequate varnish penetration.
3. Lift the armature out of the varnish and spin until
the excess varnish is removed. Clean the shaft
with Xylene (GE Spec. No. D5B9).
4. Bake at 140 C in an oven for at least eight
hours.
BALANCING ARMATURE
Refer to the appropriate longitudinal section (see
Table 2, Page 20, to determine the correct drawing) for
balance weight locations. Dynamically balance the ar-
mature within 10 grams (0.35 oz.) on the drive end and
12 grams (0.42 oz.) on the commutator end by adding
weights on the commutator cap and the armature head.
REASSEMBLY
Brushholders
1. Using a bolt and washer, attach the brushholder
clamp to the frame mount. Position the studs of
the brushholder in the clamp, and move the
brushholder radially outward as far as possible.
2. Tighten the brushholder clamp bolt but do not
torque. Install all brushholders.
3. Connect the brushholder cables. Refer to Table
2, Page 20, to determine the correct connection
diagram.

Vertical Drilling Motor, Type GE752, GEK–91584D
57
Armature Bearings
NOTE: Parts that will be shrink–fitted should be
heated in an oven and assembled hot. Make
sure shrink–fitted parts are tight against adja-
cent parts after they have cooled.
Drive–End Bearing
(Figs. 34, 35, 36 and 37)
1. Place the armature in a saddle.
2. If the inner sleeve was removed, heat it to 110 C
(230 F) and shrink it tight on the shaft against
the shoulder.
3. Spread 0.5 oz. of grease onto the seals on the
inner and outer bearing caps and the inner
sleeve.
4. Pack 4.8 oz. of grease in the outer circumference
of the inner bearing cap as shown by the shaded
area in the bearing cap.
5. Install the inner bearing cap on the sleeve.
6. Heat and install the flinger tight against the
sleeve.
7. Heat and install the inner race of the roller bear-
ing tight against the flinger.
8. Install the outer race of the bearing in the
framehead.
9. Fill the roller bearing completely with 29.0 oz. of
grease.
10. Install the gasket onto the inner bearing cap.
11. Install guide pins into the inner bearing cap to
guide the framehead into position.
12. Assemble the framehead/bearing assembly
onto the shaft, over the guide pins until seated
against the bearing cap. Remove the guide pins.
NOTE: Orient the inner bearing cap on UP, AUP,
US and AUT models to facilitate grease tube as-
sembly.
13. Assemble the grease tubes to the inner bearing
cap:
a. On UP1 and AUP1 models, there are two
grease tubes, assembled to the inner bearing
cap and protrude through a hole in the frame.
b. On UP2 and AUP2 models, there is one
grease tube, assembled to the inner bearing
cap and protrudes through a hole in the
frame.
c. On all other models, there is one grease tube
assembled to the inner bearing cap and pro-
trudes through a hole in the framehead.
14. Pack 4.8 oz. of grease in the outer circumference
of the outer bearing cap and install the bearing
cap to the framehead. Secure the assembly with
bolts and lockwashers. Torque to the appropriate
value in Table 3, Page 37.
Commutator–End Bearing
(All Models Except US2, UP6, AUT2 and AUP5)
Refer to Fig. 38.
1. Clean and inspect the bearing and the shaft
bearing fit. Remove nicks and burrs.
2. If sleeve (16) was removed, heat it to 110 C
(230 F) and shrink it tight onto the shaft against
the shoulder.
3. Pack 5.25 oz. grease into the outer circumfer-
ence of the cavity of bearing housing (8).
4. Heat bearing housing (8) in an oven to 100 C
(212 F). While hot, assemble ball bearing (3)
into the housing firmly against the shoulder at the
bottom of the bearing fit.
5. Fill all voids in the ball bearing completely with
approximately 20.8 oz. of grease, Fig. 38. Smear
0.5 oz. of grease on the bearing housing and the
bearing cap seals.
6. Heat the bearing and housing assembly in an
oven to 100 C (212 F). While hot, assemble it
onto the shaft, with the inner race tight against
sleeve (16).
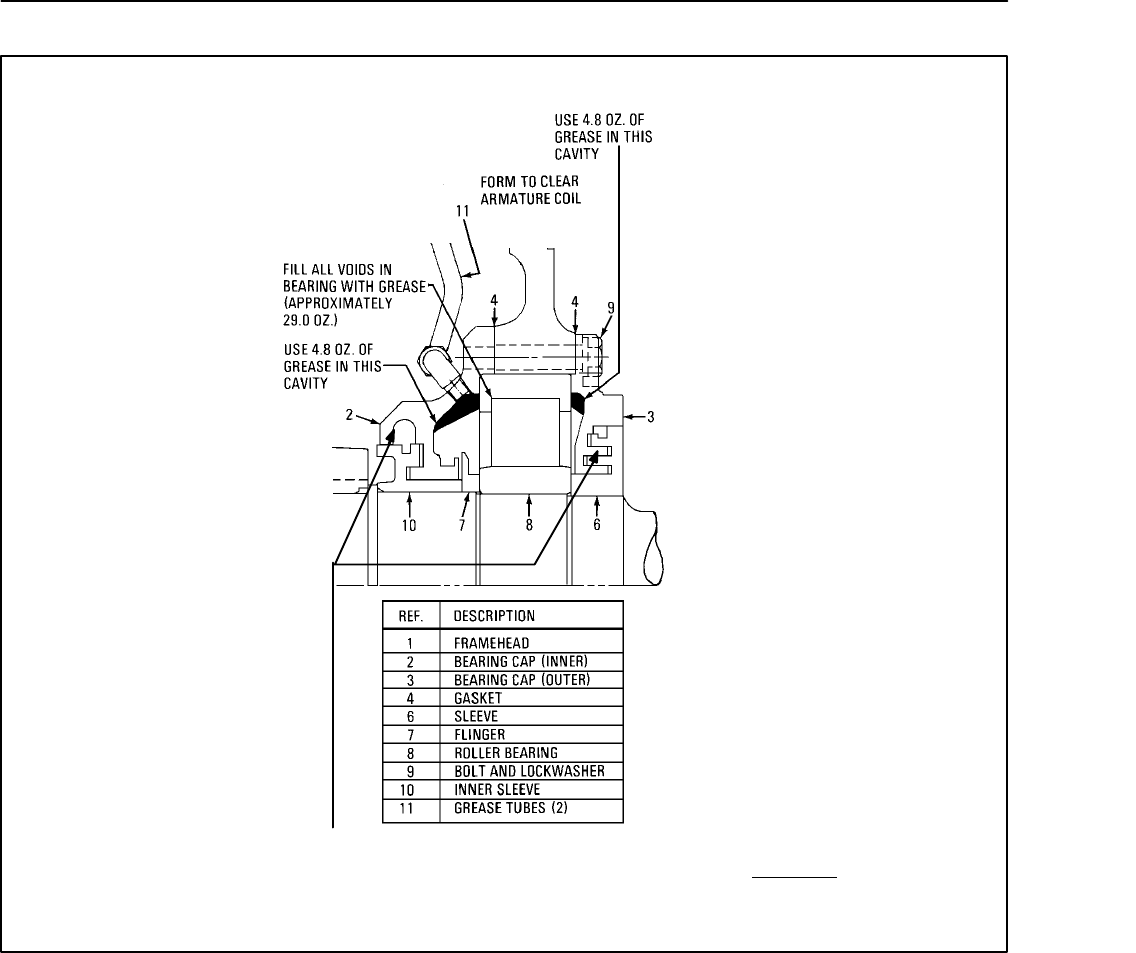
GEK–91584D, Vertical Drilling Motor, Type GE752
58
FIG. 34. DRIVE–END BEARING ASSEMBLY. E–18166E.
SMEAR 0.50 OZ. OF
GREASE
ON GREASE SEALS.
MODELS
SEE TABLE 2, PAGE 20
NOTE: Do not heat the bearing and housing as-
sembly above 100
C (212
F). Higher tempera-
tures may cause the oil to “bleed” from the
grease.
7. Heat spacer (9) to 110 C (230 F) and shrink it
onto the shaft tight against the inner race of ball
bearing (3).
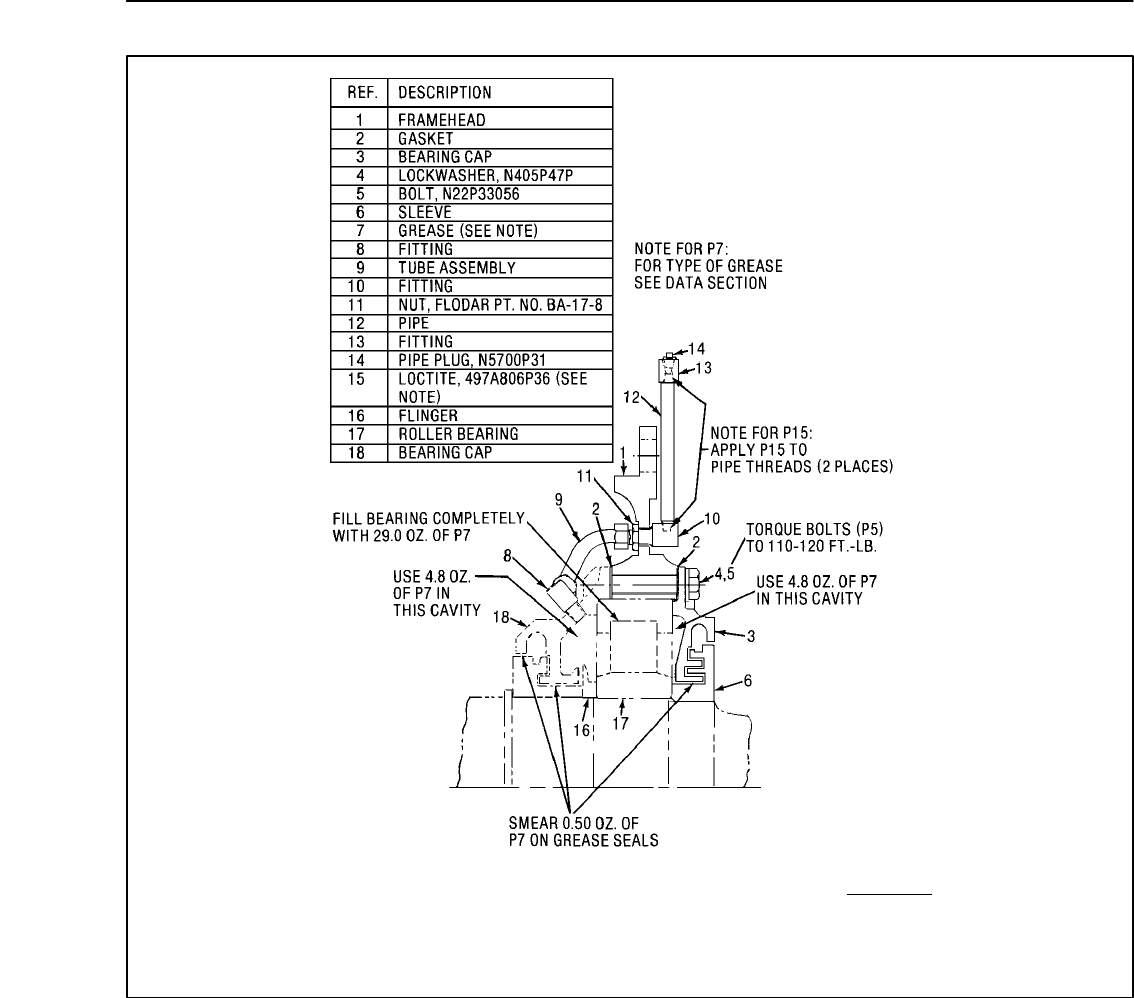
Vertical Drilling Motor, Type GE752, GEK–91584D
59
FIG. 35. DRIVE–END BEARING ASSEMBLY. E–39301.
MODELS
SEE TABLE 2, PAGE 20
The bearing assembly will be completed when the
armature is assembled into the frame.
Commutator–End Bearing
(Models US2, UP6, AUT2 and AUP5)
Refer to Fig. 39.
1. Clean and inspect the bearing and the shaft
bearing fit. Remove nicks and burrs.
2. If sleeve (13) was removed, heat it to 110 C
(230 F) and shrink it tight onto the shaft against
the shoulder.
3. When sleeve (13) has cooled, assemble a new
seal ring (5) onto the sleeve, oriented as shown
in Fig. 40.
4. Pack 5.20 oz. grease into the outer circumfer-
ence of the cavity of bearing housing (8).

GEK–91584D, Vertical Drilling Motor, Type GE752
60
FIG. 36. DRIVE–END BEARING ASSEMBLY (41B537821, CHG. B). E–37952B
13
12
17
2
4,5
20
3
6
14 ASSEMBLED TO EITHER P13
OR P17, DEPENDING ON MODEL.
NOT INCLUDED ON ALL MODELS
NOT INCLUDED ON ALL MODELS
APPLY P15 TO THREADS
AT BOTH ENDS OF P12
USE IF NECESSARY TO
ADJUST FOR PROPER
ASSEMBLY OF PARTS
17, 18 AND 19
TORQUE TO
110–120 FT. LBS.
22 FILL BEARING COMPLETELY
WITH 29 OZ. OF P7
24
NOT INCLUDED ON
ALL MODELS
SMEAR .5 OZ. OF
P7 ON SEALS
USE 4.8 OZ. OF
P7 IN EACH CAVITY
23
2
18
19
16,21
REF. DESCRIPTION
1 FRAME HEAD
2 GASKET
3 BEARING CAP
4 LOCKWASHER 5/8 N405P47P
5 BOLT 5/8–11 X 3 1/2 N22P33056
6 SLEEVE
7 GREASE
12 PIPE 1/4 X 6 IN.
13 COUPLING 1/4 NPT
14 PIPE PLUG 1/4 N5700P31
REF. DESCRIPTION
15 LOCK–TITE 497A806P36
16 FRAME HEAD
17 FITTING 90 ELBOW
18 FITTING 90 ELBOW
19 FITTING BULKHEAD
20 WASHER 9/16 N402P46B13
21 FRAME HEAD
22 ROLLER BEARING
23 BEARING CAP
24 FLINGER
MODELS
SEE TABLE 2, PAGE 20
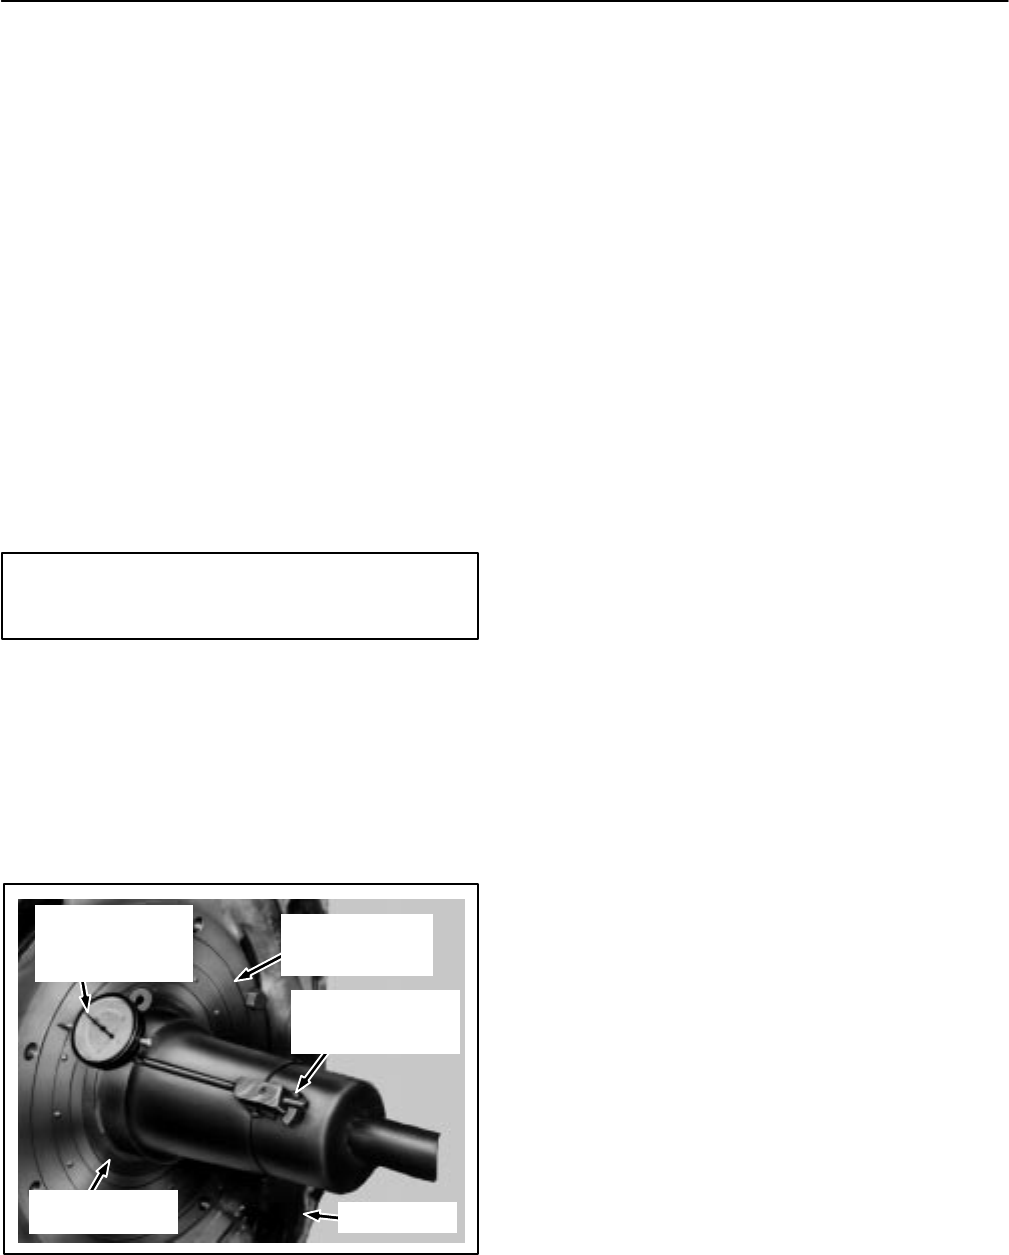
Vertical Drilling Motor, Type GE752, GEK–91584D
61
5. Heat bearing housing (2) in an oven to 100 C
(212 F). While hot, assemble nilos ring (4) (ori-
ented as shown in Fig. 40), and the ball bearing
(3) into the housing firmly against the shoulder at
the bottom of the bearing fit.
6. Fill all voids in the ball bearing completely with
approximately 20.8 oz. of grease. Smear 0.5 oz.
of grease on the bearing housing and bearing
cap seals, and on the seal ring wear surface on
the nilos ring (4).
7. Heat the bearing and housing assembly in an
oven to 100 C (212 F). While hot, assemble it
onto the shaft, with the inner race tight against
sleeve (13).
CAUTION: Be sure that the nilos ring is assembled
over sleeve (13), not pinched between the sleeve
and the bearing.
NOTE: Do not heat the bearing and housing as-
sembly above 100
C (212
F). Higher tempera-
tures may cause the oil to “bleed” from the
grease.
INNER BEARING
RACE
DIAL INDICATOR
POINTER RESTS
AGAINST OUTER
BEARING RACE
FRAMEHEAD
OUTER BEARING
RACE WITH
ROLLERS
SUPPORT FOR
INDICATOR ON
ARMATURE SHAFT
FIG. 37. CHECK ALIGNMENT OF BEARING
AFTER ASSEMBLY. A–120402.
8. Heat spacer (6) to 110 C (230 F) and shrink it
onto the shaft tight against the inner race of ball
bearing (3).
The bearing assembly will be completed when the
armature is assembled into the frame.
Armature Assembly Into Frame
Models UP and AUP
Refer to Fig. 15.
1. Assemble the brushholders into the frame. Move
them well back from commutator to avoid inter-
ference when installing the armature. Fasten
and insulate the connections and install outgoing
cables.
2. Block and level the frame in a vertical position,
commutator–end down, on a heavy duty stand.
Be sure there is clearance for the commutator–
end shaft extension when the armature is low-
ered into the frame.
3. Install three guide studs in the commutator–end
bearing housing bolt circle to guide the housing
into the framehead fit.
4. Pack 5.25 oz. of grease in the outer circumfer-
ence of bearing cap (4).
5. Lift the armature with the hoist and lifting bail at
the drive end. Line up the hoist directly over the
center of the cavity in the frame.
6. Lower the armature slowly into the frame, being
careful not to damage the commutator. When
the armature is almost fully inserted, use the
guide studs to align bearing housing (46) and
framehead bolt holes (56). (Position the bearing
cap to accommodate the grease tubes in UP1
and AUP1 models.)
7. When the armature has reached its limit of travel,
remove the guide studs and install bearing cap
(4) with a new gasket (57) using bolts and wash-
ers (52). Draw the bearing housing into
framehead (56). Torque bolts to 105–115 ft.lbs.
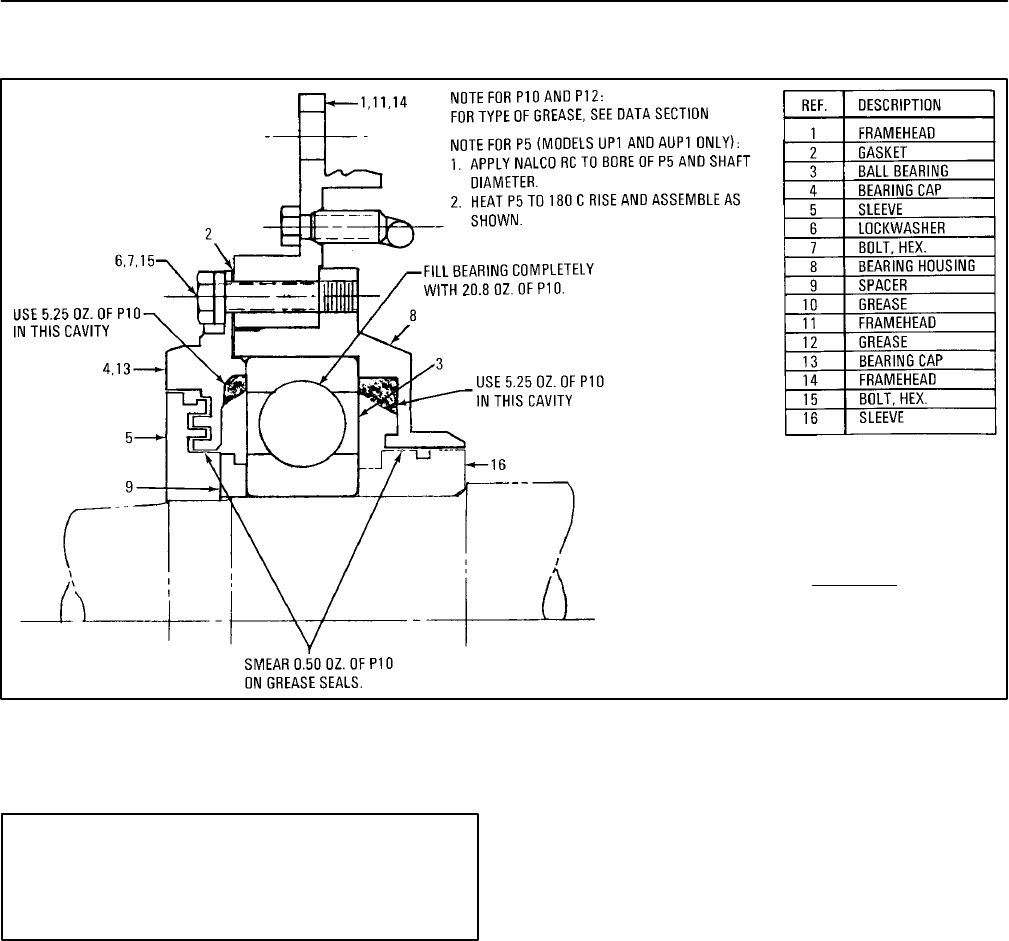
GEK–91584D, Vertical Drilling Motor, Type GE752
62
FIG. 38. COMMUTATOR–END BEARING ASSEMBLY (41B532745 CHG. F). E–39090A.
MODELS
SEE TABLE 2, PAGE 20
8. Install framehead bolts (10) and lockwashers
(12). Torque to 440–495 lb.–ft.
CAUTION: Alternate tightening of commu-
tator–end bearing housing and drive–end
framehead bolts. Uneven tightening of bolts
could damage bearings or related fitted sur-
faces.
NOTE: Be sure framehead bolt holes are
aligned with bolt holes in inner bearing cap be-
fore assembling bolts (10) and lockwashers
(12).
9. Install grease tubes at the drive end:
a. On UP1 and AUP1 models, two grease tubes
are required. Clean all residual sealing RTV
from the grease tube clearance hole in the
frame. Then, reach into the cavity of the ma-
chine, around the drive–end inner bearing
cap (51), and install these tubes to the bear-
ing cap so that they protrude through a hole in
the frame. Seal around the grease tubes at
their hole in the frame with RTV.
b. On UP2 and AUP2 models, one grease tube
is required. The procedure is the same as in-
dicated in Step 9a.
c. On all other models, one grease tube is re-
quired. This tube connects the inner bearing
cap with the framehead, and should have
been assembled with the drive–end bearing
assembly.
NOTE: Insure that all grease tubes are packed
full of grease.
10. Use a feeler gauge and check the radial clear-
ance on the drive–end bearing between each
bearing roller and the inner race, at the top of the
bearing, Fig. 40. Place the feeler gauge between
the top roller and the inner race.
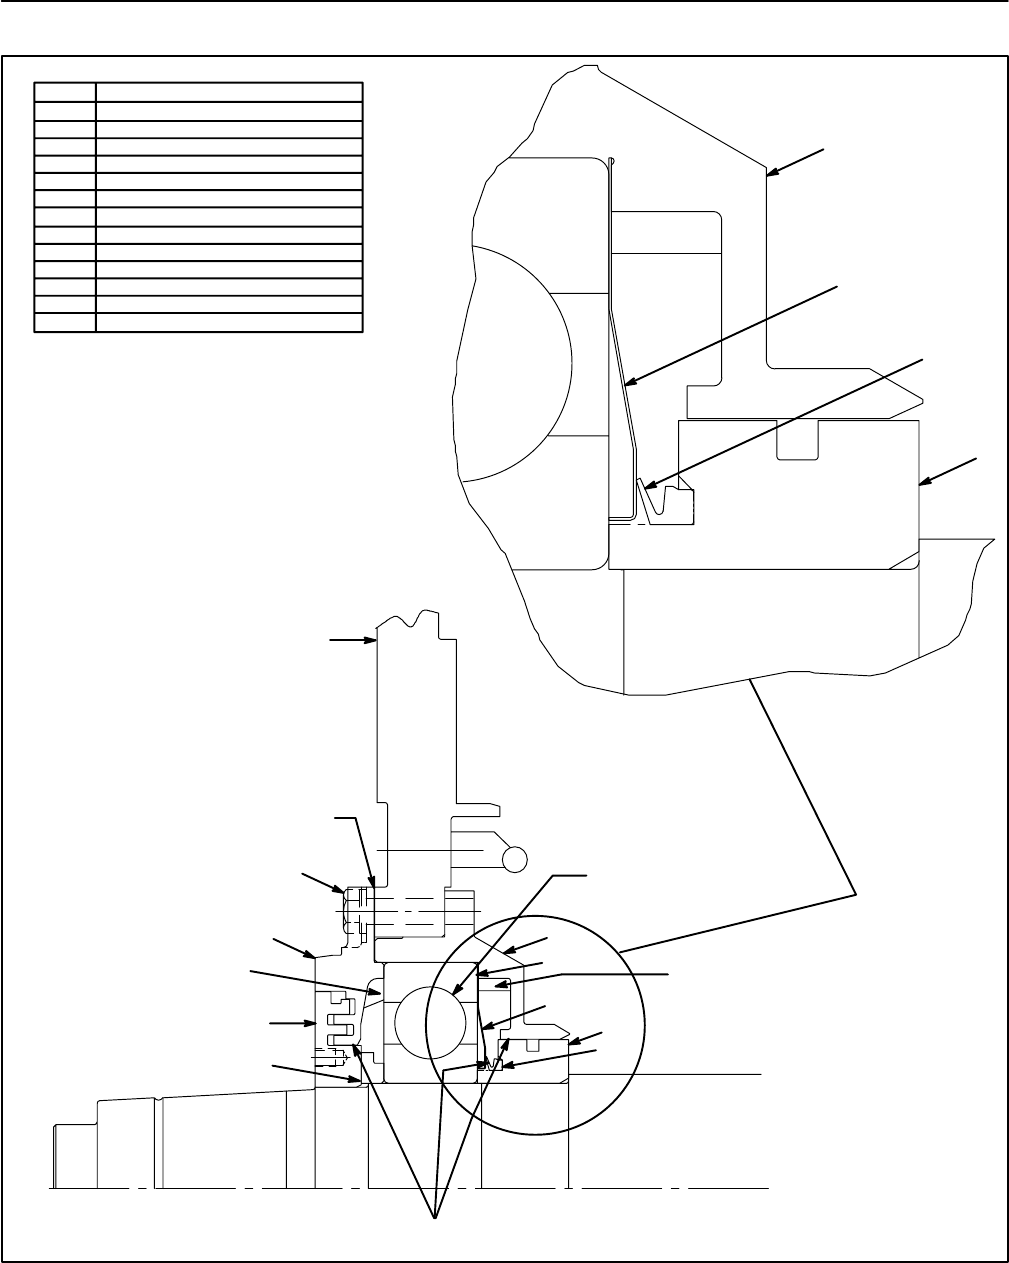
Vertical Drilling Motor, Type GE752, GEK–91584D
63
FIG. 39. COMMUTATOR-END BEARING ASSEMBLY (41B538068 CHG. 0). E-39300.
1
12
9,10
8
7
6
USE 5.2 OZ. OF P11
IN THIS CAVITY
FILL BEARING COMPLETELY
WITH 20.8 OZ. OF P11
2
3
4
5
13
USE 5.2 OZ. OF P11
IN THIS CAVITY
APPLY NALCO RC TO BORE
OF P7 AND SHAFT
HEAT P7 TO 180 C. (356 F)
RISE AND ASSEMBLE AS SHOWN
REFER TO ASSEMBLY INSTRUCTIONS
FOR DETAILS
SMEAR 0.80 OZ. OF P11 ON GREASE
SEALS AND SEAL SURFACE
oo
2
4
5
13
MODELS
US2, UP6, AUT2 AND AUP5
REF. DESCRIPTION
1 FRAME HEAD
2 BEARING HOUSING
3 BALL BEARING
4 NILOS RING
5 SEAL RING
6 SPACER
7 SLEEVE
8 BEARING CAP
9 BOLT, 5/8-11 X 2 3/4 N22P33044
10 LOCKWASHER, N405P47B13
11 GREASE
12 GASKET
13 SLEEVE
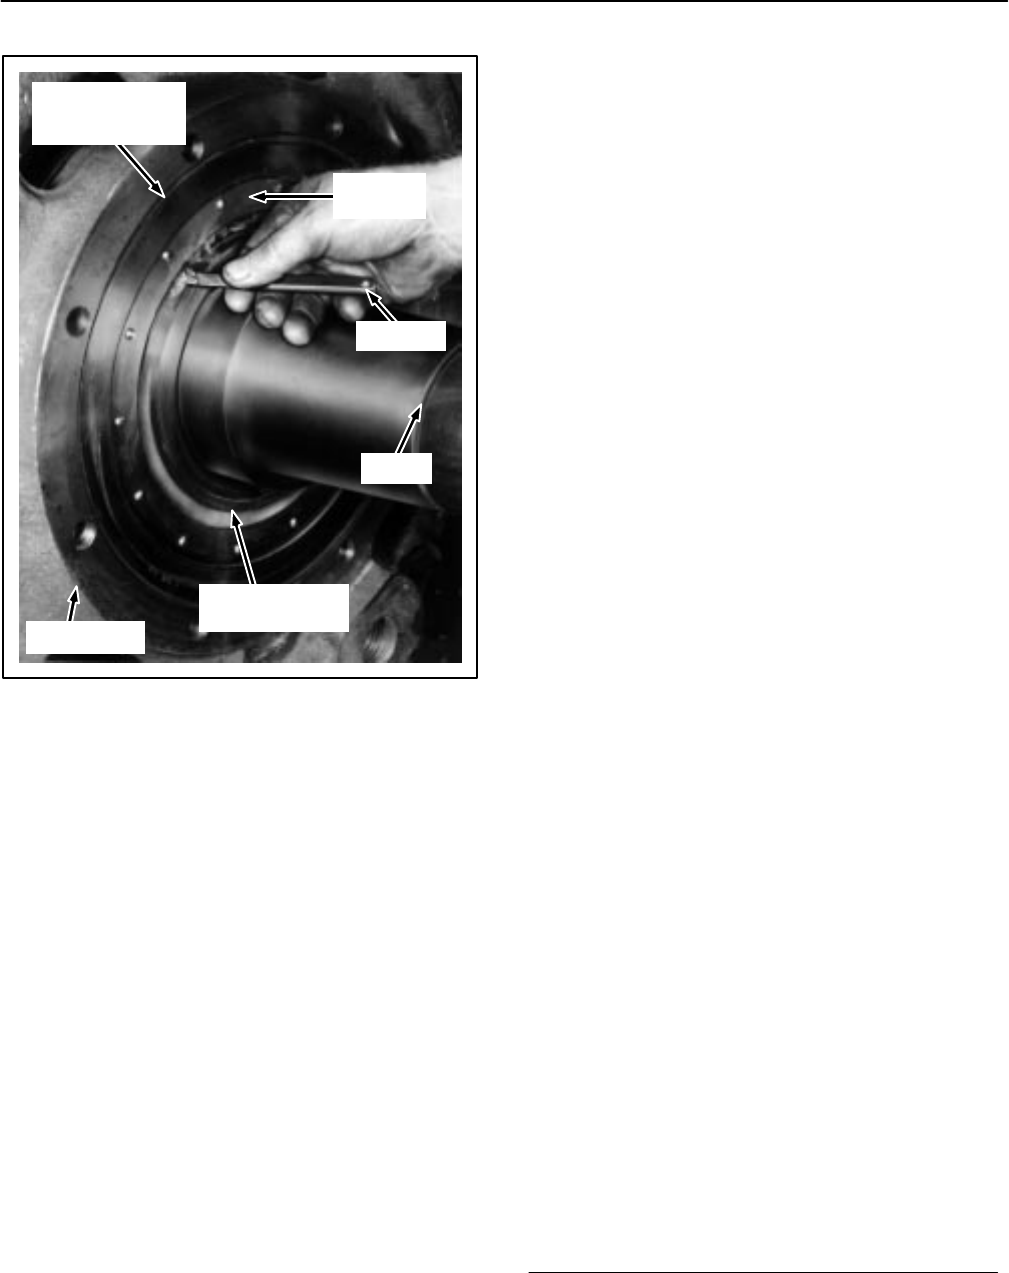
GEK–91584D, Vertical Drilling Motor, Type GE752
64
OUTER BEARING
RACE WITH
ROLLERS
BEARING
CAGE
INNER BEARING
RACE
FRAMEHEAD
SHAFT
FEELERS
FIG. 40. CHECKING INTERNAL CLEARANCE OF
BEARING. A-120403.
11. The clearance between the rollers and the inner
race should measure between 0.0012 and 0.004
in. Try various gauge thicknesses until clearance
can be determined by the feel of the gauge as the
gauge is slowly pulled from between the roller
and the inner race.
12. Pack 4.8 oz. of grease in the outer circumference
of outer bearing cap (5).
13. Install a new gasket (54) and bearing cap (5) with
bolts and lockwashers (53).
14. Smear seals on bearing cap (5) and sleeve (47)
with grease.
15. Heat sleeve (47) to 110 C (230 F) rise and
shrink it onto the shaft tight against the roller
bearing inner race (48).
16. Seal the grease tubes which protrude through
the hole in the frame with RTV–108.
17. At the commutator end, smear the seals on bear-
ing cap (4) and sleeve (42) with grease.
NOTE: Prior to heating sleeve (42), apply NAL-
CO RC* “Rail Conditioner” to the inside diame-
ter of the sleeve and to the mating surface on
the shaft. Apply the NALCO with a Scott–150
white paper towel only and allow it to dry to a
thin white film on both surfaces before pro-
ceeding with Step 18.
18. Heat sleeve (42) to 180 C (356 F) rise and
shrink it onto the shaft tight against the spacer
(43).
19. Assemble the grease tubes to the bearing cap
(4) (UP1 and AUP1 models only). Install pipe
plugs in tubes and tube fittings as indicated in
Fig. 15.
NOTE: Insure that grease tubes are packed full
of grease.
Armature Assembly Into Frame
Models US1, AUT
Refer to Fig. 18.
1. Assemble the brushholders into the frame. Move
them well back from the commutator to avoid in-
terference when installing the armature. Fasten
and insulate the connections and install outgoing
cables.
2. Block and level the frame in a vertical position,
commutator–end down, on a heavy duty stand.
Be sure there is clearance for the commutator–
end shaft extension when the armature is low-
ered into the frame.
3. Install three guide studs in the commutator–end
bearing housing bolt circle to guide the housing
into the framehead fit.
4. Pack 5.25 oz. of grease in the outer circumfer-
ence of bearing cap (8).
5. Lift the armature with the hoist and lifting bail at
the drive end. Line up the hoist directly over the
center of the cavity in the frame.
*Product of NALCO Chemical Co.

Vertical Drilling Motor, Type GE752, GEK–91584D
65
6. Lower the armature slowly into the frame, being
careful not to damage the commutator. When
the armature is almost fully inserted, use the
guide studs to align bearing housing (3) and
framehead bolt holes (14).
7. When the armature has reached its limit of travel,
remove the guide studs and install bearing cap
(8) with a new gasket (11) using bolts and wash-
ers (10). Draw the bearing housing into
framehead (14). Torque bolts to 110–120 ft.lbs.
8. Install framehead bolts and lockwashers(30).
Torque to 440–495 lb.–ft.
CAUTION: Alternate tightening of commu-
tator–end bearing housing and drive–end
framehead bolts. Uneven tightening of bolts
could damage bearings or related fitted sur-
faces.
NOTE: Be sure drive–end framehead bolt holes
are aligned with holes in inner bearing cap be-
fore assembling bolts and lockwashers (30).
9. Use a feeler gauge and check the radial clear-
ance on the drive–end bearing between each
bearing roller and the inner race, at the top of the
bearing, Fig. 40. Place the feeler gauge between
the top roller and the inner race.
10. The clearance between the rollers and the inner
race should measure between 0.0012 and 0.004
in. Try various gauge thicknesses until clearance
can be determined by the feel of the gauge as the
gauge is slowly pulled from between the roller
and the inner race.
11. Pack 4.8 oz. of grease in the outer circumference
of outer bearing cap (36).
12. Install a new gasket (35) and bearing cap (36)
with bolts and lockwashers (34). Torque bolts to
110–120 ft.lbs.
13. Smear seals on bearing cap (36) and sleeve (37)
with grease.
14. Heat sleeve (37) to 110 C (230 F) rise and
shrink it onto the shaft tight against the roller
bearing inner race (38).
15. Finish the assembly of grease tube fittings and
washer (27) where it passes through the
framehead. Tighten all fittings and hardware.
16. At the commutator end, smear the seals on bear-
ing cap (8) and sleeve (6) with grease.
NOTE: Prior to heating sleeve (6), apply NALCO
RC “Rail Conditioner” to the inside diameter of
the sleeve and to the mating surface on the
shaft. Apply the NALCO with a Scott–150 white
paper towel only and allow it to dry to a thin
white film on both surfaces before proceeding
with Step 18.
17. Heat sleeve (6) to 180 C (356 F) rise and
shrink it onto the shaft tight against the spacer
(5).
18. Install pipe plugs in grease tubes and tube fit-
tings as indicated in Fig. 18.
NOTE: Insure that grease tubes are packed full
of grease.
BRUSHHOLDER CLEARANCE
ADJUSTMENT
1. Remove the protective covering from the com-
mutator. Place a 1/16 in. fiber spacer between
the bottom of the brushholder and commutator.
Loosen the brushholder clamp bolts and move
the brushholders so they touch the fiber spacer.
Tighten the clamp bolts to 225–250 lb.–ft. torque
and remove the spacer.
2. Connect the cable leads to the brushholder ter-
minals and tighten the terminal bolts.
BRUSH INSTALLATION
1. Install new brushes.
CAUTION: When replacing brushes, use only
the GE recommended grade. Mixing of brush
grades in the same motor or changing
brushes to another grade will seriously affect
commutation, surface film, commutator and
brush life. See the DATA section for brush
grade.
2. Carefully lower the spring–loaded brush lever on
each brush. Do not allow the lever to snap
against the brush, as the brush may chip.

GEK–91584D, Vertical Drilling Motor, Type GE752
66
3. Attach the brush–shunt terminals to the brush-
holder body under the screws provided.
4. Inspect the interior of the machine for foreign ob-
jects. Install the commutator covers on the motor
and check for proper fit and latch operation.
5. Clean the terminals.
HUB MOUNTING
Hub Fitting
NOTE: GE does not supply the hub for vertical
drill motors. This procedure is included for cus-
tomer use as a reference when installing the
hub.
To prevent a hub from slipping, it should have at least
75 percent fit on the shaft; i.e., at least 75 percent of the
tapered bore of the hub should be in contact with the ta-
pered fit on the shaft. Before mounting a hub, check and
correct the fit as follows:
1. Lightly cover the bore of the hub with a blueing
compound such as Prussian Blue.
2. Snap the cold hub forcefully onto the shaft.
3. Mark the relative angular position of hub with re-
spect to the shaft.
4. Remove the hub from the shaft. A convenient
method of removal is by the use of two finely ta-
pered steel wedges (hardened and ground)
which are carefully driven between the hub and
the bearing outer sleeve on the shaft.
5. Inspect the taper fit of the shaft; blueing of the
hub bore should now show on the shaft. If at least
75 percent of shaft surface shows traces of blue-
ing, the fit is satisfactory. If, however, only a few
spots of blueing show on the shaft, the fit is not
satisfactory.
6. Dress down the blue spots on the shaft very light-
ly with a fine emery cloth such as No. 400A Trie-
mite.
7. Blue the hub bore again (see Step 1) and repeat
Steps 2, 4, 5 and 6. Be sure to place the hub onto
the shaft in the same position as marked.
Generally, the fit will be improved, but the forego-
ing procedure may have to be repeated several
times to obtain a 75 percent fit.
Under no circumstances use a lapping com-
pound since lapping will produce a shoulder at
the large end of the tapered fit. A shoulder will
prevent a perfect fit when the hub is mounted
hot; i.e., when it is mounted in the advanced posi-
tion.
8. After a good fit has been obtained, thoroughly
clean the shaft and the hub bore to remove all
blueing, oil or grease. Then mount the hub.
Hub Mounting
1. Thoroughly clean the hub fit on the shaft and
bore of the hub (see the procedure in the Clean-
ing section). Remove any scoring on the shaft or
hub bore.
2. Spot the cold hub on the shaft by hand and check
for at least 75 percent fit. See the “Hub Fitting”
section. If necessary, dress the shaft to obtain
this fit.
3. Trial mount the cold hub onto the shaft. Measure
and record the position of the hub with respect to
the end of the shaft. Take measurements with a
micrometer advance gauge similar to that shown
in Fig. 41. Zero the gauge.
Mark points of measurement, and mark across
the end of shaft and hub face so that the hub,
when heated, can be mounted in exactly the
same angular position, and so the advance mea-
surement can be made from the same point.
4. Mount the hub hot onto the shaft so as to secure
an advance from the cold position to the hot posi-
tion along the axis of the shaft as indicated in this
section. The ESTIMATED difference between
shaft temperature and hub temperature (temper-
ature rise) which will provide this advance is also
given. The temperature difference is only an esti-
mate and should be adjusted (if necessary) to
provide the advance within prescribed limits.
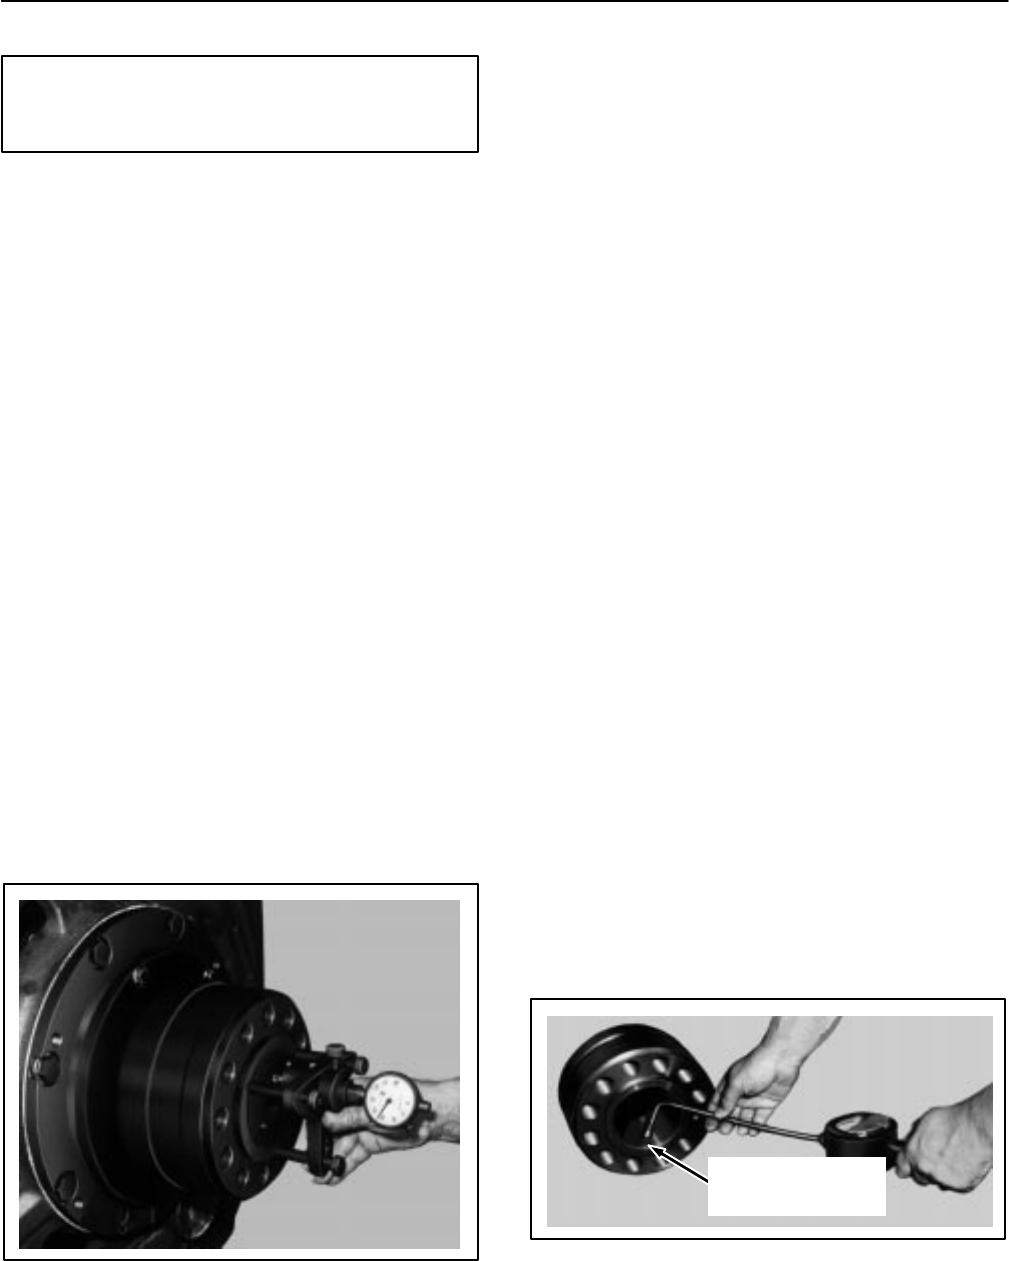
Vertical Drilling Motor, Type GE752, GEK–91584D
67
CAUTION: Zero settings of advance gauge
must not be disturbed until all readings on the
hub are completed.
Heat the hub in an oven until it has reached a uni-
form temperature (the desired number of de-
grees above shaft temperature). For example, if
shaft temperature is 25 C (77 F), heat hub to
25 C (77 F) +171 C (339 F) = 196 C (385
F). This procedure should provide an advance of
approximately 0.085 in.
An accurate method must be provided for mea-
suring hub and shaft temperatures quickly be-
fore mounting the hub. This can best be done
with a hand pyrometer. In using the pyrometer,
place points of the gauge inside the bore of the
hub, Fig. 42.
NOTE: The part must be left in the oven long
enough for the heat to penetrate throughout the
part.
Measure the temperature of the shaft and the
hub with the same instrument.
5. Insure that the hub bore and the shaft taper are
clean. Then, using adequate hand protection,
quickly mount the hot hub on the shaft in the
same angular position as when cold. When the
FIG. 41. METHOD OF USING ADVANCE
GAUGE. E–5975A.
hub is nearly in engagement with the taper fit (not
in actual contact), snap it forcibly into place with a
quick push. It is important that the hot hub be in-
stantly snapped into position before it has
cooled; otherwise, it will freeze to the shaft and
cannot be adjusted further.
6. Check the hot or shrunk–on position of the hub
on the shaft. The advance from cold to hot posi-
tion along the axis of the shaft must be held with-
in the limits indicated. Check the actual advance
with an indicator gauge, located in the same rela-
tive position as used to measure the cold position
in Step 3, Fig. 41.
If the advance is not within specified limits, re-
move the hub and repeat the assembly proce-
dure.
TESTING AFTER OVERHAUL
TESTING SERIES MACHINES
(Models 5GE752AUP, AUT)
After the motor has been reconditioned and reas-
sembled, make the following tests to assure it will oper-
ate satisfactorily.
Connect the motor to a d–c arc–welding generator,
Fig. 7. Refer to connection diagrams, Figs. 22 and 24,
for connections. Run the machine series–connected
without load at 900 rpm and measure bearing tempera-
tures.
1. Use Duxseal* putty to hold the thermometers on
the drive end and commutator–end outer bear-
PLACE PYROMETER
POINTS IN BORE
OF HUB
FIG. 42. MEASURING TEMPERATURE OF
COUPLING HUB WITH PYROMETER. E–5976.

GEK–91584D, Vertical Drilling Motor, Type GE752
68
ing caps. Thermometers should contact the
bearing caps for best results.
2. Seat the brushes and run for ten minutes at 900
rpm.
Frame temperature should not exceed 25 C rise.
3. With machine running up to speed, measure vi-
bration. Vibration should not exceed 0.002 on
commutator end. If vibration exceeds this
amount, rebalance the armature.
4. Check the commutator for roughness and make
sure the brushes are riding properly.
5. Use a listening rod to check for noisy bearings.
6. Stop the machine and mount an indicator on the
frame. While turning the armature by hand, mea-
sure commutator runout. It should not exceed
0.001 in.
7. Measure field impedance. With 60 Hz a–c and 24
amperes through each field, measure the volt-
age drop across total exciting and commutating
fields. See the DATA section for voltage limits.
8. Apply a high–potential test to the windings of the
assembled machine, as specified in the DATA
section.
WARNING: Electric shock can cause serious
or fatal injury. Proper precautions should be
taken and observed by personnel performing
testing to avoid such injury.
TESTING SHUNT MACHINES
(Models 5GE752UP and US)
After the motor has been reconditioned and reas-
sembled for service, make the following tests to be sure
it will operate satisfactorily.
Connect the motor to a d–c welding generator. Refer
to connection diagrams (Figs. 21 and 23) for connec-
*Product of Johns Manville Co.
tions. Run the machine by separately exciting the shunt
field from a 125 vdc source. From another source of
power, apply voltage to the armature circuit until the de-
sired speed is obtained.
Motor Operation
Ventilated (2300 cfm at 7.6 in. H2O
at Commutator Chamber)
Hold separate field excitation at 50.5 amperes. Vary
the armature voltage to obtain the required rpm. At ap-
proximately 700 terminal volts (no load), the speed will
be 900 rpm.
Unventilated
Hold the separate field excitation at 10 to 15 am-
peres. Vary the armature voltage to obtain the required
rpm. At approximately 338 terminal volts (no load), the
speed will be 900 rpm.
1. Run the motor for five minutes at 450 rpm. In-
crease the speed to 900 rpm and run for two
hours. Bearing temperatures should not exceed
70 C (158 F). Run until the bearing tempera-
ture remains constant for 30 minutes. Increase
the speed to 1300 rpm and hold it while perform-
ing Steps 2, 3 and 4. Then shut down the motor.
Do not exceed 1300 rpm.
2. Measure vibration when running the motor up to
speed. Vibration should not exceed 0.004 in. If
excessive, rebalance the armature.
3. Check the commutator for roughness. Be sure
brushes are riding properly.
4. Listen for noisy bearings with a listening rod.
5. Stop the motor and mount an indicator on the
frame. Turn the armature by hand and measure
commutator runout. Runout should not exceed
0.001 in.
6. Measure the insulation resistance of the wind-
ings with a megohmmeter. If the resistance mea-
sures not less than one megohm, apply an a–c
high–potential test to ground for one minute as
outlined in the DATA section.
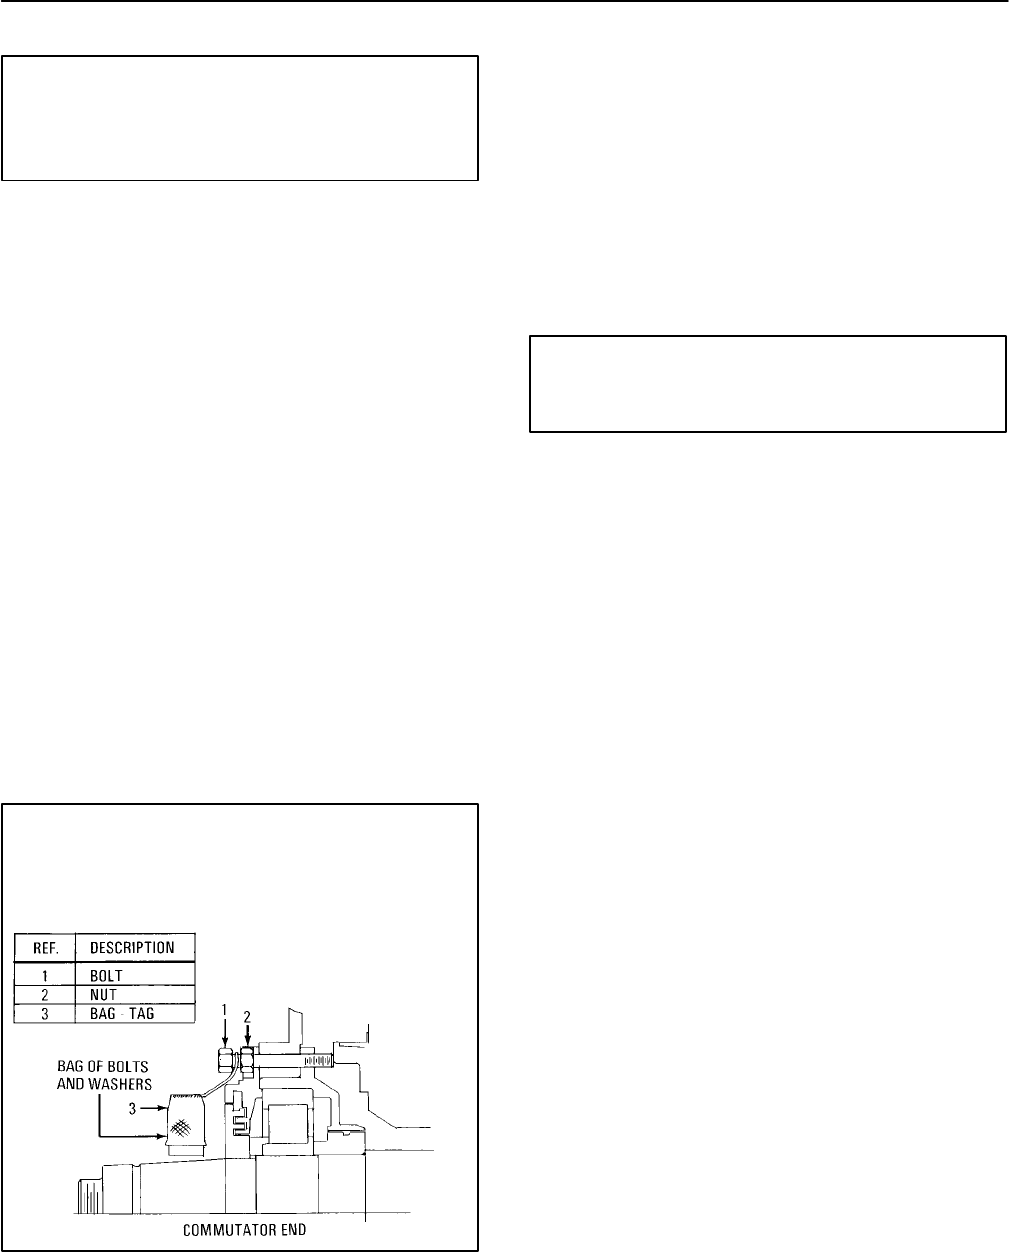
Vertical Drilling Motor, Type GE752, GEK–91584D
69
WARNING: Electric shock can cause serious
or fatal injury. To avoid such injury, personnel
should take and observe proper precautions
during the high–potential testing.
REMOVING ARMATURE
LOCKING ARRANGEMENT
(See Fig. 43)
1. Remove the two shipping bolts (1) from the bear-
ing cap. These bolts are longer and can be identi-
fied from the factory by their yellow heads.
2. Install the two regular bolts which are in a bag at-
tached to one of the shipping bolts.
3. Torque the regular bolts to 115 lb.–ft.
NOTE: The shipping bolts and bag should be
saved for future armature locking require-
ments.
FIG. 43. ARMATURE LOCKING ARRANGEMENT
(41B535748 CHG. 0). E–28735A.
LOCKING THE ARMATURE
FOR SHIPMENT
(See Fig. 43)
1. Remove two diametrically opposite bolts in the
commutator end bearing cap.
2. Install shipping bolts (1) (painted yellow) with jam
nuts (2) applied. Torque bolts to 30 lb.–ft. and
tighten the jam nuts.
CAUTION: Do not rotate the armature when
the locking bolts are in place. Bearing and
commutator damage may result.
3. Attach the two regular bolts and bag–tag (5) to
one of the locking bolts (1).
SHIPPING
Whenever drilling motors are to be shipped, they
must be properly skidded and secured to prevent any
damage in transit. The photographs and drawings which
follow illustrate a proven method of skidding these ma-
chines for handing and shipment.
HANDLING
To avoid damage to the machine during handling, re-
view the following cautionary statements:
1. Do not lift motors by the shaft extension of the ar-
mature.
2. Do not allow the armature to bump another ob-
ject.
3. Do not tighten coupling assembly bolts with an
air wrench or by pounding.
4. Do not remove armature end–play by any other
means than axial blocking.
5. Do not load the armature radially (strap down) for
shipment.
CLEANING AND SLUSHING
Before skidding the machine for shipment, all ex-
posed finished surfaces not already painted should be
cleaned and slushed as follows:
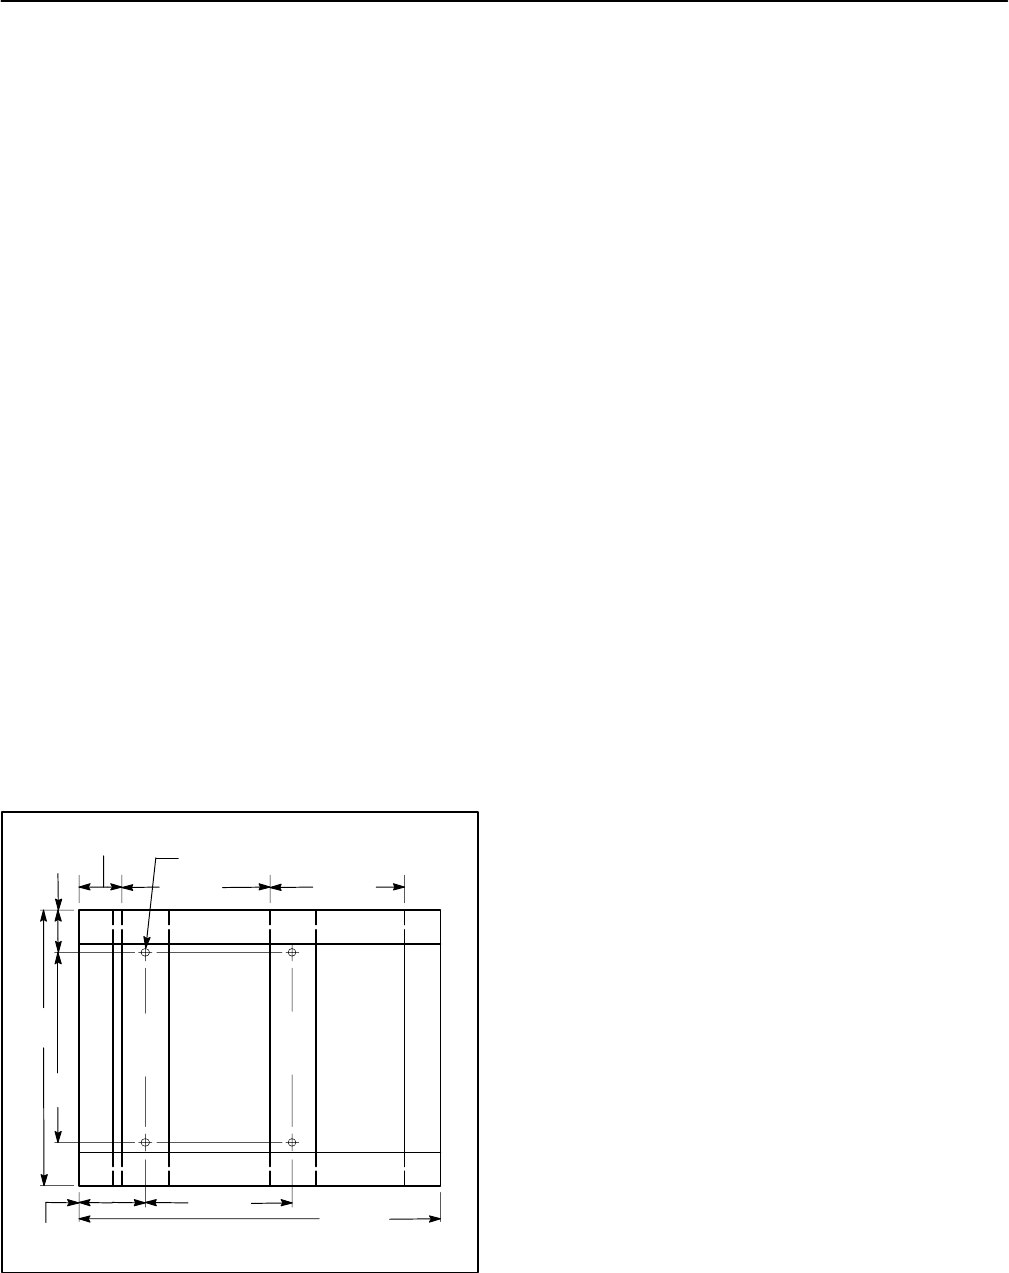
GEK–91584D, Vertical Drilling Motor, Type GE752
70
1. Remove all corrosion.
2. Wipe off the surface with clean rags and wet with
petroleum spirits GE–D5B8.
3. Follow with a clean rag wet with methanol, then
wipe dry. DO NOT touch the cleaned surface
with bare hands.
4. Slush immediately after cleaning with
GE–D6C6A1 slushing compound.
SKIDDING
Use yellow pine timbers large enough to support the
weight of the machine. The recommended size is illus-
trated in Fig. 44.
PROTECTION
When any apparatus is shipped in the open, it should
be fully protected from rain, snow, dirt, etc., by covering
with some suitable weatherproof material.
ARMATURES
To prepare drilling motor armatures for shipment or
storage, clean, slush and wrap the armature. Then, se-
FIG. 44. CONSTRUCTION DETAILS. E–7754.
3/4” DIA. (4 HOLES)
7–1/2”
25–1/4” 23–1/2”
2” X 6”
11–1/2”
25–1/4” 62–1/4”
48”
3” X 8”
3” X 6”
7–1/2”
2” X 6”
33”
3” X 8”
3” X 6”
curely support and enclose the armature in a totally en-
closed wooden box of sufficient strength to protect the it
from damage.
1. Clean the armature by removing dirt, oil or
grease from its surface.
2. Treat all unpainted, exposed finished surfaces
as follows:
a. Remove any corrosion.
b. Wipe off the surface with a clean cloth dipped
in petroleum spirits, GE–D5B8.
c. Wipe off the surface with a clean rag, dipped
in methanol, and wipe dry. DO NOT touch the
cleaned surfaces with bare hands.
d. Immediately after cleaning, slush the cleaned
surface with GE–D6C6A1 shushing com-
pound.
3. Wrap heavy paper or cardboard around the com-
mutator for protection.
4. Wrap and secure waterproof paper around ar-
mature punchings. This will prevent saddle tim-
ber moisture from condensing on the core
punchings.
5. Wrap both ends of the shaft with Grade C, Type
1, wax treated cloth and tape it securely into
place.
NOTE: Wherever metal parts come in contact
with the wood, insert a good grade of water-
proof paper between metal and wood. This will
prevent rust formation from the condensation
of moisture on the metal.
PREPARATION OF BOX
1. Make a suitable box from yellow–pine lumber us-
ing timbers of proper size to support the weight of
each armature. See Fig. 45.
2. Make 4 saddle blocks of 3 by 6 in. timber cut out
to fit circumference of armature core. Nail two to
the bottom of the box in the proper position to
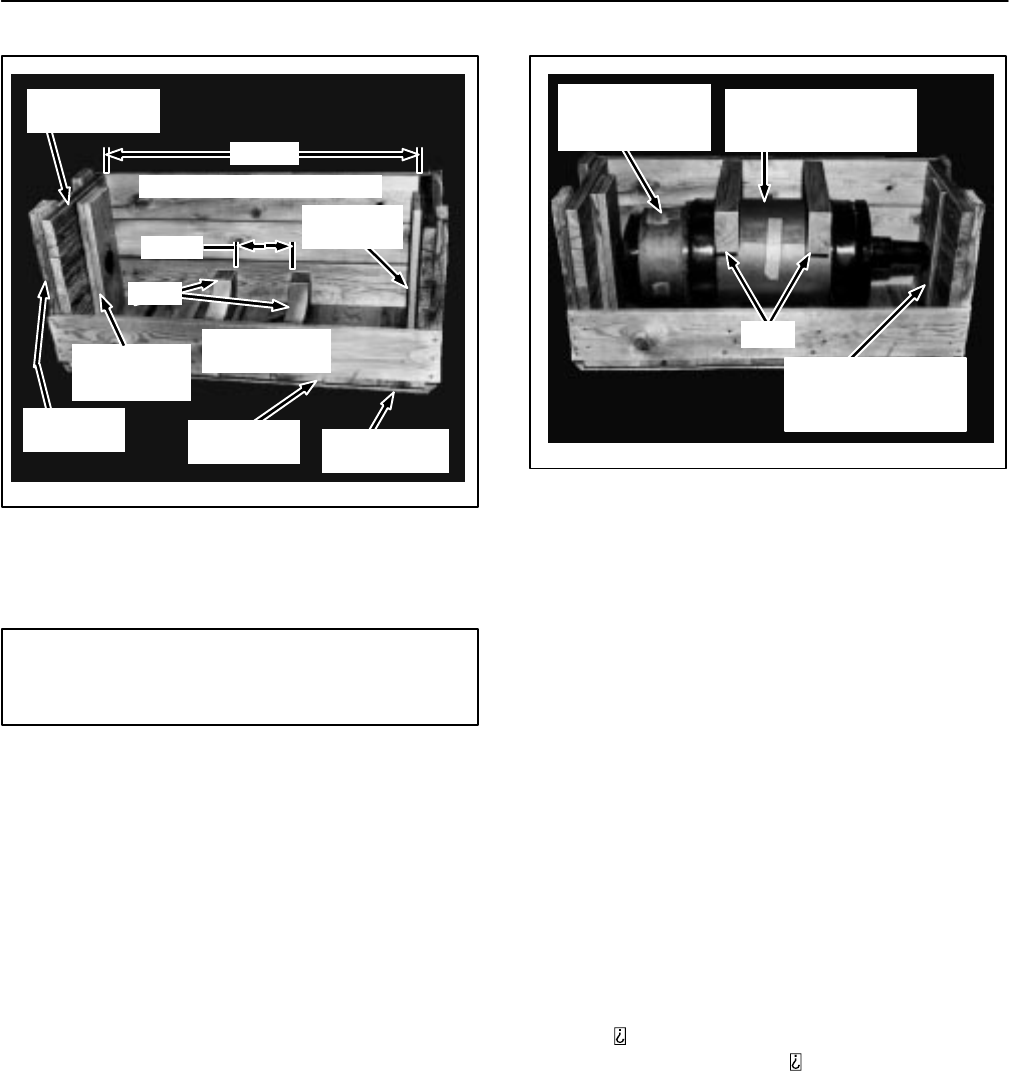
Vertical Drilling Motor, Type GE752, GEK–91584D
71
FIG. 45. BOX FOR SHIPPING
ARMATURES. E–3782A.
50–1/2
2 X 6 X 20–1/2
(8 PIECES)
ALL DIMENSIONS IN INCHES
9–1/2
1 X 6 X 22
(NO HOLE)
3 X 6
1 X 6 X 57–1/2
(18 PIECES)
1 X 6 X 22
(2 PIECES)
WITH HOLES
2 X 6 X 24
(4 PIECES) 1 X 6 X 22
(18 PIECES) 2 SKIDS –
3 X 6 X 57–1/2
support the armature on core punchings.
CAUTION: Locate the saddle blocks so they
do not project beyond the punchings; other-
wise, scuffing of coil insulation could occur.
3. Support the commutator–end of the shaft by two
1 X 6 in. boards nailed to the end of the box. Drill a
hole in the two boards just large enough for the
end of the shaft. See Fig. 45. The end of the shaft
will fit in this hole against the end of the box to
prevent movement.
4. After the armature has been placed in the box,
insert a board of proper thickness between the
end of the shaft and the end of the box. Securely
nail it in place. This will prevent any lateral move-
ment of the armature in the box.
BOXING THE ARMATURE
1. Prepare the armature as specified in the forego-
ing.
2. Place it in the box. Support it on two saddle
blocks under the punchings and secure it against
lateral movement. See Fig. 46.
FIG. 46. ARMATURE PLACED IN
SHIPPING BOX. E–3783.
WRAP WATERPROOF
PAPER AROUND
PUNCHINGS
WRAP HEAVY
PAPER AROUND
COMMUTATOR
3 X 6
ADJUST THICKNESS
OF END BOARD TO
SUIT LENGTH OF
SHAFT
3. Place two saddle blocks over the core punch-
ings, as shown in Fig. 46, and nail them to the
side boards. If the box is the correct size, the top
of the saddles will be flush with the top of the side
boards. See Fig. 47.
4. Nail the top cover in place. Also nail through to
the top saddle blocks to prevent them from mov-
ing.
STORAGE
PLACING INTO STORAGE
When placing GE drilling motors into storage, the fol-
lowing preparations should be performed to prevent
damage to the equipment as a result of the storage.
1. Machines should be placed on a pallet and
stored indoors if possible. A clean, dry ambient of
60 F is preferred. In a high humidity environ-
ment, an ambient of 70 F is recommended. Ev-
ery attempt should be made to avoid widely vary-
ing temperatures and high humidity.
2. If it is necessary to store outdoors, a protective
cover should be used to prevent entrance of rain,
dust, etc.
3. All exposed machined steel parts and surfaces
should be slushed. These areas are slushed
prior to shipment from the factory, but should be
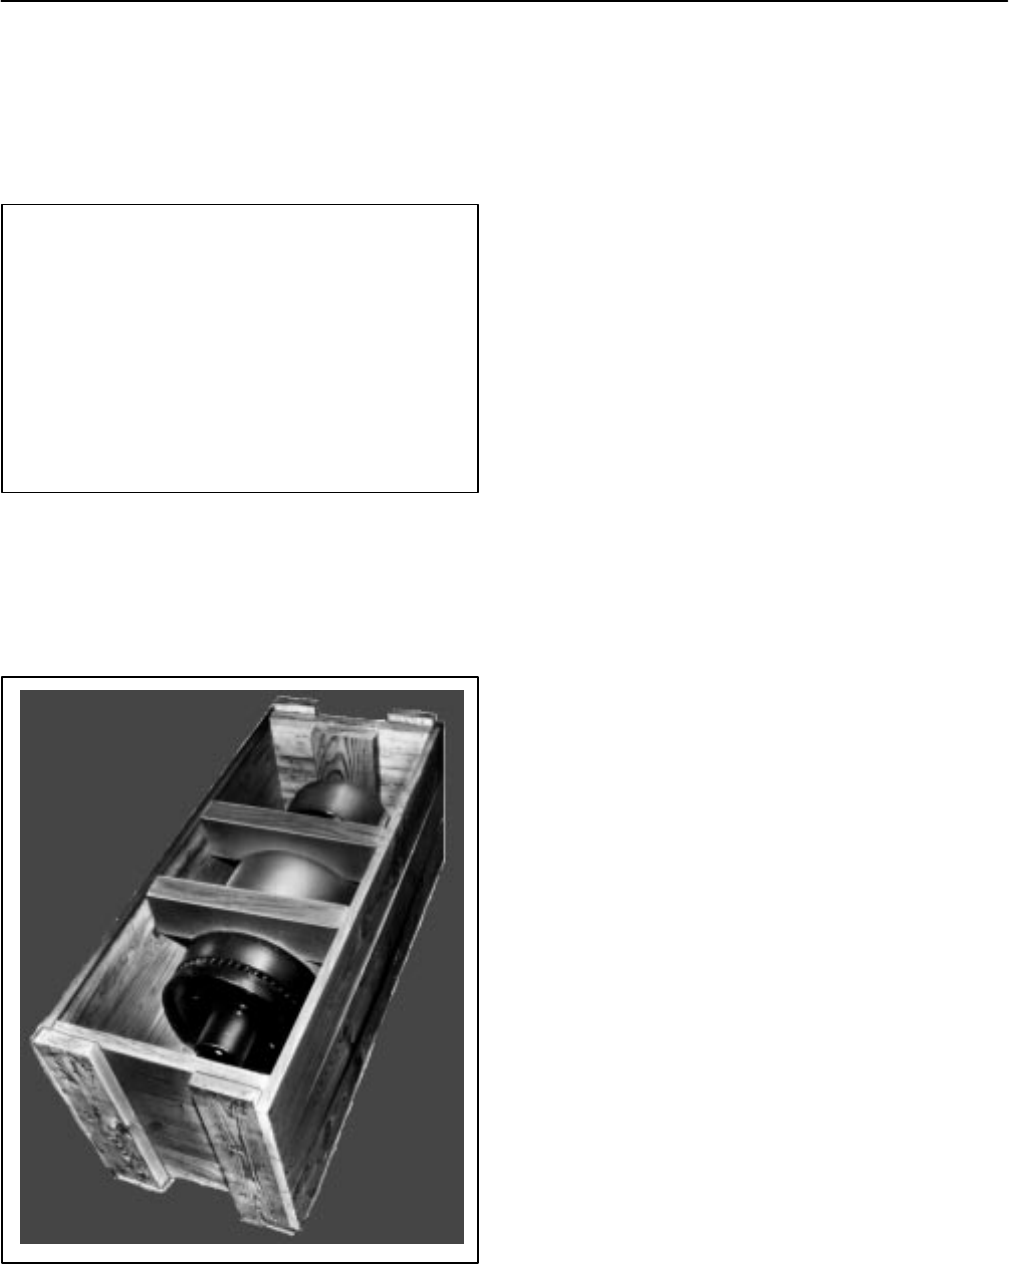
GEK–91584D, Vertical Drilling Motor, Type GE752
72
examined for rust. Any rust found should be re-
moved using fine abrasive paper, after the old
slushing compound has been removed with min-
eral spirits (GE–D5B8). Methanol should be
used to remove all residue.
WARNING: Cleaning solvents may be toxic and/
or inflammable. They can cause serious or fatal
injury if used without proper precautions. For
safety:
1. Do not inhale solvent fumes.
2. Use solvents only in adequately ventilated
areas.
3. Avoid contact of solvent with the skin.
4. Do not expose solvent to flame or sparks.
5. Observe caution statements issued by the
manufacturer of the solvent.
Extreme care should be exercised not to dam-
age critical machined surfaces such as the ta-
pered shaft surface while removing rust. The
surfaces should be reslushed with GE–D6C6A1
FIG. 47. SHIPPING BOX WITH ARMATURE,
LESS COVER. E–3784.
slush compound, Kendell Grade 5, or the equiva-
lent.
4. Brushes should be removed from their holders
and clamped under the spring clips to prevent
corrosion of the commutator surface as a result
of moisture absorption by the carbon.
5. Do not completely seal the motor, but cover ma-
jor vent areas with a waterproof shipping tape.
Leave enough opening so the machine can
breathe – i.e., moist air is not trapped. The inten-
tion is to prevent entrance of water, dust, small
animals, etc., but not to seal airtight. GE does not
recommend the use of a silica gel or dehydrating
agent.
6. Since the lubricant drains from the top half of
bearings during storage, this area is subject to
corrosion. The shaft should be rotated periodi-
cally to redistribute a protective film. If stored in-
side, rotate every three months. If outside, every
month. Before placing the machine back into
service after prolonged storage (1 year or more)
bearings should be inspected and repacked with
new grease meeting the recommended GE lubri-
cation specification.
7. The machine should be meggered when placed
into storage and periodically while in storage
(3–month intervals). Keep a record of these
megger readings as a rapid decrease in insula-
tion resistance indicates the machine condition
is deteriorating and the storage conditions inade-
quate.
Before placing a stored motor back into service, refer
to the applicable instruction “Removing Motors From
Storage”.
REMOVING FROM STORAGE
Before placing a stored motor in service, perform the
following:
1. Blow dust and dirt accumulation out of the wind-
ings with clean, dry air.
2. Visually inspect for spring corrosion, sticking
brushes in brushholders and general defects.

Vertical Drilling Motor, Type GE752, GEK–91584D
73
3. Check winding insulation continuity to ground
with a 500 volt megger. If the megger reading is
less than 2 megohms, the winding should be
baked or dried until the moisture content is suffi-
ciently reduced to raise the megger reading to 2
megohms.
4. An electrical source of heat is best for drying as it
can be easily regulated and is clean. Proceed as
follows:
NOTE: Before drying windings, consideration
must be given to bearings and lubricants. Not
only can bearing lubricants be damaged by
heat, but they can also deteriorate with age. For
this reason, it us usually best to remove bear-
ings before drying and repack with new grease
before reassembly.
a. Remove the armature from the frame and re-
move bearings from the armature shaft.
b. Heat the frame and armature until dried suffi-
ciently to obtain the 2 megohm reading.
c. Pack bearings with new grease. Refer to the
DATA table for the proper grease. Refer to the
appropriate bearing illustration for the proper
amount of grease.
d. Reassemble the motor.
e. If facilities are available, give the reas-
sembled machine a running test to check the
bearings.
Refer to Figs. 48 and 49 for outline drawings.
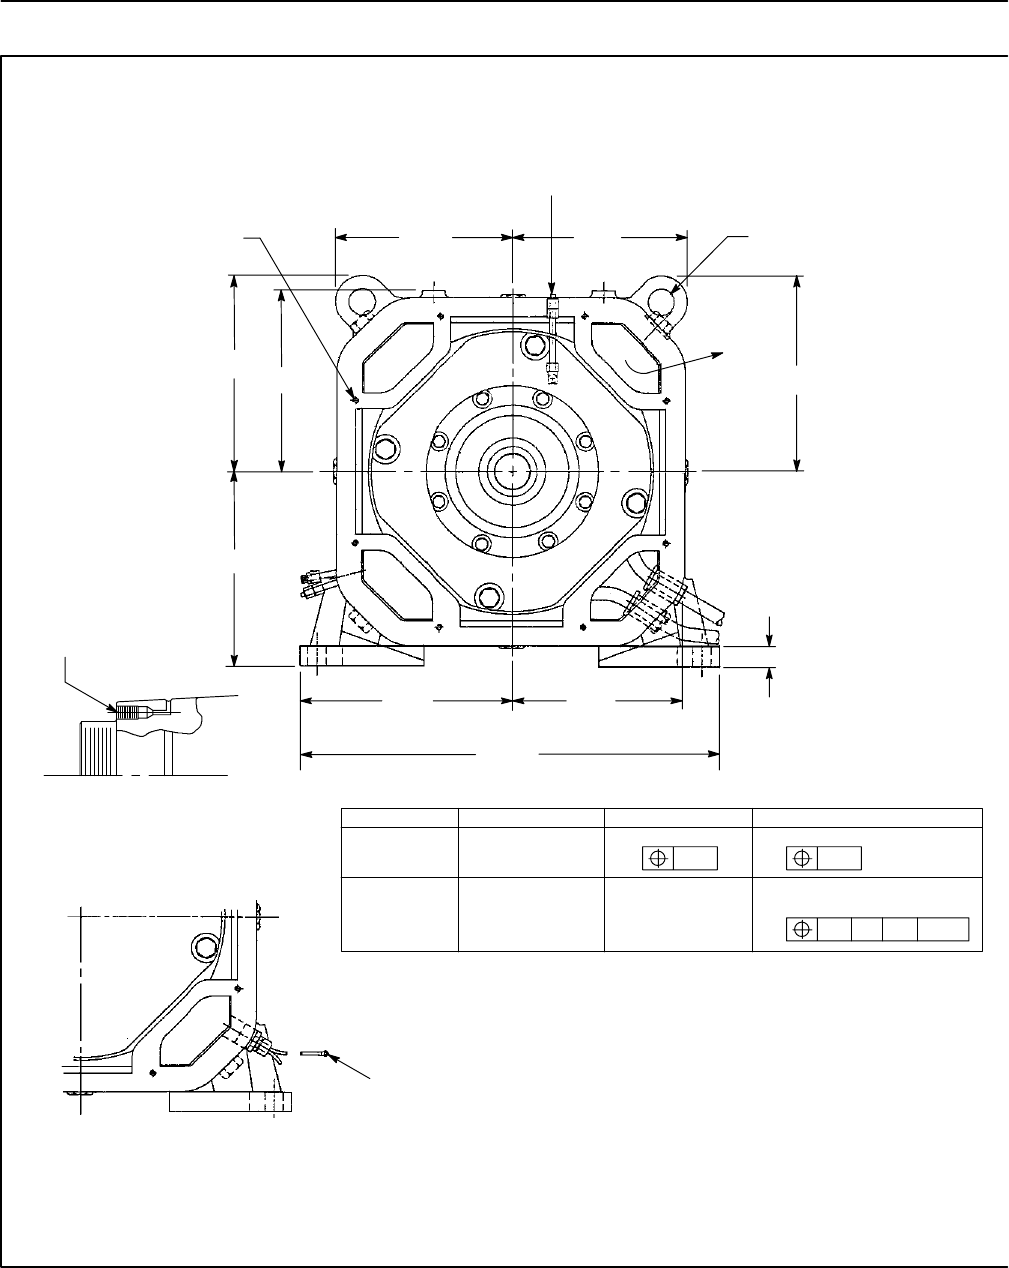
GEK–91584D, Vertical Drilling Motor, Type GE752
74
FIG. 48. OUTLINE, UP AND AUP (41E903631 CHG. H). E–28755B.
15.09
16.82
+
–.25
15.53
16.656
+.000
–.010
15.09
16.82
+
–.25
1.72
18.00 14.78
36.000
+.000
–.010
AIR OUT
(4 CORNERS)
.50–13 TAP X 1.00 DEEP
8 HOLES
F1
F2
ONE .25 PIPE PLUG–REPLACE
WITH GREASE FITTING FOR
2.25 DIA. (3 HOLES)
FOR LIFTING
.375–24 THD.
VIEW SHOWING HYDRAULIC
PUMP OFF FOR HUB
BOTH ENDS
.06 THICK TERMINALS FOR
NO. 10 SCREW ON 37/24 CABLES
EXTENDING 10 FEET FROM FRAME
FIG. 1
GE–752–UP
SAME AS GE–752–AUP EXCEPT
F1 AND F2 CABLES AS SHOWN
–A– –B– –C– .004R
+
–.002
.000
F1
F2
MODEL ”E” ”F” ”G”
UP1 .75–10 22.12 16.50
AUP1 THRU .04R .01R
UP2, 3 & 4 1.005 22.124 16.500
AUP2, & 3 DIA. THRU 22.116
REGREASING (ALL MODELS EXCEPT UP1, UP2, AUP1 AND AUP2)
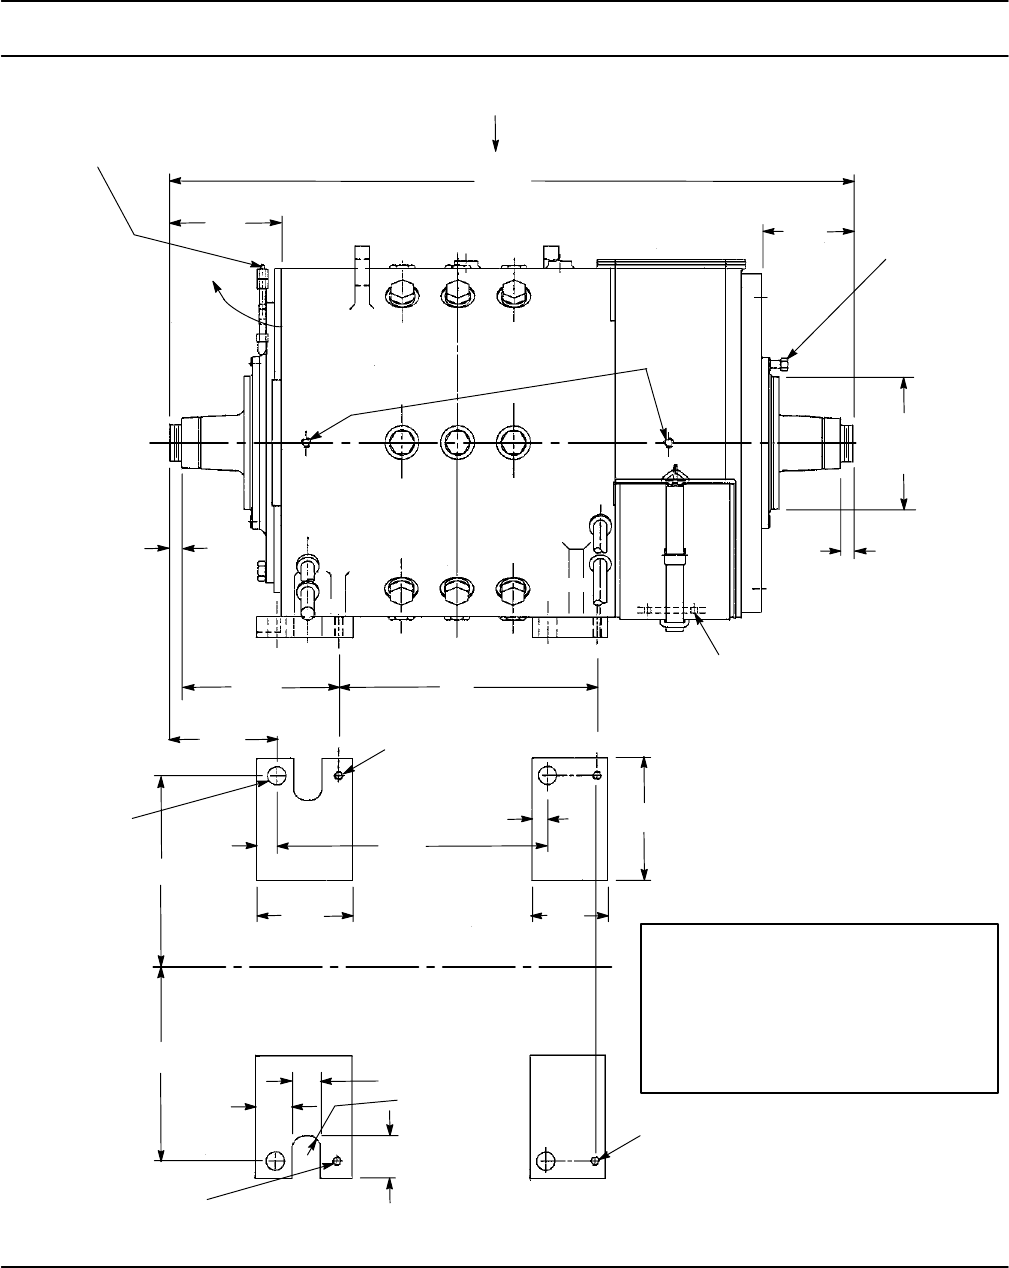
Vertical Drilling Motor, Type GE752, GEK–91584D
75
FIG. 48. OUTLINE, UP AND AUP (41E903631 CHG. H). E–28755B.
58.50
AIR OUT
9.56
13.43
+
–.06
9.24
F
10.50
23.12
1.38
1.74
8.25 6.50
G
3.19
2.38
–.12
1.00 R.
3.62
7.88
1.06
1.06
+
–.06
G+
+
–.005
11.375
DIA.
C ARMATURE
L
.50 NPT FOR
AIR PRESSURE
MEASUREMENT
A1
F2
F1
ONE .25 PIPE PLUG–REPLACE
WITH GREASE FITTING FOR
1.56 DIA. THRU
(4 HOLES)
E HOLE
.75–10 TAP THRU
(2 HOLES)
FOR JACKING FOOT
DIMENSIONS
C MOTOR
L
.562 DIA.
2 HOLES
ARMATURE LOCK
ARRANGEMENT
SEE NOTE
E HOLE
G
A2
NOTE FOR ARMATURE LOCKING ARRANGEMENT
LOCATED ON COMMUTATOR END
TO BE IN PLACE DURING MOUNTING OF MOTOR
BUT TO BE REMOVED BEFORE OPERATION OF
MOTOR
GE–752–AUP SHOWN IN MAIN VIEWS
GE–752–UP SHOWN IN FIG. 1
APPROXIMATE WEIGHTS
GE–752–UP 6750 POUNDS
GE–752–AUP 6850 POUNDS
AIR FLOW REQUIREMENTS
2300 CFM OF STANDARD AIR
MINIMUM 900 HP
2800 CFM OF STANDARD AIR
MINIMUM 1000 HP
IMPORTANT
THE ELECTRICAL EQUIPMENT SHOULD BE
LOCATED IN A SPACE WHICH
(1) PROVIDES SUFFICIENT ACCESSIBILTY
FOR BRUSH INSPECTION
(2) ALLOWS REMOVAL OF ALL THE BRUSHES
AND PIGTAIL FASTENERS
(3) ALLOWS MAINTENANCE PERSONNEL TO
COMPLY TO THE GE MAINTENANCE
INSTRUCTION SPECIAL REQUIREMENTS
REGREASING (ALL MODELS EXCEPT
UP1, UP2, AUP1 AND AUP2)
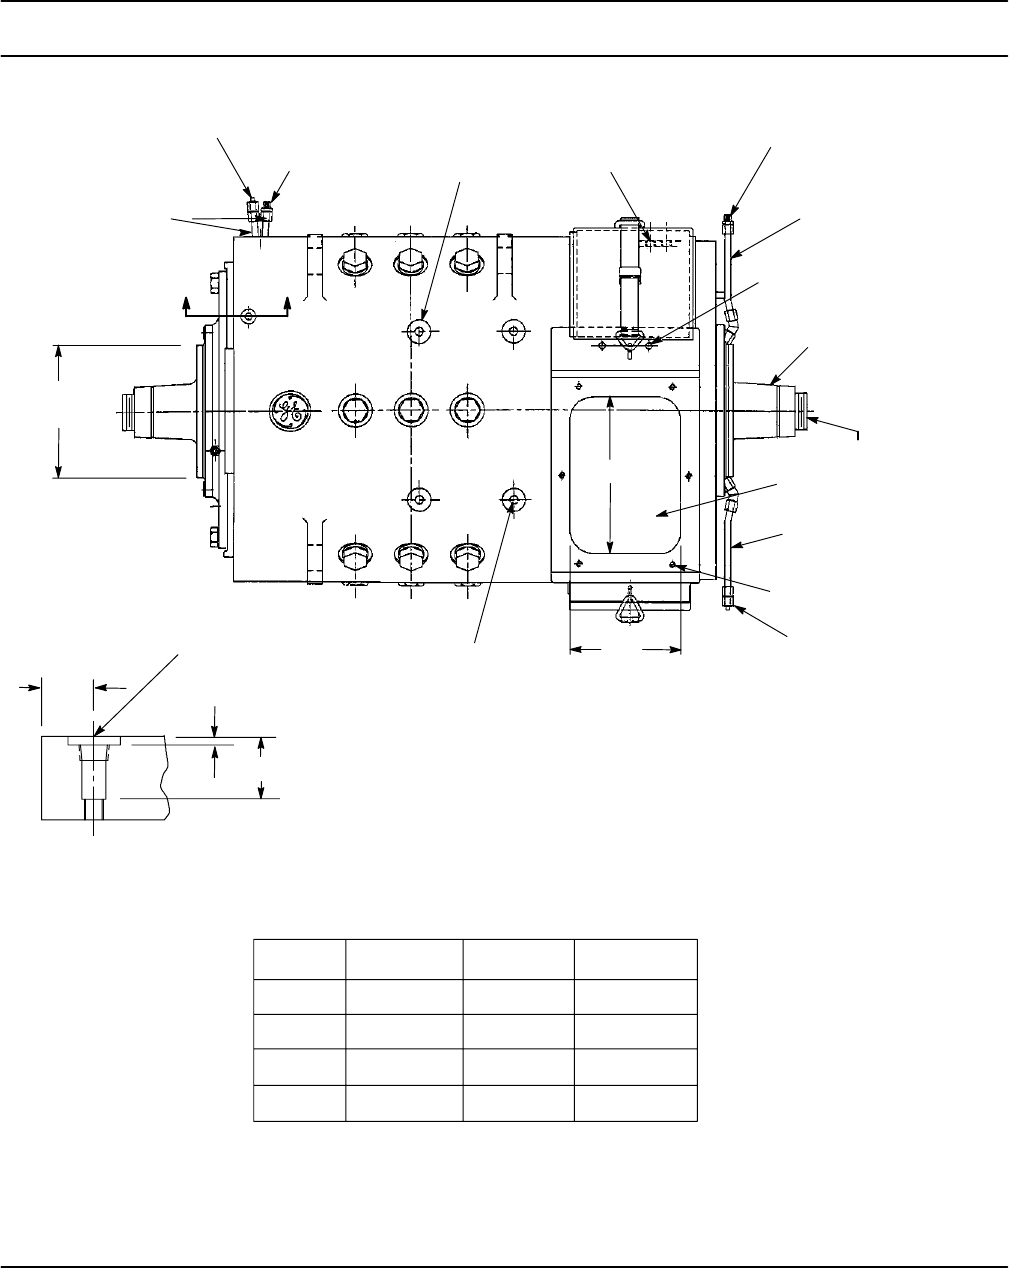
GEK–91584D, Vertical Drilling Motor, Type GE752
76
FIG. 48. OUTLINE, UP AND AUP (41E903631 CHG. H). E–28755B.
+
–.005
11.375
DIA.
GREASE VENT TUBE
FITTING ”A”
SEE TABLE 1
GREASE TUBE
FITTING ”B”
SEE TABLE 1 2.00 DIA.
4 BOSSES
.50 NPT THRU
2 HOLES
GREASE TUBE
FITTING ”C”
SEE TABLE 1
.562 DIA. THRU
2 HOLES
1.25 TAPER IN DIA.
PER FOOT IN LENGTH
(BOTH ENDS)
AIR INLET
3.125–8 NS–2A THREADS
(BOTH ENDS)
.50–13 TAP X 1.00 DEEP
6 HOLES
GREASE VENT TUBE
FITTING ”D”
SEE TABLE 1
.656 DIA. DRILL X 2.12 DEEP
.75–10 TAP X 1.50 DEEP
4 HOLES AS SHOWN
13.50
9.50
H H
1.25
REF.
.20
1.50
.390 DIA. DRILL THRU
.578 DIA. DRILL X 1.50 DEEP
1.25 DIA. C’BORE X .20 DEEP
.4375–20 TAP THRU AND .375 NPT
SECTION H–H
ENLARGED
VIEW AT G
TABLE 1
FURNISHED ON MODELS
SHOWN IN TABLE 1 FURNISHED ON MODELS
SHOWN IN TABLE 1
FURNISHED ON MODELS
SHOWN IN TABLE 1
FITTING MODELS MODELS MODELS
UP1, AUP1 UP2, AUP2 (SEE NOTE)
”A” .25 PIPE .NOT NOT
PLUG FURNISHED FURNISHED
”B” .25 MALE .25 PIPE NOT
NPT PLUG FURNISHED
”C” .25 MALE NOT NOT
NPT FURNISHED FURNISHED
”D” .25 PIPE .25 PIPE NOT
PLUG PLUG FURNISHED
NOTE: ALL MODELS EXCEPT UP1, UP2, AUP1 AND AUP2)

Vertical Drilling Motor, Type GE752, GEK–91584D
77
FIG. 48. OUTLINE, UP AND AUP (41E903631 CHG. H). E–28755B.
21.00
TOP INSPECTION
COVER
MINIMUM REQUIRED
TO REMOVE COVER
.812 DIA. X 1.94 DEEP
8 HOLES EQ. SPACED
ON 25.00 DIA. B.C.
.50 NPT
2 HOLES REF.
1.00–8 UNC–2B THREAD X 1.50 DEEP
8 HOLES EQ. SPACED ON 25.00 DIA. B.C.
.562 DIA.
2 HOLES REF.
BOTTOM INSPECTION
COVER
.687 DIA. IN 1325/24 CABLES
EXTENDING 10 FEET FROM
FRAME
1.12
1.00
2.50
.56
AIR INLET FLANGE
A
B
F
8.00
1.12
11.00
8.00 1.12
3.25
8.00
1.12
10.25
1.12
8.00
VIEW AT F
SHOWING FLANGE
WITH COVER REMOVED VIEW AT A
SHOWING FLANGE
WITH COVER REMOVED
VIEW AT B
SHOWING FLANGE
WITH COVER REMOVED
A1
A2
COMMUTATOR END

GEK–91584D, Vertical Drilling Motor, Type GE752
78
FIG. 49. OUTLINE, US1, AUT (41E903745, CHG. A). E–37954B
+
–.25
16.82 15.53
16.656
.000
.010
36.000
.000
.010
.50–13 TAP 1.00 DEEP
(8HOLES)
.25 NPT FOR
REGREASING 2.25 DIA. (3 HOLES)
FOR LIFTING
AIR OUT
(4 CORNERS)
AIR OUT
+
–
+
–
1.72
THIS AREA OF FOOT FLUSH
WITH FRAME FACE.
BOTH SIDES
FI
F2
.375–24 THREAD
VIEW SHOWING HYDRAULIC
PUMP OFF FOR HUB
BOTH ENDS
1.12 8.00 .50
FLAT
10.25
1.12 VIEW AT ”C”
SHOWING FLANGE
WITH COVER
REMOVED
1.12
11.00
.75
FLAT 8.00 1.12
.75
FLAT
VIEW AT ”A”
SHOWING FLANGE
WITH COVER
REMOVED
VIEW AT ”B”
SHOWING FLANGE
WITH COVER
REMOVED
.50–13 TAP THRU
(4 HOLES) 1.12 8.00 .75
FLAT
1.12
8.00
.50–13 TAP THRU
(4 HOLES)
.50–13 TAP THRU
(4 HOLES)
IMPORTANT:
THE ELECTRICAL EQUIPMENT SHOULD
BE LOCATED IN A SPACE WHICH–
(1) PROVIDES SUFFICIENT ACCESSIBILITY
FOR BRUSH INSPECTION.
(2) ALLOWS REMOVAL OF ALL THE
BRUSHES AND PIGTAIL FASTENERS.
(3) ALLOWS MAINTENANCE PERSONNEL
TO COMPLY TO THE GE MAINTENANCE
INSTRUCTION SPECIAL REQUIREMENTS
APPROX. WEIGHT:
GE–752–AUT = 7035 LBS.
AIR FLOW REQUIREMENTS:
2300 CFM OF STANDARD AIR
MINIMUM, 900 HP.
2800 CFM OF STANDARD AIR
MINIMUM, 1000 HP.
GE752AUT AND US1 SHOWN IN
MAIN VIEWS.

Vertical Drilling Motor, Type GE752, GEK–91584D
79
FIG. 49. OUTLINE, US1, AUT (41E903745, CHG. A). E–37954B
58.50
AIR OUT
8.55
1.06
4.63
7.88
6.37
5.69
1.06
+
–
11.375
DIA.
.005
13.44
+
–.078
.059 5.25
4.25
23.12
1.74 10.50
1.38
8.25 6.50
16.500
16.500
22.120
2.38
+
–.12
3.19 1.00 R.
3.62
5.25
.75–10 TAP
THRU
(2 HOLES)
1.005 DIA. THRU
(2 HOLES)
+
–.002
.000
ARMATURE LOCK
ARRANGEMENT
SEE NOTE
1.56 DIA. THRU
(4 HOLES)
1/2 NPT (2 HOLES)
FOR PRESSURE TAPS
.25 NPT
2 INTERCONNECTED
HOLES
”D”
F2
F1
A1
A2
NOTE FOR ARMATURE LOCKING
ARRANGEMENT LOCATED ON
COMMUTATOR END:
TO BE IN PLACE DURING MOUNTING
OF MOTOR BUT TO BE REMOVED
BEFORE OPERATION OF MOTOR.
4.89 0.05
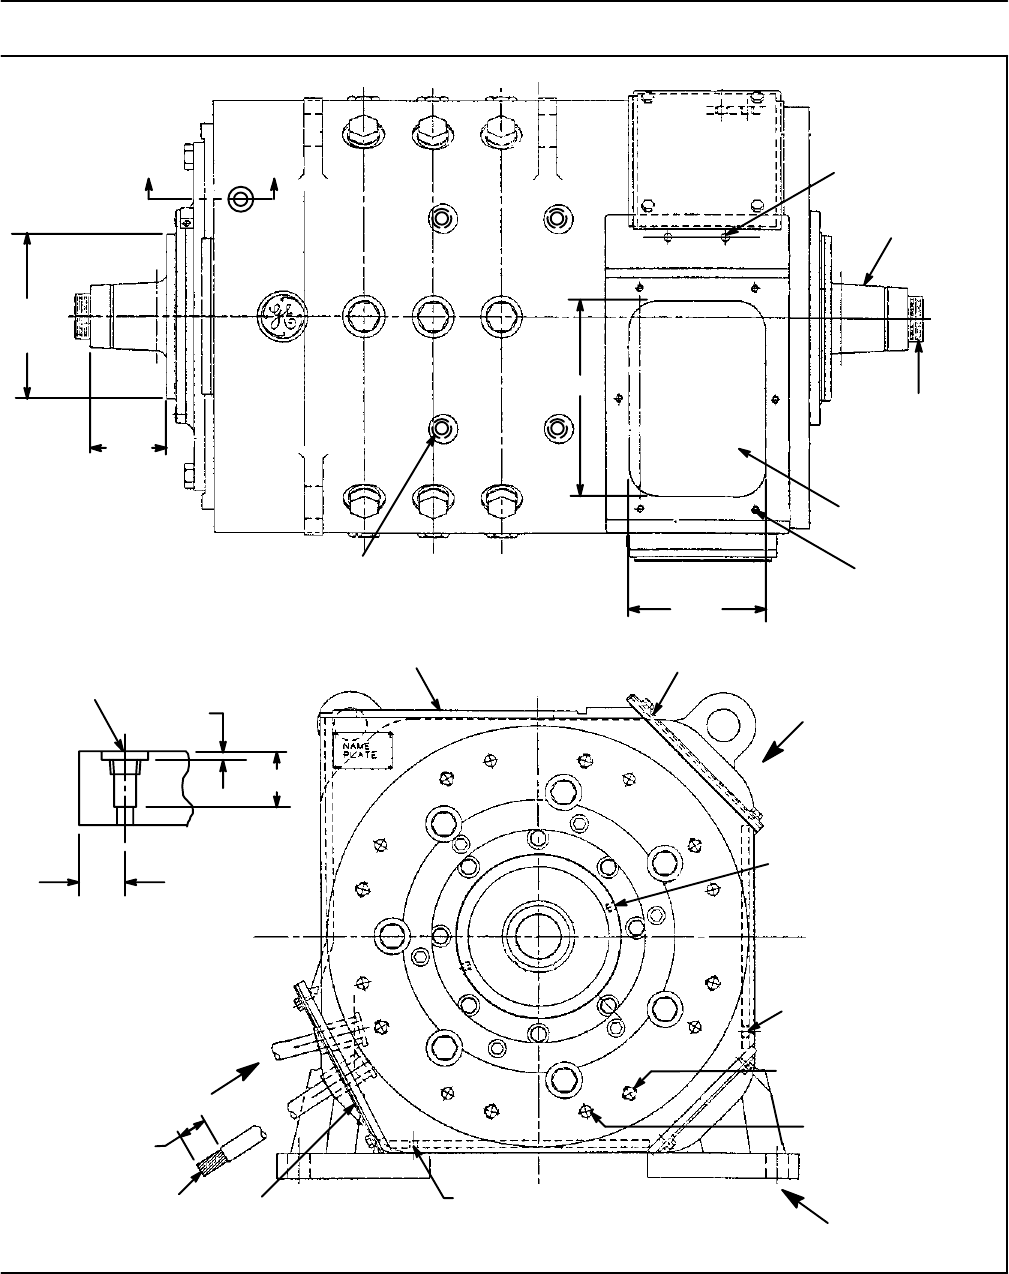
GEK–91584D, Vertical Drilling Motor, Type GE752
80
FIG. 49. OUTLINE, US1, AUT (41E903745, CHG. A). E–37954B
11.375
+
–.005
5.31
.562 DIA.
THRU
(2 HOLES)
9.50
13.50
1.25 TAPER IN DIA.
PER FT. IN LENGTH
(BOTH ENDS)
3.125–8 NS–2A
THREADS
(BOTH ENDS)
AIR INLET
.50–13 TAP 1.00 DEEP
(6 HOLES)
VIEW AT ”D”
AIR INLET FLANGE TOP INSPECTION COVER
2.00
.25 NPT (2 HOLES)
FOR REGREASING
.50 NPT (2 HOLES) REF.
1.00–8 UNC–2B THREAD
1.50 DEEP (8 HOLES EQ.
SP. ON 25.00 DIA. B.C.
.812 DIA. 1.94 DEEP
(8 HOLES EQ. SP. ON
25.00 DIA. B.C.
.562 DIA. (2 HOLES) REF.
COMMUTATOR END
BOTTOM INSPECTION
COVER
1325/24 ARMORED
CABLES EXTENDING
10 FEET FROM
FRAME
A1
A2
”A”
”B”
”C”
0.656 DIA. DRILL X 2.12 DEEP
0.750–10 TAP X 1.50 DEEP
4 HOLES AS SHOWN
DD
.390 DIA. DRILL THRU
.578 DIA. DRILL X 1.50 DEEP
1.25 DIA. C’BORE X .20 DEEP
.4375–20 TAP THRU AND .375 NPT
SECTION D–D
(ENLARGED)
1.25
REF
.20
1.50

Vertical Drilling Motor, Type GE752, GEK–91584D
81

GEK–91584D, Vertical Drilling Motor, Type GE752
82
PRINTED
IN
U.S.A.
E
GE Transportation Systems
2901 East Lake Road
Erie, Pennsylvania 16531
NEW 5–90, WLF
REVISED 10–90, WLF
REVISED 8–92, WLF
REVISED 11–93, WLF
REVISED 02–05, NBS