GemTek Technology C921217G Dell Wireless 1350 WLAN PC Card User Manual Toto QSG v1
Gemtek Technology Co., Ltd. Dell Wireless 1350 WLAN PC Card Toto QSG v1
Contents
- 1. User Manual
- 2. Manual
Manual
Dell TM Wireless 1350 WLAN PC Card
Thank you for purchasing a Dell™ Wireless™1350 WLAN PC Card. Before you
begin to use the Dell™ Wireless ™1350 WLAN PC Card, you will require the
following items and information:
z A notebook computer with a PC Card slot and one of following Operating
systems: Microsoft, Windows * 2000, Windows * XP.
z Software Installation CD included with your Dell Wireless™1350 WLAN PC
Card
z The Network name (SSID*) of your Wireless Network.
Getting Started with your Dell Wireless™1350 WLAN PC Card
Note: You must insert the Dell Wireless™1350 WLAN PC Card into your Notebook
before you install the software. If the card is already inserted into your Notebook
please skip to step 2.
To Complete the setup of your Dell Wireless™1350 WLAN PC Card, perform
the following 3 steps:
1. Inserting the Dell Wireless™1350 WLAN PC Card into your Notebook
2. Installing the Software
3. Connecting to your Wireless Network
1. Inserting the Dell Wireless™1350 WLAN PC Card into your Notebook
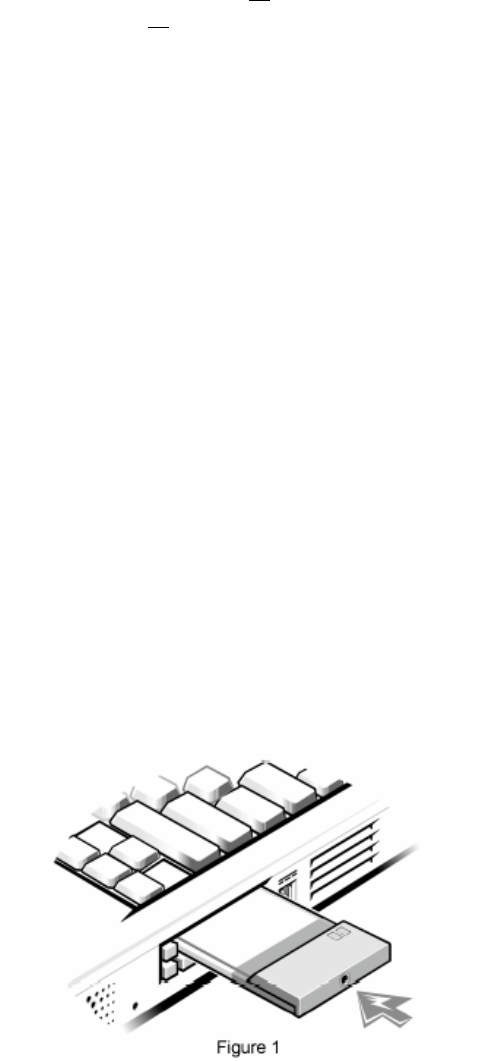
a) Insert the card into PC Card slot as shown in Figure 1.
b) The Found New Hardware Wizard screen will appear.
c) Select 'Cancel' to cancel the Hardware Wizard.
Inserting a PC Card Into a New Dell Portable Computer
2. Installing the Software
a)Insert the Dell Wireless™1350 WLAN PC Card CD into the
CD or DVD drive of your notebook .If the Main Menu screen does not
appear automatically , select Start -> Run and then type x:\setup.exe
(where x:\ is your CD-ROM driver letter) and Click OK.
b)Follow the on-screen prompts to install your software.
c)After the installation is finished, restart your computer.
3. Connecting to your Wireless Network with No Security
NOTE: To configure a wireless computer running Windows 2000, see Making a Basic
Network Connection in Windows 2000 in the Users Guide that came with your
computer’s wireless network computer.
NOTE: Windows XP users have two options for configuring their wireless network card:
they can either use native Windows XP support (Zero Configuration), or they can use the
Dell Wireless WLAN Card Utility. The recommended option is to use the native Windows
XP support for making basic wireless network connections.
NOTE: This section provides the basic steps to configure and connect a wireless
computer running Windows XP Service Pack 1 & 2. For further details see Making a
Basic Network Connection in Windows XP in the Users Guide that came with your
wireless network computer.
Windows XP Service Pack 1
Windows XP Service Pack 2
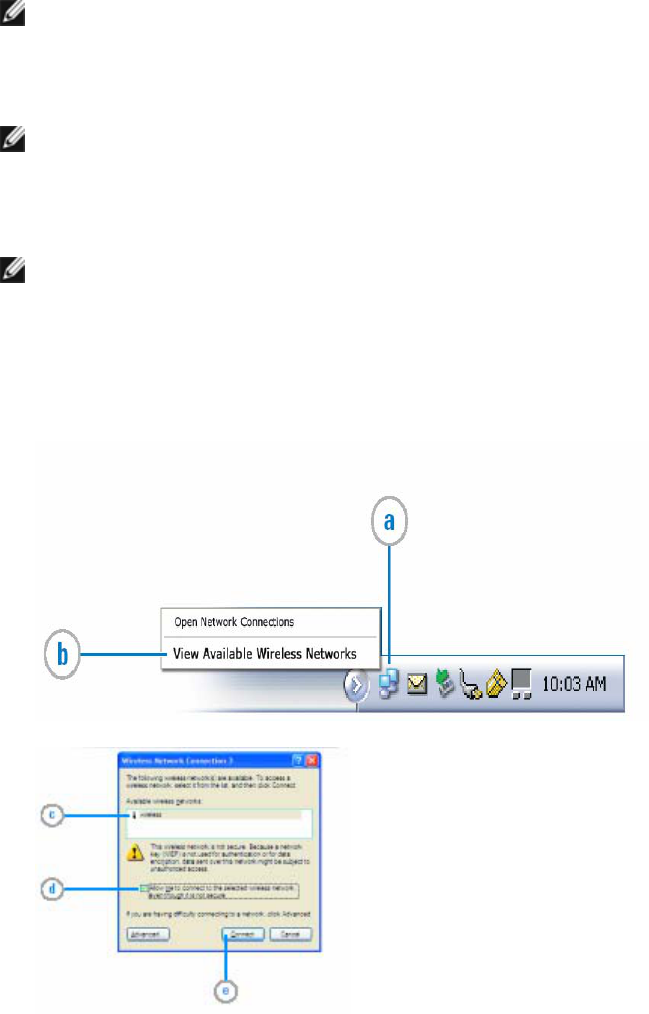
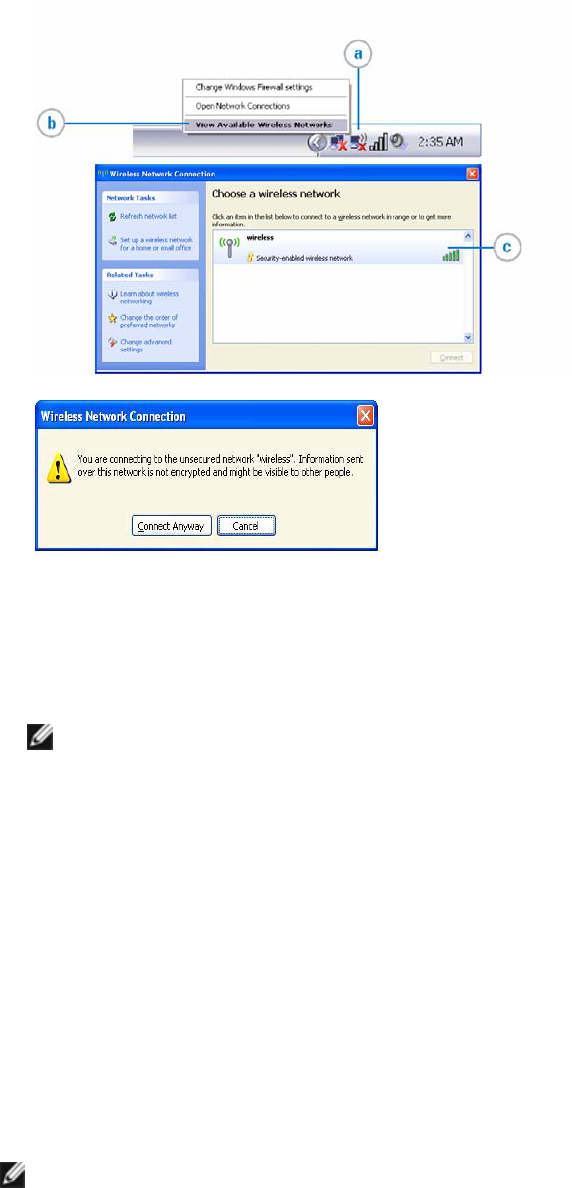
a. Right-click the wireless network connections icon in the notification area
located at the lower-right corner of the Windows desktop.
b. Left click View Available Wireless Networks.
NOTE: The names of wireless networks that are visible to your computer are shown
under Available networks. The name of your network is usually shown here.
c. In the Available wireless network field, select wireless, or other name of
your wireless network, to join the wireless network.
d. If you are using Windows XP Service Pack 1 select Allow me to connect to
the selected wireless network, even though it is not secure, otherwise skip to
step e.
e. If you are using Windows XP Service Pack 1 select Connect. If you are using
Windows XP Service Pack 2 select Connect Anyway in the pop-up dialog.
4. Making a secure Wireless Network with Security (Optional)
NOTE: Windows XP users have two options for configuring their wireless network card:
they can either use native Windows XP support (Zero Configuration), or they can use the
Dell Wireless WLAN Card Utility. The recommended option is to use the native Windows
XP support for making basic wireless network connections.
NOTE: This section contains instructions on how to make basic network security settings
on your wireless network card using Microsoft Windows XP Service Pack 1 & 2 using
native support (Zero Configuration).
NOTE: To make advanced security settings, enterprise users need information from their
system administrators, and home users need to know the advanced security settings on
their access point.
NOTE: If you have not already made a basic wireless network connection, see the
previous Step 3, or Making a Basic Network Connection in Windows 2000/XP in the
Users Guide that came with your wireless network computer . To make other types of
advanced network security settings in Windows 2000 or XP, see Making Advanced
Network Security Settings in Windows 2000/XP Using the Client Utility in the Users
Guide.
Windows XP Service Pack 1
Windows XP Service Pack 2
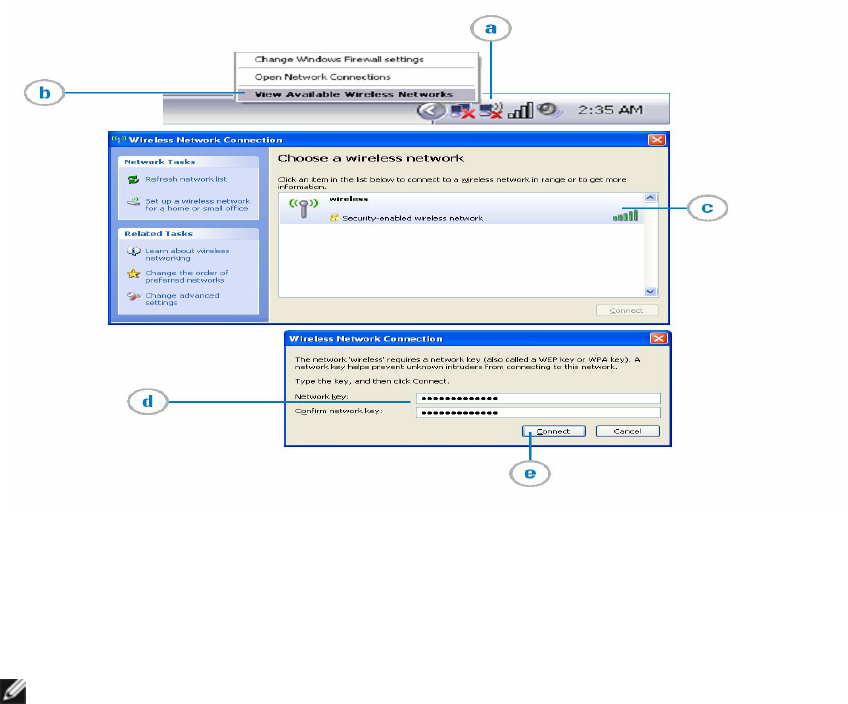
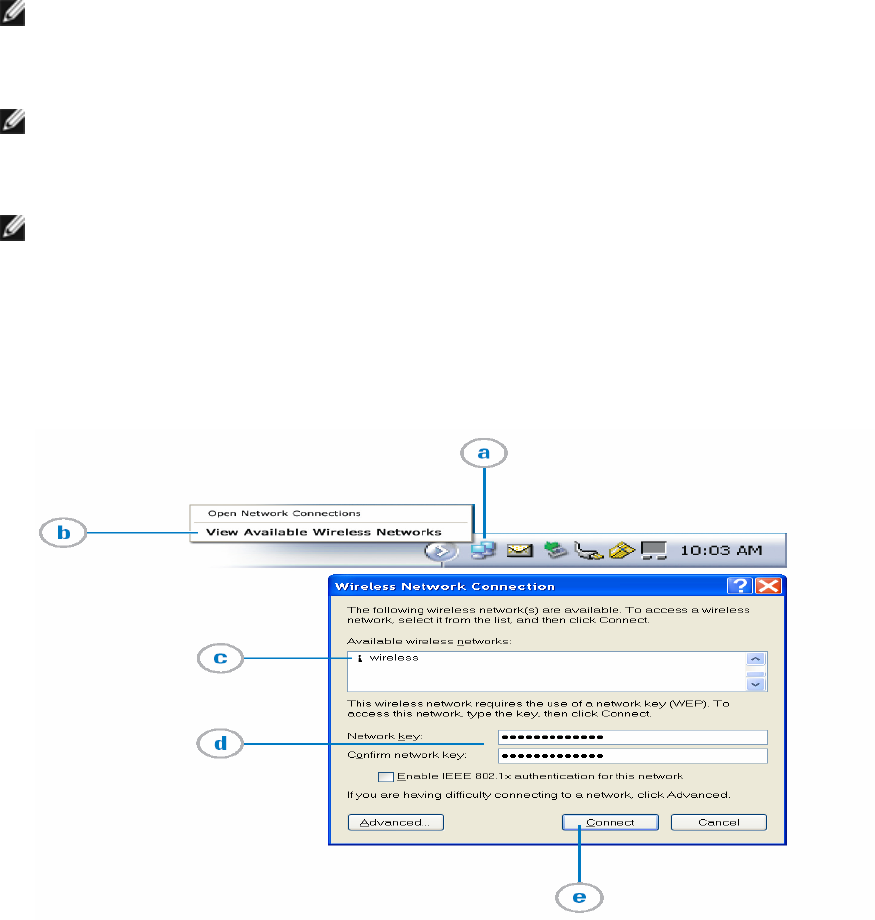
a. Right-click the wireless network connections icon in the notification area
located at the lower-right corner of the Windows desktop.
b. Left click View Available Wireless Networks.
NOTE: The names of wireless networks that are visible to your computer are shown
under Available networks. The name of your network is usually shown here.
c. In the Available wireless network field, select wireless, or other name of
your wireless network, to join the wireless network.
d. Type the WEP (Wired Equivalent Privacy) network key in the Network key
box. Your network key must exactly match the network key of the access point.
Your network key is either 5 or 13 ACSII (text) characters or 10 or 26
hexadecimal (0–9, A–F) characters.
e. Click Connect.
Dell declares that WL-611GD ( FCC ID: MXF-C921217G) is limited in CH1~CH11 for
2.4GHz by specified firmware controlled in U.S.A.
Federal Communication Commission Interference Statement
This equipment has been tested and found to comply with the limits for a Class B digital
device, pursuant to Part 15 of the FCC Rules. These limits are designed to provide
reasonable protection against harmful interference in a residential installation. This
equipment generates, uses and can radiate radio frequency energy and, if not installed
and used in accordance with the instructions, may cause harmful interference to radio
communications. However, there is no guarantee that interference will not occur in a
particular installation. If this equipment does cause harmful interference to radio or
television reception, which can be determined by turning the equipment off and on, the
user is encouraged to try to correct the interference by one of the following measures:
- Reorient or relocate the receiving antenna.
- Increase the separation between the equipment and receiver.
- Connect the equipment into an outlet on a circuit different from that
to which the receiver is connected.
- Consult the dealer or an experienced radio/TV technician for help.
FCC Caution: Any changes or modifications not expressly approved by the party
responsible for compliance could void the user's authority to operate this equipment.
This device complies with Part 15 of the FCC Rules. Operation is subject to the following
two conditions: (1) This device may not cause harmful interference, and (2) this device
must accept any interference received, including interference that may cause undesired
operation.
IMPORTANT NOTE:
FCC Radiation Exposure Statement:
This equipment complies with FCC radiation exposure limits set forth for an uncontrolled
environment.
This device complies with FCC RF Exposure limits set forth for an uncontrolled
environment, under 47 CFR 2.1093 paragraph (d)(2).
This transmitter must not be co-located or operating in conjunction with any other
antenna or transmitter.
This equipment has been SAR-evaluated for use in laptops (notebooks) with side slot
configuration.
IC (Canada)
To prevent radio interference to the licensed service, this device is intended to be
operated indoors and away from windows to provide maximum shielding. Equipment (or
its transmit antenna) that is installed outdoors is subject to licensing.