GemTek Technology NECNP04LM1 Wireless LAN Unit User Manual
Gemtek Technology Co., Ltd. Wireless LAN Unit
User manual

User's Manual
Wireless Display Media Player
SB-06WC

Index
Declaration of conformity ···················································································English1
Safety Precautions and Maintenance ································································English5
Information ·········································································································English6
Accessory ···········································································································English7
Part Names ·········································································································English8
Connections ·······································································································English9
Installation ········································································································English10
Installation of protector for wireless LAN unit ·········································English11
Installation of protector for SD memory card ··········································English12
Installation of adapter for wireless LAN unit ···········································English13
Basic Operation ································································································ English14
Preparations ····························································································English14
Display remote control ············································································English14
Dedicated remote control for the projector ·············································English15
Operations and settings of the display and projector ·····························English16
Product Operations ················································································· English16
Selection of Functions ·············································································English16
Setting the display language ···································································English16
Screen Saver ··························································································· English16
Function Controls ·····························································································English17
1. Wireless Display ·················································································· English17
2. Media Player ·······················································································English19
3. Settings ·······························································································English24
Troubleshooting ·······························································································English34
Limited Warranty ······························································································English36
Specifications ···································································································English37
English-1
Declaration of conformity
FCC statement
Federal Communication Commission Interference Statement
This equipment has been tested and found to comply with the limits for a Class B digital device,
pursuant to Part 15 of the FCC Rules. These limits are designed to provide reasonable protection against
harmful interference in a residential installation. This equipment generates, uses and can radiate radio
frequency energy and, if not installed and used in accordance with the instructions, may cause harmful
interference to radio communications. However, there is no guarantee that interference will not occur in
a particular installation. If this equipment does cause harmful interference to radio or television reception,
which can be determined by turning the equipment off and on, the user is encouraged to try to correct
the interference by one or more of the following measures:
• Reorient or relocate the receiving antenna.
• Increase the separation between the equipment and receiver.
• Connect the equipment into an outlet on a circuit different from that to which the receiver is connected.
• Consult the dealer or an experienced radio/TV technician for help.
Declaration of Conformity
This device complies with Part 15 of FCC Rules. Operation is subject to the following two conditions. (1)
This device may not cause harmful interference, and (2) this device must accept any interference received,
including interference that may cause undesired operation.
U.S. Responsible Party: NEC Display Solutions of America, Inc.
Address: 500 Park Boulevard, Suite 1100
Itasca, Illinois 60143
Tel. No.: (630) 467-3000
Type of Product: Wireless Display Media Player
Equipment Classification: Class B Peripheral
Model: SB-06WC
We hereby declare that the equipment specied above
conforms to the technical standards as specied in the FCC Rules.
FCC Caution: Any changes or modifications not expressly approved by the party responsible for compliance could void the user’s authority
to operate this equipment.
This device and its antenna(s) must not be co-located or operating in conjunction with any other antenna or
transmitter.
IMPORTANT NOTE:
FCC Radiation Exposure Statement:
This equipment complies with FCC radiation exposure limits set forth for an uncontrolled environment. This
equipment should be installed and operated with minimum distance 20cm between the radiator & your
body.
Country Code selection feature to be disabled for products marketed to the US/CANADA
Operations in the 5.15-5.25GHz band are restricted to indoor usage only.

English-2
IC
Industry of Canada statement
This device complies with Industry Canada licence-exempt RSS standard(s). Operation is subject to the
following two conditions:
(1) this device may not cause interference, and
(2) this device must accept any interference, including interference that may cause undesired operation
of the device.
Le présent appareil est conforme aux CNR d’Industrie Canada applicables aux appareils radio exempts de
licence. L’exploitation est autorisée aux deux conditions suivantes :
(1) l’appareil ne doit pas produire de brouillage, et
(2) l’utilisateur de l’appareil doit accepter tout brouillage radioélectrique subi, même si le brouillage est
susceptible d’en compromettre le fonctionnement.
Caution:
(With DFS band)
(i) the device for operation in the band 5150-5250 MHz is only for indoor use to reduce the potential for
harmful interference to co-channel mobile satellite systems;
(ii) the maximum antenna gain permitted for devices in the bands 5250-5350 MHz and 5470-5725 MHz
shall comply with the e.i.r.p. limit; and
(iii) the maximum antenna gain permitted for devices in the band 5725-5825 MHz shall comply with the
e.i.r.p. limits specified for point-to-point and non point-to-point operation as appropriate.
(iv) Users should also be advised that high-power radars are allocated as primary users (i.e. priority
users) of the bands 5250-5350 MHz and 5650-5850 MHz and that these radars could cause
interference and/or damage to LE-LAN devices.
Avertissement:
(i) les dispositifs fonctionnant dans la bande 5150-5250 MHz sont réservés uniquement pour une
utilisation à l’intérieur afin de réduire les risques de brouillage préjudiciable aux systèmes de satellites
mobiles utilisant les mêmes canaux;
(ii) le gain maximal d’antenne permis pour les dispositifs utilisant les bandes 5 250-5 350 MHz et 5 470-
5 725 MHz doit se conformer à la limite de p.i.r.e.;
(iii) le gain maximal d’antenne permis (pour les dispositifs utilisant la bande 5 725-5 825 MHz) doit se
conformer à la limite de p.i.r.e. spécifiée pour l’exploitation point à point et non point à point, selon le
cas.
(iv) De plus, les utilisateurs devraient aussi être avisés que les utilisateurs de radars de haute puissance
sont désignés utilisateurs principaux (c.-à-d., qu’ils ont la priorité) pour les bandes 5 250-5 350 MHz
et 5 650-5 850 MHz et que ces radars pourraient causer du brouillage et/ou des dommages aux
dispositifs LAN-EL.
Radiation Exposure Statement:
This equipment complies with IC radiation exposure limits set forth for an uncontrolled environment. This
equipment should be installed and operated with minimum distance 20cm between the radiator & your
body.
Déclaration d’exposition aux radiations:
Cet équipement est conforme aux limites d’exposition aux rayonnements IC établies pour un environnement
non contrôlé. Cet équipement doit être installé et utilisé avec un minimum de 20 cm de distance entre la
source de rayonnement et votre corps.
Antenna list:
Model Type Connector 2.4~2.4835GHz 5.15~5.25GHz 5.25~5.35GHz 5.47~5.725GHz 5.725~5.85GHz
Ant ( L ) PCB ant. NA 0.34 dBi -2.8 dBi -2.72 dBi -1.29 dBi -0.19 dBi
Ant ( R ) PCB ant. NA 1.15 dBi -0.58 dBi -0.45 dBi 3.24 dBi 1.78 dBi

English-3
CE statement
Europe – EU Declaration of Conformity
This device complies with the essential requirements of the R&TTE Directive 1999/5/EC. The following test
methods have been applied in order to prove presumption of conformity with the essential requirements of
the R&TTE Directive 1999/5/EC:
- EN 60950-1:2006+A11:2009+A1:2010+A12:2011
- EN62311 : 2008
- EN 300 328 V1.8.1: 2012
- EN 301 893 V1.7.1: 2012
- EN 301 489-1 V1.9.2: 2011
- EN 301 489-17 V2.2.1: 2012
In Italy the end-user should apply for a license at the national spectrum authorities in order to obtain
authorization to use the device for setting up outdoor radio links and/or for supplying public access to
telecommunications and/or network services.
Česky
[Czech]
NECDisplaySolutions,Ltd.tímtoprohlašuje,žetentoWirelessDisplayMediaPlayer
(Model:SB-06WC)jeveshoděsezákladnímipožadavkyadalšímipříslušnýmiustanoveními
směrnice1999/5/ES.
Dansk
[Danish]
UndertegnedeNECDisplaySolutions,Ltd.erklærerherved,atfølgendeudstyrWireless
DisplayMediaPlayer(Model:SB-06WC)overholderdevæsentligekravogøvrigerelevante
kravidirektiv1999/5/EF.
Deutsch
[German]
HiermiterklärtNECDisplaySolutions,Ltd.,dasssichdasGerätWirelessDisplayMediaPlayer
(Model:SB-06WC)inÜbereinstimmungmitdengrundlegendenAnforderungenunddenübrigen
einschlägigenBestimmungenderRichtlinie1999/5/EGbendet.
Eesti
[Estonian]
KäesolevagakinnitabNECDisplaySolutions,Ltd.seadmeWirelessDisplayMediaPlayer
(Model:SB-06WC)vastavustdirektiivi1999/5/EÜpõhinõuetelejanimetatuddirektiivist
tulenevateleteisteleasjakohastelesätetele.
English Hereby,NECDisplaySolutions,Ltd.,declaresthatthisWirelessDisplayMediaPlayer
(Model:SB-06WC)isincompliancewiththeessentialrequirementsandotherrelevant
provisionsofDirective1999/5/EC.
Español
[Spanish]
PormediodelapresenteNECDisplaySolutions,Ltd.declaraqueelWirelessDisplay
MediaPlayer(Model:SB-06WC)cumpleconlosrequisitosesencialesycualesquieraotras
disposicionesaplicablesoexigiblesdelaDirectiva1999/5/CE.
Ελληνική
[Greek]
ΜΕΤΗΝΠΑΡΟΥΣΑNECDisplaySolutions,Ltd.ΔΗΛΩΝΕΙΟΤΙWirelessDisplayMediaPlayer
(Model:SB-06WC)ΣΥΜΜΟΡΦΩΝΕΤΑΙΠΡΟΣΤΙΣΟΥΣΙΩΔΕΙΣΑΠΑΙΤΗΣΕΙΣΚΑΙΤΙΣΛΟΙΠΕΣ
ΣΧΕΤΙΚΕΣΔΙΑΤΑΞΕΙΣΤΗΣΟΔΗΓΙΑΣ1999/5/ΕΚ.
Français
[French]
ParlaprésenteNECDisplaySolutions,Ltd.déclarequel'appareilWirelessDisplayMedia
Player(Model:SB-06WC)estconformeauxexigencesessentiellesetauxautresdispositions
pertinentesdeladirective1999/5/CE.
Italiano
[Italian]
ConlapresenteNECDisplaySolutions,Ltd.dichiarachequestoWirelessDisplayMedia
Player(Model:SB-06WC)èconformeairequisitiessenzialiedallealtredisposizionipertinenti
stabilitedalladirettiva1999/5/CE.
Latviski
[Latvian]
AršoNECDisplaySolutions,Ltd.deklarē,kaWirelessDisplayMediaPlayer(Model:SB-06WC)
atbilstDirektīvas1999/5/EKbūtiskajāmprasībāmuncitiemartosaistītajiemnoteikumiem.
Lietuvių
[Lithuanian]
ŠiuoNECDisplaySolutions,Ltd.deklaruoja,kadšisWirelessDisplayMediaPlayer(Model:SB-
06WC)atitinkaesminiusreikalavimusirkitas1999/5/EBDirektyvosnuostatas.

English-4
Nederlands
[Dutch]
HierbijverklaartNECDisplaySolutions,Ltd.dathettoestelWirelessDisplayMediaPlayer
(Model:SB-06WC)inovereenstemmingismetdeessentiëleeisenendeandererelevante
bepalingenvanrichtlijn1999/5/EG.
Malti
[Maltese]
Hawnhekk,NECDisplaySolutions,Ltd.,jiddikjaralidanWirelessDisplayMediaPlayer
(Model:SB-06WC)jikkonformamal-ħtiġijietessenzjaliumaprovvedimentioħrajnrelevantili
hemmd-Dirrettiva1999/5/EC.
Magyar
[Hungarian]
Alulírott,NECDisplaySolutions,Ltd.nyilatkozom,hogyaWirelessDisplayMediaPlayer
(Model:SB-06WC)megfelelavonatkozóalapvetõkövetelményeknekésaz1999/5/ECirányelv
egyébelõírásainak.
Polski
[Polish]
NiniejszymNECDisplaySolutions,Ltd.oświadcza,żeWirelessDisplayMediaPlayer
(Model:SB-06WC)jestzgodnyzzasadniczymiwymogamiorazpozostałymistosownymi
postanowieniamiDyrektywy1999/5/EC.
Português
[Portuguese]
NECDisplaySolutions,Ltd.declaraqueesteWirelessDisplayMediaPlayer(Model:SB-06WC)
estáconformecomosrequisitosessenciaiseoutrasdisposiçõesdaDirectiva1999/5/CE.
Slovensko[Slovenian] NECDisplaySolutions,Ltd.izjavlja,dajetaWirelessDisplayMediaPlayer(Model:SB-06WC)
vskladuzbistvenimizahtevamiinostalimirelevantnimidoločilidirektive1999/5/ES.
Slovensky[Slovak] NECDisplaySolutions,Ltd.týmtovyhlasuje,žeWirelessDisplayMediaPlayer(Model:SB-
06WC)spĺňazákladnépožiadavkyavšetkypríslušnéustanoveniaSmernice1999/5/ES.
Suomi
[Finnish]
NECDisplaySolutions,Ltd.vakuuttaatätenettäWirelessDisplayMediaPlayer(Model:SB-
06WC)tyyppinenlaiteondirektiivin1999/5/EYoleellistenvaatimustenjasitäkoskevien
direktiivinmuidenehtojenmukainen.

English-5
Safety Precautions and Maintenance
For optimum performance, please note the following when setting up and using the Wireless Display
Media Player.
Please adhere to the precautions stated in the user’s manual of the projector or display to be
connected to this product.
In the event of a fault occurring, pull out the power plug of the display or projector
immediately!
Ifnot,thismayresultinreorelectricshock.Pulloutthepowerplugfromtheelectricaloutletimmediately.Consult
yourdealerforrepairssubsequently.
Do not use when there is a failure (e.g. the screen does not appear etc.) or when there is
smoke or strange odors
Thismayresultinreorelectricshock.
Do not place foreign objects inside the product
Donotplace foreign objects insidethedevicewhenmountingthe display or projectortothisproduct.Thismay
resultinreorelectricshock.
Do not disassemble or modify the product
Thismayresultininjury,reorelectricshock.
Do not touch the power cable when there is thunder
Donottouchthepowercableofthedisplayorprojectorwhenthereisthunder.Thismayresultinelectricshock.
Do not replace this product with the power cable still connected to the electrical outlet
Donotreplacethisproductwiththepowercableofthedisplayorprojectorstillconnectedtotheelectricaloutlet.
Thismayresultinafailure.
Do not use this product in a location where it may get wet
Cutoffthepowersupplyimmediatelyifwaterweretogetinsidethisproduct,thedisplayorprojectorandconsult
yourdealer after pulling out the power cable fromtheelectrical outlet. If not, this may result ina failure, re or
electricshock.
Do not use the wireless LAN unit as a life-saving device or equipment
ThewirelessLANunit attached to this productisnotdesignedtobe used as a life-savingequipmentordevice
suchasamedicaldevice,nuclearpowerequipment/ device, aeronautical device, transport equipment / device
orequipment/devicethatrequiresahighlevelofreliability,norisitdesignedtobeusedincombinationwithsuch
devices.
• DonotusethewirelessLANunitnearpeoplewhoarettedwitharticialpacemakers.
• DonotusethewirelessLANunitmedicaldevices.Thismayresultinelectromagneticinterferenceinthemedical
deviceandposearisktohumanlife.

English-6
Information
Corresponding regions, corresponding countries of Wireless LAN Unit
Please refer to our company website for the list of regions and countries where the use of the product is supported. Please duly note that use of the
product in a region or country which does not support its use may contravene the laws on electromagnetic transmissions in that country.
URL: http://www.nec-display.com/ap/en_projector/others/wlan.html
GPL/LGPL Software Licenses
The product includes software licensed under GNU General Public License (GPL), GNU Lesser
General Public License (LGPL), and others.
For more information on each software, see „readme.pdf“ inside the „about GPL&LGPL“ folder on the
supplied CD-ROM.
About Trademarks
• Intel and the Intel® logo are trademarks of Intel Corporation in the US and/or other countries.
• Windows is a registered trademark of Microsoft Corporation in the US and/or other countries.
WEEE Mark (European Directive 2002/96/EC)
Within the European Union
EU-wide legislation, as implemented in each Member State, requires that waste electrical
and electronic products carrying the mark (left) must be disposed of separately from
normal household waste. This includes monitors and electrical accessories, such as
signal cables or power cords. When you need to dispose of your NEC display products,
please follow the guidance of your local authority, or ask the shop where you purchased
the product, or if applicable, follow any agreements made between yourself and NEC.
The mark on electrical and electronic products only applies to the current European
Union Member States.
Outside the European Union
If you wish to dispose of used electrical and electronic products outside the European Union, please
contact your local authority so as to comply with the correct disposal method.
NOTE:
• Unauthorized reproduction of the information in this manual in part or in whole is strictly prohibited.
• The information in this manual may differ from the information shown in the actual display screen.
• The information in this manual is subject to future changes without notice.
• While every endeavor has been made to ensure the information in this manual is accurate and complete, please contact
us if you find any errors or omissions.
• Out-of-order or missing pages will be replaced. Please contact your dealer.
English-7
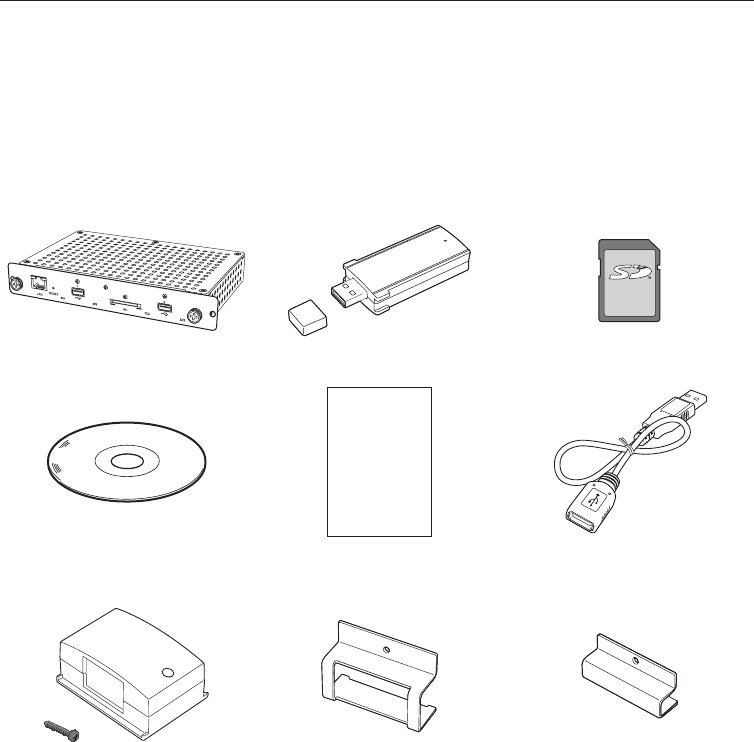
Accessory
The following accessories are enclosed with the product at the time of purchase.
Please contact your dealer if you find any of the accessories missing or damaged.
• SB-06WC Main unit
• Wireless LAN unit
• Setup manual, warranty card
• User’s manual (CD-ROM)
• USB extension cable
• SD memory card (capacity: 8GB)
• SD memory card protector
• Wireless LAN unit protector
• Wireless LAN unit adapter
• Screws (for adapter)
SB-06WCMainunit WirelessLANunit SDmemorycard(capacity:8GB)
Setup
Manual
User’smanual(CD-ROM) Setupmanual
Warrantycard
USBextensioncable
WirelessLANunitadapter
Screws(foradapter)
WirelessLANunitprotector SDmemorycardprotector
English-8
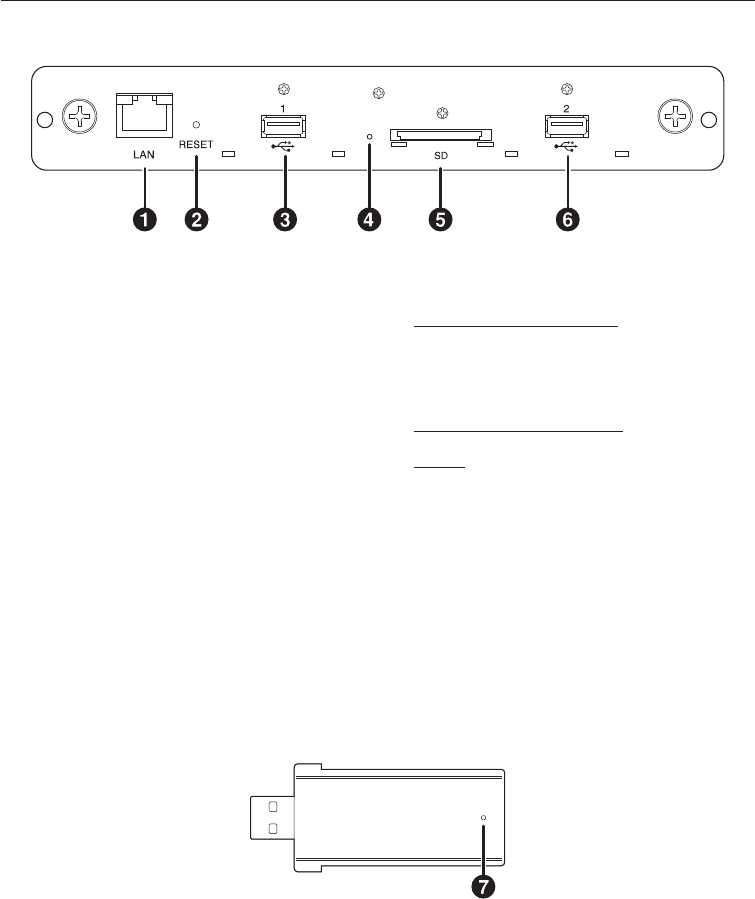
Part Names
SB-06WC Main unit
Wireless LAN unit
7 Indicator
Display the status of the wireless LAN unit.
• Lights up in blue: Intel® WiDi connection in progress
• Flashes in blue: Intel® WiDi connection in progress (data transmission in progress)/standby for
connection
1 LAN Port (RJ-45)
This is used when functions are expanded in
future.
2 Reset button
This resets the product.
3 USB Port 1
This is used to connect the enclosed wireless
L AN unit or a commercially-available USB
memory.
4 Indicator
Displays the status of the product.
When using the Intel® WiDi function:
•Lights up in green: Intel® WiDi connection in progress
(communication in progress)
•Flashes in green: Intel® WiDi connection preparation in
progress
•Lights up in orange: Intel® WiDi standby for connection
(connection preparation completed)
Media player function, setting screen:
•Lights up in green: Power ON
Common
•Lights up in red: System startup in progress
•Flashes in red: System error
Firmware update error
Firmware recovery error
•Flashes in orange: Firmware update in progress
Firmware recovery in progress
5 Slot for the SD memory card
Connect the SD memory card.
6 USB Port 2
This is used to connect the enclosed wireless
L AN unit or a commercially-available USB
memory.

English-9
Connections
Insert the enclosed wireless LAN unit or a commercially-available USB memory or SD memory card
into the product.
• Insert the wireless LAN unit into the product first before turning on the power supply.
• Insert the SD memory card into the slot for the SD memory card so that the label faces the top of the
product.
• Please refer to the paragraph on “Specifications” for the specifications of the USB memory, SD memory
card that can be used.
NOTE:
• The Intel® WiDi function cannot be used if the wireless LAN unit is connected after the product is powered up.
• The enclosed wireless LAN unit and USB memory can be used when inserted into either USB Port 1 or USB Port 2.
Enclosed wireless LAN unit or
commercially-available USB memory
SD memory card
English-10
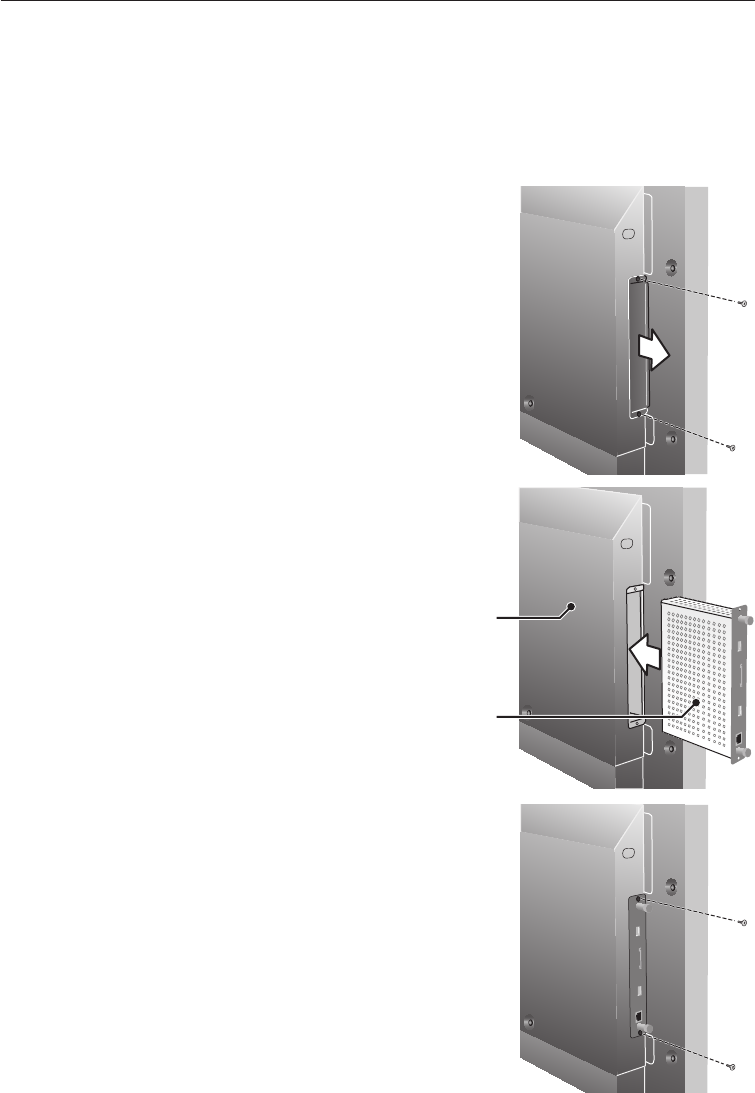
Installation
Attach this product to the display main unit or projector main unit. Depending on the display, an
optional slot board conversion adapter SB-02AM may be required. Refer to the start guide of the SB-
02AM on how to install the SB-02AM.
Check with your dealer for the compatible displays and projectors that can be used.
CAUTION:
• During installation, do not leave any foreign objects inside the display or projector.
Do not drop the product, screws and optional slot cover as well.
1. Remove the two screws on the optional Type 2 slot to remove the
optional slot cover.
For displays, remove the handle where necessary.
2. Attach this product to a display or projector.
CAUTION:
• When attaching this product to a display, make sure
the top side of this product (side opposite to the side
where the label is pasted) faces the rear of the display.
Damages may result if it is inserted in the opposite
direction.
• When attaching this product to a projector, make
sure the top side of this product faces the top of the
projector. Damages may result if it is inserted in the
opposite direction.
3. Securely fasten this product with the screws on the optional slot.
(tightening torque 49.0N・cm - 68.6N・cm)
Securely fasten the handle with the screws if the handle of the display is
removed. See the manual of the display for the tightening torque of the
handle screws.
CAUTION:
• Do not apply a force higher than the specified force when tightening the
screws. This may result in damages to the screw holes.
Rear of the display
Top side of
this product
English-11
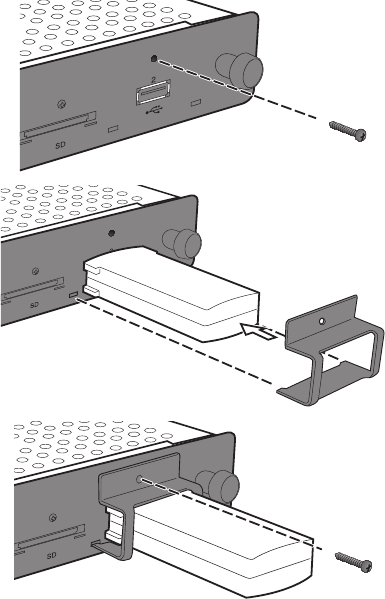
Installation of protector for wireless LAN unit
1. Remove the screws for securing the protector at
the top of the USB Port where the wireless LAN
unit is going to be connected.
NOTE:
• The wireless LAN unit can be inserted into either
USB Port 1 or USB Port 2.
CAUTION:
• Do not lose the removed screws. Do not leave them
inside the device as well.
2. Insert the wireless LAN unit to the USB Port.
3. Attach the protector for the wireless LAN unit. At
this point, fit the two studs on the protector into
the two square holes on the front panel of the
product.
4. Securely fasten the protector with the screws.
(tightening torque 4.7N•cm - 7.3N•cm)
CAUTION:
• Do not apply a force higher than the specified force
when tightening the screws. This may result in
damages to the screw holes.
English-12
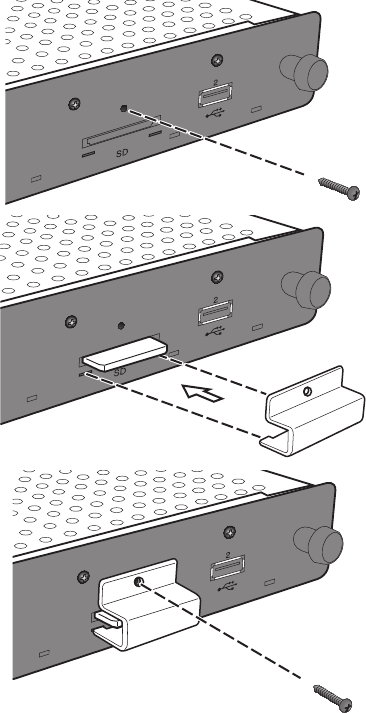
Installation of protector for SD memory card
1. Remove the screws for securing the protector at the
top of the slot for the SD memory card.
CAUTION:
• Do not lose the removed screws. Do not leave them
inside the device as well.
2. Insert the SD
memory card
into the slot for the SD
memory card
.
3. Attach the protector for the SD memory card. At
this point, fit the two studs on the protector into the
square holes on the front panel of the product.
4. Securely fasten the protector with the screws.
(tightening torque 4.7N•cm - 7.3N•cm)
CAUTION:
• Do not apply a force higher than the specified force
when tightening the screws. This may result in damages
to the screw holes.
English-13
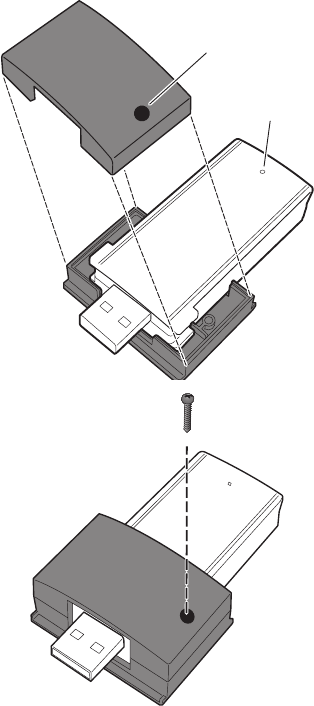
Installation of adapter for wireless LAN unit
Depending on the model of the display, when an external speaker is fitted, the wireless LAN unit may
interfere with the external speaker, making direct connection to the product impossible. In this case, use
an adapter for the wireless LAN unit (hereinafter “adapter”) and a USB extension cable to install the wireless
LAN unit to the back of the display etc.
1. Install the adapter such that the indicator on the wireless
LAN unit is on the side of the screw holes on the adapter.
Indicator
Screw hole
2. Securely fasten the adapter with the enclosed adapter screws.
(tightening torque 19.6N•cm - 29.4N•cm)
CAUTION:
• Do not apply a force higher than the specified force when
tightening the screws. This may result in damages to the screw
holes.
3. Connect the USB extension cable to the USB Port of the product and the USB port of the wireless LAN unit.
4. Peel off the cover of the two-sided tape at the bottom of the adapter and press it strongly against the rear of
the display to secure the adapter.
CAUTION:
• Secure the adapter only after you have carefully considered the installation position.
• Install the adapter on a horizontal surface.
• Install the adapter in a location that will not impose stresses on the USB extension cable.
• Do not install the adapter on top of the heat release outlet on the display.
• Remove all moisture, dust, oil, etc., from the location first before pasting the adapter at the location. Do not allow the
sticky surface to get into contact with your hands or dust. This will result in a drop in the adhesive strength.
• The two-sided tape cannot be peeled off and used again. Do not use it again once it is peeled off.
• Be careful when removing an adapter that has been attached using two-sided tape. Using excessive force may result in
damages to the adapter.
English-14
Basic Operation
Preparations
For displays
•Remote control enclosed with the display
For projectors
•Remote control enclosed with the projector
•Dedicated remote control for operating the product
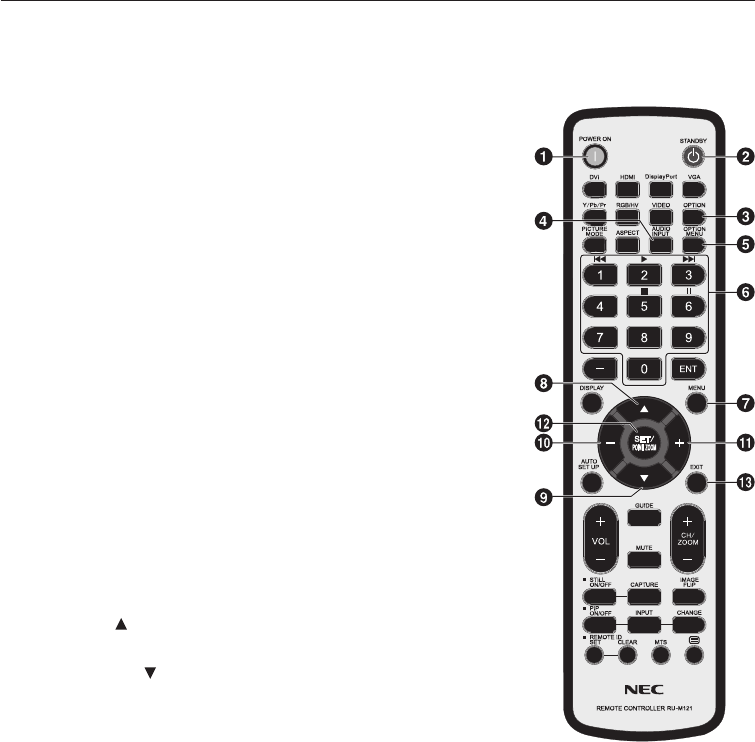
Display remote control
1 POWER ON button
Turn on the power of the display.
2 STANDBY button
Turn off the power of the display.
3 SWITCH INPUT button (OPTION)
Switch the video input of the display to the product.
4 SWITCH AUDIO INPUT button (AUDIO INPUT)
Switch the audio input of the display. Select [OPTION] when outputting
the audio of the product.
5 OPTION MENU button
Used for the menu operations of the product.
6 NUMBER button, PLAY button
U s e d f o r t h e i n p u t o f n u m b e r s . W h e n p l a y i n g c o n t e n t s
w i t h t h e m e d i a p l a y e r , t h e f u n c t i o n s a r e a s f o l l o w s .
1: Back, 2: Playback, 3: Skip, 5: Stop, 6: Pause.
7 MENU button
Turn the display OSD screen ON/OFF.
8 UP button ( )
Move to the setting at the top of the menu screen.
9 DOWN button ( )
Move to the setting at the bottom of the menu screen.
0 MINUS button ( - )
Move to the setting on the left of the menu screen.
Delete the number in front when inputting numbers.
! PLUS button ( + )
Move to the setting on the right of the menu screen.
@ SET button
Confirm the setting in the menu screen.
# EXIT button
Return to the previous menu screen.
NOTE:
• The remote control enclosed with the display differs depending on the model. Use the OPTION button for menu
operations of the product if there is no OPTION MENU button.
• See the manual of the display for button operations other than the above.
English-15
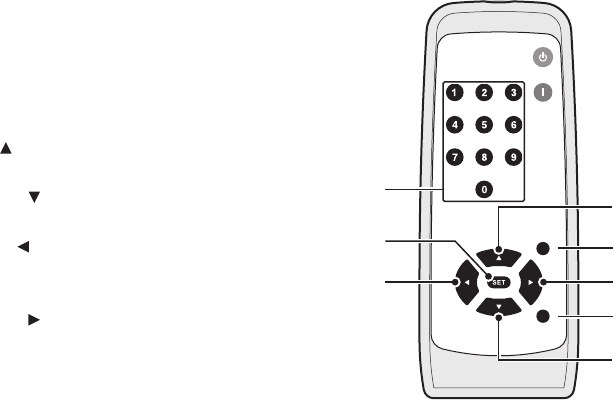
Dedicated remote control for the projector
(1) NUMBER button, PLAY button
Used for the input of numbers.
When playing contents with the media player, the functions are
as follows. 1: Back, 2: Playback, 3: Skip, 5: Stop, 6: Pause.
(2) MENU button
Used for the menu operations of the product.
(3) UP button ( )
Move to the setting at the top of the menu screen.
(4) DOWN button ( )
Move to the setting at the bottom of the menu screen.
(5) LEFT button ( )
Move to the setting on the left of the menu screen.
Delete the number in front when inputting numbers.
(6) RIGHT button ( )
Move to the setting on the right of the menu screen.
(7) SET button
Confirm the setting in the menu screen.
(8) EXIT button
Return to the previous menu screen.
NOTE:
•Use the remote control enclosed with the projector to turn the power of the projector ON/OFF.
•See the manual of the projector regarding the button operations of the remote control enclosed with the projector.
•Check with your dealer regarding the dedicated remote control for the projector.
MENU
EXIT
POWER ON
STANDBY
3
2
6
8
4
5
7
1
English-16
Operations and settings of the display and projector
For displays
(1) Connect the power cable to the display first before connecting to the electrical outlet.
(2) Turn on the main power of the display.
(3) The video input of the display changes to the product upon pressing the OPTION button on the remote
control of the display.
(4) The audio input changes upon pressing the AUDIO INPUT button on the remote control of the display.
Set the input to “OPTION” to select the audio of the product.
(5) Use the display OSD function to set the “AUDIO” setting under “OPTION SETTING” to [DIGITAL].
For projectors
(1) Connect the power cable to the projector first before connecting to the electrical outlet.
(2) Turn on the main power of the projector.
(3) The video input of the projector changes to the product upon pressing the SLOT button on the remote
control of the projector.
NOTE:
• Depending on the model, the projector may not support the audio output of the product. Please check with your dealer
for details.
Product Operations
Use the remote control enclosed with the display to operate the product when using a display.
Use the dedicated remote control for the projector to operate the product when using a projector.
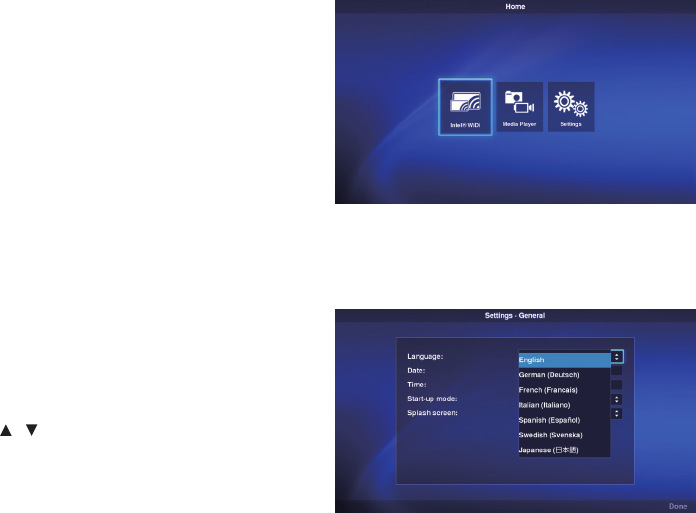
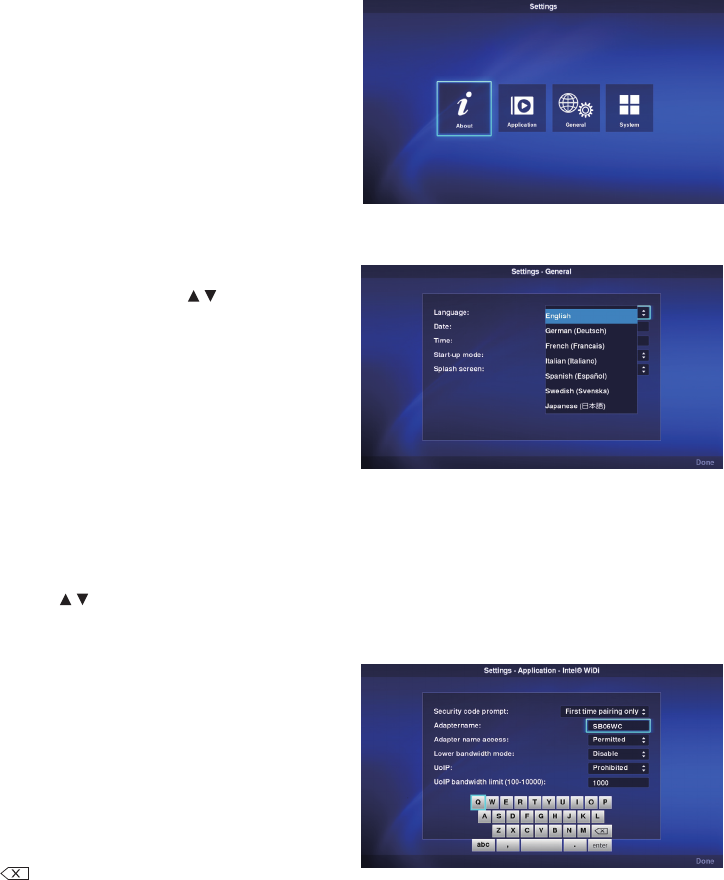
Selection of Functions
The “Home” Screen is displayed during startup
in initial state. Select the function using the -/+
buttons on the remote control and press the SET
button to move to the execution screen of each
function.
Press the OPTION MENU button* on the remote
control to return to the previous screen.
* : The remote control of the display differs depending on the
model. Use the OPTION button if there is no OPTION MENU
button on the remote control.
* : Use the MENU button when using a dedicated remote control
for the projector.
Setting the display language
The display language in the initial state is “English”. Change the display language where necessary.
(1) Select [Settings] in the home screen and press
the SET button on the remote control.
(2) Select [General] and press the SET button when
the Settings menu appears.
(3) Select [Language] and press the SET button to
display a list of the display languages, and use
the / buttons to select the desired display
language before pressing the SET button.
(4) Select [Done] and press the SET button to switch
the display language.
Screen Saver
• The screen saver screen will appear if there are no operations on the home screen or Intel® WiDi
standby screen for 30 or more seconds. Press the EXIT button to return to the previous screen from
the screen saver screen.
English-17
Function Controls
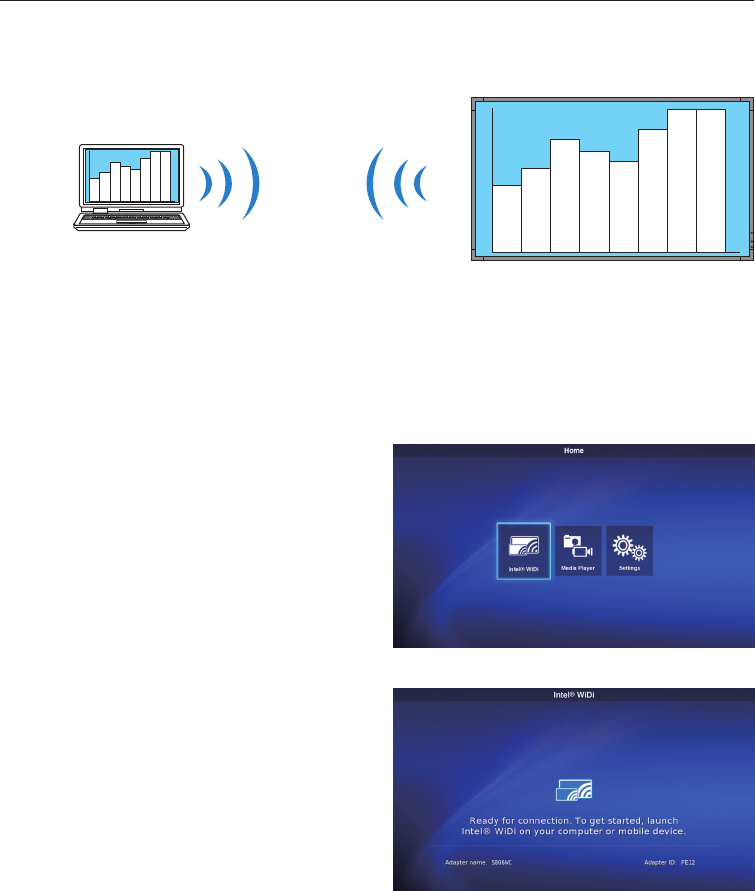
1. Wireless Display
Video from a notebook computer that supports Intel® Wireless Display (hereinafter “Intel® WiDi”) can
be received and displayed on a display or projected with a projector.
Computer that supports Intel ®
Wireless Display
Projector or display
which is connected to this product
NOTE:
• Refer to the user’s manual of the computer and the Intel website for details on the use and update of the Intel® WiDi
software.
Connection Method
Explains the operations using Windows 7, Windows 8.
(1) Select [Intel® WiDi] from the home screen and
press the SET button.
(2) The right screen is displayed when the upon
completing the connection preparation of the
product.
English-18
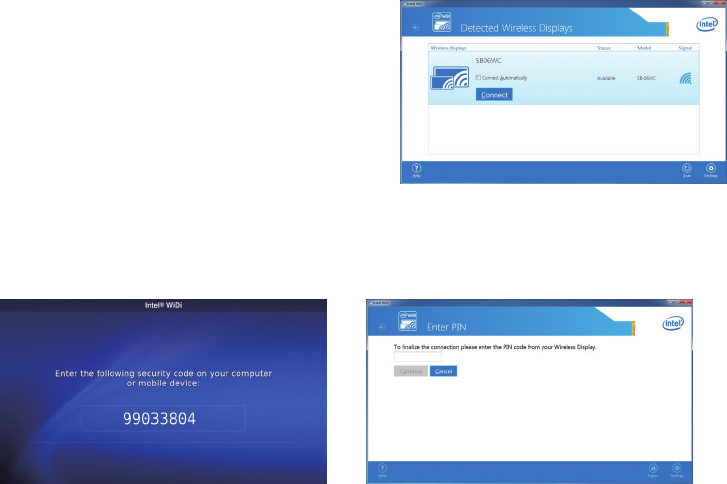
(3) Start up the Intel® WiDi software with the computer.
(4) Operate the Intel® WiDi software to select “SB06WC”
(name of the product when shipped from the factory)
and then click [Connect].
NOTE:
• For Windows 8.1, open the Charm bar and click “SB06WC”
after selecting [Device] followed by [Project].
• Depending on the operating environment, the product
“SB06WC” may not be detected. In that case, click [Scan (S)]
to scan again.
(5) When connecting the product to a computer for the first time, the security code will be displayed in
the standby screen on the display end. Enter this security code in the Intel® WiDi software and click
[Continue].
(6) At the end of the connection processing, the display screen of the computer will appear in the display.
(7) Click [Disconnect] in the Intel® WiDi software to stop the connection with the Intel® WiDi software.
How to adjust the size of the computer image displayed in the display/projector
When black edges appear around the screen without the computer display screen appearing correctly
in the screen of the display/projector, the size of the image can be adjusted using the following method.
(1) Select [Settings]-[Image and Sound (P)] in the Intel® WiDi software.
(2) Click [Adjust cropping] in the [Settings - Picture and Sound] screen.
(3) Click the [+]/[-] icons in the [Setting - Adjust Edge Display] screen to adjust the image size.
English-19
2. Media Player
2-1. Overview
Repeat the playback of video, still image and audio files stored in the same folder of the SD memory
card or USB memory in the order of the character code of the filename.
NOTE:
• Multiple videos and still images can be selected but only one can be displayed at any one time.
• Contents from multiple folders cannot be selected at the same time.
• Create the folder in the root directory.
• The character count limit of the folder name and filename is up to 260 characters including the folder path and
extension. If 2-byte characters are used, the limit becomes even shorter.
Two playback modes
(1) Auto play mode:
• When contents are stored in advance in a designated folder (folder name: Contents*1) of the SD memory card or USB
memory, playback of the stored contents will start at the same time the display is started*2, or when the media player
function is selected.
*1: Create the “Contents” folder in the root directory.
*2: Set the start mode to “Media Player” when starting playback automatically after starting the display.
Refer to “3-4. General” for the details of the start mode.
(2) Manual play mode:
• Start manual playback after selecting the media, folder and contents.
Playback Settings
• The playback time for still images can be set. The time can be set between 10 and 999 sec.
• When the selected contents consist of only a single static image, the contents will continue to be displayed regardless
of the set time.
• The type of screen transition (fade-in, fade-out, cross-fade) can be selected. Different types of screen transition cannot
be used at the same time. The time can be set between 1 and 5 sec.
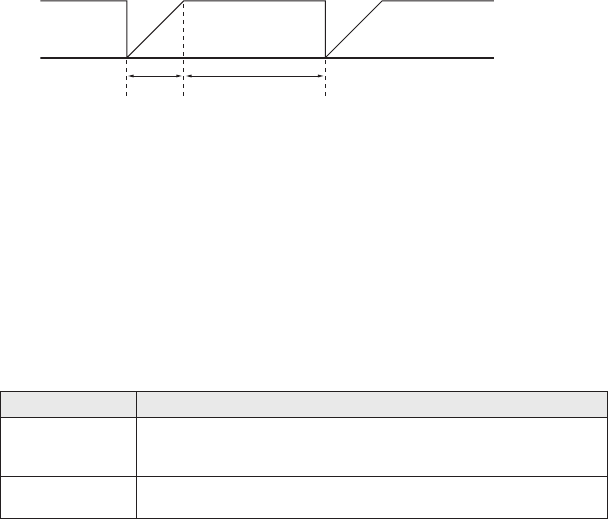
Playback time and transition time (image for fade-in cases)
Transition time
(1 to 5 sec.)
Display time
(10 to 999 sec.)
Still image display
Playback Operation
• Playback operations (playback, stop, pause, skip, back) can be carried out using the remote control.
SD contents update function
• Contents can be copied from a USB memory to a SD memory card on the product. When a SD memory card with
a protector is connected to the product, the contents in the SD memory card can be updated without removing the
protector.
• In the auto play mode, the contents files in a designated folder of the USB memory (folder name: Contents) will be
copied to the “Contents” folder of the SD memory card.
• In the manual play mode, all the files in the USB memory will be copied to the SD memory card.
Audio Selection
• The product outputs the audio of either an audio file or video file. Select which audio to playback.
Example on playback of contents
Selected contents
File type File name
Video, Still Images 1) Image-1.jpg (still image playback time setting: 10 sec)
2) Image-2.bmp (still image playback time setting: 10 sec)
3) Movie.wmv (playback time: 15 sec)
Audio 1) Audio-1.mp3 (playback time: 15 sec)
2) Audio-2.wav (playback time: 25 sec)
English-20
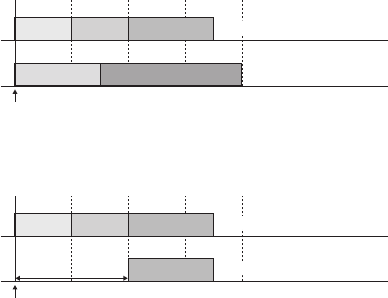
The playback image is as follows when “Audio” is selected in the audio selection settings.
Playback time (sec.)
0 10 20 30 40
Display
Audio
Starts playback
以降、リピート再生
thereafter, playback will be repeated
thereafter, playback will be repeated
Image-1.jpg
Audio-1.mp3 Audio-2.wav
Image-2.bmp Movie.wmv
The playback image is as follows when “Video” is selected in the audio selection settings.
以降、リピート再生
以降、リピート再生
音声なし
Image-1.jpg
Movie.wmv
Image-2.bmp Movie.wmv
Playback time (sec.)
0 10 20 30 40
Display
Audio
Starts playback
thereafter, playback will be repeated
thereafter, playback will be repeated
2-2. Operating flow of media player function
(1) Preparation of contents
• Create the folder in the root directory of either the SD memory card or USB memory.
• Save the contents in the folder created.
(2) Settings
Configure the various media player settings.
• Media player mode
• Display time
• Type of image transition
• Image transition time
• Contents aspect
• Audio selection
(3) Select the media
• Select the media (SD memory card or USB memory) connected to the product.
(4) Selection of folders
• Select the folder where the contents are stored.
(5) Selection of video and still images
(6) Selection of audio
(7) Playback
NOTE:
• When auto play mode is selected, the contents saved in the “Contents” folder of the designated media will be played.
The above-mentioned (3) Media, (4) Folder, (5) Video, Still Image Contents Selection, (6) Audio Contents Selection will
not be carried out.
2-3. Preparation of Contents
(1) Create the folder in the root directory of either the SD memory card or USB memory.
(2) Save video, still image or audio files in the created folder.
Refer to “Compatible Formats of the Media Player” for the file types.
NOTE:
• The media player function will playback the contents in the order of the character code of the filename. When specifying
the playback order of the contents, follow that order to change the filename.
Example: The playback order is as follows when the filenames are Image1.jpg, Image2.jpg, Image3.jpg.
(1) Image1.jpg * (2) Image2.jpg * (3) Image3.jpg *thereafter, playback will be repeated in the order (1)-(3).
English-21
2-4. Settings
(1) Configure the respective settings for the auto play mode and manual play mode.
How to display the setting menu of each play mode
[In the case of auto play mode]
(1) Select [Settings] - [Applications] - [Media Player] from the home screen.
(2) The setting screen for the auto play mode is displayed.
[In the case of manual play mode]
(1) Select [Media Player] from the home screen.
(2) Select [Manual Play Mode Settings] at the bottom left of the drive selection screen.
(3) The setting screen for the manual play mode is displayed.
(2) Configure the following settings where necessary when the setting screen appears.
Refer to “3-3-2.Media Player Settings” for details of the settings.
• Display time
• Type of image transition
• Image transition time
• Contents aspect
• Audio selection
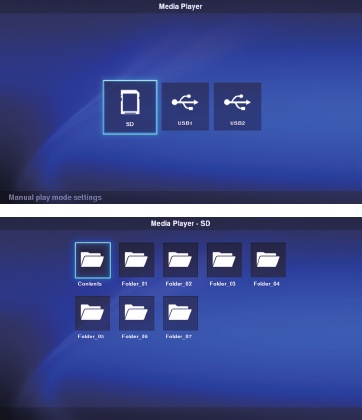
2-5. Selection, playback of contents
(1) Select “Media Player” in the home screen.
(2) Select one media when the media selection
screen appears.
NOTE:
• The icons of unconnected media will be shaded in grey.
(3) Select one folder.
NOTE:
• Only those folders in the root directory are displayed.
English-22
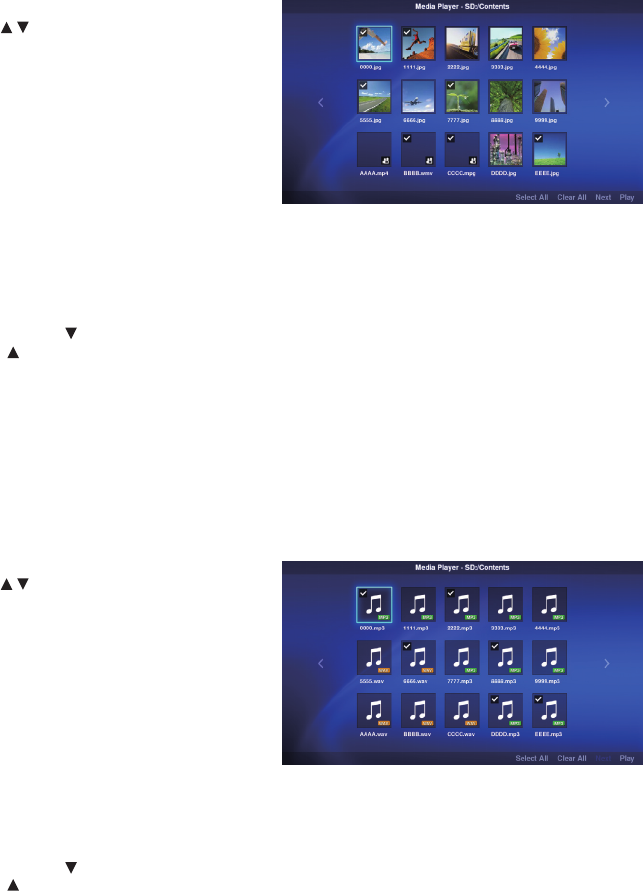
(4) Select the video and still image files to be displayed.
(1) Use the / /-/+ buttons to align the focus on the
file you want to select and press the SET button to
select the file. Press the SET button again to cancel
the selection.
NOTE:
• Upon being selected, a check mark will appear on
that thumbnail.
• For video files, a movie mark will appear on that
icon.
• The maximum number of files that can be displayed
on the file selection screen at any one time is 15.
When saving more files than this, the excess files
will be shown in a different display screen.
If “<” and “>” appears on the left and right of the screen, it means that there are multiple file selections screens.
The file selection screen is changed using the -/+ buttons.
• Playback of files is carried out in the code order of the filename. When files with the same filename but different file
formats exist, playback will be in the code order of the file format name.
(2) Press and hold the button in the contents selection screen to move the focus to the lower column.
Press the button to return to the selection of contents.
(3) Select the actions displayed in the lower column of the screen and press the SET button to perform the following
actions.
•[Select All]: Select all the video and still image contents.
•[Cancel All]: Cancel all the video and still image contents.
•[Next]: Move to the audio file selection screen.
If there are no audio files saved, [Next] will appear in grey.
•[Play]: Start the playback of contents.
NOTE:
• The selected contents will be saved in the various media at the stage when “Play” is executed.
If the contents selection screen is changed before “Play” is executed, the selected contents will be cleared.
(5) Select the audio files.
(1) Use the / /-/+ buttons to align the focus on the
file you want to select and press the SET button to
select the file. Press the SET button again to cancel
the selection.
NOTE:
• Upon being selected, a check mark will appear on
that thumbnail.
• The file format (MP3 or WAV) will be displayed on
the thumbnail of the file.
• The maximum number of files that can be displayed
on the file selection screen at any one time is 15.
When saving more files than this, the excess files will be shown in a different display screen.
If “<” and “>” appears on the left and right of the screen, it means that there are multiple file selections screens.
The file selection screen is changed using the -/+ buttons.
• Playback of files is carried out in the code order of the filename. When files with the same filename but different file
formats exist, playback will be in the code order of the file format name.
(2) Press and hold the button in the contents selection screen to move the focus to the lower column.
Press the button to return to the selection of contents.
(3) Select the actions displayed in the lower column of the screen and press the SET button to perform the following
actions.
•[Select All]: Select all the audio contents.
•[Cancel All]: Cancel all the audio contents.
•[Play]: Start the playback of contents.
NOTE:
• The selected contents will be saved in the various media at the stage when “Play” is executed.
If the contents selection screen is changed before playback is started, the selected contents will be cleared.

English-23
(6) Playback of contents
• Select [Play] in the video, still image or audio selection
screen to start the playback.
• Press the remote control buttons to perform the following
actions during playback.
2 / (Play) : Start the playback of contents from the
pause state.
5 / (Stop) : Stop the playback of contents and return
to the menu screen.
6 / I I (Pause) : Stop playback and continue showing the
displayed contents.
3 / I (Skip) : Play the next contents.
1 / I (Back) : Play the previous still image when playing
still images.
Start playback from the beginning when playing video and audio contents. Play the previous contents if pressed
within 1 sec from the start of playback of the contents.
OPTION MENU : Stop the playback and return to the home screen.
EXIT : Stop the playback of contents and return to the menu screen.
• Use the operation buttons to display the order of the video and still image files currently being played and the total
number of selected files at the bottom left of the screen.
Example) When 12/25 is displayed, it means that:
•The total number of selected video and still image files is 25;
•The order of the video or still image file currently being played is 12.
English-24
3. Settings
3-1. Overview
Display product information, configure various
settings, format the media and so on.
Select [Settings] in the home screen to display
the main screen of the setting menu.
Password Setting
• The setting menu can be protected by a password.
Upon setting a password, a password entry screen will
appear for you to enter the password when the setting
menu is selected. Please remember your password as
entry to the setting menu will be denied if the password is
wrong.
• No password is set at the initial state.
• Set the password under [Settings] - [System] - [Security] - [Password for Setting Menu].
How to change settings
(1) Select the setting with the / buttons on the
remote control and press the SET button to
display the setting.
(2) After selecting the setting, press the SET button
again to change the setting.
(3) Press the SET button after selecting [Done] at
the bottom right of the screen to save the setting.
NOTE:
• If the OPTION MENU button or EXIT button is pressed
and the screen changes before the setting is confirmed,
the changes in the setting will be cleared.
How to operating the software keyboard
A software keyboard will be displayed when entering the adapter name in the Intel® WiDi settings.
There are 3 software keyboard screens. Follow the instructions below to enter the changes.
(1) Use the / /-/+ buttons on the remote control to align the focus on the characters you wish to enter
and press the SET button to display that character in the input area of the setting menu.
(2) Select [enter] and press the SET button to confirm the input.
The meaning of keys other than English
characters and symbols are as follows.
•ABC: Change to the input screen for capital
letters.
•abc: Change to the input screen for small
letters.
•?123: Change to the input screen for numbers
and symbols.
•enter: Confirm the entered information and close
the software keyboard.
•: Delete the last character entered.
English-25
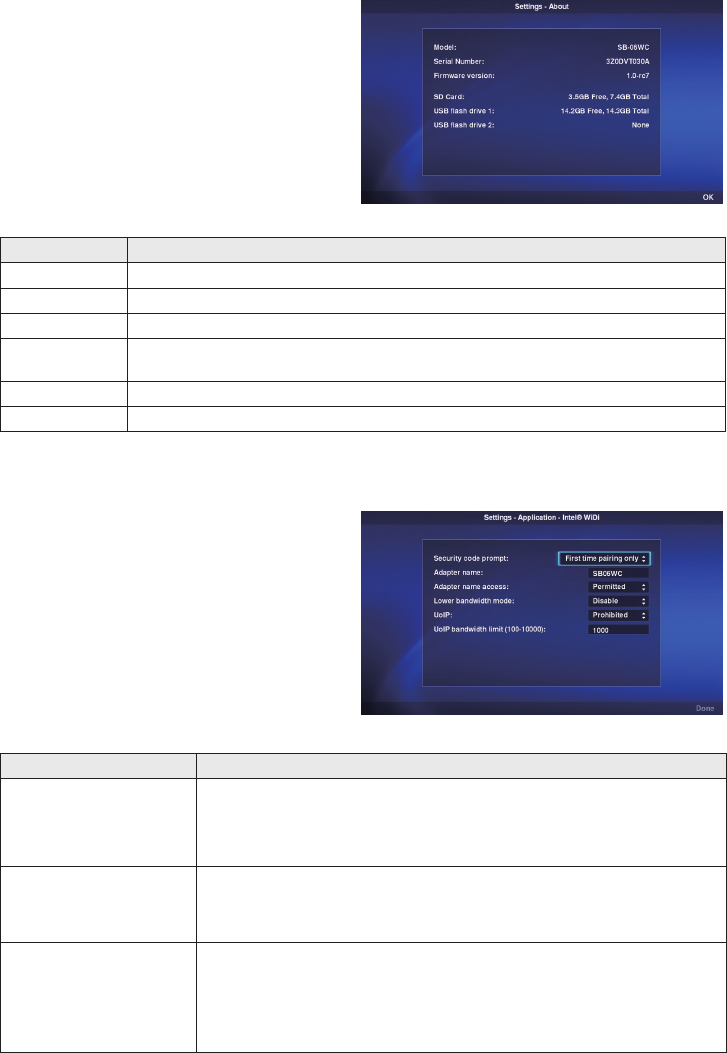
3-2. About
Displays the information of the SD memory card
and USB memory connected to the product.
Select [Information] from the main screen of the
setting menu.
Item Displays
Model Product name “SB-06WC”
Serial Number. Serial no. of this product
Firmware version Firmware version of this product
SD card Spare and usable capacity of the SD memory card connected to the SD memory card slot of
the product
USB flash drive 1 Spare and usable capacity of the USB memory connected to the
USB Port 1
of the product
USB flash drive 2 Spare and usable capacity of the USB memory connected to the
USB Port 2
of the product
3-3. Application
3-3-1. Intel® WiDi Settings
Perform the Intel® WiDi settings.
Select [Application]–[Intel® WiDi] from the main
screen of the setting menu for the setting screen.
Item Setting
Security code prompt Control the storage and use of persistent WFD groups.
Default is “First time pairing only”.
1) First time pairing only : Enter PIN code for first time pairing only.
2) Always : Enter PIN code for all pairings.
Adapter name The adapter name of the product can be specified. The adapter name is entered
using the software keyboard. Only alphabet letters and numbers can be used for
the adapter name. Hyphens “-” cannot be used.
Default is “SB06WC”.
Adapter name access Enable and disable whether the Device Name setting can be changed by the end
user.
[Setting]
1) Permitted : Permit changes to be made from the Intel® WiDi software.
2) Prohibited : Prohibit changes to be made from the Intel® WiDi software.

English-26
Lower bandwidth mode limit the bandwidth used for WiDi.
Default is “Disabled”.
[Setting]
1) Disabled : Set the mode to the low bandwidth mode.
2) Enabled : Do not set the mode to the low bandwidth mode.
GO channel list Set the Wi-Fi operating channels that the WiDi Enterprise Class Sink will use when
it is a P2P group owner.
[Setting]
"1"/"2"/"3"/"4"/"5"/"6"/"7"/"8"/"9"/"10"/"11"/"36"/"40"/"44"/"48"
GO SSID suffix Set a suffix to be used in the creation of the P2P group SSID.
[Setting]
1*4(vchar)
GO intent (0-15) Set the intent of the device with respect to being the group owner when
establishing a P2P group.
Default is “0”.
[Setting]
"0"/"1"/"2"/"3"/"4"/"5"/"6"/"7"/"8"/"9"/"10"/"11"/"12"/"13"/"14"/"15"
UoIP get and set whether the UoIP protocol is permitted.
Default is “Prohibited”.
[Setting]
1) Permitted : Permit UoIP
2) Prohibited : Prohibit UoIP
UoIP bandwidth limit (100-
10000)
Set the bandwidth limit for UoIP data traffic.
Default is “1000Kbit”.
[Setting]
100~10000 [Kbit]
Wi-Fi bands Set the frequency bands over which WiDi sessions will be supported. The setting
allows all bands, 2.4 GHz only, or 5 GHz only.
Default is “ALL”.
[Setting]
1) ALL : Use both 2.4GHz/and 5GHz
2) 2.4GHz : Use only 2.4GHz
3) 5GHz : Use only 5GHz
Group owner Set the P2P group owner policy.
Default is “Negotiate P2P GO”.
[Setting]
1) Negotiate P2P GO
2) Autonomously acts as GO

English-27
3-3-2. Media Player settings
Configure the settings for the play mode and auto
play mode of the media player.
Select [Application]–[Media Player] from the main
screen of the setting menu for the setting screen.
Item Settings
Media Player mode Sets the playback mode of the media player.
[Settings]
1) Manual (manual play mode)
Start manual playback after selecting the contents.
2) Auto: SD card (auto play mode)
If [Media Player] is selected in the home screen, the contents inside the
Contents folder of the SD memory card will be played automatically.
If [Media Player] is selected in the startup mode settings, the contents inside
the Contents folder of the SD memory card will be played automatically when
the display is powered up.
3) Auto: USB memory (auto play mode)
If [Media Player] is selected in the home screen, the contents inside the
Contents folder of the USB memory will be played automatically.
If [Media Player] is selected in the startup mode settings, the contents inside
the Contents folder of the USB memory will be played automatically when the
display is powered up.
NOTE:
• Select [Media Player] in the home screen to automatically play the contents
in the auto play mode. Select “Manual” in this setting to display the contents
selection screen of the media player.
• In the auto mode, playback will not be carried out if there are no contents in the
Contents folder of the SD memory card or USB memory.
SD Contents update
If a SD memory card is inserted, the files saved in the USB memory will be
automatically copied to the SD memory card.
The files will be copied when the USB memory is inserted, or when the media
player function is selected with the USB memory inserted.
The contents copied vary depending on the playback mode.
•In the auto play mode, only the files in the Contents folder are copied.
•In the manual play mode, all the folders and files in the folders are copied.
[Settings]
1) On: Enable the function.
2) Off: Disable the function.
NOTE:
• When there are two USB memories connected, the files in the USB memory
connected to USB Port 1 are copied.
• Create the “Contents” folder in the root directory.
• All files will be overwritten.
• In the auto play mode, a “Contents_bak” folder will be automatically created in
the SD memory card to provide a backup copy of the contents in the original
“Contents” folder.
The capacity of the SD memory card that can be used is limited because of this
backup.
• The time required for copying is about 15 minutes per gigabyte.

English-28
Item Settings
Display Time Set the time for displaying still images.
Use the number keys on the remote control to enter the time.
[Settings]
Selection range: 10-999 sec
Setting unit: 1 sec
[Setting Method]
(1) Press the SET button after selecting this setting.
(2) Press the - (minus) button to clear the current setting time.
(3) Use the number buttons to enter the display time and then press the SET
button.
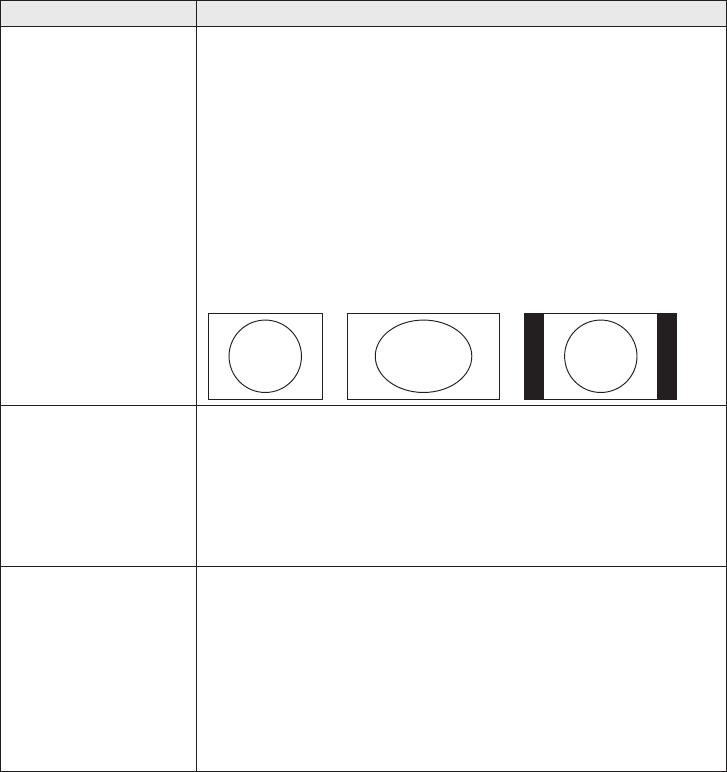
Transition type Specify the transition type.
[Settings] <Transition Image>
1) Fade-in
(Transition time)
Image 2 Image 3Image 1
2) Fade-out
(Transition time)
Image 2 Image 3Image 1
3) Cross-fade
(Transition time)
Image 2 Image 3Image 1
4) None Image 2 Image 3Image 1
(Transition time)
NOTE:
• Only one type of image transition can be specified.
• When cross-fade is selected, the switchover between videos will be fade-out
followed by fade-in.
Cross-fade
Video 2 Still imageVideo 1
Fade-inFade-out (Transition time)
• This setting does not support audio.
Transition Time Set the time for the fade-in, fade-out and cross-fade.
Use the number keys on the remote control to enter the time.
[Settings]
Setting range: 1-5 sec
Setting unit: 1 sec
[Setting Method]
(1) Press the SET button after selecting this setting.
(2) Press the - (minus) button to clear the current setting time.
(3) Use the number buttons to enter the image transition time and then press the
SET button.
English-29
Item Settings
Content Aspect Set the display method for videos and still images.
[Settings]
1) Full: Change the aspect ratio of the image to occupy the entire screen of
the display.
2) Normal: Maintain the aspect ratio of the image.
NOTE:
• Please note that there is a risk of infringing upon the rights of copyrights holders
that are protected under the Copyrights Act when screen compression or
expansion is carried out through changes in the aspect ratio in commercial
establishments or public viewing locations like cafes and hotels etc.
• When set to “Normal”, some parts on the left and right or up and down of the
screen may appear blank depending on the aspect ratio of the contents.
(Display Example)
Original image Full Normal
Audio selection Play either the audio of an audio file or the audio of a video file. Set which audio to
playback.
[Settings]
1) Video: Play the audio of the video.
Audio files will not be played even if they are selected.
2) Audio: Play the audio of the audio file.
The audio in the video will not be played even if the video contains
audio.
Non-supported File Display If the selected folder contains files with formats that are supported by the product,
you can set whether to display the names of those files in the contents selection
screen. You can check whether the files saved in the media are supported by the
product.
[Settings]
1) Display: Display compatible file names.
2) Do Not Display: Do not display compatible filenames.
NOTE:
• When the filename is set to “Display”, the thumbnail of that file appears in grey
but it cannot be selected.

English-30
3-4. General
Configure the settings for the menu display
language, date and time, startup mode and
splash screen display.
Select [General] from the main screen of the
setting menu for the setting screen.
Item Settings
Language Selects the language of the menu screen.
The default setting when shipped from the factory is “English”.
[Settings]
•English
•German
•French
•Italian
•Spanish
•Swedish
•Japanese
Date Set the current date (Month/Day/Year).
[Setting Method]
(1) Press the SET button after selecting this setting.
(2) Enter the date in the order Month/Day/Year using the number buttons.
(3) Press the SET button after selecting [Done] at the bottom left of the screen.
Time Set the current time (Hours:Minutes:Seconds). The time is displayed in 24 hours format.
[Setting Method]
(1) Press the SET button after selecting this setting.
(2) Enter the time in the order Hours/Minutes/Seconds using the number buttons.
(3) Press the SET button after selecting [Done] at the bottom right of the screen.
Start-up mode
Set the menu screen to be displayed upon startup.
If the functions to be used are fixed beforehand, those functions can be started directly
during start up by setting the startup mode.
The default setting when shipped from the factory is “Home”.
[Settings]
•Home
•Intel® WiDi
•Media Player
Splash screen Select whether to display the splash screen (NEC logo) during startup.
[Settings]
•Enable: Display the splash screen.
•Disable: Do not display the splash screen.
English-31
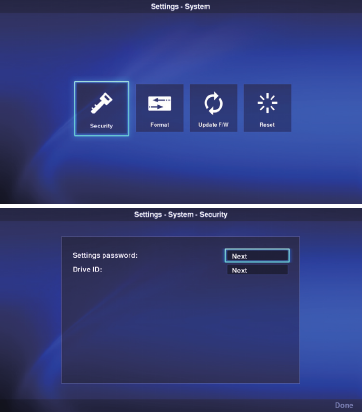
3-5. System
Security settings, media formatting, product
firmware update and initialization of product
settings etc. are performed.
Select [System] from the main screen of the
setting menu for the setting screen.
3-5-1. Security
Password for setting menu
The [Settings] menu in the home screen can be
protected by a password.
A 4-digit number is specified for the password.
No password is set when the product is first
shipped from the factory.
[Setting Method]
(1) Select [Settings password] and press the SET
button to display the following screen.
•New Password
•Confirm Password
(2)
Select [New Password]. Enter a 4-digit number after pressing the SET button and then press the SET button again
.
(3) Select [Confirm Password]. Enter the same 4-digit number entered in (2) above after pressing the SET
button and then press the SET button again.
(4) Select [Done] at the bottom right of the screen and then press the SET button to confirm the password.
NOTE:
• If the EXIT button or OPTION MENU button is pressed and the screen changes before the password is confirmed, the
entered password will be cleared.
• To cancel the password setting, leave the entry fields in [New Password], [Confirm Password] blank and press the SET
button after selecting [Done] at the bottom right of the screen. The password setting will be canceled.
Drive ID
In order to prevent the use memory devices other than the designated SD memory card or USB memory, a drive ID
can be set for the SD memory card or USB memory. Upon setting a drive ID, the product will no longer recognize
memory devices other than the SD memory card or USB memory that is written with the designated drive ID.
A drive ID is designated with a 8-digit number.
No drive ID is set when the product is first shipped from the factory.
[Setting Method]
(1) Upon selecting [Drive ID], the following menu is displayed.
•New Drive ID
•Confirm Drive ID
(2)
Select [New Drive ID]. Enter a 8-digit number after pressing the SET button and then press the SET button again.
(3) Select [Confirm Drive ID]. Enter the same 8-digit number entered in (2) above after pressing the SET
button and then press the SET button again.
(4) Select [Done] at the bottom right of the screen and press the SET button to confirm the drive ID.
(5) Media initialization is carried out in order to write the “Drive ID” set in the product to the SD memory
card or USB memory. Refer to “3-5-2. Initialization” on the initialization method.
NOTE:
• If the OPTION MENU button or EXIT button is pressed and the screen changes before the drive ID is confirmed, the
entered drive ID will be cleared.
• To cancel the drive ID setting, leave the entry fields in [New Drive ID], [Confirm Drive ID] blank and press the SET button
after selecting [Done] at the bottom right of the screen.

English-32
3-5-2. Initialization
Initialize the SD memory card or USB memory.
If a drive ID has been set, it will be written into the SD memory card or USB memory.
[Operating Method]
(1) After selecting [Drive], select [Done] at the bottom right of the screen and press the SET button.
(2) When the message “Initialize SD card?” or “Initialize USB memory?” appears, select [OK] and press
the SET button. To cancel initialization, select [Cancel] and press the SET button.
CAUTION:
• Please note that all files will be deleted upon initialization.
3-5-3. Firmware Update
Updates the firmware of the product. A USB memory is used for the update.
[Operating Method]
(1) When the product is connected to a display, set the OPTION POWER setting of the display to ON. Set
the POWER SAVE function of the display to OFF as well.
See the user’s manual of the display on how to set up the display.
(2) Download the product firmware from the Company’s website.
URL: http://www.nec-display.com/jp/support.html
(3) Save the downloaded firmware file to the root directory of the USB memory.
(4) Insert the above-mentioned USB memory into the USB port of the product.
(5) Upon opening the [F/W Update] menu and selecting [Firmware], the filename of the firmware stored in
the USB memory is displayed.
(6) After selecting the file, select [Done] at the bottom right of the screen and press the SET button to start
the firmware update.
(7) When the firmware update is completed normally, the product will start up again.
CAUTION:
• The firmware update time is about 15 minutes. Never switch off the power of the display or projector connected to the
product during the update. Never pull out the USB memory where the firmware is stored as well. The update may fail
and the product may no longer work normally.
NOTE:
• Firmware update can only be carried out using a USB memory.
3-5-4. Reset
Return the product settings to the default state when first shipped from the factory. Or start up the
product again.
Item Contents
Reset all the settings Return all general and system settings and the product’s Intel® WiDi and
media player to the default state when first shipped from the factory.
Reset the Intel® WiDi settings Return the Intel® WiDi settings to the default state when first shipped
from the factory.
Reset the media player settings Return the media player settings to the default state when first shipped
from the factory.
Re-startup Start up the product again.
The product settings will not return to the default state when first shipped
from the factory.
[Operating Method]
(1) After selecting the contents you want to run, select [Done] at the bottom right of the screen and press
the SET button.
(2) Select [OK] and press the SET button when the message “Reset the ** setting?” appears. To cancel,
select [Cancel] and press the SET button.
English-33
4. Firmware Update Recovery
If the firmware update fails, the product may not start up again. In this case, run firmware recovery.
Use the enclosed SD memory card for the recovery.
[Operating Method]
(1) Download the product firmware from the Company’s website.
URL: http://www.nec-display.com/jp/support.html
(2) Save the downloaded firmware file to the root directory of the SD memory card.
(3) Insert the above-mentioned SD memory card into the slot for the SD memory card on the product.
(4) When the product is connected to a display, set the OPTION POWER setting of the display to ON.
Set the POWER SAVE function of the display to OFF as well.
See the user’s manual of the display on how to set up the display.
(5) Turn off the power of the display or projector connected to the product.
(6) Turn on the power of the display or projector while pressing the reset button of the product.
Press and hold the reset button for about 15 sec after the display or projector starts up.
(7) The product indicator flashes in orange during the recovery process.
The indicator will flash in red instead if the recovery fails. Perform the recovery again in this case.
(8) Start up the product again when firmware recovery is completed normally.
CAUTION:
• Recovery of firmware takes about 15 minutes. Never switch off the power of the display or projector connected to the
product during recovery. Never pull out the SD memory card where the firmware is stored as well. The recovery process
will not proceed normally if the SD memory card is removed.
NOTE:
• Please consult your dealer or our after service support desk if the product fails to start up even after running the
recovery process.

English-34
Troubleshooting
General
Audio cannot be heard from the
display.
[When the product is connected to a display]
• Set the audio input of the display to “OPTION”. To do so, press the AUDIO
INPUT button and set the selected audio input (AUDIO) shown at the top right
of the screen to “OPTION”.
• Set the AUDIO setting in the display OPTION to DIGITAL. To do so, press the
MENU button, select [ADVANCED OPTIONS] - [OPTION SETTING] and set
[AUDIO] to [DIGITAL].
• Check whether the switch for the external speaker and built-in speaker of the
display has been set correctly.
• Adjust the volume of the display.
[When the product is connected to a projector]
• Depending on the model of the projector, the audio output of the product may
not be supported. Check with your dealer regarding the specifications of the
projector.
The menu screen does not appear
even after startup
• After startup, it takes about a minute for the menu screen of the product to
appear.
• After the splash screen appears, a blank screen will appear until the home
screen is displayed. This is due to the specifications of the product.
When the power lamp is flashing in red A failure may have occurred in the product. Please consult your dealer or
our after service support desk.
Intel® WiDi function
The Intel® WiDi menu cannot be
selected in the home screen.
• Start up the product again after checking whether the wireless LAN unit is
correctly inserted into the product.
The Intel® WiDi software does not
detect or connect to the
product.
• Start up the Intel® WiDi software in the PC again.
• Start up the Intel® WiDi software after re-starting the PC.
• Start up the product again.
• Reset the settings of the product.
• When multiple networks exist in the vicinity, detection or connection may
not be possible. In this case, change the channel of the wireless router to a
channel that is not in use on another network.
• Update the Intel® WiDi software in the PC to the latest version.
Distortions, interruptions and
delays are observed in the image.
• When the intensity of the radio waves is not sufficient, the display may not
appear normally.
• Move the product to a location where there are no obstructions such as walls
and doors etc between the PC and the installed display.
• Install the wireless LAN unit at a location with good electromagnetic reception
using the adapter for the wireless LAN unit and the USB extension cable.
• Due to the image processing and wireless transmission processing, there may
be a delay compared to the PC display. This is due to the specifications of the
Intel®WiDi software.
The PC image does not occupy the full
screen of the display
.
• Adjust the display size using the “Change TV Image Size” function in the Intel®
WiDi software.
• Adjust the display screen on the display end.

English-35
Media Player Function
SD memory card or
USB memory is not recognized.
• Re-insert the SD memory card or USB memory.
• Check whether the file system of the SD memory card or USB memory is
compatible with the product or not.
• The SD memory card or USB memory may be damaged. Check whether it can
be recognized correctly on the computer.
The files stored in the SD memory
card or USB memory
do not appear in the contents
selection screen.
• The contents may not be supported. Check the specifications of the contents.
• Set the non-supported file display setting to [Display] and check the contents
selection screen. If the thumbnail of the file appears in grey, it means that the
specifications of the contents are not supported.
Video and still images do not appear
normally.
• The files may be damaged. Check whether the files can be displayed correctly
on the computer.
• Copyright protected contents cannot be displayed.
Audio of video files is not output. • Change the audio selection setting to “Video”.
Audio of audio files is not output. • Change the audio selection setting to “Audio”.
Setting not included in the media
player
menu in the home screen.
• When “Auto” is selected in the media player mode setting, the setting will not
be included in the media player menu. Set the setting to “Manual”.
Even when cross-fade is selected as
the type of image transition, cross-
fade does not occur when switching
between videos.
• When cross-fade is selected, the switchover between videos will be fade-out
followed by fade-in. These are the specifications of the product.
When auto play mode is selected,
SD contents update is not
carried out.
• Create a “Contents” folder in the root directory of the SD memory card.
• Create a “Contents” folder in the root directory of the USB memory and save
the contents in that folder.
The folder does not appear in the
folder selection screen.
• Only folders in the root directory of the media are displayed.
Folders at other levels are not displayed.
Even when auto play mode is selected,
playback of contents does not start
automatically after startup.
• Select “Media Player” in the startup mode settings.
• Create a “Contents” folder in the root directory of the USB memory or SD memory
card and save the
contents
in that folder.

English-36
Limited Warranty
NEC Display Solutions of America, Inc. (hereinafter “NEC DISPLAY SOLUTIONS”) warrants this Product
to be free from defects in material and workmanship and, subject to the conditions set forth below,
agrees to repair or replace (at NEC DISPLAY SOLUTIONS_ sole option) any part of the enclosed unit
which proves defective for a period of three (3) years from the date of first consumer purchase. Spare
parts are warranted for ninety (90) days. Replacement parts or unit may be new or refurbished and
will meet specifications of the original parts or unit. This warranty gives you specific legal rights and
you may also have other rights, which vary from state to state. This warranty is limited to the original
purchaser of the Product and is not transferable.
This warranty covers only NEC DISPLAY SOLUTIONS-supplied components. Service required as a
result of third party components is not covered under this warranty. In order to be covered under this
warranty, the Product must have been purchased in the U.S.A. or Canada by the original purchaser.
This warranty only covers Product distribution in the U.S.A. or Canada by NEC DISPLAY SOLUTIONS.
No warranty service is provided outside of the U.S.A. or Canada. Proof of Purchase will be required
by NEC DISPLAY SOLUTIONS to substantiate date of purchase. Such proof of purchase must be an
original bill of sale or receipt containing name and address of seller, purchaser, and the serial number
of the product.
It shall be your obligation and expense to have the Product shipped, freight prepaid, or delivered to
the authorized reseller from whom it was purchased or other facility authorized by NEC DISPLAY
SOLUTIONS to render the services provided hereunder in either the original package or a similar
package affording an equal degree of protection. All Products returned to NEC DISPLAY SOLUTIONS
for service MUST have prior approval, which may be obtained by calling 1-800-632-4662. The Product
shall not have been previously altered, repaired, or serviced by anyone other than a service facility
authorized by NEC DISPLAY SOLUTIONS to render such service, the serial number of the product shall
not have been altered or removed. In order to be covered by this warranty the Product shall not have
been subjected to displaying of fixed images for long periods of time resulting in image persistence
(afterimage effects), accident, misuse or abuse or operated contrary to the instructions contained in
the User’s Manual. Any such conditions will void this warranty.
NEC DISPLAY SOLUTIONS SHALL NOT BE LIABLE FOR DIRECT, INDIRECT, INCIDENTAL,
CONSEQUENTIAL, OR OTHER TYPES OF DAMAGES RESULTING FROM THE USE OF ANY
NEC DISPLAY SOLUTIONS PRODUCT OTHER THAN THE LIABILITY STATED ABOVE. THESE
WARRANTIES ARE IN LIEU OF ALL OTHER WARRANTIES EXPRESS OR IMPLIED, INCLUDING,
BUT NOT LIMITED TO, THE IMPLIED WARRANTIES OF MERCHANTABILITY OR FITNESS FOR
A PARTICULAR PURPOSE. SOME STATES DO NOT ALLOW THE EXCLUSION OF IMPLIED
WARRANTIES OR THE LIMITATION OR EXCLUSION OF LIABILITY FOR INCIDENTAL OR
CONSEQUENTIAL DAMAGES SO THE ABOVE EXCLUSIONS OR LIMITATIONS MAY NOT APPLY TO
YOU.
This Product is warranted in accordance with the terms of this limited warranty. Consumers are
cautioned that Product performance is affected by system configuration, software, the application,
customer data, and operator control of the system, among other factors. While NEC DISPLAY
SOLUTIONS Products are considered to be compatible with many systems, specific functional
implementation by the customers of the Product may vary. Therefore, suitability of a Product for
a specific purpose or application must be determined by consumer and is not warranted by NEC
DISPLAYSOLUTIONS.
For the name of your nearest authorized NEC Display Solutions of America, Inc. service facility, contact
NEC Display Solutions of America, Inc. at 1-800-632-4662.
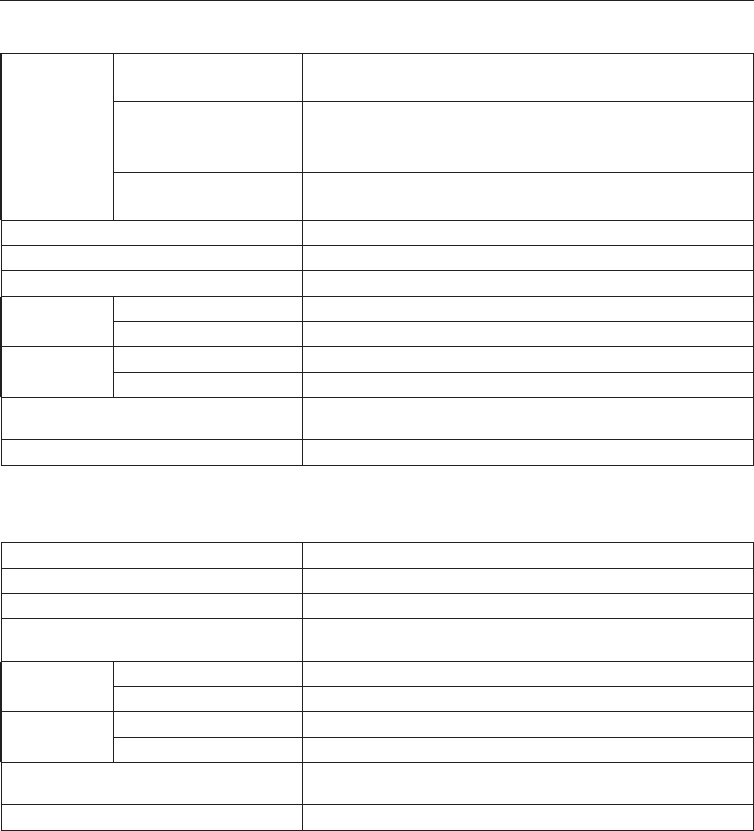
English-37
Specifications
Wireless Display Media Player SB-06WC
Interface
USB port USB2.0 port x2
•File system: FAT, FAT32
SD memory card slot
SD memory card slot x1
•Card type: SD, SDHC
•File system: FAT, FAT32
LAN port RJ-45 x1
•To be used when functions are expanded in future
Power Supply +16VDC (from Option slot interface of Display/Projector)
Power Consumption 4W
Complied Regulatory and Guidelines FCC, CE, VCCI: Class B
Operational
Environment
Temperature 0-40˚C
Humidity 10-80% (without condensation)
Storage
Environment
Temperature -10-65˚C
Humidity 10-90% (without condensation)
Dimensions 180.0(W)x 30.0(H) x 119.0(D)mm/ 7.09(W)x 1.18(H)x 4.69(D) inches
(excluding protrusions)
Weight 0.3kg/ 0.7lbs
Wireless LAN Unit NP04LM1/NP04LM2
Wireless LAN standard IEEE 802.11ac/a/b/g/n
Host Interface USB 2.0
Power Consumption 2W
Complied Regulatory and Guidelines NP04LM1: FCC Class B, IC
NP04LM2: CE Class B, VCCI Class B, MIC
Operational
Environment
Temperature 0-40˚C
Humidity 10-80% (without condensation)
Storage
Environment
Temperature -10-65˚C
Humidity 10-90% (without condensation)
Dimensions 26.2(W)x 12.9(H) x 69.7(D)mm/ 1.03(W)x 0.51(H)x 2.74(D) inches
(excluding protrusions)
Weight 15g/ 0.03lbs
CAUTION: Please refer to our company website for the list of regions and countries where the use of the Wireless LAN Unit NP04LM1/
NP04LM2 is supported. Please duly note that use of the product in a region or country which does not support its use may
contravene the laws on electromagnetic transmissions in that country.
URL:http://www.nec-display.com/ap/en_projector/others/wlan.html
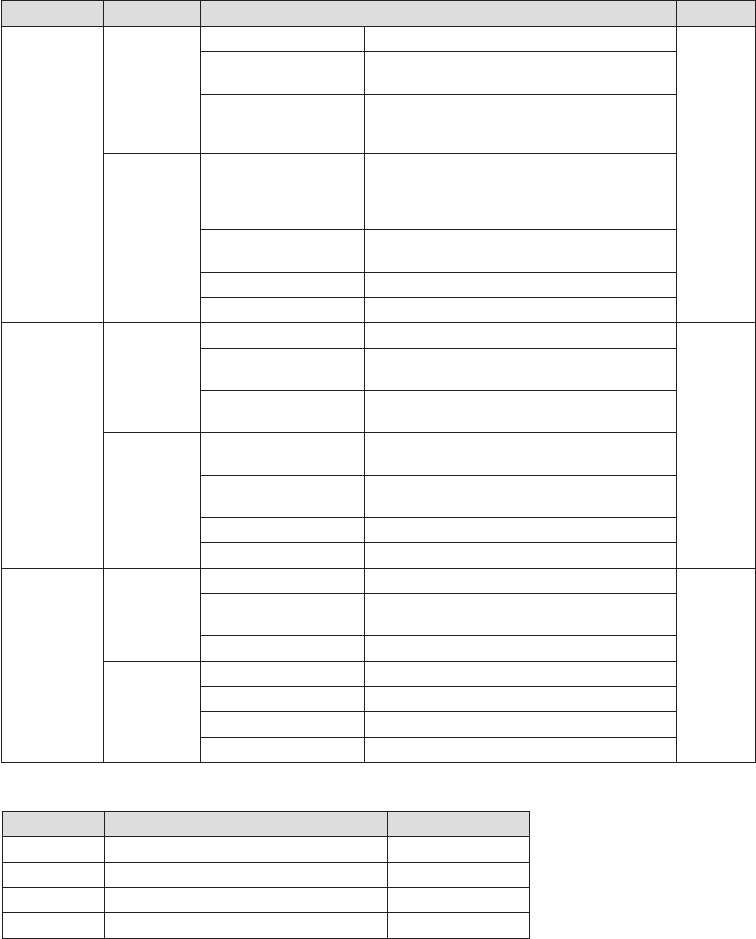
English-38
Compatible formats of the media player
(1) Video
Type Video/Audio Details extension
MPEG2,
MP2/MP3
Video Codec MPEG2 .mpg
.mpeg
Maximum bit rate Up to 720 x 480: 20Mbps
1920 x 1080, 1280 x 720: 35Mbps
Maximum frame rate 1920x1080@60p
1920x1080@60i
1280x720@60p
Audio Codec MPEG-1 Audio layer 2
MPEG-2 Audio Layer 2
MPEG-1 Audio layer 3
MPEG-2 Audio layer 3
Bit rate Layer 2 : 384(kbps)
Layer 3 : 320(kbps)
Channel 2ch
Sampling rate 16bit/24bit, 32, 44.1, 48(kHz)
VC-1/WMV9,
WMA9
Video Codec Windows Media Video 9(WMV3) .wmv
Maximum bit rate Up to 720 x 480: 20Mbps
1920 x 1080, 1280 x 720: 35Mbps
Maximum frame rate 1920 x 1080@60p
1280 x 720@60p
Audio Codec Windows Media Audio 9
Windows Media Audio 9 Professional
Bit rate 48, 64, 80, 96, 128, 160, 192, 256, 320(kbps)
*Support VBR
Channel 2ch
Sampling rate 16bit/24bit, 32, 44.1, 48(kHz)
H.264/AVC,
AAC
Video Codec H.264/AVC .mp4
Maximum bit rate 1920 x 1080: 62.5Mbps
1280 x 720: 20Mbps
Maximum frame rate 1920 x 1080@60p
Audio Codec Advanced Audio Coding
Bit rate 320(kbps)
Channel 2ch
Sampling rate 24bit: 96(kHz)
(2) Image
Type Details extension
GIF Maximum resolution: 1280 x 1280 dot .gif
JPEG Maximum resolution: 4000 x 4000 dot .jpg, .jpe, .jpeg
PNG Maximum resolution: 4000 x 4000 dot .png
BMP Maximum resolution: 4000 x 4000 dot .bmp

English-39
(3) Audio
Type Details extension
MP3 Codec MPEG-1 Audio layer 3
MPEG-2 Audio layer 3
.mp3
Bit rate MPEG-1: 32, 40, 48, 56, 64, 80, 96, 112, 128, 160, 192, 224, 256, 320 (kbps)
MPEG-2: 8, 16, 32, 40, 48, 56, 64, 80, 96, 112, 128, 144, 160 (kbps)
*Support VBR
Channel 2ch
Sampling rate MPEG-1: 16bit/24bit: 32, 44.1, 48(kHz)
MPEG-2: 16bit/24bit: 16/22.05/24(kHz)
LPCM Codec Linear Pulse Code Modulation .wav
Bit rate 1411kbps
Channel 2ch
Sampling rate 16bit: 441kHz