GemTek Technology PI930723G Wireless 802.11g PCI Adapter User Manual Manual
Gemtek Technology Co., Ltd. Wireless 802.11g PCI Adapter Manual
Manual

VS10408
User’s Guide
Wireless 802.11g PCI Adapter

FCC Statement
This equipment has been tested and found to comply with the
limits for a Class B digital device, pursuant to Part 15 of the FCC
Rules. These limits are designed to provide reasonable
protection against harmful interference in a residential
installation. This equipment generates, uses and can radiate
radio frequency energy and, if not installed and used in
accordance with the instructions, may cause harmful
interference to radio communications. However, there is no
guarantee that interference will not occur in a particular
installation. If this equipment does cause harmful interference to
radio or television reception, which can be determined by
turning the equipment off and on, the user is encouraged to try
to correct the interference by one of the following measures:
! Reorient or relocate the receiving antenna.
! Increase the separation between the equipment and
receiver.
! Connect the equipment into an outlet on a circuit different
from that to which the receiver is connected.
! Consult the dealer or an experienced radio/TV technician
for help.
FCC Caution: Any changes or modifications not expressly
approved by the party responsible for compliance could void the
user's authority to operate this equipment.
This device complies with Part 15 of the FCC Rules. Operation
is subject to the following two conditions: (1) This device may
not cause harmful interference, and (2) this device must accept
any interference received, including interference that may cause
undesired operation.
IMPORTANT NOTE:
FCC Radiation Exposure Statement:
This equipment complies with FCC radiation exposure limits set
forth for an uncontrolled environment. This equipment should be
installed and operated with minimum distance 20cm between
the radiator & your body.
This transmitter must not be co-located or operating in
conjunction with any other antenna or transmitter.
ViewSonic Corporation declares that VS10408 (FCC ID: MXF-
P1930723G) is limited in CH1~CH11 by specified firmware
controlled in U.S.A.

EC DECLARATION OF CONFORMITY (EUROPE)
ViewSonic Corporation declares that the device conform to the
specifications listed below, following the provisions of the
European R&TTE directive 1999/5/EC, EMC directive
89/336/EEC, and Low Voltage directive 73/23/EEC:
For 2.4 GHz devices with 100 mW radios, the following
standards were applied:
• ETS 300-826, 301 489-1 General EMC requirements for
Radio equipment.
• EN 609 50 Safety
• ETS 300-328-2 Technical requirements for Radio
equipment.
Caution: This equipment is intended to be used in all EU and
EFTA countries. Outdoor use may be restricted to certain
frequencies and/or may require a license for operation.
Contact local Authority for procedure to follow.
Canada (IC)
To prevent radio interference to the licensed service, this device
is intended to be operated indoors and away from windows to
provide maximum shielding. Equipment (or its transmit antenna)
that is installed outdoors
is subject to licensing.
This device has been designed to operate with an antenna
having a maximum gain of 3.8 dBi.
Antenna having a higher gain is strictly prohibited per
regulations of Industry Canada. The required antenna
impedance is 50 ohms.
To reduce potential radio interference to other users, the
antenna type and its gain should be so chosen that the EIRP is
not more than required for successful communicatio
Table of Contents
Introduction……………………………………………..1
A Look at the Hardware……………………………….2
Hardware Installation………………………………….3
Configuration……………………………………..…….4

Introduction
Augmenting the first ever 54Mbps transmission on the 2.4GHz
bandwidth, ViewSonic is presenting to the WLAN community
another high-speed option that is backward compatible to the
well accepted 802.11b WLAN technology.
In order to supplement the compatibility between 802.11b and
802.1g, Complementary Code Keying (CCK) is implemented to
achieve the common bit transfer rate of 5Mbps. While
Orthogonal Frequency Division Multiplexing (OFDM) is adopted
by 802.11g for the high-speed transfer rate in a 2.4GHz range.
ViewSonic VS10408 fully utilizes the benefits of 802.11g
standard on the proven compatibility between two transfer
modes and the high speed bit transfer that is desirable for
multimedia application in Wireless environment.
Features
The PCI adapter has the following features:
! Wireless security using WPA with TKIP encryption, 802.1X
with EAP-type Authentication
! 32 bit PCI Interface
! Backward Compatible in a 802.11b environment
! Plug & Play Installation
! Seamless roaming from cell to cell and between 802.11b to
802.11g
A Look at the Hardware
ViewSonic VS10408 Wireless 802.11g PCI Adapter has one
Light Emitting Diode (LED), or link lights. The following table
defines the behavior for the LED:
LED Activity / Status
Link Link LED Indicates the activity of the wireless
network traffic.
Hardware Installation
Thank you for purchasing the wireless PCI adapter. The
following instructions will walk you through installation of the
PCI.
Step 1 Insert the supplied CD-ROM into the CD-ROM drive.
The software automatically starts the Installation Wizard
program.
Step 2 Turn off your desktop. Follow the prompts to set up
your adapter card.
Step 3 Locate an empty PCI slot on your desktop computer.
Step 4 With the adapter card product-label and LEDs facing
up, insert the adapter card into the PCI slot.
Step 5 Complete the installation instructions supplied on the
CD-ROM.
Step 6 Turn on desktop computer.
Configuration
If using Windows XP, you can use the Windows XP Wireless
Zero Configuration (WZC) utility to manage your wireless client
adapter. You have the second choice. ViewSonic also provides
you the wireless configuration utility.
To enable the wireless connection:
Step 1 Click the icon to open the configuration utility window.
Step 2 The Wireless Network Properties window displays.
Your computer automatically connects to the network displayed
at the top of the Preferred networks list.
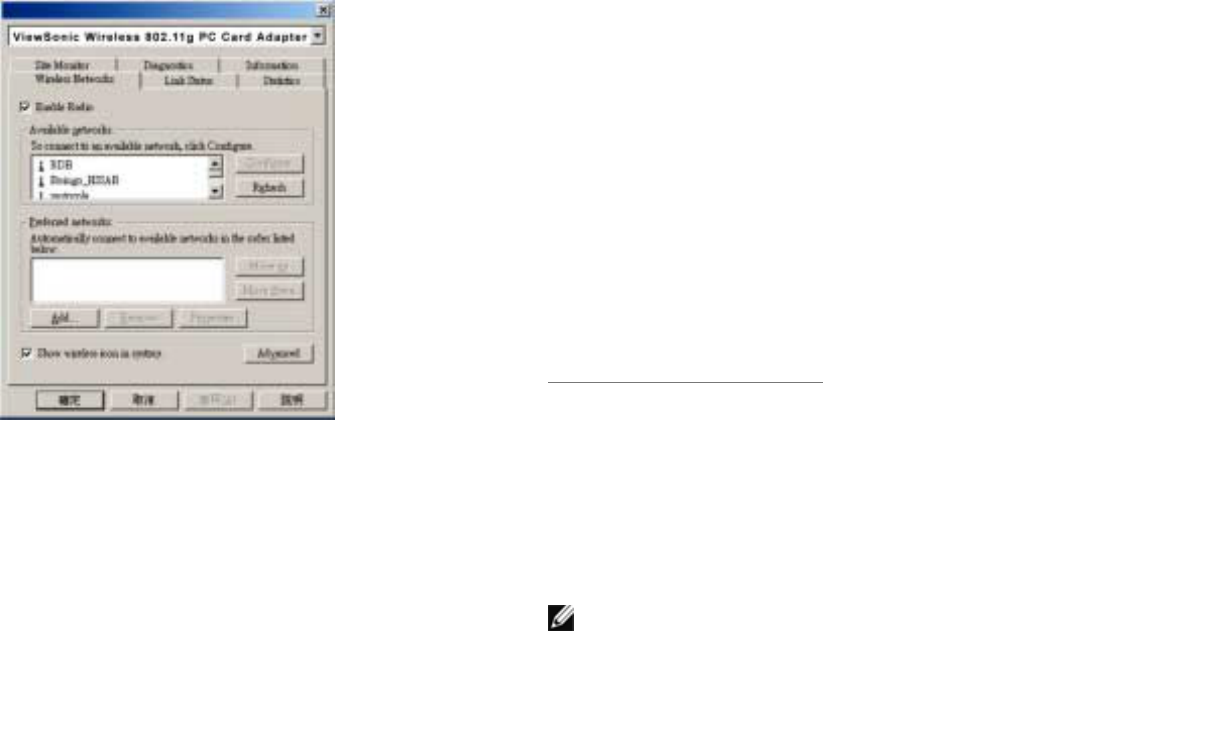
Step 3 In the Available networks list, highlight the network you
want to connect and click Configure.
Step 4 A Wireless Network Properties window will appear.
Step 5 Enter the Network name (SSID) of no more than 32
alphanumeric characters. This SSID is a network name that
identifies the wireless devices in the network. All workstations
and access points must use the same SSID to be able to
communicate with one another. The SSID is a 32-character field,
and the value is case sensitive.
Step 6 If the network requires Network Authentication, select
the type of authentication required. WPA might require further
Authentication options found on the Authentication tab. Match
the setting used by the network.
Step 7 Enter information for the new wireless network based
on the descriptions in the following:
Network Authentication
Select if your access point requires authentication. Match the
authentication used by the network.
! Open: No authentication is used. Shared The Pre-Shared
Key (PSK) authentication method is used.
In enterprises, WPA will be used in conjunction with both
wireless router and authentication server. In Small Office/ Home
Office (SOHO) environment, where there are no authentication
servers, user can use pre-shared key (PSK) mode in place of the
authentication server.
! WPA: Wi-Fi® Protected Access (WPA) authentication

(802.1X) is used with an EAP type.
WPA consists of three main elements: an Authentication Server
(typically a RADIUS server), WPA-enabled router or AP (called
"Authenticator"), and a WPA-enabled client (called "Supplicant").
! WPA-PSK: WPA authentication (802.1X) is used with a
Pre-Shared Key, which enables you to enter a static
Network key.
Data Encryption
Select the type of security encryption algorithm used. The
available types of encryption are based on the type of the
authentication selected.
! Disabled: No encryption.
! WEP: Deselect Network Key is provided for me
automatically and enter the Key provided by the network.
Available only with Open and Shared Authentication.
! TKIP: Available with WPA and WPA-PSK Authentication.
TKIP (Temporal Key Integrity Protocol) includes four algorithms:
MIC (message integrity check), to protect packets from
tampering; PPK (Per-Packet Key) hashing, to prevent weak key
attacks; extended IV (initialization vector), to reduce IV reuse
and the possibility that a hacker will collect sufficient packets to
crack the encryption; and a re-keying mechanism, to change the
temporal key dynamically. TKIP is the most commonly used
encryption method; however, if your wireless clients do not
support TKIP, the WX-5803 also supports AES (Advanced
Encryption Security) encryption. AES will replace 802.11's RC4-
based encryption under 802.11i specification.
Network key
Enter the security key for data encryption, when WEP or WPA-
PSK is selected. This can be entered in ASCII or hexadecimal
for WEP and in ASCII for WPA-PSK.
Key index
There are four Keys (1, 2, 3, 4) that can be selected for WEP.
The key index selected here must match the network key index.
The key is provided for me automatically
Select if the key is automatically provided. Most often, the key is
not automatically provided, so you have to un-check this box
and enter the network key. If using a RADIUS server, the key is
automatically provided.
This is a computer-to-computer (ad hoc) network
Select if the network you are creating or accessing is a

computer-to computer (ad hoc) network. If you are attempting to
connect to an infrastructure network, then do not select this
setting.
Step 8 After entering the information for this network, click OK.
The Wireless Network window is displayed and the new network
is listed in the Preferred networks area.
Step 9 Your computer is connected to the selected network
when you see a blue bubble on top of the icon for that network.
If the blue bubble does not appear, click Refresh. If it still does
not appear, double-check that the wireless settings match the
configuration of the wireless network.
Step 10 Click OK to save your changes.
Congratulation!
You have successfully setup your wireless connection.
Visit our website at
www.viewsonic.com