GemTek Technology PS910815 Easy Presentation Station User Manual WIRELESS Presentation Gateway
Gemtek Technology Co., Ltd. Easy Presentation Station WIRELESS Presentation Gateway
users manual

THE LINKSYS GROUP, INC.
17401 Armstrong Ave., Irvine, CA 92614
TEL: (949) 261-1288 FAX: (949) 261-8868
Wireless Presentation Gateway
WPG11
User’s Manual
FCC ID: MXF-PS910815
Draft 2.0 – Apr. 2002
Copyright statement
No part of this publication may be reproduced, stored in a retrieval system, or
transmitted in any form or by any means, whether electronic, mechanical,
photocopying, recording, or otherwise without the prior written consent of the
publisher.
Printed in Taiwan, April 2002
IMPORTANT INFORMATION
Federal Communication Commission Interference Statement
This equipment has been tested and found to comply with the limits for a
Class B digital device, pursuant to Part 15 of the FCC Rules. These limits are
designed to provide reasonable protection against harmful interference in a
residential installation. This equipment generates, uses and can radiate radio
frequency energy and, if not installed and used in accordance with the
instructions, may cause harmful interference to radio communications.
However, there is no guarantee that interference will not occur in a particular
installation. If this equipment does cause harmful interference to radio or
television reception, which can be determined by turning the equipment off
and on, the user is encouraged to try to correct the interference by one of the
following measures:
- Reorient or relocate the receiving antenna.
- Increase the separation between the equipment and receiver.
- Connect the equipment into an outlet on a circuit different from that to
which the receiver is connected.
- Consult the dealer or an experienced radio/TV technician for help.
Shielded VGA cable must be used in order to comply with emission limits.
FCC Caution: To assure continued compliance, (example - use only shielded
interface cables when connecting to computer or peripheral devices). Any
changes or modifications not expressly approved by the party responsible for
compliance could void the user's authority to operate this equipment.
IMPORTANT NOTE:
FCC RF Radiation Exposure Statement:
This equipment complies with FCC RF radiation exposure limits set forth for
an uncontrolled environment. This equipment should be installed and
operated with a minimum distance of 20 centimeters between the radiator and
your body.
This transmitter must not be co-located or operating in conjunction with any
other antenna or transmitter.
2
R&TTE Compliance Statement
This equipment complies with all the requirements of the DIRECTIVE
1999/5/EC OF THE EUROPEAN PARLIAMENT AND THE COUNCIL of 9
March 1999 on radio equipment and telecommunication terminal Equipment
and the mutual recognition of their conformity (R&TTE).
The R&TTE Directive repeals and replaces in the directive 98/13/EEC
(Telecommunications Terminal Equipment and Satellite Earth Station
Equipment) As of April 8, 2000.
Safety
This equipment is designed with the utmost care for the safety of those who
install and use it. However, special attention must be paid to the dangers of
electric shock and static electricity when working with electrical equipment. All
guidelines of this manual and of the computer manufacturer must therefore be
allowed at all times to ensure the safe use of the equipment.
EU Countries intended for use
The ETSI version of this device is intended for home and office use in Austria,
Belgium, Denmark, Finland, France (with Frequency channel restrictions),
Germany, Greece, Iceland, Ireland, Italy, Luxembourg, Netherlands, Norway,
Portugal, Spain, Sweden, Switzerland and United Kingdom.
The ETSI version of this device is also authorized for use in EFTA member
states Iceland, Liechtenstein, Norway and Switzerland.
EU Countries Not intended for use
None.
Potential restrictive use
France: Only channels 10,11,12, and13
3
Safety Notification
Your Wireless Presentation Gateway should be placed in a safe and secure
location. To ensure proper operation, please keep the unit away from water
and other damaging elements.
Please read the installation guide thoroughly before you install the
Wireless Presentation Gateway.
The Wireless Projector should be repaired by authorized and qualified
personnel only
Please do not try to open or repair the Wireless Presentation Gateway
yourself.
Do not place this product in a damp or humid environment, e.g. in a
bathroom.
The Wireless Presentation Gateway should be placed in a sheltered and
non-slippery location within a temperature range of +5 to +40 Celsius
degree.
Please do not expose the Wireless Presentation Gateway to direct
sunlight or other heat sources. The housing and electronic components
may be damaged by direct sunlight or heat sources.
4
TABLE OF CONTENTS
1. Introduction………….………………………………………………………… 7
2. Hardware Installation ………………………………………………………….8
3. WPG11 Web Configuration ………. …………………………………………10
4. EPS player Program .…….……………………………………………………14
5. Troubleshooting.………..…………………………………………………..….20
6.Specifications……………………………………………………………………21
5
1. INTRODUCTION
1.1 Congratulation on Your Purchase of the Wireless
Presentation Gateway
The Wireless Presentation Gateway features state of the art technology that
helps bring wireless capability to a conventional projector. You can now
access the projector through a wireless network effortlessly without being
constrained by the physical layout of a wired connection.
The Wireless Presentation Gateway allows for multiple dynamic wireless
connections from several PCs. The benefit of using Wireless Presentation
Gateway is therefore enormous. Image -- a user can join an ongoing
presentation session at any time and wait for his turn to do a short
presentation over the projector. When presentation is no longer required, he
can simply log off and leave the presentation group without much disturbance.
WPG11 is therefore, your perfect option for a company conference, and other
occasions (many people)
1.2 Getting Started
This user’s manual will assist you with the installation procedure. Please take
a few minutes now to review the complete manual before getting started. This
can save you much time and trouble later. In the later sections, the Wireless
Presentation Gateway is sometimes abbreviated as WPG11. Both terms will
be used interchangeably hereafter.
1.3 What’s in the Box?
The package you have received should contain the following items:
Wireless Presentation Gateway
User’s Manual (the document you are now reading)
Power Adapter
Note: If any piece is missing, please contact your dealer.
6

2. HARDWARE INSTALLATION
2.1 Front panel
EPS11 has 3 LED indicators on its front panel. Refer to the following
table for the meaning of each indicator.
LED’s Description.
Power Power status indicator. A steady light indicates
power is being applied to the EPS11 unit.
Traffic Data traffic indicator. A blinking light indicates that
at least one person is doing a presentation via
EPS11 on the projector.
Link
Status Wireless link status indicator. A steady light
indicates the EPS11 unit is connected to an AP or
Ad-Hoc client through a wireless network.
2.2 Rear Panel
The rear panel features an AC power inlet socket, a VGA port, and a
Factory Reset button. Refer to the table below for the description of each
item.
Power The power inlet socket of the EPS11. Please
make sure that you use the right power adaptor to
avoid damaging this unit.
VGA
port The VGA output of the EPS11. It is used to
connect to the projector’s VGA port with a VGA
cable.
Reset
button Pressing this button for 5 seconds resets the
configuration to the default setting.
2.3 Network Setup
You can easily connect to EPS11 with the EPS11’s client utility
7
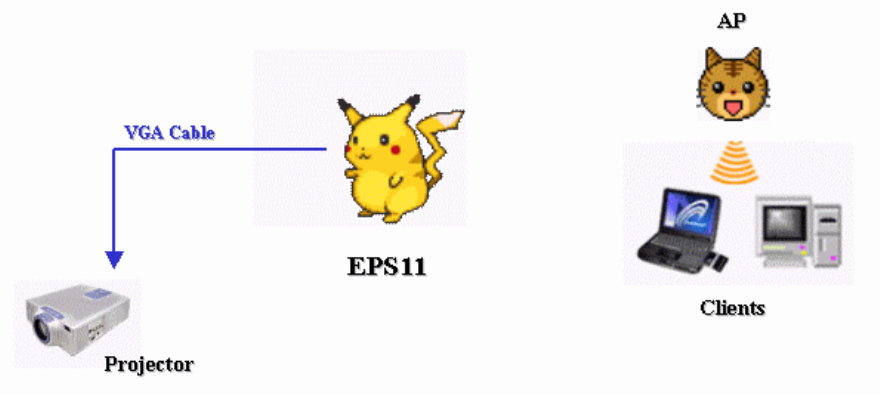
irrespective of the network setting of your computer. The image of your
computer desktop should transfer to the Projector via EPS11 immediately.
The architecture of a communication network with EPS11 is shown below.
8
3. WPG11 WEB Configuration
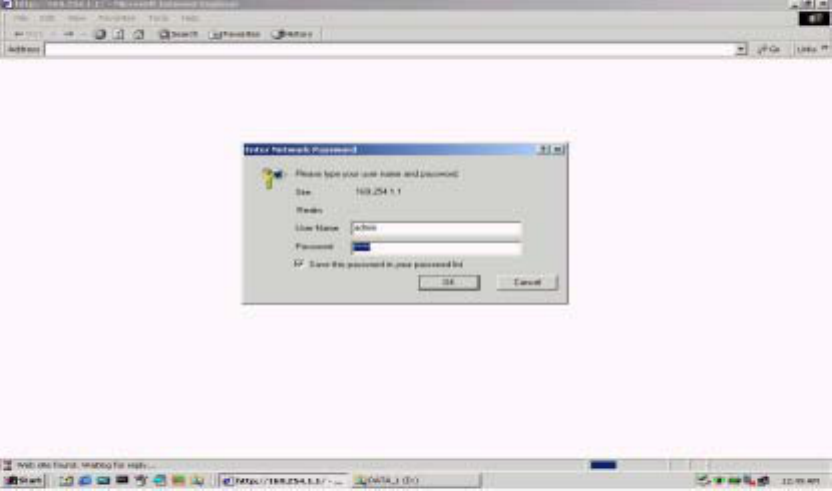
1. Open the web browser and hyperlink to the default IP address
“169.254.1.1”. An authentication dialog box will pop up like the one shown
below.
2. Enter the correct username and password in the dialog window. The
default username and password are both “admin”.
9
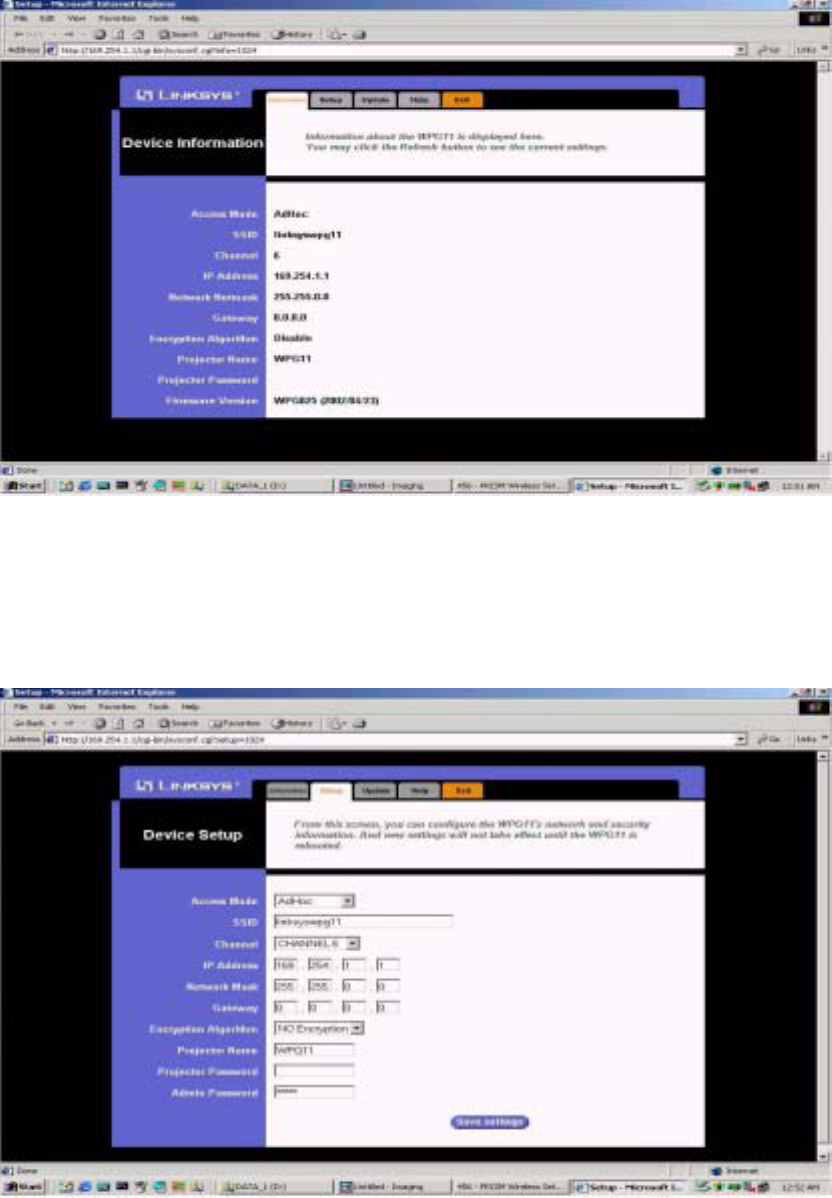
3. After a successful logon, the window first displays the values of the current
WPG11 setting, including “Projector Name”, “Projector Password” and
“Firmware version”.
4. Click the Setup tab on top of the window to move to the device setup page.
Enter the desired “Projector Name”, “Projector Password” and “Admin
Password” for your device in the appropriate fields. (You can only input at
most 8 characters in the “Projector Password” field.)
5. When done, click the Save button.
10
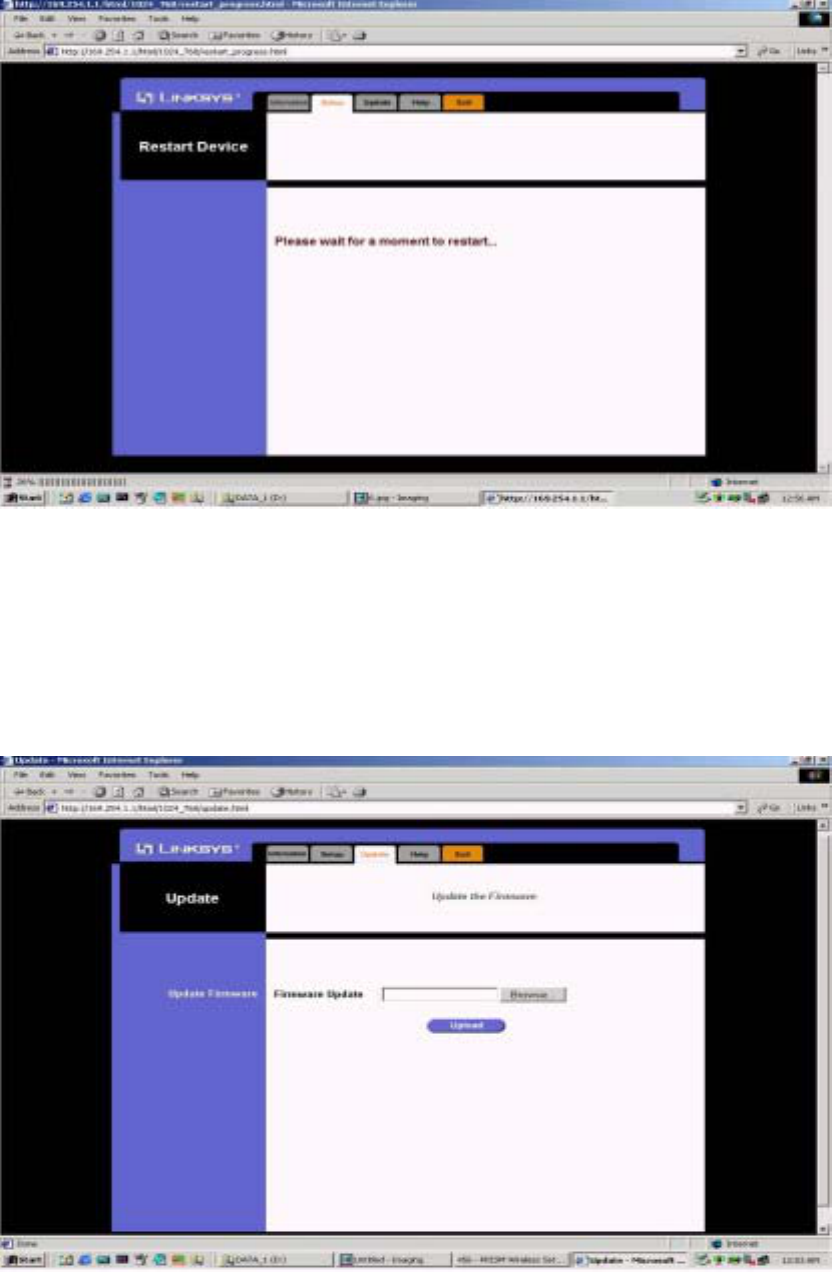
The device will now begin saving the new setting and display this progress.
When the progress bar at the bottom of the web browser counts to 100%, the
setting is saved.
6. Click the Update tab to navigate to the firmware-update page.
Next, click the Browser button to select the new firmware image from your
local file system. When done with firmware selection, click the Update
button to replace your current firmware with the selected file.
The update process may take some seconds to complete.
11
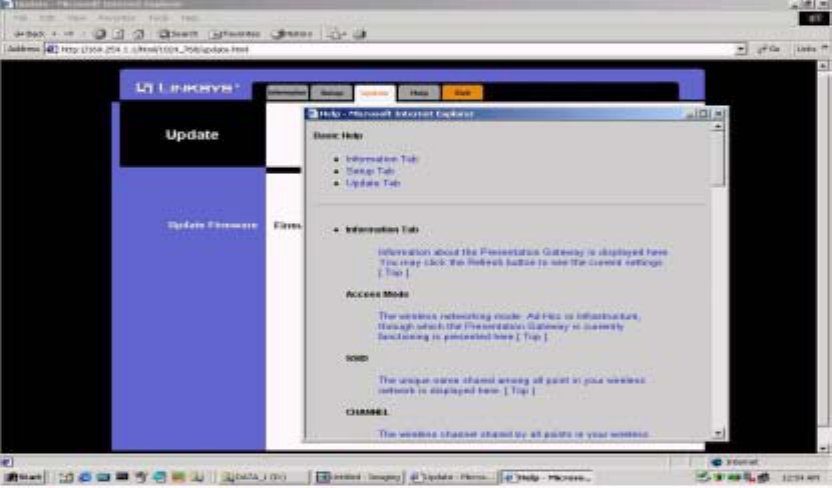
7. You can click the Help tab to obtain more information on this WPG11 at
any time. Or you can click the Exit tab to close the web browser.
12
4. EPS player Program
This section provides instructions on how to install and run the EPS player
software program on your PC. The software program enables you to connect
your PC to the EPS11 and use the projector from your PC.
4.1 Installing the EPS player Program
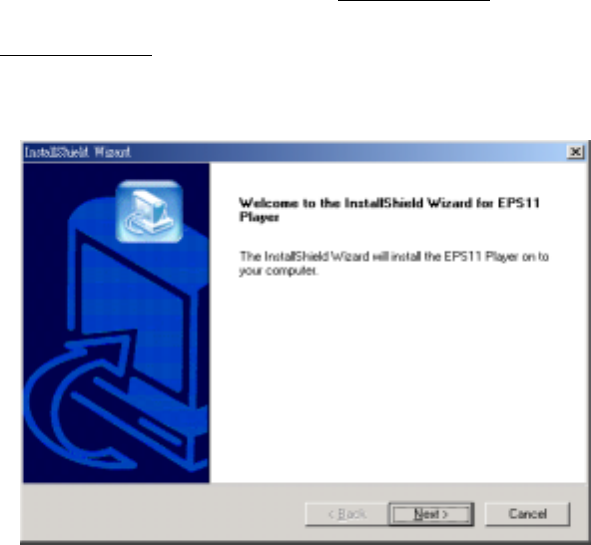
a. Running the setup program
A copy of the client setup program, EPSsetup.exe, is included on the
accompanying CD-ROM that comes with the EPS unit. Double-click on
the EPSsetup.exe file to open the Installation Wizard.
(i) On the Welcome window, click the Next button.
(ii) On the Choose Destination Location window, change the default
installation directory if needed, and click the Next button.
EPS player program and library files will now be copied into the
installation directory, and it may take several minutes to complete.
13
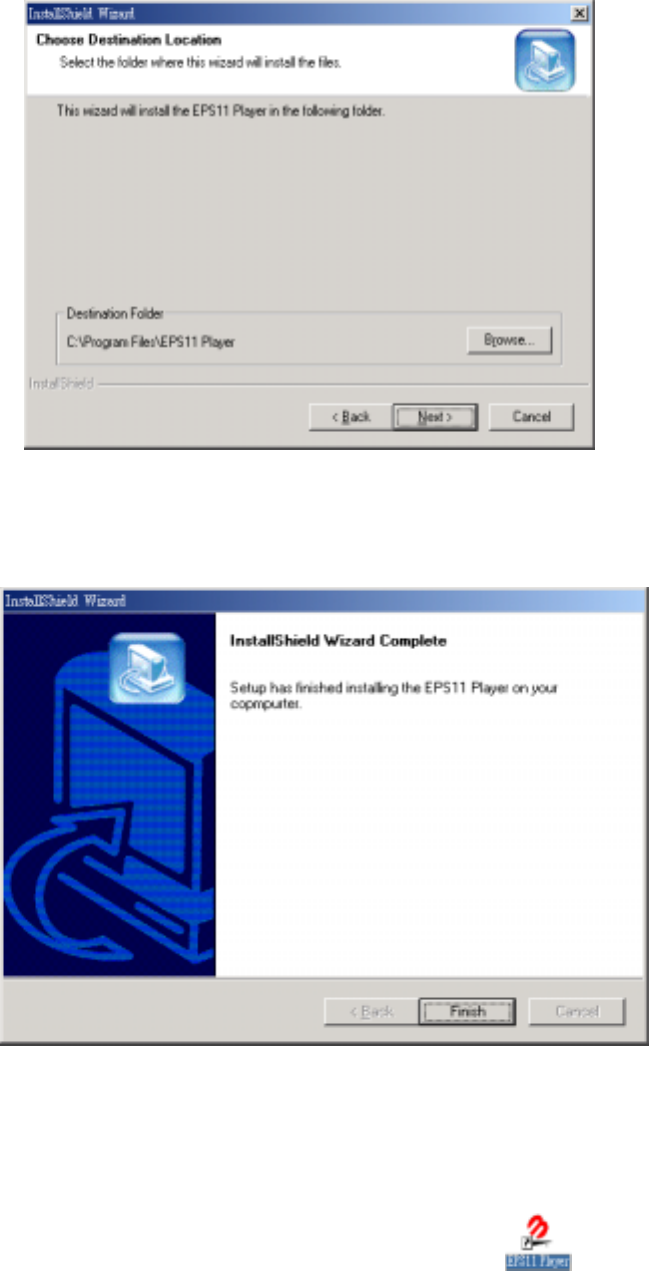
(iii) On the Installation Completed window, click the Finish button to
complete the setup process.
(iv) When the installation is completed, a shortcut will be created
on the desktop. You can double-click this shortcut to run the “EPS
player” program.
Please read Section 2 for more information on EPS player.
14
4.2 Running the EPS player
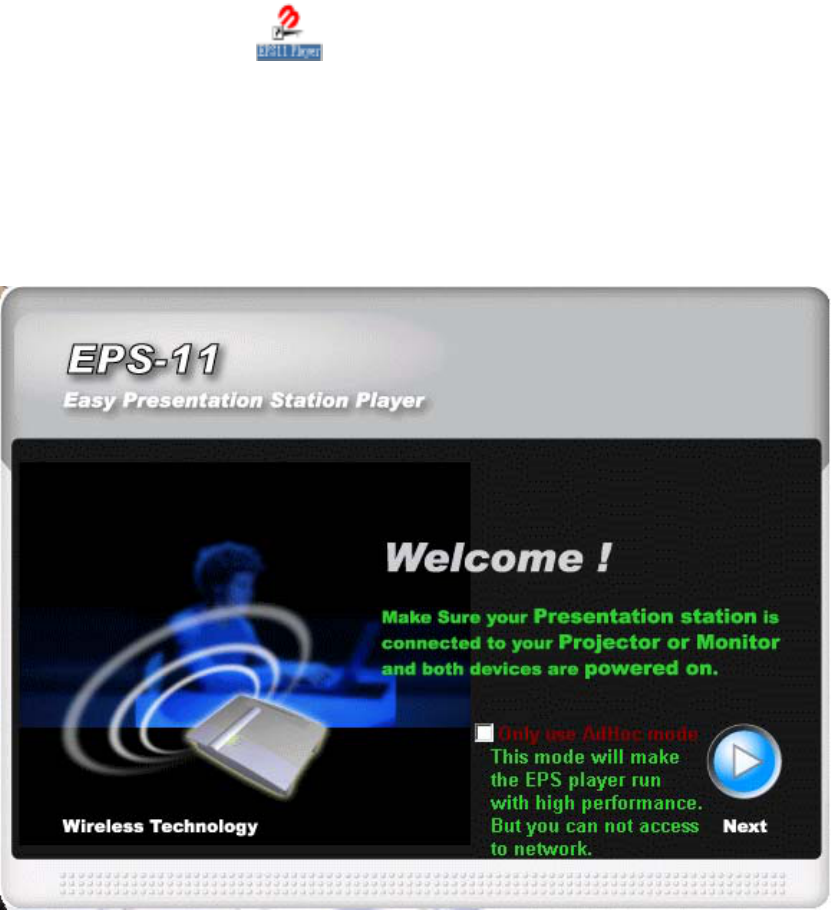
(i) Double-click the icon on the desktop to run the “EPS player”
program.
(ii) On the Welcome ! window, check the Only use Ad-Hoc mode
checkbox to make EPS player connect to the EPS unit in Ad-Hoc mode.
Uncheck this box to keep the player’s original setting.
When done, click the Next button to proceed.
(iii) The EPS player is now searching for every EPS unit on the network.
The search may take several seconds. If at least one EPS is found, the
Presentation Station Found window (Graph 1) is displayed. Proceed to
step (iv) continue the setup.
If no EPS is found, the Presentation Station Couldn’t be found window
is shown (Graph 2). You can click the Search Again button to searching
over or click the Exit button to end the player program.
15
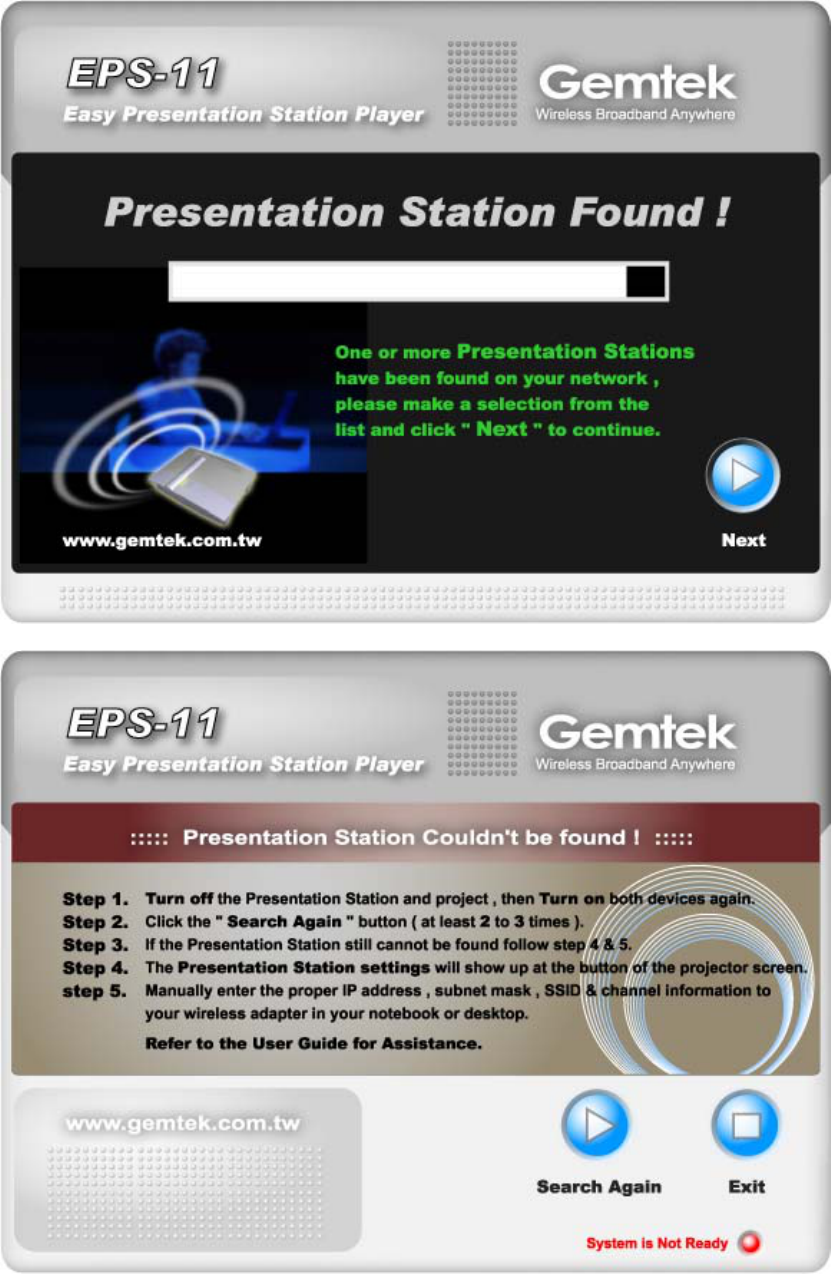
(Graph 1)
(Graph 2)
16
(iv) On the Presentation Station Found window, click the EPS Selection
combo box button to select the EPS station of your choice.
Then click the Next button to proceed.
(The player is now configuring the selected EPS based on your EPS player’s
network setting. If configuration is completed, the EPS player will show the
Presentation Options window (Graph 3). Otherwise, the Presentation
Station Couldn’t be found window is shown.)
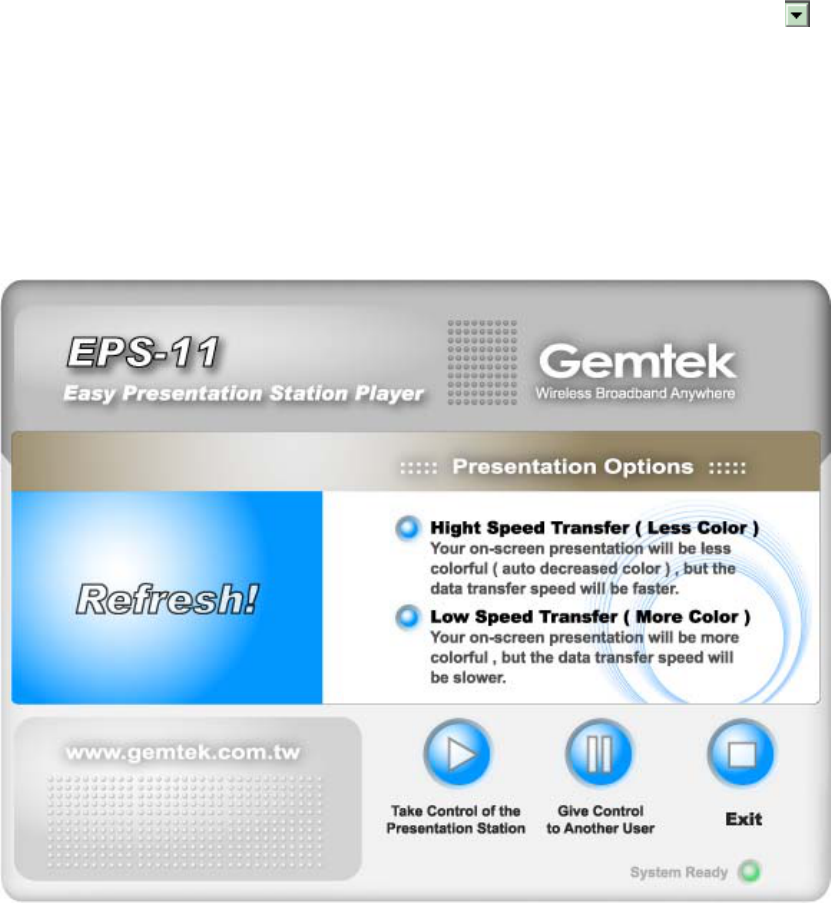
(Graph 3)
The display of the Presentation Options window indicates the connection
with EPS is active. You can do a presentation using the EPS player at this
point.
(v) The Presentation Options UI has several control items that control the
behaviors of the EPS presentation. Functionality of each is described below.
High Speed Transfer (Less Color) item
Choose this item to make your on-screen presentation less colorful (auto
color degradation), but the data transfer speed faster.
Low Speed Transfer (More Color) item
Choose this item to make your on-screen presentation more colorful, but
the data transfer speed slower.
17

Take Control of the Presentation Station button
Click this button to start presentation.
Give Control to Another User button
Click this button to give up presentation.
Exit button
Click this button to exit the EPS player program.
4.3 Context menu and Hot-keys
When the EPS player is executed, a tray icon will be created on the taskbar.
Users can right-click on this icon to invoke its context menu. Depending on
the status of the player’s connection to the EPS11 at the time, different
context menus are displayed.
Context Menu:
Select Exit item to exit the EPS player.
Hot-keys
When the Presentation Options window (Graph 3) is up, you can press [Alt +
F12] to start presenting or press [Alt + F12] again to stop the presentation.
18
5. Troubleshooting
There is no EPS11 Client Utility on your PC
Please insert the Installation Disc of EPS11 and click the Setup button.
The Installation Wizard should automatically install the client utility and
place a shortcut on your desktop. Double-click this shortcut to begin
desktop image presentation.
Clients Cannot Find the EPS11
Please check if the wireless device in your PC or Notebook is active, pull
and plug your wireless device, and then run the EPS11 client utility to
search for the EPS11 again. If the EPS11 still cannot be found, please
configure your network based on the setting shown on the EPS11’s
welcome screen. (Of course they must be in the same subnet and their IP
addresses must be different.) After reconfiguring your network, run the
EPS11 client utility again.
Desktop Image Not Displayed on Projector
Check if the VGA cable firmly connects EPS11 and the projector. If the
configuration status of the client’s EPS11 connection software is lit green
but nothing is being displayed on the projector, try to verify if the projector
is still functioning. The situation may also happen when the wireless
connection quality becomes very poor. Try to reconnect the EPS11 in Ad-
Hoc mode (You may select the option in the first dialog of EPS11 client
utility) or change the position of the EPS11 to achieve a better wireless
network connection quality.
Image Displaying is too Slow
Try to reconnect the EPS11 in Ad-Hoc mode (You may select this option in
the first dialog of the EPS11 client utility) or change the position of the
EPS11 to achieve a better wireless connection quality. In addition, change
the display mode to High Speed (EPS11 client’s software will downgrade
color automatically, and there is no need to adjust your monitor’s
displaying mode) and it should greatly improve the displaying performance.
19

20
Specifications
Product Name:Wireless Presentation Gateway
Model Name:EPS11 FCC ID: MXF-PS910815
Country to be certified: FCC ID grant, CE certification
Items Contents
1. Modulation type DSSS
2. How to move out the modulation Software Control
3. Number of channels Default: 11, Europe: 13
4. Carrier frequency of each channel
2412, 2417, 2422, 2427, 2432, 2437,
2442, 2447, 2452, 2457, 2462, 2467,
2472MHz
5. Bandwidth of each channel 5 MHz
6. IF & L.O. frequency IF=374 MHz, L.O.=2038∼2098 MHz
7. Transmitter or Transceiver Transceiver
8. Power Rating (DC or AC, ? Volt) 5V/1000mA
9. Maximum output power to
Antenna 15 dBm
10. Duty Cycle 100%
11. Basic function of product 802.11b Wireless LAN
12. Operation Temperature 0∼55℃
13. Antenna Connector Type Detachable Antenna
14. Antenna Type Dipole Antenna