GemTek Technology U920917G Wireless 11g USB Adapter User Manual WLAN USB ADAPTER
Gemtek Technology Co., Ltd. Wireless 11g USB Adapter WLAN USB ADAPTER
Users Manual
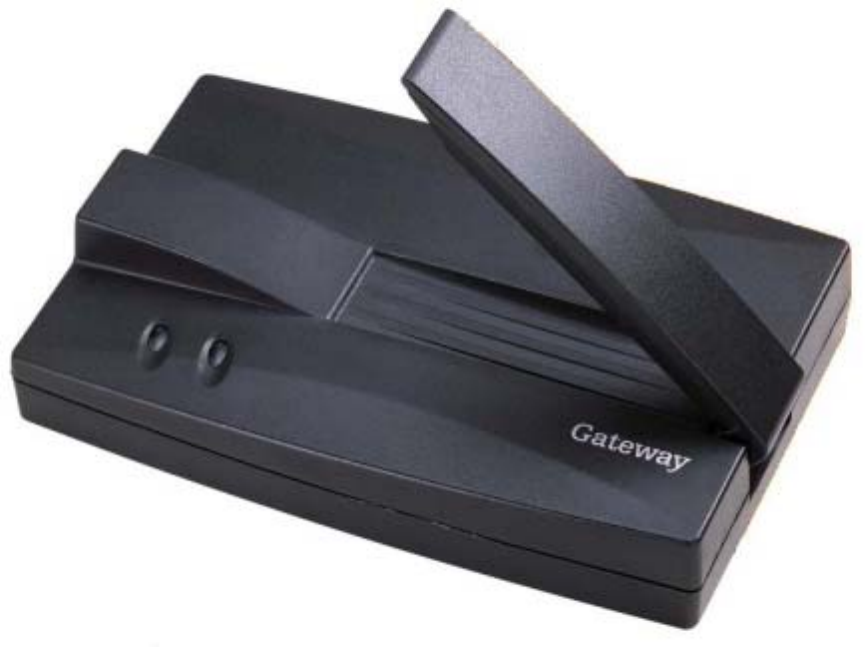
WLAN USB ADAPTER
WUBI-100GW
User Guide
Version 1.0 - Oct. 2003
1
Contents
1 Windows XP . . . . . . . . . . . . . . . . . . . . . . . . . . . . . . . . . ………………... . 1
Step 1: Installing the hardware and software . . . . . . . .. . .
Connecting the USB adapter . . . . . . . . . . . . . . . . . .
Installing the USB adapter driver . . . . . . . . . . . . . . .
Step 2: Configuring the USB adapter . . . . . . . . . . . . . . . .
Naming the computers and the workgroup . . . . . . .
Step 3: Configuring the TCP/IP protocol . . . . . . . . . . . .
Terms you should know . . . . . . . . . . . . . . . . . . . . .
Setting up a DHCP IP address for each computer .
Turning the wireless emitter off . . . . . . . . . . . . . . . . . . .
Where to go from here . . . . . . . . . . . . . . . . . . . . . . . . . .
Creating your wireless Ethernet network . . . . . . . .
Using your wireless Ethernet network . . . . . . . . . .
Troubleshooting your wireless Ethernet network . .
2 Windows 2000 . . . . . . . . . . . . . . . . . . . . . . . . . . . . . . . . 10
Step 1: Installing the hardware and software . . . . . . . . .
Installing the Gateway Wireless Monitor . . . . . . . .
Connecting the USB adapter . . . . . . . . . . . . . . . . .
Installing the USB adapter driver . . . . . . . . . . . . . .
Step 2: Configuring the USB adapter . . . . . . . . . . . . . . .
Naming the computers and the workgroup . . . . . .
Step 3: Configuring the TCP/IP protocol . . . . . . . . . . . .
Terms you should know . . . . . . . . . . . . . . . . . . . . .
Setting up a DHCP IP address for each computer .
Turning the wireless emitter off . . . . . . . . . . . . . . . . . . .
Where to go from here . . . . . . . . . . . . . . . . . . . . . . . . . .
Creating your wireless Ethernet network . . . . . . . .
Troubleshooting your wireless Ethernet network . .
3. Appendix . . . . . . . . . . . . . . . . . . . . . . . . . . . . . 15
4. Federal Communication Commission Interference Statement 17
2
1 Windows XP
This chapter describes how to connect a Gemtek wireless Ethernet USB adapter to your
Windows XP computer and configure Windows XP for a wireless Ethernet network.
Complete these tasks in sequence:
“Step 1: Installing the hardware and software”.
“Step 2: Configuring the USB adapter”.
“Step 3: Configuring the TCP/IP protocol”.
If you need to install and configure the USB adapter for “Windows 2000” on page
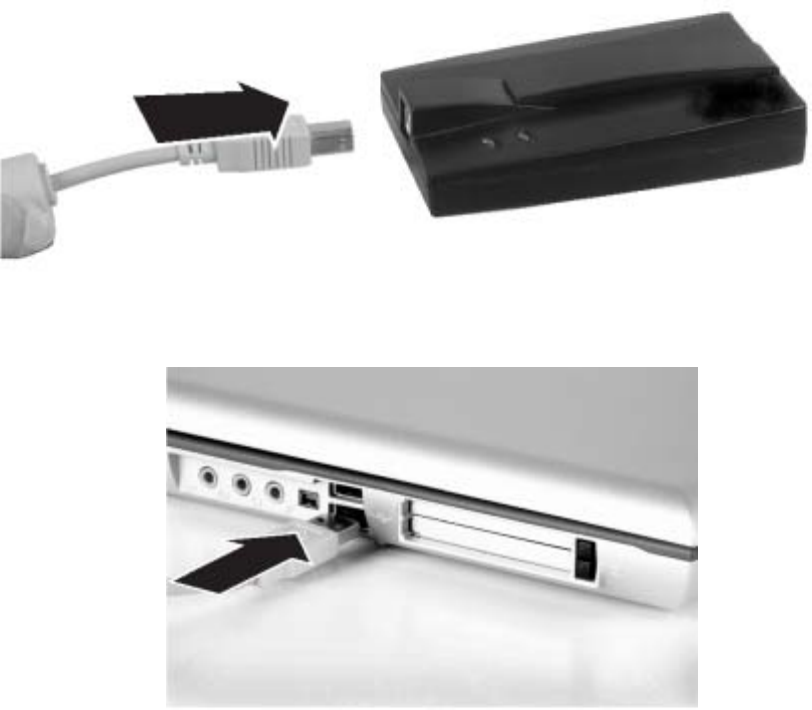
Step 1: Installing the hardware and software Connecting the USB adapter
Use the following instructions to connect the USB adapter to your computer.
1. Connect the USB cable to the USB adapter.
Step 1: Installing the hardware and software
Connect the other end of the USB cable to a USB port in your computer.
2
3
If this is the first time you have connected this USB adapter to your computer, the Found
New Hardware Wizard opens. To complete the USB adapter installation, go to “Installing
the USB adapter driver”.
Installing the USB adapter driver
Use the following instructions to install the USB adapter driver for Windows XP.
To install the USB adapter driver
1 When the Found New Hardware Wizard opens, insert the installation CD in the CD
drive.
2 Click Install the software automatically (Recommended), then click Next. The
less 802.11G USB adapter located in the
:\driver\winxp folder on the installation CD, then click Next.
click
Continue Anyway. The device driver files are copied to the hard drive.
tep : Configuring the USB adapter Naming the computers and the
he first time you use networking in your computer, you need to use the Windows XP
select other
rk Setup
e example screens show the screens that typically appear
rd. If your network situation differs from
may encounter additional screens or
creen
situation.
Click the Network Setup Wizard icon on the Windows XP taskbar. The Network Setup
s.
- OR -
Click Start
Setup Wiz
wizard displays a list of recommended drivers to install.
3 Click the Gemtek Wire
d
4 When a message tells you that the driver has not passed Windows Logo testing,
5 Click Finish to complete the installation.
2S workgroup
T
Network Setup Wizard to name each computer and the workgroup and to
network settings in Windows XP.
Important The network setup procedure uses the Windows XP Netwo
Wizard. Th
in the course of using the wiza
that used in this example, you
screens with different selections. Make sure that you read each s
in the wizard and make your selections based on your particular
network
To run the Windows XP Network Setup Wizard:
1
Wizard open
, All Programs, Accessories, Communications, then click Network
ard. The Network Setup Wizard opens.
4
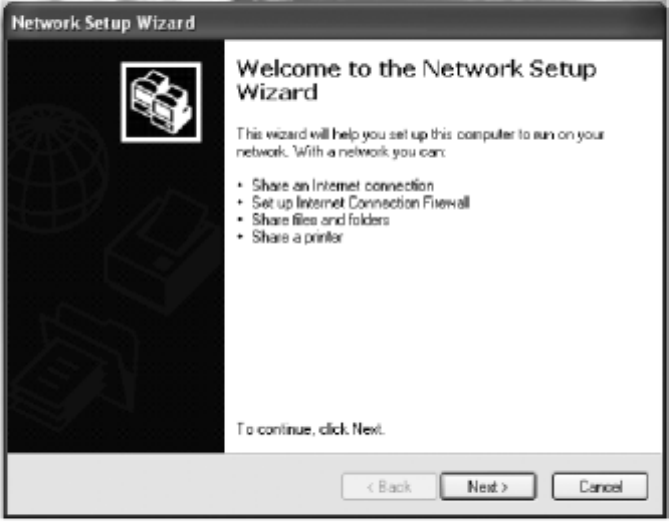
2 Click Next to continue through the wizard.
3 Click Next. The wizard found disconnected network hardware screen opens.
4 Click to select the Ignore disconnected network hardware
check box, then click Next. The Select a connection method screen opens.
5 Click This computer connects to the Internet through another computer on
my network or through a residential gateway, then click Next.
6 If the Your computer has multiple connections screen opens, click Let me choose
the connections to my network, then click Next.
On the Select the connections to bridge screen, click to select the Wireless Network
opens.
Type a description of the computer in the Computer description box.
ame identifies the
omputer to other users on the network. Use a computer name of up to 15 characters with
ome letters.
7
Connection check box.
8 Click Next. The Give this computer a description and name screen
9
10 Type a unique computer name in the Computer name box. This n
c
no blank spaces. Each computer name must be unique on your network. All-numeric
computer names are not allowed. Names must contain s
5
Important You must give each computer on the network a unique Computer
Name and the same Workgroup Name.
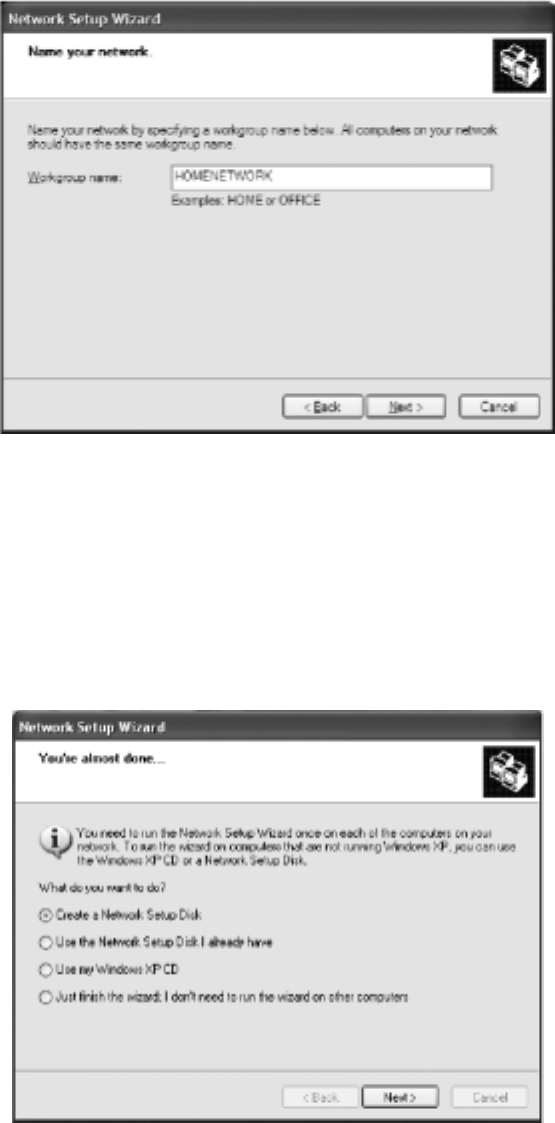
11 Click Next. The Name your network screen opens.
12 Type a name for your workgroup in the Workgroup name box. Use a workgroup
name of up to 15 characters with no blank spaces. The workgroup name must be the same
for all computers in your network workgroup, and the name must be different than any
computer name on your network.
13 Click Next. The Ready to apply network settings screen opens.
14 Click Next to apply the network settings. The You’re almost done screen opens.
6
15 If you are setting up an Ethernet network on other computers, you may want to use the
Network Setup Wizard to do so. Click a method for installing and configuring the
network on your other computers or click Just finish the wizard; I don’t need to
run the wizard on other computers.
16 Click Next.
17 Click Finish. After you name each computer and assign it to your workgroup, go to
“Step 3: Configuring the TCP/IP protocol”.
Help and Support
For more information about using the Network Setup Wizard in Windows XP, click
Start, then click Help and Support.
Type the keyword Network Setup Wizard in the HelpSpot Search box ,
then click the arrow.
computer you plan to use on your network.
e recommend you use the Transmission Control Protocol/Internet Protocol (TCP/IP),
accepted and compatible for local area networks (LANs), as well as for
ternet communications. When networking is set up in Windows XP, TCP/IP is
erms you should know
st Configuration Protocol (DHCP) lets a router automatically assign
ss is a number that uniquely identifies a
P address for each computer
order to use the TCP/IP protocol on each computer, you must either set the protocol to
r
IP address and a subnet mask. For more
formation about setting the IP address manually, see the Setting Up Your Wireless
ded on the installation CD that came with your network
tically assigns IP addresses to computers on
Step 3: Configuring the TCP/IP protocol
A networking protocol is a language computers use to talk to each other. One of several
available protocols must be set up on each
W
which is widely
In
automatically installed as the default protocol.
T
DHCP - Dynamic Ho
an IP address to a computer on the network.
IP Address - Internet Protocol (IP) addre
computer on the network.
Setting up a DHCP I
In
Obtain an IP address from a DHCP serve
or make the IP address settings manually. If you use a wireless access point router that
can act as the DHCP server, you can select Obtain an IP address from a DHCP
server. Obtaining an IP address automatically using DHCP is one of the most
common methods for setting up wireless network devices. If your network configuration
requires a static IP address (one that does not change), you must set the IP address
manually. This means that you need to enter an
in
Windows Network guide inclu
device. If you are connecting to a home Ethernet network, have a cable or DSL modem,
and a wireless access point router that automa
the network, follow the instructions in “To set up a DHCP IP address:”
7
To set up a DHCP IP address:
1 Click Start, then click Control Panel. The Control Panel window opens. If your
Control Panel is in Category View, click Network and Internet Connections. Th
Network and Internet Connections window opens. e
ialog box opens.
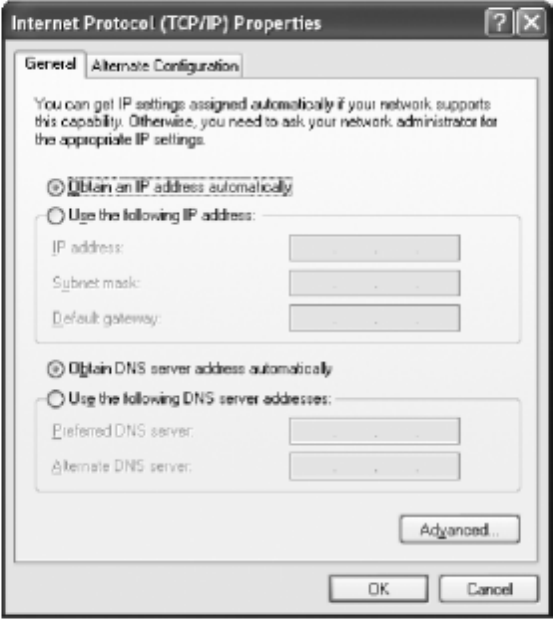
Click the General tab.
2 Click/Double-click Network Connections. The Network Connections window
opens.
3 Right-click Wireless Network Connection, then click Properties. The Wireless
Network Connection Properties dialog box opens.
4 Click to select the Internet Protocol (TCP/IP) check box in the This connection
uses the following items list. If you do not see TCP/IP, drag the scroll bar to see
more choices.
5 Click Properties. The Internet Protocol (TCP/IP) Properties
d
6
7 Click Obtain an IP address automatically.
8 Click OK to close the Internet Protocol (TCP/IP) Properties dialog box.
9 Click OK to close the Wireless Network Connection Properties dialog box.
10 Click X to close the Network Connections window.
11 Repeat this procedure for every computer on your network.
12 After you set up the IP addresses on all your computers, go to “Where to go from
here”.
8
Turning the wireless emitter off
You can turn off the wireless emitter to conserve the battery charge on your notebook
computer or to make a computer unavailable on the network. There are times, such as
when you are flying in an aircraft, when you should turn off your wireless emitter. For
more safety and regulatory information, see “Safety, Regulatory, and Legal Information”
To turn the wireless emitter off:
Click the remove hardware icon in the taskbar, the USB adapter name, then click
Stop.
- OR -
Turn off your computer.
Warning Radio frequency wireless communication can interfere with equipment
on commercial aircraft. Current aviation regulations require wireless devices to be
turned off while traveling in an airplane. IEEE 802.11a, IEEE 802.11b, and IEEE
802.11g communication devices are examples of devices that provide wireless
communication.
Important
If the remove hardware icon does not appear on the taskbar in Windows XP, click
the show hidden icons button.
ss Ethernet netwo y to create a
g a
s Network
rk device.
ou create and configure your wireless Ethernet network and you know how to turn
our wireless emitter on and off, you are ready to use the network. Go to the sharing your
sources section in the Setting Up Your Wireless Windows Network guide included on
r network device.
Where to go from here Creating your wirele rk
Now that you have configured your wireless Ethernet network, you are read
wireless network. Go to the creating a wireless access point network or creatin
Your Wireless Windowpeer-to-peer wireless network section in the Setting Up
guide included on the installation CD that came with your netwo
Using your wireless Ethernet network
fter yA
y
re
the installation CD that came with you
Troubleshooting your wireless Ethernet network
If you cannot get your wireless Ethernet network to work, go to the troubleshooting
section in the Setting Up Your Wireless Windows Network guide included on the
nstallation CD that came with your network device. i
9
2 Windows 2000
This chapter describes how to connect a Gateway wireless USB adapter to your
00 computer and configure your computer for a wireless Ethernet network.
“Step 1: Installing the hardwareand software”.
ware Installing the Gateway Wireless
Insert the CD that came with your PC Card into your computer’s CD or DVD drive. If
ens.
In the Open text box, type d:\app\setup.exe (where d is the drive letter of your CD or
VD drive).
Click OK. The Gateway Wireless Monitor wizard starts.
Click Next. The License Agreement screen opens.
Click Yes to accept the License Agreement. The Choose Destination Location screen
pens.
Click Next. The wizard installs the program on your computer.
Windows 20
Complete these tasks in sequence:
“Step 2: Configuring the USB adapter” .
“Step 3: Configuring the TCP/IP protocol”.
If you need to install and configure the USB adapter for Windows XP, see
“Windows XP”.
Step 1: Installing the hardware and soft
Monitor
Use the following instructions to install the Gateway Wireless Monitor program.
To install the Gateway Wireless Monitor:
1
the program starts automatically, go to Step 5.
- OR -
If the program does not start automatically, go to Step 2.
2 Click Start, then click Run. The Run dialog box op
3
D
4
5
6
o
7
10
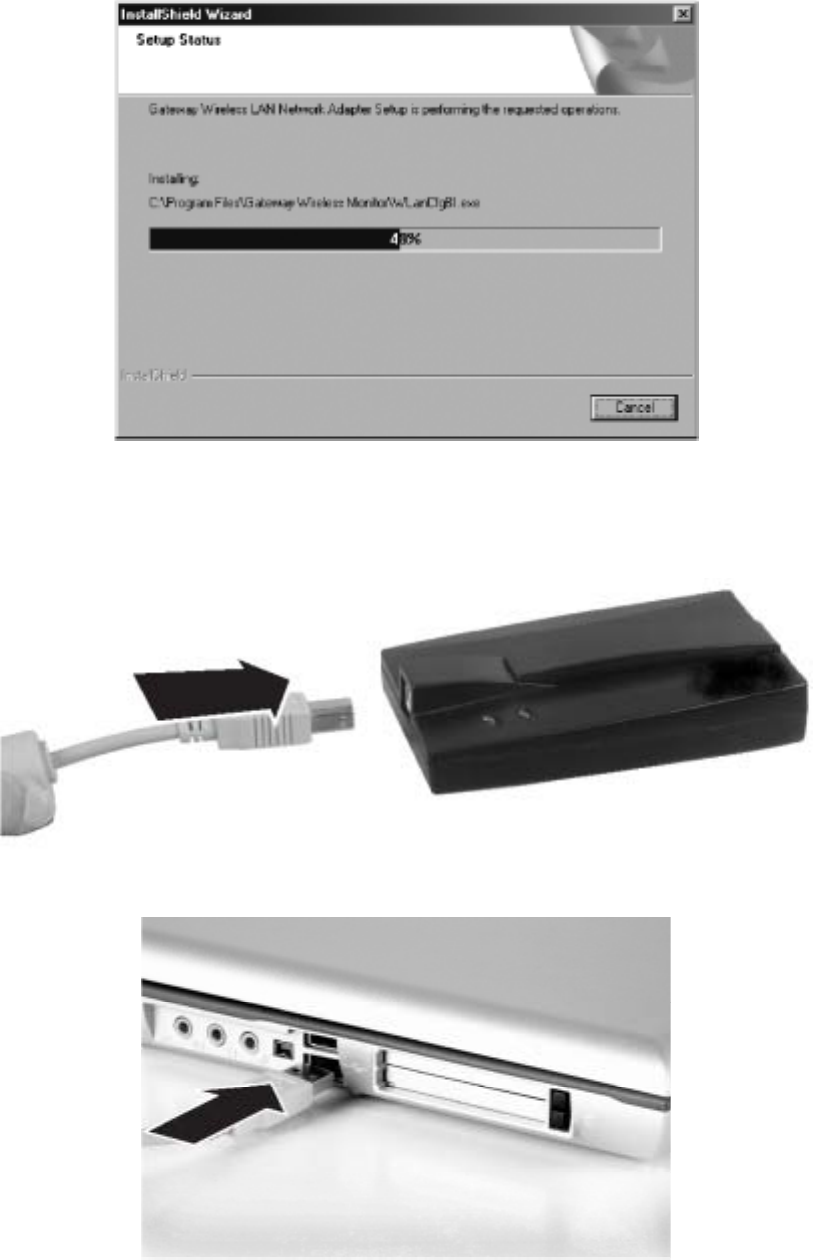
Connecting the USB adapter
Use the following instructions to connect the USB adapter to your computer.
To connect the USB adapter to your computer:
1 Connect the USB cord to the USB adapter.
2 Connect the other end of the USB cable to a USB port in your computer.
3 If this is the first time you have connected this USB adapter to your computer, the Add
11
New Hardware Wizard opens. To complete the USB adapter installation, go to “Installing
the USB adapter driver”
Installing the USB adapter driver
The following instructions tell you how to install the USB adapter driver using the Add
New Hardware Wizard.
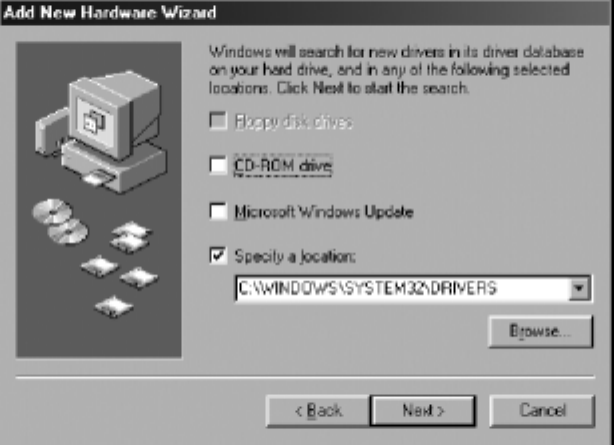
To install the USB adapter driver
1 When the Add New Hardware Wizard opens, insert the installation CD into the CD
drive.
Important
he instructions for installing the wireless device driver use the Add New
lly appear in
the course of using the wizard. If your operating system situation differs from that
used inthis example, you may encounter additionalscreens or screens with
different selections. Makesure that you read each screen in the wizard and
make your selections based on your particularnetwork situation.
2 Click Next. The search for new drivers screen opens.
T
Hardware Wizard. The example screens show the screens that typica
3 Click to select the CD-ROM drive and Specify a location check boxes. Make sure
ter driver.
7 Click Next. The device driver files are copied to the hard drive.
that all other check boxes are cleared.
4 Click Browse. The Browse for Folder dialog box opens.
5 Navigate to the Driver folder located on the installation CD. Click to highlight the
. Win2000 folder located under the Driver folder on the installation CD
6 Click OK. The Add New Wizard locates the USB adap
12
8 Click OK to restart your computer and complete the
tep 2: Configuring the USB adapter Naming the computers and the
he first time you use networking on your computer, you need to give each computer a
p.
window opens.
ox opens.
box opens.
Type a unique computer name in the Computer name box. This name identifies the
omputer to other users on the network. Use a computer name of up to 15 characters with
o blank spaces. Each computer name must be unique on your network. All-numeric
omputer names are not allowed. Names must contain some letters.
Type a name for your workgroup in the Workgroup box. Use a workgroup name of
p to 15 characters with no blank spaces. The workgroup name must be the same for all
omputers in your network workgroup, and the name must be different than any
omputer name on your network.
Click OK to close the Identification Changes dialog box.
Click OK to close the System Identification dialog box.
After you name each computer and assign it to your workgroup, go to “Step 3:
S
workgroup
T
unique name and assign each computer to the same workgrou
To identify a Windows 2000 computer on the network:
1 Click Start, Settings, then click Control Panel. The Control Panel
2 Double-click the System icon. The System Identificationdialog b
3 Click the Network Identification tab.
4 Click Properties. The Identification Changes dialog
5
c
n
c
6
u
c
c
7
8
9
Configuring the TCP/IP protocol”.
13
Important
networking protocol is a language computers use to talk to each other. One of several
twork.
e recommend you use the Transmission Control Protocol/Internet Protocol (TCP/IP),
r local area networks (LANs), as well as for
ternet communications. When networking is set up in Windows, TCP/IP should
, see the Windows
help.
HCP - Dynamic Host Configuration Protocol (DHCP) lets a router automatically assign
must either set the protocol to
btain an IP address from a DHCP server or make the IP address settings r, you
from a DHCP server. Obtaining an IP address
utomatically using DHCP is one of the most common methods for setting up wireless
ces. If your network configuration requires a static IP address (one
enter an IP address and a subnet mask. For more information
bout setting the IP address manually, see the Setting Up Your Windows Network guide
our network device.
you are connecting to a home Ethernet network, have a cable or DSL modem, and a
n for each networking connection available on your computer. For example, if you
ave both wired and wireless Ethernet hardware installed on your computer, there will be
t least two icons, one for your wired Ethernet hardware and one for your wireless
You must give each computer on the network a unique Computer Name and the
same Workgroup Name.
Step 3: Configuring the TCP/IP protocol
A
available protocols must be set up on each computer you plan to use on your ne
W
which is widely accepted and compatible fo
In
automatically be installed as the default protocol. If it is not installed
Terms you should know
D
an IP address to a computer on the network.
IP Address - Internet Protocol (IP) address is a number that uniquely identifies a
computer on the network.
Setting up a DHCP IP address for each computer
In order to use the TCP/IP protocol on each computer, you
O
manually. If you use a wireless access point router that can act as the DHCP serve
can select Obtain an IP address
a
network devi
that does not change), you must set the IP address manually.
This means that you need to
a
included on the installation CD that came with y
If
wireless access point router that automatically assigns IP addresses to computers on the
network, follow the instructions in “To set up a DHCP IP address for Windows 2000:”
To set up a DHCP IP address for Windows 2000:
1 Click Start, Settings, then click Network and Dial-up
Connections. The Network and Dial-up Connections window opens. This window has
an ico
h
a
Ethernet hardware.
14
2 Right-click the Local Area Connection icon for the wireless Ethernet hardware,
P/IP) check box in the Components
hecked are used by this connection list. If you do not see TCP/IP, drag the scroll
Properties dialog box opens.
Click Obtain an IP address automatically. ties dialog box.
your notebook
”
dapter name, then click
quency wireless communication can interfere with equipment
that
et network, you are ready to create a
ting a
indows
network device.
u create and configure your wireless Ethernet network and you know how to turn
our wireless emitter on and off, you are ready to use the network. Go to the sharing your
sources section in the Setting Up Your Wireless Windows Network guide included on
e installation CD that came with your network device.
then click Properties. The Local Area Connection Properties dialog box opens.
3 Click to select the Internet Protocol (TC
c
bar to see more choices.
4 Click Properties. The Internet Protocol (TCP/IP)
5
6 Click OK to close the Internet Protocol (TCP/IP) Proper
7 Click OK to close the Local Area Connection Properties dialog box.
8 Click X to close the Network and Dial-up Connections window.
9 Repeat this procedure for every computer on your network.
10 After you set up the IP addresses on all your computers, go to “Where to go from
here” .
Turning the wireless emitter off
You can turn off the wireless emitter to conserve the battery charge on
computer or to make a computer unavailable on the network. There are times, such as
when you are flying in an aircraft, when you should turn off your wireless emitter. For
more safety and regulatory information, see “Safety, Regulatory, and Legal Information
To turn the wireless emitter off:
Click the remove hardware icon in the taskbar, the USB a
Stop.
- OR -
Turn off your computer.
Warning Radio fre
on commercial aircraft. Current aviation regulations require wireless
devices to be turned off while traveling in an airplane. IEEE 802.11a, IEEE
802.11b, and IEEE 802.11g communication devices are examples of devices
provide wireless communication.
Where to go from here Creating your wireless Ethernet network
Now that you have configured your wireless Ethern
wireless network. Go to the creating a wireless access point network or crea
peer-to-peer wireless network section in the Setting Up Your Wireless W
Network guide included on the installation CD that came with your
Using your wireless Ethernet network
After yo
y
re
th
15
Troubleshooting your wireless Ethernet network
If you cannot get your wireless Ethernet network to work, go to the troubleshooting
section in the Setting Up Your Wireless Windows Network guide included on the
installation CD that came with your network device.
Appendix
S f ents Wireless Guidance
U-210 802.11g wireless LAN (low power Radio Frequency, RF, transmitting
00 - 2483.5 MHz band. The following section is a general
verview of considerations while operating the wireless LAN. Limitations, cautions, and
e Radio
less
less devices are closely regulated and use may not
e allowed. the RF
ves
n to
ed to
ow that the RF exposure is below what is considered safe limits; however, care should
rs keep the transmitter away from their
e restrictions on using wireless
evices. Examples of common restrictions are listed below:
ent
es
E 802.11b and IEEE 802.11g
lso known as wireless Ethernet or Wifi) communication devices are examples of
t provide wireless communication. For more information about turning
and
ization
a ety, Regulatory, and Legal Information Regulatory compliance
statem
The WG
device) operates in the 24
o
concerns are listed below and in the specific country sections (or country group sections).
This wireless device is only qualified for use in the countries identified by th
Approval Marks on the device rating label. If the country you will be using the wire
device in is not listed, contact that countries local Radio Approval agency for
requirements prior to operation. Wire
b
The power output of the WUBI-100GW wireless LAN device is well below
exposure limits as known at this time. Because this wireless device emits less energy than
is allowed in radio frequency safety standards and recommendations, Gemtek belie
these devices are safe for use. Regardless of the power levels, care should be take
minimize human contact during normal operation. Measurements have been perform
sh
be taken to make sure that the user or bystande
bodies when the wireless device is transmitting. The transmitting antenna should be
installed and used in a manner to maintain 20 cm (8 inches) from user’s or bystanders’
bodies. This wireless device is intended to be used indoors. In some areas, use of this
device outdoors is prohibited. Some circumstances requir
d
Warning Radio frequency wireless communication can interfere with equipm
on commercial aircraft. Current aviation regulations require wireless devic
to be turned off while traveling in an airplane. IEE
(a
devices tha
off the wireless device, see “Turning the wireless emitter off” on page 16
“Turning the wireless emitter off”.
Warning In environments where the risk of interference to other devices or
services is harmful or perceived as harmful, the option to use a wireless device
may be restricted or eliminated. Airports, hospitals, and oxygen or flammable gas
laden atmospheres are limited examples where use of wireless devices may
be restricted or eliminated. When in environments where you are uncertain of the
sanction to use wireless devices, ask the applicable authority for author
prior to use or turning on the wireless device.
16
Warning Every country has different restrictions on the use of wireless devic
Since your system is equipped with a wireless device, when traveling between
countries with your system, check with the local Radio Approval authorities prio
to any move or trip for any restrictions on the use of a wireless device in the
destination country.
Warning Do not operate the wireless device unless all covers and shields are i
place and the system is fully assembled.
Warning Wireless devices are not user serviceable. Do not modify them in any
way. Modification to a wireless device will void the authorization to use it.
es.
r
n
s B
f the FCC Rules. These limits are designed to
rovide reasonable protection against harmful interference in a residential
to
owing measures:
Reorient or relocate the receiving antenna.
e
ure continued compliance, any changes or modifications not
xpressly approved by the party responsible for compliance could void the user's
CC Rules. Operation is subject to the
llowing two conditions: (1) This device may not cause harmful interference, and
operation.
PORTANT NOTE:
CC Radiation Exposure Statement:
his equipment complies with FCC radiation exposure limits set forth for an
ncontrolled environment. This equipment should be installed and operated with
Federal Communication Commission Interference Statement
This equipment has been tested and found to comply with the limits for a Clas
digital device,pursuant to Part 15 o
p
installation. This equipment generates, uses and can radiate radio frequency
energy and, if not installed and used in accordance with the instructions, may
cause harmful interference to radio communications. However, there is no
guarantee that interference will not occur in a particular installation. If this
equipment does cause harmful interference to radio or television reception, which
can be determined by turning the equipment off and on, the user is encouraged
try to correct the interference by one of the foll
-
- Increase the separation between the equipment and receiver.
- Connect the equipment into an outlet on a circuit different from that to which th
receiver is connected.
- Consult the dealer or an experienced radio/TV technician for help.
FCC Caution: To ass
e
authority to operate this equipment.
This device complies with Part 15 of the F
fo (2) This device must accept any interference received,
including interference that may cause undesired
IM
F
T
u
17
minimum distance 20cm between the radiator & your body.
This transmitter must not be co-located or operating in conjunction with any other
antenna or transmitter.
18