Gemalto PR01517 AT9000 MK2 Full Page Reader User Manual Manual
Gemalto AT9000 MK2 Full Page Reader Manual
Gemalto >
Manual

Gemalto Document Reader AT9000 MK2
User Guide
Document: DT-01898
Version: D
Date: August 2017

Document Reader AT9000 MK2 User Guide Introduction
Page 2 of 33
Important Notices
By using the Gemalto Document Reader AT9000 MK2 product range (the “Product”), you (the “User”), agree to be bound by the
following terms and conditions.
Because use of the Product varies widely and is beyond the control of Gemalto the user is responsible for determining whether the
Gemalto Product is fit for a particular purpose and suitable for user’s application. Warranties, remedies and limitations may vary by
product and jurisdiction.
Gemalto offers a range of security products to protect against article and/or document identity counterfeit, alteration, diversion,
duplication, simulation and substitution. However no security products can guarantee absolute protection against attempts to
successfully accomplish these illegal activities.
Technical Information: The technical information, recommendations and other statements contained in this document are based
upon tests or experience that Gemalto believes are reliable, but the accuracy or completeness of such information is not
guaranteed.
Warranty, Limited Remedy and Limited Liability:
THE FOLLOWING IS MADE IN LIEU OF ALL WARRANTIES, EXPRESS OR IMPLIED, INCLUDING THE IMPLIED WARRANTY
OF MERCHANTABILITY OR FITNESS FOR A PARTICULAR PURPOSE. Gemalto warrants that its Product will meet Gemalto’s
written specifications at the time of shipment. Gemalto’s obligation and your exclusive remedy shall be, at Gemalto’s option, to
replace or repair the Gemalto Product or refund the purchase price of the Gemalto Product. IN NO EVENT WILL GEMALTO BE
LIABLE FOR ANY INDIRECT, INCIDENTAL, SPECIAL OR CONSEQUENTIAL DAMAGES INCLUDING, BUT NOT LIMITED TO
LOSS OF PROFITS, IN ANY WAY RELATED TO THE PRODUCTS REGARDLESS OF THE LEGAL THEORY ASSERTED
© Gemalto 2017. All rights reserved.
Scotch Brite is a trademark of 3M. Used under license in Canada. Microsoft, Windows, Windows Vista, Visual C++, Visual C# and
Visual Basic are registered trademarks of Microsoft Corporation in the United States and other countries. Java is a registered
trademark of Oracle and/or its affiliates. Data Matrix is a trademark of Robotic Vision Systems, Inc. (RVSI). Kensington is a
registered trademark of ACCO Brands. QR Code is a registered trademark of DENSO WAVE INCORPORATED.No part of this
publication may be reproduced, transcribed, stored in a retrieval system or transmitted in any form whatsoever, without the prior
written consent of Gemalto.
U.S. Pat Nos. 6,019,287 and 6,611,612
Gemalto reserves the right to make changes to its Products at any time and without notice.
Office Locations
The Americas
1545 Carling Avenue, Suite 700
Ottawa, Ontario
Canada K1Z 8P9
Telephone: +1 800 581 2631
technical.service@gemalto.com
Europe, Middle East and Africa
6 rue de la Verrerie
CS 20001
92197 Meudon
France
Telephone: +33 1 55 01 50 00
Asia, Pacific and Australia
12 Ayer Rajah Crescent
139941 Singapore
Singapore
Telephone: +65 6317 3333
Document Reader AT9000 MK2 User Guide Introduction
Page 3 of 33
Preface
This user guide describes the features and functions of the Gemalto Document Reader AT9000 MK2
(PV60-xx-xx-xx).
Revision History
Version
Date
Description
A
Feb 27, 2013
Release version
B
June 2015
Updated contact info
C
Feb. 2016
EMC compatibility notice
D
Aug 2017
Gemalto
Electromagnetic Compatibility (EMC)
The Products are designed to be immune to levels of interference generated within an office environment
and not to interfere with other equipment. In order to provide this level of compatibility the Product, its
cabling and Power Supply Unit (PSU) or its installations, must not be modified in any way.
Modifications or changes to the Product, the interface cables or the power
supply not expressly approved by the manufacturer could void the User's
authority to operate the Product and/or break local laws or regulations.
In some situations AC line transients or Electrostatic Discharge may cause a
loss of communication between the document reader and the host application.
If this occurs, it may be necessary to restart the host application, or unplug
and reconnect the USB cable, or power cycle the document reader in order to
restore operation.
For further regulatory information or copies of certificates contact your local Gemalto representative or
direct your questions to technical.service@gemalto.com
EMC Compliance Europe
The Product meets the following European Council Directives:
Scanner: EMC (2014/30/EU), RFID Option RED (2014/53/EU)
PSU: EMC (2014/30/EU), LVD (2014/35/EU)
FCC/Canada Radio Frequency Rules and Regulations
This equipment has been tested and found to comply with the limits for a Class A digital device, pursuant
to Part 15 of the Federal Communication Commission (FCC) Rules. These limits are designed to provide
a reasonable protection against harmful interference when the equipment is operated in a commercial
environment. This equipment generates, uses, and can radiate radio frequency energy and, if not
installed and used in accordance with the instruction manual, may cause harmful interference to radio
communications. Operation of this equipment in a residential area is likely to cause harmful interference
in which case the user will be required to correct the interference at his/her own expense.
Document Reader AT9000 MK2 User Guide Introduction
Page 4 of 33
NO MODIFICATIONS. Modifications to this device shall not be made without the written consent of
Gemalto. Unauthorized modifications may void the authority granted under FCC Rules permitting the
operation of this device.
Product Labelling
FCC ID: MESPR01517
IC: 22832-PR01517
U.S. Pat. Nos.
6,019,287 and
6,611,612
FCC Labelling
This device complies with Part 15 of the FCC Rules. Operation is subject to the following two conditions:
(1) This device may not cause harmful interference, and
(2) This device must accept any interference received, including interference that may cause undesired
operation.
FCC ID: MESPR01517
Canada Labelling
This device complies with Industry Canada’s licence exempt RSSs. Operation is subject to the following
two conditions:
(1) This device may not cause interference, and
(2) This device must accept any interference, including interference that may cause undesired operation
of the device.

Document Reader AT9000 MK2 User Guide Introduction
Page 5 of 33
Le présent appareil est conforme aux CNR d'Industrie Canada applicables aux appareils radio exempts
de licence. L'exploitation est autorisée aux deux conditions suivantes:
(1) l'appareil ne doit pas produire de brouillage, et
(2) l'utilisateur de l'appareil doit accepter tout brouillage radioélectrique subi, même si le brouillage est
susceptible d'en compromettre le fonctionnement.
Canadian ID: 22832-PR01517
Disposal - European Directive 2002/96/EC
Do not dispose of this equipment in domestic or general waste. These devices can be
recycled and should be disposed of in accordance with your local and national
regulations.
Do not send equipment back to Gemalto unsolicited.
Packing for Transportation
When packing this product for repair or shipment, carefully disconnect the cables and power supply and
pack in the original inner and outer packaging cartons.
Document Reader AT9000 MK2 User Guide Introduction
Page 6 of 33
Important Safety Information
This manual contains important information regarding the operation of the Gemalto AT9000 MK2 Full
Page Reader. For the safe and reliable operation of the readers, all users must ensure that they are
familiar with and fully understand all instructions contained herein.
Indicates a hazardous situation which, if not avoided, could result in death or
serious injury.
Indicates a hazardous situation which, if not avoided, could result in injury or
equipment damage.
Indicates a situation which, if not avoided, could result in equipment damage.
Note:
Provides additional important information.
To reduce the risk associated with hazardous voltage which, if not avoided, could result in
death or serious injury:
Do not use the reader with any AC power supply other than the provided Gemalto AC
power supply.
Do not use AC power supply and/or power cord if damaged.
Do not open the reader and/or power supply. Reader is to be serviced by trained
personnel only. No user serviceable parts or adjustments inside.
Do not modify or attempt to modify the reader and/or AC power supply.
Use only in an indoor dry location. Do not use the product in an outdoor and/or wet
environment.
Do not use abrasive cleaners or solvents. These may scratch the glass or damage the
plastic parts.

Document Reader AT9000 MK2 User Guide Introduction
Page 7 of 33
Table of Contents
Electromagnetic Compatibility (EMC) .................................................................................................................................. 3
FCC/Canada Radio Frequency Rules and Regulations ...................................................................................................... 3
Disposal - European Directive 2002/96/EC ......................................................................................................................... 5
Packing for Transportation .................................................................................................................................................. 5
1. Introduction ....................................................................................................................................................................... 8
Supported documents and formats ..................................................................................................................................... 8
Imaging features ............................................................................................................................................................... 10
Physical design features ................................................................................................................................................... 10
Common applications ........................................................................................................................................................ 10
Security features ............................................................................................................................................................... 11
True-color/anti-glare technologies ..................................................................................................................................... 12
Reader components .......................................................................................................................................................... 13
2. Installing the Reader ....................................................................................................................................................... 16
Unpack the reader ............................................................................................................................................................. 16
Install the software ............................................................................................................................................................ 17
Connect the reader cables ................................................................................................................................................ 17
Power on the reader .......................................................................................................................................................... 18
Test the reader installation ................................................................................................................................................ 18
3. Reading Documents........................................................................................................................................................ 21
4. Maintenance .................................................................................................................................................................... 23
Powering the reader on/off ................................................................................................................................................ 23
Cleaning the reader ........................................................................................................................................................... 23
Removing the document hood .......................................................................................................................................... 23
Replacing the document glass .......................................................................................................................................... 24
Adjusting the document clip height .................................................................................................................................... 26
5. Specifications .................................................................................................................................................................. 28
6. Troubleshooting .............................................................................................................................................................. 30
7. Customer Service ............................................................................................................................................................ 32
Returning the reader for maintenance ............................................................................................................................... 33
Document Reader AT9000 MK2 User Guide Introduction
Page 8 of 33
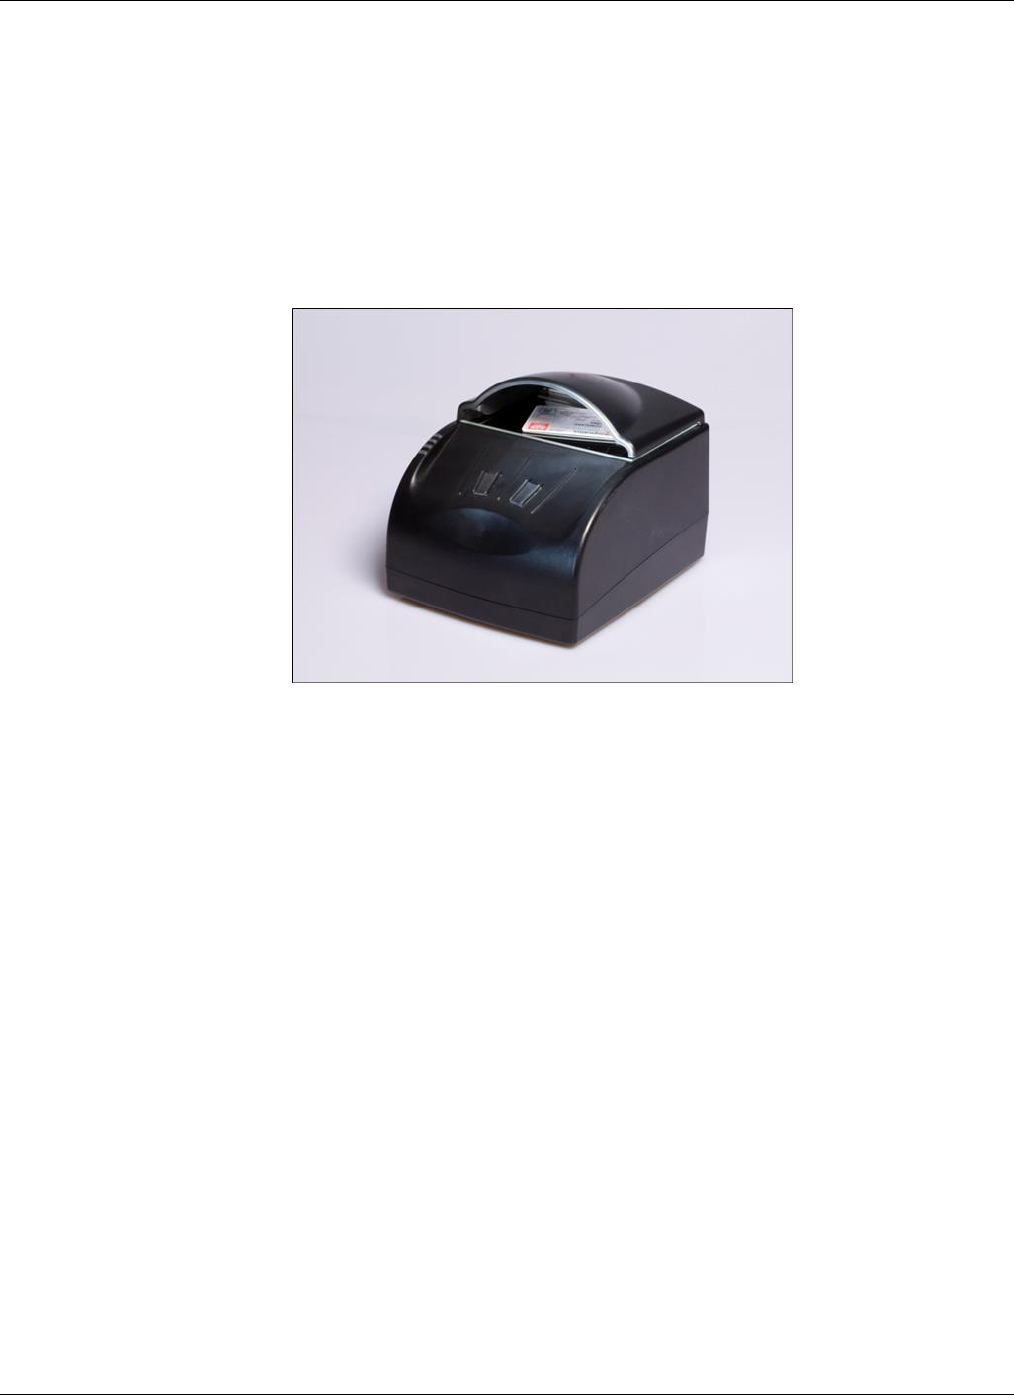
1. Introduction
The Gemalto AT9000 MK2 Full Page Readers are intelligent, Optical Character Recognition (OCR), full-
image capture and Radio Frequency IDentification (RFID) devices that provide automated data capture
from a variety of personal identification documents, including ePassports, passports, visas and other
travel documents.
The reader’s small footprint and its ability to image challenging documents in brightly lit conditions with
minimal CPU loading on the host PC makes it ideal for use by immigration control, airlines, banks, hotels,
and casinos. The readers have no motorized moving parts to ensure maximum reliability.
Gemalto Document Reader AT9000 MK2
Supported documents and formats
The Gemalto Document Reader AT9000 MK2 reads a wide-range of documents and formats:
Supported documents include passports, visas and all other ICAO-standard (ICAO 9303) travel
documents, as well as many non-ICAO variations.
Integrated ePassport and e-driving license (eDL/iDL) support so operator can read the OCR and
smartcard chip in one operation. All data groups, hashings, validations, basic access control
(BAC), passive/active authentication (PA/AA), Chip Authentication (CA), Terminal Authentication
(TA), Extended Access Control (EAC PKI 1.11) and Supplementary Access Control (SAC) are
supported.
Optical character recognition (OCR) support for reading the Machine-Readable Zone (MRZ) and
Human-Readable Zone (HRZ) on machine readable travel documents (MRTD).
Optical & RFID reading of 1 line eDL reading and access control for driving licenses to ISO18013
parts 2 &3
Reads 1D and 2D barcodes (PDF417, Aztec, QR codes and Data Matrix).
Reads home print and mobile (cell) phone boarding passes (BCBP) and 1D/2D barcodes.
ISO7816 contact smartcard reading (optional)
Magnetic stripe reading (optional)
Enhanced document identification and authentication software (optional)

Document Reader AT9000 MK2 User Guide Introduction
Page 9 of 33

Document Reader AT9000 MK2 User Guide Introduction
Page 10 of 33
Imaging features
The Gemalto Document Reader AT9000 MK2 family has the following imaging features:
True-color and anti-glare technologies deliver accurate, true-color images while minimizing
interference from document laminate reflections, optically-variable security features or ambient
light
Multiple light sources for image capture and authentication – visible (RGB), infra-red (IR), ultra-
violet (UV-A)
Captures full-color or grey-scale images
400 and 720 DPI camera options
Flexible software interface (Gemalto Document Reader SDK) allows host application to select
which illumination sources to use, image type, image compression, photo extraction, etc.
Environments include Visual C++®, Java® and Microsoft® .NET Framework for Visual Basic®
.NET and Visual C#®
Gemalto Confirm Laminate imaging with tamper detection
Physical design features
The Gemalto Document Reader AT9000 MK2 family has the following physical design features:
Supports single-handed operation. Semi-enclosed removable hood holds document in place
during reading.
Document hood may be removed if desired. The reader is capable of hoodless operation in most
brightly-lit indoor environments.
Simple, intuitive and quick operation that accepts documents in any orientation
Small footprint, no moving parts, robust construction.
Provides two USB2.0 ports for attaching additional biometric devices like a webcam or fingerprint
reader.
Powered from a single USB 2.0 port. An optional external power supply is available to support
externally attached modules (e.g. magnetic stripe or contact smartcard reader) or USB
peripherals.
Common applications
Typical uses of the Gemalto Document Reader AT9000 MK2 include:
APIS data capture with cross checking of FAA watch lists
ePassport and other travel document reading and authentication
Scanning full-color or grey-scale images of travel documents
Electronic manifests with traveler photo images
Hotel check-in and reporting
Document authentication at banks and casinos
ID checks
Airline ticket fraud detection
Document Reader AT9000 MK2 User Guide Introduction
Page 11 of 33
Travel document quality assurance
Security features
The Gemalto Document Reader AT9000 MK2 can help the operator detect forged or counterfeit
documents.
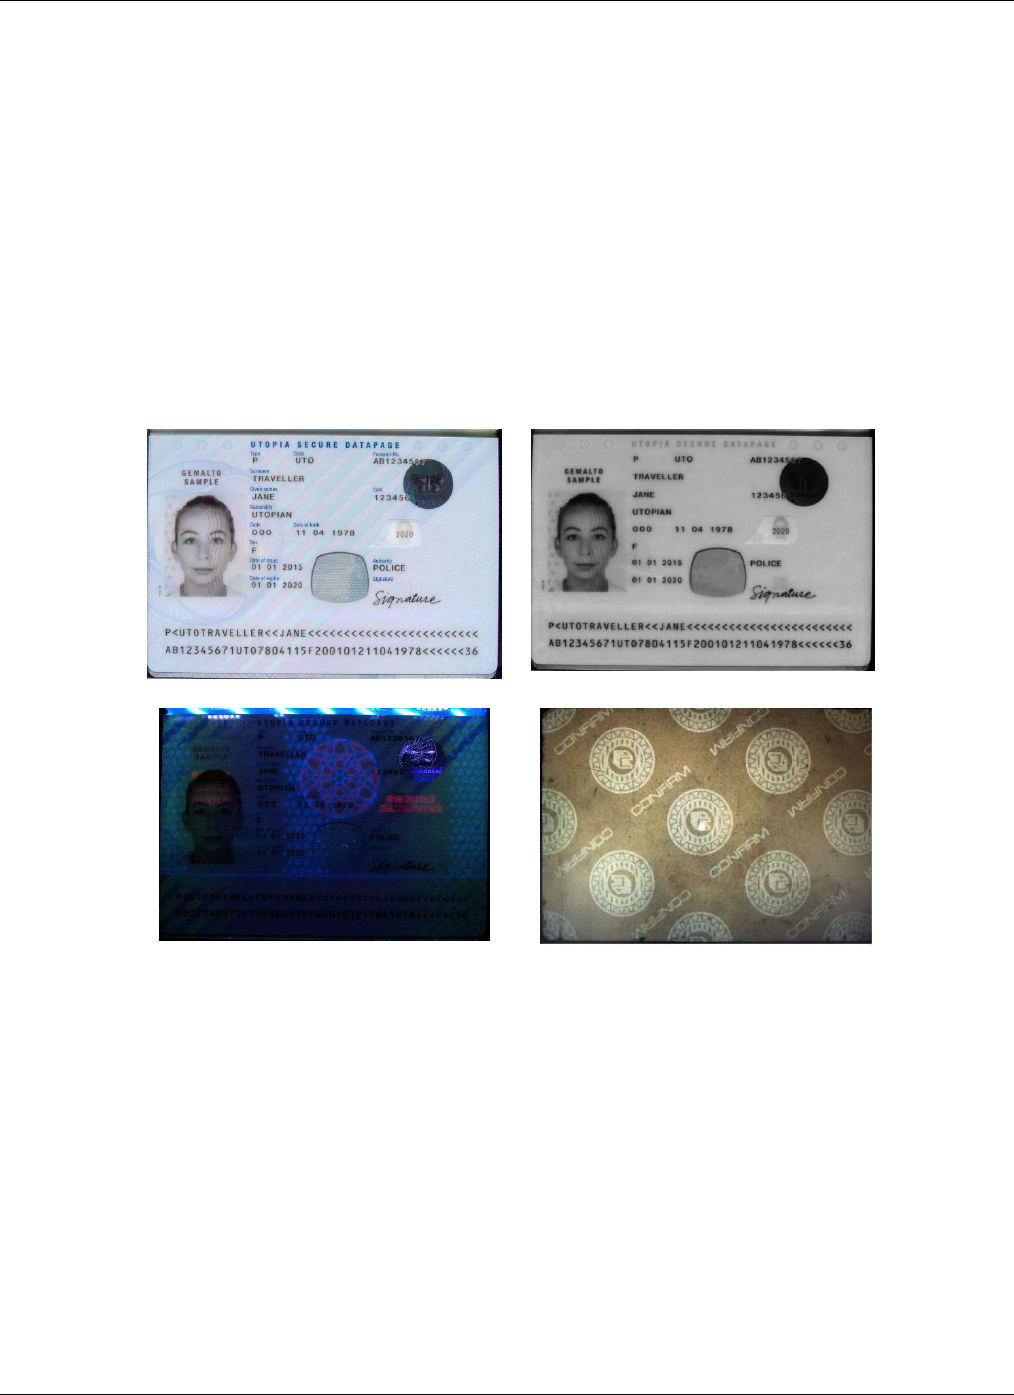
Reading the UV features printed in fluorescent inks on a document provides inspectors with color images
of covert document security features.
Optional Gemalto Confirm Laminate imaging allows the inspectors to quickly verify the authenticity of the
document. It can also indicate if documents have been tampered with by revealing marks or other
damage.
The following images were taken using the Gemalto AT9000 MK2 Full Page Reader.
Visible Image
Infrared Image
Ultraviolet Image
Confirm Laminate Image
Document Reader AT9000 MK2 User Guide Introduction
Page 12 of 33
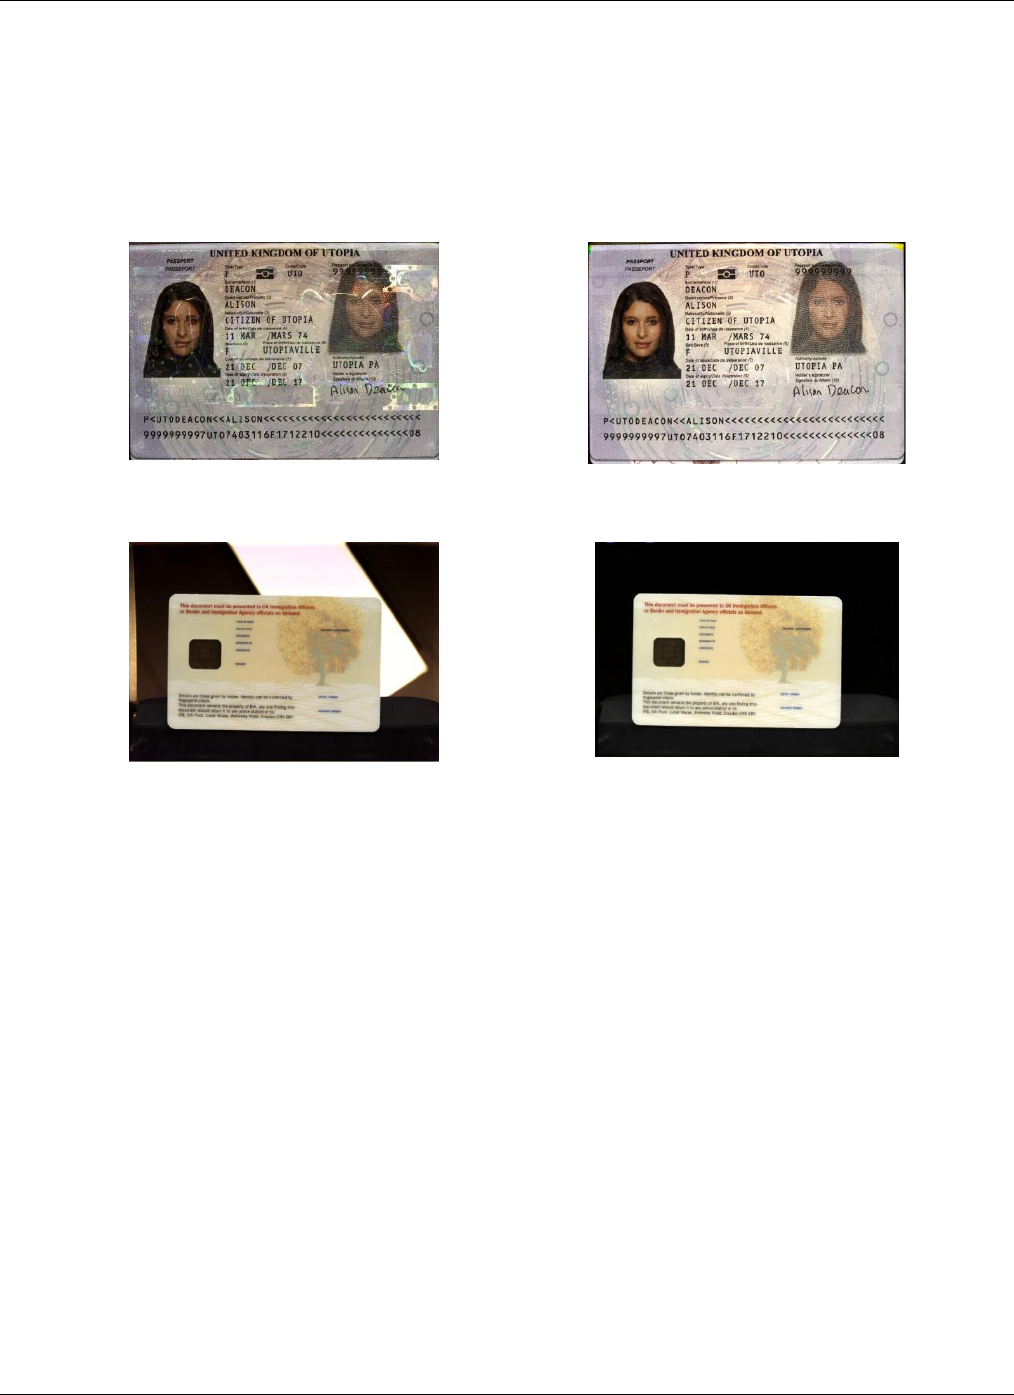
True-color/anti-glare technologies
Anti-glare technology, ambient light compensation and true color imaging ensure that the Gemalto
Document Reader AT9000 MK2 will deliver superior, accurate images of challenging documents in
demanding conditions, including those with holographic laminates.
Without Anti-Glare Technology
With Anti-Glare Technology
Overhead Ambient Lighting
Ambient Light Removed
Document Reader AT9000 MK2 User Guide Introduction
Page 13 of 33
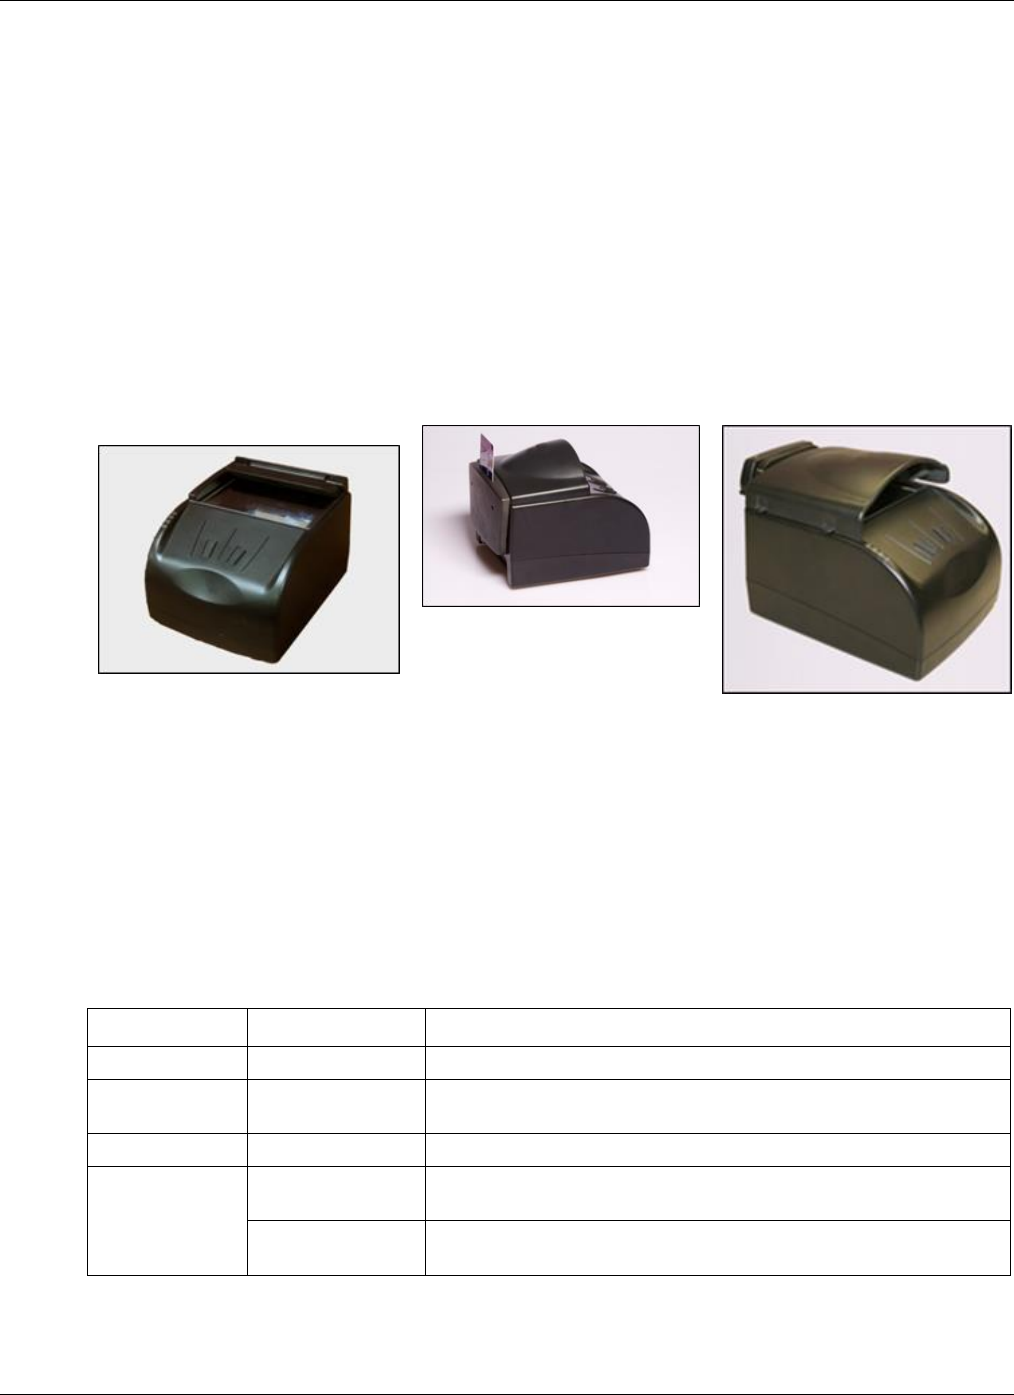
Reader components
The Gemalto Document Reader AT9000 MK2 is a small desktop device with:
A window for scanning documents
Device status and activity lights
Back panel ports for communication, power, and security
Removable document hood and adjustable clip to allow for scanning of oversized documents
Optional 5 volt power supply
Optional rear-mounted smartcard reader
Optional rear-mounted magnetic strip reader
Depending on your model, various configurations or components may be available.
Document Reader AT9000 MK2
without removable document hood
Document Reader AT9000 MK2
with optional smartcard reader and
optional fixed hood
Document Reader AT9000 MK2
with optional magnetic stripe reader and
removable document hood
Document window
The document window is a glass surface located on top of the reader. Place documents on the window to
scan them. The reader will automatically detect when a document is placed on it.
Keep this surface clean to ensure optimum operation of the reader. See “Cleaning the reader” on page
34.
Indicator lights
The indicator lights show the reader status and scan results.
Light
Color
Description
Error
Red
Document is of an unknown type or did not process properly.
OK
Green
A known document type was presented and processing was
successful.
Busy
Yellow
Reader is scanning a document and processing the data.
Ready
Blue
Reader is ready to scan a document (when connected to the host
application).
Flashing Blue
USB cable is not connected (only present if optional power supply is
used)
Document Reader AT9000 MK2 User Guide Introduction
Page 14 of 33
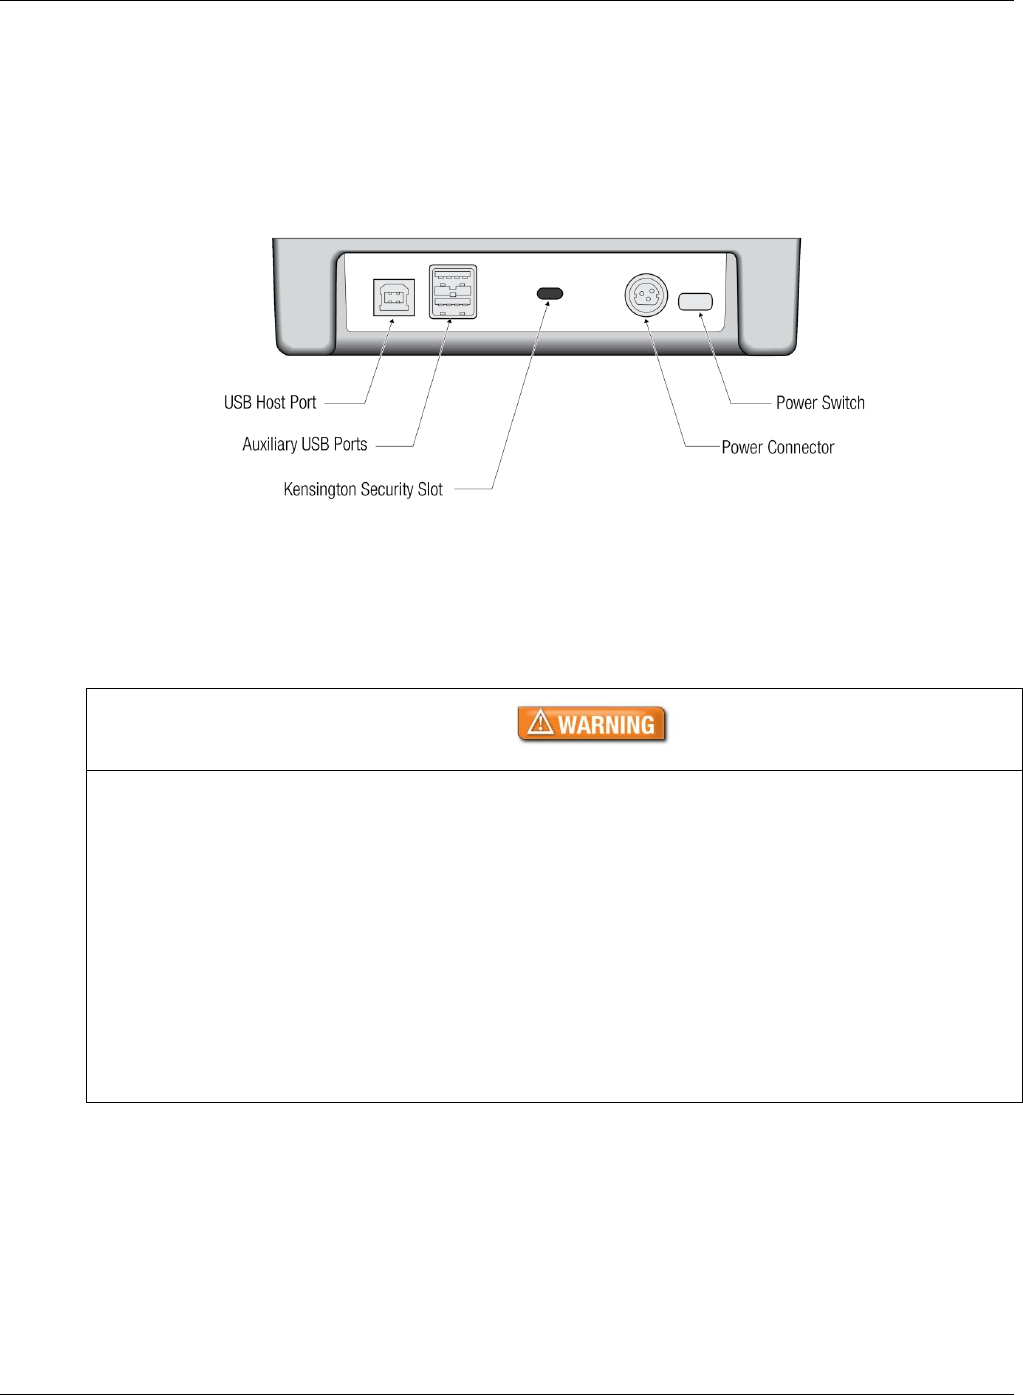
Back panel
The back panel contains the power switch, power supply connector, and USB ports. Data is sent to the
host PC through the USB host connector. When powered from the optional external power supply, the
reader also functions as a USB 2.0 hub. It has two auxiliary ports for connecting additional USB
peripherals (such as a mouse, keyboard, or 2D barcode reader).
The Kensington® Security Slot can be used to tether the reader to the workspace.
The reader is capable of operating on USB 2.0 power. However, when operating on USB power, due to
the limited power available over the USB interface:
performance of the reader will be superior when using the external power supply
the back panel USB peripheral ports will not be available.
A power supply is included with each Gemalto AT9000 MK2 Full Page Reader.
To reduce the risk associated with hazardous voltage which, if not avoided, could result in
death or serious injury:
Do not use the reader with any AC power supply other than the provided Gemalto AC
power supply.
Do not use AC power supply and/or power cord if damaged.
Do not open the reader and/or power supply. Reader is to be serviced by trained
personnel only. No user serviceable parts or adjustments inside.
Do not modify or attempt to modify the reader and/or AC power supply.
Use only in an indoor dry location. Do not use the product in an outdoor and/or wet
environment.
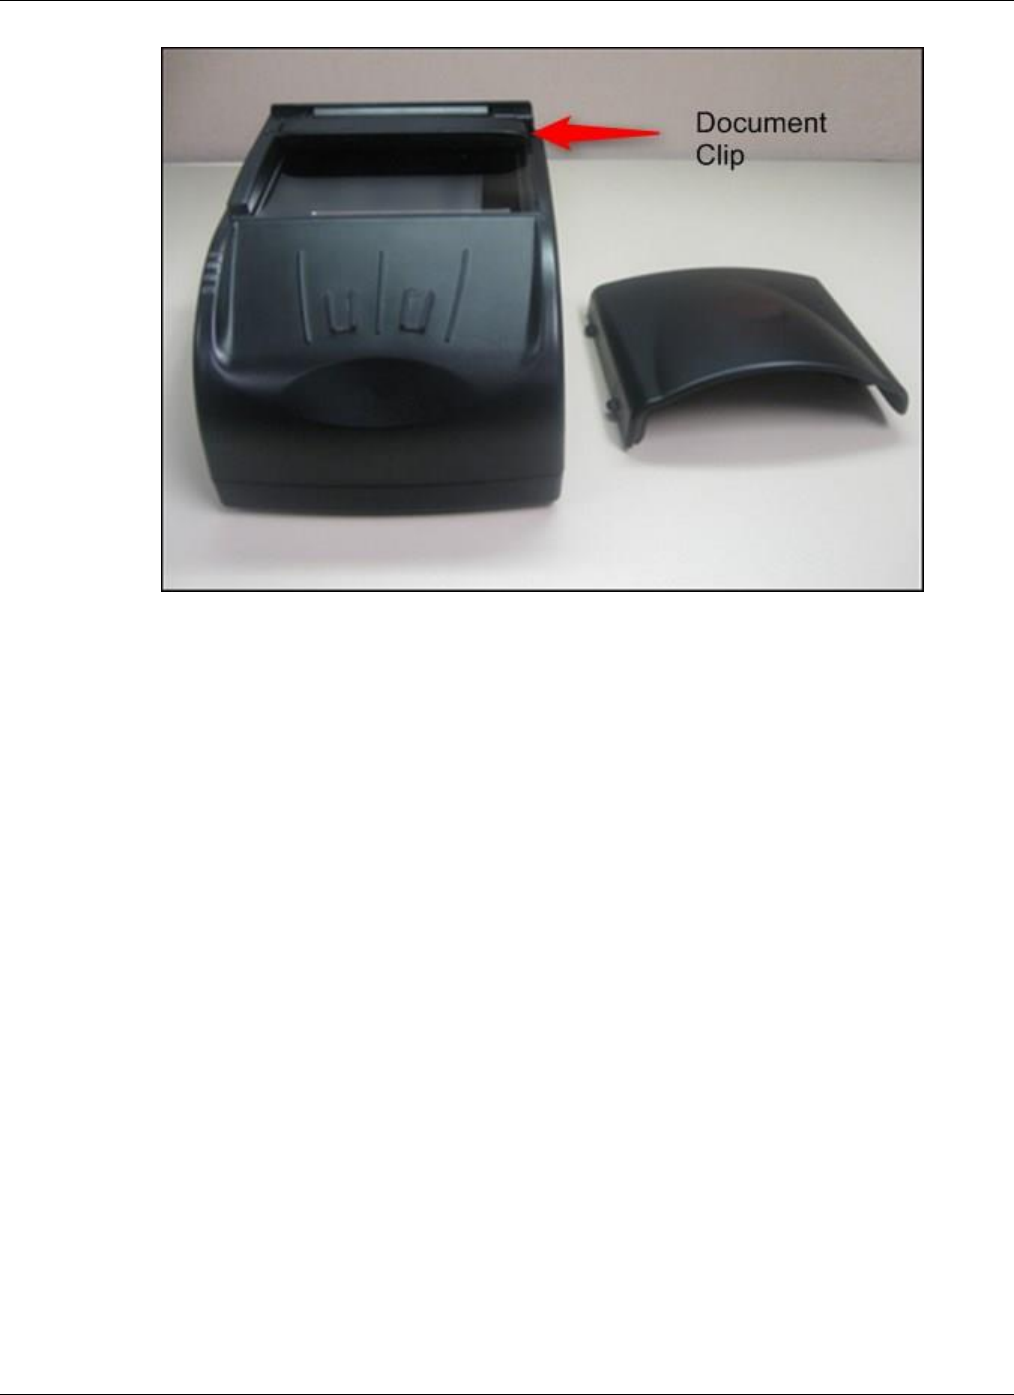
Document hood
The Document Reader AT9000 MK2 features a semi-enclosed hood that performs two functions: it holds
the document in place to enable hands-free operation and it minimizes ambient light to ensure high-
quality scans. The hood can easily be removed if the user needs to scan an extra thick document, or if
the user finds it more convenient to use the reader this way.
The Gemalto Document Reader AT9000 MK2 can compensate for ambient light in most bright office
environments.
Document Reader AT9000 MK2 User Guide Introduction
Page 15 of 33
An adjustable document clip located above the document window ensures that documents, regardless of
their thickness, easily slide into the reader and are held flat during scanning.

Document Reader AT9000 MK2 User Guide Installing the Reader
Page 16 of 33
2. Installing the Reader
This chapter explains how to install the Gemalto Document Reader AT9000 MK2 software and connect
the reader to the PC.
Before you begin
Before you install the reader, you need to meet the following requirements:
A PC with USB 2.0 ports (the reader will not work if connected to a USB 1.1 port)
A PC running Windows® /XP/Vista/7/8.1/10
Administrative rights to install the software
If you are installing multiple readers with the RFID option, ensure a minimum of 25 cm (10 inches)
between readers to prevent potential interference.
Unpack the reader
Each reader package consists of:
Gemalto Document Reader AT9000 MK2
PSU and AC cable (optional)
Test card
USB communication cable
3M™ Scotch-Brite™ Microfiber Cleaning Cloth
Software download instructions
To unpack the reader:
1. Remove the contents from the box and separate the components from the packing material.
2. Verify that all the parts described have been received. If any parts are missing or damaged, contact
Gemalto Global Technical Services (GTS).
3. Keep and store the original packaging in the event that the reader requires shipment back to
Gemalto for maintenance.
Note: If the reader has been stored in a cold environment (i.e. below room temperature), allow the
reader warm up for a minimum two hours before powering it on.
DO NOT connect the reader to the computer until you have installed the software. See “Install
the software” on page 17.
Document Reader AT9000 MK2 User Guide Installing the Reader
Page 17 of 33
Install the software
The reader package contains an instruction sheet with links to a customer portal to download the software
components and documentation necessary to install and operate the reader:
Gemalto demonstration programs and SDK
Reader and software documentation
Required drivers
Additional SDKs based on the reader model
To install the reader software:
1. Download the latest SDK software from the link. Click on the Gemalto Document Reader SDK x.x.x
Setup.exe link and save the exe file to a known location on the PC (for example, the desktop).
2. Run the downloaded .exe file and follow the on-screen instructions.
Connect the reader cables
Note: Make sure you install the software before connecting the reader.
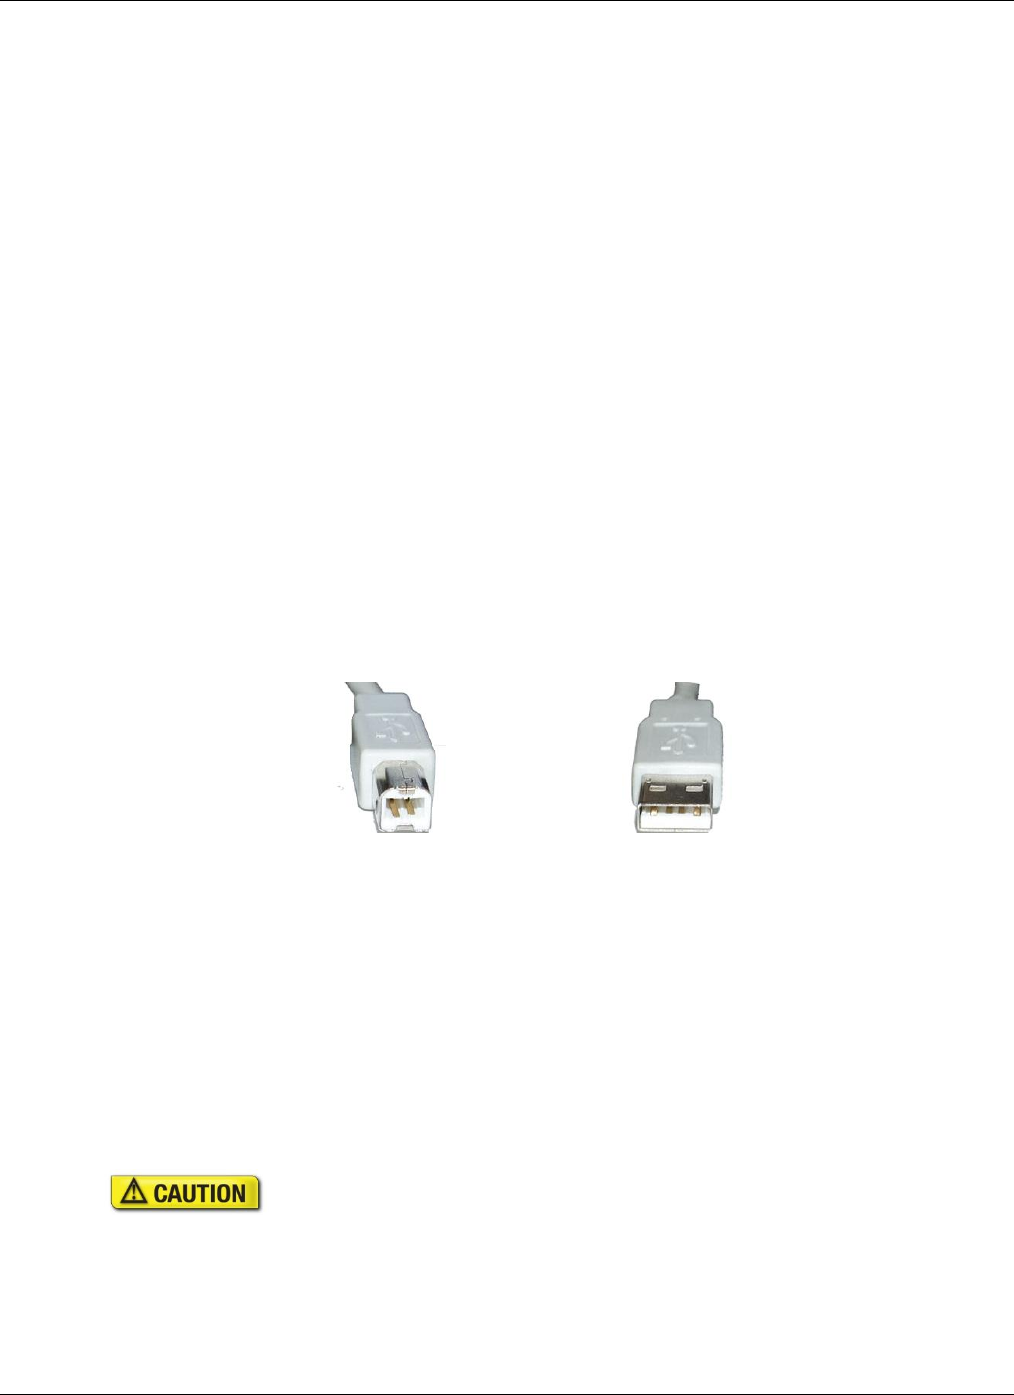
To install the reader, you need to connect the following cables:
USB cable – The reader is supplied with a USB 2.0 cable (Type A to Type B). The cable provides
both power and data connectivity to the reader.
Type B (connects to reader)
Type A (connects to PC)
Power supply (optional) – You need to use the optional PSU if you want to use the reader as
a powered USB2.0 hub. The Power connector is a latching type that cannot accidentally detach
as the reader is moved about. To remove the connector, grasp the connector shell and pull away
from the reader. The connector shell will slide backward slightly, allowing the connector to
disengage from the reader.
To connect the reader cables:
Note: Use on the USB cable and optional PSU provided with the reader.
Modifications or changes to the Product, the interface cables or the power
supply not expressly approved by the manufacturer could void the User's
authority to operate the Product and/or break local laws or regulations.

Document Reader AT9000 MK2 User Guide Installing the Reader
Page 18 of 33
To reduce the risk associated with hazardous voltage which, if not avoided,
could result in death or serious injury:
Do not use the reader with any AC power supply other than the
provided Gemalto AC power supply.
1. Connect the USB cable:
I. Insert the Type B connector into the USB port located on the back of the reader.
II. Insert the Type A connector into a USB port on the host PC.
2. If want to attach peripheral USB devices to the reader, you will need to connect the power supply (if
you are using the reader as-is, you can skip this step). To connect the power supply:
I. Connect the connector from the power supply to the power connector at the rear of the
reader. Do not force. There is only one orientation that will allow the cable to be connected
to the power port.
II. Connect the AC cable to a functioning power outlet.
Power on the reader
To power on the reader press the power switch located on the back of the reader for approximately 0.5
second.
A power-on self-test occurs automatically when the reader powers up. If the reader is installed correctly
and is operational, the indicator lights will perform the following boot-up sequence:
All lights come on briefly at initial power-up.
During power-up self test the OK light (green) remains on while the Ready light (blue) flashes.
After approximately 10 seconds, the Ready light (blue) remains on and all other lights turn off
The lights may also indicate the following common communication errors:
The blue Ready light flashes rapidly if no USB connection is detected.
The blue Ready and red Error lights flash rapidly if a USB 1.1 connection is detected. The reader
will not transfer document images over a USB 1.1 connection.
Test the reader installation
After installing the reader, perform a quick test to ensure the reader is functioning properly and the
software was installed correctly.
To test the reader:
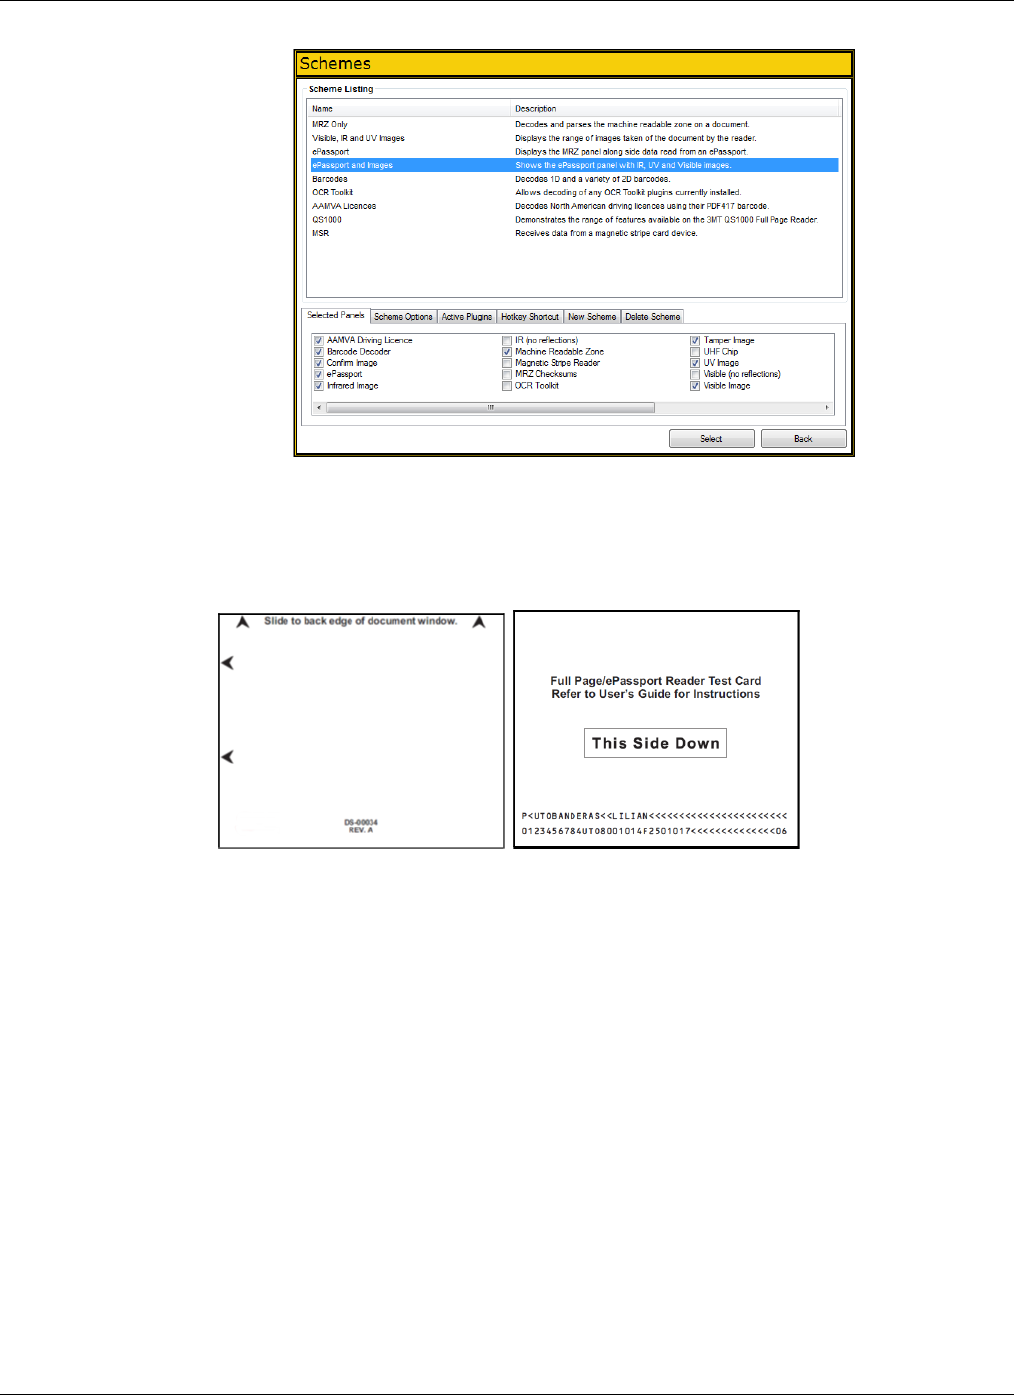
1. Start the application Page Reader Expo from the shortcut created during software installation.
2. Select a scheme that matches your reader. If you are unsure, select the “ePassport and Images”
scheme.
Document Reader AT9000 MK2 User Guide Installing the Reader
Page 19 of 33
3. Click Select.
4. Verify that the Ready light (blue) is on and the Reader State in the lower left is “Enabled”.
The reader is ready to accept documents.
5. Select the test card (DS-00031 or DS-00034) supplied with the reader.
6. Place the test card face down on the document window, aligned with the left guide, with the test
card instructions facing up.
7. Push the card to the back of the document window until it stops.
Note: Do not move the document during the scanning process.
8. Observe the lights during the scanning procedure.
The Ready light (blue) turns off and the Busy light (yellow) turns on while the reader scans and
processes the data.
The OK light (green) turns on, indicating a successful read.
The Ready light (blue) turns on, indicating that the reader is ready to scan another document.
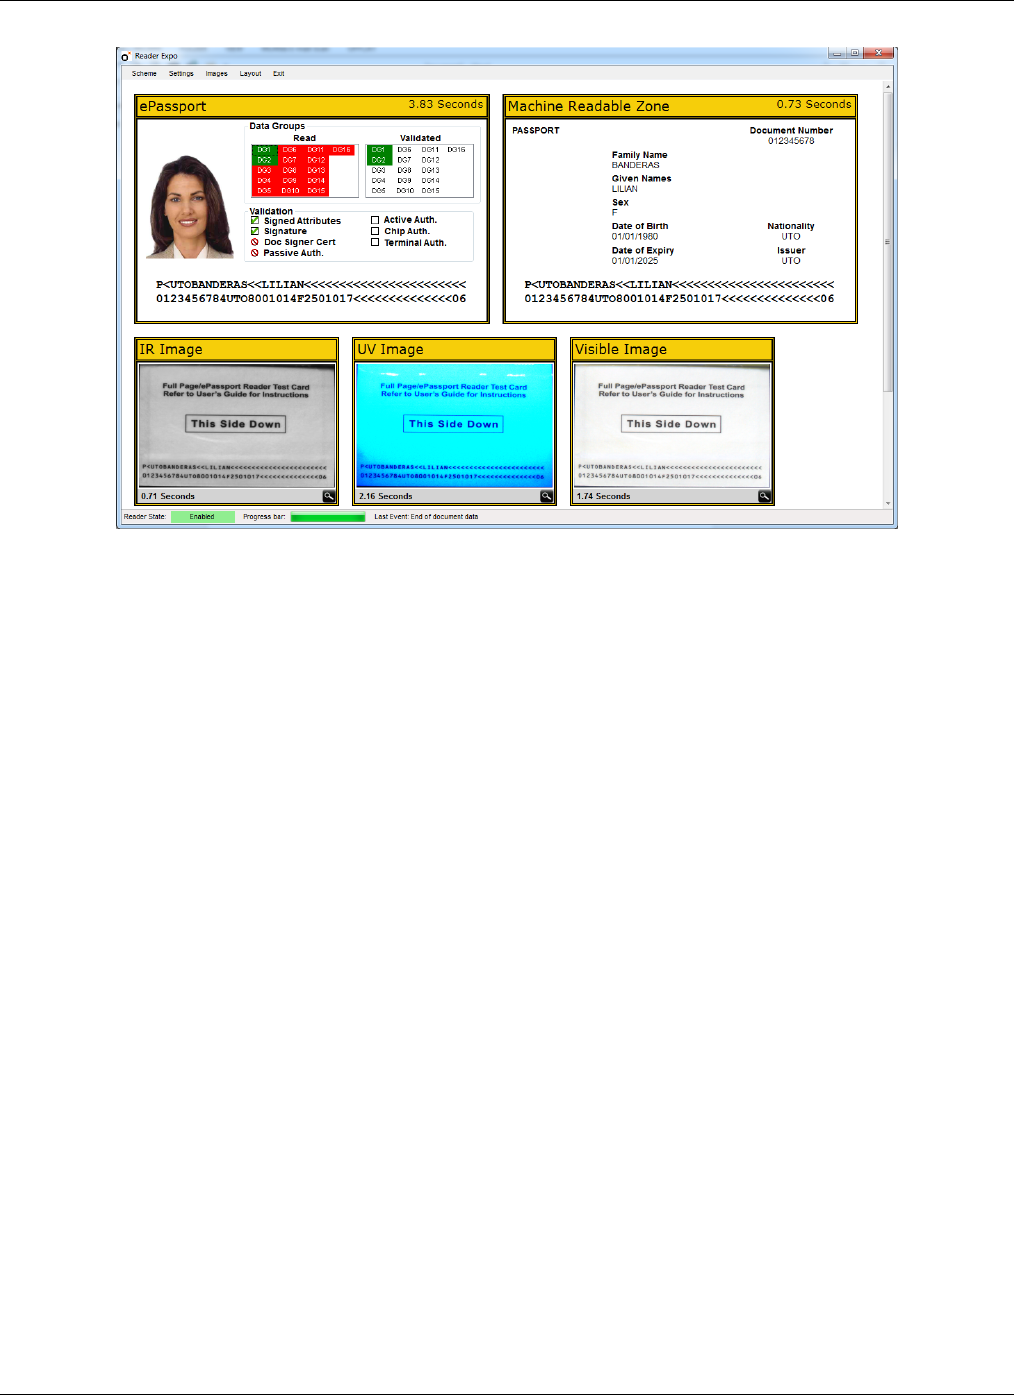
The data from the test card is sent to the host computer and the results displayed on the PC screen.
If the test is successful, a screen similar to the following screen is displayed.
Document Reader AT9000 MK2 User Guide Installing the Reader
Page 20 of 33
Document Reader AT9000 MK2 User Guide Reading Documents
Page 21 of 33
3. Reading Documents
The Gemalto Document Reader AT9000 MK2 reads the barcode and machine-readable zone (MRZ) text
on both identification cards and passports. When a document is properly aligned on the document
window, the reader automatically captures an image and then performs optical character recognition
(when there is OCR data), followed by barcode recognition.
The AT9000 MK2 with RFID option can detect and read information encoded on contactless integrated
circuits (chips) in passports and ID cards. Whether the chip is in the front or rear cover, the data page, or
any other page, the reader's antenna will detect and read the chip. You do not have to turn the book
around to ensure the chip is read.
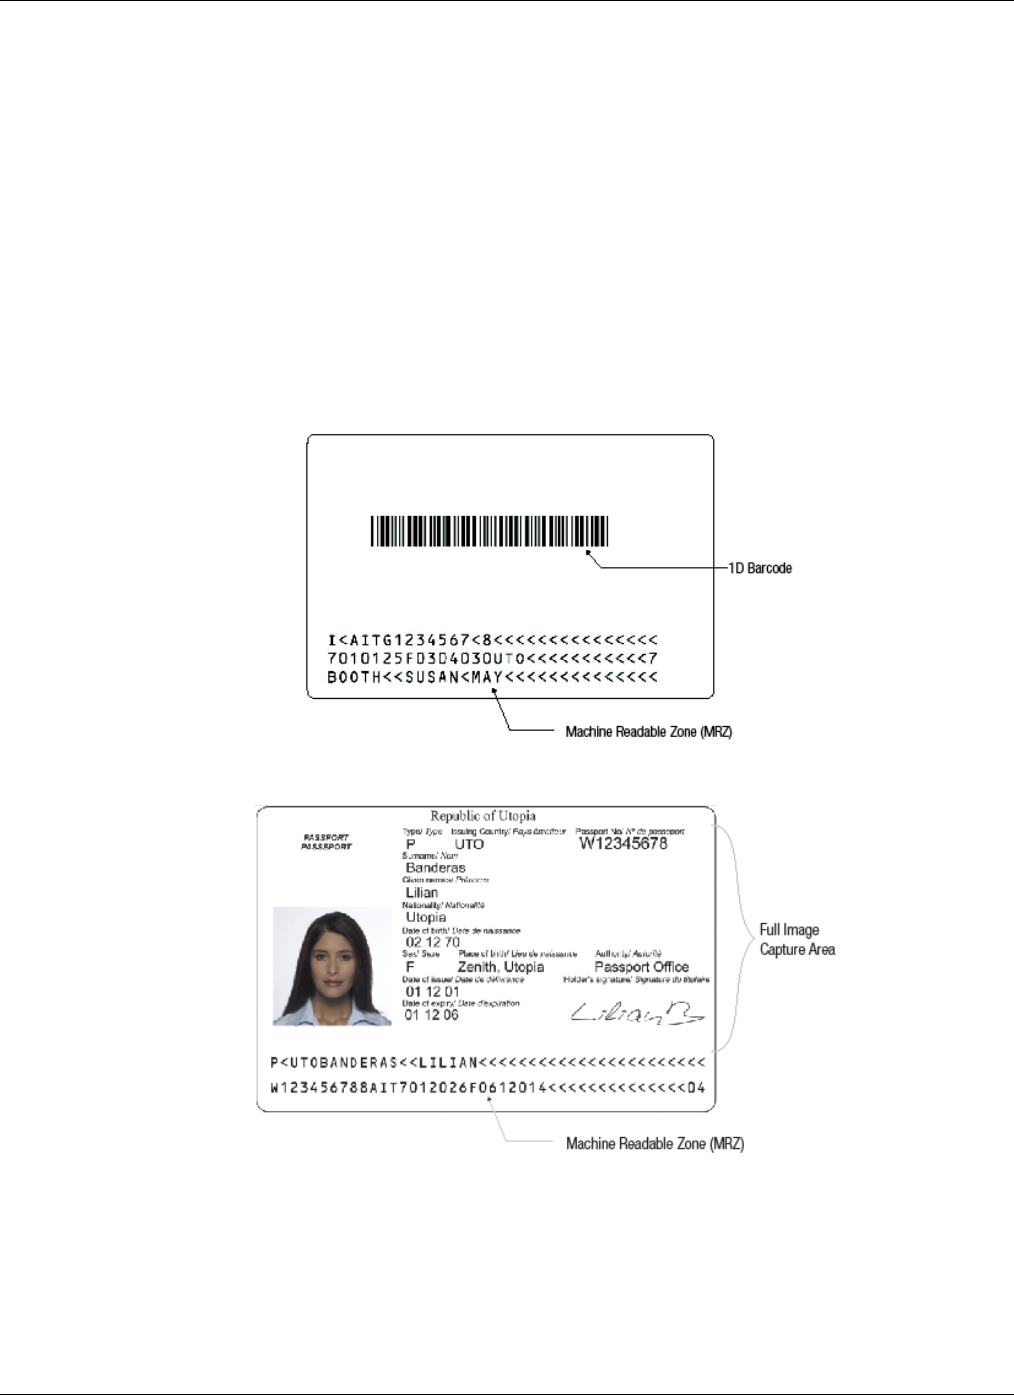
Document layout
Identification cards typically have a photo and basic information on the front and a 3-line MRZ on the
back.
Passports have a photo, vital information and a 2-line MRZ on the front.
Document Reader AT9000 MK2 User Guide Reading Documents
Page 22 of 33
Reading standard documents
This section describes proper document placement for typical documents. When reading typical
documents the booklet slides under the clip against the document guide.
To read a standard document:
1. Hold the document open as you place it on the document window.
2. Place the booklet or card on the document window close to the left so the left edge is against the
document guide and then slide it back so the leading edge is fully inserted at the back of the
document window.
The hood was designed to hold a document in a natural semi-opened position. This hands-free
function allows you to release the document and focus on the traveler.
3. During reading, the document must lie flat against the document window. The leading edge of the
booklet or card should be all the way to the back of the document window (and underneath the
document clip, if installed). The left edge of the booklet must be against the document guide.
4. When the document reaches its proper position, the reader will automatically start scanning the
document.
Note: The outer half of the booklet must lie flat against the bezel to ensure that any chip located in
the back half of the booklet is read properly.
5. Observe the indicator lights during the scanning procedure:
The Ready light (blue) turns off and the Busy light (yellow) turns on while the reader scans and
processes the data.
The OK light (green) turns on, indicating a successful read.
The Ready light (blue) turns on, indicating that the reader is ready to scan another document.
The data from the document is sent to the PC.

Document Reader AT9000 MK2 User Guide Maintenance
Page 23 of 33
4. Maintenance
The Gemalto Document Reader AT9000 MK2 has no user-serviceable parts but its glass surface must be
cleaned on a regular basis. For extensive repairs, return the reader to Gemalto service depot. See page
32 for more information.
Powering the reader on/off
To power off the reader, press and hold the power switch on the back panel for 1 second. To power the
reader back on, press the power switch again for approximately 0.5 second.
Cleaning the reader
Clean the reader regularly to ensure proper performance.
Use a safe cloth that will not damage glass, such as the 3M™ Scotch-Brite™ Microfiber
Cleaning Cloth (provided). To reorder cleaning cloths, contact Global Technical Services
(GTS). See page 32 for more information.
Do not use abrasive cleaners or solvents. These may scratch the glass or damage the
plastic parts.
To clean the reader:
1. Power off the reader by depressing the power switch and holding for approximately 1 second.
2. Remove the hood as described on page 23.
3. Clean the document window with a clean 3M™ Scotch-Brite™ Microfiber Cleaning Cloth. For
stubborn dirt, use a mild glass cleaner or a lightly dampened cloth (water).
4. Verify that there are no streaks or smudge spots remaining on the document window.
5. Clean the body of the reader with a lightly dampened cloth (water).
6. Turn on the reader by pressing the power switch.
7. Verify that the power-up self test performs correctly.
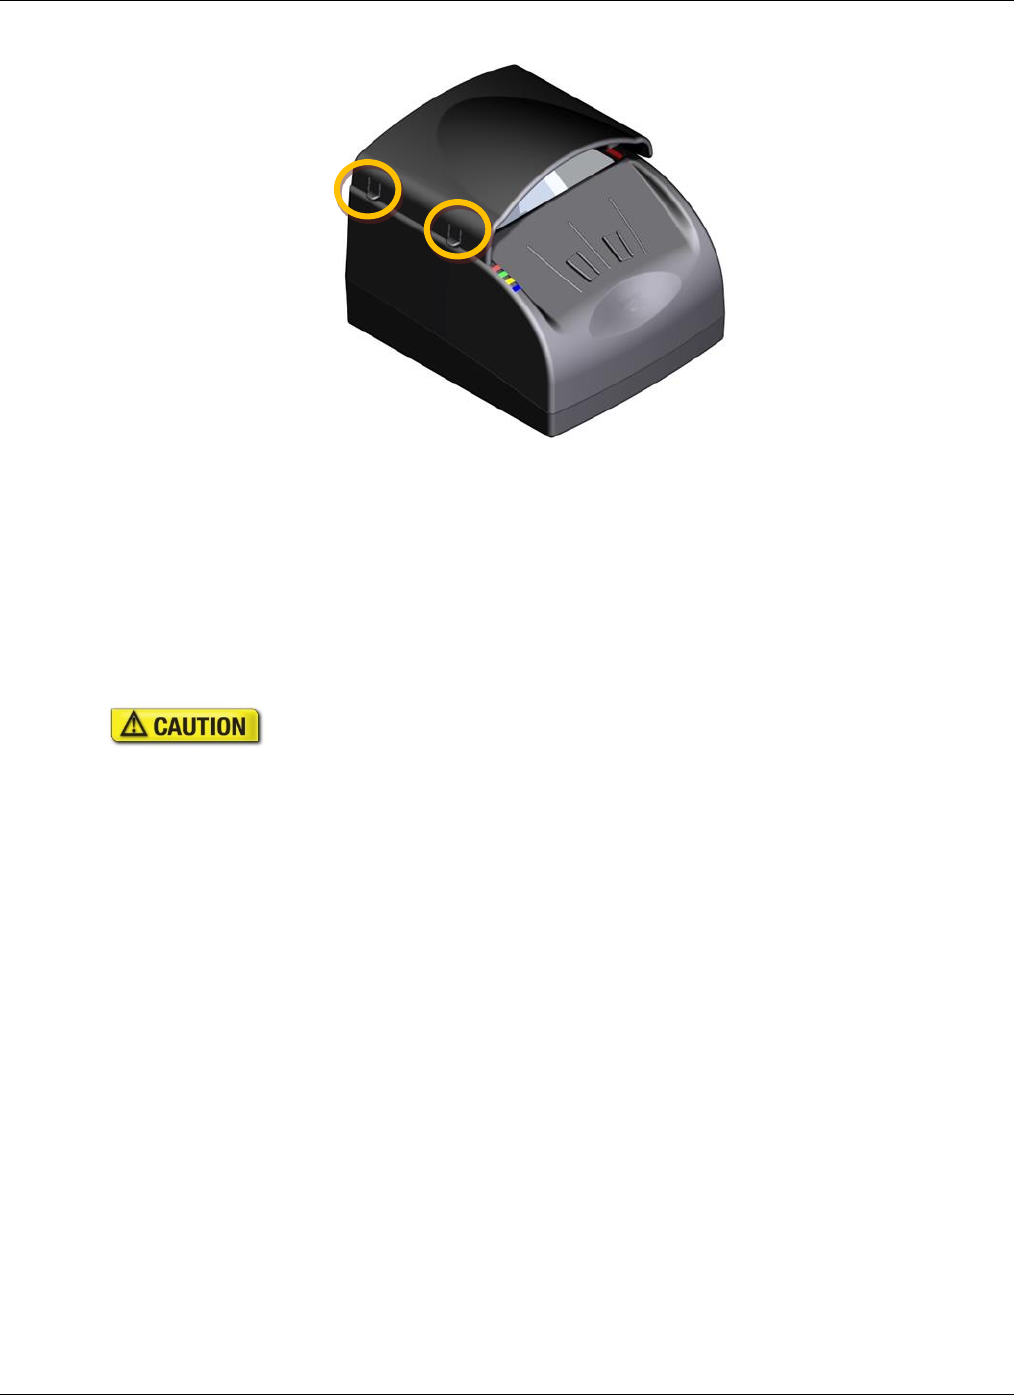
Removing the document hood
You can remove the document hood for convenience, to scan oversized documents, or to access the
document glass for cleaning or replacement. The Gemalto Document Reader AT9000 MK2 can
compensate for ambient light in most bright office environments. However, unless you need to scan an
oversized document, you should always leave the document hood attached. The document hood protects
the glass and also improves scan quality and speed by reducing the amount of ambient light.
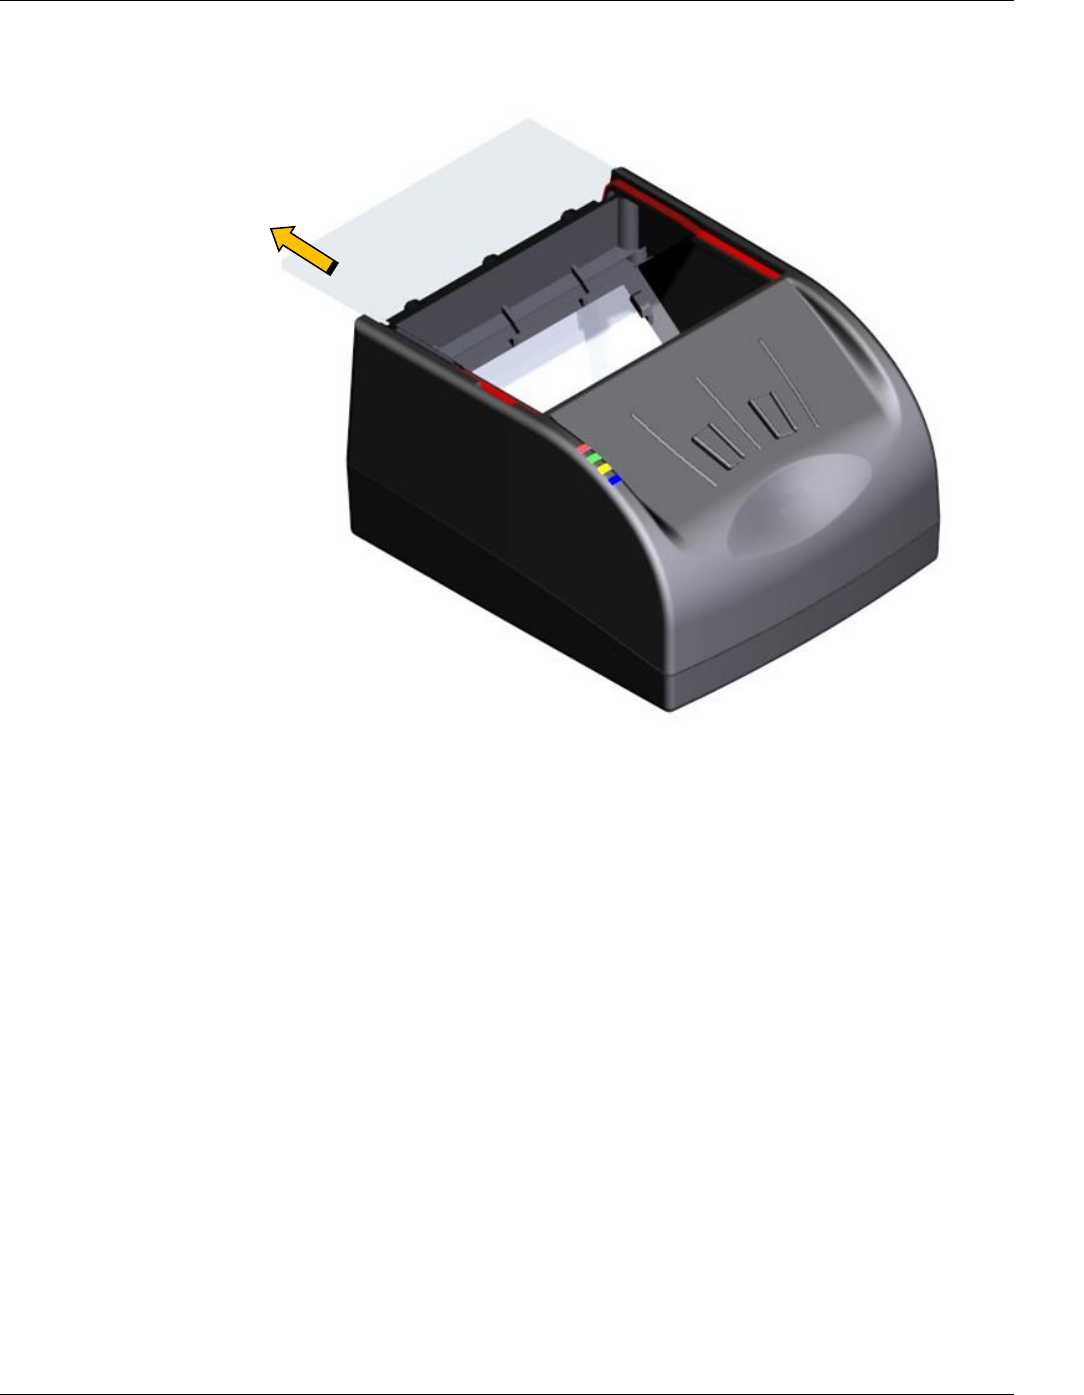
To remove the document hood:
1. Lift up on the side tabs.
2. Unsnap the left side of the hood and remove.
Document Reader AT9000 MK2 User Guide Maintenance
Page 24 of 33
3. To re-attach the document hood, ensure that the pin on the right of the hood is correctly seated
before pressing down on the tabs on the left of the hood.
Replacing the document glass
You can replace the glass in the document window if it becomes damaged. See page 32 for information
about ordering a replacement.
Only an authorized, trained technician should perform this procedure. Failure to correctly
follow the instructions could result in injury or cause damage to the equipment.
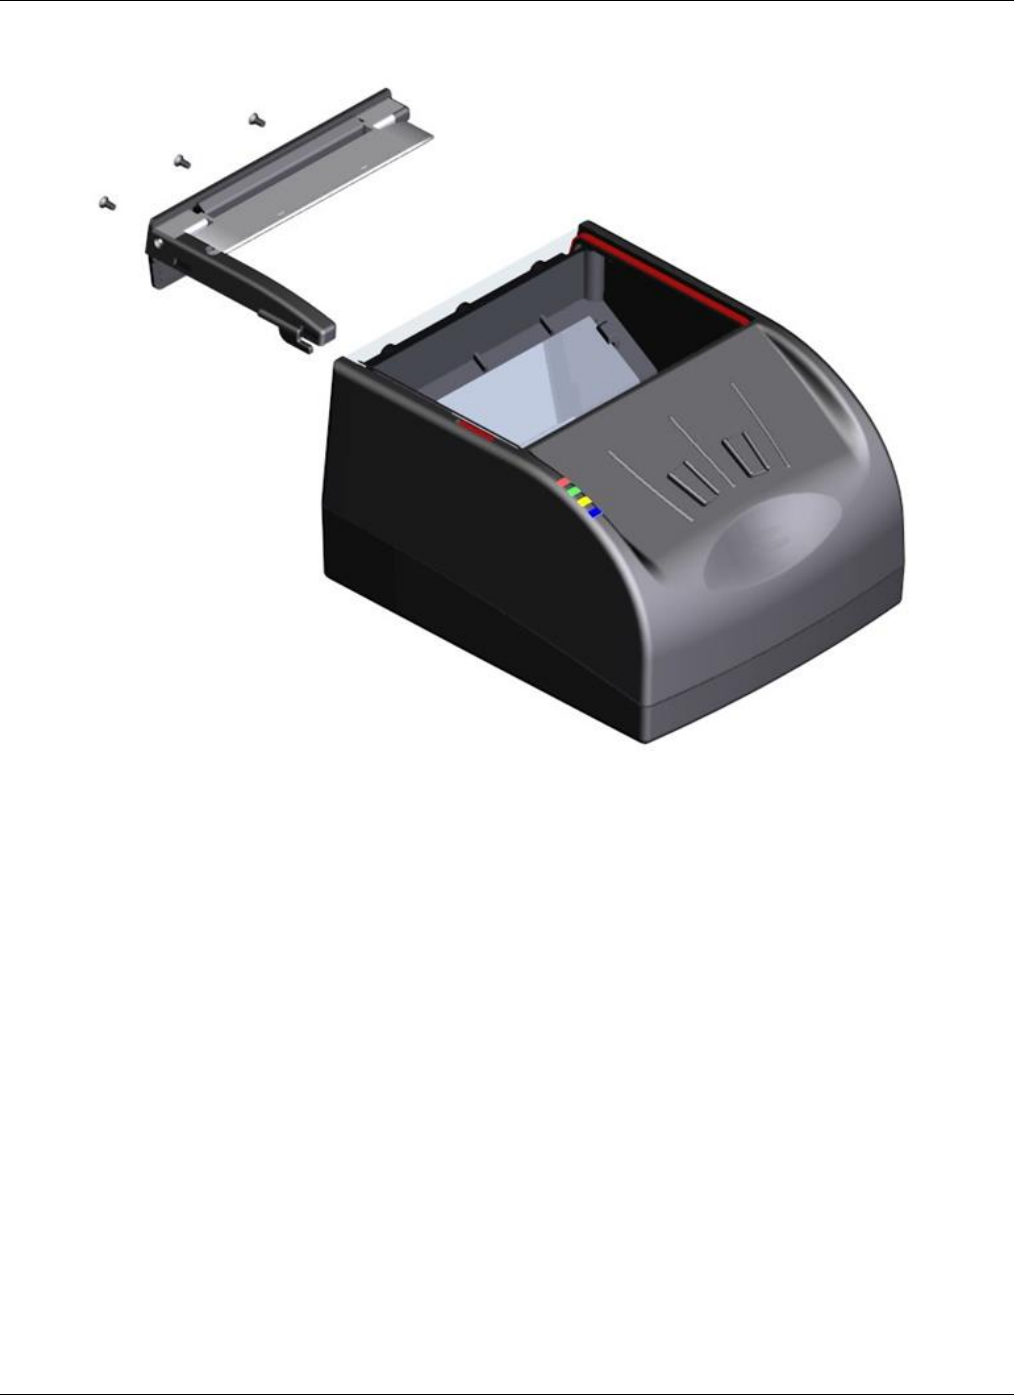
To replace the document window glass:
1. Remove document hood, as described on page 23.
2. If an optional module is attached to the back of the reader:
I. Remove the two screws securing the module.
II. Remove the center screw securing the document guide and clip assembly.
If there is no optional module, remove the three retaining screws located on the back of the panel.
3. Slide off the document guide and document clip assembly.
Document Reader AT9000 MK2 User Guide Maintenance
Page 25 of 33
4. Gently slide the glass to the back of the reader while being careful not to damage or remove the
rubber gasket seal.
Document Reader AT9000 MK2 User Guide Maintenance
Page 26 of 33
5. Before inserting the replacement glass the gasket should be inspected and wiped with a damp
dust-free cloth. Special care is needed to NOT damage gasket. If the gasket is damaged the IP
rating will be compromised.
6. Insert the replacement glass. Ensure that the beveled edge on the glass is inserted toward the front
of the reader.
NOTE: It is important that the internal components be free from dust or other contamination. If any
dust is present, use compressed air to remove it from the optical chamber.
7. Re-attach the document guide. Ensure that the guide hooks into the slot in the enclosure top.
8. Re-attach the document hood. Ensure that the pin on the right of the hood is correctly seated
before pressing down on the tabs on the left of the hood.
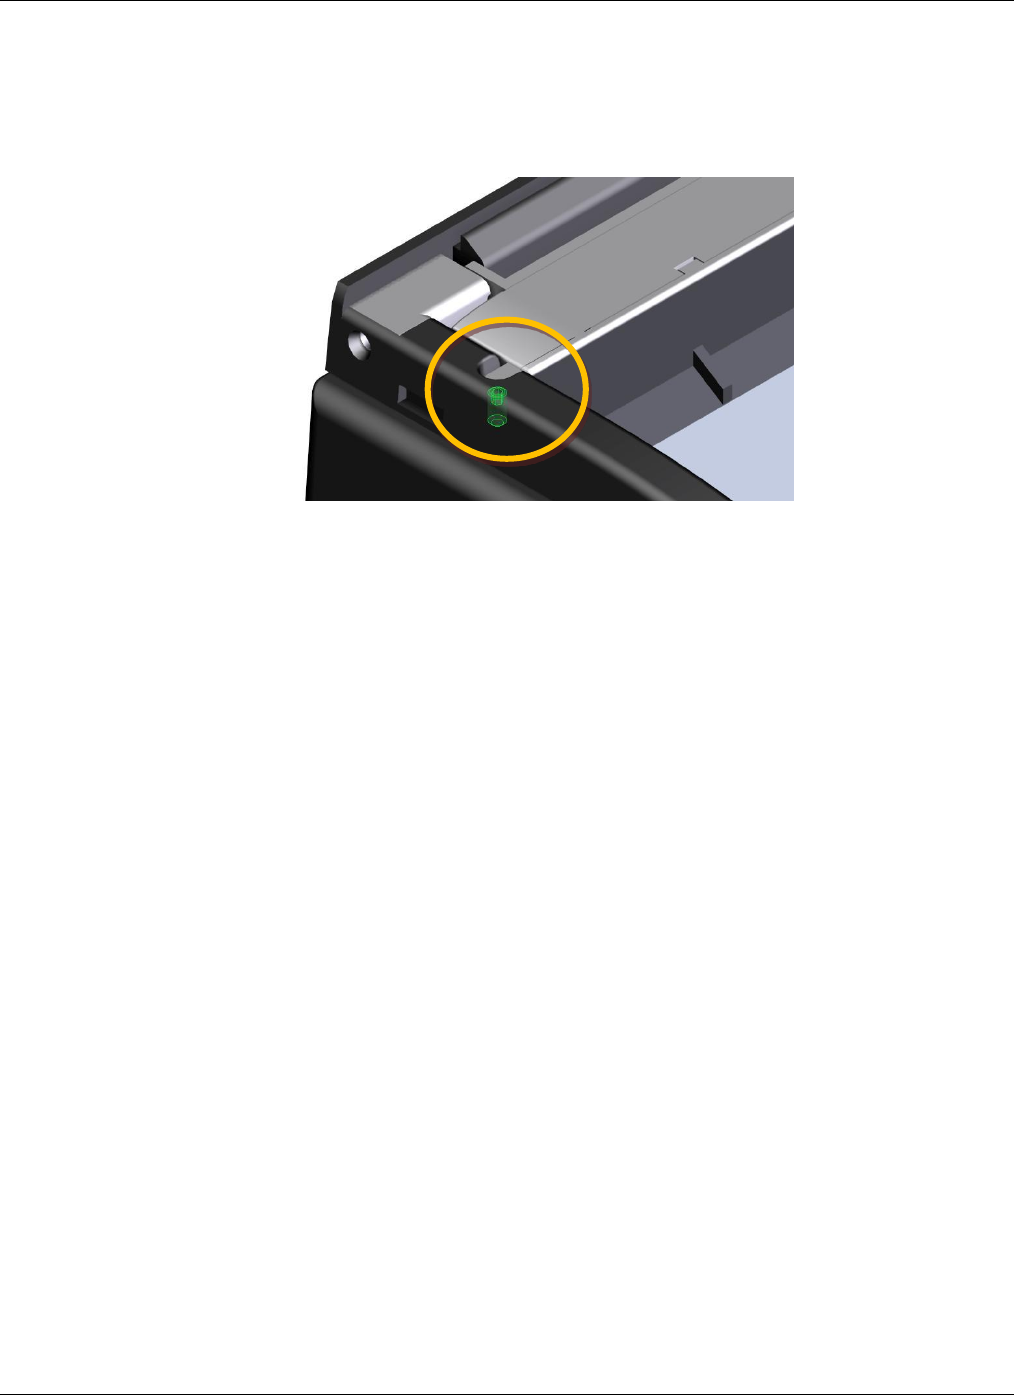
Adjusting the document clip height
You can adjust the default height of the document clip to better accommodate your documents. The
default height is controlled by a small set screw (1/8-inch). At the factory the clip is set such that a single
sheet of paper (approx. 0.004 inches) will freely slide under the clip, whereas an ID card (approx. 0.03
inches) will just make contact with the clip.
To adjust the document clip height:
1. Remove document hood, as described on page 23.
2. Lift and hold the document clip to its maximum height.
Document Reader AT9000 MK2 User Guide Maintenance
Page 27 of 33
3. Using an 1/8-inch hex screwdriver, adjust the height of the set screw (located near the top-left
corner of the document glass):
Turn clockwise to lower the default height of the document clip
Turn counter-clockwise to raise the default height of the document clip
4. Release the document clip.
5. Re-attach the document hood. Ensure that the pin on the right of the hood is correctly seated
before pressing down on the tabs on the left of the hood.
Document Reader AT9000 MK2 User Guide Specifications
Page 28 of 33
5. Specifications
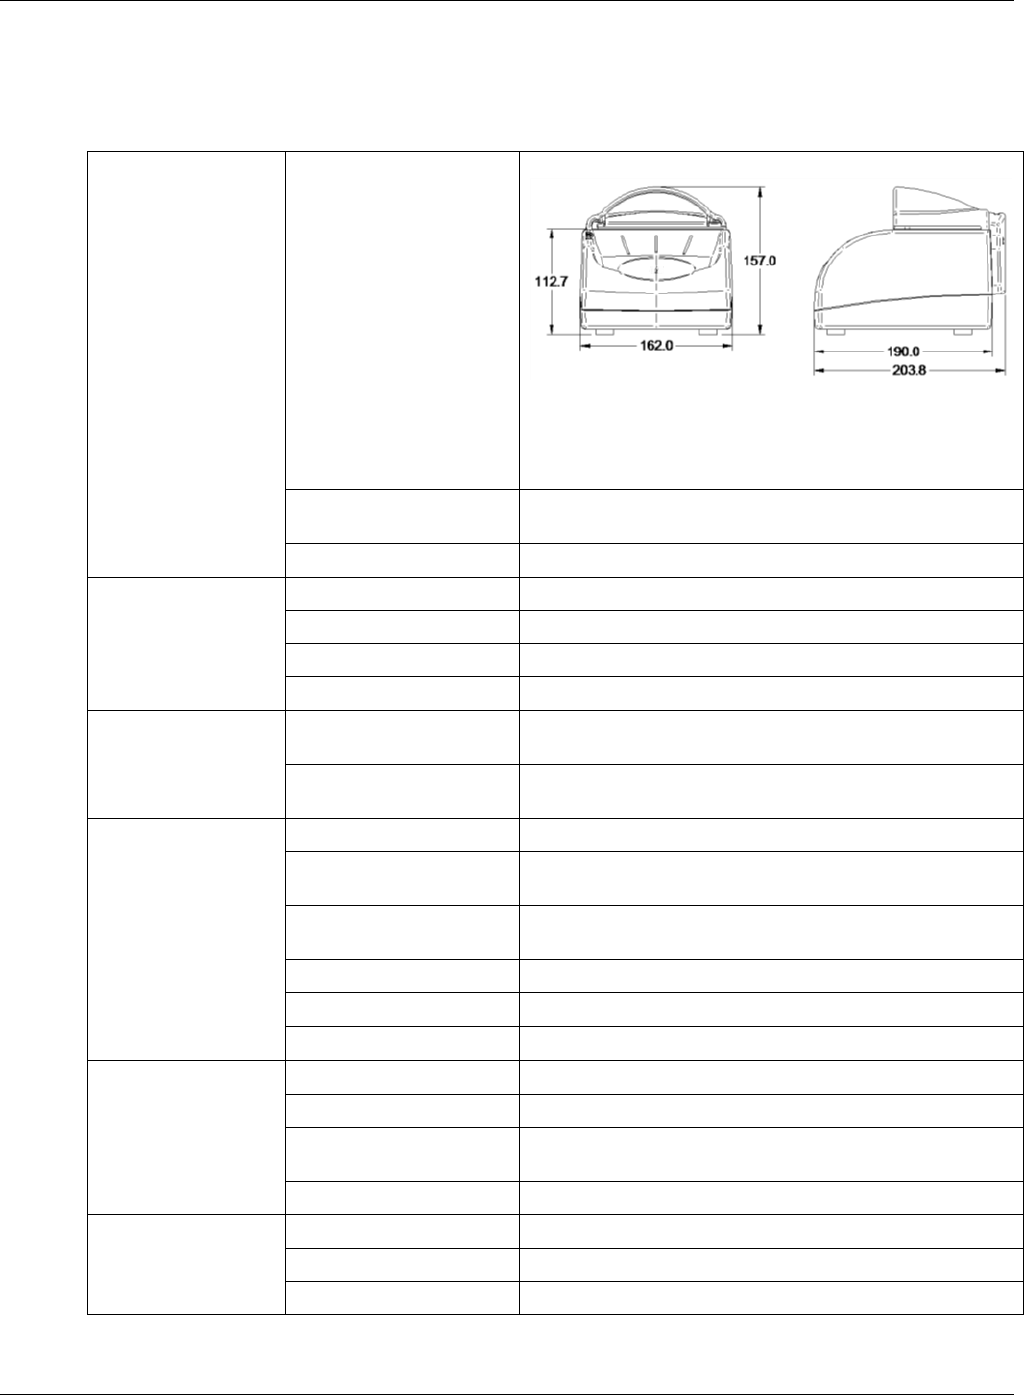
Physical
Specifications
Dimensions
Length:
Without smartcard module: 19 cm (7.5 inches)
With smartcard module: 20 cm (8.0 inches)
Width: 16.2 cm (6.4 inches)
Height: 15.7 cm (6.2 inches)
Imaging Window
125 x 88 mm (4.92 x 3.47”)
4.0 mm (0.157") tempered glass *
Weight
1.25 kg (44 ounces)
Electrical
Specifications
Input voltage
5 V DC, from external power supply or USB 2.0 host port
Power consumption
Less than 2.5W (USB 2.0 powered)
Connector
3-pin locking
PSU Efficiency
Level VI
Environmental
Specifications
Temperature
Operating: 0°C to 40°C (32°F to 104°F)
Storage: –20°C to 50°C (–4°F to 122°F)
Humidity
Operating: 20% to 80% (non-condensing)
Storage: 5% to 95% (non-condensing)
Communication
Interfaces and
Protocols
Interface
USB 2.0, 480 Mbit/s “High Speed”
Host USB Power
Reader can be powered from a single host USB 2.0
connector
USB connectors
One USB Type-B connector (host)
Two USB Type-A connectors (peripherals)
USB cable length
2.00 m (79 inches)
Aux. USB power
5V DC, 500mA per port (with external power supply only)
RF Chip
ISO 14443-2, 3, 4 Type A and B with PC/SC driver
Optional Power
Supply Specifications
Input voltage
100V to 240V AC +/-10%
Line frequency
47 Hz to 63 Hz
Cable length
Power supply cable: 1.3 m (52 inches)
AC line cord: 2.0 m (78 inches)
Power rating
15W
Smart Card
Communication
Interfaces and
Protocols
Protocol
T=1, T=0
Frequency
Up to 8 MHz (PPS, DI parameter)
Communication speed
Up to 344,105 bit/s (PPS, Fl parameter)

Document Reader AT9000 MK2 User Guide Specifications
Page 29 of 33
ISO Support
7816 Class A and AB
Contact
Sliding contact
8 contacts - ISO location
Regulatory
Information and
Standards
Directives
2014/35/EU Low Voltage Directive
2014/30/EU EMC Directive
2014/53/EU RE Directive
2002/96/EC Waste Electrical and Electronic Equipment
(WEEE) Directive
2011/65/EU Restriction of Hazardous Substances (RoHS2)
Directive
Document Reader AT9000 MK2 User Guide Troubleshooting
Page 30 of 33
6. Troubleshooting
Use the following table to identify and correct common issues encountered when using the reader.
Symptom
Possible Causes
Recommended Actions
The LEDs do not come on
during power up.
There is no power to the reader.
Momentarily depress the power switch
Verify the reader is connected to a USB
2.0 host port and/or external power
supply.
The unit is damaged.
Follow the procedure outlined in
“Returning the reader for maintenance” on
page 42.
The Ready LED is
continuously blinking.
The USB cable is not connected.
Verify that the cable is installed.
The system has no USB 2.0
capability.
Verify that your PC is USB 2.0-compliant.
The Ready and Error LEDs
are continuously blinking.
The system has only USB 1.1
capability.
Install the reader on a PC that supports
USB 2.0.
The reader is not
communicating with host PC
system.
The cable is not properly
connected or USB drivers are not
properly installed.
Verify that the USB cable is connected to
the host.
Verify that the USB driver is installed.
Verify that only one reader is connected to
the host system and only one instance of
the host application is running.
The Error LED illuminates
when a document is scanned
The document is non-machine
readable.
This is a normal condition when there is
no machine readable data and only the
image is captured from the document.
The document is poorly printed or
does not conform to specification.
The reader is designed to read documents
that are poorly printed. However, some
documents are of such poor quality that
the reader will not be able to process the
OCR data.
Verify the document conforms to ICAO
9303 or OCR B font requirements
High ambient light.
Ensure that ambient light compensation is
enabled in the software SDK
Re-orient the reader so that bright light
does not fall directly on the document
window.
Install document reader hood (see Reader
Components section)
The unit is not configured to read
the document being scanned.
Verify the reader configuration with
technical staff.
Contact Global Technical Services (GTS)
at Gemalto.
Document Reader AT9000 MK2 User Guide Troubleshooting
Page 31 of 33
The document is not orientated
correctly on the scanning window.
For details on document placement, see
“Reading standard documents” on page
22.
The demo application is not
working.
The application may already be
running.
Verify that only one copy of the application
is running.
Software is installed incorrectly
Remove the existing application & re-
install software. For more information see
the Software Installation section.
Another application is running
Verify that no other application that
accesses the document reader is running.
You do not have PC
Administrative rights.
Consult with your IT support
representative.
LEDs do not change after
reading an RF chip
This is a normal condition. RF status is
displayed only on the host screen.
Reader becomes
unresponsive
Close and restart the application.
Disconnect USB and PSU from PC and
then reconnect.
Disconnect USB and PSU. Close
application and then restart PC.
Reconnect document reader to PC and
then open application.
Contact GTS if still unresponsive.
USB peripherals attached to
the reader do not power on
or do not function correctly
You need to use the external
power supply when attaching
external devices
Verify the AC power source.
Verify that the AC cable is connected to
the AC power source.
Verify that the power cable is connected to
the power supply port located on the back
panel.

Document Reader AT9000 MK2 User Guide Customer Service
Page 32 of 33
7. Customer Service
If you cannot solve the problem after following the instructions in the Troubleshooting section, contact
Gemalto’s Global Technical Services (GTS).
Before contacting GTS
Be prepared to provide the information required to properly diagnose the problem:
A detailed description of the problem
A detailed description of the actions taken to correct the problem
The serial number of the reader (located on the reader’s bottom panel)
Contacting GTS
Once you have the above information, contact Gemalto’s Global Technical Services at
technical.service@gemalto.com

Document Reader AT9000 MK2 User Guide Customer Service
Page 33 of 33
Returning the reader for maintenance
In the event of a suspected problem with Gemalto equipment, please use the following procedure.
To return a reader for maintenance:
1. Diagnose – The system manager will determine that there is an actual fault with the equipment
which cannot be corrected by following the procedures in this document or with local in-house
knowledge
2. Initiate Call – The system manager should contact Gemalto GTS via telephone, or email. GTS will
request a detailed description of the problem along with the serial number of the unit. It is the
customer’s responsibility to include or have on hand all pertinent information.
3. Response/Call Back – A GTS representative will discuss with the system manager to determine
the problem. If the problem can be corrected locally by the system manager with the guidance of
the GTS representative, no further action will be required.
4. Return Authorization – If the problem cannot be corrected via telephone assistance, the GTS
representative will issue a Return Materials Authorization (RMA) number and form. The RMA
number will be used to track the failed reader, along with verification of the location of the service
depot to where it should be sent.
5. Return – The system manager will carefully disconnect the defective equipment. The reader should
ideally be packaged in its original packing box. If not, a suitable box with sufficient packing
material should be used to minimize damage during transit. Place a copy of the RMA form inside
the box
The RMA number should be prominently displayed on the shipping container in which the reader is
being returned. This reference number will ensure prompt processing of the equipment once it
arrives at Gemalto
The CUSTOMER is responsible for insurance coverage on the reader in case of loss or damage
during transit to Gemalto. The reader should be returned to the Gemalto designated service depot.
6. Shipping Instructions – Four copies of a commercial invoice, a packing slip, a pro forma invoice,
or the following information, typed on letterhead, must be sent with the reader:
Description of equipment, including serial numbers
Quantity
Value and Country of Origin
Exporter (customer's company)
Consignee (Gemalto)
Please affix the shipping documents and a copy of the RMA form to the outside of the container.
7. Repair – When the defective equipment is received at the service depot, the reader will be
repaired, tested and returned to the address the CUSTOMER specifies on the RMA form