Gemini Industries Gemtek Pt300 Users Manual User
pt300 to the manual 3fbea070-a2b3-43e0-a6c3-d8034438ea96
2015-02-02
: Gemini-Industries Gemini-Industries-Gemtek-Pt300-Users-Manual-429396 gemini-industries-gemtek-pt300-users-manual-429396 gemini-industries pdf
Open the PDF directly: View PDF ![]() .
.
Page Count: 24
Gemini GLS
User Manual
User Manual.indd 1 2/2/06 10:27:23 AM

Gemini GLS (Global Location Service)
About Device
e simple, yet sporty and sleek Gemini GLS is a personal and portable tracking
device unlike anything else. Always know where your child may be. Watch over
loved ones who may need you. Track your company’s assets wherever they go.
With just one push of a button, you can know within seconds the exact location
your Gemini device.*
Device Features
• An “SOS” Button that immediately sends an alert to contacts preset by the
user in case of an emergency
• Speed Dial Buttons that allow the unit to call up to 2 pre-determined
numbers (a third Speed Dial Button is reserved for Gemini Customer
Service)
• An LED indicator to show GSM (cellular) and GPS signal strength, as well as
a low battery indicator and Test Button for GSM (cellular) and GPS coverage
• Rechargeable battery with capacity of up to 22 hours, with a short charging
time of only 4 hours to restore full battery capacity
• A sensitive microphone and speakerphone for using the cellular phone
functions (a headset port is also included, if privacy is desired by the user)
• Tri-band modem for worldwide coverage, with a highly sensitive GPS module
• Sleek and stylish design that is both attractive if exposed or easily concealed
with the use of available accessories
• Extended standby time over 30 hours
• Talk time of up to 4 hours
• Secure online account access for unit personalization and tracking.
• User defined Geofence (also referred to as Safety Zone) to set defined
perimeters for alert notification
* Your Gemini device operates using the GSM and GPRS cellular network and must be within an
area with cellular coverage to function properly. Please refer to the Terms and Conditions for use at
www.geminitracking.com.
User Manual.indd 2 2/2/06 10:27:24 AM

i
Contents
Packing List . . . . . . . . . . . . . . . . . . . . . . . . . . . . . . . . . . . . . . . . . . . . . . . . . . . . . . . . ii
Description of Unit . . . . . . . . . . . . . . . . . . . . . . . . . . . . . . . . . . . . . . . . . . . . . . . . 1
Front View . . . . . . . . . . . . . . . . . . . . . . . . . . . . . . . . . . . . . . . . . . . . . . . . . . . . . . . . . 1
Rear View . . . . . . . . . . . . . . . . . . . . . . . . . . . . . . . . . . . . . . . . . . . . . . . . . . . . . . . . . . 2
Bottom View . . . . . . . . . . . . . . . . . . . . . . . . . . . . . . . . . . . . . . . . . . . . . . . . . . . . . . . . 2
Le View . . . . . . . . . . . . . . . . . . . . . . . . . . . . . . . . . . . . . . . . . . . . . . . . . . . . . . . . . . . 3
Right View . . . . . . . . . . . . . . . . . . . . . . . . . . . . . . . . . . . . . . . . . . . . . . . . . . . . . . . . . . 3
Description of Lights . . . . . . . . . . . . . . . . . . . . . . . . . . . . . . . . . . . . . . . . . . . . . . 4
Buttons: Signal Light & Sound . . . . . . . . . . . . . . . . . . . . . . . . . . . . . . . . . . . . 5
Battery Tips . . . . . . . . . . . . . . . . . . . . . . . . . . . . . . . . . . . . . . . . . . . . . . . . . . . . . . . . 6
Getting Started . . . . . . . . . . . . . . . . . . . . . . . . . . . . . . . . . . . . . . . . . . . . . . . . . . . . . 7
Charging the Battery . . . . . . . . . . . . . . . . . . . . . . . . . . . . . . . . . . . . . . . . . . . . . . . . . 7
Turn the Gemini On and Off . . . . . . . . . . . . . . . . . . . . . . . . . . . . . . . . . . . . . . . . . . 7
Adjusting Volume . . . . . . . . . . . . . . . . . . . . . . . . . . . . . . . . . . . . . . . . . . . . . . . . . . . 7
Answering a Call . . . . . . . . . . . . . . . . . . . . . . . . . . . . . . . . . . . . . . . . . . . . . . . . . . . . 7
Ending a Call . . . . . . . . . . . . . . . . . . . . . . . . . . . . . . . . . . . . . . . . . . . . . . . . . . . . . . . 7
Speed Dial Buttons . . . . . . . . . . . . . . . . . . . . . . . . . . . . . . . . . . . . . . . . . . . . . . . . . . . 8
Example 1: Placing a Voice Call . . . . . . . . . . . . . . . . . . . . . . . . . . . . . . . . . . . . . . . . 9
Example 2: How to Request a Position . . . . . . . . . . . . . . . . . . . . . . . . . . . . . . . . . 10
SOS Button . . . . . . . . . . . . . . . . . . . . . . . . . . . . . . . . . . . . . . . . . . . . . . . . . . . . . . . . 11
Geofence Button . . . . . . . . . . . . . . . . . . . . . . . . . . . . . . . . . . . . . . . . . . . . . . . . . . . . 12
Internet Setup . . . . . . . . . . . . . . . . . . . . . . . . . . . . . . . . . . . . . . . . . . . . . . . . . . . . . . 12
Activating/Deactivating your Geofence from the Gemini unit . . . . . . . . . . . . . 12
Receiving/Testing Signals . . . . . . . . . . . . . . . . . . . . . . . . . . . . . . . . . . . . . . . . 13
Receiving GPS & GSM (cellular) Signals . . . . . . . . . . . . . . . . . . . . . . . . . . . . . . . 13
Testing GPS & GSM (cellular) Signals . . . . . . . . . . . . . . . . . . . . . . . . . . . . . . . . . 14
Quick Reference Guide . . . . . . . . . . . . . . . . . . . . . . . . . . . . . . . . . . . . . . . . . . . 14
Specifications . . . . . . . . . . . . . . . . . . . . . . . . . . . . . . . . . . . . . . . . . . . . . . . . . . . . . 15
Helpful Hints . . . . . . . . . . . . . . . . . . . . . . . . . . . . . . . . . . . . . . . . . . . . . . . . . . . . . 16
Troubleshooting . . . . . . . . . . . . . . . . . . . . . . . . . . . . . . . . . . . . . . . . . . . . . . . . . . 17
Limited Warranty . . . . . . . . . . . . . . . . . . . . . . . . . . . . . . . . . . . . . . . . . . . . . . . . . 18
User Manual.indd 1 2/2/06 10:27:24 AM
ii
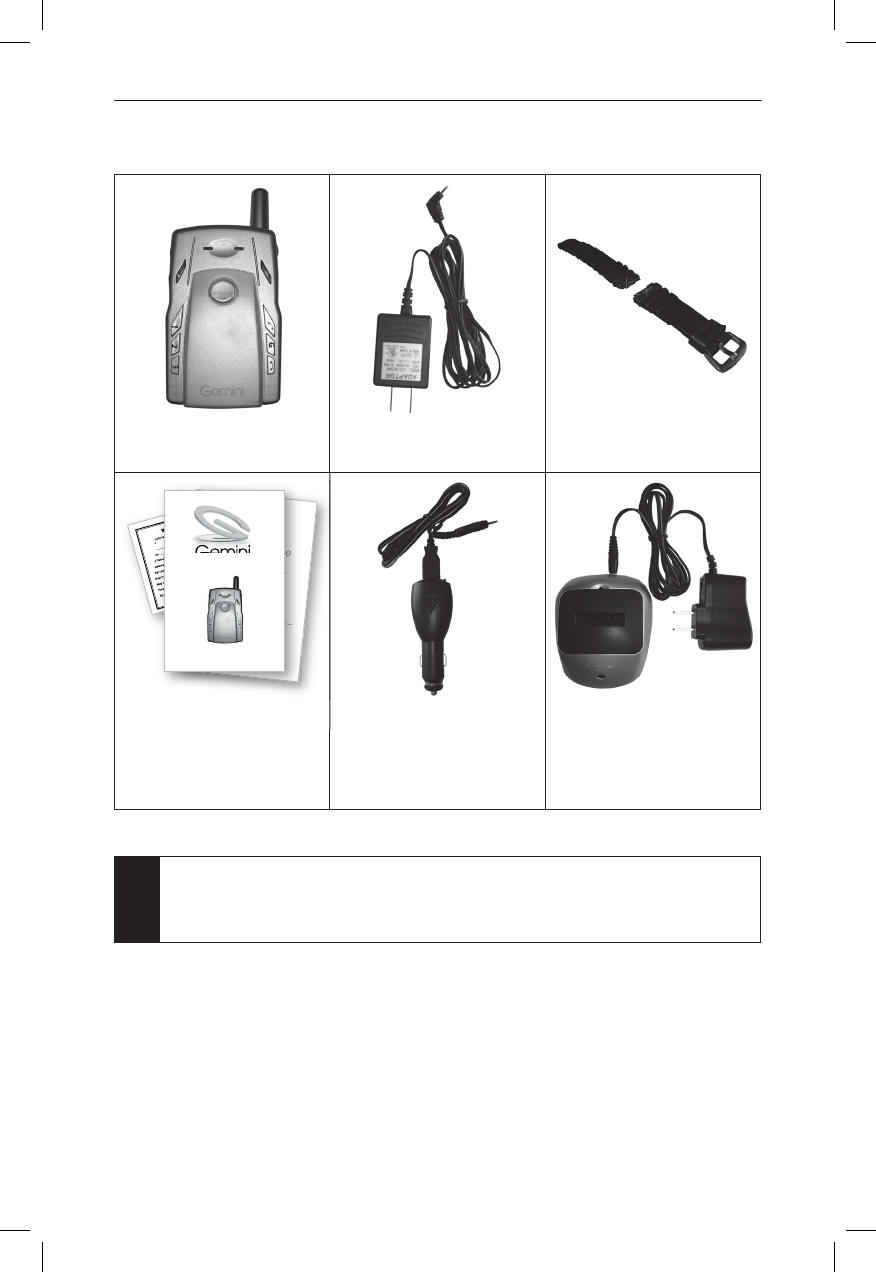
Packing List
Gemini GLS Unit Home Charger Armband
User’s Manual,
Set Up Guide and
Warranty Card
Car Charger Desktop
Battery Charger
Note
• Contents of the manual are subject to change without notice.
• Accessories may vary by region. Please consult your retailer.
User Manual.indd 2 2/2/06 10:27:38 AM
1
Description of Unit
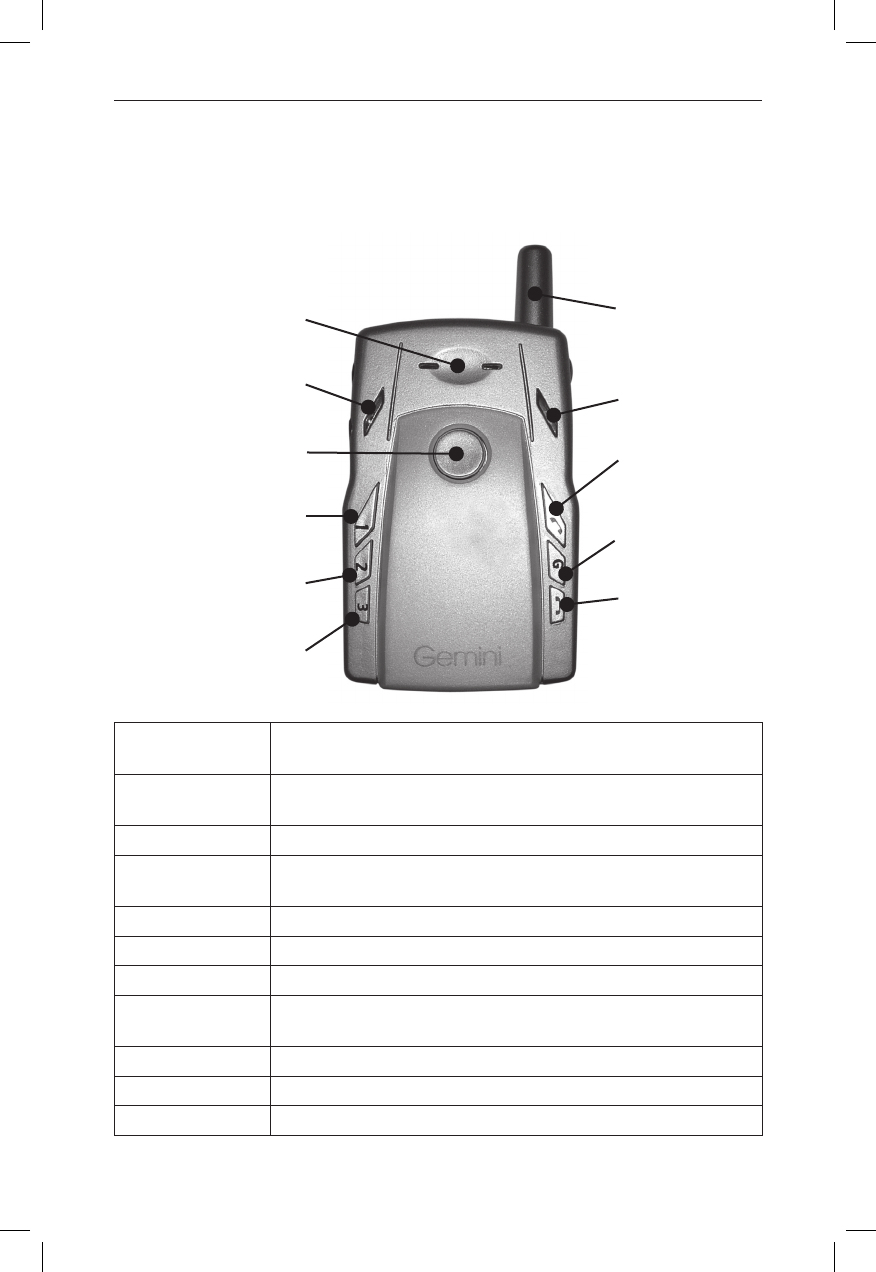
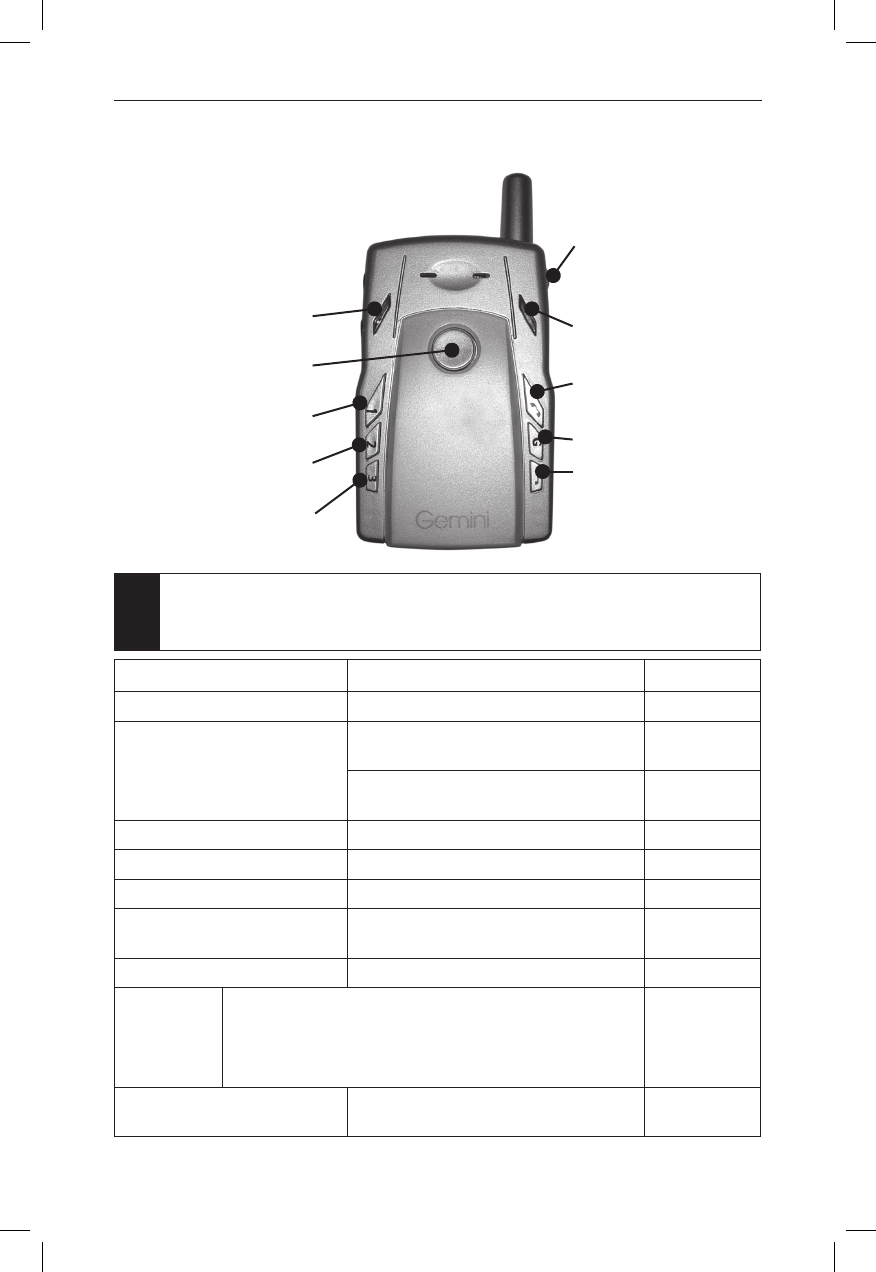
Front View
Signal Light LED light information for user (See “Description of Lights” on page
4 for details)
SOS Button Reports to the control center by sending a text message when
pressed, signaling an emergency.
Speaker Speaker for voice calls when not using earphones
Charging Light Light stays on when charging is in process and turns off when
charging is complete
Answer Button Press to answer an incoming call
Geofence Button Activates and deactivates the Geofence feature
Hang-up Button Press to end a call
GSM (cellular) &
GPS Antenna
External component for receiving GSM (cellular) and GPS signals
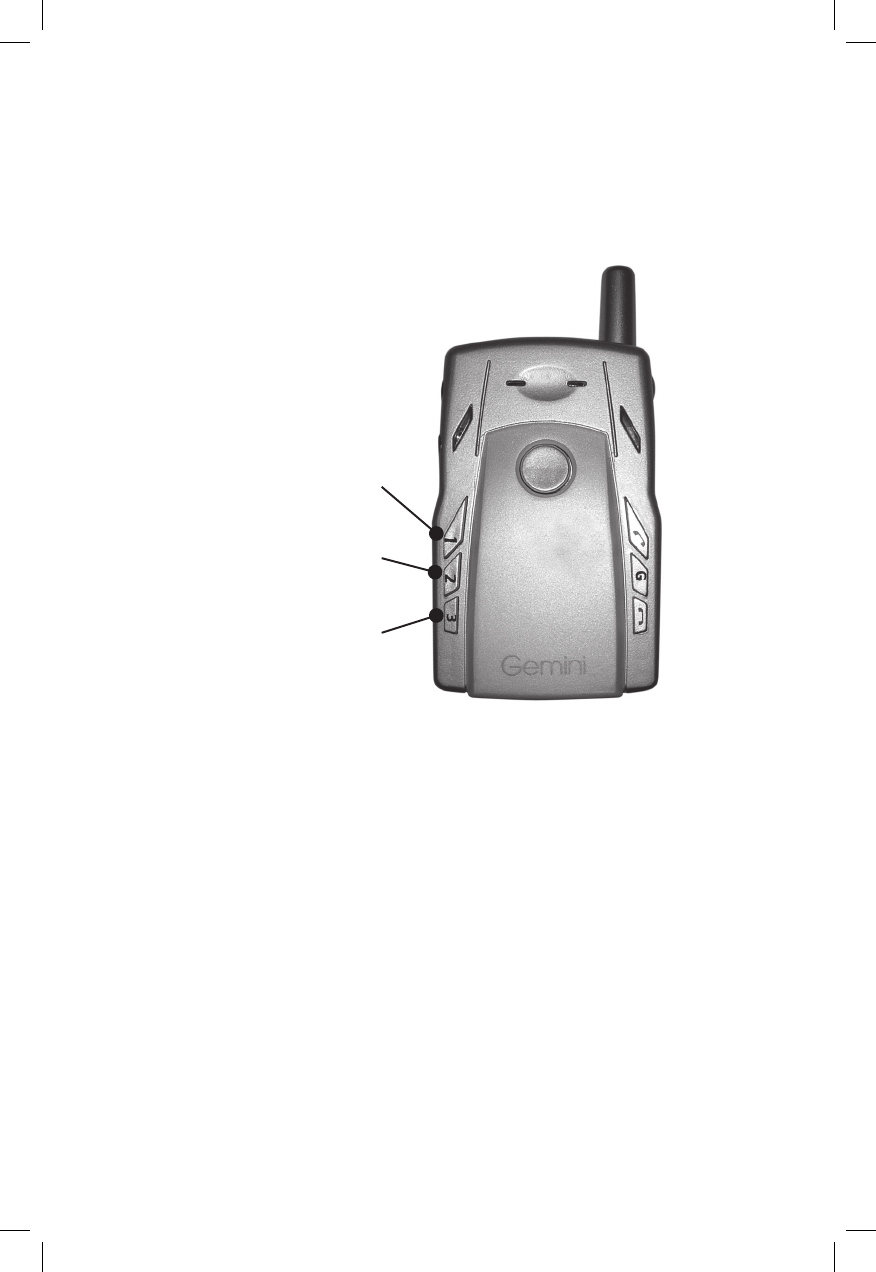
Speed Dial 3 Press to dial Gemini Customer Service
Speed Dial 2 Press to dial the second designated phone number
Speed Dial 1 Press to dial the first designated phone number
User Manual.indd 1 2/2/06 10:27:41 AM
2
Description of Unit (continued)
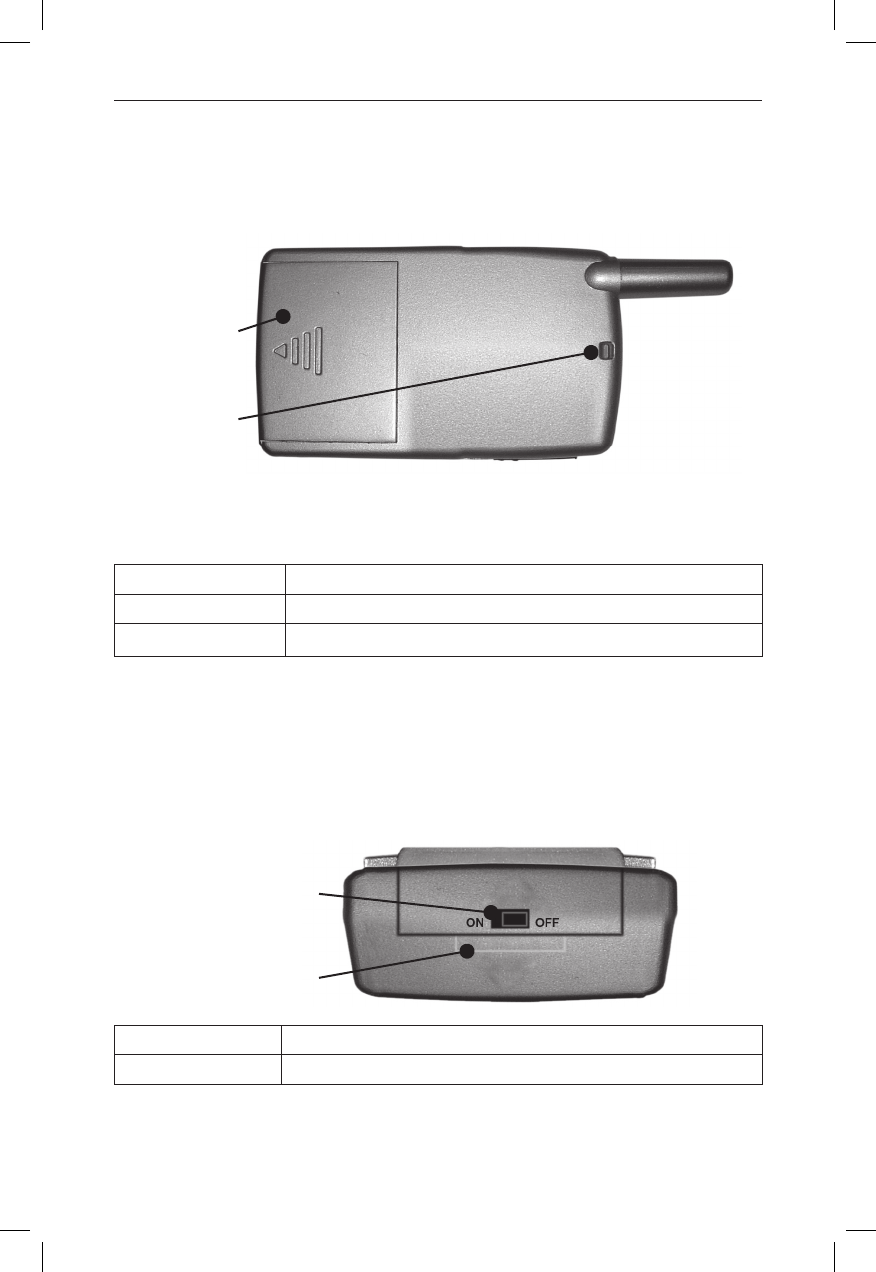
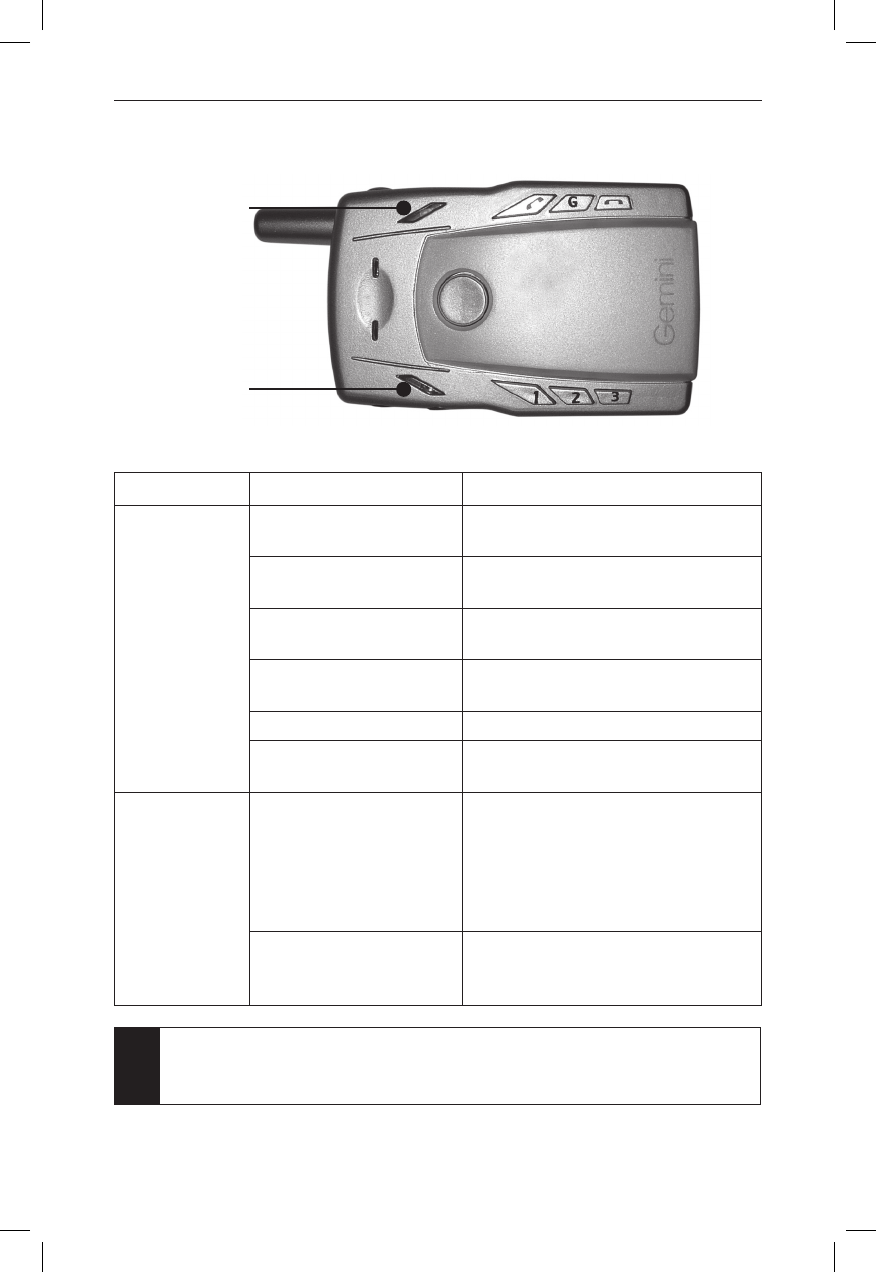
Rear View
Armband Holder For attaching armband to unit, can be attached if desired
Battery Cover Removes easily to change the battery
Strap Mount For attaching a strap or necklace to the unit
Bottom View
On/Off Switch To turn power On/Off
Battery Cover Lock To lock the battery cover
User Manual.indd 2 2/2/06 10:27:43 AM
3
Description of Unit (continued)
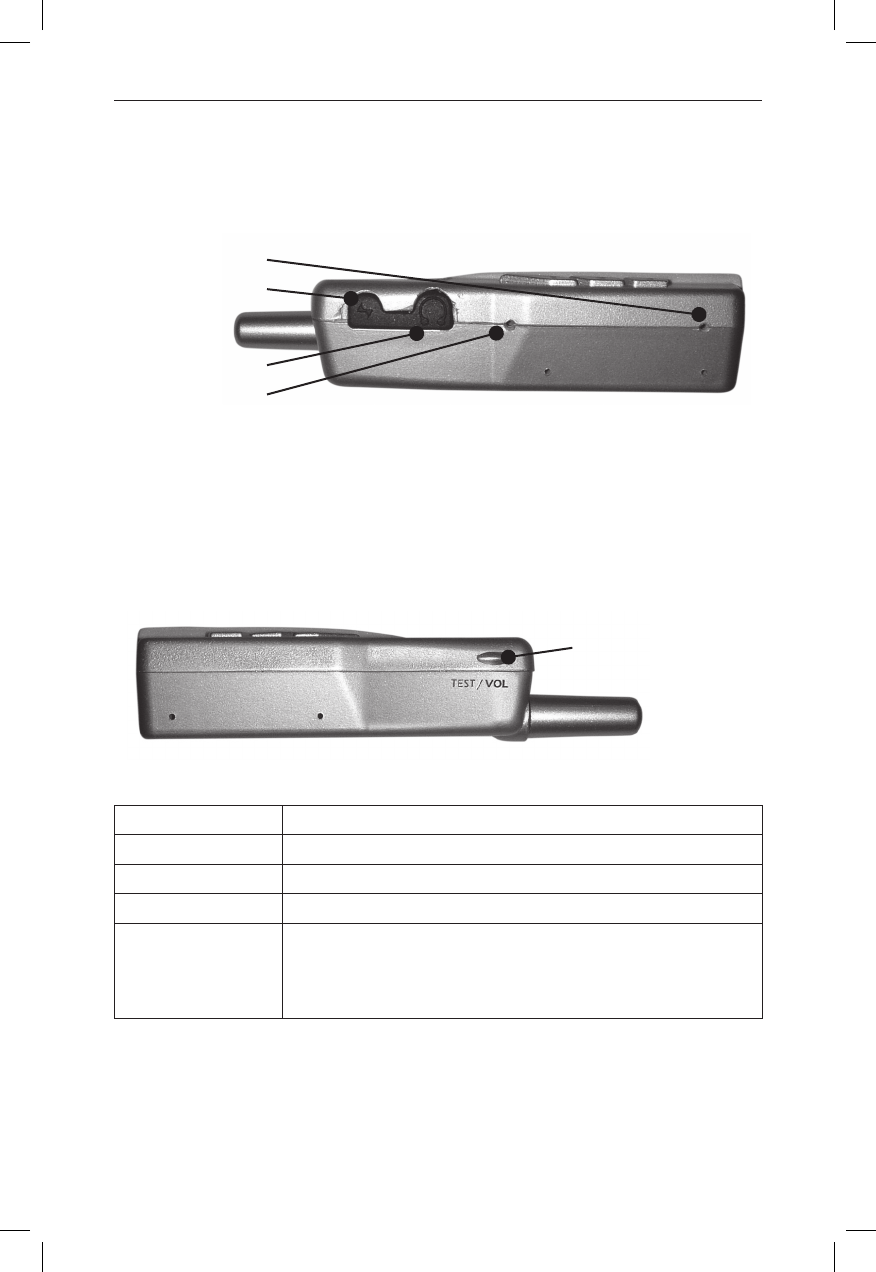
Left View
Right View
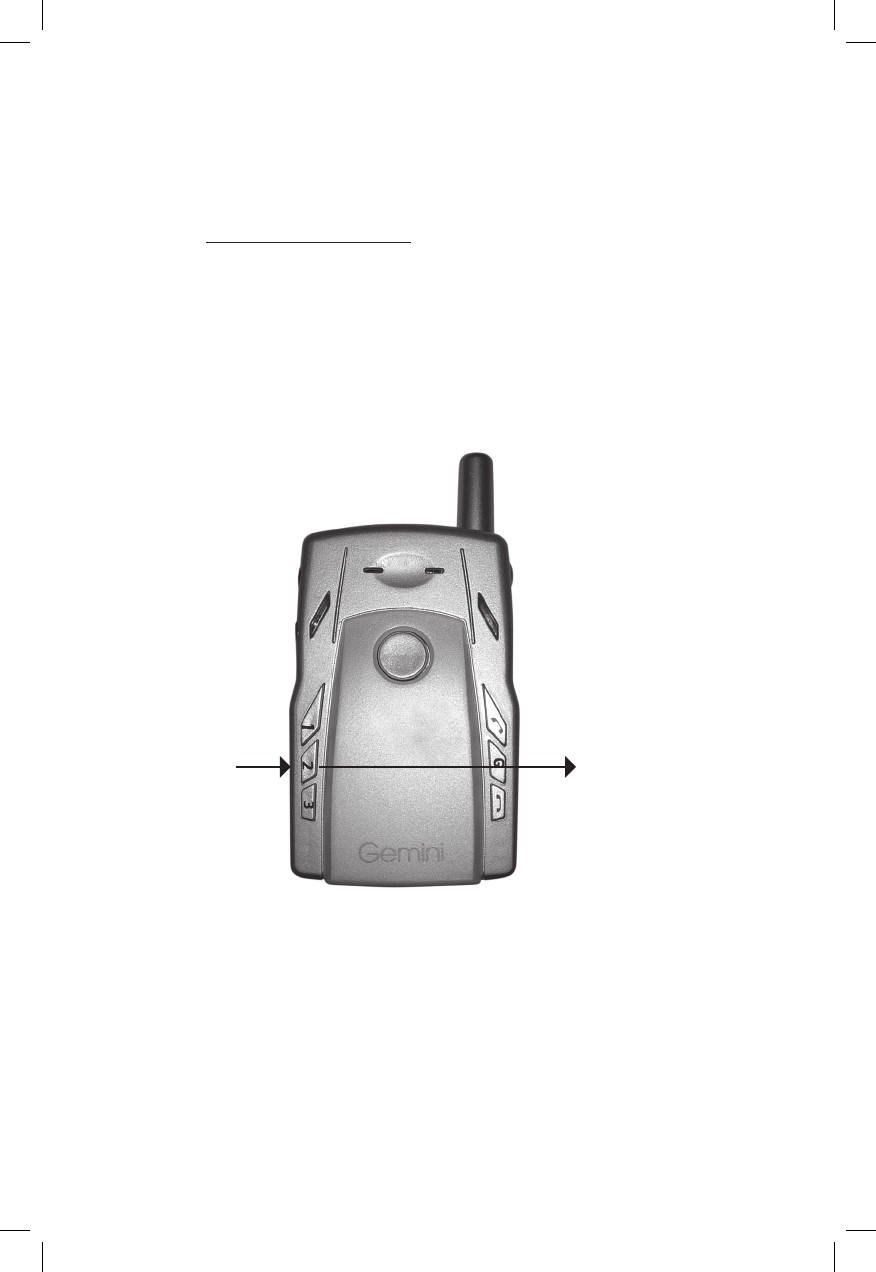
Microphone To speak into for voice calls
Charger Jack For charging the battery of the main unit
Earphone Jack For hands free function
Music Ring Output Music ring for incoming call
Volume/Test To adjust the volume during phone calls. In standby mode, if
pressed for more than 2 seconds, the unit will beep and show
the GPS and GSM (cellular) reception on the LED (See “Quick
Reference Guide,” on page 14 for details)
User Manual.indd 3 2/2/06 10:27:44 AM
4
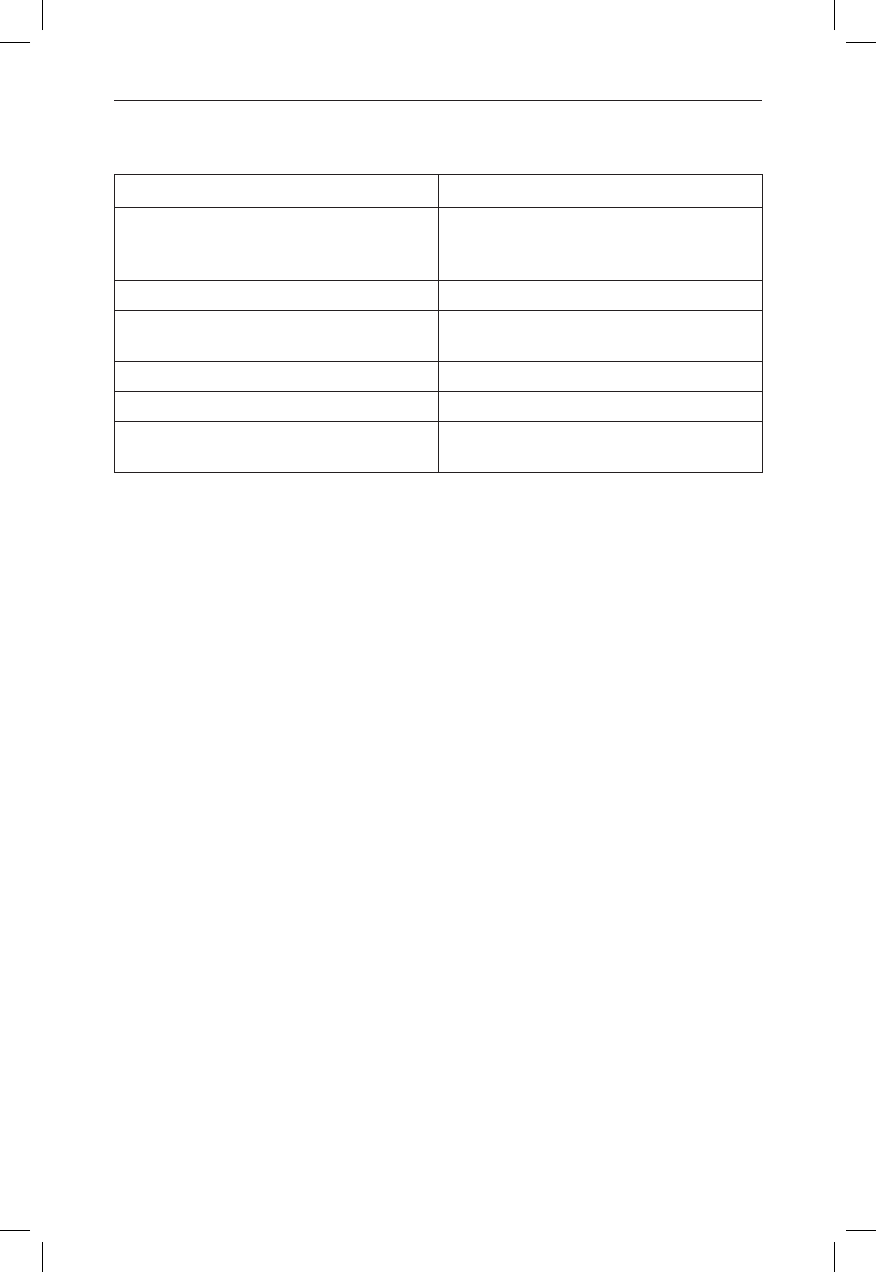
Description of Lights
LIGHT LED COLOR AND ACTION DESCRIPTION
Signal Light Blue Light stays on for
approximately 2 minutes
Unit is looking for a GPS signal
Blue Light blinks for
approximately 2 minutes
Unit has received a valid GPS signal
Green light blinks 4 times Unit has received a valid GSM (cellular)
signal.
Blue and Green Lights blink
alternately
Normal stand-by mode, ready for use.
Red Lights stay on Battery is low
Off Unit is communicating or completing a
command or action
Charging Light Orange light stays on Indicates the unit is charging while in
the Off position.
Note: If device is left on while charging,
the orange light will remain on even
if the unit is fully charged. For quicker
charging, turn unit Off while charging.
Off Charger is not plugged in or if charger
is plugged in and in the Off position,
the unit is fully charged.
Note
• Green Light refers to GSM (cellular) signal Blue Light refers to
GPS signal
User Manual.indd 4 2/2/06 10:27:46 AM
5
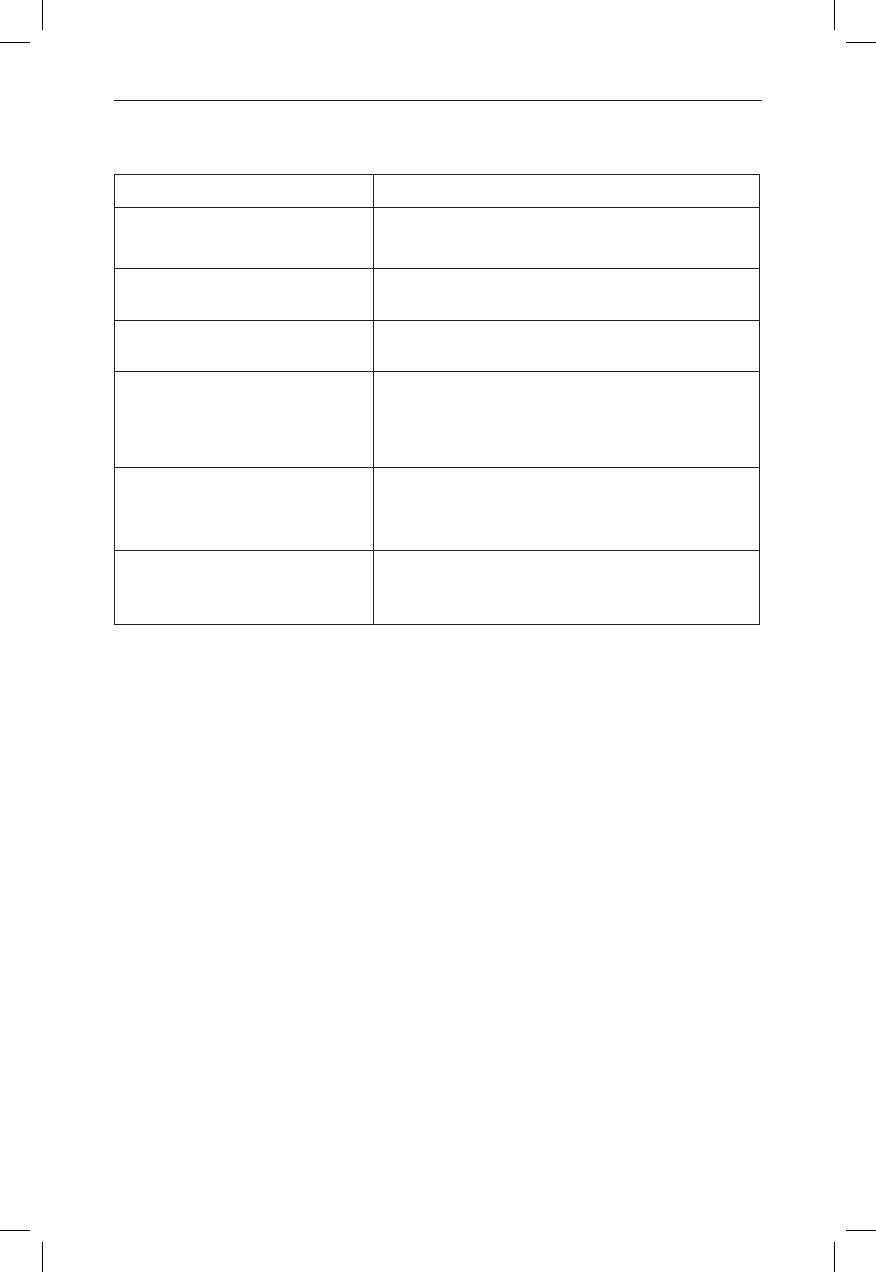
Buttons: Signal Light & Sounds
Note
• Geofence and SOS Buttons MUST be held for at least 4 seconds, other
buttons press for 2 seconds.
BUTTON LIGHT SOUND
Answer Button Green light with 1 blink 1 beep
Geofence Button—press
and hold for at least 4 sec-
onds
Green light with 1 blink 1 beep
(activating)
Green light with 1 blink 2 beeps
(deactivating)
Hang-up Button Green light with 1 blink 1 beep
Speed Dial 1 Green light with 1 blink 1 beep
Speed Dial 2 Green light with 1 blink 1 beep
Speed Dial 3
Gemini Customer Service
Green light with 1 blink 1 beep
Volume No light on signal 1 beep
Test Green light stays on for 3 seconds if cell phone signal is
OK (no green lights if no cell phone signal)
Blue light stays on for 4 seconds if GPS signal is OK (If no
GPS signal, then signal light blinks blue for 20 seconds)
2 beeps
SOS Button—press and hold
for at least 4 seconds
Green light stays on until SMS sending
is completed or SOS status is over
No Sound
User Manual.indd 5 2/2/06 10:27:48 AM

6
Battery Tips
Battery life depends on the network, signal strength, temperature, features,
and accessories in use. For maximum performance, please note the following
guidelines:
• New batteries or batteries stored for a long time may take more time to charge
• When charging and storing your battery, keep it near room temperature
• Never expose batteries to temperature below –10°C (14°F) or above 45°C
(113°F).
• It is normal for batteries to gradually require longer charging times. If you
notice a significant change in your battery life, it is probably time to purchase
a new battery.
Warning
Dispose of properly and according to any applicable state or local laws.
Never dispose of batteries in a fire because they may explode.
User Manual.indd 6 2/2/06 10:27:48 AM

7
Getting Started
Charging the Battery
Note
• For the initial charging of the battery, it is recommended that the unit
remain in the “Off” postition.
1. Insert the Home Charger plug into “Charger Jack” on your Gemini unit (See
“Description of Unit” on page 3 for location of jack).
2. Plug the other end of the home charger into an electrical outlet.
3. Signal Light is orange while charging.
Turn the Gemini On and Off
1. Locate the On/Off switch on the Gemini unit.
2. Push the On/Off switch to the “On” position.
Adjusting Volume
1. Press “Volume/Test Button” to adjust sound level while using the unit during
a phone call. (Volume adjustment sequence: Medium > High> Low)
Answering a Call
1. Press the “Answer” Button for 2 seconds. ere will be one beep and signal
light will blink green once.
Ending a Call
1. Press the “Hang-up” Button for 2 seconds. ere will be one beep and signal
light will blink green once.
User Manual.indd 7 2/2/06 10:27:48 AM
8
Speed Dial Buttons
The Speed Dial Buttons Have Three Functions:
1. e person carrying the unit may place a voice call to the numbers assigned
to the speed dial buttons. (See Example 1: Placing a Voice Call, page 9).
2. Mobile numbers assigned to these buttons are able to request location
information from the unit. e Gemini recognizes these numbers and
automatically hangs up aer one ring. e location of the Gemini will
then be sent to the phone that requested the location. You can also see the
location by logging into your account at www.geminitracking.com and
using the “Last Track” function. (See Example 2: How to Request a Position,
page 10).
Note
• e numbers programmed in the Speed Dial Buttons are unable to
place a voice call to the unit.
3. e mobile phone numbers programmed as speed dials will receive a
message when the SOS Button is pressed, indicating that the SOS Button was
pressed along with the location of the unit.
User Manual.indd 8 2/2/06 10:27:49 AM
9
Example 1: Placing a Voice Call
By simply pressing the appropriate Speed Dial Button, the person carrying the
unit may place a voice call only to the numbers assigned to these Speed Dial
Buttons.
In the example above, the unit is able to place a voice call to Mom’s Cell, Dad’s
Cell, or Gemini Customer Service.
User Manual.indd 9 2/2/06 10:27:50 AM
10
Example 2: How to Request a Position
Using the Internet
Please visit www.geminitracking.com and log into your account. Once logged in,
click on “Locate Unit”, select the unit you would like to request a position for and
then click “Get Location”.
Using a Telephone
Only numbers stored in the Speed Dial Buttons may request a position.
Mom’s Cell requests a position of the Gemini by calling the unit.
User Manual.indd 10 2/2/06 10:27:52 AM

11
SOS Button
e SOS Button should ONLY be used for an emergency. By pressing and
holding down the SOS Button for 4 seconds, a message is sent including the
location to the contact you chose to be notified.
In the example above, pressing the SOS Button will send a message to Mom’s Cell
and Dad’s Cell with a message that indicates an SOS alert with the location of
the unit.
Note
• SOS Button MUST be held for at least 4 seconds.
User Manual.indd 11 2/2/06 10:27:54 AM

12
Geofence (Safety Zone) Button
Internet Setup
For more information and to program the Geofence (also called Safety Zone),
please visit www.geminitracking.com.
Once you are logged into your account on the Internet, click on “Set Boundaries”
and follow the instructions. If the unit goes outside of this highlighted area a text
message is sent to the speed dial numbers that you set to be alerted.
Activating/Deactivating Your Geofence from the Gemini unit
e carrier of the Gemini can Activate/Deactivate the Geofence doing the
following:
• To activate press and hold down on the “G” Button for 4 seconds (unit will
beep once)
• To deactivate press and hold down on the “G” Button for 4 seconds (unit will
beep twice)
User Manual.indd 12 2/2/06 10:27:54 AM

13
Receiving/Testing Signals
Receiving GPS & GSM (cellular) Signals
Every time you turn your unit on, it immediately starts searching for a GPS
signal, then a GSM (cellular) signal. e following light sequence indicates which
signals have been received:
1. Signal light stays solid blue for approximately 2 minutes while searching for
a GPS signal.
2. Signal light blinks blue to indicate a valid GPS signal has been received.
3. Signal light blinks green 4 times to indicate a valid GSM (cellular) signal.
4. Signal light blinks blue/green alternately to indicate normal standby mode,
ready to use.
Testing GPS & GSM (cellular) Signals
1. To test for GPS and/or GSM (cellular) signals while in normal standby mode,
press the “Test” Button. e unit tests first for a GSM (cellular) signal then a
GPS signal. Sequence of lights is as follows:
1. Green light stays on for 4 seconds if GSM (cellular) signal is OK (no green
light if no GSM signal).
1. Blue light stays on for 4 seconds if GPS signal is OK (if no GPS signal. then
signal light blinks blue for 20 seconds).
Note
• e functions are limited to areas where GPS/cellular service are
available.
User Manual.indd 13 2/2/06 10:27:54 AM

14
Quick Reference Guide
FUNCTIONS OPERATIONS
Sending
an SOS
Press and hold the SOS Button for a minimum of 4 seconds. The Signal
light will be green while the unit reports the emergency to the control
panel and to the speed dial numbers that you set.
Location
Request—
from a phone
Mobile phone numbers that have been preset and stored in Speed
Dial Buttons 1 and 2 can call and request location information from
the unit. The Gemini recognizes these numbers and automatically
hangs up after one ring. The location of the Gemini will then be sent
to the phone that requested the location.
Activating
Geofence
Press “G” Button for 4 seconds, the unit will beep once and report to
the control center and automatically activate the Geofence function.
You can also set and define Geofence boundaries by logging on to
your account at www.geminitracking.com.
Deactivating
Geofence
Press “G” Button for 4 seconds, the unit beeps twice and deactivates
the Geofence. You can also deactivate the Geofence by logging on to
your account at www.geminitracking.com.
Answering
Call
Any phone can be used to call the unit, and the unit will notify the user
with music ring. To answer the call, simply press the “Answer” Button.
Ending Call User can end the call by pressing the “Hang-up” Button.
Calling out Users can call any preset number (1, 2, 3) by simply pressing the
appropriate Speed Dial Button.
Volume
Control
Press “Volume/Test” Button to adjust sound level during a phone call.
(Volume adjustment sequence: Medium → High → Low)
GSM/GPS Test Press “Volume/Test” Button to test for GSM (cellular) and GPS
reception while in normal standby mode. Green light stays on for 4
seconds if GSM (cellular) signal is OK (no green light if no GSM signal)
Blue light stays on for 4 seconds if GPS signal is OK (if no GPS signal.
then signal light blinks blue for 20 seconds).
Hands-free Earphone is included for user to answer the phone hands-free.
Worldwide
monitoring
and tracking
With the European GSM communication module, to use worldwide
without distance restrictions
Low battery Signal light is red and says on. A message is sent to the control panel
that the unit needs to be charged.
Charging Signal light is orange and stays on when the unit is charging while in
the “Off” position, and goes out if the unit is fully charged.
Car/Home
charger
Using DC 12V charger (for car) and AC 110V–240V charger (for home)
to charge the unit.
User Manual.indd 14 2/2/06 10:27:54 AM
15
Specifications
ITEM SPECIFICATION
Dimension L:73mm
W:45mm
H:20mm
Weight 170 g ± 5 g
Frequencies 900/1800/1900MHz
850/1800/1900MHz
Storage temperature Between –10°C and + 55°C
Battery capacity 850 mA
Power consumption Standby mode: <45mA,
GSM Operating: < 250mA
User Manual.indd 15 2/2/06 10:27:55 AM

16
Helpful Hints
• For faster charging, turn your unit Off while charging or remove the battery
and charge it directly using your desktop charger. (Note: Unit will not operate
while in Off position or with the battery removed.)
• Signal light will always be red when the unit is in the On position while
charging, even when the battery is fully charged.
• Signal light sequence when unit is turned On:
• Signal light stays solid blue for approximately 2 minutes while searching
for a GPS signal
• Signal light blinks blue to indicate a valid GPS signal has been received
• Signal light blinks green 4 times to indicate a valid GSM (cellular) signal
• Signal light blinks blue/green alternately to indicate normal standby
mode, ready to use
• Unit is always searching for GPS signal, even in normal standby mode.
• To test for GPS and/or GSM (cellular) signals while in normal standby mode,
press the “Test” Button.
• Blue light stays on for 4 seconds if GPS signal is OK (If no GPS signal,
then signal light blinks blue for 20 seconds).
• Green light stays on for 3 seconds if GSM (cellular) signal is OK (No
green light if no GSM signal).
• Geofence and SOS Buttons must be held for at least 4 seconds, other buttons
press for 2 seconds.
User Manual.indd 16 2/2/06 10:27:55 AM
17
Troubleshooting
PROBLEM SOLUTIONS
Buttons not working Make sure battery is properly inserted.
Make sure the unit is charged.
Unable to find GPS signal Make sure unit is in an unobstructed area. For best
results turn unit Off, go outside, and turn unit On.
Unable to find GSM signal Make sure cellular service is available where you are
located.
Speed Dial 1 & 2 not work-
ing (Speed Dial 3 is reserved for
Gemini Customer Service)
Make sure you have properly set and stored valid
and working phone numbers. Login to your Gemini
account online at www.geminitracking.com to
confirm.
SOS Button not working Make sure unit is charged.
Make sure contacts have been set to receive alert.
Login to your online account to confirm.
Incoming calls hard to hear Press “Volume/Test” Button to adjust sound level
during the phone call. (Volume adjustment
sequence: Medium → High → Low)
For any issues not listed here, please login to your account at
www.geminitracking.com and refer to the online Help.
User Manual.indd 17 2/2/06 10:27:55 AM

18
Limited Warranty
Gemini warrants to the original purchaser only that the Product will be free from defects
in material and workmanship for a period of one (1) year from the date of original
purchase. Gemini’s warranty shall not apply to any Product: (i) subjected to accident,
misuse, neglect, alteration, acts of God, improper handling, improper transport, improper
storage, improper use or application, or unauthorized repair; (ii) with cosmetic problems
or defects that result from normal wear and tear under ordinary use, and do not affect
the performance or use of the Product; (iii) subjected to contact with liquid, water, rain,
extreme humidity, etc; (iv) subject to defects or damage that results from the use of
non-Gemini branded or certified products, accessories or other peripheral equipment;
or (v) subject to damage resulting from testing, adjustments, installation, maintenance,
alteration or modification in any way by someone other than Gemini or its authorized
service centers. e warranty scope is limited to the Product; accessories are considered
consumable material and are beyond the scope of this warranty. Gemini’s warranty applies
only to a Product that is manufactured by or for Gemini and identified by the Gemini
trademark, trade name or product identification logo affixed to the Product. If the Product
develops a covered defect within the one-year period, Gemini will, at its option, either
repair or replace the Product without charge to you, provided that the Product is returned
during the warranty period. If the Product is returned during the limited warranty period,
but the problem with the Product is not covered under the terms and conditions of this
limited warranty, you will be notified and given an estimate of the charges you must pay
to have the Product repaired, with all shipping charges billed to you. If the estimate is
refused, the Product will be returned via UPS ground and you will be assessed a $10 fee
for shipping. If the Product is returned aer the expiration of the limited warranty period,
Gemini’s normal service policies shall apply and you will be responsible for all shipping
charges. THE FOREGOING ARE YOUR EXCLUSIVE WARRANTIES RELATING TO
THE PRODUCT AND GEMINI HEREBY DISCLAIMS ALL IMPLIED WARRANTIES,
INCLUDING THE IMPLIED WARRANTIES OF MERCHANTIBILITY AND FITNESS
FOR A PARTICULAR PURPOSE.
Because it is impossible for Gemini to know the purposes for which you acquired this
Product or the uses to which you will put this Product, you assume full responsibility
for the selection of the Product for its use. While every reasonable effort has been made
to insure that you will receive a Product that you can use, Gemini does not warrant that
the functions of the Product will meet your requirements or that the operation of the
Product will be uninterrupted or error-free. e Gemini service works using cellular
or other wireless phone networks as well as the Global Positioning System (“GPS”)
satellite network. ese services are provided by third party providers, therefore, Gemini
cannot make warranties, express or implied, regarding the accuracy or quality of the
service(s). THE SERVICES ARE NOT AVAILABLE EVERYWHERE, PARTICULARLY
IN REMOTE AREAS, OR AT ALL TIMES AND MAY BE AFFECTED ADVERSELY BY
CONDITIONS BEYOND OUR CONTROL.
is warranty lasts one (1) year from the date of original purchase. To obtain warranty
service or technical support, please contact Gemini’s Customer Support Center. You
will receive instructions on how to return the Product for repair or replacement. You
will bear the cost of shipping the unit to Gemini for warranty repairs and for shipping
User Manual.indd 18 2/2/06 10:27:56 AM

19
the unit back to you upon completion of repairs. We may use functionally equivalent
reconditioned/refurbished/pre-owned or new products or parts. To take advantage of this
Limited Warranty you will be required to either 1) return the below warranty registration
card within 30 days of purchase or 2) supply the original packing slip or dated bill of
sale (invoice) when you return the product for warranty repairs. If you do not return the
registration card within 30 days of purchase or supply the original packing slip or dated
bill of sale when you send in your unit for service, Gemini’s normal repair service policies
shall apply and you will be responsible for all shipping charges.
THESE ARE YOUR SOLE AND EXCLUSIVE REMEDIES FOR ANY AND ALL CLAIMS
THAT YOU MAY HAVE ARISING OUT OF OR IN CONNECTION WITH THIS
PRODUCT, WHETHER MADE OR SUFFERED BY YOU OR ANOTHER PERSON
AND WHETHER BASED IN CONTRACT OR TORT. IN NO EVENT WILL GEMINI
BE LIABLE TO YOU OR ANY OTHER PARTY FOR ANY DIRECT, INDIRECT,
GENERAL, SPECIAL, INCIDENTAL, CONSEQUENTIAL, EXEMPLARY OR OTHER
DAMAGES ARISING OUT OF THE USE OR INABILITY TO USE THE PRODUCT
(INCLUDING, WITHOUT LIMITATION, DAMAGES FOR LOSS OF BUSINESS
PROFITS, BUSINESS INTERRUPTION, LOSS OF INFORMATION OR ANY OTHER
PECUNIARY LOSS), OR FROM ANY BREACH OF WARRANTY, EVEN IF GEMINI
HAS BEEN ADVISED OF THE POSSIBILITY OF SUCH DAMAGES. IN NO CASE
SHALL GEMINI’S LIABILITY EXCEED THE AMOUNT YOU PAID FOR THE
PRODUCT.
Some states do not allow limitations on how long an implied warranty lasts, so the above
limitations may not apply to you. Some states do not allow the exclusion or limitation of
incidental or consequential damages, so the above exclusions may not apply to you. is
warranty gives you specific legal rights, and you may also have other rights, which vary
from state to state.
User Manual.indd 19 2/2/06 10:27:56 AM

20 All rights reserved. Unauthorized duplication of this manual is prohibited.
User Manual.indd 20 2/2/06 10:27:57 AM
