GemTek Technology NECNP04LM1 Wireless LAN Unit User Manual
Gemtek Technology Co., Ltd. Wireless LAN Unit
UserManual.wiki
>
GemTek Technology
>
NECNP04LM1 User Manual
User manual
Navigation menu
Upload a User Manual
Namespaces
Wiki Guide
HTML
PDF
Info
Views
User Manual
Discussion / Help
Navigation

![English-3CE statement Europe – EU Declaration of Conformity This device complies with the essential requirements of the R&TTE Directive 1999/5/EC. The following test methods have been applied in order to prove presumption of conformity with the essential requirements of the R&TTE Directive 1999/5/EC: - EN 60950-1:2006+A11:2009+A1:2010+A12:2011 - EN62311 : 2008 - EN 300 328 V1.8.1: 2012 - EN 301 893 V1.7.1: 2012 - EN 301 489-1 V1.9.2: 2011 - EN 301 489-17 V2.2.1: 2012 In Italy the end-user should apply for a license at the national spectrum authorities in order to obtain authorization to use the device for setting up outdoor radio links and/or for supplying public access to telecommunications and/or network services. Česky[Czech]NECDisplaySolutions,Ltd.tímtoprohlašuje,žetentoWirelessDisplayMediaPlayer(Model:SB-06WC)jeveshoděsezákladnímipožadavkyadalšímipříslušnýmiustanovenímisměrnice1999/5/ES.Dansk[Danish]UndertegnedeNECDisplaySolutions,Ltd.erklærerherved,atfølgendeudstyrWirelessDisplayMediaPlayer(Model:SB-06WC)overholderdevæsentligekravogøvrigerelevantekravidirektiv1999/5/EF.Deutsch[German]HiermiterklärtNECDisplaySolutions,Ltd.,dasssichdasGerätWirelessDisplayMediaPlayer(Model:SB-06WC)inÜbereinstimmungmitdengrundlegendenAnforderungenunddenübrigeneinschlägigenBestimmungenderRichtlinie1999/5/EGbendet.Eesti[Estonian]KäesolevagakinnitabNECDisplaySolutions,Ltd.seadmeWirelessDisplayMediaPlayer(Model:SB-06WC)vastavustdirektiivi1999/5/EÜpõhinõuetelejanimetatuddirektiivisttulenevateleteisteleasjakohastelesätetele.English Hereby,NECDisplaySolutions,Ltd.,declaresthatthisWirelessDisplayMediaPlayer(Model:SB-06WC)isincompliancewiththeessentialrequirementsandotherrelevantprovisionsofDirective1999/5/EC.Español[Spanish]PormediodelapresenteNECDisplaySolutions,Ltd.declaraqueelWirelessDisplayMediaPlayer(Model:SB-06WC)cumpleconlosrequisitosesencialesycualesquieraotrasdisposicionesaplicablesoexigiblesdelaDirectiva1999/5/CE.Ελληνική[Greek]ΜΕΤΗΝΠΑΡΟΥΣΑNECDisplaySolutions,Ltd.ΔΗΛΩΝΕΙΟΤΙWirelessDisplayMediaPlayer(Model:SB-06WC)ΣΥΜΜΟΡΦΩΝΕΤΑΙΠΡΟΣΤΙΣΟΥΣΙΩΔΕΙΣΑΠΑΙΤΗΣΕΙΣΚΑΙΤΙΣΛΟΙΠΕΣΣΧΕΤΙΚΕΣΔΙΑΤΑΞΕΙΣΤΗΣΟΔΗΓΙΑΣ1999/5/ΕΚ.Français[French]ParlaprésenteNECDisplaySolutions,Ltd.déclarequel'appareilWirelessDisplayMediaPlayer(Model:SB-06WC)estconformeauxexigencesessentiellesetauxautresdispositionspertinentesdeladirective1999/5/CE.Italiano[Italian]ConlapresenteNECDisplaySolutions,Ltd.dichiarachequestoWirelessDisplayMediaPlayer(Model:SB-06WC)èconformeairequisitiessenzialiedallealtredisposizionipertinentistabilitedalladirettiva1999/5/CE.Latviski[Latvian]AršoNECDisplaySolutions,Ltd.deklarē,kaWirelessDisplayMediaPlayer(Model:SB-06WC)atbilstDirektīvas1999/5/EKbūtiskajāmprasībāmuncitiemartosaistītajiemnoteikumiem.Lietuvių[Lithuanian]ŠiuoNECDisplaySolutions,Ltd.deklaruoja,kadšisWirelessDisplayMediaPlayer(Model:SB-06WC)atitinkaesminiusreikalavimusirkitas1999/5/EBDirektyvosnuostatas.](https://usermanual.wiki/GemTek-Technology/NECNP04LM1/User-Guide-2231517-Page-5.png)
![English-4Nederlands[Dutch]HierbijverklaartNECDisplaySolutions,Ltd.dathettoestelWirelessDisplayMediaPlayer(Model:SB-06WC)inovereenstemmingismetdeessentiëleeisenendeandererelevantebepalingenvanrichtlijn1999/5/EG.Malti[Maltese]Hawnhekk,NECDisplaySolutions,Ltd.,jiddikjaralidanWirelessDisplayMediaPlayer(Model:SB-06WC)jikkonformamal-ħtiġijietessenzjaliumaprovvedimentioħrajnrelevantilihemmd-Dirrettiva1999/5/EC.Magyar[Hungarian]Alulírott,NECDisplaySolutions,Ltd.nyilatkozom,hogyaWirelessDisplayMediaPlayer(Model:SB-06WC)megfelelavonatkozóalapvetõkövetelményeknekésaz1999/5/ECirányelvegyébelõírásainak.Polski[Polish]NiniejszymNECDisplaySolutions,Ltd.oświadcza,żeWirelessDisplayMediaPlayer(Model:SB-06WC)jestzgodnyzzasadniczymiwymogamiorazpozostałymistosownymipostanowieniamiDyrektywy1999/5/EC.Português[Portuguese]NECDisplaySolutions,Ltd.declaraqueesteWirelessDisplayMediaPlayer(Model:SB-06WC)estáconformecomosrequisitosessenciaiseoutrasdisposiçõesdaDirectiva1999/5/CE.Slovensko[Slovenian] NECDisplaySolutions,Ltd.izjavlja,dajetaWirelessDisplayMediaPlayer(Model:SB-06WC)vskladuzbistvenimizahtevamiinostalimirelevantnimidoločilidirektive1999/5/ES.Slovensky[Slovak] NECDisplaySolutions,Ltd.týmtovyhlasuje,žeWirelessDisplayMediaPlayer(Model:SB-06WC)spĺňazákladnépožiadavkyavšetkypríslušnéustanoveniaSmernice1999/5/ES.Suomi[Finnish]NECDisplaySolutions,Ltd.vakuuttaatätenettäWirelessDisplayMediaPlayer(Model:SB-06WC)tyyppinenlaiteondirektiivin1999/5/EYoleellistenvaatimustenjasitäkoskeviendirektiivinmuidenehtojenmukainen.](https://usermanual.wiki/GemTek-Technology/NECNP04LM1/User-Guide-2231517-Page-6.png)

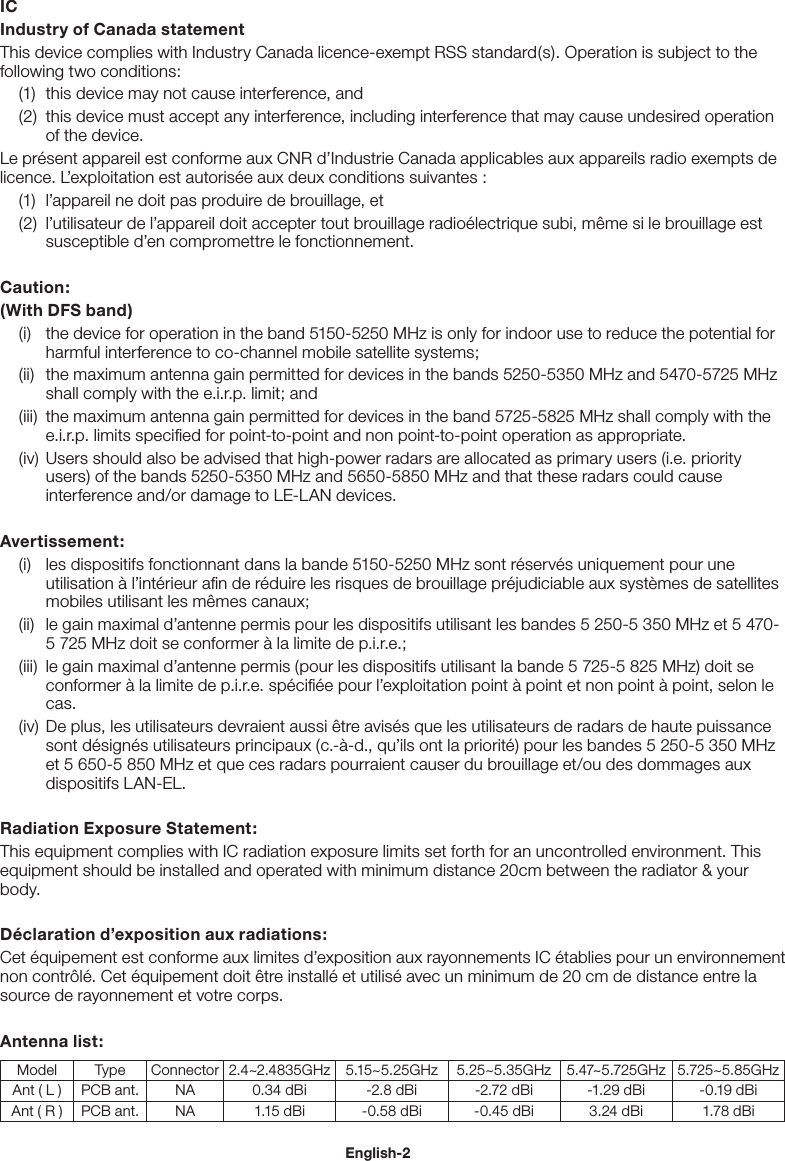
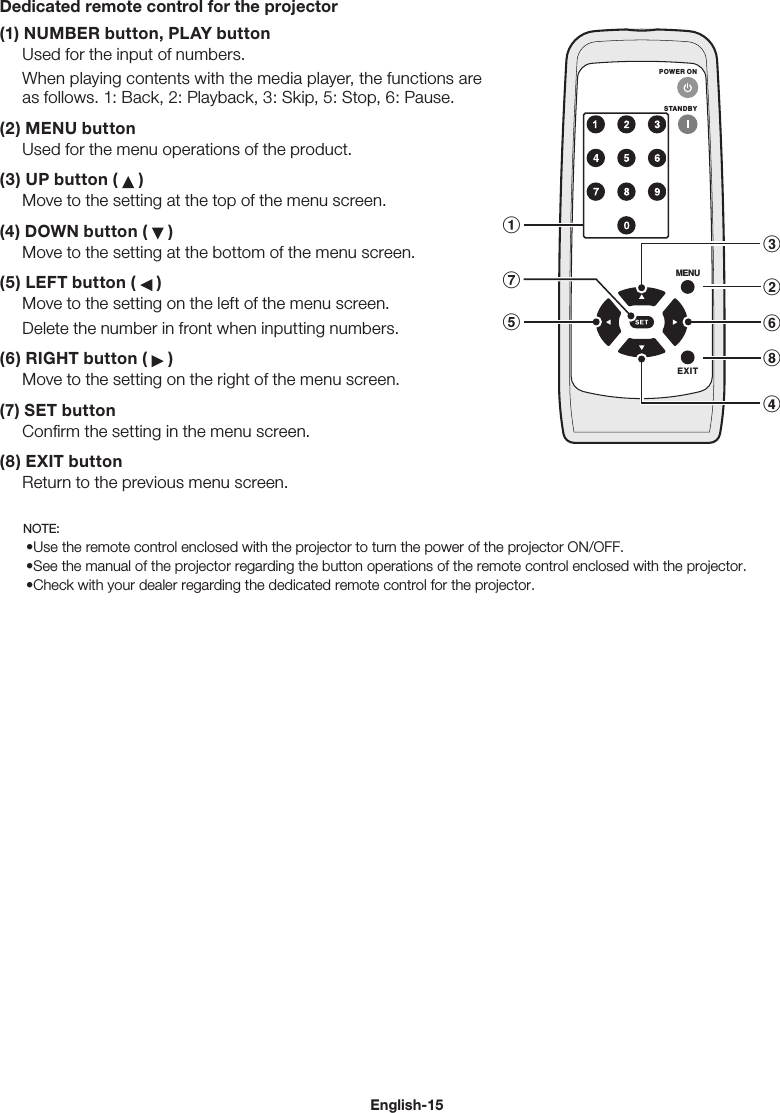
![English-14Basic Operation Preparations For displays •Remote control enclosed with the display For projectors •Remote control enclosed with the projector •Dedicated remote control for operating the product Display remote control 1 POWER ON button Turn on the power of the display. 2 STANDBY button Turn off the power of the display. 3 SWITCH INPUT button (OPTION) Switch the video input of the display to the product. 4 SWITCH AUDIO INPUT button (AUDIO INPUT) Switch the audio input of the display. Select [OPTION] when outputting the audio of the product. 5 OPTION MENU button Used for the menu operations of the product. 6 NUMBER button, PLAY button U s e d f o r t h e i n p u t o f n u m b e r s . W h e n p l a y i n g c o n t e n t s w i t h t h e m e d i a p l a y e r , t h e f u n c t i o n s a r e a s f o l l o w s . 1: Back, 2: Playback, 3: Skip, 5: Stop, 6: Pause. 7 MENU button Turn the display OSD screen ON/OFF. 8 UP button ( ) Move to the setting at the top of the menu screen. 9 DOWN button ( ) Move to the setting at the bottom of the menu screen. 0 MINUS button ( - ) Move to the setting on the left of the menu screen. Delete the number in front when inputting numbers. ! PLUS button ( + ) Move to the setting on the right of the menu screen. @ SET button Confirm the setting in the menu screen. # EXIT button Return to the previous menu screen. NOTE: • The remote control enclosed with the display differs depending on the model. Use the OPTION button for menu operations of the product if there is no OPTION MENU button. • See the manual of the display for button operations other than the above.](https://usermanual.wiki/GemTek-Technology/NECNP04LM1/User-Guide-2231517-Page-16.png)
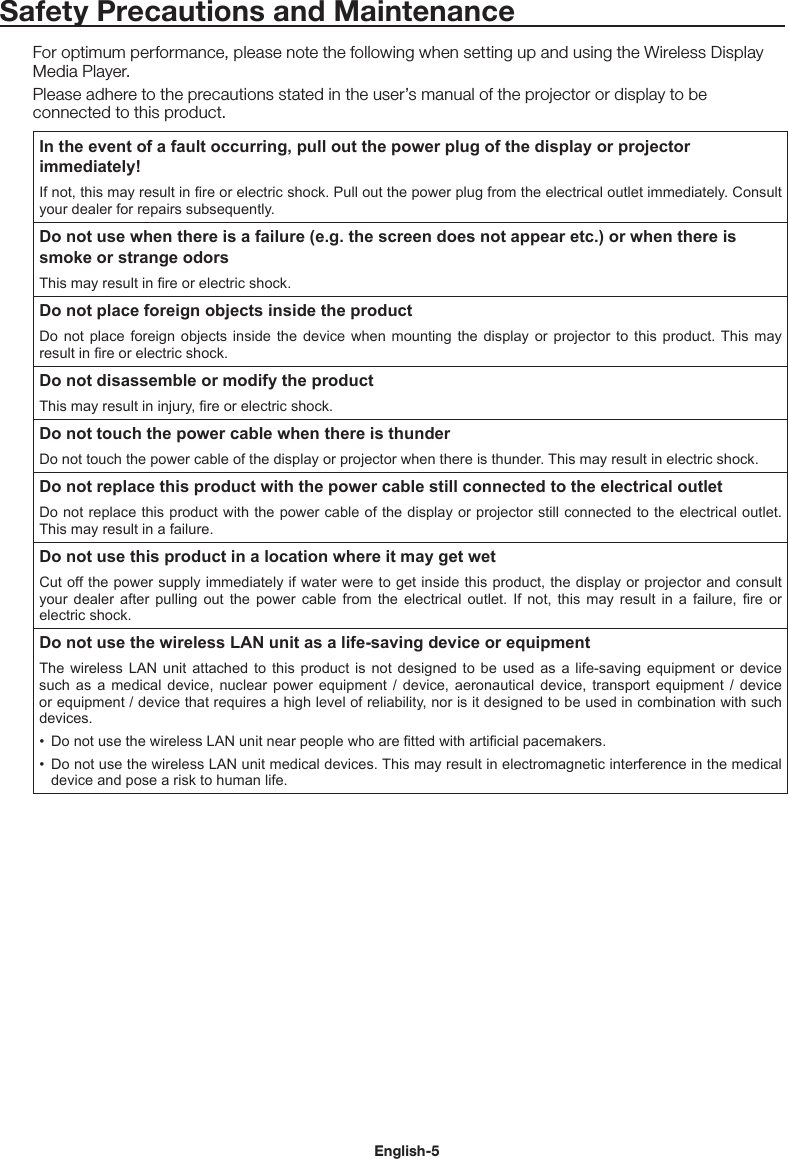
![English-16Operations and settings of the display and projector For displays (1) Connect the power cable to the display first before connecting to the electrical outlet. (2) Turn on the main power of the display. (3) The video input of the display changes to the product upon pressing the OPTION button on the remote control of the display. (4) The audio input changes upon pressing the AUDIO INPUT button on the remote control of the display. Set the input to “OPTION” to select the audio of the product. (5) Use the display OSD function to set the “AUDIO” setting under “OPTION SETTING” to [DIGITAL]. For projectors (1) Connect the power cable to the projector first before connecting to the electrical outlet. (2) Turn on the main power of the projector. (3) The video input of the projector changes to the product upon pressing the SLOT button on the remote control of the projector. NOTE: • Depending on the model, the projector may not support the audio output of the product. Please check with your dealer for details. Product Operations Use the remote control enclosed with the display to operate the product when using a display. Use the dedicated remote control for the projector to operate the product when using a projector. Selection of Functions The “Home” Screen is displayed during startup in initial state. Select the function using the -/+ buttons on the remote control and press the SET button to move to the execution screen of each function. Press the OPTION MENU button* on the remote control to return to the previous screen. * : The remote control of the display differs depending on the model. Use the OPTION button if there is no OPTION MENU button on the remote control. * : Use the MENU button when using a dedicated remote control for the projector. Setting the display language The display language in the initial state is “English”. Change the display language where necessary. (1) Select [Settings] in the home screen and press the SET button on the remote control. (2) Select [General] and press the SET button when the Settings menu appears. (3) Select [Language] and press the SET button to display a list of the display languages, and use the / buttons to select the desired display language before pressing the SET button. (4) Select [Done] and press the SET button to switch the display language. Screen Saver • The screen saver screen will appear if there are no operations on the home screen or Intel® WiDi standby screen for 30 or more seconds. Press the EXIT button to return to the previous screen from the screen saver screen.](https://usermanual.wiki/GemTek-Technology/NECNP04LM1/User-Guide-2231517-Page-18.png)
![English-17Function Controls 1. Wireless Display Video from a notebook computer that supports Intel® Wireless Display (hereinafter “Intel® WiDi”) can be received and displayed on a display or projected with a projector. Computer that supports Intel ® Wireless DisplayProjector or display which is connected to this product NOTE: • Refer to the user’s manual of the computer and the Intel website for details on the use and update of the Intel® WiDi software. Connection Method Explains the operations using Windows 7, Windows 8. (1) Select [Intel® WiDi] from the home screen and press the SET button. (2) The right screen is displayed when the upon completing the connection preparation of the product.](https://usermanual.wiki/GemTek-Technology/NECNP04LM1/User-Guide-2231517-Page-19.png)
![English-18(3) Start up the Intel® WiDi software with the computer. (4) Operate the Intel® WiDi software to select “SB06WC” (name of the product when shipped from the factory) and then click [Connect]. NOTE: • For Windows 8.1, open the Charm bar and click “SB06WC” after selecting [Device] followed by [Project]. • Depending on the operating environment, the product “SB06WC” may not be detected. In that case, click [Scan (S)] to scan again. (5) When connecting the product to a computer for the first time, the security code will be displayed in the standby screen on the display end. Enter this security code in the Intel® WiDi software and click [Continue]. (6) At the end of the connection processing, the display screen of the computer will appear in the display. (7) Click [Disconnect] in the Intel® WiDi software to stop the connection with the Intel® WiDi software. How to adjust the size of the computer image displayed in the display/projector When black edges appear around the screen without the computer display screen appearing correctly in the screen of the display/projector, the size of the image can be adjusted using the following method. (1) Select [Settings]-[Image and Sound (P)] in the Intel® WiDi software. (2) Click [Adjust cropping] in the [Settings - Picture and Sound] screen. (3) Click the [+]/[-] icons in the [Setting - Adjust Edge Display] screen to adjust the image size.](https://usermanual.wiki/GemTek-Technology/NECNP04LM1/User-Guide-2231517-Page-20.png)
![English-212-4. Settings (1) Configure the respective settings for the auto play mode and manual play mode. How to display the setting menu of each play mode [In the case of auto play mode] (1) Select [Settings] - [Applications] - [Media Player] from the home screen. (2) The setting screen for the auto play mode is displayed. [In the case of manual play mode] (1) Select [Media Player] from the home screen. (2) Select [Manual Play Mode Settings] at the bottom left of the drive selection screen. (3) The setting screen for the manual play mode is displayed. (2) Configure the following settings where necessary when the setting screen appears. Refer to “3-3-2.Media Player Settings” for details of the settings. • Display time • Type of image transition • Image transition time • Contents aspect • Audio selection 2-5. Selection, playback of contents (1) Select “Media Player” in the home screen. (2) Select one media when the media selection screen appears. NOTE: • The icons of unconnected media will be shaded in grey. (3) Select one folder. NOTE: • Only those folders in the root directory are displayed.](https://usermanual.wiki/GemTek-Technology/NECNP04LM1/User-Guide-2231517-Page-23.png)
![English-22(4) Select the video and still image files to be displayed. (1) Use the / /-/+ buttons to align the focus on the file you want to select and press the SET button to select the file. Press the SET button again to cancel the selection. NOTE: • Upon being selected, a check mark will appear on that thumbnail. • For video files, a movie mark will appear on that icon. • The maximum number of files that can be displayed on the file selection screen at any one time is 15. When saving more files than this, the excess files will be shown in a different display screen. If “<” and “>” appears on the left and right of the screen, it means that there are multiple file selections screens. The file selection screen is changed using the -/+ buttons. • Playback of files is carried out in the code order of the filename. When files with the same filename but different file formats exist, playback will be in the code order of the file format name. (2) Press and hold the button in the contents selection screen to move the focus to the lower column. Press the button to return to the selection of contents. (3) Select the actions displayed in the lower column of the screen and press the SET button to perform the following actions. •[Select All]: Select all the video and still image contents. •[Cancel All]: Cancel all the video and still image contents. •[Next]: Move to the audio file selection screen. If there are no audio files saved, [Next] will appear in grey. •[Play]: Start the playback of contents. NOTE: • The selected contents will be saved in the various media at the stage when “Play” is executed. If the contents selection screen is changed before “Play” is executed, the selected contents will be cleared. (5) Select the audio files. (1) Use the / /-/+ buttons to align the focus on the file you want to select and press the SET button to select the file. Press the SET button again to cancel the selection. NOTE: • Upon being selected, a check mark will appear on that thumbnail. • The file format (MP3 or WAV) will be displayed on the thumbnail of the file. • The maximum number of files that can be displayed on the file selection screen at any one time is 15. When saving more files than this, the excess files will be shown in a different display screen. If “<” and “>” appears on the left and right of the screen, it means that there are multiple file selections screens. The file selection screen is changed using the -/+ buttons. • Playback of files is carried out in the code order of the filename. When files with the same filename but different file formats exist, playback will be in the code order of the file format name. (2) Press and hold the button in the contents selection screen to move the focus to the lower column. Press the button to return to the selection of contents. (3) Select the actions displayed in the lower column of the screen and press the SET button to perform the following actions. •[Select All]: Select all the audio contents. •[Cancel All]: Cancel all the audio contents. •[Play]: Start the playback of contents. NOTE: • The selected contents will be saved in the various media at the stage when “Play” is executed. If the contents selection screen is changed before playback is started, the selected contents will be cleared.](https://usermanual.wiki/GemTek-Technology/NECNP04LM1/User-Guide-2231517-Page-24.png)
![English-23(6) Playback of contents • Select [Play] in the video, still image or audio selection screen to start the playback. • Press the remote control buttons to perform the following actions during playback. 2 / (Play) : Start the playback of contents from the pause state. 5 / (Stop) : Stop the playback of contents and return to the menu screen. 6 / I I (Pause) : Stop playback and continue showing the displayed contents. 3 / I (Skip) : Play the next contents. 1 / I (Back) : Play the previous still image when playing still images. Start playback from the beginning when playing video and audio contents. Play the previous contents if pressed within 1 sec from the start of playback of the contents. OPTION MENU : Stop the playback and return to the home screen. EXIT : Stop the playback of contents and return to the menu screen. • Use the operation buttons to display the order of the video and still image files currently being played and the total number of selected files at the bottom left of the screen. Example) When 12/25 is displayed, it means that: •The total number of selected video and still image files is 25; •The order of the video or still image file currently being played is 12.](https://usermanual.wiki/GemTek-Technology/NECNP04LM1/User-Guide-2231517-Page-25.png)
![English-243. Settings 3-1. Overview Display product information, configure various settings, format the media and so on. Select [Settings] in the home screen to display the main screen of the setting menu. Password Setting • The setting menu can be protected by a password. Upon setting a password, a password entry screen will appear for you to enter the password when the setting menu is selected. Please remember your password as entry to the setting menu will be denied if the password is wrong. • No password is set at the initial state. • Set the password under [Settings] - [System] - [Security] - [Password for Setting Menu]. How to change settings (1) Select the setting with the / buttons on the remote control and press the SET button to display the setting. (2) After selecting the setting, press the SET button again to change the setting. (3) Press the SET button after selecting [Done] at the bottom right of the screen to save the setting. NOTE: • If the OPTION MENU button or EXIT button is pressed and the screen changes before the setting is confirmed, the changes in the setting will be cleared.How to operating the software keyboard A software keyboard will be displayed when entering the adapter name in the Intel® WiDi settings. There are 3 software keyboard screens. Follow the instructions below to enter the changes. (1) Use the / /-/+ buttons on the remote control to align the focus on the characters you wish to enter and press the SET button to display that character in the input area of the setting menu. (2) Select [enter] and press the SET button to confirm the input. The meaning of keys other than English characters and symbols are as follows. •ABC: Change to the input screen for capital letters. •abc: Change to the input screen for small letters. •?123: Change to the input screen for numbers and symbols. •enter: Confirm the entered information and close the software keyboard. •: Delete the last character entered.](https://usermanual.wiki/GemTek-Technology/NECNP04LM1/User-Guide-2231517-Page-26.png)
![English-253-2. About Displays the information of the SD memory card and USB memory connected to the product. Select [Information] from the main screen of the setting menu. Item DisplaysModel Product name “SB-06WC”Serial Number. Serial no. of this productFirmware version Firmware version of this productSD card Spare and usable capacity of the SD memory card connected to the SD memory card slot of the productUSB flash drive 1 Spare and usable capacity of the USB memory connected to the USB Port 1 of the productUSB flash drive 2 Spare and usable capacity of the USB memory connected to the USB Port 2 of the product 3-3. Application 3-3-1. Intel® WiDi Settings Perform the Intel® WiDi settings. Select [Application]–[Intel® WiDi] from the main screen of the setting menu for the setting screen. Item SettingSecurity code prompt Control the storage and use of persistent WFD groups. Default is “First time pairing only”. 1) First time pairing only : Enter PIN code for first time pairing only. 2) Always : Enter PIN code for all pairings.Adapter name The adapter name of the product can be specified. The adapter name is entered using the software keyboard. Only alphabet letters and numbers can be used for the adapter name. Hyphens “-” cannot be used. Default is “SB06WC”.Adapter name access Enable and disable whether the Device Name setting can be changed by the end user. [Setting] 1) Permitted : Permit changes to be made from the Intel® WiDi software. 2) Prohibited : Prohibit changes to be made from the Intel® WiDi software.](https://usermanual.wiki/GemTek-Technology/NECNP04LM1/User-Guide-2231517-Page-27.png)
![English-26Lower bandwidth mode limit the bandwidth used for WiDi. Default is “Disabled”. [Setting] 1) Disabled : Set the mode to the low bandwidth mode. 2) Enabled : Do not set the mode to the low bandwidth mode.GO channel list Set the Wi-Fi operating channels that the WiDi Enterprise Class Sink will use when it is a P2P group owner. [Setting] "1"/"2"/"3"/"4"/"5"/"6"/"7"/"8"/"9"/"10"/"11"/"36"/"40"/"44"/"48"GO SSID suffix Set a suffix to be used in the creation of the P2P group SSID. [Setting] 1*4(vchar)GO intent (0-15) Set the intent of the device with respect to being the group owner when establishing a P2P group. Default is “0”. [Setting] "0"/"1"/"2"/"3"/"4"/"5"/"6"/"7"/"8"/"9"/"10"/"11"/"12"/"13"/"14"/"15"UoIP get and set whether the UoIP protocol is permitted. Default is “Prohibited”. [Setting] 1) Permitted : Permit UoIP 2) Prohibited : Prohibit UoIPUoIP bandwidth limit (100-10000)Set the bandwidth limit for UoIP data traffic. Default is “1000Kbit”. [Setting] 100~10000 [Kbit]Wi-Fi bands Set the frequency bands over which WiDi sessions will be supported. The setting allows all bands, 2.4 GHz only, or 5 GHz only. Default is “ALL”. [Setting] 1) ALL : Use both 2.4GHz/and 5GHz 2) 2.4GHz : Use only 2.4GHz 3) 5GHz : Use only 5GHzGroup owner Set the P2P group owner policy. Default is “Negotiate P2P GO”. [Setting] 1) Negotiate P2P GO 2) Autonomously acts as GO](https://usermanual.wiki/GemTek-Technology/NECNP04LM1/User-Guide-2231517-Page-28.png)
![English-273-3-2. Media Player settings Configure the settings for the play mode and auto play mode of the media player. Select [Application]–[Media Player] from the main screen of the setting menu for the setting screen. Item SettingsMedia Player mode Sets the playback mode of the media player. [Settings] 1) Manual (manual play mode) Start manual playback after selecting the contents. 2) Auto: SD card (auto play mode) If [Media Player] is selected in the home screen, the contents inside the Contents folder of the SD memory card will be played automatically. If [Media Player] is selected in the startup mode settings, the contents inside the Contents folder of the SD memory card will be played automatically when the display is powered up. 3) Auto: USB memory (auto play mode) If [Media Player] is selected in the home screen, the contents inside the Contents folder of the USB memory will be played automatically. If [Media Player] is selected in the startup mode settings, the contents inside the Contents folder of the USB memory will be played automatically when the display is powered up. NOTE: • Select [Media Player] in the home screen to automatically play the contents in the auto play mode. Select “Manual” in this setting to display the contents selection screen of the media player. • In the auto mode, playback will not be carried out if there are no contents in the Contents folder of the SD memory card or USB memory.SD Contents updateIf a SD memory card is inserted, the files saved in the USB memory will be automatically copied to the SD memory card. The files will be copied when the USB memory is inserted, or when the media player function is selected with the USB memory inserted. The contents copied vary depending on the playback mode. •In the auto play mode, only the files in the Contents folder are copied. •In the manual play mode, all the folders and files in the folders are copied. [Settings] 1) On: Enable the function. 2) Off: Disable the function. NOTE: • When there are two USB memories connected, the files in the USB memory connected to USB Port 1 are copied. • Create the “Contents” folder in the root directory. • All files will be overwritten. • In the auto play mode, a “Contents_bak” folder will be automatically created in the SD memory card to provide a backup copy of the contents in the original “Contents” folder. The capacity of the SD memory card that can be used is limited because of this backup. • The time required for copying is about 15 minutes per gigabyte.](https://usermanual.wiki/GemTek-Technology/NECNP04LM1/User-Guide-2231517-Page-29.png)
![English-28Item SettingsDisplay Time Set the time for displaying still images. Use the number keys on the remote control to enter the time. [Settings] Selection range: 10-999 sec Setting unit: 1 sec [Setting Method] (1) Press the SET button after selecting this setting. (2) Press the - (minus) button to clear the current setting time. (3) Use the number buttons to enter the display time and then press the SET button.Transition type Specify the transition type.[Settings] <Transition Image>1) Fade-in(Transition time)Image 2 Image 3Image 12) Fade-out(Transition time)Image 2 Image 3Image 13) Cross-fade(Transition time)Image 2 Image 3Image 14) None Image 2 Image 3Image 1(Transition time) NOTE: • Only one type of image transition can be specified. • When cross-fade is selected, the switchover between videos will be fade-out followed by fade-in. Cross-fadeVideo 2 Still imageVideo 1Fade-inFade-out (Transition time)• This setting does not support audio.Transition Time Set the time for the fade-in, fade-out and cross-fade. Use the number keys on the remote control to enter the time. [Settings] Setting range: 1-5 sec Setting unit: 1 sec [Setting Method] (1) Press the SET button after selecting this setting. (2) Press the - (minus) button to clear the current setting time. (3) Use the number buttons to enter the image transition time and then press the SET button.](https://usermanual.wiki/GemTek-Technology/NECNP04LM1/User-Guide-2231517-Page-30.png)
![English-29Item SettingsContent Aspect Set the display method for videos and still images. [Settings] 1) Full: Change the aspect ratio of the image to occupy the entire screen of the display. 2) Normal: Maintain the aspect ratio of the image. NOTE: • Please note that there is a risk of infringing upon the rights of copyrights holders that are protected under the Copyrights Act when screen compression or expansion is carried out through changes in the aspect ratio in commercial establishments or public viewing locations like cafes and hotels etc. • When set to “Normal”, some parts on the left and right or up and down of the screen may appear blank depending on the aspect ratio of the contents. (Display Example) Original image Full NormalAudio selection Play either the audio of an audio file or the audio of a video file. Set which audio to playback. [Settings] 1) Video: Play the audio of the video. Audio files will not be played even if they are selected. 2) Audio: Play the audio of the audio file. The audio in the video will not be played even if the video contains audio.Non-supported File Display If the selected folder contains files with formats that are supported by the product, you can set whether to display the names of those files in the contents selection screen. You can check whether the files saved in the media are supported by the product. [Settings] 1) Display: Display compatible file names. 2) Do Not Display: Do not display compatible filenames. NOTE: • When the filename is set to “Display”, the thumbnail of that file appears in grey but it cannot be selected.](https://usermanual.wiki/GemTek-Technology/NECNP04LM1/User-Guide-2231517-Page-31.png)
![English-303-4. General Configure the settings for the menu display language, date and time, startup mode and splash screen display. Select [General] from the main screen of the setting menu for the setting screen. Item SettingsLanguage Selects the language of the menu screen. The default setting when shipped from the factory is “English”. [Settings] •English •German •French •Italian •Spanish •Swedish •JapaneseDate Set the current date (Month/Day/Year). [Setting Method] (1) Press the SET button after selecting this setting. (2) Enter the date in the order Month/Day/Year using the number buttons. (3) Press the SET button after selecting [Done] at the bottom left of the screen.Time Set the current time (Hours:Minutes:Seconds). The time is displayed in 24 hours format. [Setting Method] (1) Press the SET button after selecting this setting. (2) Enter the time in the order Hours/Minutes/Seconds using the number buttons. (3) Press the SET button after selecting [Done] at the bottom right of the screen.Start-up modeSet the menu screen to be displayed upon startup. If the functions to be used are fixed beforehand, those functions can be started directly during start up by setting the startup mode. The default setting when shipped from the factory is “Home”. [Settings] •Home •Intel® WiDi •Media PlayerSplash screen Select whether to display the splash screen (NEC logo) during startup. [Settings] •Enable: Display the splash screen. •Disable: Do not display the splash screen.](https://usermanual.wiki/GemTek-Technology/NECNP04LM1/User-Guide-2231517-Page-32.png)
![English-313-5. System Security settings, media formatting, product firmware update and initialization of product settings etc. are performed. Select [System] from the main screen of the setting menu for the setting screen. 3-5-1. Security Password for setting menu The [Settings] menu in the home screen can be protected by a password. A 4-digit number is specified for the password. No password is set when the product is first shipped from the factory. [Setting Method] (1) Select [Settings password] and press the SET button to display the following screen. •New Password •Confirm Password (2) Select [New Password]. Enter a 4-digit number after pressing the SET button and then press the SET button again. (3) Select [Confirm Password]. Enter the same 4-digit number entered in (2) above after pressing the SET button and then press the SET button again. (4) Select [Done] at the bottom right of the screen and then press the SET button to confirm the password. NOTE: • If the EXIT button or OPTION MENU button is pressed and the screen changes before the password is confirmed, the entered password will be cleared. • To cancel the password setting, leave the entry fields in [New Password], [Confirm Password] blank and press the SET button after selecting [Done] at the bottom right of the screen. The password setting will be canceled. Drive ID In order to prevent the use memory devices other than the designated SD memory card or USB memory, a drive ID can be set for the SD memory card or USB memory. Upon setting a drive ID, the product will no longer recognize memory devices other than the SD memory card or USB memory that is written with the designated drive ID. A drive ID is designated with a 8-digit number. No drive ID is set when the product is first shipped from the factory. [Setting Method] (1) Upon selecting [Drive ID], the following menu is displayed. •New Drive ID •Confirm Drive ID (2) Select [New Drive ID]. Enter a 8-digit number after pressing the SET button and then press the SET button again. (3) Select [Confirm Drive ID]. Enter the same 8-digit number entered in (2) above after pressing the SET button and then press the SET button again. (4) Select [Done] at the bottom right of the screen and press the SET button to confirm the drive ID. (5) Media initialization is carried out in order to write the “Drive ID” set in the product to the SD memory card or USB memory. Refer to “3-5-2. Initialization” on the initialization method. NOTE: • If the OPTION MENU button or EXIT button is pressed and the screen changes before the drive ID is confirmed, the entered drive ID will be cleared. • To cancel the drive ID setting, leave the entry fields in [New Drive ID], [Confirm Drive ID] blank and press the SET button after selecting [Done] at the bottom right of the screen.](https://usermanual.wiki/GemTek-Technology/NECNP04LM1/User-Guide-2231517-Page-33.png)
![English-323-5-2. Initialization Initialize the SD memory card or USB memory. If a drive ID has been set, it will be written into the SD memory card or USB memory. [Operating Method] (1) After selecting [Drive], select [Done] at the bottom right of the screen and press the SET button. (2) When the message “Initialize SD card?” or “Initialize USB memory?” appears, select [OK] and press the SET button. To cancel initialization, select [Cancel] and press the SET button. CAUTION: • Please note that all files will be deleted upon initialization. 3-5-3. Firmware Update Updates the firmware of the product. A USB memory is used for the update. [Operating Method] (1) When the product is connected to a display, set the OPTION POWER setting of the display to ON. Set the POWER SAVE function of the display to OFF as well. See the user’s manual of the display on how to set up the display. (2) Download the product firmware from the Company’s website. URL: http://www.nec-display.com/jp/support.html (3) Save the downloaded firmware file to the root directory of the USB memory. (4) Insert the above-mentioned USB memory into the USB port of the product. (5) Upon opening the [F/W Update] menu and selecting [Firmware], the filename of the firmware stored in the USB memory is displayed. (6) After selecting the file, select [Done] at the bottom right of the screen and press the SET button to start the firmware update. (7) When the firmware update is completed normally, the product will start up again. CAUTION: • The firmware update time is about 15 minutes. Never switch off the power of the display or projector connected to the product during the update. Never pull out the USB memory where the firmware is stored as well. The update may fail and the product may no longer work normally. NOTE: • Firmware update can only be carried out using a USB memory. 3-5-4. Reset Return the product settings to the default state when first shipped from the factory. Or start up the product again. Item ContentsReset all the settings Return all general and system settings and the product’s Intel® WiDi and media player to the default state when first shipped from the factory.Reset the Intel® WiDi settings Return the Intel® WiDi settings to the default state when first shipped from the factory.Reset the media player settings Return the media player settings to the default state when first shipped from the factory.Re-startup Start up the product again. The product settings will not return to the default state when first shipped from the factory. [Operating Method] (1) After selecting the contents you want to run, select [Done] at the bottom right of the screen and press the SET button. (2) Select [OK] and press the SET button when the message “Reset the ** setting?” appears. To cancel, select [Cancel] and press the SET button.](https://usermanual.wiki/GemTek-Technology/NECNP04LM1/User-Guide-2231517-Page-34.png)
![English-33 4. Firmware Update Recovery If the firmware update fails, the product may not start up again. In this case, run firmware recovery. Use the enclosed SD memory card for the recovery. [Operating Method] (1) Download the product firmware from the Company’s website. URL: http://www.nec-display.com/jp/support.html (2) Save the downloaded firmware file to the root directory of the SD memory card. (3) Insert the above-mentioned SD memory card into the slot for the SD memory card on the product. (4) When the product is connected to a display, set the OPTION POWER setting of the display to ON. Set the POWER SAVE function of the display to OFF as well. See the user’s manual of the display on how to set up the display. (5) Turn off the power of the display or projector connected to the product. (6) Turn on the power of the display or projector while pressing the reset button of the product. Press and hold the reset button for about 15 sec after the display or projector starts up. (7) The product indicator flashes in orange during the recovery process. The indicator will flash in red instead if the recovery fails. Perform the recovery again in this case. (8) Start up the product again when firmware recovery is completed normally. CAUTION: • Recovery of firmware takes about 15 minutes. Never switch off the power of the display or projector connected to the product during recovery. Never pull out the SD memory card where the firmware is stored as well. The recovery process will not proceed normally if the SD memory card is removed. NOTE: • Please consult your dealer or our after service support desk if the product fails to start up even after running the recovery process.](https://usermanual.wiki/GemTek-Technology/NECNP04LM1/User-Guide-2231517-Page-35.png)
![English-34Troubleshooting General Audio cannot be heard from the display.[When the product is connected to a display] • Set the audio input of the display to “OPTION”. To do so, press the AUDIO INPUT button and set the selected audio input (AUDIO) shown at the top right of the screen to “OPTION”. • Set the AUDIO setting in the display OPTION to DIGITAL. To do so, press the MENU button, select [ADVANCED OPTIONS] - [OPTION SETTING] and set [AUDIO] to [DIGITAL]. • Check whether the switch for the external speaker and built-in speaker of the display has been set correctly. • Adjust the volume of the display. [When the product is connected to a projector] • Depending on the model of the projector, the audio output of the product may not be supported. Check with your dealer regarding the specifications of the projector.The menu screen does not appear even after startup• After startup, it takes about a minute for the menu screen of the product to appear. • After the splash screen appears, a blank screen will appear until the home screen is displayed. This is due to the specifications of the product.When the power lamp is flashing in red A failure may have occurred in the product. Please consult your dealer or our after service support desk. Intel® WiDi function The Intel® WiDi menu cannot be selected in the home screen.• Start up the product again after checking whether the wireless LAN unit is correctly inserted into the product.The Intel® WiDi software does not detect or connect to the product.• Start up the Intel® WiDi software in the PC again. • Start up the Intel® WiDi software after re-starting the PC. • Start up the product again. • Reset the settings of the product. • When multiple networks exist in the vicinity, detection or connection may not be possible. In this case, change the channel of the wireless router to a channel that is not in use on another network. • Update the Intel® WiDi software in the PC to the latest version.Distortions, interruptions and delays are observed in the image.• When the intensity of the radio waves is not sufficient, the display may not appear normally. • Move the product to a location where there are no obstructions such as walls and doors etc between the PC and the installed display. • Install the wireless LAN unit at a location with good electromagnetic reception using the adapter for the wireless LAN unit and the USB extension cable. • Due to the image processing and wireless transmission processing, there may be a delay compared to the PC display. This is due to the specifications of the Intel®WiDi software.The PC image does not occupy the full screen of the display .• Adjust the display size using the “Change TV Image Size” function in the Intel® WiDi software. • Adjust the display screen on the display end.](https://usermanual.wiki/GemTek-Technology/NECNP04LM1/User-Guide-2231517-Page-36.png)
![English-35Media Player Function SD memory card or USB memory is not recognized.• Re-insert the SD memory card or USB memory. • Check whether the file system of the SD memory card or USB memory is compatible with the product or not. • The SD memory card or USB memory may be damaged. Check whether it can be recognized correctly on the computer.The files stored in the SD memory card or USB memory do not appear in the contents selection screen.• The contents may not be supported. Check the specifications of the contents. • Set the non-supported file display setting to [Display] and check the contents selection screen. If the thumbnail of the file appears in grey, it means that the specifications of the contents are not supported.Video and still images do not appear normally.• The files may be damaged. Check whether the files can be displayed correctly on the computer. • Copyright protected contents cannot be displayed.Audio of video files is not output. • Change the audio selection setting to “Video”.Audio of audio files is not output. • Change the audio selection setting to “Audio”.Setting not included in the media player menu in the home screen.• When “Auto” is selected in the media player mode setting, the setting will not be included in the media player menu. Set the setting to “Manual”.Even when cross-fade is selected as the type of image transition, cross-fade does not occur when switching between videos. • When cross-fade is selected, the switchover between videos will be fade-out followed by fade-in. These are the specifications of the product.When auto play mode is selected, SD contents update is not carried out.• Create a “Contents” folder in the root directory of the SD memory card. • Create a “Contents” folder in the root directory of the USB memory and save the contents in that folder.The folder does not appear in the folder selection screen.• Only folders in the root directory of the media are displayed. Folders at other levels are not displayed.Even when auto play mode is selected, playback of contents does not start automatically after startup.• Select “Media Player” in the startup mode settings. • Create a “Contents” folder in the root directory of the USB memory or SD memory card and save the contents in that folder.](https://usermanual.wiki/GemTek-Technology/NECNP04LM1/User-Guide-2231517-Page-37.png)