Generac 1538 0 User Manual PRESSURE WASHER Manuals And Guides L0403239
GENERAC Power Washer, Gas Manual L0403239 GENERAC Power Washer, Gas Owner's Manual, GENERAC Power Washer, Gas installation guides
User Manual: Generac 1538-0 1538-0 GENERAC PRESSURE WASHER - Manuals and Guides View the owners manual for your GENERAC PRESSURE WASHER #15380. Home:Lawn & Garden Parts:Generac Parts:Generac PRESSURE WASHER Manual
Open the PDF directly: View PDF ![]() .
.
Page Count: 36
GEN RAC °]
Portable Products
/
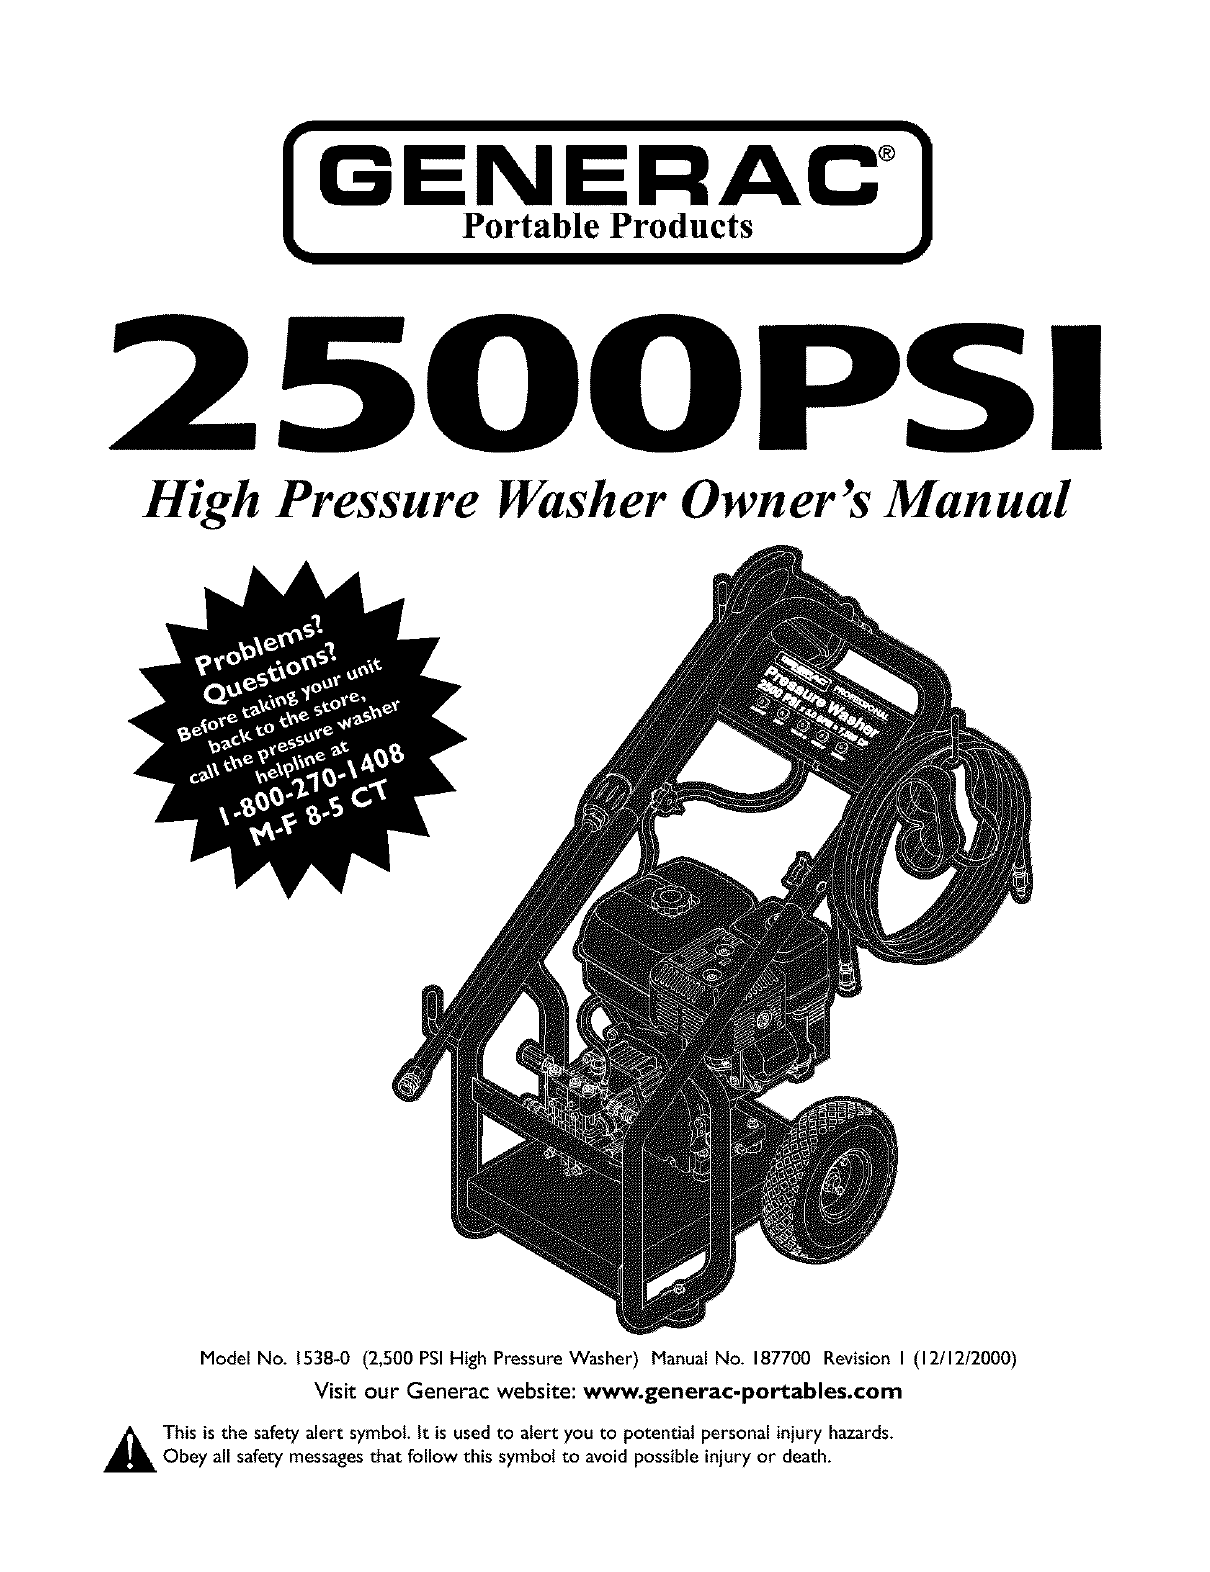
High Pressure Washer Owner's Manual
Model No. 1538-0 (2,500 PSI High Pressure Washer) Manual No. 187700 Revision I (12/12/2000)
Visit our Generac website: www.generac-portables.com
A This is the safety alert symbol. It is usedto alert you to potential personal injury hazards.
Obey all safety messagesthat follow this symbol to avoid possible injury or death.
Generac Portable Products 2,500 PSIHigh PressureWasher
EQUIPMENT
DESCRIPTION
CONGRATULATIONS on your purchase of a
GENERAC high pressure washer. It has been designed,
engineered and manufactured to give you the best possible
dependability and performance.
This manual contains information for a high pressure
washer that operates at 2,500 PSIat a flow rate of
3.0 gallons per minute. This powerful, high quality
professional system features large 10" wheels, a pump
equipped with an automatic cool down system, chemical
injection system, adjustable unloader, nozzle extension with
quick connect nozzles, safety goggles,heavyduty 50' hose,
and more.
Pleaseread and retain this manual.The instructionswill
enable you to assembleyour unit without tools, and
maintain your high pressure washer properly.
Every effort has been made to ensure that the information
in this manual is both accurate and current. However,
Generac reserves the right to change,alter or otherwise
improve the product and its documentation at any time
without prior notice.
Should you experience any problem you cannot easily
remedy, call the pressure washer helpline at
1-800-270-1408.
CUSTOMER
RESPONSIBILITIES
•Readand observe the safety rules.
• Follow regular schedule in maintaining, caring for and
using your high pressure washer.
• For off-season storage, review "Preparing the Unit for
Storage" on page 14.
SAFETY RULES
_AUTION! When setting up, transporting,
adjusting or making repairs to your high pressure
washer, always disconnect the spark plug wire from
the spark plug and place the wire where it cannot
contact spark plug.
_DANGER! Engineexhaust gasescontain DEADLY
carbon monoxide gas.This dangerous gas,if
breathed in sufficient concentrations, can cause
unconsciousness or even death. Operate this
equipment only in the open air where adequate
ventilation is available.
_ANGER! Gasoline is highly FLAMMABLE and its
vapors are EXPLOSIVE.Do Not permit smoking,
open flames, sparks or heat in the vicinity while
handling gasoline. Avoid spilling gasoline on a hot
engine. Allow unit to coot for 2 minutes before
refueling. Comply with all laws regulating storage
and handlingof gasoline.
Read this manual carefully and become familiar
with your pressure washer. Know its applications,
its limitations, and any hazards involved.
Locate this pressure washer in areas awayfrom
combustible materials, combustible fumes or dust.
The high pressure equipment is designedto be used with
Generac authorized parts only. If you use this equipment
with parts that do not comply with minimum
specifications, the user assumesall risks and liabilities.
Some chemicals or detergents may be harmful if inhaled
or ingested,causingsevere nausea,fainting or poisoning.
The harmful elements maycause property damageor
severe injury.
Do Not allow CHILDREN to operate the pressure
washer at any time.
/
2
Generac Portable Products 2,500 PSIHigh PressureWasher
• Operate engine only at governed speed. Runningthe
engine at excessive speeds increasesthe hazard of
personal injury. Do Not tamper with parts which may
increase or decreasethe governed speed.
•Do Not wear loose clothing, jewelry or anything that
may be caught in the starter or other rotating parts.
• Before starting the pressure washer in cold weather,
check all parts of the equipment and be sure ice has not
formed there.
•Never use a spraygun whichdoes not havea trigger lock
or trigger guard in placeand in working order.
• Keep the hose connected to machine or the spraygun
while the system is pressurized. Disconnecting the hose
while the unit is pressurized is dangerous.
•Never operate units with broken or missing parts, or
without protective housing or covers.
• Operate and store this unit on a stable surface.
• Check the fuel system for leaks or signs of deterioration,
such as chafed or spongy hose, loose or missing clamps,
or damagedtank or cap. Correct all defects before
operating the pressure washer.
•Do Not spray flammableliquids.
•Do Not secure the spraygun in the open position.
• Use a respirator or mask whenever there is a chance
that vaporsmay be inhaled.Read all instructionswith
mask so you are certain the mask will provide the
necessary protection againstinhalingharmful vapors.
•Never aim the spray gun at people, animals or plants.
The high pressure stream of water that this equipment
produces can pierce skin and its underlying tissues,
leading to serious injury and possible amputation.
•Never allow any part of the body to come in contact
with the fluid stream. Do Not come in contact with a
fluidstream created by a leak in the high pressure hose.
• Always wear eye protection when you use this
equipment or when you are in the vicinitywhere the
equipment is in use.
• High pressure spray can causepaint chips or other
particles to become airborne.
•Do Not operate the pressure washer above the rated
pressure.
• Never move the machine by pulling on the high pressure
hose. Use the handle provided on the unit.
• Always be certain the spraygun, nozzles and accessories
are correctly attached.
• High pressure spray may damagefragile items including
glass.Do Not point spraygun at glasswhen in the jet
spray mode.
• Hold the spraygun firmly in your hand before you
squeeze the trigger. Failure to do so could result in an
injuryfrom a whipping spray gun. Do Not leave the
spray gun unattended while the machine is running.
• The cleaning area should have adequate slopes and
drainage to reduce the possibility of a fall due to slippery
surfaces.
• Keep water spray awayfrom electric wiring or fatal
electric shock may result.
•Do Not by-pass any safety device on this machine.
• The muffler and engine heat up during operation and
remain hot immediatelyafter shutting it down. Avoid
contact with a hot muffler or engine as you could be
severely burned.
• High pressure hose can develop leaks from wear, kinking,
abuse, etc. Water sprayingfrom a leak is capable of
injectingmaterial into skin. Inspect hose each time before
using it. Check all hosesfor cuts, leaks, abrasions or
bulgingof cover, or damageor movement of couplings. If
any of these conditions exist, replace hose immediately.
Never repair high pressure hose. Replace it with
another hose that exceeds maximum pressure rating of
your unit.
• The muffler and air cleaner must be installedand in good
condition before operating the pressure washer. These
components act as spark arresters if the engine backfires.
In the State of California a spark arrester is required by law
(Section 4442 of the California Public Resources Code).
Other states may have similar laws. Federal laws apply on
federal lands.
NOTE: If you equip the muffler with a spark arrester, it
must be maintained in effective working order. You can
order a spark arrester through your authorized Honda
service dealer.
/3
GeneracPortableProducts2,500PSIHighPressureWasher
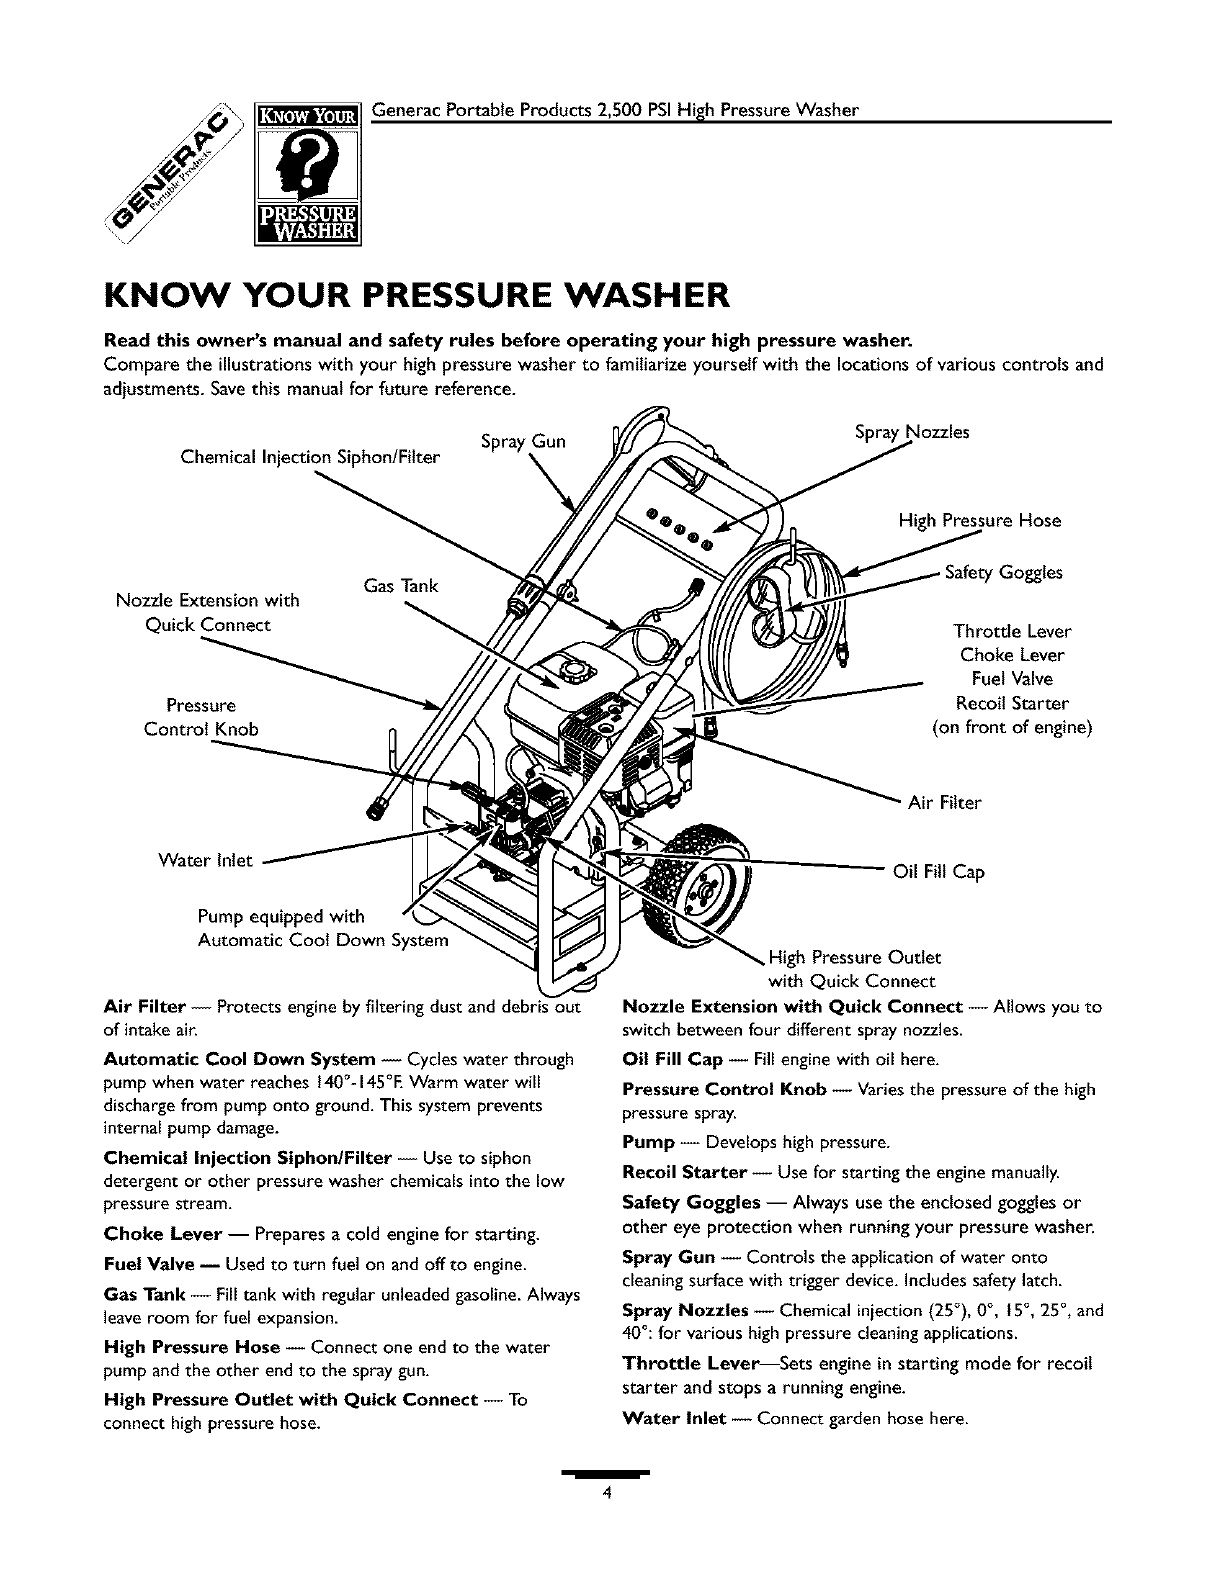
KNOW YOUR PRESSURE WASHER
Read this owner's manual and safety rules before operating your high pressure washer.
Compare the illustrations with your high pressure washer to familiarize yourself with the locations of various controls and
adjustments. Save this manual for future reference.
Spray Gun Spray Nozzles
Chemical Injection Siphon/Fitter
Gas Tank
High Pressure Hose
Safety Goggles
Nozzle Extension with
Quick Connect Throttle Lever
Choke Lever
Fuel Valve
Pressure Recoil Starter
Control Knob (on front of engine)
Air Filter
Water Inlet
Pump equipped with
Automatic Coot Down System
Air Filter -- Protects engine by filtering dust and debris out
of intake air.
Automatic Cool Down System -- Cycles water through
pump when water reaches 140°-145°E Warm water will
discharge from pump onto ground. This system prevents
internal pump damage.
Chemical Injection Siphon/Filter -- Use to siphon
detergent or other pressure washer chemicals into the low
pressure stream.
Choke Lever -- Prepares a cold engine for starting.
Fuel Valve -- Used to turn fuel on and off to engine.
Gas Tank -- Fill tank with regular unleaded gasoline. Always
leave room for fuel expansion.
High Pressure Hose -- Connect one end to the water
pump and the other end to the spray gun.
High Pressure Outlet with Quick Connect -- To
connect high pressure hose.
Oil Fill Cap
High Pressure Outlet
with Quick Connect
Nozzle Extension with Quick Connect -- Allows you to
switch between four different spray nozzles.
Oil Fill Cap -- Fill engine with oil here.
Pressure Control Knob -- Varies the pressure of the high
pressure spray.
Pump -- Develops high pressure.
Recoil Starter -- Use for starting the engine manually.
Safety Goggles -- Always use the enclosed goggles or
other eye protection when running your pressure washer.
Spray Gun -- Controls the application of water onto
cleaning surface with trigger device. Includes safety latch.
Spray Nozzles -- Chemical injection (25°), 0°, 15°, 25°, and
40°: for various high pressure cleaning applications.
Throttle Lever_Sets engine in starting mode for recoil
starter and stops a running engine.
Water Inlet -- Connect garden hose here.
/
4
Generac Portable Products 2,500 PSIHigh PressureWasher
IMPORTANT: Read entire owner's manual before you
attempt to assembleor operate your new pressure washer.
REMOVE PRESSURE
WASHER FROM
CARTON
•Remove the parts box packedwith pressure washer.
• Slice two corners at the end of carton from top to
bottom so the panel can be folded down fiat, then
remove all packing material.
• Roll pressure washer out of carton.
Carton Contents
Items in the carton include:
• Main Unit
• Parts Box (which includesthe following):
Safety Goggles
Handle Assembly
Handle Fastening Hardware (which includes):
Carriage Bolts (2)
Plastic Knobs (2)
"J" Hook
Chemical Hose Clip
Nozzle Cleaning Kit
High Pressure Hose
Owner's Manual
EngineManual
EngineWarranty Card
EmissionsControl Warranty Card
Owner's Registration Card
Spray Gun with Quick Connect Fitting
Nozzle Extension with Quick Connect Fitting
Bagcontaining5 mult_olored Quick Connect Nozzles
Oit Bottle
O-Ring Maintenance Kit
If any of the above parts are missing or damaged,call the
pressure washer helpline at 1-800-270-1408.
PREPARING PRESSURE
WASHER FOR USE
If you have any problems with the assemblyof your
pressure washer or if parts are missing or damaged,call the
pressure washer helpline at 1-800-270-1408.
To prepare your pressure washer for operation, you
will need to perform these tasks:
• Fill out and send in the registration card.
• Attach the handle.
• Add oil to the engine crankcase.
• Add fuel to the fuel tank.
• Connect the high pressure hoseto the spray gun and the
pump.
• Connect the water supply to the pump.
• Attach the nozzle extension to the spray gun.
• Select and attach quick connect nozzle to the nozzle
extension.
Attach Handle
NOTE: All assembly operations given in this section will
be described from the perspective of viewing the pressure
washer from the rear.
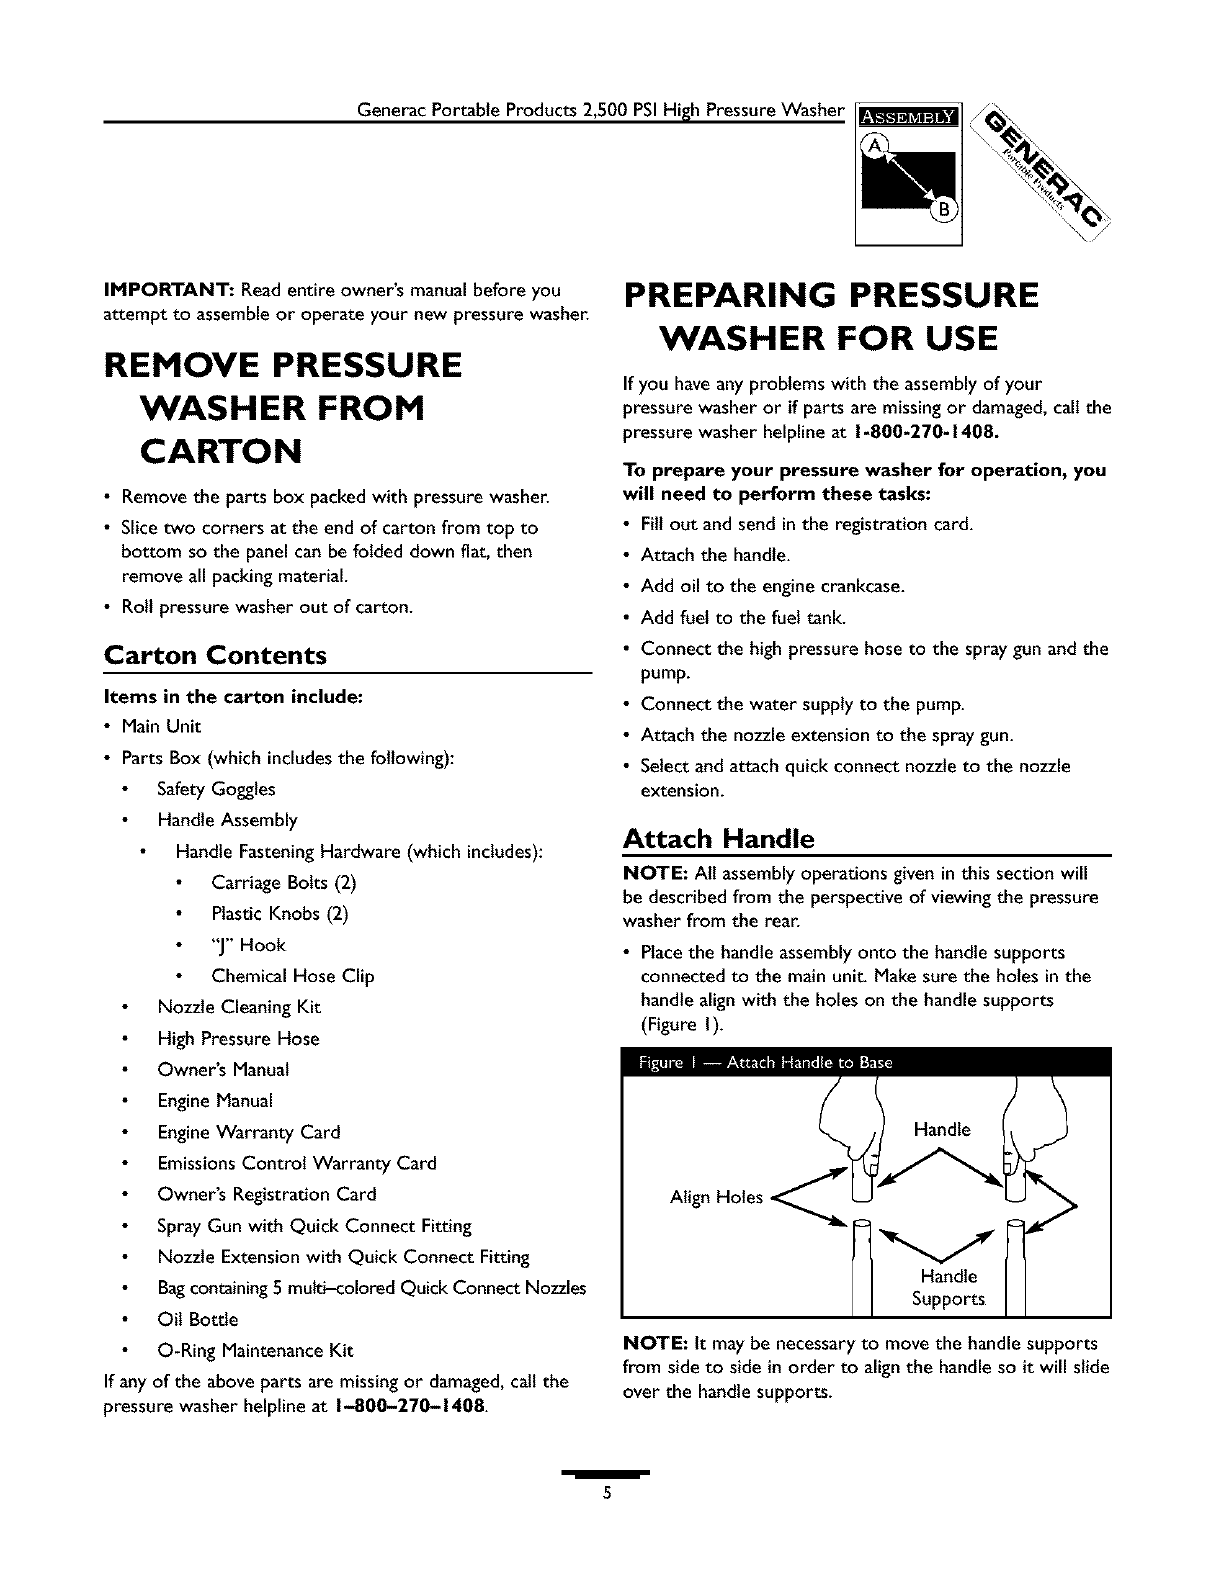
• Placethe handle assemblyonto the handle supports
connected to the main unit. Make sure the holes in the
handle align with the holes on the handle supports
(Figure I).
Supports
NOTE: It may be necessaryto move the handle supports
from side to side in order to alignthe handle so it will slide
over the handle supports.
/5
GeneracPortableProducts2,500PSIHighPressureWasher
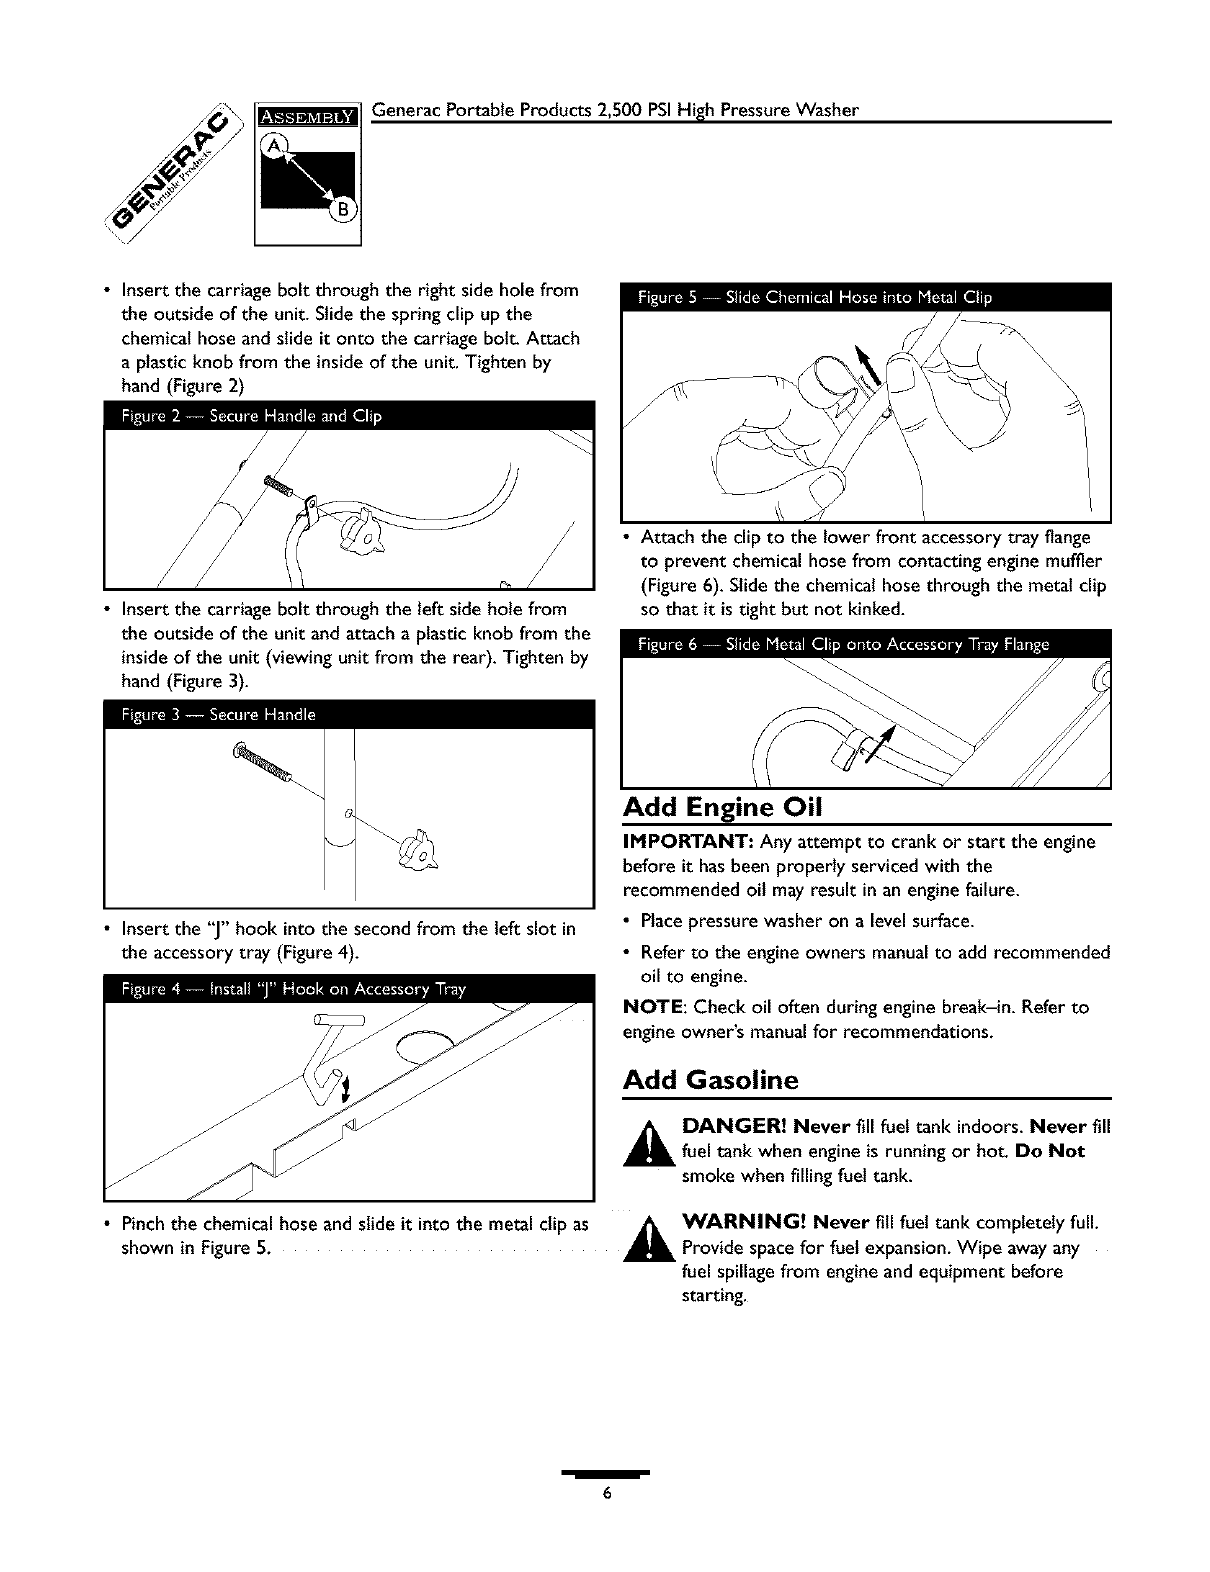
• Insertthecarriageboltthroughtherightsideholefrom
theoutsideoftheunit.Slidethespringcllpupthe
chemicalhoseandslideit ontothecarriagebolt.Attach
aplasticknobfromtheinsideoftheunit.Tightenby
hand(Figure2)
• Insertthecarriageboltthroughtheleftsideholefrom
theoutsideoftheunitandattachaplasticknobfromthe
insideoftheunit(viewingunitfromtherear).Tightenby
hand(Figure3).
• Attachthecllptothelowerfrontaccessorytrayflange
to preventchemicalhosefromcontactingenginemuffler
(Figure6).Slidethechemicalhosethroughthemetalclip
sothatit istightbutnotkinked.
• Insertthe"J"hookintothesecondfromtheleftslotin
theaccessorytray(Figure4).
Add Engine Oil
IMPORTANT: Any attempt to crank or start the engine
before it has been properly serviced with the
recommended oil may result in an engine failure.
• Place pressure washer on a levelsurface.
• Refer to the engine owners manualto add recommended
oil to engine.
NOTE: Check oil often during engine break-in. Refer to
engine owner's manual for recommendations.
Add Gasoline
_ANGER! Never fill fuel tank indoors. Never fill
fuel tank when engine is running or hot. Do Not
smoke when filling fuel tank.
• Pinch the chemical hoseand slide it into the metal clip as _, WARNING! Never fill fuel tank completely full.
shown in Figure 5. _ Provide spacefor fuel expansion. Wipe away any
fuel spillagefrom engine and equipment before
starting.
/6
GeneracPortableProducts2,500PSIHighPressureWasher
• Usefresh,cleanunleadedautomotivegasolineandstorein
approved,clean,coveredcontainers.Usecleanfill
funnels.Neveruse"stale"gasolineleftoverfromlast
seasonorgasolinestoredforlongperiods.
• Cleanareaaroundfuelfillcap,removecap.
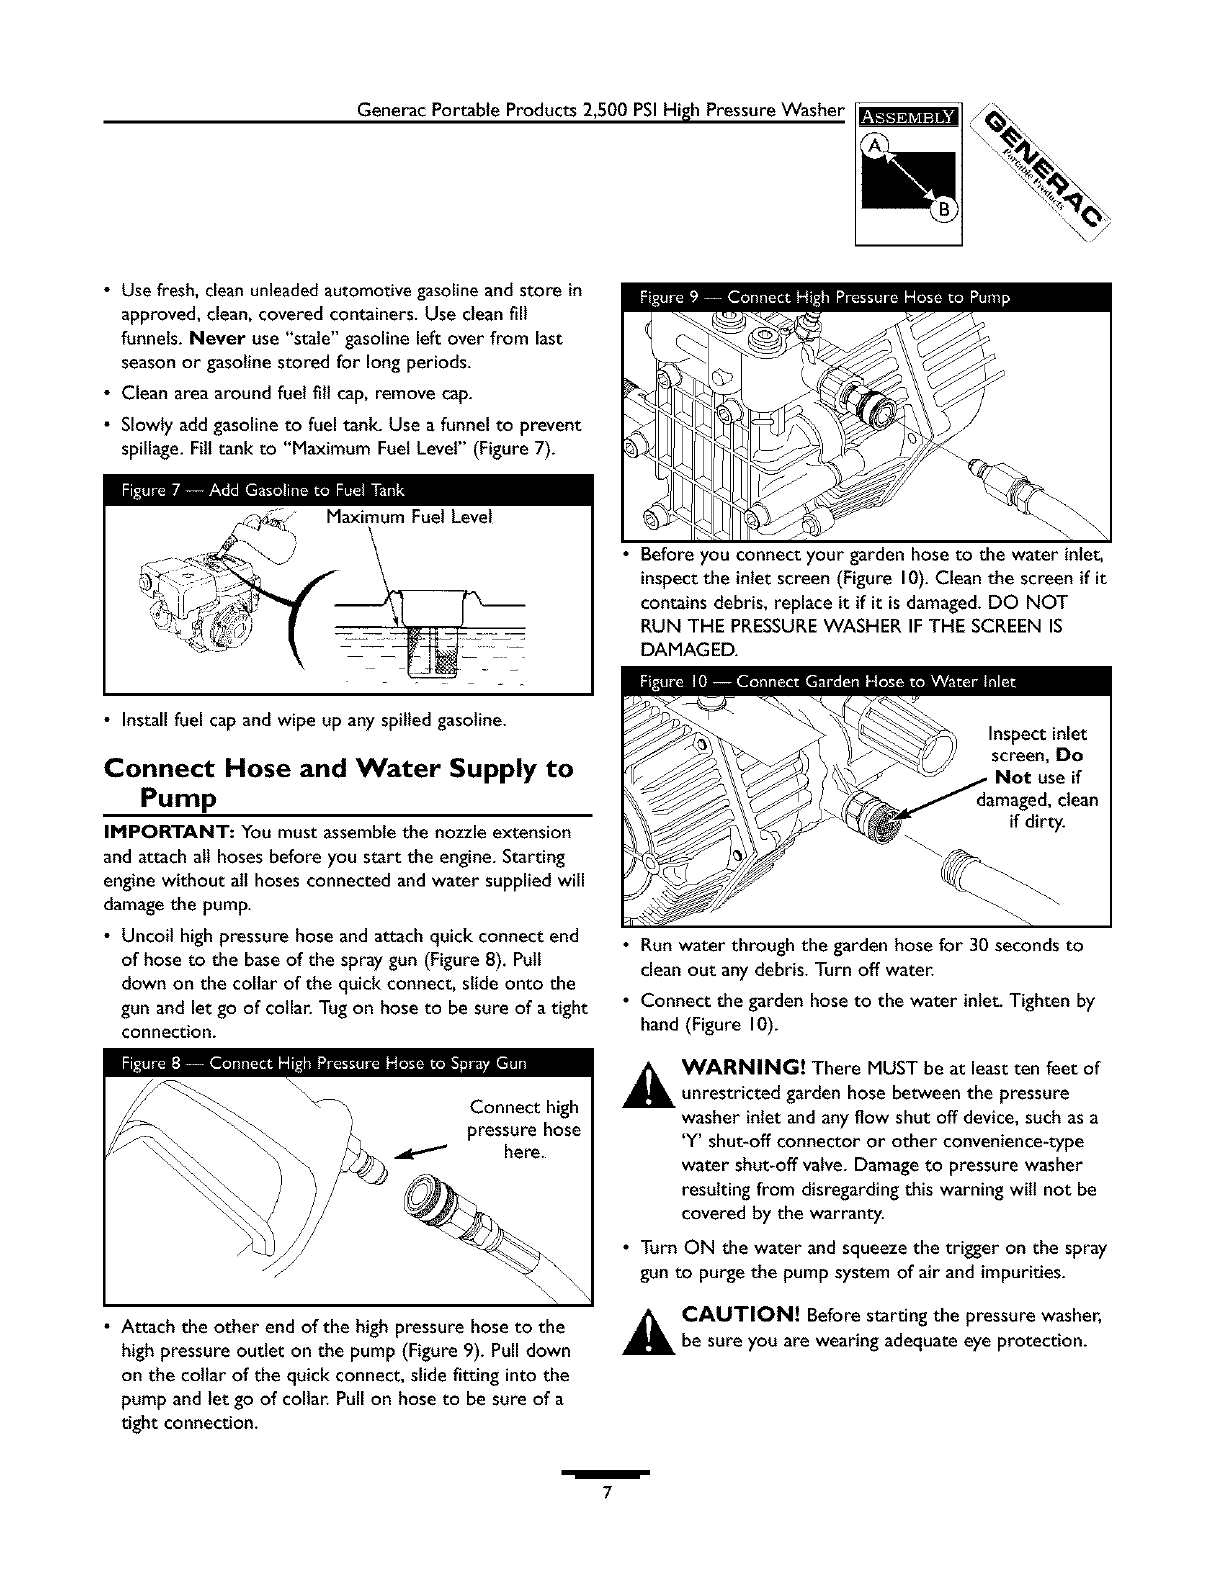
• Slowlyaddgasolineto fueltank.Useafunnelto prevent
spillage.Filltankto "MaximumFuelLevel"(Figure7).
_/ MaximumFuelLevel
• Installfuelcapandwipeupanyspilledgasoline.
Connect Hose and Water Supply to
Pump
IMPORTANT: You must assemblethe nozzle extension
and attach all hoses before you start the engine. Starting
engine without all hoses connected and water supplied will
damagethe pump.
• Uncoil high pressure hose and attach quick connect end
of hose to the baseof the spray gun (Figure 8). Pull
down on the collar of the quick connect, slide onto the
gun and let go of collar. Tug on hose to be sure of a tight
connection.
• Attach the other end of the high pressure hose to the
high pressure outlet on the pump (Figure 9). Pull down
on the collar of the quick connect, slide fitting into the
pump and let go of collar. Pull on hose to be sure of a
tight connection.
• Before you connect your garden hose to the water inlet,
inspect the inlet screen (Figure 10). Clean the screen if it
contains debris, replace it if it is damaged.DO NOT
RUN THE PRESSUREWASHER IF THE SCREEN IS
DAMAGED.
• Run water through the garden hose for 30 seconds to
clean out any debris. Turn off water.
• Connect the garden hose to the water inlet. Tighten by
hand (Figure 10).
_ll ARNING! There MUST be at least ten feet of
unrestricted garden hose between the pressure
washer inlet and any flow shut off device, such as a
'Y' shut-off connector or other convenience-type
water shut-off valve. Damage to pressure washer
resulting from disregarding this warning will not be
covered by the warranty.
•Turn ON the water and squeeze the trigger on the spray
gun to purge the pump system of air and impurities.
_ll AUTION! Before starting the pressure washer,
be sure you are wearing adequate eye protection.
/
7
Generac Portable Products 2,500 PSIHigh PressureWasher
Checklist Before Starting Engine
Review the unit's assemblyto confirm you have performed
alt of the following:
• Make sure the handle is in place and secure.
• Check that oit has been added to the proper level inthe
engine crankcase.
• Add the proper gasoline to fuel tank.
• Check for properly attached hose connections.
• Check to make sure that there are no kinks, cuts, or
damageto the high pressure hose.
• Provide a proper water supply (not to exceed 140°F)at
an adequate flow.
• Be sure to read "Safety Rules" and "How To Use Your
PressureWasher" before using the pressure washer.
HOW TO USE YOUR
PRESSURE WASH ER
If you haveany problems operating your pressurewasher,
pleasecatl the pressure washer helpline at 1-800-270-1408.
To Start Your Pressure Washer
To start your pressure washer for the first time, follow
these instructionsstep-by-step. This starting information
also applies if you have let the pressure washer sit idle for
at least a day.
• Placethe pressure washer in an area close enough to an
outside water source capable of supplying water at a flow
rate greater than 3.3gallons per minute.
• Check that the high pressure hose is connected to the
spray gun and to the pump. See"Preparing Pressure
Washer for Use" for illustrations.
• Make sure unit is in alevelposition.
• Connect the garden hose to the water inlet on the
pressure washer pump. Turn ON the water.
_AUTION! Oo Not run the pump without the
water supply connected and turned on. You must
follow this caution or the pump will be damaged.
• Squeezethe trigger on the gun until you have a steady
stream of water. This purges the pump of air and
impurities.
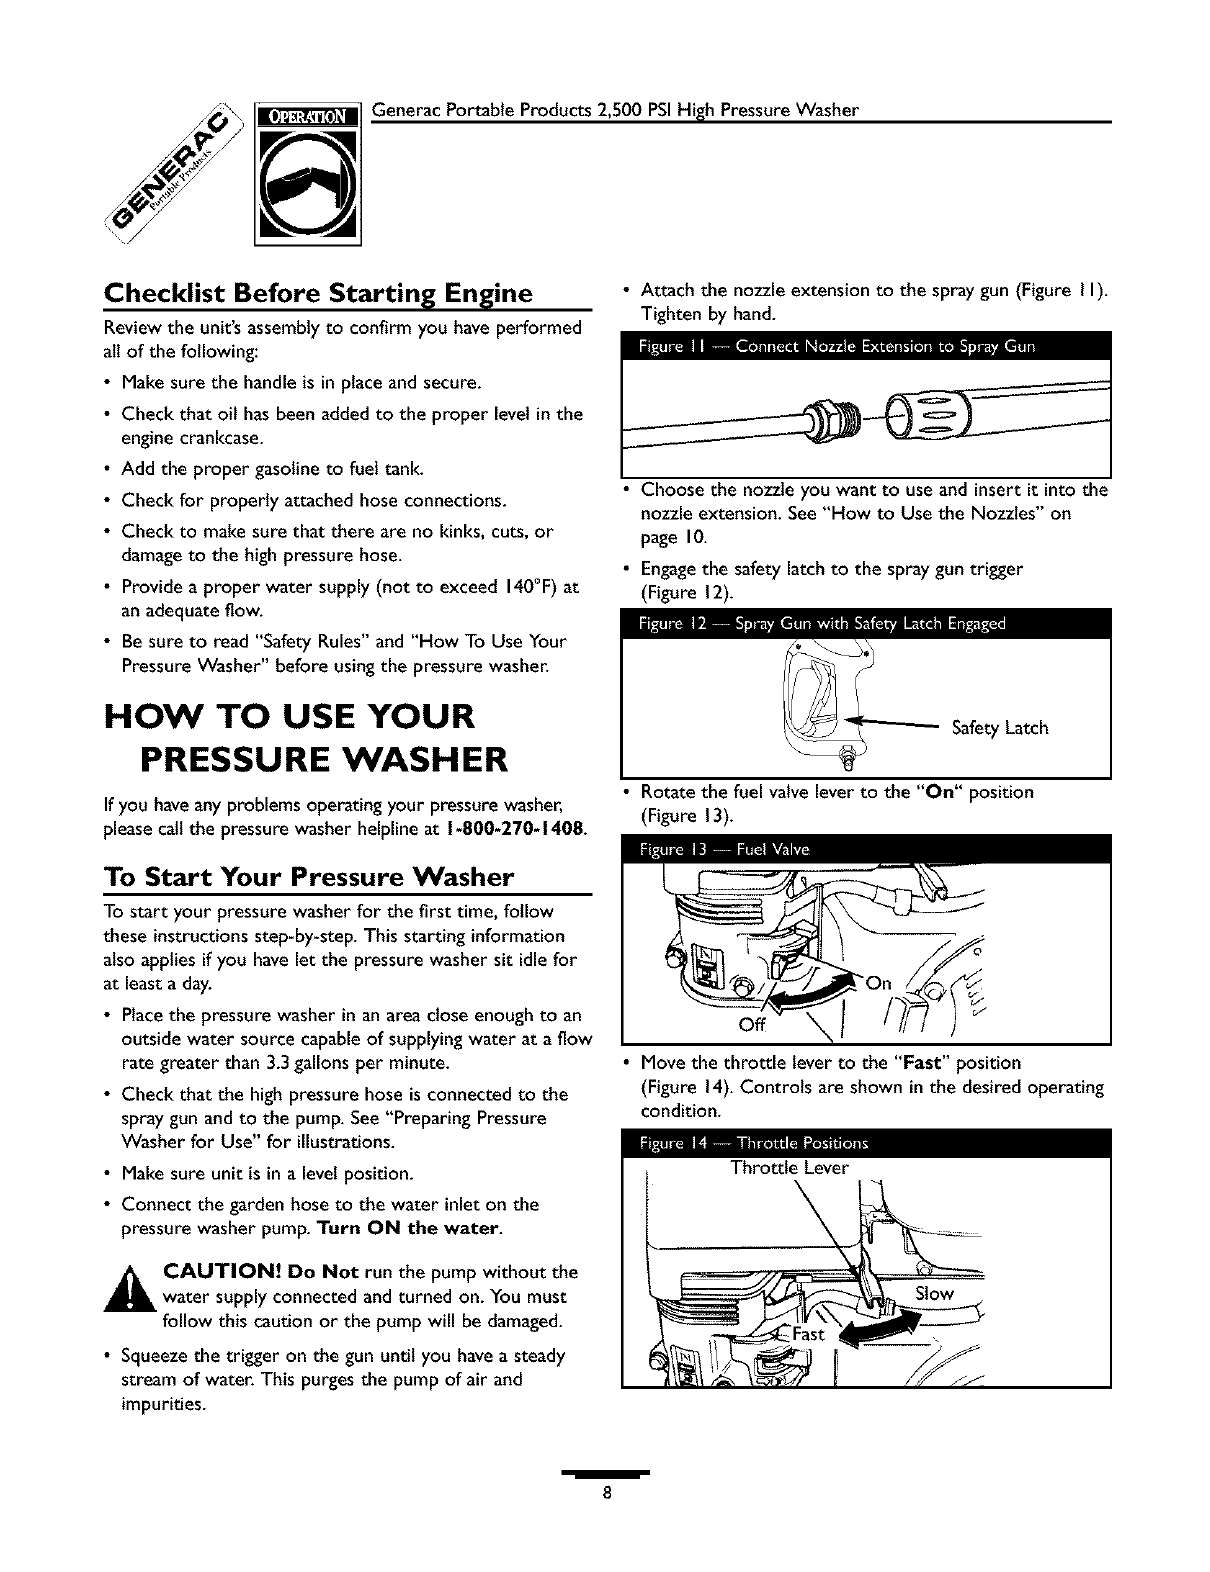
• Attach the nozzle extension to the spray gun (Figure I I).
Tighten by hand.
• Choose the nozzle you want to use and insert it into the
nozzle extension. See "How to Use the Nozzles" on
page IO.
• Engage the safety latch to the spray gun trigger
(Figure 12).
Safety Latch
• Rotate the fuel valve lever to the "On" position
(Figure 13).
off
• Move the throttle lever to the "Fast" position
(Figure 14). Controls are shown in the desired operating
condition.
/8

GeneracPortableProducts2,500PSIHighPressureWasher
•Move the choke lever to the "Closed" position
(Figure 15).
Closed /
NOTE: For a warm engine, be sure the choke lever is in
the "Open" position.
Set the engine switch to the "On" position (Figure 16).
EngineSwitch
.off
Grasp starter grip and pull slowly until you feel some
resistance. Then pull cord out with rapid full arm stroke.
Let rope return slowly. Do Not let rope "snap back"
against starter.
•If the choke lever has been moved to the "Closed"
position to start the engine, gradually move it to the
"Open" position as the eng{ne warms up.
NOTE: If the recoil starter is hard to pull, it may be
necessary to squeeze the gun trigger to tel{eve internal
pump pressure.
How to Stop Your Pressure Washer
• Move the throttle lever to the "Slow" position.
• Wait for the engine to idle down.
• Move the engine switch to the "Off' position.
• Simply shutting off the engine will not release pressure in
the system. Squeeze trigger on the spray gun to
relieve pressure in the hose.
How to Use Accessory Tray
The unit is equipped with an accessory tray with places to
store your nozzle extension and quick connect nozzles, and
slots to hold the cleaning solution bottle and the detergent
siphoning filter. There are also two hooks on the handle to
hold your spray gun and high pressure hose.
NOTE: The extra holes in the tray are for storing a brush
and a turbo wand. The brush and turbo wand are NOT
included with your pressure washer. You can buy these
items as optional accessories.
• Place the nozzle extension through the hole on the
accessory tray as shown in Figure 17.
Hang your chemical solution bottle on the "J" hook and
place the detergent siphoning filter in the last slot on the
left (Figure 17).
• Place the spray gun on the hook attached to the handle
on the right side of the unit (Figure 17).
• Hang the high pressure hose on the hook attached to
the handle on the left side of the unit as shown on
page 4.
/
9

Generac Portable Products 2,500 PSIHigh PressureWasher
How to Use the Nozzles
_ANGER! Never exchange nozzles without
lockingthe safety latch on the trigger.
The quick-connect on the nozzle extension allows you to
switch between five different nozzles.The nozzles vary the
spray pattern as shown below (Figure 18).
Follow these instructions to change nozzles:
•Engagethe safety latch on the spray gun.
• Pull back the collar on the quick-connect and pull the
current nozzle off. Store the nozzle in the space
provided on the handle'sstorage panel.
NOTE: For a more gentle rinse, select the white 40° or
green 25°nozzle. To scour the surface, select the yellow
15°or red 0° nozzle. To apply chemical, select the black
nozzle.
• Pull back on the collar,insert the new nozzle and release
the collar. Tug on the nozzle to make sure it is securely
in place.
• For most effective cleaning, keep the spray nozzle
between 8 to 24 inchesaway from the cleaning surface. If
you get the spray nozzle too close, you may damagethe
cleaning surface.
Cleaning and Applying Chemical
_i WARNING! You must attach all hoses before
you start the engine. Starting the engine without all
the hoses connected and without the water turned
ON will damagethe pump.
IMPORTANT: Use soaps designed specifically for
pressure washers. Household detergents could damage
the pump.
To apply detergent follow these steps:
•Review the use of the nozzles.
• Prepare the detergent solution as required by the
manufacturer.
• Hang the detergent solution on the "J" hook attached to
the accessory tray, as shown in Figure 19.
• Placethe small filter end of the detergent siphoning tube
into the detergent container.
Low Pressure
Black
25°
High Pressure
White Green Yellow Red
40° 25° 15° 0°
/
I0

Generac Portable Products 2,500 PSIHigh PressureWasher
_ AUTION! Keep the chemical injectiontube
from coming in contact with the hot mumer.
• Make sure the black nozzle is installed.
NOTE: Detergent cannot be applied with the high
pressure nozzles (White, Green, Yellow, or Red).
• Make sure the garden hose is connected to the water
inlet.Check that the high pressure hose is connected to
the spraygun and the pump and start the engine.
• Apply the detergent to a dry surface, starting at lower
portion of area to be washed and work upward, using
long, even, overlapping strokes. Do Not allow the
detergent to dry on (prevents streaking).
• Allow the detergent to soak in between 3-5 minutes
before washing and rinsing. Reapplyas needed to prevent
surface from drying.
Pressure Washer Rinsing
_ ARNING! Be extremely careful if you must
use the pressure washer from a ladder,scaffolding
or any other relatively unstable location. Hose
water pressure builds as you climb. When you press
the trigger, the recoil from the initial spray can be
very strong. The high pressure spray could cause
you to falt if you are too close to the cleaning
surface.
After you have applied detergent, scour the surface
and rinse it clean as follows:
• Apply safety latch to spray gun.
• Remove the black chemical nozzle from the nozzle
extension.
• Select and instaltthe desired high pressure nozzle
following the instructions"How to Use the Nozzles" on
page 10.
• Keep the spray gun a safedistance from the area you
plan to spray.
• Increase or decrease spray pressure by turning the
pressure control knob counterclockwise or clockwise
respectively (Figure 20). Use lower pressure to wash
itemssuch a as a car or boat. Use higher pressure to
strip paint and degrease driveways.
Pressure
Control
Knob
• Apply a high pressure spray to a small area and then
check the surface for damage.If no damage is found, you
can assume it isokay to continue cleaning.
• Start at the top of the area to be rinsed, working down
with same overlapping strokes as you used for cleaning.
Automatic Cool Down System
(Thermal Relief)
If you run the engine on your pressure washer for
3-5 minutes without pressingthe trigger on the spray gun,
circulating water in the pump can reach a temperature
between 140-145°E At this temperature, the system
engagesand cools the pump by discharging the warm
water onto the ground. This system prevents internal
damage to the pump.
/
II

cPobocts2500shss.sh
SPECIFICATIONS
Rated Pressure ..... 2,500 psi
Flow Rate .......... 3.0 gallons per minute (gpm)
Detergent .......... Use detergent approved for
pressure washers
Water Supply Temp . Not to Exceed 140°F
Automatic Cool .... Willcycte when water
Down System ....... reaches 140°*145°F
Pump Oil ........... SAE80W-90, 9.6 oz (285 ml)
GENERAL MAINTENANCE
RECOMMENDATIONS
The pressure washer warranty does not cover items that
have been subjected to operator abuse or negligence. To
receive full value from the warranty, the operator must
maintain the high pressure washer as instructed in this
manual.
•Some adjustments will need to be made periodically to
properly maintain your high pressure washer.
• All maintenance in this manual and the engine owner's
manual should be made at leastonce each season.
• Once a year you should cleanor replace the spark plug,
clean or replace the air filter and check the spray gun
and adjustable nozzle extension assemblyfor wear. A
new spark plug and clean air filter assure proper fuel-air
mixture and help your engine run better and last longer.
Pleaserefer to your engine owner's manual for more
details.
BEFORE EACH USE
Check engineoil level.
Check water inlet screen for damage.
Check in-line filter for damage.
Check high pressure hose for leaks.
Check detergent siphoning tube and filter for damage.
Check spraygun and adjustable nozzle extension
assemblyfor leaks.
• Rinseout garden hose to flush out debris before
connecting to pressure washer.
PRESSURE WASH ER
MAINTENANCE
Check and Clean Inlet Screen
Examinethe screen on the water inlet. Clean it if the
screen isdogged or replace it if screen is damaged.
Check High Pressure Hose
The high pressure hosecan develop leaksfrom wear,
kinking, or abuse.Inspect the hose each time before using
it. Check for cuts, leaks,abrasions or bulging of cover,
damageor movement of couplings. If any of these
conditions exist, replace the hose immediately.
_WARNING! Water sprayingfrom a leak is
capable of injectingmaterial into skin. Inspect hose
each time before using it_ Never repair a high
pressure hose. Replace it with another hose that
exceeds the maximum pressure rating of your
pressure washer.
Check Detergent Siphoning Tube
Examinethe filter on the detergent tube and clean if
clogged. The tube should fit tightly on the barbed fitting.
Examine the tube for leaks or tears. Replacethe filter or
tube if either is damaged.
Cleaning Detergent Siphoning Tube
If you used the detergent siphoning tube, you must flush it
with clean water before stopping the engine.
• Placethe chemical injectionsiphon/filter in a bucket futl
of clean water.
• Attach the btack low pressure nozzle.
• Flush for 1-2 minutes.
• Shut off the engine.
IMPORTANT: Simply shutting OFF engine will not
release pressure in the system. When the engine has
shut down, squeeze the trigger on the spray gun to
relieve the pressure in the hose.
I
12

Generac Portable Products 2,500 PSIHigh PressureWasher
Check Gun and Nozzle Extension
Examinethe hose connection to the spray gun and make
sure it is secure. Test the trigger by pressing it and making
sure it "springs back" into place when you release it Put
the safety latch in the ON position and test the trigger. You
should not be able to press the trigger.
Check In-Line Filter
Refer to Figure 21 and service the in-linefilter if it
becomes clogged, as follows:
I.
2.
.
Filter Screen
Nozzle Extension _ _c_._f_
O-ring _'_
Detach spray gun and nozzle extension from high
pressure hose. Detach nozzle extension from spray
gun and remove o-ring and screen from nozzle
extension. Flushthe screen, spraygun, and adjustable
nozzle extension with clean water to clear debris.
if the screen is damaged,the o-ring kit contains a
replacement in-line filter screen and an o-ring. If
undamaged,reuse screen.
Placethe in-line filter screen into the threaded end of
the nozzle extension. Direction does not matter. Push
the screen in with the eraser end of a pencil until it
rests fiat at the bottom of the opening. Takecare to
not bend the screen.
4. Placethe o-ring into the recess. Pushthe o-ring snugly
againstthe in-line filter screen.
5. Assemble the nozzle extension to the spraygun, as
described earlier in this manual.
Purge Pump of Air and
Contaminants
To remove air from the pump, follow these steps:
•Set up the pressure washer as described in "Preparing
PressureWasher For Use". Connect the water supply
and turn water on.
• Pull the trigger on the spray gun and hold.
• When the water supply is steady and constant, engage
the safety latch.
To remove contaminants from the pump, follow
these steps:
• Set up the pressure washer as described in "Preparing
Pressure Washer For Use". Connect the water supply
and turn water on.
• Start the engine according to instructions in "To Start
Your Pressure Washer".
• Remove nozzle extension from spray gun.
• Squeezethe trigger on the spray gun and hold.
• When the water supply is steady and constant, engage
the safety latch and attach the nozzle extension.
Nozzle Maintenance
if a nozzle becomes restricted or clogged with foreign
materials, such as dirt, excessive pump pressure may
develop. A pulsing sensation occurs during use. This
generally is not a pump related problem, but rather a
clogged or partially restricted nozzle.
If a nozzle become clogged or partially restricted,
immediately clean it with the kit included with your
pressure washer by following these instructions:
• Shut off the engineand turn off the water supply.
• Remove the nozzle from the end of the nozzle extension.
• Use the wire includedin the kit or a small paper clip to
free the foreign materials clogging or restricting the
nozzle (Figure 22).
to remove
debris.
• Remove additional debris by rinsing out the nozzle. Rinse
between 30 to 60 seconds.
• Reinstall the nozzle into the nozzle extension.
• Reconnect the water supply,turn on the water, and start
the engine.
• Test the pressure washer.
/13
GeneracPortableProducts2,500PSIHighPressureWasher
O-Ring Maintenance
Through the normal operation of your pressure washer,
o-rings, which keep the connections of the hoses and spray
gun tight and leak-free, may become worn or damaged.
Provided with your pressure washer is an O-Ring
Maintenance Kit which includes replacement o-rings,
rubber washer and water inlet filter. Refer to the
instruction sheet provided in the kit to service your unit's
o-rings. Note that not all of the parts in the kit will be used
on your unit.
To remove a worn or damaged o-ring:
•Use a small flathead screwdriver to get underneath the
o-ring and pry it off.
ENGINE MAINTENANCE
See the engine owner's manual for instructions on how to
properly maintain the engine.
PREPARING THE UNIT
FOR STORAGE
Water should not remain in the unit for long periods of
time. Sediments or minerals can deposit on pump parts and
"freeze" pump action. If you do not plan to use the
pressure washer for more than 30 days, follow this
procedure:
I. Flush detergent siphoning tube by placing the filter into
a pail of clean water while running pressure washer in
low pressure mode. Flushfor one to two minutes.
2. Shut off the engineand let it cool, then remove all
hoses. Disconnect spark plugwire from spark plug.
3. Empty the pump of all pumped liquidsby pulling the
recoil handle about 6 times. This should remove most
of the liquidin the pump.
NOTE: To protect the unit from freezing temperatures,
draw RV antifreeze (non-alcohol) into the pump by pouring
the solution into a 3-foot section of garden hose connected
to inlet adapter and pulling recoil handle twice.
4. Store unit in a clean, dry area.
STORING THE ENGINE
See the engine owner's manual for instructions on how to
properly prepare the engine for storage.
I
14
Generac Portable Products 2,500 PSIHigh PressureWasher
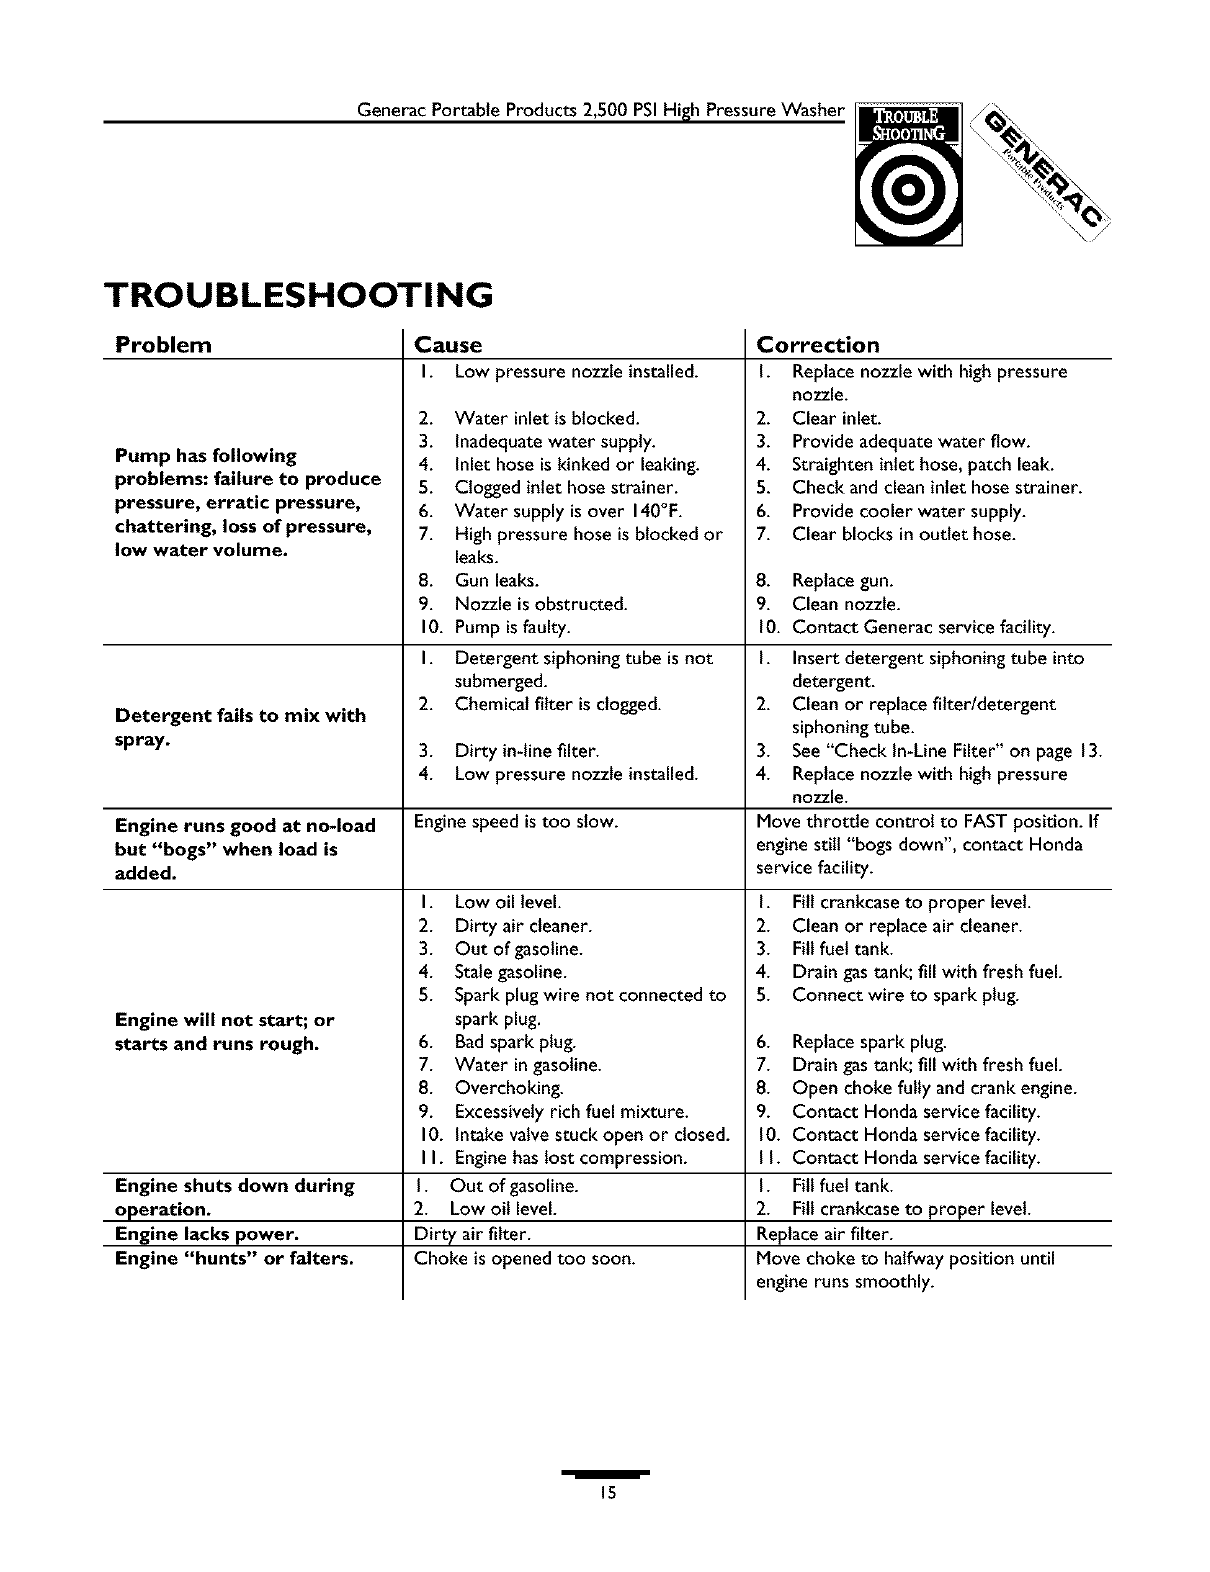
TROUBLESHOOTING
Problem
Pump has following
problems: failure to produce
pressure, erratic pressure,
chattering, loss of pressure,
low water volume.
Detergent fails to mix with
spray.
Cause
I. Low pressure nozzle installed.
2. Water inlet isblocked.
3. Inadequatewater supply.
4. Inlet hose is kinked or leaking.
5. Clogged inlet hose strainer.
6. Water supply is over 140°E.
7. High pressure hose is blocked or
leaks.
8. Gun leaks.
9. Nozzle is obstructed.
10. Pump is faulty.
I. Detergent siphoning tube is not
submerged.
2. Chemicat filter is clogged.
3. Dirty in-line filter.
4. Low pressure nozzle installed.
Engine runs good at no-load Engine speed is too slow.
but "bogs" when load is
added.
Engine will not start; or
starts and runs rough.
Engine shuts down during
operation.
Engine lacks power.
Engine "hunts" or falters.
I. Low oil level.
2. Dirty air cleaner.
3. Out of gasoline.
4. Stalegasoline.
5. Spark plug wire not connected to
spark plug.
6. Badspark plug.
7. Water ingasoline.
8. Overchoking.
9. Excessivelyrich fuel mixture.
10. Intake valvestuck open or closed.
I I. Enginehas lostcompression.
I. Out of gasoline.
2. Low oil level.
Dirty air filter.
Choke is opened too soon.
Correction
I. Replace nozzle with high pressure
nozzle.
2. Clear inlet.
3. Provide adequate water flow.
4. Straighten inlet hose, patch leak.
5. Check and clean inlet hose strainer.
6. Provide cooler water supply.
7. Clear blocks in outlet hose.
8. Replacegun.
9. Clean nozzle.
10. Contact Generac service facility.
I. Insert detergent siphoning tube into
detergent.
2. Clean or replace filter/detergent
siphoning tube.
3. See"Check In-Line Filter" on page 13.
4. Replacenozzle with high pressure
nozzle.
Move throttle control to FASTposition. If
enginestill "bogs down", contact Honda
service facility.
I. Fill crankcaseto proper level.
2. Clean or replace air cleaner.
3. Fill fuel tank.
4. Drain gastank; fill with fresh fuel.
5. Connect wire to spark plug.
6. Replacespark plug.
7. Drain gastank; fill with fresh fuel.
8. Open choke fully andcrank engine.
9. Contact Honda service facility.
10. Contact Honda service facility.
I I. Contact Honda service facility.
I. Fill fuel tank.
2. Fill crankcaseto proper level.
Replace air filter.
Move choke to halfway position until
engine runs smoothly.
/15
I
j/_ I
Generac Portable Products 2,500 PSIHigh PressureWasher
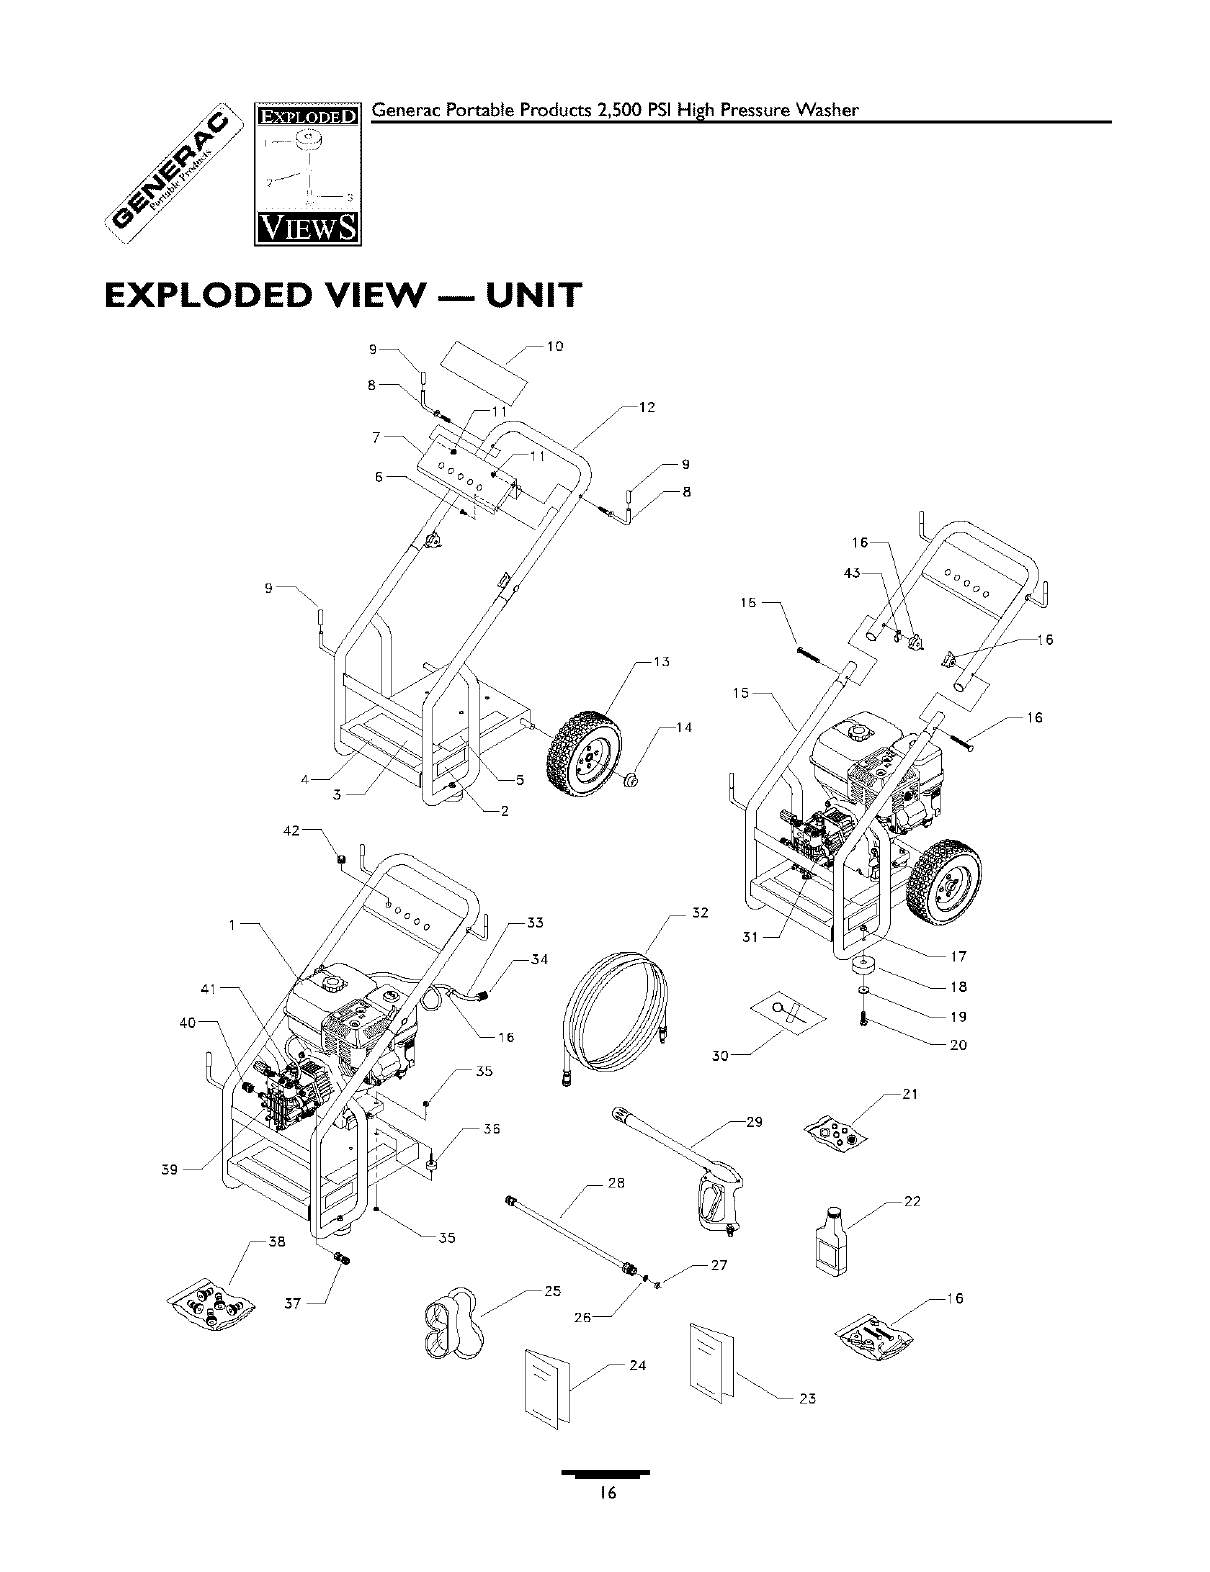
EXPLODED VIEW --- UNIT
9_ \\
3
_2
42_ \
_14
/
15_ \
\\
\\\\\
41_ \\
24
/
16
Generac Portable Products 2,500 PSIHigh PressureWasher
I
l/!
m
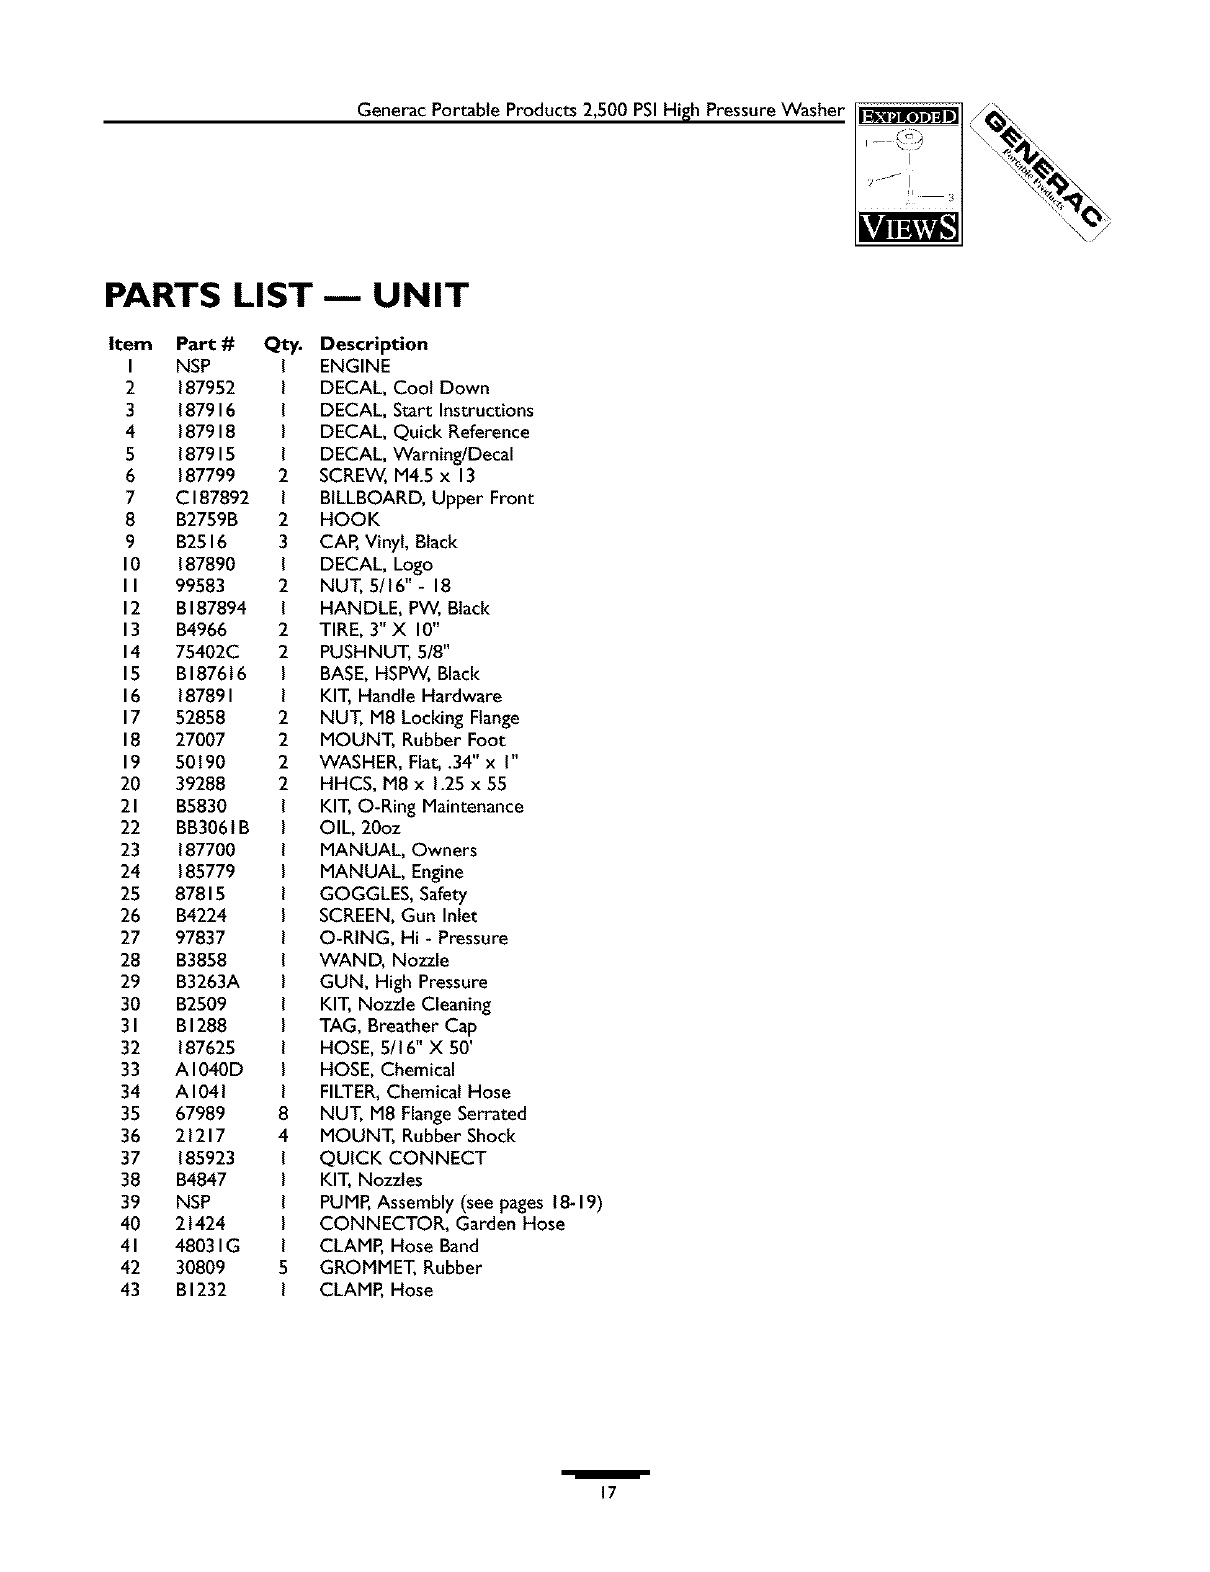
PARTS LIST--- UNIT
Item Part#
I NSP
2 187952
3 187916
4 187918
5 187915
6 187799
7 CI87892
8 B2759B
9 B2516
10 187890
II 99583
12 BI87894
13 B4966
14 75402C
15 BI87616
16 187891
17 52858
18 27007
19 50190
20 39288
21 B5830
22 BB3061B
23 187700
24 185779
25 87815
26 B4224
27 97837
28 B3858
29 B3263A
30 B2509
31 BI288
32 187625
33 AI040D
34 AI041
35 67989
36 21217
37 185923
38 B4847
39 NSP
40 21424
41 48031G
42 30809
43 BI232
Qty. Description
ENGINE
DECAL, Cool Down
DECAL, Start Instructions
DECAL, Quick Reference
DECAL, Warning/Decal
SCREW, M4.5 x 13
BILLBOARD, Upper Front
HOOK
CAP, Vinyl, Black
DECAL, Logo
NUT, 5/16" - 18
HANDLE, PW, Black
TIRE, 3" X 10"
PUSHNUT, 5/8"
BASE,HSPW, Black
KIT, Handle Hardware
NUT, M8 Locking Flange
MOUNT, Rubber Foot
WASHER, Flat, .34" x I"
HHCS, M8 x 1.25 x 55
KIT, O-Ring Maintenance
OIL, 20oz
MANUAL, Owners
MANUAL, Engine
GOGGLES, Safety
SCREEN,Gun Inlet
O-RING, Hi - Pressure
WAND, Nozzle
GUN, High Pressure
KIT, Nozzle Cleaning
TAG, Breather Cap
HOSE, 5/16" X 50'
HOSE, Chemical
FILTER,Chemical Hose
NUT, M8 FlangeSerrated
MOUNT, Rubber Shock
QUICK CONNECT
KIT, Nozzles
PUMP,Assembly (see pages 18-19)
CONNECTOR, Garden Hose
CLAMP, Hose Band
GROMMET, Rubber
CLAMP, Hose
/
17

I
? j/_ I
Generac Portable Products 2,500 PSIHigh PressureWasher
EXPLODED VIEW 1PUMP
4¸31
52
31
21 3O
20
37 41
37
52
t3 50
45
17
/
18
Generac Portable Products 2,500 PSIHigh PressureWasher
I
l/!
m
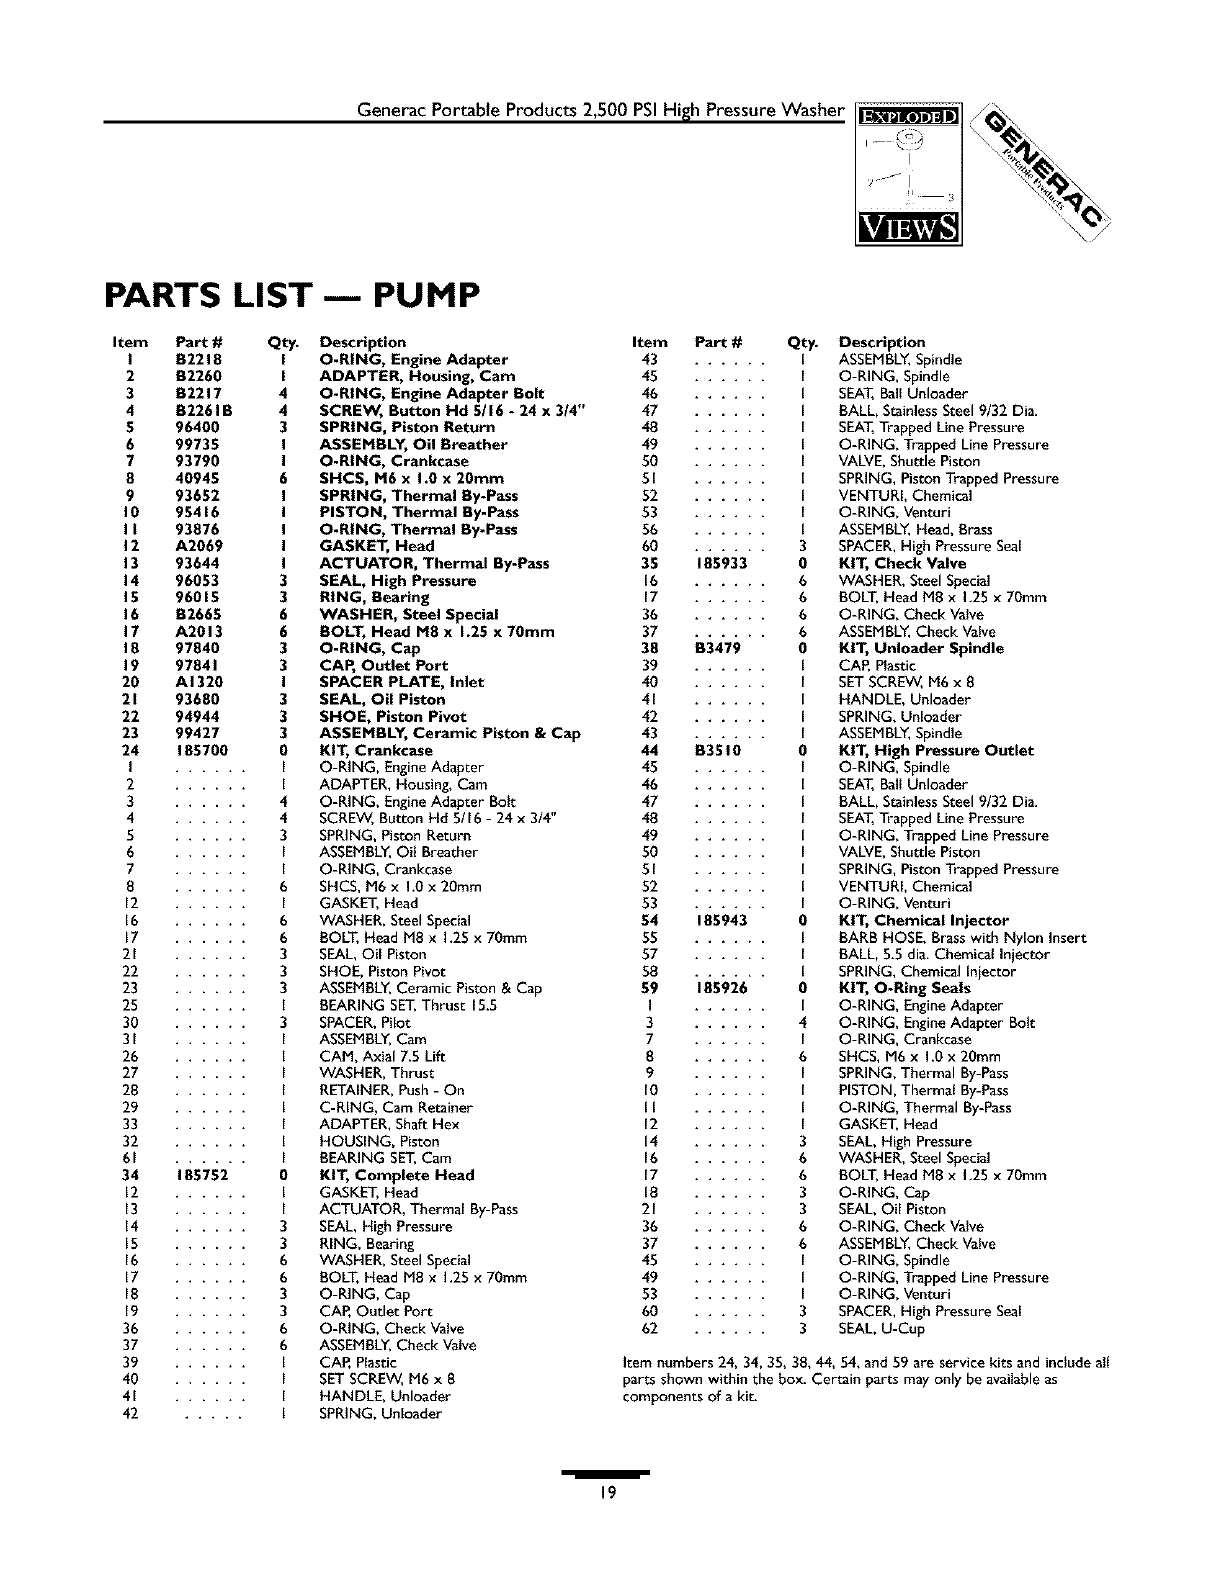
PARTS LIST-- PUMP
Item Part#
IB2218
2 B2260
3 B2217
4 B2261B
5 96400
6 99735
7 93790
B 40945
9 93652
10 95416
II 93876
12 A2069
13 93644
14 96053
IS 96015
16 B2665
17 A2013
18 97840
19 97841
20 AI320
21 93680
22 94944
23 99427
24 185700
2 ......
3 ......
4 ......
S ......
6 ......
7 ......
8 ......
12 ......
16 ......
17 ......
21 ......
22 ......
23 ......
25 ......
30 ......
31 ......
26 ......
27 ......
28 ......
29 ......
33 ......
32 ......
61
34 185752
12 ......
13 ......
14 ......
15 ......
16 ......
17 ......
18 ......
19 ......
36 ......
37 ......
39 ......
40 ......
41 ......
42 .....
Qty. Description
O-RING, Engine Adapter
ADAPTER, Housing, Cam
O-RING, Engine Adapter Bolt
SCREW, Button Hd 5116 -24 x 3/4"
SPRING, Piston Return
ASSEMBLY, Oil Breather
O-RING, Crankcase
SHCS, M6 x 1.0 x 20mm
SPRING, Thermal By-Pass
PISTON, Thermal By-Pass
O-RING, Thermal By-Pass
GASKET, Head
ACTUATOR, Thermal By-Pass
SEAL, High Pressure
RING, Bearing
WASHER, Steel Special
BOLT, Head M8 x 1.25 x 70mm
O-RING, Cap
CAP, Outlet Port
SPACER PLATE, Inlet
SEAL, Oil Piston
SHOE, Piston Pivot
ASSEMBLY, Ceramic Piston & Cap
KIT, Crankcase
O-RING, EngineAdapter
ADAPTER, Housing, Cam
O-RING, Engine Adapter Bolt
SCREW, Button Hd 5/16 - 24 x 3/4"
SPRING, Piston Return
ASSEMBLY,Oil Breather
O-RING, Crankcase
SHCS, M6 x 1.0x 20mm
GASKET, Head
WASHER, Steel Special
BOLT, Head M8 x 1.25 x 70ram
SEAL,OilPiston
SHOE, Piston Pivot
ASSEMBLY,Ceramic Piston & Cap
BEARING SET,Thrust 15.5
SPACER,Pilot
ASSEMBLY,Cam
CAM, Axial 7.5 Lift
WASHER, Thrust
RETAINER, Push- On
C-RING, Cam Retainer
ADAPTER, Shaft Hex
HOUSING, Piston
BEARING SET,Cam
KIT, Complete Head
GASKET, Head
ACTUATOR, Thermal By-Pass
SEAL, High Pressure
RING, Bearing
WASHER, Steel Special
BOLT, Head M8 x 1.25 x 70ram
O-RING, Cap
CAR Outlet Port
O-RING, Check Valve
ASSEMBLY,Check Valve
CAR Plastic
SET SCREW, M6 x 8
HANDLE, Unloader
SPRING, Unloader
Item Part#
43 ......
45 ......
46 ......
47 ......
48 ......
49 ......
50 ......
51 ......
52 ......
53 ......
56 ......
60
35 185933
16 ......
17 ......
36 ......
37
38 B3479
39 ......
40 ......
41 ......
42 ......
43
44 B3510
45 ......
46 ......
47 ......
48 ......
49 ......
50 ......
51 ......
52 ......
53
54 185943
55 ......
57 ......
58
59 185926
3 ......
7 ......
8 ......
9 ......
l0 ......
II ......
12 ......
14 ......
16 ......
17 ......
18 ......
21 ......
36 ......
37 ......
45 ......
49 ......
53 ......
60 ......
62 ......
Qty. Description
ASSEMBLY,Spindle
O-RING, Spindle
SEAT,Ball Unloader
BALL, StainlessSteel 9/32 Dia.
SEAT,Trapped Line Pressure
O-RING, Trapped Line Pressure
VALVE,Shuttle Piston
SPRING, Piston Trapped Pressure
VENTURI, Chemical
O-RING, Venturi
ASSEMBLY,Head, Brass
SPACER,High Pressure Seal
KIT, Check Valve
WASHER, Steel Special
BOLT, Head M8 x 1.25 x 70ram
O-RING, Check Valve
ASSEMBLY,Check Valve
KIT, Unloader Spindle
CAP, Plastic
SET SCREW, M6 x 8
HANDLE, Unloader
SPRING, Unloader
ASSEMBLY,Spindle
KIT, High Pressure Outlet
O-RING, Spindle
SEAT,Ball Unloader
BALL, StainlessSteel 9/32 Dia.
SEAT,Trapped Line Pressure
O-RING, Trapped Line Pressure
VALVE,Shuttle Piston
SPRING, Piston Trapped Pressure
VENTURI, Chemical
O-RING, Venturi
KIT, Chemical Injector
BARB HOSE, Brass with Nylon Insert
BALL, 5.5 dia. Chemical InjectOr
SPRING, Chemical Iniector
KIT, O-Ring Seals
O-RING, Engine Adapter
O-RING, Engine Adapter Bolt
O-RING, Crankcase
SHCS, M6 x 1.0 x 20mm
SPRING, Thermal By-Pass
PISTON, Thermal By-Pass
O-RING, Thermal By-Pass
GASKET, Head
SEAL, High Pressure
WASHER, Steel Special
BOLT, Head M8 x 1.25 x 70ram
O-RING, Cap
SEAL,OilPiston
O-RING, Check Valve
ASSEMBLY,Check Valve
O-RING, Spindle
O-RING, TrappedLinePressure
O-RING, Venturi
SPACER, HighPressureSeal
SEAL, U-Cup
Item numbers 24, 34, 35, 38, 44, 54, and 59 are service kits and includeall
parts shown within the box. Certain parts may only be available as
components of a kit.
/
19
Lavadorade Alta Preslbn 2,500 PSIde Generac Portable Products
DESCRIPCION DEL
EQUlPO
FELICIDADES en la compra de su lavador a alta presibn
GENERAC. Este ha sido dise_ado, fabricado y creado para darle
el mayor rendimiento y eficada posible.
Este manual contiene informaci6n referente el lavador a alta
presibn que funciona a 2,500 psi, a un promedio de flujo de
3.0 galones por minuto. Este sistema profesional de alto poder y
de alta calidad, posee una Ilanta de 10pulgadas,una bomba
equipada con un sistema de enfriamiento, un sistema de inyecci6n
qulmica, un descargador ajustable, una extensi6n de lanzasque se
pueden conectar r_pidamente, gafas de seguridad, una manguera
de alta resistencia de 50 piesy muchtsimo m_s.
Por favor, lea y conserve este manual. Las instrucciones le
permitir_n ensamblar la unidad y mantener su lavador a alta
presibn funcionando adecuadamente.
Se han hechos todos los esfuerzos necesarios para asegurar que
la informacibn que aparece en este manual es tanto exacta como
actualizada.
Sin embargo, Generac se reserva el derecho de cambiar, alterar o
de otra manera, mejorar el producto y sus respectivos
documentos en cualquier momento, sin previo aviso.
En el caso de que usted tenga un problema que no pueda resolver
f_cilmente, Ilame la llnea directa del lavador a alta presi6n, al
1-800-270-1408.
RESPONSABILIDADES DEL
CLIENTE
Lea y cumpla con los reglamentos de seguridad.
Sigael plan regular de mantenimiento, de cuidado y del uso de
su lavador a alta presibn.
Parael almacenamiento por largos perlodos de tiempo, revise
"Preparando la Unidad para su Almacenamiento" en la
p_gina32.
INSTRUCCIONES DE
SEGURIDAD
iPRECAUCI_N! Cuando transporte, instale,ajuste o
_haga reparaciones a su mgquina lavadora de alta presi6n,
siempre desconecte el alambre de la bujta y col6quelo
donde No pueda entrar en contacto con la bujta.
_L |PELIGRO! Los gasesdel sistemade escapedel motor
contienen gas de monbxido de carbono MORTAL. Sieste
gaspeligroso se inhalaen concentraciones suficientes,
puede causarp_rdida de la consciencia oinclusola
muerte. Opere este equipo 6nicamenteal aire libre, donde
exista ventilaci6n adecuada.
_PELIGRO! La gasolinaes altamente INFLAMABLE ysus vapores son EXPLOSIVOS.No permita que fumen,
que existan llamasabiertas, chispaso calor a su alrededor
cuando manipule gasolina.Evite regar gasolina sobre un
motor caliente. Permita que la unidad se enfrte antes de
volver a colocarle combustible. Cumpla con todas las leyes
que regulan el almacenamiento y el manejo de gasolina.
Lea este manual minuciosamente yconozca a fondo las
partes y el funcionamiento de su mgquina lavadora a
presi6n. Conozca susaplicaciones, sus limitaciones ylos
peligros involucrados.
Coloque esta m_quina lavadora a presibnen greas alejadas de
materiales combustibles, humos opolvo combustibles.
El equipo de alta presi6n est_ disehado para ser utilizado
UNICAMENTE con laspartes autorizadas Generac. Si
utiliza este equipo con partes que no cumplan con las
especificaciones mtnimas, el usuario asume todos los riesgos y
responsabilidades.
Algunos quimicos o detergentes pueden ser nocivos si se
inhalanoingieren,causando nguseasevera, desmayoso
envenenamiento. Los elementos nocivos pueden ocasionar
da_o a la propiedad olesiones severas.
No permita en ning6n momento que NIKIOS operen la
mgquina lavadora a presi6n.
/
20
Lavadora de Alta Presi6n 2,500 PSIde Generac Portable Products
Opere el motor 6nicamente a la velocidad de mando. Hacer
funcionar el motor a velocidades excesivasaumenta el riesgo
de lesiones personales. No juegue con partes que puedan
aumentar o disminuir la velocidad de mando.
No use ropa suelta, joyas oelementos que puedan quedar
atrapados en el arranque o en otras partes rotatorias.
Antes de poner en marcha la m_quina lavadora a presi6n en
clima frio, revise todas las partes del equipo y aseg6resede
que no se haya formado hielo sobre elias.
Nunca utilice una pistola de rociado que no tenga un seguro
paragatillo o protecci6n para gatillo en su lugar yen buenas
condiciones.
Mantenga conectada la manguera a la m_quina oa la pistola de
rociado cuando el sistema est_ presurizado. Es peligroso
desconectar la manguera cuando la unidad est_ presurizada.
Nunca deber_n ser operadas las unidades con partes rotas o
ausentes, o sin la caja o cubiertas de protecci6n.
Reviseque el sistema de combustible no presente fugas o
signos de deterioro, como mangueras desgastadaso porosas,
sujetadores flojos oausentes, tapa otanque dahados. Corrija
todos los defectos antes de operar la m_quina lavadora a
presi6n.
No rocie llquidos inflamables.
Utilice un respirador o m_scara siempre que exista la
posibilidad de inhalar vapores. Lea todas las instrucciones de
la m_scarapara asegurarse de que le brindar_ la protecci6n
necesaria contra la inhalaci6n de vapores nocivos.
Nunca apunte la pistola a la gente, animaleso plantas. La
corriente de agua de alta presibn que produce este equipo
pueden perforar la piel y sus tejidos profundos, ocasionando
lesiones serias y posible amputaci6n.
Nunca permita que partes del cuerpo entren en contacto
con la corriente del fluido. No entre en contacto con la
corriente del fluido creada por una fuga en la manguera de
alta presibn.
Siempre use proteccibn para los ojos cuando utilice este
equipo o cuando est_ cerca de donde se est_ usando el
equipo.
El rociado de alta presibn puede hacer que particulas
peque_asde pintura u otras particulas salgandisparadasy
viajen a altas velocidades.
No opere la m_quina lavadora a presibn con un valor de
presibn superior a su clasificacibn de presibn.
Nunca mueva la m_quina halando la manguera de alta
presibn. Utilice la manija que viene con la unidad.
Siempre asegOresede que la pistola de rociado, boquillas y
accesorios est_n conectados correctamente.
No asegure la pistola de rociado en la posicibn (open =
abierto).
El rociado de alta presi6n puede da_ar elementos fr_giles,
incluyendo el vidrio. No apunte la pistola de rociado al vidrio
cuando est_ en el modo de rociado a chorro.
Sostengafirmemente en su mano la manguera de rociado
antes de poner en marcha la unidad. De no hacerlo, podrian
ocurrir lesiones por el movimiento brusco de la pistola de
rociado. No abandone la pistola de rociado cuando la
mgquina est_ en funcionamiento.
El grea de limpieza deber_ tener inclinaciones y drenajes
adecuados para disminuir la posibilidad de catdasdebido a
superficies resbalosas.
Mantenga el chorro del agua alejado de alambrados el_ctricos,
de Io contrario podrtan ocurrir descargasel_ctricas fatales.
No eluda ningOndispositivo de seguridad de esta mgquina.
El silenciador y el motor se calientan durante el
funcionamiento y permanecen calientes inmediatamente
despu_s del apagado. Evite el contacto con silenciadores o
motores calientes, o podrta quemarse severamente.
Opere y almacene esta unidad sobre una superficie estable.
La manguera de alta presibn puede desarrollar fugas debido al
desgaste, dobleces, abuso, etc. El agua que sale de una fuga es
capaz de inyectar materiales en la pieL lnspeccione la
manguera siempre que la vaya a usar. Revisetodas las
mangueras para ver si presentan cortes, fugas, abrasiones o
deformacibn de la cubierta, daho omovimiento de
acoplamientos. Si existe cualquiera de estas condiciones,
remplace la manguera inmediata-mente.Nunca repare la
manguera de alta presibn. Remplacela con una manguera que
tenga la misma capacidadde presibn m_xima de su unidad.
El silenciador y el depurador de aire deber_n estar instalados
yen buenas condiciones antes de operar la m_quina lavadora
a presi6n. Estos componentes act_an como apagachispassi el
motor presenta contrafuegos.
Enel estado de California es obligatorio, segOnla ley,el uso de
apagachispas(Seccibn 4442 del Cbdigo de Recursos POblicosde
California). Otros estados pueden tener leyes similares. Las leyes
federales se aplican en tierras federales.
NOTA: Si equipa el silenciador con un apagachispas,este deber_
ser mantenido en buenas condiciones de trabajo. Usted puede
ordenar el apagachispasa tray,s de su distribuidor de servicio
autorizado Honda.
/
21
Lavadorade Alta Preslbn 2,500 PSIde Generac Portable Products
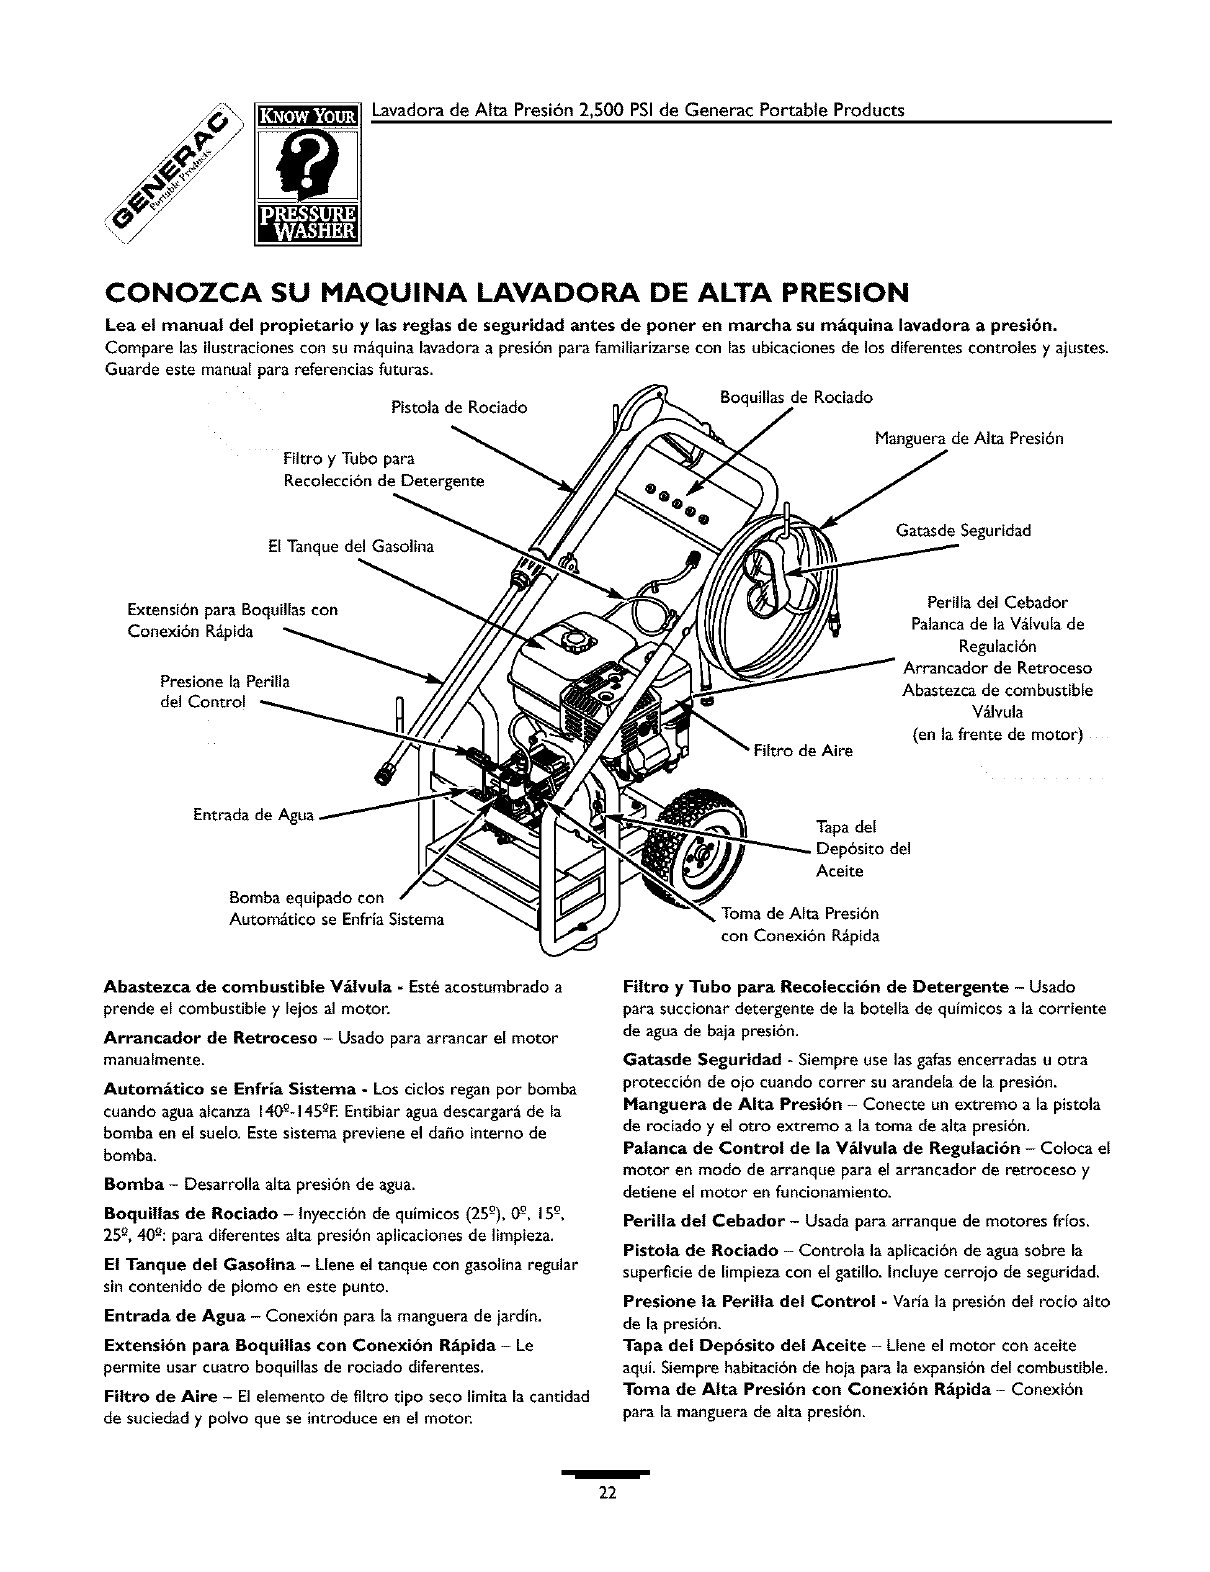
CONOZCA SU MAQUINA LAVADORA DE ALTA PRESION
Lea el manual del propietario y las reglas de seguridad antes de poner en marcha su m_quina lavadora a presi6n.
Compare las ilustracionescon su m_quina lavadora a presi6n para familiarizarse con las ubicaciones de los diferentes controles y ajustes.
Guarde este manual para referencias futuras.
Pistola de Rociado
Filtro y Tubo para
Recolecci6n de Detergente
Boquillas de Rociado
Manguera de Alta Presibn
El Tanque del Gasolina
Extensibn para Boquillas con
Conexibn R_pida
Presione la Perilla
del Control
tro de Aire
Gatasde Seguridad
Perilla del Cebador
Palancade la V_Ivula de
Regulaci6n
Abastezca de combustible
Vglvula
(en la frente de motor)
Entrada de Agua
Bomba equipado con
Automgtico se EnfriaSistema
Tapa del
ep6sito del
Aceite
Toma de Alta Presi6n
con Conexi6n R_pida
Abastezca de combustible Vglvula - Est_ acostumbrado a
prende el combustible y lejos al motor.
Arrancador de Retroceso - Usado para arrancar el motor
manualmente.
Autom_tico se Enfria Sistema - Los ciclos regan pot bomba
cuando agua alcanza 140-°-145-oEEntibiar agua descargar_ de la
bomba en el suelo. Este sistema previene el da6o interno de
bomba.
Bomba - Desarrolla alta presi6n de agua.
Boquillas de Rociado - lnyeccibn de quimicos (25-°), 0-°, 15-°,
25-°, 40-°: para diferentes alta presi6n aplicaciones de limpieza.
El Tanque del Gasolina - Llene el tanque con gasolina regular
sin contenido de plomo en este punto.
Entrada de Agua - Conexi6n para la manguera de iardin.
Extensi6n para Boquillas con Conexi6n Rgtpida - Le
permite usar cuatro boquillas de rociado diferentes.
Filtro de Aire - El elemento de filtro tipo seco limita la cantidad
de suciedad y polvo que se introduce en el motor.
Filtro y Tubo para Reeoleeci6n de Detergente - Usado
para succionar detergente de la botella de qulmicos a la corriente
de agua de baja presi6n.
Gatasde Seguridad - Siempre use las gafasencerradas u otra
protecci6n de oio cuando correr su arandela de la presi6n.
Manguera de Alta Presi6n - Conecte un extremo a la pistola
de rociado y el otro extremo a la toma de alta presi6n.
Patanca de Control de la Vglvula de Regulaci6n - Coloca el
motor en modo de arranque para el arrancador de retroceso y
detiene el motor en funcionamiento.
Perilla del Cebador - Usada para arranque de motores frtos.
Pistola de Rociado - Controla la aplicacibn de agua sobre la
superficie de limpieza con el gatillo. Incluye cerrojo de seguridad.
Presione la Perilla del Control - Varla la presi6n del rocto alto
de la presi6n.
Tapa del Dep6sito del Aceite - Llene el motor con aceite
aqui. Siempre habitaci6n de hoia para la expansi6n del combustible.
Toma de Alta Presi6n con Conexi6n Rgpida- Conexi6n
para la manguera de alta presi6n.
I
22
Lavadora de Alta Preslbn 2,500 PSIde Generac Portable Products
IMPORTANTE: Lea totalmente el manual del propietario
antes que {ntente ensamblar u operar su lavador a alta
presi6n.
REMUEVA EL LAVADOR A
ALTA PRESION DEL
EMPAQUE
Remueva [a caja con las piezas, incluidascon el lavador de alta
presi6n.
Corte dos esquinas en los extremos del cart6n desde la parte
superior hasta la parte inferior, de tal manera que el p_nel
_uedaser doblado en forma plana,luego quite todo el
material de embalaie.
Ruede el lavador a alta presi6n fuera de la caja.
Contenido de la caja
Los articulos que se encuentran en la caja son:
Unidadprincipal
Caia de accesorios (incluye Io siguiente):
Manguera de Alta Presi6n
Manubrio
Botella de Aceite para Motor
Tarieta de Registro del Propietario
Gafas de Seguridad
Juego de Limpieza de la Lanza
Juego de Mantenimiento del Anillo-O
Manual del Propietario
Manual del Motor
Tarieta de Garantta del Motor
Tarieta de Garantta de Control de Emisiones
Pistola Rociadora con las Piezasde Conexi6n R_pida
Extensibn de la Lanza con las Piezasde Conexi6n
R_pida
Bolsa con 5 Lanzasde Conexiones R_pidasMulticolores
Piezaspara la manubrio (incluye Io siguiente):
Perno del Soporte (2)
Perilla Pl_stica (2)
Gancho "J"
Clip Detergente de la Manga
Si una de las partes que se mencionan arriba se encuentran
daffadas o hacen falta, Ilame a la Ifnea directa del lavador a alta
presi6n, al 1-800-270-1408.
PREPARANDO EL
LAVADOR A ALTA
PRESION PARA SU USO
Si usted tiene un probiema al ensamblar la unidad o si hacen falta
algunaspiezaso se encuentran dahadas, Ilame a la linea directa del
lavador a alta presibn, al 1-800-270-1408.
A prepara su arandela de la presi6n para la operaci6n,
usted necesitarg a realiza estas tareas:
Lleney mande en la tarjeta de matricula.
Conecte la manecilla a la unidad principal.
ASada aceite al motor.
ASadagasolinaal tanque de combustible.
Conecte la manguera a alta presi6n a la pistola rociadora y a
la bomba.
Conecte el suministro de agua a la bomba.
Fijar el Manubrio
NOTA: Todaslas operaciones de ensamble proporcionadas en
esta secci6n, ser_n descritas desde la perspectiva del considerar
de la lavadora a presi6n desde su parte posterior.
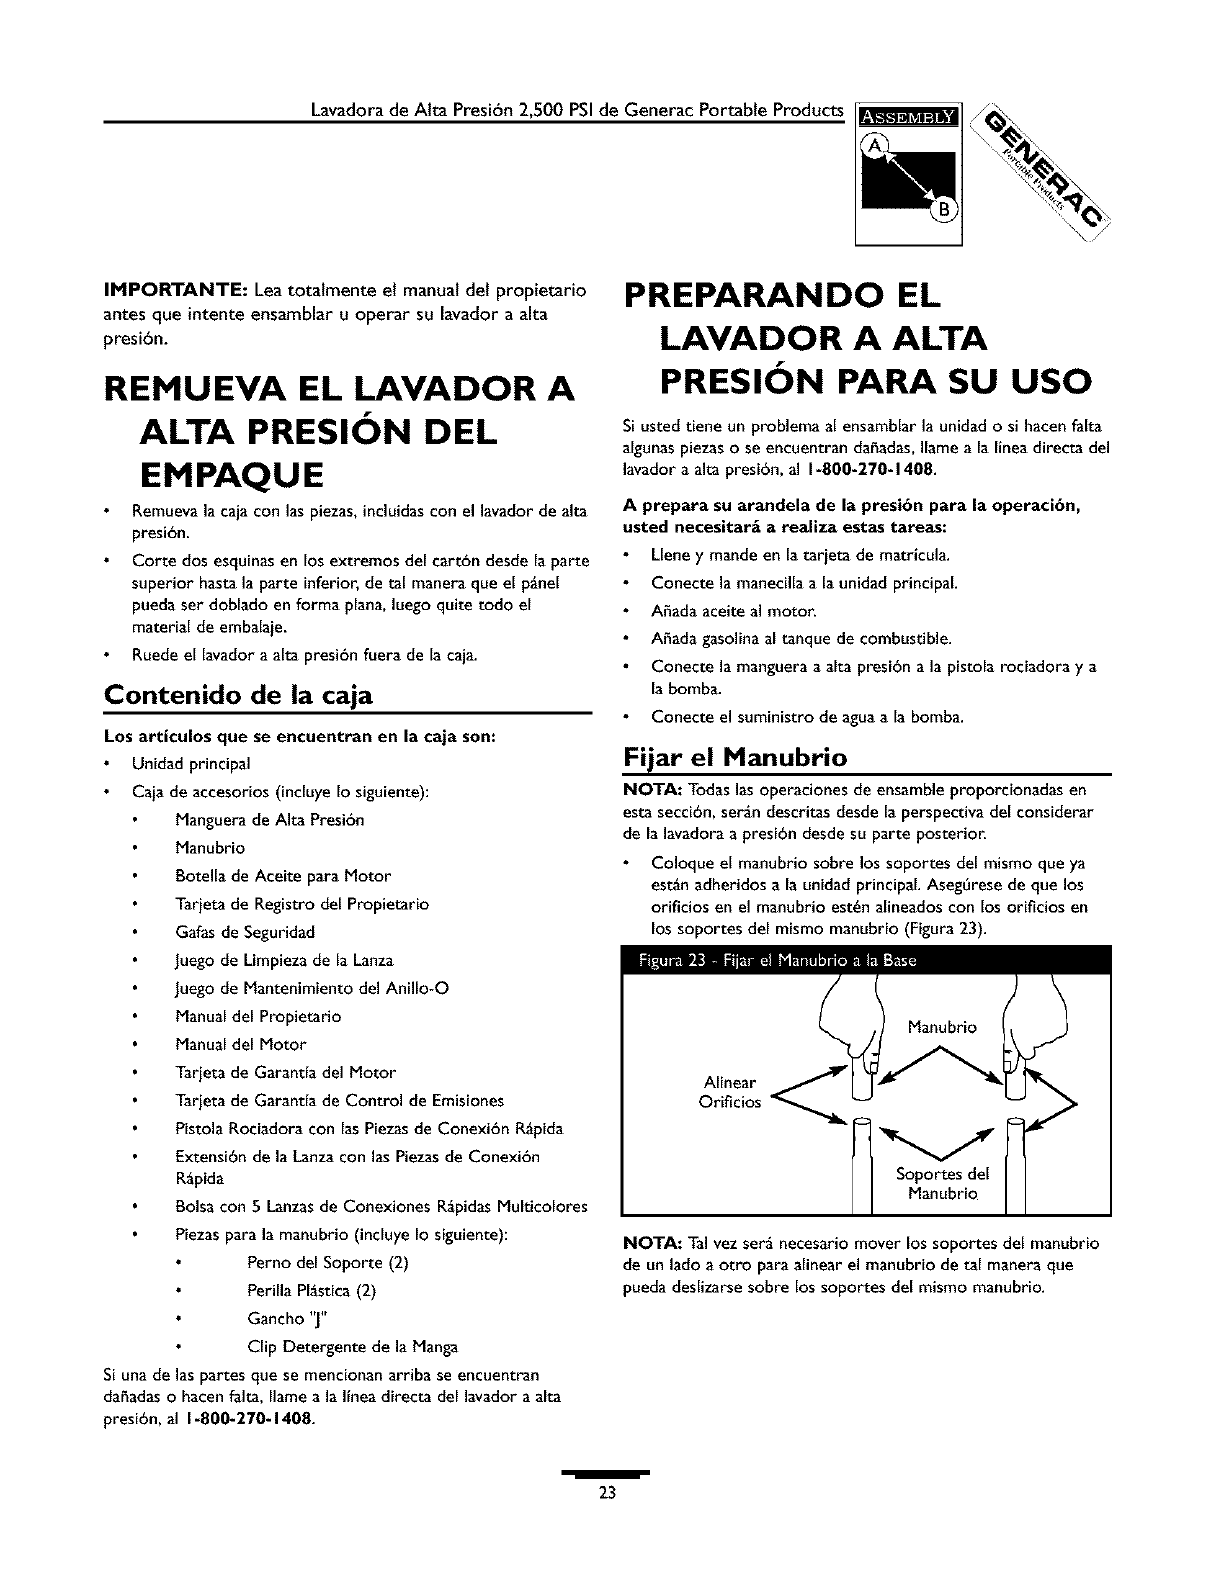
Coloque el manubrio sobre los soportes del mismo que ya
est_n adheridos a la unidad principal. AsegSrese de que los
orificios en el manubrio est_n alineados con los orificios en
los soportes del mismo manubrio (Figura 23).
Alinear
Oriflcios
Soportes del
Manubrio
NOTA: Tal vez ser_, necesario mover los soportes del manubrio
de un lado a otro para alinear el manubrio de tal manera que
pueda deslizarse sobre los soportes del mismo manubrio.
I
23
Lavadorade Alta Preslbn 2,500 PSIde Generac Portable Products
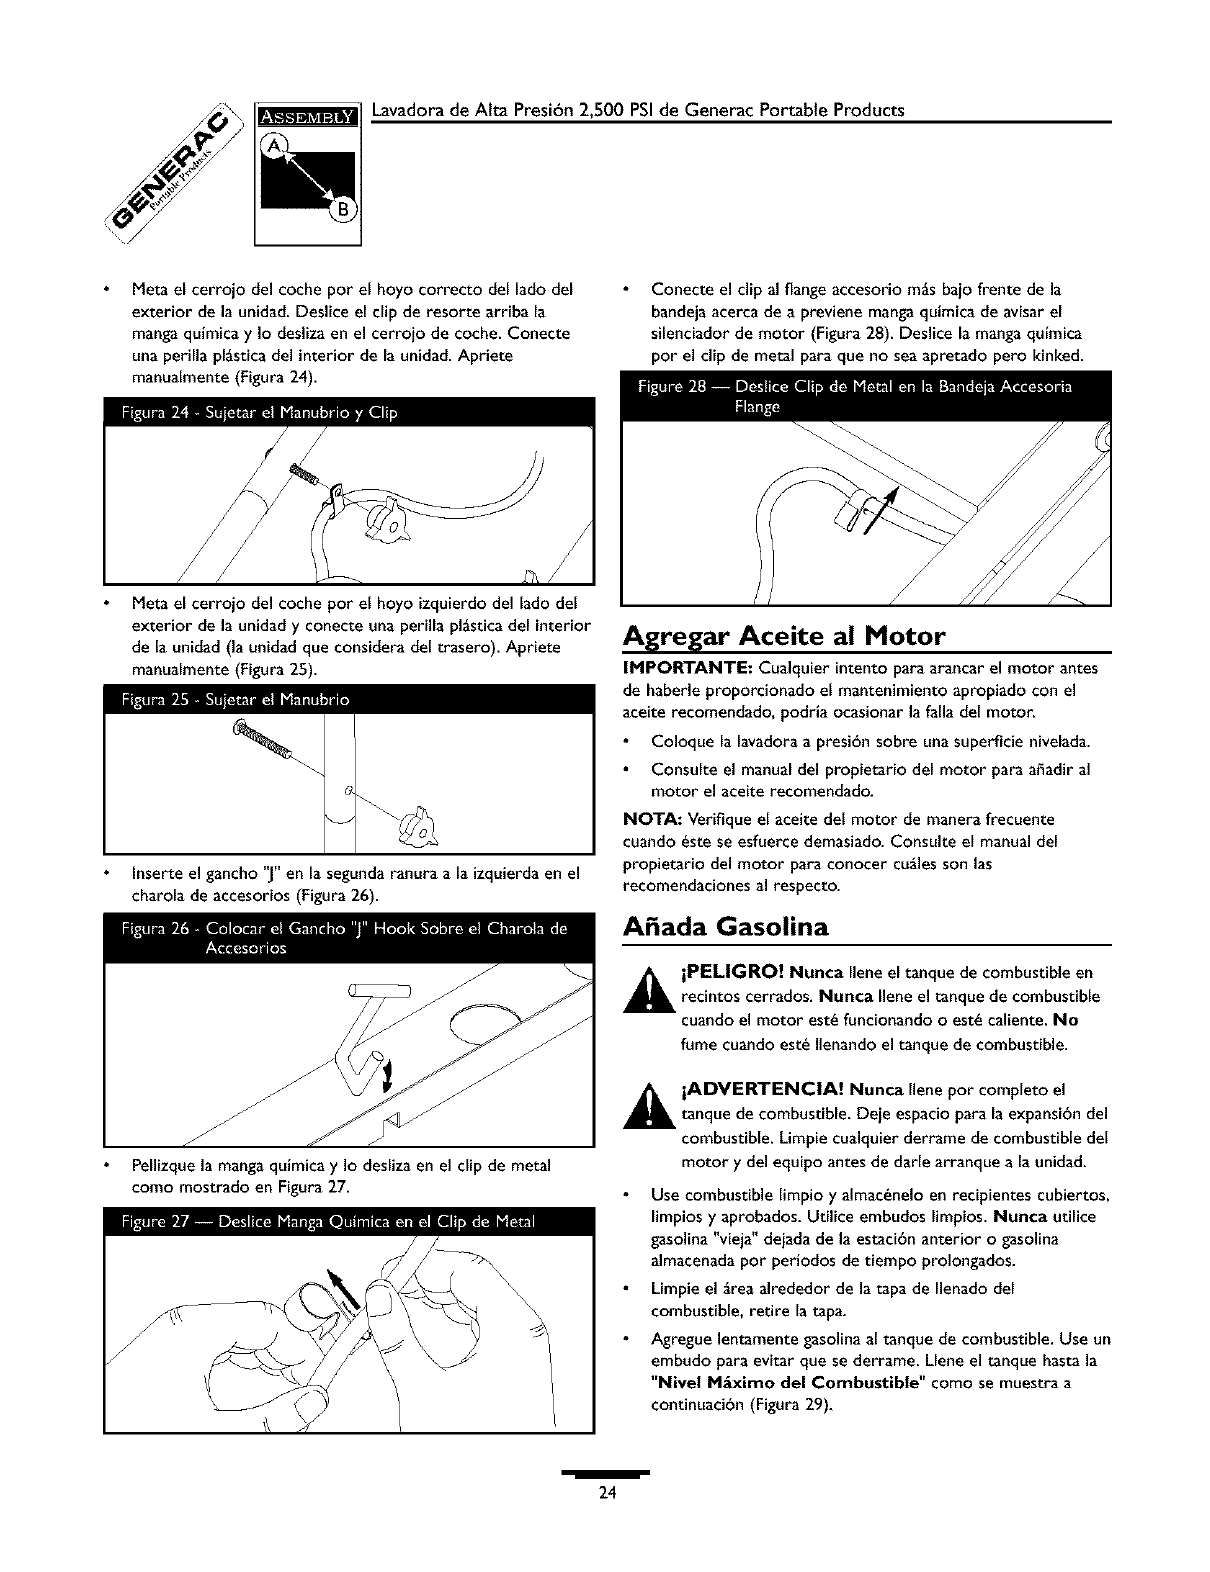
Meta el cerrojo del coche pot el hoyo correcto del lado del
exterior de la unidad. Deslice el clip de resorte arriba la
mangaqulmica y Io desliza en el cerrojo de coche. Conecte
una perilla pl_stica del interior de la unidad. Apriete
manualmente (Figura 24).
Conecte el clip al flange accesorio m_s bajo frente de la
bandeja acerca de a previene mangaquimica de avisar el
silenciador de motor (Figura 28). Deslice la manga qufmica
por el clip de metal para que no seaapretado pero kinked.
Meta el cerrojo del coche por el hoyo izquierdo del lado del
exterior de la unidad y conecte una perilla pl_sticadel interior
de la unidad (la unidad que considera del trasero). Apriete
manualmente (Figura 25).
G
Inserte el gancho "j" en la segunda ranura a la izquierda en el
charola de accesorios (Figura 26).
Pellizque la mangaquimica y Io desliza en el clip de metal
como mostrado en Figura 27.
Agregar Aceite al Motor
IMPORTANTE: Cualquier intento para arancar el motor antes
de haberle proporcionado el mantenimiento apropiado con el
aceite recomendado, podria ocasionar la falla del motor.
Coloque la lavadora a presibn sobre una superficie nivelada.
Consulte el manual del propietario del motor para a_adir al
motor el aceite recomendado.
NOTA: Verifique el aceite del motor de manera frecuente
cuando _ste se esfuerce demasiado. Consulte el manual del
propietario del motor para conocer cuglesson las
recomendaciones al respecto.
A ada Gasolina
_ PELIGRO! Nunca Ilene el tanque de combustible en
recintos cerrados. Nunca Ilene el tanque de combustible
cuando el motor est_ funcionando o est_ caliente. No
fume cuando est_ Ilenando el tanque de combustible.
_k iADVERTENCIA! Nunca Ilene por completo el
tanque de combustible. Deje espacio para la expansibn del
combustible. Limpie cualquier derrame de combustible de[
motor y del equipo antes de darle arranque a la unidad.
Use combustible limpio y almac_nelo en recipientes cubiertos,
limpios y aprobados. Utilice embudos limpios. Nunca utilice
gasolina"vieja" dejada de la estacibn anterior o gasolina
almacenada por periodos de tiempo prolongados.
Limpie el grea alrededor de la tapa de Ilenado del
combustible, retire la tapa.
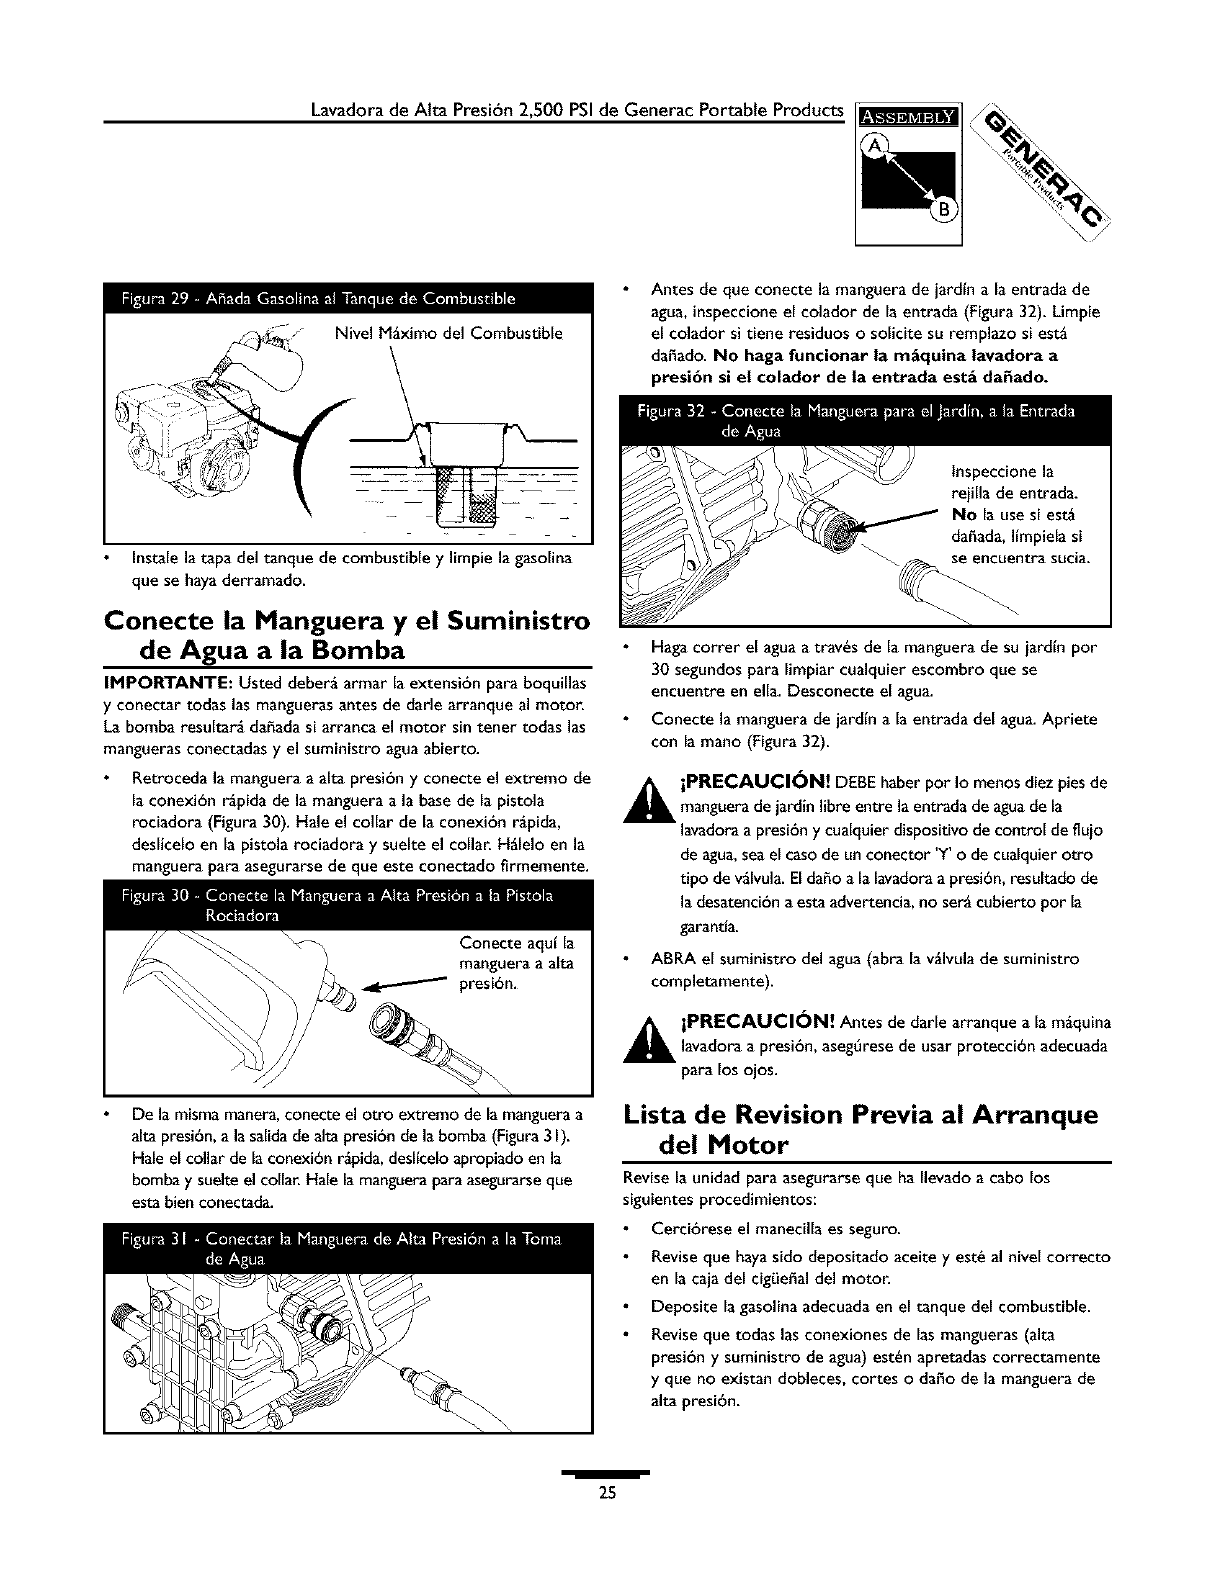
Agregue lentamente gasolina al tanque de combustible. Use un
embudo para evitar que se derrame. Llene el tanque hasta la
"Nivel Mgximo del Combustible" como se muestra a
continuaci6n (Figura 29).
/
24
Lavadora de Alta Preslbn 2,500 PSIde Generac Portable Products
Antes de que conecte la manguera de jardin a la entrada de
agua, inspeccione el colador de la entrada (Figura 32). Limpie
el colador si tiene residuos o solicite su remplazo si est_
daffado. No haga funcionar la mgquina lavadora a
presi6n si el eolador de la entrada estg daEado.
Instale la tapa del tanque de combustible y limpie la gasolina
que se haya derramado.
Conecte la Manguera yel Suministro
de Agua a la Bomba
IMPOI_rANTE: Usted deber_ armar la extensi6n para boquillas
y conectar todas las manguerasantes de darle arranque al motor.
La bomba resultar_ daffadasi arranca el motor sin tener todas las
mangueras conectadas y el suministro agua abierto.
Retroceda la manguera a alta presi6n y conecte el extremo de
la conexi6n r_pida de la manguera a la base de la pistola
rociadora (Figura 30). Hale el collar de la conexi6n r_pida,
deslicelo en la pistola rociadora y suelte el collar. H_lelo en la
manguera para asegurarsede que este conectado firmemente.
De ia misma manera, conecte ei otto extremo de la manguera a
alia presi6n, a la salida de alta presi6n de la bomba (Figura 3 I).
Hale el collar de la conexi6n r_pida, desllcelo apropiado en la
bombay suelte el colla_ Hale la manguera para asegurarse que
esta bien conectada.
|
Haga correr el agua a tray,s de la manguera de su iardin por
30 segundos para limpiar cualquier escombro que se
encuentre en ella. Desconecte el agua.
Conecte la manguera de jardin a la entrada del agua. Apriete
con la mano (Figura 32).
j_IL iPRECAUCI(_N! DEBE haber por Io menos diez pies de
manguerade jardin libre entre la entrada de aguade la
lavadoraa presi6n y cualquier dispositivo de control de fluio
de agua,seael casode un conector 'Y' o de cualquier otro
tipo de v_lvula.El daho a la lavadoraa presi6n, resultado de
la desatenci6na estaadvertencia, no ser_ cubierto por la
garantfa.
ABRA el suministro del agua (abra la v_lvula de suministro
completamente).
_IL PRECAUCI(_N! Antes de darle arranque a la m_quina
lavadora a presi6n, asegSresede usar protecci6n adecuada
para los ojos.
Lista de Revision Previa al Arranque
del Motor
Revise la unidadpara asegurarse que ha Ilevado a cabo los
siguientes procedimientos:
Cerci6rese el manecilla es seguro.
Revise que hayasido depositado aceite y est_ al nivel correcto
en la caja del cigLieSaldel motor.
Deposite la gasolina adecuadaen el tanque del combustible.
Revise que todas las conexiones de las mangueras(alta
presi6n y suministro de agua) est_n apretadas correctamente
y que no existan dobleces, cortes o daSo de la manguera de
alta presi6n.
/
25

Lavadorade Alta Preslbn 2,500 PSIde Generac Portable Products
Proporcione el suministro de agua adecuado (que no exceda
los 140-°F).
Aseg_rese de leer lassecciones "Reglas de Seguridad" y
"Cbmo Darle Arranque a su M_quina Lavadora a Presi6n"
antes de usar la m_quina lavadora a presi6n.
COMO USAR SU
MAQUINA LAVADORA
APRESION
Si tiene problemas operando su mgquina lavadora a presi6n, por
favor Ilame a la Eneade ayuda para m_quinas lavadoras a presi6n
al 1-800-270-1408.
C6mo Darle Arranque a su M quina
Lavadora a Presi6n
Para darle arranque a su m_quina lavadoraa presi6n movida a
motor pot primera vez, siga estas instruccionespasoa paso. Esta
informacibn acerca del arranque inicial tambi_n se aplica cuando
vayaa darle arranque al motor despu_s de haber dejado de la
m_quina lavadora a presibn fuera de uso por al menos un dta.
Coloque la mgquinalavadoraa presibn en un _reacercanaa una
suministro de aguaexterior capazdeabasteceraguaa un volumen
mayor de 3.3galonespor minuto.
Reviseque la manguera de alta presibn se encuentre
conectada firmemente a la pistola de rociado y a la bomba.
Vea "Preparandoel Lavador a Alta Presi6n Para su Uso".
Aseg_rese que la unidad est_ nivelada.
Conecte la manguera de jardtn a la entrada del agua.Aprietela
con la mano. Abra el suministro de agua.
_1 iPRECAUCION! No haga funcionar la bomba si no
tiene el suministro conectado y abierto. Deber_ cumplir
con esta preeauei6n, de otra forma la bomba resultar_
dahada.
Apriete firmemente el gatillo de la pistola para purgar de aire
eimpurezasel sistema de bombeo.
Conecte la extensi6n de la lanzaa la pistola rociadora.
Apri6tela con las manos (Figura 33).
Seleccionela boquilla de conexibn r_pida que usted desee e
ins6rtelaen el extremo de la extensibn de la lanza (Vea
"Como Usar las Boquillas").
Coloque el pasador de seguridad al gatillo de la pistola
rociadora (Figura 34).
Seguridad
Mueva la vglvula del combustible a la posicibn de "Encendido"
("On") (Figura 35).
Apagadc _"
Mueva la palancareguladora a la posici6n de "R_pido"
("Fast") (Figura 36). Los controles se muestran en la
condici6n operadora deseada.
PalancaReguladora
/
26

Lavadora de Alta Presi6n 2,500 PSIde Generac Portable Products
Para encender un motor frlo, mueva la palanca de la bobina a
la posici6n de "Cerrado" ("Closed").
Cerrado
NOTA: Para encender de nuevo un motor caliente, dele la palanca
de la bobina en la posici6n de "Abierto" ("Open") (Figura 37).
Ponga el interruptor del motor en la posici6n de "Encendido"
("On") (Figura 38).
Interruptor delMotor
Agarre el gancho del est_rter y hale lentamente hasta que
sienta un poco de resistencia. Luego hale la cuerde
r_pidamente con toda su fuerza. Deie que la cuerda regrese
lentamente. No deie que la cuerda salte de regreso en contra
del est_rter.
Si la palancade la bobina ha sido movida a la posici6n de
"Cerrado" ("Closed") para comenzar el motor, mu_vala
gradualmente a la posici6n de "Abierto" ("Open"), a medida
que el motor se calienta.
NOTA: En casode que resulte dificil jalar el arrancador de
retroceso, quiz_s ser_ necesario apretar con firmeza el disparador
de la pistola para disminuir la presi6n interna de bombeo.
C6mo Parar su Lavador a Presi6n
Mueva la palanca a la posici6n de "Lento" ("Slow").
Espere que el motor descanse.
Mueva el interruptor del motor a la posici6n de "Apagado" ("Off").
El apagar el motor, simplemente no soltar_ la presi6n en el
sistema. Apriete el gatiUo en la pistola rociadora para
soltar la presi6n en la manguera.
Utilizaci6n de la Charola de
Accesorios
El unidad es_ equipado con una charola de accesorios. Posee tres
oriflcios para sostener la extensi6n de su boquilla, conexi6n
r_pida boquillas, su varilla turbo y su cepillo, asl como dos ranuras
para sostener la botella de soluci6n limpiadora y el filtro para el
detergente. Tambi_n tiene dos ganchos en el manubrio para
sostener su pistola aspersora y la manguera de alta presi6n.
NOTA: Los dos orificios extra en la charola se usan para colocar
el cepillo y la varilla turbo. El cepillo y la varilla turbo NO se
incluyen con su lavadora a presi6n. Puede adquirir dichos artlculos
como accesorios opcionales.
Coloque la extensi6n de la boquilla a tray,s del orificio en el
charola de accesorios, tal y como se muestra en la Figura 39.
Sostenga la botella de su soluci6n limpiadora en el gancho en
forma de "J"y coloque el filtro del detergente en la _Itima
ranura a la izquierda (Figura 39).
Coloque la pistola aspersora sobre el gancho adherido al
manubrio al lado derecho de la unidad (Figura 39).
Sostenga la manguera de alta presi6n sobre el gancho
adherido al manubrio al lado izquierda de la unidad, tal y
como se muestra en la p_gina 22.
/
27

Lavadorade Alta Presi6n 2,500 PSIde Generac Portable Products
C6mo Usar las Boquillas
_L iPELIGRO! Nunca intercambie boquillas sin haber
asegurado el cerrojo de seguridad del gatillo.
La conexibn r_pida de la extensi6n para boquillas le permite usar
cuatro boquillas diferentes. Las boquillas tienen diferentes
patrones de rociado como se ilustra a continuacibn (Figura 40).
Para cambiar las boquillas:
Enganche e_cerrojo de seguridad de la pistola de rociado.
Mueva hacia atr_s el collar de la conexi6n r_pida y saque la
boquiHa insta_ada. Almacene _e boquiHa en el espacio
suministrado en e_ pane_ de control.
NOTA: Para un enjuague mgs suave, seleccione la boquilla blanca
de 40 -ooverde de 25 -°. Para fregar la superficie, seleccione la
boquilla roja de 0-o ola amarilla de 15-°.Para aplicar el qufmico,
seleccione la boquilla negra de baja presi6n.
Mueva e_collar hacia atr_s, inserte le boquilla nueva y suelte el
collar. Hale la boquil_a para asegurarse de que est_ conectada
firmemente.
Para una limpieza m_s efectiva, mantenga la boquiHa de rociado
de 8 a 24 pu_gadas de la superficie de Empieza. Si coloca la
boquiHa muy cerca, podrla dahar la superficie que est_
Empiando.
Limpieza y Aplicaci6n del Quimico
_L ADVERTENCIA! Usted deber_ conectar todas las
manguerasantes de darle arranque al motor. Arrancar el
motor sin tener todas las manguerasconectadas y sin el
suministro de aguaABIERTO (ON) causar_ el dafio de la
bomba.
IMPORTANTE: Utilice quimicos dise_ados
especificamente para m_quinas lavadoras a presi6n. Los
detergentes caseros podrian dafiar la bomba.
Para aplicar el detergente, siga los siguientes pasos:
Revise el uso de las boquil_as.
Prepare _a soluci&n detergente siguiendo las instrucciones del
fabricante.
Sostenga la soluci6n detergente en el gancho ']" adherido al
charola de accesorios, tal y como Io muestra la Figura 4L
Coloque el pequefio extremo final del filtro del tubo de
inyeccibn del detergente dentro del contenedor del
detergente.
La Presi6n Baja
Usada para
aplicar quimicos
25-o
Negra
La Presi6n Alta
40-o 25-° 15-° 0-°
Blanca Verde Amarilla Roja
/
28

Lavadora de Alta Preslbn 2,500 PSIde Generac Portable Products
,_ iPRECAUCI_N! Evite que el tubo de inyecci6n de
qufmicos entre en contacto con el silenciador caliente.
Aseg6rese de que la boquilla negra est6 instalada en la
extensibn para boquillas.
NOTA: No se puede aplicar detergente con las boquillas de alta
presibn (Blanca, Verde, Amarilla oRoja).
Aseg6rese que la manguera de jardin est6 conectada a la
entrada del agua. Revise que la manguera de alta presibn est6
conectada a la pistola de rociado y a la bomba. Dele arranque
al motor.
Aplique el detergente sobre la superficie seca, comenzando en
la parte inferior del _rea y dirigi6ndose hacia arriba, utilizando
movimientos largos, parejos y superpuestos. No permita que
el detergente se seque. Si permite que el detergente se seque,
la superficie podrfa quedar con manchas.
Permita que el detergente penetre de 3a 5 minutos antes de
enjuagar. Vuelva a aplicar cuando sea necesario para evitar que
la superficie se seque.
Enjuage de la M quina Lavadora a
Presi6n
_ADVERTENCIA! Seaextremadamente cuidadoso si
usa la mgquina lavadora a presibn desde una escalera,
andamio o cualquier superficie relativamente inestable.La
presibn de una m_quina lavadora en funcionamiento se
acumula a medida que usted sube. Cuando oprima el
gatillo, la fuerza de reaccibn del rociado inicialpodria
hacerlo caer.El rociado de la alta presibn podria hacerlo
caer si est_ muy cerca de la superficie que est_ limpiando.
Despu6s de haber aplicado el detergente, refriegue
la superficie y enjuagela de la siguiente manera:
Coloque el cerrojo de seguridad a la pistola de rociado.
Retire la boquilla negra para quimicos de la extensi6n para
boquillas.
Seleccione e instalela boquilla de alta presibn que desee
siguiendo las instruccionesde "C6mo Usar las Boquillas" de la
p_gina28.
Mantenga la pistola de rociado a una distancia segura del _rea
que planea rociar.
Disminuya oaumente la presibn de rociado al darle vuelta a la
perilla en la direccibn de las manecillas del reloj oen direccibn
opuesta, respectivamente (Figura 42). Use una presi6n m_s
baja para lavar cosas como carros o botes. Use una presibn
rags alta para eliminar pintura y la grasa de las calzadas.
Perilla Para
elControl
de la
Aplique un rociado de alta presi6n en un _rea pequefia,
despu6s revise si la superficie presenta da_os. Si no encuentra
dahos, puede continuar con el trabajo de limpieza.
Comience en la parte superior del _rea que va a enjuagar,
dirigi6ndose hacia abajo con los mismos movimientos
superpuestos que utiliz6 para la limpieza.
Sistema de Enfriamiento
Automgtico (Alivio T6rmico)
Elagua que circula dentro de la bomba puede alcanzar
temperaturas entre los 140-145-°F si hace funcionar el motor de
su m_quina lavadora a presi6n de 3 a 5 minutos sin oprimir el
gatillo de la pistola de rociado. Cuando el agua alcanza dicha
temperatura, el sistema de enfriamiento autom_tico se activa y
enfrta la bomba descargando agua caliente en el piso. Este
sistema evita el da_o interno de la bomba. La descarga terminar_
una vez la bomba se haya enfriado
/
29

Lavadora de Alta Presi6n 2,500 PSIde Generac Portable Products
ESPECIFICACIONES
Presi6n de Salida ...... 2,500 PSI
Promedio de Flujo .... 3.0 gaIones por minuto (gpm)
Detergente ........... Use el detergente adecuado para
lavadores a presi6n
Temperatura del Suministro
de Agua .............. Que no pasede 140-°F
Sistema de ........... Funcionar_ cuando el agua alcance de
Enfriamiento 140°- 145gF
Automgtico
Aceite de Bombeo .... SAE 80W-90, 285 ml (9.6 oz)
RECOMENDACIONES
G EN ERALES
La garantta de la m_quina lavadoraa presi6n no cubre los
elementos que ban sido sujetos a abuso o negIigenciapor parte
del operador. Para hacer v_Iida la cobertura total de la garantia, el
operador deber_ mantener la lavadora de presi6n tal y como se
indicaen el manual.
Algunos ajustes tendr_n que hacerse peribdicamente para
mantener adecuadamente su mgquina lavadora a presi6n.
Todos los servicios y ajustes deber_n hacerse por Io menos
una vez en cada estacibn.
Una vez al a_o, usted deber_ limpiar orempIazar la bujfa y el
filtro de aire. Una buiia nuevay un flItro de aire limpio
garantizan una mezda de combustible-aire adecuaday le ayuda
a su motor a funcionar mejor y a tener una vida _til m_s
prolongada. Por favor, para mayores detaIles, consuIte el
manual del propietario del motor.
Antes de Cada Uso
Reviseel nivel de aceite del motor.
Revisesi existen dafios en el coIador de la entrada de agua.
Revisesi existen da_os en el fiItro en Ifnea.
Revisesi existen fugas en la manguera de aIta presi6n.
Revisesi existen da_os en los flltros de qufmicos.
Revisesi existen fugasen el conjunto de la extensibn para
boquilIas y pistoIa.
Elimine el aire y los contaminantes de la bomba.
MANTENIMIENTO DE LA
MAQUINA LAVADORA A
PRESION
Revise y Limpie el Colador de
Entrada
Examineel coIador de entrada de la manguera de iardin. Ltmpielo
si est_ tapado orempIacelo si est_ roto.
Revise la Manguera de Alta Presi6n
Lasmangueras de aIta presi6n pueden desarrolIar fugasdebido al
desgaste, dobleces oabuso. Revise la mangueraantes de cada uso.
Revise si existen cortes, fugas,abrasiones, levantamiento de la
cubierta, daho omovimiento de los acopIamientos. Siexiste
cualquiera de estas condiciones, rempIace la manguera
inmediatamente.
_iPELIGRO! Nunca repare la manguerade aIta presibn.
RempIacela con una manguera que cumpla con la
capacidad minima de presibn de su m_quina lavadora a
presibn.
Chequee el Tubo de Sif6n del
Detergente
Examineel flItro en el tubo del detergente y Ifmpielo si se
encuentra sucio. Eltubo deberia quedar apretado en la pieza.
Examine el tubo para ver si existe cualquier tipo de goteo oest_
roto. ReempIaceel filtro oel tubo si alguno de elIos se encuentra
dahado.
Limpiando el Tubo
Si usted us6 el tubo, usted debe lavarlo con agua limpia antes de
parar el motor.
Coloque el fiItro y la inyecci6nqufmica en un balde IIeno de
agualimpia.
Conecte la lanza negra de baia presibn.
Lave de I a 2 minutos.
Apague el motor.
IffPORTANTE: Apagando el motor, simpIemente no soltar_ la
presibn en el sistema. Cuando el motor se ha apagado,
apriete el gatillo en la pistola rociadora para deshacerse
de la presi6n en la manguera.
/
30

Lavadora de Alta Presi6n 2,500 PSIde Generac Portable Products
Revise la Pistola y la Extensi6n para
Boquillas
Examinela conexi6n de la manguera a la pistola y cerciorese de
que est_ en buen estado. Pruebe el gatillo oprimi4ndolo y
asegur_ndose de que se devuelve a su sitio cuando Io suelte.
Coloque el cerrojo de seguridad y pruebe el gatillo. Usted no
debe ser capazde oprimir el gatillo. Remplacela pistola
inmediatamente si falla cualquiera de estas pruebas.
Revise el Filtro en Linea
Consulte la Figura 43 y suministre servicio al filtro en linea si se
tapa siguiendo estos pasos:
I. Retire la pistola y la extensi6n para boquillas de la manguera
de alta presi6n. Retire la extensi6n para boquillas de la
pistola y retire el anillo 'o' y el colador de la extensi6n para
boquillas. Laveel colador, pistola y extensi6n para boquillas
con agualimpia para eliminar toda clase de residuos.
2. Si el colador est_ dahado, encontrar_ un colador para el
filtro en linea y un anillo 'o' de repuesto en el juego de
anillos 'o'. Si no est_ da_ado, vuelva a usarlo.
3. Coloque el colador del filtro en linea en el extremo con
rosca de la extensi6n para boquillas. Sudirecci6n no
importa. Coloque el colador ejerciendo presi6n con el
borrador de un Igpiz hasta que se asiente por completo en el
fondo de la abertura. Tenga cuidado de no doblar el colador.
4. Coloque el anillo 'o' en la ranura respectiva. Empuje el anillo
'o' hasta que quede ajustado contra el colador del filtro en
llnea.
5. Conecte la extensibn para boquillas a la pistola de rociado de
la manera descrita anteriormente en este manual.
Elimine el Aire y los Contaminantes
de la Bomba
Para retirar el aire de la bomba, siga los siguientes
pasos:
Instalela m_quina lavadora a presi6n como est_ descrito en
"Preparandoel lavador a alta presibn para su uso". Conecte el
abastecimiento de agua y prenda agua.
Estire el disparador en el fusil del rocio y el asidero.
Cu_ndo el agua es cons_nte y constante, compromete el
picaporte de la seguridad.
Para retire los contaminantes de la bomba, siga los
siguientes pasos:
Instalela m_quina lavadora a presi6n como est_ descrito en
"Preparandoel lavador a alta presi6n para su uso". Conecte el
abastecimiento de aguay prenda agua.
Pongaen marcha el motor de acuerdo alas instruccionesde
"C6mo Darle Arranque a su Mgquina Lavadora a Presibn".
Quite boquilla la extensibn del fusil del roc{o.
Hale el gatillo de la pistola y mant4ngalo apretado.
Cuando el suministro de agua seauniforme y constante,
engancheel cerroio de seguridad y vuelva a aiustar la
extensi6n para boquillas.
Mantenimiento de las Boquillas
Si la boquilla se obstruye o tapa con materiales extra_os, como
suciedad, se puede presentar presi6n excesiva de la bomba. Si las
boquillas se tapan parcialmente, se puede tener una sensaci6n
puls_til durante el uso. Esto generalmente no es un problema
relacionado con la bomba, es m_s que todo una boquilla tapada o
parcialmente obstruida.
Si las boquillas se tapan u obstruyen parcialmente, llmpielas
inmediatamentecon el juego incluido en su m_quina lavadora a
presi6n siguiendo estasinstrucciones:
Apague el motor y cierre el suministro de agua.
Quite la boquilla del fin de la extensi6n de boquilla.
Use el alambre incluidoen el juego o un dip de papel
peque_o para liberar los materiales extrahos que est_n
tapando u obstruyendo la boquilla (Figura 44).
los residuos.
Retire la suciedad adicional enjuagando la boquilla. Enjuague
de 30 a 60 segundos.
Vuelva a instalarla boquilla en la extensi6n para boquillas.
Vuelva a conectar el suministro de agua,abra el suministro del
aguay ponga el motor en funcionamiento.
Pruebe la mgquina lavadora a presi6n.
/
31
Lavadorade Alta Presi6n 2,500 PSIde Generac Portable Products
Mantenimiento de los Anillos 'O'
Durante la operaci6n normal de su m_quina lavadora a presi6n
los anillos 'o' mantienen apretadas y libres de fugas las conexiones
de las mangueras y la pistola, ellos pueden desgastarse odaharse
con el uso.
Su m_quina lavadora a presi6n viene con un Juego de
Mantenimiento para anillos 'O', el cual contiene anillos 'o',
arandela de caucho y un colador de repuesto para la entrada de la
manguera de jardln. La nora que no todas las partes en el juego se
usar_n en su unidad.
Para retirar un anUlo 'O' desgastado o da_ado:
Utilice un destornillador de cabeza plana peque5o, col6quelo
por debajo del anillo 'o' y sgquelo haciendo palanca.
MANTENIMIENTO DEL
MOTOR
Consulte el manual del propietario del motor para las
instrucciones de c6mo mantener adecuadamente el motor.
PREPARANDO LA
UNIDAD PARA SU
ALMACENAMIENTO
El agua no debe permanecer en la unidad por un largo periodo de
tiempo. Los sedimentos o minerales se pueden depositar en las
piezas de la bombay "congelar" la acci6n de la bomba. Si usted no
piensa usar el lawdor a presi6n por mas de 30 dias, siga este
procedimiento:
I. Lave el tubo de detergente, colocando el filtro en un envase
lleno de agua limpia mientras est_ corriendo el agua a baja
presi6n. Lave pot I o 2 minutos.
2. Apague el motor y d_ielo enfriar, luego quite todas las
mangueras. Desconecte el alambre de la bujia.
3. Vacie todos los liquidos presentes en la bomba, halando la
manecilla de retroceso hasta seis veces. Esto deberia
remover la mayor parte de los liquidos presentes en la
bomba.
NOTA: Para evitar que la unidad se congele, ponga
anticongelante RV (que no contenga alcohol) en la bomba, en una
secci6n de 3 pies de la manguera del lardin conectada a un
adaptador y halando la manecilla dos veces.
4. Almacene la unidad en un lugar limpio y seco.
ALMACENANDO EL
MOTOR
Consulte el manual del propietario del motor para las
instrucciones de c6mo preparar adecuadamente el motor para su
almacenamiento.
/
32
Lavadora de Alta Preslbn 2,500 PSIde Generac Portable Products
NOTAS
/33
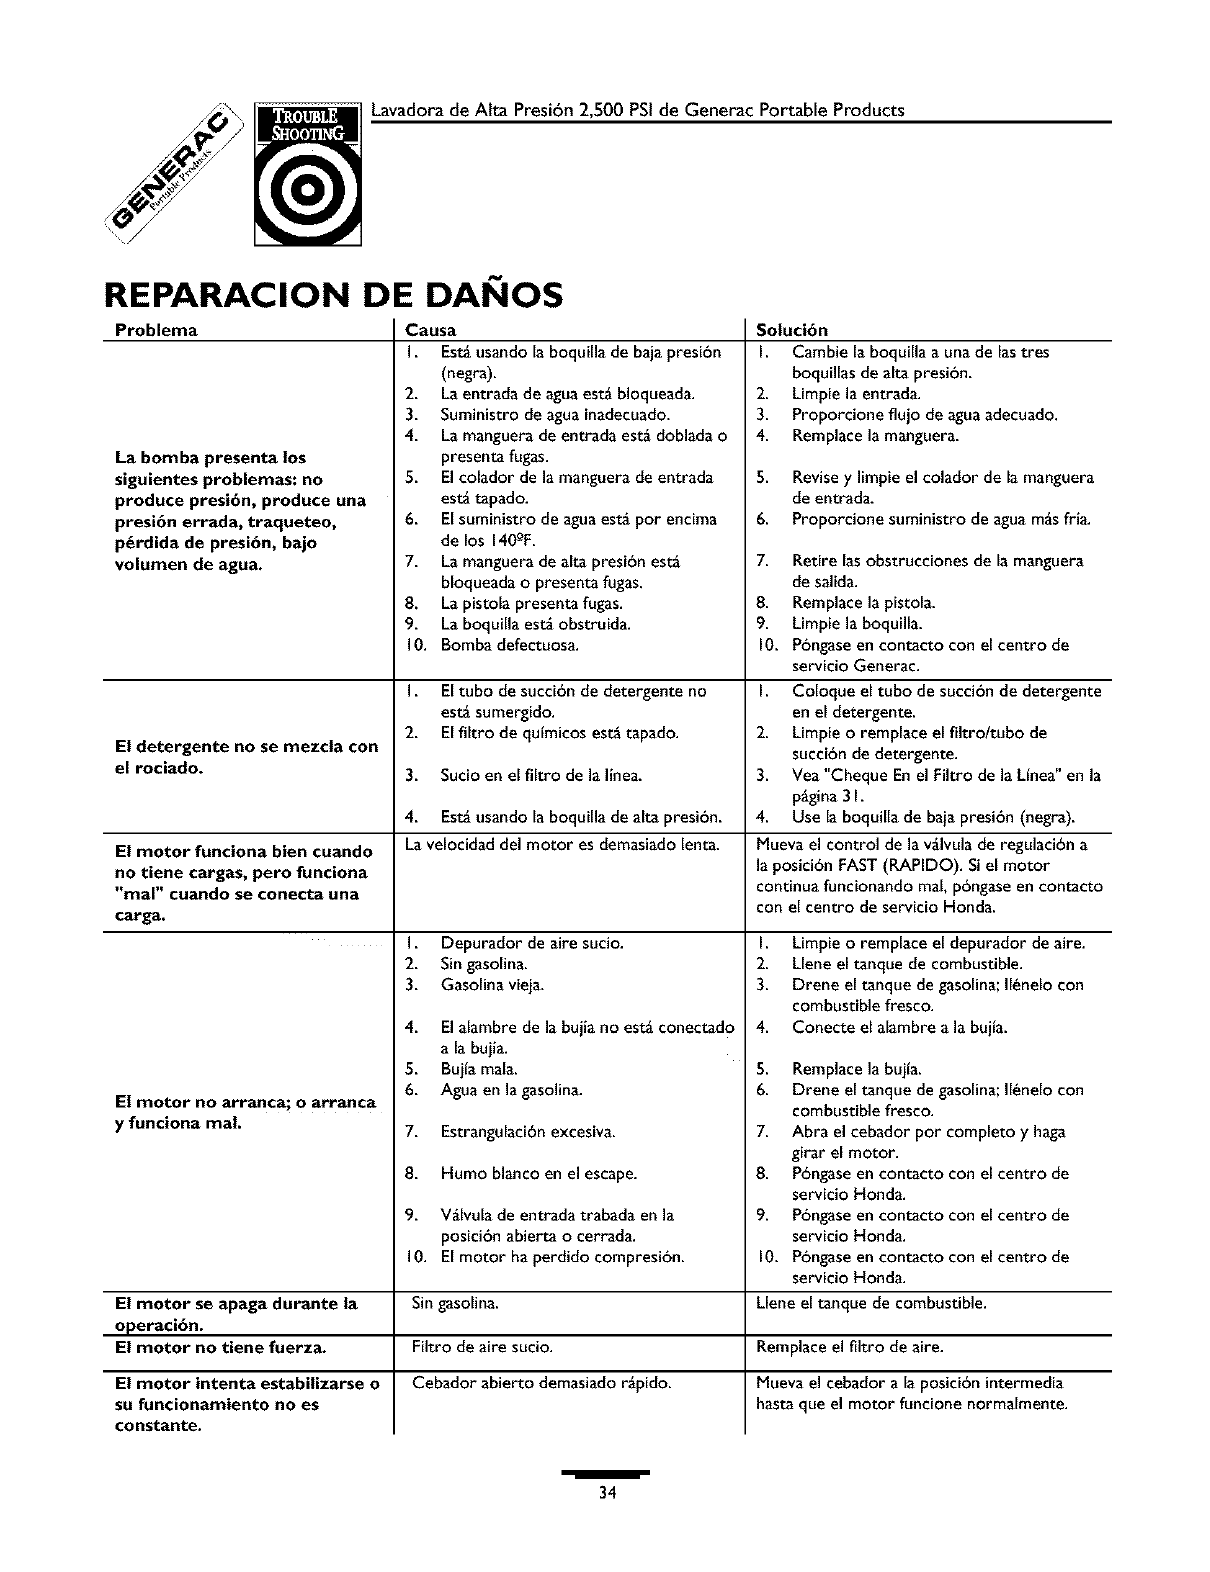
LavadoradeAltaPresi6n2,500PSIdeGeneracPortableProducts
REPARACION DE DAI IOS
Problema Causa
La bomba presenta los
siguientes problemas: no
produce presi6n, produce una
presi6n errada, traqueteo,
p6rdida de presi6n, bajo
volumen de agua.
El detergente no se mezcla con
el rociado,
I. Est_ussndola boquills de bajs presi6n
(negra).
2. La entrsda de agua est_ bloqueada.
3. Suministro de agus insdecuado.
4. La manguera de entrads est_ doblsda o
presenta fugas.
5. El colsdor de Is msnguera de entrsda
est_ tapado.
6. El suministro de aguaest_ por encima
de los 140°F.
7. La manguers de slta presi6n est_
bloquesda o presenta fugss.
8. La pistols presenta fugas.
9. La boquills est_ obstruida.
10. Bomba defectuoss.
I. El tubo de succi6n de detergente no
est_ sumergido.
2. El filtro de qu{micos est_ tapado.
Soluci6n
I. Csmbie la boquilla a una de Iss tres
boquillss de slta presi6n.
2. Limpie Is entrads.
3. Proporcioneflujo de agusadecuado.
4. Remplsce Is msnguers.
S. Revisey limpieel colador de Is msnguers
de entrsda.
6. Proporcione suministro de agus ragsfris.
7. Retire lasobstrucciones de la manguera
de sslida.
8. Remplsce Is pistola.
9. Limpie Is boquills.
10. P6ngaseen contacto con el centro de
servicio Genersc.
I. Coloque el tubo de succi6n de detergente
en el detergente.
2. Limpie oremplace el filtro/tubo de
succi6n de detergente.
3. Vea "Cheque En el Filtro de Is Lines" en la
p_gina3I.
4. Use Is boquilla de baiapresi6n (negra).
3. Sucio en elfiltro de Is linea.
4. Est_ ussndo la boquills de slta presi6n.
El motor funciona bien cuando La velocidad del motor es demasisdo lenta. Mueva el control de Is vglvula de regulacibn s
no tiene cargas, pero funciona Is posicibn FAST (RAPIDO). Si el motor
"real" cuando se conecta una continua funcionando real, p6ngase en contacto
carga, con el centro de servicio Honda.
I. Depurador de aire sucio. I.
2. Sin gasolins. 2.
3. Gasolina vieia. 3.
4. El slambre de la bujis no est_ conectado
a Is buiis.
5. Buita mala.
6. Agus en la gasolina.
El motor no arranca; oarranca
yfunciona mal. 7. Estrsngulacibn excesiva.
8. Humo blsnco en el escape.
9. V_lvula de entrads trsbsda en Is
posicibn sbierta o cerrads.
10. Elmotorhsperdidocompresibn.
4.
Limpie oremplace el depurador de aire.
Llene el tanque de combustible.
Drene el tanque de gasolina;116nelocon
combustible fresco.
Conecte el slsmbre s Is bujts.
5. Remplsce la buita.
6. Drene el tanque de gasolina;116nelocon
combustible fresco.
7. Abrs el cebador por completo y haga
girar el motor.
8. P6ngaseen cont_cto con el centro de
servicio Honda.
9. Pbngaseen cont_cto con el centro de
servicio Honda.
10. Pbngaseen contacto con elcentro de
servicio Honda.
El motor se apaga durante la Sin gasolina. Llene eltanque de combustible.
operaci6n.
El motor no tiene fuerza. Filtro de aire sucio.
Cebador abierto demasisdo r_pido.
El motor intenta estabilizarse o
su funcionamiento no es
constante.
Remplaceel filtro de aire.
Mueva el cebsdor a Is posici6n intermedia
hssta que el motor funcione normalmente.
/
34
GARANTiAS LIMITADAS DE LAVADORAS A PRESION
Generac Portable Products (que de ahora en adelante se denominarg como la COMPAiqiA) garantiza al comprador
original, que la lavadora de presibn fabricada pot la COMPANIA est_ libre de cuatquier desperfecto en mano de obra y
material por el(os) periodo(s) indicado(s) lineas abajo, a partir de la fecha original de compra. La presente garantia no es
transferible. El t_mino "comprador original" designa a la persona que originalmente la adquiric').
Periodos de la Garantia
Lavadora de Energia El_ctrica
Cualquier otro imputsado pot el Motor:
Ia_o (no se aplica para usos comerciales ni de arrendamiento)
CONSUMIDOR* COMERCIAL*
Motor Garantizado _nicamente Garantizado _nicamente
pot el fabricante del pot el fabricante del
motor motor
Bomba: I a_o 90 dias
*NOTA: Para el prop6sito de esta garantia el uso del "consumidor" significa la utilizaci6n personal y en el
hogar del aparato dom_stico por el comprador original. Una vez que la lavadora a presi6n haya sido
sometida a uso comercial, ser_ considerada por Io tanto y desde ese momento como lavadora a presi6n
con fines comerciales para los t_rminos de la presente garantia.
Durante e{ periodo especificado de la garantia, la COMPANIA podr;_, a SUopcibn, reparar o reemplazar cu_quier parte
que, despudsde haber sido examinada por la COMPAhliA o pot Distribuidores Autorizados de la COMPANIA, haya sido
encontrada como defectuosa bajo condiciones normales de uso y de servicio**. Todos los costos de transportacibn de los
servicios previstos pot la garantia, inctuyendoel regreso a la f_brica de ser necesario, ser_n cubiertos por el comprador y
pagados previamente por et mismo.
** DESGASTE NORMAL: Como sucede con todos los aparatos mecgnicos, las lavadoras a presi6n
necesitan recibir servicio y cambiar algunas de sus piezas de manera peri6dica para funcionar
adecuadamente. La presente garantia no cubre ninguna reparaci6n en el caso de que el uso normal haya
terminado con la vida dtil de una pieza o de la bomba de la lavadora.
La presente garanda no incluye: Productosusadosni equipo de demostracibn. Las piezas,tales como PISTOLAS,
MANGUERAS, VARILLAS, BOQUILLAS u otros articutos que pueden sufrir desgastecomo abrazaderas,aceite, vglvulas,
cintillos, aros, fittros, empaques de la bomba, etc. Las bombas que hayansido puestas en marcha sin suministro de agua. El
da_o omalfuncionamientos resultado de: accidentes, abuso,modificaciones, alteraciones o servicio de mantenimiento
inapropiado.Deterioro provocado pot congelamiento o productos quimicos. Mantenimiento normal tal como ajustes,
limpiezadel sistema de combustible y obstruccibn (debida a productos quimicos, mugre, carbc')no lodo, etc.).
LA PRESENTEGARANT{A REEMPLAZA AL RESTODE GARANT{AS, EXPL{CITAS O IMPL{CITAS,
ESPEC{FICAMENTE,LA COMPAhI{A NO OFRECE NINGUNA OTRA GARANTiA PARA MERCADEO O
PROPIEDAD PARA UN USO EN PARTICULAR. LA DURACI6N DE CUALQUIERA DE LAS GARANTiAS
IMPL{CITASQUE NO PUEDAN SERDESCONOCIDAS EST', LIMITADA AL PERiODO DE TIEMPO QUE SE
ESPECIFICAEN LA GARANTiA EXPL{CITA.SEEXCLUYE LA RESPONSABILIDAD POR DAhlOS
PROVOCADOS, INCIDENTALES O ESPECIALES,INCLUSO SI LOS DAiqOS SON RESULTADO DIRECTO DE
LA NEGLIGENCIA DE LA COMPAiq{A. LA COMPAiq{A TAMBlieN RECHAZA CUALQUIER
RESPONSABILIDAD POR DAiqOS INCIDENTALES O PROVOCADOS TALESCOMO LA PERDIDA DE
TEMPO O ELUSO DEL EQUIPO DE PODER, O CUALQUIER PERDIDA COMERCIAL DEBIDA A LA FALLA
DEL EQUIPO: Y CUALQUIERA DE LAS GARANT{AS IMPL{CITASEST_,N LIMITADAS A LA DURACI6N DE
LA PRESENTEGARANT{A POR ESCRITO.
Aigunos estados no permiten limitante algunaen ta duracic')nde una garantia implicita,o la exclusi6n o limitacibn de dahos
incidentaleso provocados, asl que laslimitaciones o exclusiones arriba mencionadas podrian no aplicarse a su caso. La
presente garantia le otorga derechos legalesespecificos y usted podria tenet ademgsotros derechos, que pueden variar de
un estado a otto.
Paraobtener servicio de mantenimiento, acuda a las instatacionesAutorizadas pot la COMPAiq{A para tal efecto, mgs
cercanas a su domicilio o 1-877-544-0982. La presente garantia no cubre et servido ofrecido en ning_n otro lugar.Enel
momento de solicitar el servicio de garantia, deberg presentarse el comprobante de la fecha de compra original.
Generac Portable Products
Jefferson, Wisconsin U.S.A.
/35
LIMITED PRESSURE WASHER WARRANTY
GENERAC PORTABLEPRODUCTS (hereafter referred to as the COMPANY) warrants to the original retail purchaser,the
pressure washer manufactured by the COMPANY to be free from defects in material and workmanship for the period(s)
set forth below from the date of original purchase. This warranty is not transferable. The term "original purchaser" means
the person for whom the pressure washer is originally purchased.
Warranty Schedules
Electric Power Washer Iyear (does not apply to commercial or rental applications)
CONSUMER* COMMERCIAL*
All Other Engine-driven Engine: Warranted solely by Warranted solely by
EngineManufacturer EngineManufacturer
Pump: I year 90 days
* NOTE: For the purpose of this warranty "consumer" use means personal residential household use by
original purchaser. "Commercial" use means all other uses, including rental, construction, commercial and
income producing purposes. Once a pressure washer has experienced commercial use, it shall thereafter be
considered a commercial use pressure washer for the purposes of this warranty.
During said warranty period, the COMPANY wilt, at its option, repair or replace any part which, upon examination by the
COMPANY or COMPANY-Authorized Dealers, isfound to be defective under normal useand service_. All transportation
costs under warranty, includingreturn to the factory if necessary,are to be borne by the purchaser and prepaid by the
purchaser.
** NORMAL WEAR: As with all mechanical devices, pressure washers need periodic parts service and
replacement to perform well. This warranty does not cover repair when normal use has exhausted the life
of a part or pressure washer pump.
This warranty does not include: Used products and demonstration equipment. Parts,such as GUNS, HOSES,WANDS,
NOZZLES or other wear itemssuch as quick couplers, oil, gauges,belts, o-rings, filters, pump packing, etc. Pumpswhich
have been run without water supplied. Damageor malfunctions resulting from: accidents, abuse,modifications, alterations,
or improper servicing. Freezingor chemical deterioration. Normal maintenance suchas adjustments, fuel system cleaning
and obstruction (due to chemical, dirt, carbon or time, etc.).
THIS WARRANTY IS IN PLACE OF ALL OTHER WARRANTIES, EXPRESSOR IMPLIED,SPECIFICALLY,
THE COMPANY MAKES NO OTHER WARRANTIES AS TO MERCHANTABILITY OR FITNESSFOR A
PARTICULAR PURPOSE.THE DURATION OF ANY IMPLIED WARRANTIES WHICH CANNOT BE
DISCLAIMED IS LIMITED TO THE TIME PERIOD AS SPECIFIEDIN THE EXPRESSWARRANTY. LIABILITY
FOR CONSEQUENTIAL, INCIDENTAL, OR SPECIALDAMAGES UNDER ANY AND ALL WARRANTIES IS
EXCLUDED, EVEN IF SUCH DAMAGES ARE A DIRECT RESULTOF THE COMPANY'S NEGLIGENCE. THE
COMPANY ALSO DISCLAIMS ANY RESPONSIBILITYFOR INCIDENTAL OR CONSEQUENTIAL
DAMAGES SUCH AS THE LOSSOF TIME OR THE USEOF THE POWER EQUIPMENT, OR ANY
COMMERCIAL LOSSDUE TO THE FAILUREOF THE EQUIPMENT: AND ANY IMPLIEDWARRANTIES
ARE LIMITED TO THE DURATION OF THIS WRITTEN WARRANTY.
Some states do not allow limitationson how longan impliedwarranty lasts,or the exclusion or limitation of incidentalor
consequential damages,so the above limitationsor exclusions may not apply to you. This warranty givesyou specific legal
rights andyou may also haveother rights, which varyfrom state to state.
For service, see your nearest COMPANY-Authorized warranty service facility or call 1-877-544-0982. Warranty service can
be performed only by a COMPANY-Authorized service facility. This warranty will not apply to service at any other facility.
At the time of requesting warranty service, evidence of original purchasedate must be presented.
Generac Portable Products
Jefferson, Wisconsin U.S.A.
