General Dynamics Broand USBSTKADT USB Modem User Manual CE7776F2
General Dynamics Broadband, Inc. USB Modem CE7776F2
Contents
- 1. User Manual
- 2. RF Exposure Caution Leaflet
User Manual

Wireless Broadband Modem
USB-Stick-Modem Quick Start Guide
Important Notes
:
Run the installation CD-ROM provided before connecting the USB Stick Modem to the
computer. The installation software will instruct the user when to insert the USB-Modem into the
computer If you wish to disconnect the USB Stick Modem from the computer card it is important
to first make it safe for removal. Do this by clicking on the icon in the toolbar on the lower right
of the screen and selecting STOP.
Caution:
This USB modem is approved for use in normal size laptop computers only (typically with 12
inch or larger display screens). To comply with FCC RF exposure requirements, this modem
should not be used in configurations that cannot maintain a distance of at least 5mm
(approximately 0.2 inch) from users and bystanders.
Antenna
s
(
internal
)
Status Indicator
SIM Card Tray
(beneath USB Connector - if fitted)
USB
Connector
(Cap removed)
- 2 -
Getting Started
This Quick Start Guide gives basic installation and configuration instructions. Follow the instructions on the
following pages to install the USB Stick Modem client software and driver files, before connecting the
modem to the computer and then perform on-line registration.
Refer to the User Guide on the installation CD-ROM for the complete installation, upgrade and configuration
procedures.
Be sure to complete each of the following steps outlined below before moving on to the next step.
SIM Card (if required)
You have been supplied with a username and password to be used when connecting to the TDD
network.
The SIM may not always be required when authenticating TDD networks, check with your service
provider.
The SIM card is inserted directly into the modem below the USB connector, there is no SIM tray.
Before removing the SIM card from the Modem, it is good practice and recommended that a safe
hardware removal procedure is always followed for the Modem device. Disconnect and close the
Client Software application.
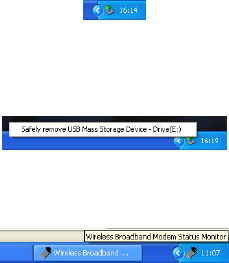
To remove the USB Stick Modem first locate the “Safely Remove Hardware” Icon shown above from
the notification area usually to the right of the task bar. Using the mouse, left click on the icon. A
“Safely remove …” notification will be displayed similar to the one below. Click on the IPWireless
Network Adapter to safely power off the adapter. Note: If the adapter is in use i.e. connected to a
network or the Client Software is open and displaying status, you will see a notification informing you
that it is not possible to remove the adapter. Ensure that the Client Software is disconnected and
closed before a safe removal.
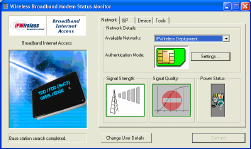
To connect to the TDD network you must first enter your username and password details in the Client
Software using the Change User Details button near the bottom of the Application.
When connected the Client Software will minimize to the notification bar next to the clock. The
application can be restored by double clicking on this icon shown below.
- 3 -
Step 1. Install Client Software and USB Stick Modem Drivers
Follow the instructions according to your installed operating system.
Windows 2000™
You must log in with administrative privileges
1. Close any programs that may be running and insert the CD into the CD-ROM drive on your
computer. If the CD does not autorun and display a start screen, select Start->Run and enter
d:\Setup.exe where d is your CD-ROM drive letter.
2. The Installation Setup Wizard will then prompt you through each step of the installation. (Use the
Next> and <Back buttons to navigate the wizard and click Finish on the final screen).
3. When you reach the Licence Agreement screen, the installation will not proceed further unless
you accept the terms of the License Agreement.
4. The installation software will then copy the Client Software and USB Stick Modem driver files
onto your computer from the installation CD.
5. When the transfer of files to the computer is complete, you will be asked to to plug the USB Stick
Modem + provided USB cable into your computer.
Windows Vista™, Windows XP™
You must log in with administrative privileges
1. Close any programs that may be running and insert the CD into the CD-ROM drive on your
computer. If the CD does not autorun and display a start screen, select Start->Run and enter
d:\Setup.exe where d is your CD-ROM drive letter.
2. The Installation Setup Wizard will then prompt you through each step of the installation. (Use the
Next> and <Back buttons to navigate the wizard and click Finish on the final screen).
3. When you reach the Licence Agreement screen, the installation will not proceed further unless
you accept the terms of the License Agreement.
4. The installation software will then copy the Client Software and USB Stick Modem driver files
onto your computer from the installation CD.
5. When the transfer of files to the computer is complete, you will be asked to plug the USB Stick
Modem into your computer.
- 4 -
Step 2. Insert the USB Stick Modem and Obtain the Best Radio Signal
Fit the SIM or USIM card, where one has been provided, into the SIM slot in the USB Stick Modem,
observing the correct orientation and with the gold contacts on the SIM/USIM face down.
Connnect the USB Stick Modem into a USB port on your computer either directly or using the cable
supplied. The modem will draw power from the computer that it needs in order to operate. The red power
on indicator will glow steady after a few seconds to indicate that it is ready for operation.
To obtain the best signal strength position the USB Stick Modem near a window. If connection fails with low
signal strength try relocating the USB Stick Modem.
When the computer detects that the USB Stick Modem has been connected,, the computer will attempt to
use the USB Stick Modem driver files that were loaded during step 1.
The USB Stick Modem will automatically attempt to find a base station. During this process the green
connection indicator will flash on and off, when connection is established the indicator will become steady.
When data is being transferred the indicator will flicker intermittently.
Step 3. Perform On-line Registration
If you have been supplied with a username and password your installation software may skip this step. If
this step is not skipped you will be prompted to supply your username and password details the first time
you run the Client Software.
Note some network operators may perform user authentication with SIM/USIM rather than username and
password.
Note - In order for the registration process to complete successfully, the Internet browser application on your
computer must accept ‘cookies’. Browsers accept cookies by default. However, if you have disabled
cookies, enable them before continuing (refer to the Internet browser help on your computer on how to
enable cookies).
To start the On-line registration process, again click Next> which will result in the Wireless Broadband
Status Monitor program automatically starting.
The program will attempt to automatically establish an Internet connection, and if successful, it will
automatically start an Internet browser to your Service Provider’s pre-defined registration web page.
Follow the instructions on each screen to complete the registration process.
At the end of the registration process the Internet browser should be closed. This will result in the Internet
connection being automatically disconnected.
You have now completed the installation and registration process. If you experience any trouble with
installation or registration, consult the Troubleshooting Tips in the User Guide or call your Service Provider
for assistance.
- 5 -
Step 4. Updating Operating System Patches and TCP Settings
The installation software will now determine if your computer needs any official operating system patches
applied or any TCP configuration settings changed.
Follow the instructions on each screen to complete the upgrading of any patches or TCP settings.
Step 5.Your installation is now complete
The installation has completed. You will be asked to reboot your computer so that any operating system
patches and TCP setting changes can be used.
After the computer has rebooted, press the USB Stick Modem desktop icon and, once the software
application has started, press the Connect button to establish an Internet connection.
TDD Mode
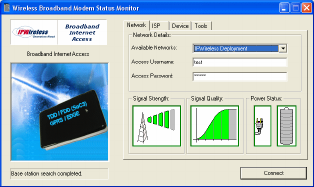
The USB Stick Modem, when searching for a cell, will slowly flash the green light emitting diode
(LED). When a cell has been located the green LED will remain on (solid) and the network signal
strength and quality will be displayed within the Client Software application as shown below. The
Connect button will become selectable whenever it is possible to attempt a connection. When
connected the Client Software application will minimize and the green LED will flash more rapidly
than when searching for a cell. To disconnect from the network, the Client Software should be
restored from the notification bar and the Disconnect button selected.
- 6 -
Additional Information
The no entry icon may be seen in the Signal Quality graph while the modem is searching for a signal.
This behavior is expected.
When only the red LED is lit it may not be possible to open the Client Software application.
Safety and Care Instructions
Before using your USB Stick Modem for the first time, please read and follow all warnings, safety, care,
cleaning and operating instructions on the USB Stick Modem label and in this guide. These guidelines will
help protect your product from potential damage and ensure your personal safety.
Safety Guidelines for the USB Stick Modem
Do not attempt to disassemble the USB Stick Modem; doing so may expose you to unsafe conditions.
The USB Stick Modem does not contain any user serviceable components.
Service should be performed by the Service Provider Service Center only. Contact Service Provider
Customer Service to find the nearest Service Center.
Position the USB Stick Modem so that it is protected from falling objects. Do not allow liquids to spill on
or into the USB Stick Modem.
Do not expose the USB Stick Modem to extreme hot (over 131° F/+55°C) or cold (under 14° F/-10°C)
temperatures.
- 7 -
Do not leave the USB Stick Modem in a motor vehicle parked in direct sunlight for more than fifteen
minutes.
Do not expose the USB Stick Modem to open flames.
Do not modify the antenna or substitute any other antenna. Doing so may result in product
failure and possible exposure to unsafe levels of RF.
Switch your USB Stick Modem off when near medical equipment, fuel, chemicals, a potentially explosive
atmosphere such as a gasoline station, or when in an area in which blasting is in progress. Also, switch
it off when on an aircraft. Follow any other rules, regulations, or posted notices that apply to the use of
electronic or radio equipment in areas such as hospitals. The easiest way to turn off the USB Stick
Modem is to remove it from your computer.
Before using the USB Stick Modem near a pacemaker or similar device, consult a
physician or the device manufacturer for more information.
Do not use the USB Stick Modem when you need to pay attention to other activities. For example, never
use it while driving or while supervising or operating machinery.
The USB Stick Modem, like any other wireless communications device, cannot
guarantee a connection in all circumstances. Do not rely on it for matters where a connection
is essential.
Exposure to Radio Frequency Signals
The following information includes important safety guidelines regarding exposure to radio
frequency (RF) signals and the use of electronic devices.
Your modem is a low power radio transmitter and receiver. When it is ON, it receives and also
sends out RF signals. The USB Stick Modem has been evaluated against the Specific Absorption Rate
(SAR) limits defined by the FCC for devices of this type and the highest report SAR value complies with
the 1.6W/kg averaged over 1g complies with this limit. The highest SAR value measured for the USB
Stick modem was 1.50W/kg averaged over 1g.
This USB modem is approved for use in normal size laptop computers only (typically with 12 inch or
larger display screens). To comply with FCC RF exposure requirements, this modem should not be
used in configurations that cannot maintain a distance of at least 5mm (approximately 0.2 inch) from
users and bystanders.
For example, in certain laptop and tablet computers or other configurations where the USB connectors
on the host computer are unable to provide or ensure the necessary separation between the modem
and its users or bystanders to satisfy the RF exposure compliance requirements.
- 8 -
If you use the modem in accordance with these guidelines, the level of RF exposure will fall within the
guidelines and the standards previously identified.
FCC Interference Statement
15.19 This device complies with Part 15 of the FCC rules. Operation is subject to the following two
conditions.
(1) This device may not cause harmful interference, and
(2) This device must accept any interference received, including interference that may cause
undesired operation.
Changes or modifications made to this equipment not expressly approved by the manufacturer may void
the user’s FCC authorisation to operate the equipment.
NOTE: This equipment has been tested and found to comply with the limits for a Class B digital device,
pursuant to part 15 of the FCC Rules. These limits are designed to provide reasonable protection
against harmful interference in a residential installation. This equipment generates, uses and can radiate
radio frequency energy and, if not installed and used in accordance with the instructions, may cause
harmful interference to radio communications. However, there is no guarantee that interference will not
occur in a particular installation. If this equipment does cause harmful interference to radio or television
reception, which can be determined by turning the equipment off and on, the user is encouraged to try to
correct the interference by one or more of the following measures:
- Reorient or relocate the receiving antenna.
- Increase the separation between the equipment and receiver.
- Connect the equipment into an outlet on a circuit different from that to which the receiver is
connected.
- Consult the dealer or an experienced radio/TV technician for help.
- 9 -
Care and Cleaning Guidelines
Use a clean soft cloth, slightly moistened with water, and wipe the outside surface of the
USB Stick Modem only. Do not use aerosol sprays, solvents, or abrasives when cleaning your USB
Stick Modem. These items may scratch the surface or damage the interior components of the USB Stick
Modem. Avoid dropping, shaking or striking the USB Stick Modem. This may damage its components.
Information in this document and the products described are subject to change without notice. 2000-2009
IPWireless, Inc. All rights reserved.
Reproduction, alteration, or distribution in any manner whatsoever without the written permission of IPWireless,
Inc. is strictly forbidden.
Microsoft, Windows are registered trademarks of Microsoft Corporation.
Other trademarks and trade names may be used in this document to refer to either the entities claiming the
marks and names, or their products. IPWireless, Inc. disclaims any proprietary interest in trademarks and trade
names other than its own.
December 2009 Part No. IPW-2105_issue3