General Dynamics Itronix IX260A750MPIBT Laptop computer with PCS, WLAN and Bluetooth User Manual ManualIX260A750MPIBT rev 0

General Dynamics Itronix Corporation Laptop computer with PCS, WLAN and Bluetooth ManualIX260A750MPIBT rev 0

Contents

Exhibit 8 User Manual
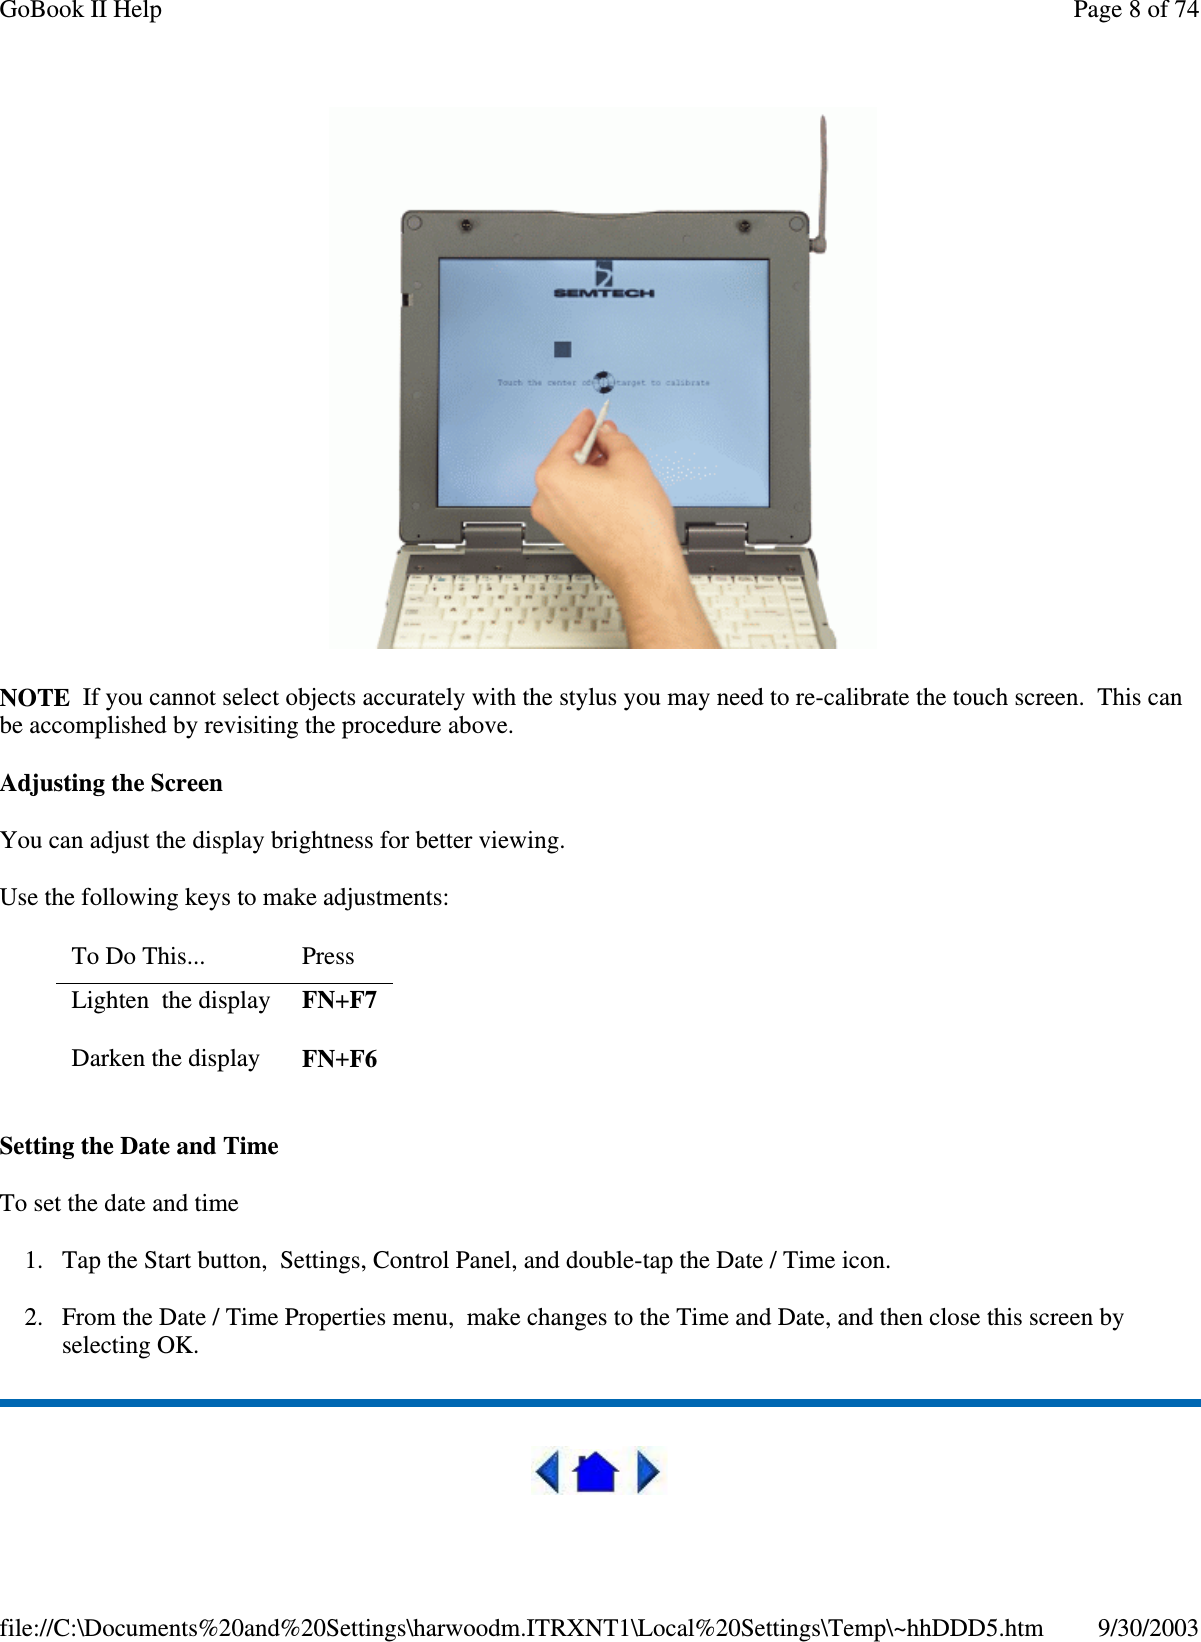
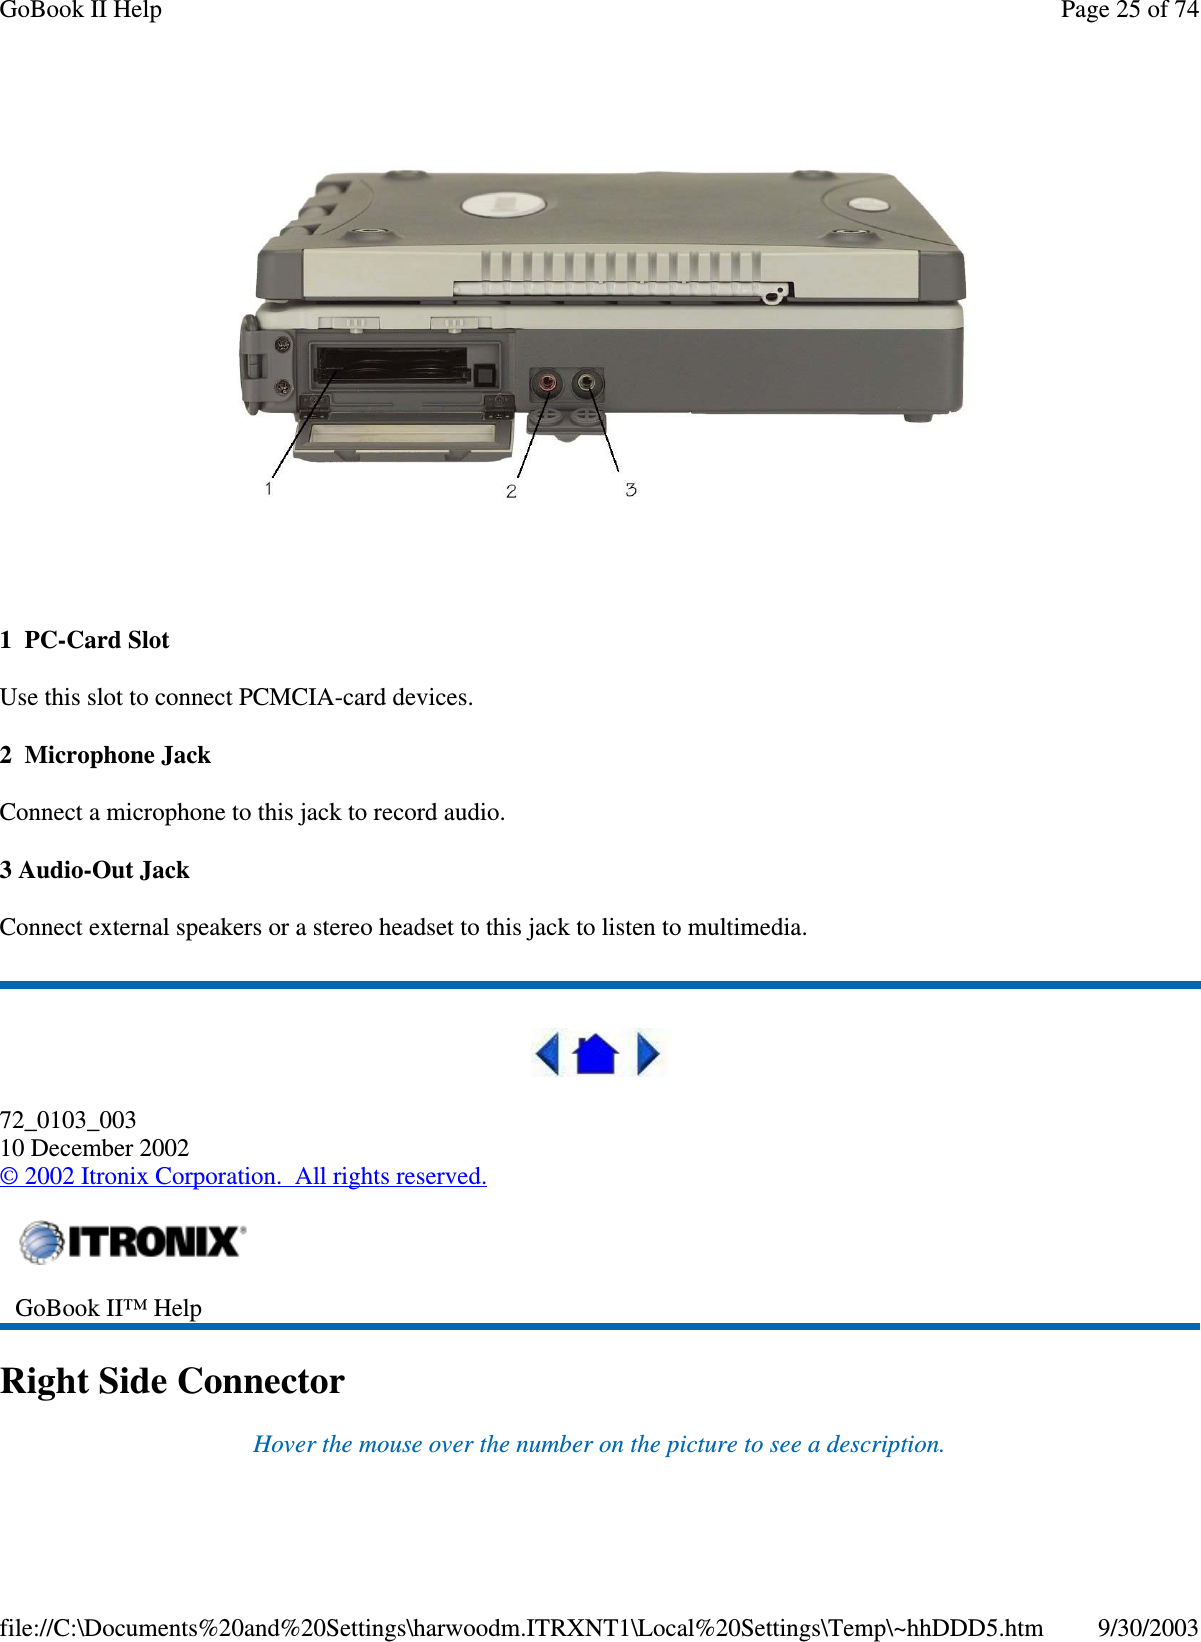
Getting StartedCongratulations on your purchase of the Itronix GoBook II computer! Your new GoBook II features the mostinnovative advances in portable computing technology. It combines state-of-the-art ergonomics with a rugged, durablearchitecture to provide you with a notebook computer that is compact, powerful, rugged and easy to use. Designed for awide range of business and personal productivity applications, the GoBook II is an ideal choice for use in applicationsthat require durability and performance.For maximum expandability without compromising portability, the GoBook II has a USB interface and a PC card slot.The high capacity hard disk drive provides you with plenty of storage space for multimedia files and applications.The GoBook II features a standard 87-key Nitevue® keyboard (89-key international). The high-resolution 12.1-inchtouch screen LCD panel provides clear and crisp viewing with the convenience of a touch screen.This online document, GoBook II Help, contains all the information you need to set up and use your new GoBook II. Itdescribes all the features of the GoBook II in an easy-to-read yet thorough manner. For information on printing,navigating or otherwise using GoBook II Help see How to Use This Help System.ChecklistsGoBook II™ HelpPage 1 of 74GoBook II Help9/30/2003file://C:\Documents%20and%20Settings\harwoodm.ITRXNT1\Local%20Settings\Temp\~hhDDD5.htm
After opening the package, carefully inspect the contents. Contact your dealer if any items are missing or appeardamaged. The shipping carton should contain the following:STANDARDThe Itronix GoBook II computerBatteryADP-90AB or ADP-75FB AC adapter with power cord12.1 inch XGA displayStylusShoulder StrapGoBook II Quick Start GuideOPTIONSThe following items are normally optional, but some vendors may include them in the standard package. Some itemsmay not be available in some countries, or some vendors may choose not to carry all the items.Floppy disk driveCD-ROM driveCD-RW DriveDVD-ROM driveSVGA displaySoft HandleMedia Bay Li-Ion battery pack (3000 mAhr)Hard Disk Drive HeaterLCD HeaterCAUTION When purchasing any of the accessories listed above, purchase only those accessories that are approvedfor use with your computer. The above accessories are proprietary items. Your system vendor can obtain theseapproved accessories. If you use items that are not approved for use with this computer, you may cause your computerto malfunction, or to emit or receive electromagnetic radiation in excess of local regulations. For non-proprietaryaccessories such as PC Cards or printers, ensure that the accessory functions properly in your computer before makingthepurchase. Your system vendor maybe able to recommend reliable brands and models.Page 2 of 74GoBook II Help9/30/2003file://C:\Documents%20and%20Settings\harwoodm.ITRXNT1\Local%20Settings\Temp\~hhDDD5.htm
FeaturesHigh Capacity Hard Disk DriveThe computer has a high capacity hard disk drive, enabling you to install your favorite programs and store largemultimedia files.Full Array of Ports and ConnectorsYour computer includes standard ports for connecting to peripherals such as USB devices and monitors. USB portsallow you to add many types of peripherals.Large SVGA or XGA LCDYour computer has a large, easy to view SVGA or XGA LCD panel.Built-in Microphone and Stereo SpeakersThe stereo speakers and internal microphone enable you to run a variety of multimedia applications.Function KeysFunction keys allow you to suspend your computer, shut the LCDs off, and give you easy control of audio and yourmonitor.Where to Look For InformationAbout Your ComputerThis Help System describes the key elements of your computer. New users can find a simple step-by-step orientation inthis chapter.About WindowsFor more extensive information and help about Windows go to Help and Support, found on the Start Menu. Go toStart, Programs, Accessories to open , an online orientation of Windows XP.72_0103_00310 December 2002©2002 Itronix Corporation. All rights reserved.GoBook II™ HelpPage 3 of 74GoBook II Help9/30/2003file://C:\Documents%20and%20Settings\harwoodm.ITRXNT1\Local%20Settings\Temp\~hhDDD5.htm
PrecautionsYou can use your computer under a wide range of environmental conditions. However, to ensure long use andcontinued high performance, consider the following factors when setting up your computer:Follow all warnings and instructions noted in this documentation and in the Windows Help and Support, foundon the Start Menu.The first time you use your computer, we recommend that you carefully read the section on Power Managementto familiarize yourself with some basic battery information and to ensure optimum performanceThere is danger of explosion if the battery is incorrectly replaced. Replace only with the same or equivalent typerecommended by the manufacturer. Dispose of used batteries according to the manufacturer's instructions.Do not open the RAM door by yourself.Unplug the computer from the power outlet before cleaning. Use a damp cloth for cleaning. Do not use aerosols,solvents, or strong detergentsSlots and openings in the computer case are for ventilation purposes. Do not block or cover these openings or thesystem could overheatOn the bottom of the GoBook II, there is a label with information on the power requirements of this system.These requirements must be followed. If you are unsure of your local power supply, consult your dealer or localPower CompanyDo not step on or place anything on the power cordIf you use the computer with an extension cord, ensure that the total ampere ratings of all the devices sharing theextension do not exceed the rating of the extension cord or the rating of the wall outletUnless instructed, never push foreign objects into the computer through any of the slots or openings. Dangerousvoltages are present, which could cause electric shock, fire, or damage sensitive componentsFor best results, use a power strip with a built-in surge protector. Do not use inferior extension cords as this mayresult in damage to your computer72_0103_00310 December 2002©2002 Itronix Corporation. All rights reserved.GoBook II™ HelpPage 4 of 74GoBook II Help9/30/2003file://C:\Documents%20and%20Settings\harwoodm.ITRXNT1\Local%20Settings\Temp\~hhDDD5.htm
The First Time. . .Using your computer for the first time involves:Installing the batteryConnecting the AC adapter to the computerTurning the Computer On and OffAdjusting the VolumeInstalling the BatteryMake sure the computer is sheltered when you install the Lithium Ion battery; the computer is not weather sealed untilthe battery is properly installed. The battery should be fully charged before you operate the unit on battery power. Toget the most from your battery, follow the guidelines in the Power Management section.To install the battery1. Remove the battery door.2. Align the battery connectors and place the battery in the computer.3. Replace the battery door and rotate the door latches to secure the door.NOTE When the battery is installed and the computer is connected to AC power, see Connecting the AC Adapterbelow, it starts charging automatically. At moderate temperatures, approximately 70° Fahrenheit (21°C), the batterywill be fully charged in four to six hours. In warmer or cooler temperatures, the battery can take much longer to fullycharge. Refer to the Power Management section for additional information.Connecting the AC AdapterTo connect the ADP-90AB or ADP-75FB AC adapter1. Connect the AC adapter power cord to the AC adapter.2. Connect the AC adapter to the power jack at the rear of your computer.3. Connect the AC adapter power cord to an AC outlet.4. Lift the display to open the LCD.5. Open the LCD panel to a comfortable viewing angle.6. Press the Power Button to turn ON the power.Turningthe Computer On and OffPage 5 of 74GoBook II Help9/30/2003file://C:\Documents%20and%20Settings\harwoodm.ITRXNT1\Local%20Settings\Temp\~hhDDD5.htm
You can operate the computer while the battery is charging, while on external power , or on battery power only.To turn on the computerPress the Power Button button once, and then give the system time to respond.To turn off the computer1. From the Start menu, tap Shut Down.2. Then, from the Shut Down Windows screen select Shut Down and tap OK.If you need to leave the system for a short time, or if you want to conserve battery power, you can suspend thecomputer by pressing FN+F3.SeePower Management for additional information.Suspend to RAM In a suspend to RAM, the contents of your computer's memory are held intact, while almost all thecomponents in your computer either turn off completely, or reduce power consumption to a minimum. In a suspend toRAM, your computer remains active, but with a minimum possible power consumption. Return the computer to fullpower by pressing any key. A fully-charged battery can maintain a Suspend to RAM for many hours.SuspendtoDisk(Hibernate) Suspend to Disk is similar to turning off the computer, except that the current state ofthe computer is copied to the hard disk as a special file. In a Suspend to Disk there is no power consumption. When thecomputer returns from suspend mode , the desktop appears with the same files and programs open as when thecomputer was suspended. Suspend to Disk is very useful when you don’t want to take the time to shut down all openprograms one by one to shut off the computer. This mode is also called hibernation mode.CAUTION Shutting down the computer improperly could result in lost or corrupted data.Adjusting the VolumeVolume for the computer is adjusted by using function key combinations.FN +F8 decreases the volumeFN +F9 increases the volumeFN +F10 toggles the volume mute on or offYou can also adjust the volume with the Windows volume control applet, which is located on the taskbar and looks likethis .NOTE Adjusting the volume using the function keys produces only a slight change with each press. It may takeseveral presses to increase or decrease the volume to a level that you desire.Page 6 of 74GoBook II Help9/30/2003file://C:\Documents%20and%20Settings\harwoodm.ITRXNT1\Local%20Settings\Temp\~hhDDD5.htm
72_0103_00110 December 2002©2002 Itronix Corporation. All rights reserved.Calibrating the Touch ScreenYour GoBook II computer has a touch screen display. Follow the guidelines below to calibrate the touch screen foroptimum use.Calibrating the touch screenTo calibrate the touch screen, open the Calibration Applet by selecting Start, Programs, Mobile Computer Tools, TouchScreen Calibrator. You can also open the Calibration Applet by selecting Start, Settings, Control Panel, Touch ScreenCalibrator.After the Calibration Applet starts, click on the Calibrate buttonAfter you have completed calibration by touching the four highlighted points with an approved stylus, select OK tohave the new settingstakeeffect.GoBook II™ HelpCAUTIONAlways use an approved stylus or your finger.Never use sharp, hard, or abrasive implements on the touch screen such as ball point pens, pencils, or keys.They could damage the screen.To clean the touch screen panel, apply a household glass cleaner to a soft, clean, dry cloth and wipe thescreen.Page 7 of 74GoBook II Help9/30/2003file://C:\Documents%20and%20Settings\harwoodm.ITRXNT1\Local%20Settings\Temp\~hhDDD5.htm
NOTE If you cannot select objects accurately with the stylus you may need to re-calibrate the touch screen. This canbe accomplished by revisiting the procedure above.Adjusting the ScreenYou can adjust the display brightness for better viewing.Use the following keys to make adjustments:Setting the Date and TimeTo set the date and time1. Tap the Start button, Settings, Control Panel, and double-tap the Date / Time icon.2. From the Date / Time Properties menu, make changes to the Time and Date, and then close this screen byselecting OK.To Do This... PressLighten the display FN+F7Darken the display FN+F6Page 8 of 74GoBook II Help9/30/2003file://C:\Documents%20and%20Settings\harwoodm.ITRXNT1\Local%20Settings\Temp\~hhDDD5.htm
72_0103_00310 December 2002©2002 Itronix Corporation. All rights reserved.Startup Problems?If your computer does not operate, try these solutions.Connect the AC adapter to charge the battery if it is not charged.NOTE The Power LED on the AC adapter should be lit as well as the External Power Indicator on theGoBook II if the AC adapter is connected and functioning properly. Additionally, one of the power icons shouldappear in the task tray.If the AC adapter is connected, make sure the electrical outlet you are using works.Check to make sure the battery is installed and charged properly.If the battery doesn’t begin charging, remove the battery, connect the AC adapter, and turn on the computer bypressing On. Reinstall the battery. The Battery Power Indicator LED is solid while the battery is charging.The Troubleshooting section lists additional solutions you can try.72_0103_00310 December 2002©2002 Itronix Corporation. All rights reserved.Getting Familiar with Your ComputerThe GoBook II computer is a ruggedized , weather-sealed laptop computer system built for the demanding environmentof the mobile worker. Designed for use by mobile workforces, this computer is a superior work tool for collecting,managing, and communicating information in the field.The following pages describe the external and internal features of your GoBook II computer.GoBook II™ HelpGoBook II™ HelpPage 9 of 74GoBook II Help9/30/2003file://C:\Documents%20and%20Settings\harwoodm.ITRXNT1\Local%20Settings\Temp\~hhDDD5.htm
Individual PartsThe following diagrams and descriptions provide an overview of your GoBook II computer.Hover the mouse over each number on the picture to see a description.Front View1. Touch Screen Display2. Display Latches3. Antenna3a. Antenna’s (internal mini-WLAN & BlueTooth)4. Activity Indicators5. Power Button6. Touchpad7. Scrolling Button8. Touchpad Buttons9. Power / Wireless Modem Indicators10. SpeakersPage10of74GoBook II Help9/30/2003file://C:\Documents%20and%20Settings\harwoodm.ITRXNT1\Local%20Settings\Temp\~hhDDD5.htm
Back ViewCooling FanPower Jack15-Pin VGA Port60-Pin Multi-IO Port9-Pin Serial Port6. PS2 Port7. RJ-11 Modem Jack8. RJ-45 Network Jack9. USB Port10. D-RingsPage11of74GoBook II Help9/30/2003file://C:\Documents%20and%20Settings\harwoodm.ITRXNT1\Local%20Settings\Temp\~hhDDD5.htm
Left Side View1. PC Card Slot2. Microphone Jack3. Audio Jack4. StylusRight Side View1.Antenna2. Media Bay - CDROM, DVD, Floppy Disk, CDRW, or Media Bay Battery3. Radio Bay4. Cooling Fan5. SecuritySlotPage12of74GoBook II Help9/30/2003file://C:\Documents%20and%20Settings\harwoodm.ITRXNT1\Local%20Settings\Temp\~hhDDD5.htm
Display with StylusLED Activity IndicatorsThe activity indicators, located above the keyboard, light up when a particularfunction of the computer is active. Each indicator is marked with acorresponding symbol and is visible when the lid is open or closed. LEDnumbers are from left to right.Icon & LED #FunctionLED #1Mini PCINot UsedPage13of74GoBook II Help9/30/2003file://C:\Documents%20and%20Settings\harwoodm.ITRXNT1\Local%20Settings\Temp\~hhDDD5.htm
LED Power / Wireless Modem IndicatorsThe case front LED’s indicate external power, unit ON/OFF, battery status, andwireless modem ON/OFF. The indicators remain active and viewable even when theLCD panel is closed.72_0103_00310 December 2002LED #2LED #3Disk Status(HW)LED #4Media DriveBayLED #5Number LockLED #6Caps LockLED #7Scroll LockIconFunction LEDExternalPowerGreenLED offPower GreenFlashing GreenBatteryGreenFlashing GreenLED offWirelessModemGreenFlashing GreenLED offPage14of74GoBook II Help9/30/2003file://C:\Documents%20and%20Settings\harwoodm.ITRXNT1\Local%20Settings\Temp\~hhDDD5.htm
©2002 Itronix Corporation. All rights reserved.Keyboard BasicsThe keyboard on the GoBook II computer looks much like the keyboard of a typewriter and operates in almost thesame way. While typewriter keys put characters on paper, the keys on the laptop enter characters in the computer andperform certain functions, depending on the application or program.The GoBook II computer features:87-key US keyboard; 89-key international keyboardTwelve function keys, F1-F12Embedded numeric keypadMouse keys and cursor control keysRestarting the ComputerPrimary KeysArrow KeysGoBook II™ HelpPress…CTRL+ALT+DEL...Page15of74GoBook II Help9/30/2003file://C:\Documents%20and%20Settings\harwoodm.ITRXNT1\Local%20Settings\Temp\~hhDDD5.htm
The arrow keys are defined by the software application.The UP ARROW key usually moves the cursor up one line. In some cases, you can use the up arrow to makeselections from menus and scrollable list boxes.The DOWN ARROW key usually moves the cursor down one line. In Windows, you can use the down arrow to makeselections from menus and scrollable list boxes.The RIGHT ARROW key usually moves the cursor one character position to the right.The LEFT ARROW key usually moves the cursor one character position to the left.Function KeysHold the FN key while pressing the numbered function key.Numeric KeypadThe numeric keypad is embedded in the keyboard area. Theembedded keypad emulates the numeric keypad typically found on afull-size keyboard. It is arranged like a calculator for applications thatrequire you to key many numbers or for use with the Calculator in thestandard Windows Accessories.TouchpadThe touchpad is a pointing device thatprovides all the features of a two-buttonmouse. Its primary function is to movethe cursor around the screen.Using Your TouchpadClicking1. First, place your fingers on the keyboard in the normal typing position. The touchpad is easily accessible bymoving either your left or right thumb off the space bar and on to the touchpad.2. Gently move your thumb across the touchpad in the direction you want the cursor to move. The pad detects thechangeinpressure and moves the cursor in the correspondingdirection.Page16of74GoBook II Help9/30/2003file://C:\Documents%20and%20Settings\harwoodm.ITRXNT1\Local%20Settings\Temp\~hhDDD5.htm
NOTE The touchpad on your GoBook II computer is electrically sensitive to finger touch. It will not respond iftouched by anything other than your fingers, such as a stylus or pencil.3. The touchpad offers another method of making selections in a software program. It is called double-tapping. Thisfunction corresponds to double-clicking with a mouse. Once the cursor has been moved to the object you want toselect, lightly double-tap the pressure sensitive touchpad. This double-tapping on the touchpad will select thedesired item and prompt the software to perform the related operation.4. The left and right buttons located directly below the touchpad are the same in function as those on a two-buttoned mouse. Clicking these buttons makes selections, drags objects, or performs a variety of other functionsdepending on the software. To select an object, first move the pointer over the object you want to select, and thenpress the left button one time. The functions of these buttons are software specific.Double-clickingDouble-clicking is a common technique for selecting objects or launching programs from icons. Once you havemoved the pointer over the object you wish to select, rapidly press the left button two times. This action iscommonly referred to as "double-clicking" an object.DraggingMove the pointer to the desired location then press down the left button. While still holding down the left button,move the pointer to the desired location. Release the button.Move the pointer to the desired location. Tap the touchpad twice quickly as if you were double-clicking, howeverdo not remove your finger after the second tap. Move the cursor to the desired location. Lift your finger to finishdragging.Adjust the touchpad settings by selecting Settings/Control Panel/Mouse/Buttons. These settings allow you to changethe orientation of the touchpad from right-handed to left-handed, and fine-tune the pointer movement and timing ofclicks.Touchpad PrecautionsIf not properly cared for the touchpad can be easily damaged. Please take note of the following precautions.Do not rest heavy objects on the touchpad or the touchpad buttons.General GuidelinesThe mobile computer uses a Liquid Crystal Display (LCD), which is the type of screen used on many notebook andsub-notebook computers. One problem experienced on computers with an LCD display, especially in coldenvironments, is that the cursor seems to "disappear" whenever the mouse is moved quickly. To improve the visibilityof the mouse cursor, you should use a slow or medium speed/sensitivity level.You can combine a higher level of acceleration with a slow or medium speed/sensitivity level. This will allow you tomove the mouse cursor quickly by increasing your finger pressure, while still providing a finer degree of control whenyou apply minimum pressure.NOTE To change the speed of the mouse, from the Start Menu select Settings, Control Panel, and then choose Mouseto make adjustments.Page17of74GoBook II Help9/30/2003file://C:\Documents%20and%20Settings\harwoodm.ITRXNT1\Local%20Settings\Temp\~hhDDD5.htm
Scrolling ButtonsIf you are scrolling through a document, you may it find the scrolling button more restful to your hand than holdingdown a mouse button. The scrolling button is located between the touchpad buttons. Push the top of the button toscroll up in a document or Web page; press the bottom of the button to scroll down.Connecting an External Keyboard or MouseYou can use your GoBook II computer with an optional external keyboard, numeric keypad, or IBM PS/2 compatiblemouse. These devices are "hot swap" capable, which means you do not have to power down the GoBook II to connectthem to the PS/2 connection located on the back of the unit.72_0103_00310 December 2002©2002 Itronix Corporation. All rights reserved.Display BasicsXGA vs. SVGA DisplayYour GoBook II computer has either an XGA (standard) or SVGA (optional) display.XGA Display: The XGA display is a transmissive color display designed to minimize glare and maximize transmittedlight from the backlight so it has excellent readability in indirect light. The XGA display is the most popular displaybecause it is easy to read indoors and in vehicles.SVGA Display: The optional SVGA display is a transflective color display designed for frequent outdoor use withsuperior readability in direct sunlight. It also includes a backlight to improve visibility in low light conditions such asshade, in a vehicle or indoors.Connecting to an External MonitorThe GoBook II has a 15-Pin VGA monitor port to connect your computer to an external monitor.Using the VGA monitor port for dual displayYou may use an external monitor simultaneously with your GoBook II’s LCD. You may also disable the GoBook II'sLCD and use the external monitor exclusively.GoBook II™ HelpPage18of74GoBook II Help9/30/2003file://C:\Documents%20and%20Settings\harwoodm.ITRXNT1\Local%20Settings\Temp\~hhDDD5.htm
1. Locate the 15-pin VGA monitor port on the back of the unit behind the IO door. Then connect the video signalcable from the external monitor to the monitor port.2. Connect the monitor’s power cable to a power outlet and turn on the monitor.3. If the new monitor has not automatically been detected and is not displaying what appears on your GoBook II’sLCD screen, open the Control Panel.4. Double-tap Display. The Display Properties window opens.5. Tap the Settings tab. Then select the Advanced button.6. Tap the S3DuoVue tab and select the CRT box the enable display on an external monitor.7. You can also use the FN+F2 hot keys to cycle through the CRT, LCD, and CRT//LCD settings.72_0103_00310 December 2002©2002 Itronix Corporation. All rights reserved.Disk DrivesYour computer comes with several components for reading and writing (recording) information.TheHardDiskDriveThe hard disk provides high-capacity storage and fast access. Windows and most programs are stored here. YourGoBook II identifies the hard disk drive as drive C. For information about removing or installing the hard drive seeHard Drive Care and Handling.The Floppy Disk, CD-ROM, or DVD-ROM DriveYour computer may come with a floppy disk drive. The floppy disk drive accepts 3.5-inch floppy disks and is read andwrite capable.The CD-ROM drive is a read only drive. It cannot be used to write data to a recordable compact disk. The CD-ROMdrive can read data from CDs, including audio or video CDs. The DVD drive can read both DVD and CD disks. YourGoBook II identifies the drive with the letter following the hard drive letter. If you hard drive is C, then the CD0-ROMdrive will be D. The media bayis located on the right side ofyour computer, asyou are facingthe display,andisGoBook II™ HelpPage19of74GoBook II Help9/30/2003file://C:\Documents%20and%20Settings\harwoodm.ITRXNT1\Local%20Settings\Temp\~hhDDD5.htm
accessible by sliding the two bay door latches, which release and open the door.Inserting a CD-ROM or DVD-ROM Disk1. Press the button on the front of the drive to open the disk tray and pull the tray open.2. Place the disk on the tray, label side up.3. Place the disk on the central spindle and press gently until the disk clicks into place.4. Slide back the tray until it clicks shut.Removing a CD-ROM or DVD-ROM Disk1. Make sure the computer is not accessing the CD-ROM/DVD-ROM drive.2. Press the button on the front of the drive and pull the tray all the way out.3. Pick up the CD-DVD by the edges and remove the CD-ROM/DVD-ROM from the tray. Push the tray into thecomputer until it closes fully.CAUTION When the computer is reading from a CD-ROM/DVD-ROM or Floppy disk drive, the indicator light forthe drive will flash. Do not attempt to remove a disk while this light is active.Changing your 'swappable' media bay device1. Make sure the computer is not accessing the media baydrive.2. Slide the door latches to release the media bay door.3. Left click the "unplug or eject" media bay icon on theright side of the taskbar.4. Select the media bay device and left click to stop thedevice.5. Wait for the "safe to remove hardware" message.6. Grasp the media bay device by the removal tab and pull straight out until it is clear from the slot.7. Click OK8. Re-insert the next media bay device by firmly pushing it back into the slot until it clicks into place.Precautions for Handling CD-ROM/DVD-ROM DisksKeeptheseprecautions in mind when handlingCD-ROM/DVD-ROM discs.Page20of74GoBook II Help9/30/2003file://C:\Documents%20and%20Settings\harwoodm.ITRXNT1\Local%20Settings\Temp\~hhDDD5.htm
Always hold the disc by the edges; avoid touching the surface of the disc.Use a clean, dry, cloth to remove dust, smudges, or fingerprints. wipe from the center outward.Do not write on the surface of the disc.Extremes in temperature may damage discs. Store discs in a cool dry place.Do not use benzene, thinners, or cleaners with detergent. Only use CD0-ROM/DVD-ROM cleaning kits.Do not bend or drop the discs.Do not place objects on top of discs.CAUTION do not insert any foreign objects into the disc tray. Do not force the tray to open or close manually. Whennot in use, keep the tray closed to prevent dust or dirt from entering the drive unit. If you experience difficulty whenremoving a CD/DVD disc, stretch a paper clip (or use a pin or a thin metal rod) and insert it into the emergency ejecthole located on the front panel.The CD/DVD disk tray should eject immediately. This procedure can also be used to remove a CD-DVD from thedrive when the GoBook II is powered off.72_0103_00310 December 2002©2002 Itronix Corporation. All rights reserved.The PC Card SlotThe PC card slot can be used as an interface between your computer and a variety of communications devices, such asnetwork adapters, SCSI adapters, and fax/modems. They can also be used to provide additional data storage capacity.Your computer’s PC Card slot supports Type I, II or III PC Cards, 32-bit CardBus cards, and Zoomed Video cards.GoBook II™ HelpPage21of74GoBook II Help9/30/2003file://C:\Documents%20and%20Settings\harwoodm.ITRXNT1\Local%20Settings\Temp\~hhDDD5.htm
Installing a Card1. The top side of a PC Card is usually identified with a label. Insert the card into the slot with the top up and theedge with pinhole contacts going in first. You will feel some resistance as the card slides into the back of the slot.2. PC Cards require drivers, or a program that allows the operating system to use a specific device. Many driversare included with Windows, but if not, you will be prompted to install the driver included with your card.NOTE Please read the instructions included with individual PC Cards. Some cards may be inserted with power on,while others require that the computer be turned off.Removing a PC Card1. If a PC Card is in use, you must shut down the PC Card before removing it.2. Select the PC Card icon on the right side of the Windows tray taskbar , then tap Stop.3. When the Windows message appears, telling you that it is safe to remove the card, tap OK.4. Press the eject button on the PC Card slot to release the eject button (it is spring loaded and remains hidden untilit is pressed).5. Press the eject button again to release the PC Card.72_0103_00310 December 2002©2002 Itronix Corporation. All rights reserved.MakingConnectionsPage22of74GoBook II Help9/30/2003file://C:\Documents%20and%20Settings\harwoodm.ITRXNT1\Local%20Settings\Temp\~hhDDD5.htm
Your computer is equipped with a full array of ports and connectors, including standard input/output (I/O) ports forquickly and easily adding peripheral devices such as printers and monitors. Refer to documentation included withindividual devices for details on connecting these devices to your computer. Along with the standard ports found onmost computers, your computer may also include optional modem and LAN ports for advanced communicationstechnology.Rear ConnectorsHover the mouse over each number on the picture to see a description.1 DC-in JackConnect the DC power cable from the AC adapter to this jack.2 VGA Out (External Video) PortThe 15-pin monitor can connect your computer to an external monitor.3Multi-I/OPortThe 60-pin Multi-IO port is provided so you can connect the GoBook II to an optional cradle or office dock.4 Serial PortThe 9-pin serial port can be used to connect your computer to serial devices such a a fax/modem or a serial mouse.Thisport is identified as COM1 and is 16550A compatible.GoBook II™ HelpPage23of74GoBook II Help9/30/2003file://C:\Documents%20and%20Settings\harwoodm.ITRXNT1\Local%20Settings\Temp\~hhDDD5.htm
5 PS/2 PortYou can use the mini-DIN PS/2 port to connect your computer to a PS/2 device such as a PS/2 keyboard or mouse.6 Fax/modem RJ-11 JackThe fax/modem can transmit data using the 56 Kbps V.90 or V.92 protocol, and send and receive faxes at 14.4 Kbps.In some countries, local regulations may not permit the use of the fax/modem designed for this system. In this case,you may use a PCMCIA modem.CAUTION Plug your modem into an analog telephone jack only. Most homes use analog lines. Do not use digitallines, such as PBX and ISDN systems found in many offices. Digital lines may damage your modem. If you areunsure as to the type of port you have to plug into, simple detection and protection devices are available at your localcomputer store.7 LAN RJ-45 Jack (optional)With an Ethernet LAN you can make LAN connections without installing PC cards. Connection speed is 10/100Mbps.8 USB (Universal Serial Bus) PortThe USB is latest standard for attaching input devices, scanners, and other devices to a PC. USB devices can bechained together on a single cable. USB is 1.1 compliant.72_0103_00310 December 2002©2002 Itronix Corporation. All rights reserved.Left Side ConnectorsHover the mouse over each number on the picture to see a descriptionGoBook II™ HelpPage24of74GoBook II Help9/30/2003file://C:\Documents%20and%20Settings\harwoodm.ITRXNT1\Local%20Settings\Temp\~hhDDD5.htm
1 PC-Card SlotUse this slot to connect PCMCIA-card devices.2 Microphone JackConnect a microphone to this jack to record audio.3 Audio-Out JackConnect external speakers or a stereo headset to this jack to listen to multimedia.72_0103_00310 December 2002©2002 Itronix Corporation. All rights reserved.Right Side ConnectorHover the mouse over the number on the picture to see a description.GoBook II™ HelpPage25of74GoBook II Help9/30/2003file://C:\Documents%20and%20Settings\harwoodm.ITRXNT1\Local%20Settings\Temp\~hhDDD5.htm
1SecuritySlotYour computer has a Security Slot that can be used with a standard laptop locking device, such as a Kennsington Lock.You can connect the GoBook II to a large object with the lock to prevent theft of your GoBook. See thedocumentation that comes with your lock for more information.72_0103_00310 December 2002©2002 Itronix Corporation. All rights reserved.Wireless CommunicationsThe GoBook II includes three antennas for wireless communication. The WLAN antenna and Blue Tooth antenna areembedded in the upper display housing and requires no user action. Another antenna is located on the upper rightcorner of the display for the Sierra Wireless AC750 WAN radio. Simply raise this antenna when using your SierraWireless AC750 WAN radio.Use only the supplied or an approved antenna(s). Unauthorized antennas, modifications, or attachments could impaircall quality, damage the phone, or result in violation of FCC regulations.The GoBook II (IX260) contains the radio transmitters listed below. The following statements are relevant when usingthese radios:This device contains a Cisco MPI-350 WLAN radio transmitter, a Sierra Wireless AC750 WAN radio transmitterPage26of74GoBook II Help9/30/2003file://C:\Documents%20and%20Settings\harwoodm.ITRXNT1\Local%20Settings\Temp\~hhDDD5.htm
and a Blue Tooth radio transmitter. To comply with FCC RF exposure requirements when using the SierraWireless AC750 WAN radio transmitter, a minimum separation distance of 1.5 cm must be maintained betweenthe external dipole antenna and all users/bystanders. When using the Cisco MPI-350 WLAN transmitter, aminimum separation distance of 1.5 cm must be maintained between the back of the LCD display and allusers/bystanders. When using the Blue Tooth transmitter, a minimum separation distance of 1.5 cm must bemaintained between the back of the LCD display and all users/bystanders. The Sierra Wireless AC750 WANradio, Cisco MPI-350 WLAN transmitter, and the Blue Tooth transmitter should be turned off before carryingthe Laptop PC in order to comply with FCC RF exposure requirements.Since each customer's radio configuration is unique please refer to the manufacturer documentation to setup and useyour radio's.WAN and WLANThe GoBook II supports many different wireless radio configuration options including LAN (Local Area Network) andWAN (Wide Area Network) wireless communication.LAN radios are local and therefore span a small area such as a building or small group of buildings. The GoBook II'sLAN radios include the Cisco Mini-PCI slot WLAN (Wireless Local Area Network) .WAN radios cover a wider geographical area so they can be used anyplace the carrier has digital coverage. Forexample, our cell phone system. WAN radios are usually connected via a communications infrastructure such as atelephone system and connect at 14.4K to 153K depending on the carrier, technology, and coverage. The GoBook II'sWAN radios include GPRS.72_0103_00310 December 2002©2002 Itronix Corporation. All rights reserved.BluetoothGoBook II™ HelpGoBook II™ HelpPage27of74GoBook II Help9/30/2003file://C:\Documents%20and%20Settings\harwoodm.ITRXNT1\Local%20Settings\Temp\~hhDDD5.htm
Bluetooth systems create a personal-area network (PAN), or piconet, that may fill a room or may encompass no moredistance than that between the cell phone on a belt-clip and the headset on your head.When Bluetooth-capable devices come within range of one another, an electronic conversation takes place to determinewhether they have data to share or whether one needs to control the other. The user doesn’t have to press a button orgive a command -- the electronic conversation happens automatically. Once the conversation has occurred, the devices-- whether they’re part of a computer system or a stereo -- form a network.Once a piconet is established, the members randomly hop frequencies in unison so they stay in touch with one anotherand avoid other piconets that may be operating in the same room.One of the ways Bluetooth devices avoid interfering with other systems is by sending out very weak signals of 1milliwatt. By comparison, the most powerful cell phones can transmit a signal of 3 watts. The low power limits therange of a Bluetooth device to about 10 meters, cutting the chances of interference between your computer system andyour portable telephone or television. Even with the low power, the walls in your house won’t stop a Bluetooth signal,making the standard useful for controlling several devices in different rooms.72_0103_00310 December 2002©2002 Itronix Corporation. All rights reserved.Page28of74GoBook II Help9/30/2003file://C:\Documents%20and%20Settings\harwoodm.ITRXNT1\Local%20Settings\Temp\~hhDDD5.htm
GPRSFor specific information about your GPRS radio please refer to the manufacturer’s documentation.72_0103_00310 December 2002©2002 Itronix Corporation. All rights reserved.Cisco Wireless LANThe GoBook II computer includes a high powered WLAN radio:1. The Cisco MPI350 MiniPCI slot with one antennas in the display. The Cisco MiniPCI Card User’s Manualmay already be installed on your GoBook II computer. Refer to it for more information.72_0103_00310 December 2002©2002 Itronix Corporation. All rights reserved.Power ManagementThe GoBook II has power management capability so you can reduce the amount of energy used, especially duringperiods of inactivity. Effective use of power management options can greatly conserve and extend your battery life.GoBook II™ HelpGoBook II™ HelpGoBook II™ HelpPage29of74GoBook II Help9/30/2003file://C:\Documents%20and%20Settings\harwoodm.ITRXNT1\Local%20Settings\Temp\~hhDDD5.htm
Battery CalibrationBIOS Level Battery CalibrationThe first time you use a battery, you should calibrate it. The calibration process empties and charges the battery. Thisallows the Windows battery gauge to accurately monitor battery status. To calibrate a battery, follow these steps:1. Plug in the AC adapter.2. Restart the computer. When the startup screen appears, just prior to the Windows logo screen, press the Del keyto enter the BIOS Setup Utility.3. At the "Choose the setup function" screen, select "Battery Calibration" and hit enter.NOTE Make sure the AC adapter and battery are present.4. Choose Primary or secondary battery and hit enter. Battery Calibration will take from 10 to 16 hours, dependingon how much power the battery may already contain.Windows Battery CalibrationOver time, as the battery is repeatedly drained and recharged, battery performance will decrease. Occasionally, thebattery needs to be recalibrated for maximum performance. This is the purpose of the Battery Calibration application,to restore the battery to maximum performance levels.To run the Battery Calibration program tap Start, Programs, and Mobile Computer Tools.After starting calibration, the Battery Calibration application requires no further input from the user. The calibrationconsists of four steps:1. Partial Discharge - the battery is drained to a level below 60 %.2. Charge - the battery is fully charged to 100 %.3. Discharge and calibrate:First, the battery is discharged all the way down to zero. Now the battery is 'calibrated' but not charged. Youmay stop the process after this point and let the battery charge outside of the Battery Calibration application.4. Charge - if the Battery Calibration continues running, the battery will fully charged to 100%.NOTE The unit will not go into suspend mode while Battery Calibration is running.CAUTION Do not disconnect AC power while Battery Calibration is running. If AC remains disconnected for morethan two minutes, the application will terminate.CAUTION Do not remove the battery while Battery Calibration is running. Doing so will cause the application toterminate immediately.Page30of74GoBook II Help9/30/2003file://C:\Documents%20and%20Settings\harwoodm.ITRXNT1\Local%20Settings\Temp\~hhDDD5.htm
72_0103_00310 December 2002©2002 Itronix Corporation. All rights reserved.Using the BatteryMonitoring Battery PowerThere are two ways to monitor how much power the battery has left:1. Click Start, Settings, Control Panel, Power Management (Power Options); then tap the Power Meter tab.2. Moving the cursor to the battery icon on the taskbar, without selecting anything, is the simplest way to check onbattery power status. The status will show as a pop-up when you mouse-over the icon.NOTE If you do not see the battery icon, enable it in Start, Settings, Control Panel, Power Management (PowerOptions). Choose the Advanced tab and select "Always show icon on the taskbar."Low Battery AlarmsHow your computer responds to a low battery condition can be set by going to Start, Settings, Control Panel, PowerManagement, Alarms.Two different power alarms can be enabled or disabled: the Low Battery Alarm, and the Critical Battery Alarm. Usethe slidebar to set the power level at which the alarms are activated. Click on the Action button to choose whether thealarm sounds, displays a message, or both.CAUTION When battery power is low, the Battery Power Indicator will flash and the alarm will beep or display awarning on your screen. Take immediate action, such as saving files or connecting to the AC adapter ,ordatamaybelost.When the computer alerts you that the battery is low, immediately do one of the following:Connect the AC power adapterSave your work and suspend to disk (Hibernate) by pressing the Power ButtonSaveyour work and then select Shut Down from the Start menuGoBook II™ HelpPage31of74GoBook II Help9/30/2003file://C:\Documents%20and%20Settings\harwoodm.ITRXNT1\Local%20Settings\Temp\~hhDDD5.htm
Turn off the computer (or suspend to disk) and replace the discharged battery with a charged battery (SeeChanging the Battery)NOTE Do not restart the computer until you have connected to an AC adapter, or replaced the discharged battery witha charged battery.72_0103_00310 December 2002©2002 Itronix Corporation. All rights reserved.Battery ChargingWhen you use the AC adapter to connect your GoBook II to a power outlet, the internal battery will begin to rechargeautomatically. While the battery is charging, the Battery Power Indicator will be flashing green. When the batteryis fully charged, it will turn off.If your computer is turned off, or suspended to RAM, a fully discharged battery will take about 4 hours to recharge. Ifyou computer is turned on and is not in suspend mode, it will take 4- 6 hours to recharge the battery. Refer to thefollowing table:NOTE a fully charged Li-Ion battery can run the GoBook II for approximately 3 hours or more.Power Saving ModesAdjust the default power management settings in the Power Management (Power Options) dialog box in the ControlPanel. The Power Management (Power Options) dialog box allows you to set different actions to take when thecomputer is left idle for a certain amount of time.Suspend ModeThere are several possible settings for suspend mode. You may SuspendtoRAM,SuspendtoDisk(Hibernate), ordisable suspend altogether, which is not recommended.GoBook II™ HelpCharging DischargingSystem On 4-6 hours 3-4 hoursSystem Off (suspend to RAM) 4 hours —Page32of74GoBook II Help9/30/2003file://C:\Documents%20and%20Settings\harwoodm.ITRXNT1\Local%20Settings\Temp\~hhDDD5.htm
SuspendtoRAMIn a suspend to RAM, the contents of your computer’s memory are held intact, while most of the components in yourcomputer either turn off completely, or reduce power consumption to a minimum. In a Suspend to RAM, yourcomputer remains active but with the minimum possible power consumption. Return the computer to full power bypressing any key. A fully-charged battery can maintain a Suspend to RAM for many hours.Suspend to Disk (Hibernate)Suspend to Disk (Hibernate) is similar to turning off the computer, except that the current state of the computer iscopied to the hard disk as a special file. When the computer returns from suspend mode, the desktop appears with thesame files and programs open as when the computer was suspended. Suspend to Disk (Hibernate) is very useful whenyou don’t want to take the time to shut down all open programs one by one to shut off the computer, only to have toopen the same programs and files the next time you use the computer. This mode is also called hibernation mode.Initiating Suspend ModeThere are four ways to initiate suspend mode. The settings can be adjusted in the Power Management dialog box:The computer will automatically enter suspend mode when not used for a set period of timeSelecting the Standby button in the Shut Down Windows dialog boxPressing the power button (if enabled in power settings)Pressing the suspend function key (FN+F3)Power Button SettingsThe function of the Power Button can be set to Shut down, Stand by or Hibernate in the Windows Control Panel.However, holding the Power Button down for more than four seconds will force a power off while operating underany situation, resulting in the loss of any unsaved information.Power Saving TipsAvoid operating the fax/modem, or audio and video applications when using battery power. Operating a faxmodem, video, or audio equipment increases the computer’s power requirements.Decreasing monitor brightness can also save power. Decrease brightness by pushing FN +F6. Increase it bypushing FN +F7.When to Replace the BatteryOver time, the battery’s capacity gradually decreases. We recommend that you replace your battery when you noticethat it begins to store significantly less charge.WARNING There is danger of explosion if the battery is incorrectly replaced. Replace only with the same orequivalent type recommended by the manufacturer. Dispose of used batteries according to the manufacturer'sinstructions.Page33of74GoBook II Help9/30/2003file://C:\Documents%20and%20Settings\harwoodm.ITRXNT1\Local%20Settings\Temp\~hhDDD5.htm
Changing the BatteryChange the main battery pack as follows:1. Turn off the computer.2. Disconnect external power .3. Close the display and turn the computer over.4. Rotate the latches on the battery door to the open position andremove the door. Remove the battery.5. Make sure the replacement battery is properly orientated. Insertthe battery into the battery compartment. Check that the latcheslock back into position.6. Charge the new battery by plugging the computer into AC power.Heat ConsiderationsThe computer’s processor has been specially designed to consume little power and generates very little heat. However,working in a hot environment, or working for long periods may raise the temperature. Your computer takes thefollowing steps to lower temperature:1. The cooling fan turns on. You may hear the fan and feel air coming from a vent near the right rear of thecomputer when this happens.2. If the temperature continues to rise, Processor activity is reduced. You may notice a slight loss of performancewhen this happens.3. If the computer overheats, the processor will stop functioning and the computer will shutdown.72_0103_00310 December 2002©2002 Itronix Corporation. All rights reserved.Customizing Your CMOS SettingsThis chapter explains how to use the Setup Utility to modify the CMOS settings. The Setup Utility displays and allowsmodification of the GoBook II components and the configuration of devices that are connected to it. This information isused to test and initialize components at start-up time and to make sure everything runs properly when the system isoperating.The GoBook II is configured with a set of default values. You maybe able to increase systemperformance bychangingPage34of74GoBook II Help9/30/2003file://C:\Documents%20and%20Settings\harwoodm.ITRXNT1\Local%20Settings\Temp\~hhDDD5.htm
some of the timing values in the Setup Utility, but this can be limited by the kind of hardware you are using. In certaincircumstances, the system may generate an error message that asks you to make changes to the CMOS settings usingthe Setup Utility. This happens when the system finds an error during the POST (Power On Self Test) that it carries outat startup.CAUTION It is not recommended that you change any settings since this may cause the unit to not function properly.If you are not sure how to configure the CMOS settings we suggest that you select Auto configuration with OptimalSettings on the Main Menu screen, then exit saving changes. This loads optimized default settings for normal use.Using the Setup UtilityThe Setup Utility allows you to configure your computer’s basic settings. When you turn your computer on, the systemreads this information to initialize the hardware so that it can operate correctly. You can use the Setup Utility to changeyour computer’s start-up configuration. For example, you can change your system's security routine.Starting the Setup UtilityYou can only start the Setup Utility shortly after the computer has been turned on or rebooted. To execute a controlledreboot select Start, shutdown, Restart. Shortly after the computer restarts the following prompt appears on thecomputer display, “DEL:Setup”PresstheDEL key when you see the prompt. The prompt will change to "GO >Setup"and the system will start the Setup Utility with the following screen displayed.GoBook II™ HelpPage35of74GoBook II Help9/30/2003file://C:\Documents%20and%20Settings\harwoodm.ITRXNT1\Local%20Settings\Temp\~hhDDD5.htm
72_0103_00310 December 2002©2002 Itronix Corporation. All rights reserved.The Main MenuThe Setup Utility main menu has seven main submenu options:Standard CMOS SetupAdvanced CMOS SetupPower Management SetupPeripheral SetupStealth Mode SetupAuto-Detect Hard DisksChange User PasswordChange Supervisor PasswordSave Settings and Exit, and Exit Without Saving are used to exit the Setup Utility.Navigatingand EnteringInformationintheBIOSGoBook II™ HelpPage36of74GoBook II Help9/30/2003file://C:\Documents%20and%20Settings\harwoodm.ITRXNT1\Local%20Settings\Temp\~hhDDD5.htm
Use the following keys to move between fields and to enter information72_0103_00310 December 2002©2002 Itronix Corporation. All rights reserved.Standard CMOS SetupThe Standard CMOS Setup page of the Setup Utility has a list of fields that describe the basic configuration of yourcomputer. CMOS is simplyatype of Non-Volatile Memoryused to store the basic configuration of the computer.Key FunctionDEL Starts the Setup utility after turning on the computer.ESC Exits any submenu. If you wish to exit the Setup Utility withoutsaving changes, go to the main menu, then press Esc.Up,downarrowkeys /TabMoves among selections.PgUpPgDnUse the PgUp,PgDn keys to modify a field. Use PgUp toincrease a value, such as a date or number, and PgDn to decreaseit. For other types of choices, such as "enabled," or "disabled,"use either key to move between choices.Enter Makes a selection.F2 orF3Changes the color of the graphic display.F10 Saves changes, then exitsGoBook II™ HelpPage37of74GoBook II Help9/30/2003file://C:\Documents%20and%20Settings\harwoodm.ITRXNT1\Local%20Settings\Temp\~hhDDD5.htm
Standard Feature DescriptionCAUTION Incorrect settings can cause your system to malfunction. To correct mistakes, press Esc until you haveexited the Setup Utility.Primary/ SecondaryMaster and Slave SettingsField Setting FunctionSystemTimeUse these fields to set the time and date. The time is displayed in 24 hourformat. The date can be set from January 1, 1980 to December 31, 2099. Thevalues set in these two fields take effect immediately.FloppyDrive ANotInstalled1.44 MB (31/2")Indicates if a floppy disk drive is installed. Default is 1.44 MB (3 1/2"). If thisfield is set to "Not Installed" the system will not detect a floppy inserted in themedia bay.Type Shows type of system installed including the following options:- (Pri. Master) Auto, user, Not Installed-(sec.Master)auto,ATAPICD-ROM,NotInstalledPri. Master AutoUserNotInstalledThe default setting is Auto. Auto lets the system automatically read setupinformation from the device.Sec. Master AutoATAPICD-ROMNotInstalledThe default setting is Auto. Auto lets the system automatically read setupinformation from the device. When set to Auto, the BIOS will automaticallydetect hard disk capacity.SystemMemory;ExtendedMemoryThese fields display the amount of conventional memory and extended memorydetected by the system during boot up. They are display only fields.Page38of74GoBook II Help9/30/2003file://C:\Documents%20and%20Settings\harwoodm.ITRXNT1\Local%20Settings\Temp\~hhDDD5.htm
CAUTION Before attempting to configure a hard disk drive, make sure you have the configuration informationsupplied by the manufacturer of your hard drive. Incorrect settings can result in your system not recognizing theinstalled hard disk.72_0103_00310 December 2002©2002 Itronix Corporation. All rights reserved.AdvancedCMOSSetupSize Displays the hard disk capacity.Cylinders Display the number of cylinders on the hard disk drive.WPCOM Precomp CylinderSec Number of sectors per cylinderHeads Displays the number of heads per cylinder on the hard disk drive.LBAModeLBA (Logical Block Addressing) mode is used to support IDE hard disks larger than 504 MB.LBA support is required for compatibility with the FAT32 system. Only some hard disk drivessupport LBA mode. The default setting depends on the hard disk drive type.Blk Mode Multi-sector transfers enabledPIOModePIO (Programmed Input/Output) mode refers to data transfer method used by IDE drives. Thesemodes use the CPU's registers for data transfer in contrast with DMA (Direct Memory Access),which transfers directly between main memory and the peripheral device. The default valueAuto lets the system automatically read setup information it needs for setup from the hard diskdrive. Five explicit values, 0 to 4, are also possible.32BitModeEnables hard drive 32-bit data transfer. Only some hard disk controllers support 32Bit mode.GoBook II™ HelpPage39of74GoBook II Help9/30/2003file://C:\Documents%20and%20Settings\harwoodm.ITRXNT1\Local%20Settings\Temp\~hhDDD5.htm
72_0103_00310 December 2002Field Setting FunctionBootupSequenceC; A;CDROMUse this field to set the devices from which the system should boot in order ofpriority. The default value is C; A; CDROM,. This means the computer willattempt to boot from the hard disk drive (HDD), then the floppy disk drive (FDD),then the CD-ROM.A; C;CDROMthe computer will boot from the FDD, then the HDD, then the CD-ROM. TheBIOS will auto detect a floppy disk in boot device A:CDROM;A; C;The computer will boot from the CD-ROM, then the FDD, then the HDD.S.M.A.R.T.for HardDisabledEnabledThe S.M.A.R.T. (Self-Monitoring, Analysis, and Disks Reporting Technology)system is a diagnostics technology that monitors and predicts device performance.The disk drive software monitors the internal performance of the motors, media,heads, and electronics of the drive. Only S.M.A.R.T. Hard Disks are supported.The default is Enabled.Bootup Num-LockOffOnUse this field to initially disable the Num-Lock feature of the internal keyboardwhen the GoBook II starts The default is Off.DisplayExpansionModeEnabledDisabledIf you are using DOS or a 640 x 480 resolution to run windows, the display will notfill the entire screen. Enable this mode to expand the display to the entire screen.PasswordCheckSetup The default value is Setup, which specifies that a password is only required to enterthe Setup Utility.Always If Always is selected, the password is required when the system is booted up orresuming from a suspend-to-disk.Page40of74GoBook II Help9/30/2003file://C:\Documents%20and%20Settings\harwoodm.ITRXNT1\Local%20Settings\Temp\~hhDDD5.htm
©2002 Itronix Corporation. All rights reserved.Power Management SetupThis section of the Setup Utility manages power settings. To save power, you may select the time the computer mayidle before going into standby, or a low power state, then into suspend mode. See Power Management for anintroduction to suspend modes.GoBook II™ HelpField Setting FunctionIntel ® SpeedStepTechnologyRecommended Enables the system to reduce the CPU speed when the battery is inuse to conserve power. This is the default setting.Battery The computer will utilize Intel ® SpeedStep Technology when thebattery is in use. This technology lowers the CPU clock speed tosave power.Performance The computer always uses optimal CPU clock speed and does notutilize Intel ® SpeedStep TechnologyReverse When the battery is in use, the computer will utilize Intel ®SpeedStep Technology. When the computer is running on AC powerit will run in Performance mode.Disabled Disables Intel ® SpeedStep Technology feature.Battery LowWarning BeepDisabled Batterylowwarningbeepdisabled.Enabled Battery low warning beep enabled (beeps at 7% remaining).Radio Wake-Up Enabled The internal radio is allowed to resume the unit.Disabled The internal radio is not allowed to resume the unit.Page41of74GoBook II Help9/30/2003file://C:\Documents%20and%20Settings\harwoodm.ITRXNT1\Local%20Settings\Temp\~hhDDD5.htm
72_0103_00310 December 2002©2002 Itronix Corporation. All rights reserved.Peripheral SetupSettings on this page allow you to change port configurations.GoBook II™ HelpField Setting FunctionInternalMDCModemAutoDisabledDefault is disabled.OnboardSerialPort A &BAuto COM 1 is assigned to the serial portlocated at the rear of your GoBookII. Set this field to Auto to enablethe system to automatically assign anI/O address and interrupt to the port.Disabled Disables COM 1. You may need toremove this port in Windows torelease the IRQ resource for use byother devices.3F8/COM1 Default address and COM portsetting.Page42of74GoBook II Help9/30/2003file://C:\Documents%20and%20Settings\harwoodm.ITRXNT1\Local%20Settings\Temp\~hhDDD5.htm
72_0103_00310 December 2002©2002 Itronix Corporation. All rights reserved.Stealth Mode SetupStealth mode is a feature that allows the GoBook II to be used in an environment where sound and light could bedangerous to the users, such as a military user. If Stealth mode is disabled the LEDs, Fan, system beeps, audio, anddisplaybrightness operate normally.2F8/COM2 Optional address setting.3E8/COM3 Optional address setting.2E8/COM4 Optional address setting.OnboardParallelPortAuto Set this field to Auto, so that thesystem automatically assigns an I/Oaddress and interrupt. You can alsochoose a specific I/O address.Disabled Disables the LPT port.378 This is the default address setting.278 Optional address setting.3BC Optional address setting.ParallelPort IRQ57Only available with addresses 378,278 and 3BCParallelPortDMA013Only available in ECP modeParallelPortModeNormal NormalBi-dir Bi-directionalEPP 1.9 Enhanced Parallel PortEPP 1.7 Enhanced Parallel PortECP Extended Capabilities PortGoBook II™ HelpPage43of74GoBook II Help9/30/2003file://C:\Documents%20and%20Settings\harwoodm.ITRXNT1\Local%20Settings\Temp\~hhDDD5.htm
When Stealth mode is enabled the various options have the following effect.NOTE The off setting means that option is in Stealth Mode.The keyboard backlight does the following whether stealth mode is enabled or disabled:Does not illuminate when the system is off or suspendedDoes not illuminate on resume or bootTurns off when FN+F1 is pressed to turn off the display.Field Setting FunctionLEDs On LEDs function normallyOff LEDs are disabledFan On The fan functions normallyOff The Fan is disabled. Heat management is then controlled solely through throttling.SystemBeepsOn Beeps are heard during POSTOff The system beeper is disabled during the boot up or resume process.Audio On Audio is preserved across suspend/resume and boot. The default volume level isset to mid range.Off Volume is set to 0 across suspend/resume and boot. Use the existing audiofunction keys to restore volume.DisplayBrightnessOn Display brightness is preserved across suspend/resume and boot. It is restored todefault when the brightness level is set at 0. The default level is mid range.Off Brightness is set to 0 across suspend/resume and boot. FN+F1 restores brightnessto the value it was set to before suspend. Additionally, FN+F7 can be used toincrease display brightness gradually. FN+F6 can be used to decrease brightnessgradually.Page44of74GoBook II Help9/30/2003file://C:\Documents%20and%20Settings\harwoodm.ITRXNT1\Local%20Settings\Temp\~hhDDD5.htm
72_0103_00310 December 2002©2002 Itronix Corporation. All rights reserved.Auto-Detect Hard DisksWhen the Auto-Detect Hard Disks option is selected, the BIOS will automatically detect Primary Master andSecondary Slave settings.NOTE If you Auto-Detect your Hard Disk Drive while your media bay drive is empty, you will need to reset theSecondary Master to Auto On before you can use the CD-ROM (or other media devices).72_0103_00310 December 2002©2002 Itronix Corporation. All rights reserved.Change PasswordChange Supervisor PasswordA supervisor password must be set before a lower-level password can be set. After selecting Change SupervisorPassword, press Enter. You will be prompted for the new password, and then again to verify it. Type in six or fewerkeystrokes. If you make an error, press Esc to start over.Change User PasswordWith a Userpassword,you can enter the SetupUtilityand change or remove the Userpassword, butyou cannot enterGoBook II™ HelpGoBook II™ HelpPage45of74GoBook II Help9/30/2003file://C:\Documents%20and%20Settings\harwoodm.ITRXNT1\Local%20Settings\Temp\~hhDDD5.htm
the Setup Utility and change or remove the Supervisor password. You also cannot enable diskette access if it has beendisabled.72_0103_00310 December 2002©2002 Itronix Corporation. All rights reserved.Auto Configuration with Optimal SettingsThe Auto Configuration menu resets the computer to default values. The Auto Detect Hard Disks likewise helps usersto configure their systems quickly. When you see the prompt, "Load high performance settings (y/n)" choose y to resetthe computer to default values.72_0103_00310 December 2002©2002 Itronix Corporation. All rights reserved.Exit and SavingSave Settings and ExitSelect this option to save changes to the field values and restart the computer using the new values. Pressing F10 fromany of the menu screens also allows you to save settings and exit.Exit Without SavingSelect this option to discard any changes you have made to the field values and restart the computer using the oldvalues.GoBook II™ HelpGoBook II™ HelpPage46of74GoBook II Help9/30/2003file://C:\Documents%20and%20Settings\harwoodm.ITRXNT1\Local%20Settings\Temp\~hhDDD5.htm
72_0103_00310 December 2002©2002 Itronix Corporation. All rights reserved.Optional Equipment and AccessoriesThe GoBook II computer has several equipment and accessory options to further enhance your mobile computingexperience.CAUTION When purchasing any additional accessories, purchase only those accessories that are approved for usewith your computer. Some accessories are proprietary items and can be obtained through your system vendor. If youuse items that are not approved for use with this computer, you may cause your computer to malfunction, or to emit orreceive electromagnetic radiation in excess of local regulations. For non-proprietary accessories such as PC Cards orprinters, ensure that the accessory functions properly in your computer before making the purchase. Your systemvendor may be able to recommend reliable brands and models.Surge ProtectionA large number of computer and high technology equipment damage is directly related to AC power and telephone lineproblems. These problems can include surges, spikes, noise, interference, and weather-related problems, which in turncan cause glitches, hang-ups, crashes, performance slow downs, and down time with computer equipment. The marketis flooded with hundreds of AC power line surge suppressors advertising high performance surge protection; only a fewof them actually provide adequate protection.This section provides guidelines for selecting a quality surge suppressor to be used with your GoBook II, and it helpsidentify a few sources for products with acceptable performance.Selecting the Right Surge ProtectionConsider the level of quality you need when selecting a surge suppressor. This depends on factors such as surgeenvironment, the type of equipment to be protected, and the quality of the electrical wiring and service.Surge EnvironmentSurge environment refers to the damage potential from electrical surges in a particular geographical area. A highquality suppressor should be used if there is frequent lightning activity in the area and the location service is fed byoverhead utility poles.TypeofEquipment to be ProtectedGoBook II™ HelpPage47of74GoBook II Help9/30/2003file://C:\Documents%20and%20Settings\harwoodm.ITRXNT1\Local%20Settings\Temp\~hhDDD5.htm
If the computer is equipped with a modem, the modem should also be surge protected. Protecting the power linewithout protecting the modem line provides only partial protection.Quality of Electrical Wiring and ServiceWiring should be up to current NEC standards and have verified good AC grounds. It is important that your computersystem be plugged into a grounded AC outlet when charging and that all peripherals connected to your systemreference the same AC ground.Selecting the Right EquipmentThere are a number of companies that sell quality surge suppressors such as Sutton Designs, APC, and Panamax. Whenyou are looking for a surge suppressor, consider these things.Expect to pay at least $50 for a good quality surge suppressor.The surge suppressor should be a UL 1449, 497, and 1283 listed for surge suppression, modem surge protection,and RFI/EMI noise filtering respectively.The surge suppressor should have diagnostic LEDs that verify good AC ground, proper wiring, and proper surgeoperation. On/off switches that light are not recommended since they can produce electrical noise.The Joule ratings should be a minimum of 480 Joules for the AC surge circuit.The Joule ratings should be a minimum of 240 Joules for the modem.The modem surge circuit should present low capacitance to the modem line or it will slow the transmission rate.Capacitance should be specified at less than 50 picofarads.Quality surge suppressor manufacturers generally offer a lifetime warranty.Consider obtaining a protected equipment coverage policy which insures the equipment in the event of surgedamage.The devices that will be attached to the computer also need to be surge protected.72_0103_00310 December 2002©2002 Itronix Corporation. All rights reserved.GoBook II™ HelpPage48of74GoBook II Help9/30/2003file://C:\Documents%20and%20Settings\harwoodm.ITRXNT1\Local%20Settings\Temp\~hhDDD5.htm
Vehicle AdapterThe Vehicle Adapter is an optional device that supplies power from the vehicle battery to operate the computer andcharge the battery installed in the unit. It typically connects to the vehicle battery using the cigarette lighter socket.To prevent possible damage to the battery, the system will not allow the battery to charge at extreme temperatures. Beaware of the following charging characteristics, especially if the computer is left unattended in a closed vehicle.To connect the vehicle adapter1. Insert the vehicle adapter’s power cord into the power port on the back of the computer.2. Insert the cigarette lighter adapter into the vehicle’s cigarette lighter socket, turning it slightly to make a goodconnection.The power light illuminates to indicate that current is reaching the vehicle adapter. When you connect the vehicleadapter, it automatically begins charging the computer’s battery. At moderate temperatures, around 21°C (70ºF),the battery will be fully charged in approximately four to five hours. However, under extremely cold or hottemperatures, or if the system is on, it will take longer to charge the battery (up to 16 hours).72_0103_00310 December 2002©2002 Itronix Corporation. All rights reserved.Vehicle CradleThe vehicle cradle is a vehicle-based docking station designed to safely secure the computer in the vehicle. A standardkey lock located on the front of the cradle locks the computer onto the cradle for security purposes. You can use thevehicle cradle to:Charge batteriesCommunicate with other devicesAutomaticallyconnect to an external RF antennaTemperature Charging Activity<5°C (<41°F) Battery will not charge>50°C (<122°F) Battery will not chargeGoBook II™ HelpPage49of74GoBook II Help9/30/2003file://C:\Documents%20and%20Settings\harwoodm.ITRXNT1\Local%20Settings\Temp\~hhDDD5.htm
PRECAUTIONSThere are no user-replaceable parts within the vehicle cradle, so do not open the cradle case. The vehiclecradle is internally protected; it resets automatically if there is a power fault.Do not use the vehicle cradle to charge the computer battery overnight. Turn off the vehicle cradle at theend of each work day to prevent draining the voltage in your vehicle’s battery below starting levels.Charging BatteriesThe vehicle cradle is designed to charge the computer’s battery with voltage from the vehicle battery while youare traveling between jobs. Follow the procedure below to charge a battery.To charge a battery installed in the computer1. Place the computer onto the vehicle cradle, making sure it is securely latched.2. If charging is required it begins automatically. The Battery Power Indicator flashes.3. When the battery is fully charged, the Battery Power Indicator remains steady.ImportantA temperature of 5°C to 50°C (41°F to 22°F) is required when charging batteries with thevehicle cradle. Batteries will not charge successfully outside this temperature range.If you charge your battery daily, rely on the gas gauge reading to determine batterycapacity. The gas gauge displayed by the Power Meter may show that the battery is full,but charging continues. This happens because the charging process is trying to put a littlemore capacityinto the battery. Externalpower can be removed at this time since thePage50of74GoBook II Help9/30/2003file://C:\Documents%20and%20Settings\harwoodm.ITRXNT1\Local%20Settings\Temp\~hhDDD5.htm
Communicating with Other DevicesConnect the external device to either of the USB ports on the back of the cradle, and then place the GoBook IIonto the vehicle cradle. You can install or remove the computer from the vehicle cradle without connecting ordisconnecting the cables.Vehicle Mount AntennasYou can also connect an external RF antenna to the cradle using the SMA RF connector on the back of thevehicle cradle. FCC regulations require that users of vehicle-mounted antennas must use only antennasauthorized for use with the GoBook II in order to meet FCC RF exposure limits. Please contact yourorganization’s help desk for a list of approved vehicle-mounted antennas. For mounting installation and/ormounting instructions for these types of antennas, see the instructions that accompany each antenna.RF Antenna PlacementWARNING Improper installation and/or operating configurations of permanent and magnetic vehicle-mountedantennas may cause FCC RF exposure limits to be exceeded. Vehicle-mounted antennas must be placed at least20 cm from operators and bystanders.Placement of a vehicle-mounted antenna1. Measure and identify an area 20 cm (8 inches) in from the edges of the vehicle roof (see diagram below).2. Place the antenna within that area.To maximize RF performance, position the antenna in the center of the vehicle roof.Cleaning or Replacing Cradle Contact PinsThe contact pins on the vehicle cradle are exposed to contamination and stress when the computer is installed andremoved from the cradle during normal daily operation. If the pins become dirty, they can be removed andcleaned as necessary using electrical contact cleaner. Or they can be replaced. The power and ground pins arepins 3 and 8 respectively. When charging problems are encountered and replacement pins are not available,other pins in the contact assembly can be used to field fix the unit until replacement parts are available.To clean or replace the cradle contact pins1. Hold down theprotectiveplastic cover.battery is virtually full.If your battery is new or has not been used for several weeks, rely on the indicator light todetermine when the battery is fully charged. The gas gauge is unreliable in these cases; itmayread 100%, when the actual capacityis only10%.Page51of74GoBook II Help9/30/2003file://C:\Documents%20and%20Settings\harwoodm.ITRXNT1\Local%20Settings\Temp\~hhDDD5.htm
2. Grasp a pin and pull straight up, being careful not to bend it.3. Clean the pin with electrical contact cleaner and reinstall it into the cradle contact assembly.If a pin is bent or cannot be cleaned, contact your support desk to obtain a replacement pin.NOTE Pin 8 is not user replaceable. Contact your support desk for information about replacing this RFconnector.CAUTION Do not place any metal objects on top of the cradle that might make contact with the metal pins ofthe contact connector. Doing so may cause an electrical short and subsequent damage to the cradle.72_0103_00310 December 2002©2002 Itronix Corporation. All rights reserved.HeatersHard Disk Drive HeaterYour GoBook II has a hard disk drive (HDD) heater option to warm the HDD before spinning up in temperaturesbelow 5°C,the minimum safe operating temperature of the HDD. The heater is built into the removable HDDmodule and operates as needed when the computer is turned on or is in an operational state. If the temperature isbelow 5°C when booting or resuming you will see the message "Warming internal hard drive. Please wait...".The unit will continue booting when it detects the HDD is warm enough to operate safely.NOTE If you are using the computer in a cold temperature environment and the battery level is too low for theheater to operate, you will see the error message "Battery too low to warm the hard drive. Shutting down..." andthe computer will shut down. Apply external power and reboot.LCD HeaterThe GoBook II also has an optional CCFL heater to improve display brightness in a cold environment. Theheater consists of a film and heater strip that is bonded over the CCFL area of the display. It is designed to turnon when the temperature is cold enough to impact display brightness.72_0103_003GoBook II™ HelpPage52of74GoBook II Help9/30/2003file://C:\Documents%20and%20Settings\harwoodm.ITRXNT1\Local%20Settings\Temp\~hhDDD5.htm
10 December 2002©2002 Itronix Corporation. All rights reserved.Maintenance and StorageThe GoBook II is ruggedized and weather resistant. Handle it with the normal care required by any sophisticatedelectronic equipment, and the computer will provide reliable service even under harsh field conditions.Follow the guidelines in this section to care for your unit.Battery Maintenance and StorageMaintaining BatteriesFollow these guidelines to maintain performance of Lithium-Ion (Li-on) batteries.Avoid exposing batteries to extremely hot or cold temperatures for long periods. To prevent possibledamage to the battery, the GoBook II does not allow the battery to charge if the internal temperature of thebattery gets too low (< 5°C or < 41°F) or too high (> 50°C or > 122°F).Charge the battery nightly where the temperature will remain around 20°C (68°F).Re-calibrate your battery when your battery performance degrades.Storing BatteriesStore the battery within the recommended temperature range: 10°C to 30°C (50°F to 86°F).Unused or stored batteries can lose power over time. When you install a battery that has not been used forawhile, connect external power to the computer and charge the battery.After storage, battery calibration may increase its capacity.72_0103_00310 December 2002GoBook II™ HelpPage53of74GoBook II Help9/30/2003file://C:\Documents%20and%20Settings\harwoodm.ITRXNT1\Local%20Settings\Temp\~hhDDD5.htm
©2002 Itronix Corporation. All rights reserved.Computer Maintenance and StorageMaintaining Your ComputerFollow these guidelines to help maintain the condition and performance of your computer.Turn off the computer when you are not using it.Charge the batteries daily or whenever their capacity is low.Operate the computer within the recommended temperature ranges of -23°C to +60°C (32°F to +140°F).Care and CleaningPhysical Inspection Periodically inspect the computer and accessories for wear, damage, loose or missingparts. Identifying and correcting potential problems early can help reduce the need to return the unit for service.Outside Case Like all tools, the outside of the computer will get dirty with use. The case is made of paintedMagnesium and polycarbonate blend (plastic) doors and covers. These areas can be cleaned with a solution ofone part Formula 409™ and one part water. Follow the procedure below.To clean the outside case1. Disconnect external power and turn off the computer.2. Remove the battery.3. Using a soft, dry cloth (do not use paper products because they can scratch the surface, add a small amountof cleaning solution to the cloth and clean the computer case.4. Wipe off any excess liquid with a soft cloth.5. Reinstall the battery.Display Periodically inspect the display to make sure the brightness function is operating properly and that allpixels are operational.To clean your touch screenTo clean the display assembly, use the same cleaning solution and procedure described earlier for the outsidecase. In some cases, you can use a small amount of isopropyl alcohol to remove streaks or smears. Use a soft,clean cloth to clean the display. Do not usepaperproducts because theycan scratch the screen.GoBook II™ HelpPage54of74GoBook II Help9/30/2003file://C:\Documents%20and%20Settings\harwoodm.ITRXNT1\Local%20Settings\Temp\~hhDDD5.htm
External Power Connector The external power connector may sometimes be exposed to moisture and/orcontamination causing an unreliable connection to the external power source.Clean the connector using a cotton swab dipped in isopropyl alcohol.RJ-11/ RJ-45 / USB Connectors Make sure these connectors are operating properly. During normal use, theconnector pins can get dirty or become broken, bent, or pushed out of place. Clean the connector with a cottonswab dipped in isopropyl alcohol.Keyboard Check all keys to make sure they are working properly. To clean the keyboard, use the samecleaning solution and procedure described above for the outside case.If keyboard problems persist, the keyboard might need to be replaced. This can be done without returning theunit for service. Contact your local support person for more information.I/O Ports Make sure the video, serial, and audio ports are operating properly. Periodically inspect the ports fordamage or contamination, and make sure the cover is attached to the computer. The I/O cover can be replacedwithout returning the unit for service. Contact your local support person for more information.PC Card Door and Connector Whenever possible, make sure this door is closed and latched properly. Whenthe PC Card door is closed, it provides a watertight seal for the PC Card socket. Shield the area from allcontaminants such as liquids, rain, snow, and dust when the door is open.Make sure the PC Card connector is operating properly by reading from or writing to a PC Card.Cradle Contacts The cradle contacts on the bottom of the computer may get dirty with daily use. Pins can becleaned with a cotton swab dipped in isopropyl alcohol. See Cleaning or Replacing Cradle Contact Pins formore information.Storing Your ComputerIf you plan to store the computer, follow these storage guidelines.To store the computer1. Files and data should be saved before storing the computer.Contact your organization’s help desk about the procedure for backing up files or data.2. Exit all applications and use the appropriate procedure to exit from your operating system.3. Turn off the computer by going to the Start menu and selecting Shutdown.4. Remove the battery from the unit and store it in a dry place.5. Store the computer within the recommended temperature ranges of -40°C to +75°C (-40°F to +167°F).If you use PC cards, refer to the manufacturer’s instructions you received with the card for storage and careinformation.Page55of74GoBook II Help9/30/2003file://C:\Documents%20and%20Settings\harwoodm.ITRXNT1\Local%20Settings\Temp\~hhDDD5.htm
72_0103_00310 December 2002©2002 Itronix Corporation. All rights reserved.Hard Drive Care and HandlingThere is one hard drive option for the GoBook II: a removable shock-mounted 2.5-inch hard drive. All harddrives contain media for data storage in the form of a rotating disk, read/write head(s), a motor, and electronicsfor interfacing and control. Drives can be susceptible to damage from severe shock and other stressfulenvironmental impacts. The degree of susceptibility to damage is directly related to the individual hard drive andthe mounting system employed.When reading or writing to the hard disk , the head is “flying” on a thin layer of air, micro-inches above the disk.A shock can cause the read/write head to contact the spinning disk, resulting in immediate loss of stored data andpossible physical damage to the disk. It could also create loose debris in the drive enclosure that may causeprogressive damage over time.To reduce exposure to high operating shocks, the GoBook II uses power modes for the hard drive that preventthe read/write heads from being positioned over the disk when it is not being used: idle mode and standby mode.You can reduce the risk of damage to the hard drive and increase the reliability of the hard drive and dataintegrity by following the recommendations below.Installing and Removing the Hard DriveTo remove the hard drive:1. Shut down the unit and remove external power.2. Open the battery door and remove the battery using the extraction tape. The hard drive is in a cassette thatcan be seen in the batterywelljust under the RTC hatch.GoBook II™ HelpPage56of74GoBook II Help9/30/2003file://C:\Documents%20and%20Settings\harwoodm.ITRXNT1\Local%20Settings\Temp\~hhDDD5.htm
3. On the left side of the hard drive cassette you will see a small black release lever. Pull the lever towardsyou (away from the direction of the RTC hatch) and slide the cassette out into the battery storage area.4. Lift the hard drive cassette from the battery storage area.To install the hard drive:1. Make sure the unit is shut down and external power is removed.2. The battery door should be off the unit and the battery removed.3. Make sure the small black release lever is rotated towards you (in its released position).4. Slide the hard drive cassette into its storage location.5. Replace the battery and then replace the battery door.Internal Hard DrivesDo not intentionally drop the computer. The unit is designed to withstand the day to day rigors of themobile environment and provide years of reliable service. The useful life of the product can be enhancedby not intentionally abusing it.Whenever possible suspend the unit by pressing FN+F3 before moving it from one location to another.This will unload the read/write heads and spin down the disk.Page57of74GoBook II Help9/30/2003file://C:\Documents%20and%20Settings\harwoodm.ITRXNT1\Local%20Settings\Temp\~hhDDD5.htm
Maintain the environmental seal of the computer by keeping all external access doors closed and latched.Also avoid exposing the unit to extreme temperatures or moisture when the doors are open.Periodically backup or archive important files and data.External PC Card Hard DrivesEach PC Card hard drive manufacturer provides specific guidelines for the care and handling of the product. Inaddition, follow these recommendations:When the PC Card hard drive is not inserted in a PC Card socket, store the hard drive in a protectivecarrying case. This will help protect it from inadvertent shocks.Always use care when handling the hard drive. Do not drop, bend, flex, or crush it.Avoid exposing the PC Card hard drive to extreme moisture, heat, or sunlight.Keep all debris out of the connector to ensure good electrical connections.There are no user repairable parts in the PC Card hard drive. Do not attempt to disassemble any part of thehard drive. The warranty will be voided if drive seals are broken or screws have been removed.Periodically backup or archive important files and data.If you encounter or suspect hard drive problems, you can run SCANDISK, which provides a description of fileusage and syntax on selected drives. SCANDISK will identify any failures on the hard drive and prompt you forcorrective action based on selected options. If problems are found, it may be necessary to run SCANDISKseveral times to determine the extent and severity of the problem. SCANDISK may discover multiple badclusters.Uptotenbadclusterscanbeallowedbeforereturning the computer for service. After you have runSCANDISK and the problem persists or becomes more severe, or if SCANDISK finds more than ten badclusters, return the unit for service.To run SCANDISK in WIN2K and WINXP right click on the drive letter, go to properties, and select the toolstab, Error-checking and click check now. In other Windows operating systems you can run SCANDISK bygoing to Start, Programs, Accessories, System Tools. Then select SCANDISK.72_0103_00310 December 2002©2002 Itronix Corporation. All rights reserved.GoBook II™ HelpPage58of74GoBook II Help9/30/2003file://C:\Documents%20and%20Settings\harwoodm.ITRXNT1\Local%20Settings\Temp\~hhDDD5.htm
Touch Screen Care72_0103_00310 December 2002©2002 Itronix Corporation. All rights reserved.Error MessagesThe following are possible error and warning messages you may encounter while operating the GoBook IIcomputer. The messages described in this section are listed below.Error and warning messages are generated by several different sources including:PowerOnSelfTest(POST)MS-DOSWindowsApplicationsPOST MessagesWhen the GoBook II computer restarts, it tests its hardware components. This test is called the Power On SelfCAUTIONAlways use an approved stylus or your finger.Never use sharp, hard, or abrasive implements on the touch screen such as ball point pens, pencils,or keys. They could damage the screen.To clean the touch screen panel, apply a household glass cleaner to a soft, clean, dry cloth and wipethe screen.GoBook II™ HelpPage59of74GoBook II Help9/30/2003file://C:\Documents%20and%20Settings\harwoodm.ITRXNT1\Local%20Settings\Temp\~hhDDD5.htm
Test (POST) . If the system finds an error during this test, it displays an error message.Some POST errors can occur before anything can be displayed on the screen. In this case, the computer issues aseries of beeps, then stops working. This type of error indicates a serious hardware problem, and you shouldcontact your supervisor or your organization’s help desk.The most common POST error messages are listed next along with solutions you can try.Disk not foundRestart the computer by pressing the power button for at least eight seconds. If the problem persists, contactyour supervisor or your organization's help desk.Fixed disk controller failureDisk controller is not responding. Report this error to your supervisor or your organization's help desk.FixeddiskfailureReport this error to your supervisor or your organization's help desk.GA20 ErrorHardware failure. Report this error to your supervisor or your organization's help desk.Hard disk boot sector invalidHard disk failedRestart the computer by pressing the power button for at least eight seconds. If the problem persists, contactyour supervisor or your organization's help desk.Insert boot-disk and press any keyRestart the computer by pressing the Power Button for at least eight seconds. If the problem persists, contactyour supervisor or your organization's help desk.KB / Interface ErrorReboot the computer by pressing CTRL+ALT+DEL. If the message persists, and the keyboard is not usable,report this error to your supervisor or your organization's help desk.Keyboard ErrorUnlock KeyboardRestart the computer by pressing the Power Button for at least eight seconds. If the problem persists, contactyour supervisor oryour organization's helpdesk.Page60of74GoBook II Help9/30/2003file://C:\Documents%20and%20Settings\harwoodm.ITRXNT1\Local%20Settings\Temp\~hhDDD5.htm
No boot device availableReboot the computer by pressing CTRL+ALT+DEL. If the message persists, the hard disk may need to bereplaced. Report this error to your supervisor or your organization's help desk.No boot sector on hard diskData corrupted on hard disk. Restore hard disk data by rebooting from CD-ROM.Non-system disk or disk error - Replace and press any key to continueRemove the non-bootable PC memory card or floppy disk and press any key to reboot.Non-system disk - insert boot disk and press any keyRestart the computer by pressing the Power Button for at least eight seconds. If the problem persists, contactyour supervisor or your organization's help desk.Press the F1 key to resumeThis message indicates that an error was found during POST. Pressing the F1 key allows the system to attemptto boot.CPU Fan ErrorReport the error to your supervisor or your organization's help desk.Battery too low to warm the hard drive. Shutting down...There is not enough battery power to operate the Hard Disk Drive (HDD) heater and the temperature is too coldto safely turn on the HDD. Apply external power and/or move the unit to a location that is at least 5°C.Warming internal hard drive. Please wait...The temperature is less than 5°C and the HDD heater is operating. The unit will continue booting when the HDDtemperature is warm enough for safe operation.72_0103_00310 December 2002©2002 Itronix Corporation. All rights reserved.GoBook II™ HelpPage61of74GoBook II Help9/30/2003file://C:\Documents%20and%20Settings\harwoodm.ITRXNT1\Local%20Settings\Temp\~hhDDD5.htm
MS-DOS MessagesThe MS-DOS operating system may display a warning or error message if it encounters a problem with acommand in the CONFIG.SYS or AUTOEXEC.BAT file, or a command that you entered at the DOS prompt.Following are a few of the most common MS-DOS messages.Bad command or file nameA command was entered that is spelled incorrectly or does not exist on the computer.Invalid media type reading drive X (where X is any drive letter)Abort, Retry, Fail?The media may not be formatted. Press a to abort, then format the card using the MS-DOS Format command, orfrom Windows using the Format Disk command.Invalid drive specificationYou tried to access a drive that does not exist. This can happen if you try to access drive D, but the media is notloaded. Report this error to your supervisor or help desk.Non-System disk or disk errorReplace and press any key when readyThis can occur if media is in the card socket and you restart the computer. Remove the media, and then press anykey.Not ready reading drive X (where X is any drive letter)Abort, Retry, Fail?Make sure that the media is inserted fully into the card socket, then press r to retry.72_0103_00310 December 2002©2002 Itronix Corporation. All rights reserved.GoBook II™ HelpPage62of74GoBook II Help9/30/2003file://C:\Documents%20and%20Settings\harwoodm.ITRXNT1\Local%20Settings\Temp\~hhDDD5.htm
Windows MessagesWindows messages are typically self-explanatory. (See Troubleshooting, for more information).Application MessagesBoth MS-DOS and Windows applications may display messages if a warning or error condition occurs. Refer tothe online Help or other documentation for the application that generated the message.72_0103_00310 December 2002©2002 Itronix Corporation. All rights reserved.TroubleshootingThis section is designed to help you determine and fix problems you might encounter while operating theGoBook II computer. Try the following things in order:First look through the categories in this section for a solution.If you don’t find a solution for your situation here, try one of the resources listed below.If you are having a problem with a computer application ,usetheonline Help that comes with theapplication to find a solution.If you still cannot resolve your problem, contact the help desk at your organization.ForMoreHelpWindows Help is already installed on your system. To access this information, select Windows Help andSupport from the Start Menu.Third-party Windows manuals are available from your local bookstore.ApplicationsMyapplication locks up, acts strangely,orproduces a General Protection Fault (GPF) errorGoBook II™ HelpPage63of74GoBook II Help9/30/2003file://C:\Documents%20and%20Settings\harwoodm.ITRXNT1\Local%20Settings\Temp\~hhDDD5.htm
If you’ve tried to resolve the problem and your application still doesn’t respond, you may need to restartyour computer as described below.To reboot your computer, select Start, Shut Down, Restart. If that does not work, try pressingCTRL+ALT+DEL twice.If the computer does not restart, the keyboard may be locked up. Perform a hardware reset by holdingdown the Power Button for at least five seconds and then release the button.CAUTION This will result in a loss of all unsaved data.The data on the hard disk could be corrupted. Run SCANDISK.Windows is out of memory/resources. Exit Windows and restart Windows.Communications programs such as HyperTerminal don’t seem to work or they lock WindowsWhen you first try to use HyperTerminal or similar application, the system responds with a message askingif you want to install the modem. Answer “Yes” to this question and follow the instructions on the screento install it.72_0103_00310 December 2002©2002 Itronix Corporation. All rights reserved.BatteriesThe battery does not chargeTo prevent possible damage to the battery, the system will not allow a charge if the battery temperature isextremely hot or cold (such as in a closed, unattended vehicle). If possible, charge the battery in a locationwith a moderate temperature of around 20°C (68°F).If possible, turn off the computer while the battery is charging.If the battery is new or has been stored for a week or more, follow this procedure:1. Make sure the computer is turned off.2. Open the batterydoor and remove the battery.GoBook II™ HelpPage64of74GoBook II Help9/30/2003file://C:\Documents%20and%20Settings\harwoodm.ITRXNT1\Local%20Settings\Temp\~hhDDD5.htm
3. Connect the AC adapter to the computer and an AC wall outlet, and then turn on the computer by pressingthe Power Button.4. Let the computer complete the boot process. Then reinstall the battery and replace the battery door..5. Allow the system to remain idle for one hour with the AC adapter connected to the computer.The Battery Power Indicator blinks when the battery starts charging.6. If the battery still fails to charge after an hour, remove the battery, wait several seconds, and then install itagain.If the battery does not begin charging within several minutes, return the unit for service.The batteries take much longer than seven hours to chargeUnder moderate temperatures, about 21°C (70ºF), the computer’s battery takes approximately 4 to 5 hoursto completely charge. Under extremely cold or hot temperatures, however, the battery can take up to 16hours to fully charge.The batteries don’t last very longCalibrate the battery using the Battery Calibration selection in Mobile Computer Tools. If your battery isnew or has not been used for several weeks, calibrating the battery over a weekend may substantiallyincrease its capacity.As your battery ages, the maximum capacity that it can hold naturally decreases, and even the bestmaintained batteries eventually need to be retired. Consider replacing the battery if you are not getting theusage you need from it.The gas gauge isn’t full after charging the batteryThis may indicate that the charging process terminated prematurely.The gas gauge reads “full,” but the charging indicator light is still blinkingIf you charge your battery daily, rely on the gas gauge reading to determine battery capacity. The chargingprocess may continue even if the gas gauge reads full. External power can be removed because the batteryis virtually full.My battery seems to have less and less capacityIf your battery is new, or if your are using it for the first time, you will need to calibrate it prior to using it.As your battery ages, the maximum capacity that it can hold naturally decreases, and even the bestmaintained batteries eventually need to be retired. Consider replacing the battery if you are not getting theusage you need from it.Page65of74GoBook II Help9/30/2003file://C:\Documents%20and%20Settings\harwoodm.ITRXNT1\Local%20Settings\Temp\~hhDDD5.htm
72_0103_00310 December 2002©2002 Itronix Corporation. All rights reserved.DisplayThe display performance is slowThe temperature may be too cold. Move the computer to a warmer operating environment.I can’t read the displayAdjust the brightness level using FN+F6 and FN+F7.The automatic power-saving mode may have shut off (suspended) the computer. Press any key to resume.If the display brightness is unreadable after a resume or reboot but is easily adjusted with FN+F6 andFN+F7 you may have set Stealth mode in the Setup Utility. If you disable Stealth mode the display andbacklight will operate normally.The underlined, inverse, and hypertext characters are difficult to read on the screenChange the color scheme. From the Start Menu select Settings, Control Panel, choose Display, and then tapthe Appearance tab to make changes to the color scheme.I can’t see the cursor while using the DOS editorPress FN+INSERT to change from insert mode to overwrite mode to enable a block cursor. When itdefaults to insert mode, the DOS editor uses an underline cursor which is less visible than the block cursorfor overwrite mode.The display appears to have random pixels darkened after scrollingContact your supervisor or your organization’s help desk for information about correcting this problem.I changed my display resolution, but I see no difference on the screenTry restarting your computer for the changes to take effect.GoBook II™ HelpPage66of74GoBook II Help9/30/2003file://C:\Documents%20and%20Settings\harwoodm.ITRXNT1\Local%20Settings\Temp\~hhDDD5.htm
72_0103_00310 December 2002©2002 Itronix Corporation. All rights reserved.Hard DiskThe hard disk will not spin up so the computer can’t boot upThis occurs if the unit is exposed to extreme low temperatures. This is not a hardware failure associatedwith the hard disk . Allow the computer to warm to room temperature. The minimum cold or soft boottemperature is 0°C (32°F)I can’t save files because the disk is fullReport this situation to your supervisor or your organization’s help desk.Diskette Read ErrorAny card in the PC card socket except for a properly formatted memory card will cause this error since it istrying to read the PC card.Any media in the installed media bay, except for properly formatted media, will cause this error since it istrying to read the media.I get the message "Battery too low to warm the hard drive. Shutting down..."There is not enough battery power to operate the Hard Disk Drive (HDD) heater and the temperature is toocold to safely turn on the HDD. Apply external power and/or move the unit to a location that is at least 5°C.72_0103_00310 December 2002©2002 Itronix Corporation. All rights reserved.GoBook II™ HelpPage67of74GoBook II Help9/30/2003file://C:\Documents%20and%20Settings\harwoodm.ITRXNT1\Local%20Settings\Temp\~hhDDD5.htm
I/O PortsI can’t access a serial portMake sure another application is not using the same port .Make sure the correct COM port is selected in your application. Refer to the online Help for yourapplication.72_0103_00310 December 2002©2002 Itronix Corporation. All rights reserved.KeyboardSomething unexpected happens when I press a keyYou may have pressed a key combination that performs a Windows function. Make sure you are pressingthe correct keys for the application you are running.Incorrect characters appear on the screen when I press certain keysYou may be in NUM LOCK mode. Press NUM LOCK to toggle NUM LOCK mode off.72_0103_00310 December 2002©2002 Itronix Corporation. All rights reserved.GoBook II™ HelpGoBook II™ HelpGoBook II™ HelpPage68of74GoBook II Help9/30/2003file://C:\Documents%20and%20Settings\harwoodm.ITRXNT1\Local%20Settings\Temp\~hhDDD5.htm
Landline ModemsThe modem doesn’t workWhen you first try to use HyperTerminal or similar application , the system responds with a messageasking if you want to install the modem. Answer “Yes” to this question and follow the instructions on thescreen to install it.Make sure the communication settings are correct in your application. Refer to the online Help for yourapplication.The modem doesn’t dial a numberCheck these things:If you are using an external modem, make sure the cables are attached correctly.Make sure your communications parameters are correct in your application. Refer to the online Help foryour application.The modem dials and receives an answer but does not establish a connectionYou may have incorrect parameters selected for your application to talk with the remote modem. Refer tothe online Help for your application.You may need to adjust your modem’s baud rate or protocol selection.Communications programs such as HyperTerminal don’t seem to work or they lock WindowsIf you are using the internal modem, be sure to specify the proper communications port .When you first try to use HyperTerminal or similar application, the system responds with a message askingif you want to install the modem. Answer “Yes” to this question and follow the instructions on the screento install it.The modem dials and the answering modem generates tone, but our modem does not begin the training sequenceto establish a connectionAlthough the problem may appear to originate from the computer, the source of the problem is the answeringmodem.Try setting up the answering modem to generate the correct V.22 tone, which can usually be done bysending an AT command to the modem.Page69of74GoBook II Help9/30/2003file://C:\Documents%20and%20Settings\harwoodm.ITRXNT1\Local%20Settings\Temp\~hhDDD5.htm
72_0103_00310 December 2002©2002 Itronix Corporation. All rights reserved.MiscellaneousThe computer shuts off unexpectedlyThe computer has entered suspend mode . Press any key to turn it back on.The battery capacity may be low. Connect external power to charge the battery, or replace the battery witha fully charged one.The battery contacts may be dirty. Turn off the computer, remove the battery, and clean the contacts.The speaker volume is too high or too lowIncrease the volume by pressing FN+F9; decrease the volume by pressing FN+F8.The computer won’t turn onThe battery may not be installed properly, or it may not be fully charged. Make sure a fully charged batteryis properly installed.Connect external power to charge the battery if it is not charged.If you are using the AC adapter , check the electrical outlet you are using to make sure it is workingproperly.If the GoBook II computer does not turn on, restart the computer by holding down the Power Button for atleast 10 seconds and then release it.The computer won’t turn offPress and hold the Power Button for at least eight seconds.The computer enters suspend mode too quicklyWhen there is no activity for a period of time, the computer turns off or enters suspend mode. To extendthis time, use the Power Management program and increase the non-activity time to enter suspend.The computer doesn’t automatically suspendCheck to make sure the COMports are off. For example, exit anyapplication that uses COMports.GoBook II™ HelpPage70of74GoBook II Help9/30/2003file://C:\Documents%20and%20Settings\harwoodm.ITRXNT1\Local%20Settings\Temp\~hhDDD5.htm
Make sure external power is not connected. Depending on power settings, some systems will not suspendautomatically when they are connected to external power.Make sure the standby time is set properly in the Power Management program.The system date and time are incorrectReset the correct date and time by choosing the Date/Time icon from Control Panel and making theappropriate changes.I receive an “out of memory” error messageToo many applications may be running at the same time. Close applications you don’t need.Run MS-DOS applications in full screen rather than a window. Press ALT+ENTER to toggle between fullscreen and window mode.If you’re using desktop wallpaper, set wallpaper to None. To do this, choose Display from Control Paneland make the appropriate change.Make sure you have enough space on your hard disk . Contact your supervisor or your organization’s helpdesk for assistance.Set up a permanent swap file. Contact your supervisor or your organization’s help desk for assistance.Holding down the Power button to reset the computer doesn’t always workTry resetting the computer again. If this doesn’t work, remove all power, including the battery pack, andallow the unit to remain idle for ten minutes. After ten minutes, connect external power and retry.The LED's, backlight, and/or keyboard backlight don't illuminate.You may have enabled Stealth mode in the Setup Utility. Go to CMOS Setup and disable Stealth mode.The computer doesn't make any sounds, even during boot-up.You may have enabled Stealth mode in the Setup Utility. Go to CMOS Setup and disable Stealth mode.The fan stopped running.You may have enabled Stealth mode in the Setup Utility. Go to CMOS Setup and disable Stealth mode.72_0103_00310 December 2002©2002 Itronix Corporation. All rights reserved.Page71of74GoBook II Help9/30/2003file://C:\Documents%20and%20Settings\harwoodm.ITRXNT1\Local%20Settings\Temp\~hhDDD5.htm
MouseI have difficulty double-clicking the mouse fast enoughFrom the Start Menu, select Settings, Control Panel, and then choose Mouse. The Buttons tab contains thesetting for the double-click speed.I can’t see the mouse pointerThe mouse pointer may be off the screen. Move the mouse until it reappears on the screen.From the Start Menu, select Settings, Control Panel, and then choose Mouse. The Motion tab containssettings for the mouse speed and mouse trails.72_0103_00310 December 2002©2002 Itronix Corporation. All rights reserved.PC CardsI can’t remove the PC cardPress the ejector button located inside the PC card door on the side of the computer. The button will popout. Press the ejector button again to eject the PC card. Slide the card out.If the ejector button malfunctions when you press it, release the button and then press it again.Diskette Read ErrorAny card in the PC Card socket except for a properly formatted memory card will cause this error since itis trying to read the PC Card.The system does not recognize the PC Card CD-ROM when it is inserted into the PC Card socketGoBook II™ HelpGoBook II™ HelpPage72of74GoBook II Help9/30/2003file://C:\Documents%20and%20Settings\harwoodm.ITRXNT1\Local%20Settings\Temp\~hhDDD5.htm
There is a delay of 10 to 15 seconds before the CD-ROM drive is recognized.Drivers may not be installed. Contact your organization’s help desk for assistance.The computer locks up when I remove the PC cardBefore you remove the card, select the PC card icon on the taskbar (in the tray area near the clock in thelower right corner), and choose “Stop [card name] card.”The computer locks up when inserting a PC cardBecause of the combination media bay configuration on the GoBook II, the computer may not be lockedup. Instead, it may be taking a couple of minutes before the system recognizes the PC card slot.72_0103_00310 December 2002©2002 Itronix Corporation. All rights reserved.Pen/Touch ScreenWhen I try to use the stylus on my touch screen, nothing happensIf you cannot select objects accurately with the stylus, you may need to recalibrate the touch screen.To calibrate the touch screen1. From the Start Menu, select Programs, Mobile Computer Tools and then choose Touch Screen Calibrator.This opens the Calibration Applet.2. Click on the Calibrate button.3. After you have completed calibration by touching the highlighted points using an approved stylus, selectOK to have the new settings take effect.The touch screen display warps or pillows in high humidityThe computer remains functional; however, moving the computer to a more suitable environment willallow the displayto recover.GoBook II™ HelpPage73of74GoBook II Help9/30/2003file://C:\Documents%20and%20Settings\harwoodm.ITRXNT1\Local%20Settings\Temp\~hhDDD5.htm
The touch screen doesn’t respond after a suspendThe touch screen needs a few seconds to work after a suspend. Wait a moment and try again.72_0103_00310 December 2002©2002 Itronix Corporation. All rights reserved.Page74of74GoBook II Help9/30/2003file://C:\Documents%20and%20Settings\harwoodm.ITRXNT1\Local%20Settings\Temp\~hhDDD5.htm

Navigation menu