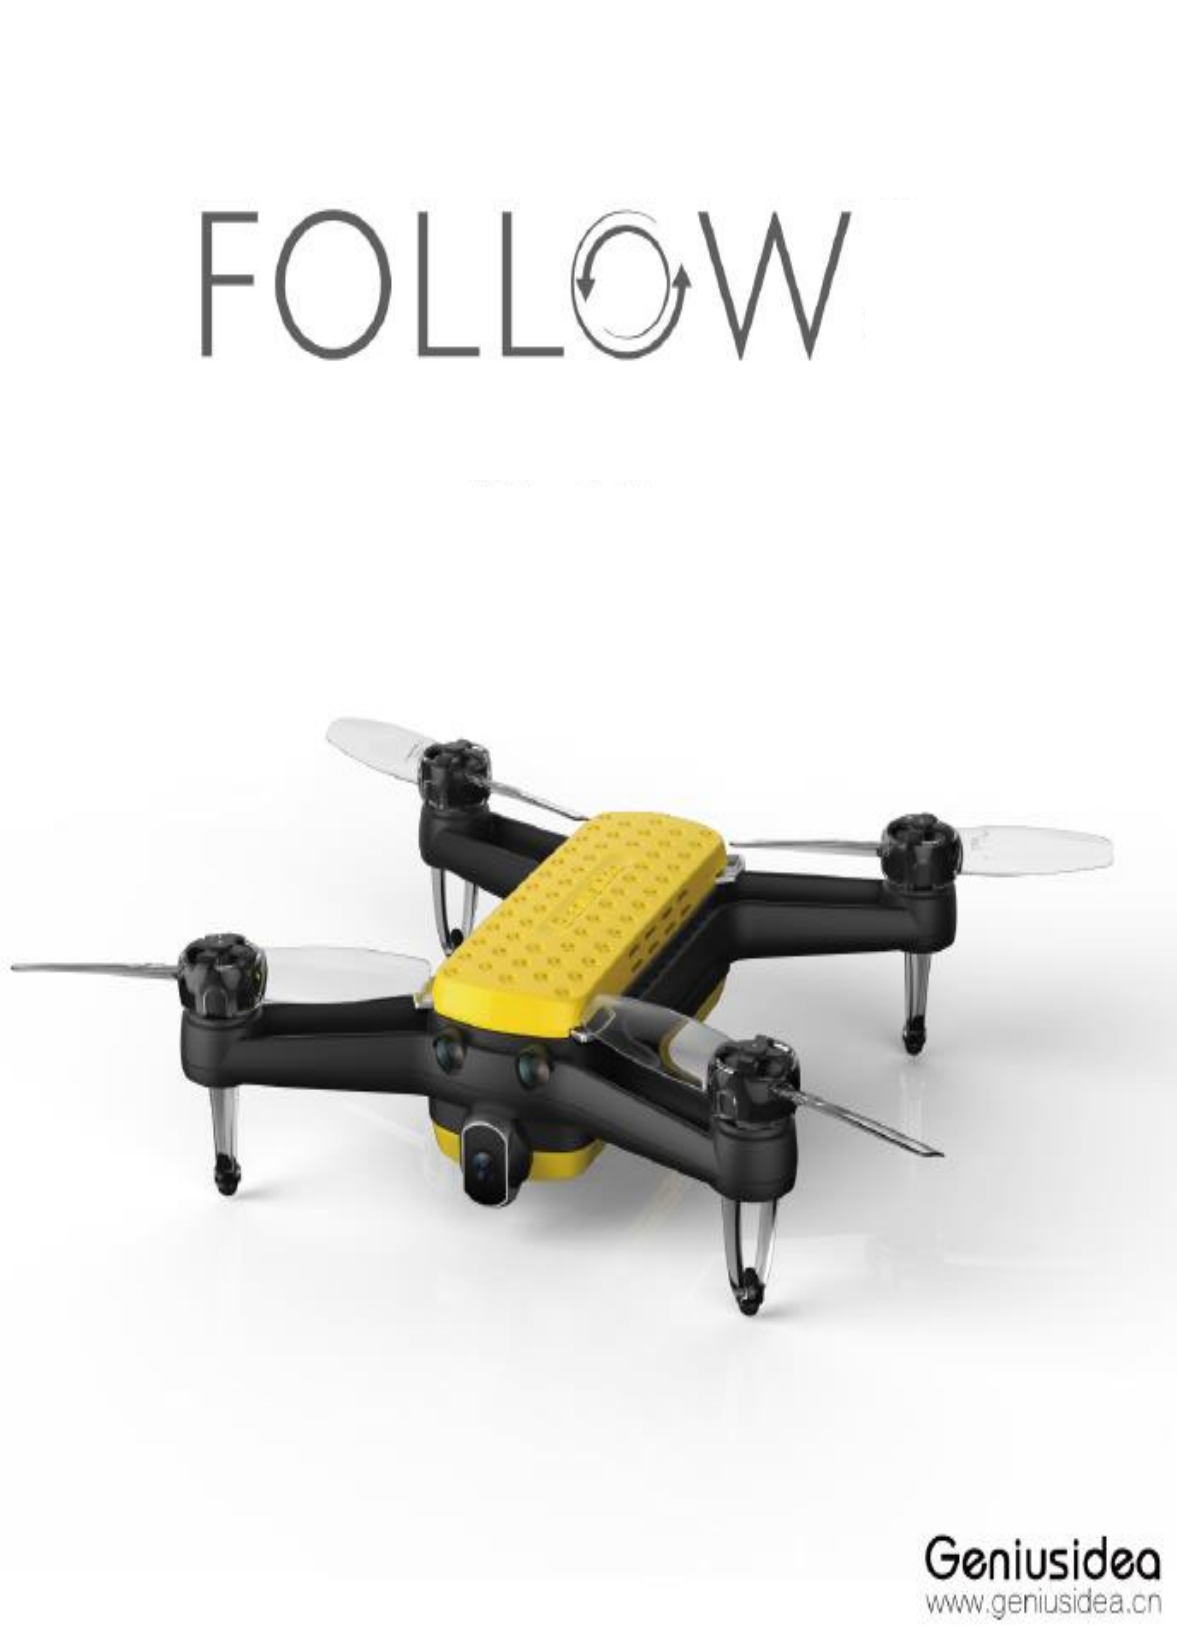
Geniusidea Technology FOLLOW Follow User Manual Manual
Shenzhen Geniusidea Technology Ltd. Follow Manual
Manual
User
Manual

Table of Contents
Suggested use ·········································································································· 5
Product overview ············································································································6
Brief introduction ···············································································································6
Sales packing list ················································································································7
Names of main devices ·········································································································8
Preflight preparation ·····································································································9
Battery charging and installation ····························································································9
Battery charging ················································································································9
Battery installation and removal ·····························································································10
Install batteries ··················································································································10
Remove batteries ···············································································································10
G-idea APP download ··········································································································11
Preflight check ···················································································································11
First flight experience ····································································································12
Requirements for flight environment ················································································12
List of LED indicators' indications ···················································································14
Start-up and shutdown ····································································································15
Start-up ···························································································································15
Shutdown ························································································································15

Standby ·········································································································· 15
Connect with the "Follow" drone ·········································································· 16
Release and hover ····························································································· 17
Take back the "Follow" drone ·············································································· 18
Low battery ····················································································································18
Manipulate the "Follow" drone ························································································19
Manual mode ····················································································································20
Motion sensing mode ··········································································································21
Camera angle ··················································································································22
Introduction to APP functions ·······················································································23
Parameter settings ···········································································································24
Picture shooting ··············································································································25
Time-lapse shooting ············································································································25
Burst mode ······················································································································25
Video shooting ················································································································25
Target following ················································································································26
Fixed point surrounding ·······································································································26
Route planning ··················································································································26
Gesture shooting ················································································································26
Panorama shooting ·············································································································26
File management ·············································································································28
Multimedia library ··············································································································28
Transfer the files from "Follow" drone to computer ··························································28

APP setting of "Follow" drone ······················································································29
Silent shooting ··················································································································29
Camera orientation ·············································································································29
Modification of WIFI information ···························································································30
Drone system upgrade ·········································································································30
Remaining capacity ············································································································30
Product manual ·················································································································30
About ·····························································································································31
User information ················································································································31
Flight route ······················································································································31
Repair and maintenance ································································································32
Remove and change the propeller ·····················································································32
Storage & transportation ·································································································33
Transportation ···················································································································33
Battery storage ··················································································································34
Battery disposal ··············································································································34
Firmware upgrade ············································································································35
After-sale warranty information ·······················································································36

Geniusidea provides the following file data for "Follow" drone users:
1. Packing List
2. User Manual
3. Quick Guide
4. Disclaimer and Safety Operation Manual
5. Battery Safety Operation Manual
User Manual includes the information on usage, safety, maintenance, etc., which shall be read carefully before using the
product. Please carefully read the Disclaimer and Safety Operation Manual and Battery Safety Operation Manual, and
ensure that you have understood and agreed on all the clauses and precautions in them. Please log in the official website to
get the latest version of the data mentioned above.
www.geniusidea.cn
Suggested use
FCC Statement
This equipment has been tested and found to comply with the limits for a Class B digital device,
pursuant to Part 15 of the FCC Rules. These limits are designed to provide reasonable
protection against harmful interference in a residential installation. This equipment generates
uses and can radiate radio frequency energy and, if not installed and used in accordance with
the instructions, may cause harmful interference to radio communications. However, there is
no guarantee that interference will not occur in a particular installation. If this equipment does
cause harmful interference to radio or television reception, which can be determined by turning
the equipment off and on, the user is encouraged to try to correct the interference by one or
more of the following measures:
-- Reorient or relocate the receiving antenna.
-- Increase the separation between the equipment and receiver.
-- Connect the equipment into an outlet on a circuit different from that to which the receiver is
connected.
-- Consult the dealer or an experienced radio/TV technician for help.
This device complies with part 15 of the FCC Rules. Operation is subject to the following two
conditions:(1) This device may not cause harmful interference, and (2) this device must accept
any interference received, including interference that may cause undesired operation.
Changes or modifications not expressly approved by the party responsible for compliance
could void the user's authority to operate the equipment.
This equipment complies with FCC radiation exposure limits set forth for an uncontrolled environment.
This equipment should be installed and operated with minimum distance 20cm between the radiator &
your body.

Brief introduction
"Follow" drone is the world's leading artificial intelligence small drone for aerial photography, which is safe, portable and
easy to use. The total weight of "Follow" is only 270g (including the battery), and it can shoot pictures of 13 mega-pixel and
high-quality videos of 4k resolution, which also has the functions of target following, surrounding/panorama shooting,
one-key taking off/landing/returning, etc.
Through the "G-idea" installed on the mobile device, the user can easily manipulate "Follow" drone, enjoying
unprecedented experience and fun of manipulation.
Product overview
Sales packing list
List of articles
Quantity
"Follow" drone
1
Portable box
1
Chargeable lithium battery
4
Colorful casing
2
Propeller
2
Nylon tape
2
USB data line
1
Charging stand
1
Transformer
1
Quick Guide
1
Warranty Clauses
1
Battery Safety Operation Manual
1
Disclaimer and Safety Operation Manual
1

Names of main devices
Indicator
Supporting feet*4
Silica gel foot pads*4
Power switch
Face case
Bottom case
Sonar
Luminous flux
Sonar
Battery cover
Batteries*2
Propeller B rotating counterclockwise
Propeller A rotating clockwise
Top cover
Radiator
Obstacle avoidance camera/LED indicator
Front main camera
External memory card slot
USB data line interface
Obstacle avoidance camera/LED indicator
Propeller B rotating counterclockwise
Propeller A rotating clockwise
Battery charging and installation
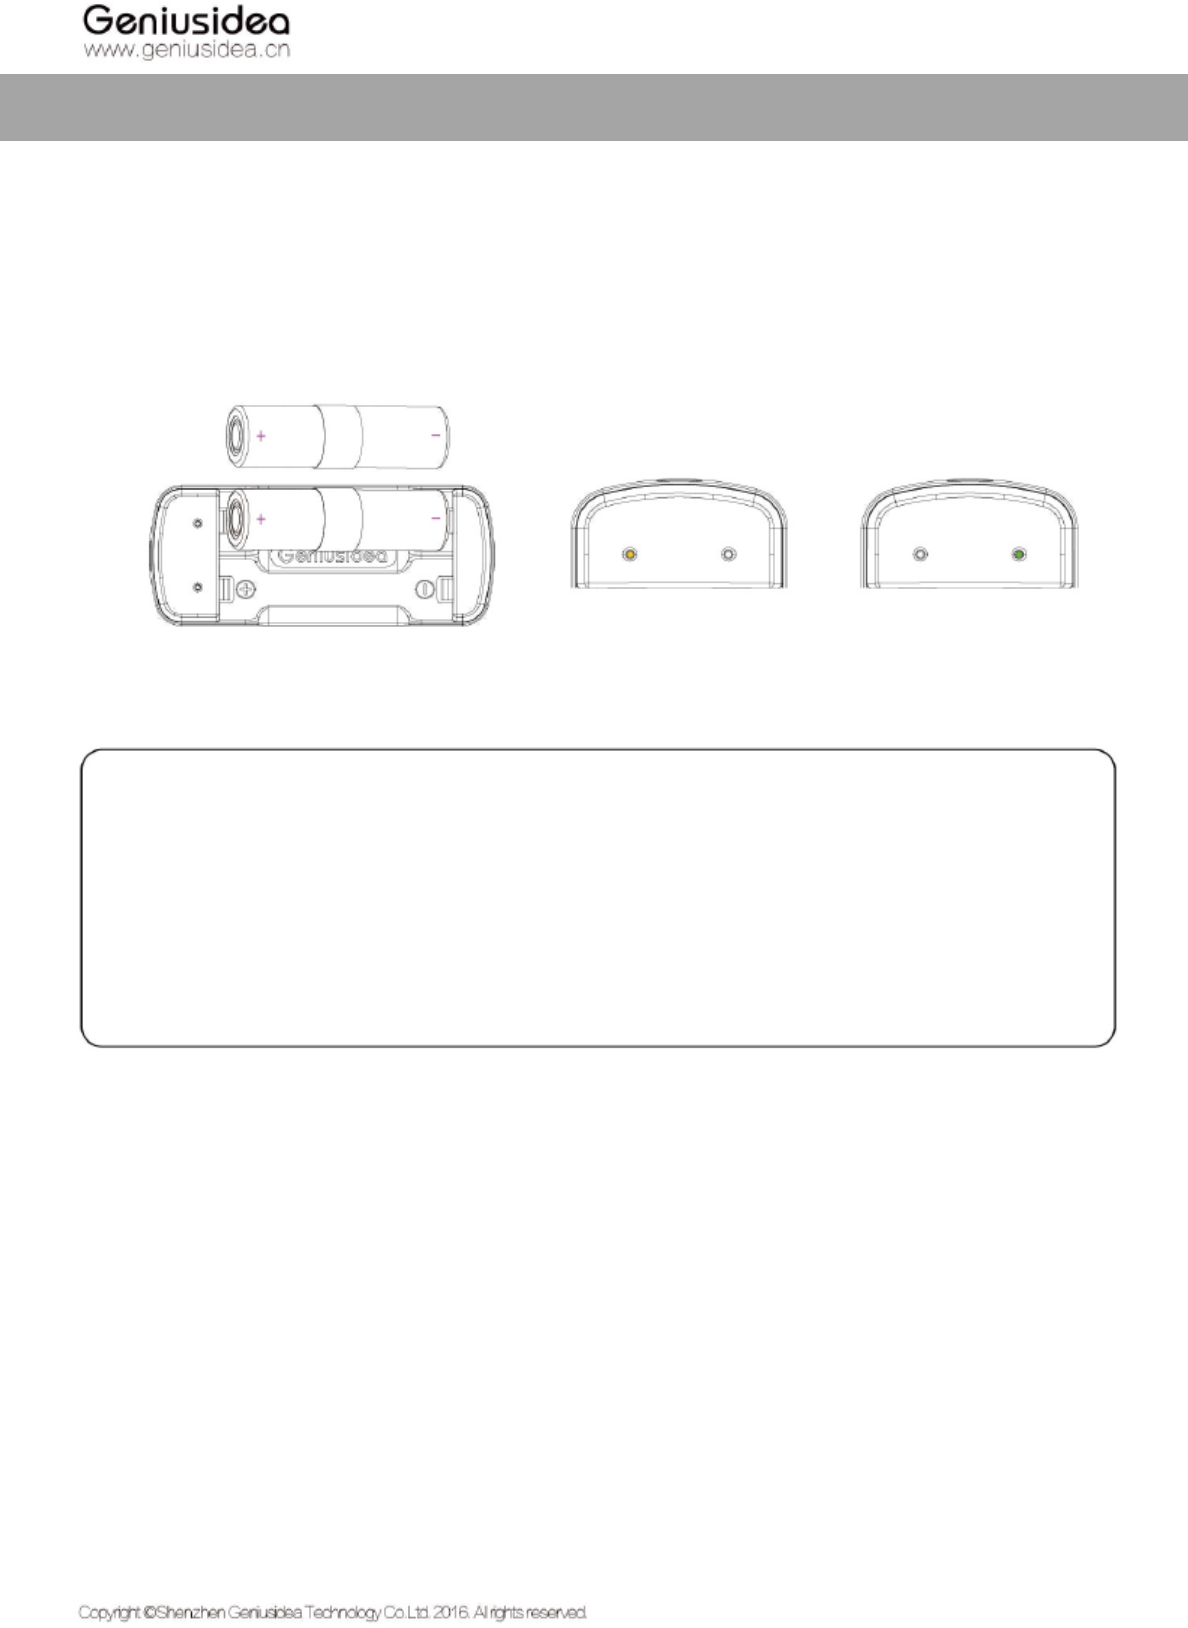
Battery charging
Put the battery on the charger, and make the battery fully contact the interface of the charging stand.
Preflight preparation
Note:
*When it is unused for a long time, the battery may suffer the over discharge, which will lead to the failure of charging
and utilization. Therefore, it's necessary to charge the battery regularly to maintain the cell's activity, and to use, charge,
transport and store the battery in accordance with relevant requirements in the Battery Safety Operation Manual.
*When the charger detects that the battery temperature exceeds the normal working range (5℃-40℃), it will stop
charging and proceed when the temperature drops to a normal value. During this process, the power indicator shall
always display as the state of under charging, which means that the yellow indicator is normally on.
Yellow indicator
normally on: it is under
charging
Green indicator normally
on: the battery is fully
charged
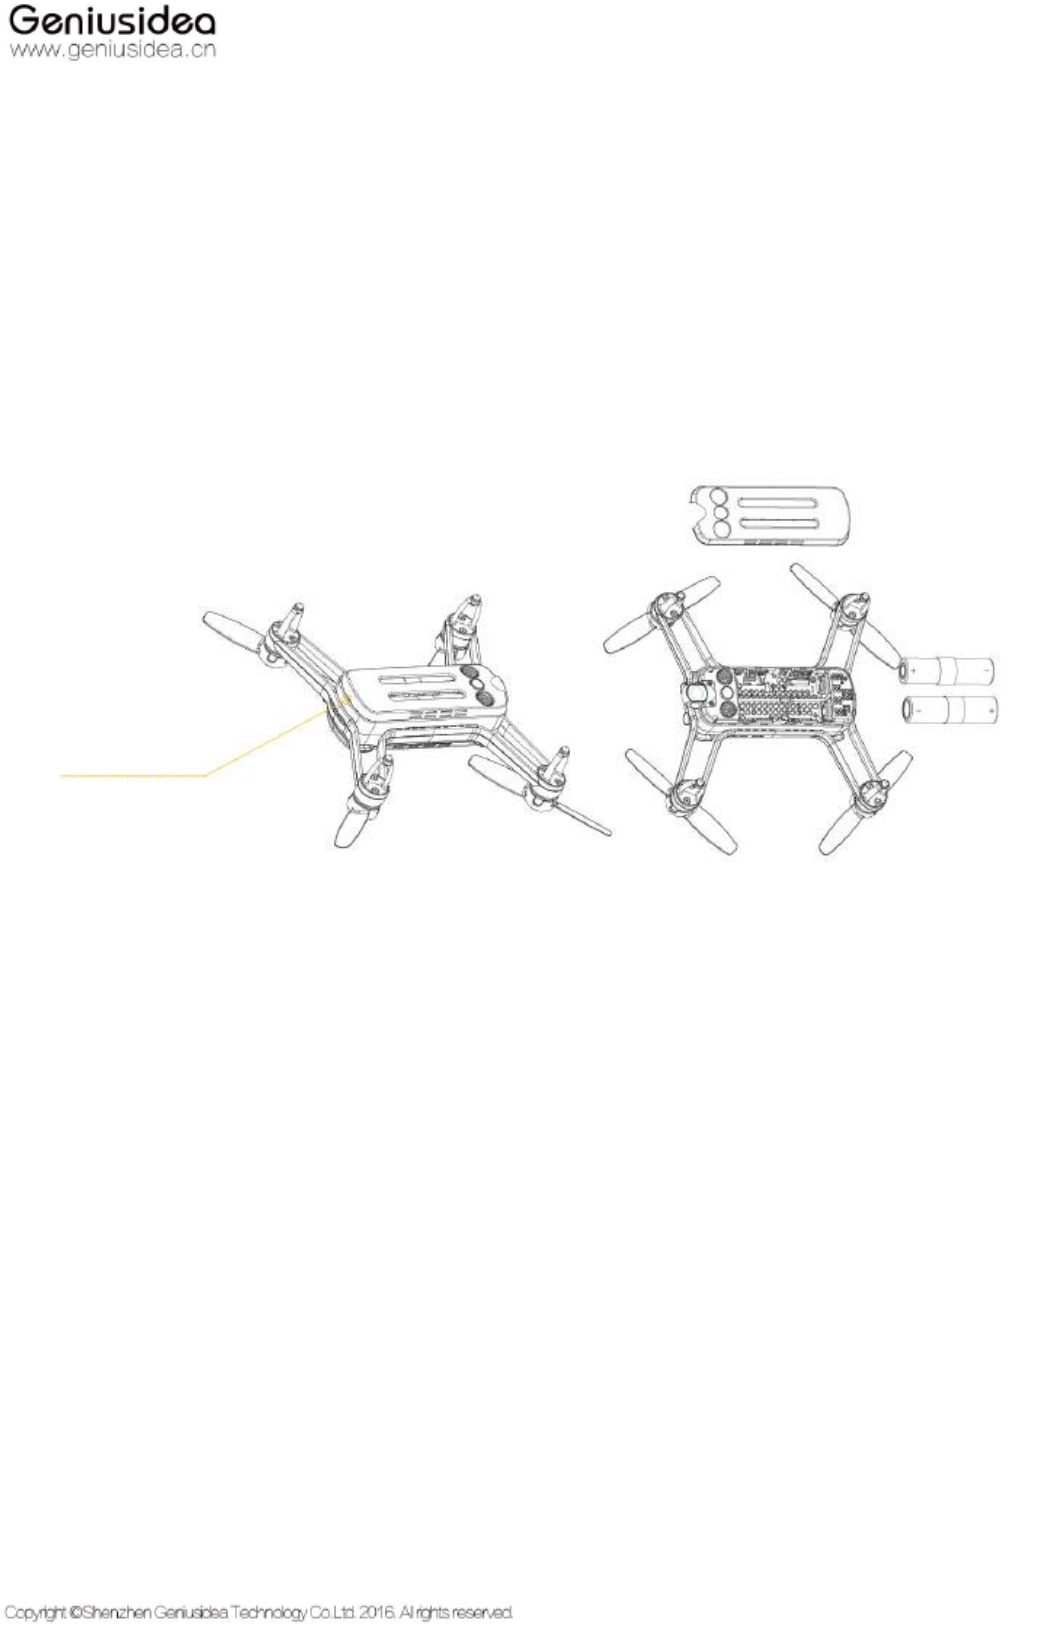
Battery installation and removal
Install batteries
Put your strength on your fingers to dig the battery cover and open the rear cover.
Press the battery into the battery position of "Follow", with positive and negative electrodes aligned.
Remove batteries
Put your strength on your fingers to dig the battery cover and open the rear cover.
Remove the battery by slightly pulling the battery handle.
Digging position on the
battery cover

G-idea APP download
Since the "Follow" drone can be simply controlled through the G-idea downloaded and installed on the mobile device, there
is no need to buy an extra remote controller. There will be a newbie tutorial for the user first logging in the G-idea, which
covers the main functions and manipulation methods by graphic and text description. If the user wants to browse the tutorial
again, it can be seen in "G-idea - setting - user manual".
Scan the following two-dimensional code to access the download page, or download the APP on the official website
WWW.Geniusidea.cn.
System versions available for "Accompany +" APP: iOS 8.0 or above; Android 4.4 or above.
Preflight check
Guarantee the following points before conducting a trial flight:
• Maintain the mobile device to be connected to the Internet and activate the GPS positioning system, thus to
guarantee that the drone can be correctly switched to the local allowable Wi-Fi frequency band.
• The battery is fully charged and correctly installed; all the components work normally.
• The electric quantity of your mobile device used to manipulate the drone is sufficient.
• Environment and weather conditions are good enough for the flight.
• Be far away from the crowded area.

First flight experience
Requirements for flight environment
The "Follow" drone can be used indoors with calm air condition, or outdoors with the wind velocity below 10Km/h.
In order to achieve the high quality of videos and pictures shot, it's better to perform the shooting in the environment with
calm wind and sufficient light, and guarantee that there is no obstacle to affect the flight or block the operator's sight.
Please conduct the flight of the "Follow" drone in the environment with the temperature of 5℃-35℃ and the altitude lower
than 2000m.
Please conduct the flight in local legal areas.
Please make sure that the flight area is spacious and bright; don't make the drone fly beyond the remote control range
Don't use "Follow" in the crowded area.
Don't use "Follow" drone in the areas with no-fly signs or around buildings.
Don't conduct the flight under bad weather, such as rain, snow, fog, haze, thunder, lightning, strong wind (wind velocity
above Category 3), hail, dust storm, etc.
Don't use this product under such environment as strong magnetic field, etc.
Since the "Follow" drone uses luminous flux and sonar sensor to conduct positioning, carefully use the "Follow" drone
under the following environments:
• The scene which is too dark or too bright
• The scene with drastic and rapid changes of light

Prevent it from flying on the surface with the following characteristics:
• Ground with pure color
• Surface with strong reflection, such as water surface or the surface of the transparent
and reflective object
• Surface of the moving object
• Surface of the material which has strong absorption of sound waves
• Smooth surface with sparse and obscure texture
• Surface of the object whose inclination exceeds 30º
• Area covered by snow
*For more detailed precautions and safety operation instructions, please refer to the Disclaimer and Safety Operation
Manual.

List of LED indicators' indications
The following table shows the state of the indicator light and its corresponding implication.
Indicator
State & color
Implication
Power indicator
Normally on
1. Standby; 2 Flight
Slow flashing
System self-inspection after start-up
Fast flashing
Drone firmware upgrade
Power indicator
Green indicator normally on
When the USB is successfully connected
Green indicator flashes twice
Upon the normal operation after the start-up and before the
system self-inspection
Yellow indicator normally on
1 System self-inspection fails 2 The current environment
isn't applicable for the flight
Yellow indicator flashes
Low battery
Red indicator flashes once
Release the shutter when shooting pictures
Red indicator keeps flashing
It is shooting a piece of video

Start-up and shutdown
Start-up
Put the drone right side up, toggle the switch to "ON" until the LED indicator on top of the front camera flashes twice to let
the "Follow" enter the start-up self-inspection. After about 20 seconds, when the electrical tune rings and the start-up
self-inspection is completed, put the "Follow" drone on the level ground to wait for the drone's electrical tune ringing again,
following which the drone enters the preparation state for flight.
Shutdown
Under the standby state, toggle the switch to "OFF" until the LED power indicator on top of the front camera is off.
Standby
When the "Follow" drone is in the flight preparation state, the LED indicator on top of the front camera is normally on,
which means that it can be released to fly at any time. After 10-minute standby, the "Follow" drone will automatically enter
the dormant state.
Note:
* After the start-up, the "Follow" drone will conduct the self-inspection; if there is a fault, after the self-inspection,
the drone electrical tune won't ring, which means that the self-inspection fails. You can try to restart the "Follow"
drone. Don't try repeatedly; if the fault still exists, please contact the customer service.

Connect with the "Follow" drone
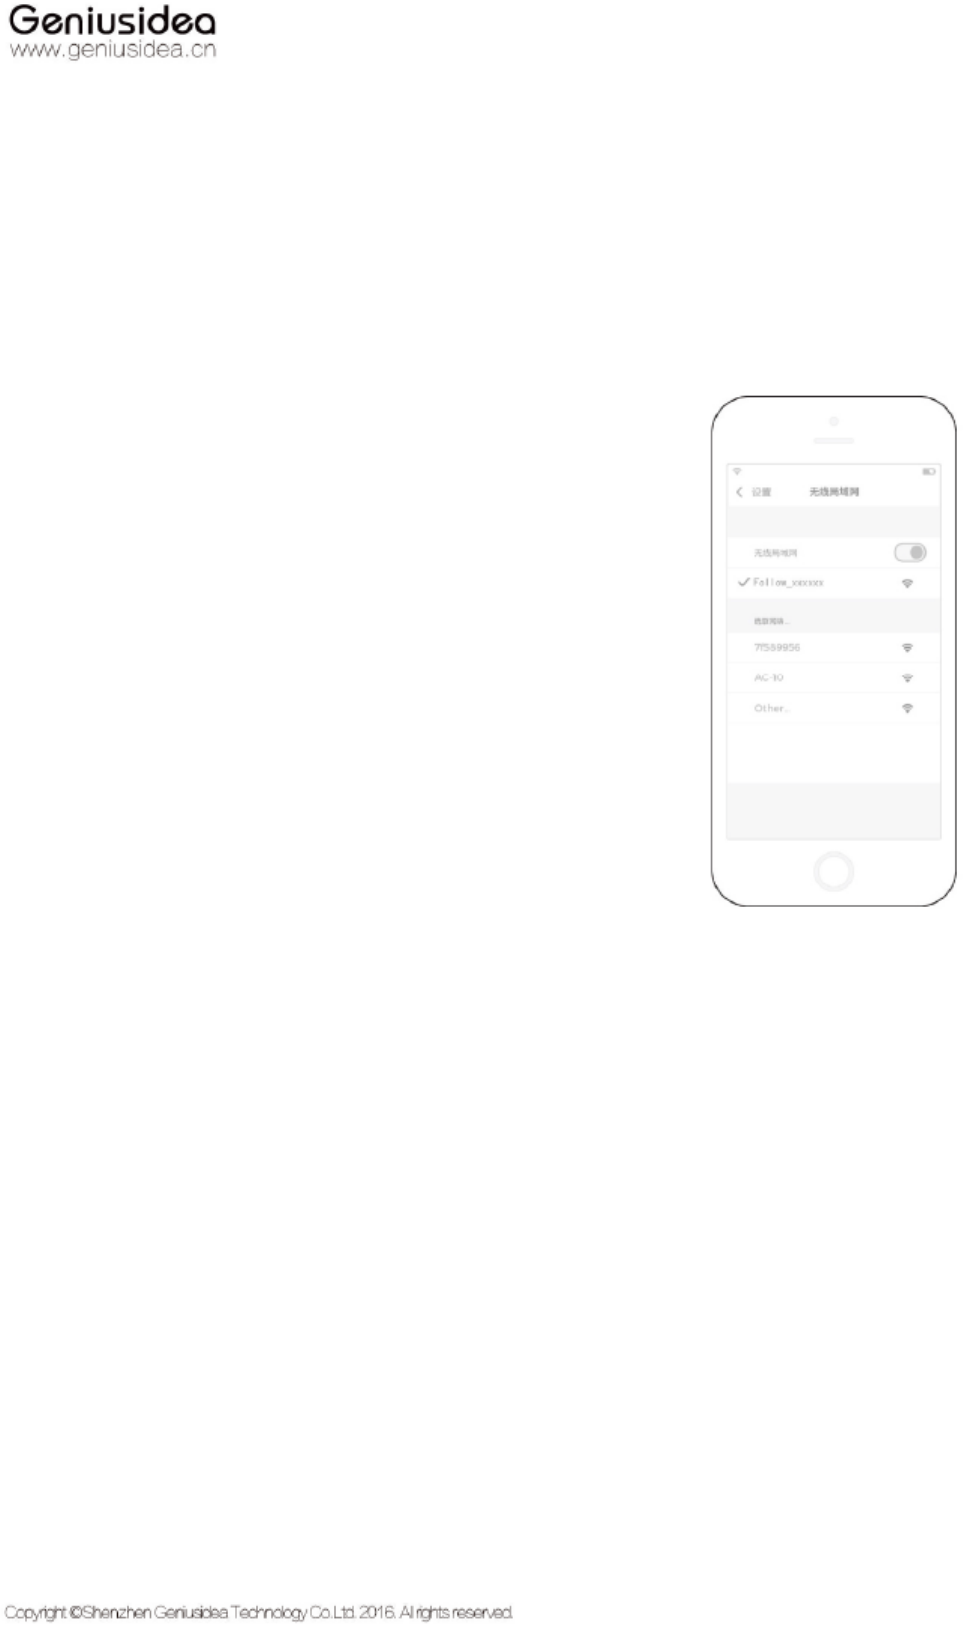
The "Follow" drone is connected to the mobile device through Wi-Fi. Please connect the mobile device to the Wi-Fi of the
"Follow" drone in accordance with the following steps:
1. Confirm that the "Follow" drone is started and in the normal standby state;
2. Enter the mobile device's Wi-Fi setting interface;
3. On the mobile device's Wi-Fi setting interface, the Wi-Fi of the "Follow" drone is initially displayed as "Follow
XXXXXX", wherein, the "XXXXXX" is the unique No. of each machine;
4. Click to select it and input the correct password (the initial password is
"password" by default).
*The "Follow" drone provides the Wi-Fi with frequency bands of 2.4GHz and 5GHz. When logging in "Accompany +" for
the first time, the options of Wi-Fi frequency bands will pop up. Then new WIFI password can be set in APP - "Setting" -
"Modify the WIFI information" subsequently.
*If there are several users trying to connect the "Follow" drone, only the first user successfully connecting the drone can
own the operating authorization of the "Follow" drone.

Prevent it from flying on the surface with the following characteristics:
• Ground with pure color
• Surface with strong reflection, such as water surface or the surface of the transparent and
reflective object
• Surface of the moving object
• Surface of the material which has strong absorption of sound waves
• Smooth surface with sparse and obscure texture
• Surface with texture of high repeatability
• Surface of the object whose inclination exceeds 30º
• Area covered by snow
*For more detailed precautions and safety operation instructions, please refer to the Disclaimer and Safety Operation
Manual.

List of LED indicators' indications
The following table shows the state of the indicator light and its corresponding implication.
Indicator
State & color
Implication
Power indicator
Normally on
1. Standby; 2 Flight
Slow flashing
System self-inspection after start-up
Fast flashing
Drone firmware upgrade
Power indicator
Green indicator normally on
When the USB is successfully connected
Green indicator flashes twice
Upon the normal operation after the start-up and before the
system self-inspection
Yellow indicator normally on
1 System self-inspection fails 2 The current environment
isn't applicable for the flight
Yellow indicator flashes
Low battery
Red indicator flashes once
Release the shutter when shooting pictures
Red indicator keeps flashing
It is shooting a piece of video
Start-up and shutdown
Start-up
Put the drone right side up, toggle the switch to "ON" until the LED indicator on top of the front camera flashes twice to let
the "Follow" enter the start-up self-inspection. After about 20 seconds, when the electrical tune rings and the start-up
self-inspection is completed, put the "Follow" drone on the level ground to wait for the drone's electrical tune ringing again,
following which the drone enters the preparation state for flight.
Shutdown
Under the standby state, toggle the switch to "OFF" until the LED power indicator on top of the front camera is off.
Standby
When the "Follow" drone is in the flight preparation state, the LED indicator on top of the front camera is normally on,
which means that it can be released to fly at any time. After 10-minute standby, the "Follow" drone will automatically enter
the dormant state.
Note:
* After the start-up, the "Follow" drone will conduct the self-inspection; if there is a fault, after the self-inspection,
the DRONE electrical tune won't ring, which means that the self-inspection fails. You can try to restart the
"Follow" drone. Don't try repeatedly; if the fault still exists, please contact the customer service.
Connect with the "Follow" drone
The "Follow" drone is connected to the mobile device through Wi-Fi. Please connect the mobile device to the Wi-Fi of the
"Follow" drone in accordance with the following steps:
1. Confirm that the "Follow" drone is started and in the normal standby state;
2. Enter the mobile device's Wi-Fi setting interface;
3. On the mobile device's Wi-Fi setting interface, the Wi-Fi of the "Follow" drone is initially displayed as "Follow
XXXXXX", wherein, the "XXXXXX" is the unique No. of each machine;
4. Click to select it and input the correct password (the initial password is
"password" by default).
*The "Follow" drone provides the Wi-Fi with frequency bands of 2.4GHz and 5GHz. When logging in "Accompany +" for
the first time, the options of Wi-Fi frequency bands will pop up. Then new WIFI password can be set in APP - "Setting" -
"Modify the WIFI information" subsequently.
*If there are several users trying to connect the "Follow" drone, only the first user successfully connecting the drone can
own the operating authorization of the "Follow" drone.
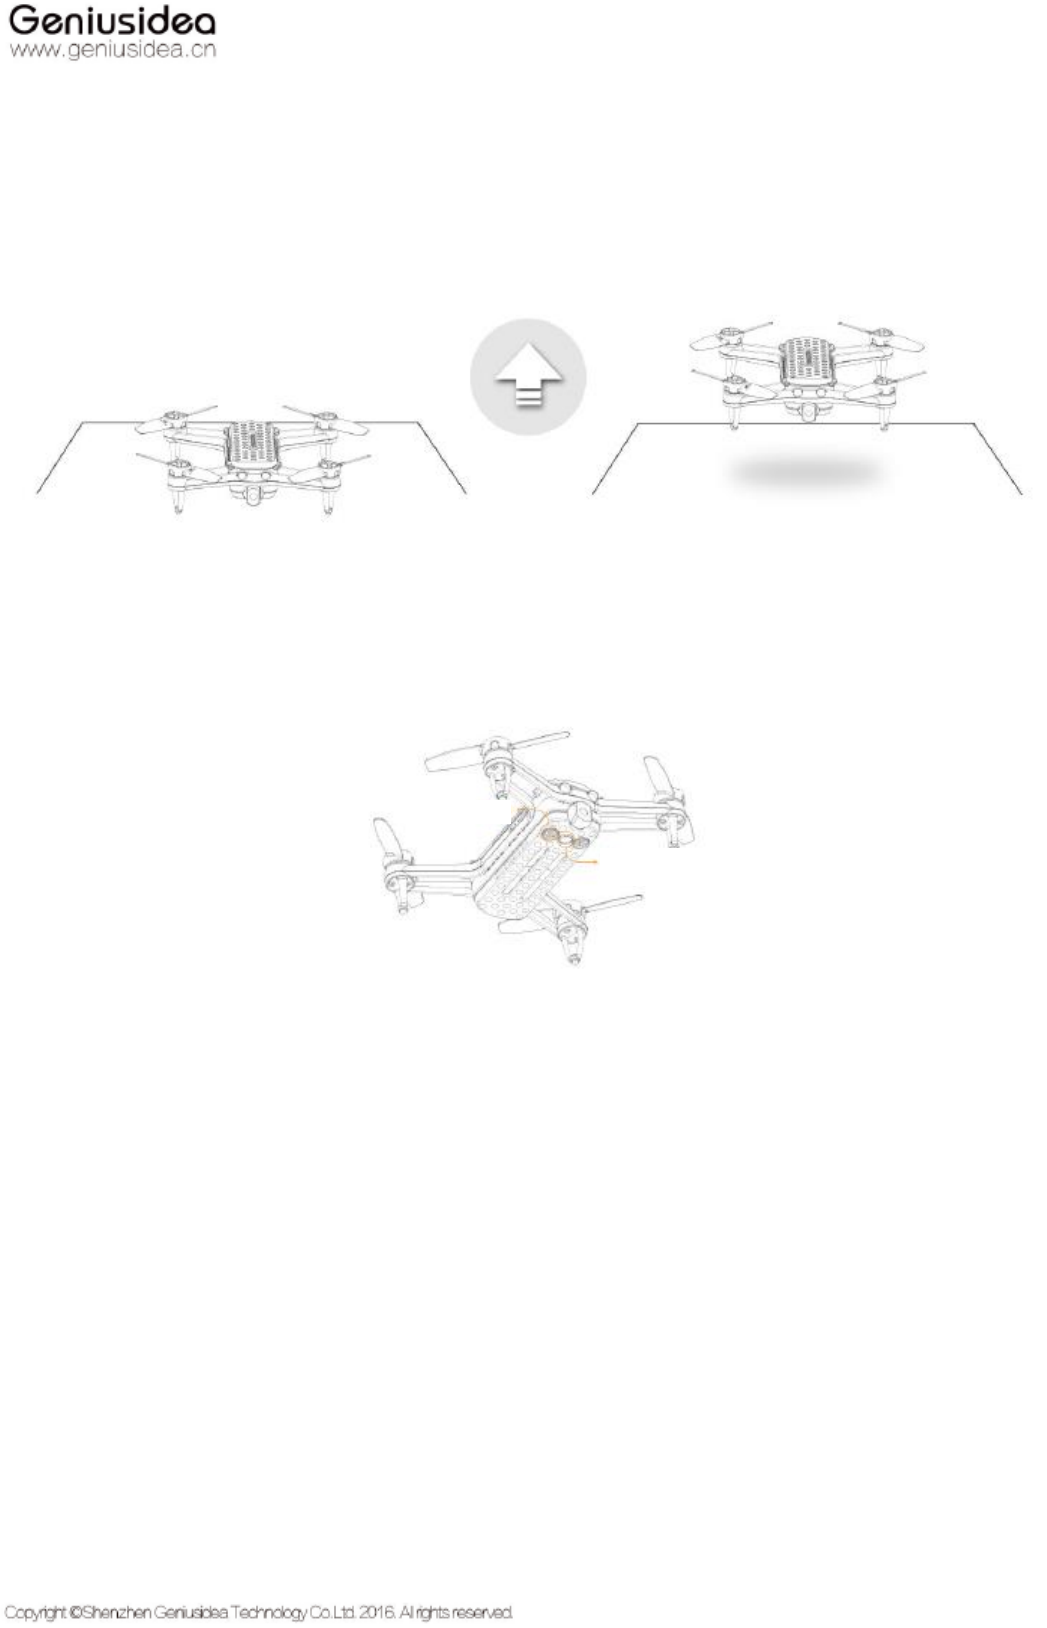
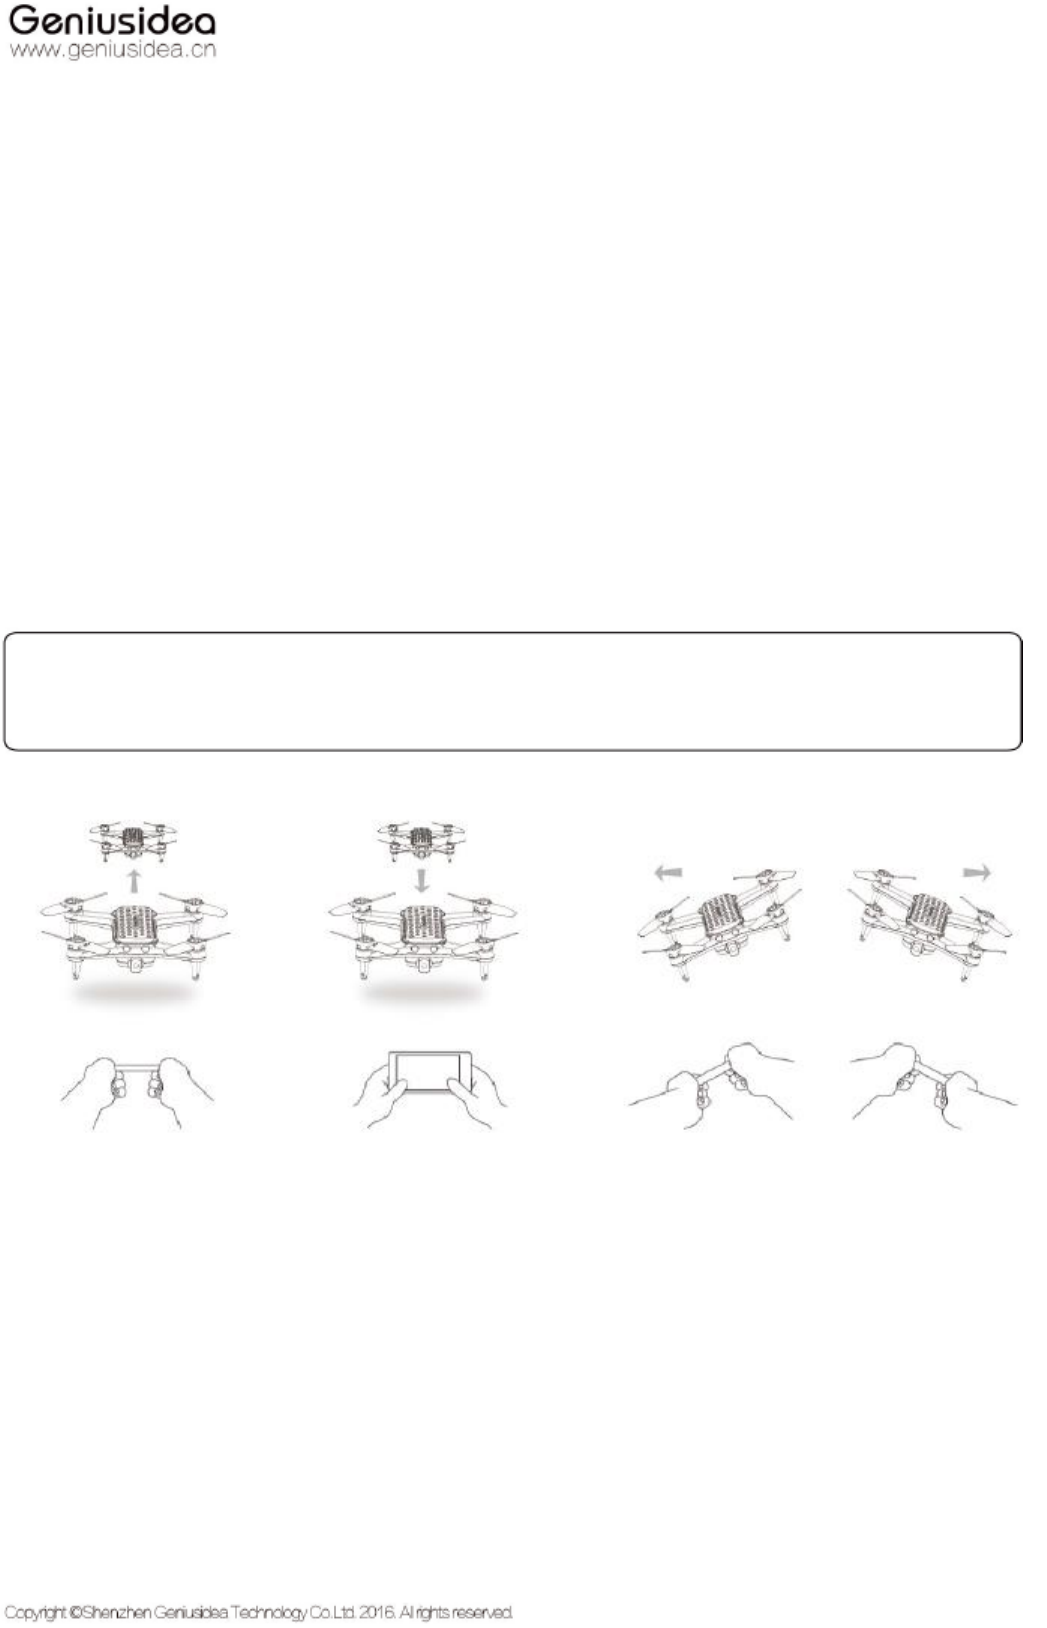
Release and hover
Under the standby state, put the "Follow" drone on the level ground, click the "One-key take-off" icon at the remote control
terminal, and confirm it, following which the propeller will start to rotate and accelerate, and the "Follow" drone will
automatically fly one meter high from the ground and hover in the air.
Note:
*When it takes off, don't cover the camera and sonar sensor at its bottom
Ultrasound
Luminous flux
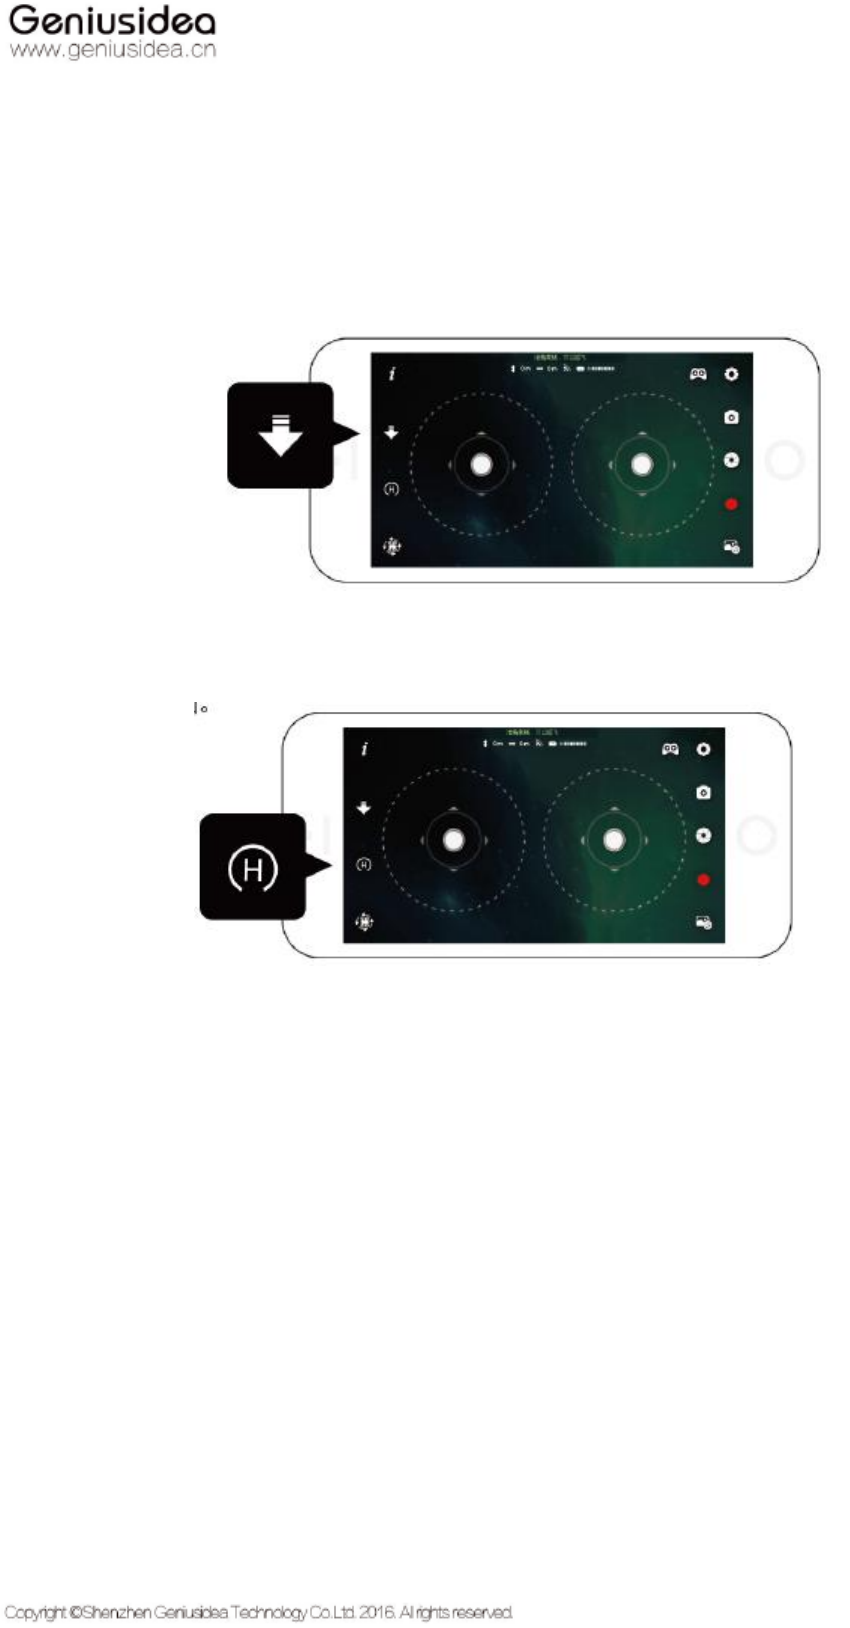
Take back the "Follow" drone
There are two ways to take back the "Follow" drone:
1. Manipulate the "Follow" drone in front of you, press the "One-key land" icon, following which the drone will slowly go
down, and enter the standby state after it lands on the ground, with the propeller gradually stopping the rotating.
2. Manipulate the "Follow" drone to the environment available for safe landing, and click the "One-key return" icon on the
APP control interface, following which the "Follow" drone will slowly go down to the ground.
Note:
*Pay attention to the ground condition when it goes down.
*For more notes, please refer to the Disclaimer and Safety Operation Manual
Low battery
Battery level
When the battery level is less than
25%
When only 60s flight time
remains
APP interface edge
Yellow indicator on the edge flashes
Red indicator on the edge flashes
Display on the APP status bar
The drone is about to land
The drone is landing
The "Follow" drone's motion
It flies or hovers just as normal, but at
this time, the user shall timely take back
the drone.
The "Follow" starts to return
automatically
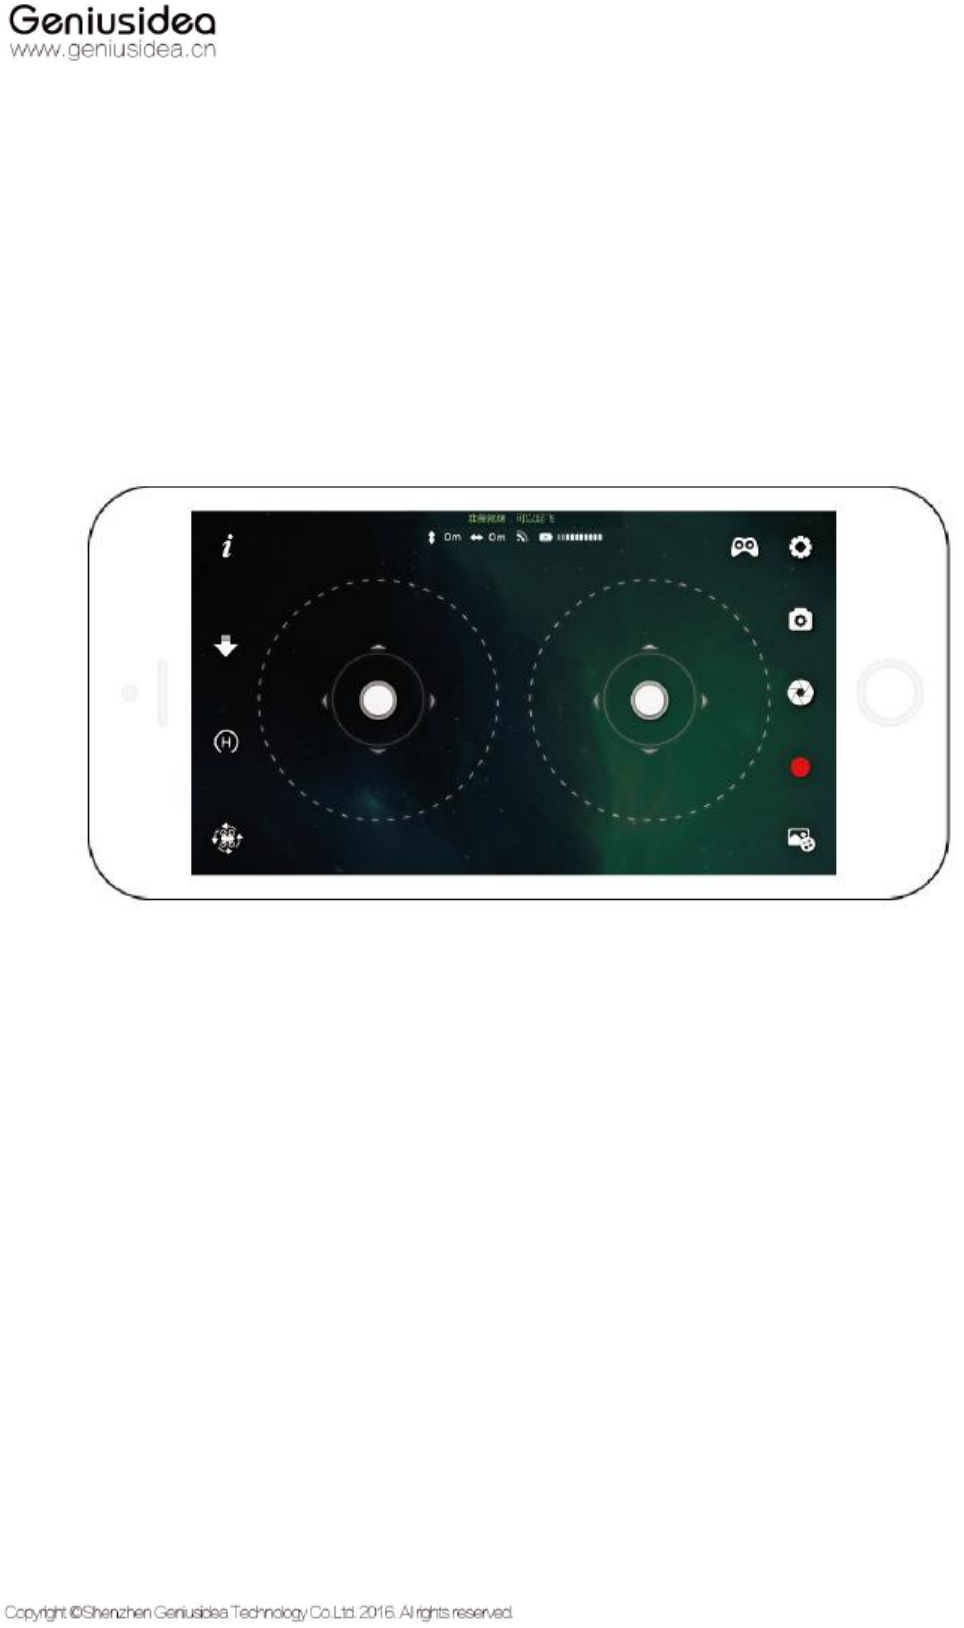
Manipulate "Follow" drone
Click "One-key take-off" on the main page of "G-idea" APP to enter the operation interface. The in the top right
corner can be selected to switch the manipulation mode, and "G-idea" App provides two manipulation modes. It is "Manual
mode" for the first manipulation, and your choice for the last time will be recorded.
Note:
*The above-mentioned operation method is the "Selfie" mode, and if the user selects the "Framing" mode, the
operation direction will be reversed.
Manual mode
Manipulate the "Follow" drone through the virtual joystick.
• The left joystick controls the drone to go up/down and to turn horizontally.
• The right joystick controls the flight direction.
◑Push the right joystick up - the drone will fly in the direction of its head;
◑Push the right joystick down - the drone will fly in the direction of its tail;
◑Push the right joystick left - the drone will fly to its left side;
◑Push the right joystick left - the drone will fly to its right side.
Motion sensing mode
Manipulate the "Follow" drone through the virtual push-pull rod/the motion sensing key on the screen's left/right side
respectively.
• The virtual push-pull rod on the left side controls the drone to go up/down.
• Constantly press the motion sensing key on the right side with your right thumb to control the flight direction:
◑Incline the mobile device in the direction far away from your body - the drone will fly in the direction of its
head;
◑Incline the mobile device in the direction towards your body - the drone will fly in the direction of its tail;
◑Incline the mobile device towards left- the drone will fly to its left;
◑Incline the mobile device towards right- the drone will fly to its right;
Note:
*The above-mentioned operation method is: "Selfie" mode, and if the user selects the "Framing" mode, the
operation direction will be reversed.
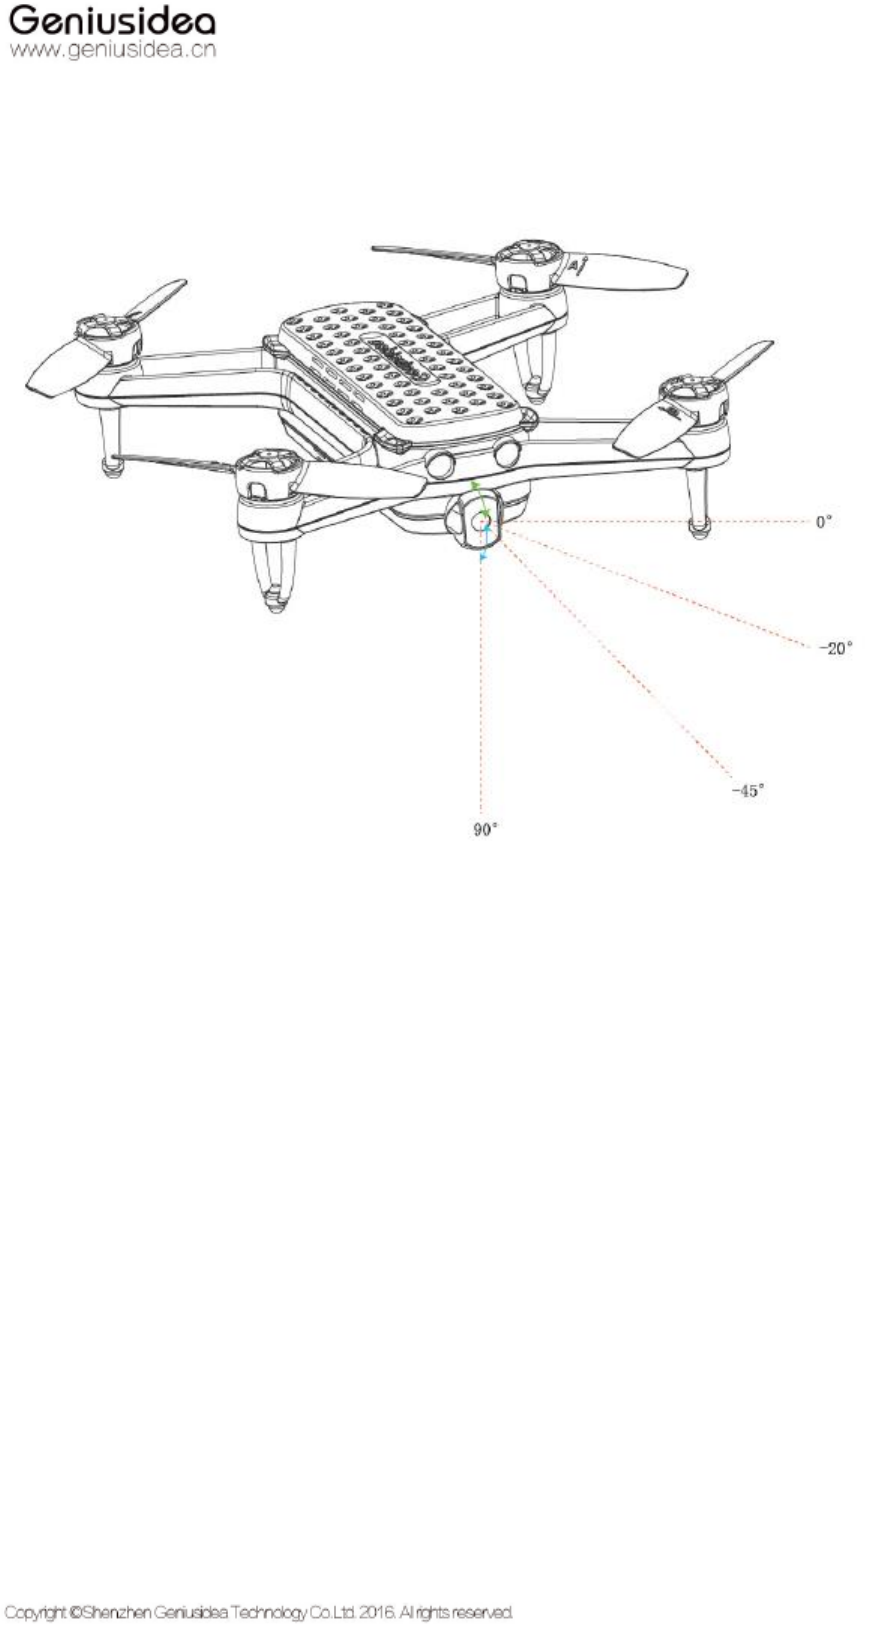
Camera angle
The camera angle of the "Follow" drone can be changed through manual adjustment.
Introduction to APP functions
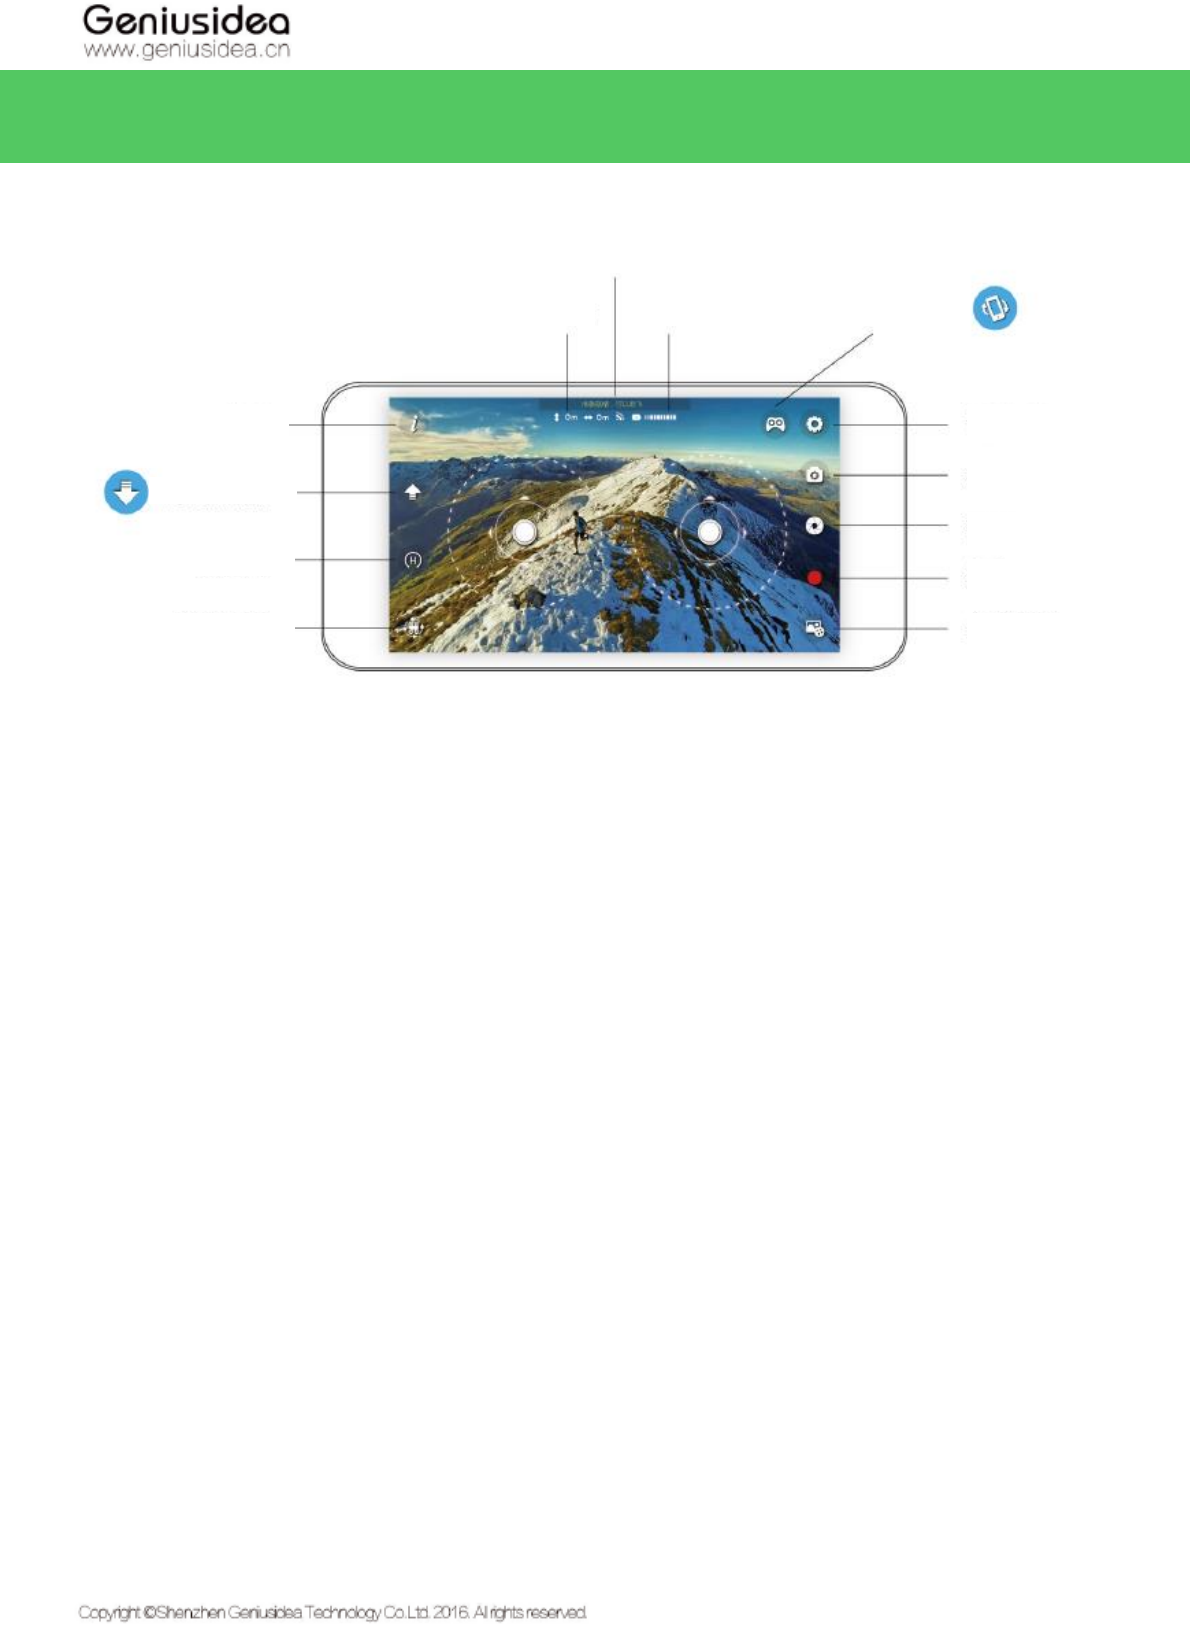
Flight status bar
DRONE's battery
level
Flight height/distance
Help
Take-off/land
Surrounding flight
One-key return
Motion sensing
mode/manual
mode
Setting list
Camera setting
Picture shooting
Camera shooting
Multimedia library
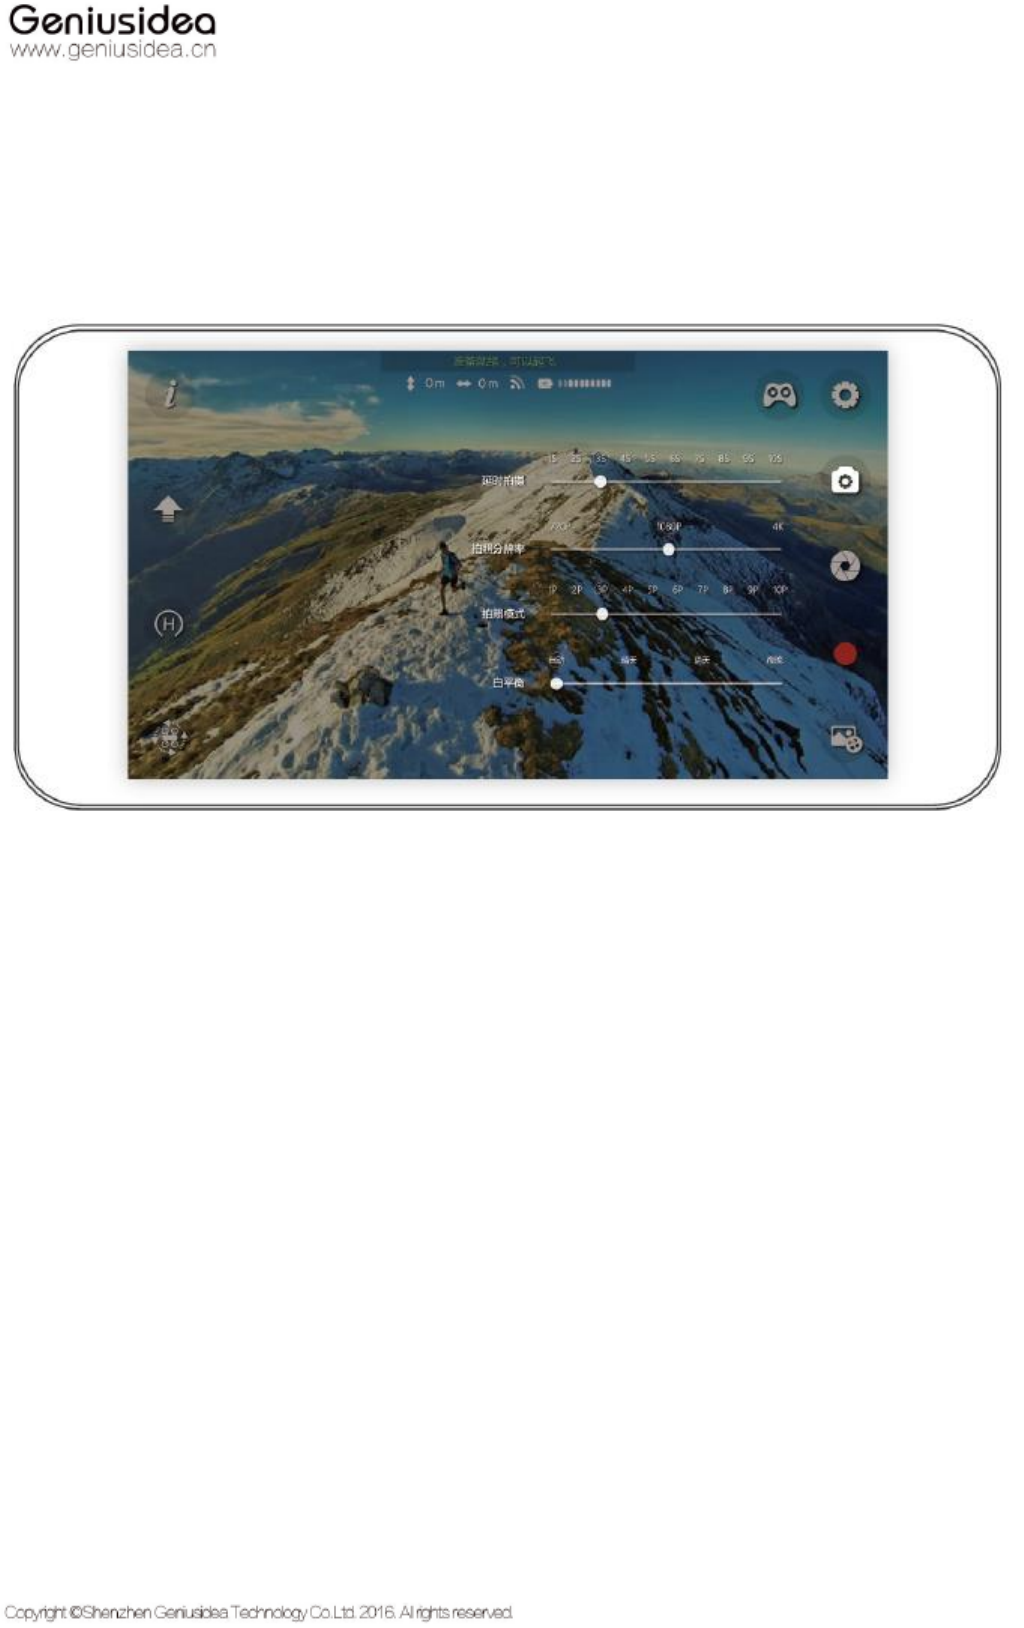
Parameter settings
The camera's setting functions are as follows in sequence:
1. Time-lapse shooting
setting;
2. Resolution for picture
shooting;
3. Burst mode setting;
4. White balance setting;

Picture shooting
Time-lapse shooting
Click to enter the camera setting, and click to trigger the countdown shooting after setting the delay time.
Burst mode
Click to enter the camera setting, and click to trigger the high-speed continuous shooting after setting the
quantity of pictures for continuous shooting.
Video shooting
Click to start to shoot the video, following which the red LED indicator will continuously flash. Click to stop
the video shooting.
The "Follow" drone can shoot the video with three types of picture quality, which are 720p, 1080p and 4k, and the real-time
preview picture is of 720P. There is the electronic image stabilization for the 720p and 1080p videos, which can be directly
downloaded to the mobile device. Please use the USB data line to download the 4K video into the computer.
Note:
*The mobile device can only enter the page of shooting functions after it is connected to the "Follow" drone.

Target following
Click to enter the setup menu and activate the target following. Then return to the manipulation interface, and select
the target object to conduct the following.
Fixed point surrounding
Under that mode, the "Follow" drone will shoot pictures of the tracked person with the method of "Human tracking", which
is to treat the tracked person as the center of a surrounding circle, with the initial distance as its radius.
Click to enter the surrounding flight setting, set the surrounding radius and click the to start the
surrounding flight.
Click to achieve the clockwise surrounding flight; and click to achieve the counterclockwise surrounding
flight.
Route planning
Click to enter the setup menu, enter the route planning interface, activate the route planning function by setting the
position points on the map, following which the "Follow" drone will start to fly according to the position points, with the
route saved/uploaded at the same time.
Gesture shooting
Make specified gestures in front of the main camera, following which the "Follow" drone will start 3-second countdown
after it successfully detects the gestures.
Panorama shooting
Click to enter the setup menu, and select the panorama shooting, following which the "Follow" drone will take
panoramic pictures automatically

Note:
* The best radius of surrounding shooting is 1-10 meters. When the DRONE is detecting, please make sure that the
tracked person is in a standing posture, with the whole body appearing in the picture.
Warning:
* Pay attention to the surrounding environment conditions when the target following and route planning functions
are used, since it is recommended to use the DRONE in bright and spacious places, and make sure that there are no
obstacles around and on the preplanned flying route. Do not make any sudden or abrupt movements, or movements
with larger amplitude of variation, so as to prevent the "Follow" drone from the failure of timely and accurate
identification; please always pay attention to the surrounding environmental safety, and control the DRONE in time
for any possible safety problems.
To avoid any unnecessary accidents, the use of target following or route planning function is not recommended
under the following conditions:
1. The light is too dark or too bright;
2. Bad weather occurs, such as rain, snow, fog, haze, thunder, lightning, strong wind (above 10Km/h),
hail, dust storm, etc.
3. The tracked target's color or texture is too close to that of the surrounding environment;
4. The tracked target's shape changes abruptly during the movement;
5. The "Follow" drone flies on the uneven or inclined surfaces.
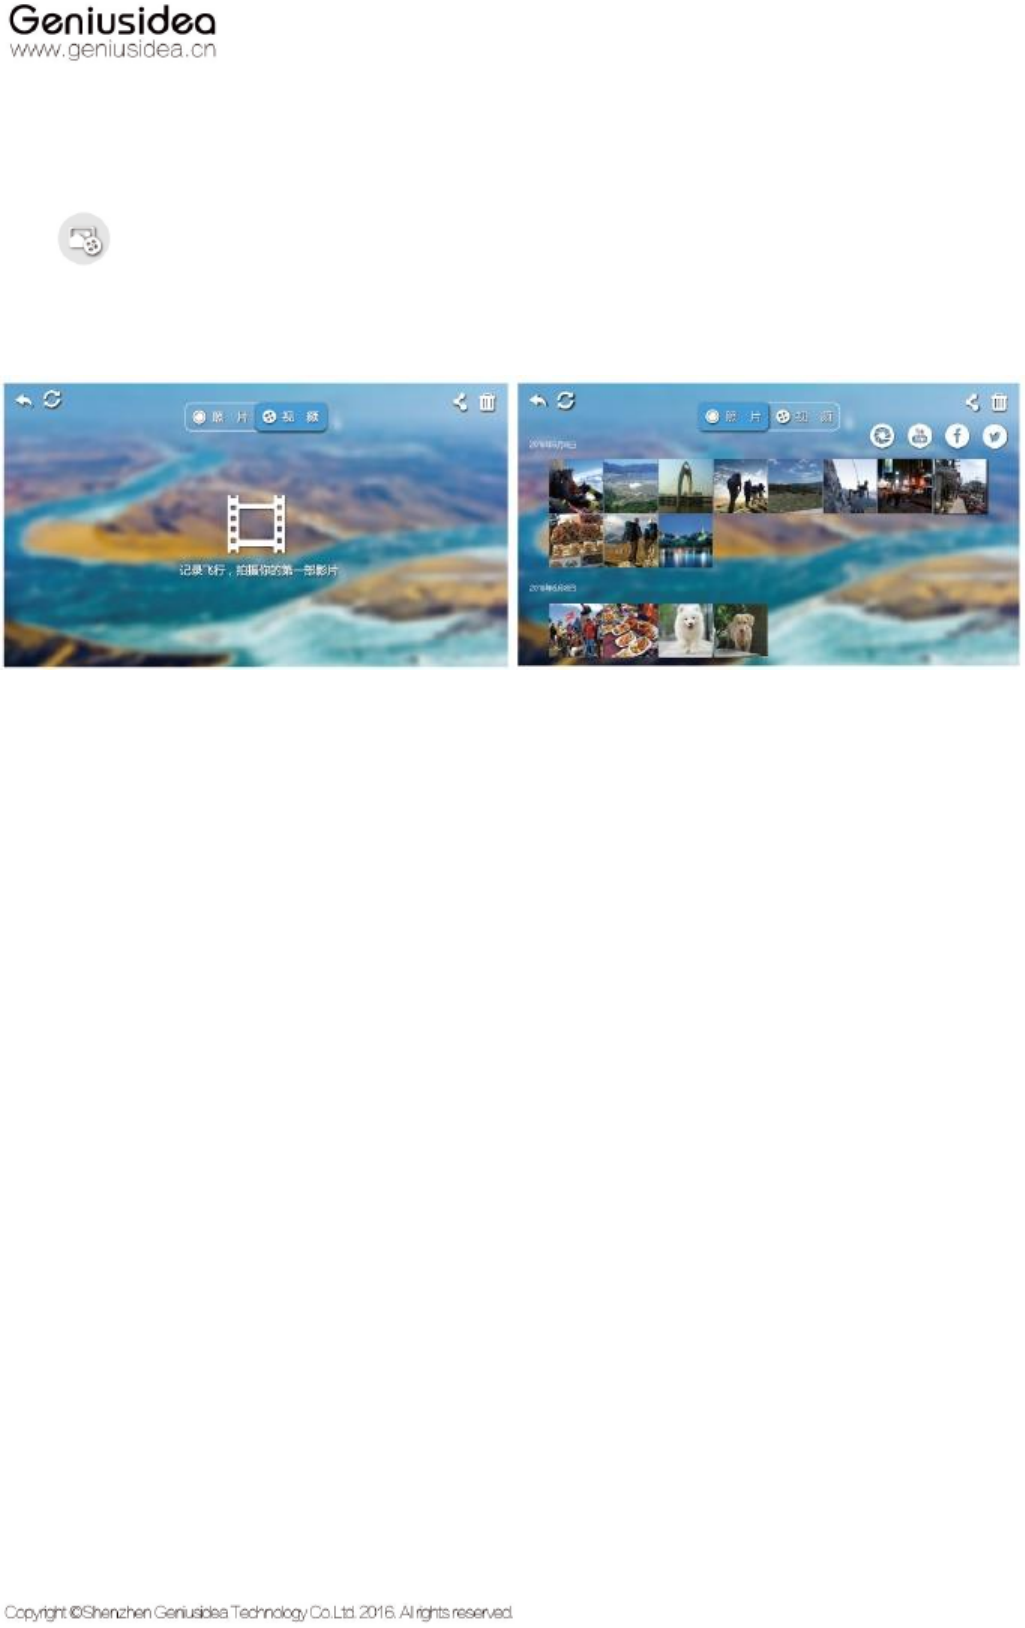
File management
Multimedia library
Click in the bottom right corner on the APP main interface to enter the multimedia library, where you can view,
archive and share the pictures and videos. The videos shot need to be downloaded from the "Follow" drone to the mobile
device via Wi-Fi.
Transfer the files from "Follow" drone to computer
The "Follow" drone can connect to the computer through the USB data line.
When the Windows users log in, a dialog box pops up on the computer screen, and the existing files can be archived by
selecting "Open the folder to view files".
The ios edition is solely available for downloading videos of 720p and 1080p to mobile devices through the Wi-Fi of the
"Follow" drone; 4K videos can be uploaded to the computer through the USB line.
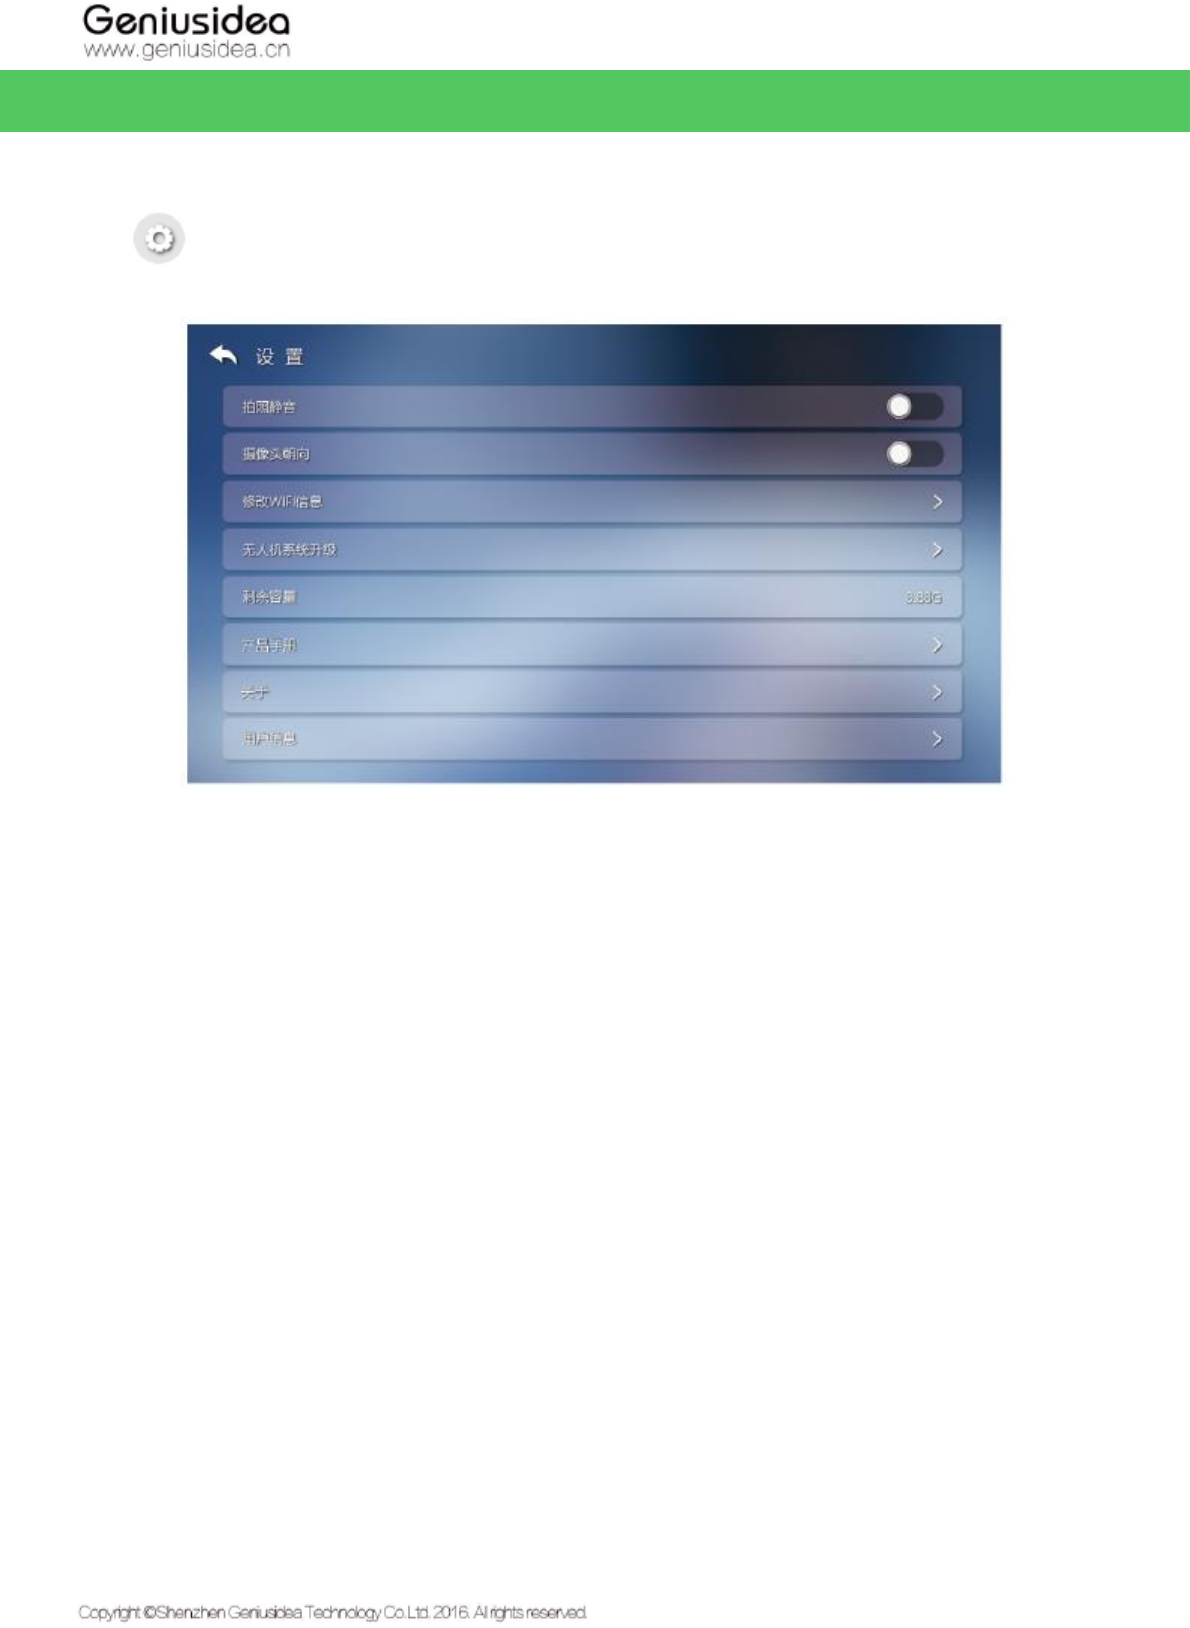
APP setting of "Follow" drone
Click on the App main page to enter the setting interface.
Silent shooting
Click the icon to turn on/off the sound for taking pictures.
Camera orientation
Click the icon to adjust the drone head's orientation (the camera is turned towards the user or outwards).

Modification of WIFI information
The name and password of the "Follow" drone's Wi-Fi can be modified, and the Wi-Fi frequency band (2.4G/5G) can be
selected under this option.
Drone system upgrade
Check and upgrade the firmware version under this option. Please refer to "Repair and maintenance - "Follow" drone
firmware upgrade" for detailed steps.
Remaining capacity
The user can check the remaining capacity of the "Follow" drone's memory through this option
Product manual
When users install and use this App for the first time, the tutorial will pop up automatically to give necessary operation
instructions to the new users. After that, the users can view the tutorial in the "Product manual".
About
Click this option to display the current version of the "Follow" drone, as well as its firmware version and service terms,
together with other related information.
User information
The users can modify the user picture, nickname and other information under this option.
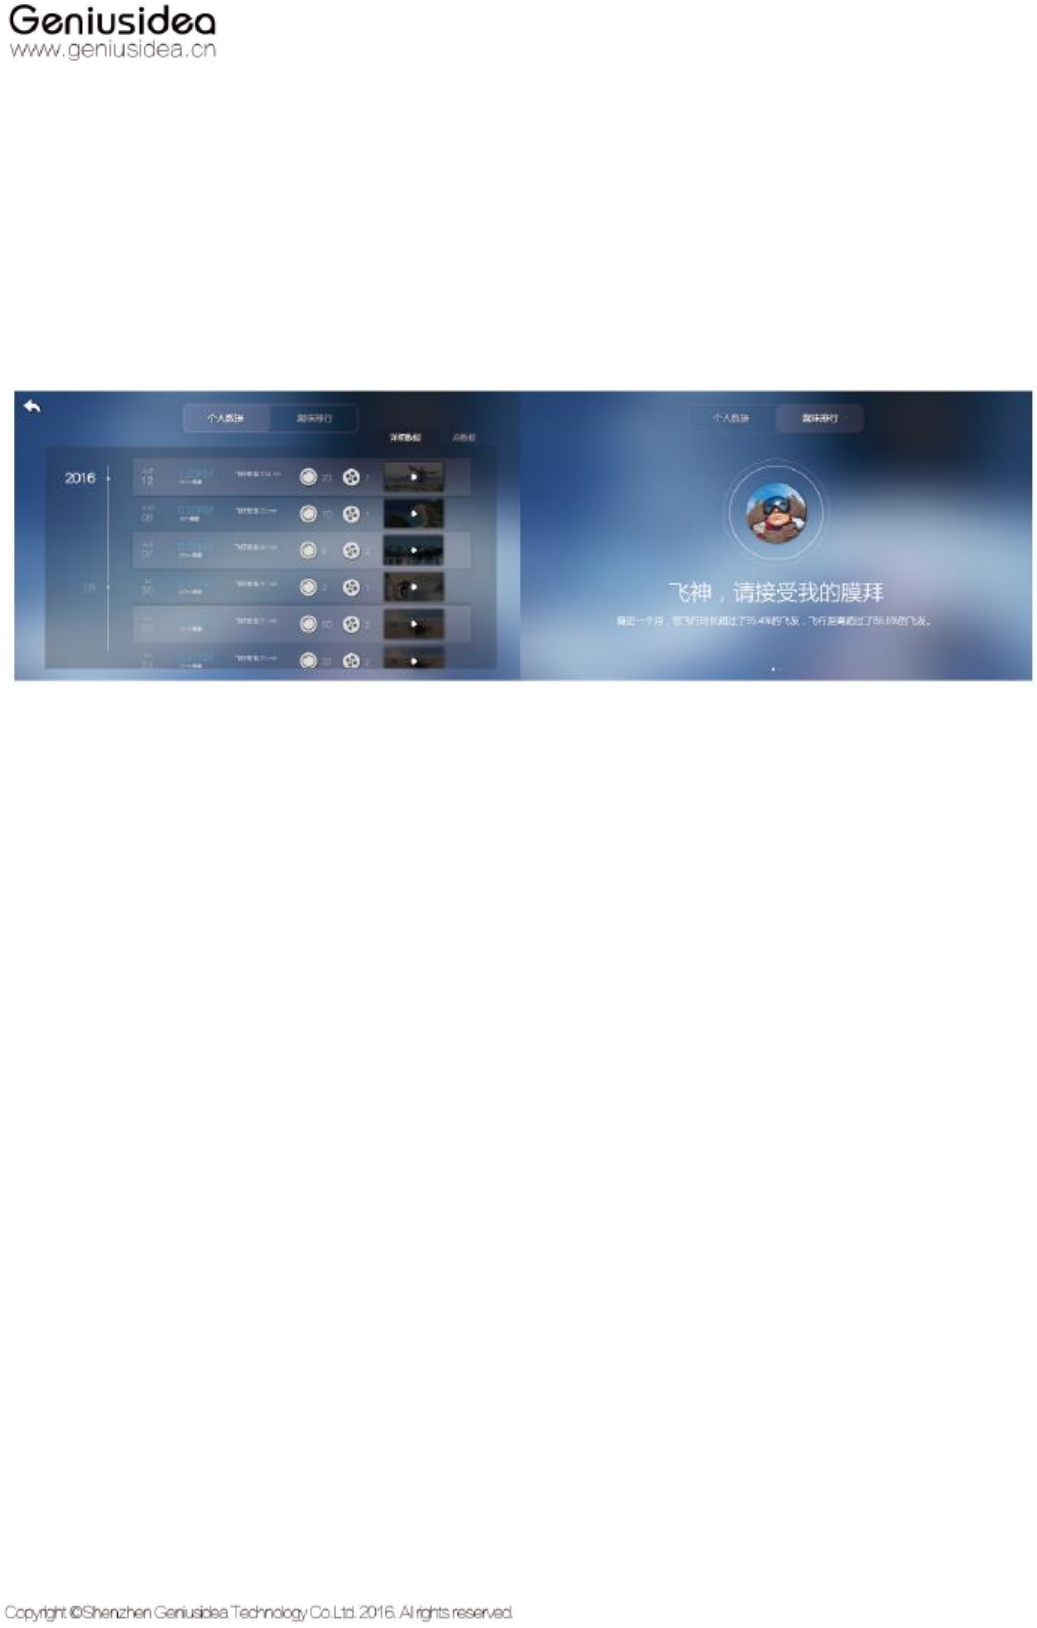
Flight route
The function of flight route will record your flight data, which can also be uploaded for ranking.

Repair and maintenance
The users can change the casing and propeller of the "Follow" drone according to instructions in this manual.
If the casing or propeller of the "Follow" drone is damaged, the user can follow the instructions in this manual to replace it.
(When the users buy the "Follow" drone, one set of propeller and two sets of colorful casings will be donated additionally).
Please follow the following steps to replace the new component or accessory. Please use the tools and accessories officially
authorized by the "Follow" drone.
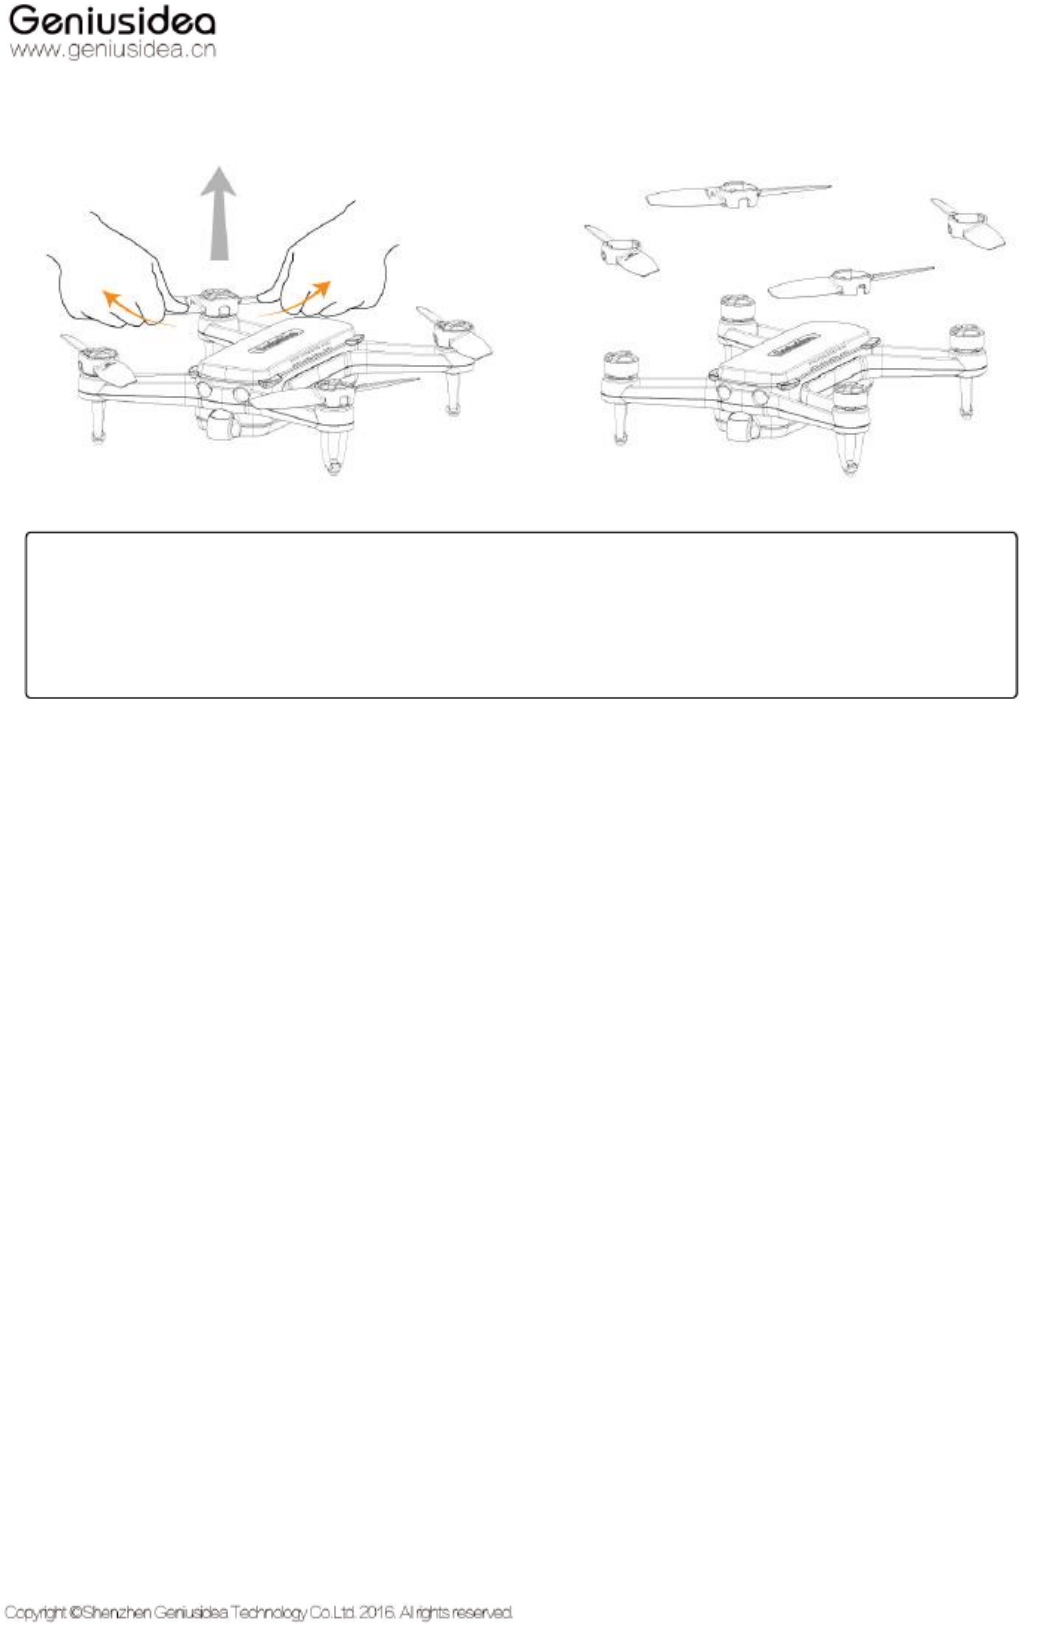
Remove and replace the propeller
The four propellers of the "Follow" drone are composed of two sets of propellers rotating in opposite directions, of which
those on the diagonal line rotate in the same direction.
When disassembling and replacing the propeller, please select the right propeller and mount it on the corresponding
position.
1. Ensure that the "Follow" drone is power-off,
2. Place the drone on the level surface;
3. Exert an upward and horizontal force on the paddle.
4. Separate the paddle bottom from the motor.
5. Align the new paddle to the correct slot and mount it on the motor.
Storage & transportation
Please store the "Follow" drone in a proper environment. Do not hang heavy objects on the drone.
Transportation
The temperature range of the "Follow" drone's chargeable lithium battery during transportation is: 25±3℃
For more detailed information about the lithium battery, please refer to Battery Safety Operation Manual
Note:
*Slightly push aside the propeller with both hands, and take out the DRONE after hearing the crisp "Clap"
sound twice.
Battery storage
Please store the battery in a proper environment separately to prevent the battery from over discharge. Please refer to
Battery Safety Operation Manual for more information
Half a year
-30~25℃(1*)
3 months
-30~25℃(1*)
1 month
-30~25℃(1*)
Charging temperature
Storage temperature
0°C
5。C
25°C
45°C
50°C
25°C
Charging
percentage
80°C
90°C
100°C
95°C
95°C
Battery disposal
The battery will age due to long service time, or become out-of-service due to other reasons. It is forbidden to continue
using the battery under the following conditions, and the battery shall be properly disposed according to the right recycling
methods and local laws as well as regulations.
Bulge: The battery surface has obvious bulges, deformation or other abnormities;
Aging: There are no obvious signs of aging, but the endurance time is sharply decreased, compared to the initial status;
Damage: There are obvious signs of damages, such as cracks, abrasion, puncture or other abnormities.
Please properly dispose the waste batteries according to the requirements stipulated by local laws and regulations
concerning the waste battery recycle and disposal.
To avoid the damage to the battery, please keep it away from the damp or dusty environment. If the battery won't be used for
a long time, please remove it from the "Follow" drone and separately store it under the temperature of 5℃-40℃. Please
refer to Battery Safety Operation Manual for more information
Firmware upgrade
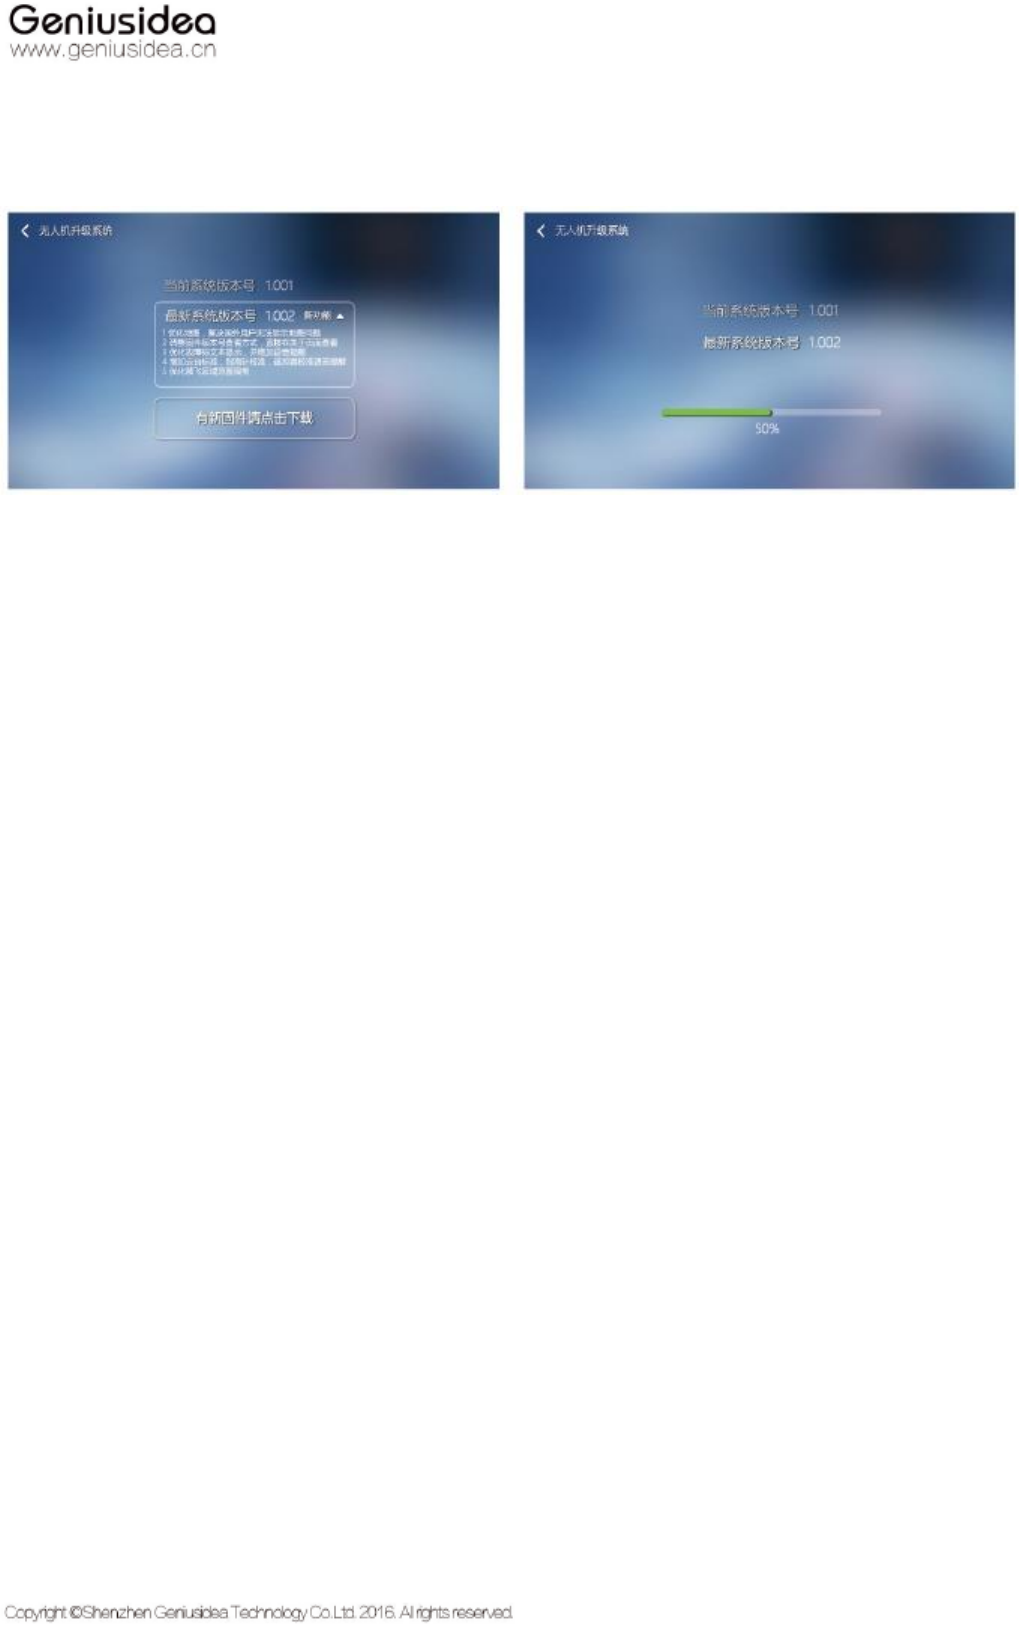
1. Upgrade the firmware through "Follow" drone App.
a. Connect the mobile device to the "Follow" drone to obtain the drone firmware version;
b. Connect the mobile device to the Internet to obtain the latest firmware version. If the "Follow" drone's firmware
version is the same to that latest one, its App will inform the user that the firmware is already of the latest version;
otherwise, the "Follow" drone App will display the "Download" button for the user to download the latest firmware
version;
c. After the downloading, the "Follow" drone App will inform the user to connect the "Follow" drone again and
upload the latest firmware version to the drone;
d. After the uploading, the "Follow" drone starts to upgrade the firmware. The upgrade process will last for about 3
minutes, during which the power indicator flashes fast.
e. When the firmware is successfully upgraded, the power indicator stops fast flashing and restores to be normally on.

2. Upgrade the firmware through the USB line
a. Download the firmware upgrade package from the official website;
b. Connect the "Follow" drone to the computer through the USB line;
c. Transfer the downloaded firmware upgrade package to the root directory of the "Follow" drone's memory;
d. Turn the "Follow" drone off and on again;
e. After the "Follow" drone is turned on, it will upgrade the firmware automatically; if the upgrade isn't activated,
please check to see if the upgrade package is placed under the right route; the upgrade process will last for about 3
minutes;
f. When the firmware is successfully upgraded, the power indicator stops fast flashing and restores to be normally
on.
After-sale warranty information
Please visit the following pages of the "Follow" drone official website to get the latest after-sale service information:
Warranty policy: www. geniusidea. cn
Return/exchange policy: www. geniusidea. cn
After-sale service form: www. geniusidea. cn