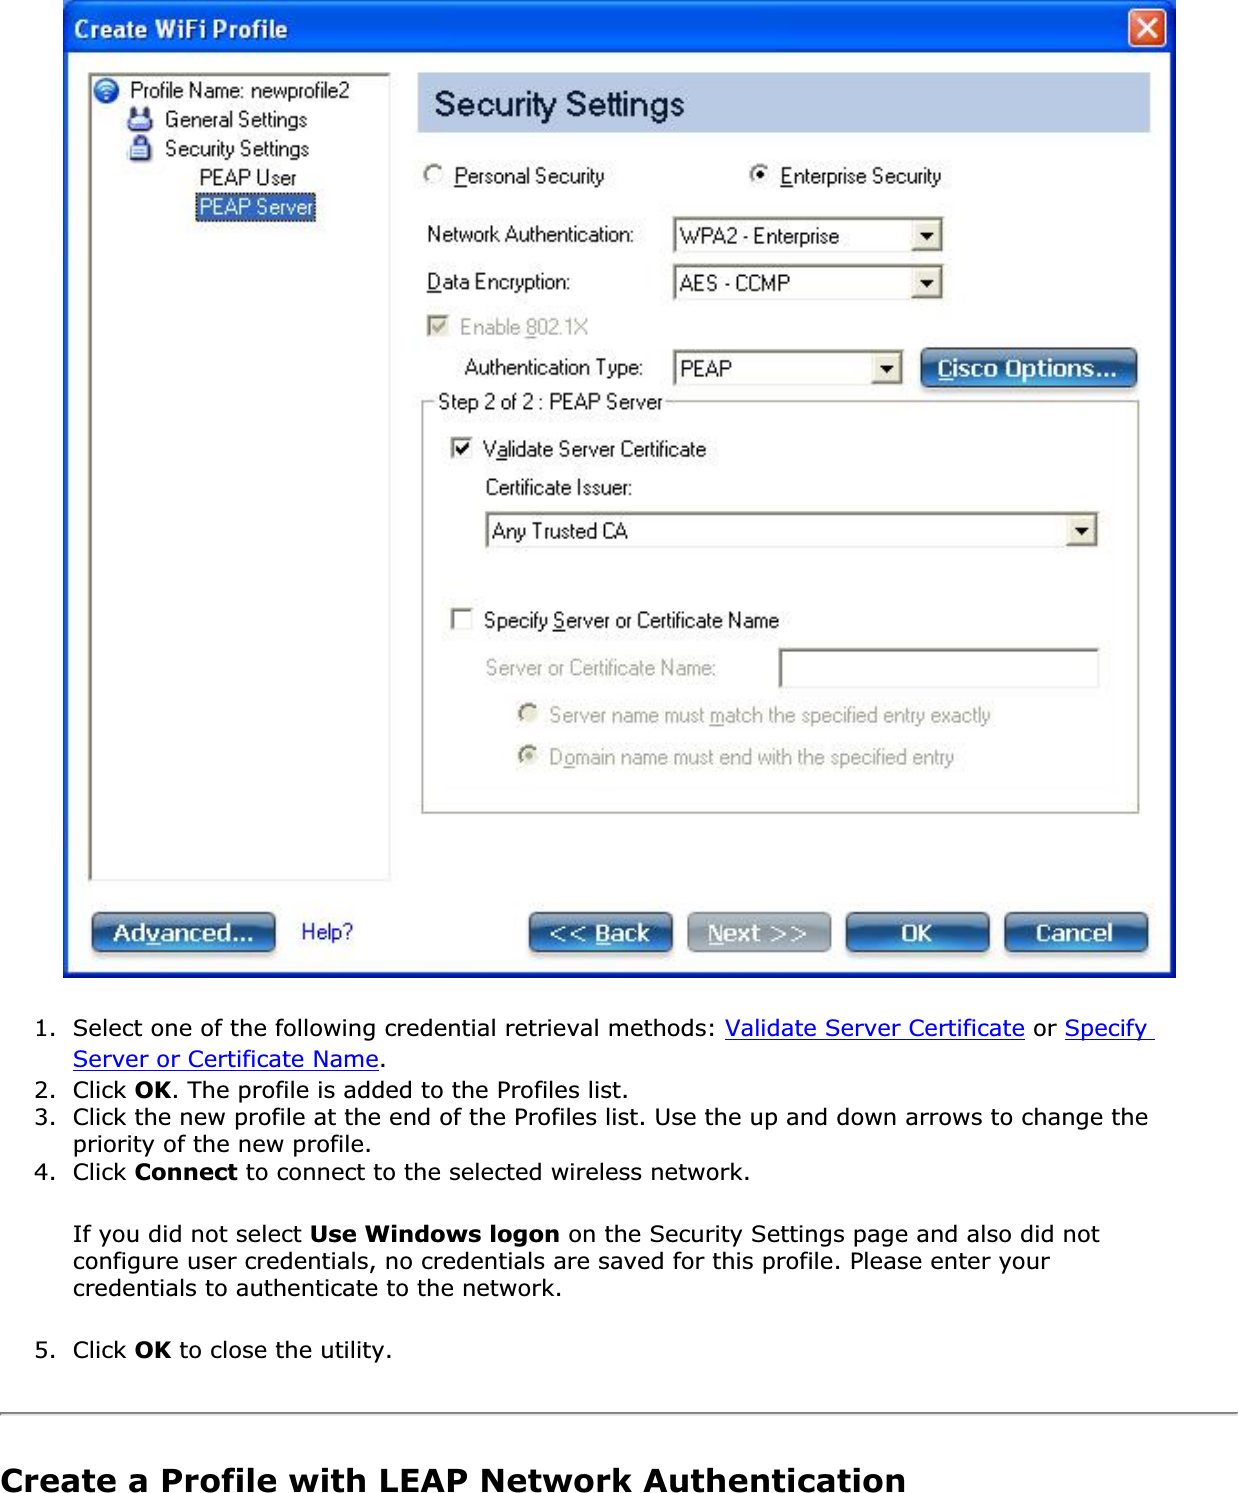
Getac Technology 040 WLAN Module User Manual Contents
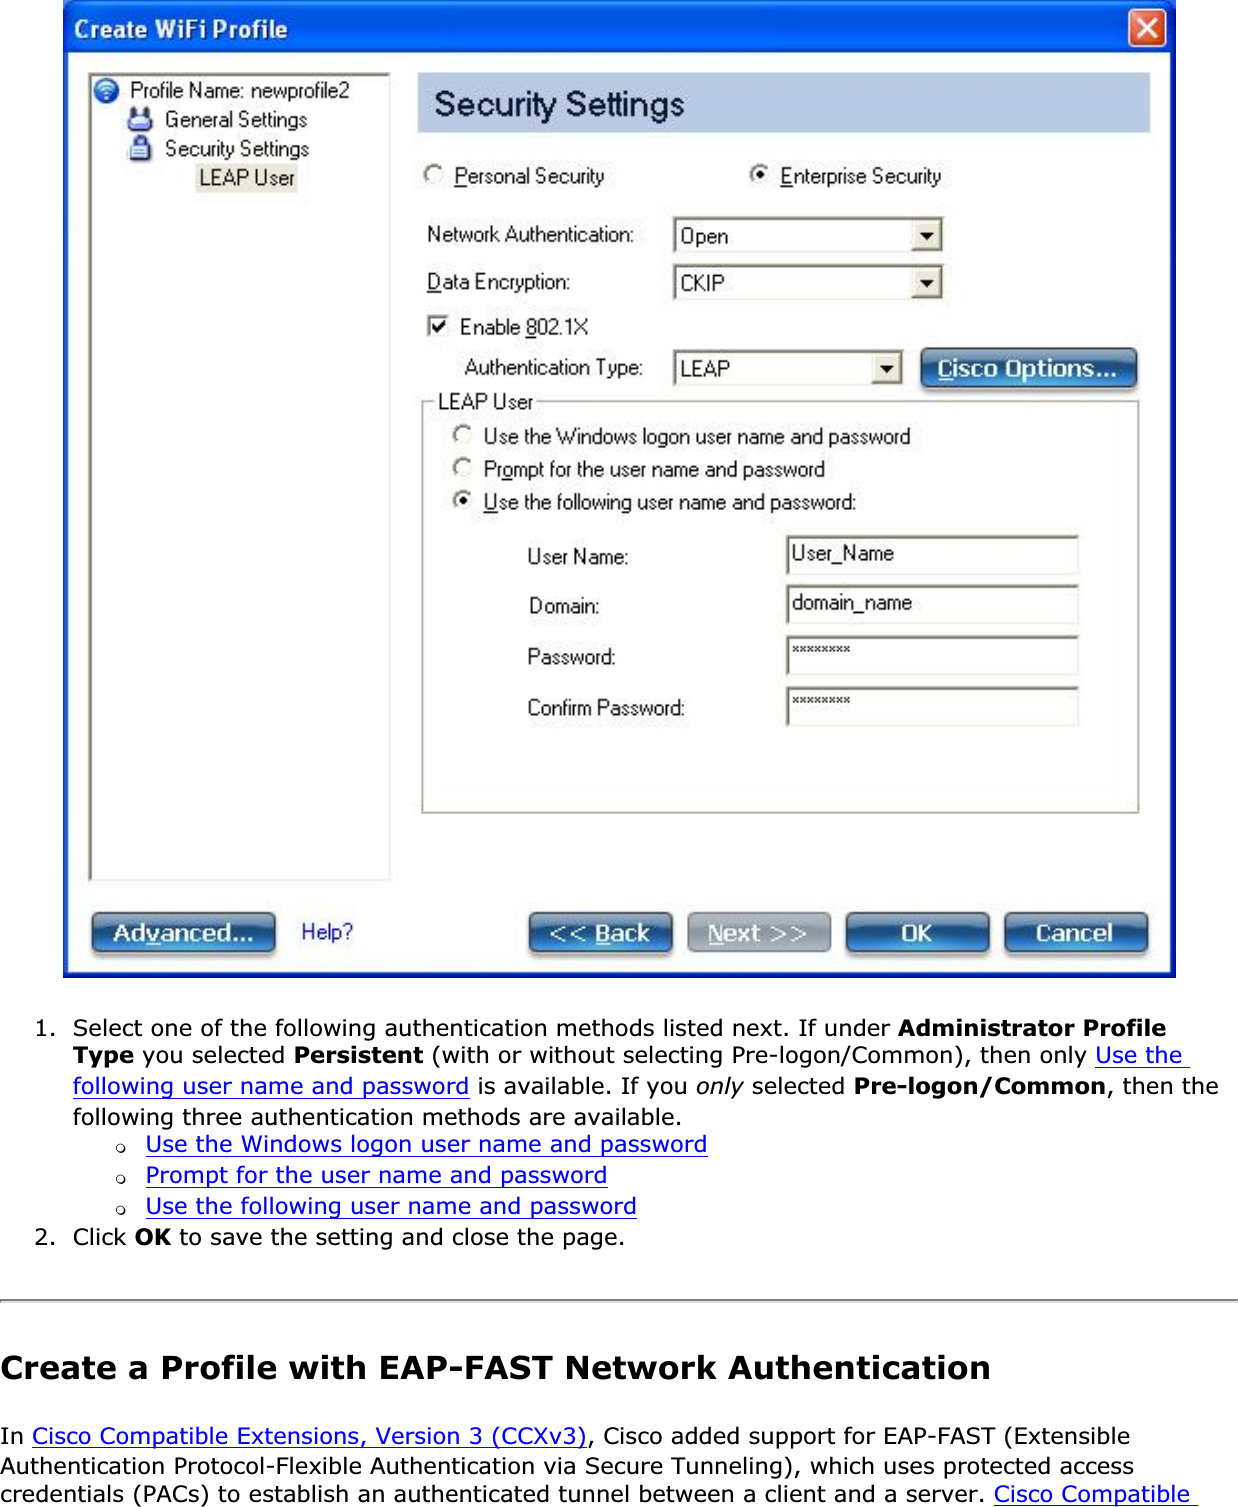
Getac Technology Corp. WLAN Module Contents
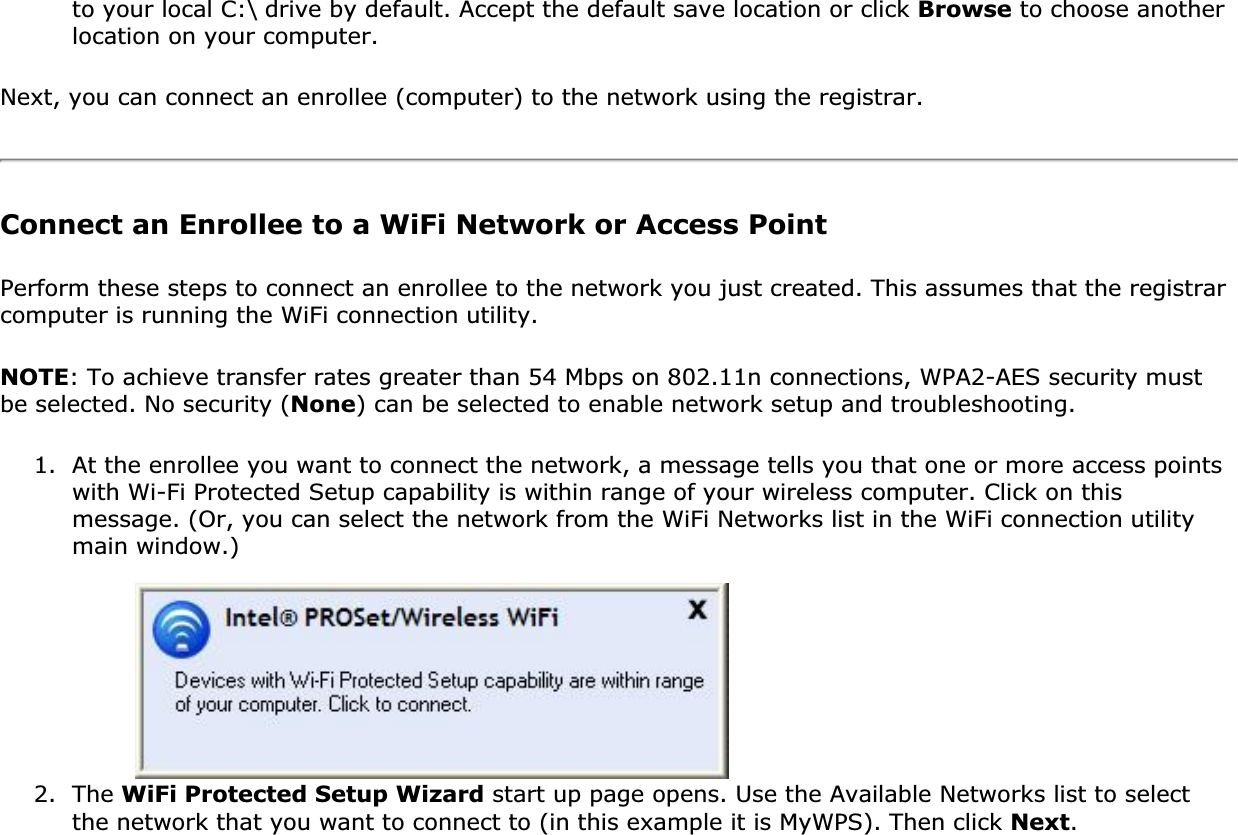
UserManual.wiki
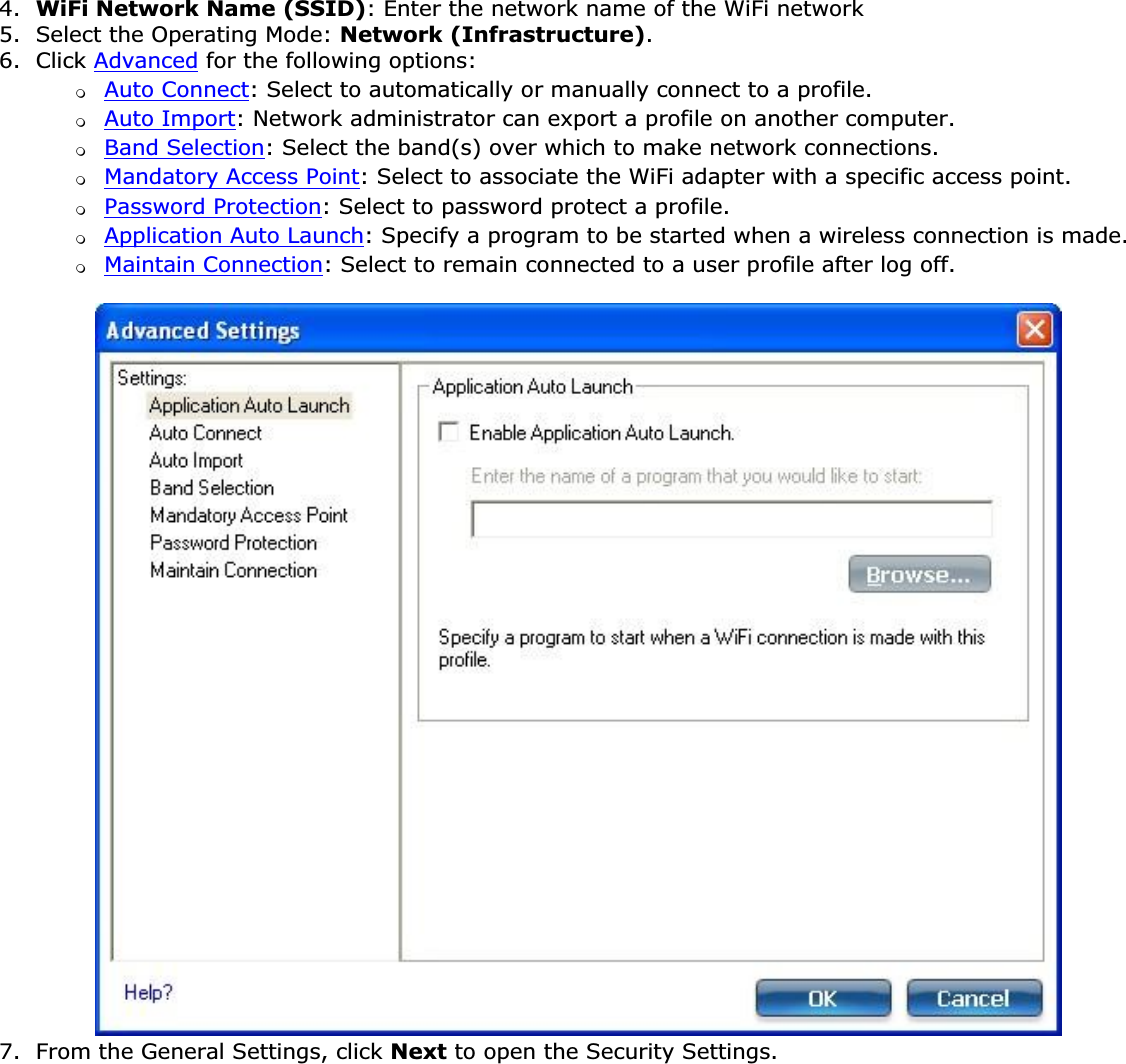
>
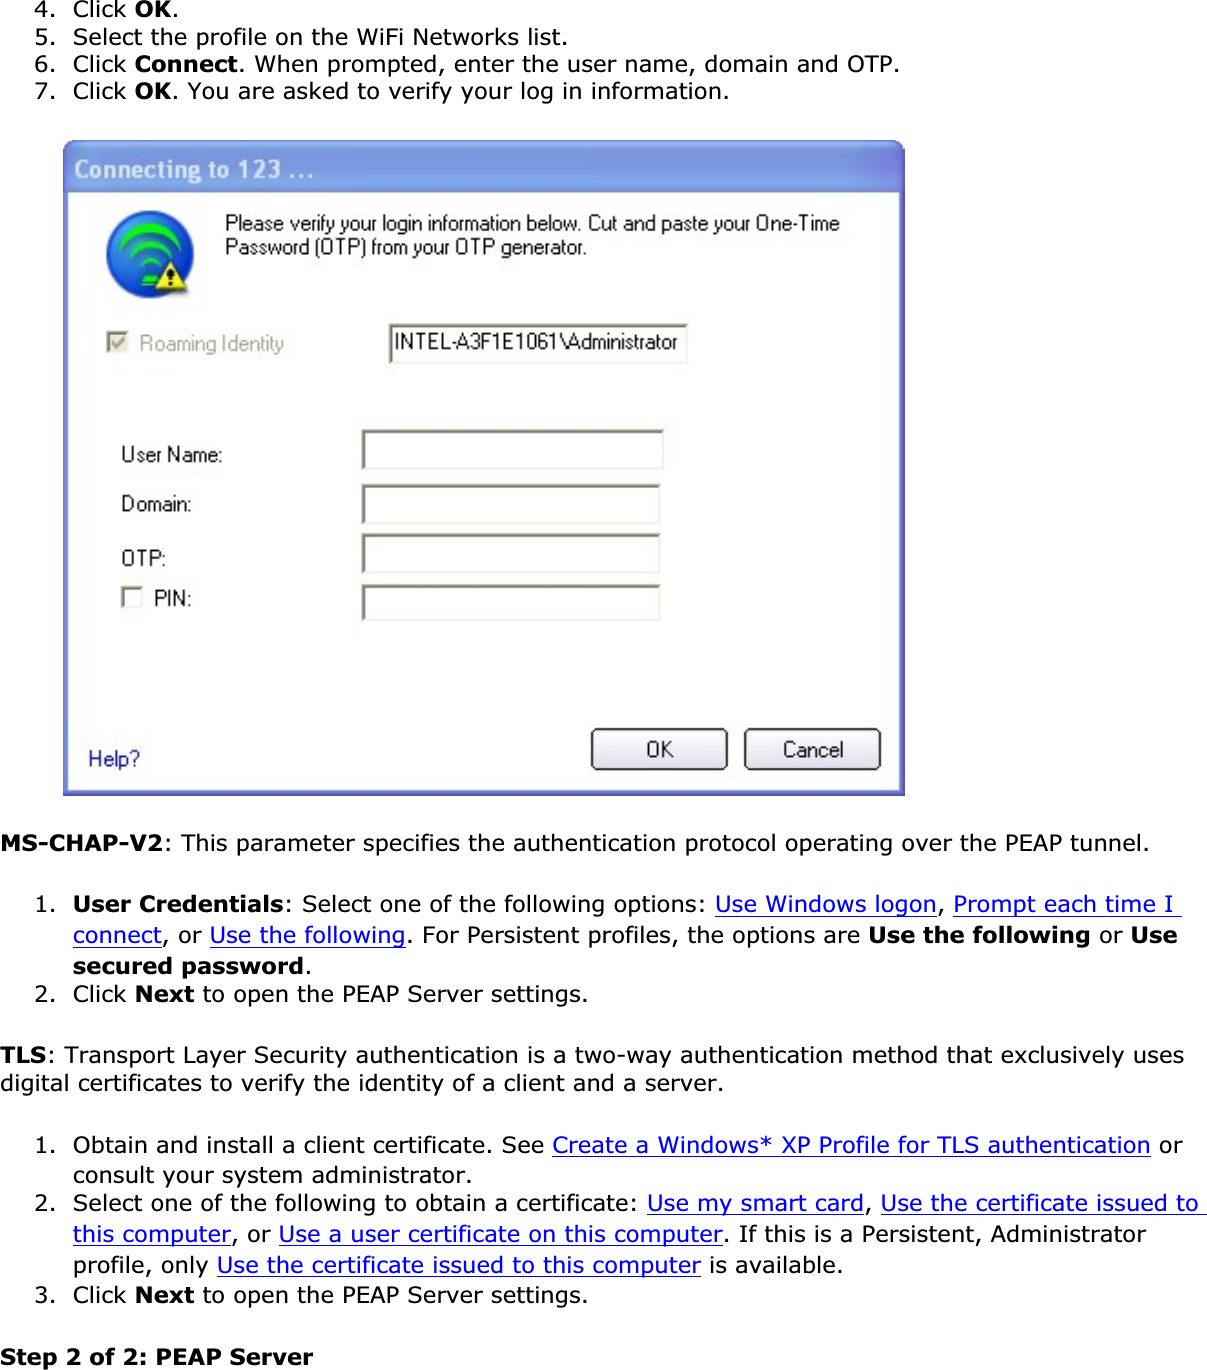
Getac Technology
>
040 User Manual
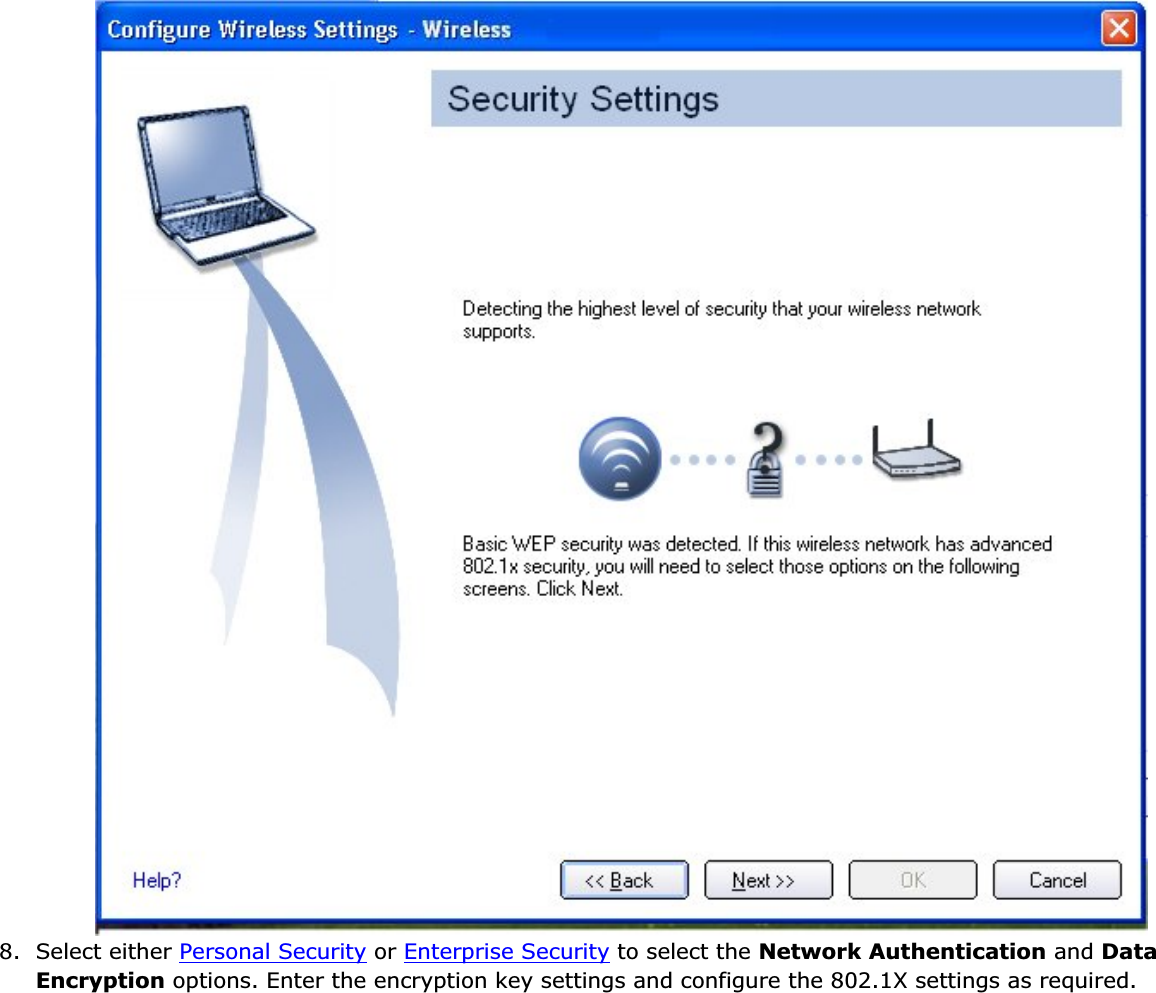
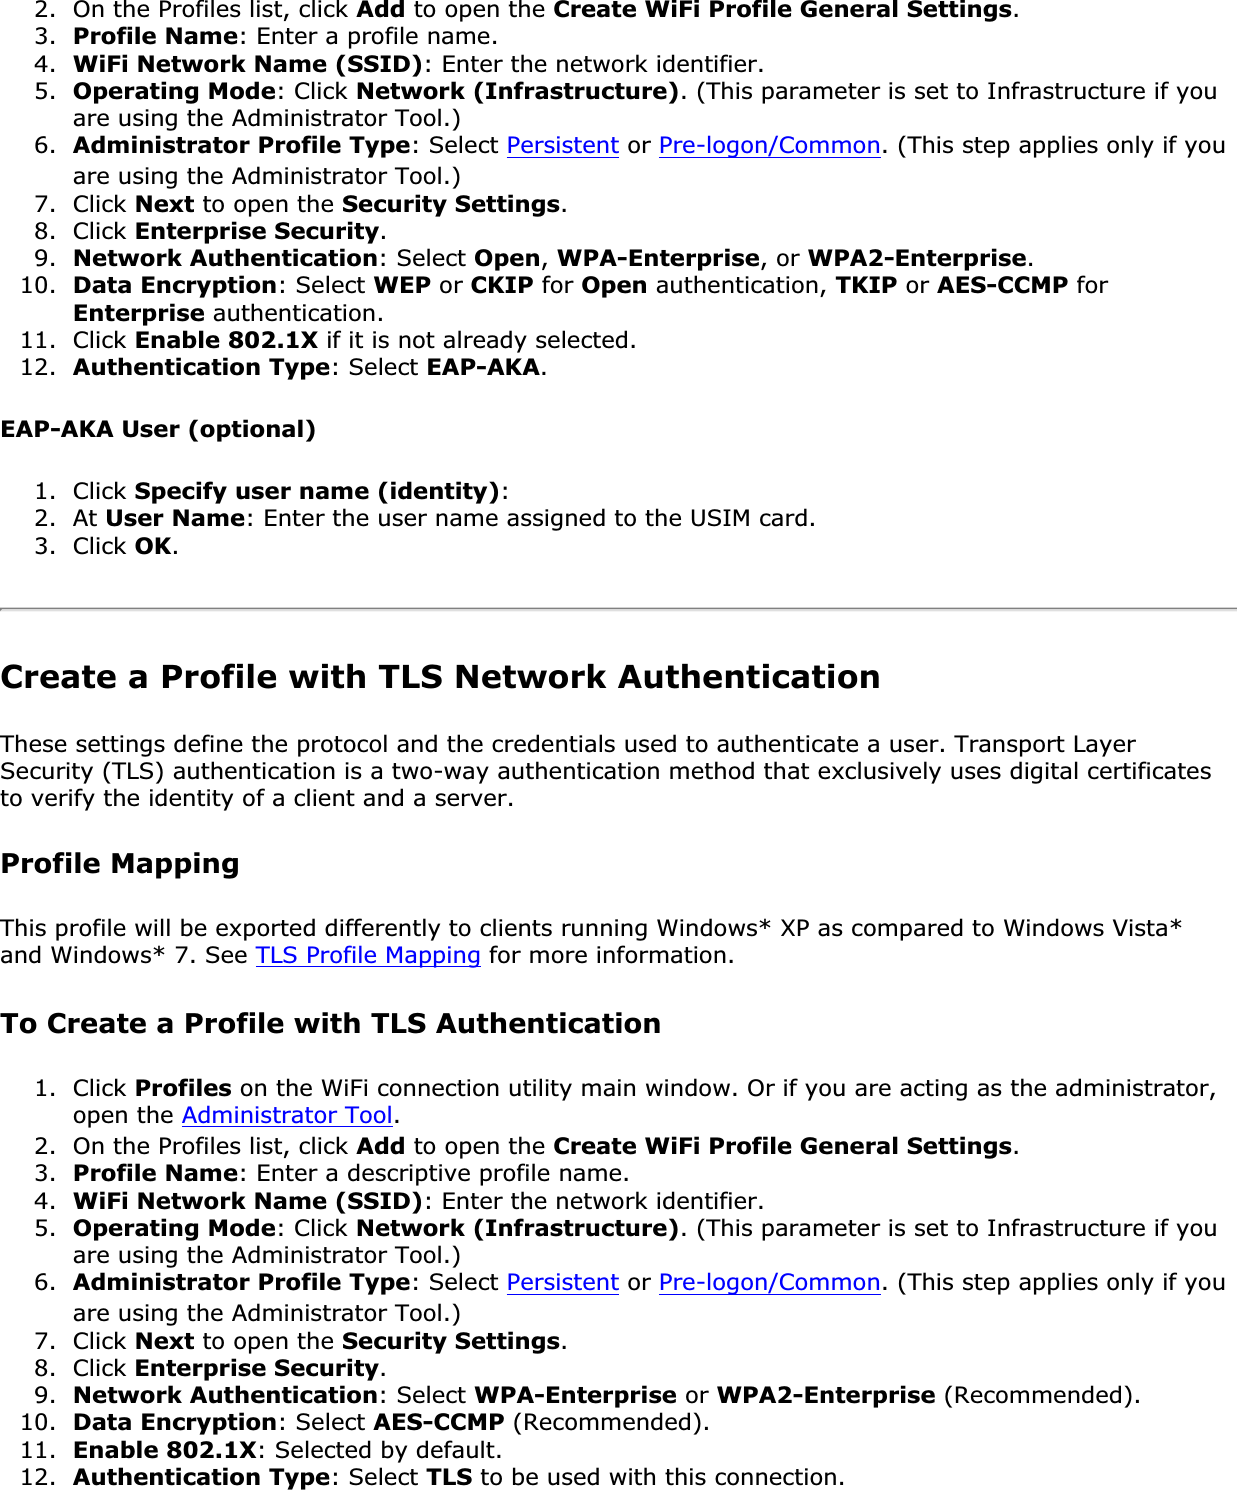
user manual
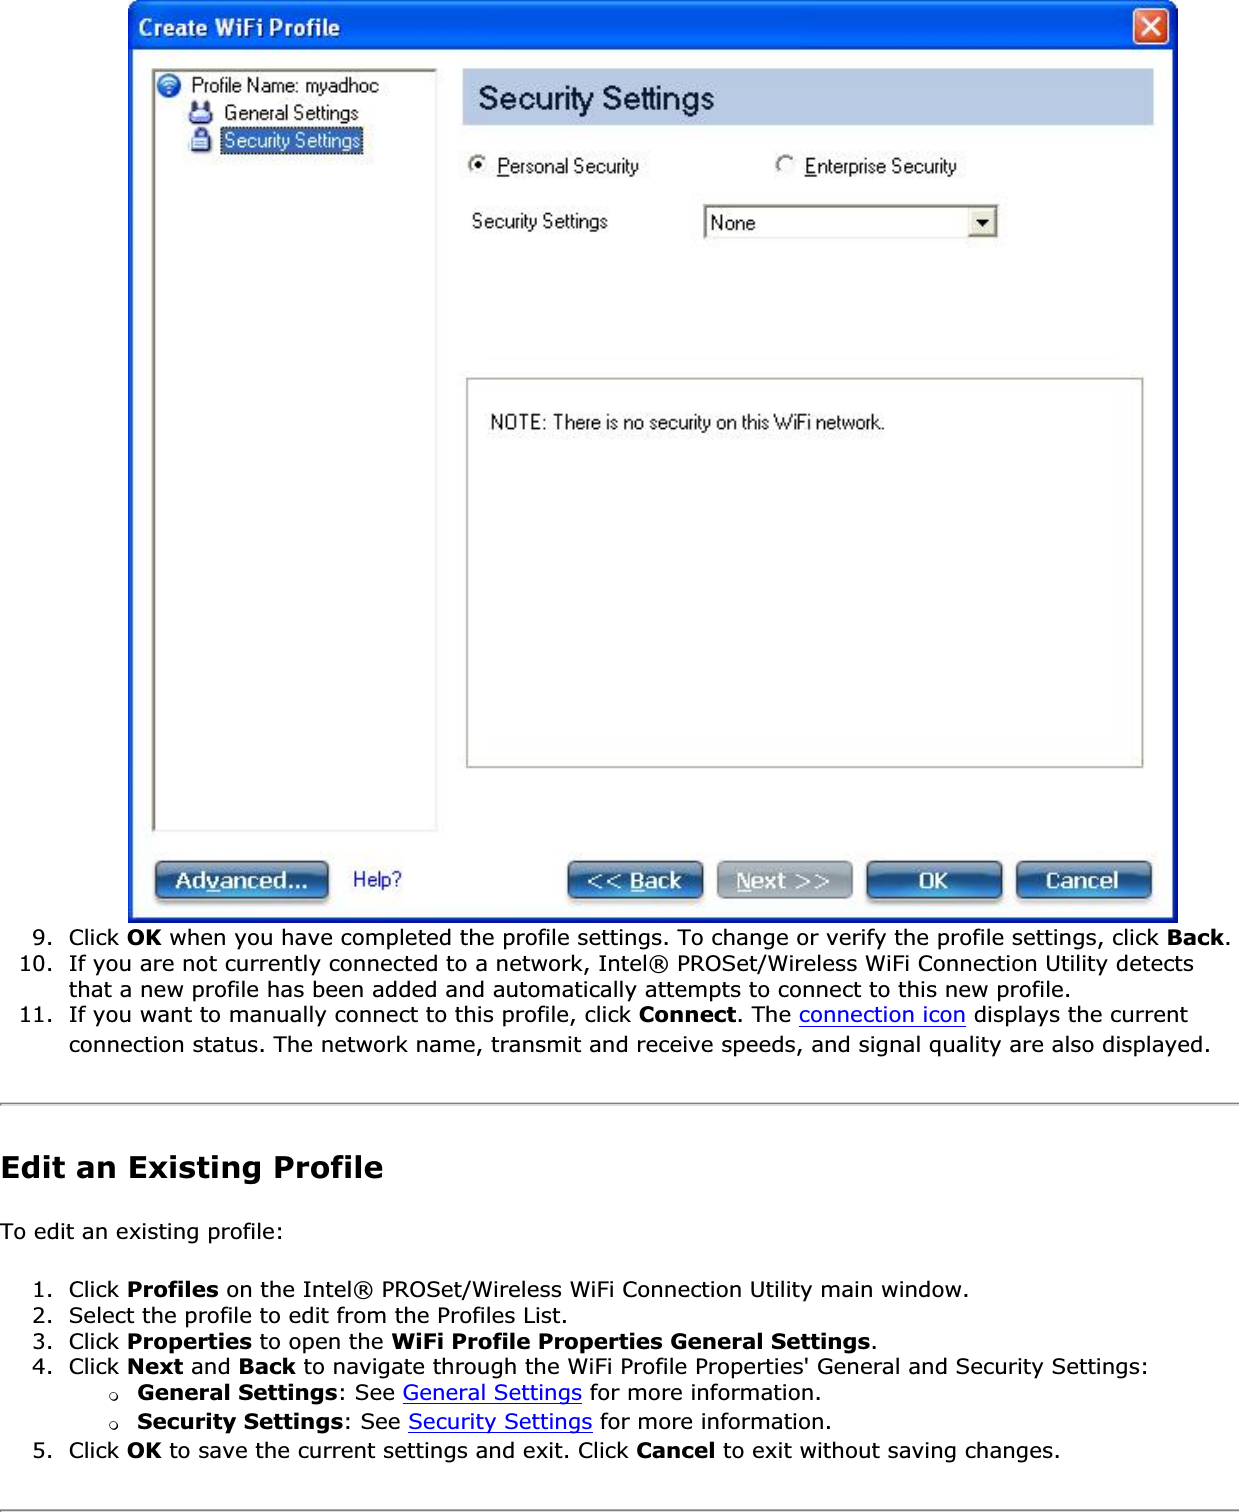
Navigation menu
Upload a User Manual
Namespaces
Wiki Guide
HTML
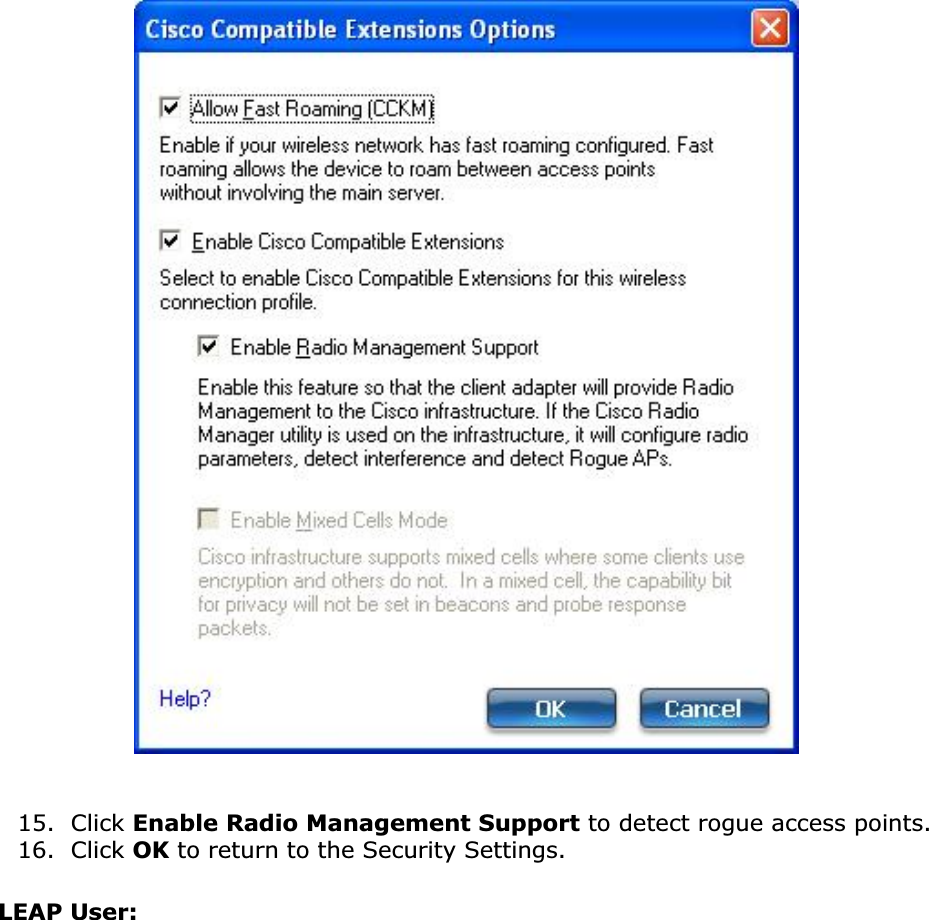
PDF
Info
Views
User Manual
Discussion / Help
Navigation
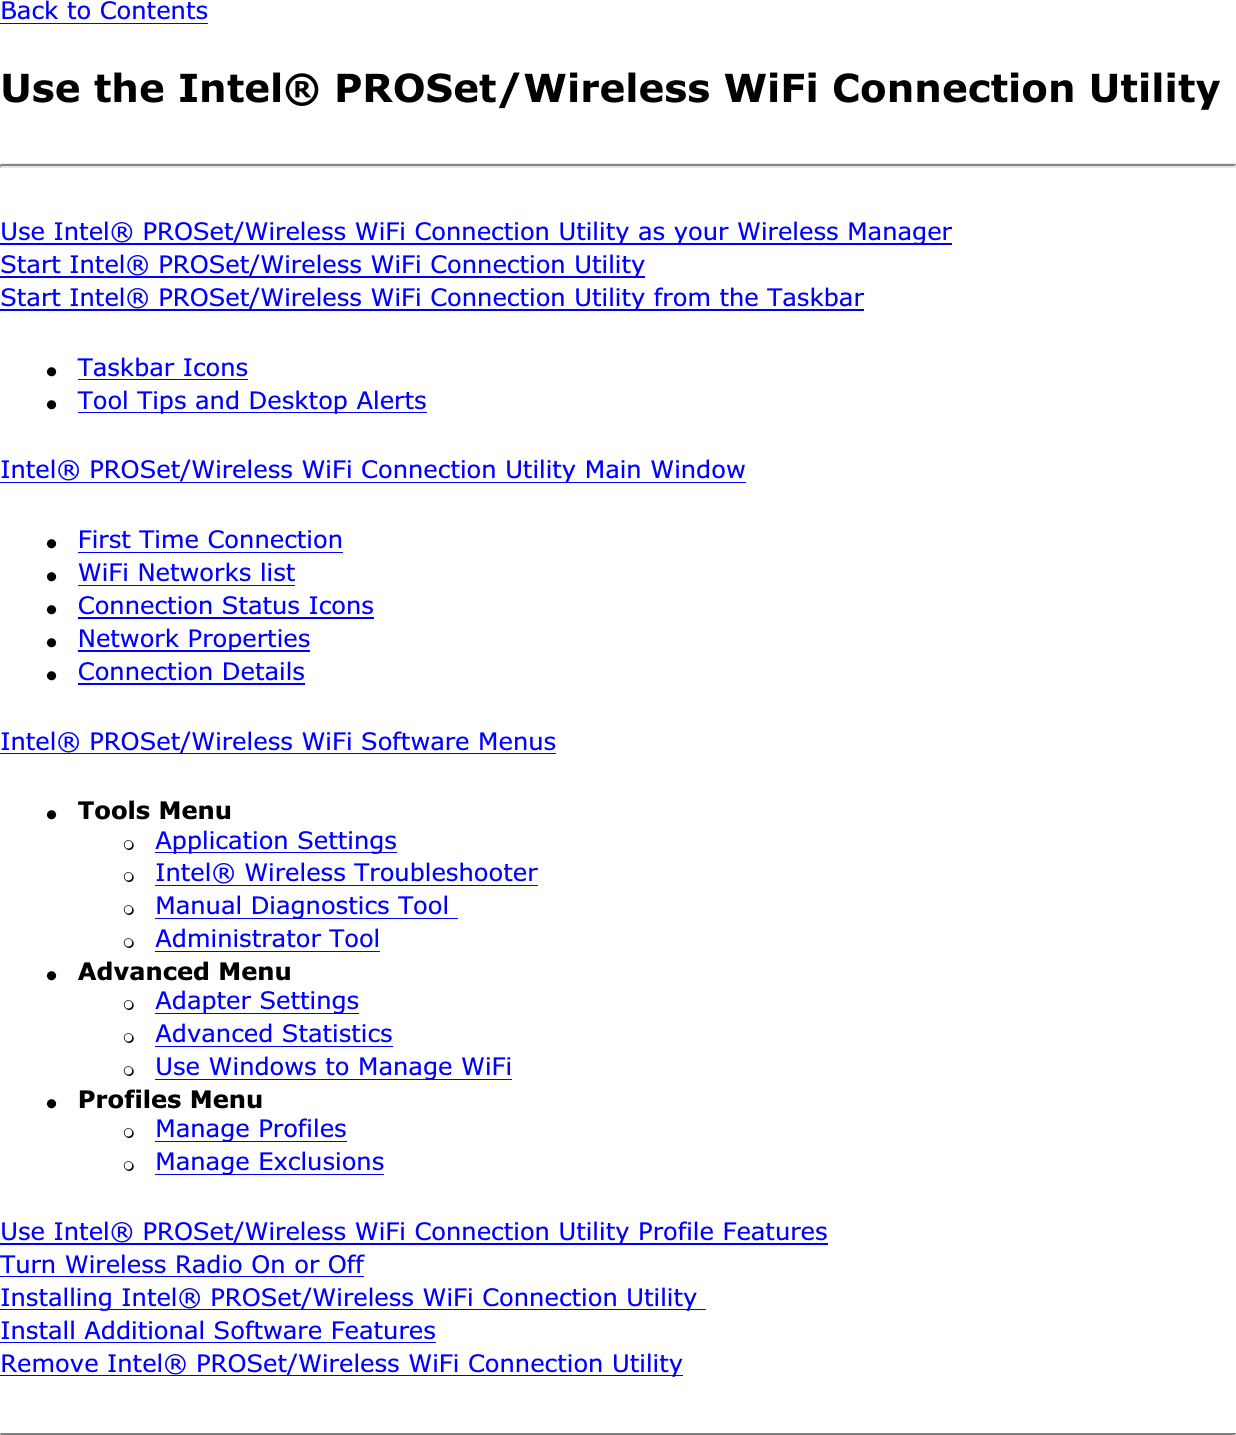
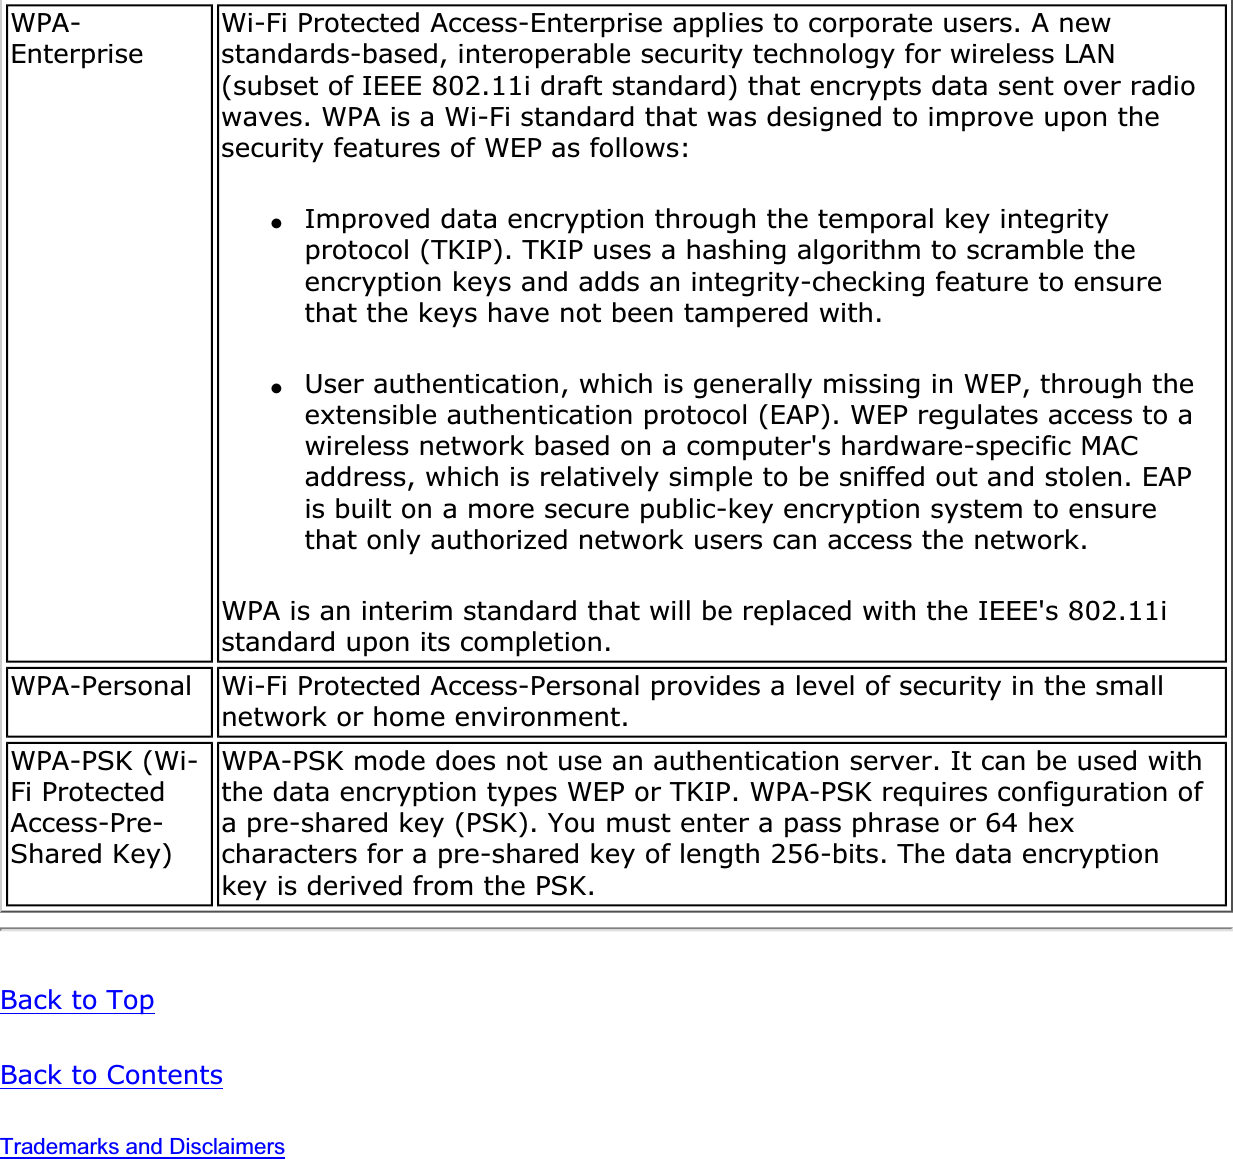
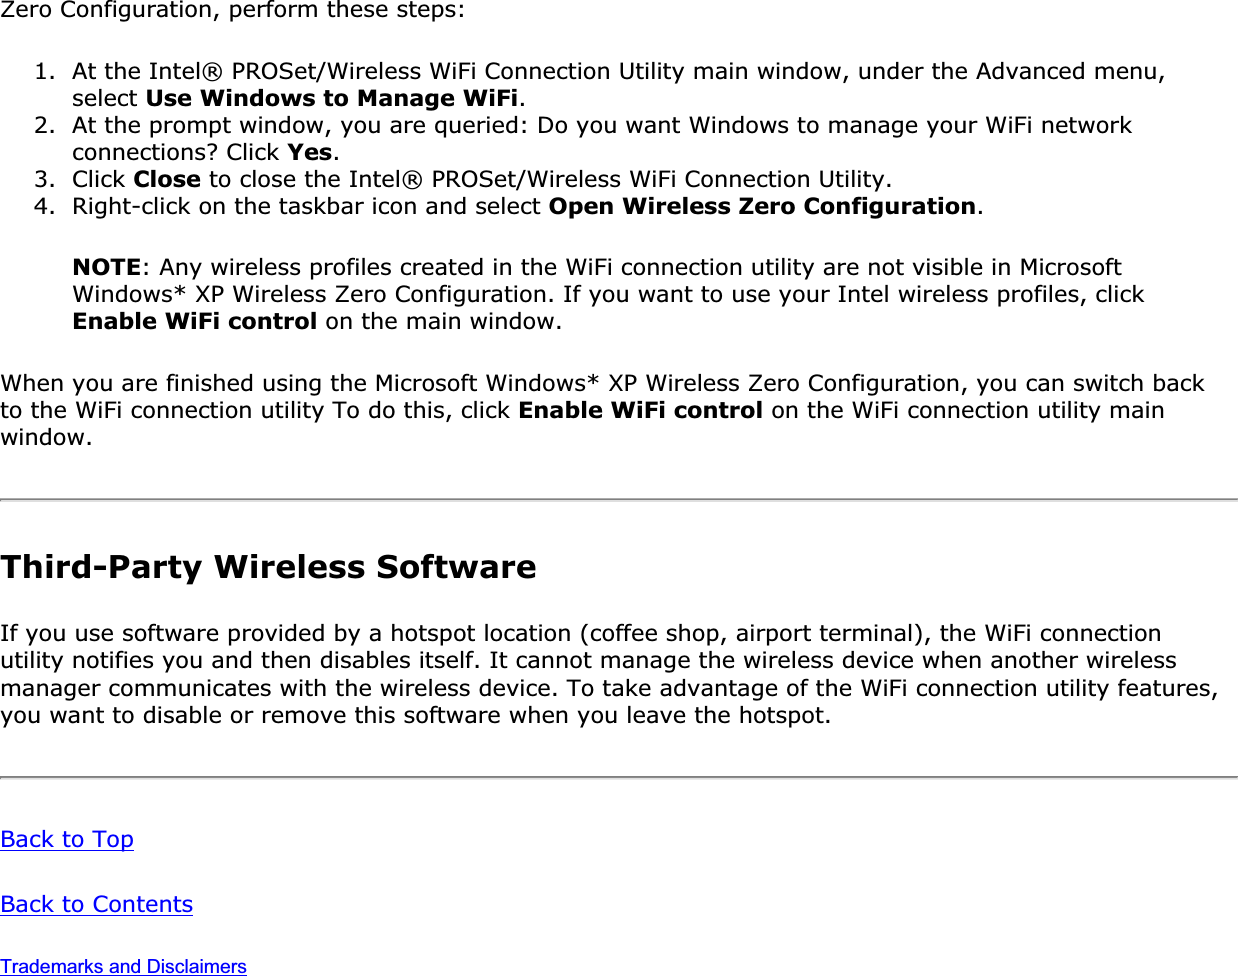
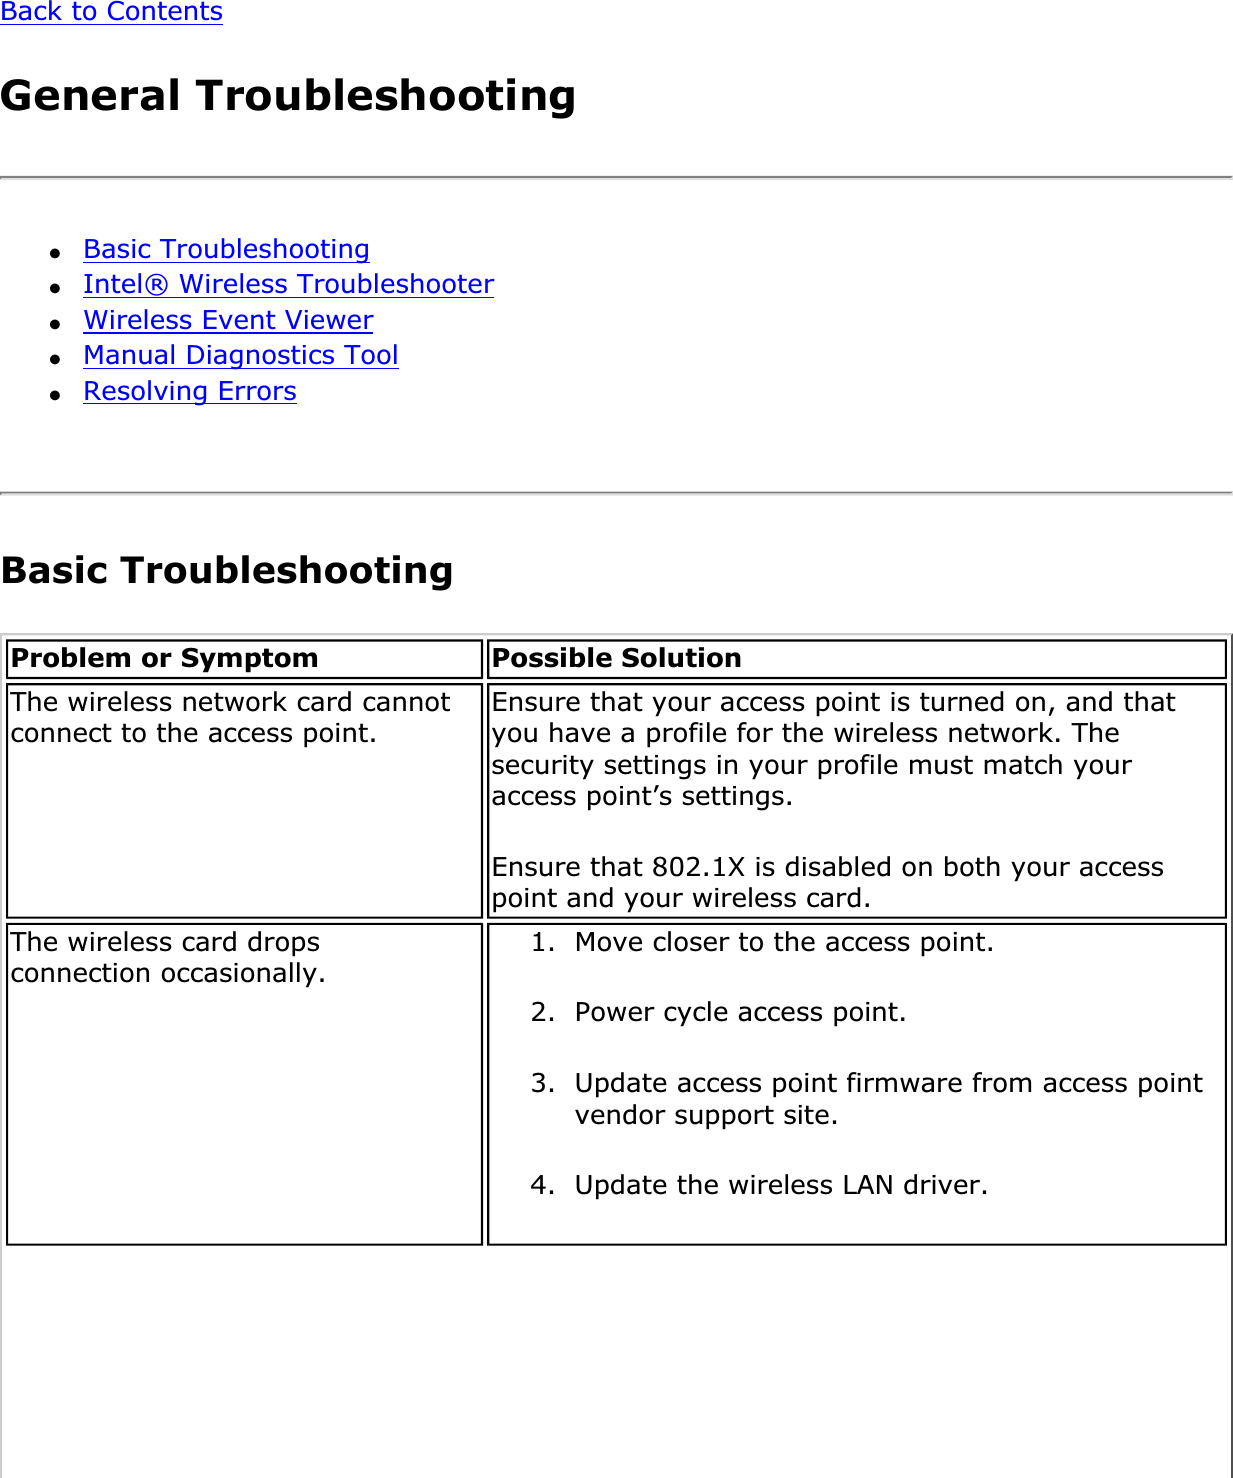
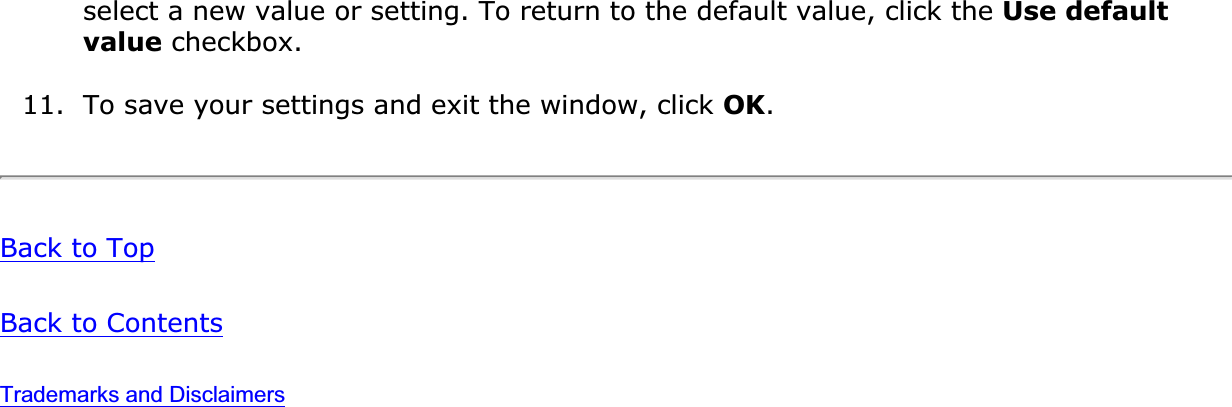
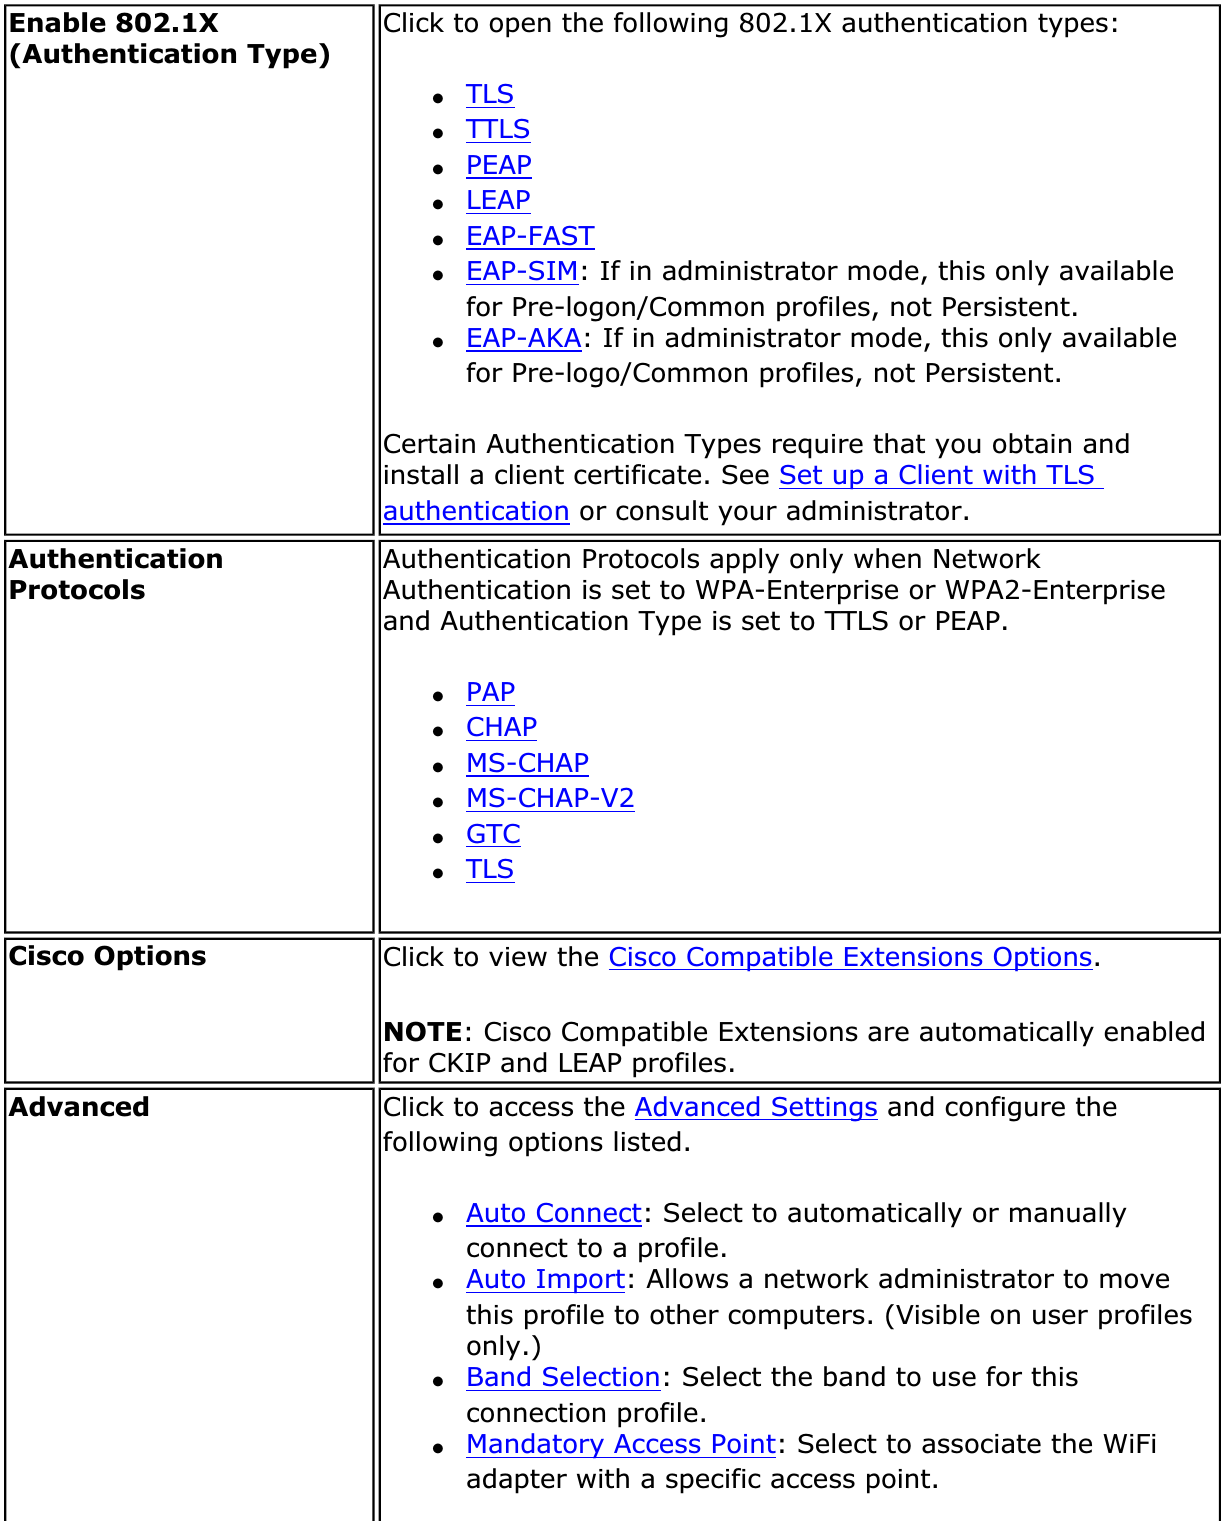
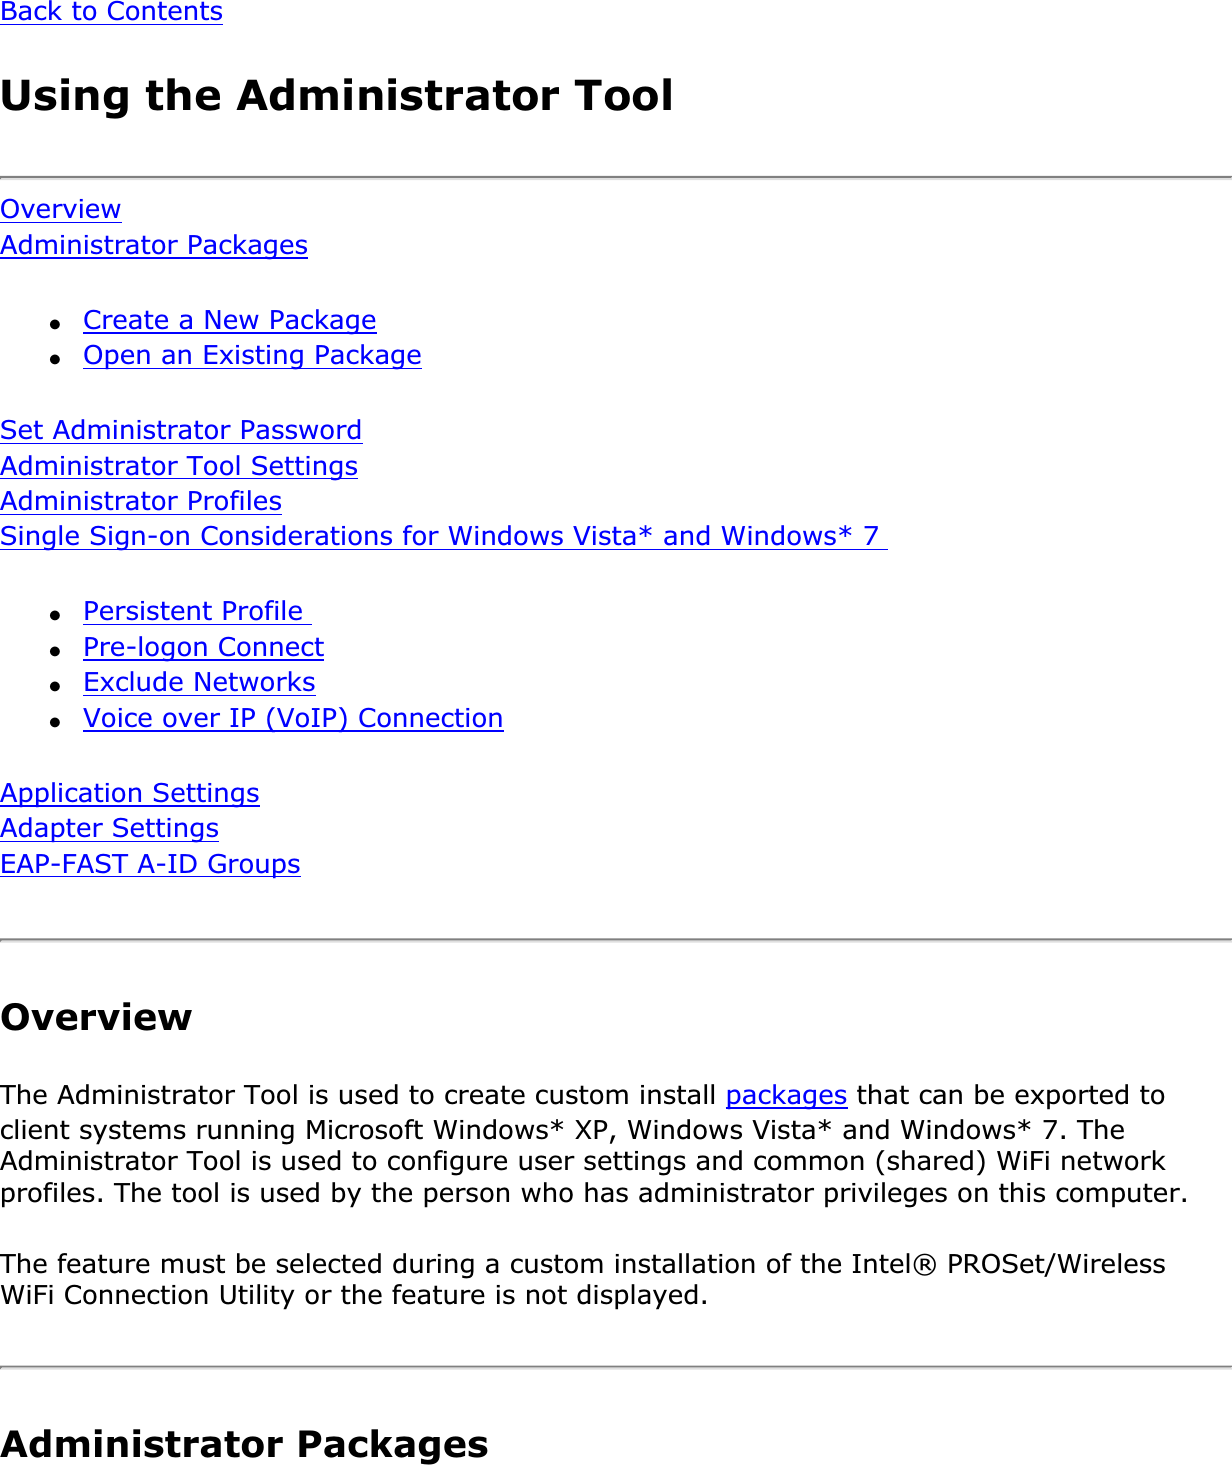
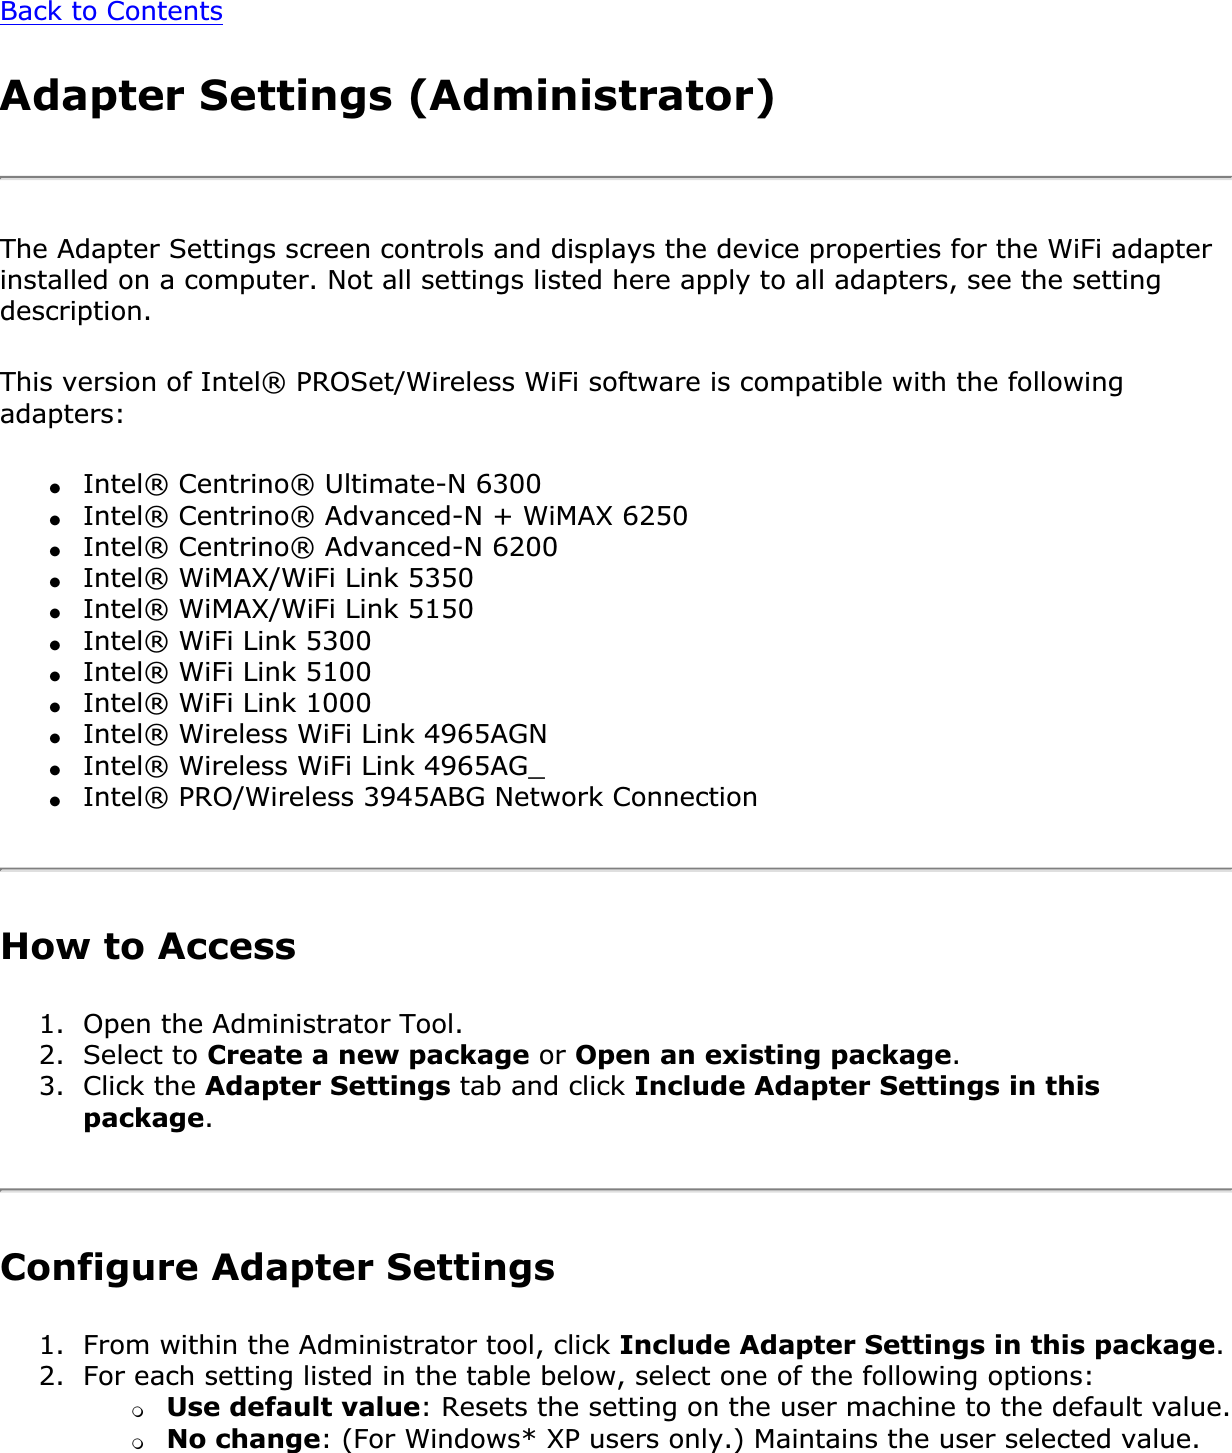
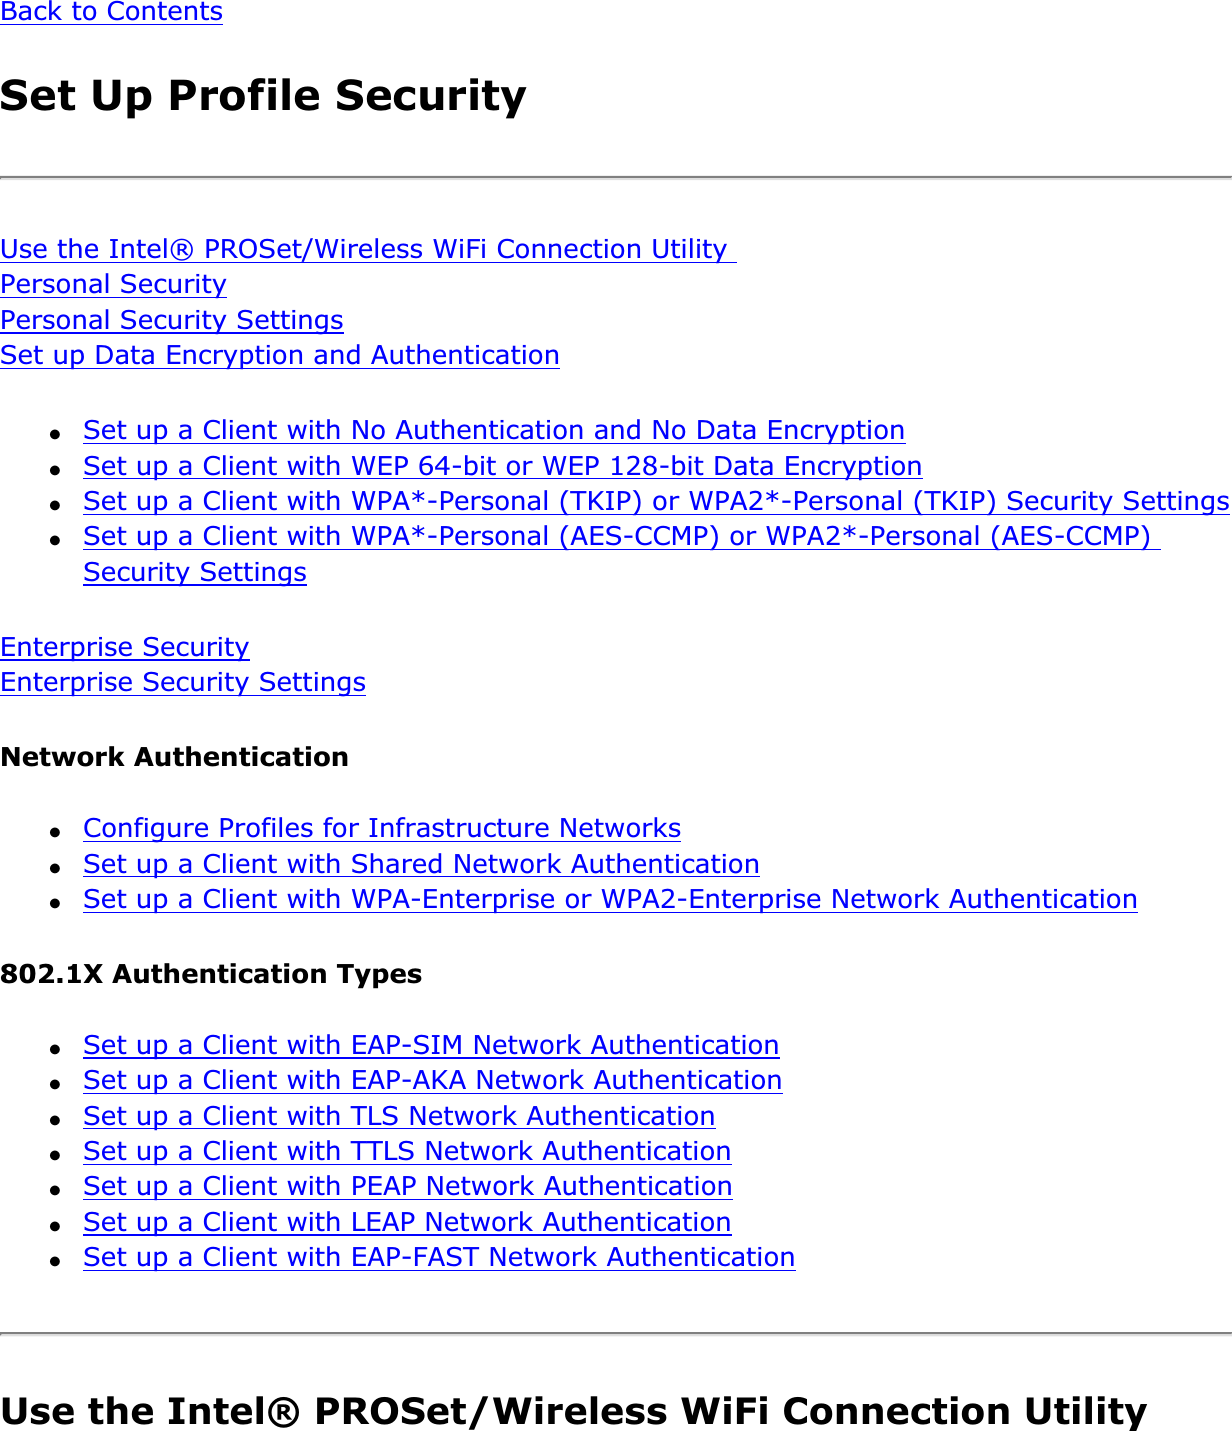
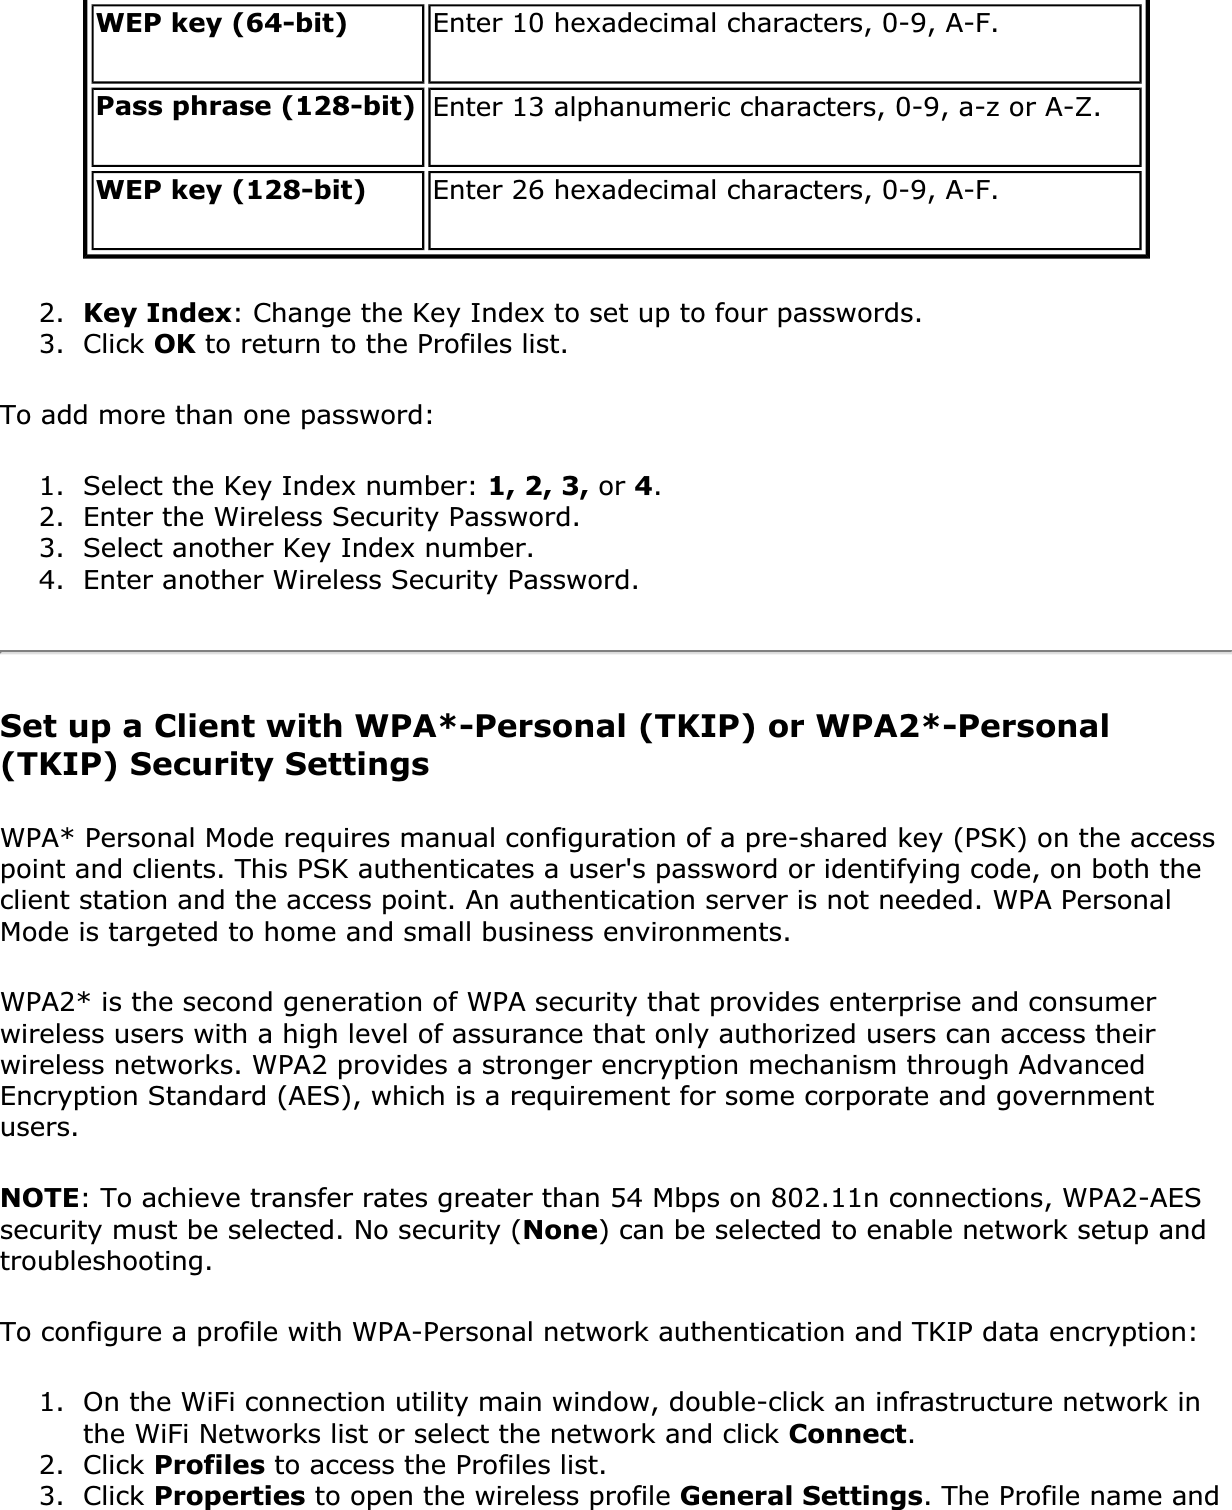
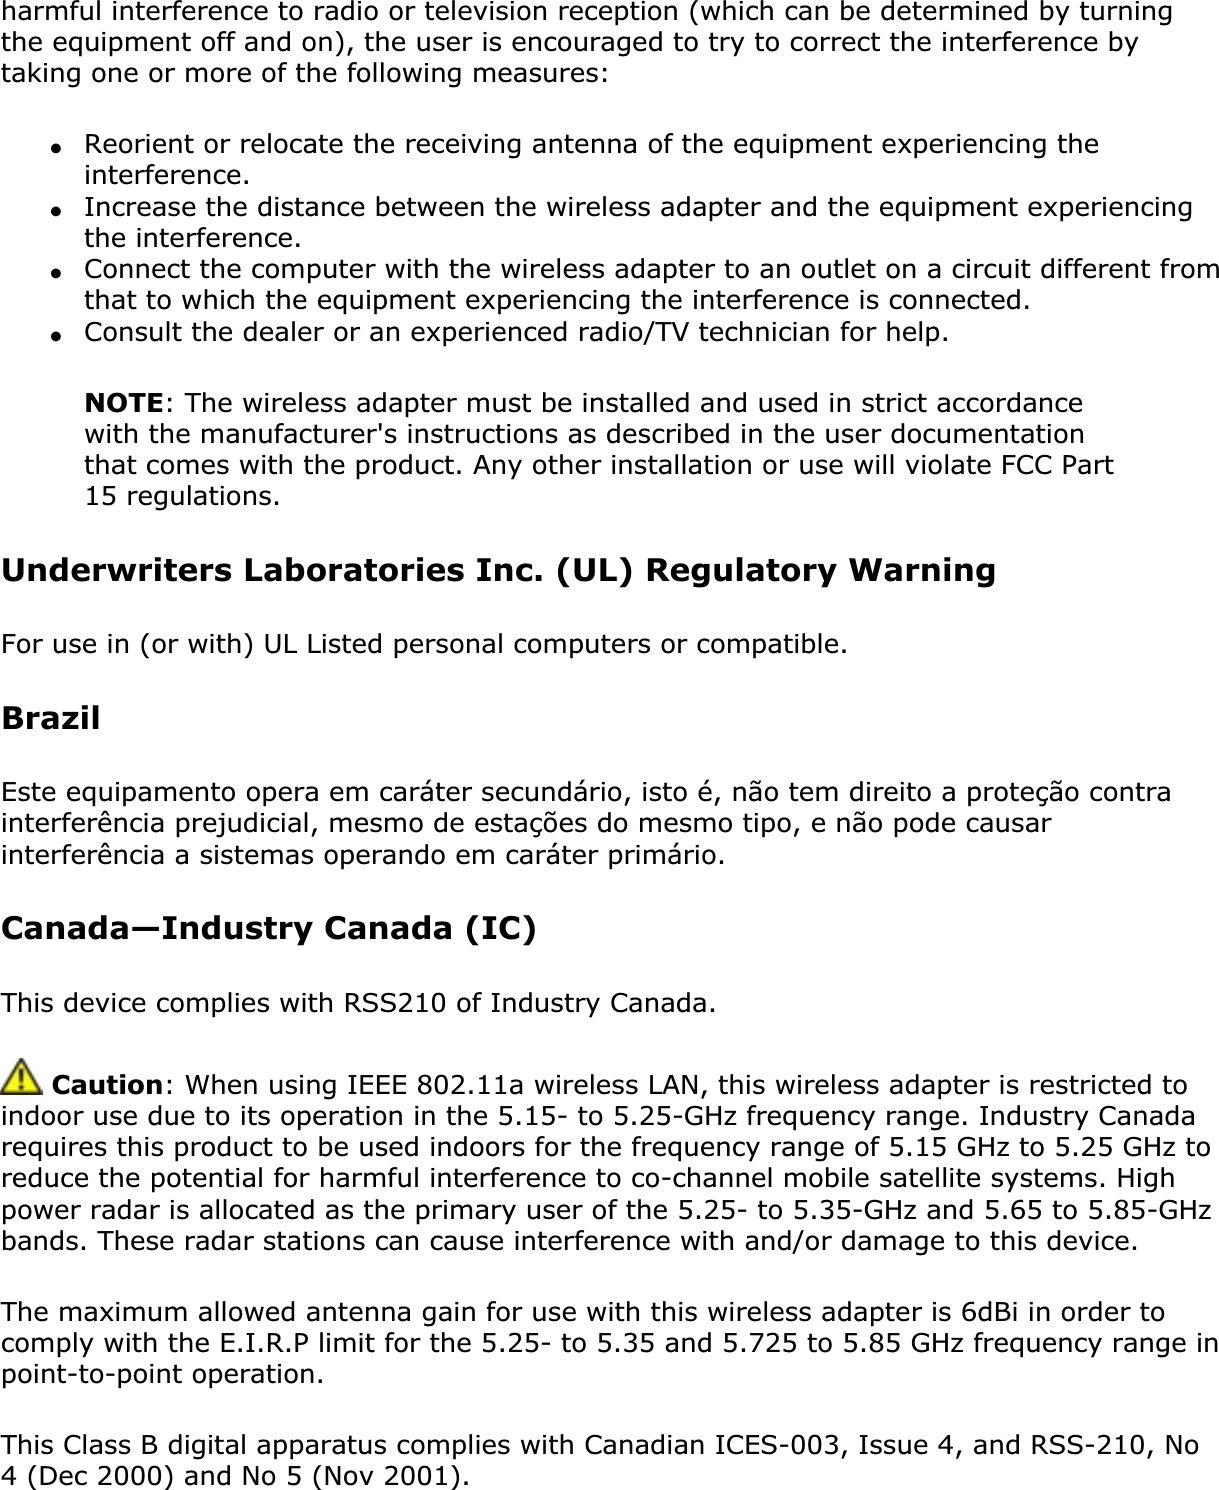
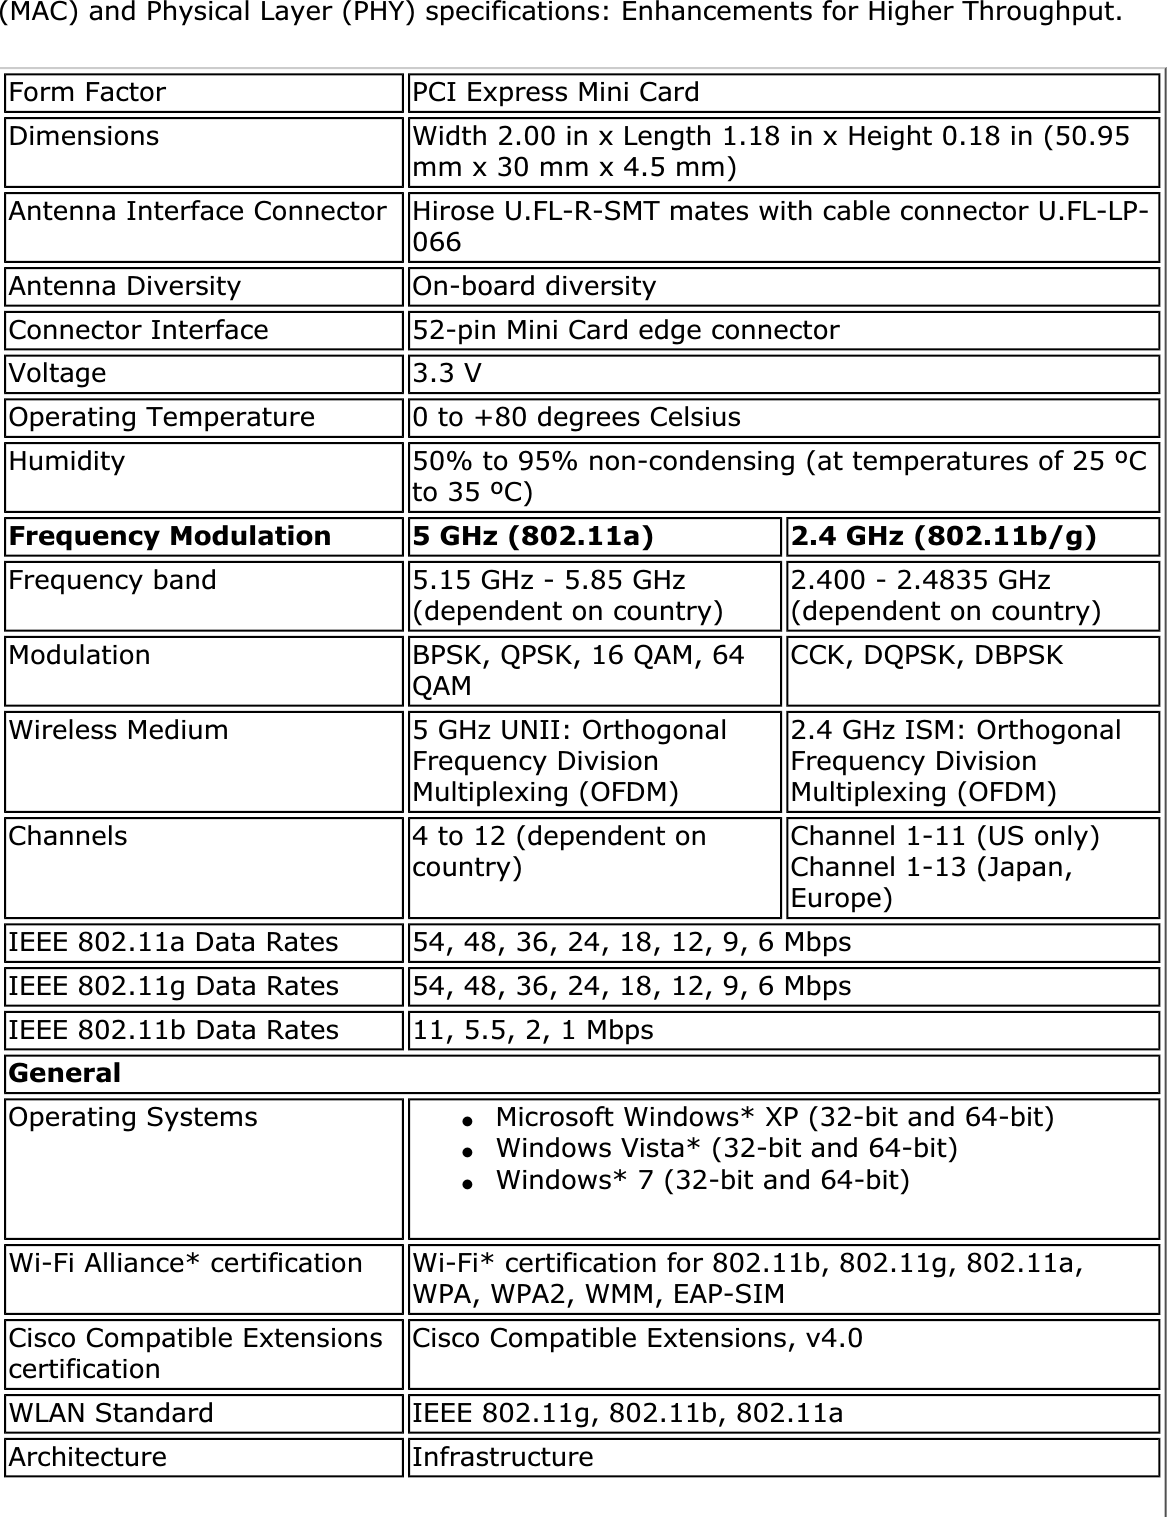
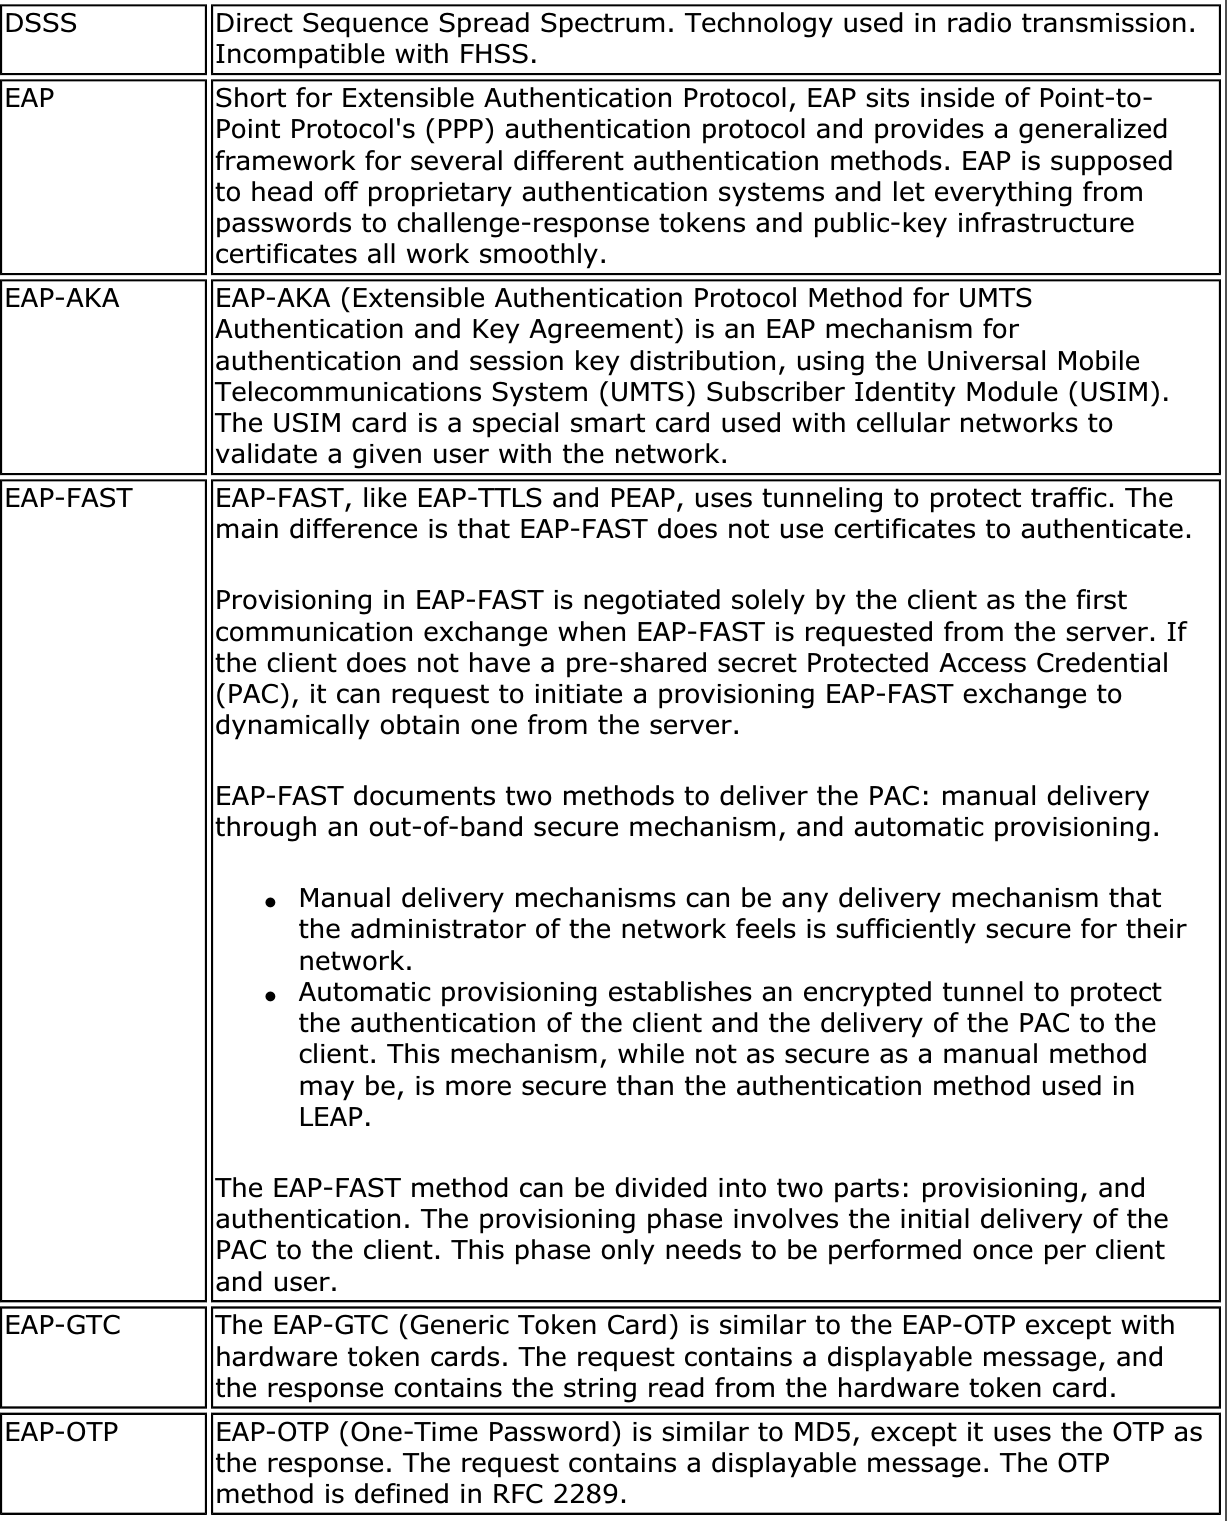
![Tools Application Settings: Use to set system wide connection preferences. See Application Settings for information.Intel® Wireless Troubleshooter: Use to resolve wireless network connection problems. See Intel® Wireless Troubleshooter for more information.Manual Diagnostics Tool: The Manual Diagnostics Tool lets you run a set of diagnostics tests that verify the functionality of your WiFi adapter. See ManualDiagnostics Tool for more information.Administrator Tool: Used by administrators or the person who has administrator privileges on this computer to configure shared profiles (Pre-logon/Common, Persistent, and Voice over IP [VoIP]). The Administrator Tool can also be used by an Information Technology department to configure user settings within the WiFi connection utility and to create custom install packages to export to other systems. See Administrator Tool for more information.NOTE: The Administrator Tool is available only if it installed during a custom installation of the Intel® PROSet/Wireless WiFi Software. See Install Additional Software Features for more information on custom installation.Advanced Adapter Settings: Displays Adapter Settings that are equivalent to the settings in the Microsoft Windows Advanced settings. See Adapter Settings for information.To access Adapter Settings from Microsoft Windows:●Double-click Network Connections from the Windows Control Panel.●Right-click the Wireless Network Connection.●Select Properties from the menu.●Click Configure to display the Advanced settings for the adapter.Advanced Statistics: Select to view detailed information about the WiFi adapter and connection. See Advanced Statistics for more information.Use Windows to Manage WiFi: Select to enable Microsoft Windows* XP as the wireless manager. See Microsoft Windows* XP Wireless Zero Configuration for more information.Profiles Manage Profiles: Select to create or edit profiles.Manage Exclusions: Select to exclude networks from automatic connection. See Manage Exclusions for more information.](https://usermanual.wiki/Getac-Technology/040/User-Guide-1346536-Page-8.png)


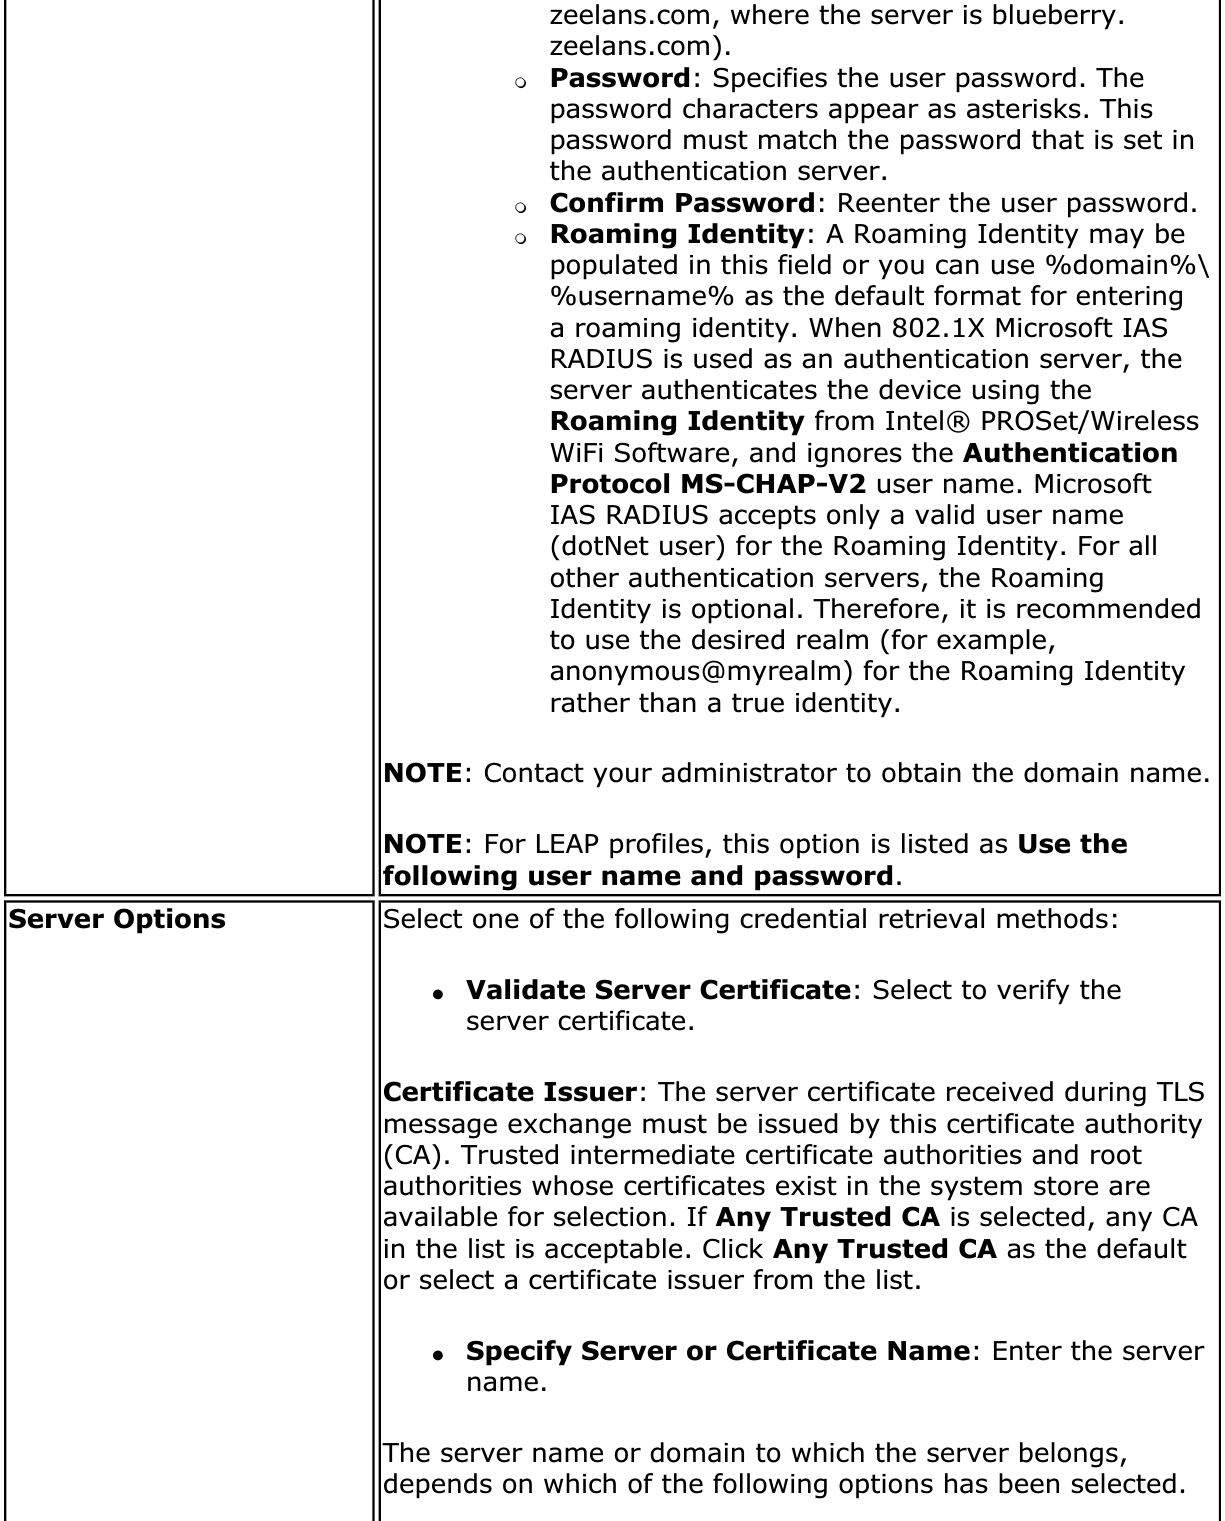
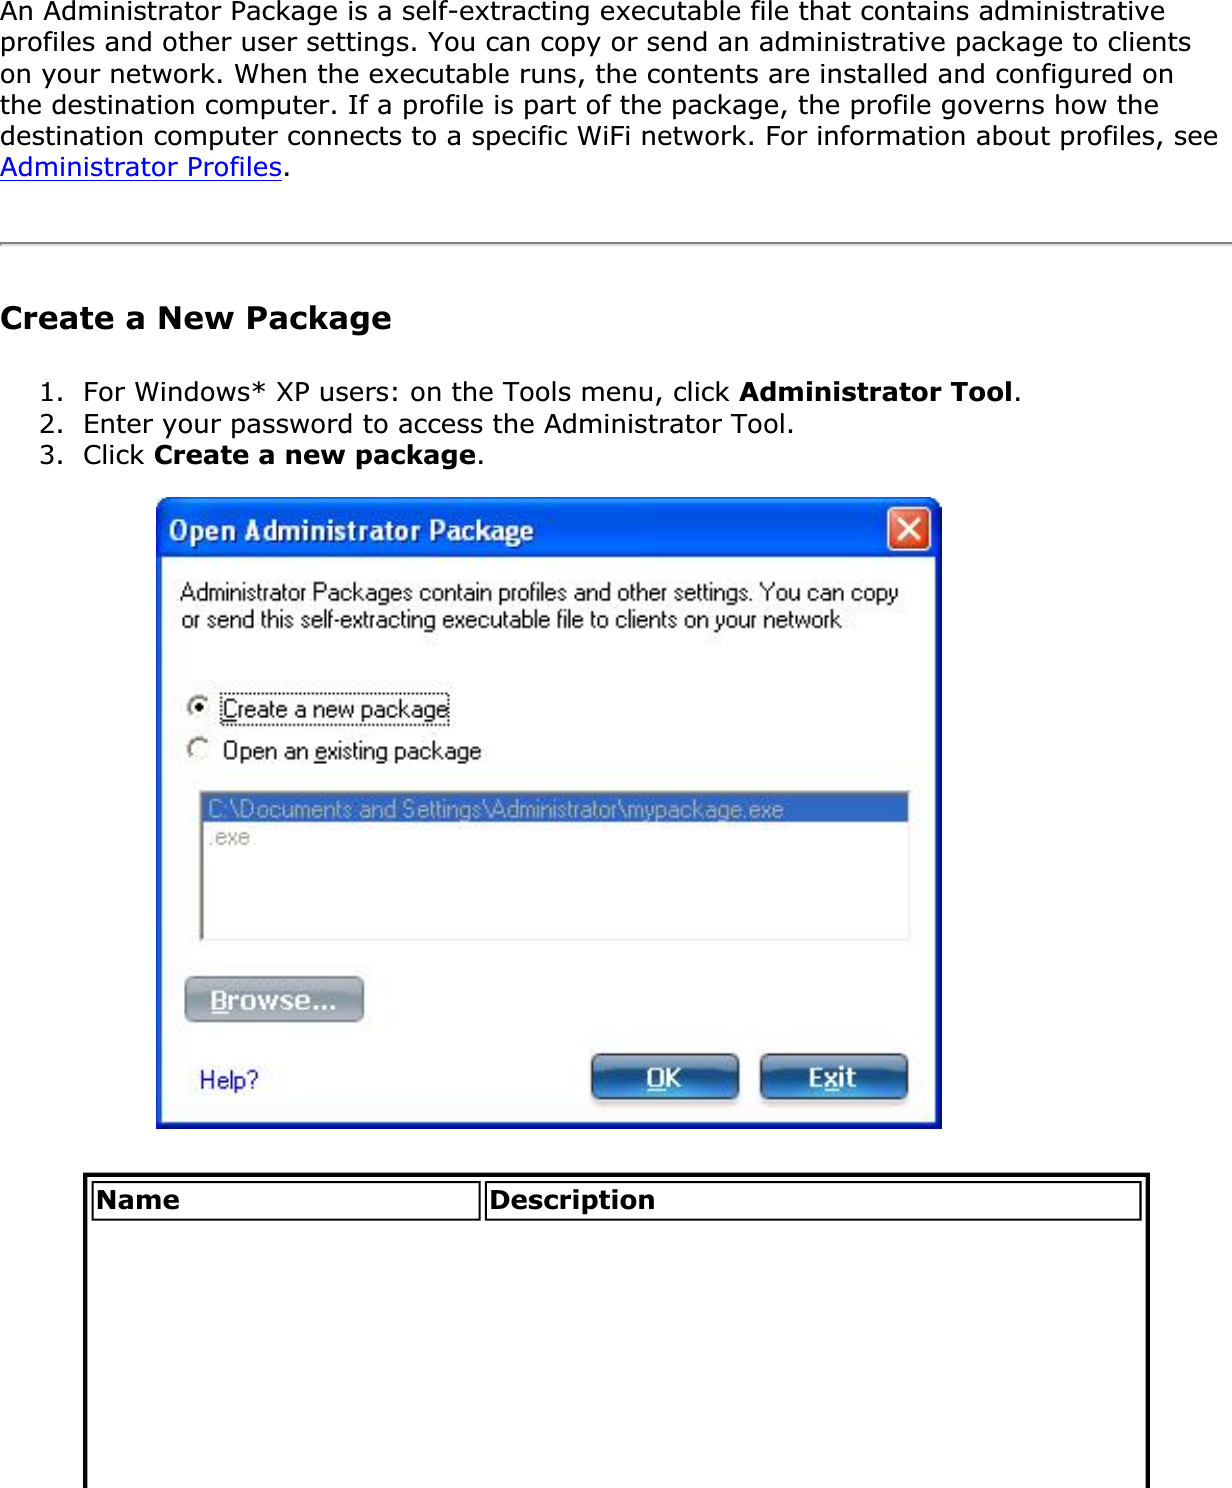
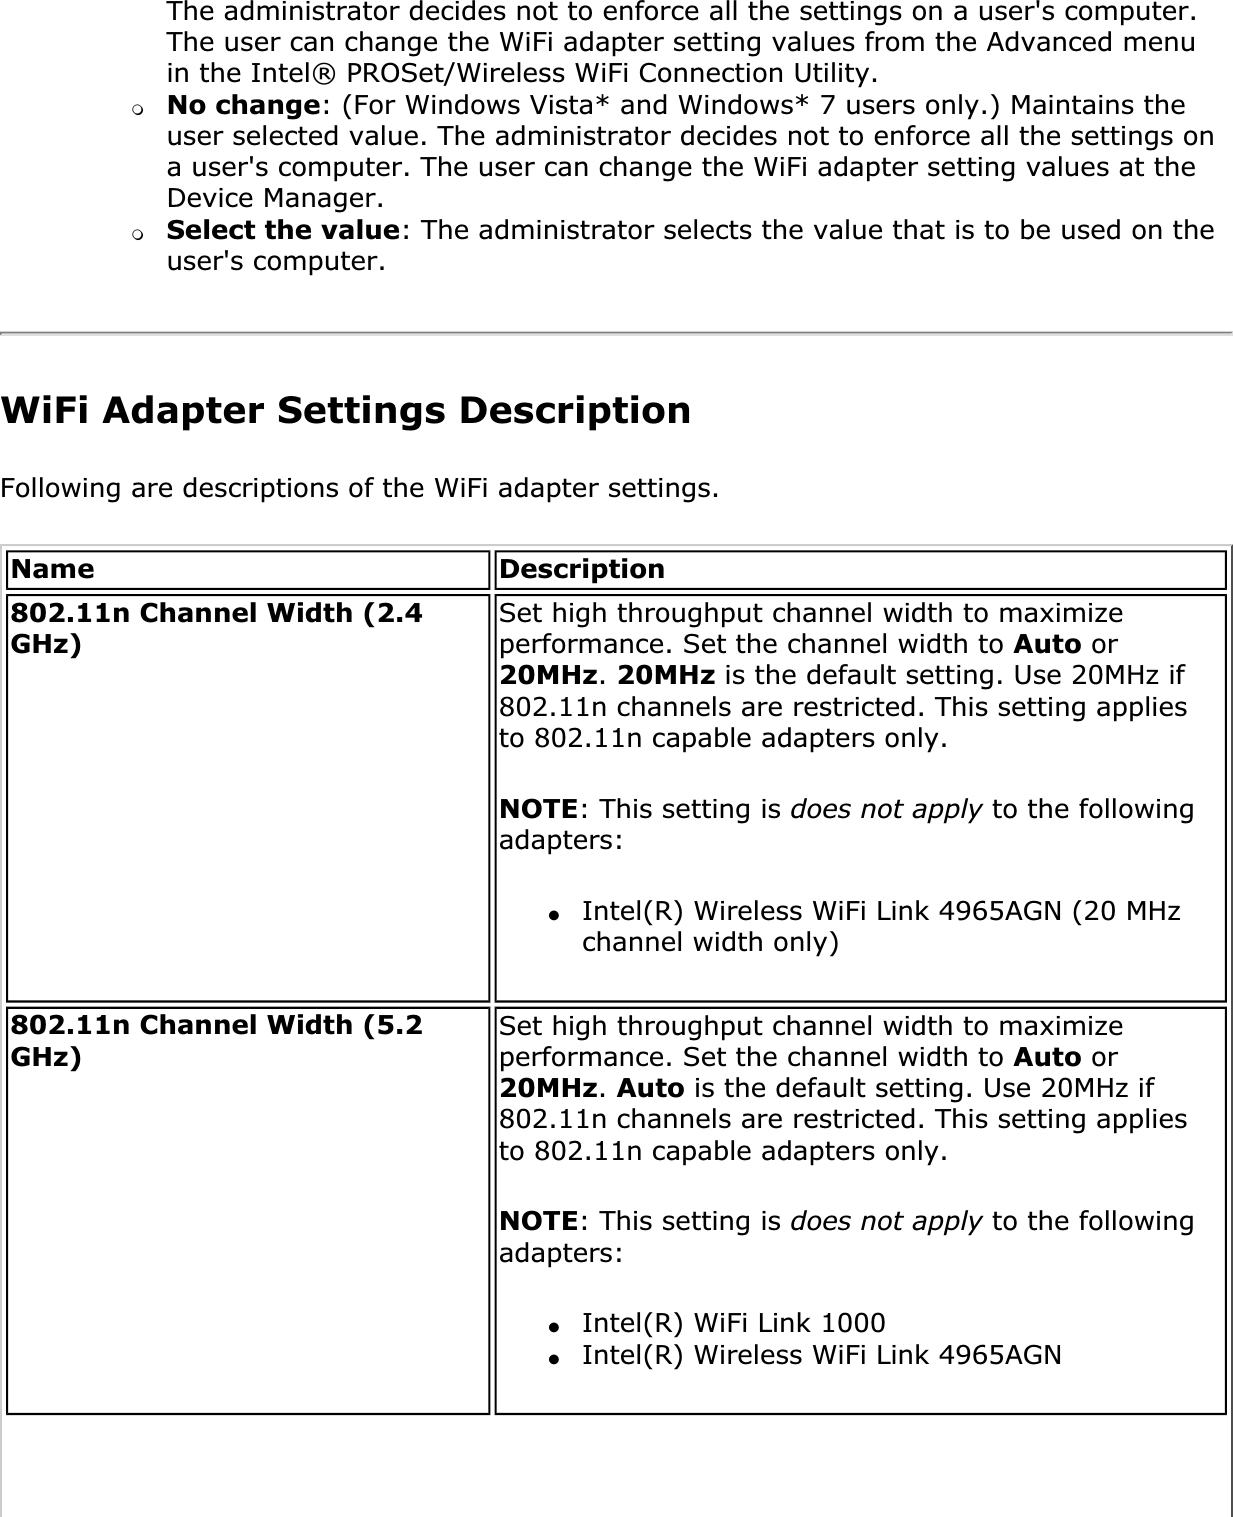
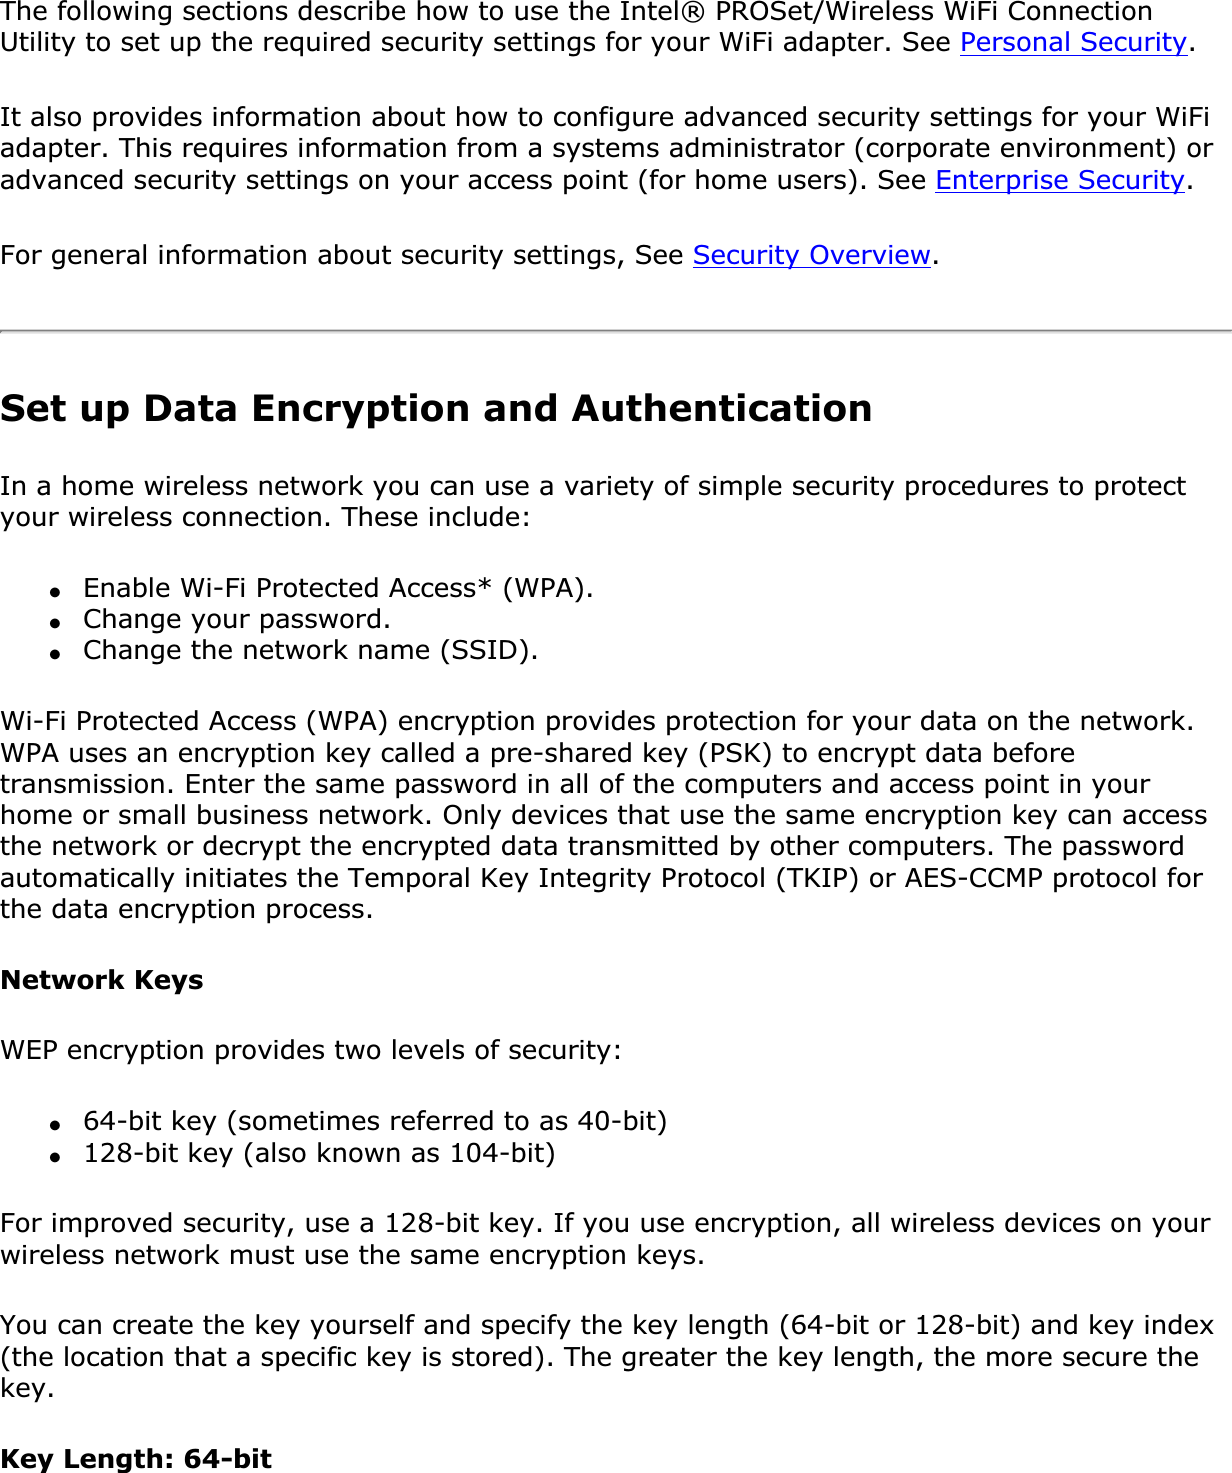
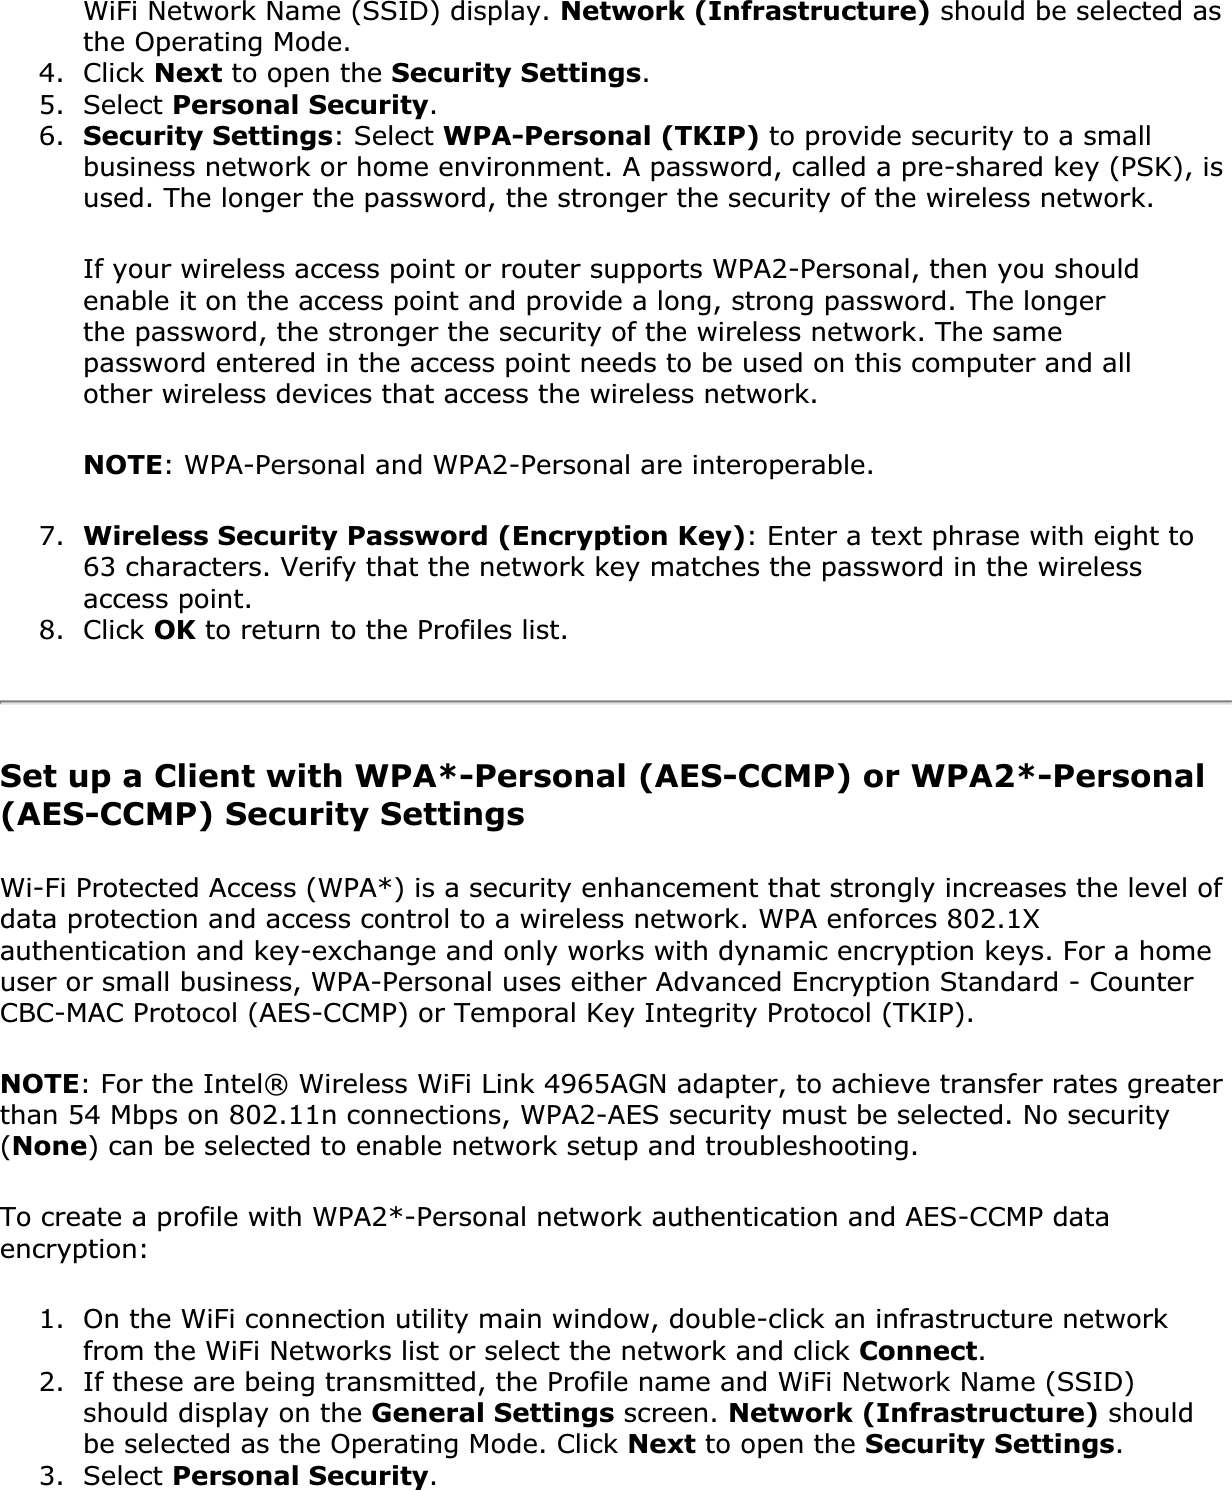
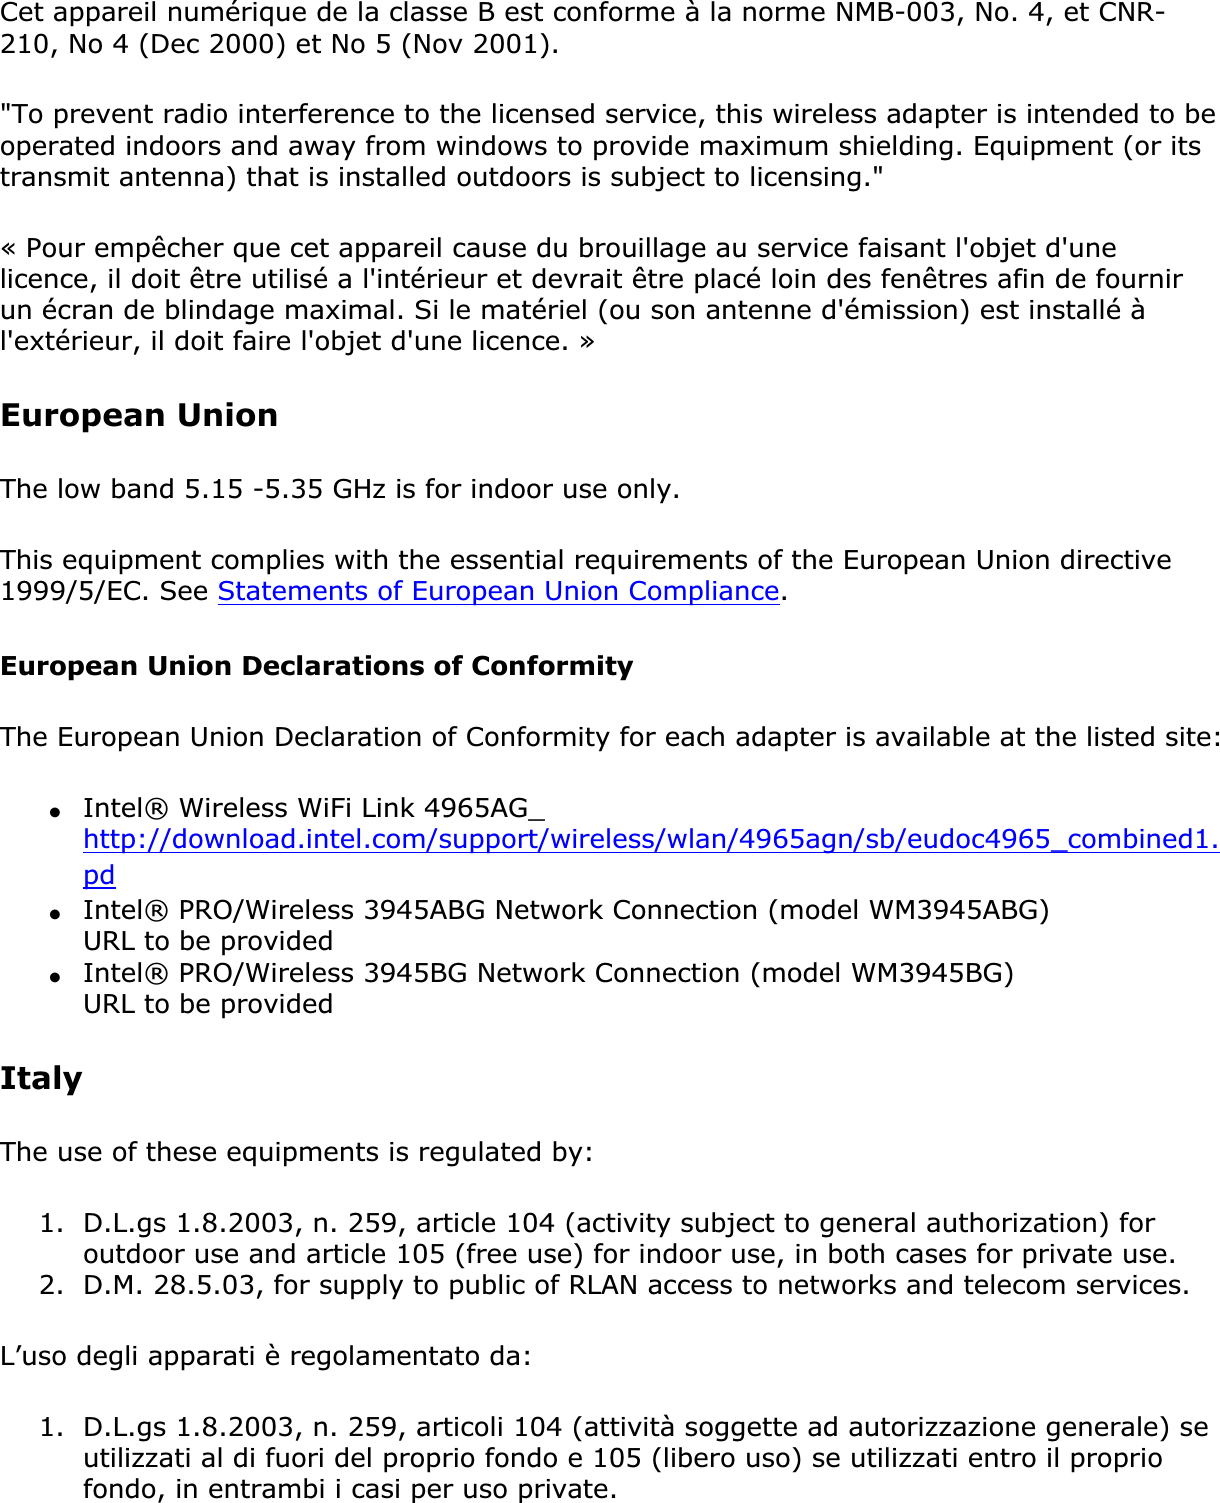
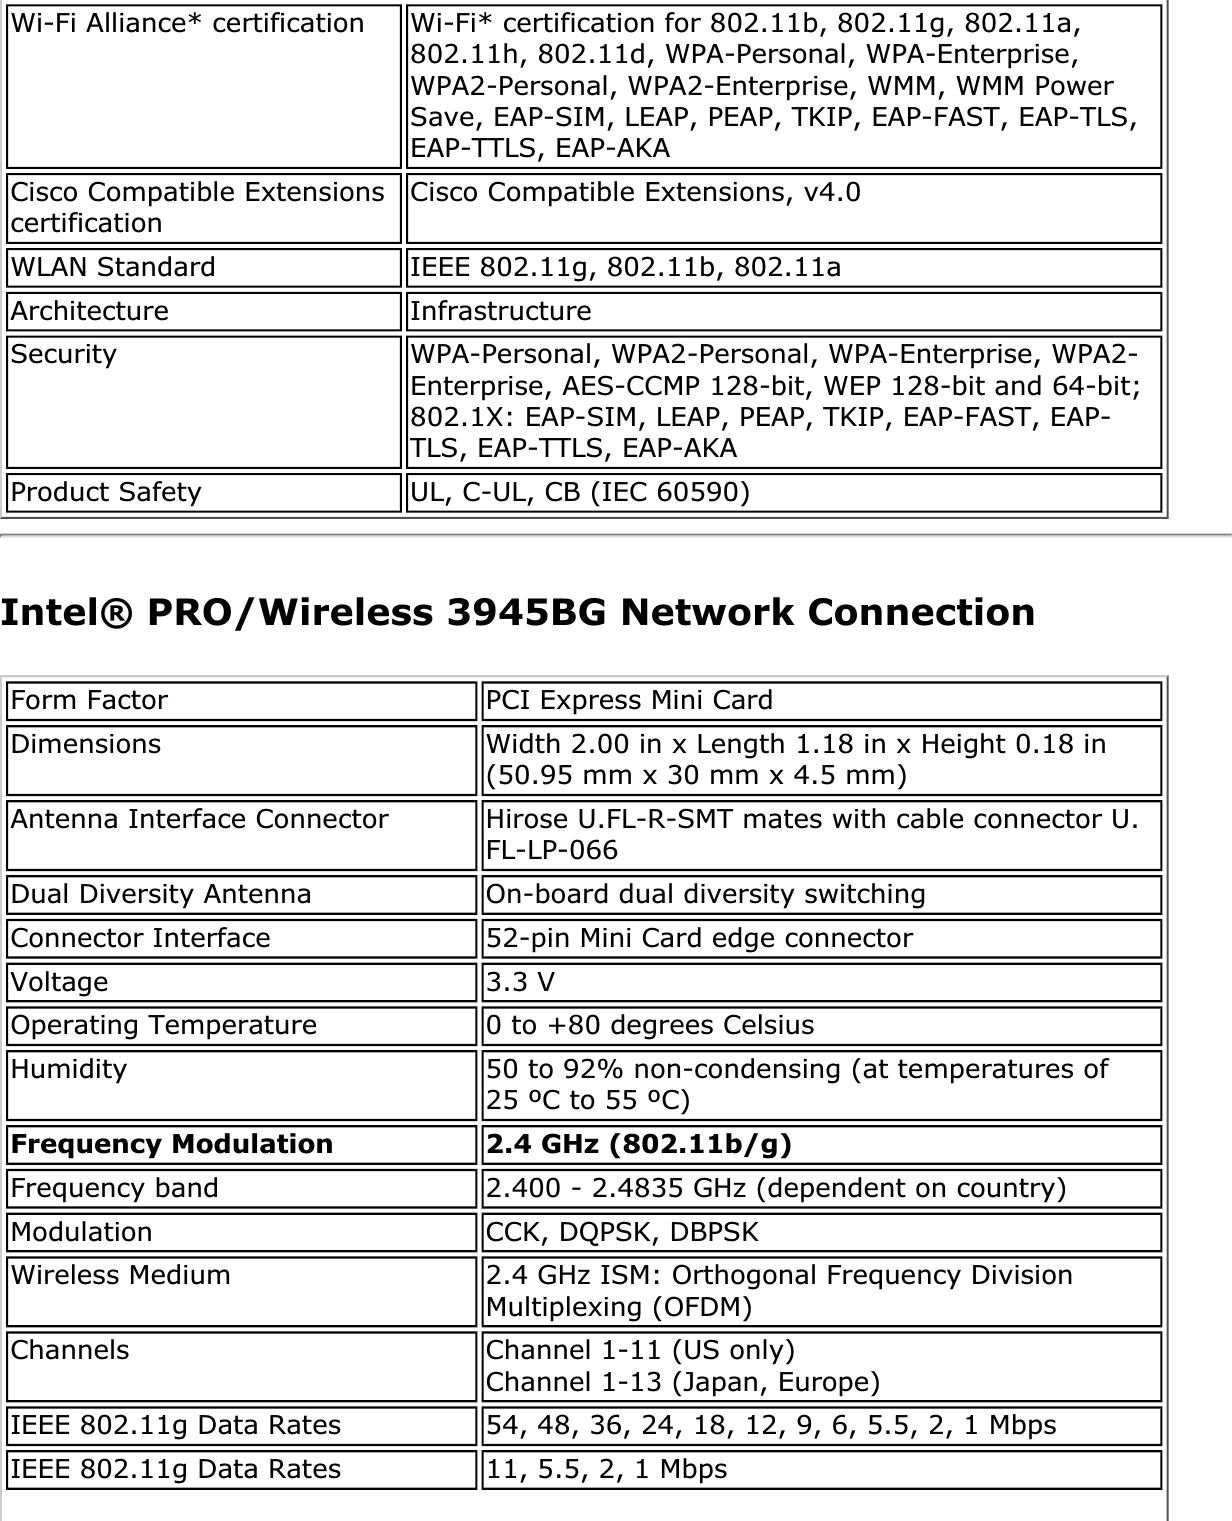
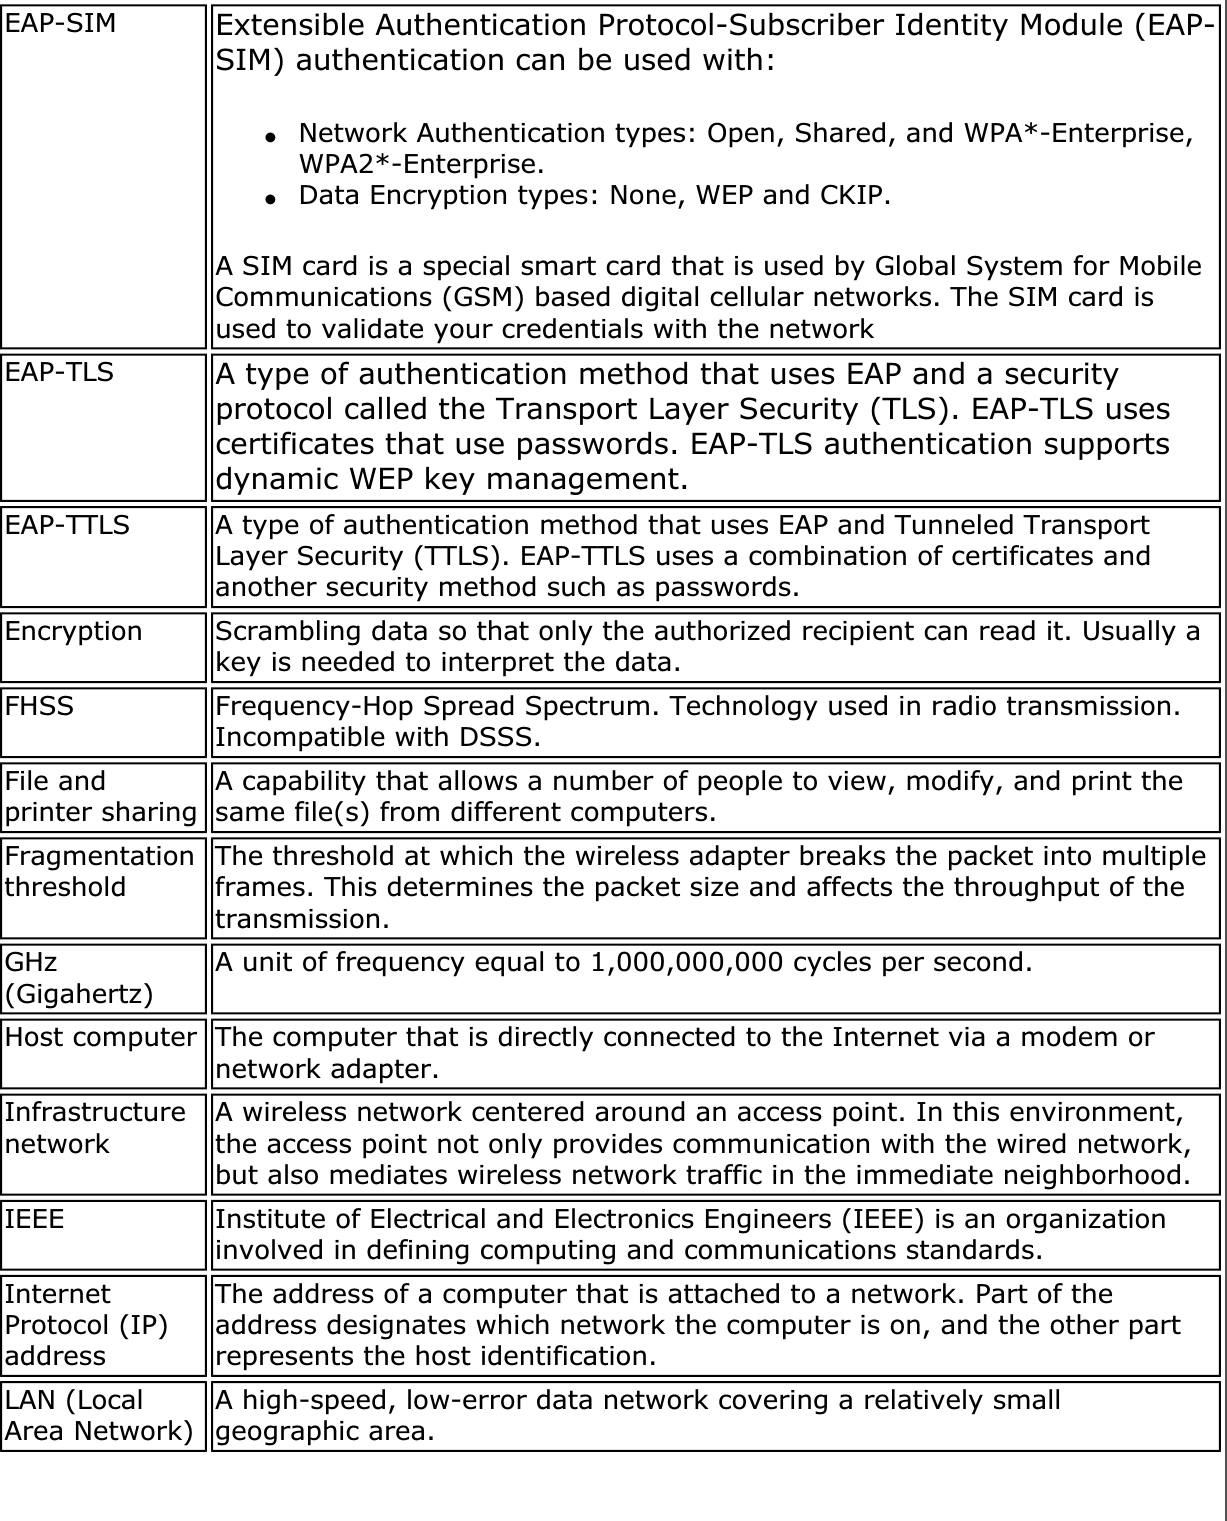
![to provide mutual authentication and to negotiate an encryption algorithm and cryptographic keys before data is transmitted. Only available for PEAP authentication type.Cisco FeaturesCisco LEAP Cisco LEAP (Cisco Light EAP) is a server and client 802.1X authentication through a user-supplied logon password. When a wireless access point communicates with a Cisco LEAP-enabled RADIUS (Cisco Secure Access Control Server [ACS]), Cisco LEAP provides access control through mutual authentication between client WiFi adapters and the wireless networks and provides dynamic, individual user encryption keys to help protect the privacy of transmitted data.Cisco Rogue Access Point Security FeatureThe Cisco Rogue access point feature provides security protection from an introduction of a rogue access point that could mimic a legitimate access point on a network in order to extract information about user credentials and authentication protocols that could compromise security. This feature only works with Cisco's LEAP authentication. Standard 802.11 technology does not protect a network from the introduction of a rogue access point. See LEAP Authentication for more information.802.11b and 802.11g Mixed Environment Protection ProtocolSome access points, for example Cisco 350 or Cisco 1200, support environments in which not all client stations support WEP encryption; this is called Mixed-Cell Mode. When these wireless networks operate in "optional encryption" mode, client stations that join in WEP mode, send all messages encrypted, and stations that use standard mode send all messages unencrypted. These access points broadcast that the network does not use encryption but allow clients that use WEP mode. When "Mixed-Cell" is enabled in a profile, it lets you connect to access points that are configured for "optional encryption."CKIPCisco Key Integrity Protocol (CKIP) is Cisco proprietary security protocol for encryption in 802.11 media. CKIP uses the following features to improve 802.11 security in infrastructure mode:●Key Permutation (KP)●Message Sequence Number](https://usermanual.wiki/Getac-Technology/040/User-Guide-1346536-Page-101.png)


![Statements of European Compliance●Intel® Centrino® Ultimate-N 6300 Adapter●Intel® Centrino® Advanced-N 6200 Adapter●Intel® WiFi Link 5300 Adapter ●Intel® WiFi Link 5100 Adapters●Intel® WiFi Link 1000 Adapter●Intel® Wireless WiFi Link 4965AGN Adapter ●Intel® Wireless WiFi Link 4965AG_ Adapter ●Intel® PRO/Wireless 3945ABG Network Connection●Intel® PRO/Wireless 3945BG Network ConnectionIntel® Centrino® Ultimate-N 6300 AdapterThis equipment complies with the essential requirements of the European Union directive 1999/5/EC.•esky[Czech] Intel® Corporation tímto prohlašuje, že tento Intel® Centrino® Ultimate-N 6300 je ve shod• se základními požadavky a dalšími p•íslušnými ustanoveními sm•rnice 1999/5/ES.Dansk[Danish] Undertegnede Intel® Corporation erklærer herved, at følgende udstyr Intel® Centrino® Ultimate-N 6300 overholder de væsentlige krav og øvrige relevante krav i direktiv 1999/5/EF.Deutsch[German] Hiermit erklärt Intel® Corporation, dass sich das Gerät Intel® Centrino® Ultimate-N 6300 in Übereinstimmung mit den grundlegenden Anforderungen und den übrigen einschlägigen Bestimmungen der Richtlinie 1999/5/EG befindet.Esti[Estonian] Käesolevaga kinnitab Intel® Corporation seadme Intel® Centrino® Ultimate-N 6300 vastavust direktiivi 1999/5/EÜ põhinõuetele ja nimetatud direktiivist tulenevatele teistele asjakohastele sätetele.English Hereby, Intel® Corporation, declares that this Intel® Centrino® Ultimate-N 6300 is in compliance with the essential requirements and other relevant provisions of Directive 1999/5/EC.Español[Spanish] Por medio de la presente Intel® Corporation declara que el Intel® Centrino® Ultimate-N 6300 cumple con los requisitos esenciales y cualesquiera otras disposiciones aplicables o exigibles de la Directiva 1999/5/CE.](https://usermanual.wiki/Getac-Technology/040/User-Guide-1346536-Page-248.png)
![Ελληνικ•[Greek] ΜΕ ΤΗΝ ΠΑΡΟΥΣΑ Intel® Corporation ΔΗΛΩΝΕΙ ΟΤΙ Intel® Centrino® Ultimate-N 6300 ΣΥΜΜΟΡΦΩΝΕΤΑΙ ΠΡΟΣ ΤΙΣ ΟΥΣΙΩΔΕΙΣ ΑΠΑΙΤΗΣΕΙΣ ΚΑΙ ΤΙΣΛΟΙΠΕΣ ΣΧΕΤΙΚΕΣ ΔΙΑΤΑΞΕΙΣ ΤΗΣ ΟΔΗΓΙΑΣ 1999/5/ΕΚ.Français[French] Par la présente Intel® Corporation déclare que l'appareil Intel® Centrino® Ultimate-N 6300 est conforme aux exigences essentielles et aux autres dispositions pertinentes de la directive 1999/5/CE. Italiano[Italian] Con la presente Intel® Corporation dichiara che questo Intel® Centrino® Ultimate-N 6300 è conforme ai requisiti essenziali ed alle altre disposizioni pertinenti stabilite dalla direttiva 1999/5/CE. Latviski[Latvian] Ar šo Intel® Corporation deklar•, ka Intel® Centrino® Ultimate-N 6300 atbilst Direkt•vas 1999/5/EK b•tiskaj•m pras•b•m un citiem ar to saist•tajiem noteikumiem.Lietuvi•[Lithuanian] Šiuo Intel® Corporation deklaruoja, kad šis Intel® Centrino® Ultimate-N 6300 atitinka esminius reikalavimus ir kitas 1999/5/EB Direktyvos nuostatas.Nederlands[Dutch] Hierbij verklaart Intel® Corporation dat het toestel Intel® Centrino® Ultimate-N 6300 in overeenstemming is met de essentiële eisen en de andere relevante bepalingen van richtlijn 1999/5/EG.Malti[Maltese] Hawnhekk, Intel® Corporation, jiddikjara li dan Intel® Centrino® Ultimate-N 6300 jikkonforma mal-•ti•ijiet essenzjali u ma provvedimenti o•rajn relevanti li hemm fid-Dirrettiva 1999/5/EC.Magyar[Hungarian] Alulírott, Intel® Corporation nyilatkozom, hogy a Intel® Centrino® Ultimate-N 6300 megfelel a vonatkozó alapvetõ követelményeknek és az 1999/5/EC irányelv egyéb elõírásainak.Norsk[Norwegian] Intel® Corporation erklærer herved at utstyret Intel® Centrino® Ultimate-N 6300 er i samsvar med de grunnleggende krav og øvrige relevante krav i direktiv 1999/5/EF.Polski[Polish] Niniejszym, Intel® Corporation, o•wiadcza, •e Intel® Centrino® Ultimate-N 6300 jest zgodne z zasadniczymi wymaganiami oraz innymi stosownymi postanowieniami Dyrektywy 1999/5/WE.Português[Portuguese] Intel® Corporation declara que este Intel® Centrino® Ultimate-N 6300 está conforme com os requisitos essenciais e outras disposições da Directiva 1999/5/CE.Slovensko[Slovenian] Šiuo Intel® Corporation izjavlja, da je ta Intel® Centrino® Ultimate-N 6300 v skladu z bistvenimi zahtevami in ostalimi relevantnimi dolo•ili direktive 1999/5/ES.Slovensky[Slovak] Intel® Corporation týmto vyhlasuje, že Intel® Centrino® Ultimate-N 6300 sp••a základné požiadavky a všetky príslušné ustanovenia Smernice 1999/5/ES.Suomi[Finnish] Intel® Corporation vakuuttaa täten että Intel® Centrino® Ultimate-N 6300 tyyppinen laite on direktiivin 1999/5/EY oleellisten vaatimusten ja sitä koskevien direktiivin muiden ehtojen mukainen.](https://usermanual.wiki/Getac-Technology/040/User-Guide-1346536-Page-249.png)
![Svenska[Swedish] Härmed intygar Intel® Corporation att denna Intel® Centrino® Ultimate-N 6300 står i överensstämmelse med de väsentliga egenskapskrav och övriga relevanta bestämmelser som framgår av direktiv 1999/5/EG.Íslenska[Icelandic] Hér með lýsir Intel® Corporation yfir því að Intel® Centrino® Ultimate-N 6300 er í samræmi við grunnkröfur og aðrar kröfur, sem gerðar eru í tilskipun 1999/5/EC. Intel® Centrino® Advanced-N 6200 AdapterThis equipment complies with the essential requirements of the European Union directive 1999/5/EC.•esky[Czech] Intel® Corporation tímto prohlašuje, že tento Intel® Centrino® Advanced-N 6200 je ve shod• se základními požadavky a dalšími p•íslušnými ustanoveními sm•rnice 1999/5/ES.Dansk[Danish] Undertegnede Intel® Corporation erklærer herved, at følgende udstyr Intel® Centrino® Advanced-N 6200 overholder de væsentlige krav og øvrige relevante krav i direktiv 1999/5/EF.Deutsch[German] Hiermit erklärt Intel® Corporation, dass sich das Gerät Intel® Centrino® Advanced-N 6200 in Übereinstimmung mit den grundlegenden Anforderungen und den übrigen einschlägigen Bestimmungen der Richtlinie 1999/5/EG befindet. Esti[Estonian] Käesolevaga kinnitab Intel® Corporation seadme Intel® Centrino® Advanced-N 6200 vastavust direktiivi 1999/5/EÜ põhinõuetele ja nimetatud direktiivist tulenevatele teistele asjakohastele sätetele.English Hereby, Intel® Corporation, declares that this Intel® Centrino® Advanced-N 6200 is in compliance with the essential requirements and other relevant provisions of Directive 1999/5/EC.Español[Spanish] Por medio de la presente Intel® Corporation declara que el Intel® Centrino® Advanced-N 6200 cumple con los requisitos esenciales y cualesquiera otras disposiciones aplicables o exigibles de la Directiva 1999/5/CE.Ελληνικ•[Greek] ΜΕ ΤΗΝ ΠΑΡΟΥΣΑ Intel® Corporation ΔΗΛΩΝΕΙ ΟΤΙIntel® Centrino® Advanced-N 6200ΣΥΜΜΟΡΦΩΝΕΤΑΙ ΠΡΟΣ ΤΙΣ ΟΥΣΙΩΔΕΙΣ ΑΠΑΙΤΗΣΕΙΣ ΚΑΙ ΤΙΣΛΟΙΠΕΣ ΣΧΕΤΙΚΕΣ ΔΙΑΤΑΞΕΙΣ ΤΗΣ ΟΔΗΓΙΑΣ 1999/5/ΕΚ.Français[French] Par la présente Intel® Corporation déclare que l'appareil Intel® Centrino® Advanced-N 62000 est conforme aux exigences essentielles et aux autres dispositions pertinentes de la directive 1999/5/CE. Italiano[Italian] Con la presente Intel® Corporation dichiara che questo Intel® Centrino® Advanced-N 6200 è conforme ai requisiti essenziali ed alle altre disposizioni pertinenti stabilite dalla direttiva 1999/5/CE.](https://usermanual.wiki/Getac-Technology/040/User-Guide-1346536-Page-250.png)
![Latviski[Latvian] Ar šo Intel® Corporation deklar•, ka Intel® Centrino® Advanced-N 6200 atbilst Direkt•vas 1999/5/EK b•tiskaj•m pras•b•m un citiem ar to saist•tajiem noteikumiem.Lietuvi•[Lithuanian] Šiuo Intel® Corporation deklaruoja, kad šis Intel® Centrino® Advanced-N 6200 atitinka esminius reikalavimus ir kitas 1999/5/EB Direktyvos nuostatas.Nederlands[Dutch] Hierbij verklaart Intel® Corporation dat het toestelIntel® Centrino® Advanced-N 6200 in overeenstemming is met de essentiële eisen en de andere relevante bepalingen van richtlijn 1999/5/EG.Malti[Maltese] Hawnhekk, Intel® Corporation, jiddikjara li dan Intel® Centrino® Advanced-N 6200 jikkonforma mal-•ti•ijiet essenzjali u ma provvedimenti o•rajn relevanti li hemm fid-Dirrettiva 1999/5/EC.Magyar[Hungarian] Alulírott, Intel® Corporation nyilatkozom, hogy a Intel® Centrino® Advanced-N 6200 megfelel a vonatkozó alapvetõ követelményeknek és az 1999/5/EC irányelv egyéb elõírásainak.Norsk[Norwegian] Intel® Corporation erklærer herved at utstyret Intel® Centrino® Advanced-N 6200 er i samsvar med de grunnleggende krav og øvrige relevante krav i direktiv 1999/5/EF.Polski[Polish] Niniejszym, Intel® Corporation, o•wiadcza, •e Intel® Centrino® Advanced-N 6200 jest zgodne z zasadniczymi wymaganiami oraz innymi stosownymi postanowieniami Dyrektywy 1999/5/WE.Português[Portuguese] Intel® Corporation declara que este Intel® Centrino® Advanced-N 6200 está conforme com os requisitos essenciais e outras disposições da Directiva 1999/5/CE.Slovensko[Slovenian] Šiuo Intel® Corporation izjavlja, da je ta Intel® Centrino® Advanced-N 6200 v skladu z bistvenimi zahtevami in ostalimi relevantnimi dolo•ili direktive 1999/5/ES.Slovensky[Slovak] Intel® Corporation týmto vyhlasuje, že Intel® Centrino® Advanced-N 6200 sp••a základné požiadavky a všetky príslušné ustanovenia Smernice 1999/5/ES.Suomi[Finnish] Intel® Corporation vakuuttaa täten että Intel® Centrino® Advanced-N 6200 tyyppinen laite on direktiivin 1999/5/EY oleellisten vaatimusten ja sitä koskevien direktiivin muiden ehtojen mukainen.Svenska[Swedish] Härmed intygar Intel® Corporation att denna Intel® Centrino® Advanced-N 6200 står i överensstämmelse med de väsentliga egenskapskrav och övriga relevanta bestämmelser som framgår av direktiv 1999/5/EG.Íslenska[Icelandic] Hér með lýsir Intel® Corporation yfir því að Intel® Centrino® Advanced-N 6200 er í samræmi við grunnkröfur og aðrar kröfur, sem gerðar eru í tilskipun 1999/5/EC. Intel® WiFi Link 5300 AdapterThis equipment complies with the essential requirements of the European Union directive](https://usermanual.wiki/Getac-Technology/040/User-Guide-1346536-Page-251.png)
![1999/5/EC.•esky[Czech] Intel® Corporation tímto prohlašuje, že tento Intel® WiFi Link 5300 je ve shod• se základními požadavky a dalšími p•íslušnými ustanoveními sm•rnice 1999/5/ES.Dansk[Danish] Undertegnede Intel® Corporation erklærer herved, at følgende udstyr Intel® WiFi Link 5300 overholder de væsentlige krav og øvrige relevante krav i direktiv 1999/5/EF.Deutsch[German] Hiermit erklärt Intel® Corporation, dass sich das Gerät Intel® WiFi Link 5300 in Übereinstimmung mit den grundlegenden Anforderungen und den übrigen einschlägigen Bestimmungen der Richtlinie 1999/5/EG befindet. Esti[Estonian] Käesolevaga kinnitab Intel® Corporation seadme Intel® WiFi Link 5300 vastavust direktiivi 1999/5/EÜ põhinõuetele ja nimetatud direktiivist tulenevatele teistele asjakohastele sätetele.English Hereby, Intel® Corporation, declares that this Intel® WiFi Link 5300 is in compliance with the essential requirements and other relevant provisions of Directive 1999/5/EC.Español[Spanish] Por medio de la presente Intel® Corporation declara que el Intel® WiFi Link 5300 cumple con los requisitos esenciales y cualesquiera otras disposiciones aplicables o exigibles de la Directiva 1999/5/CE. Ελληνικ•[Greek] ΜΕ ΤΗΝ ΠΑΡΟΥΣΑ Intel® Corporation ΔΗΛΩΝΕΙ ΟΤΙ Intel® WiFi Link 5300 ΣΥΜΜΟΡΦΩΝΕΤΑΙ ΠΡΟΣ ΤΙΣ ΟΥΣΙΩΔΕΙΣ ΑΠΑΙΤΗΣΕΙΣ ΚΑΙ ΤΙΣ ΛΟΙΠΕΣ ΣΧΕΤΙΚΕΣΔΙΑΤΑΞΕΙΣ ΤΗΣ ΟΔΗΓΙΑΣ 1999/5/ΕΚ.Français[French] Par la présente Intel® Corporation déclare que l'appareil Intel® WiFi Link 5300 est conforme aux exigences essentielles et aux autres dispositions pertinentes de la directive 1999/5/CE. Italiano[Italian] Con la presente Intel® Corporation dichiara che questo Intel® WiFi Link 5300 è conforme ai requisiti essenziali ed alle altre disposizioni pertinenti stabilite dalla direttiva 1999/5/CE. Latviski[Latvian] Ar šo Intel® Corporation deklar•, ka Intel® WiFi Link 5300 atbilst Direkt•vas 1999/5/EK b•tiskaj•m pras•b•m un citiem ar to saist•tajiem noteikumiem.Lietuvi•[Lithuanian] Šiuo Intel® Corporation deklaruoja, kad šis Intel® WiFi Link 5300 atitinka esminius reikalavimus ir kitas 1999/5/EB Direktyvos nuostatas.Nederlands[Dutch] Hierbij verklaart Intel® Corporation dat het toestel Intel® WiFi Link 5300 in overeenstemming is met de essentiële eisen en de andere relevante bepalingen van richtlijn 1999/5/EG.Malti[Maltese] Hawnhekk, Intel® Corporation, jiddikjara li dan Intel® WiFi Link 5300 jikkonforma mal-•ti•ijiet essenzjali u ma provvedimenti o•rajn relevanti li hemm fid-Dirrettiva 1999/5/EC.Magyar[Hungarian] Alulírott, Intel® Corporation nyilatkozom, hogy a Intel® WiFi Link 5300 megfelel a vonatkozó alapvetõ követelményeknek és az 1999/5/EC irányelv egyéb elõírásainak.](https://usermanual.wiki/Getac-Technology/040/User-Guide-1346536-Page-252.png)
![Norsk[Norwegian] Intel® Corporation erklærer herved at utstyret Intel® WiFi Link 5300 er i samsvar med de grunnleggende krav og øvrige relevante krav i direktiv 1999/5/EF.Polski[Polish] Niniejszym, Intel® Corporation, o•wiadcza, •e Intel® WiFi Link 5300 jest zgodne z zasadniczymi wymaganiami oraz innymi stosownymi postanowieniami Dyrektywy 1999/5/WE.Português[Portuguese] Intel® Corporation declara que este Intel® WiFi Link 5300 está conforme com os requisitos essenciais e outras disposições da Directiva 1999/5/CE. Slovensko[Slovenian] Šiuo Intel® Corporation izjavlja, da je ta Intel® WiFi Link 5300 v skladu z bistvenimi zahtevami in ostalimi relevantnimi dolo•ili direktive 1999/5/ES.Slovensky[Slovak] Intel® Corporation týmto vyhlasuje, že Intel® WiFi Link 5300 sp••a základné požiadavky a všetky príslušné ustanovenia Smernice 1999/5/ES.Suomi[Finnish] Intel® Corporation vakuuttaa täten että Intel ® WiFi Link 5300 tyyppinen laite on direktiivin 1999/5/EY oleellisten vaatimusten ja sitä koskevien direktiivin muiden ehtojen mukainen.Svenska[Swedish] Härmed intygar Intel® Corporation att denna Intel® WiFi Link 5300 står i överensstämmelse med de väsentliga egenskapskrav och övriga relevanta bestämmelser som framgår av direktiv 1999/5/EG.Íslenska[Icelandic] Hér með lýsir Intel® Corporation yfir því að Intel® WiFi Link 5300 er í samræmi við grunnkröfur og aðrar kröfur, sem gerðar eru í tilskipun 1999/5/EC.Intel® WiFi Link 5100 AdapterThis equipment complies with the essential requirements of the European Union directive 1999/5/EC.•esky[Czech] Intel® Corporation tímto prohlašuje, že tento Intel® WiFi Link 5100 je ve shod• se základními požadavky a dalšími p•íslušnými ustanoveními sm•rnice 1999/5/ES.Dansk[Danish] Undertegnede Intel® Corporation erklærer herved, at følgende udstyr Intel® WiFi Link 5100 overholder de væsentlige krav og øvrige relevante krav i direktiv 1999/5/EF.Deutsch[German] Hiermit erklärt Intel® Corporation, dass sich das Gerät Intel® WiFi Link 5100 in Übereinstimmung mit den grundlegenden Anforderungen und den übrigen einschlägigen Bestimmungen der Richtlinie 1999/5/EG befindet.Esti[Estonian] Käesolevaga kinnitab Intel® Corporation seadme Intel® WiFi Link 5100 vastavust direktiivi 1999/5/EÜ põhinõuetele ja nimetatud direktiivist tulenevatele teistele asjakohastele sätetele.](https://usermanual.wiki/Getac-Technology/040/User-Guide-1346536-Page-253.png)
![English Hereby, Intel® Corporation, declares that this Intel® WiFi Link 5100 is in compliance with the essential requirements and other relevant provisions of Directive 1999/5/EC.Español[Spanish] Por medio de la presente Intel® Corporation declara que el Intel® WiFi Link 5100 cumple con los requisitos esenciales y cualesquiera otras disposiciones aplicables o exigibles de la Directiva 1999/5/CE. Ελληνικ•[Greek] ΜΕ ΤΗΝ ΠΑΡΟΥΣΑ Intel® Corporation ΔΗΛΩΝΕΙ ΟΤΙ Intel® WiFi Link 5100 ΣΥΜΜΟΡΦΩΝΕΤΑΙ ΠΡΟΣ ΤΙΣ ΟΥΣΙΩΔΕΙΣ ΑΠΑΙΤΗΣΕΙΣ ΚΑΙ ΤΙΣΛΟΙΠΕΣ ΣΧΕΤΙΚΕΣ ΔΙΑΤΑΞΕΙΣ ΤΗΣ ΟΔΗΓΙΑΣ 1999/5/ΕΚ.Français[French] Par la présente Intel® Corporation déclare que l'appareil Intel® WiFi Link 5100 est conforme aux exigences essentielles et aux autres dispositions pertinentes de la directive 1999/5/CE.Italiano[Italian] Con la presente Intel® Corporation dichiara che questo Intel® WiFi Link 5100 è conforme ai requisiti essenziali ed alle altre disposizioni pertinenti stabilite dalla direttiva 1999/5/CE.Latviski[Latvian] Ar šo Intel® Corporation deklar•, ka Intel® WiFi Link 5100 atbilst Direkt•vas 1999/5/EK b•tiskaj•m pras•b•m un citiem ar to saist•tajiem noteikumiem.Lietuvi•[Lithuanian] Šiuo Intel® Corporation deklaruoja, kad šis Intel® WiFi Link 5100 atitinka esminius reikalavimus ir kitas 1999/5/EB Direktyvos nuostatas.Nederlands[Dutch] Hierbij verklaart Intel® Corporation dat het toestel Intel® WiFi Link 5100 in overeenstemming is met de essentiële eisen en de andere relevante bepalingen van richtlijn 1999/5/EG.Malti[Maltese] Hawnhekk, Intel® Corporation, jiddikjara li dan Intel® WiFi Link 5100 jikkonforma mal-•ti•ijiet essenzjali u ma provvedimenti o•rajn relevanti li hemm fid-Dirrettiva 1999/5/EC.Magyar[Hungarian] Alulírott, Intel® Corporation nyilatkozom, hogy a Intel® WiFi Link 5100 megfelel a vonatkozó alapvetõ követelményeknek és az 1999/5/EC irányelv egyéb elõírásainak.Norsk [Norwegian] Intel® Corporation erklærer herved at utstyret Intel® WiFi Link 5100 er i samsvar med de grunnleggende krav og øvrige relevante krav i direktiv 1999/5/EF.Polski[Polish] Niniejszym, Intel® Corporation, o•wiadcza, •e Intel® WiFi Link 5100 jest zgodne z zasadniczymi wymaganiami oraz innymi stosownymi postanowieniami Dyrektywy 1999/5/WE.Português[Portuguese] Intel® Corporation declara que este Intel® WiFi Link 5100 está conforme com os requisitos essenciais e outras disposições da Directiva 1999/5/CE.Slovensko[Slovenian] Šiuo Intel® Corporation izjavlja, da je ta Intel® WiFi Link 5100 v skladu z bistvenimi zahtevami in ostalimi relevantnimi dolo•ili direktive 1999/5/ES.](https://usermanual.wiki/Getac-Technology/040/User-Guide-1346536-Page-254.png)
![Slovensky[Slovak] Intel® Corporation týmto vyhlasuje, že Intel® WiFi Link 5100 sp••a základné požiadavky a všetky príslušné ustanovenia Smernice 1999/5/ES.Suomi[Finnish] Intel® Corporation vakuuttaa täten että Intel® WiFi Link 5100 tyyppinen laite on direktiivin 1999/5/EY oleellisten vaatimusten ja sitä koskevien direktiivin muiden ehtojen mukainen.Svenska[Swedish] Härmed intygar Intel® Corporation att denna Intel® WiFi Link 5100 står i överensstämmelse med de väsentliga egenskapskrav och övriga relevanta bestämmelser som framgår av direktiv 1999/5/EG.Íslenska[Icelandic] Hér með lýsir Intel® Corporation yfir því að Intel® WiFi Link 5100 er í samræmi við grunnkröfur og aðrar kröfur, sem gerðar eru í tilskipun 1999/5/EC.Intel(R) WiFi Link 1000 AdapterThis equipment complies with the essential requirements of the European Union directive 1999/5/EC.•esky[Czech] Intel® Corporation tímto prohlašuje, že tento Intel(R) WiFi Link 1000 je ve shod• se základními požadavky a dalšími p•íslušnými ustanoveními sm•rnice 1999/5/ES.Dansk[Danish] Undertegnede Intel® Corporation erklærer herved, at følgende udstyr Intel(R) WiFi Link 1000 overholder de væsentlige krav og øvrige relevante krav i direktiv 1999/5/EF.Deutsch[German] Hiermit erklärt Intel® Corporation, dass sich das Gerät Intel(R) WiFi Link 1000 in Übereinstimmung mit den grundlegenden Anforderungen und den übrigen einschlägigen Bestimmungen der Richtlinie 1999/5/EG befindet.Esti[Estonian] Käesolevaga kinnitab Intel® Corporation seadme Intel(R) WiFi Link 1000 vastavust direktiivi 1999/5/EÜ põhinõuetele ja nimetatud direktiivist tulenevatele teistele asjakohastele sätetele.English Hereby, Intel® Corporation, declares that this Intel(R) WiFi Link 1000 is in compliance with the essential requirements and other relevant provisions of Directive 1999/5/EC.Español[Spanish] Por medio de la presente Intel® Corporation declara que el Intel(R) WiFi Link 1000 cumple con los requisitos esenciales y cualesquiera otras disposiciones aplicables o exigibles de la Directiva 1999/5/CE. Ελληνικ•[Greek] ΜΕ ΤΗΝ ΠΑΡΟΥΣΑ Intel® Corporation ΔΗΛΩΝΕΙ ΟΤΙ Intel(R) WiFi Link 1000 ΣΥΜΜΟΡΦΩΝΕΤΑΙ ΠΡΟΣ ΤΙΣ ΟΥΣΙΩΔΕΙΣ ΑΠΑΙΤΗΣΕΙΣ ΚΑΙ ΤΙΣΛΟΙΠΕΣ ΣΧΕΤΙΚΕΣ ΔΙΑΤΑΞΕΙΣ ΤΗΣ ΟΔΗΓΙΑΣ 1999/5/ΕΚ.](https://usermanual.wiki/Getac-Technology/040/User-Guide-1346536-Page-255.png)
![Français[French] Par la présente Intel® Corporation déclare que l'appareil Intel(R) WiFi Link 1000 est conforme aux exigences essentielles et aux autres dispositions pertinentes de la directive 1999/5/CE.Italiano[Italian] Con la presente Intel® Corporation dichiara che questo Intel(R) WiFi Link 1000 è conforme ai requisiti essenziali ed alle altre disposizioni pertinenti stabilite dalla direttiva 1999/5/CE.Latviski[Latvian] Ar šo Intel® Corporation deklar•, ka Intel(R) WiFi Link 1000 atbilst Direkt•vas 1999/5/EK b•tiskaj•m pras•b•m un citiem ar to saist•tajiem noteikumiem.Lietuvi•[Lithuanian] Šiuo Intel® Corporation deklaruoja, kad šis Intel(R) WiFi Link 1000 atitinka esminius reikalavimus ir kitas 1999/5/EB Direktyvos nuostatas.Nederlands[Dutch] Hierbij verklaart Intel® Corporation dat het toestel Intel(R) WiFi Link 1000 in overeenstemming is met de essentiële eisen en de andere relevante bepalingen van richtlijn 1999/5/EG.Malti[Maltese] Hawnhekk, Intel® Corporation, jiddikjara li dan Intel(R) WiFi Link 1000 jikkonforma mal-•ti•ijiet essenzjali u ma provvedimenti o•rajn relevanti li hemm fid-Dirrettiva 1999/5/EC.Magyar[Hungarian] Alulírott, Intel® Corporation nyilatkozom, hogy a Intel(R) WiFi Link 1000 megfelel a vonatkozó alapvetõ követelményeknek és az 1999/5/EC irányelv egyéb elõírásainak.Norsk [Norwegian] Intel® Corporation erklærer herved at utstyret Intel(R) WiFi Link 1000 er i samsvar med de grunnleggende krav og øvrige relevante krav i direktiv 1999/5/EF.Polski[Polish] Niniejszym, Intel® Corporation, o•wiadcza, •e Intel(R) WiFi Link 1000 jest zgodne z zasadniczymi wymaganiami oraz innymi stosownymi postanowieniami Dyrektywy 1999/5/WE.Português[Portuguese] Intel® Corporation declara que este Intel(R) WiFi Link 1000 está conforme com os requisitos essenciais e outras disposições da Directiva 1999/5/CE.Slovensko[Slovenian] Šiuo Intel® Corporation izjavlja, da je ta Intel(R) WiFi Link 1000 v skladu z bistvenimi zahtevami in ostalimi relevantnimi dolo•ili direktive 1999/5/ES.Slovensky[Slovak] Intel® Corporation týmto vyhlasuje, že Intel(R) WiFi Link 1000 sp••a základné požiadavky a všetky príslušné ustanovenia Smernice 1999/5/ES.Suomi[Finnish] Intel® Corporation vakuuttaa täten että Intel(R) WiFi Link 1000 tyyppinen laite on direktiivin 1999/5/EY oleellisten vaatimusten ja sitä koskevien direktiivin muiden ehtojen mukainen.Svenska[Swedish] Härmed intygar Intel® Corporation att denna Intel(R) WiFi Link 1000 står i överensstämmelse med de väsentliga egenskapskrav och övriga relevanta bestämmelser som framgår av direktiv 1999/5/EG.](https://usermanual.wiki/Getac-Technology/040/User-Guide-1346536-Page-256.png)
![Íslenska[Icelandic] Hér með lýsir Intel® Corporation yfir því að Intel(R) WiFi Link 1000 er í samræmi við grunnkröfur og aðrar kröfur, sem gerðar eru í tilskipun 1999/5/EC.Intel® Wireless WiFi Link 4965AGN AdapterThis equipment complies with the essential requirements of the European Union directive 1999/5/EC.•esky[Czech] Intel® Corporation tímto prohlašuje, že tento Intel® Wireless WiFi Link 4965AGN je ve shod• se základními požadavky a dalšími p•íslušnými ustanoveními sm•rnice 1999/5/ES.Dansk[Danish] Undertegnede Intel® Corporation erklærer herved, at følgende udstyr Intel® Wireless WiFi Link 4965AGN overholder de væsentlige krav og øvrige relevante krav i direktiv 1999/5/EF.Deutsch[German] Hiermit erklärt Intel® Corporation, dass sich das Gerät Intel® Wireless WiFi Link 4965AGN in Übereinstimmung mit den grundlegenden Anforderungen und den übrigen einschlägigen Bestimmungen der Richtlinie 1999/5/EG befindet. Esti[Estonian] Käesolevaga kinnitab Intel® Corporation seadme Intel® Wireless WiFi Link 4965AGN vastavust direktiivi 1999/5/EÜ põhinõuetele ja nimetatud direktiivist tulenevatele teistele asjakohastele sätetele.English Hereby, Intel® Corporation, declares that this Intel® Wireless WiFi Link 4965AGN is in compliance with the essential requirements and other relevant provisions of Directive 1999/5/EC.Español[Spanish] Por medio de la presente Intel® Corporation declara que el Intel® Wireless WiFi Link 4965AGN cumple con los requisitos esenciales y cualesquiera otras disposiciones aplicables o exigibles de la Directiva 1999/5/CE.Ελληνικ•[Greek] ΜΕ ΤΗΝ ΠΑΡΟΥΣΑ Intel® Corporation ΔΗΛΩΝΕΙ ΟΤΙ Intel® Wireless WiFi Link 4965AGN ΣΥΜΜΟΡΦΩΝΕΤΑΙ ΠΡΟΣ ΤΙΣ ΟΥΣΙΩΔΕΙΣ ΑΠΑΙΤΗΣΕΙΣΚΑΙ ΤΙΣ ΛΟΙΠΕΣ ΣΧΕΤΙΚΕΣ ΔΙΑΤΑΞΕΙΣ ΤΗΣ ΟΔΗΓΙΑΣ 1999/5/ΕΚ.Français[French] Par la présente Intel® Corporation déclare que l'appareil Intel® Wireless WiFi Link 4965AGN est conforme aux exigences essentielles et aux autres dispositions pertinentes de la directive 1999/5/CE. Italiano[Italian] Con la presente Intel® Corporation dichiara che questo Intel® Wireless WiFi Link 4965AGN è conforme ai requisiti essenziali ed alle altre disposizioni pertinenti stabilite dalla direttiva 1999/5/CE. Latviski[Latvian] Ar šo Intel® Corporation deklar•, ka Intel® Wireless WiFi Link 4965AGN atbilst Direkt•vas 1999/5/EK b•tiskaj•m pras•b•m un citiem ar to saist•tajiem noteikumiem.](https://usermanual.wiki/Getac-Technology/040/User-Guide-1346536-Page-257.png)
![Lietuvi•[Lithuanian] Šiuo Intel® Corporation deklaruoja, kad šis Intel® Wireless WiFi Link 4965AGN atitinka esminius reikalavimus ir kitas 1999/5/EB Direktyvos nuostatas.Nederlands[Dutch] Hierbij verklaart Intel® Corporation dat het toestel Intel® Wireless WiFi Link 4965AGN in overeenstemming is met de essentiële eisen en de andere relevante bepalingen van richtlijn 1999/5/EG.Malti[Maltese] Hawnhekk, Intel® Corporation, jiddikjara li dan Intel® Wireless WiFi Link 4965AGN jikkonforma mal-•ti•ijiet essenzjali u ma provvedimenti o•rajn relevanti li hemm fid-Dirrettiva 1999/5/EC.Magyar[Hungarian] Alulírott, Intel® Corporation nyilatkozom, hogy a Intel® Wireless WiFi Link 4965AGN megfelel a vonatkozó alapvetõ követelményeknek és az 1999/5/EC irányelv egyéb elõírásainak.Norsk [Norwegian] Intel® Corporation erklærer herved at utstyret Intel® Wireless WiFi Link 4965AGN er i samsvar med de grunnleggende krav og øvrige relevante krav i direktiv 1999/5/EF.Polski[Polish] Niniejszym, Intel® Corporation, o•wiadcza, •e Intel® Wireless WiFi Link 4965AGN jest zgodne z zasadniczymi wymaganiami oraz innymi stosownymi postanowieniami Dyrektywy 1999/5/WE.Português[Portuguese] Intel® Corporation declara que este Intel® Wireless WiFi Link 4965AGN está conforme com os requisitos essenciais e outras disposições da Directiva 1999/5/CE. Slovensko[Slovenian] Šiuo Intel® Corporation izjavlja, da je ta Intel® Wireless WiFi Link 4965AGN v skladu z bistvenimi zahtevami in ostalimi relevantnimi dolo•ili direktive 1999/5/ES.Slovensky[Slovak] Intel® Corporation týmto vyhlasuje, že Intel® Wireless WiFi Link 4965AGN sp••a základné požiadavky a všetky príslušné ustanovenia Smernice 1999/5/ES.Suomi[Finnish] Intel® Corporation vakuuttaa täten että Intel ® Wireless WiFi Link 4965AGN tyyppinen laite on direktiivin 1999/5/EY oleellisten vaatimusten ja sitä koskevien direktiivin muiden ehtojen mukainen. Svenska[Swedish] Härmed intygar Intel® Corporation att denna Intel® Wireless WiFi Link 4965AGN står i överensstämmelse med de väsentliga egenskapskrav och övriga relevanta bestämmelser som framgår av direktiv 1999/5/EG.Íslenska[Icelandic] Hér með lýsir Intel® Corporation yfir því að Intel® Wireless WiFi Link 4965AGN er í samræmi við grunnkröfur og aðrar kröfur, sem gerðar eru í tilskipun 1999/5/EC. Intel® Wireless WiFi Link 4965AG_ AdapterThis equipment complies with the essential requirements of the European Union directive 1999/5/EC.](https://usermanual.wiki/Getac-Technology/040/User-Guide-1346536-Page-258.png)
![•esky[Czech] Intel® Corporation tímto prohlašuje, že tento Intel® Wireless WiFi Link 4965AG_ je ve shod• se základními požadavky a dalšími p•íslušnými ustanoveními sm•rnice 1999/5/ES.Dansk[Danish] Undertegnede Intel® Corporation erklærer herved, at følgende udstyr Intel® Wireless WiFi Link 4965AG_ overholder de væsentlige krav og øvrige relevante krav i direktiv 1999/5/EF.Deutsch[German] Hiermit erklärt Intel® Corporation, dass sich das Gerät Intel® Wireless WiFi Link 4965AG_ in Übereinstimmung mit den grundlegenden Anforderungen und den übrigen einschlägigen Bestimmungen der Richtlinie 1999/5/EG befindet. Esti[Estonian] Käesolevaga kinnitab Intel® Corporation seadme Intel® Wireless WiFi Link 4965AG_ vastavust direktiivi 1999/5/EÜ põhinõuetele ja nimetatud direktiivist tulenevatele teistele asjakohastele sätetele.English Hereby, Intel® Corporation, declares that this Intel® Wireless WiFi Link 4965AG_ is in compliance with the essential requirements and other relevant provisions of Directive 1999/5/EC.Español[Spanish] Por medio de la presente Intel® Corporation declara que el Intel® Wireless WiFi Link 4965AG_ cumple con los requisitos esenciales y cualesquiera otras disposiciones aplicables o exigibles de la Directiva 1999/5/CE.Ελληνικ•[Greek] ΜΕ ΤΗΝ ΠΑΡΟΥΣΑ Intel® Corporation ΔΗΛΩΝΕΙ ΟΤΙ Intel® Wireless WiFi Link 4965AG_ ΣΥΜΜΟΡΦΩΝΕΤΑΙ ΠΡΟΣ ΤΙΣ ΟΥΣΙΩΔΕΙΣ ΑΠΑΙΤΗΣΕΙΣΚΑΙ ΤΙΣ ΛΟΙΠΕΣ ΣΧΕΤΙΚΕΣ ΔΙΑΤΑΞΕΙΣ ΤΗΣ ΟΔΗΓΙΑΣ 1999/5/ΕΚ.Français[French] Par la présente Intel® Corporation déclare que l'appareil Intel® Wireless WiFi Link 4965AG_ est conforme aux exigences essentielles et aux autres dispositions pertinentes de la directive 1999/5/CE. Italiano[Italian] Con la presente Intel® Corporation dichiara che questo Intel® Wireless WiFi Link 4965AG_ è conforme ai requisiti essenziali ed alle altre disposizioni pertinenti stabilite dalla direttiva 1999/5/CE. Latviski[Latvian] Ar šo Intel® Corporation deklar•, ka Intel® Wireless WiFi Link 4965AG_ atbilst Direkt•vas 1999/5/EK b•tiskaj•m pras•b•m un citiem ar to saist•tajiem noteikumiem.Lietuvi•[Lithuanian] Šiuo Intel® Corporation deklaruoja, kad šis Intel® Wireless WiFi Link 4965AG_ atitinka esminius reikalavimus ir kitas 1999/5/EB Direktyvos nuostatas.Nederlands[Dutch] Hierbij verklaart Intel® Corporation dat het toestel Intel® Wireless WiFi Link 4965AG_ in overeenstemming is met de essentiële eisen en de andere relevante bepalingen van richtlijn 1999/5/EG.Malti[Maltese] Hawnhekk, Intel® Corporation, jiddikjara li dan Intel® Wireless WiFi Link 4965AG_ jikkonforma mal-•ti•ijiet essenzjali u ma provvedimenti o•rajn relevanti li hemm fid-Dirrettiva 1999/5/EC.](https://usermanual.wiki/Getac-Technology/040/User-Guide-1346536-Page-259.png)
![Magyar[Hungarian] Alulírott, Intel® Corporation nyilatkozom, hogy a Intel® Wireless WiFi Link 4965AG_ megfelel a vonatkozó alapvetõ követelményeknek és az 1999/5/EC irányelv egyéb elõírásainak.Norsk [Norwegian] Intel® Corporation erklærer herved at utstyret Intel® Wireless WiFi Link 4965AG_ er i samsvar med de grunnleggende krav og øvrige relevante krav i direktiv 1999/5/EF.Polski[Polish] Niniejszym, Intel® Corporation, o•wiadcza, •e Intel® Wireless WiFi Link 4965AG_ jest zgodne z zasadniczymi wymaganiami oraz innymi stosownymi postanowieniami Dyrektywy 1999/5/WE.Português[Portuguese] Intel® Corporation declara que este Intel® Wireless WiFi Link 4965AG_ está conforme com os requisitos essenciais e outras disposições da Directiva 1999/5/CE. Slovensko[Slovenian] Šiuo Intel® Corporation izjavlja, da je ta Intel® Wireless WiFi Link 4965AG_ v skladu z bistvenimi zahtevami in ostalimi relevantnimi dolo•ili direktive 1999/5/ES.Slovensky[Slovak] Intel® Corporation týmto vyhlasuje, že Intel® Wireless WiFi Link 4965AG_ sp••a základné požiadavky a všetky príslušné ustanovenia Smernice 1999/5/ES.Suomi[Finnish] Intel® Corporation vakuuttaa täten että Intel ® Wireless WiFi Link 4965AGN tyyppinen laite on direktiivin 1999/5/EY oleellisten vaatimusten ja sitä koskevien direktiivin muiden ehtojen mukainen. Svenska[Swedish] Härmed intygar Intel® Corporation att denna Intel® Wireless WiFi Link 4965AG_ står i överensstämmelse med de väsentliga egenskapskrav och övriga relevanta bestämmelser som framgår av direktiv 1999/5/EG.Íslenska[Icelandic] Hér með lýsir Intel® Corporation yfir því að Intel® Wireless WiFi Link 4965AG_ er í samræmi við grunnkröfur og aðrar kröfur, sem gerðar eru í tilskipun 1999/5/EC. Intel® PRO/Wireless 3945ABG Network ConnectionThis equipment complies with the essential requirements of the European Union directive 1999/5/EC.•esky[Czech] Intel® Corporation tímto prohlašuje, že tento Intel® PRO/Wireless 3945ABG Network Connection je ve shod• se základními požadavky a dalšími p•íslušnými ustanoveními sm•rnice 1999/5/ES.Dansk[Danish] Undertegnede Intel® Corporation erklærer herved, at følgende udstyr Intel® PRO/Wireless 3945ABG Network Connection overholder de væsentlige krav og øvrige relevante krav i direktiv 1999/5/EF.](https://usermanual.wiki/Getac-Technology/040/User-Guide-1346536-Page-260.png)
![Deutsch[German] Hiermit erklärt Intel® Corporation, dass sich das Gerät Intel® PRO/Wireless 3945ABG Network Connection in Übereinstimmung mit den grundlegenden Anforderungen und den übrigen einschlägigen Bestimmungen der Richtlinie 1999/5/EG befindet. Esti[Estonian] Käesolevaga kinnitab Intel® Corporation seadme Intel® PRO/Wireless 3945ABG Network Connection vastavust direktiivi 1999/5/EÜ põhinõuetele ja nimetatud direktiivist tulenevatele teistele asjakohastele sätetele.English Hereby, Intel® Corporation, declares that this Intel® PRO/Wireless 3945ABG Network Connection is in compliance with the essential requirements and other relevant provisions of Directive 1999/5/EC.Español[Spanish] Por medio de la presente Intel® Corporation declara que el Intel® PRO/Wireless 3945ABG Network Connection cumple con los requisitos esenciales y cualesquiera otras disposiciones aplicables o exigibles de la Directiva 1999/5/CE. Ελληνικ•[Greek] ΜΕ ΤΗΝ ΠΑΡΟΥΣΑ Intel® Corporation ΔΗΛΩΝΕΙ ΟΤΙ Intel® PRO/Wireless 3945ABG Network Connection ΣΥΜΜΟΡΦΩΝΕΤΑΙ ΠΡΟΣ ΤΙΣΟΥΣΙΩΔΕΙΣ ΑΠΑΙΤΗΣΕΙΣ ΚΑΙ ΤΙΣ ΛΟΙΠΕΣ ΣΧΕΤΙΚΕΣ ΔΙΑΤΑΞΕΙΣ ΤΗΣΟΔΗΓΙΑΣ 1999/5/ΕΚ.Français[French] Par la présente Intel® Corporation déclare que l'appareil Intel® PRO/Wireless 3945ABG Network Connection est conforme aux exigences essentielles et aux autres dispositions pertinentes de la directive 1999/5/CE.Italiano[Italian] Con la presente Intel® Corporation dichiara che questo Intel® PRO/Wireless 3945ABG Network Connectionè conforme ai requisiti essenziali ed alle altre disposizioni pertinenti stabilite dalla direttiva 1999/5/CE.Latviski[Latvian] Ar šo Intel® Corporationdeklar•, ka Intel® PRO/Wireless 3945ABG Network Connection atbilst Direkt•vas 1999/5/EK b•tiskaj•m pras•b•m un citiem ar to saist•tajiem noteikumiem.Lietuvi•[Lithuanian] Šiuo Intel® Corporation deklaruoja, kad šis Intel® PRO/Wireless 3945ABG Network Connection atitinka esminius reikalavimus ir kitas 1999/5/EB Direktyvos nuostatas.Nederlands[Dutch] Hierbij verklaart Intel® Corporation dat het toestel Intel® PRO/Wireless 3945ABG Network Connection in overeenstemming is met de essentiële eisen en de andere relevante bepalingen van richtlijn 1999/5/EG.Malti[Maltese] Hawnhekk, Intel® Corporation, jiddikjara li dan Intel® PRO/Wireless 3945ABG Network Connection jikkonforma mal-•ti•ijiet essenzjali u ma provvedimenti o•rajn relevanti li hemm fid-Dirrettiva 1999/5/EC.Magyar[Hungarian] Alulírott, Intel® Corporation nyilatkozom, hogy a Intel® PRO/Wireless 3945ABG Network Connection megfelel a vonatkozó alapvetõ követelményeknek és az 1999/5/EC irányelv egyéb elõírásainak.](https://usermanual.wiki/Getac-Technology/040/User-Guide-1346536-Page-261.png)
![Norsk [Norwegian] Intel® Corporation erklærer herved at utstyret Intel® PRO/Wireless 3945ABG Network Connection er i samsvar med de grunnleggende krav og øvrige relevante krav i direktiv 1999/5/EF.Polski[Polish] Niniejszym, Intel® Corporation, o•wiadcza, •e Intel® PRO/Wireless 3945ABG Network Connection jest zgodne z zasadniczymi wymaganiami oraz innymi stosownymi postanowieniami Dyrektywy 1999/5/WE.Português[Portuguese] Intel® Corporation declara que este Intel® PRO/Wireless 3945ABG Network Connection está conforme com os requisitos essenciais e outras disposições da Directiva 1999/5/CE. Slovensko[Slovenian] Šiuo Intel® Corporation izjavlja, da je ta Intel® PRO/Wireless 3945ABG Network Connection v skladu z bistvenimi zahtevami in ostalimi relevantnimi dolo•ili direktive 1999/5/ES.Slovensky[Slovak] Intel® Corporation týmto vyhlasuje, že Intel® PRO/Wireless 3945ABG Network Connection sp••a základné požiadavky a všetky príslušné ustanovenia Smernice 1999/5/ES.Suomi[Finnish] Intel® Corporation vakuuttaa täten että Intel® PRO/Wireless 3945ABG Network Connection tyyppinen laite on direktiivin 1999/5/EY oleellisten vaatimusten ja sitä koskevien direktiivin muiden ehtojen mukainen. Svenska[Swedish] Härmed intygar Intel® Corporation att denna Intel® PRO/Wireless 3945ABG Network Connection står i överensstämmelse med de väsentliga egenskapskrav och övriga relevanta bestämmelser som framgår av direktiv 1999/5/EG.Íslenska[Icelandic] Hér með lýsir Intel® Corporation yfir því að Intel® PRO/Wireless 3945ABG Network Connection er í samræmi við grunnkröfur og aðrar kröfur, sem gerðar eru í tilskipun 1999/5/EC.Intel® PRO/Wireless 3945BG Network ConnectionThis equipment complies with the essential requirements of the European Union directive 1999/5/EC.•esky[Czech] Intel® Corporation tímto prohlašuje, že tento Intel® PRO/Wireless 3945BG Network Connection je ve shod• se základními požadavky a dalšími p•íslušnými ustanoveními sm•rnice 1999/5/ES.Dansk[Danish] Undertegnede Intel® Corporation erklærer herved, at følgende udstyr Intel® PRO/Wireless 3945BG Network Connection overholder de væsentlige krav og øvrige relevante krav i direktiv 1999/5/EF.Deutsch[German] Hiermit erklärt Intel® Corporation, dass sich das Gerät Intel® PRO/Wireless 3945BG Network Connection in Übereinstimmung mit den grundlegenden Anforderungen und den übrigen einschlägigen Bestimmungen der Richtlinie 1999/5/EG befindet.](https://usermanual.wiki/Getac-Technology/040/User-Guide-1346536-Page-262.png)
![Esti[Estonian] Käesolevaga kinnitab Intel® Corporation seadme Intel® PRO/Wireless 3945BG Network Connection vastavust direktiivi 1999/5/EÜ põhinõuetele ja nimetatud direktiivist tulenevatele teistele asjakohastele sätetele.English Hereby, Intel® Corporation, declares that this Intel® PRO/Wireless 3945BG Network Connection is in compliance with the essential requirements and other relevant provisions of Directive 1999/5/EC.Español[Spanish] Por medio de la presente Intel® Corporation declara que el Intel® PRO/Wireless 3945BG Network Connection cumple con los requisitos esenciales y cualesquiera otras disposiciones aplicables o exigibles de la Directiva 1999/5/CE. Ελληνικ•[Greek] ΜΕ ΤΗΝ ΠΑΡΟΥΣΑ Intel® Corporation ΔΗΛΩΝΕΙ ΟΤΙ Intel® PRO/Wireless 3945BG Network Connection ΣΥΜΜΟΡΦΩΝΕΤΑΙ ΠΡΟΣ ΤΙΣΟΥΣΙΩΔΕΙΣ ΑΠΑΙΤΗΣΕΙΣ ΚΑΙ ΤΙΣ ΛΟΙΠΕΣ ΣΧΕΤΙΚΕΣ ΔΙΑΤΑΞΕΙΣ ΤΗΣΟΔΗΓΙΑΣ 1999/5/ΕΚ.Français[French] Par la présente Intel® Corporation déclare que l'appareil Intel® PRO/Wireless 3945BG Network Connection est conforme aux exigences essentielles et aux autres dispositions pertinentes de la directive 1999/5/CE.Italiano[Italian] Con la presente Intel® Corporation dichiara che questo Intel® PRO/Wireless 3945BG Network Connectionè conforme ai requisiti essenziali ed alle altre disposizioni pertinenti stabilite dalla direttiva 1999/5/CE. Latviski[Latvian] Ar šo Intel® Corporationdeklar•, ka Intel® PRO/Wireless 3945BG Network Connection atbilst Direkt•vas 1999/5/EK b•tiskaj•m pras•b•m un citiem ar to saist•tajiem noteikumiem.Lietuvi•[Lithuanian] Šiuo Intel® Corporation deklaruoja, kad šis Intel® PRO/Wireless 3945BG Network Connection atitinka esminius reikalavimus ir kitas 1999/5/EB Direktyvos nuostatas.Nederlands[Dutch] Hierbij verklaart Intel® Corporation dat het toestel Intel® PRO/Wireless 3945BG Network Connection in overeenstemming is met de essentiële eisen en de andere relevante bepalingen van richtlijn 1999/5/EG.Malti[Maltese] Hawnhekk, Intel® Corporation, jiddikjara li dan Intel® PRO/Wireless 3945BG Network Connection jikkonforma mal-•ti•ijiet essenzjali u ma provvedimenti o•rajn relevanti li hemm fid-Dirrettiva 1999/5/EC.Magyar[Hungarian] Alulírott, Intel® Corporation nyilatkozom, hogy a Intel® PRO/Wireless 3945BG Network Connection megfelel a vonatkozó alapvetõ követelményeknek és az 1999/5/EC irányelv egyéb elõírásainak.Norsk [Norwegian] Intel® Corporation erklærer herved at utstyret Intel® PRO/Wireless 3945BG Network Connection er i samsvar med de grunnleggende krav og øvrige relevante krav i direktiv 1999/5/EF.](https://usermanual.wiki/Getac-Technology/040/User-Guide-1346536-Page-263.png)
![Polski[Polish] Niniejszym, Intel® Corporation, o•wiadcza, •e Intel® PRO/Wireless 3945BG Network Connection jest zgodne z zasadniczymi wymaganiami oraz innymi stosownymi postanowieniami Dyrektywy 1999/5/WE.Português[Portuguese] Intel® Corporation declara que este Intel® PRO/Wireless 3945BG Network Connection está conforme com os requisitos essenciais e outras disposições da Directiva 1999/5/CE. Slovensko[Slovenian] Šiuo Intel® Corporation izjavlja, da je ta Intel® PRO/Wireless 3945BG Network Connection v skladu z bistvenimi zahtevami in ostalimi relevantnimi dolo•ili direktive 1999/5/ES.Slovensky[Slovak] Intel® Corporation týmto vyhlasuje, že Intel® PRO/Wireless 3945BG Network Connection sp••a základné požiadavky a všetky príslušné ustanovenia Smernice 1999/5/ES.Suomi[Finnish] Intel® Corporation vakuuttaa täten että Intel® PRO/Wireless 3945BG Network Connection tyyppinen laite on direktiivin 1999/5/EY oleellisten vaatimusten ja sitä koskevien direktiivin muiden ehtojen mukainen. Svenska[Swedish] Härmed intygar Intel® Corporation att denna Intel® PRO/Wireless 3945BG Network Connection står i överensstämmelse med de väsentliga egenskapskrav och övriga relevanta bestämmelser som framgår av direktiv 1999/5/EG.Íslenska[Icelandic] Hér með lýsir Intel® Corporation yfir því að Intel® PRO/Wireless 3945BG Network Connection er í samræmi við grunnkröfur og aðrar kröfur, sem gerðar eru í tilskipun 1999/5/EC.Back to Contents](https://usermanual.wiki/Getac-Technology/040/User-Guide-1346536-Page-264.png)
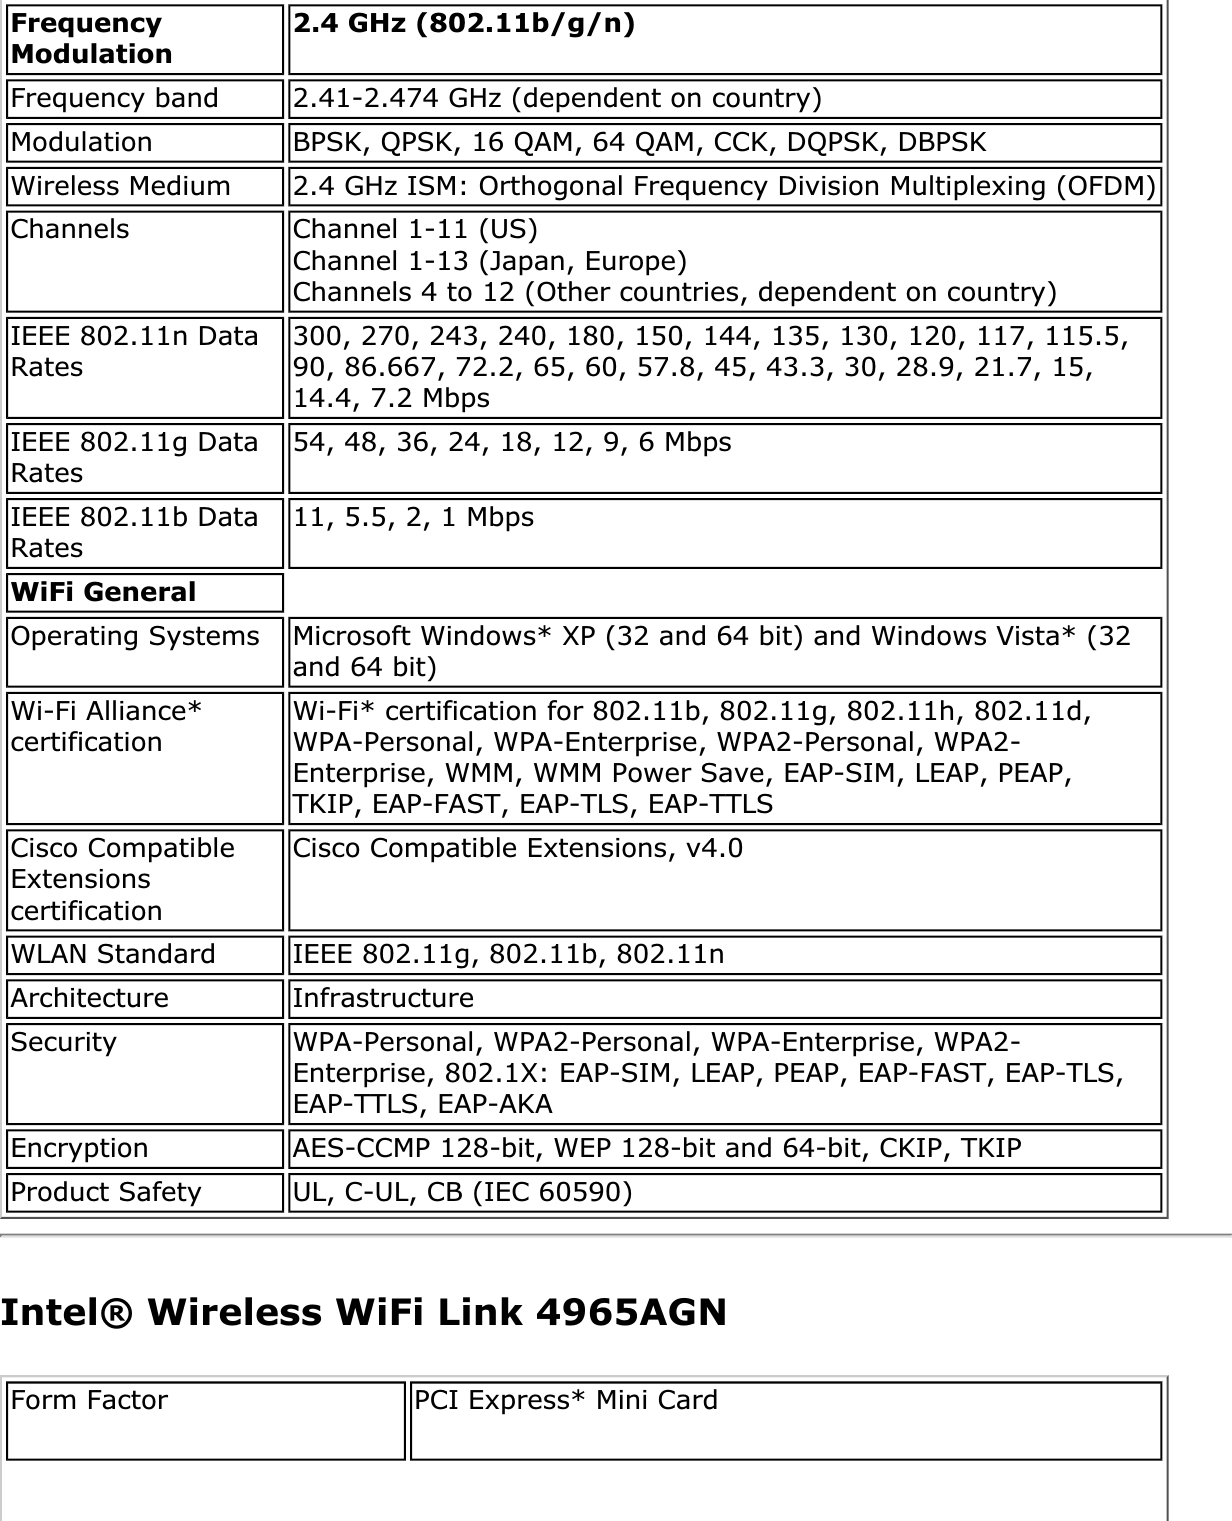
![IEEE 802.11a Data Rates 54, 48, 36, 24, 18, 12, 9, 6 MbpsIEEE 802.11g Data Rates 54, 48, 36, 24, 18, 12, 9, 6 MbpsIEEE 802.11b Data Rates 11, 5.5, 2, 1 MbpsGeneralOperating Systems ●Microsoft Windows* XP (32-bit and 64-bit) ●Windows Vista* (32-bit and 64-bit) ●Windows* 7 (32-bit and 64-bit)Wi-Fi Alliance* certification Wi-Fi* certification for 802.11b, 802.11g, 802.11a, 802.11h, 802.11d, WPA-Personal, WPA-Enterprise, WPA2-Personal, WPA2-Enterprise, WMM, WMM Power Save, EAP-SIM, LEAP, PEAP, TKIP, EAP-FAST, EAP-TLS, EAP-TTLS, EAP-AKACisco Compatible Extensions certification Cisco Compatible Extensions, v4.0WLAN Standard IEEE 802.11g, 802.11b, 802.11a, 802.11nArchitecture InfrastructureSecurity WPA-Personal, WPA2-Personal, WPA-Enterprise, WPA2-Enterprise, AES-CCMP 128-bit, WEP 128-bit and 64-bit; 802.1X: EAP-SIM, LEAP, PEAP, TKIP, EAP-FAST, EAP-TLS, EAP-TTLS, EAP-AKAProduct Safety UL, C-UL, CB (IEC 60590)Intel® Wireless WiFi Link 4965AG_This is a version of Intel Wireless WiFi 4965AGN with 8-2.11n capabilities disabled. 802.11n refers to: IEEE P802.11n / D2.0 Draft Amendment to STANDARD [FOR] Information Technology-Telecommunications and information exchange between systems-Local and Metropolitan networks-Specific requirements-Part 11: Wireless LAN Medium Access Control](https://usermanual.wiki/Getac-Technology/040/User-Guide-1346536-Page-274.png)


![WEP Key Either a pass phrase or hexadecimal key. The pass phrase must be 5 ASCII characters for 64-bit WEP or 13 ASCII characters for 128-bit WEP. For pass phrases, 0-9, a-z, A-Z, and ~!@#$%^&*()_+|`-={}|[]\:";'<>?,./ are all valid characters. The hex key must be 10 hexadecimal characters (0-9, A-F) for 64-bit WEP or 26 hexadecimal characters (0-9, A-F) for 128-bit WEP.Wi-Fi*(WirelessFidelity)Is meant to be used generically when referring of any type to 802.11 network, whether 802.11b, 802.11a, or dual-band.WiMAX WiMAX, the Worldwide Interoperability for Microwave Access, is a telecommunications technology aimed at providing wireless data over long distances in a variety of ways, from point-to-point links to full mobile cellular type access. It is based on the IEEE 802.16 standard. The name WiMAX was created by the WiMAX Forum, which was formed in June 2001 to promote conformance and interoperability of the standard. The forum describes WiMAX as "a standards-based technology enabling the delivery of last mile wireless broadband access as an alternative to cable and DSL." Wirelessrouter A stand-alone wireless hub that allows any computer that has a wireless network adapter to communicate with another computer within the same network and to connect to the Internet.WLAN(WirelessLocal-AreaNetwork)A type of local-area network that uses high-frequency radio waves rather than wires to communicate between nodes.WPA* (Wi-Fi ProtectedAccess)This is a security enhancement that strongly increases the level of data protection and access control to a wireless network. WPA is an interim standard that will be replaced with the IEEE's 802.11i standard upon its completion. WPA consists of RC4 and TKIP and provides support for BSS (Infrastructure) mode only. WPA and WPA2 are compatible.WPA2* (Wi-Fi ProtectedAccess 2)This is the second generation of WPA that complies with the IEEE TGi specification. WPA2 consists of AES encryption, pre-authentication and PMKID caching. It provides support for BSS (Infrastructure) mode and IBSS mode. WPA and WPA2 are compatible.](https://usermanual.wiki/Getac-Technology/040/User-Guide-1346536-Page-291.png)