Getac Technology PHS8-PZ GSM/GPRS/UMTS/HSPA MODULE User Manual
Getac Technology Corporation GSM/GPRS/UMTS/HSPA MODULE
User Manual

Z710
USER MANUAL

Rugged Mobile Computing Solutions
2012
Trademarks
Google and Android are trademarks of Google Inc.
The Bluetooth word mark and logos are owned by the Bluetooth SIG, Inc.
All other brand and product names are trademarks or registered trademarks of their
respective companies.
Disclaimer
Specifications and manuals are subject to change without notice. Getac assumes
no liability for damage incurred directly or indirectly from errors, omissions, or
discrepancies between the device and the manuals.
Notes
Depending on the specific model purchased, the color and look of your device and
accessories may not exactly match the graphics shown in this document.
The screenshots and other presentations shown in this document are for reference
only. They may differ from the actual screens and presentations generated by the
actual product.
Your device is based on Google’s open-source Android 2.3 operating system, with
additions by Getac. It does not include Google’s closed-source applications such
as Gmail, Google Maps, Android Market, etc.
For the latest version of the manual, please visit the Getac website at
www.getac.com.
Detailed instructions on using Android 2.3 are also provided in the User’s Guide

available from Google’s website. Note that not all applications and features described
in Google’s document are supported by your device.

i
Table of Contents
Chapter 1 Getting Started .......................................... 1-1
Identifying Hardware Components ..................................... 1-1
Front Components ..................................................... 1-1
Back Components ..................................................... 1-3
Top Components ...................................................... 1-4
Bottom Components ................................................... 1-5
Left-Side Components ............................................... 1-6
Getting Your Device Ready for Use ................................ 1-7
Installing the SIM Card .............................................. 1-7
Connecting to AC Power and Charging the Battery ......... 1-7
Performing the Initial Startup ....................................... 1-8
Using Options .............................................................. 1-9
Using a MicroSD Card .............................................. 1-9
Using the Tether ..................................................... 1-10
Chapter 2 Basic Skills ................................................. 2-1
Waking Up and Shutting Down ....................................... 2-1
Waking Up .............................................................. 2-1
Shutting Down .......................................................... 2-1
Navigating on the Screen ............................................. 2-2
Home Screen ............................................................. 2-3
Extensions to the Home Screen ................................. 2-3
Items on the Home Screen ....................................... 2-3

ii
Customizing Your Home Screen ................................. 2-4
Using the Launcher ..................................................... 2-5
Working with Menus .................................................... 2-6
Options Menus ........................................................ 2-6
Context Menus ........................................................ 2-6
Status Bar ................................................................. 2-7
Quick Contact ............................................................. 2-7
Entering Information ..................................................... 2-8
Using the Onscreen Keyboard .................................... 2-8
Editing Text ............................................................ 2-9
Searching Information ................................................... 2-9
Locking the Screen .................................................... 2-10
Chapter 3 Getting Connected ..................................... 3-1
Overview .................................................................... 3-1
Types of Connections ................................................ 3-1
Entering Airplane Mode .............................................. 3-1
Connecting to Mobile Networks ...................................... 3-2
Mobile Network Status Icons ...................................... 3-2
Checking or Modifying Mobile Network Settings ............. 3-2
Using Wi-Fi Networks .................................................. 3-3
Turning Wi-Fi On or Off .......................................... 3-3
Connecting to a Wi-Fi Network ................................. 3-4
Managing Wi-Fi Settings ........................................... 3-4
Using the Bluetooth Function ......................................... 3-5
Turning Bluetooth On or Off ...................................... 3-5
Pairing with a Bluetooth Device.................................. 3-6
Connecting to a Paired Bluetooth Device ..................... 3-6
Managing Bluetooth Settings ....................................... 3-7
Connecting to VPNs .................................................... 3-7

iii
Adding a VPN ........................................................ 3-7
Connecting to a VPN ............................................... 3-8
Disconnecting from a VPN ........................................ 3-8
Connecting to a Computer via USB ................................ 3-8
Adding an Account ...................................................... 3-9
Chapter 4 Placing and Receiving Calls ...................... 4-1
Opening the Phone Application ....................................... 4-1
Placing a Call ............................................................ 4-2
Dialing a Call ......................................................... 4-2
Placing a Call from Contacts ..................................... 4-2
Placing a Call from the Call Log ............................... 4-3
Responding to a Call .................................................. 4-3
Answering a Call ..................................................... 4-3
Declining a Call ...................................................... 4-3
Ending a Call ......................................................... 4-3
During a Call ............................................................. 4-4
Adjusting the Phone Volume ...................................... 4-4
Using Additional Functions ......................................... 4-4
More Phone Operations ................................................ 4-5
Using Call Log ....................................................... 4-5
Reading or Sending Messages ................................... 4-6
Checking Your Voicemail ........................................... 4-6
Making an Emergency Call ........................................ 4-6
Dialing an International Call ....................................... 4-7
Configuring Phone Call Settings .................................. 4-7
Chapter 5 Contacts and Calendar .............................. 5-1
Contacts ..................................................................... 5-1
Importing Contacts from Your SIM Card ........................ 5-1
Adding a Contact .................................................... 5-2

iv
Using Contacts List and Details ................................. 5-2
Editing Contacts Details ............................................ 5-3
Joining or Separating Contacts ................................... 5-4
Calendar .................................................................... 5-5
Working with Different Views ...................................... 5-5
Viewing Event Details ............................................... 5-6
Creating an Event ................................................... 5-6
Editing or Delete an Event ........................................ 5-7
Changing Calendar Settings ....................................... 5-7
Chapter 6 Web and Communications ......................... 6-1
Browser ...................................................................... 6-1
Surfing the Web ....................................................... 6-1
Working with Bookmarks ........................................... 6-2
Changing Browser Settings ........................................ 6-3
Email ........................................................................ 6-4
Opening Email and the Account Screen ....................... 6-4
Reading and Responding to E-mail Messages .............. 6-5
Composing and Sending an E-mail ............................ 6-6
Working with Account Folders .................................... 6-7
Changing Email Account Settings ................................ 6-7
Messaging .................................................................. 6-7
Reading and Responding to Messages ........................ 6-7
Composing and Sending Messages ............................. 6-8
Changing Messaging Settings ..................................... 6-9
Chapter 7 Multimedia ................................................. 7-1
Camera and Camcorder ................................................. 7-1
Taking Pictures ........................................................ 7-1
Shooting Videos ...................................................... 7-3
Gallery ...................................................................... 7-4

v
Viewing Pictures and Videos ...................................... 7-4
Working with Thumbnails ........................................... 7-5
Music ........................................................................ 7-6
Copying Music Files onto the SD Card ....................... 7-6
Playing Music ......................................................... 7-7
Add a Song to the Ringtone List ............................... 7-8
Working with Playlists ............................................... 7-8
Chapter 8 Managing Your Device ............................... 8-1
Managing Power .......................................................... 8-1
Low Battery Signals and Actions ................................. 8-1
Power-Saving Tips .................................................. 8-2
Settings ..................................................................... 8-3
Wireless and Networks Settings .................................. 8-3
Call Settings ........................................................... 8-5
Sound Settings ........................................................ 8-5
Display Settings ....................................................... 8-6
Location and Security Settings.................................... 8-7
Applications Settings ................................................. 8-8
Accounts and Sync Settings ...................................... 8-8
Privacy Settings ....................................................... 8-9
SD Card and Phone Storage Settings ......................... 8-9
Search Settings ...................................................... 8-10
Language and Keyboard Settings ................................ 8-11
Voice Input and Output Settings ................................ 8-12
Accessibility Settings ................................................ 8-12
Date and Time Settings ........................................... 8-12
About Phone.......................................................... 8-13
Chapter 9 Caring and Maintenance ............................ 9-1
Caring for Your Device ................................................. 9-1

vi
Chapter 10 ................................ Regulatory Information
10-1
Regulations Statements ................................................. 10-1
European Notice ...................................................... 10-1
FCC Regulations..................................................... 10-2
Safety Precautions ...................................................... 10-3
About Charging ...................................................... 10-3
About the Charger .................................................. 10-3
About the Radio Frequency Exposure ......................... 10-4
Getting Started 1-1
Chapter 1
Getting Started
This chapter introduces you to the external components of your device and guides
you through the process of setting up your device for use.
Identifying Hardware Components
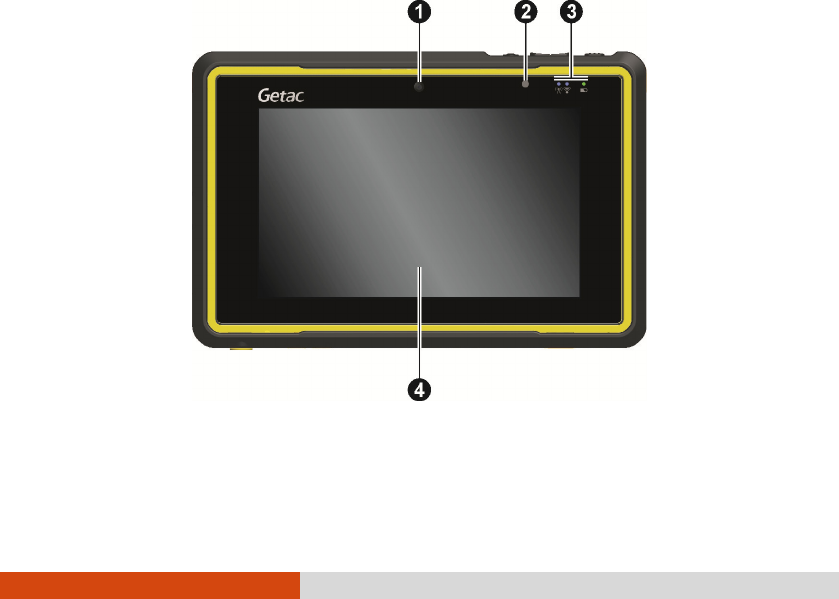
Front Components
1-2 Getting Started
Ref
Component Description
Camera Lens Takes still pictures or records video clips.
The front lens
supports 1 MP (mega pixel).
Light Sensor Senses the ambient light
for automatic adjustments of the
display and keypad backlight. The features
can be enabled
through OSD Control Panel and G-Manager.
NOTE: Do not cover the sensor when in use.
Indicators
Mobile
Phone Indicator
Flashes in
blue to indicate that
the phone function is switched
on.
RF (Radio
Frequency)
Indicator
Flashes in blue to indicate that the Bluetooth radio is on.
Flashes in amber to indicate that the Wi-Fi (wireless
network) radio is on.
Flashes in purple to indicate that the GPS receiver is on.
If more than one module is switched on, the indicator
changes color in a cyclic way.
Charge/
Notification
Indicator
Glows in amber to indicate that battery charging is in
progress.
Glows in green to indicate that the battery is fully charged.
Glows in red to indicate that the battery
power is critically
low (less than 10%).
Flashes in red to
inform you of scheduled appointments,
alarms and reminders.
Touch Screen Displays the output of your
device and responds to your
tapping.

Getting Started 1-3
Back Components
Ref
Component
Description
Speaker Plays music, sounds and voices.
Stylus Serves as the input device by tapping on the touchscreen
to make selections and enter information.
Store it in the slot
when not in use.
Flash Provides extra light when taking pictures.
Camera Lens Takes still pictures or records video clips. The rear lens
supports 5 MP (mega pixel).
1-4 Getting Started
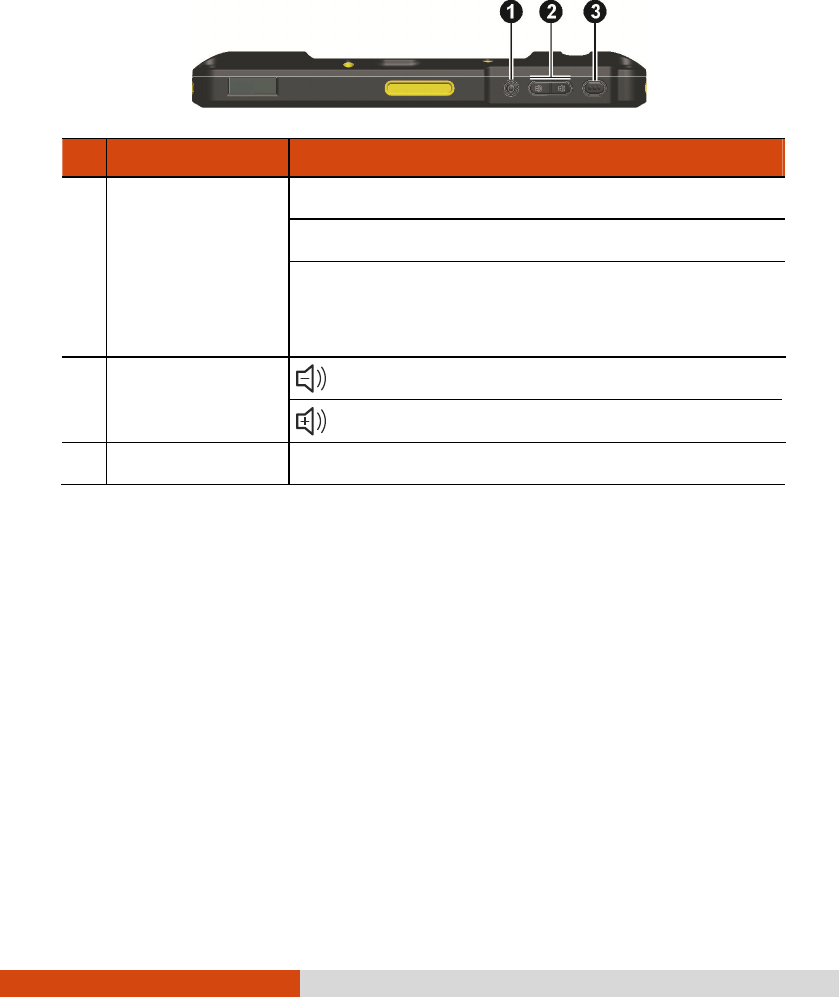
Top Components
Ref
Component Description
Power Button Starts up your device.
Turns off or restores the screen.
When pressed longer:
Opens a menu with options for Silent mode, Airplane
mode, and Power off.
Volume Control
Buttons
decrease the sound volume.
increase the sound volume.
Trigger Button Provides the “trigger” function for specific applications.
Getting Started 1-5
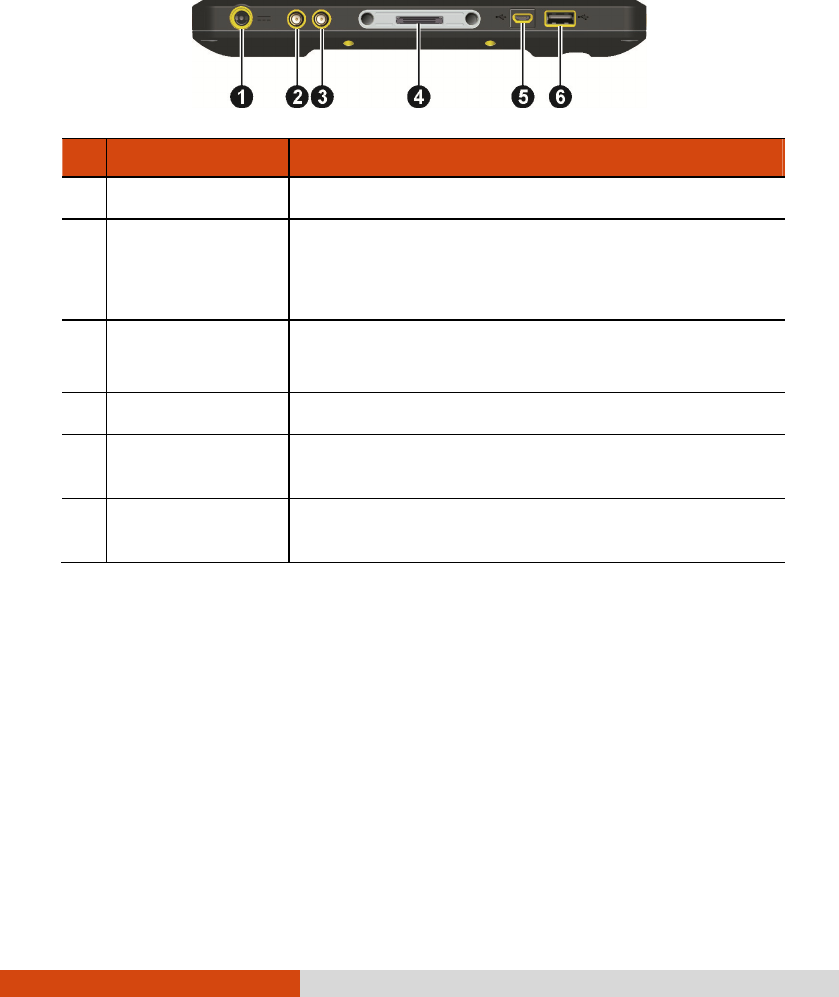
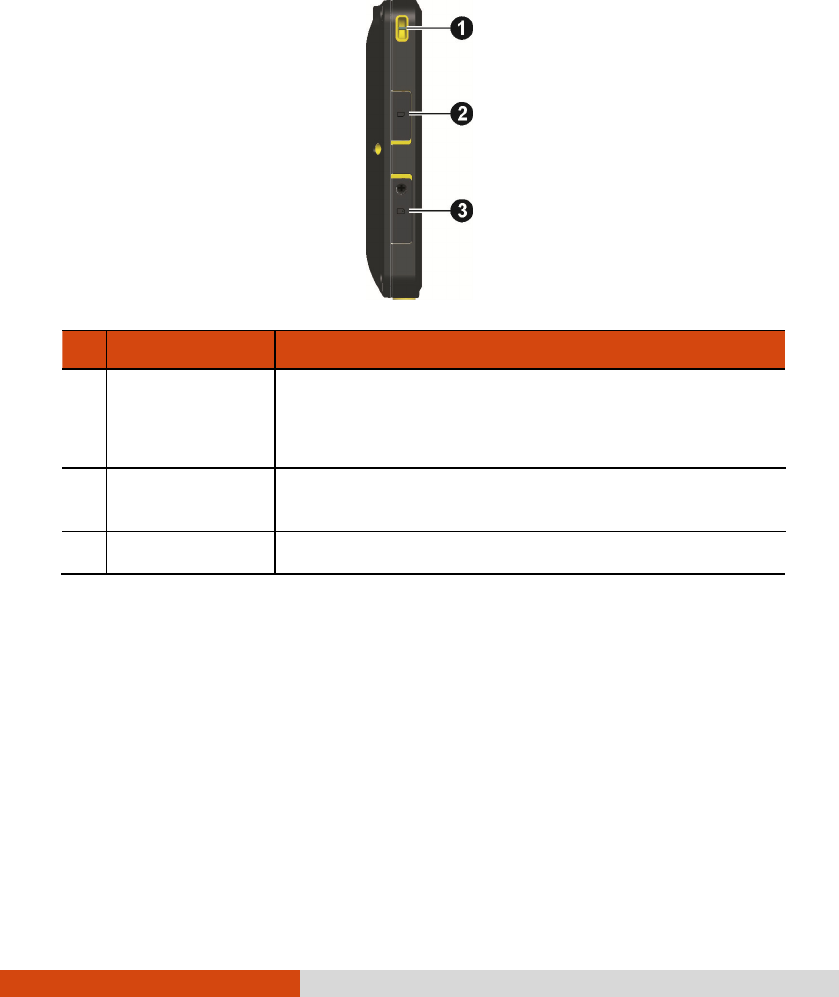
Bottom Components
Ref
Component Description
Power Connector Connects to the AC adapter.
WWAN
Pass-through
Connector
Connects the external antenna for WWAN (
wireless wide
area network) 3G connectivity.
NOTE: Must be connected via docking.
GPS Pass-through
Connector
Connects the external antenna for GPS signal reception.
NOTE: Must be connected via docking.
Docking Connector
Connects to the office dock (an option).
Micro USB Hose
Connector
Connects to a USB device via Micro USB cable.
USB Client
Connector
Connects to a computer via USB cable for data transfer.
1-6 Getting Started
Left-Side Components
Ref
Component Description
Tether Holder For holding a tether (such as the stylus tether).
There
is one holder on the left side and
another on the right
side.
MicroSD Card
Cover
Inside is the microSD card slot.
SIM Card Cover Inside is the 3G SIM card slot.
Getting Started 1-7
Getting Your Device Ready for Use
Installing the SIM Card
1. Open the SIM card slot by removing one screw.
2. Insert the SIM card into the slot.
NOTE: To remove the SIM card, slightly push in the card to release it and then
pull the card out of the slot.
3. Replace the cover and tighten the screw.
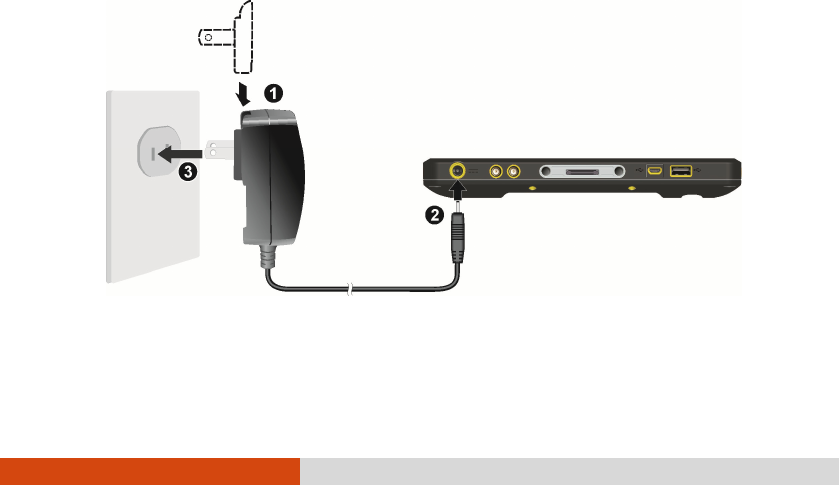
Connecting to AC Power and Charging the Battery
Be sure to fully charge the battery before using your device for the first time.
1. Fit the converter plug to the AC adapterr ().
2. Connect the DC jack end of the AC adapter to your device () and the other
end to a wall outlet ().
Converter Plug

1-8 Getting Started
3. The charge indicator glows in amber when charging is in progress. Do not
disconnect your device from AC power until the battery is fully charged, as
indicated by the amber indicator turning into green. This will take a couple of
hours.
CAUTION: For optimal performance of the lithium battery, take note of the
following:
Use the included AC adapter only.
There is no need to fully discharge the battery before charging. You can
charge the battery before it is discharged.
Do not charge the battery where the temperature is high (e.g. in direct
sunlight).
As a protection against damage, your device stops charging when the battery’s
temperature is extremely high or low. In high temperature conditions, the
charging stops when the battery’s temperature gets above 70C (158F) and
continues when the temperature lowers to 60C (140F). In low temperature
conditions, the charging stops when the temperature gets below -5C (23F)
and continues when the temperature rises to 0C (32F).
If you will not use the product for a long period of time, be sure to fully charge
the battery at least once every two weeks. Over discharge of the battery can
affect the charging performance.
Performing the Initial Startup
When turning on your device for the very first time, you will be guided through
a setup process.
1. Make sure that your device is either connected to AC power or the battery
has power.
2. Press the power button.
The device powers up and displays the initial screen.
3. If a SIM card has been inserted and the mobile phone network operator (or
you) has set the PIN, you will be prompted to enter the PIN.

Getting Started 1-9
4. Follow the on-screen instructions to complete the setup process for touchscreen
calibration, language, and others.
5. After the setup is completed, the Home screen appears. You can now use your
device.
Using Options
Using a MicroSD Card
Your device has a microSD card slot where you can insert a microSD memory
card.
Inserting a MicroSD Card
1. Open the microSD card cover.
2. Insert the card into the slot, with the connector pointing to the slot and its
label facing the front of the device.
3. Close the cover.
Preparing an SD Card for Use
To use a new SD card with your device, format the card on your device. You
also need to do so if you have problems reading data on an old SD card.
1. If needed, backup the data on your old SD card to your computer.
2. Insert the SD card to your device.
3. Go to the Home screen and press the menu key on your device.
4. Tap Settings SD card & phone storage Unmount SD card.
5. Tap Format SD card.

1-10 Getting Started
Removing an SD card
You can safely remove the SD card from your device any time the device is shut
down. If you need to remove the card while the device is on, unmount the card
first to prevent corrupting or damaging the card.
To unmount:
1. Go to the Home screen and press the menu key on your device.
2. Tap Settings SD card & phone storage Unmount SD card.
3. Open the protection cover. Press the edge of the card to release it and then
pull the card out of the slot.
Using the Tether
A tether is provided for attaching the stylus to your device.
1. Insert one of the tether’s loop ends through the hole of the stylus. Then, insert
the other end through the first loop and pull it tight.
2. Insert the other loop end to the right-side or left-side holder on the device.
Then, insert the stylus end through the loop and pull it tight.

Basic Skills 2-1
Chapter 2
Basic Skills
This chapter familiarizes you with the basic operations of your device.
CAUTION: The device can get uncomfortably warm when you use it in high
temperatures. In such a circumstance, please take safety measures (such as
wearing gloves) to protect yourself. Prolonged body contact can cause discomfort
and potentially a burn.
Waking Up and Shutting Down
Waking Up
Your device sleeps after a period of inactivity (1 minute by default). You can also
manually put your device to sleep by briefly pressing the power button.
To wake up, press the power button and, at the lock screen, drag the lock icon
all the way to the right.
Shutting Down
Press and hold the power button until a menu pops up. Tap Power off and then
OK.

2-2 Basic Skills
Navigating on the Screen
CAUTION: Do not use a sharp object such as a ballpoint pen or pencil on the
touchscreen. Doing so may damage the touchscreen surface. Use your finger or
the included stylus.
NOTE: The stylus can be tethered to your device. Store it in the slot (on the back of
your device) when not in use.
Use the stylus (or your finger) to navigate and select objects on the screen.
Here are some common terms that you should know when using the touchscreen:
Tap
Touch the screen once with the stylus to open an item or select an object.
Tap and hold
Tap and hold the stylus on an item to see a list of actions available for that
item.
Drag
Hold the stylus on an item and, without lifting the stylus, move across the screen
until you reach the target position.
Swipe or slide
Move the stylus across the screen, without pausing when you first touch it (so
you don’t “drag” instead). For example, you slide the screen up or down
to scroll a list.
Pinch
In some applications (such as Browser and Gallery), you can zoom in and
out by placing two fingers on the screen at once and pinching them together
(to zoom out) or spreading them apart (to zoom in).

Basic Skills 2-3
Home Screen
The Home screen is your starting point to access all the features on your device.
You can have it display application icons, widgets, shortcuts, and other features
that you want.
At the top of the screen, the Status bar displays the time, information about the
status of your device, and icons for notifications that you’ve received.
To return to the Home screen at any time, press the Home key.
Extensions to the Home Screen
You can slide left or right across the Home screen to see other parts of the Home
screen. The extensions to the Home screen provide more space for widgets,
shortcuts, and other items.
Small dots at the lower left and right indicate which screen you’re viewing. Tap
and hold the small dots on the lower left or right of the screen to view thumbnails
of the Home screen and its extensions, which you can tap to open.
Items on the Home Screen
There are three types of items you can add to the Home screen. They are:
Shortcuts
Add shortcuts to applications, a bookmarked webpage, a favorite contact, a music
playlist, and many other items. The shortcuts available depend on the applications
you have installed.
Widgets
Add any of a variety of miniature applications (widgets) to your Home screen,
including a clock, a music player, a picture frame, a calendar that shows
upcoming appointments, etc.

2-4 Basic Skills
Folders
Add a folder where you can organize Home screen items, or folders that contain
your contacts. Your folders’ contents are kept up to date automatically.
Customizing Your Home Screen
You can add application icons, shortcuts, widgets, and other items to any part of
the Home screen. You can also change the wallpaper.
Adding an Item to the Home Screen
1. Open the Home screen where you want to add the item.
2. Press the menu key on your device and tap Add.
- or -
Tap and hold an empty location on the Home screen.
3. In the menu that opens, tap the type of item to add.
4. Tap the item to add.
Moving an Item on the Home Screen
1. Tap and hold the item you want to move, until it is enlarged. Don’t lift the
stylus.
2. Drag the item to a new location on the screen.
Pause at the edge of the screen to drag the item onto another Home screen
pane.
3. When the item is where you want it, lift the stylus.

Basic Skills 2-5
Removing an Item from the Home Screen
1. Tap and hold the item you want to remove, until it is enlarged. Don’t lift the
stylus.
The Launcher icon changes to a Trash Can icon.
2. Drag the item to the Trash Can icon.
Changing the Wallpaper
1. While on the Home screen, press the menu key on your device and tap
Wallpaper.
- or -
Tap and hold an empty area of the Home screen and in the menu that opens,
tap Wallpapers.
2. Tap Pictures or Wallpapers.
Tap Pictures to use a picture that you have in your device. You can crop
the picture before setting it as a wallpaper.
Tap Wallpaper to open a screen where you can sample the wallpaper images
that come with the device. Slide the miniature images left and right to view
the samples.
3. Tap Save or Set wallpaper.
Using the Launcher
The Launcher holds icons for all of the applications on your device.
To open the Launcher, tap at the bottom of the Home screen. If you have
more applications than can fit on the Launcher in one view, you can slide the
Launcher up or down to view more.

2-6 Basic Skills
Tap an icon in the Launcher to open the application. When you open an application,
the other applications you’ve been using keep on running. You can quickly switch
among your applications, to work with several at once.
To switch to a recently used application, press and hold the Home key to open
a small window with icons of applications that you’ve used recently.
Working with Menus
There are two kinds of Android menus: options menus and context menus.
Options Menus
Options menus contain tools that apply to the activities of the current screen or
application, not to any specific item on the screen.
You open an options menu by pressing the menu key on your device.
NOTE: Not all screens have options menus.
Context Menus
Context menus contain tools that apply to a specific item on the screen.
You open a context menu by tapping and holding an item on the screen.
NOTE: Not all items have context menus.
Basic Skills 2-7
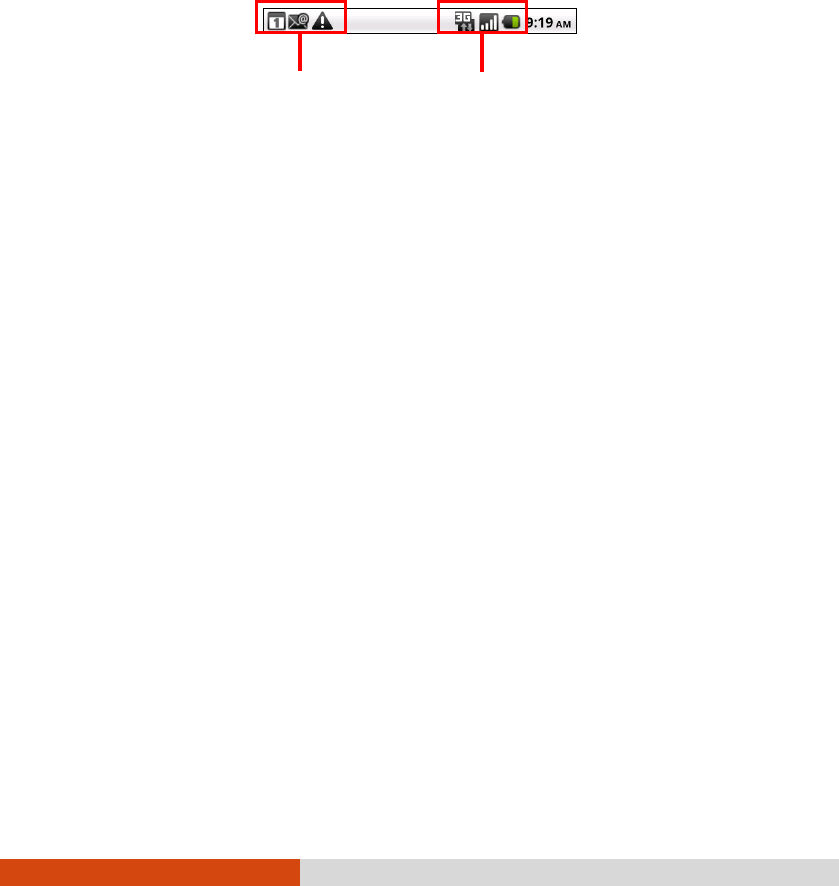
Status Bar
The Status bar appears at the top of almost every screen. It displays icons indicating
that you’ve received notifications (on the left) and icons indicating the phone’s
status (on the right), along with the current time.
Notification icons report the arrival of new messages, events, and alarms. When
you receive a notification, its icon appears in the Status bar, along with a summary
that appears only briefly.
You can open the Notifications panel to view a list of all your notifications. Use
one of the two methods to open the panel:
Drag the Status bar down from the top of the screen.
While on the Home screen, press the menu key on your device and tap
Notifications.
To respond to a notification, tap it in the panel.
To clear all event-based notifications, tap Clear at the top right of the panel.
To close the Notifications panel, drag the tab at the bottom of the Notifications
panel to the top of the screen or press the Back key on your device.
Quick Contact
As you build up your list of contacts on your device, you can use Quick Contact
for Android in many applications to quickly start a chat, email, or text message,
to place a call, or to locate your contacts. Quick Contact for Android is a special
Status icons
Notifications icons
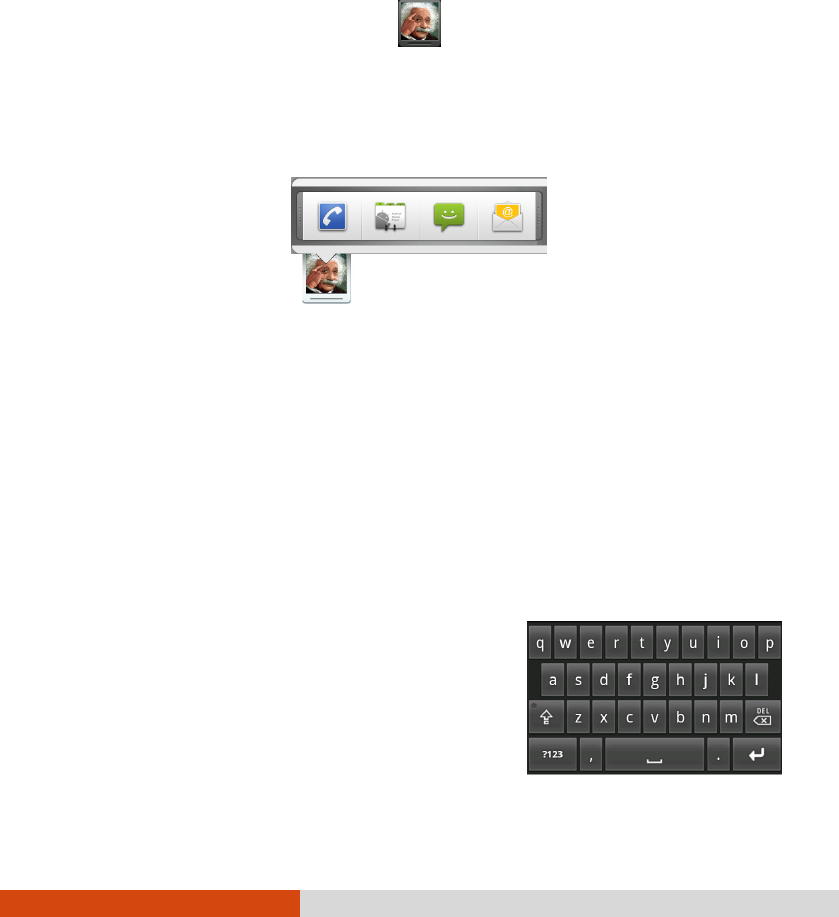
2-8 Basic Skills
icon that you can tap to open a bubble with options for quickly initiating a connection
to that contact.
Contacts that you can access with Quick Contact are displayed differently in different
applications, but usually with a picture frame that looks like this:
Tap a Quick Contact icon to open a bubble with icons for all the ways you can
communicate with the contact. Tap an icon to start communicating with the contact
in that application.
You can add a shortcut for a contact to your Home screen, which you can then
tap to open Quick Contact for Android for that contact. (For more information about
adding shortcuts to the Home screen, see “Adding an Item to the Home Screen”
earlier in this chapter.)
Entering Information
Using the Onscreen Keyboard
You enter text, numbers, and symbols using the
onscreen keyboard. Some applications open the
keyboard automatically. In others, you tap a
n input
field where you want to enter text to open the
keyboard.
Basic Skills 2-9
To enter text, tap the keys on the keyboard to type.
NOTE:
Tap and hold a vowel or the C, N, or S key to open a small window where you
can tap an accented vowel or other alternate letter.
If you’ve used the Android Keyboard settings to make more than one
language available, you can slide left or right on the Space key to cycle to the
previous or next language. (For settings information, see “Language and
Keyboard Settings” in Chapter 8.)
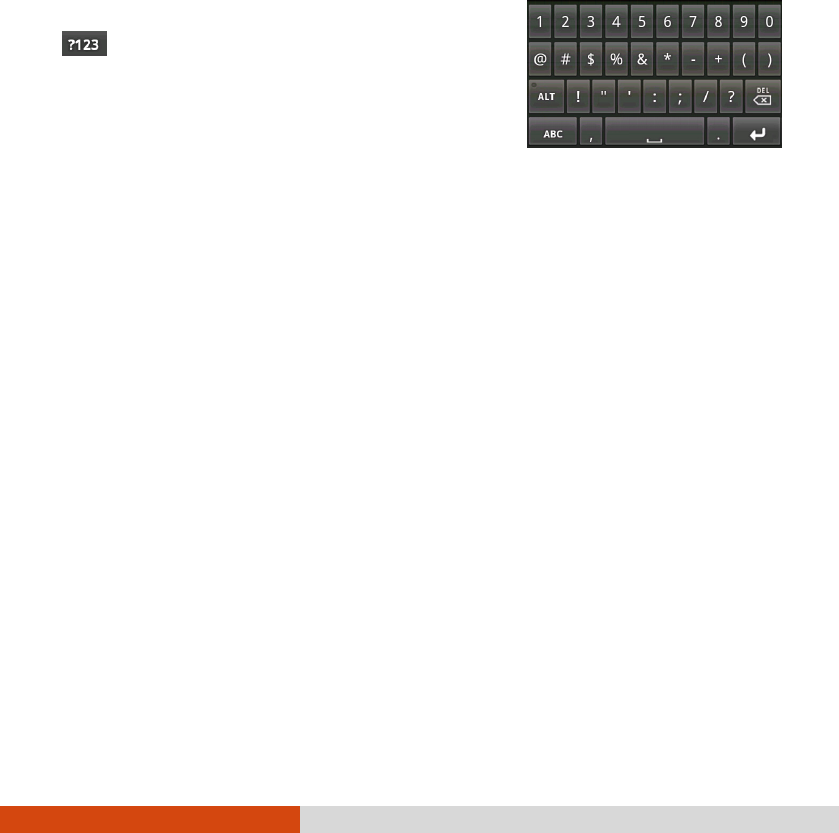
To enter numbers or symbols, tap the Symbols key
to switch to the numbers and symbols
keyboard. Tap the Alt key on the symbols keyboard
to view additional symbols; press it again to switch
back. Tap and hold a key to open a window of
additional symbols.
NOTE: If your model supports other input methods, you can switch to another input
method by tapping and holding an input field while the onscreen keyboard is open.
Tap Input method in the menu that opens and then tap the method you want.
Editing Text
You can edit the text you enter in text fields and use menu commands to cut,
copy, and paste text, within or across applications. Some applications don’t support
editing some or all of the text they display; others may offer their own way to
select text you want to work with.
Searching Information
NOTE: If you’re searching the web, make sure your device is connected to the
Internet.
You can search for information on your device and on the web using Google search.
1. Access the Search box by one of the three ways.

2-10 Basic Skills
Go to the Home screen for the Search widget (which is on the Home screen
by default).
Tap the Search icon in the Launcher.
Press the Search key. In applications such as Contacts, the application’s
own search box opens when you press the key.
2. If you want to target where to search, tap the icon at the left of the search
box.
A panel opens with icons for All, for Web, and for the applications you’ve checked
in the Searchable items settings. (See “Search Settings” in Chapter 8.) Tap
the icon that represents where you want to search.
3. Type in the input field.
If you’re searching the web, suggestions from Google web search are added
to the list of previously chosen search results. If you’re searching the device,
matching items on your device appear in the list.
4. If what you’re searching for is in the list of suggestions or previously chosen
search results, tap it in the list.
If what you’re searching for is not in the list, tap the icon at the right of the
search box or tap the Go key on the onscreen keyboard to search.
5. The search result displays in the appropriate application, such as Contacts or
the Browser.
Locking the Screen
The lock screen displays whenever you turn on your device or wake up the screen.
By default, you unlock the screen by dragging the lock icon all the way to the
right.

Basic Skills 2-11
You can configure screen lock security so that only a pattern, PIN, or password
can unlock the screen. (See “Location and Security Settings” in Chapter 8 for
information on configuring screen lock security.)

Getting Connected 3-1
Chapter 3
Getting Connected
This chapter tells you how you can get your device connected through a variety
of ways.
Overview
Types of Connections
Your device can connect to a variety of networks and devices, including mobile
networks for voice and data transmission, Wi-Fi data networks, and Bluetooth
devices, such as headsets. You can also connect your device to a computer to
transfer files.
Entering Airplane Mode
Some locations may require you to switch off all wireless radios. You can do so
by placing your device in Airplane mode.
To quickly enter Airplane mode, press and hold the power button until a menu
pops up. Tap Airplane mode. The icon displays in the Status bar.
3-2 Getting Connected
Connecting to Mobile Networks
Your device supports HSDPA (High-Speed Downlink Packet Access). HSDPA is
an enhanced 3G (third generation) mobile telephony communications protocol. It
can operate on 850/900/1800/1900/2100MHz.
To use the phone, you need to first set up an account with a mobile phone network
service provider. The functions available to you depend on the services offered by
your service provider and your type of subscription.
Your service provider will provide you with a SIM card. This card contains your
mobile phone account details and rights, contacts that can be stored and any
additional services to which you have subscribed. You must install a SIM card before
you can make or receive phone calls or use wireless data services. (See “Installing
the SIM Card” in Chapter 1 for installation instructions.)
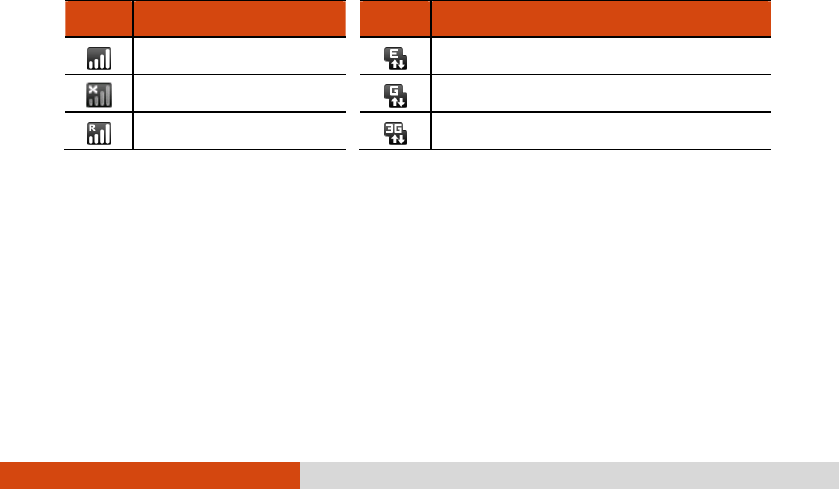
Mobile Network Status Icons
The icons in the Status bar indicate which kind of data network you’re connected
to and the voice and data network signal strength.
Icon
Meaning
Icon
Meaning
Signal strength
Connected to EDGE
No signal
Connected to 2G (GPRS)
Roaming
Connected to 3G (UMTS or HSDPA)
Checking or Modifying Mobile Network Settings
Initially, your device is configured to use the fastest mobile network available for
data. But you can configure your device to use only a slower 2G network for data,
to extend the life of your battery between charges. You can also configure your

Getting Connected 3-3
device to access a different set of networks entirely, or to behave in special ways
when roaming.
While on the Home screen, press the menu key on your device. Tap Settings
Wireless & networks Mobile networks. From here you can check what network
you’re using, enable or disable data roaming, and limit your data connections to
2G networks. (See “Wireless and Networks Settings” in Chapter 8 for information.)
Using Wi-Fi Networks
Wi-Fi is a wireless networking technology that can provide Internet access at
distances of up to 100 meters.
Turning Wi-Fi On or Off
1. While on the Home screen, press the menu key on your device.
2. Tap Settings Wireless & networks.
3. Tap Wi-Fi to change the Wi-Fi radio status.
4. When turned on, the Status bar displays icons that indicate Wi-Fi status.
Notification that an open Wi-Fi network is in range.
Connected to a Wi-Fi network (waves indicate connection strength)
If your device finds a network that you connected to previously, it connects
to it.
NOTE:
When not using Wi-Fi, turn off the radio. Leaving the radio on will consume
more power.
You can quickly turn off all wireless radios by pressing and holding the power
button and tap Airplane mode in the popup menu.

3-4 Getting Connected
Connecting to a Wi-Fi Network
1. Make sure the Wi-Fi radio is on. (See “Turning Wi-Fi On or Off” previously.)
2. While on the Home screen, press the menu key on your device.
3. Tap Settings Wireless & networks Wi-Fi settings.
4. Your device scans for available Wi-Fi networks and displays the names in the
Wi-Fi settings screen.
If there is a need to re-scan, open the optons menu and tap Scan.
5. On the list of discovered networks, tap the one you want to connect to.
6. If the network is secured, you’re prompted to enter a password or other
credentials.
If the network is open, you are prompted to confirm that you want to connect
to it.
Managing Wi-Fi Settings
Modifying or Removing Settings
When connected to a network, you can tap its name in the Wi-Fi settings screen
for details about the speed, security, address, and related settings.
If you need to modify the settings, tap and hold the name of the network and
tap Modify network.
If you don’t want your device to connect to a remembered network anymore, tap
and hold the name of the network and tap Forget network.

Getting Connected 3-5
Manually Adding a Wi-Fi Network
You can manually add Wi-Fi settings for a network that does not broadcast its
name (SSID) or is currently out of range. In the Wi-Fi settings screen, tap Add
Wi-Fi network (at the bottom of the list of discovered networks).
Using the Bluetooth Function
NOTE: Getac does not guarantee the product’s compatibilities with the Bluetooth
headsets/devices from all manufacturers.
Bluetooth technology is a short-range wireless communications technology. Devices
with Bluetooth capabilities can exchange information over a distance of about 10
meters (30 feet) without requiring a physical connection.
Turning Bluetooth On or Off
1. While on the Home screen, press the menu key on your device.
2. Tap Settings Wireless & networks.
3. Tap Bluetooth to change the Bluetooth radio status.
When turned on, the Status bar displays the icon.
NOTE:
When not using the Bluetooth function, turn off the Bluetooth radio. Leaving
the radio on will consume more power.
You can quickly turn off all wireless radios by pressing and holding the power
button and tap Airplane mode in the popup menu.

3-6 Getting Connected
Pairing with a Bluetooth Device
The first time you use a new Bluetooth device with your device, you must “pair”
them, so that they know how to connect securely to each other. After that, you
can simply connect to a paired device.
1. Make sure that the other Bluetooth device is set as “discoverable” and within
range.
2. Make sure the Bluetooth radio is on. (See “Turning Bluetooth On or Off”
previously.)
3. While on the Home screen, press the menu key on your device.
4. Tap Settings Wireless & networks Bluetooth settings.
Your device scans for and displays the IDs of all available Bluetooth devices
in range.
5. Some Bluetooth devices have multiple profiles. To select which profiles you want
to use with your device, tap and hold the device, tap Options in the menu
that opens. Check or uncheck a profile to use it or not.
6. On the list of discovered devices, tap the ID of the device you want to pair
with.
7. The devices pair with each other. If you’re prompted to enter a passcode, try
entering 0000 or 1234 (the most common passcodes), or consult the
documentation that came with the device to learn its passcode.
If the pairing is successful, your device connects to the device.
Connecting to a Paired Bluetooth Device
Once paired, you can connect to a Bluetooth device.
1. While on the Home screen, press the menu key on your device.

Getting Connected 3-7
2. Tap Settings Wireless & networks Bluetooth settings.
3. In the list of devices, tap a paired but unconnected device in the list.
If the device you expected isn’t displayed, tap Scan for devices.
4. When connected, the Status bar displays the icon.
Managing Bluetooth Settings
While in the Bluetooth settings screen, you can change settings such as your device’s
Bluetooth name and discoverable mode.
To disconnect from a Bluetooth device, tap the device in the list and tap OK to
confirm that you want to disconnect.
To unpair a Bluetooth device, tap and hold the device in the list and tap Unpair
or Disconnect & unpair in the menu that opens.
Connecting to VPNs
VPNs (Virtual private networks) allow you to connect to the resources inside a
secured local network, from outside that network.
Adding a VPN
NOTE: To configure VPN access from your device, you must obtain the details from
your network administrator.
1. While on the Home screen, press the menu key on your device.
2. Tap Settings Wireless & networks VPN settings.
3. Tap Add VPN.
4. Tap the type of VPN to add.

3-8 Getting Connected
5. Configure each component of the VPN settings following the instructions from
your network administrator.
6. Press the menu key on your device and tap Save.
The VPN is added to the list on the VPN settings screen.
Connecting to a VPN
1. While on the Home screen, press the menu key on your device.
2. Tap Settings Wireless & networks VPN settings.
The VPNs you’ve added are listed on the VPN settings screen.
3. Tap the VPN to which you want to connect.
4. In the dialog that opens, enter any requested credentials and tap Connect.
When you’re connected to a VPN, you receive an ongoing notification in the
Status bar.
Disconnecting from a VPN
To disconnect from a VPN, open the Notifications panel and tap the ongoing
notification for the VPN connection.
Connecting to a Computer via USB
You can connect your device to a computer with the USB cable, to transfer files
between your device and the computer.
1. Use the USB cable that came with your device to connect the device to a
USB port on your computer.
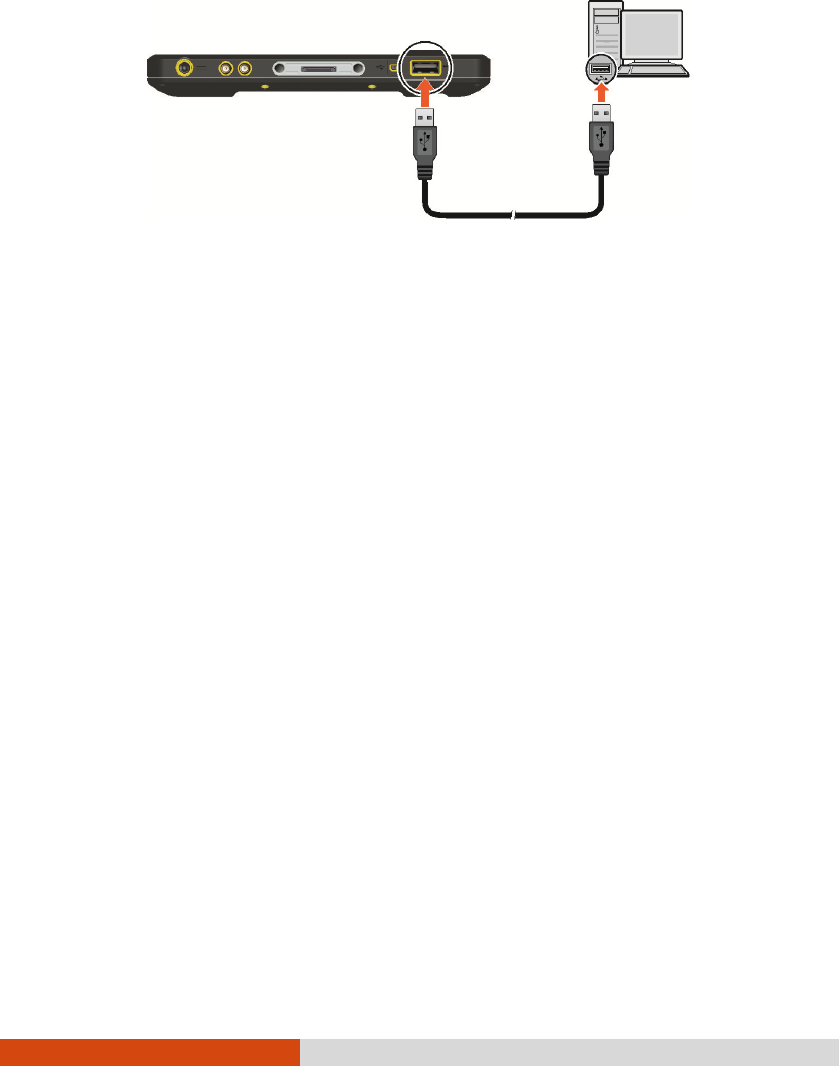
Getting Connected 3-9
You receive a notification that the USB is connected.
2. Open the Notifications panel and tap USB connected.
3. Tap Turn on USB storage in the screen that opens to confirm that you want to
transfer files.
You can now access the internal SD card of your device and the external SD
card (if inserted) from your computer.
4. To disconnect your device from the computer, open the Notifications panel and
tap Turn off USB storage. Tap Turn off USB storage in the screen that opens.
Adding an Account
If you have a Microsoft Exchange ActiveSync account (Exchange 2003 and 2007)
at work or a Google account on the web, you can add the account in your device
so you can sync contacts, email, and calendar events with your device from that
account.
NOTE: To add some accounts, you may need to obtain details from an IT support
representative about the service to which the account connects.
1. Make sure your device is connected to the Internet either through Wi-Fi or
3G.

3-10 Getting Connected
2. While on the Home screen, press the menu key on your device.
3. Tap Settings Accounts & sync Settings Add account.
4. Enter your email address and password.
5. Tap Next.
Your device attempts to communicate with your account service provider to
validate your account. If the process does not work, you can enter the information
manually. (Contact your IT administrator for account details.)
6. Configure the sync options.
When you’re finished, the account is added to the list. Depending on how you
configured the account, email, contacts, and other information start syncing to
your device.
NOTE: To change sync settings, open the Accounts & sync screen and tap the
account.
Placing and Receiving Calls 4-1
Chapter 4
Placing and Receiving
Calls
This chapter tells you how to use the Phone application.
Opening the Phone Application
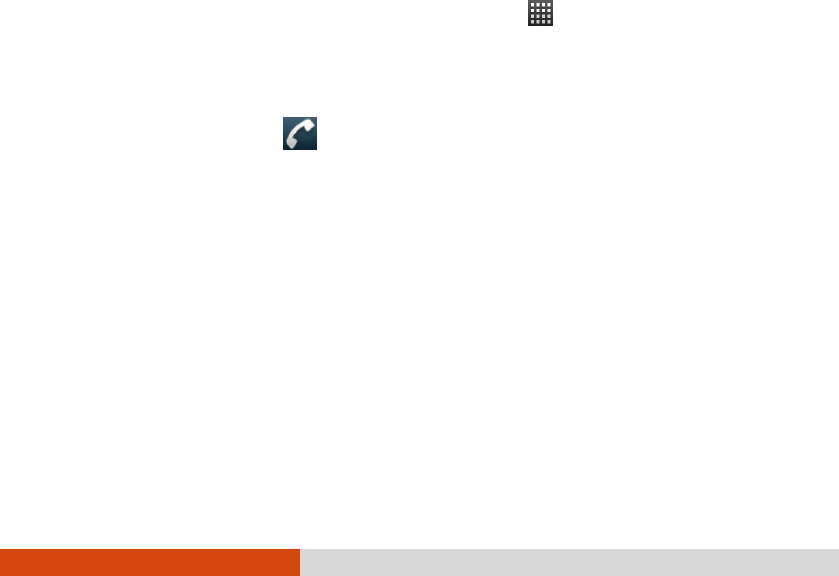
You can open the Phone application by several ways:
Tap the Phone application icon in the Launcher ( ). The application opens
to the Phone tab.
Press the Send key. The application opens to the Call log tab.
Tap the Phone icon at the bottom of the Home screen. The application
opens to the last tab you were in.
Tap a phone number item in an application.

4-2 Placing and Receiving Calls
Placing a Call
There are several ways you can place a call.
Dialing a Call
1. Tap the Phone application icon in the Launcher ( ). Or, if you are currently
using Phone or Contacts, tap the Phone tab.
2. Tap the keys on the phone keypad to enter phone number.
If you enter a wrong number, tap to erase digits one by one. To erase
the entire number, tap and hold .
3. tap the green phone icon on the screen to place the call.
Placing a Call from Contacts
1. To open Contacts, you can tap the Contacts icon in the Launcher ( );
or, if you are currently using Phone, tap the Contacts tab.
If calling a contact in the favorite contacts list that you have created, you can
tap the Favorites tab.
2. Tap the contact to call.
3. Tap the phone number to use to call the contact.
NOTE:
You can also quickly call a contact by using Quick Contact. (See “Quick
Contact” in Chapter 2 for information.)
For detailed information on Contacts, see “Contacts” in Chapter 5.

Placing and Receiving Calls 4-3
Placing a Call from the Call Log
The Call log is a list of all the calls you’ve made, received or missed.
1. Tap the Call log tab.
2. Tap the green phone icon at the right of the entry.
NOTE: See “Using Call Log” later for detailed information on Call log.
Responding to a Call
When you receive a phone call, the Incoming Call screen opens with the caller
ID and any additional information about the caller that you have entered in Contacts.
Answering a Call
To answer an incoming call, drag the green phone icon to the right.
Declining a Call
To decline an incoming call, drag the red phone button to the left.
Ending a Call
To end a call, tap End call on the screen.
4-4 Placing and Receiving Calls
During a Call
Adjusting the Phone Volume
To adjust the call volume, use the volume control button on your device (
to increase or to decrease).
CAUTION: Never raise the sound volume level too high when using earphones. An
excessive sound volume level could cause damage to your hearing.
Using Additional Functions
When a call is in progress, you can put a call on hold, create a phone conference,
mute your microphone, and more. Use the icons on the screen for various operations.
(If the icons are hidden, press the menu key on your device to show the icons.)
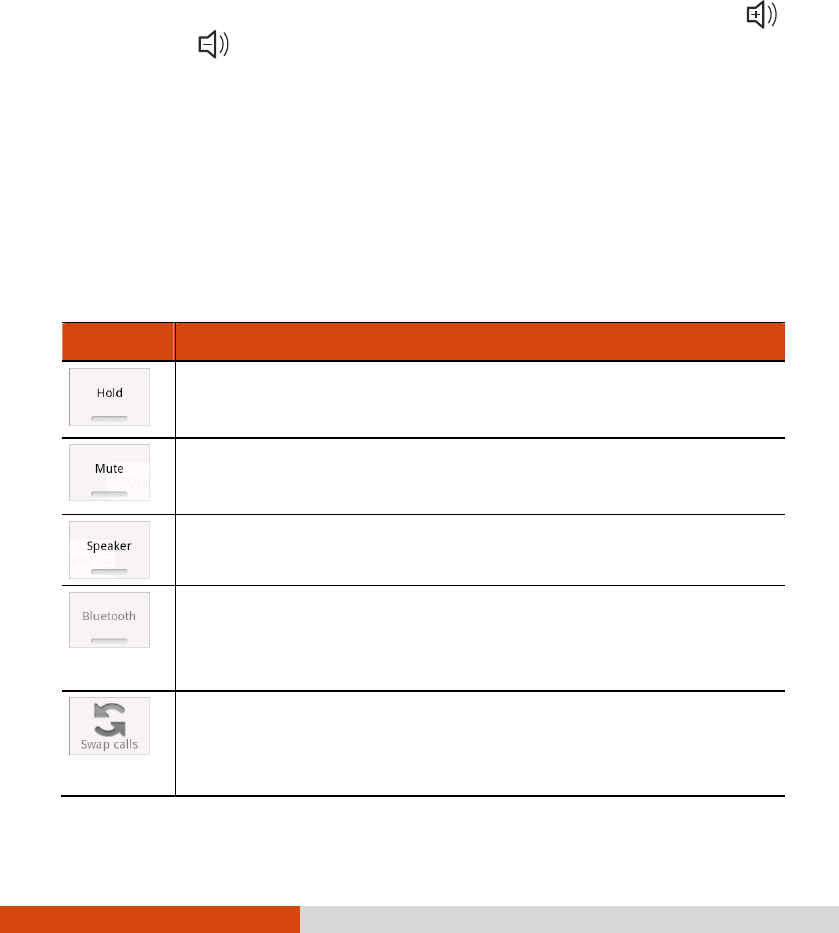
Icons Functions
Places the call on hold.
To take the call off hold, tap Unhold.
Mutes the microphone during the call.
To unmute, tap the icon again.
Turns the speakerphone on or off.
Switches between a Bluetooth headset and the phone.
When a Bluetooth headset is paired and connected to your phone,
you can conduct all calls on the headset for hands-free conversation.
Switches between current calls.
If you accept a new call when you’re alread
y on a call, you can
switch between the two callers.
Placing and Receiving Calls 4-5
Icons Functions
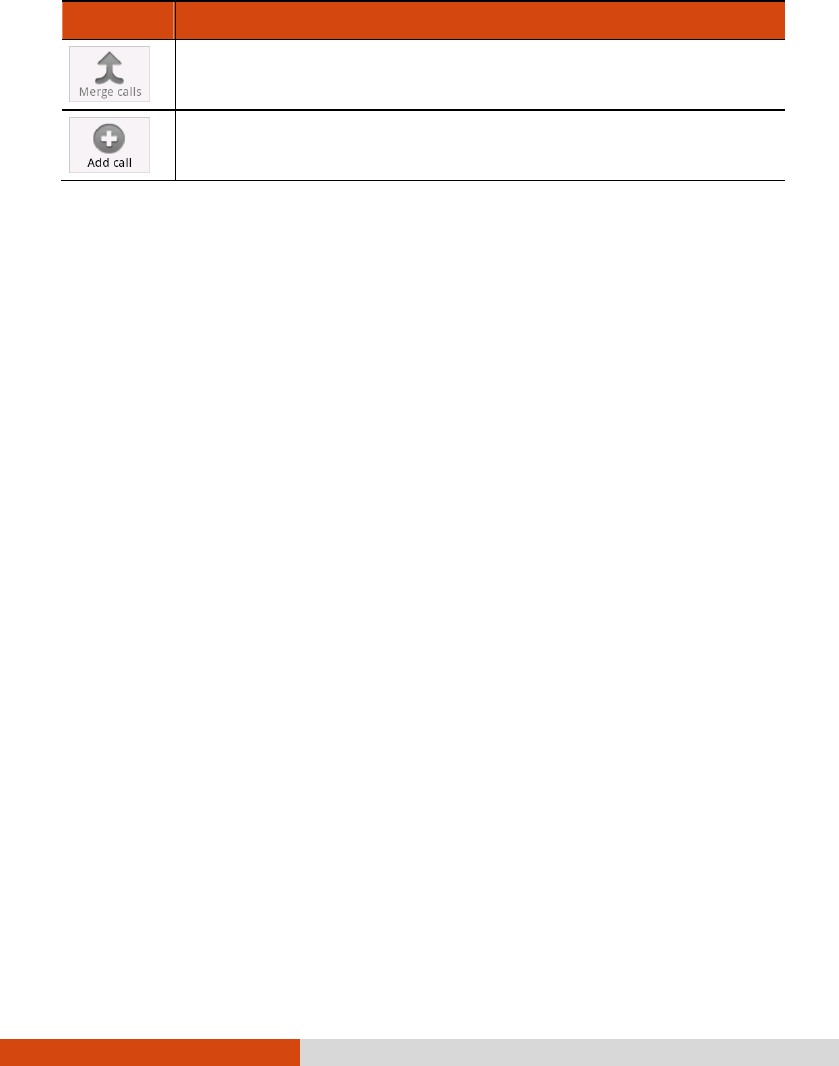
Merges the current calls into a conference call. (See “
Setting up a
Conference Call” later for more information.)
Allows you to place another call while putting the current call on hold.
(See “Setting up a Conference Call” later for more information.)
Setting up a Conference Call
NOTE: You may need to consult your mobile phone network service for the
availability and subscription of the conference call function.
1. Place a call to the first participant.
2. When you’re connected, tap Add call.
The first participant is put on hold and you’re prompted to place the second
call.
3. Place the next call.
4. When you’re connected, tap Merge calls.
The participant is added to the conference call. You can add as many calls
as your mobile phone network service supports.
5. During a conference call, tap Manage to drop a conference call participant or
to talk privately with one of the participants.
More Phone Operations
Using Call Log
The Call log is a list of all the calls you’ve placed, received, or missed. It offers
a convenient way to redial a number, return a call, or add a number to your Contacts.

4-6 Placing and Receiving Calls
To open Call log, tap the Call log tab.
Calls are listed with the most recent at the top. Scroll to view earlier entries in
the log.
Tap a Call log entry to open a screen where you can call the contact again, send
the contact a message, add the number to your Contacts, and learn more about
the original call.
Tap and hold a Call log entry to open a menu where you can call the contact,
view contact information, edit the number before you redial, and more.
To clear the call log list, press the menu button on your device and tap Clear call
log.
Reading or Sending Messages
To read or send text messages (SMS) and multimedia messages (MMS), use
the Messaging application. See “Messaging” in Chapter 6 for information.
Checking Your Voicemail
When you have a new voicemail message, the voicemail icon appears in the
Status bar. To listen to your voicemail, open the Notification panel and tap New
Voicemail. Or you can check your voicemail by tapping the Voicemail icon
in the Phone keypad.
If you have not set up your voicemail number, or if you need to change it, you
can do that with the Call settings. (See “Call Settings” in Chapter 8.)
Making an Emergency Call
You can use your device to dial the international emergency number 112. This number
can normally be used to make an emergency call in any country with or without
a SIM card inserted, as long as you are within a mobile phone network.

Placing and Receiving Calls 4-7
Some mobile phone network services may require that a SIM card be inserted,
and in some cases that the PIN be entered.
There may be other emergency numbers available. Your mobile phone network
service may save additional local emergency numbers in the SIM card.
Dialing an International Call
When you are manually dialing a number, tap and hold on the number key 0 until
the + sign appears. The + sign replaces the international prefix of the country from
where you are calling.
Enter the full phone number you want to dial including country code, area code
(without the leading area code zero) and local phone number.
Configuring Phone Call Settings
You can configure phone call settings, such as call forwarding, call waiting, and
other special features offered by your carrier. See “Call Settings” in Chapter 8
for information.

Contacts and Calendar 5-1
Chapter 5
Contacts and Calendar
This chapter tells you how to use the Contacts and Calendar applications.
Contacts
The Contacts application gives you quick and easy access to the people you want
to reach.
To open Contacts, tap the Contacts icon in the Launcher ( ).
You can also open Contacts by using Quick Contact. (See “Quick Contact” in
Chapter 2 for information.)
NOTE: When you have added an account in your device, you may synchronize
contacts information (if such service is available with your account on the web).
Importing Contacts from Your SIM Card
You may have stored contacts on the SIM card if you’re moving it from another
phone. You can add some or all of these contacts to the Contacts application.
1. After opening Contacts, press the menu key on your device and tap
Import/Export.
2. Tap Import from SIM.
3. To import all, press the menu key on your device and tap Import all.

5-2 Contacts and Calendar
To select individual contacts to import, tap and hold the contact you want and
tap Import in the menu that opens.
Adding a Contact
1. After opening Contacts, press the menu key on your device and tap New contact.
2. Enter the contact’s name.
3. Tap a category of contact information, such as phone numbers and email
addresses, to enter that kind of information about your contact.
Scroll the page to view all categories.
4. Tap a category’s plus button to add more than one entry for that category—for
example, to add both work and home numbers.
Tap the button to the left of the item of contact information to open a menu
with preset labels, such as Mobile and Work for a phone number, or tap Custom
in the menu to create your own label.
5. Tap the Picture Frame icon to select a picture to display next to the name
in your lists of contacts and in other applications.
6. When you’re finished, tap Done.
Using Contacts List and Details
When you open Contacts, all of your contacts are displayed alphabetically in a
scrolling list. You can drag the list up or down to scroll it.
To change which contacts are displayed when viewing the list, press the menu
key on your device and tap Display options. Check Only contacts with phones to
hide contacts that don’t have phone numbers.
To search for a contact, press the Search key. As you start entering the name,
contacts with matching names appear below the search box.

Contacts and Calendar 5-3
To view the details of a contact, tap the contact in the contact list. From the details
screen, you can tap a communication method to start dialing, texting, or emailing
the contact by using the listed number, address, and so on.
Editing Contacts Details
Editing Information
1. Open the contact list.
2. Tap and hold the contact whose details you want to edit; in the menu that
opens, tap Edit contact.
You can also press the menu key on your device and tap Edit contact while
viewing a contact’s details.
3. Edit the contact information.
4. Tap Done.
Changing a Contact’s Default Phone Number
1. Select the contact entry in the contacts list.
2. Tap and hold the phone number to use as the contact’s default phone number.
3. Tap Make default number in the menu that opens.
The default phone number is marked with a checkmark.
Setting a Ringtone for a Contact
NOTE: To use custom audio files as ringtones for incoming calls, set up the file as a
ringtone in the Music application. (See “Add a Song to the Ringtone List” in
Chapter 7 for information.)
You can specify a unique ringtone for a contact.

5-4 Contacts and Calendar
1. Select the contact entry in the contacts list.
2. Press the menu key on your device and tap Options.
3. Tap the down arrow button to open the ringtone list. Tap the one to play when
the contact calls.
4. Tap OK.
Joining or Separating Contacts
When you add contacts in other ways, such as by exchanging emails, Contacts
attempts to avoid duplication by joining any new contact information with existing
contacts under a single entry. You can also join contacts manually.
If contact information from different sources was joined in error, you can separate
the information back into individual contacts on your phone.
To join or separate contacts:
1. Select the contact entry in the contacts list.
2. Press the menu key on your device and tap Edit contact.
3. Press the menu key and tap Join or Separate contact.

Contacts and Calendar 5-5
Calendar
The Calendar application works with the web-based Google Calendar calendaring
service for creating and managing events, meetings, and appointments. It also works
with the Microsoft Exchange ActiveSync calendaring service.
To open Calendar, tap the Calendar icon in the Launcher ( ).
The first time you open Calendar, you are asked to add an account first or, if
an account has been set up, you will see the existing calendar events from your
account on the web.
NOTE: For information on adding an account in your device, see “Adding an
Account” in Chapter 3.
When you first set up Calendar to synchronize events on your device, it includes
events from the previous month through one year in the future. Subsequently,
Calendar keeps a year’s worth of future events synchronized between your device
and the web, plus any later events that you add to your calendar using Calendar
on your device.
Working with Different Views
To change your calendar view, press the menu key on your device and tap Agenda,
Day, Week, or Month.
Month View
Month view displays a chart of the events of the month. Segments of each day
with scheduled events are blue in the day’s vertical bar.

5-6 Contacts and Calendar
Week View
Week view displays a chart of the events of one week.
Day View
Day view displays a chart of the events of one day, in a table of one-hour rows.
A red line indicates the current time.
Agenda View
Agenda view is a list of your events in chronological order.
Viewing Event Details
Tap an event to view its details.
Creating an Event
You can use Calendar on your device to create events that appear on your device
and in your Calendar on the web.
1. In any Calendar view, press the menu key on your device and tap New event.
You can also tap and hold a spot in Day, Week, or Month view. In the menu
that opens, tap New event.
2. Enter details about the event.
Tap the plus button to add more reminders.
3. Enter other desired information. You can press the menu key on your device
and tap Show extra options to add more details.
4. Scroll to the bottom of the Event details screen and tap Done.

Contacts and Calendar 5-7
Editing or Delete an Event
To edit an event, tap and hold the event and tap Edit event in the menu that opens.
Or, if you are viewing the event details, press the menu key on your device and
tap Edit event.
To delete an event, tap and hold the event and tap Delete in the menu that opens.
Or, if you are viewing the event details, press the menu key on your device and
tap Delete.
Changing Calendar Settings
You can set up how Calendar displays event and how it notifies you of upcoming
events.
To change Calendar settings, open a Calendar view, press the menu key on your
device and tap More Settings.

Web and Communications 6-1
Chapter 6
Web and
Communications
This chapter tells you how to use the Browser, Email, and Messaging applications.
Browser
Use the Browser application to view webpages and to search for information on
the web when your device is connected to the Internet.
Surfing the Web
1. Tap the Browser icon on the Home screen or the Browser application icon
in the Launcher ( ).
The last webpage you were viewing is displayed. If you have not used Browser
recently, your home page opens.
Browser also opens when you tap a web link—for example, in an email or
text message.

6-2 Web and Communications
2. To go to a webpage, tap the URL box at the top of the Browser screen. (If
the URL box isn’t visible, drag the page down until the URL box comes into
view.)
3. Enter the address (URL) of the webpage. Tap a suggestion or enter an address
and tap the arrow icon .
Webpages that are optimized for mobile devices typically open at a size
appropriate for your screen.
Webpages that aren’t designed specifically for mobile devices typically open in
overview mode—the page is zoomed out so you can get the big picture. To
zoom in, slide slightly on the screen to reveal the Zoom control and tap the
plus icon to zoom in.
4. To refresh the current page, press the menu key on your device and tap Refresh.
5. To find text on a page, press the menu key on your device and tap More
Find on page.
6. You can open links on a webpage.
To go back among the pages you’ve opened, press the Back key on your device.
To go forward, press the menu key on your device and tap Forward.
7. You can open up to eight Browser windows at once and switch among them.
To open a new Browser window, press the menu key on your device and tap
New Window.
To switch windows, press the menu key on your device and tap Windows. Tap
a window to open it.
Working with Bookmarks
You can bookmark webpages so that you can quickly return to them.

Web and Communications 6-3
Adding a Bookmark
1. Open the webpage you want to bookmark.
2. Tap the bookmark icon at the top of the screen. Or, press the menu
key on your device and tap Bookmarks Add.
3. Edit the name and the address if necessary and tap OK.
Opening a Bookmark
1. Tap the bookmark icon at the top of the screen. Or, press the menu
key on your device and tap Bookmarks.
A window opens with a list of your bookmarks, sorted by how often you visit
them.
2. Tap a bookmark to open it.
The bookmark opens in the current window. If you prefer to open it in a new
window, tap and hold the bookmark and tap Open in new window.
Changing Browser Settings
You can configure a number of Browser settings, including several that you can
use to manage your privacy.
To open the Browser settings screen, press the menu key on your device, and
tap More Settings.

6-4 Web and Communications
Email
Use the Email application to read and send email from the email service account(s)
that you have.
Opening Email and the Account Screen
Opening Email
Tap the Email application icon in the Launcher ( ).
The first time you open Email, a setup wizard opens to help you add an email
account; or, if an account has been set up, you will see the Accounts screen.
After the initial setup, Email opens to the last screen you were viewing or, if you
have not used Email recently, it displays the contents of your Inbox (if you have
only one account) or the Accounts screen (if you have multiple accounts).
Opening the Account Screen
The Accounts screen lists your Combined Inbox and each of your email accounts.
If you have starred, draft, or unsent messages in any of your accounts, the folders
for those items from all accounts are displayed as well.

Web and Communications 6-5
If you have configured Email to send and receive email from more than one account,
you can view all messages sent to all accounts in your Combined Inbox.
NOTE:
You can add email accounts by pressing the menu key on your device while in
the Accounts screen and tapping Add account.
To delete an existing account, tap and hold the account. In the menu that
opens, tap Remove account.
Reading and Responding to E-mail Messages
You can read messages in your Combined Inbox or in the Inbox or other folders
for individual accounts.
1. Open Email. Tap the Combined Inbox, an account’s Inbox, or another folder
of messages.
– or –
When you receive a new email, you will see a new email notification icon
(unless you have disabled the feature). Tap the notification to open the
email message window.
NOTE: Only some of your account’s recent email is downloaded to your device. To
download earlier messages in batches for IMAP or POP3 accounts, tap Load more
messages at the bottom of the list of email. For Exchange ActiveSync accounts,
you can change how many days or weeks of email to store on your device.
2. Tap the message to read.
3. While in a message screen, you can:
Reply to or delete the message using the buttons at the bottom of the screen.
Reply to, forward, or delete the message or mark the message as unread
using the options menu.
Star the message by tapping the star in its header. Once you star a message,
a Starred folder is added to the Accounts screen.

6-6 Web and Communications
Tap the right or left arrow icon to read the next or previous message.
NOTE: You can delete, star, or mark unread a batch of messages at once. In the
Inbox or mailbox, check the messages that you want to work with as a batch.
Composing and Sending an E-mail
1. After opening Email, press the menu key on your device and tap Compose.
You can also open Email by using Quick Contact. (See “Quick Contact” in
Chapter 2 for information.)
2. Address the message.
As you enter text in the To field, matching addresses are offered from your
Contacts. You can tap a suggested address or enter a new one. Separate multiple
addresses with commas.
3. To address a copy or blind copy of the message, press the menu key on
your device and tap Add Cc/Bcc.
4. Enter a subject for the message.
5. Enter the text of the message.
6. To send a photo with the message, press the menu key on your device and
tap Attach.
7. Tap Send.
Or, if you’re not ready to send the message, tap Save as draft to save it in
a Drafts folder.
If you aren’t connected to a network, for example, if you’re working in Airplane
mode, the messages that you send are stored in your Outbox folder until you’re
connected to a network again.

Web and Communications 6-7
Working with Account Folders
Each account has Inbox, Outbox, Sent, and Drafts folders. Depending on the features
supported by your account’s service provider, you may have additional folders.
To open the folders screen, tap the folder icon while in the Accounts screen.
You can also open an account’s folders while viewing its Inbox or other folder,
by pressing the menu key on your device and tapping Folders.
Tap the folder you want to open.
Changing Email Account Settings
You can change a number of settings for an account, including how often you check
for email, how you’re notified of new mail, and details about the servers the account
uses to send and receive mail.
To change settings of an account, open the inbox of the account, press the menu
key on your device, and tap Account settings.
Messaging
Use the Messaging application to exchange text messages (SMS) and multimedia
messages (MMS) with your friends on their mobile phones.
Reading and Responding to Messages
1. Tap the Messaging icon in the Launcher ( ) to open the message list
screen.
– or –

6-8 Web and Communications
When you receive a new message, you will see a new message notification
icon in the Status bar (unless you have disabled the feature). Tap the
notification to open the message list screen.
2. Tap a message thread to open it.
If you have disabled the auto-retrieve feature of MMS, you have to tap Download
to view a MMS message.
3. If the message contains a media file, tap Play to view, watch, or listen to it.
4. While in the message list, you can tap and hold a message to open a menu
with number of options for working with the message and its sender’s information.
Composing and Sending Messages
You can send text (SMS) messages of up to 160 characters to another mobile
phone.
You can send multimedia (MMS) messages that contain text and a picture, a
recorded voice, an audio file, a video, or a picture slideshow.
1. In the message list screen, tap New message.
2. Enter a mobile phone number in the To field. As you type, matching contacts
appear. You can tap a suggested contact or continue typing.
You can also enter the name of a contact.
3. Tap the composition text box to start entering your message.
4. If sending an MMS message:

Web and Communications 6-9
Press the menu key on your device and tap Add subject to add a message
subject.
Press the menu key on your device and tap Attach to open the options menu
for adding multimedia item(s).
After adding an item, you can use the buttons in the screen to preview, change,
or remove the media attachment.
5. Tap Send or Send MMS.
Changing Messaging Settings
You can change a number of Messaging settings. For example, you can have older
messages deleted, receive delivery reports for the messages you send, and select
the ringtone to sound when you receive new message notifications.
To change Messaging settings, open Messaging, press the menu key on your device,
and tap Settings.
Multimedia 7-1
Chapter 7
Multimedia
This chapter tells you how to use the Camera, Camcorder, Gallery, and Music
applications.
Camera and Camcorder
Use the Camera or Camcorder application to take pictures and shoot videos.
NOTE: Camera and Camcorder belong to the same application.
Taking Pictures
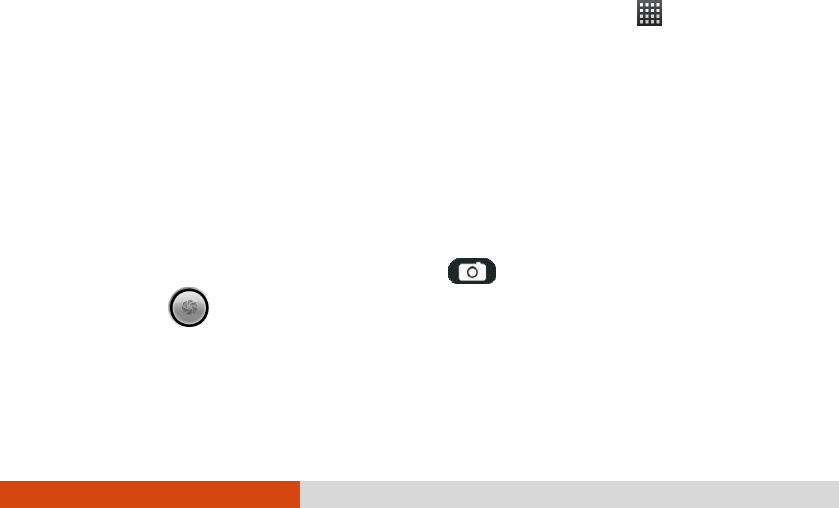
1. To open Camera, tap the Camera icon in the Launcher ( ). You will
be in Camera mode.
2. If you want to adjust settings, tap the appropriate status icon. (See “Camera
Settings” later for more information.)
3. Aim the camera lens at the subject.
You can zoom in or out by tapping the Zoom icon 1x and then drag the knob
to select a zoom level.
4. To take the picture, press the Camera key on your device or tap the
Shutter icon on the screen.
7-2 Multimedia
Green focus indicators appear at four corners. A shutter sound is played when
the picture is taken.
5. The picture you just took is displayed as a thumbnail at the corner. You can
tap the thumbnail to view the picture. (See “Gallery” in this chapter for more
information.)
The file is saved to the internal SD card of your device.
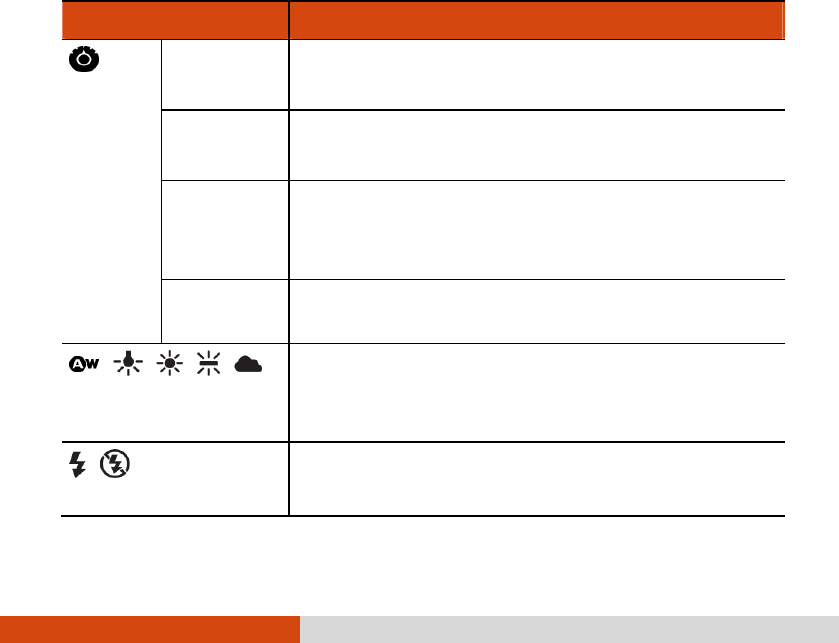
Camera Settings
While in Camera, tap the status icon for the settings you want to change. Then
tap a setting in the popup menu that opens. The popup menu closes after a short
period; you can also press the Back key on your device to close the menu.
All changes remain effective until you change them again.
Icons and Items Descriptions
Settings
Focus mode Sets the focus to Auto, Infinity (for sharpness of
distant
scenery), or Macro (for a close-up shot).
Picture size Sets the size of the picture. Choices are 3M Pixels, 2M
Pixels, MP, VGA, QVGA, and QQVGA.
Flicker mode Sets the frequency to match the local electrical system
(50Hz or 60Hz) for flicker free
shooting under electric
light.
Restore to
defaults
Restores all Camera settings to their default values.
/ / / /
White Balance
Five choices (Automatic, Incandescence, Daylight,
Fluorescence, and Cloudy)
from which you can select
one that matches the current light source.
/
Flash mode
Set to On to add extra light for shooting in a dark place
or set to Off.
Multimedia 7-3
Zoom Available choices depend on the current resolution setting.
Contrast Adjust the contrast in the range of +4 to -4.
Shooting Videos
1. To open Camcorder, tap the Camcorder icon in the Launcher ( ). You
will be in Video mode.
2. If you want to adjust settings, tap the appropriate status icon. (See “Camcorder
Settings” later for more information.)
3. Aim the camera lens at the subject.
4. To start shooting the video, press the Camera key on your device or
tap the Shutter icon on the screen.
The elapsed time shows at the corner.
5. To stop, press the Camera key or tap the Stop Video icon.
6. An image from your most recent video is displayed as a thumbnail at the corner.
You can tap the thumbnail to view the video. (See “Gallery” in this chapter
for more information.)
The file is saved to the internal SD card of your device.
Camcorder Settings
While in Camcorder, tap the status icon for the settings you want to change. Then
tap a setting in the popup menu that opens. The popup menu closes after a short
period; you can also press the Back key on your device to close the menu.
All changes remain effective until you change them again.

7-4 Multimedia
Icons and Items Descriptions
Settings
Flicker mode Sets the frequency to match the local electrical system
(50Hz or 60Hz) for flicker free
shooting under electric
light.
Restore to
defaults
Restores all Camera settings to their default values.
Icons and Items Descriptions
/ / / /
White Balance
Five choices (Automatic, Incandescence, Daylight,
Fluorescence, and Cloudy)
from which you can select
one that matches the current light source.
Flash mode Off only.
Video quality The video quality (together with maximum length)
is
High (30m).
Gallery
Use the Gallery application to view pictures and play videos that you’ve taken with
your device, downloaded, or copied onto your SD card (the internal one of your
device and/or an external SD card).
Viewing Pictures and Videos
1. Tap the Gallery icon in the Launcher ( ).
2. Pictures and videos are grouped in albums. Tap an album to open it and view
its contents in thumbnail view.
3. The thumbnails are displayed in chronological order. Tap a thumbnail to view
or play it in full screen. (Actual size depends on the picture/video quality.)

Multimedia 7-5
4. When you open a picture, control icons appear around the picture. These icons
allow you to send the picture to others, set the picture as your wallpaper or
contact picture, delete the picture, and zoom in/out. To access more functions
such as editing the picture, press the menu key on your device.
When you open a video, playback control icons appear at the bottom of the
screen for pausing, resuming, and skipping backward and forward.
NOTE: Control icons appear only briefly. To recall them, tap the picture or video.
Working with Thumbnails
While in thumbnail view, you can perform functions using the options menu. Press
the menu key on your device to open the options menu.
Items Descriptions
Capture picture Opens the Camera application.
Capture video Opens the Camcorder application.
Multiselect Enables/disables multiple selections
. This is useful when you
want to work with batches of pictures or videos.
Slideshow Starts the slideshow (not available for videos).
Settings Provides general settings and slideshow settings.
You can act on selected item(s) using the context menu. Tap and hold an item
to open the context menu.
Items Descriptions
Picture
Options
View Opens the picture in full screen.
Share Sends the picture to others.
Rotate Rotates the picture to the left or right by 90 degrees.
7-6 Multimedia
Delete Deletes the picture.
Crop Crops the picture with a sizable and movable frame.
Set as Sets the picture as your wallpaper or contact picture.
Video
Options
Play Plays the video in full screen.
Share Sends the video to others.
Delete Deletes the video.
Details Displays the details of the video.
Music
Use the Music application to organize and listen to music and other audio files
stored on your SD card (the internal one of your device and/or an external microSD
card).
Music supports audio files in MP3, M4A (iTunes application AAC, DRM-free),
AMR, MIDI, and OGG Vorbis formats and playlists in M3U, WPL, and PLS file
formats.
Copying Music Files onto the SD Card
You can use folders and subfolders on the SD card to organize your music files.
Or you can simply copy the audio files to the top level of the SD card.
If the music files have accompanying artwork in JPEG format, rename the art file
albumart.jpg and include it in the same folder as the music files.
If you have created any playlists, create a subfolder for them in your music folder
on the SD card and copy the playlists into it.
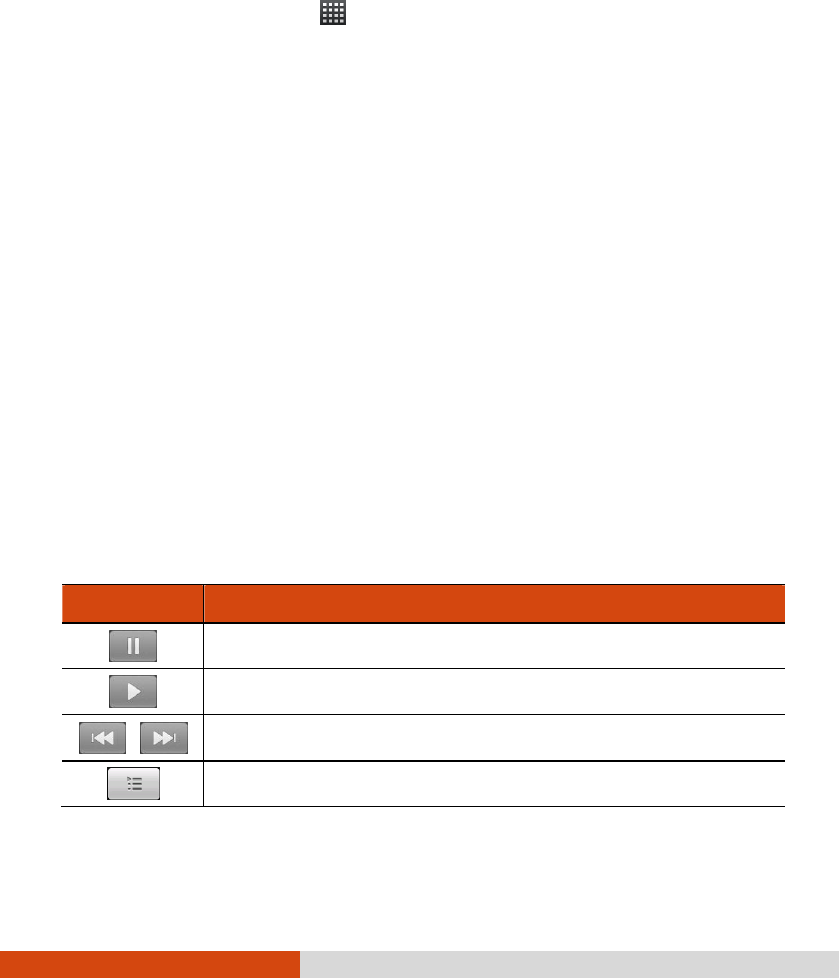
Multimedia 7-7
Playing Music
1. To open Music, tap the Music widget on the Home screen or tap the Music
icon in the Launcher ( ).
Music searches the SD card(s) for music files and builds a catalog of your
music, based on information about each file that is stored in the file itself.
2. When the catalog is complete, the Music Library screen opens, with tabs that
you can tap to view your music library organized by Artists, Albums, Songs,
or Playlists.
3. Tap a song in your library to listen to it.
– or –
While viewing a list of tracks in an album, press the menu key on your device
and tap Play all.
4. The Playback screen opens and the song you selected or the first song in
the album or other playlist starts to play.
Playback Controls
The Playback screen contains several icons that you can tap to control the playback
of songs, albums, and playlists:
Icons Functions
Pauses playback.
Resumes playback.
/ Skips to the previous/next track in the album, playlist, or shuffle.
Opens the current playlist.
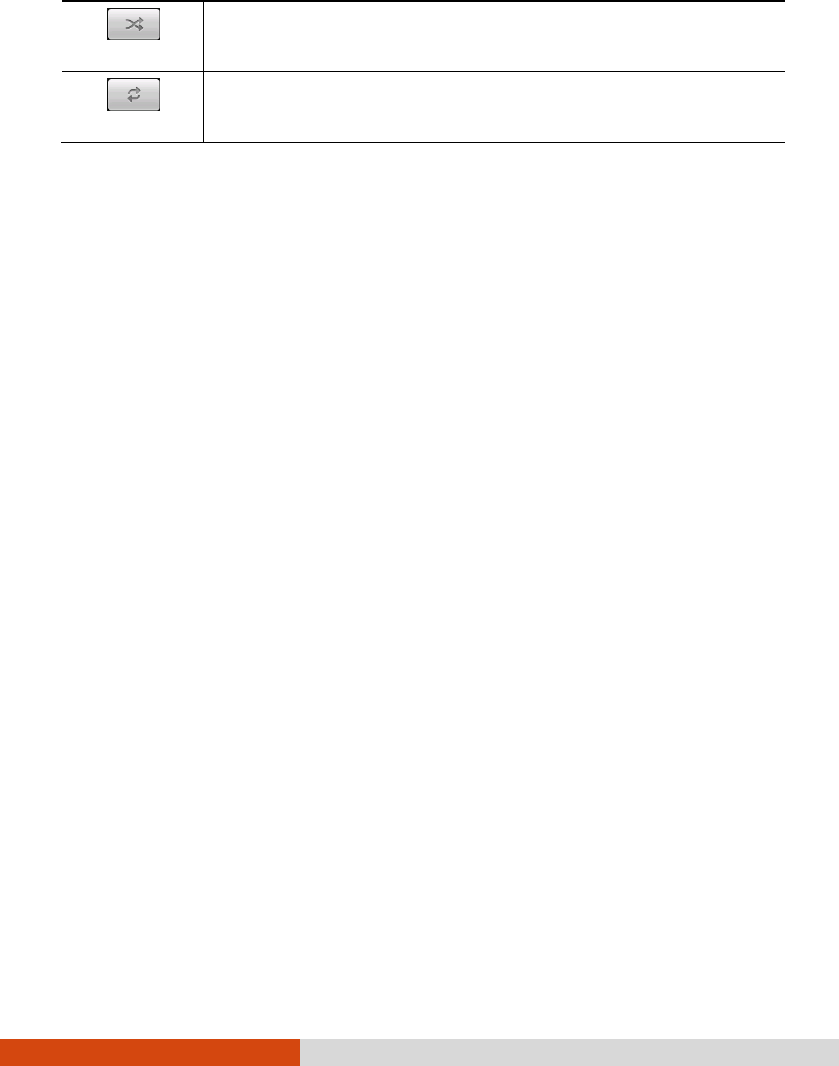
7-8 Multimedia
Switches on or off shuffle mode (
tracks are played in random
order).
Switches to the next repeat mode: Don’t repeat
, Repeat the playlist,
or Repeat the current track.
Add a Song to the Ringtone List
You can use a song as your phone ringtone, in place of one of the ringtones
that come with the device.
Tap and hold the song in a library list and tap Use as phone ringtone. Or, on the
Playback screen, press the menu key on your device and tap Use as phone ringtone.
The song is added to the ringtone list and set as the default phone ringtone for
your device.
Working with Playlists
You can create playlists to organize your music files into sets of songs, which you
can play in the order you set or in a shuffle.
Creating a Playlist
1. When viewing a list of songs in the library, tap and hold the first song you
want to add to the new playlist.
2. Tap Add to playlist.
3. Tap New.
4. Enter a name and tap Save.
The new playlist is added to the Playlist library.

Multimedia 7-9
You can also add the song that is playing in the Playback screen as the first song
in a playlist by pressing the menu key on your device and tapping Add to playlist.
Or tap Save as playlist to save all the songs in an album that you’re playing as
a playlist.
Adding a Song to a Playlist
1. While viewing a list of tracks in the Library, tap and hold a song to add it
to a playlist.
2. Tap Add to playlist.
3. Tap the name of the playlist to add the song to.
The song is added to the playlist.
You can also add the song that is playing in the Playback screen to a playlist
by pressing the menu key on your device and tapping Add to playlist.
Moving songs in a Playlist
While in a playlist, you can drag a song up or down to change its order in the
playlist.
Removing a Song from a Playlist
While in a playlist, tap and hold the song to remove from the playlist and tap
Remove from playlist.
NOTE: The song isn’t deleted from the SD card or other playlists; it’s removed only
from the playlist you’re working with.

Managing Your Device 8-1
Chapter 8
Managing Your Device
This chapter tells you how to manage power and configure your device.
Managing Power
The operating time of a fully charged battery depends on how you are using the
device. Some functions, such as using multimedia or operating an SD card, may
consume the battery power considerably.
Low Battery Signals and Actions
CAUTION: When you recharge the battery upon a warning of low power, you
should charge for at least 30 minutes. If you unplug the AC charger soon, you may
not have sufficient battery power for your operation.
To check the battery level, go to the Home screen, press the menu key on your
device, and tap Settings About phone Status. The battery status (charging
or discharging) and level (as a percentage of fully charged) are displayed at
the top of the screen.
You should save your data and recharge the battery immediately upon a warning
of low power; otherwise your device will turn off automatically. You need to connect
the device to external AC power for charging before you can use it again.

8-2 Managing Your Device
Power-Saving Tips
Follow these suggestions to maximize the battery’s operating time, particularly when
you are relying solely on the battery power for extended time periods.
Turn off radios that you aren’t using.
Lower the screen brightness and set a shorter screen timeout.
Lower the volume.
Avoid power-consuming applications. To check which applications consume the
most battery power, go to the Home screen, press the menu key on your device,
and tap Settings About phone Battery use.
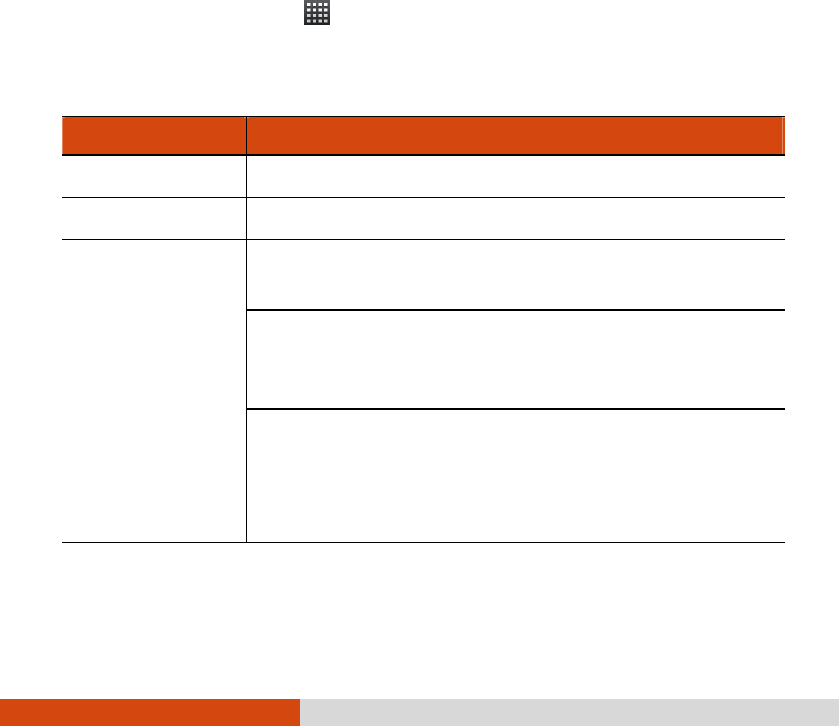
Managing Your Device 8-3
Settings
NOTE:
Incorrect settings may cause your system to malfunction. Make sure that you
fully understand the function of a certain item before any adjustment.
Some setting items are available only for specific subscriptions you have with
your carrier or applications you have in your device.
The Settings application contains most of the tools for customizing and configuring
your device. To open Settings, use any of the two methods:
Go to the Home screen, press the menu key on your device, and tap Settings.
Open the Launcher ( ) and tap the Settings icon.
Wireless and Networks Settings
Item Description
Airplane mode Check to turns off all wireless radios.
Wi-Fi Check to turn on Wi-Fi radio.
Wi-Fi settings To set whether to receive a notification when an open Wi-
Fi
network becomes available.
To display the list of Wi-
Fi networks previously configured
and those detected. (See “Connecting to a Wi-Fi Network”
in Chapter 3 for more information.)
To add a Wi-Fi netw
ork by entering its SSID and security
type.
If needed you can press the menu key on your device on
your device and tap Advanced to configure advanced settings.
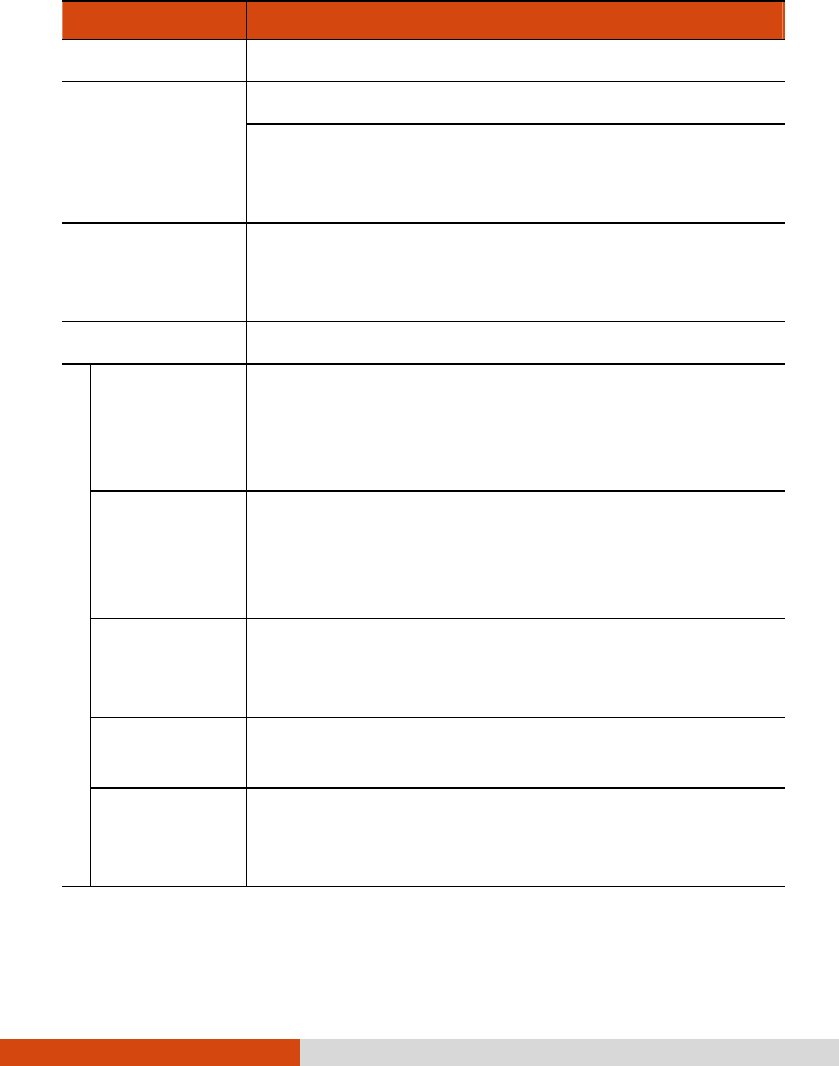
8-4 Managing Your Device
Item Description
Bluetooth Check to turn on Bluetooth radio.
Bluetooth settings To set the device name and discoverability.
To scan for Bluetooth devices and view the result. (See
“Pairing with a Bluetooth Device” in Chapter 3 for more
information.)
VPN settings To set the type of VPN to add and view the
list of VPNs
that you’ve previously configured. (See “Connecting to VPNs”
in Chapter 3 for more information.)
Mobile networks See below.
Data enabled Check to enable data transmit
through any mobile networks.
Uncheck this item if you are tra
veling in an area where you
do not have a
mobile data plan and want to avoid charges
for data use on local carriers’ mobile networks.
Data roaming Check to enable data roaming. Uncheck this item to
prevent
your device from transmitting data over other carriers’ mobile
networks when you leave an area that is covered by your
carrier’s networks.
Access Point
Names
To select mobile access point configurations; or press
the
menu key on your device to add a new APN. Consult your
carrier about how to use the tools on this screen.
Use only 2G
networks
Check to obtain slightly better battery life, by preventing
your
device from connecting to higher-speed networks
Network
operators
To search for and display mobile
networks that are compatible
with your device. Consult your carrier to understand the
billing
implications of selecting another carrier.

Managing Your Device 8-5
Call Settings
Item Description
Call settings See below.
Fixed Dialing
Numbers
To limit use to
outgoing calls only to the fixed dialing numbers
(FDN) that you save on the SIM card. (GSM phones only)
Voicemail service
To select your carrier’s voicemail service
or another service,
if possible.
Voicemail
settings
To enter the phone number to use for listening to and
managing your voicemail. You can enter a comma
(,) to
insert a pause into the number—for example, to add a
password after the phone number.
Other call settings See below.
Call forwarding To
configure how your calls are forwarded when you’re on
the phone, when you don’t answer, and so on.
Additional
settings
To
set whether your phone number is displayed to the people
you call.
T
o see and respond to new calls when you’re already on
a call.
Sound Settings
Item Description
Silent mode
Check to silence all sounds (including call and notification
r
ingtones) except the audio from music, videos, and other
media and any alarms you have set.
8-6 Managing Your Device
Item Description
Volume To s
et the volume of ringtones that sound when you receive
a phone call or notification, media (music, videos, etc.
), and
alarms. If you u
ncheck the option to use the same volume
for both calls and notifications, you can set the notification
ringtone volume independently.
Phone ringtone To set the ringtone to sound when you receive a phone call.
Notification ringtone
To set the ringtone to sound when you receive a notification.
Audible touch tones Check to hear tones when you use Phone to dial a number.
Audible selection Check to play a sound when you tap
buttons, icons, and other
onscreen items that react to your tap.
Screen lock sounds Check to play a sound when the screen is locked or unlocked.
Display Settings
Item Description
Brightness To adjust the brightness of the screen.
Auto-rotate screen To set whether the screen orientation changes accordingly
as
you turn the device sideways or upright.
Animation To
set whether you want to enjoy animated transitions for
specific occasions.
Screen timeout To set how long of idle time to wait before the screen darkens.
G-sensor calibration
To calibrate the built-in G-sensor for accurate measurement.
Managing Your Device 8-7
Location and Security Settings
Item Description
Use wireless
networks
To set whether to use information from Wi-
Fi and mobile
networks for location-aware applications.
Use GPS satellites To set whether to use the built-in GPS (Global Positi
oning
System) satellite receiver to pinpoint your location.
Set up screen lock
To specify the unlock security. Could be none, a pattern, a
numeric PIN, or a password.
Set up SIM card lock
To configure the device to require entering the SIM card
PIN
to use it.
To change the SIM card PIN.
Visible passwords Check
to briefly show each character of passwords as you
enter them, so that you can see what you enter.
Select device
administrators
Opens list of the applications you
have authorized to be device
administrators for your device.
This is typically an enterprise
application that you granted this authority to, when you
added
an account hosted by an enterprise service that requires the
ability to implement security policies on the devices that
connect to it.
Use secure
credentials
Check to allow applications to access your encrypted store
of secure certificates and related passwords and other
credentials. If you have not set a password for the credential
storage, this setting is dimmed.
Install from SD card To install a secure certificate from an SD card
Set password To set or change the password (at least 8 characters)
for
your secure credential storage.
8-8 Managing Your Device
Clear storage To delete all secure certificates an
d related credentials and
erase the secure storage’s own password.
Applications Settings
Item Description
Unknown sources
Check to permit installation of applications that you obtain from
web sites, email, or other locations other than Android Market.
Manage
applications
To open a list of applications on your device.
The default
view lists downloaded applications
. You can tap another tab
to change the view.
Tap an application to view details about the application
and
perform related actions (if buttons are available).
Running services To open a list of services—
applications or parts of applications
that provide services to other applications or that run even
when their main application isn’t running.
Development To set up functions
that are useful for developing Android
applications.
Accounts and Sync Settings
Item Description
Background data Check to permit applications to synchronize data in the
background, whether or not you are actively working in them.
Auto-sync Check to permit applications to synchronize data on their own
schedule.
Managing Your Device 8-9
Manage accounts The rest of this screen lists the account(s) you’ve added
to the device. (For
information on adding an account, see
“Adding an Account” in Chapter 3.)
To change an account’
s sync settings, tap the account to open
a screen where you can select the items to sync. (The
available items depend on the account.)
Item Description
While in an account’s settings screen, you can sync
information manually by pressing the menu
key on your device
and tap Sync now. To remove the account
along with all its
data (contacts, mail, settings, and so on), tap Remove
account.
Privacy Settings
Item Description
Factory data reset To erase all of your personal data from the
internal storage,
including information about your account(s), your sys
tem and
application settings, and any downloaded applications.
Resetting does not erase any system software updates you’ve
downloaded or any files on your SD card.
SD Card and Phone Storage Settings
Item Description
External SD card,
Total/ Available
space
Lists the amount of space on any SD card inserted
in your
device and the amount you have used.
8-10 Managing Your Device
SD card, Total/
Available space
Lists the amount of space on the internal SD
card the amount
you have used.
Unmount SD card Tap to safely remove the SD card from your device
when
the device power is on
. (This item appears only when an
SD card is inserted in your device.)
Format SD card Tap to format the SD card inserted in your
device. (This
item appears only when an SD card is inserted in your device
and is unmounted.)
Item Description
Internal phone
storage, Available
space
Lists the amount of internal phone storage used by the
operating system, its components, applications, and their
permanent and temporary data.
Search Settings
Item Description
Google search Check Show web suggestions
to display suggestions for Google
web searches below the Google search box as you type.
Searchable items To specify the kinds of data you can search for on your device.
Clear shortcuts To erase the list of previously chosen search results that
appear as suggestions below the Google search box.

Managing Your Device 8-11
Language and Keyboard Settings
Item Description
Select language To select the language of the operating system.
(Languages
supported depend on your model.)
Note that this does not change the keyboard language.
Android keyboard… To set up options related to the onscreen keyboard.
If you want to switch the keyboard layout among the
different
languages written in Latin script
, you can do so by setting
up the Input Languages item. Check the
languages you want
to have available when using the onscreen keyboard.
Depending on your model, there might be other input methods
in addition to Android keyboard.
Item Description
User dictionary To view, add, edit, or delete words in the dictionary
. With
a database of pre-
entered words, possible matching words
appear in a strip above the keyboard when you begin to type;
so you can choose the correct word without typing all the
characters.
Tap to open the dictionary. To add a word, press the menu
key on your device and tap Add.
Another way of adding a
word is tapping a completed word in the strip above the
keyboard when you are typing in an application.
8-12 Managing Your Device
Voice Input and Output Settings
Item Description
Text-to-speech
settings
To set the text-to-
speech application to use, if you have more
than one installed.
Accessibility Settings
Item Description
Accessibility Check to enable all installed accessibility plug-ins.
Power button ends
call
Check to allow the power button to end a pho
ne call instead
of turning off the screen.
Date and Time Settings
Item Description
Automatic Uncheck to set the date, time, and time zone on the device
manually, rather than obtaining the current time from the mobile
network.
Use 24-hour format Check to display the time using 24-hour time format.
Select date format To set the format for displaying dates.
Managing Your Device 8-13
About Phone
Item Description
Status Displays
a long list of information about your battery, mobile
network connection, and other details.
Sensors Displays current measured values of sensors.
Battery use Displays a list of the applications and operating system
components you have used since you last connected the device
to a power source, sorted by the amount of power they have
used.
The rest of
the screen lists legal, hardware, and software
information of your device.

Caring and Maintenance 9-1
Chapter 9
Caring and Maintenance
This chapter gives solutions to common device problems you may encounter. It also
provides guidelines on taking care of your device.
Caring for Your Device
Taking good care of your device will ensure trouble-free operation and reduce the
risk of damage to your device.
For optimal performance, use your device where the temperature is appropriate.
The operating temperature of your device is between 0C (32F) and 35C
(95F).
Keep your device away from excessive moisture and extreme temperatures.
Avoid exposing your device to direct sunlight or strong ultraviolet light for extended
periods of time.
Do not place anything on top of your device or drop objects on your device.
Do not drop your device or subject it to severe shock.
Do not subject your device to sudden and severe temperature changes. This
could cause moisture condensation inside the unit, which could damage your
device. In the event of moisture condensation, allow your device to dry out
completely before use.

9-2 Caring and Maintenance
The screen surface can easily be scratched. Avoid touching it with sharp objects.
Non-adhesive generic screen protectors designed specifically for use on portable
devices with LCD panels may be used to help protect the screen from minor
scratches.
Never clean your device with it powered on. Use a soft, lint-free cloth to wipe
the screen and the exterior of your device.
Do not use paper towels to clean the screen.
Never attempt to disassemble, repair or make any modifications to your device.
Disassembly, modification or any attempt at repair could cause damage to your
device and even bodily injury or property damage and will void the warranty.
Do not store or carry flammable liquids, gases or explosive materials in the
same compartment as your device, its parts or accessories.

Regulatory Information 10-1
Chapter 10
Regulatory Information
NOTE: Marking labels located on the exterior of your device indicate the
regulations that your model complies with. Please check the marking labels on
your device and refer to the corresponding statements in this chapter. Some
notices apply to specific models only.
Regulations Statements
European Notice
Products with the CE marking comply with Radio & Telecommunication Terminal
Equipment Directive (R&TTE) (1999/5/EEC), the Electromagnetic Compatibility
Directive (89/336/EEC) and the Low Voltage Directive (73/23/EEC) – as
amended by Directive 93/68/ECC – issued by the Commission of the European
Community.
Compliance with these directives implies conformity to the following European
Standards:
EN301489-1: Electronic compatibility and Radio spectrum Matters (ERM),
ElectroMagnetic Compatibility (EMC) standard for radio equipment and services;
Part 1: Common technical requirements
EN301489-17: Electronic compatibility and Radio spectrum Matters (ERM),
ElectroMagnetic Compatibility (EMC) standard for radio equipment and services;
Part 17: Specific conditions for 2.4 GHz wideband transmission systems and 5 GHz
high performance RLAN equipment

10-2 Regulatory Information
EN55022: Radio disturbance characteristics
EN55024: Immunity characteristics
EN6100-3-2: Limits for harmonic current emissions
EN6100-3-3: Limitation of voltage fluctuation and flicker in low-voltage supply system
EN60950 / IEC 60950: Product Safety
The manufacturer cannot be held responsible for modifications made by the User
and the consequences thereof, which may alter the conformity of the product with
the CE Marking.
FCC Regulations
This device complies with part 15 of the FCC Rules. Operation is subject to the
following two conditions: (1) This device may not cause harmful interference, and
(2) this device must accept any interference received, including interference that
may cause undesired operation.
This device has been tested and found to comply with the limits for a Class B
digital device, pursuant to Part 15 of the FCC Rules. These limits are designed
to provide reasonable protection against harmful interference in a residential
installation. This equipment generates, uses and can radiated radio frequency energy
and, if not installed and used in accordance with the instructions, may cause harmful
interference to radio communications. However, there is no guarantee that interference
will not occur in a particular installation. If this equipment does cause harmful
interference to radio or television reception, which can be determined by turning
the equipment off and on, the user is encouraged to try to correct the interference
by one or more of the following measures:
Reorient or relocate the receiving antenna.
Increase the separation between the equipment and receiver.
Connect the equipment into an outlet on a circuit different from that to which
the receiver is connected.
Consult the dealer or an experienced radio/TV technician for help.

Regulatory Information 10-3
Changes or modifications not expressly approved by the party responsible for
compliance could void the user‘s authority to operate the equipment.
Safety Precautions
Prolonged listening of music in maximum volume can damage the ears.
The use of headphones other than those recommended/supplied can cause
hearing impairment due to excessive sound pressure.
About Charging
Use only the AC adapter supplied with your device. Use of another type of
AC adapter will result in malfunction and/or danger.
Use only the car charger supplied by the manufacturer. Use of another type
of car charger will result in malfunction and/or danger.
This product is intended to be supplied by a LISTED Power Unit marked with
“LPS,” “Limited Power Source,” and output rated + 12 V dc / 2.0 A.
Use a specified cradle approved by the manufacturer.
Use a specified battery in the equipment.
About the Charger
Do not use the charger in a high moisture environment. Never touch the charger
when your hands or feet are wet.
Allow adequate ventilation around the charger when using it to operate the device
or charge the battery. Do not cover the charger with paper or other objects
that will reduce cooling. Do not use the charger while it is inside a carrying
case.

10-4 Regulatory Information
Connect the charger to a proper power source. The voltage and grounding
requirements are found on the product case and/or packaging.
Do not use the charger if the cord becomes damaged.
Do not attempt to service the unit. There are no serviceable parts inside. Replace
the unit if it is damaged or exposed to excess moisture.
About the Radio Frequency Exposure
This device meets the government’s requirements for exposure to radio waves. This
device is designed and manufactured not to exceed the emission limits for exposure
to radio frequency (RF) energy set by the Federal Communications Commission
of the U.S. Government.
This device complies with FCC radiation exposure limits set forth for an uncontrolled
environment.
This device only supports 2 orientations and detail is illustrated as below.
Camera