Giant Electronics L1010 Two Way Radio with FRS User Manual Outline for T9100 User Guide
Giant Electronics Ltd Two Way Radio with FRS Outline for T9100 User Guide
User Manual
1
L1010
User Manual

2
SAFETY AND GENERAL INFORMATION
Important Information for Safe and Efficient Operation
Please read this information before using your radio.
Safety and General
1. Do not transmit more than 50% of time. It is important as the radio generates measurable RF
energy exposure only when transmitting.
2. Do not open the radio. Any unauthorized modification may violate FCC rules and invalidate
the guarantee.
3. Radio frequency signals transmitted may cause interference to hearing aids.
4. Turn off the radio when near medical equipment.
5. This product should not be used by people with pacemakers.
6. Do not use the radio when driving a vehicle or operating machinery.
7. Do not use the radio when on board aircraft.
8. Do not hold the antenna when transmitting.
9. Do not use the radio when the antenna has damaged.
10. Turn off the radio and remove the batteries if you are not going to use it for a long time.
11. Do not attempt to charge alkaline batteries.
12. Only use the power adapter charger supplied. Using an unauthorized charger will invalidate
the guarantee and may damage the product.
13. Only use the approved headsets with the radio.

3
Two-way Radio Operation
The device was tested for typical body-worn operations using the supplied belt-clip. To maintain
compliance with FCC RF exposure requirements, body-worn operations are restricted to the
supplied belt-clip. For hand-held operation, the radio should be held at least 1 inch (2.5cm) from
the user’s face. The use of accessories that do not satisfy these requirements may not comply with
FCC RF exposure requirements and should be avoided. For more information about RF exposure,
please visit the FCC web site at www.fcc.gov.
Approved Accessories
For a list of approved RCA accessories, visit our Web site at www.RCA.com.
OPERATIONAL CAUTIONS
1. Never dispose of batteries in a fire. There is a serious risk of explosion and /or the release of
highly toxic chemicals.
2. Do not expose your product to direct sunlight, extreme cold or place it near heating
appliances.
3. Do not submerge any part of your product in water and do not use it in damp, humid or wet
conditions.
4. Do not expose your product to fire, explosive or other hazardous conditions. For example, at
petrol stations or areas where explosive products are used.
4
FCC Information:
This device complies with Part 15 of the FCC Rules. Operation is subject to the following two
conditions:
1 this device may not cause harmful interference, and
2 this device must accept any interference received, including interference that may
cause undesired operation.
Note:
This equipment has been tested and found to comply with the limits for a Class B digital
device, pursuant to Part 15 of the FCC Rules. These limits are designed to provide
reasonable protection against harmful interference in a residential installation. This
equipment generates, uses and can radiate radio frequency energy and, if not installed and
used in accordance with the instructions, may cause harmful interference to radio
communications.
However, there is no guarantee that interference will not occur in a particular installation.
If this equipment does cause harmful interference to radio or television reception, which
can be determined by turning the equipment off and on, the user is encouraged to try to
correct the interference by one or more of the following measures:
5
Reorient or relocate the receiving antenna.
Increase the separation between the equipment and receiver.
Connect the equipment into an outlet on a circuit different from that to which the
receiver is connected.
Consult the dealer or an experienced radio/TV technician for help.
Warning:
Changes or modifications to this equipment not expressly approved by the party responsible
for compliance could void the user's authority to operate the equipment.
Any adjustment to this equipment is recommended to be performed by or under the
immediate supervision and responsibility of a person certified as technically qualified to perform
transmitter maintenance and repair duties in the private land mobile services and fixed services by
an organization or committee representative of users of those services.
Replacement of any transmitter component (crystal, semiconductor, etc.) for this equipment
could result in violation of FCC rules.
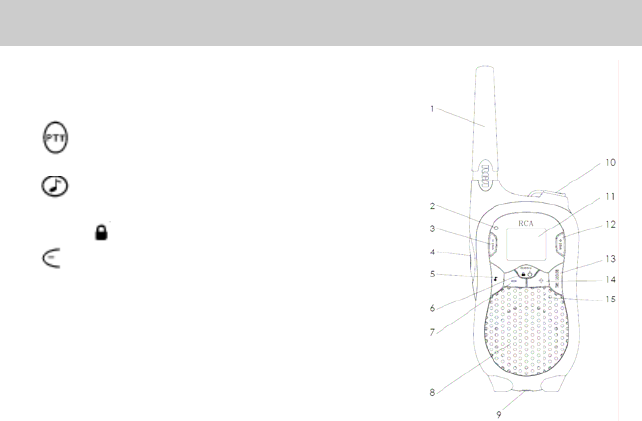
CONTROL BUTTONS AND DISPLAY ICONS–
MODEL R1010 SERIES
1. Antenna
6
2. LED - The red light stays on when transmitting
3. ‘VOL-’Volume decrease
4. Start transmitting and transmits with low power
on all channels
5. Transmit your call tone to other radios set to the
same channel and Interference Eliminator Code
6. MENU/ : Mode selection, Power ON/OFF, Key lock
7. Channel/Menu Decrease
8. Loud speaker
9. Plug-in Charger jack port
10. Headset jack port
11. LCD screen - Displays selected channel and other
settings
12. ‘VOL+’ Volume increase

13. /Monitor/Scan
14. Channel/Menu Increase
15. Microphone
Battery meter – Shows the battery
level
Channel display digit
Interference Eliminator Code display
digit
CA – Shows the call melody
VOX – Appears when the VOX function
is turned on for hands-free use
IVOX – Appears when the baby monitor
function is turned on
Keypad locked
Talk confirmation tone
7
GETTING STARTED
Congratulations on your purchase of this state-of-the-art RCA two-way radio!
Please read this operation manual carefully before using your new radio to ensure that you operate
it both correctly and safely.
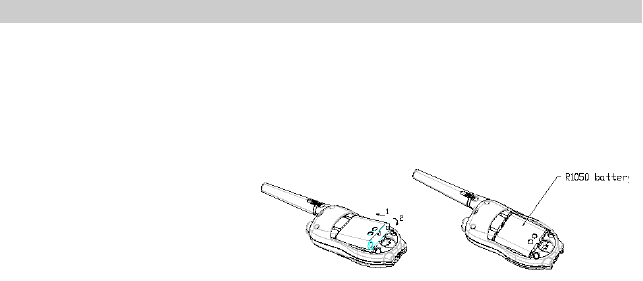
Installing the Batteries
Your radio uses four AAA
alkaline batteries and beeps when
the batteries are low.
1. Turn the radio off.
2. With the back of the radio
facing you, lift the battery
latch up to release the battery
cover and remove the cover.
3. Insert four AAA alkaline batteries as shown on the inside of the battery compartment.
4. Reposition the battery cover and press down to secure.
8
NOTE: The R1010 model radio can use a NiMH rechargeable battery instead of four AAA
batteries. A rechargeable battery upgrade kit is available.

Installing the NiMH Battery Pack:
1. Follow step 2 above to remove the battery cover.
2. Remove the battery pack from the clear plastic bag. Do not disassemble or unwrap the
battery pack.
3. Insert the NiMH battery pack so the metal contacts on the side of the battery are facing
outward from the radio to connect with the contacts on the battery door.
4. Reposition the battery cover and press down to secure.
Battery Meter
The battery icon shows the battery charge level, from full to empty. When the battery is
empty, the radio chirps periodically after you release the PTT button. The radio powers off when
the voltage drops below a predetermined level to protect the rechargeable battery.
Note: Remove the batteries before storing your radio for extended periods of time. Batteries
corrode over time and may cause permanent damage to your radio.
Turning Your Radio On and Off
9
To turn on, press and hold the. button until the radio chirps and briefly shows icons of all of
your radio’s available features for a brief period. The display then scrolls through the available
channels (1 – 22) and Interference Eliminator Codes (0 – 38).
To turn off the radio, press and hold the button until the display becomes blank.
INITIAL SETUP
Selecting a Channel
The channel is the frequency that your radio uses to transmit. Your radio has multiple channels
that can be shared on a “take turns” basis. For uninterrupted communication, do not talk on a
channel if someone else if using it.
Your radio has 22 channels. Channels 1 – 7 and 15 – 22 are one watt (two watts if you press PTT
Boost). Channels 8 – 14 are 0.5 watt (one watt if using power boost).
To check for activity on a channel before you talk, press and hold . If you hear static, the
channel is clear to use.
1. Press or to set the channel
2. Press or PTT Boost to save the channel setting or MENU to continue set up.
10
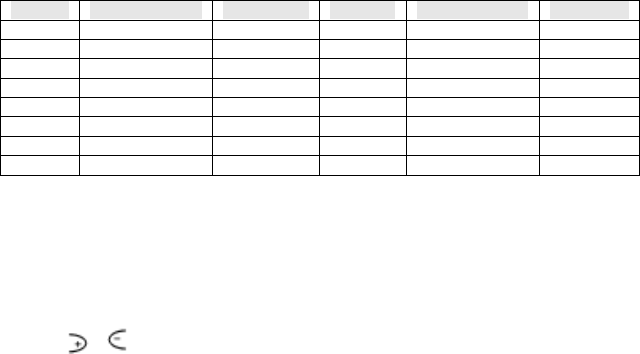
Channels and Frequencies
Channel Frequency Description Channel Frequency Description
1 462.5625 MHz FRS 8 467.5625 MHz FRS
2 462.5875 MHz FRS 9 467.5875 MHz FRS
3 462.6125 MHz FRS 10 467.6125 MHz FRS
4 462.6375 MHz FRS 11 467.6375 MHz FRS
5 462.6625 MHz FRS 12 467.6625 MHz FRS
6 462.6875 MHz FRS 13 467.6875 MHz FRS
7 462.7125 MHz FRS 14 467.7125 MHz FRS
Interference Eliminator Code
Interference Eliminator Codes help minimize interference by providing you with a choice of code
combinations. Your radio has 38 Interference Eliminator Codes. Codes 1 – 38 are the standard
codes that appear on other FRS/FRS radios.
To set the code for a channel:
1. Press MENU until the code starts to flash.
2. Press or to select the code.
3. Press PTT to save the code setting or MENU to continue set up.
11
You can set a different code for each channel using this procedure. Press and hold or to
scroll through the Interference Code rapidly so you can quickly reach the code you want.
Note: You must set the Interference Eliminator Code to 0 on a radio that uses Interference
Eliminator Codes to communicate with radios that do not have Interference Eliminator Codes.
Select 0 for “no tone, no code”
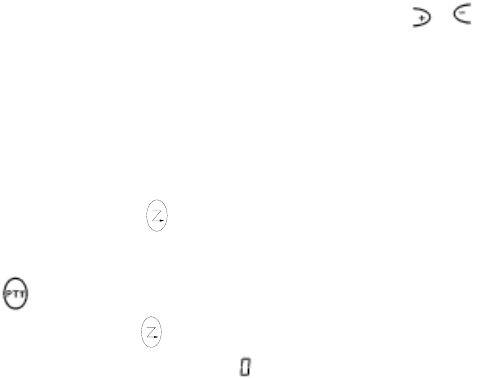
Scanning Channels
Use scanning to monitor channels and codes for transmissions or to find someone in your group
who has accidentally changed channels.
To start scanning, briefly press and release . The scan indicator displays “Z” and the radio
begins to scroll through the channel and Interference Eliminator Code combinations. When the
radio detects channel activity, it stops scanning and you can hear the transmission. To respond to
the transmission, press or PTT Boost within five seconds.
To stop scanning, briefly press and release .
Note: If your radio’s interference Eliminator Code is set to while scanning, the radio checks for
activity on each channel regardless of the code used on the channel. If your radio’s Interference
12

Eliminator Code is set to , the radio checks for activity only on channels using codes
and ignores channels using code .
Group Scanning
In Group scanning mode, the radio only scan among the channels enabled in the group and the
current channel.
To add a channel into the group
1. Press MENU key until the current channel number and a ‘-’ displays in LCD;
or to change the ‘-’ into ‘y’;
2. Press
3. Press PTT to save the code setting or MENU to continue set up.
To enable Group Scanning:
1. Press MENU key until a ‘-’ and ‘GP’ (Stands for ‘group’) displays in LCD;
2. Press or to change the ‘-’ into ‘y’;
3. Press PTT to save the code setting or MENU to continue set up.
Group Scanning operates the same as Normal Scanning.
13

Note: If there is no channel in the group, or the group contains only one channel and the channel is
the current channel at the same time, then the group scan will act as normal scan.
Advanced Scan
14
rele
If the radio stops scanning on a channel you do not want to listen to, briefly press and
ase or to resume scanning for the next active channel
Channel Busy Indicator
When a channel is busy, the LED flashes twice per second.
TALKING AND LISTENING
To communicate, all radios in your group must be set to the same channel and Interference
Eliminator Code.
1. To talk, press and hold . Hold the radio 2 to 3 inches away from your mouth when talking.
2. When you finished talking, release .
For maximum clarity, hold the radio two to three inches away from your mouth and speak directly
into the microphone. Do not cover the microphone while talking.

Talk Range
Your radio is designed to maximize performance and improve transmission range. Do not use the
radios closer than five feet apart.
Setting the Volume
When powered up, simply press ‘Vol’ + or ‘Vol –‘ button to adjust your volume to a comfortable
listening level. When you are setting the volume, you will see a “V” on the screen.
Be sure not to hold the radio too close to your ear. If the volume is set too high, it could hurt your
ear.
Press PTT to confirm the volume setting.
Monitor Button
Pressing and holding for three seconds allows you to check for activity on the current
channel before you talk and check the volume level of the radio when you are not receiving. This
allows you to adjust the volume, if necessary.
15
Call Tones
Setting and Transmitting Call Tones
Your radio can transmit different call tones to other radios in your group to alert them that you
want to talk. You have 10 call tones from which to choose.
To set a call tone:
1. With the radio on, press MENU until the current call tone setting flashes and CA appears.
2. Press or to change and hear the call tone.
3. Press MENU or or PTT Boost to set the new call tone.
4. To transmit your call tone to other radios set to the same channel and Interference Eliminator
Code as your radio, press ♪.
Note: Setting the call to 0 disables the call tone feature.
Transmitting a Talk Confirmation Tone
You can set your radio to transmit a unique tone when you finish transmitting. It’s like saying
“Roger” or “Over” to let others know you finished talking.
To turn talk confirmation on, press and hold while you turn the radio on. When you release
16
or PTT Boost after transmitting, your confirmation tone transmits and displays.
To turn the talk confirmation tone off, turn your radio off and then turn it back on while pressing
and holding .
SPECIAL FEATURES
Push to Talk (PTT) Timeout Timer
To prevent accidental transmissions and to save battery life, the radio emits a continuous warning
tone and stops transmitting if you press PTT for 60 continuous seconds.
Keypad Lock
To avoid accidentally changing your radio settings:
1. Press MENU until displays.
2. Press + or – to select “y” or “-“ to set key lock on or off.
3. When in lock mode, you can turn the radio on and off, receive, transmit, send a call tone, and
monitor channels. All other functions are locked.
To unlock the radio, press and hold MENU for three seconds until is no longer displayed.
17
Removing Channels from the Scan List (Nuisance Delete Feature)

To prevent the radio from scanning a channel, press and hold or for at least three seconds,
then release. This temporarily removes the channel from the scan list.
To restore the channels, turn the radio off and then back on. The channel is now restored.
Note: You cannot remove your home channel from the scan list. The home channel is the channel
your radio was set to when you started the scanning.
Baby Monitor Feature
Your radios may be used as a baby monitor. To use this feature:
1. Turn off your radio.
2. Turn your radio on with button pressed.
The "IVOX" icon will appear in the display to indicate that the baby monitor feature is active.
To transmit, speak into the radio microphone. To receive, simply stop talking.
4. Pressing or PTT Boost to transmit will disable the baby monitor feature.
5. Press or PTT Boost button for a very short time to activate the baby monitor again.
IVOX will appear on the screen again.
18
Note: When using the baby monitor feature, there is a short delay after you start talking, before the
radio transmits.
Hands-Free Use with Accessories (VOX)
You can transmit hands-free with the use of optional accessories. Once VOX is turned on, the
radio detects your voice and transmits when you speak.
1. Turn the radio off and firmly plug the VOX accessory into the accessory port.
2. Turn the radio on, and then turn the volume down. VOX will flash on the display.
3. Adjust the volume appropriately by pressing or .
4. To transmit, speak into the accessory microphone. There is a short delay between the time you
start talking and when the radio transmits.
5. To receive, simply stop talking.
6. To turn VOX off, press or PTT Boost and then remove the audio accessory.
Stopwatch
You can use your radio as a stopwatch. To use this feature:
1. With the radio on, press MENU until "0" “00” appears in the display.
2. Press and the stopwatch will begin to run. Minutes and seconds will be shown.
19

3. While the stopwatch is running, pressing will pause it and display the time that has
passed. Note that the stopwatch doesn’t quit working; it still runs in the background. If is
pressed again, the stopwatch will continue running based on the time from the start of the
stopwatch, rather than the time that is shown in the pause state.
4. To reset the stopwatch, press while in the pause state.
5. Pressing , PTT Boost or will end the stopwatch feature and allow the radio to begin
transmitting again. If you press the monitor key, the watch will stop and the radio will enter the
monitor state. Release MON to quit to standby state.
Note: This timer is for your reference only. When your radio is being used as a stopwatch, you
will not be able to use VOX or the baby monitor feature.
Auto Power Off
Your radio has an auto power off feature. To use this:
1. Press MENU button until displays “P” in LCD channel position.
2. Use the or button to select 0, 30, 60 or 90 minutes. If you select 0, the auto power
feature is disabled. If you select 30, 60 or 90 minutes, the radio will automatically turn off
when that amount of time has passed.
20

3. In this mode, pressing any button or receiving a valid signal will reset the auto power off timer
to the original setting value.
ACCESSORIES
Many accessories (sold separately) are available for your radio. For more information, please refer
to the brochure included with your radio.
Using Audio Accessories
1. Turn the radio off. Lift the accessory jack cover and plug the audio accessory into the
accessory port.
2. Turn the radio on. VOX will appear.
3. Lower the volume before placing the accessory on your head or in your ear.
4. Adjust the volume to a comfortable level using or .
5. To transmit, speak into the accessory microphone, if any.
6. To receive, stop talking.
Setting the Sensitivity Level When in VOX Mode
Adjusting the radio’s sensitivity level helps minimize the possibility of unintended noises
triggering a transmission and helps the radio pick up soft voices. When the baby monitor feature is
active, you will set its sensitivity level. Otherwise, you will set the sensitivity level of VOX.
21
1. Press MENU until VOX or IVOX displays.

2. Press or select the sensitivity level:
3 = High Sensitivity for quiet environments
2 = Medium Sensitivity for most environments
1 = Low Sensitivity for noisy environments
Note: When you connect a VOX accessory, the radio is automatically set to the last chosen
sensitivity level.
WARRANTY
What your warranty covers:
‧ Defects in materials or workmanship.
For how long after your purchase:
‧ One year, from date of purchase. (The warranty period for rental units begins with the first
rental or 45 days from date of shipment to the rental firm, whichever comes first.)
What we will do:
22
‧ Provide you with a new or, at our option, a refurbished unit. The exchange unit is under
warranty for the remainder of the original product’s warranty period.
23
How you get service:
‧ Properly pack your unit. Include any cables, etc., which were originally provided with the
product. We recommend using the original carton and packing materials.
‧ “Proof of purchase in the form of a bill of sale or receipted invoice which is evidence that the
product is within the warranty period, must be presented to obtain warranty service.” For rental
firms, proof of first rental is also required. Also print your name and address and a description
of the defect. Send via standard UPS or its equivalent to:
Giant International Ltd.
3500 Lenox Road, Suite 630
Atlanta, GA 30326
Service Hotline: 800-638-5234
‧ Pay any charges billed to you by the Exchange Center for service not covered by the warranty.
‧ Insure your shipment for loss or damage. Giant International Ltd. accepts no liability in case of
damage or loss.
‧ A new or refurbished unit will be shipped to you freight prepaid.
What your warranty does not cover:
‧ Customer instruction. (Your Owner’s Manual provides information regarding operating
instructions and user controls. Any additional information, should be obtained from your
dealer.)
‧ Installation and setup service adjustments.
24
‧ REPAIR OR REPLACEMENT AS PROVIDED UNDER THIS WARRANTY IS THE
EXCLUSIVE REMEDY OF THE CONSUMER. GIANT INTERNATIONAL LTD. SHALL
NOT BE LIABLE FOR INCIDENTAL OR CONSEQUENTIAL DAMAGES RESULTING
‧ Batteries.
‧ Damage from misuse or neglect.
‧ Products which have been modified or incorporated into other products.
‧ Products purchased or serviced outside the USA.
‧ Acts of nature, such as but not limited to lightning damage.
Product Registration:
‧ Please complete and mail the Product Registration Card packed with your unit. It will make it
easier to contact you should it ever be necessary. The return of the card is not required for
warranty coverage.
Limitation of Warranty:
‧ THE WARRANTY STATED ABOVE IS THE ONLY WARRANTY APPLICABLE TO THIS
PRODUCT. ALL OTHER WARRANTIES, EXPRESS OR IMPLIED (INCLUDING ALL
IMPLIED WARRANTIES OF MERCHANTABILITY OR FITNESS FOR A PARTICULAR
PURPOSE) ARE HEREBY DISCLAIMED. NO VERBAL OR WRITTEN INFORMATION
GIVEN BY GIANT INTERNATIONAL LTD., ITS AGENTS, OR EMPLOYEES SHALL
CREATE A GUARANTY OR IN ANY WAY INCREASE THE SCOPE OF THIS
WARRANTY.
FROM THE USE OF THIS PRODUCT OR ARISING OUT OF ANY BREACH OF ANY
EXPRESS OR IMPLIED WARRANTY ON THIS PRODUCT. THIS DISCLAIMER OF
WARRANTIES AND LIMITED WARRANTY ARE GOVERNED BY THE LAWS OF THE
STATE OF INDIANA. EXCEPT TO THE EXTENT PROHIBITED BY APPLICABLE LAW,
ANY IMPLIED WARRANTY OF MERCHANTABILITY OR FITNESS FOR A
PARTICULAR PURPOSE ON THIS PRODUCT IS LIMITED TO THE APPLICABLE
WARRANTY PERIOD SET FORTH ABOVE.
How state law relates to this warranty:
‧ Some states do not allow the exclusion nor limitation of incidental or consequential damages, or
limitations on how long an implied warranty lasts so the above limitations or exclusions may
not apply to you.
‧ This warranty gives you specific legal rights, and you also may have other rights that vary from
state to state.
25