Giant Electronics T9140 Two way Radio with GMRS, FRS and MP3 Player User Manual manual
Giant Electronics Ltd Two way Radio with GMRS, FRS and MP3 Player manual
User Manual
1
T9140
User manual
Prepare By: YK Ling
Dated at: 01 November 2005

2
Safety and General Information
Important Information for Safe and Efficient Operation
Please read this information before using your radio.
Safety and General
1. Do not transmit more than 50% of time. It is important as the radio generates measurable RF energy
exposure only when transmitting.
2. Do not open the radio. Any unauthorized modification may violate FCC rules and invalidate the guarantee.
3. Radio frequency signals transmitted may cause interference to hearing aids.
4. Turn off the radio when near medical equipment.
5. This product should be not used by people with pacemakers.
6. Do not use the radio when driving a vehicle or operating machinery.
7. Do not use the radio when on board aircraft.
8. Do not hold the antenna when transmitting.
9. Do not use the radio when the antenna has damaged.
10. Do not try to modify the antenna. Unauthorized antenna, modification, or attachment could damage the radio
and may violate FCC regulations.
11. Turn off the radio and remove the batteries if you are not going to use it for a long time.
12. Do not attempt to charge alkaline batteries.
13. Only use the power adapter charger supplied. Using an unauthorized charger will invalidate the guarantee and may
damage the product.
14. Only use the approved headsets with the radio.
Two-way Radio Operation
The device was tested for typical body-worn operations using the supplied belt-clip. To maintain compliance
with FCC RF exposure requirements, body-worn operations are restricted to the supplied belt-clip. For
hand-held operation, the radio should be held at least 1 inch (2.5cm) from the user’s face. The use of accessories
that do not satisfy these requirements may not comply with FCC RF exposure requirements and should be
avoided. For more information about RF exposure, please visit the FCC web site at www.fcc.gov.
Operational Cautions
1. Never dispose of batteries in a fire. There is a serious risk of explosion and /or the release of highly toxic
chemicals.
2. Do not expose your product to direct sunlight, extreme cold or place it near heating appliances.
3. Do not submerge any part of your product in water and do not use it in damp, humid or wet conditions.
4. Do not expose your product to fire, explosive or other hazardous conditions. For example, at petrol stations or areas
where explosive products are used.
5. Turn off the radio while in charging.

3
FCC License Information
This two-way radio operates on GMRS (General Mobile Radio Service) frequencies which require an FCC
(Federal Communications Commission) license. A user must be licensed prior to operating on any GMRS
channels. Serious penalties could result for unlicensed use of GMRS channels, in violation of FCC rules, as
stipulated in the Communications Act’s Sections 501 and 502 (amended).
Licensed users will be issued a call sign by the FCC, which should be used for station identification when
operating this radio. GMRS users should also cooperate by engaging in permissible transmissions only, avoiding
channel interference with other GMRS users, and being prudent with the length of their transmission time.
Application for a GMRS system license can be made on FCC Form 605. You can call the FCC Forms Hotline
1–800–418–FORM (3676). If You Have Questions about the FCC License: Call the FCC 1–888–CALL–FCC
(225–5322). You may also visit the FCC’s Web site at http://www.fcc.gov or
http://wireless.fcc.gov/services/personal/generalmobile/ concerning GMRS.
Note: Use of this radio outside the country where it was intended to be distributed is subject to government
regulations and may be prohibited.
FCC Statements:
This device complies with Part 15 of the FCC Rules. Operation is subject to the following two conditions:
(1) this device may not cause harmful interference, and
(2) this device must accept any interference received, including interference that may cause undesired
operation.
NOTE: This equipment has been tested and found to comply with the limits for a Class B digital device,
pursuant to Part 15 of the FCC Rules. These limits are designed to provide reasonable protection against harmful
interference in a residential installation. This equipment generates, uses and can radiate radio frequency energy
and, if not installed and used in accordance with the instructions, may cause harmful interference to radio
communications.
However, there is no guarantee that interference will not occur in a particular installation. If this
equipment does cause harmful interference to radio or television reception, which can be determined by turning
the equipment off and on, the user is encouraged to try to correct the interference by one or more of the following
measures:
* Reorient or relocate the receiving antenna.
* Increase the separation between the equipment and receiver.
* Connect the equipment into an outlet on a circuit different from that to which the receiver is connected.
* Consult the dealer or an experienced radio/TV technician for help.
Canada Statements:
This Class B digital apparatus complies with Canadian ICES-003.
Cet appareil numérique de la classe B est conforme à la norme NMB-003 du Canada.
4
Quick Start Guide
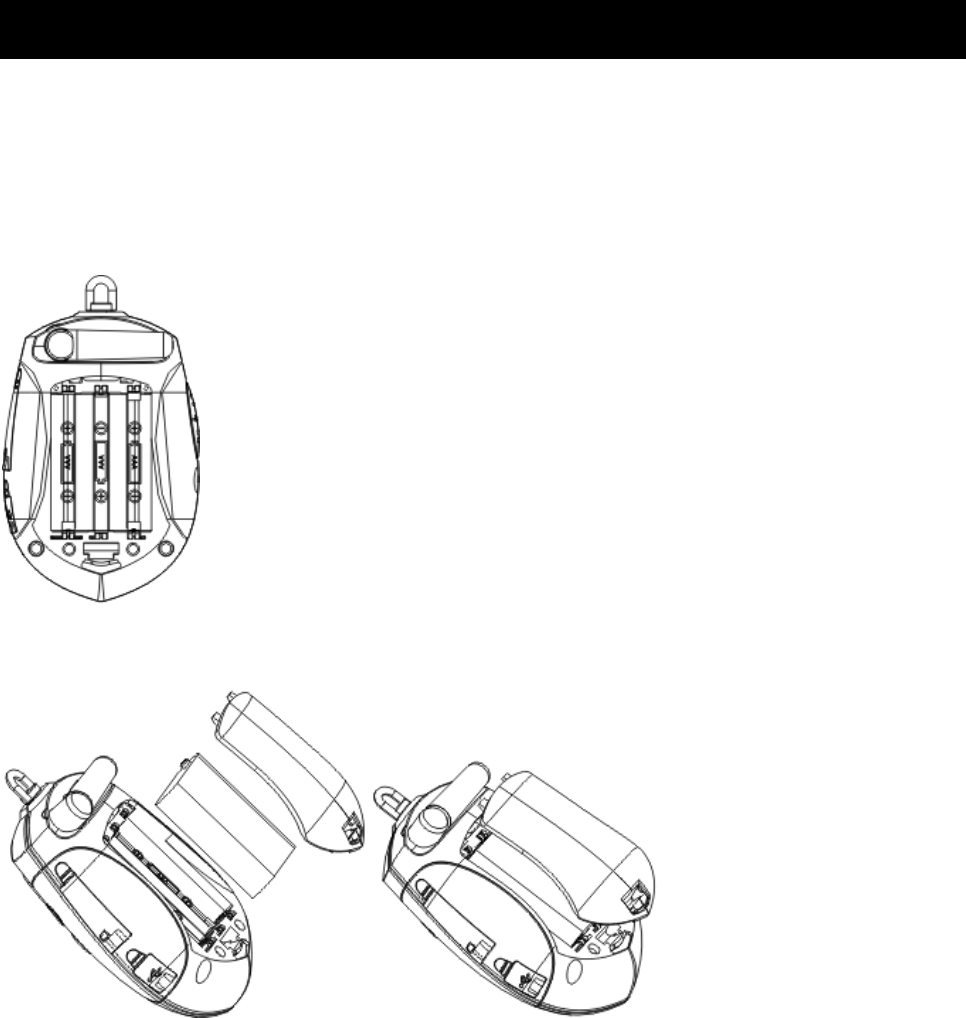
Installation
T9140 can be powered with 3 AAA alkaline batteries (not included) or Ni-MH rechargeable batteries pack (standard
accessory).
To install the batteries:
1. Make sure your radio is off.
2. Release the battery cover.
3. Insert 3 AAA batteries (not included) or Ni-MH rechargeable battery pack according to the polarity symbols inside the
battery compartment.
4. Close the battery cover.

5
To avoid damage to the unit do not mix old and new batteries.
Power on/off & basic instruction
1. To turn T9140 on, hold down FRS/MP3 for 2s. It enters Two-way Radio Mode as default.
2. Press FRS/MP3 to switch between Two-way Radio Mode and MP3 Player Mode.
3. Press MENU button to navigate the functions. You can customize your settings according to the detailed operation
guide or try its fantastic functions. Simply breathe taking!
4. To turn it off, hold down FRS/MP3 for 2s. You settings will be saved unless you take the battery out or its power
supply is down.
Key & Parts Description
Key Icon Two-way Radio MP3
1.PTT 1. Talk;
2. Save a setting.
Not Function
2.MP3/FRS
1. Power On/Off with holding down for 2
seconds;
2. Press down, to inter–switch between MP3
and FRS modes.
1. Power On/Off with holding down for 2 seconds;
2. Press down, to inter–switch between MP3 and FRS
modes.
3.MENU Scroll through menus. 1. Press down to enter menu
2. Hold down 2s to exit menu if it is in menu mode
6
4.+
►►
1. Increase volume;
2. Scroll through available settings in
menus.
1. Press down to jump to next song
2. Hold down 2s while playing to increase volume
3. Scroll through available settings in menus.
5.—
◄◄
1. Decrease volume;
2. Scroll through available settings in
menus.
1. Press down to jump back to the previous song;
2. Hold down 2s while playing to decrease volume
3. Scroll through available settings in menus.
6.♪
●
1. Press down to transmit call tone;
2. Monitor channel activity when hold down
for 2 seconds.
1. Equalizer switch
2. Start/Stop recording
3. Hold down 2s to switch between Play/Record mode
7.►
■
Not function
1. Press down to switch between start playing/ pause/
continue
2. Hold down 2s to stop playing
3. Hold down 5s to enter Sleep mode
8. LED 12. Antenna
9. LCD 13. Earphone Jack
10. Speaker 14. SD Card Socket
11. MIC 15. USB Socket
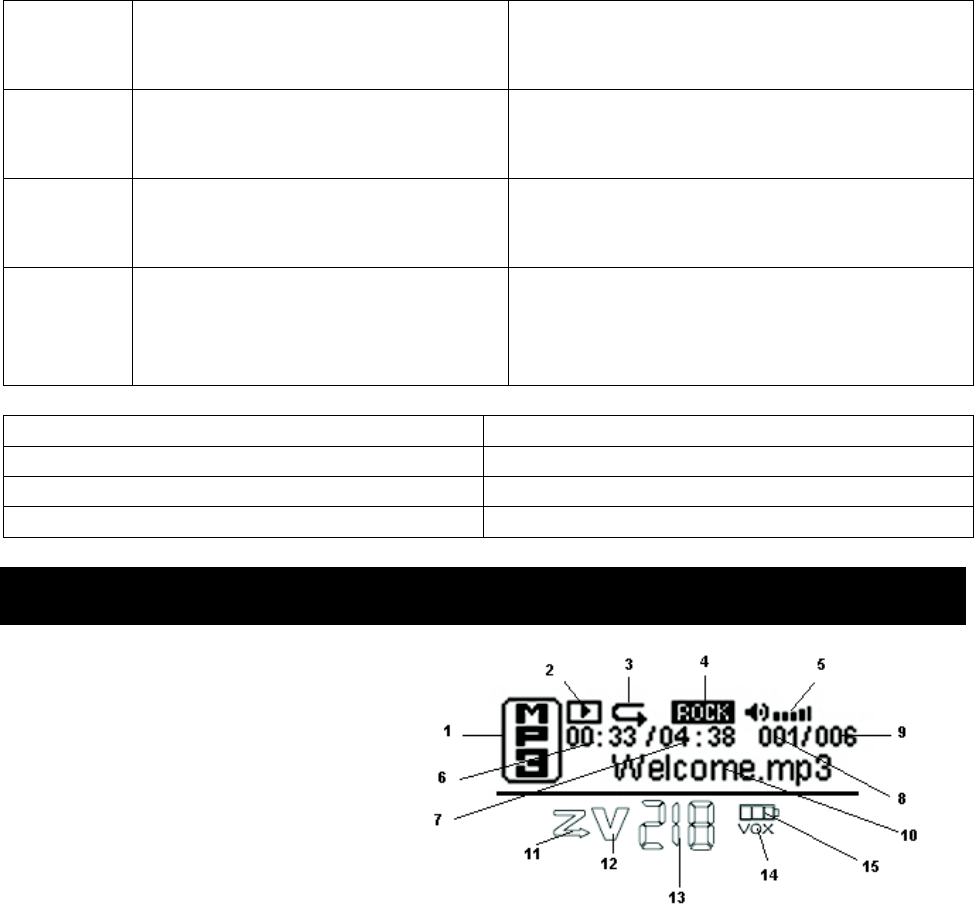
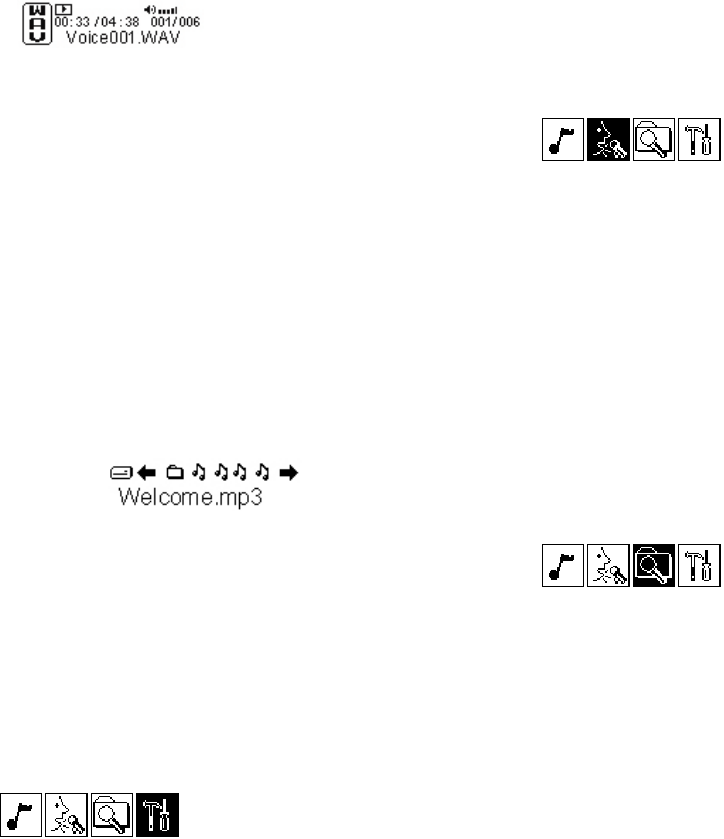
LCD Description
1-10 MP3 player
1. File type
2. Control status
3. Repeat and shuffle
4. Euqalizer
5. Player volume
6. Elapsed time
7. Total time
8. File Number
9. Total files
10.File information
11-15 Two-way radio
11.Scan
12.Two-way radio volume
13.Digit
14.VOX
15.Battery meter
7
-← →+
Time S
-← →+
Time Min
-← →+
Menu Map
Two-way Radio Menu
MP3 Player Menu
Connecting to PC
Your T9140 supports USB 2.0. Using a USB cable (standard accessary ), you can connect it to the USB socket of your
PC for file management.
You don’t need to install driver on PC for it if your operating system is Windows ME/2000/XP. Otherwise, you should
Player
Recorder
N
avigation
Settings
About
Equalizer
Loop
Contrast
Setting
Backlight
Time
Sleep
Power Off
Language
Lyrics
Exit
N
ormal
Rock
Jazz
Classic
Pop
N
ormal
Repeat one
Repeat all
Shuffle
Shuffle
&Repeat
Recorded Files
EXIT
PLAY
DELETE
Total:xxx MB
Free:xxx MB
Music Files
Files
Exit Navigation
中文简体
中文繁体
English & Korean
English & Japan
English & Latin
English & Russia
ON
OFF
Channel Call Tone VOX Scan

8
put the Install CD (standard accessary ) into your CD-ROM driver, and follow the instructions as displayed on screen.
Two-way Radio operations
To operate this product as a Two-way Radio, please read the following instructions carefully.
If you are in MP3 Mode, press MP3/FRS button to switch to Two-way Radio Mode. In this mode, only the bottom part
of LCD displays.
Select a Channel
To communicate with other Two-way Radio users, you must turn your T9140 to the same channel as theirs. Your T9140
has 22 channels. For channel information, see Channel & Frequencies on page xx, and make sure you are not violating
FCC regulation.
Take the following 3 steps to select a channel.
1. Press MENU button. The channel number will begin to flash.
2. Use + or – button to change channel.
3. Press PTT button to confirm.
To Transmit and Receive
1. Before you transmit, listen for activity on the selected channel.
2. When the channel is clear, press and hold the PTT to transmit.
3. Hold the radio with microphone approximately 5 cm in front of your mouth. Speak in a clear, normal conversational
voice.
4. When you have finished speaking, release the PTT and listen for a response.
Volume
1. To adjust the volume, press + or – until a V displays.
2. Press + to increase the volume, press – to decrease.
3. Press PTT to confirm your setting.
Select and send a Call tone
Call tone is used as the notice to say that you are about to communicate.
There are 10 short melodies for you to choose as your call tone. To select one,
1. Press MENU button twice, the number of call tone will flash.
2. Use + or – to choose, the tone will be played for you.
3. Press PTT button to confirm your selection.
4. Select No.0 call tone means disables call tone.
To send out the call tone you selected, press ♪.
VOX (Hands-Free Talk)
You can transmit hands–free with the use of optional accessories. Once VOX is turned on, the radio detects your voice
and transmits when you speak.
1. Turn the radio off and firmly plug the earphone accessory into the accessory port.
2. Turn the radio on, and then turn the volume down. VOX will flash on the display.
3. Adjust the volume appropriately by pressing + or – .
4. To transmit, speak into the accessory microphone. There is a short delay between the time you start talking and when
the radio transmits.
9
5. To receive, simply stop talking.
6. To turn VOX off, press PTT and then remove the audio accessory.
Setting the Sensitivity Level When in VOX Mode
Adjusting the radio’s sensitivity level helps minimize the possibility of unintended noises triggering a transmission and
helps the radio pick up soft voices. When the baby monitor feature is active, you will set its sensitivity level. Otherwise,
you will set the sensitivity level of VOX.
1. Press MENU until VOX or IVOX displays.
2. Press + or - select the sensitivity level:
3 = High Sensitivity for quiet environments
2 = Medium Sensitivity for most environments
1 = Low Sensitivity for noisy environments
3. Press PTT to confirm.
Scanning
Use scanning to monitor channels for transmissions, or to find someone in your group who has accidentally changed
channels.
1. Press MENU four times until scan icon “Z” displays and “Y” or “–” flashes.
2. Press either
+ Until “Y” displays to turn scanning on.
– Until “–“ displays to turn scanning off.
3. Press PTT to confirm
When the radio detects channel activity, it stops scanning and you can hear the transmission. Press PTT within 5
seconds to respond.
Monitor
Use monitor function can detect the activity of the channel you set.
To monitor a channel, hold down ♪ button for 2 s.
You will hear a lot of noise if there is nobody using the current channel.
To exit monitor, simply release the ♪ button.
END of Two-way Radio operations.
MP3 operations
To operate this product as a MP3/WMA player and recorder, please read the following instructions carefully.
If you are in Two-way Radio mode, press MP3/FRS button to switch to MP3 Mode.
If you have a SD card (not included) in the SD card socket, it will check and load the card content first.
It enters MP3/WMA player as default.
At any time, you can hold down ♪ button for 5 s to enter Sleep Mode.
To wake it up, press ♪ again.
Player
In this mode , you can take the following steps to select and play a music file (MP3/WMA).
1. If you are not in Player Mode, return to Main Menu; choose the 1st icon, press
10
MENU button.
2. Press + or – button to choose the file stored in the memory (content in the SD card will be appended after the files
in the internal Flash).
3. Press
♪ button to start playing.
4. Hold down + (–) button to increase (decrease) the volume until you can hear the music properly.
5. You can choose from the 4 Digital Equalizer (Rock, Jazz, Classic, Pop) by pressing ♪ button.
6. While playing, you can press down ♪ to pause; to continue, press ♪ once more.
7. To stop playing, hold down ♪ button for 2 s.
Note:
1. While playing, you can simply press + or – button to jump to another song, but if the current song has already played
for more than 5s, pressing – button will play this song again from the beginning.
2. You can press MENU to return to Main Menu.
3. Holding down ♪ button for 2 seconds will enter Record Mode.
Recorder
In this mode, you can take the following steps to record any sound and playback!
To record,
1. If you are not in Recorder Mode, return to Main Menu; choose the 2nd icon,
press MENU button.
2. To start recording, press ♪. The stop watch displayed on the upper–left is the recorded time; the one on the upper
–right is the maximum time you can record.
3. The sound goes to the MIC of T9140 will be recorded as a WAV file; its name is displayed on the bottom,
4. To end recording, press ♪ again.
To playback, similar as operation in Player Mode
Note:
1. You can press MENU to return to Main Menu.
2. Holding down
♪ button for 2 seconds will enter Player Mode.
Navigation files
In this mode, you can take the following steps to manage all the files in memory.
1. If you are not in Navigation Mode, return to Main Menu; choose the 3rd icon,
press MENU button.
2. Press + or – button to navigate between the icons that stands for file. The information will be displayed.
3. To manage the selected file, press ♪ button. You can choose to Delete or Play the file. To cancel, choose Exit.
4. To exit Navigation Mode, navigate to the icon that describes as EXIT NAVIGATION
Note:
1. There can also be some folders when navigation, e.g., [Voice] that contains recorded sound files.
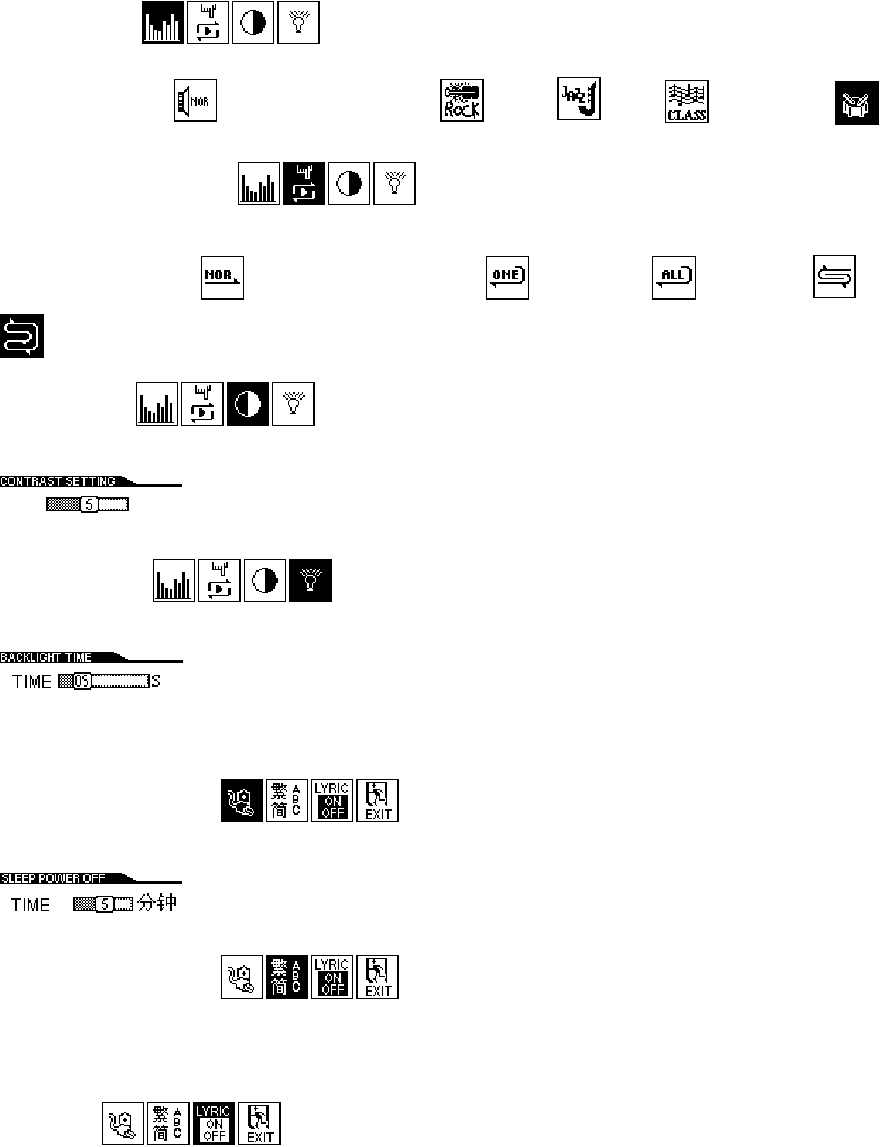
Settings
In this mode, you can customize your MP3 player with the following instructions.
If you are not in Settings Mode, return to Main Menu; choose the 4th icon, press MENU button.
11
Equalizer
Digital Equalizer can give you different feelings of your songs!
Five icons stands for NORMAL (No equalizer), ROCK, JAZZ, CLASSIC and POP.
Repeat and shuffle
You choose your repeat and shuffle way in this sub mode.
Five icons stands for Normal(No repeat/shuffle), Repeat One, Repeat All, Shuffle and
Shuffle+Repeat All.
Contrast
Press + or – button to increase or decrease the contrast degree
until it fits your eyes, then press MENU to confirm.
Back light
Press + or – button to increase or decrease the last time.
There are 00, 05, 10, 15, 20, 30, 90s to choose from. 00 means no back light; 05 means back light will last 5s after your
last touch of button, and so on. Press MENU to confirm and return to Settings Mode.
Sleep power off
Your T9140 have an Auto Power Save function. You can adjust its timer.
Press + or – button to increase or decrease the time, then press MENU to confirm.
Language setting
T9140 supports multi–language display to display your file name and lyrics properly.
6 languages are supported. 中文简体, 中文繁体, English & Korean, English & Japanese, English & Latin, English &
Russian.
Lyrics
You can choose ON/OFF to determine whether to show the lyrics.
Exit Settings Mode
Choose the last icon and press MENU button will exit Settings.
12
END of Settings
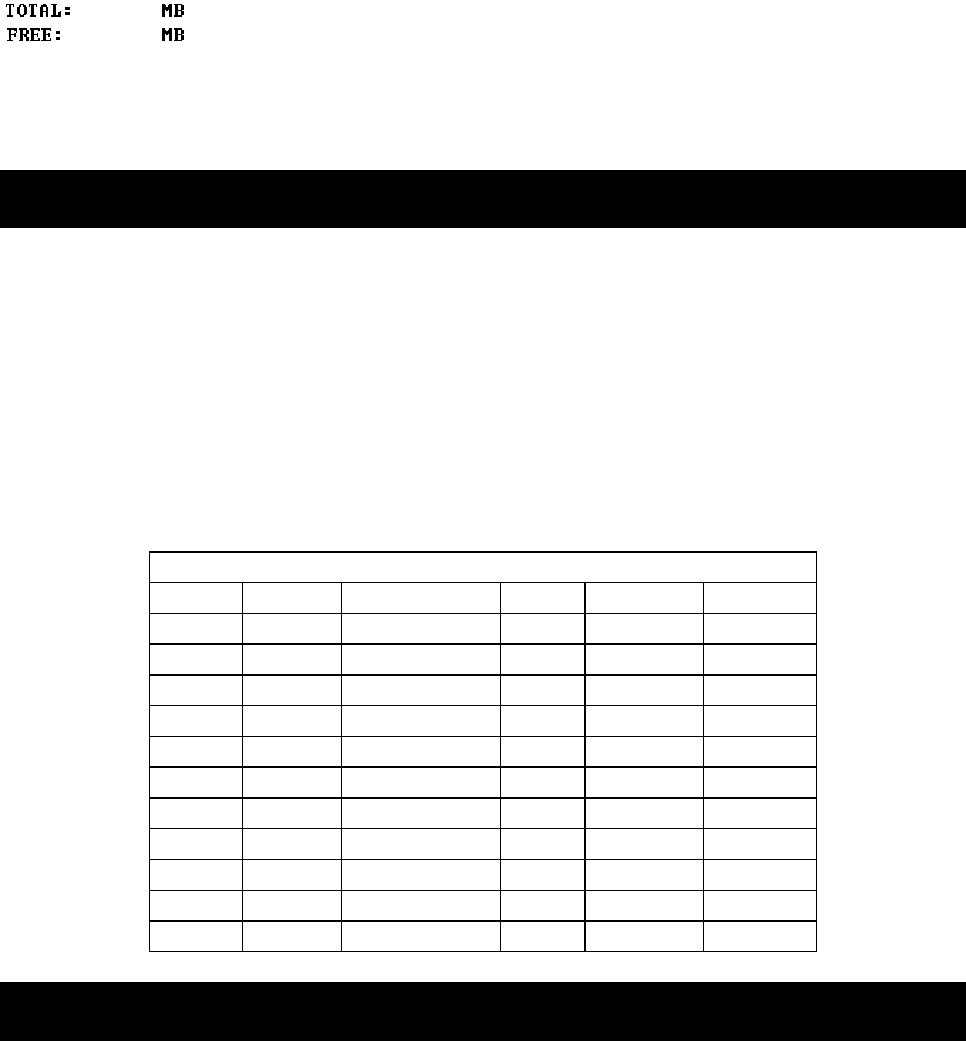
Other
It will show you the total memory space and free space.
END of MP3 operations.
Specifications
Two-way Radio
US Two-way Radio
22 channels GMRS/FRS
10 music call tone
16 level volume
3 level VOX
AAA x 3 batteries
MP3 Player
USB 2.0 Support
20Hz - 15kHz frequency response
2 mW earphone output or 60mW speaker output
128M internal FLASH
SD card support up to 1G
FRS/GMRS Channels & Frequencies
Channel Freq (MHz) Description Channel Freq (MHz) Description
1 462.5625 GMRS / FRS 12 467.6625 FRS
2 462.5875 GMRS / FRS 13 467.6875 FRS
3 462.6125 GMRS / FRS 14 467.7125 FRS
4 462.6375 GMRS / FRS 15 462.5500 GMRS
5 462.6625 GMRS / FRS 16 462.5750 GMRS
6 462.6875 GMRS / FRS 17 462.6000 GMRS
7 462.7125 GMRS / FRS 18 462.6250 GMRS
8 467.5625 FRS 19 462.6500 GMRS
9 467.5875 FRS 20 462.6750 GMRS
10 467.6125 FRS 21 462.7000 GMRS
11 467.6375 FRS 22 462.7250 GMRS
Warranty
What your warranty covers:
Defects in materials or workmanship.
13
For how long after your purchase:
One year, from date of purchase. (The warranty period for rental units begins with the first rental or 45 days from date of
shipment to the rental firm, whichever comes first.)
What we will do:
Provide you with a new or, at our option, a refurbished unit. The exchange unit is under warranty for the remainder of the
original product’s warranty period.
How you get service:
Properly pack your unit. Include any cables, etc., which were originally provided with the product. We recommend using
the original carton and packing materials.
“Proof of purchase in the form of a bill of sale or receipted invoice which is evidence that the product is within the
warranty period, must be presented to obtain warranty service.” For rental firms, proof of first rental is also required.
Also print your name and address and a description of the defect. Send via standard UPS or its equivalent to:
Giant International Ltd.
3500 Lenox Road, Suite 630
Atlanta, GA 30326
Service Hotline: 800-638-5234
Pay any charges billed to you by the Exchange Center for service not covered by the warranty.
Insure your shipment for loss or damage. Giant International Ltd. accepts no liability in case of damage or loss.
A new or refurbished unit will be shipped to you freight prepaid.
What your warranty does not cover:
Customer instruction. (Your Owner’s Manual provides information regarding operating instructions and user controls.
Any additional information, should be obtained from your dealer.)
Installation and setup service adjustments.
Batteries.
Damage from misuse or neglect.
Products which have been modified or incorporated into other products.
Products purchased or serviced outside the USA.
Acts of nature, such as but not limited to lightning damage.
Product Registration:
Please complete and mail the Product Registration Card packed with your unit. It will make it easier to contact you
should it ever be necessary. The return of the card is not required for warranty coverage.
Limitation of Warranty:
THE WARRANTY STATED ABOVE IS THE ONLY WARRANTY APPLICABLE TO THIS PRODUCT. ALL OTHER
WARRANTIES, EXPRESS OR IMPLIED (INCLUDING ALL IMPLIED WARRANTIES OF MERCHANTABILITY
OR FITNESS FOR A PARTICULAR PURPOSE) ARE HEREBY DISCLAIMED. NO VERBAL OR WRITTEN
INFORMATION GIVEN BY Giant International Ltd., ITS AGENTS, OR EMPLOYEES SHALL CREATE A
GUARANTY OR IN ANY WAY INCREASE THE SCOPE OF THIS WARRANTY.
REPAIR OR REPLACEMENT AS PROVIDED UNDER THIS WARRANTY IS THE EXCLUSIVE REMEDY OF
THE CONSUMER. Giant International Ltd. SHALL NOT BE LIABLE FOR INCIDENTAL OR CONSEQUENTIAL
14
DAMAGES RESULTING FROM THE USE OF THIS PRODUCT OR ARISING OUT OF ANY BREACH OF ANY
EXPRESS OR IMPLIED WARRANTY ON THIS PRODUCT. THIS DISCLAIMER OF WARRANTIES AND
LIMITED WARRANTY ARE GOVERNED BY THE LAWS OF THE STATE OF INDIANA. EXCEPT TO THE
EXTENT PROHIBITED BY APPLICABLE LAW, ANY IMPLIED WARRANTY OF MERCHANTABILITY OR
FITNESS FOR A PARTICULAR PURPOSE ON THIS PRODUCT IS LIMITED TO THE APPLICABLE WARRANTY
PERIOD SET FORTH ABOVE.
How state law relates to this warranty:
Some states do not allow the exclusion nor limitation of incidental or consequential damages, or limitations on how long
an implied warranty lasts so the above limitations or exclusions may not apply to you.
This warranty gives you specific legal rights, and you also may have other rights that vary from state to state.
If you purchased your product outside the USA:
This warranty does not apply. Contact your dealer for warranty information.