Giant Telecom X25P55 2.4GHz FHSS Cordless Phone w/ CID & Speakerphone User Manual
Giant Telecom Limited 2.4GHz FHSS Cordless Phone w/ CID & Speakerphone
User Manual
– 1 –
BZ22439
Cover

– 2 –
IMPORTANT SAFETY
INSTRUCTIONS
BEFORE USING YOUR TELEPHONE EQUIPMENT, BASIC
SAFETY PRECAUTIONS SHOULD ALWAYS BE FOLLOWED
TO REDUCE THE RISK OF FIRE, ELECTRIC SHOCK AND
INJURY TO PERSONS, INCLUDING THE FOLLOWING
1. Read and understand all instructions.
2. Follow all warnings and instructions marked on the
product.
3. Unplug this product from the wall outlet before cleaning. Do
not use liquid cleaners or aerosol cleaners. Use a damp
cloth for cleaning.
4. Do not use this product near water, for example, near a
bath tub, wash bowl, kitchen sink, laundry tub, in a wet
basement, or near a swimming pool.
5. Do not place this product on an unstable cart, stand or
table. The product may fall, causing serious damage to the
product.
6. Slots and openings in the cabinet and the back or bottom
are provided for ventilation. To protect it from overheating,
these openings must not be blocked or covered. The
openings should never be blocked by placing the product
on the bed, sofa, rug, or other similar surface. This product
should never be placed near or over a radiator or heat
register. This product should not be placed in a built-in
installation unless proper ventilation is provided.
7. This product should be operated only from the type of
power source indicated on the marking label. If you are not
sure of the type of power supply to your home, consult your
dealer or local power company.
8. Do not allow anything to rest on the power cord. Do not
locate this product where the cord will be damaged by
person walking on it.
9. Do not overload wall outlet extension cords, as this can
result in the risk of fire or electric shock.
10. Never push objects of any kind into this product through
cabinet slots as they may touch dangerous voltage points
or short out parts that could result in a risk of fire or electric
shock. Never spill liquid of any kind on this product.
11. To reduce the risk of electric shock, do not disassemble
this product. Instead, when some repair work is required,
take the unit to a qualified technician. Opening or removing
covers may expose you to dangerous voltages or other
risks. Incorrect reassembly can cause electric shock when
the appliance is subsequently used.
12. Unplug this product from the wall outlet and refer servicing
to qualified service personnel under the following
conditions:
When the power supply cord or plug is damaged or frayed.
If liquid has been spilled into the product.
If the product has been exposed to rain or water.
If the product does not operate normally by following the
operating instructions. Adjust only those controls that are
covered by the operating instructions because improper
adjustment of other controls may result in damage and will
often require extensive work by a qualified technician to
restore the product to normal operation.
If the product has been dropped or cabinet has be
damaged.
If the product exhibits a distinct change in performance.
13. Avoid using a telephone (other than a cordless type) during
an electrical storm. There may be a remote risk of electrical
shock from lightning.
Do not use the telephone to report a gas leak in the vicinity
of the leak.
IMPORTANT: Because cordless phones operate on electricity, you
should have one phone in your home that isn’t cordless, in case the
power in your home goes out.
– 3 –
WARNING:
TO PREVENT FIRE OR ELECTRICAL SHOCK HAZARD, DO
NOT EXPOSE THIS PROCUCT TO RAIN OR MOISTURE.
THE LIGHTING
FLASH AND
ARROW HEAD
WITHIN THE
TRIANGLE IS A
WARNING SIGN
ALERTING YOU
OF
“DANGEROUS
VOLTAGE”
INSINDE THE
PRODUCT.
CAUTION: TO
REDUCE THE RISK
OF ELECTRICAL
SHOCK, DO NOT
REMOVE COVER
(OR BACK). NO
USER
SERVICEABLE
PARTS INSIDE.
REFER SERVICING
TO QUALIFIED
SERVICE
PERSONNEL.
THE
EXCLAMATION
WITHIN THE
TRIANGLE IS
WARNING SIGN
ALERTING YOU
OF IMPORTANT
INSTRUCTIONS
ACCOMPANYING
THE PRODUCT.
SEE MARKING ON BOTTOM / BACK OF PRODUCT
Battery Safety Precautions
Do not burn, disassemble, mutilate, or puncture. Like other
batteries of this type, toxic materials could be released which
can cause injury.
To reduce the risk of fire or personal injury, use only the battery
listed in User’s Guide.
Keep batteries out of children.
Remove batteries if storing over 30 days.
CAUTION:
Danger of explosion if battery is incorrectly replaced. Replace only
with SANIK, type no.: SN-AAA 60HJ rechargeable battery or
equivalent. Do not dispose of the battery in a fire. The cell may
explode. Check with local code for possible special disposal
instructions.
SAVE THIS INSTRUCTION
Installation
IMPORTANT:
Please make sure you completed the Handset battery installation
first, before you plug in the Base Adaptor.
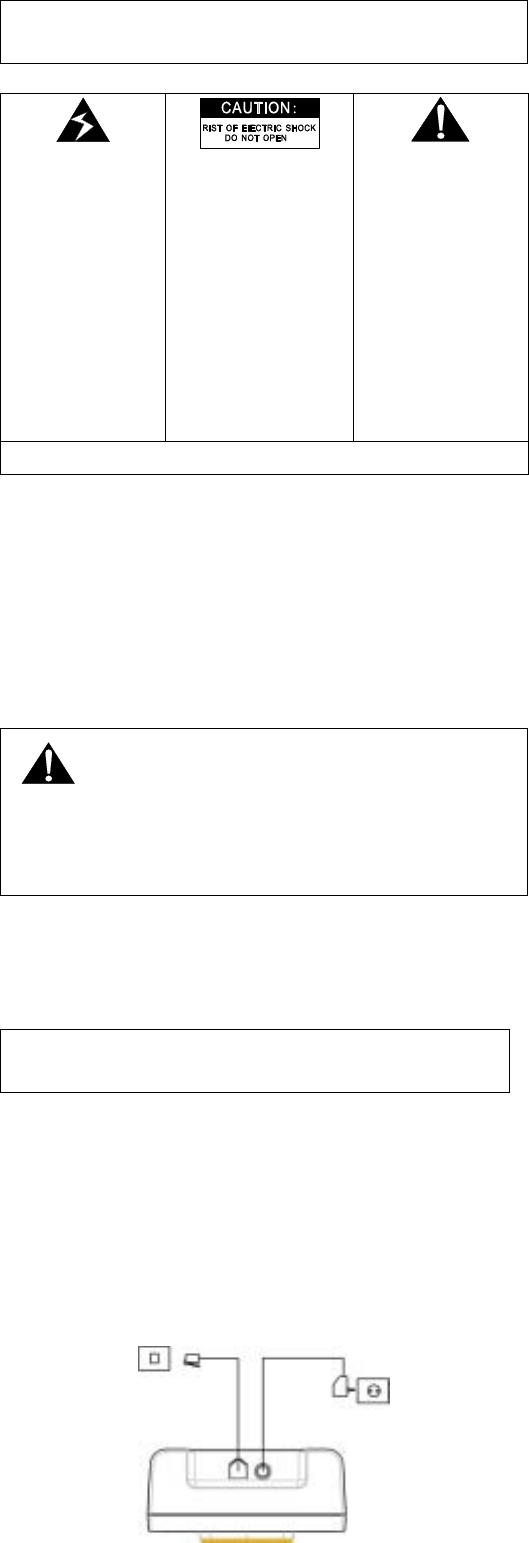
Connecting the Base Station and Power Plug
Connecting the plugs to the corresponding sockets in the base station
(they can not be connected incorrectly because the sockets and plugs
are designed prevent reverse poling). Lay the cable under the
telephone to the rear. Plug the telephone line in the telephone
connection socket. Insert the power plug at the other end in the power
outlet. The base station in now ready to operate.
AC power outlet Phone jack
– 4 –
The base station and charging station have no power
switch. Ensure that a Mains power outlet is close by and
that the power plug is easy to access. Check that the
voltage specified on the power plug corresponds with that
supplied by local power network.
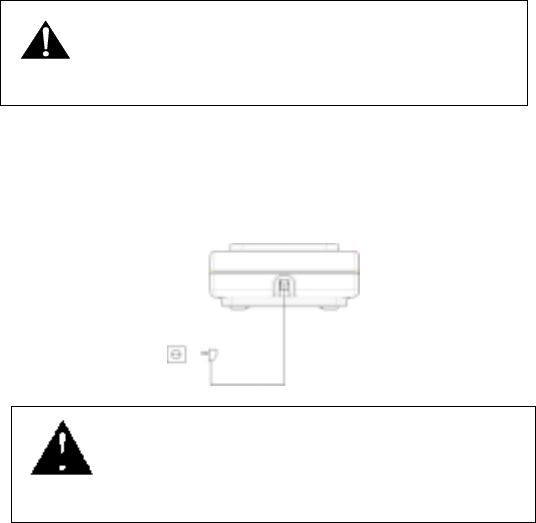
Connecting the Charging Station
Insert the power plug in the socket on the rear side of the charging
station. Insert the power plug at the other end in the power outlet. The
charging station is now ready to operate.
CAUTION:
Use only the ALCATEL (Output rated 6V
350mA) power supply that came with this
unit. Using other power supplies may
damage the unit.
– 5 –
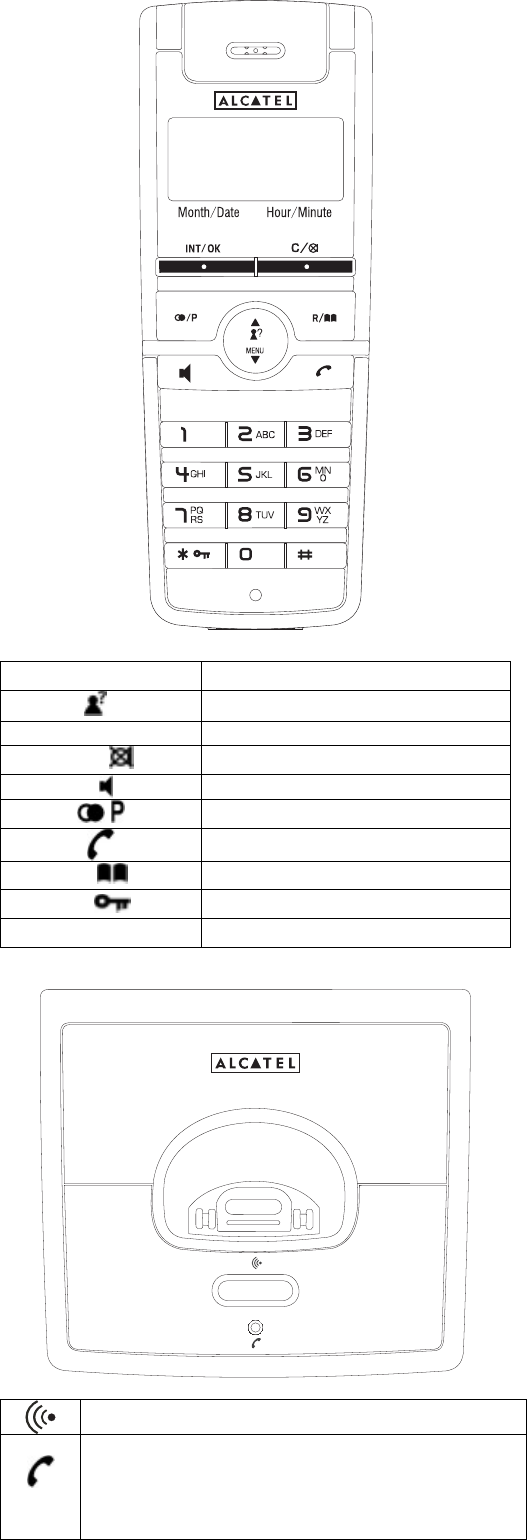
Handset and Base Layouts
MENU/▼ Menu / Down key
/▲ CID / Up key
INT / OK INT / OK key
C/ Cancel / Mute key
Speaker phone key
/ Redial / Pause key
External call key.
R/ Flash key / Phone book key
*/ Asterisk key / Lock key
# Hash key
Page key
In-use LED:
The In-use LED will be steadily on during off-hook. During
the period of incoming call, the In-use LED will also follow
the ring cadence to go on or off. When registering, it will
flash as a special cadence.
– 6 –
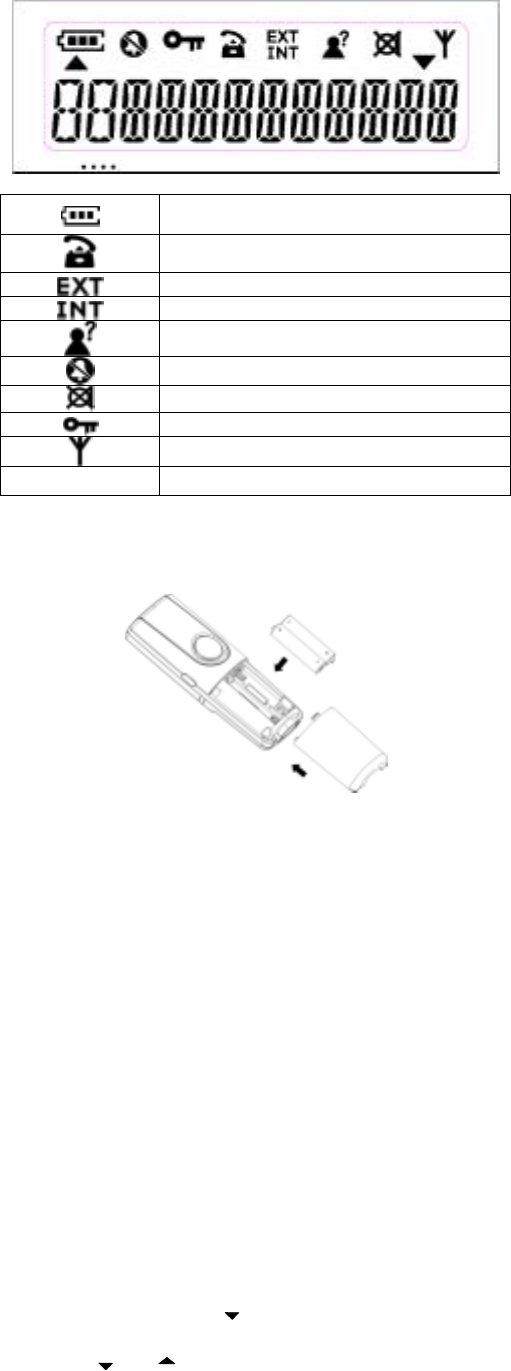
LCD Display
Battery icon
Phone icon
External call icon
Internal call icon
CLI icon
No ring icon
Mute icon
Key lock icon
Aerial icon
▲ / ▼ Up / Down arrow
Getting Started
Install and Charge the Batteries
Insert two pieces AAA batteries in the compartment, ensuring correct
polarity and close the compartment.
Place the handset in the base station to charge for 16 hours prior
for first use. If you don’t properly charge the phone, battery
performance will be compromised.
Warning: The handset does not work and damaged if the wrong
batteries are inserted.
Using the Handset Telephone
Using the telephone
When the handset is inserted in the charging station unit, it
starts to charge automatically. To optimize the battery
performance, charge the handset battery for 16 hours prefer to
first use.
Note: This phone defaults to Tone Dialing. To change Pulse Dialing,
see chapter “Base Station Settings – Changing the Dialing Mode”. If
you don’t know which type of service you have, please check with
the local telephone company.
Selecting the Language
Ten different languages are available for selection for each handset.
In standby mode, press key and “6” key.
The LANGUAGE menu appears, press “INT/OK” key.
Press or
key as often as necessary to select the
required language.
Press “INT/OK” key to confirm the selection.
Note: The following languages are available:
English; Portuguese; Spanish
Making Internal Calls
IMPORTANT: Internal calls can be made only if more than one

– 7 –
handset is registered on the base station.
Press “INT/OK” key.
Press the number of the required handset (1-4). Carry out the
conversation.
Press key to end the call.
Making External Calls
Direct dialing
Press key and wait for a dialing tone.
Dial the telephone number and complete the call.
Press key to end the call.
On hook dialing
Dial the telephone number (delete any incorrect entries by
pressing “C” key).
Press key to carry out the conversation.
Press key to end the call.
This service need subscription to local operator and it supports the
FSK CLI system only.
Taking Calls
When an external call is received, all registered handsets and the base
station ring. “EXT” flashes in the handset display and, if configured,
the telephone number of the caller appears (network depended). If the
caller has been entered in your phone book, the name appears. The
incoming call LED on the base station flashes. In the case of an
internal call, “INT” flashes in the handset display.
Handset is in the base station
Take the handset from the base station; a connection is
automatically established (when the AUTO ANS function is
active). Otherwise, press key.
Carry out the conversation.
Press key to end the call.
Handset is not in the base station
Press key. Carry out the conversation.
Press key to end the call.
Redialing Operations
The phone stores the last 10 numbers dialed in the redial memory
Press key; the last call number is displayed.
Browse: Press
or key to search the required number
in the redial memory list.
Or
Redial: Press key to redial the number.
Or
Delete: Press “INT/OK” key to select DELETE or DELETE
ALL by using
or key.
Press “INT/OK” key to confirm.
Or
Save: Press “INT/OK” key to select SAVE by using
or
key.
Press “INT/OK” key.
Enter the name (max. 10 characters) and press “INT/OK” key
when finished.
Edit the number (max. 25 digits) and press “INT/OK” key when
finished.
“PB FULL” appears stand for memory full.
Dialing from the Phone Book
Press key; the first entry in the phone book appears. (Or
“EMPTY” if no entry)
Press
or key to select the required subscriber from the
phone book. Alternatively, enter the first letter of the name
required.
Press key. The number is dialed. Carry out the
conversation.

– 8 –
Note: How to store entries in the phone book is explained in the
chapter “Phone Book”.
Call Log Operations
IMPORTANT: To use the “Call Log” function, you must subscribe
to your network operator’s Caller Line Identification (CLI) service.
Browse, Call Back, Delete, Save
If calls have been received in your absence, these are stored in the
CALL LOG memory when your telephone service has enabled this
function. The number of calls appears in the display. Incoming calls
are also indicated in the display during a call.
Press key as often as necessary until CALL LOG menu
appears and press “INT/OK” key. Alternatively, press and hold
/
key.
Browse: Press
or key to scroll through the CALL
LOG memory.
Or
Call Back: Press key to call back.
Or
Delete: Press “INT/OK” key to select DELETE or DELETE
ALL by using
or key.
Press “INT/OK” key to confirm.
Or
Save: Press “INT/OK” key to select SAVE by using
or
key.
Press “INT/OK” key.
Note: If the record has no number, it cannot be stored and
“INVALID” will appear.
Enter the name (max. 10 characters) and press “INT/OK” key
when finished.
Edit the number (max. 25 digits) and press “INT/OK” key when
finished.
“PB FULL” appears stand for memory full.
Note: 1. The CLI icon and display indicator only disappear after
browsing through all the new entries.
Muting the Microphone
Press key to switch the microphone on or off during a call.
Holding Calls / Forwarding Calls
If the telephone is connected to a PABX system, it is possible to put
calls on hold and call other extension lines or to forward calls.
Press “R” key to put the call on hold and dial the extension
number (e.g. 23).
Press “R” key once more to take the call back again or press
key to forward the call.
Note: The above information can vary according to the PABX system
used. Therefore, refer to the relevant information of the PABX
network.
Intercom Call Transfer
It is possible to put an external call on hold and call another handset
registered to the base or to forward calls.
Press “INT/OK” key to hold the external call and initiate an
internal call.
Input the desired handset number (e.g. 2).
The target handset will ring. After the internal connection is
made, press key to transfer the external call.
If “INT/OK” key is pressed before another handset is answered,
the call transfer procedure will be cancelled and the external
call connection is regained.
If key is pressed before another handset is answered, both
the external and internal call will be disconnected.
Teleconference
After have received an external call, it is possible to include a second
handset in the conversation (three way conference).
Press “INT/OK” key and enter the number of the corresponding
handset (e.g. 2) which will join the teleconference.

– 9 –
The external caller is kept on hold. As soon as the other handset
takes the call, press and hold “#” key 2 seconds to activate the
teleconference.
By pressing key, any of the handsets quit from the
teleconference and the other handset continues with the external
call.
Alternatively, you can use another handset to join the conference by
pressing key after the external call is established.
Handset Speaker Phone
Press key to activate or deactivate the handset speaker.
Changing the Receiver Volume
Press
or key to change the receiver volume during a
call.
Paging the Handset
If a handset has been misplaced, it is possible to call all the handsets.
Short press
key on the base station. To stop the page call,
press any key on the handset and
key on base station.
Entering a Dialing Pause (P)
If the telephone is connected to a PABX system, it may be necessary
to insert a dialing pause. To do this, press “P” key after entering the
relevant digit in the pre-dial buffer, e.g. 0, for an outside line (0P….).
A “P” appears in the display indicating a pause. The pause can also be
entered when programming numbers in the phone book.
Switching the Key Lock On/Off
Incoming calls can still be received when key locked.
Press and hold “*” key for 2 seconds to activate or deactivate
the key lock.
Phone Book
The telephone can store up to 40 entries in the phone book with name
and call number. When the function is supported by the telephone
provider service and the caller, the handset displays the name of the
caller (when stored in the phone book).
Browse Entries
Press key until the PHONE BOOK menu appears and
press “INT/OK” key.
Press
or key to select BROWSE and press “INT/OK”
key.
Note: If the phone book is empty, “EMPTY” will display, otherwise,
a list of stored entries will display.
Press
or key to scroll through the phone book.
Alternatively, enter the first letter of the name required.
Store Entries
Press key until the PHONE BOOK menu appears and
press “INT/OK” key.
Press
or key to select STORE and press “INT/OK”
key.
Enter the name (max. 10 characters) and press “INT/OK” key
when finished.
Enter the number (max. 25 digits) and press “INT/OK” key
when finished.
“PB FULL” appears stand for memory full.
Key assignment Overview
1 1 SPACE 6 M N O 6
2 A B C 2 7 P Q R S 7
3 D E F 3 8 T U V 8
4 G H I 4 9 W X Y Z 9
5 J K L 5 0 0
Edit Entries
Press key until the PHONE BOOK menu appears and
press “INT/OK” key.
Press
or key to select EDIT and press “INT/OK” key.

– 10 –
Enter the name (press “C” key to delete any incorrect character)
and press “INT/OK” key when finished.
Enter the number (press “C” key to delete any incorrect digit)
and press “INT/OK” key when finished.
Delete Entries
Press key until the PHONE BOOK menu appears and
press “INT/OK” key.
Press
or key to select DELETE and press “INT/OK”
key.
Press
or key to select the desired entry.
Press “INT/OK” key to delete the entry.
Press “C” key to return to the phone book menu.
Set Different Melodies for Phone Book Entries
Press key until the PHONE BOOK menu appears and
press “INT/OK” key.
Press
or key to select MELODY and press “INT/OK”
key.
Press
or key to select the desired entry and press
“INT/OK” key.
Press
or key to select the default ring melody or
melody 1-10 and press “INT/OK” key to confirm the setting.
Delete All Entries
Press key until the PHONE BOOK menu appears and
press “INT/OK” key.
Press
or key to select DELETE ALL and press
“INT/OK” key.
“CONFIRM?” will display, press “INT/OK” key to confirm the
delete operation.
Handset Settings
Changing the Ringing Volume
Press key until the HANDSET menu appears and press
“INT/OK” key.
Press
or key to select VOLUME and press “INT/OK”
key.
Press
or key to adjust the volume level (0-5) and
press “INT/OK” key to confirm.
Note: The ringer volume can be heard at different volumes. If
the ringer symbol appears as non bar, the ringing volume will
be switched to OFF.
Changing the External Ringer Melody
Press key until the HANDSET menu appears and press
“INT/OK” key.
Press
or key to select EXT RING and press
“INT/OK” key.
Use
or key to select the required melody (1-10) and
press “INT/OK” key to confirm.
Changing the Internal Ringer Melody
Press key until the HANDSET menu appears and press
“INT/OK” key twice.
Press
or key to select INT RING and press
“INT/OK” key.
Use
or key to select the required melody (1-10) and
press “INT/OK” key to confirm.
Entering/Changing Handset Name
It is possible to assign a name to each handset. This name is then
displayed when the phone is in standby mode.
Press key until the HANDSET menu appears and press
“INT/OK” key.
Press
or key to select HS NAME and press
“INT/OK” key.
Enter/change the name (up to 10 characters) of the handset (e.g.
MOBIL 1) and press “INT/OK” key to confirm.

– 11 –
Tones Setting
Press key as often as necessary until the HANDSET menu
appears and press “INT/OK” key.
Press
or key to select TONES and press “INT/OK”
key.
Press
or key to select the desired tone (key tone,
confirmation tone, low battery tone and out of range tone) and
press “INT/OK” key.
Press
or key to switch the desired tone on or off and
press “INT/OK” key to confirm.
Call Timer
Press key as often as necessary until the HANDSET menu
appears and press “INT/OK” key.
Press
or key to select TIMER and press “INT/OK”
key.
Press
or key to select on or off and press “INT/OK”
key to confirm.
Activating/Deactivating Automatic Call
Answering
The automatic call answering function enables the incoming call to
be taken immediately when the handset is removed from the base
station.
Press key as often as necessary until the HANDSET menu
appears and press “INT/OK” key.
Press
or key to select AUTO ANS and press
“INT/OK” key.
Use
or key to switch automatic call answering on or
off and press “INT/OK” key to confirm.
Default Settings
The handset can be reset to the default settings. In doing so, all the
settings which you have changed are returned to their default values.
The phone book entries are retained.
Press key until the HANDSET menu appears and press
“INT/OK” key.
Press
or key to select DEFAULT and press
“INT/OK” key.
“CONFIRM?” will display, press “INT/OK” key to confirm.
Base Station Settings
Base Ringer Melody
Press key until the BASE menu appears and press
“INT/OK” key.
Press
or key to select MELODY and press “INT/OK”
key.
Press
or key to select the ringer melody (1-10) and
press “INT/OK” key.
Base Ringer Volume
Press key until the BASE menu appears and press
“INT/OK” key.
Press
or key to select VOLUME and press “INT/OK”
key.
Press
or key to select the ringer volume (0-5) and
press “INT/OK” key.
Note: If you set the base ringer volume to 0, the base ringer will be
off.
Changing the Dialing Mode
Press key until the BASE menu appears and press
“INT/OK” key.
Press
or key to select DIAL MODE and press
“INT/OK” key.
Press
or key to select the required dialing mode
DTMF or PULSE and press “INT/OK” key.
– 12 –
Barring Calls
The following options are available for selection for barring calls:
Option Description
DISABLE All telephone calls are possible.
EXTERNAL All external calls are barred.
NUMBER Define a number which should be barred, e.g. 0190
Press key until the BASE menu appears and press
“INT/OK” key.
Press
or key to select the submenu CALL BAR and
press “INT/OK” key.
Use
or key to select the handset which should be
barred and press “INT/OK” key.
Use
or key to select an option and press “INT/OK”
key.
If you select NUMBER, enter a number with maximum 5 digits
and then press “INT/OK” key to confirm the setting.
Deregister HS
If several handsets are registered on one base station, they can
deregister each other mutually. The handset cannot deregister itself.
Press key until the BASE menu appears and press
“INT/OK” key.
Press
or key to select DEREG HS and press
“INT/OK” key.
“DEREG: ?” will display, input the desired handset number and
press “INT/OK” key.
Changing the Flash Time
Press key until the BASE menu appears and press
“INT/OK” key.
Press
or key to select FLASH and press “INT/OK”
key.
Press
or key to select the required flash time (100ms,
300ms or 600ms) and press “INT/OK” key.
Clear Message Waiting
Press key until the BASE menu appears and press
“INT/OK” key.
Press
or key to select CLEAR MSG and press
“INT/OK” key.
“CONFIRM?” will display, press “INT/OK” key to confirm.
Default Settings
Press key until the BASE menu appears and press
“INT/OK” key.
Press
or key to select DEFAULT and press
“INT/OK” key.
“CONFIRM?” will display, press “INT/OK” key to confirm.
Registering Additional Handsets
Further handset of the same model can be registered on the base
station. The max number of handsets that can register to the same
base is 4.
Press key until the REGISTER menu appears and press
“INT/OK” key.
Handset display shows “SEARCHING”.
Press and hold
key on the base station more than 3 seconds
until acknowledgement signal is heard.
Note: After the connection has been established, the name and
number of the handset (the next available handset number should be 2)
appear in the display.
The base will be ready for registration for 2 minutes when the page
key is pressed and hold for more than 3 seconds. After selecting
“REGISTER”, the handset starts searching for a base station which is
available for registration. The icon starts flashing.
Technical Specifications

– 13 –
Open Field Range*: Typical 300m
Indoor Range*: Typical 50m
Handset Operating Time:
(average values**)
Approx. 6 hours talk time
Approx. 70 hours standby
Handset Weight: Approx. 115g
AC/DC Adapter: U060035D12
Input: 230 V AC, 50Hz
Output: 6 V DC, 350mA
AC/DC Adapter: (for
Handset charger)
U060015D12
Input: 230V AC,50Hz
Output: 6 V DC, 150mA
Rechargeable Battery: SN-AAA60HJ or equivalent (Ni-MH,
1.2V, 600mAh)
Operating Temperature: 0 to 45 °C
* Value may vary according to environment.
** For guidance only, depends on initial battery charge.
Troubleshooting Tips
Caller ID Solutions
No Display
Is battery fully charged? Charge the battery for 14 hours or
replace the battery. Make sure the battery is properly installed
and connected.
If you are using AC (electrical) power, make sure that the unit
is connected to a non-switched electrical outlet. Disconnect the
unit from the plug and plug it in again.
Are you subscribed to caller ID service from your local
telephone company?
Caller ID incomplete
The unit displays this message if it detects anything other data
message than valid Caller ID information during the silent
period after the first ring. This message indicates the presence
of noise on the line.
Telephone Solutions
No dial tone
Check installation:
-- Is the base power cord connected to a working electrical
outlet?
-- Is the telephone line cord connected to the base unit and wall
phone jack?
Disconnect the base from wall phone jack and connect another
phone to the same jack. If there is no dial tone on the second
phone, the problem might be your wiring or local service.
The handset might be out of range of the base. Move closer to
the base.
Make sure the battery is properly charged (for 12 hours).
Ensure the battery is installed correctly.
Did the handset beep when you pressed the talk/callback button?
Did the in use indicator come on? The battery may need to be
charged.
Dial tone is OK, but can’t dial out
Make sure the tone/pulse setting is programmed correctly.
Handset does not ring
Make sure the RINGER switch on the handset is turned to ON.
You may have too many extension phones on your line. Try
unplugging some phones.
See solutions for “No dial tone”.
Charge/In Use Indicator on the base flashes
Provided your phone company offers voice messaging service
and you subscribe to it, the charge/in use indicator on the base
flashes when the phone is not in use to indicate there is message
waiting. It stops flashing after message has been reviewed.
Phone dials in pulse with tone service
Make sure the PHONE is in TONE dialing mode.
Phone won’t dial out with pulse service
Make sure the PHONE is in PULSE dialing mode.
You experience static, noise, or fading in and out
Change channels.
The handset maybe out of range. Move closer to the base.
– 14 –
Relocate the base.
Charge the battery.
Make sure base is not plugged into an electrical outlet with
another household appliance.
Unit beeps
Place handset in base cradle for 20 seconds reset the security
code. If that doesn’t work, charge the battery for 12 hours.
Clean the charging contacts on the handset and base with a soft
cloth or an eraser.
See solutions for “No dial tone”.
Replace the battery.
Memory Dialing
Did you program the memory location keys correctly?
Did you follow the proper dialing sequence?
Make sure the tone/pulse setting is programmed correctly.
Did you reprogram numbers into memory after a power outage
or battery replacement?
Cause of Poor Reception
Aluminum siding.
Foil backing on insulation.
Heating ducts and other metal construction can shield radio
signals.
You’re too close to appliances such as microwaves, stoves,
computers, etc.
Atmospheric conditions, such as strong storm.
Base is installed in the basement or lower floor of the house.
Baby monitor is using the same frequency.
Handset battery is low.
You’re out of range of the base.
General Product Care
To keep your telephone working and looking good, follow these
guidelines:
Avoid putting the phone near heating appliances and devices
that generate electrical noise (for example, motors or
fluorescent lamps).
DO NOT expose to direct sunlight or moisture.
Avoid dropping and other rough treatment to the phone.
Clean with a soft cloth.
Never use a strong cleaning agent or abrasive powder because
this will damage the finish.
Retain the original packaging in case you need to ship the
phone at later date.
***End of Document***