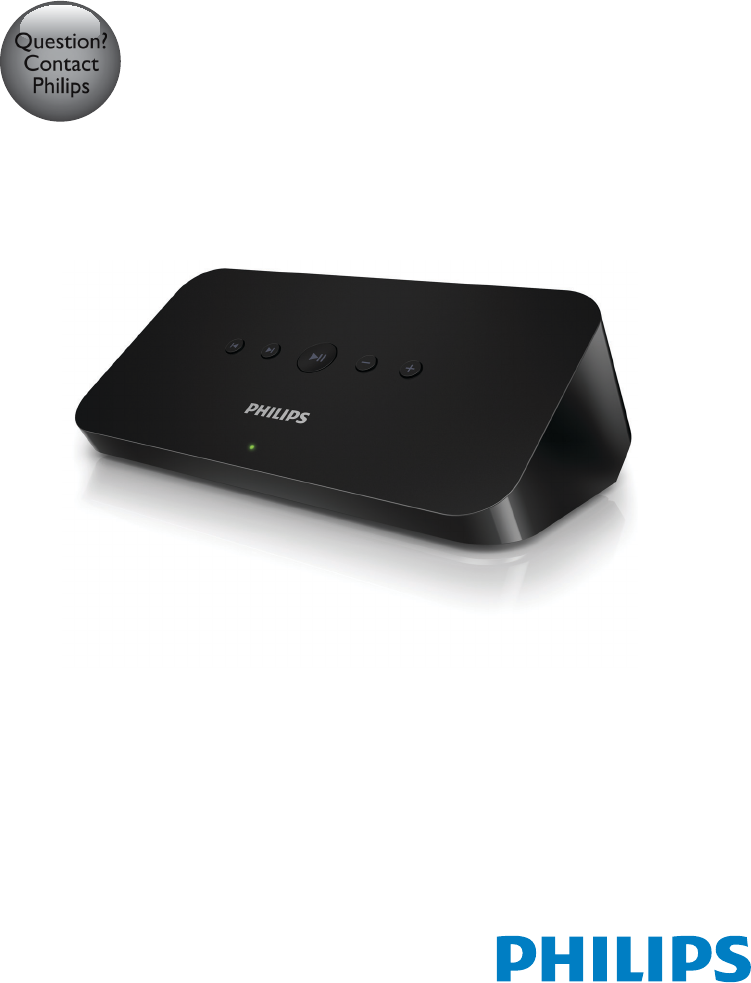
Gibson Innovations SW100M Spotify Connect Multiroom Box User Manual
Gibson Innovations Limited Spotify Connect Multiroom Box Users Manual
Users Manual
www.philips.com/support
User manual
Always there to help you
Register your product and get support at
SW100M
Question?
Contact
Philips

1EN
Contents
1 Important 2
Safety 2
Notice 3
2 Your audio adapter 5
Introduction 5
What's in the box 5
What else you need 5
3 Overview of the main unit 6
4 Prepare 7
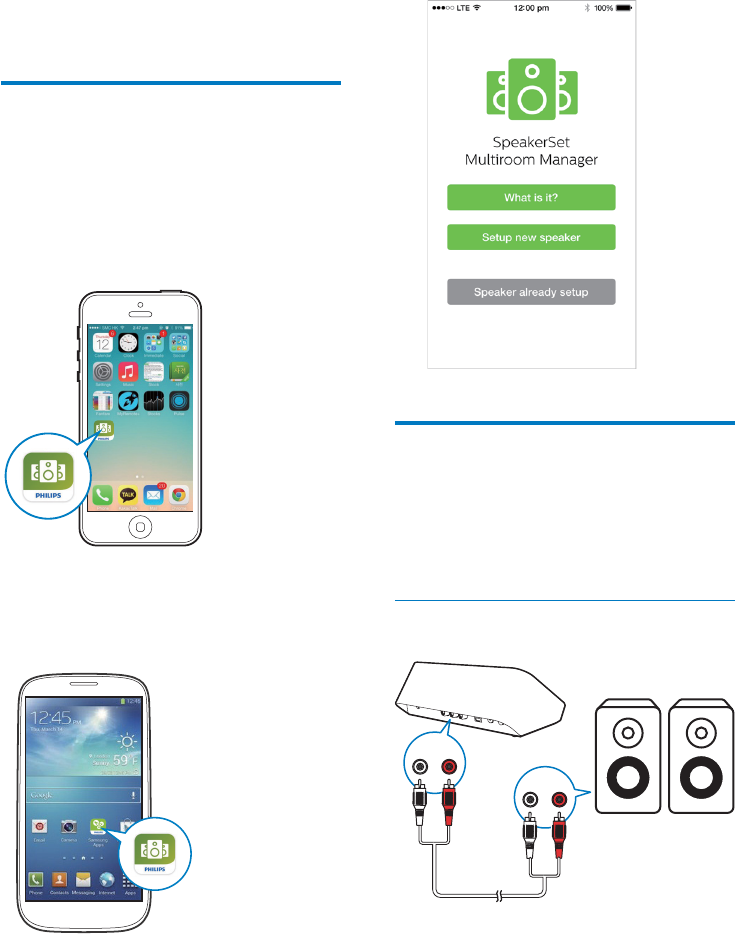
Download SpeakerSet Multiroom
Manager to your iOS or Android device 7
Connect to your audio system 7
Connect power and switch on 8
5 Connect SW100M to your home
Wi-Fi network 9
Option 1: Set up through an iOS device 10
Option 2: Set up through an Android
device 11
Option 3: Set up wireless connection
to a WPS router directly 12
Option 4: Set up through a PC/Mac
(advanced) 13
Rename speakers 13
6 Play 14
Enjoy Spotify music services through
SW100M 14
Stream music to multiple speakers/
audio adapters at the same time 15
7 Other features 19
Restore factory settings 19
Update software 20
8 Product information 21
Specications 21
9 Troubleshooting 22
10 Appendix: Understand meanings
of LED colors 23
2EN
1 Important
Safety
Know these safety symbols
This 'bolt of lightning' indicates uninsulated
material within your unit may cause an electrical
shock. For the safety of everyone in your
household, please do not remove product
covering.
The 'exclamation point' calls attention to
features for which you should read the enclosed
literature closely to prevent operating and
maintenance problems.
WARNING:Toreducetheriskofreorelectric
shock, this apparatus should not be exposed to
rainormoistureandobjectslledwithliquids,
such as vases, should not be placed on this
apparatus.
CAUTION: To prevent electric shock, match
wide blade of plug to wide slot, fully insert.
Important Safety Instructions
a Read these instructions.
b Keep these instructions.
c Heed all warnings.
d Follow all instructions.
e Do not use this apparatus near water.
f Clean only with dry cloth.
g Do not block any ventilation openings.
Install in accordance with the
manufacturer's instructions.
h Do not install near any heat sources such
as radiators, heat registers, stoves, or
other apparatus (including ampliers) that
produce heat.
i Protect the power cord from being
walked on or pinched, particularly at
plugs, convenience receptacles, and the
point where they exit from the apparatus.
j Only use attachments/accessories
specied by the manufacturer.
k Use only with the cart, stand, tripod,
bracket, or table specied by the
manufacturer or sold with the apparatus.
When a cart is used, use caution when
moving the cart/apparatus combination to
avoid injury from tip-over.
l Unplug this apparatus during lightning
storms or when unused for long periods
of time.
m Refer all servicing to qualied service
personnel. Servicing is required when
the apparatus has been damaged in any
way, such as power-supply cord or plug
is damaged, liquid has been spilled or
objects have fallen into the apparatus, the
apparatus has been exposed to rain or
moisture, does not operate normally, or
has been dropped.
n Apparatus shall not be exposed to
dripping or splashing.
o Do not place any sources of danger on
the apparatus (e.g. liquid lled objects,
lighted candles).

3EN
p Where the MAINS plug or an appliance
coupler is used as the disconnect device,
the disconnect device shall remain readily
operable.
Warning
•Never remove the casing of this apparatus.
•Never lubricate any part of this apparatus.
•Never place this apparatus on other electrical
equipment.
•Keep this apparatus away from direct sunlight, naked
amesorheat.
•Ensure that you always have easy access to the power
cord, plug or adaptor to disconnect this apparatus from
the power.
Risk of overheating! Never install this apparatus
inaconnedspace.Alwaysleaveaspaceof
at least four inches around this apparatus for
ventilation. Ensure curtains or other objects
never cover the ventilation slots on this
apparatus.
Notice
Anychangesormodicationsmadetothis
device that are not expressly approved by
WOOX Innovations may void the user’s
authoritytooperatetheequipment.
Notice for the USA and Canada
This device complies with Part 15 of the FCC
Rules and RSS standard of Industry Canada.
Operation is subject to the following two
conditions:
1 this device may not cause harmful
interference, and
2 this device must accept any interference
received, including interference that may
cause undesired operation.
This equipment has been tested and found
to comply with the limits for a Class B digital
device, pursuant to part 15 of the FCC
Rules and CAN ICES-3(B)/NMB-3(B) of
Industry Canada. These limits are designed to
provide reasonable protection against harmful
interference in a residential installation. This
equipmentgenerates,uses,andcanradiate
radiofrequencyenergyand,ifnotinstalled
and used in accordance with the instruction
manual, may cause harmful interference to radio
communications.
However, there is no guarantee that
interference will not occur in a particular
installation.Ifthisequipmentdoescauseharmful
interference to radio or television reception,
which can be determined by turning the
equipmentoffandon,theuserisencouraged
to try to correct the interference by one or
more of the following measures:
• Relocate the receiving antenna.
• Increase the separation between
equipmentandreceiver.
• Connecttheequipmentintoanoutleton
a circuit different from that to which the
receiver is connected.
• Consult the dealer or an experienced
radio/TV technician for help.
RF Radiation Exposure Statement: This
equipmentcomplieswithFCC’sandIC’sRF
radiation exposure limits set forth for an
uncontrolled environment. The antenna(s)
used for this transmitter must be installed and
operated to provide a separation distance of
at least 20 cm from all persons and must not
be collocated or operating in conjunction with
any other antenna or transmitter. Installers must
ensure that 20cm separation distance will be
maintained between the device (excluding its
handset) and users.

4EN
CAN ICES-3(B)/NMB-3(B).
Philips and the Philips’ Shield Emblem are
registered trademarks of Koninklijke Philips N.V.
and are used by WOOX Innovations Limited
under license from Koninklijke Philips N.V.
Specicationsaresubjecttochangewithout
notice. WOOX reserves the right to change
products at any time without being obliged to
adjust earlier supplies accordingly.
Disposal of your old product
Your product is designed and manufactured
withhighqualitymaterialsandcomponents,
which can be recycled and reused.
This product may contain lead and mercury.
Disposal of these materials may be regulated
due to environmental considerations. For
disposal or recycling information, please contact
your local authorities or visit www.recycle.
philips.com.
Environmental information
All unnecessary packaging has been omitted.
We have tried to make the packaging easy to
separate into three materials: cardboard (box),
polystyrene foam (buffer) and polyethylene
(bags, protective foam sheet.)
Your system consists of materials which can
be recycled and reused if disassembled by
a specialized company. Please observe the
local regulations regarding the disposal of
packaging materials, exhausted batteries and old
equipment.
Trademark notice
iPad, iPhone, iPod, iPod classic, iPod nano
and iPod touch are trademarks of Apple Inc.,
registered in the U.S. and other countries.
Lightning is a trademark of Apple Inc.
Android is a trademark of Google Inc. Use of
this trademark is subject to Google permissions.
Class II equipment symbol:
CLASS II apparatus with double insulation, and
no protective earth provided.
Note
•The type plate is located on the bottom of the
apparatus.

5EN
2 Your audio
adapter
Congratulations on your purchase, and
welcometoPhilips!Tofullybenetfromthe
support that Philips offers, register your product
at www.philips.com/welcome.
If you contact Philips, you will be asked for the
model and serial number of this apparatus. The
model number and serial number are on the
bottom of the apparatus. Write the numbers
here:
Model No. __________________________
Serial No. ___________________________
Introduction
After connection of this audio adapter to your
audio system, you can:
• stream Spotify music wirelessly via
Spotify Connect with your iOS or
Android device as remote control
• listen to Spotify music everywhere
at your home through group play
(multiple Spotify Multiroom speakers
required)
What's in the box
Check and identify the contents of your
package:
• Audio adapter
• 1 x AC power adapter
• Printed materials
What else you need
To stream Spotify music wirelessly to the audio
adapter through Wi-Fi, you need:
• acertiedWi-Firouter
• an iOS or Android device, such as an
iPod touch/iPhone/iPad or an Android
phone or tablet
• the SpeakerSet and Spotify (with a
premium account) apps available on
Apple App Store (for iOS devices)
or Google Play Store (for Android
devices)
Your audio adapter should be connected to
the same local network as your iOS or Android
device through the Wi-Fi router.
6EN
3 Overview of the
main unit
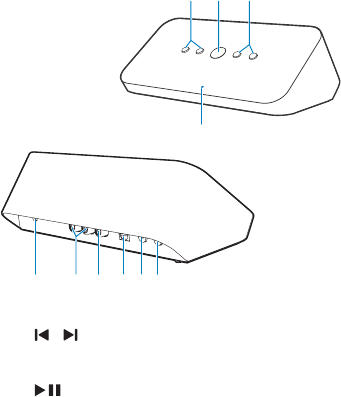
a /
• Skip to the previous/next song.
b
• Start or pause music play.
c -/+
• Adjust volume.
d System status indicator
• Show the current status of the audio
adapter.
e WPS button/indicator
• Enter WPS Setup mode for connection
of the audio adapter to a Wi-Fi
network.
• Show the Wi-Fi setup status in WPS
mode.
f SETUP button/indicator
• Enter App-Assisted Wi-Fi Setup mode
for connection of the audio adapter to
a Wi-Fi network.
• Show the Wi-Fi setup status.
ab c
d
ejihgf
g OPTICAL OUT
• Connect the audio adapter to your
audio system through an optical cable
(not supplied).
h COAX OUT
• Connect the audio adapter to your
audio system through a coaxial cable
(not supplied).
i AUX OUT
• Connect the audio adapter to your
audio system through RCA audio
cables (red/white; not supplied).
j DC IN
• Connect the power adapter.
7EN
4 Prepare
Always follow the instructions in sequence.
Download SpeakerSet
Multiroom Manager to your
iOS or Android device
1 (For iPod touch/iPhone/iPad users) Install
SpeakerSet from Apple App Store, and
then run the app.
(For users of Android smartphones or tablets)
Install SpeakerSet from Google Play Store and
then run the app.
2 On the initial setup page, tap Setup a new
speaker.
Connect to your audio
system
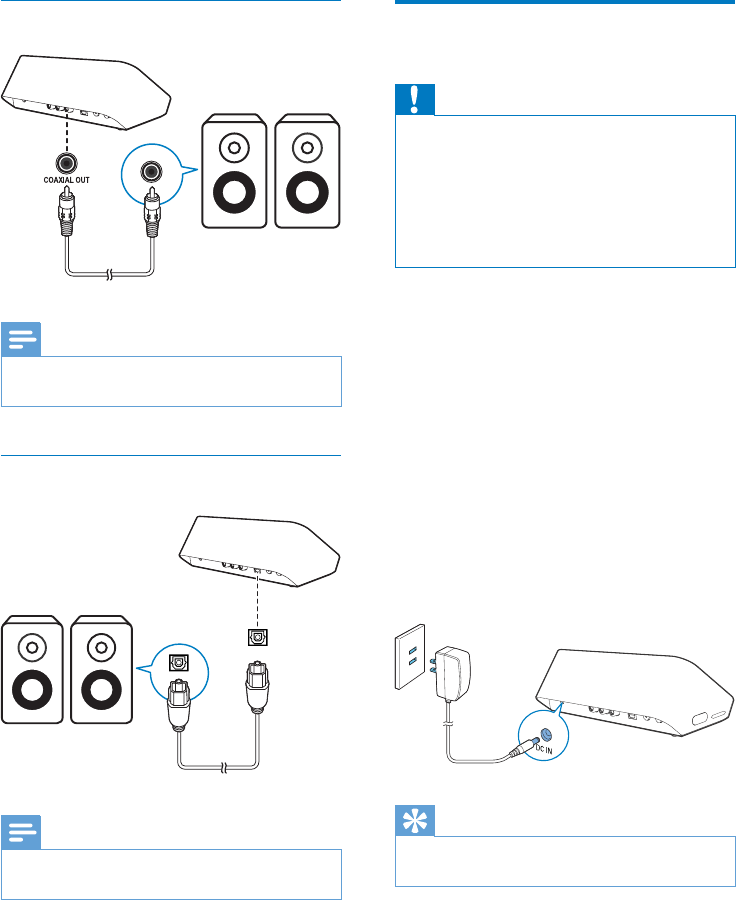
Toenjoymusic,rstconnecttheaudioadapter
to your audio system in one of the following
ways:
Option 1: Connect through AUX
OUT
LR
LR
8EN
Option 2: Connect through
COAXIAL OUT
Note
•Make sure that no cable is plugged in the AUX OUT
sockets.
Option 3: Connect through OPTICAL
OUT
Note
•Make sure that no cable is plugged in the AUX OUT
sockets.
OPTICAL OUT
Connect power and switch
on
Caution
•Risk of product damage! Make sure that the power
supply voltage matches the voltage printed on the
bottom of the audio adapter.
•Risk of electric shock! When you unplug the AC
adapter, always pull the plug from the socket. Never
pull the cord.
•Before you connect the AC adapter, make sure that you
have completed all the other connections.
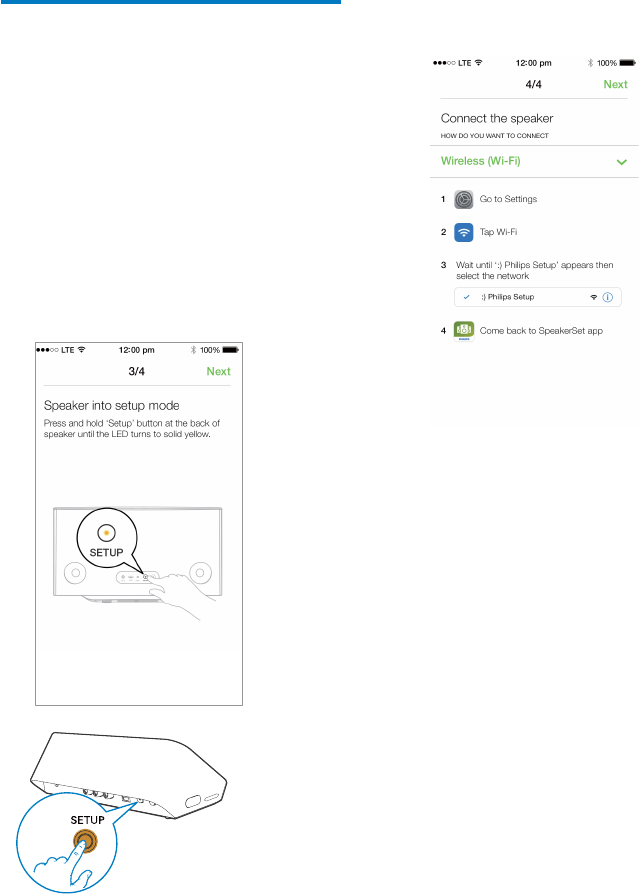
• As instructed on the app screen, connect
the AC power adapter to
• the DC IN socket on the back of the
audio adapter.
• the wall power socket.
» The audio adapter switches on
automatically.
» The system status indicator on the
front panel blinks amber during boot-
up.
» If a Wi-Fi connection has been set
up for the audio adapter, the system
status indicator turns solid green after
successful connection.
Tip
•The audio adapter enters standby mode automatically
after 15 minutes of inactivity.

9EN
5 Connect
SW100M to
your home Wi-
Fi network
To connect the audio adapter to your existing
home Wi-Fi network, you need to apply your
home Wi-Fi settings to the audio adapter in one
of the following ways (depending on the type
of your smart device and whether your Wi-Fi
router is WPS enabled):
Devices
required
for speaker
setup
Setup method
iOS device
+ Wi-Fi
router
Choose option 1 (see 'Option
1: Set up through an iOS device'
on page 10).
Android
device
+ Wi-Fi
router
Choose option 2 (see 'Option
2: Set up through an Android
device' on page 11).
WPS Wi-Fi
router
Choose option 3 (see 'Option
3: Set up wireless connection to
a WPS router directly' on page
12).
PC/Mac
with Wi-Fi
enabled
+ Wi-Fi
router
Choose option 4 (see 'Option
4: Set up through a PC/Mac
(advanced)' on page 13).
Before connection of the audio adapter to your
home Wi-Fi network, make sure that:
a your Wi-Fi router is powered on and
working properly.
b the audio adapter has been powered
on and booted up successfully.
c (for option 1, 2 and 4 only) you have
jotted down the password of your
home Wi-Fi router.
* If your Wi-Fi password contains such special
characters as #/:/;/', you need to change your
password.
Once connected successfully, the audio adapter
will remember your home Wi-Fi settings.
Whenever the audio adapter is powered on,
it is connected to your home Wi-Fi network
automatically.
10 EN
Option 1: Set up through an
iOS device
1 Before setup, make sure that your iOS
device is connected to your home Wi-Fi
network.
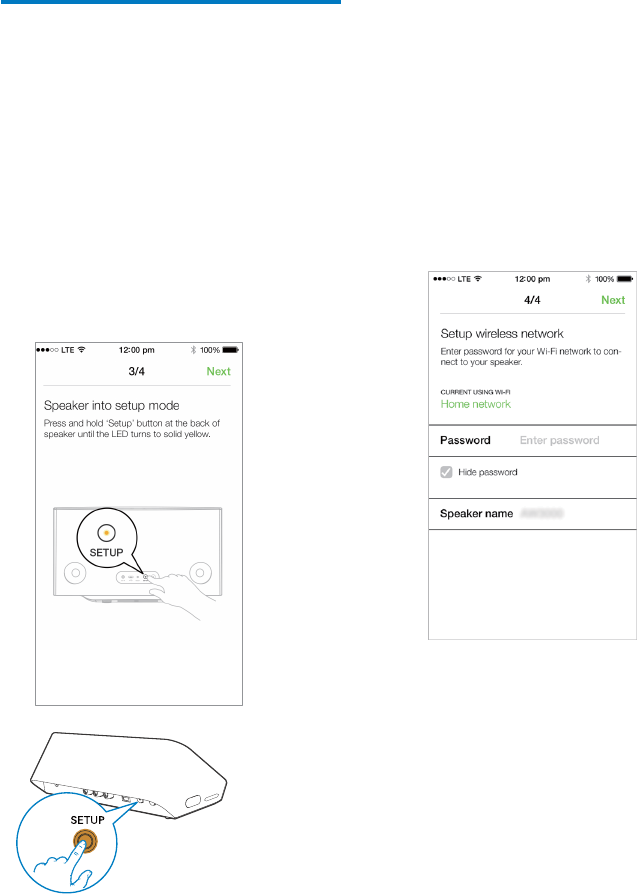
2 As instructed on the app, press and hold
SETUP on the back of the audio adapter
for more than 3 seconds.
» Both the system status indicator on
the front panel and the Wi-Fi status
indicator on the SETUP button turns
solid amber.
3 Tap Next on the above app screen, and
then read how to proceed with network
setup.
4 Select Wireless (Wi-Fi) under HOW DO
YOU WANT TO CONNECT?.
5 As instructed, exit the app, and then select
:) Philips Setup from the list of available
Wi-Fi networks.
6 After automatic detection of the audio
adapter successfully, open the SpeakerSet
app again.
7 Select the name of your home Wi-Fi
network under Select a network to use
speaker.
8 Enter the password of your home Wi-Fi
network, and then tap Donetonish
setup.
9 Wait until successful connection of
the audio adapter to your home Wi-Fi
network.
» The Wi-Fi status indicator on the
SETUP button turns off.
» The system status indicator on the
front panel turns solid green.
11EN
Option 2: Set up through an
Android device
1 Before setup, make sure that your Android
device is connected to your home Wi-Fi
network.
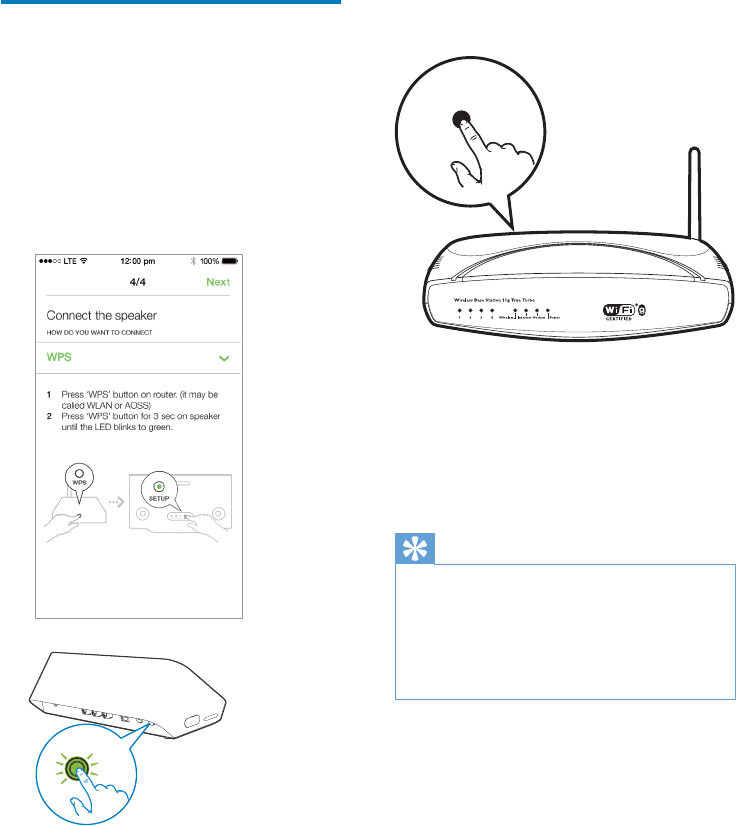
2 As instructed on the app, press and hold
SETUP on the back of the audio adapter
for more than 3 seconds.
» Both the system status indicator on
the front panel and the Wi-Fi status
indicator on the SETUP button turns
solid amber.
3 Tap Next on the above app screen, and
then read how to proceed with network
setup.
4 Select Wireless (Wi-Fi) under HOW DO
YOU WANT TO CONNECT?.
5 Select the name of your home Wi-Fi
network under Select a network to use
speaker.
6 Enter the password of your home Wi-Fi
network, and then tap Donetonish
setup.
7 Wait until successful connection of
the audio adapter to your home Wi-Fi
network.
» The Wi-Fi status indicator on the
SETUP button turns off.
» The system status indicator on the
front panel turns solid green.
12 EN
Option 3: Set up wireless
connection to a WPS router
directly
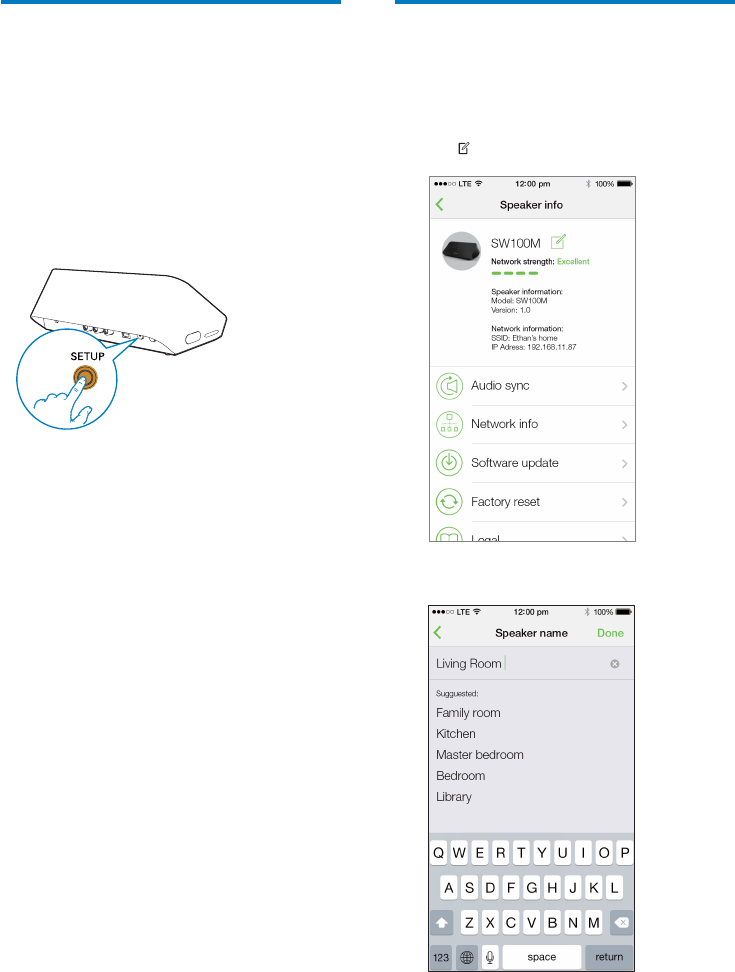
1 As instructed on the app, press and hold
WPS on the back of the audio adapter for
more than 3 seconds.
» The Wi-Fi status indicator on the WPS
button blinks green.
WPS
2 Press the WPS button on your home
Wi-Fi router.
3 Wait until successful connection of the
speaker to your home Wi-Fi network.
» The Wi-Fi status indicator on the WPS
button turns off.
» The system status indicator on the
front panel turns solid green.
Tip
•Only WPA and WPA2 are supported. If the wireless
security is WEP or no security is applied, the WPS
method does not work.
•For some Wi-Fi routers, you may need to hold the
WPS button for Wi-Fi connection or enable the WPS
PBCfunctionfromtheroutercongurationpages.See
theusermanualsofthespecicroutersfordetails.
WPS
13EN
Option 4: Set up through a
PC/Mac (advanced)
1 Go to your Wi-Fi enabled PC/Mac.
2 Press and hold SETUP on the back of the
audio adapter for more than 3 seconds.
» Both the system status indicator on
the front panel and the Wi-Fi status
indicator on the SETUP button turns
solid amber.
3 Select :) Philips Setup from the list of
available Wi-Fi networks on your PC/Mac.
4 After successful connection, open a web
browser on your PC/Mac.
5 Enter http://philips.speakers or 172.24.0.1
at the address bar and click the Enter key.
6 Make changes on the setup page and
conrmyoursettings.
» The Wi-Fi status indicator on the
SETUP button turns off.
» The system status indicator on the
front panel turns solid green.
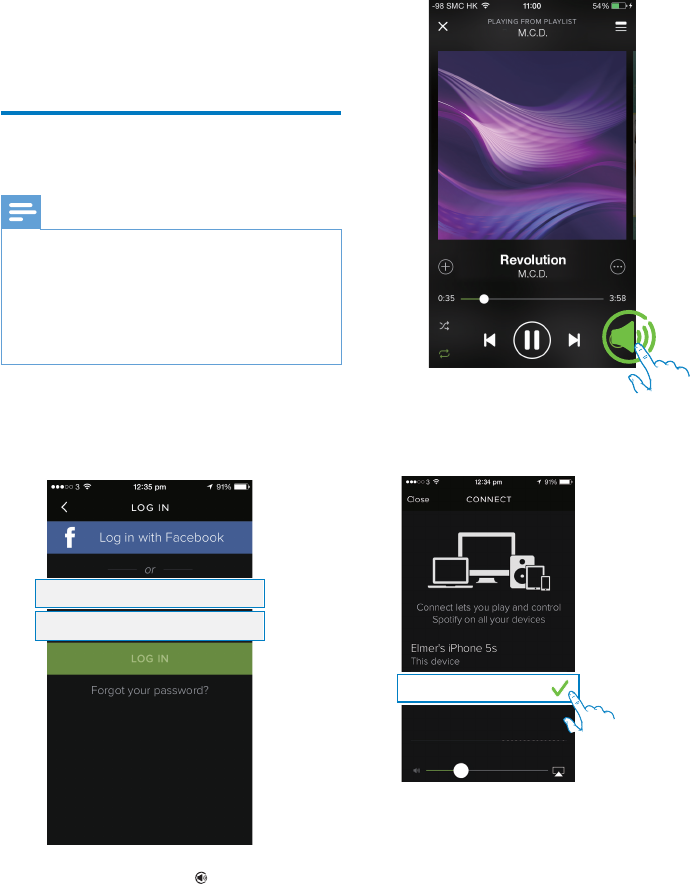
Rename speakers
1 After successful Wi-Fi setup, go to the
home page and tap the speaker icon on
the app screen.
2 Tap beside the speaker name.
3 Rename the speaker as you like.
4 Tap Donetoconrm.
14 EN
6 Play
Enjoy Spotify music services
through SW100M
Note
•With Spotify, you can enjoy unlimited music on your
new device. Thanks to the Spotify Connect feature, you
can play and control all this music wirelessly. Choose
music on your mobile or tablet, and hear it on your
brand new device.
•Make sure that the audio adapter is connected to your
home Wi-Fi network with Internet connection available.
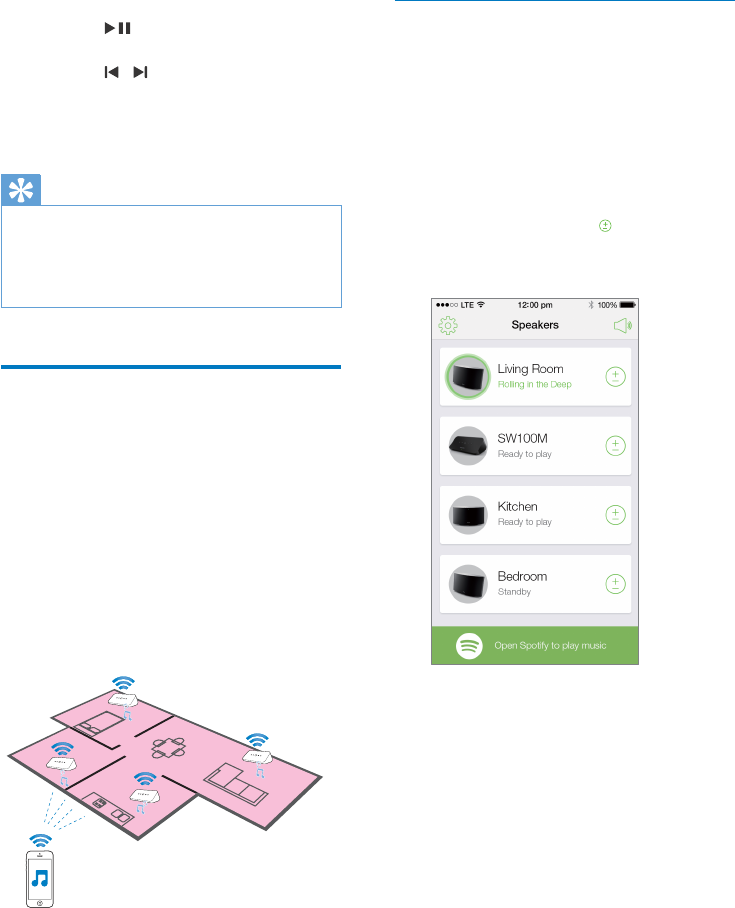
1 Switch to the Spotify app from SpeakerSet
or open the Spotify app directly.
2 Log in to your Spotify premium account.
3 Tap the Connect icon on the play
screen.
Username
Password
4 Select the audio adapter for music
streaming.
5 Stream music from the Spotify app to the
audio adapter.
» You can enjoy music through your
audio system connected to the audio
adapter.
Philips SW100M xxxxxx
15EN
During play, you can:
• press on the audio adapter to
pause/resume music play.
• press / on the audio adapter to
skip to the previous/next song.
• press +/- on the audio adapter to
adjust volume level.
Tip
•See the SpeakerSet app screen for more advanced
settings.
•You can take your iOS or Android device away from
the network, or even switch it off. In this case, Spotify
music will continue to play on your audio adapter.
Stream music to multiple
speakers/audio adapters at
the same time
You can add multiple Spotify Multiroom
Speakers/audio adapters connected to the
same Wi-Fi network into a group. Then, you
can stream music from Spotify on your iOS
or Android device in the same Wi-Fi network
to all speakers/audio adapters in the group at
the same time. In this way, you can enjoy music
everywhere at your home.
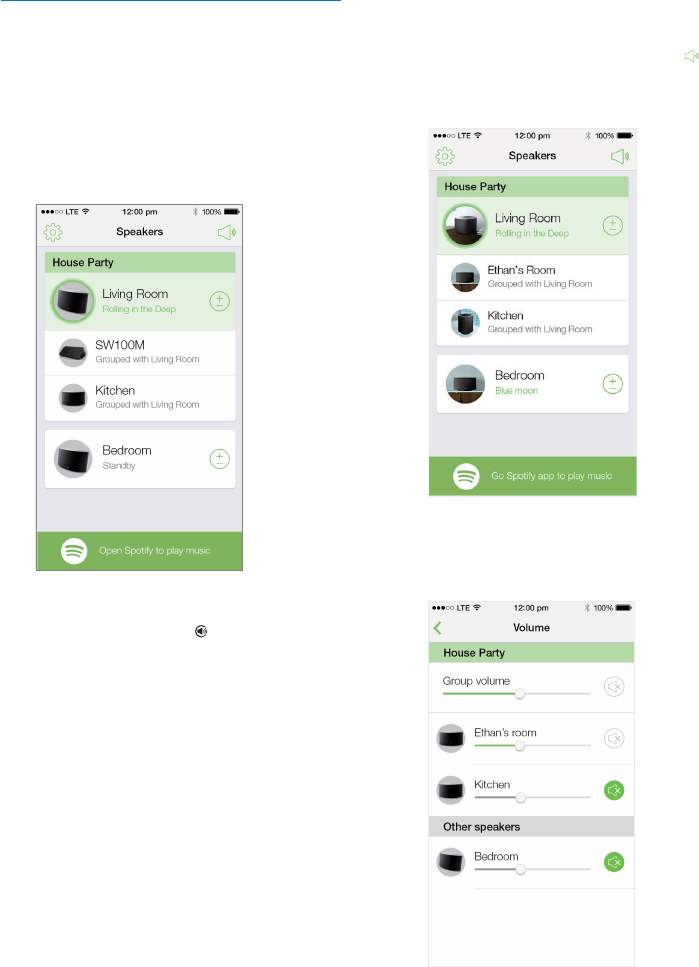
Group and ungroup speakers/audio
adapters
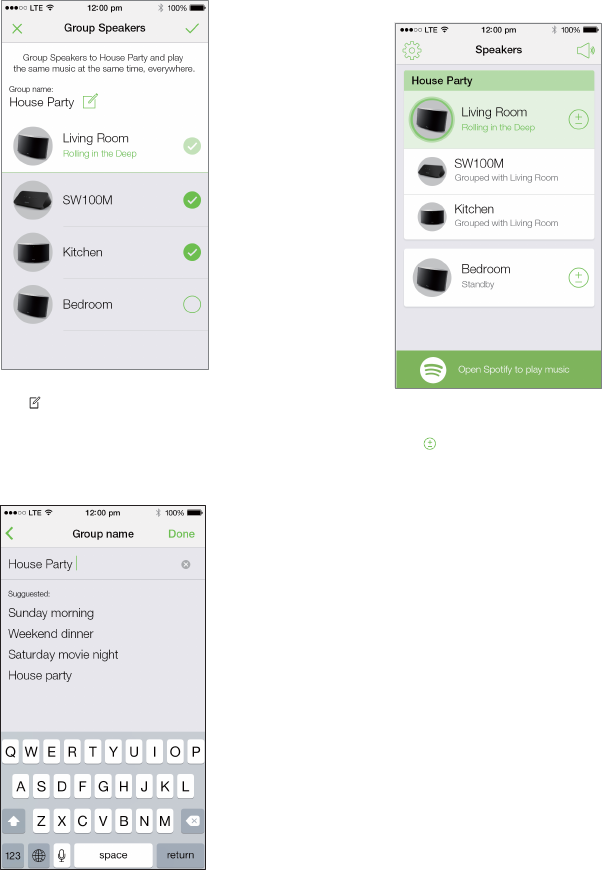
1 Connect multiple Spotify Multiroom
Speakers/audio adapters to your home
Wi-Fi network (see 'Connect SW100M to
your home Wi-Fi network' on page 9).
2 Run SpeakerSet on your iOS/Android
smartphone or tablet.
3 On the home page, tap beside a
speaker/audio adapter to act as the master
speaker of a group.
16 EN
4 Tick circles beside the speakers/audio
adapters to add them into the group.
5 Tap beside the group name to enter the
edit page.
6 Edit the group name as you like on the edit
page.
7 Tap the check mark at the top right on the
above app screen, and then wait for more
than10secondsuntilthegroupingnishes.
To ungroup speakers:
1 Tap beside the master speaker.
2 Untick the box beside the speaker/audio
adapter to be removed from the group.
17EN
Enjoy music streamed to the group
speakers/audio adapters
1 On the home page, tap the icon of the
master speaker on the SpeakerSet app
screen.
2 Tap Go Spotify app to play music to
switch to the Spotify app.
3 Log in to your Spotify premium account.
4 Tap the Connect icon to select the
master speaker.
5 Select and play your favorite music from
the Spotify app.
» You can enjoy music streamed to all
speakers/audio adapters in the same
group at the same time.
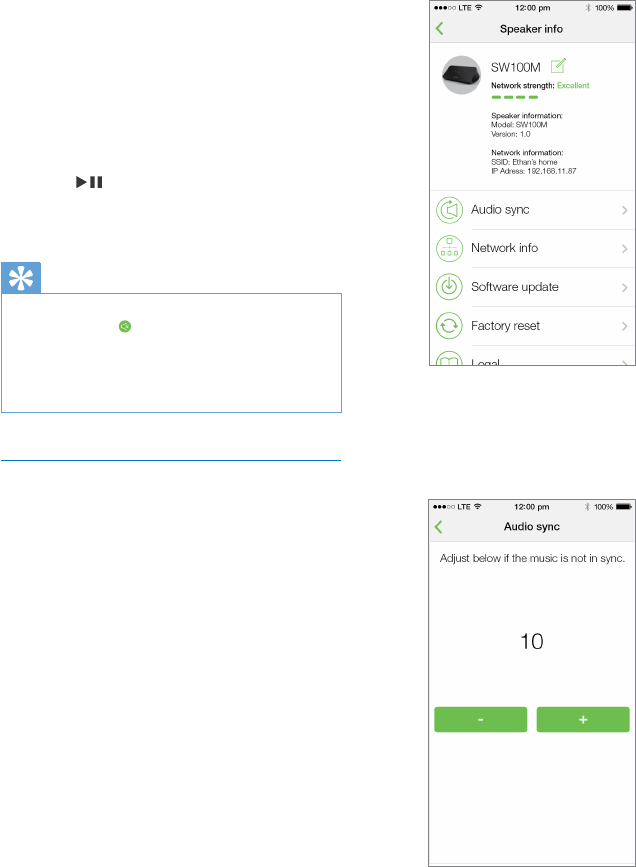
To adjust volume of all speakers/audio
adapters in a group at the same time:
1 Open the SpeakerSet app, then tap
on the main page to enter the volume
adjustment page.
2 Move the group volume slider to adjust
volume of all speakers/audio adapters in
the group at the same time.
18 EN
To adjust volume of an individual speaker/
audio adapter:
• Press +/- on the top panel of the speaker/
audio adapter.
• Open the SpeakerSet app, then move the
slider beside the speaker/audio adapter on
the above volume adjustment page directly.
To play/pause music play:
• Press on the top panel of any speaker/
audio adapter in the group or use controls
on the Spotify app screen directly.
Tip
•On the volume adjustment page of the SpeakerSet app,
you can also tap beside a speaker/audio adapter to
mute/unmute its volume output.
•More music controls and sound settings are available
on the SpeakerSet app screen, such as bass/treble
adjustment.
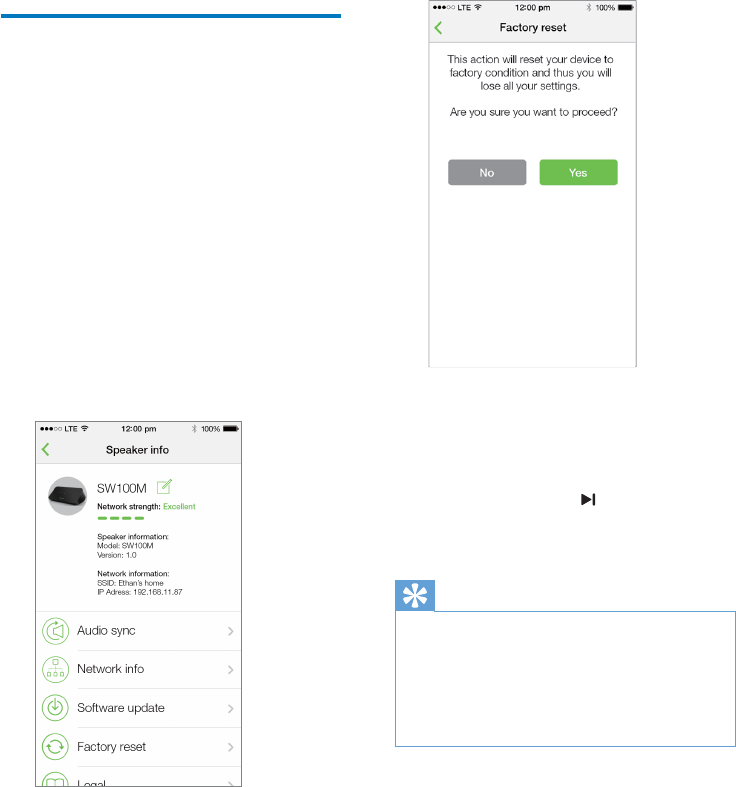
Adjust audio delay
During group play, if the audio output from your
audio system connected to the audio adapter
is not synchronized with that from the other
speakers in the group, you can adjust the delay
time for the audio adapter to synchronize with
the other speakers.
1 Open the SpeakerSet app, then tap the
image of the audio adapter on the main
page to see the available options.
2 Tap Audio sync to enter the audio
synchronization page.
3 Adjust the audio delay time until the sound
output is synchronized.
19EN
7 Other features
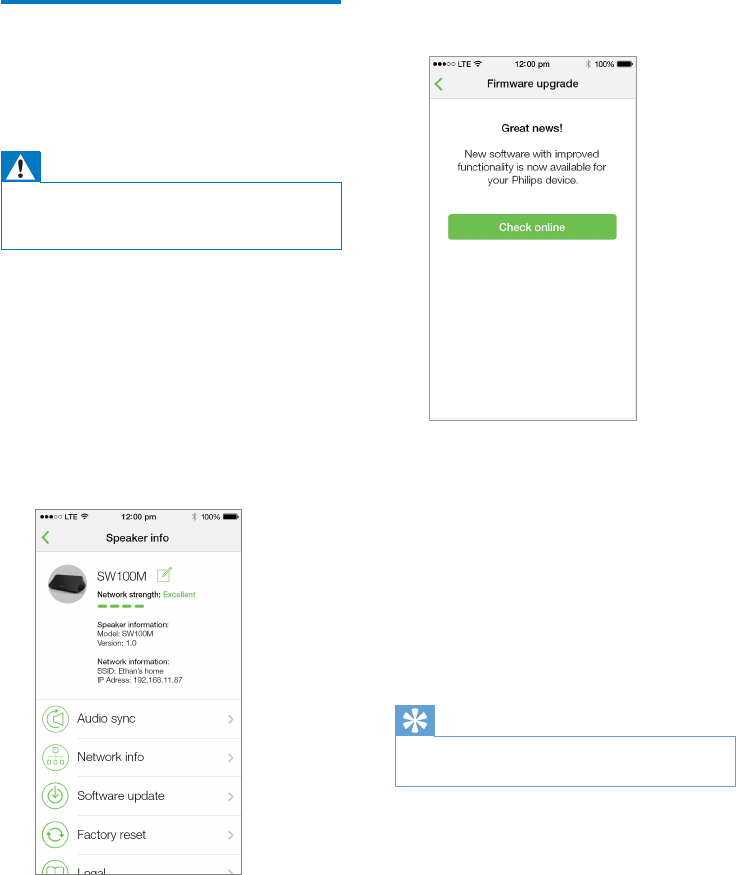
Restore factory settings
In some cases, you may need to reset the audio
adapter, for example, when you need to reset
the Wi-Fi settings or log out from the current
Spotify premium account.
1 Make sure that the audio adapter is
powered on and connected to the same
Wi-Fi network as your smartphone or
tablet.
2 Make sure that your home Wi-Fi network
is connected to the Internet.
3 Run SpeakerSet on your iOS or Android
smartphone or tablet.
4 Tap the image of the audio adapter to see
the available options.
5 Tap Factory reset to enter the factory
reset page.
6 Tap Ye s to reset your audio adapter.
If the above operation fails, you can reset the
audio adapter in the following way:
1 Unplug the power cable.
2 Hold both the + and keys on the top
panel and then plug in the power cable
again.
Tip
•The audio adapter reboots after factory reset.
•Your Spotify account will be logged out after factory
reset.
•If the reset audio adapter is running in a group, it will be
ungrouped. When the master speaker is reset, one of
the other speakers in the group will serve as the master
speaker instead.
20 EN
Update software
To improve product performance, Philips may
offer you new software for you to update your
audio adapter.
Warning
•Always connect your audio adapter to AC power for
rmwareupgrade.Neverpoweroffyouraudioadapter
norclosetheappduringrmwareupgrade.
1 Make sure that audio adapter is powered
on and connected to the same Wi-Fi
network as your smartphone or tablet.
2 Make sure that your home Wi-Fi network
is connected to the Internet.
3 Run SpeakerSet on your iOS or Android
smartphone or tablet.
4 Tap the image of the audio adapter to see
the available options.
5 Tap Software update to enter the software
update page.
6 Tap Check online to see whether any new
version of software is available.
7 If a new version is available, tap Update to
start software update.
» The system status indicator on the
front panel blinks amber and red
alternately during this process.
8 Wait until the software update process
nishes,thentapOK to reboot the audio
adapter.
Tip
•Depending on the network connection, it may take 10
minutestonishupdate.
21EN
8 Product
information
Note
•Product information is subject to change without prior
notice.
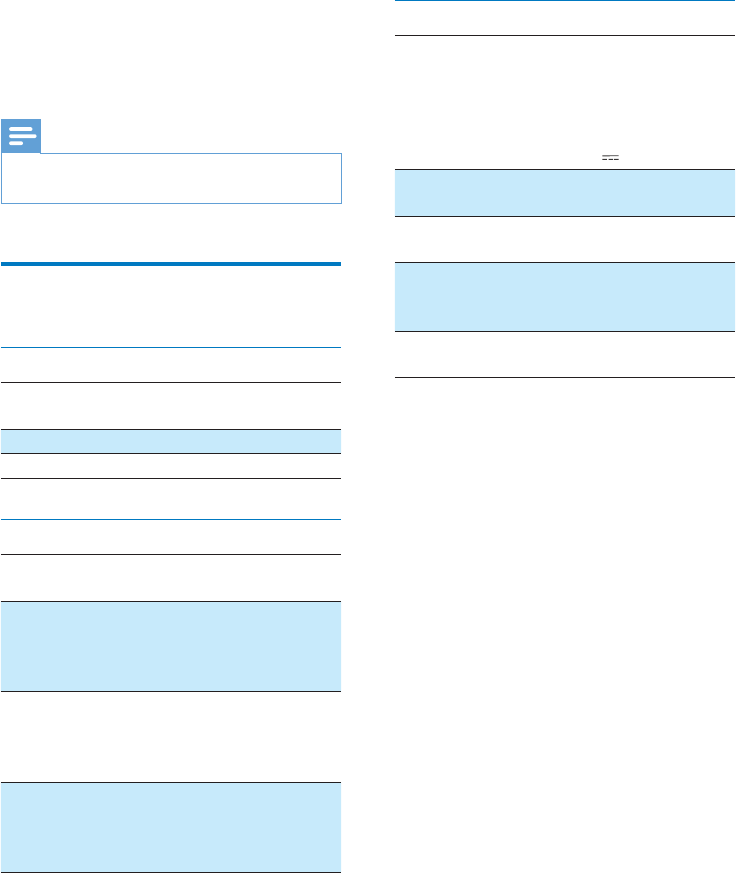
Specications
Audio output
Output Voltage 1000 mV
RMS
Signal to Noise Ratio > 62 dBA
Total Harmonic Distortion < 2%
Wireless
Wireless
standard
802.11b/g/n
Wireless
security
WEP, 10 or 26 hex digit keys
WPA (TKIP) or WPA2 (TKIP /
AES) with 8 - 40 ASCII printable
characters passphrase
Frequency
range
2412 - 2462 MHz (CH1-CH11)
(for /37, /55)
2412 - 2472 MHz (CH1-CH13)
(for /12, /10, /05, /79, /98)
WPS
PBC (one
button
push)
Ye s
General information
AC power
PHILIPS
SWITCHING POWER
SUPPLY
Model:
S018KU0500200;
input: 100 - 240
V~, 50/60 Hz 500
mA; output: 5.0 V
2000 mA
Operation Power
Consumption
< 10 W
Power Consumption in
Network Standby
< 2 W
Dimensions
- Main Unit (L x W x H) 179 x 105 x
66 mm
Weight
- Main Unit 0.4 kg

22 EN
9 Troubleshooting
Warning
•Never remove the casing of this apparatus.
To keep the warranty valid, never try to repair
the system yourself.
If you encounter problems when using this
apparatus, check the following points before
requestingservice.Iftheproblemremains
unsolved, go to the Philips web site (www.
philips.com/welcome). When you contact
Philips, ensure that the apparatus is nearby
and the model number and serial number are
available.
No power
•Make sure that the AC power plug of the
audio adapter is connected properly.
•Make sure that there is power at the AC
outlet.
•Check whether the audio adapter is in
standby mode (see 'Connect power and
switch on' on page 8).
No sound
•Check whether the audio adapter is
correctly connected to your audio system.
•Check whether your audio system is
powered on.
•Check whether the audio adapter is muted
or the streamed music is still buffering. The
system status indicator blinks green when
the audio adapter is muted or during music
buffering. If the audio adapter is muted,
adjust volume on the SpeakerSet app or
on the audio adapter directly.
•Check the Wi-Fi network connection.
Set up the network again if needed (see
'Connect SW100M to your home Wi-Fi
network' on page 9).
•If there is no sound from a speaker in a
group, check whether the speaker is out of
range. You can check whether the wireless
connection of the speaker is poor on the
app screen directly.
No response from the speaker
•Restart the audio adapter, and then set up
the Wi-Fi network for the audio adapter
again (see 'Connect SW100M to your
home Wi-Fi network' on page 9).
•Disconnect and reconnect the AC power
plug to switch on the speaker again.
•If there is no sound from a speaker in a
group, check whether the speaker is out of
range. You can check whether the wireless
connection of the speaker is poor on the
app screen directly.
How can I recongure the Wi-Fi settings?
•Reset the speaker (see 'Restore factory
settings' on page 19), and then congure
the Wi-Fi settings again (see 'Connect
SW100M to your home Wi-Fi network' on
page 9).
Occasional breaking of music streaming
Do one or all of the following:
•Move SW100M closer to your Wi-Fi
router.
•Remove any obstacles between SW100M
and your Wi-Fi router.
•Avoid using Wi-Fi channel which is
overlapped by the nearby Wi-Fi network.
•Check if your network speed is fast enough
(in cases where multiple devices share the
same router, the wireless performance may
be affected). Turn off the other devices
connected to your home router.
•Enable the Quality of Service (QoS)
option (if available on the Wi-Fi router).
•Turn off other Wi-Fi routers.
No response from the audio adapter
•Restart the audio adapter, and then set up
the Wi-Fi network for the audio adapter
again (see 'Connect SW100M to your
home Wi-Fi network' on page 9).
•Disconnect and reconnect the AC power
plug to switch on the audio adapter again.
•If there is no sound from a speaker in a
group, check whether the speaker is out of
range. You can check whether the wireless
connection of the speaker is poor on the
app screen directly.
23EN
10 Appendix:
Understand
meanings of
LED colors
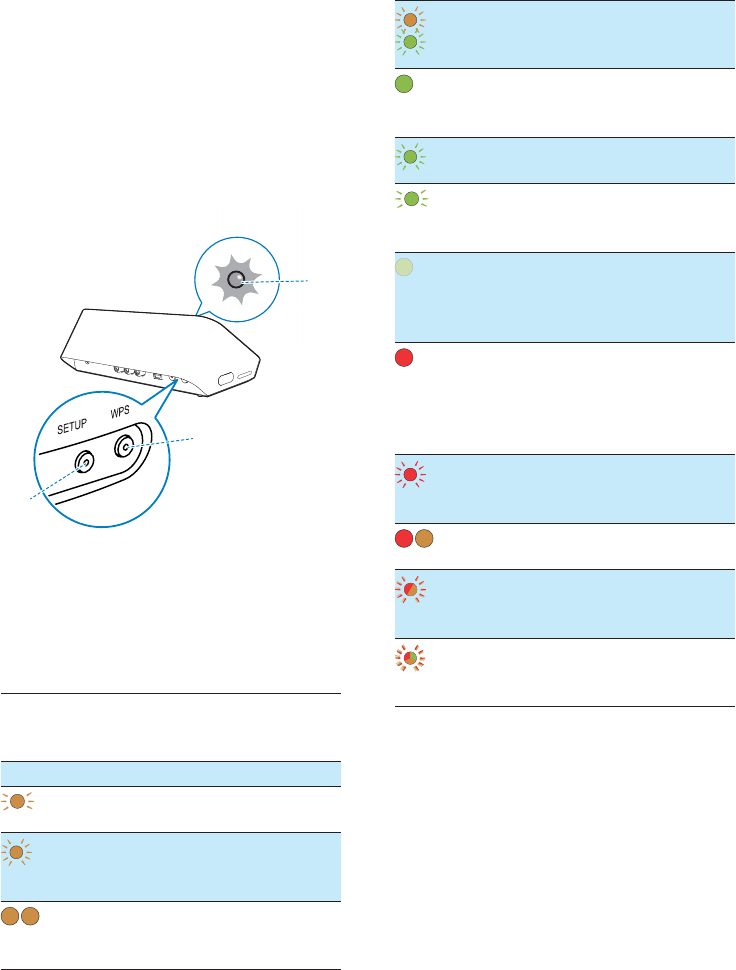
a System status indicator (on the front
panel)
b SETUP indicator (on the back panel)
c WPS indicator (on the back panel)
LED
colors
LED behavior Status of
the audio
adapter
No light Power off
11 blinking amber
slowly
Booting up
11 blinking amber
quickly
Connecting
to a
network
1 2 1 and 2 indicators in
solid amber
In app-
assisted Wi-Fi
setup mode
a
c
b
1
1
1 blinking amber
quickly,and3 blinking
green
In WPS
mode
11 solid green Network
connection
successful
11 blinking green
quickly
During audio
buffering
11 blinking green
slowly
Muted or
playback
paused
11 dimmed by 50% in
solid green
In standby
mode with
network
connection
11 solid red In standby
mode
without
network
connection
11 blinking red Network
connection
failed
1 2 1 solid red, and 2
solid amber
During
factory reset
11 blinking red and
amber
During
rmware
upgrade
1
11 blinking red,
amber and green
alternately
Firmware
upgrade
failed

2014 © WOOX Innovations Limited.
All rights reserved.
This product was brought to the market by WOOX
Innovations Limited or one of its afliates, further referred
to in this document as WOOX Innovations, and is the
manufacturer of the product. P&F is the warrantor in relation
to the product with which this booklet was packaged. Philips
and the Philips Shield Emblem are registered trademarks of
Koninklijke Philips N.V.
SW100M_UM_37_EN
P&F USA Inc.
PO Box 2248
Alpharetta, GA 30023-2248
Phone 1 866 309 0845
Meet Philips at the Internet
http://www.philips.com/welcome