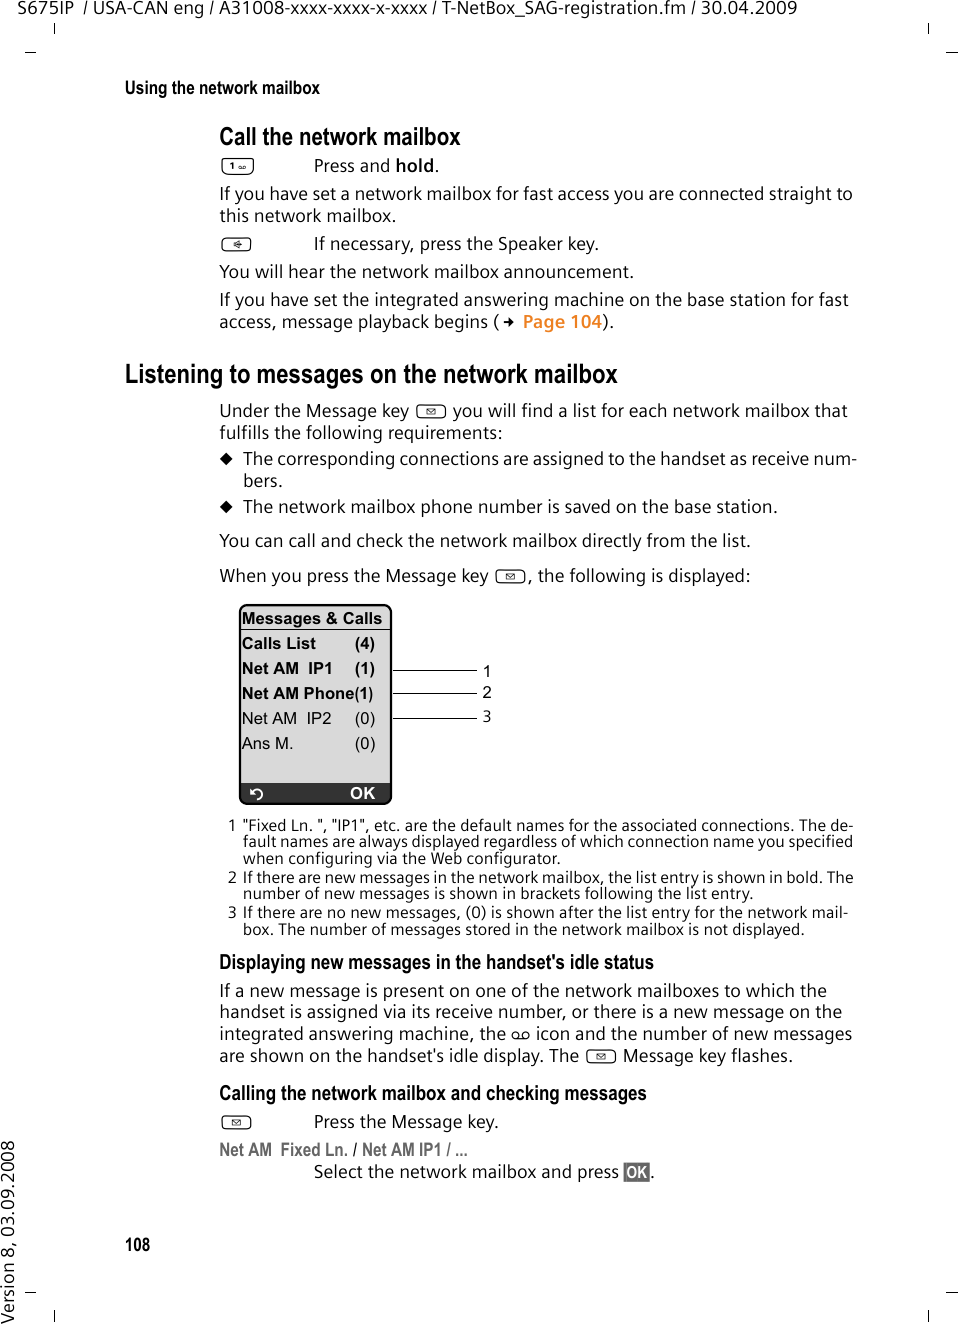
Gigaset Communications S67H UPCS Phone User Manual S675 S685 IP Lang BA
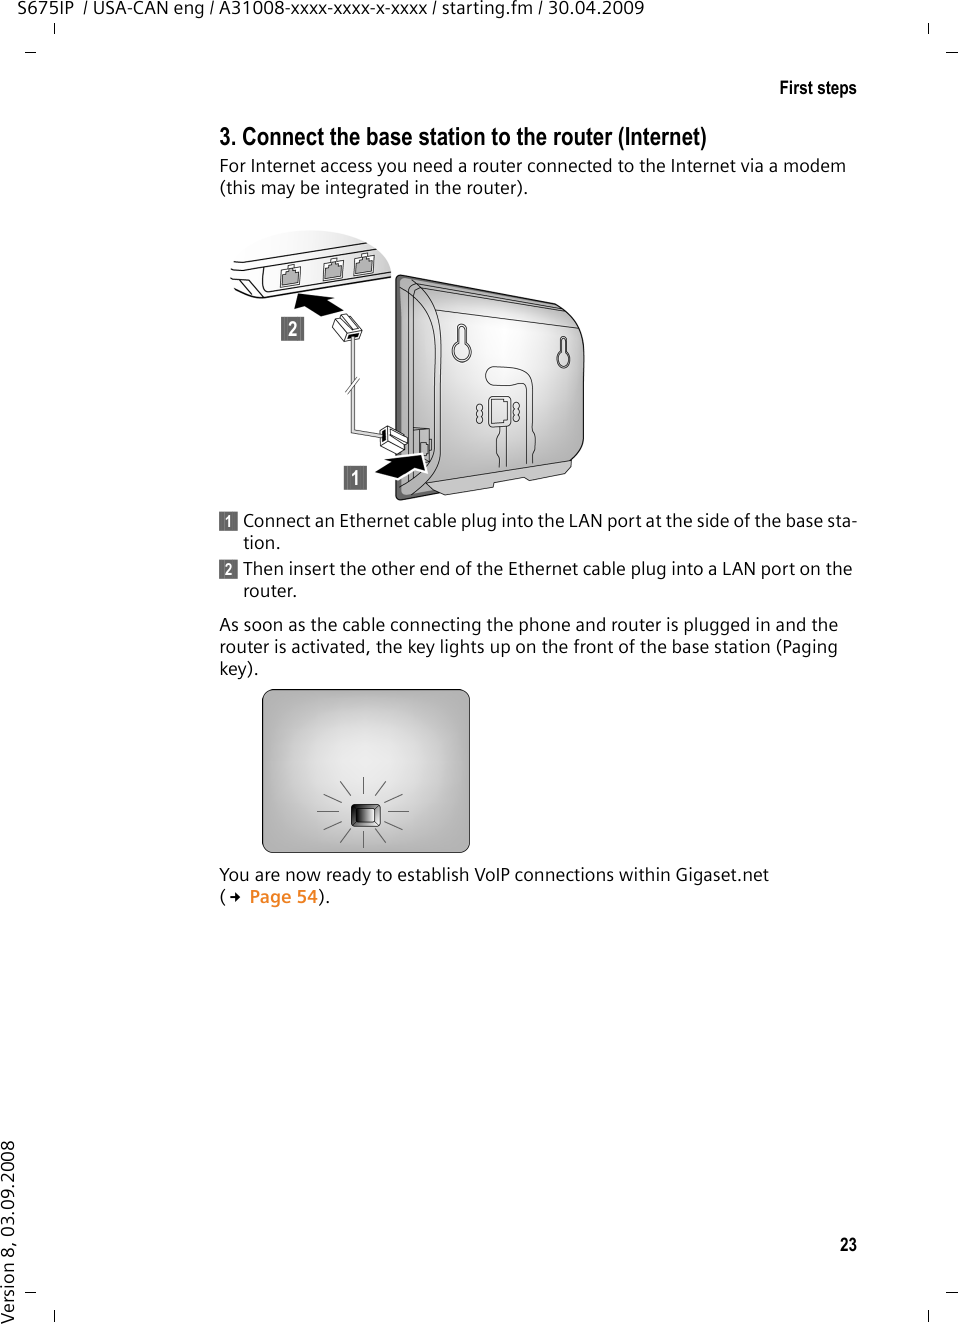
Gigaset Communications GmbH UPCS Phone S675 S685 IP Lang BA
UserManual.wiki
>
Gigaset Communications
>
S67H User Manual
User Manual
Navigation menu
Upload a User Manual
Namespaces
Wiki Guide
HTML
PDF
Info
Views
User Manual
Discussion / Help
Navigation
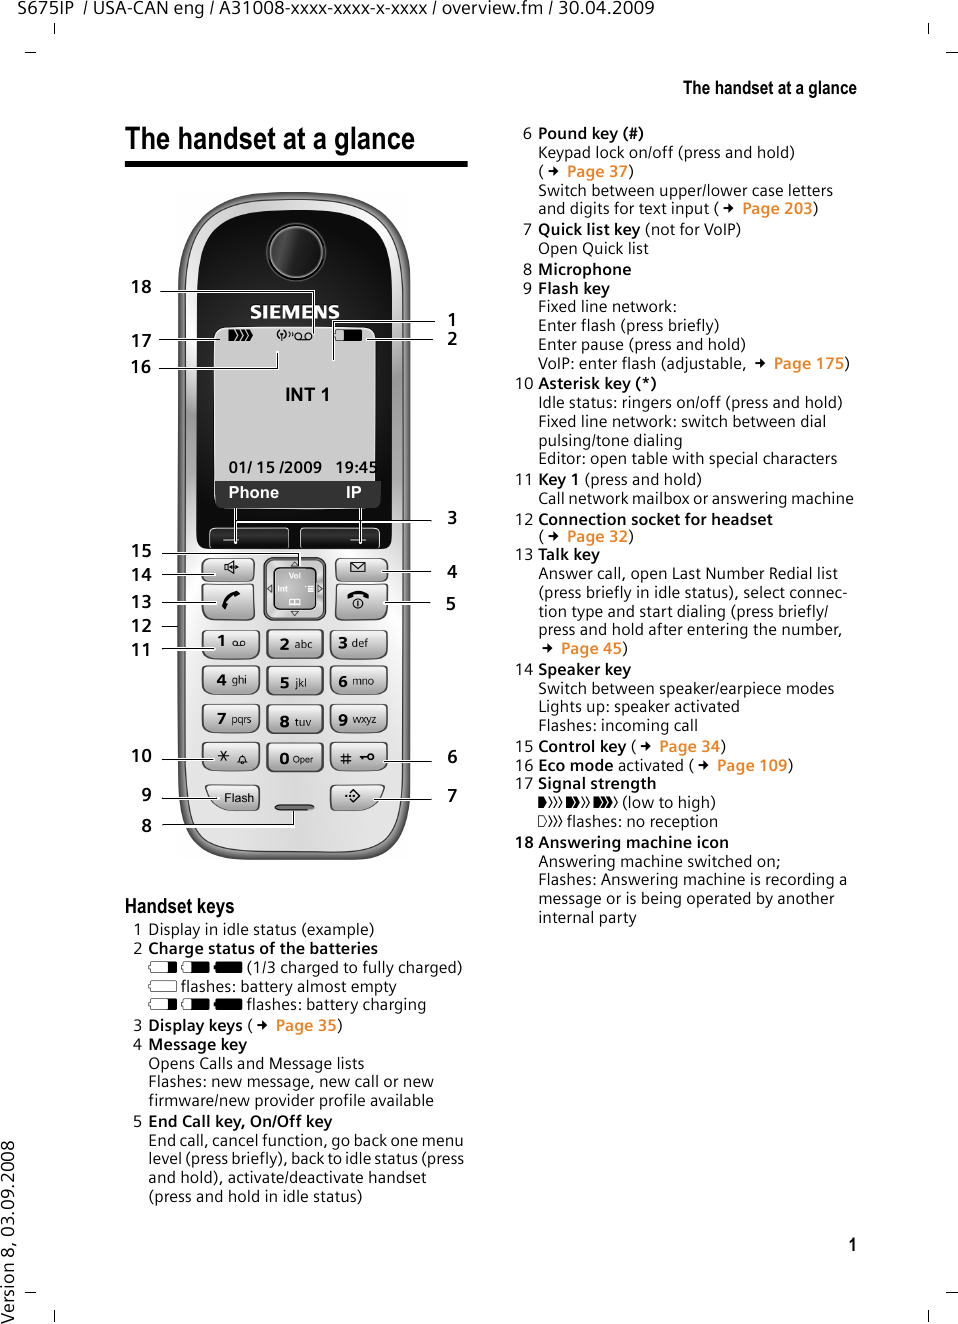
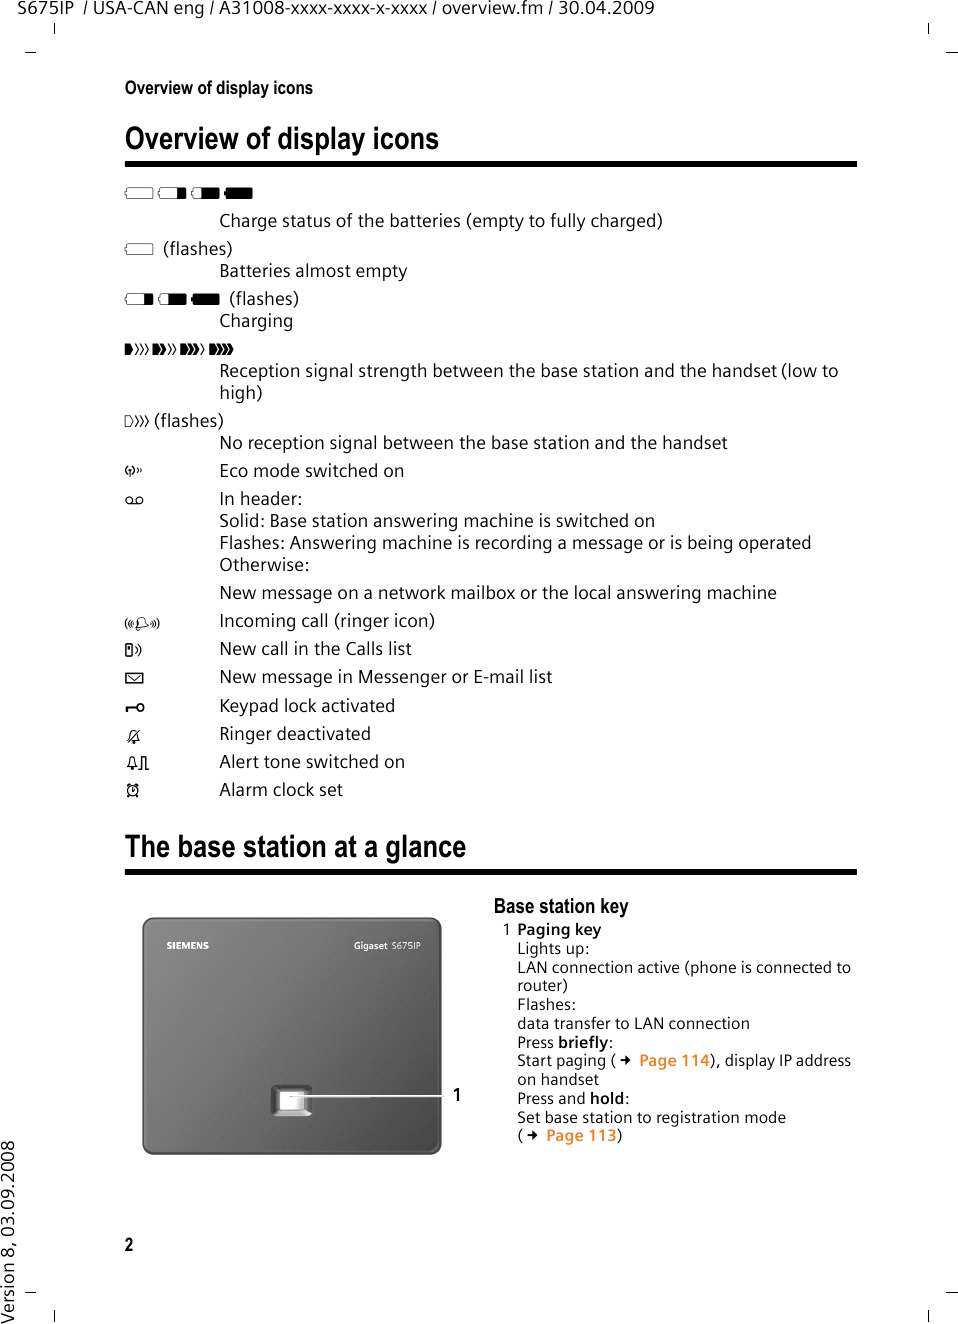


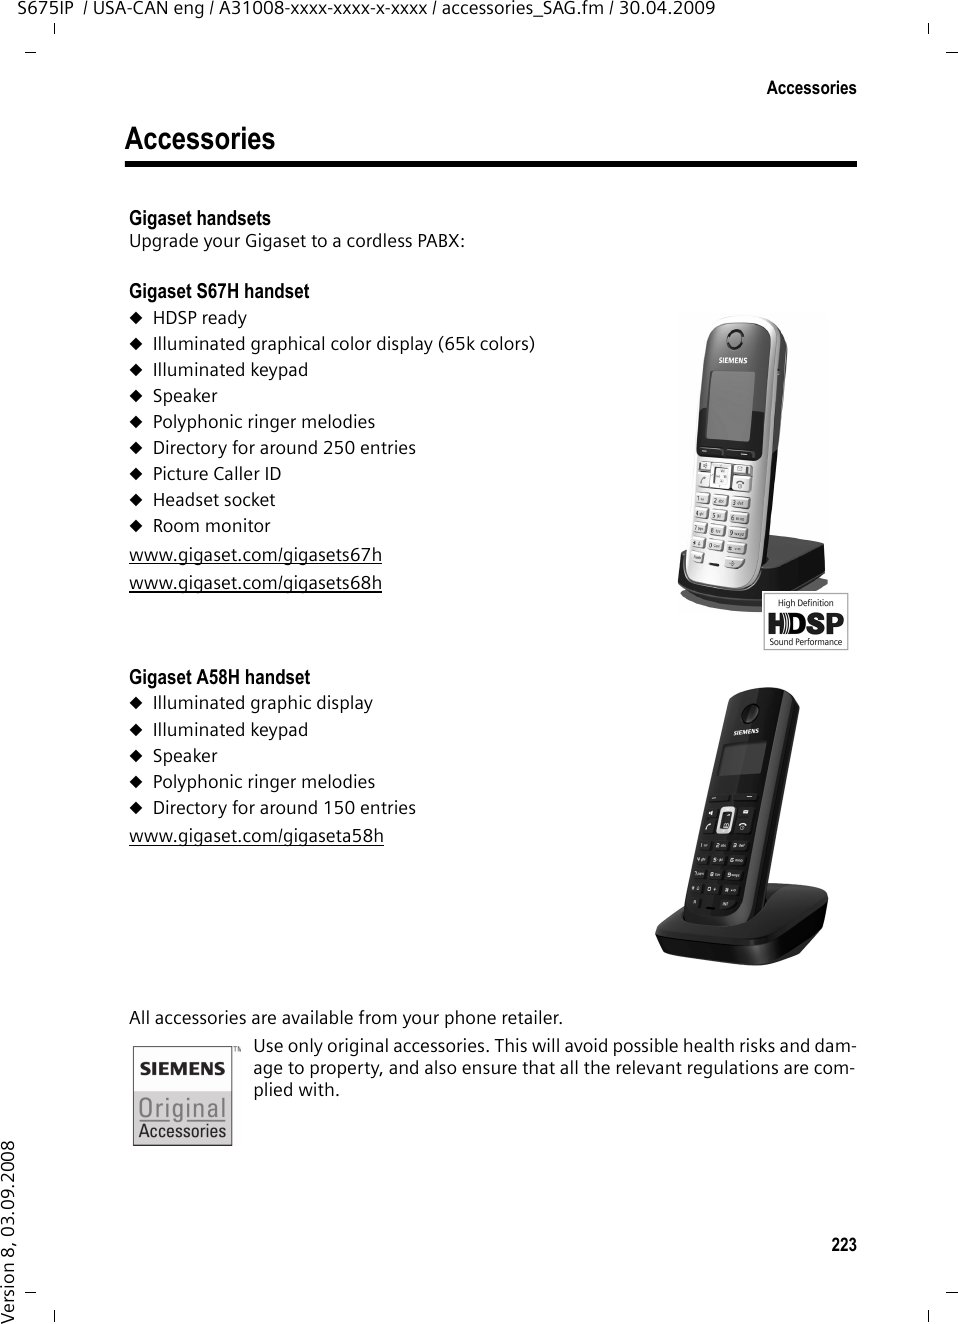
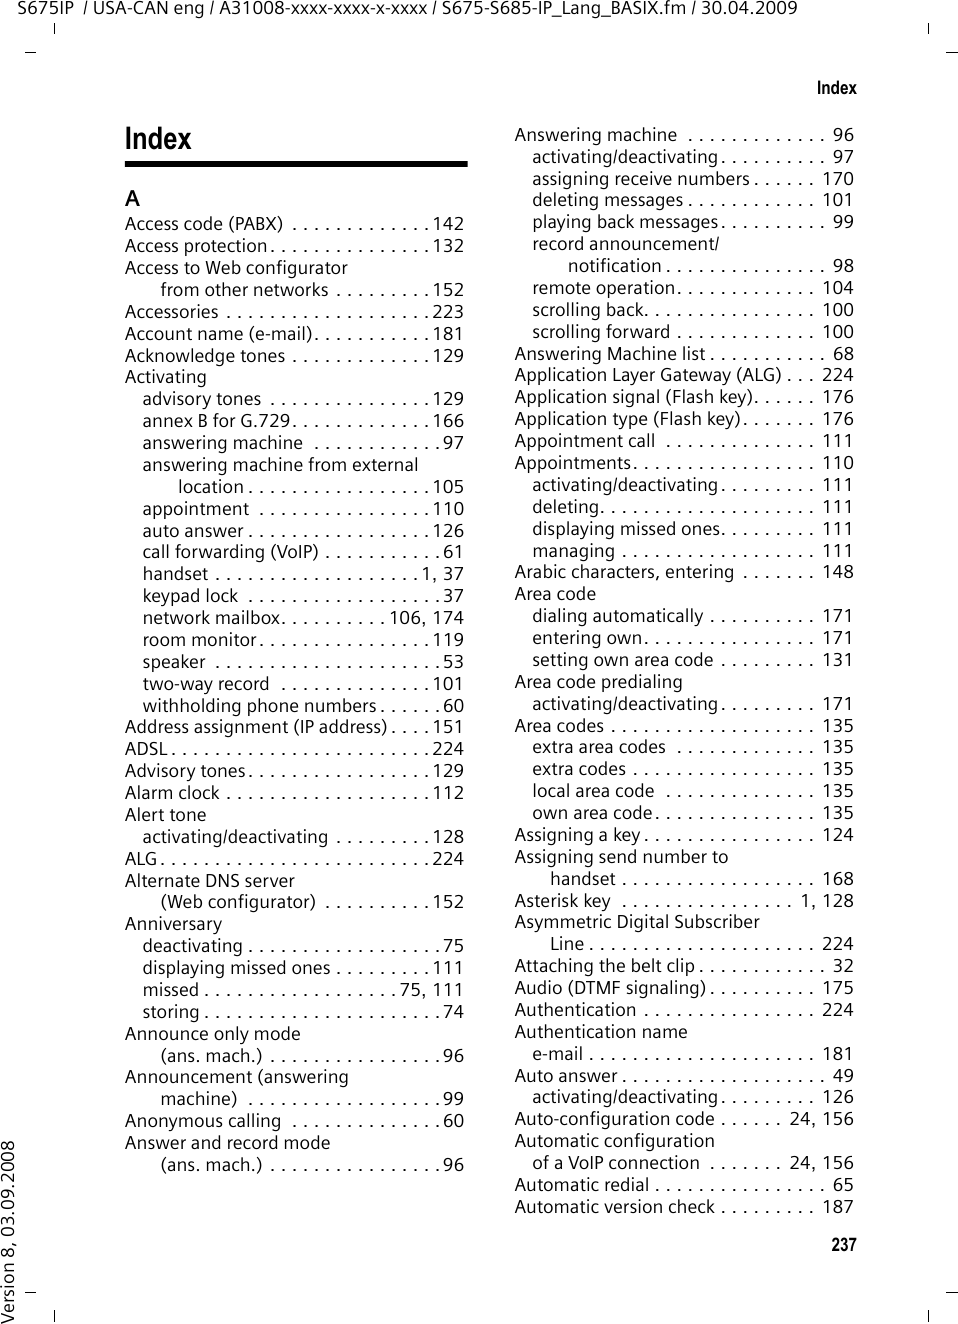
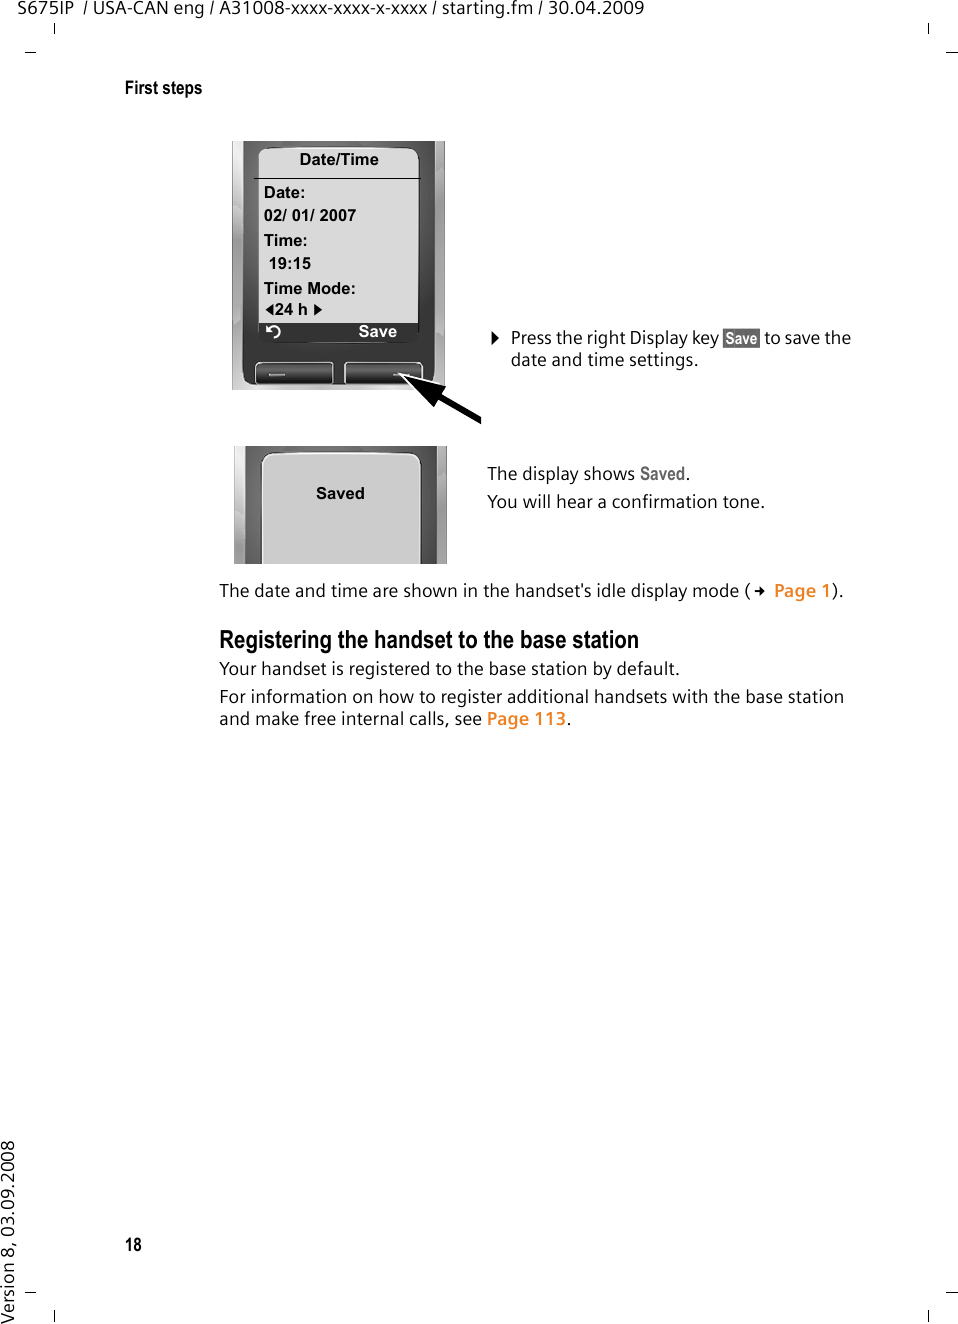
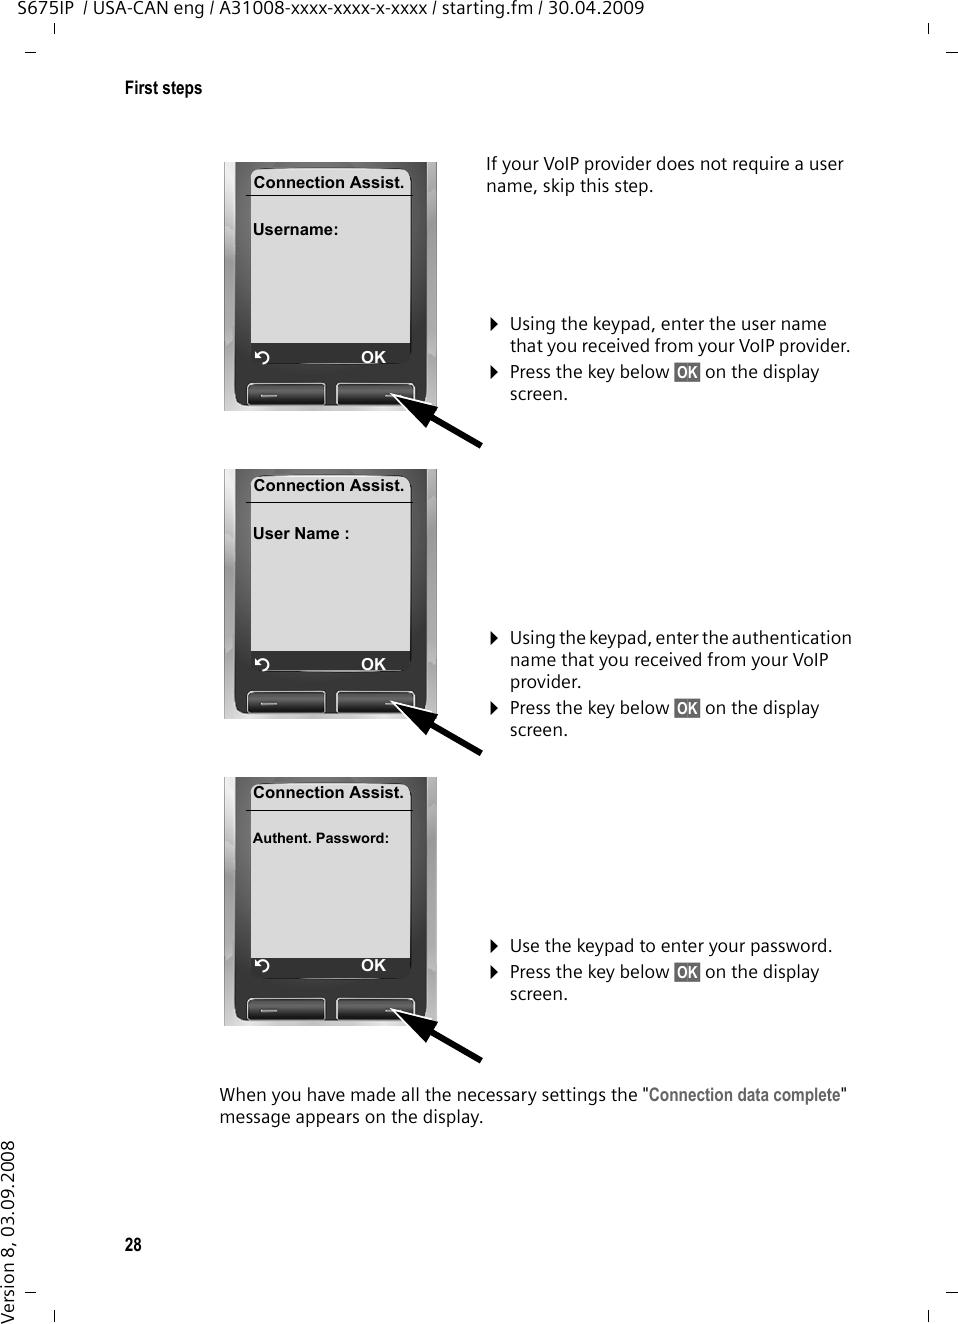
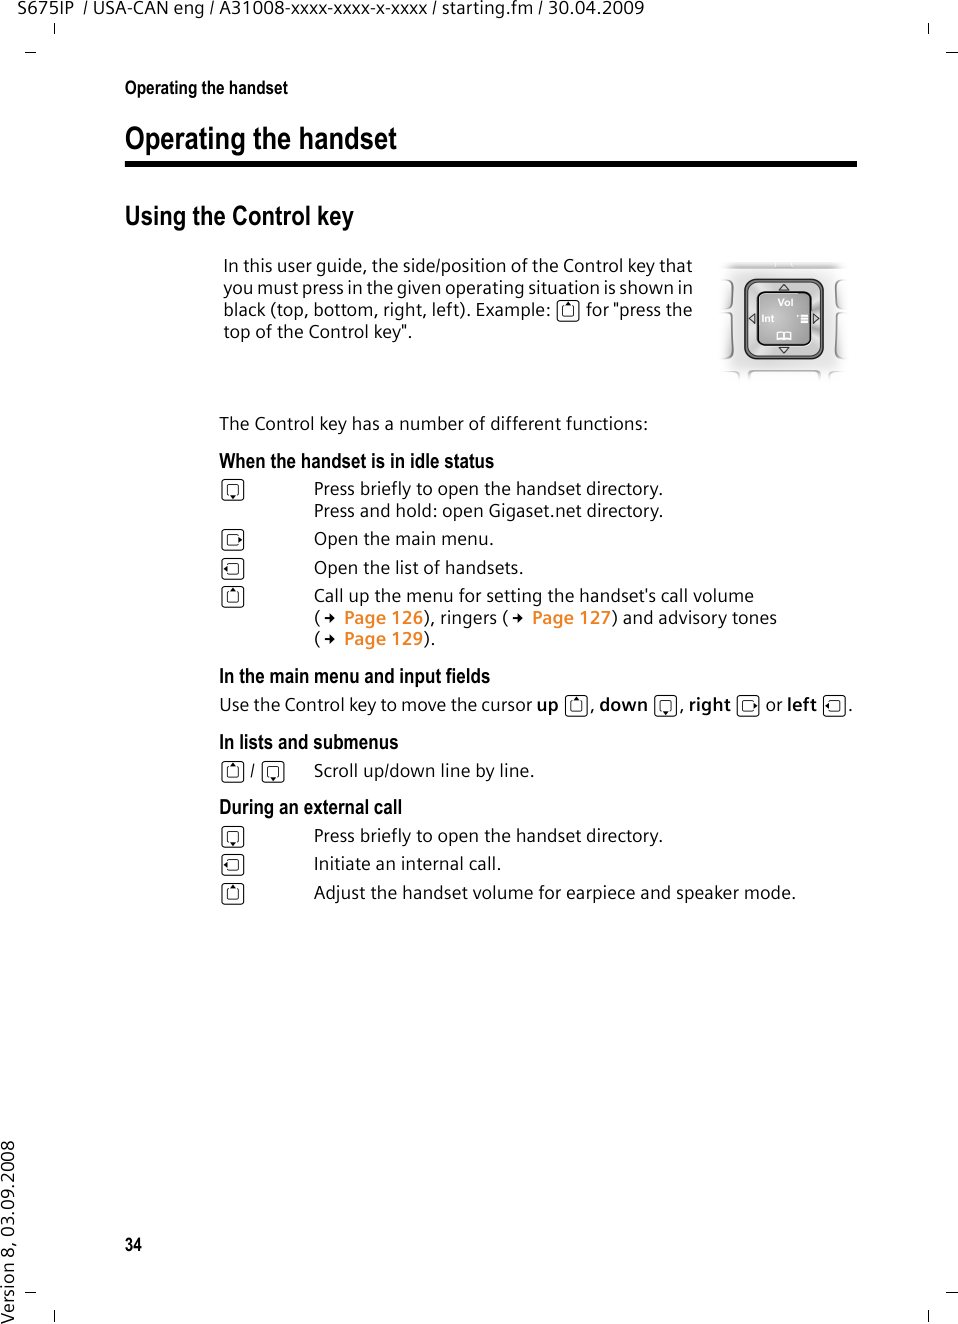
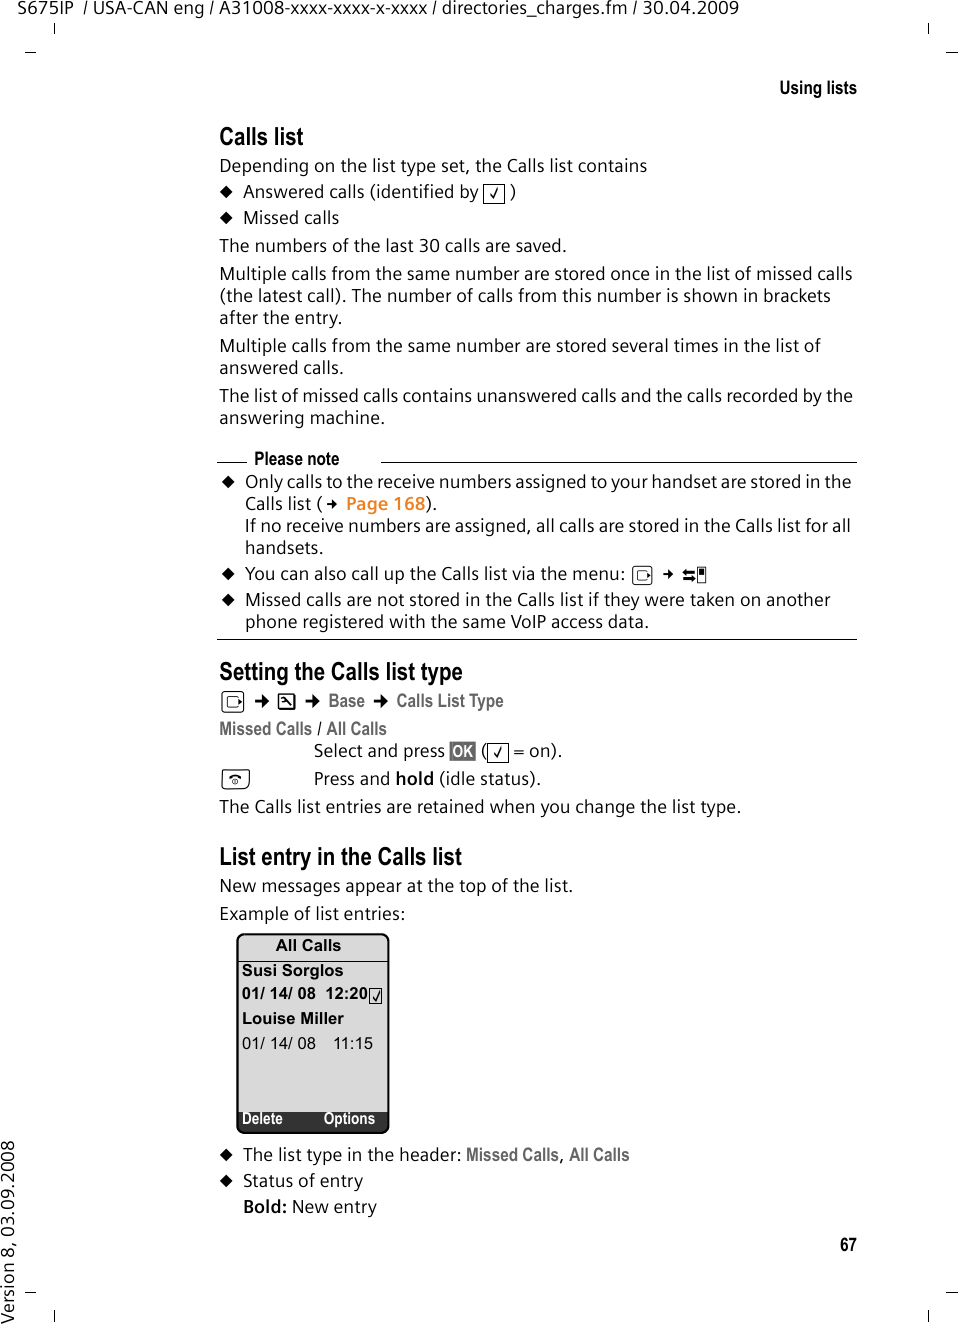
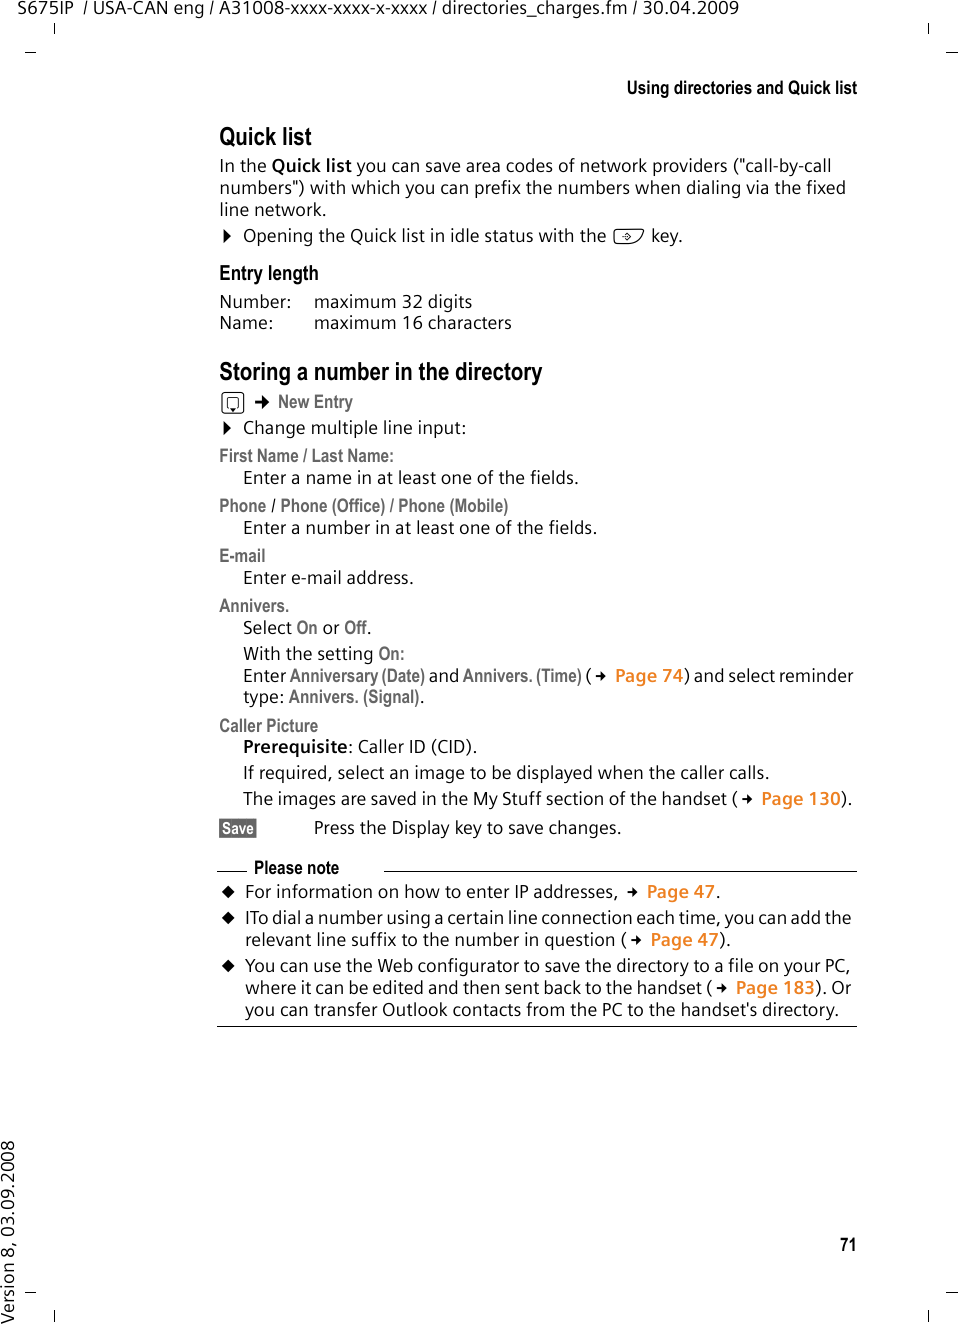
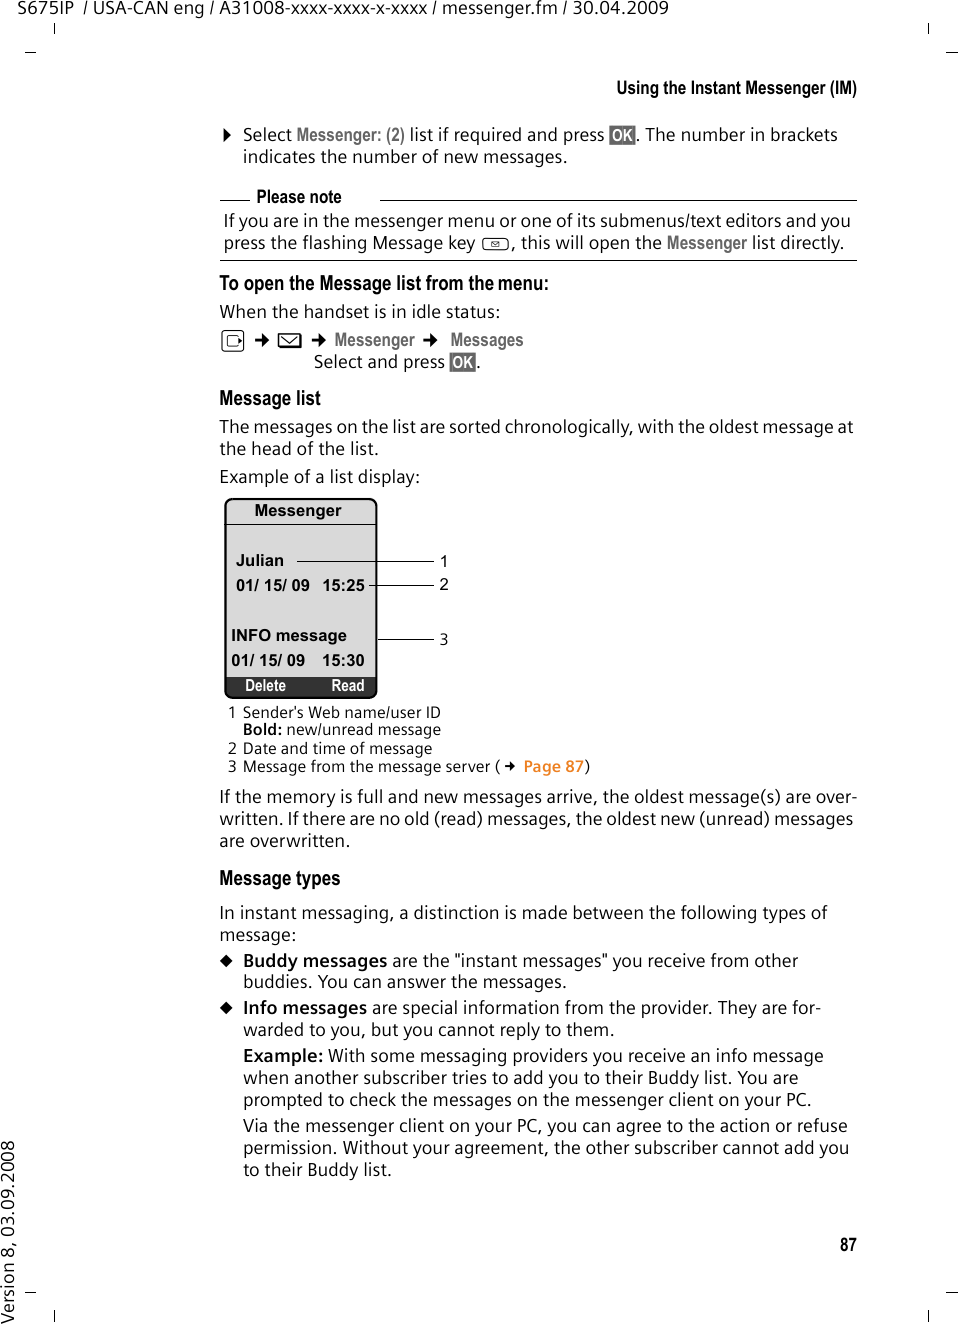
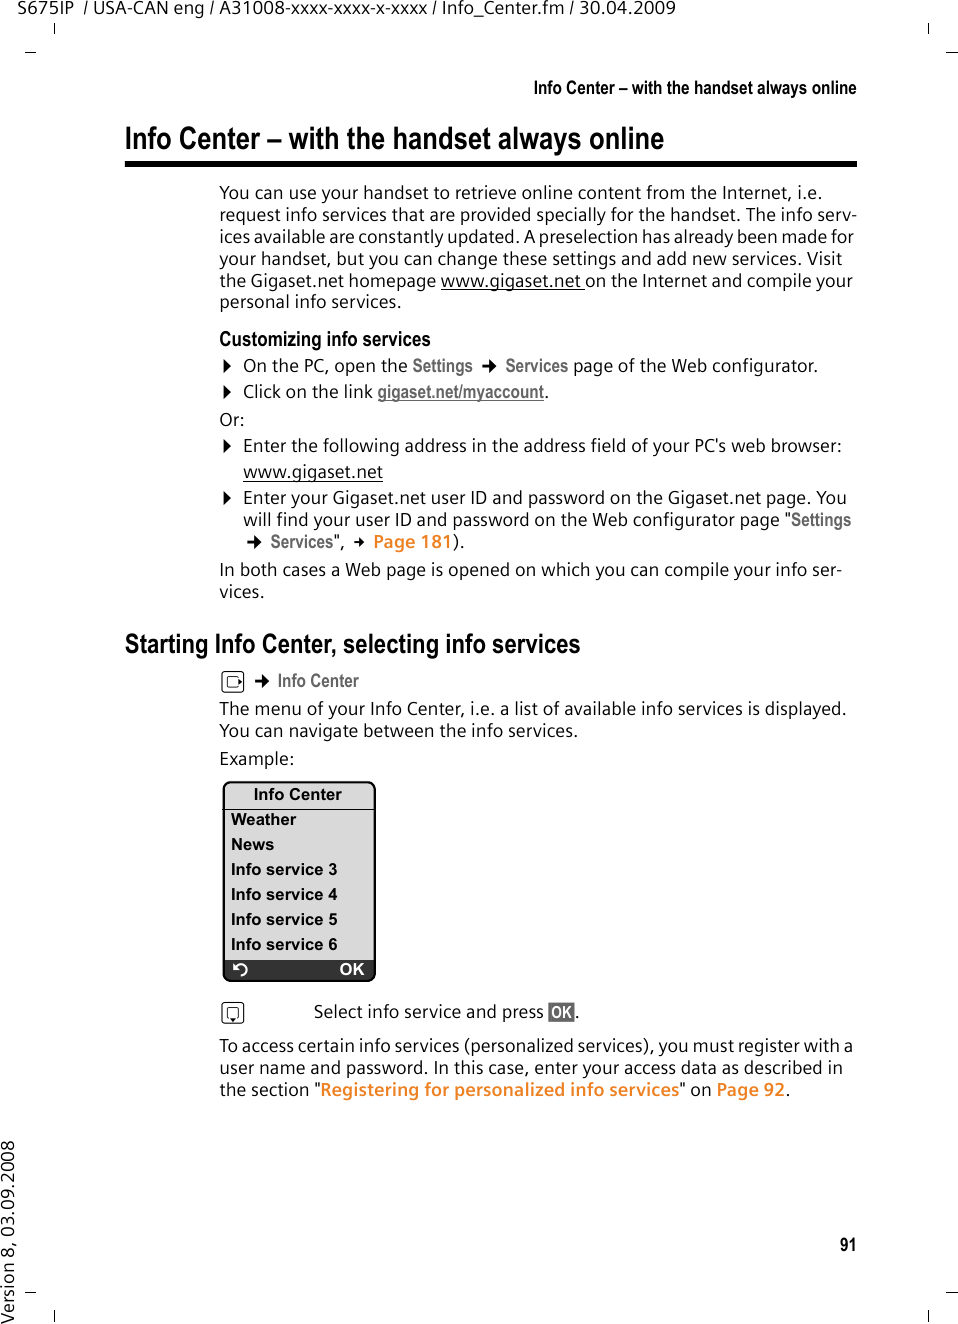
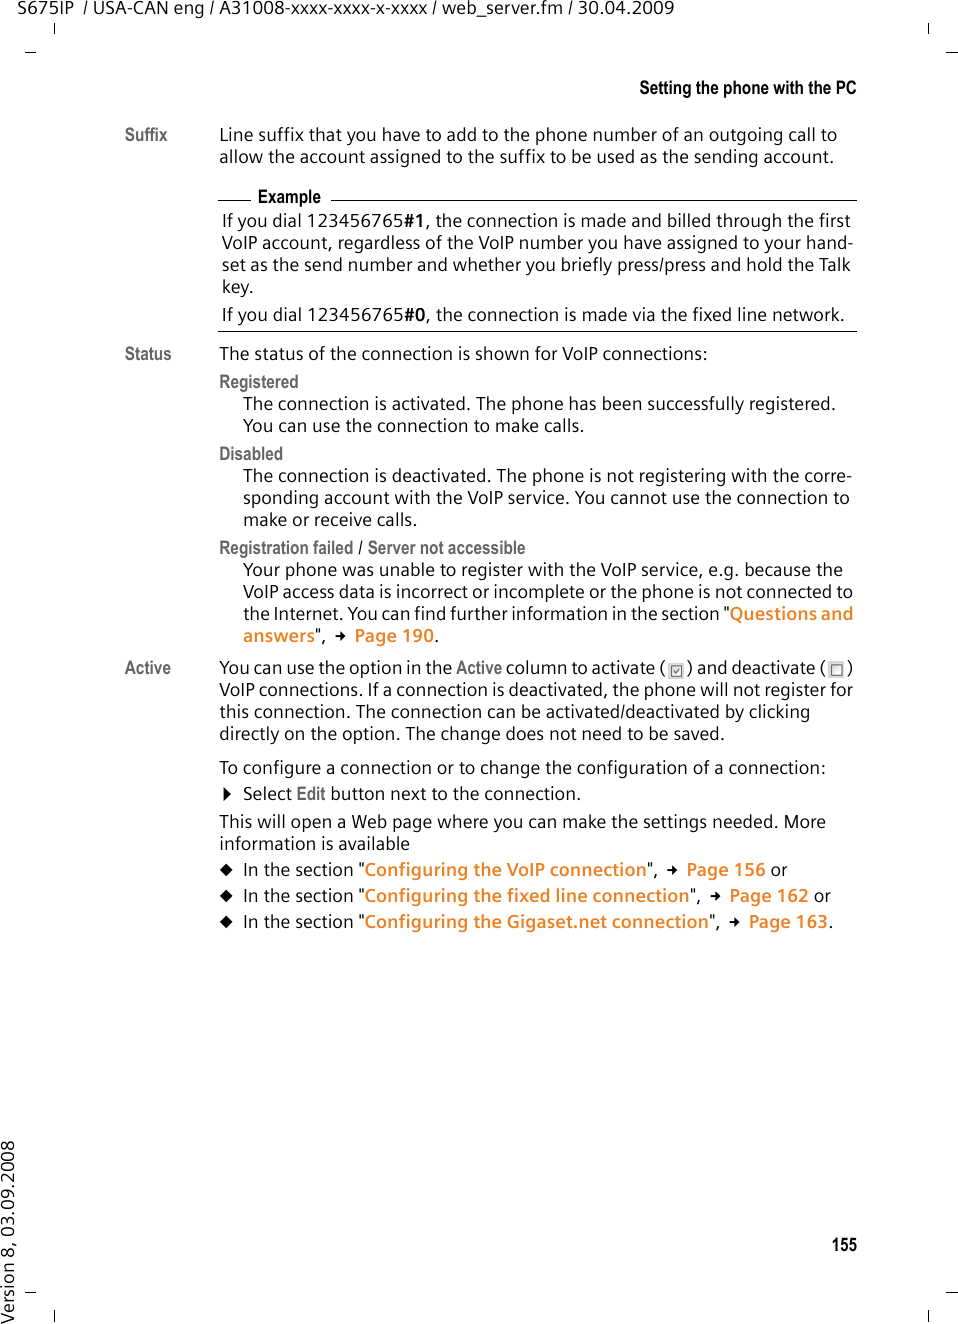
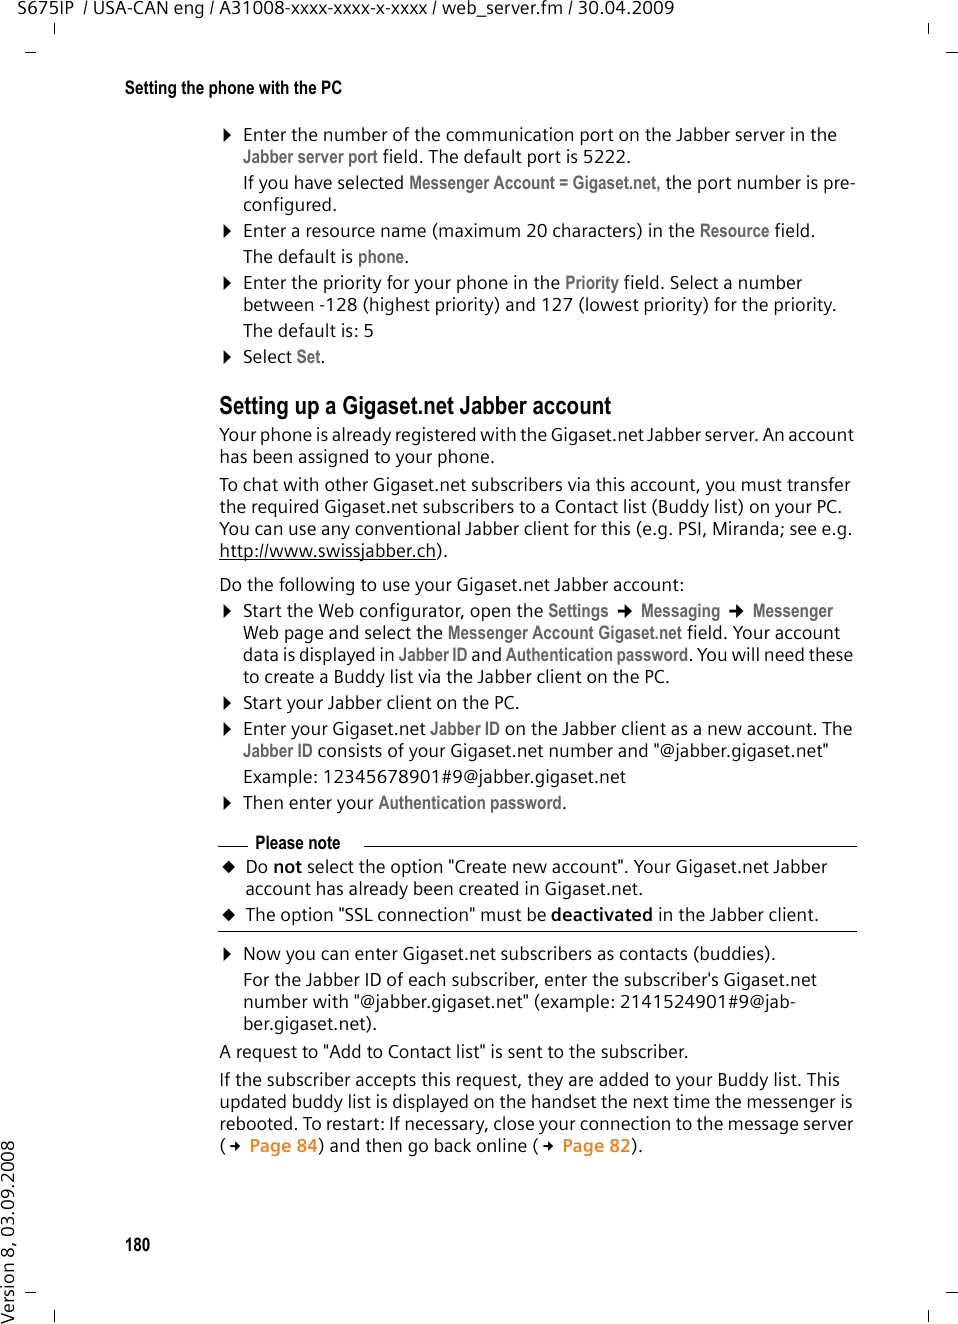
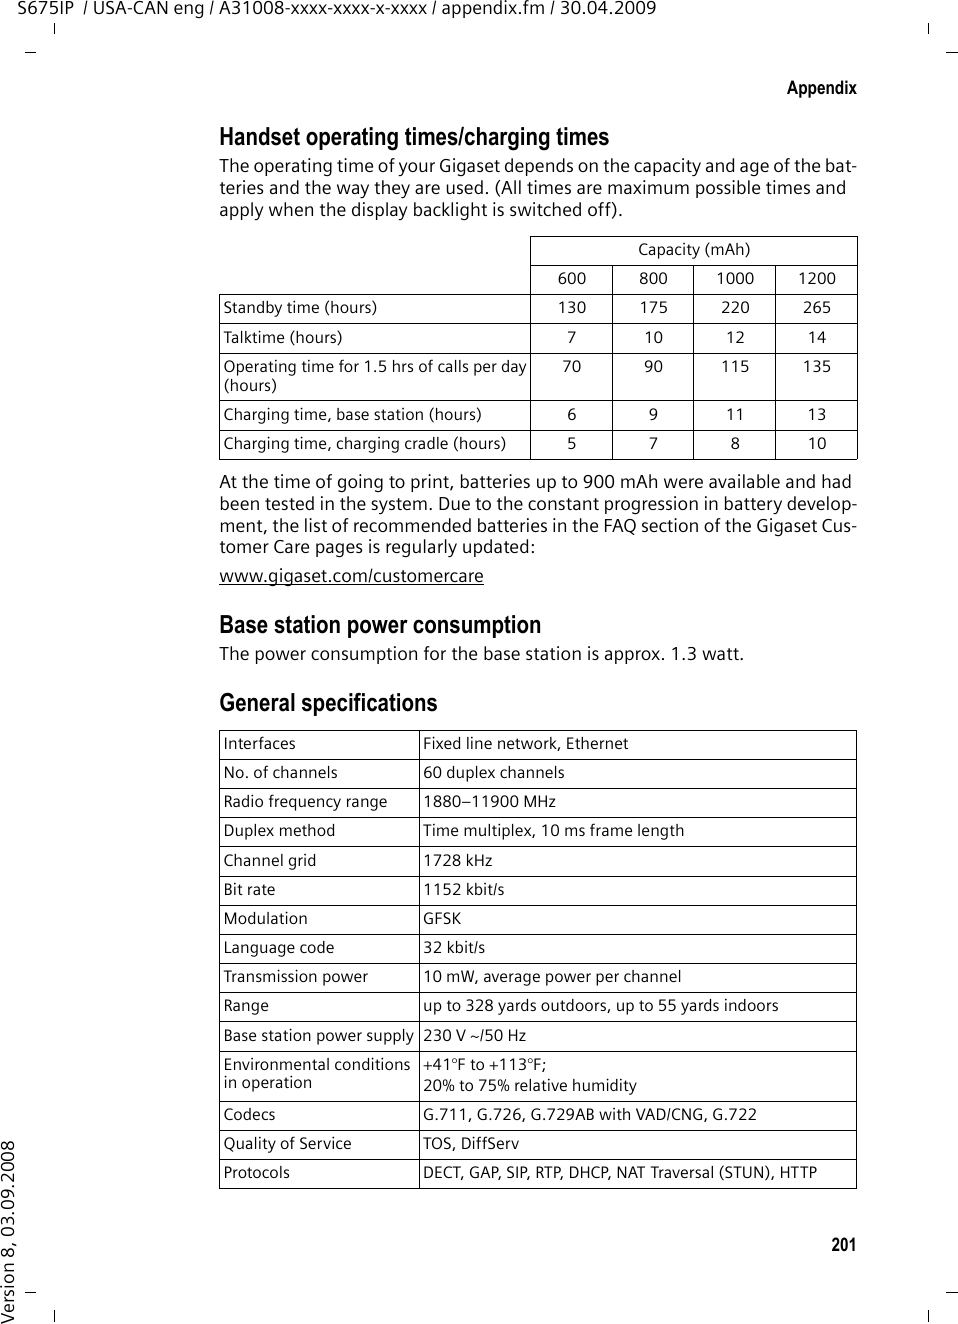
![16First stepsS675IP / USA-CAN eng / A31008-xxxx-xxxx-x-xxxx / starting.fm / 30.04.2009Version 8, 03.09.2008After the first battery charge and discharge, you may place your handset in the charging cradle after every call. Setting the date and timeThe date and time must be set to have the correct time for incoming calls and to use the alarm clock and calendar.If the date and time have not yet been set on the phone, the Display key §Time§ is displayed. Setting up manually:WarninguAlways repeat the charging and discharging procedure if you remove the batteries from the handset and reinsert them.uThe batteries may warm up during charging. This is not dangerous.uAfter a while, the charge capacity of the batteries will decrease for technical reasons.Please noteThe address of a time server on the Internet is stored on your telephone. The date and time are taken from this time server provided that the base station is connected to the Internet and synchronization with the time server is acti-vated (£Page 187). Manual settings are overwritten in this case. ¤Press the key below §Time§ (right Display key) on the display screen. You will see the following display screen for multiple line input. Each active line is marked with [...].¤Overwrite the date currently displayed: enter the month, day and year (8 digits) via the keypad, e.g. Q22 2 Q Q Ofor 1/ 22 /2009.?TimeDate/TimeDate:[02/ 01/ 2007]Time:00:00 amTime Mode:12 h ÝSave](https://usermanual.wiki/Gigaset-Communications/S67H/User-Guide-1113145-Page-16.png)
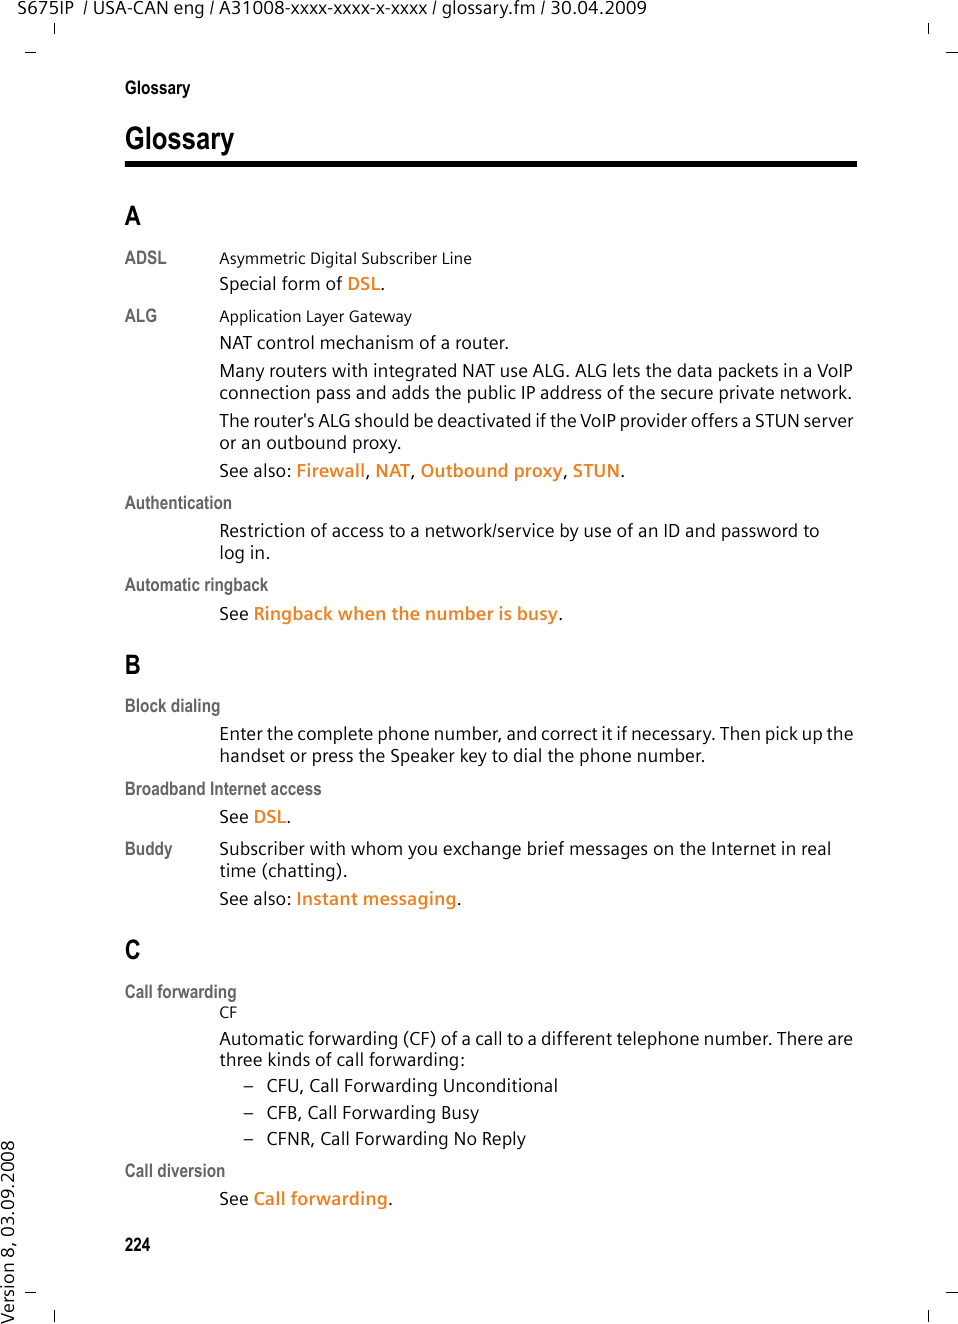
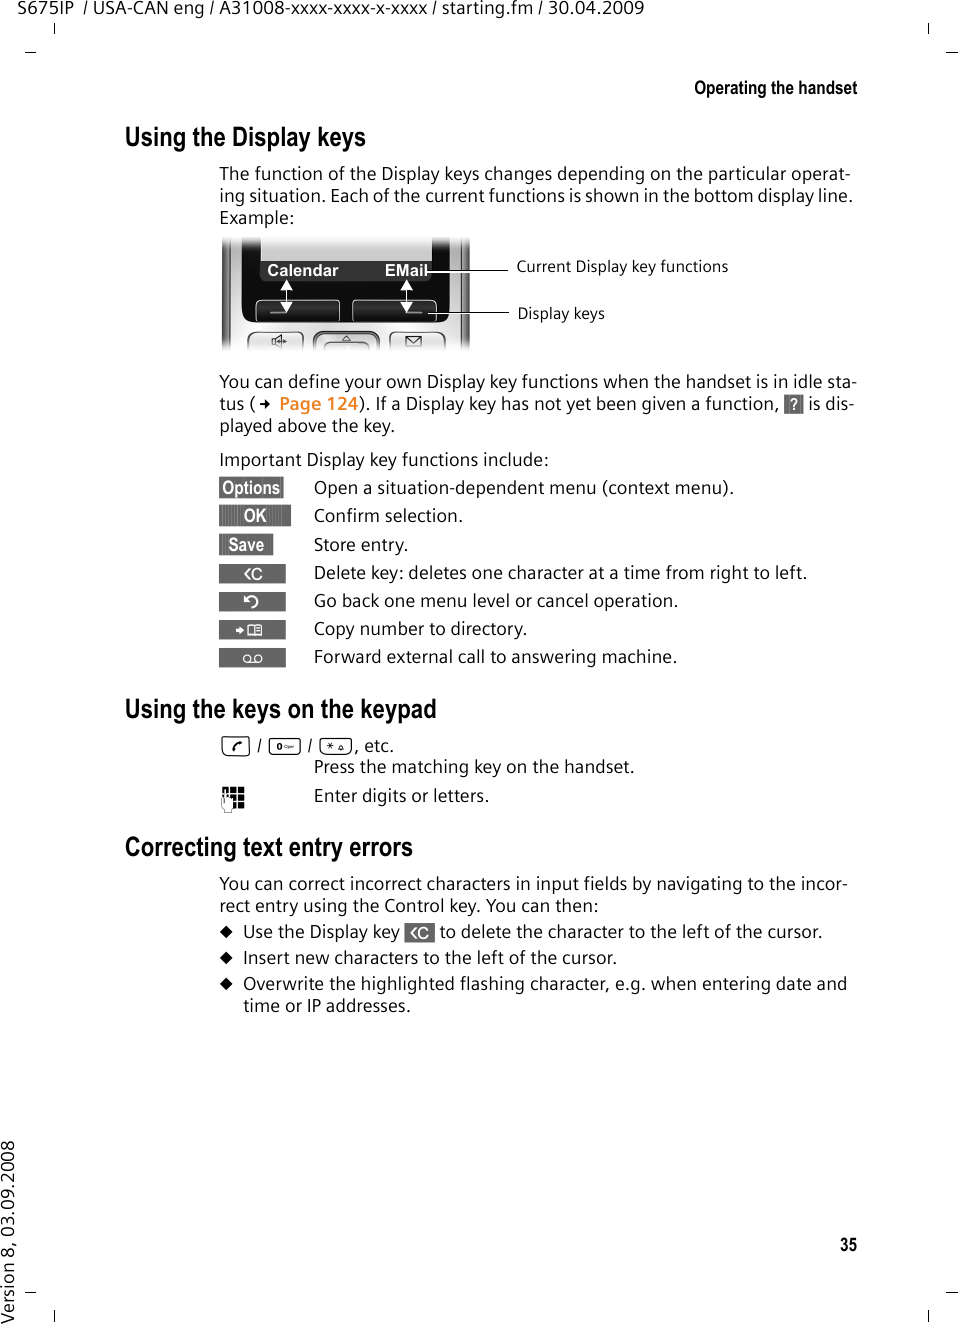
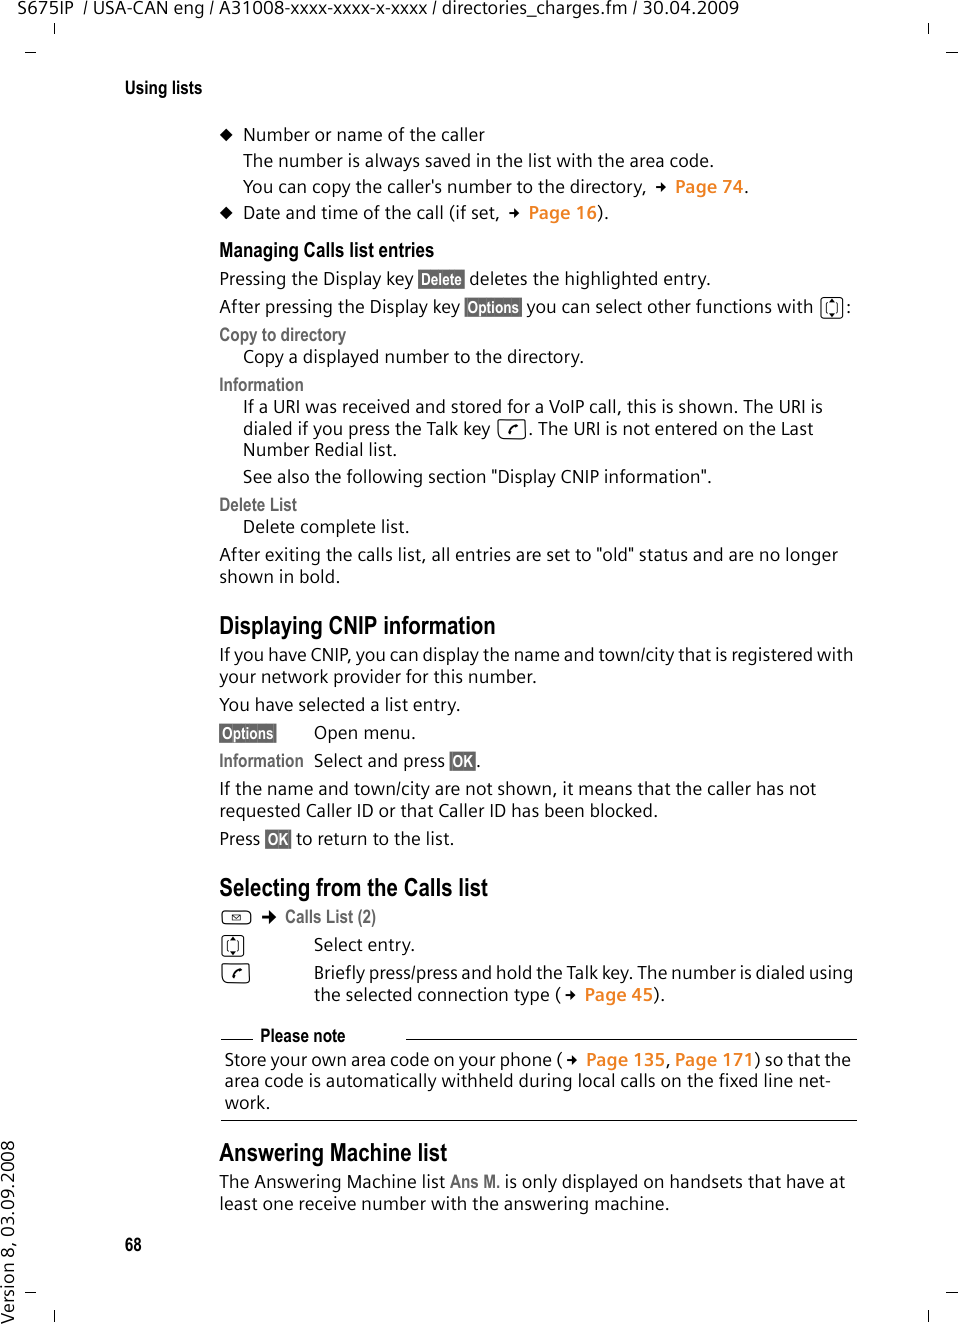
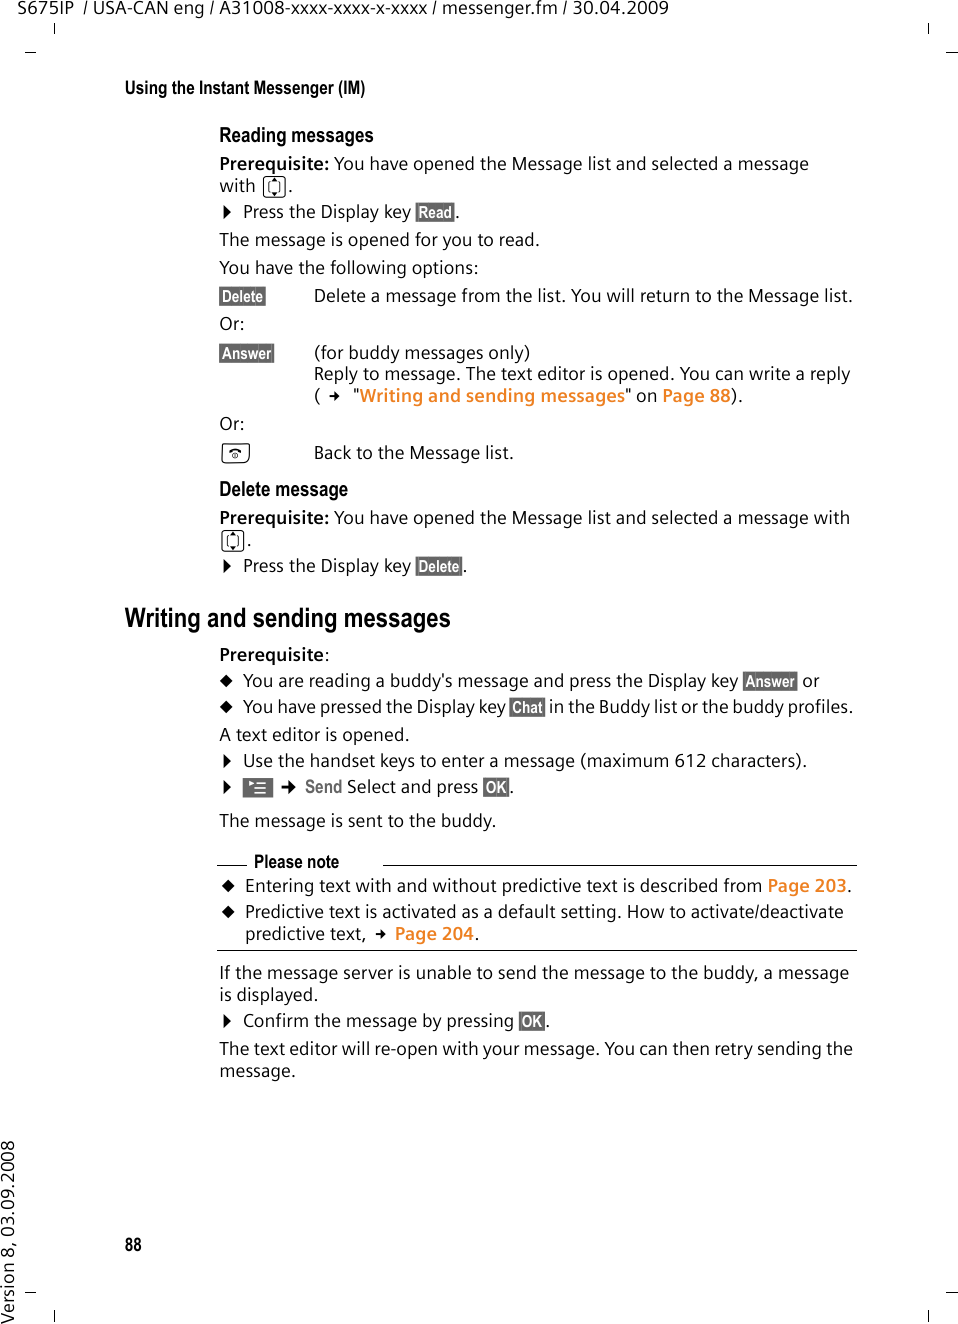
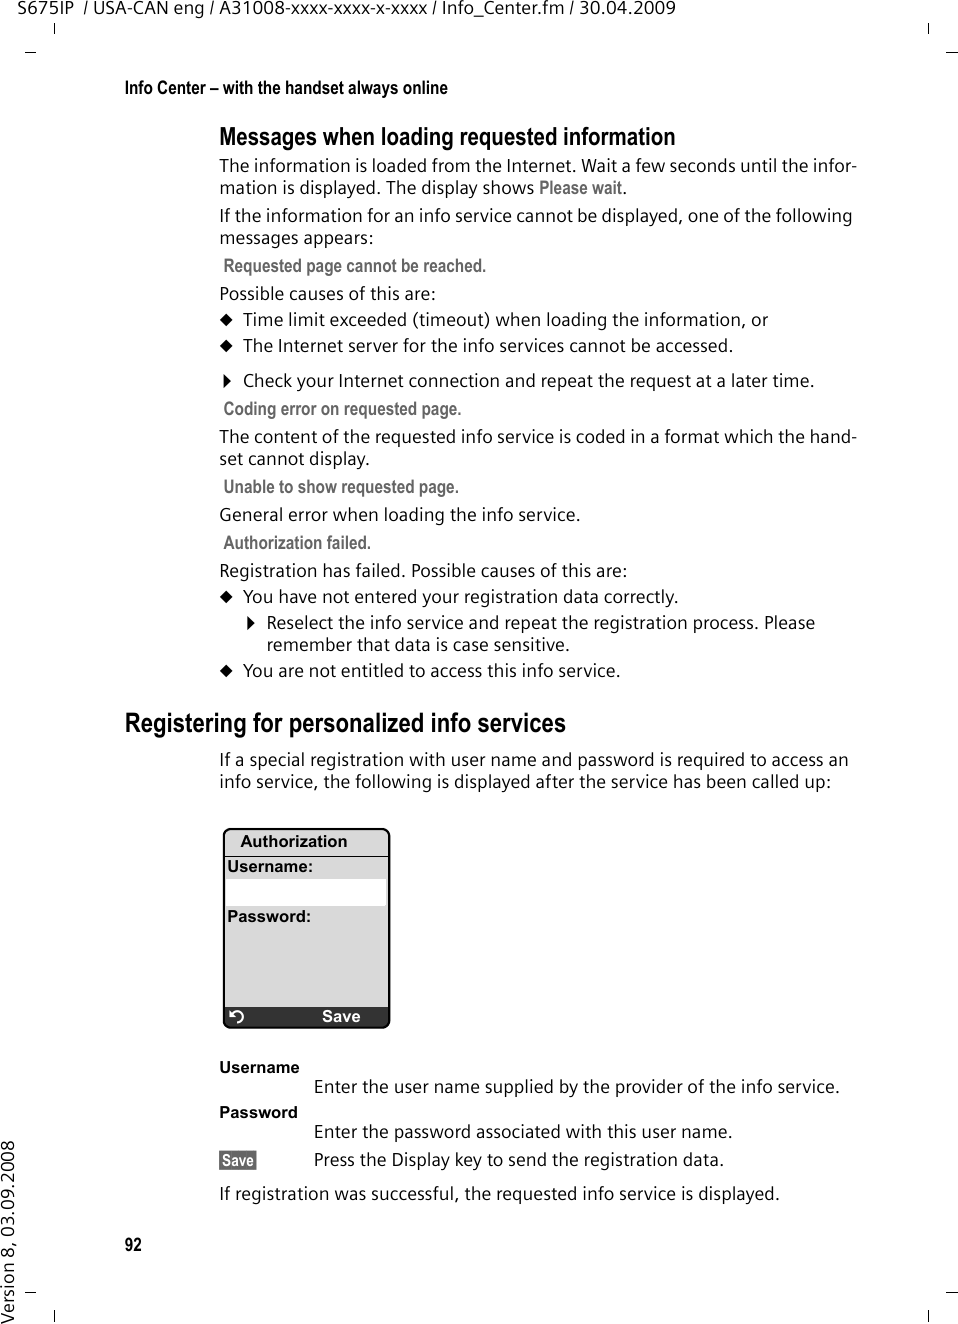
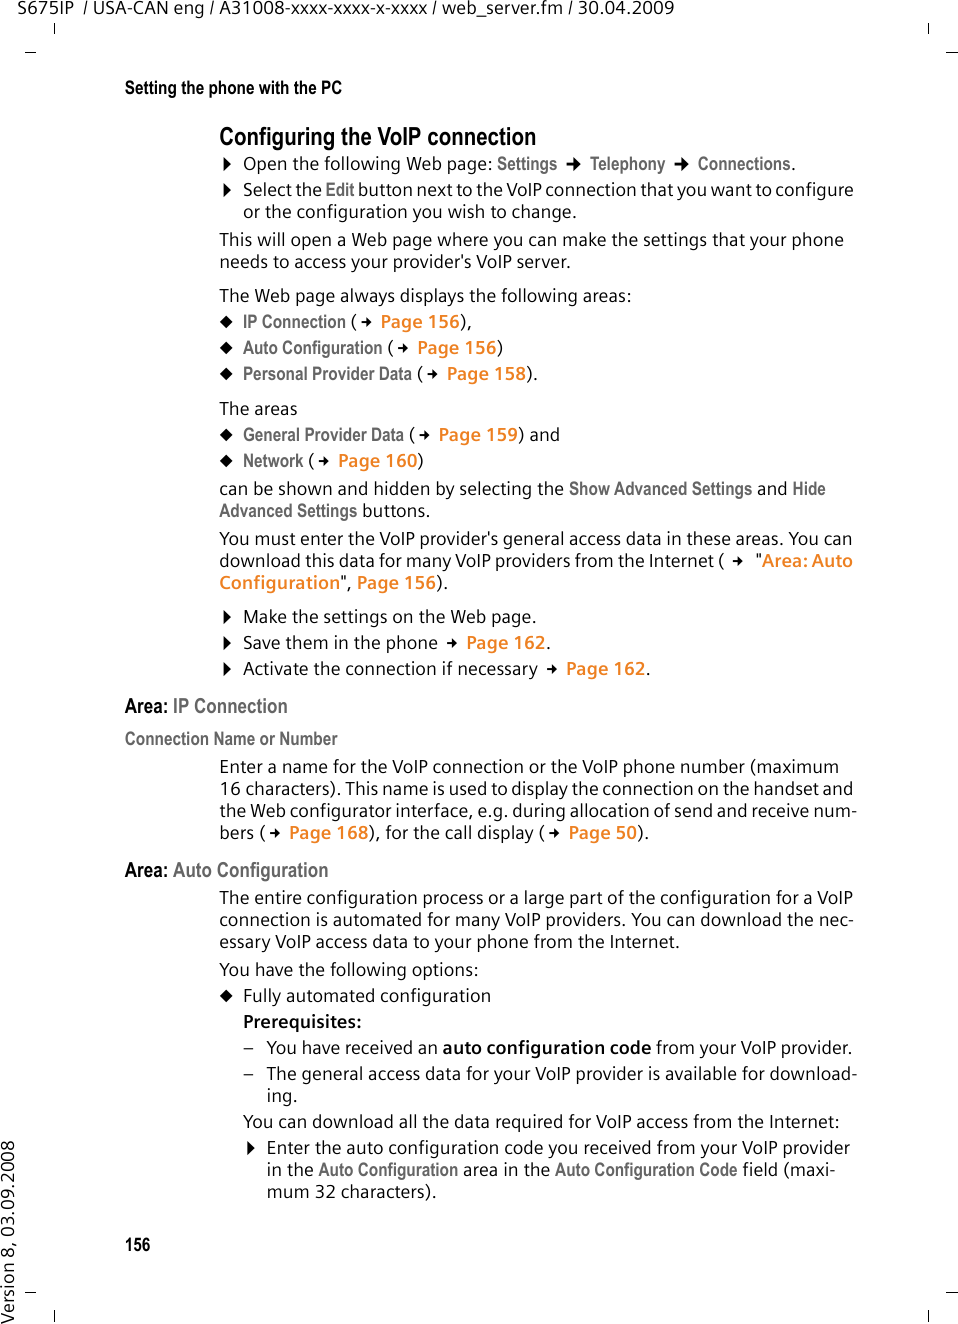
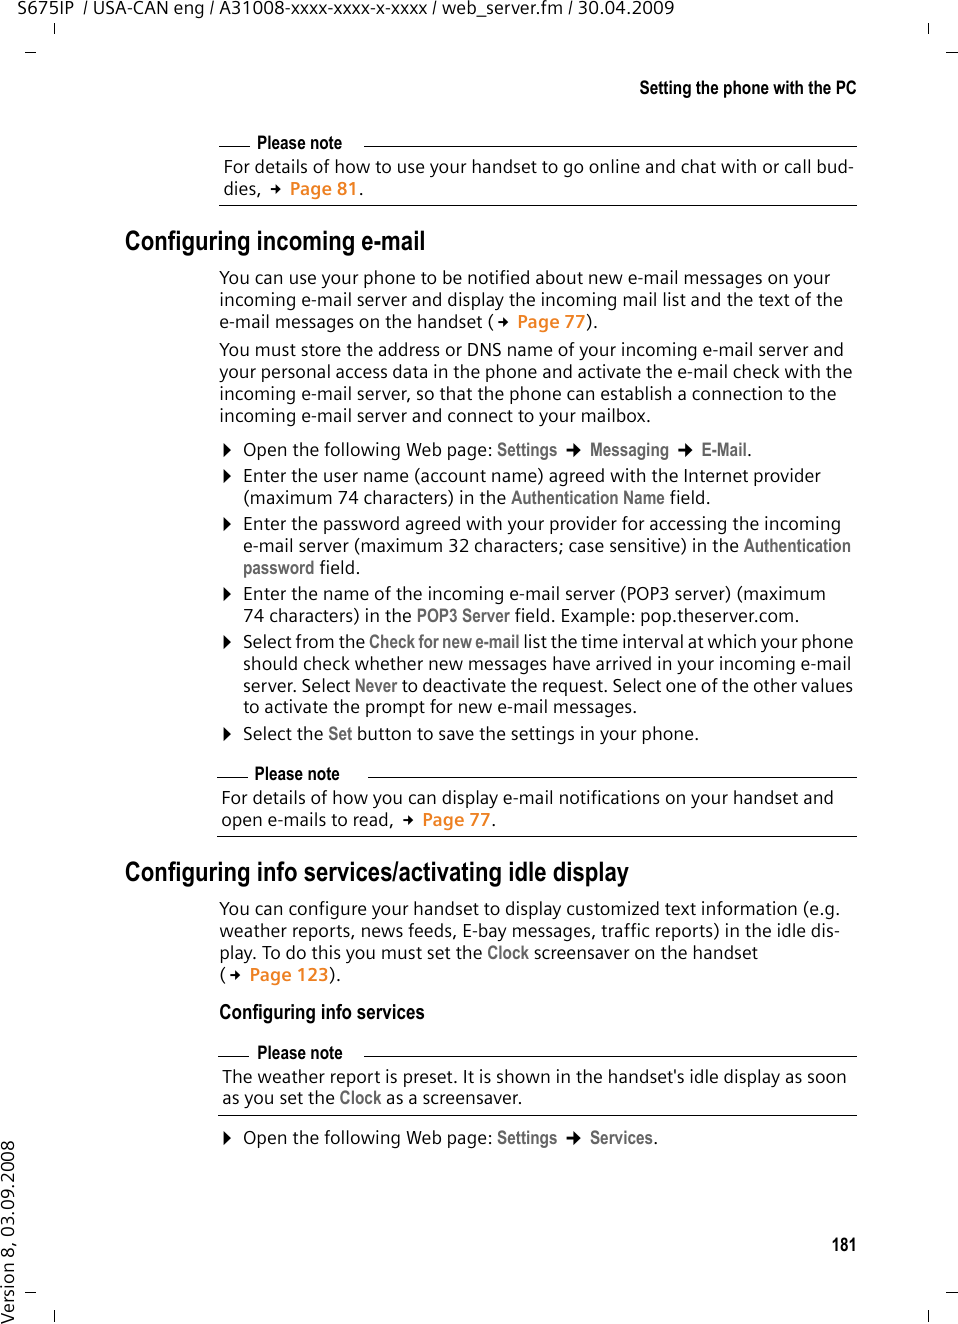
![17First stepsS675IP / USA-CAN eng / A31008-xxxx-xxxx-x-xxxx / starting.fm / 30.04.2009Version 8, 03.09.2008¤Press the bottom of the Control key s to switch to the line for entering the time.¤Overwrite the time currently displayed: enter hours and minutes (4 digits) via the keypad, e.g. Q M 5for 7:15.If necessary, use the Control key to swap between fields.¤If necessary, press the left Display key §am/pm§ to switch between am and pm.¤Press the bottom of the Control key s to switch to the next line for setting the time mode.¤Press the Control key r once on the left or right to switch from 12 h mode to 24 h mode.Date/TimeDate:02/ 01/ 2007Time:[ 00:00 ] amTime Mode:12 h am/pm Save07:15 pmTime Mode:f12 h gam/pm Save](https://usermanual.wiki/Gigaset-Communications/S67H/User-Guide-1113145-Page-17.png)
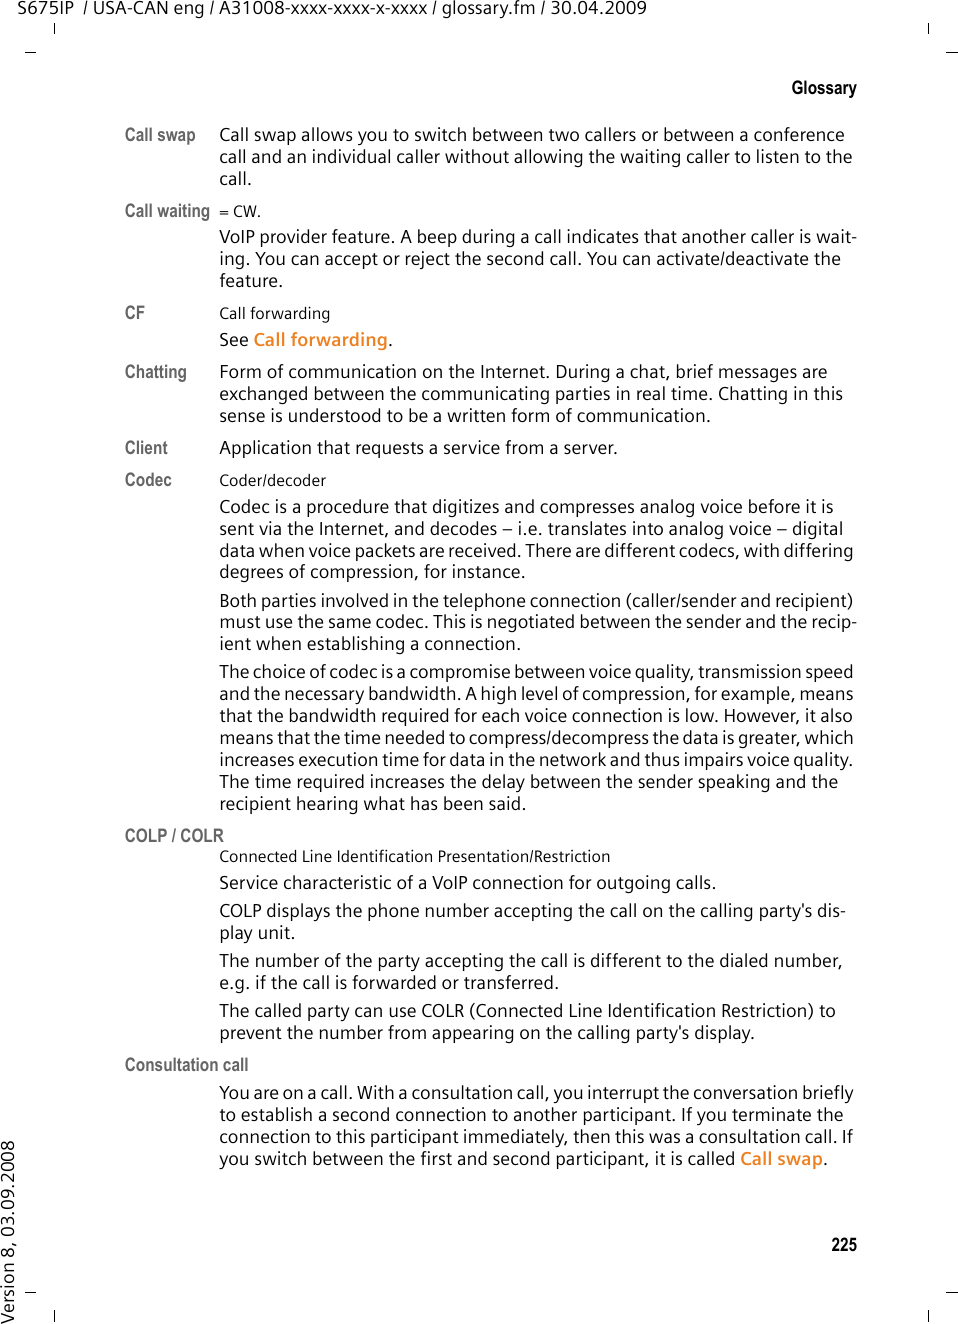
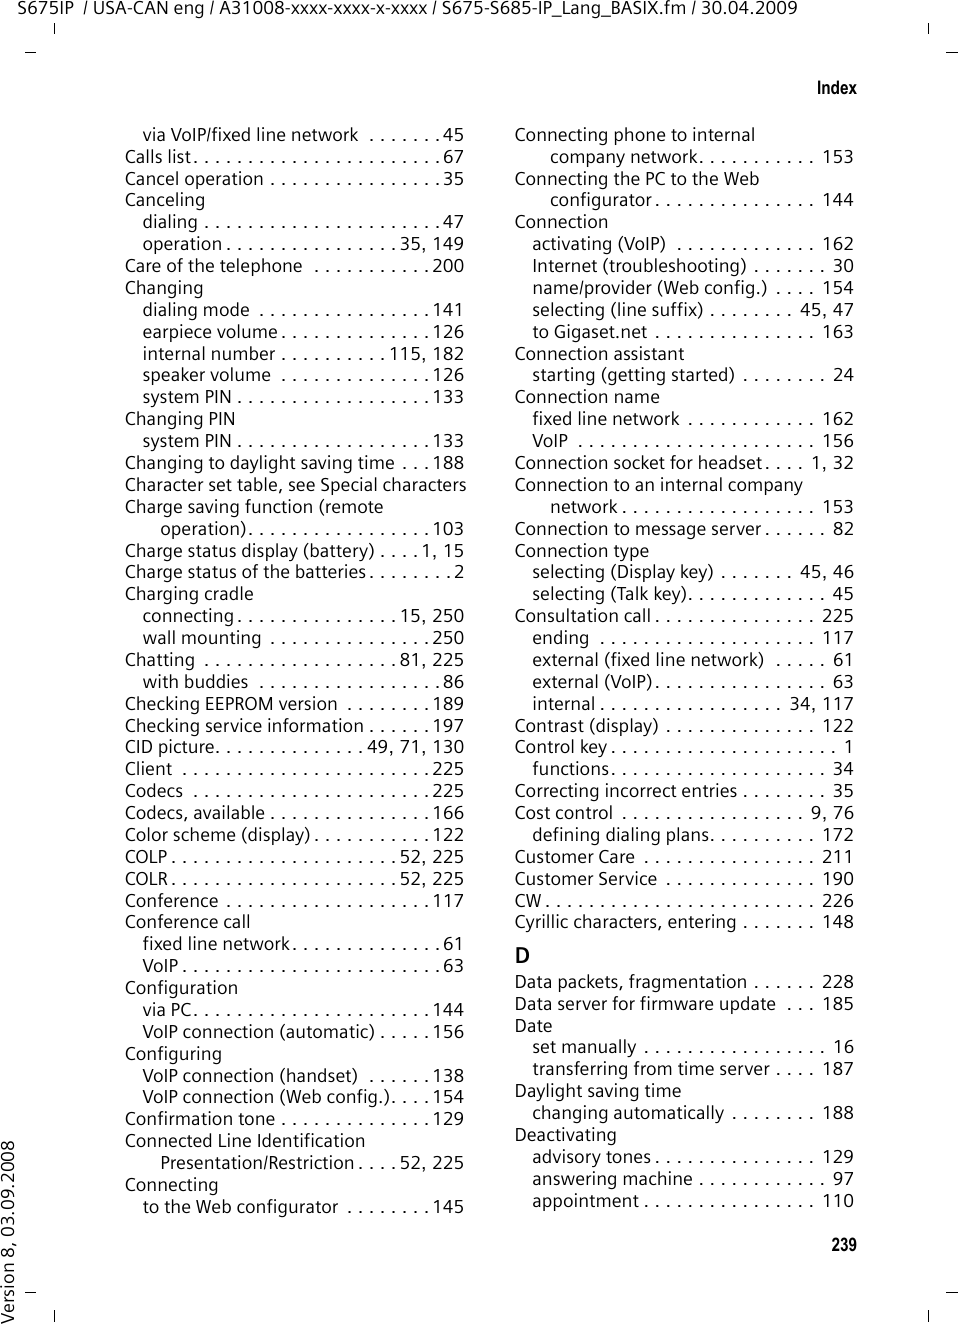
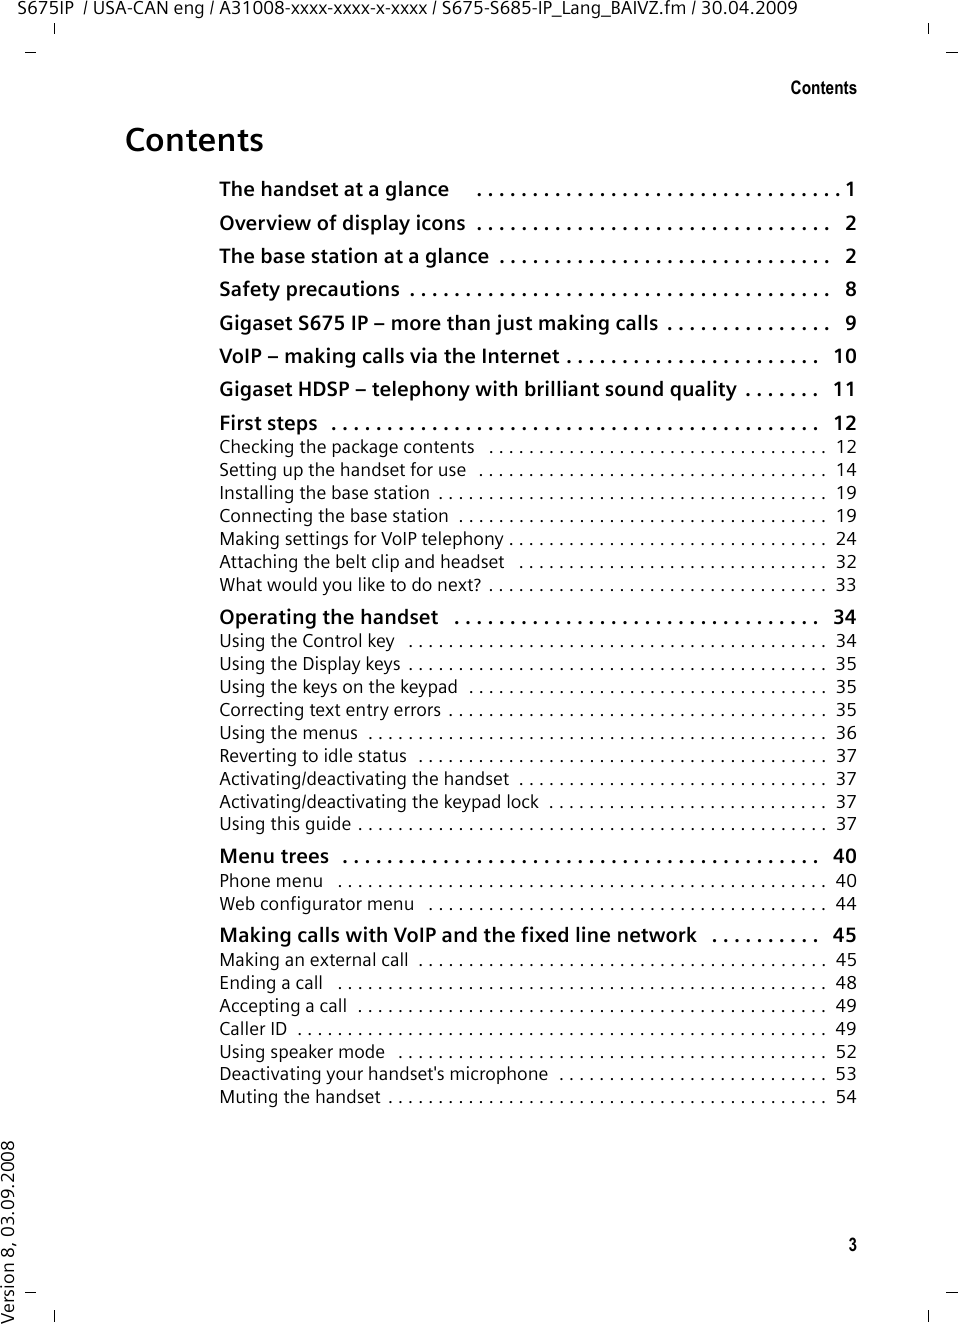
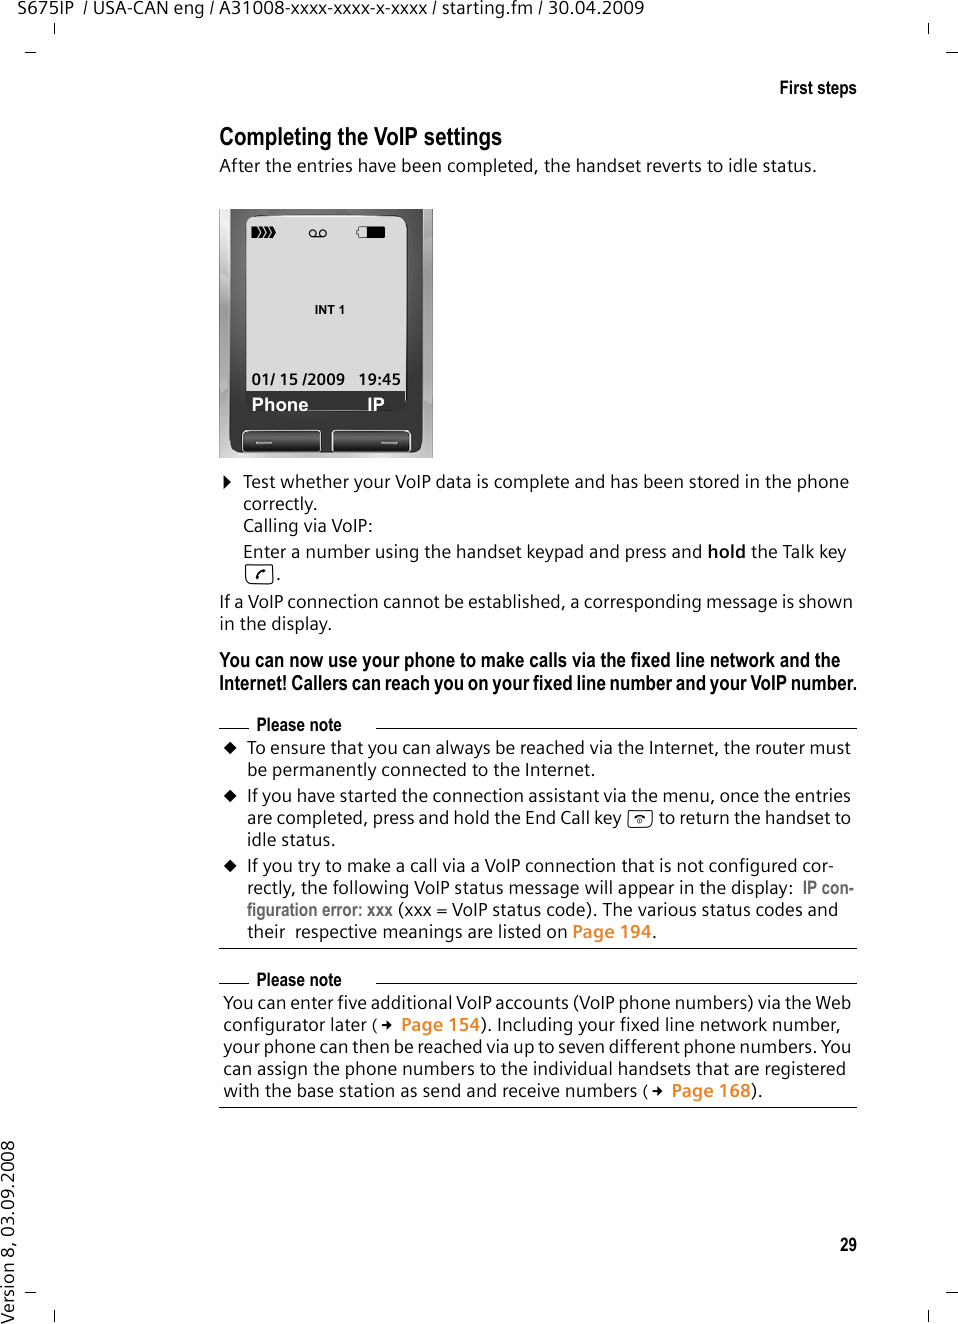
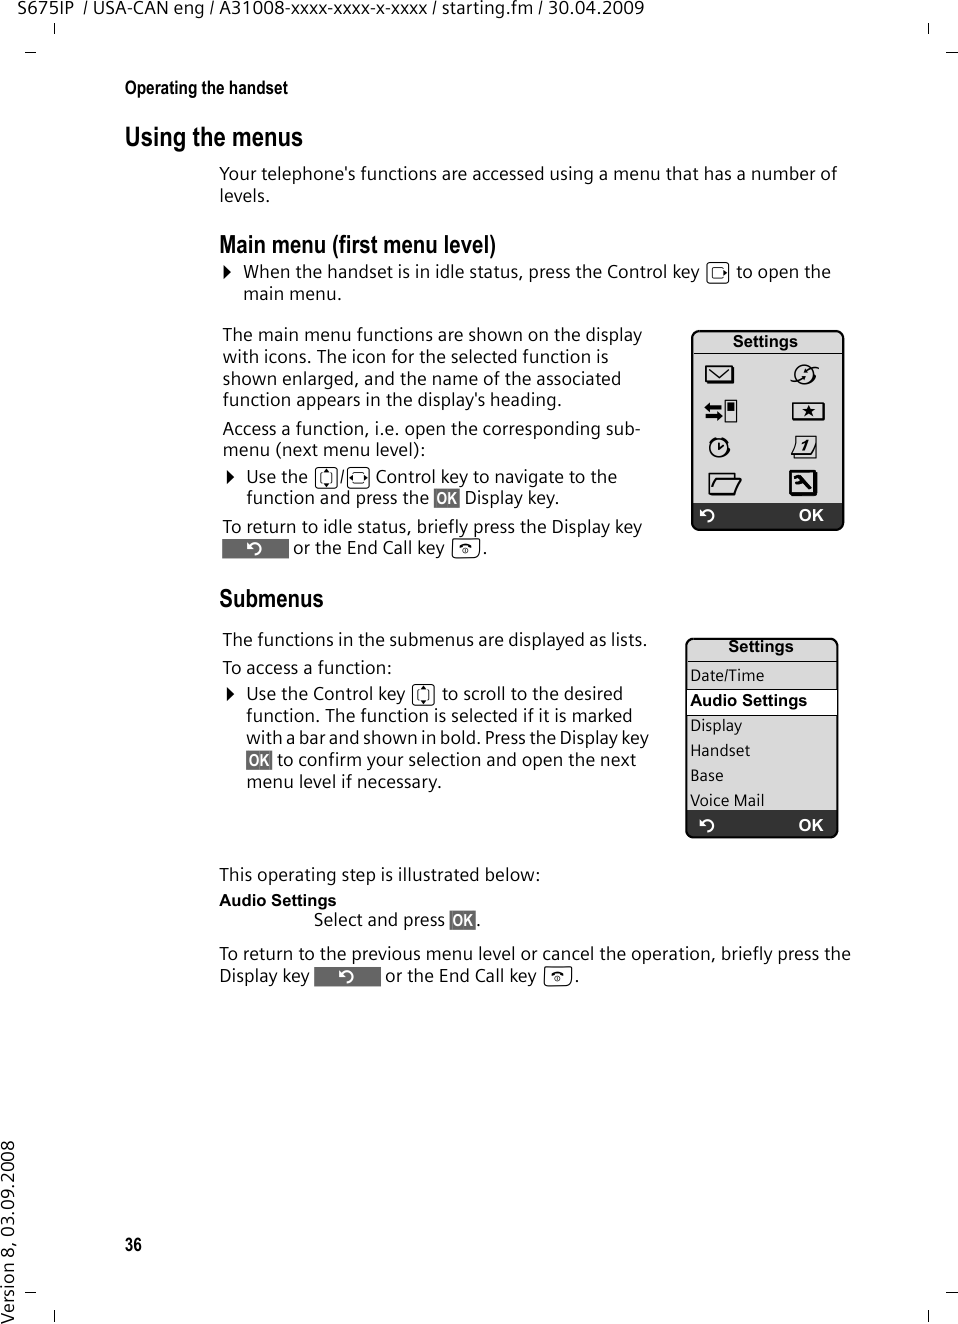
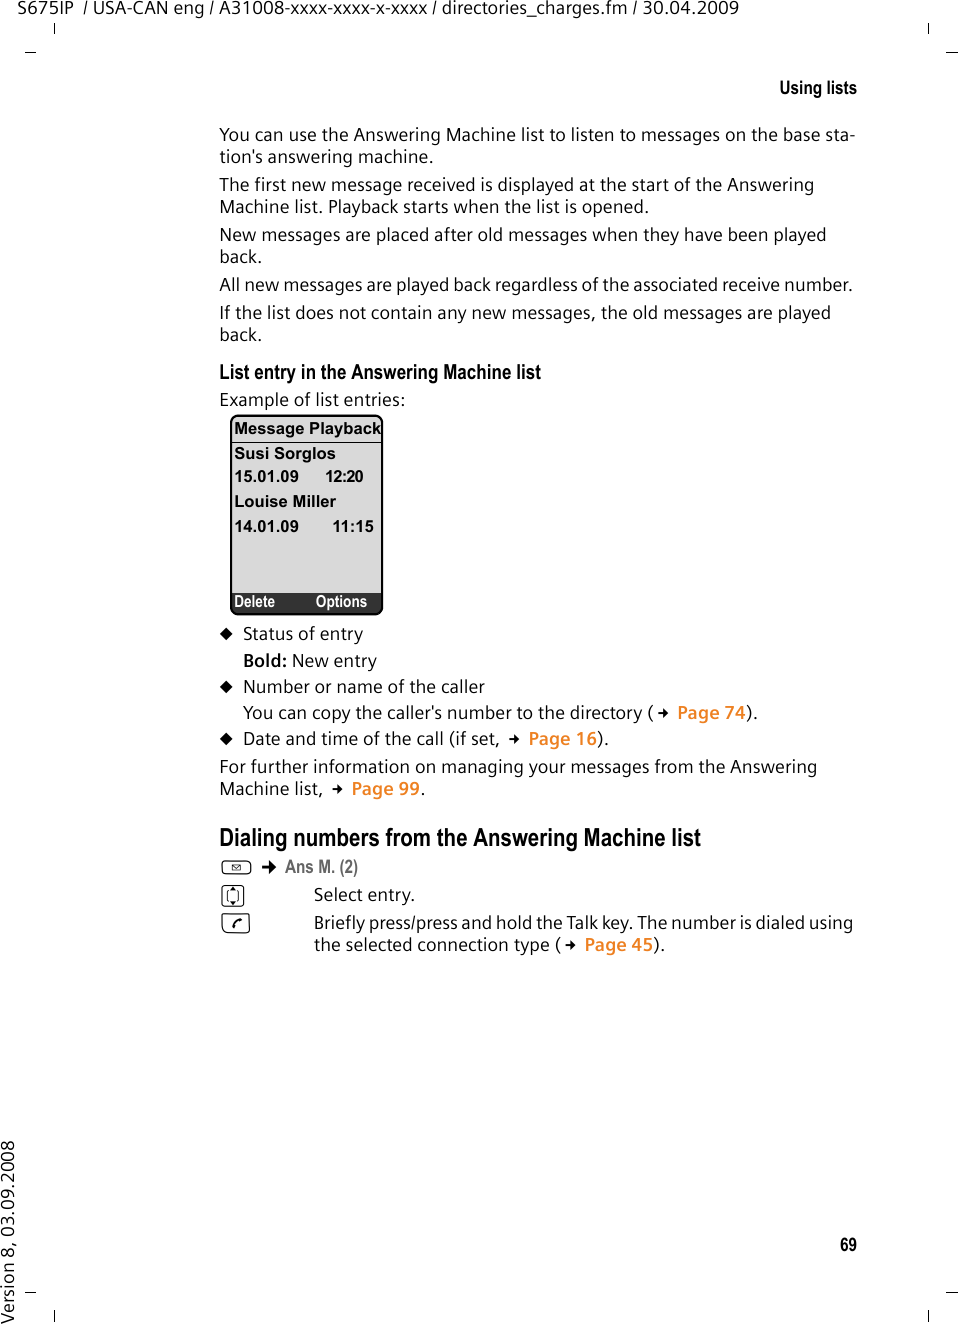
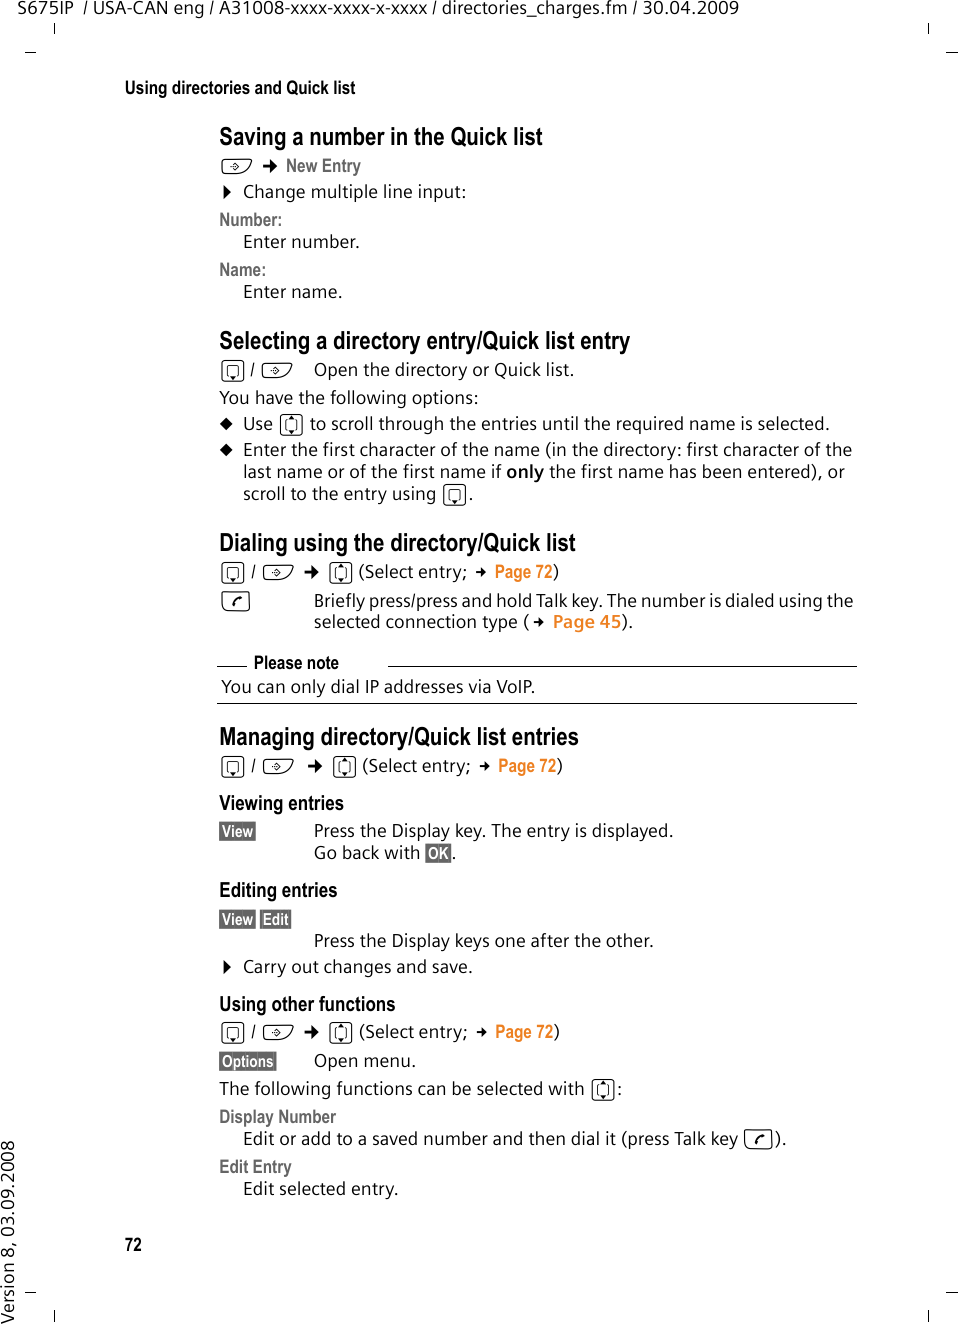
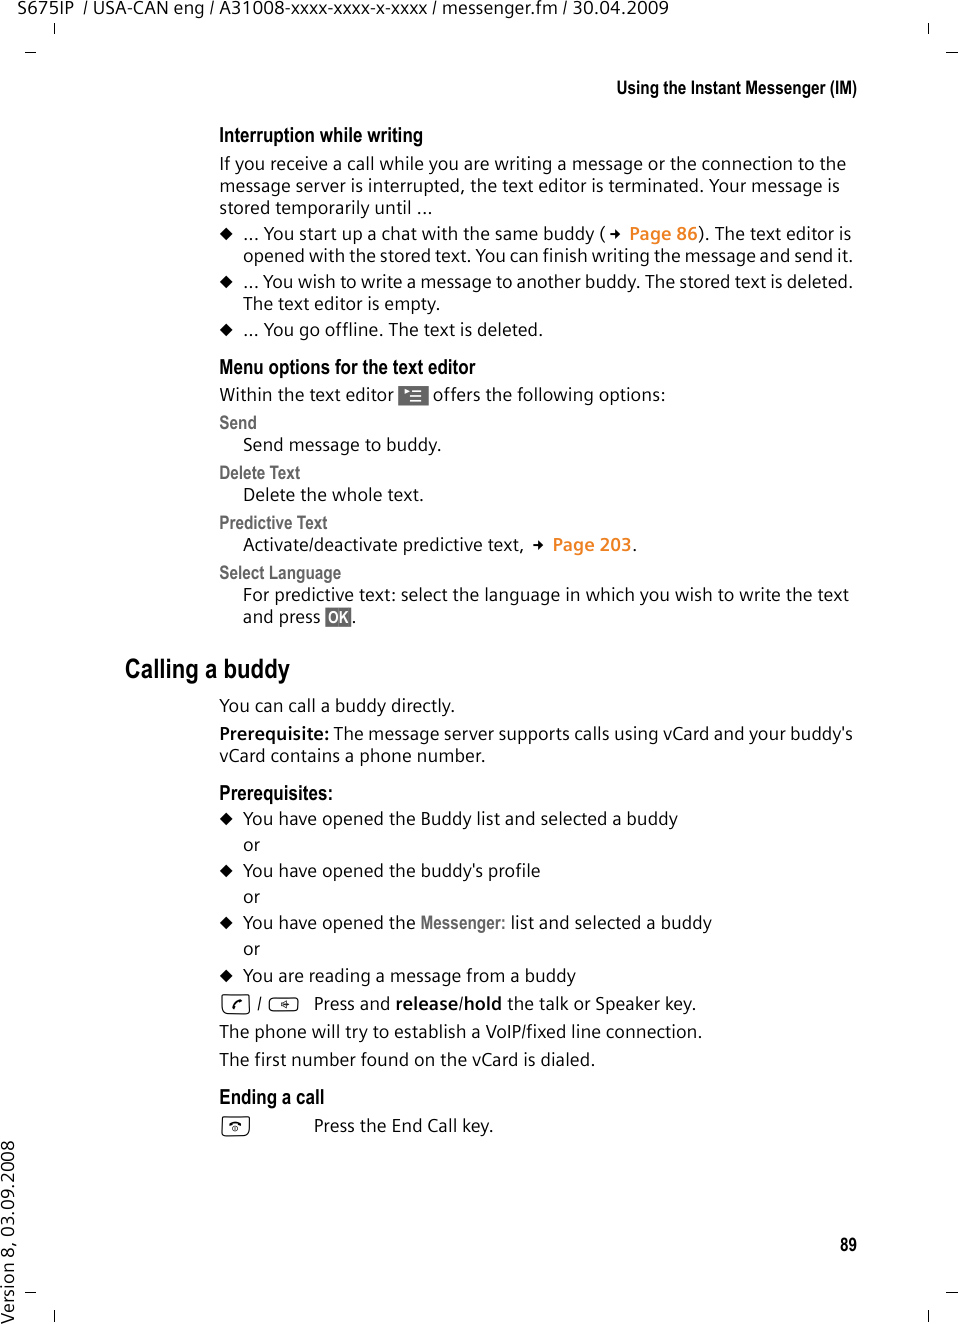
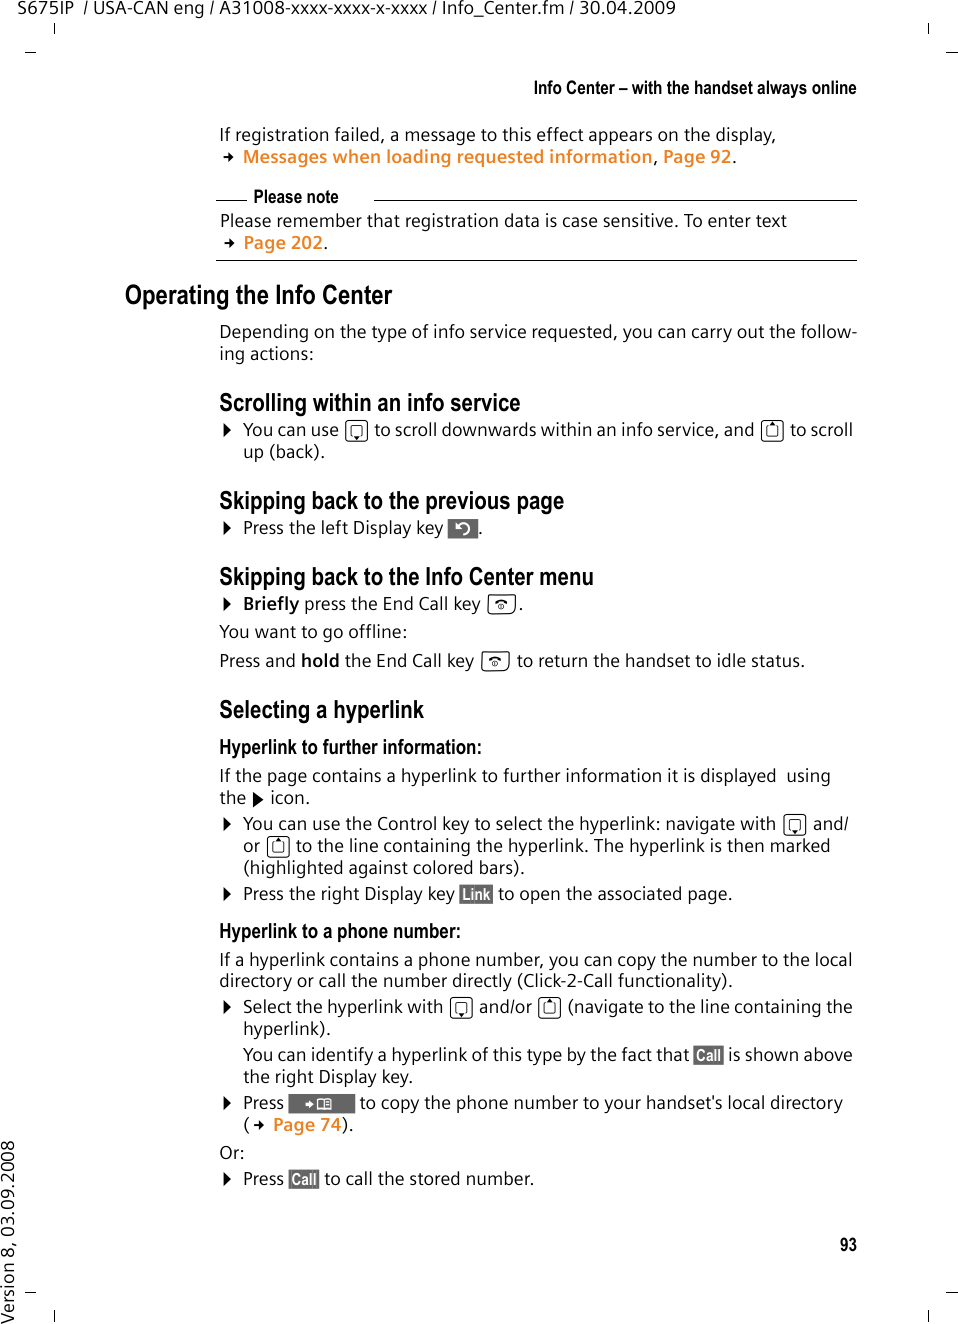
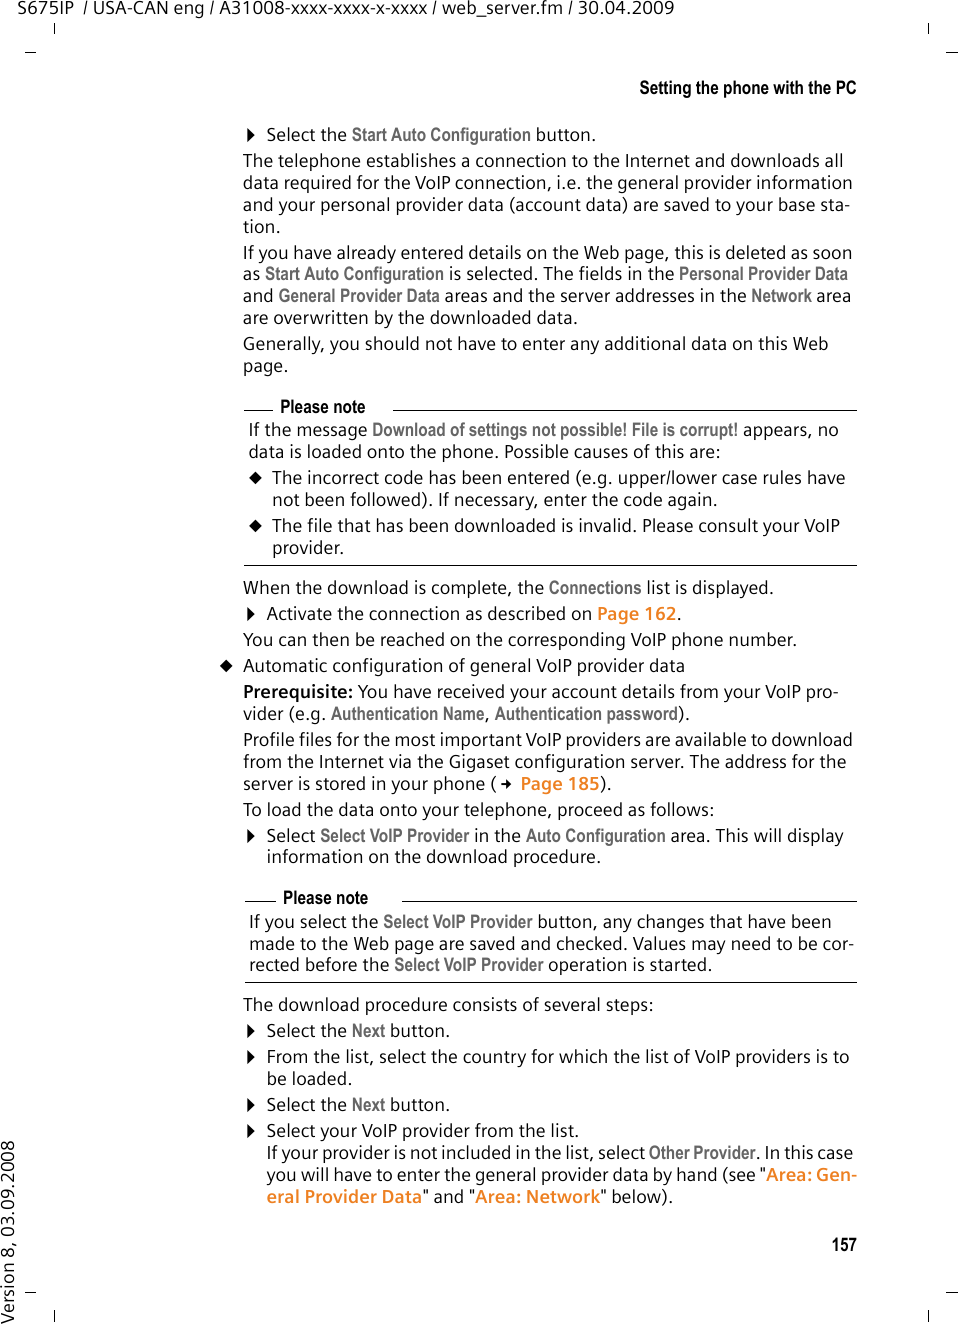
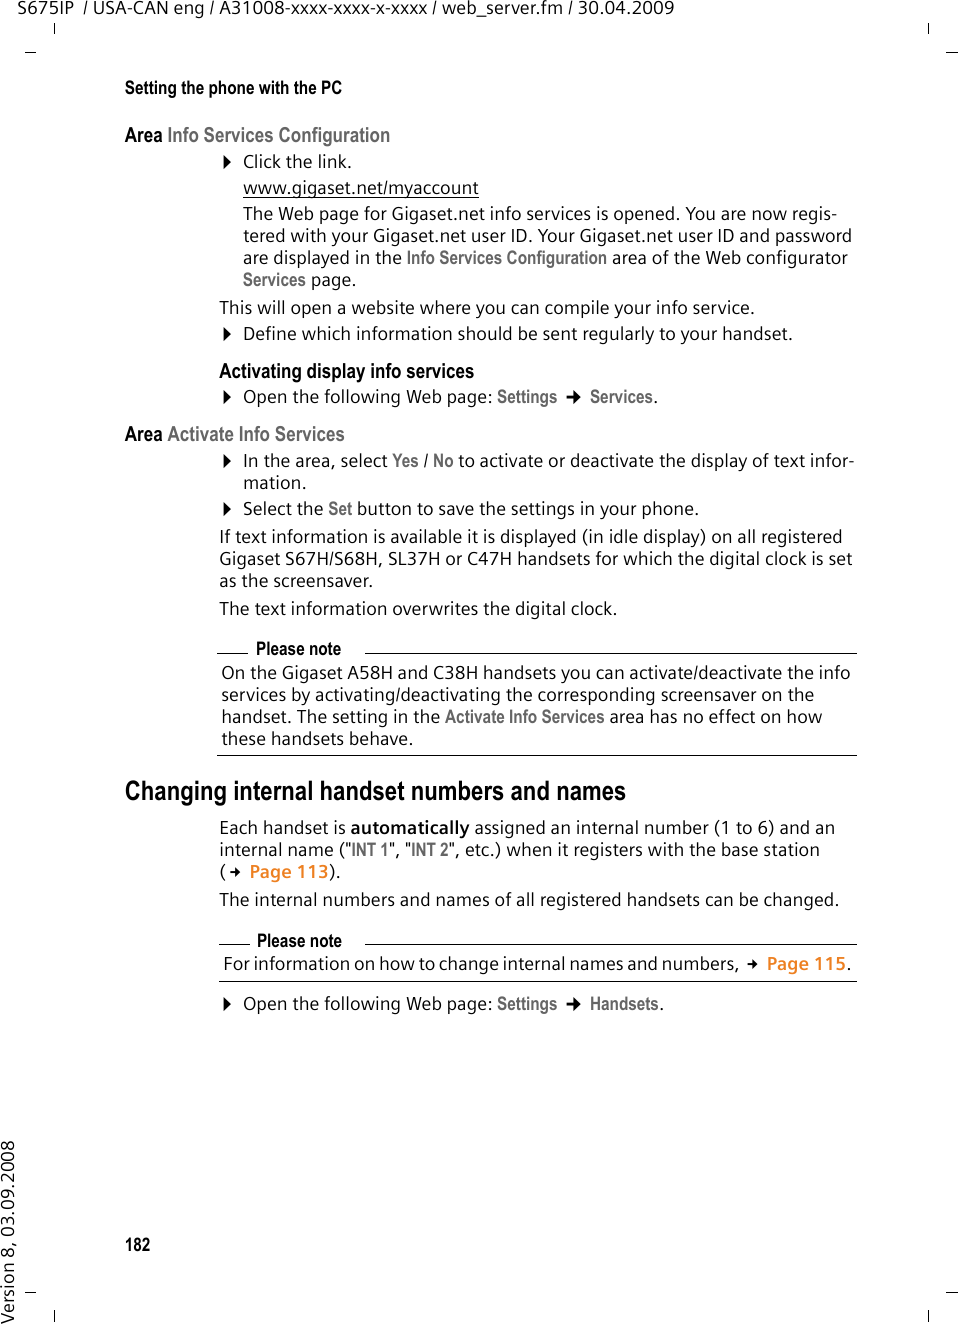
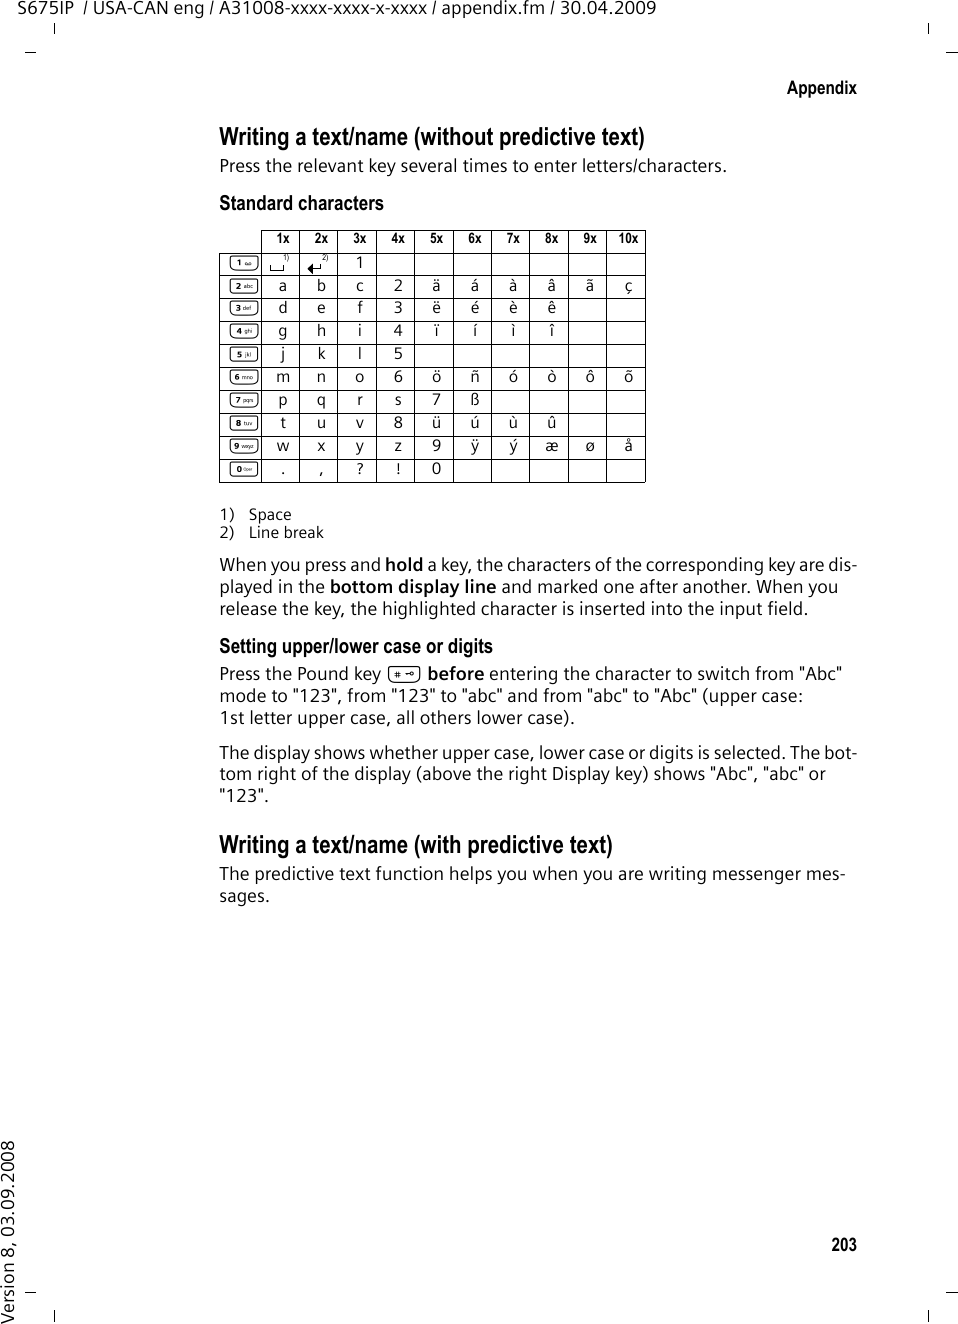
![25First stepsS675IP / USA-CAN eng / A31008-xxxx-xxxx-x-xxxx / starting.fm / 30.04.2009Version 8, 03.09.2008You will see the following display. ¤Press the key below §Yes§ on the display screen. You are prompted to enter your phone's sys-tem PIN.Connection Assist.Start wizard for entry of VoIP connection data? No YesNew firmware available appears in the display.New/improved firmware is available for your phone on the Internet. First per-form an automatic update of the firmware (£Page 136). Once the update has been completed (after approx. 3 minutes) the handset's idle display appears again and the Message key f flashes. If you press f, the display shown in the picture above appears and you can start the connection assistant. Please noteTo protect your phone and its system settings from unauthorized access, please define a 4-digit number code (system PIN) known only to yourself. This code must be entered before you can register/de-register handsets or alter your phone's VoIP or LAN settings.The default system PIN is 0000 (4 x zero). For further information, see Page 132. The active line is marked [----].¤Enter your phone's current system PIN using the keypad. ¤Press the key below §OK§ on the display screen. The connection assistant is launched. System PINPlease enter System PIN:[- - - -]ÝOK](https://usermanual.wiki/Gigaset-Communications/S67H/User-Guide-1113145-Page-25.png)

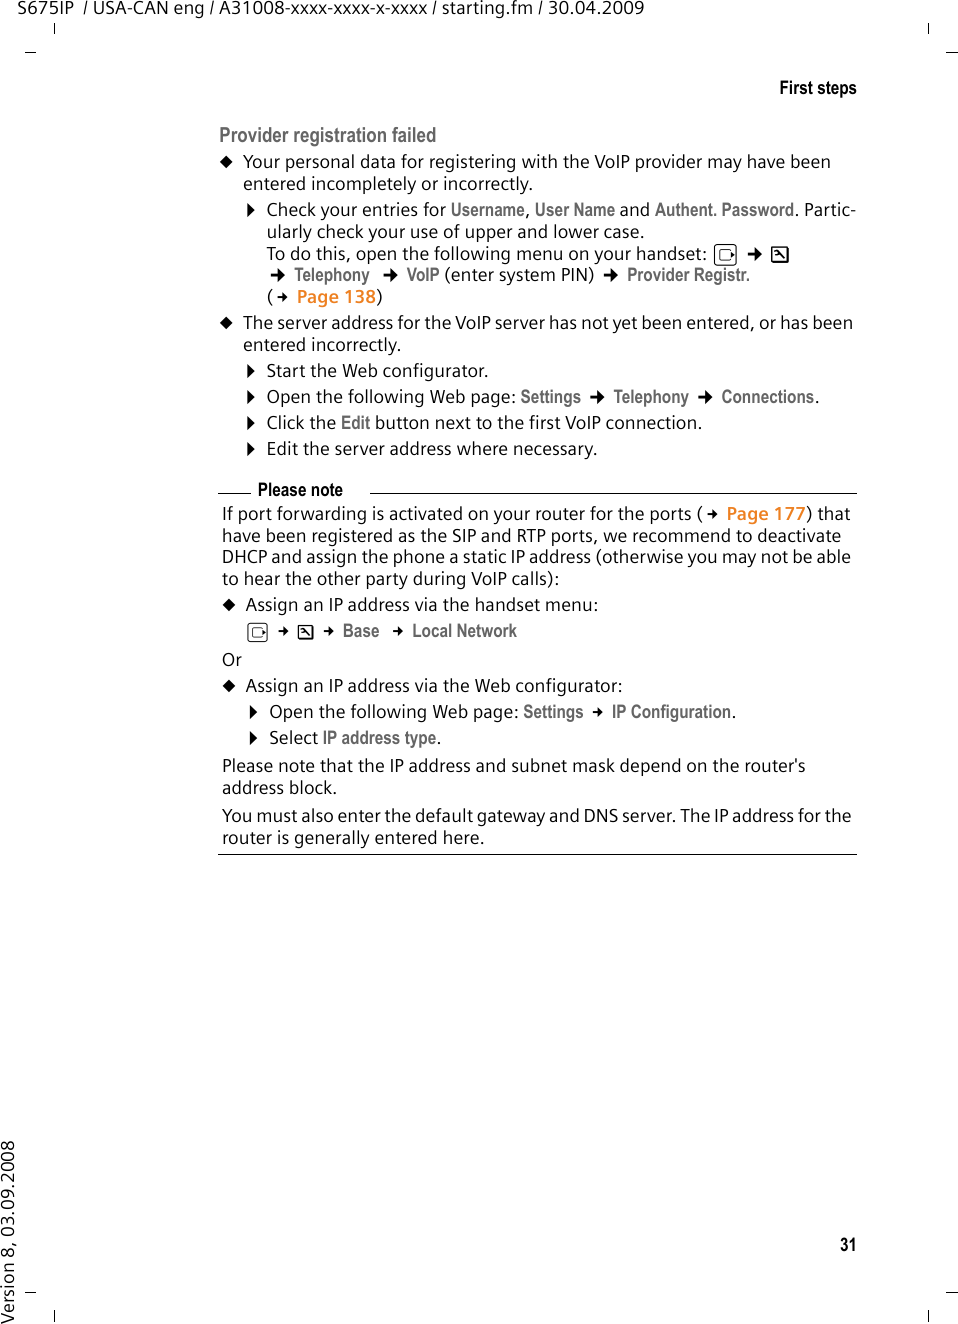

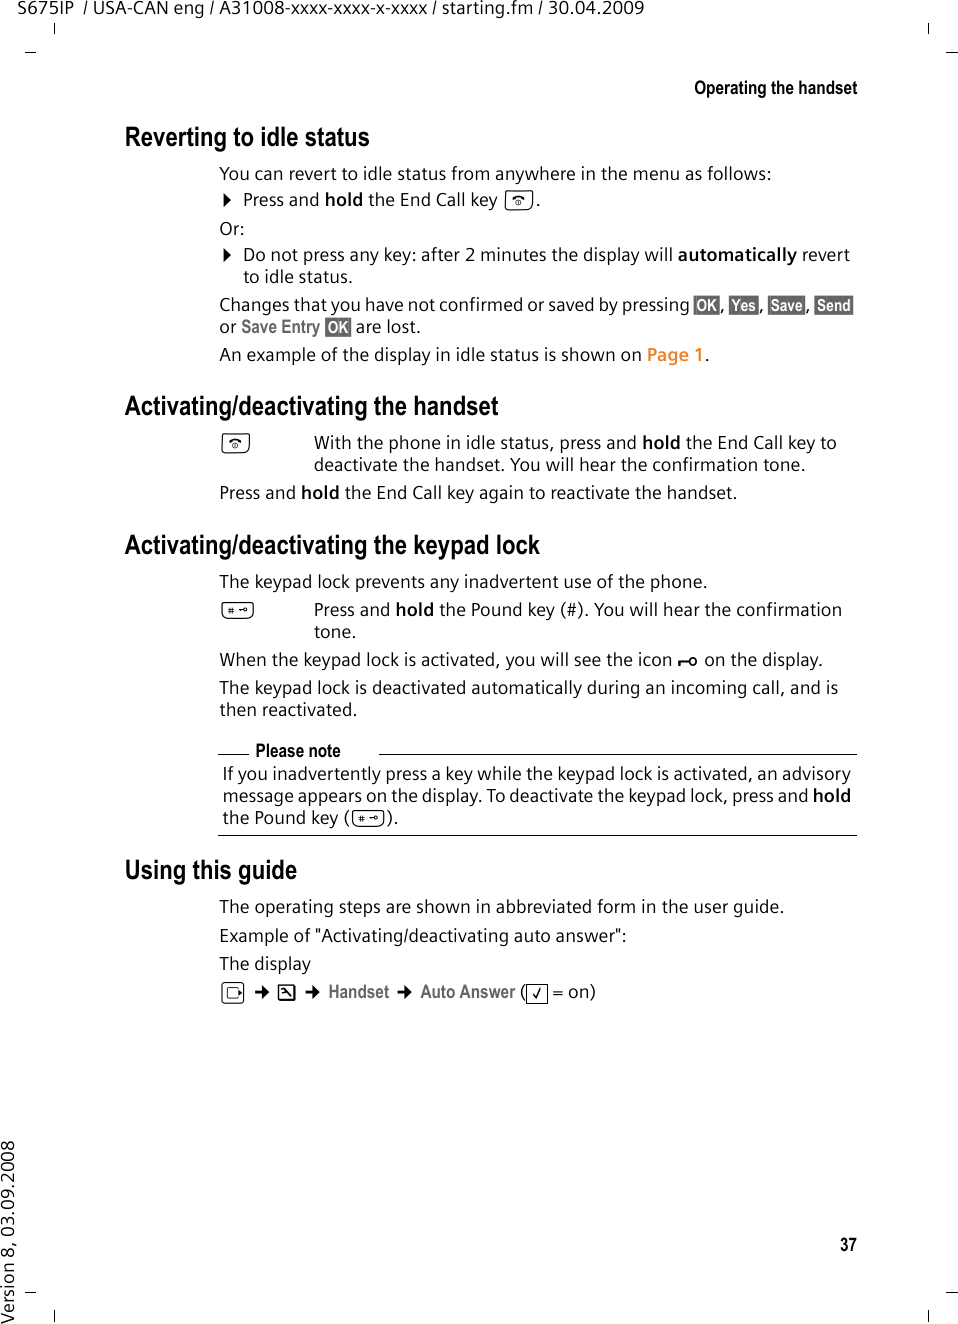

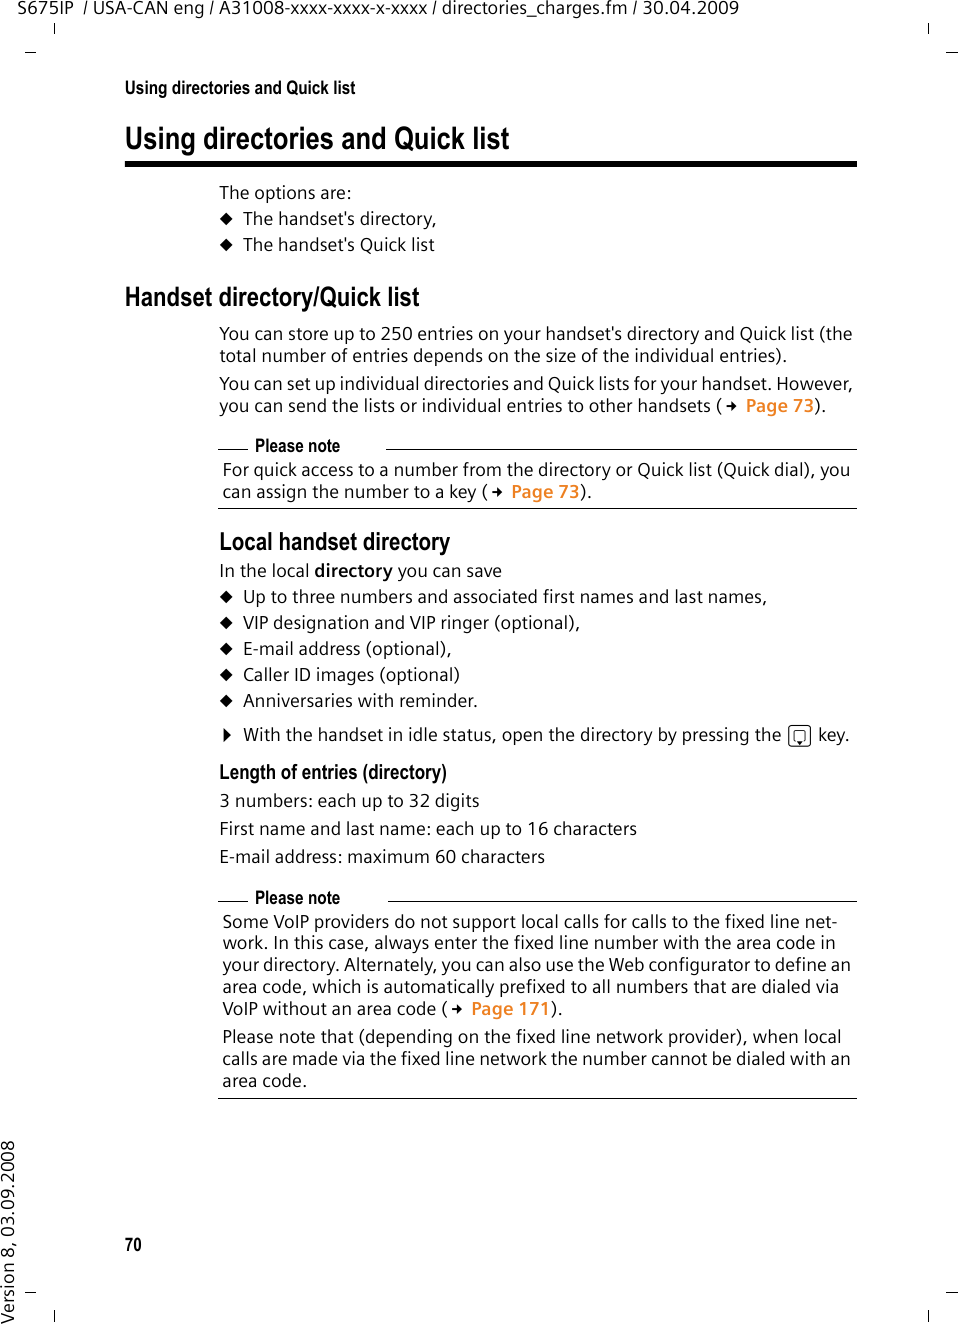
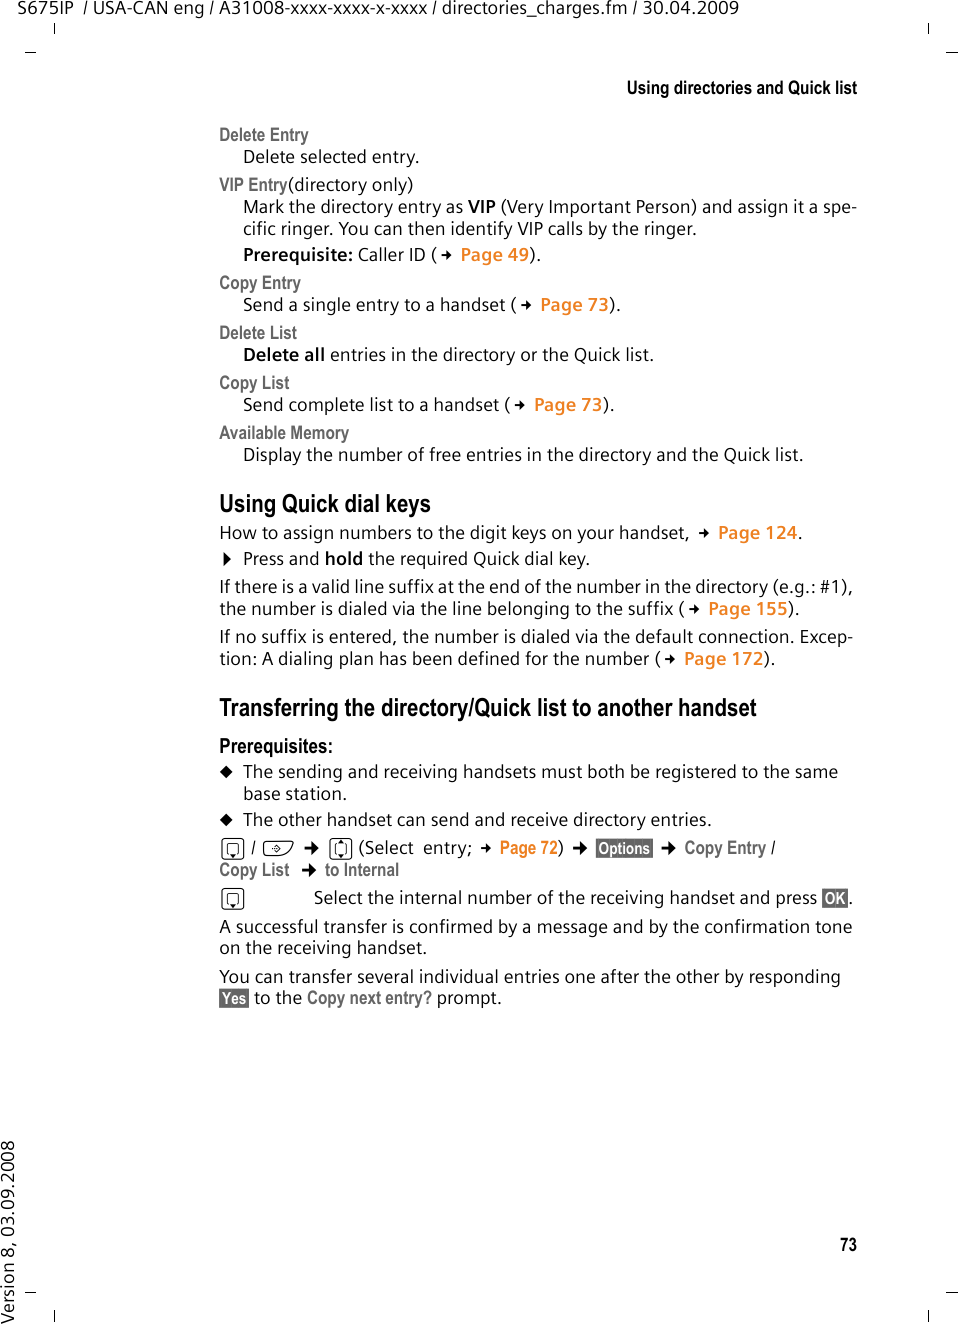
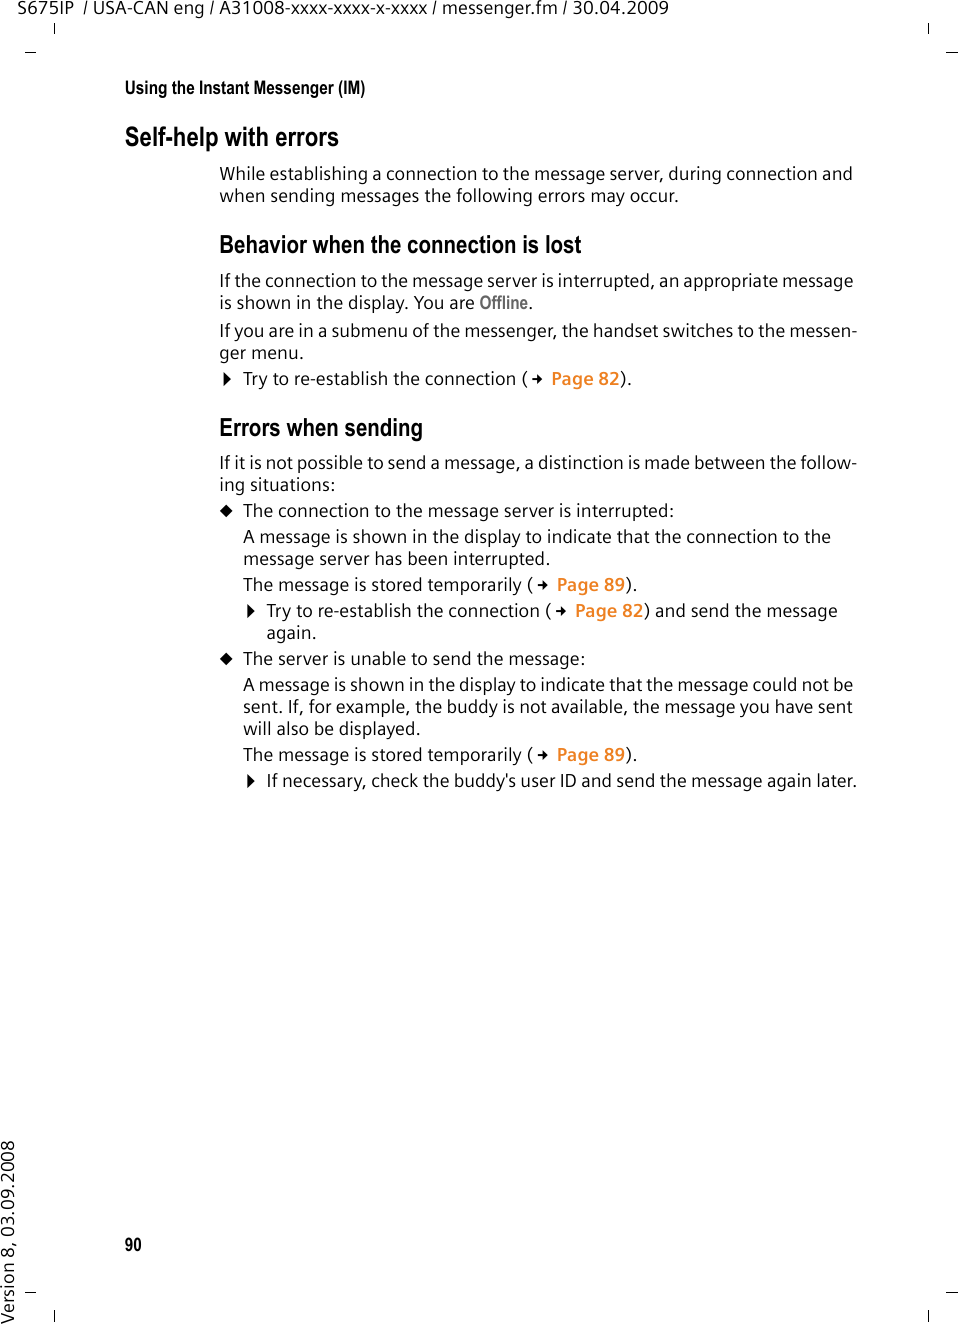
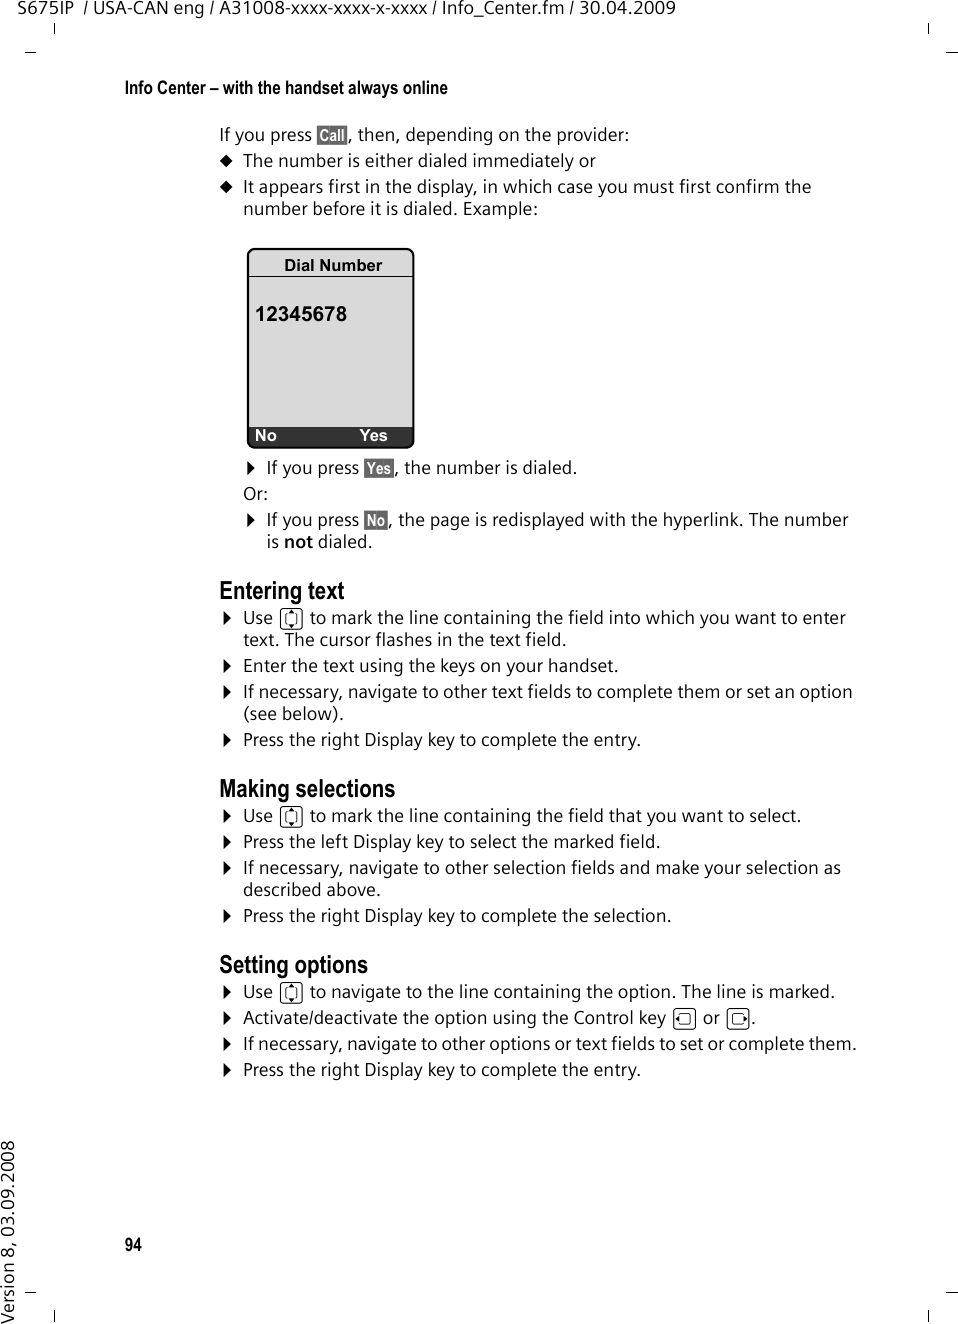


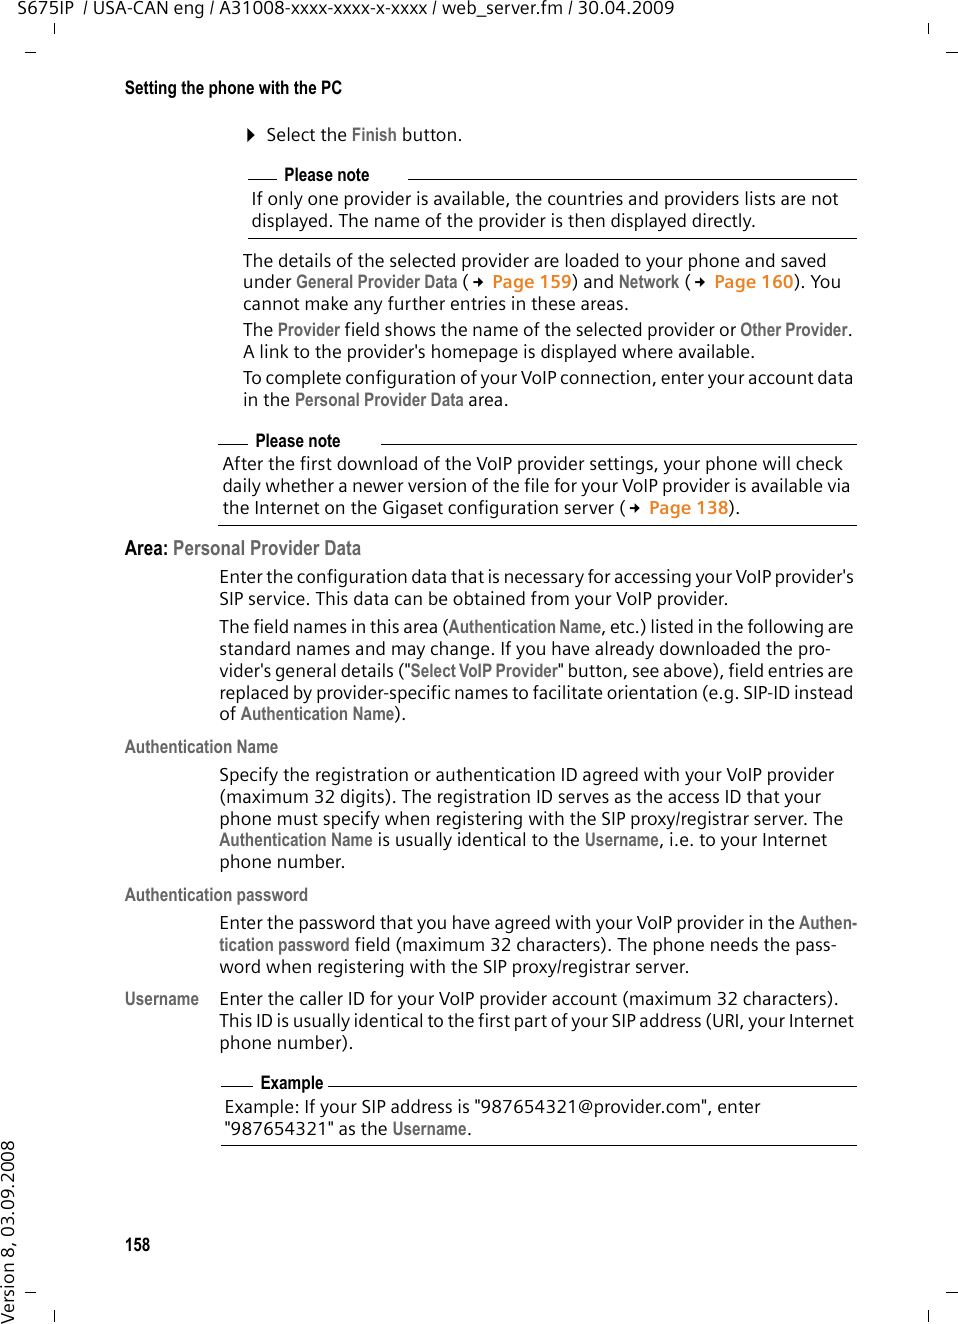
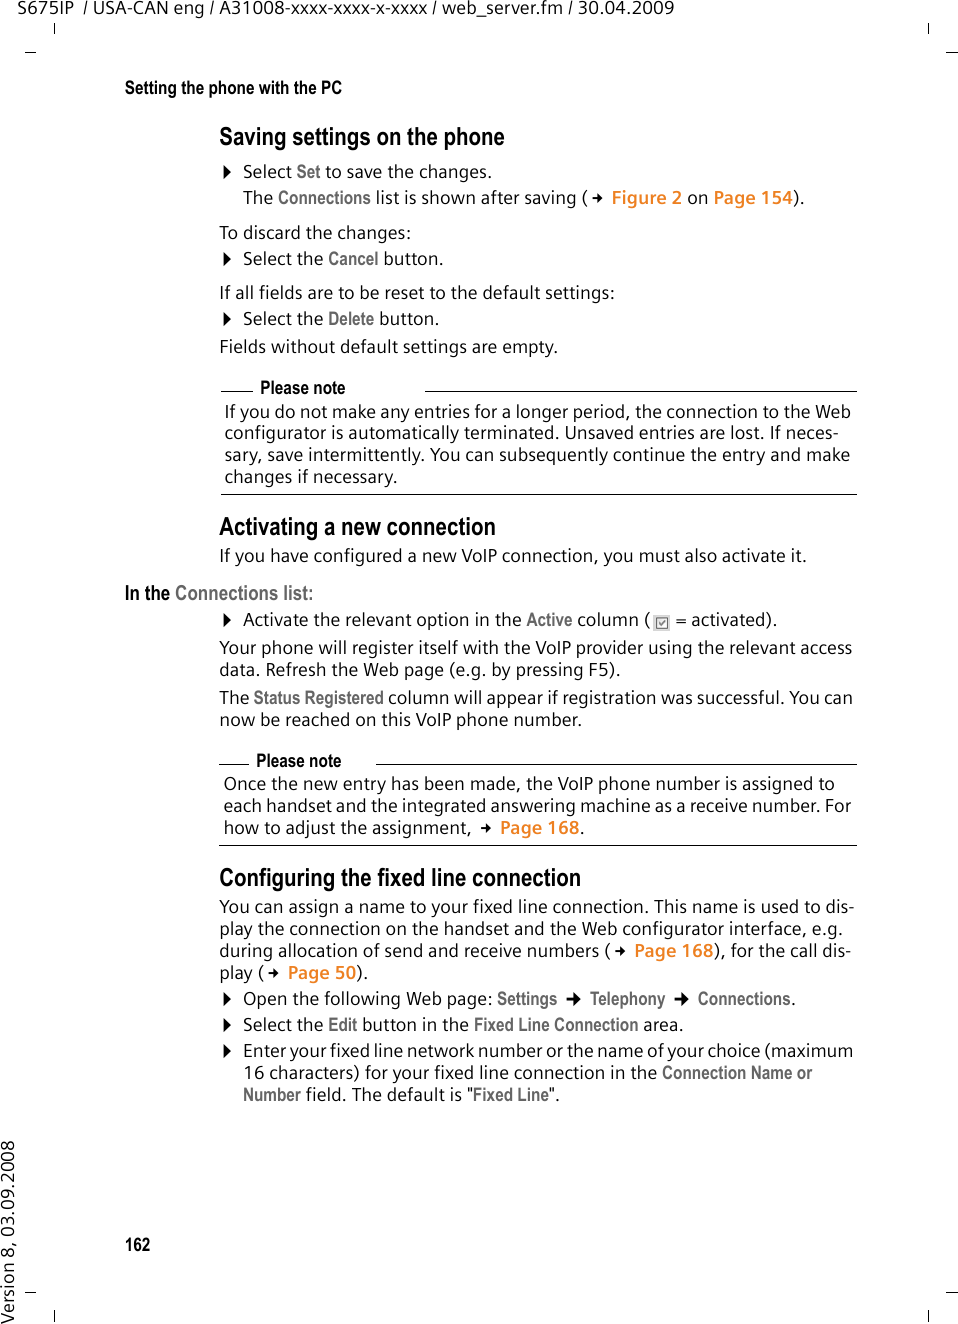

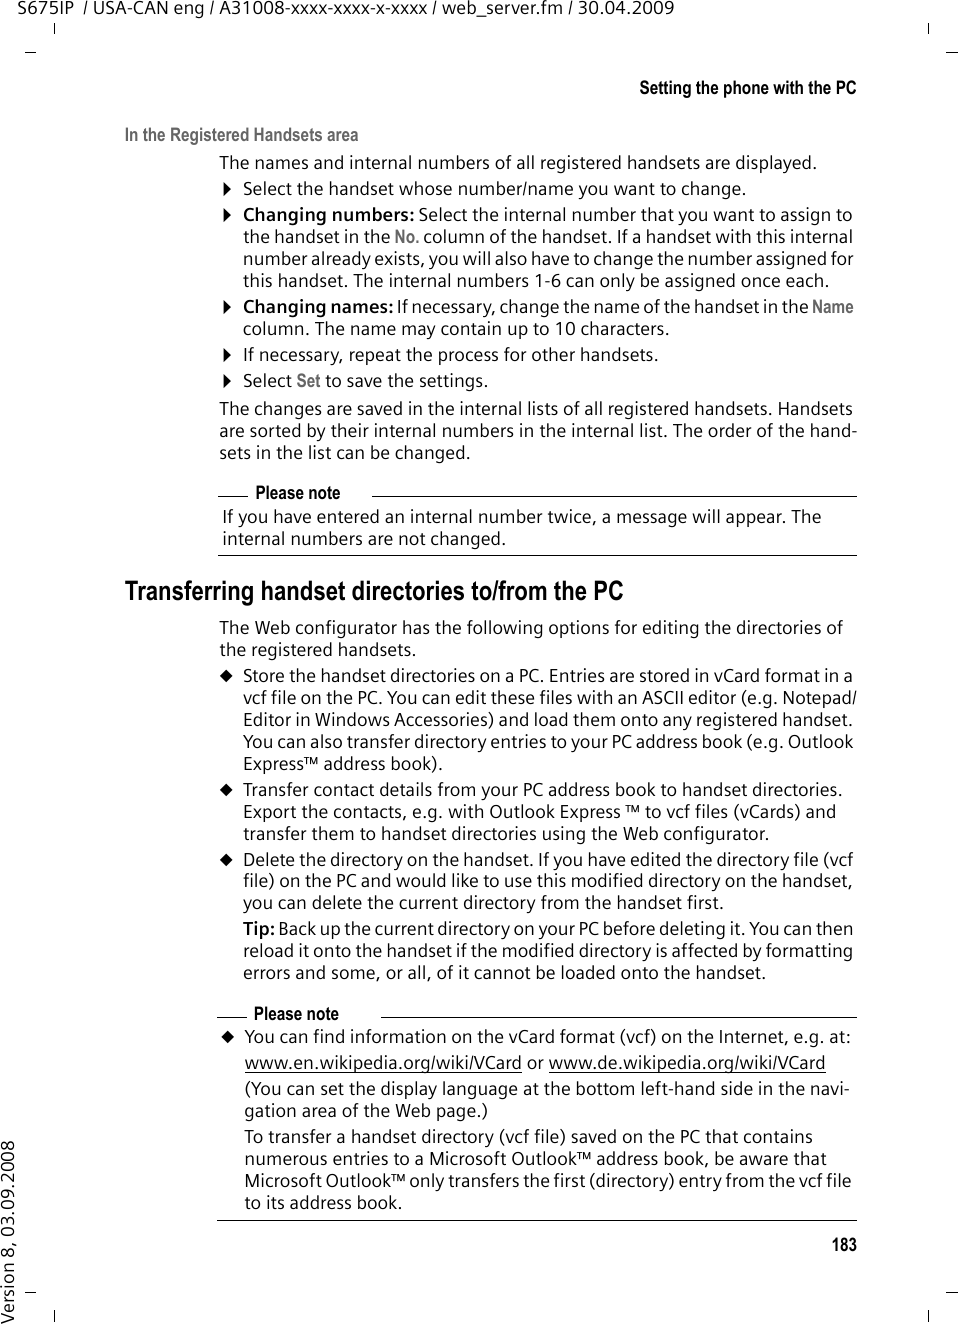

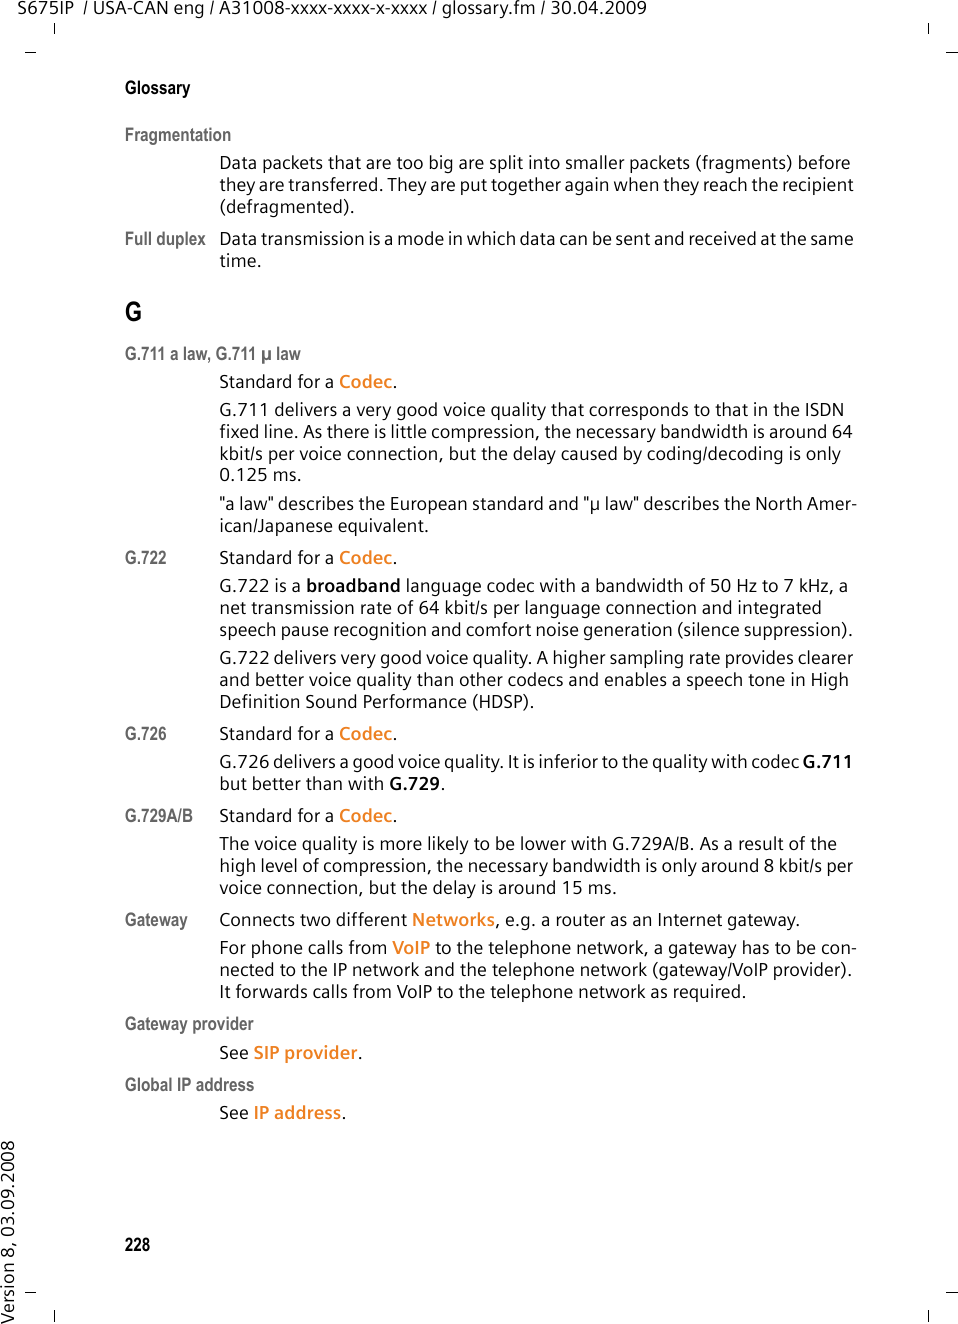
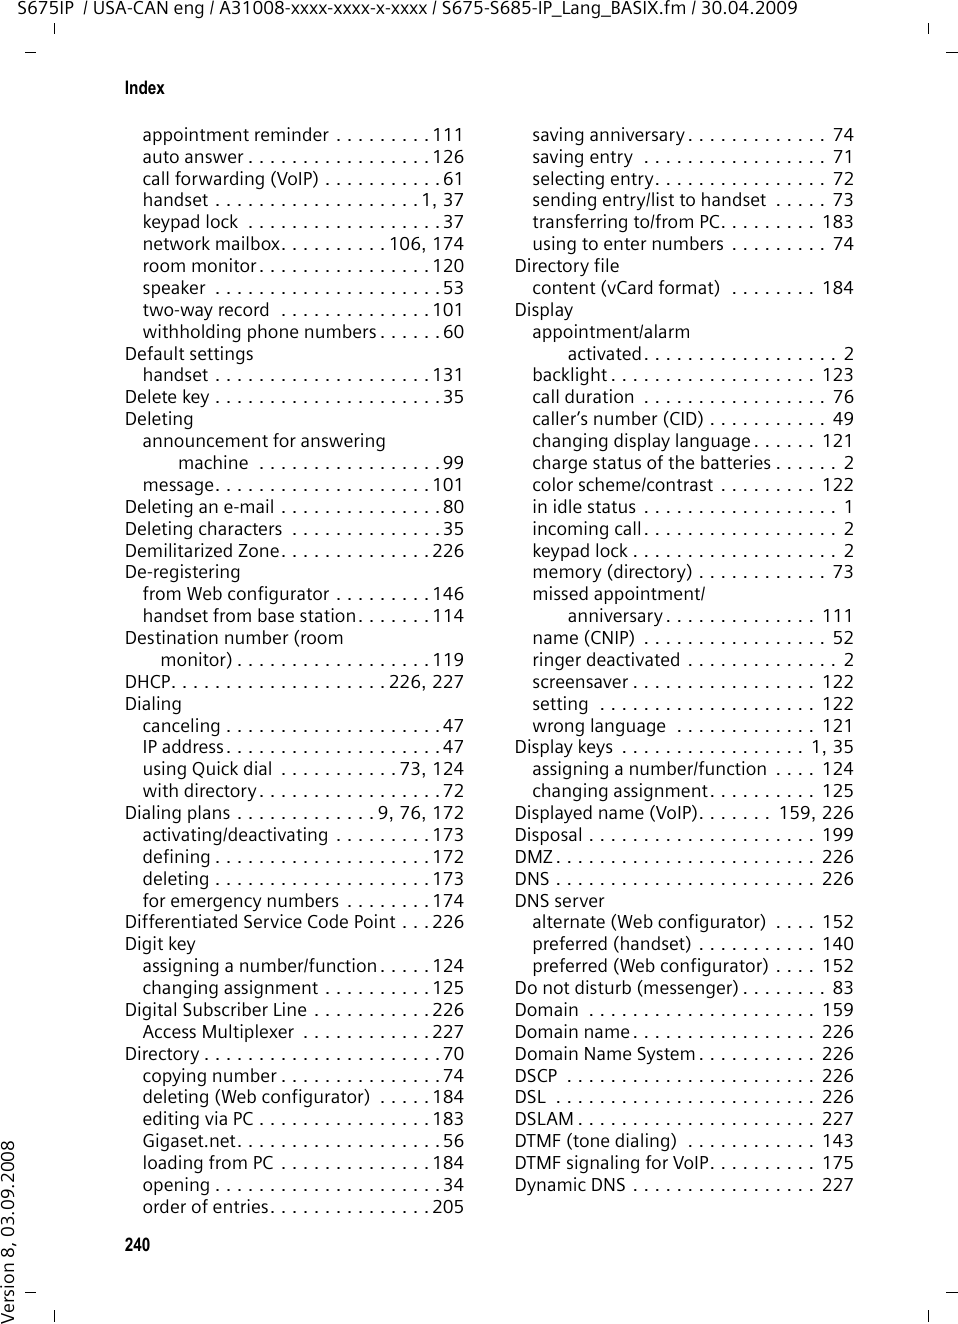
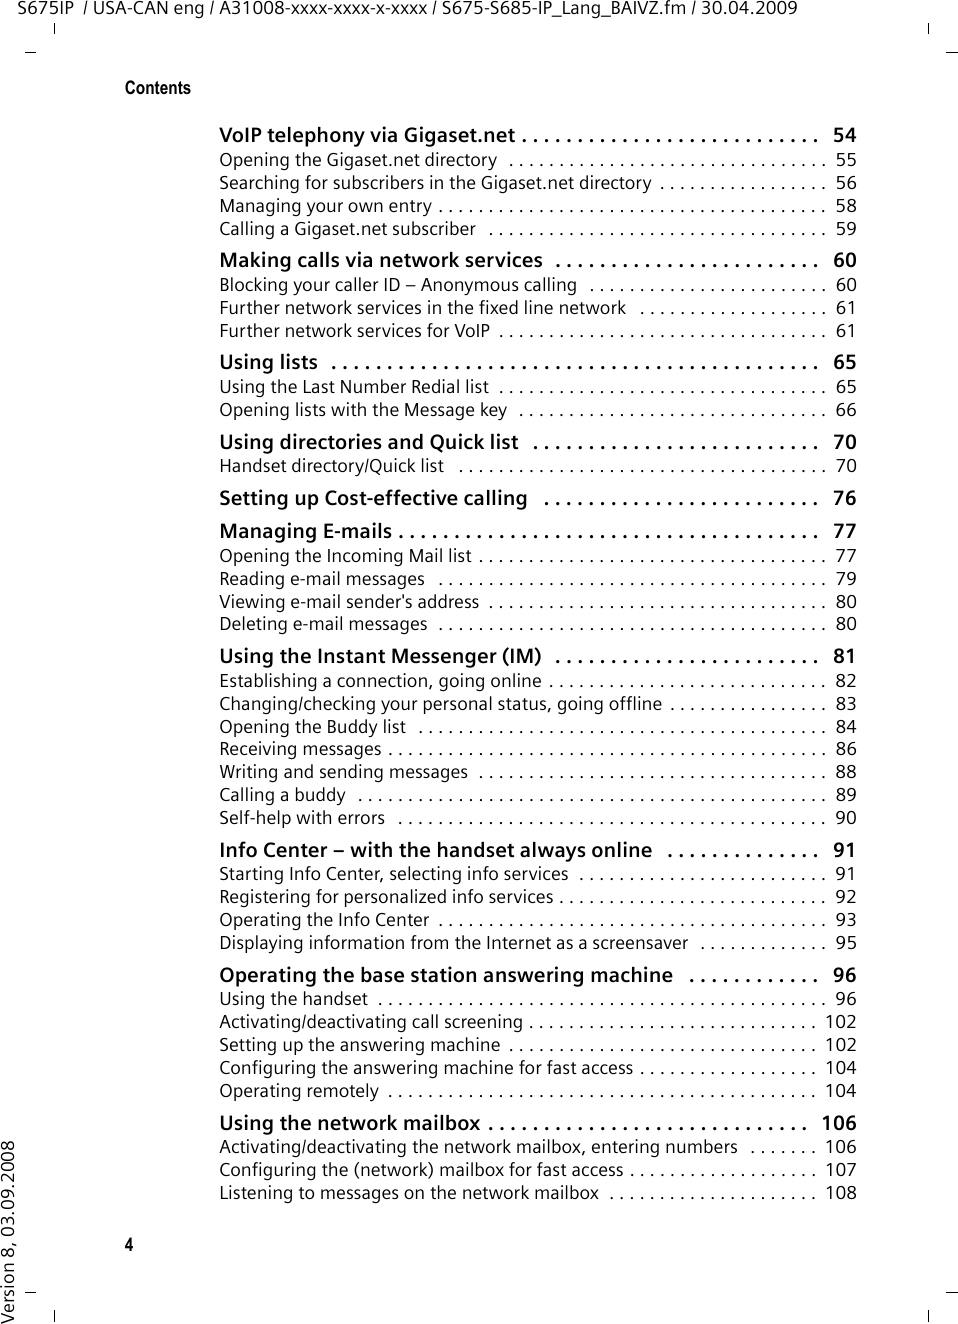
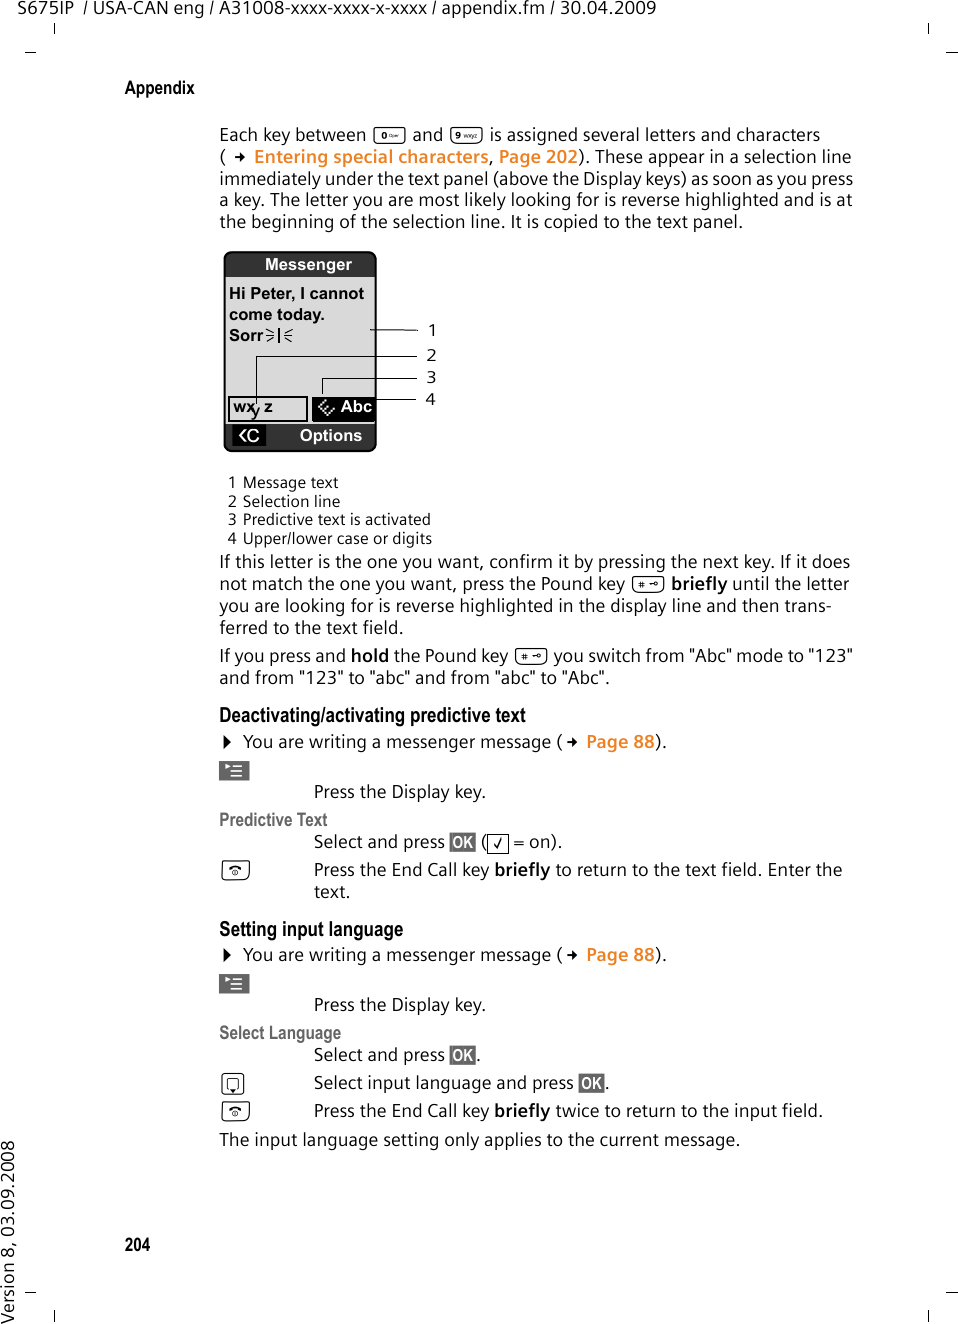
![202AppendixS675IP / USA-CAN eng / A31008-xxxx-xxxx-x-xxxx / appendix.fm / 30.04.2009Version 8, 03.09.2008Pin connections on the telephone jackIf you buy a replacement phone cord from a retailer, pay attention to the wiring of the phone jack.Writing and editing textThe following rules apply when writing text:uControl the cursor with u v t s.uCharacters are inserted to the left of the cursor.uPress the Asterisk key * to display the table of special characters ( £ "Entering special characters".)uThe first letter of the name of directory entries is automatically capitalized, followed by lower case letters.Entering special characters ¤Press the Asterisk key *. A table is opened containing all the special characters. The cursor is posi-tioned on the character " . " (period). ¤Navigate to the required character with the Control key r, q. Example: to select * press 4 x u and 1 x s.¤Press the Display key §Insert§. The character is inserted into the text.Pressing ” again closes the table without inserting a character.Correct pin assignment on the phone jack 1unused2unused3a4b5unused6unused3 214 5 6 s _!?@, ’"¤();:§.§ -+&%*=<>/â£$¥[]§Â \~^¿¡{}#|](https://usermanual.wiki/Gigaset-Communications/S67H/User-Guide-1113145-Page-202.png)

![216Gigaset S675 IP – free softwareS675IP / USA-CAN eng / A31008-xxxx-xxxx-x-xxxx / appendix.fm / 30.04.2009Version 8, 03.09.2008GNU LESSER GENERAL PUBLIC LICENSEVersion 2.1, February 1999Copyright (C) 1991, 1999 Free Software Foundation, Inc., 59 Temple Place, Suite 330, Boston, MA 02111-1307 USAEveryone is permitted to copy and distribute verbatim copies of this license document, but changing it is not allowed.[This is the first released version of the Lesser GPL. It also counts as the successor of the GNU Library Public License, version 2, hence the version number 2.1.]PreambleThe licenses for most software are designed to take away your freedom to share and change it. By contrast, the GNU General Public Licenses are intended to guarantee your freedom to share and change free software--to make sure the software is free for all its users.This license, the Lesser General Public License, applies to some specially designated soft-ware packages—typically libraries—of the Free Software Foundation and other authors who decide to use it. You can use it too, but we suggest you first think carefully about whether this license or the ordinary General Public License is the better strategy to use in any particular case, based on the explanations below.When we speak of free software, we are referring to freedom of use, not price. Our Gen-eral Public Licenses are designed to make sure that you have the freedom to distribute copies of free software (and charge for this service if you wish); that you receive source code or can get it if you want it; that you can change the software and use pieces of it in new free programs; and that you are informed that you can do these things.To protect your rights, we need to make restrictions that forbid distributors to deny you these rights or to ask you to surrender these rights. These restrictions translate to certain responsibilities for you if you distribute copies of the library or if you modify it.For example, if you distribute copies of the library, whether gratis or for a fee, you must give the recipients all the rights that we gave you. You must make sure that they, too, receive or can get the source code. If you link other code with the library, you must pro-vide complete object files to the recipients, so that they can relink them with the library after making changes to the library and recompiling it. And you must show them these terms so they know their rights.We protect your rights with a two-step method: (1) we copyright the library, and (2) we offer you this license, which gives you legal permission to copy, distribute and/or modify the library.To protect each distributor, we want to make it very clear that there is no warranty for the free library. Also, if the library is modified by someone else and passed on, the recipients should know that what they have is not the original version, so that the original author's reputation will not be affected by problems that might be introduced by others.Finally, software patents pose a constant threat to the existence of any free program. We wish to make sure that a company cannot effectively restrict the users of a free program by obtaining a restrictive license from a patent holder. Therefore, we insist that any pat-ent license obtained for a version of the library must be consistent with the full freedom of use specified in this license.Most GNU software, including some libraries, is covered by the ordinary GNU General Public License. This license, the GNU Lesser General Public License, applies to certain des-ignated libraries, and is quite different from the ordinary General Public License. We use this license for certain libraries in order to permit linking those libraries into non-free pro-grams.When a program is linked with a library, whether statically or using a shared library, the combination of the two is legally speaking a combined work, a derivative of the original library. The ordinary General Public License therefore permits such linking only if the entire combination fits its criteria of freedom. The Lesser General Public License permits more lax criteria for linking other code with the library.](https://usermanual.wiki/Gigaset-Communications/S67H/User-Guide-1113145-Page-218.png)