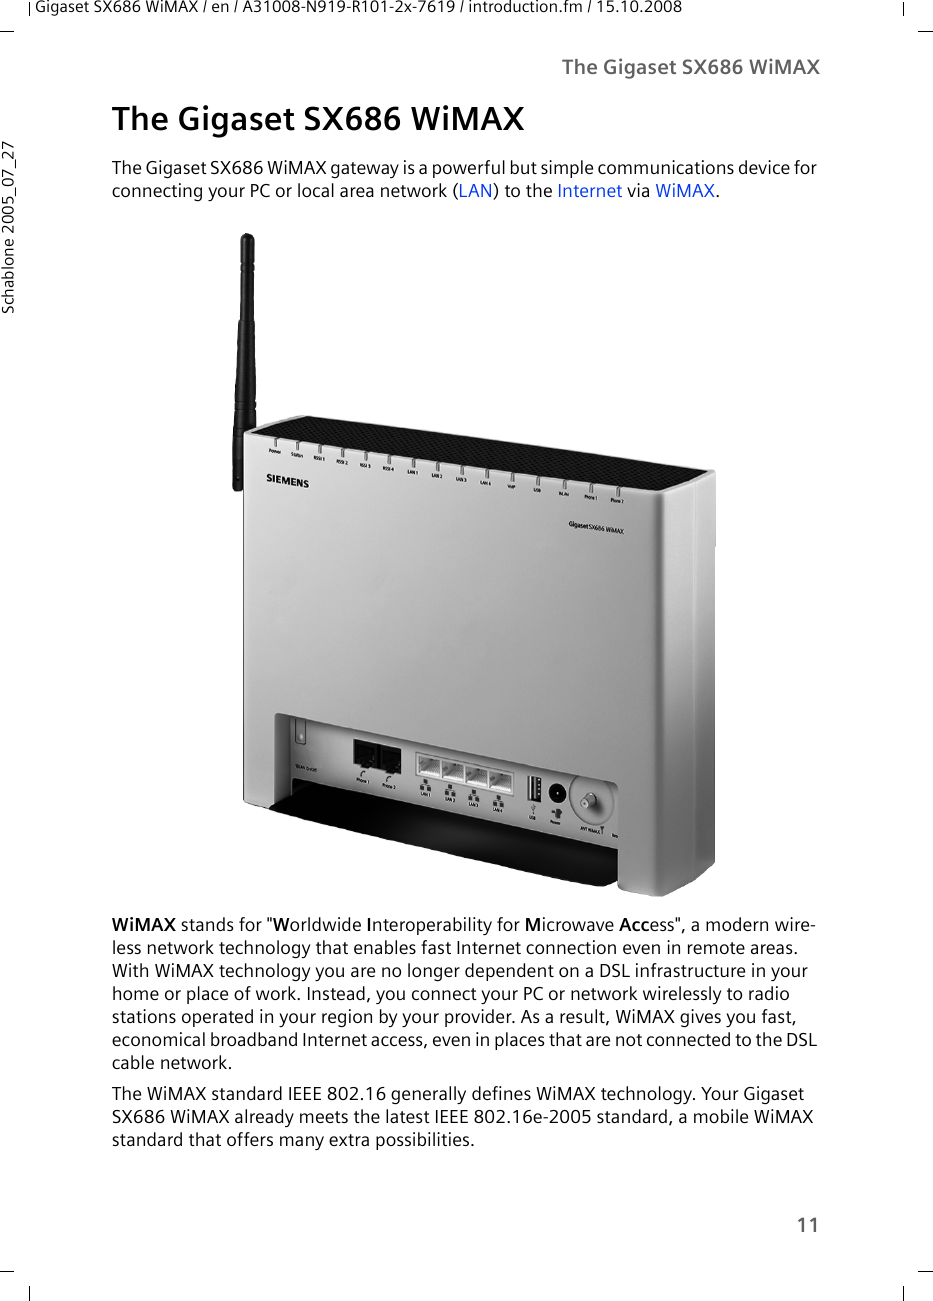
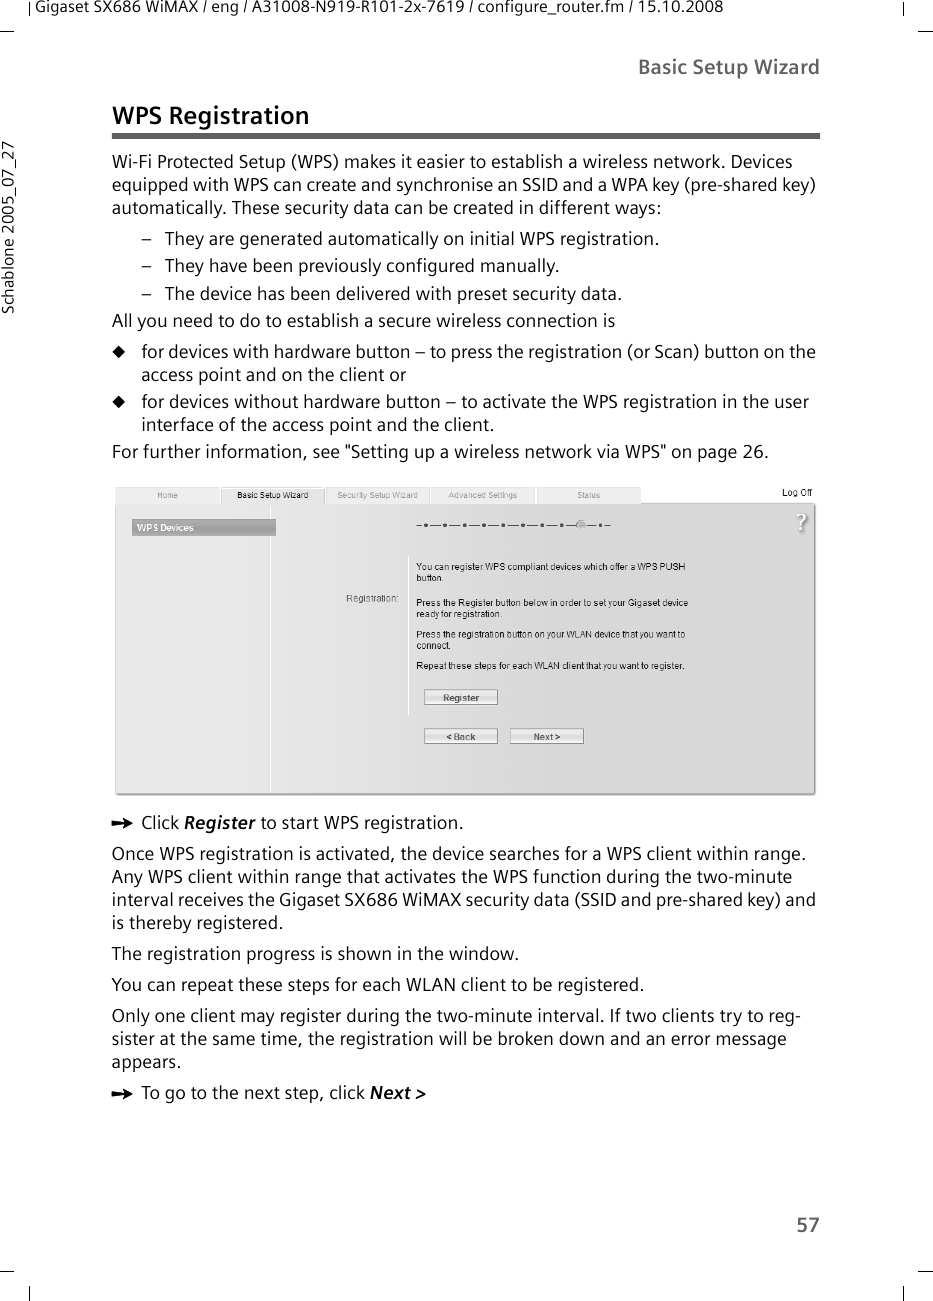
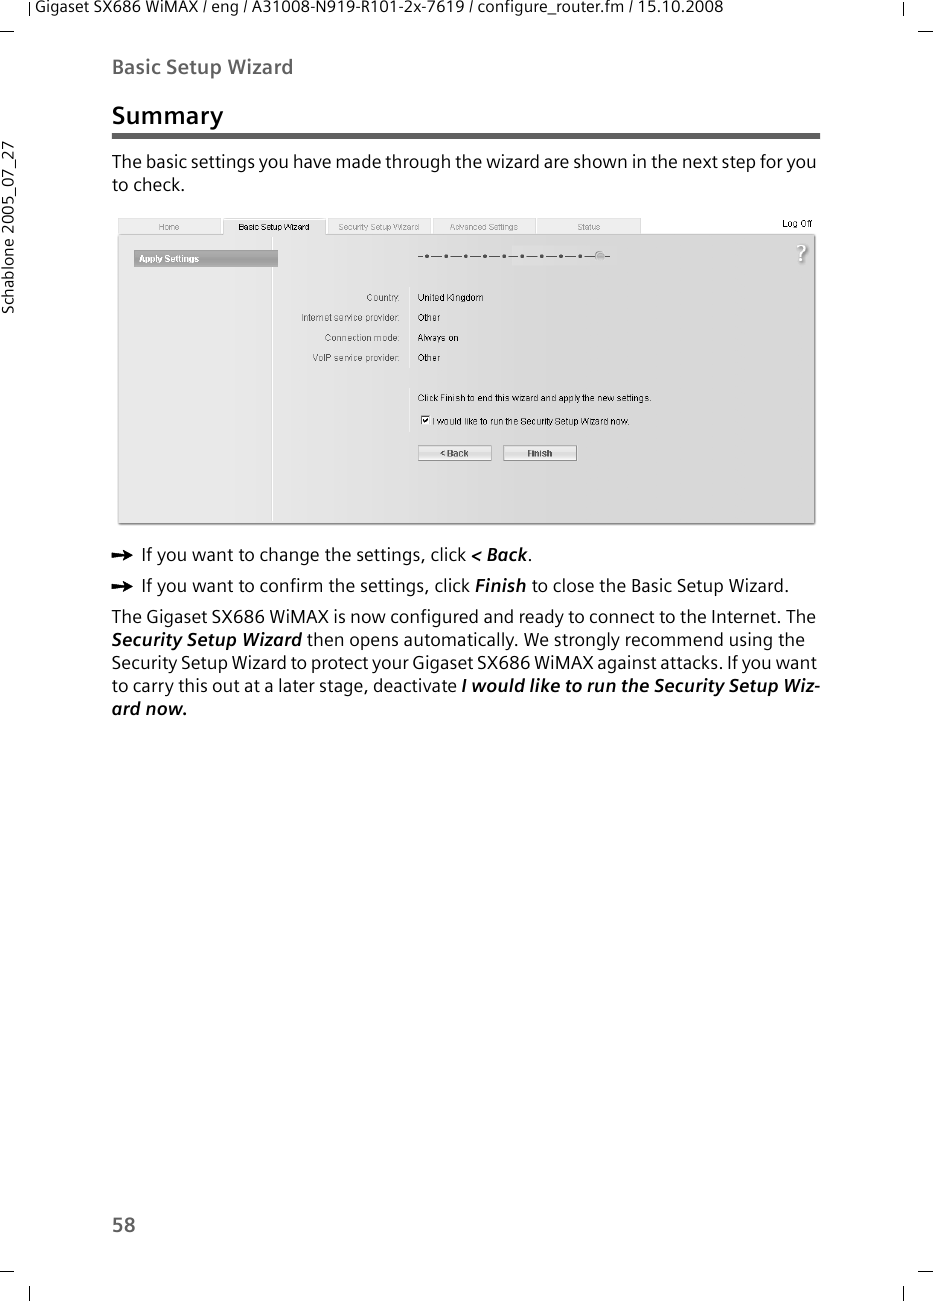
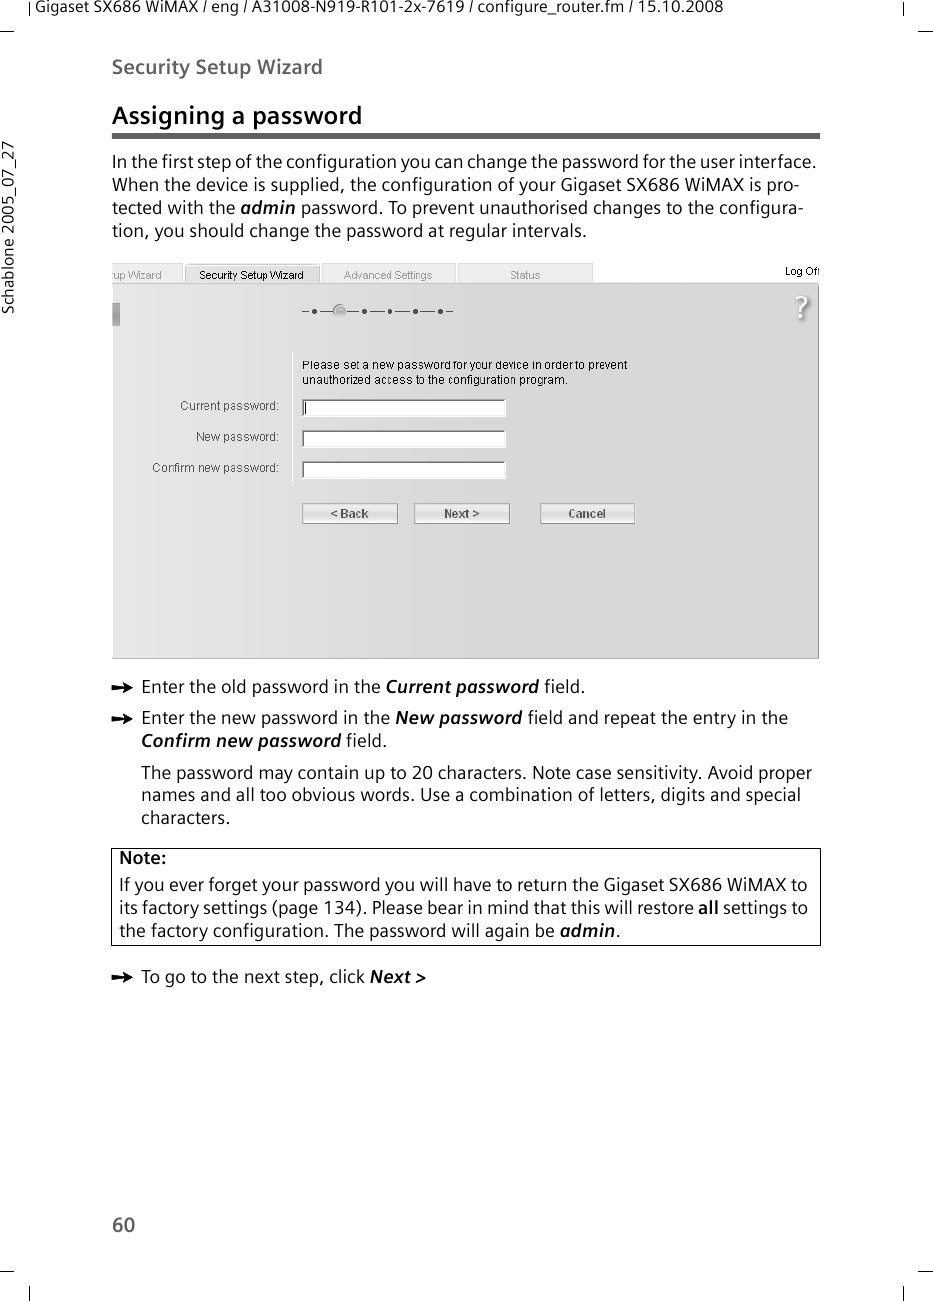
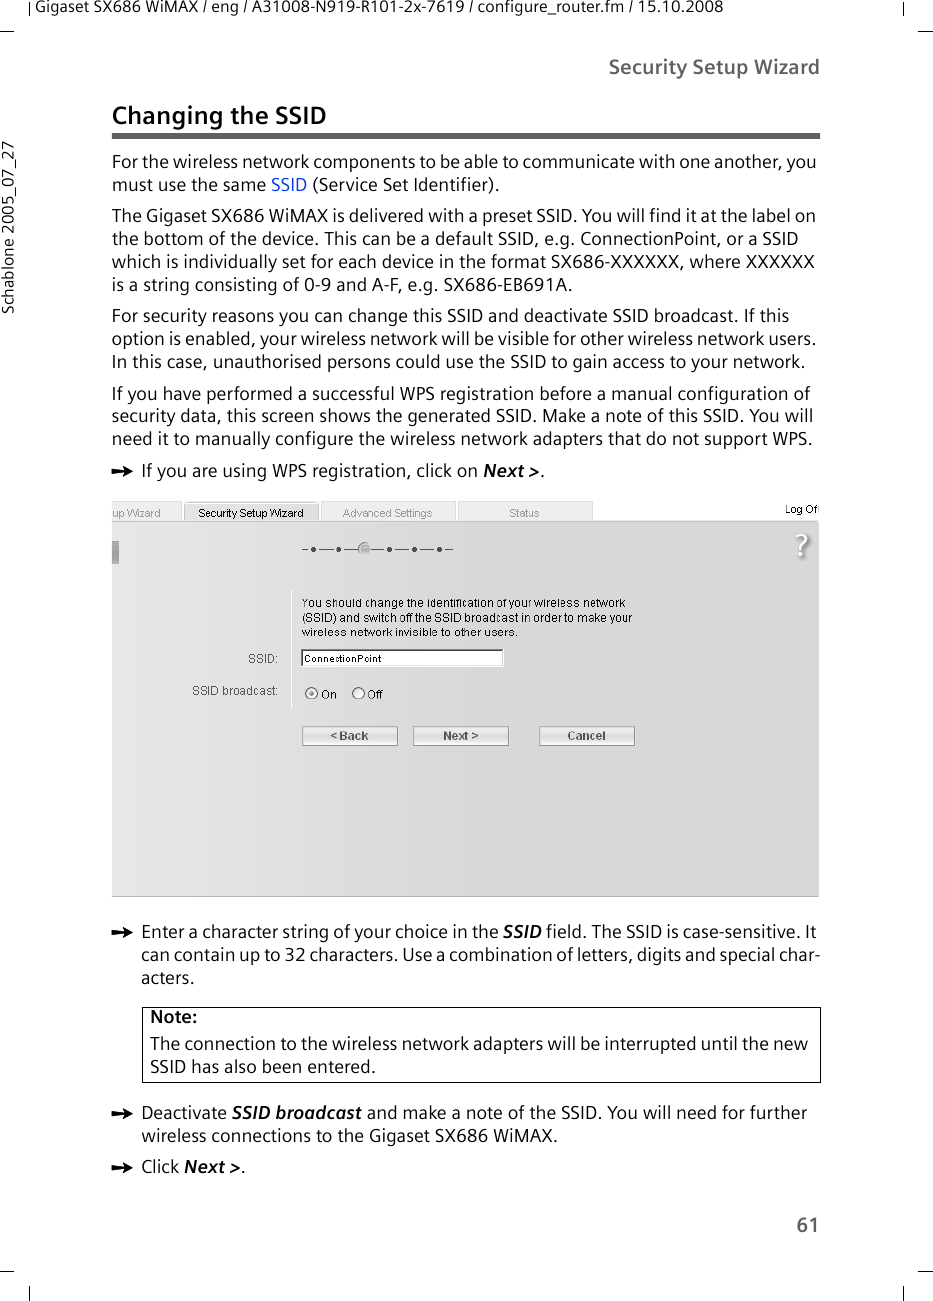
Gigaset Communications SX686 Wimax terminal station User Manual Gigaset SX686 WiMAX Oct 2008
Gigaset Communications GmbH Wimax terminal station Gigaset SX686 WiMAX Oct 2008
UserManual.wiki
>
Gigaset Communications
>
SX686 User Manual
>
User Manual Guide
Contents
1.
User Manual Guide
2.
User Manual Installation
User Manual Guide
Navigation menu
Upload a User Manual
Namespaces
Wiki Guide
HTML
PDF
Info
Views
User Manual
Discussion / Help
Navigation
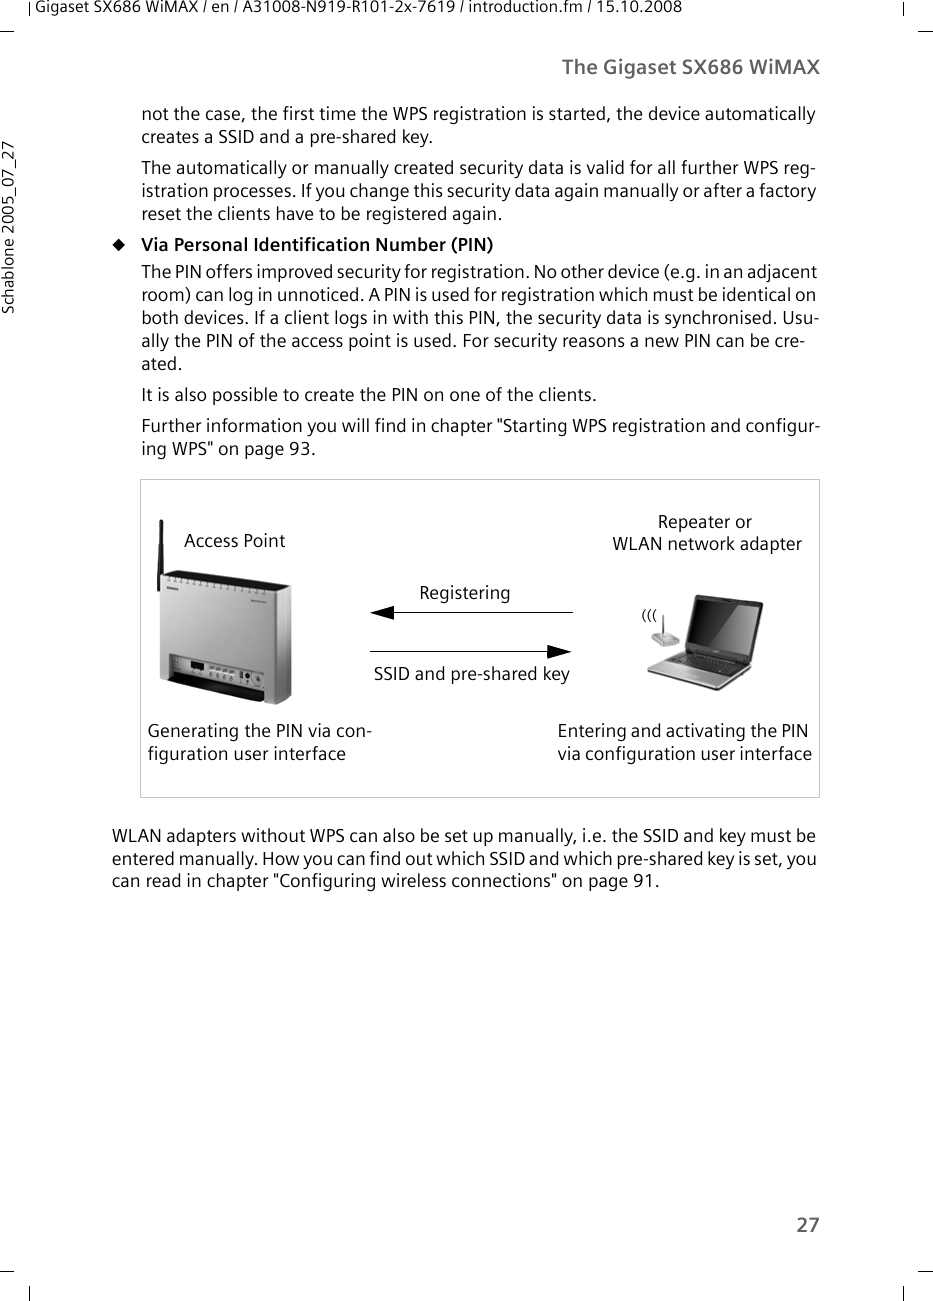


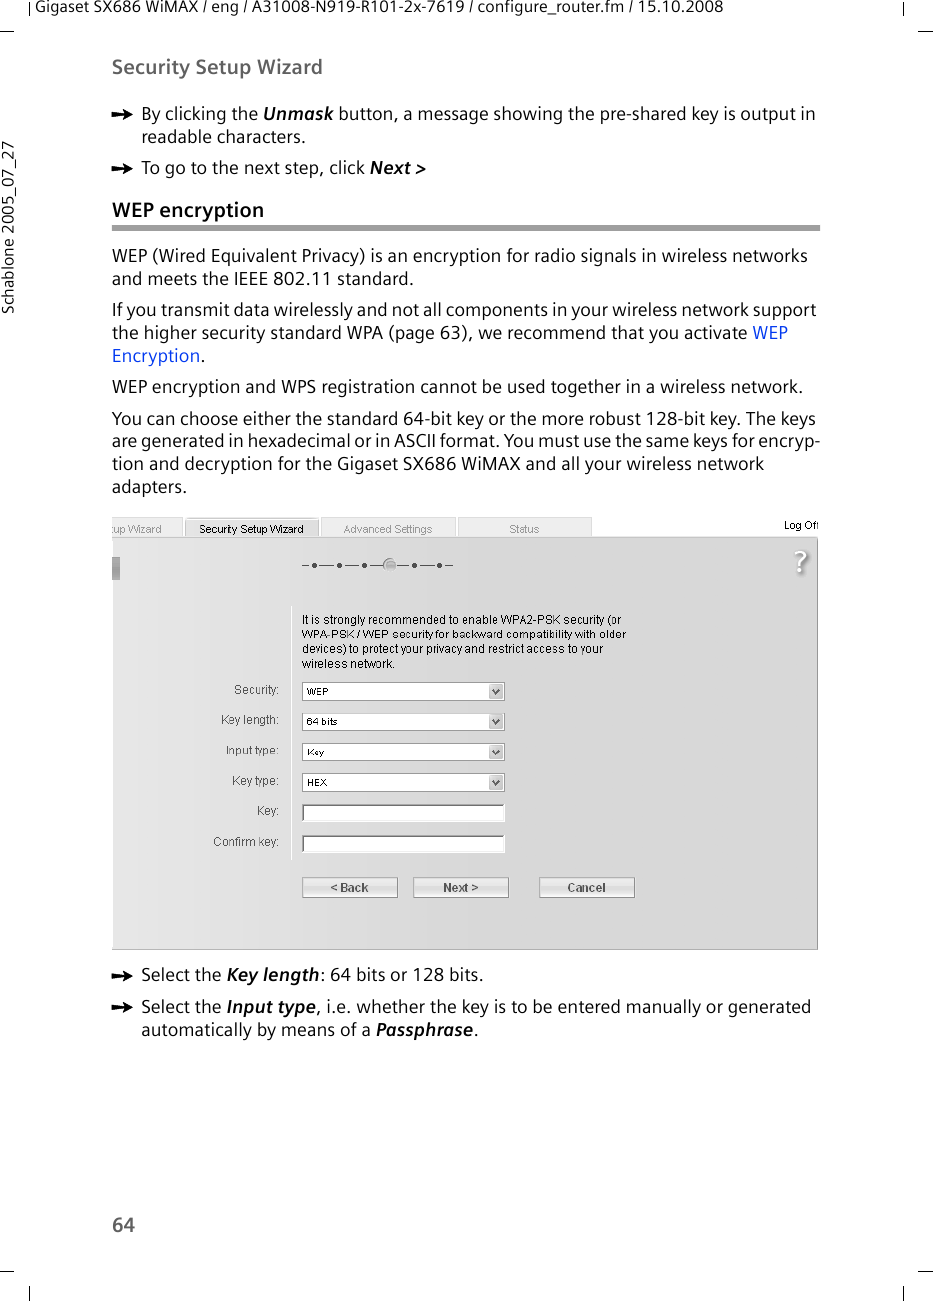
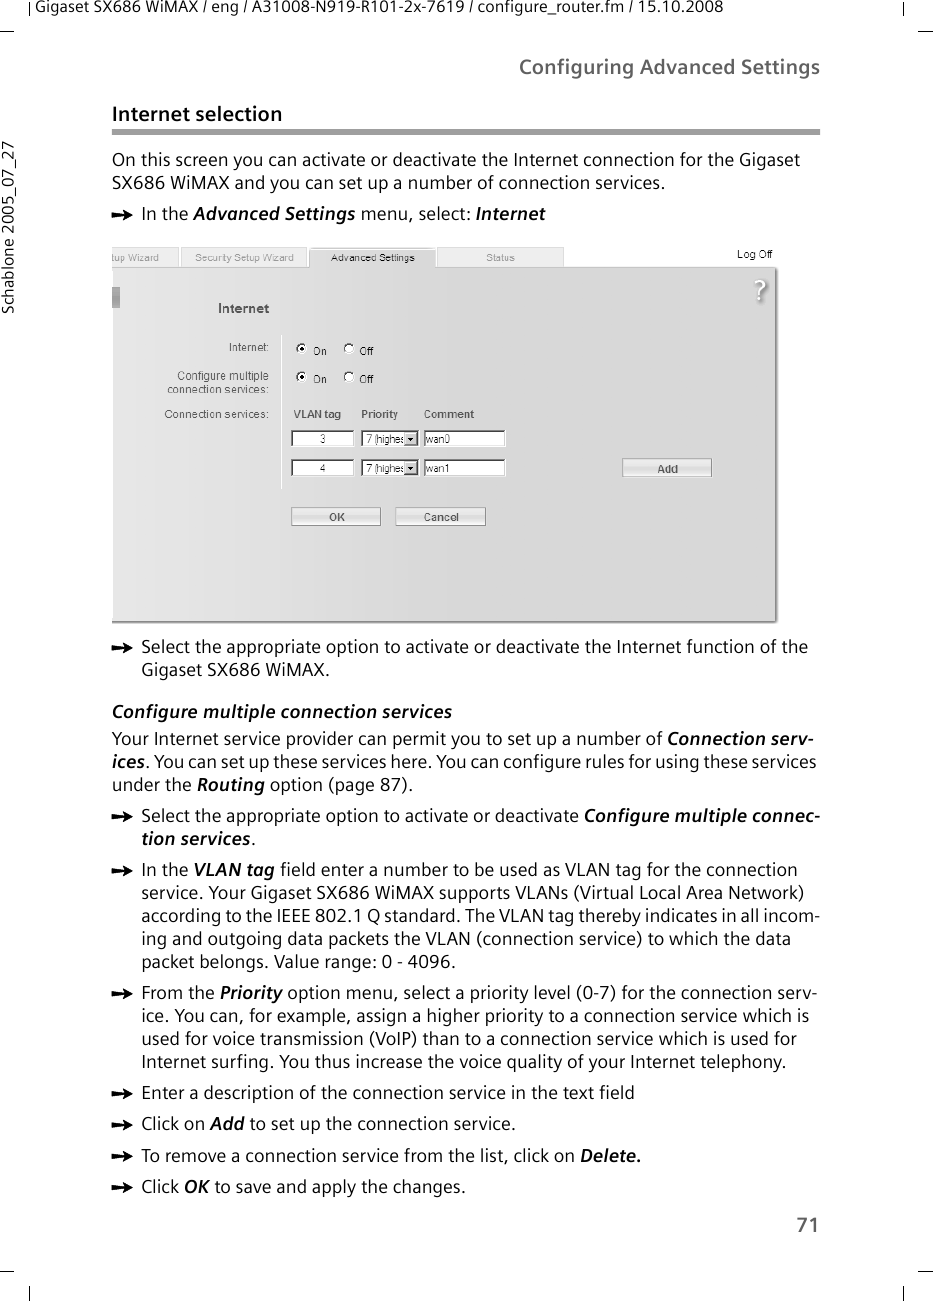
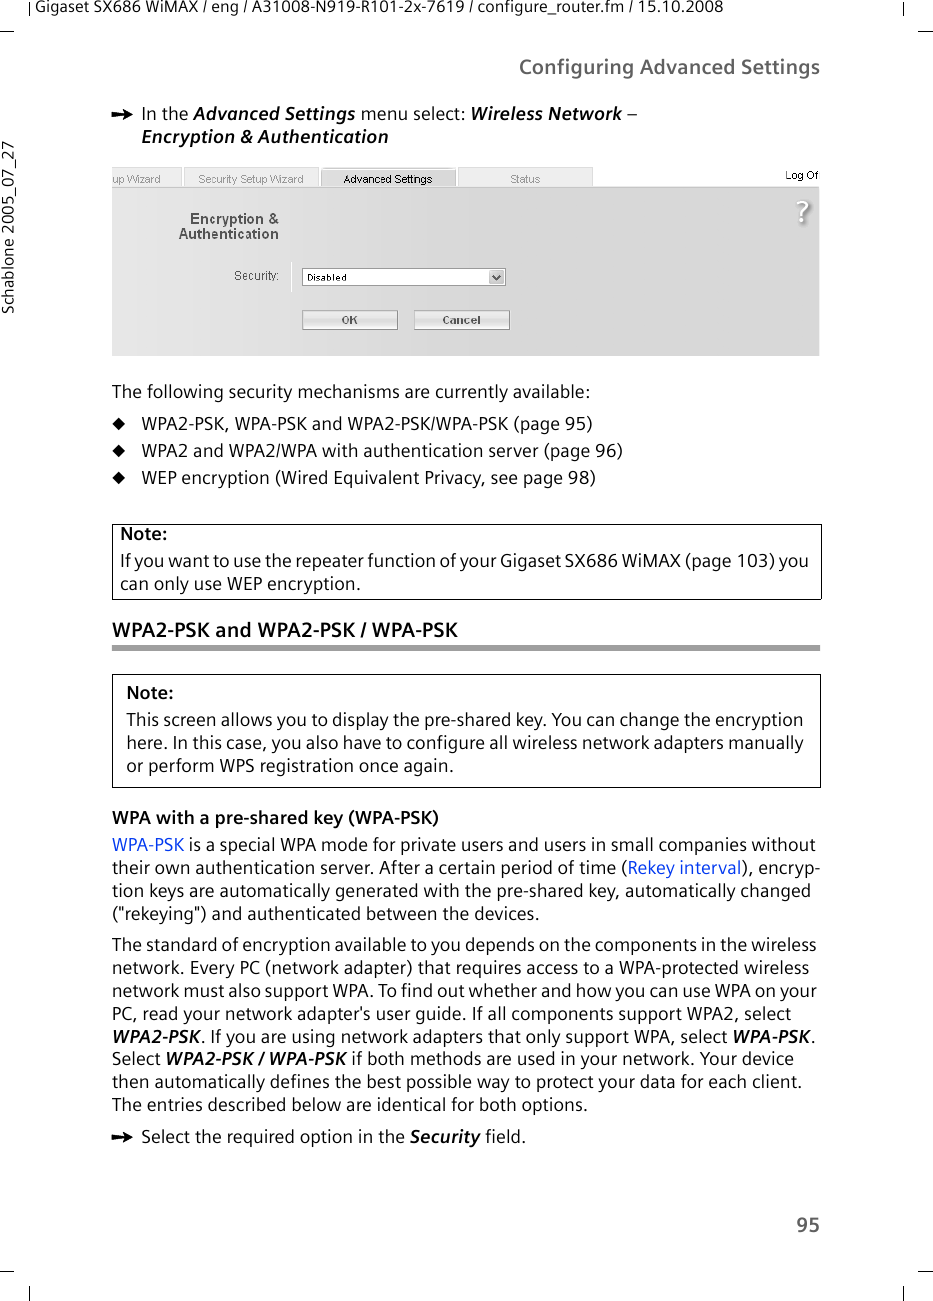
![62Security Setup WizardGigaset SX686 WiMAX / eng / A31008-N919-R101-2x-7619 / configure_router.fm / 15.10.2008Schablone 2005_07_27Setting up security functions for the wireless networkWireless networks are even more susceptible to eavesdropping than wired networks. With conventional network adapters, an intruder only needs a device with a WLAN adapter (e.g. a notebook or a PDA [Personal Digital Assistant]) with an appropriately configured network card in order to eavesdrop on every communication made via a nearby wireless LAN.The Gigaset SX686 WiMAX makes use of effective encryption methods to prevent unau-thorised eavesdropping as far as possible.The Gigaset SX686 WiMAX is delivered with preset individual encryption (WPA2-PSK/ WPA-PSK with pre-shared key). You will find this key at the label on the bottom of the device.If all components of your wireless network provide this encryption method there is no need of any settings in this screen. If not, or if you want to change the preset key (e. g. if unauthorised persons may have access to your device), you can configure the encryp-tion for your wireless network in the next step.You can use the following security mechanisms:uWPA2-PSK, WPA-PSK or WPA2-PSK/WPA-PSK (page 63)uWEP encryption (Wired Equivalent Privacy, see page 64)You will find further options for setting up data encryption and authentication in the Advanced Settings menu (page 94).](https://usermanual.wiki/Gigaset-Communications/SX686.User-Manual-Guide/User-Guide-1053206-Page-62.png)
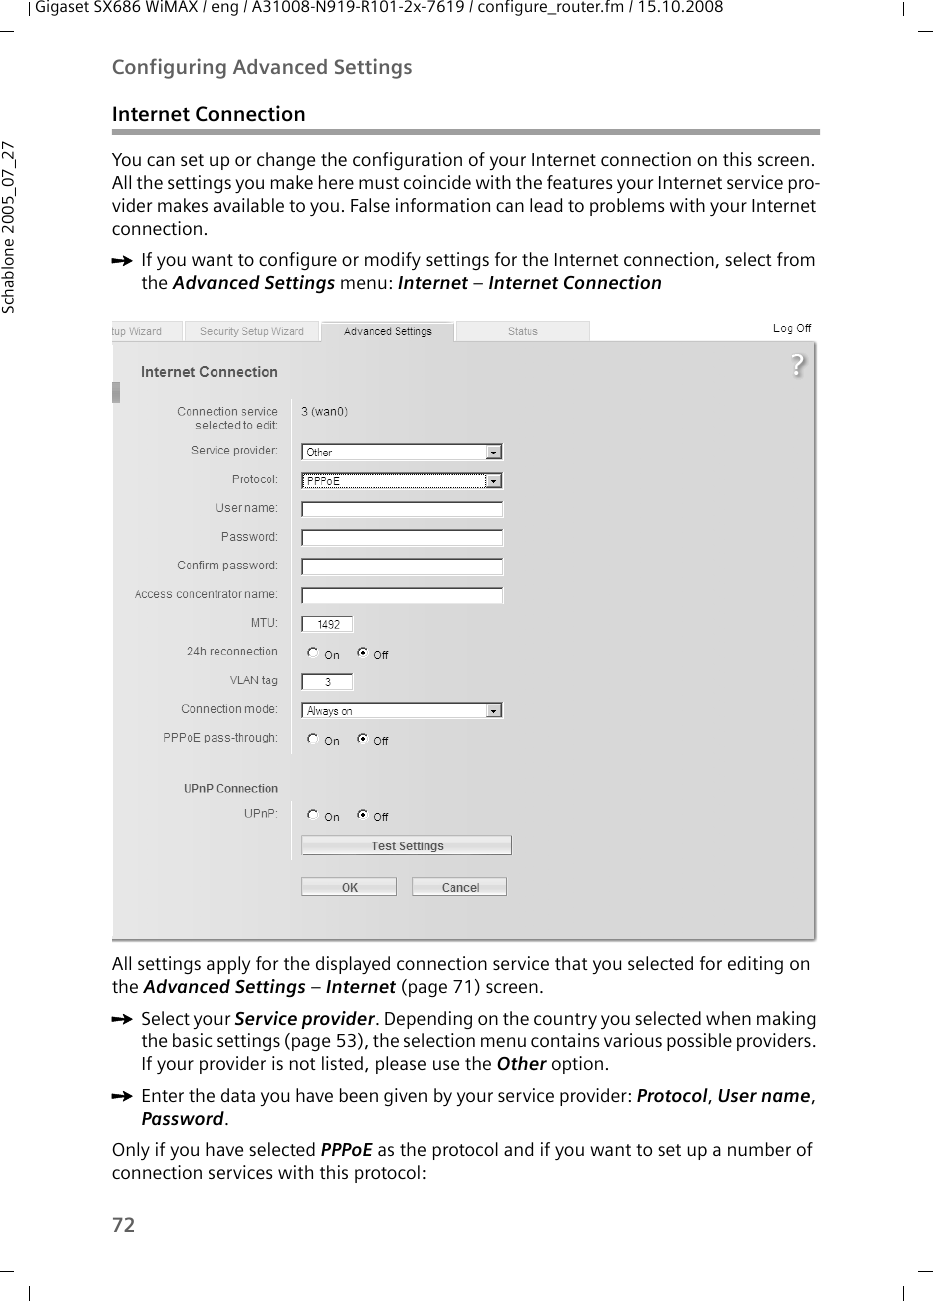
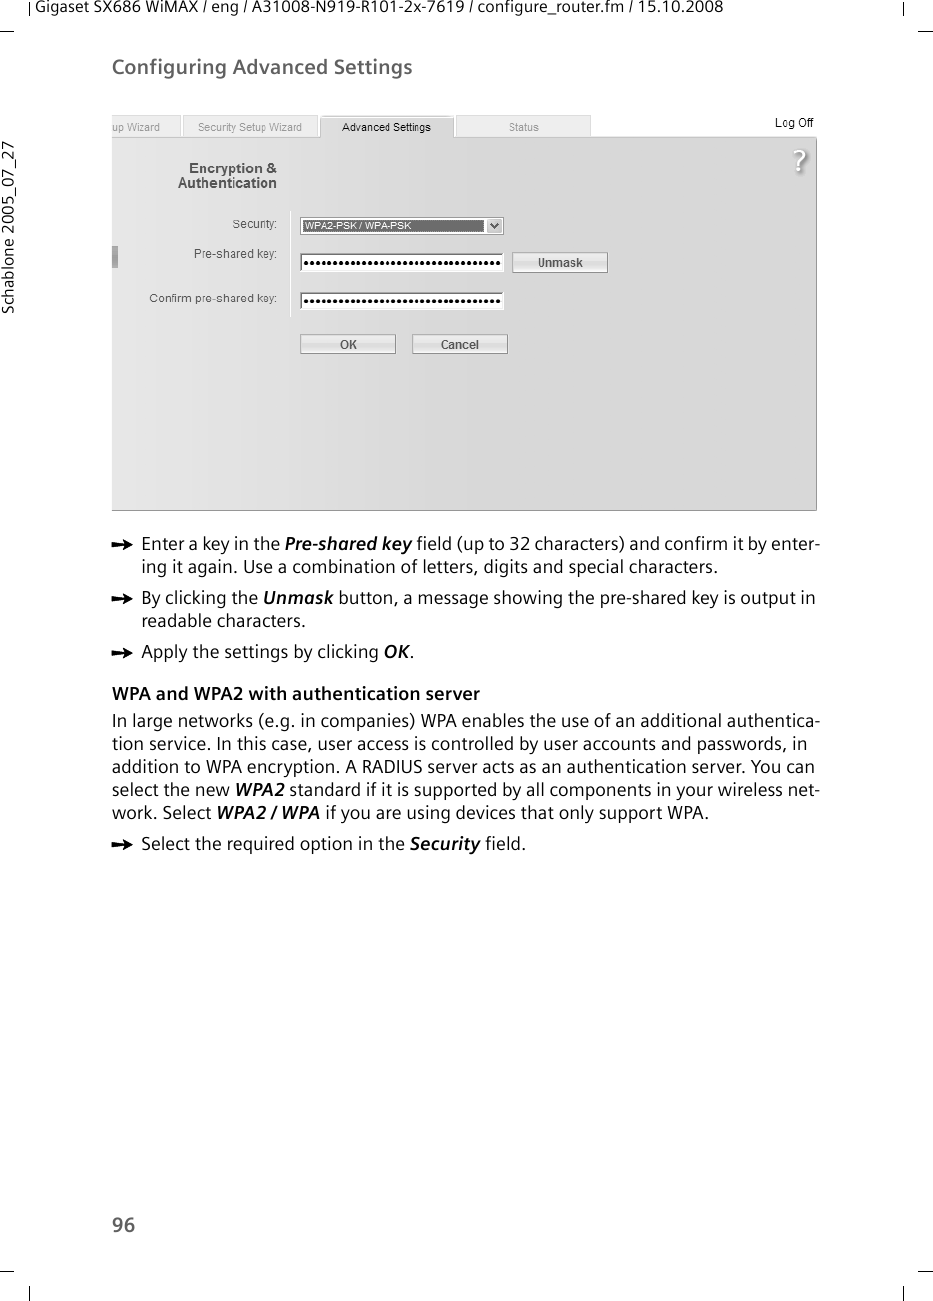
![63Security Setup WizardGigaset SX686 WiMAX / eng / A31008-N919-R101-2x-7619 / configure_router.fm / 15.10.2008Schablone 2005_07_27WPA2/WPA with pre-shared key (PSK)WPA is a more advanced procedure than WEP for protecting wireless networks. Dynamic keys, based on TKIP (Temporal Key Integrity Protocol), offer increased security. The new standard WPA2 uses AES (Advanced Encryption Standard) for encryption.WPA-PSK is a special WPA mode for private users and users in small companies without their own authentication server. After a certain period of time (Rekey interval), encryp-tion keys are automatically generated with the pre-shared key, automatically changed ("rekeying") and authenticated between the devices.This screen shows the preset encryption settings.ìIf you do not want to change the encryption settings, click on Next >.If you want to change the pre-shared key:ìSelect WPA2-PSK if WPA2 is supported by all components in the wireless network.ìSelect WPA-PSK only if WPA is supported by all components in the wireless network.ìSelect WPA2-PSK / WPA-PSK if only some components in the wireless network sup-port WPA.ìEnter a key of your choice in the Pre-shared key field (min. 8 to max. 63 characters or hexadecimal characters [0-9, A-F]) and confirm it by repeating the entry. You must set up the same pre-shared key for all wirelessly connected PCs. Use a combi-nation of letters, digits and special characters.Note:Every PC (network adapter) that requires access to a WPA-protected wireless network must also support WPA. Information about this can be found in the operating manual for your network adapter.](https://usermanual.wiki/Gigaset-Communications/SX686.User-Manual-Guide/User-Guide-1053206-Page-63.png)


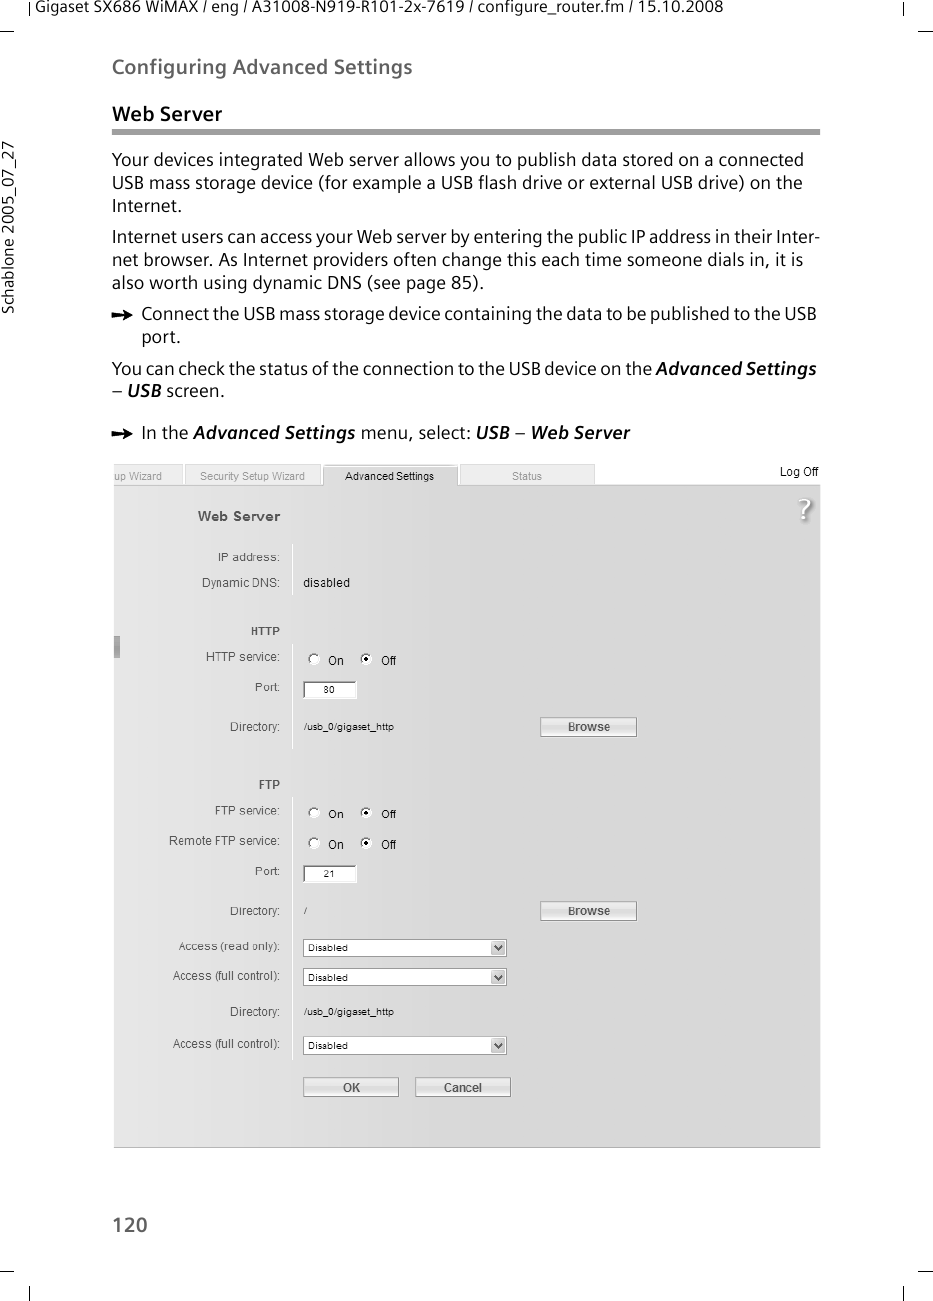
![121Configuring Advanced SettingsGigaset SX686 WiMAX / eng / A31008-N919-R101-2x-7619 / configure_router.fm / 15.10.2008Schablone 2005_07_27The IP address (see page 88) of the Gigaset SX686 WiMAX is displayed, as well as infor-mation as to whether Dynamic DNS (see page 85) is activated.HTTPHTTP (Hypertext Transfer Protocol) is the standard protocol for transferring data on the Internet. You can use this to publish your own homepage on the Internet, for example.ìActivate the HTTP service for your Web server.ìYou can change the Port via which Internet users can access your data, to mask your data and protect it from unauthorised users, for example. ìChoose the Directory in which the data is stored on the USB mass storage device and which should be shared for Internet access using the Browse button. Please note that this will share the selected directory and all its subdirectories for Internet access.The /usb0/gigaset_http path is shown by default. usb_0 is the partition number on the USB device. After you have chosen a directory on the USB device, this will be shown.Internet users can access the HTTP server as follows: ìOpen the Internet browser and enter the full address:http://public_IP_address:[port]/gigaset_http/directory/start_filepublic_IP_addressIP address of the Gigaset SX686 WiMAX assigned by the Internet service provider. This address is shown on the Status page (see page 136). If you use a dynamic DNS service (see page 75) enter the domain name given by your service provider instead of the IP address.PortThe port 80 is used for the HTTP service by default. Port must only be specified if another port is used for the HTTP server.gigaset_httpThis is a fixed part of the path and has to be entered always.directoryEnter the directory in which the HTTP server start file is located on the USB mass storage device. You have to enter the full directory path of the shared directory.Example: If the Web server is located in the /usb0/web-server/my_webpage directory and the / directory is shared, you have to enter this full path. If the /usb0/web-server/my_webpage is shared, you can start the Web server without entering the path.start_fileEnter the name of the HTTP server start file.](https://usermanual.wiki/Gigaset-Communications/SX686.User-Manual-Guide/User-Guide-1053206-Page-121.png)
![126Call guideGigaset SX686 WiMAX / en / A31008-N919-R101-2x-7619 / telefone.fm / 15.10.2008Schablone 2005_07_27Conference call between three participantsCall answering and forwardingR1Terminate one call and return to the waiting callPress R1 to end the current call. You then switch to the waiting call. The second call is ended automatically when you replace the receiver.Key combination Effect DescriptionR3 Conference callWhen you are making a call and a sec-ond call is waiting (see above), press R3 to enable a conference call between you and the two call parties. R2End the conference call and continue calls separatelyPress R2 to end the conference call.You are then connected to the previ-ously active call again and the previ-ous waiting call is now in the wait state again.R4End conference call and set up the con-nection between call partiesIf you press R4 during a conference call, you end your call and set up a connection between the other two external call parties. You can then replace the receiver. In the case of an internal conference call, you simply need to hang up.End conference call Replace the receiver to terminate all calls.Key combination Effect Description*21*[number]# Forward to internal phone numberDial *21*, the desired internal phone number to which all calls are to be forwarded that are received on this extension, and then press the # key.Example: You want to set up call for-warding from your phone to a second internal phone number. Dial *21**2#.#21# Delete call forward-ingUse the key combination #21# to delete internal call forwarding, which you set up as described above.Key combination Effect Description](https://usermanual.wiki/Gigaset-Communications/SX686.User-Manual-Guide/User-Guide-1053206-Page-126.png)
![127Call guideGigaset SX686 WiMAX / en / A31008-N919-R101-2x-7619 / telefone.fm / 15.10.2008Schablone 2005_07_27Call waiting and call reject if busy*61*[number]#Call forwarding to internal number if absentDial *61*, the desired internal phone number to which all calls are to be forwarded that are received on this extension, and then press the #key. The call is forwarded after 20 seconds with this key combination.#61# Delete call forward-ing if absentUse the key combination #61# to delete internal call forwarding (if absent), which you set up as described above.*67*[number]#Call forwarding to internal number if line busyDial *67*, the desired internal phone number to which all calls are to be forwarded that are received on this extension, and then press the #key. The call is forwarded with this key combination if the line is busy.#67# Delete call forward-ing if line busyUse the key combination #67# to delete internal and external call for-warding (if line busy), which you set up as described above.#77# Delete all call for-warding settingsUse the key combination #77# to delete all call forwarding settings described above.*43# Allow call waitingUse the key combination *43# to allow call waiting when the line is busy.#43# Delete call waiting Dial #43# to disable call waiting if busy again.*26# Reject all callsUse the key combination *26# to specify that all calls are to be rejected. This is only possible if call waiting is disabled.#26# Delete the reject calls settingUse the key combination #26# to delete the reject all calls setting.Key combination Effect Description](https://usermanual.wiki/Gigaset-Communications/SX686.User-Manual-Guide/User-Guide-1053206-Page-127.png)