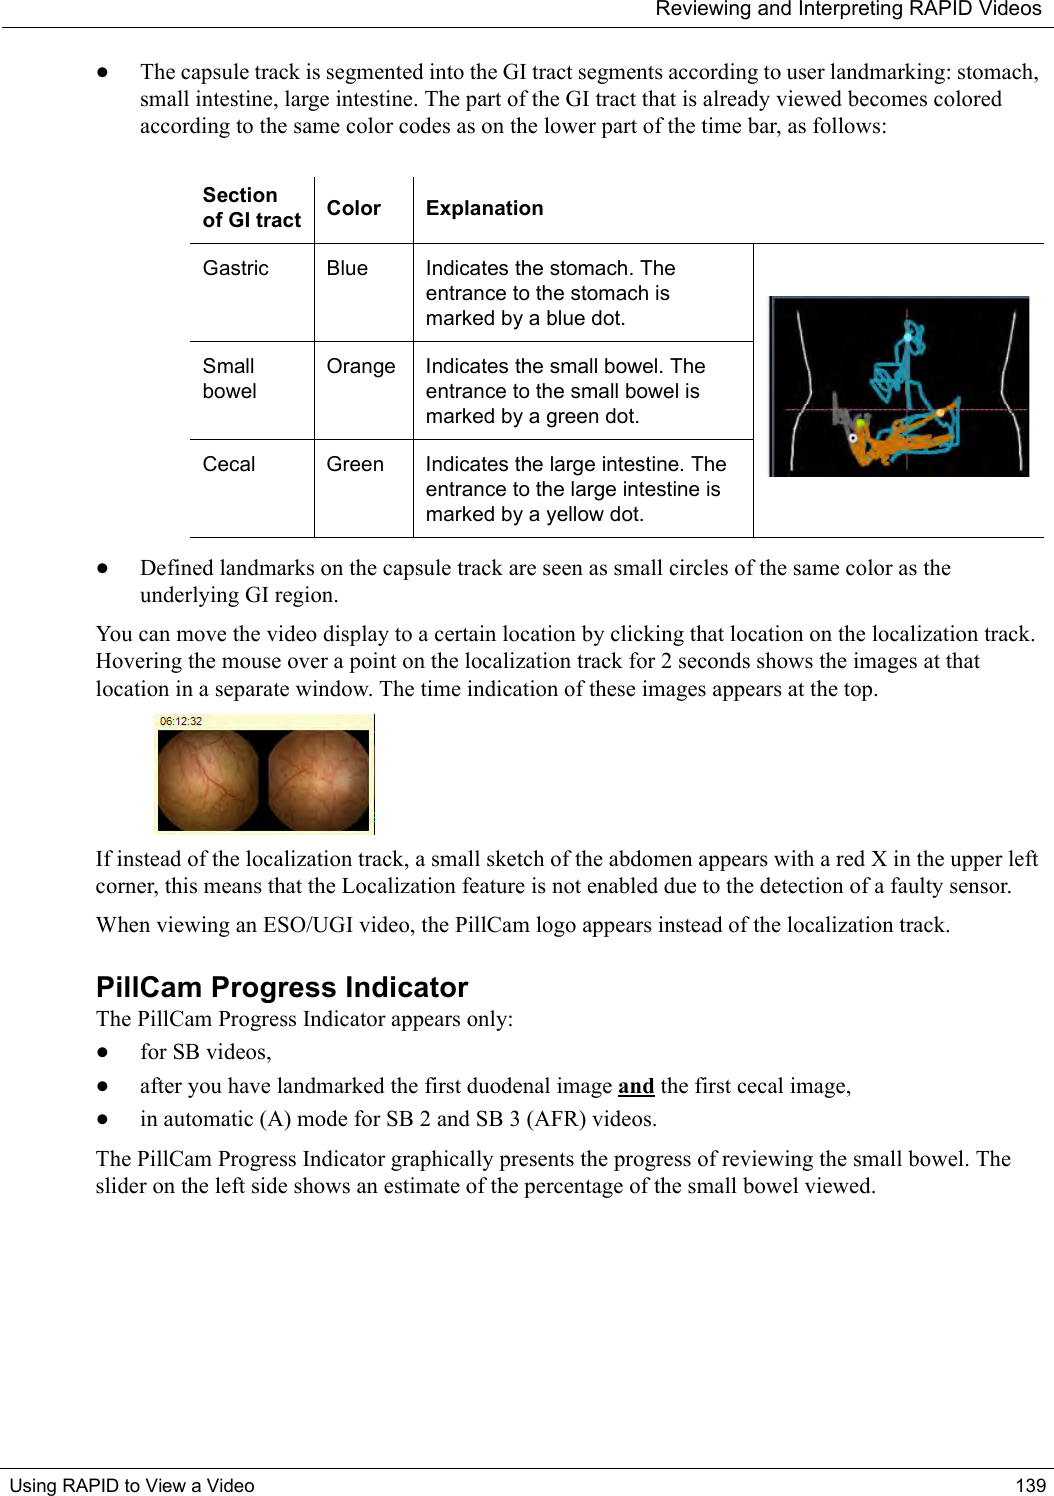
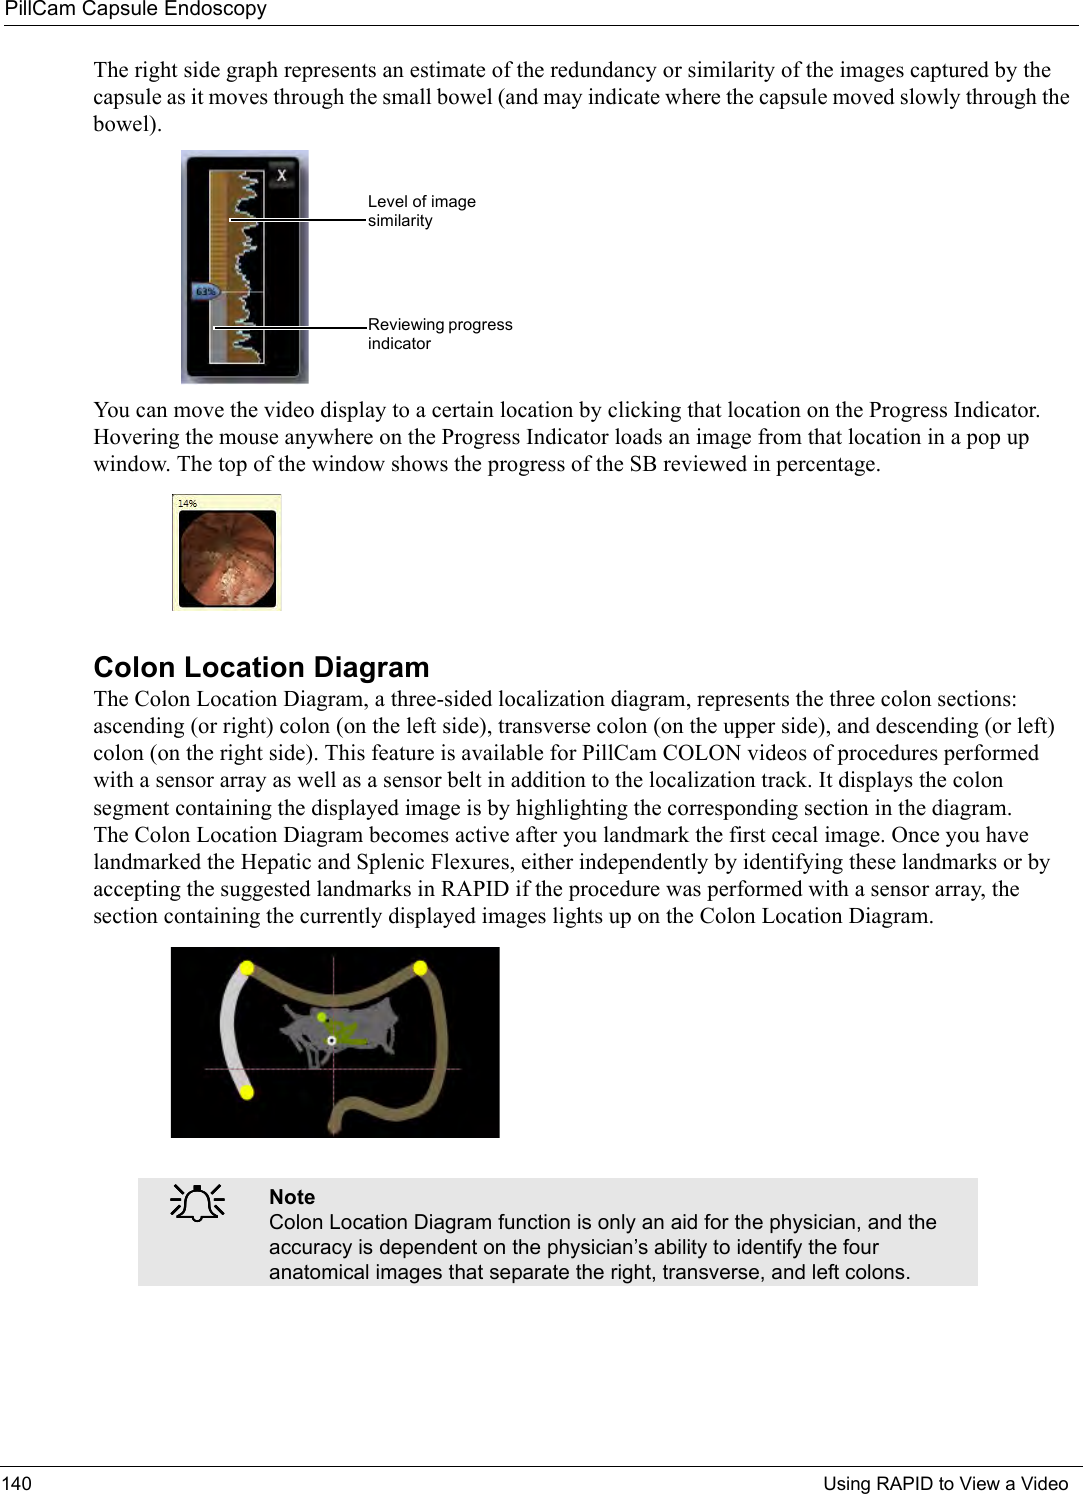
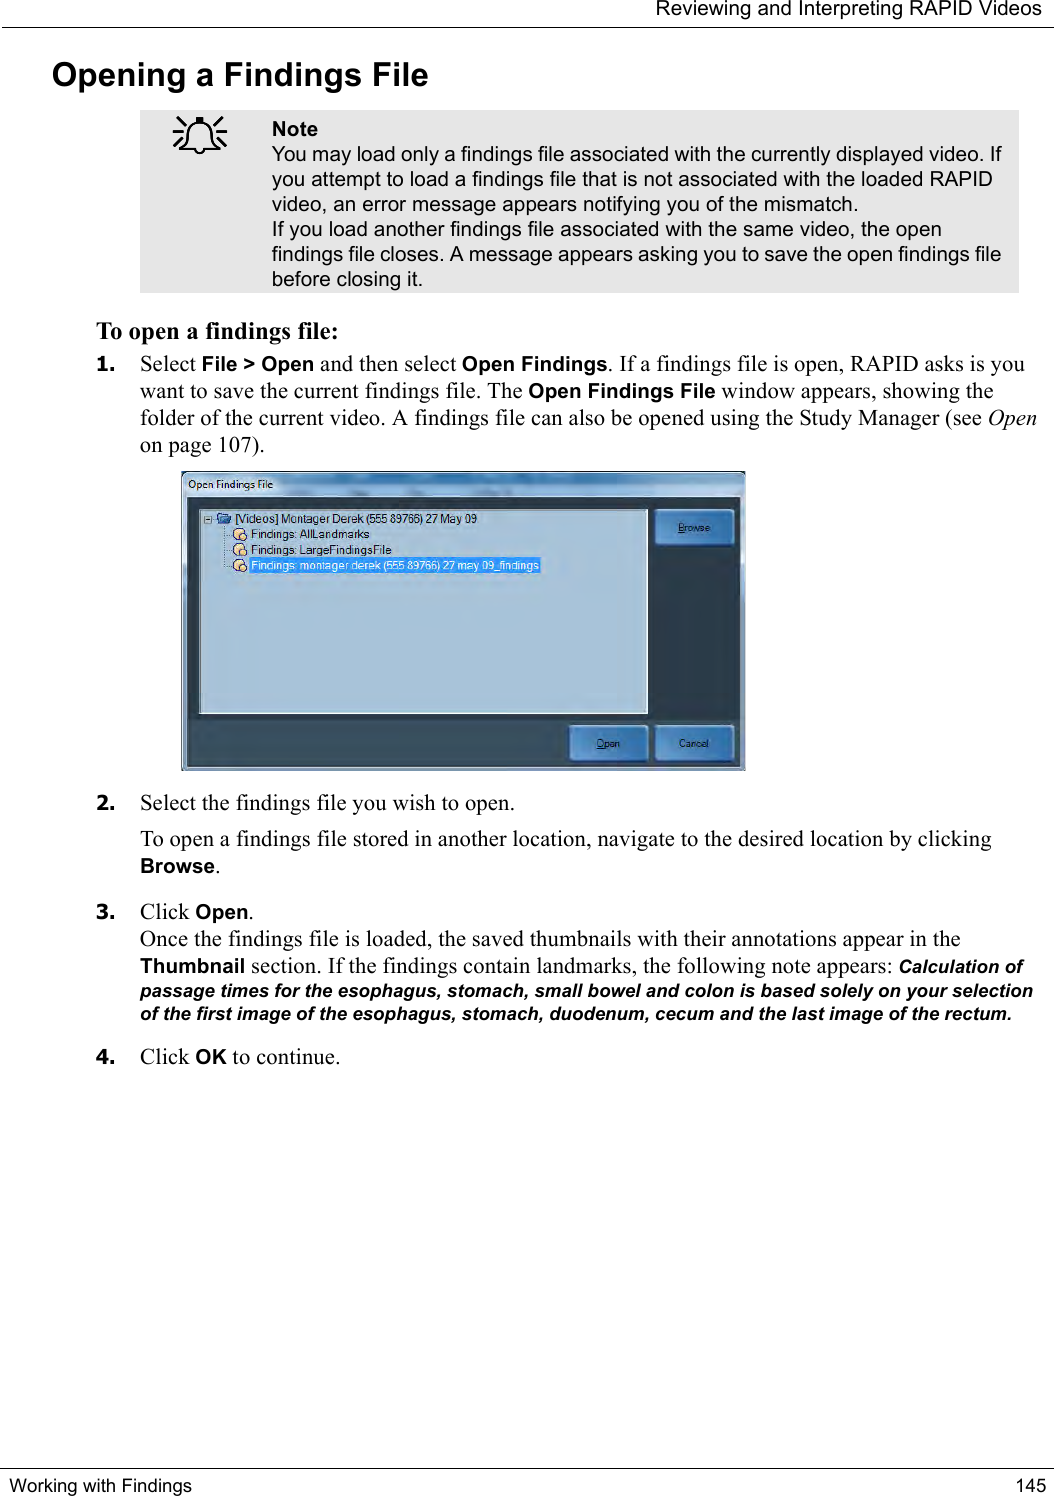
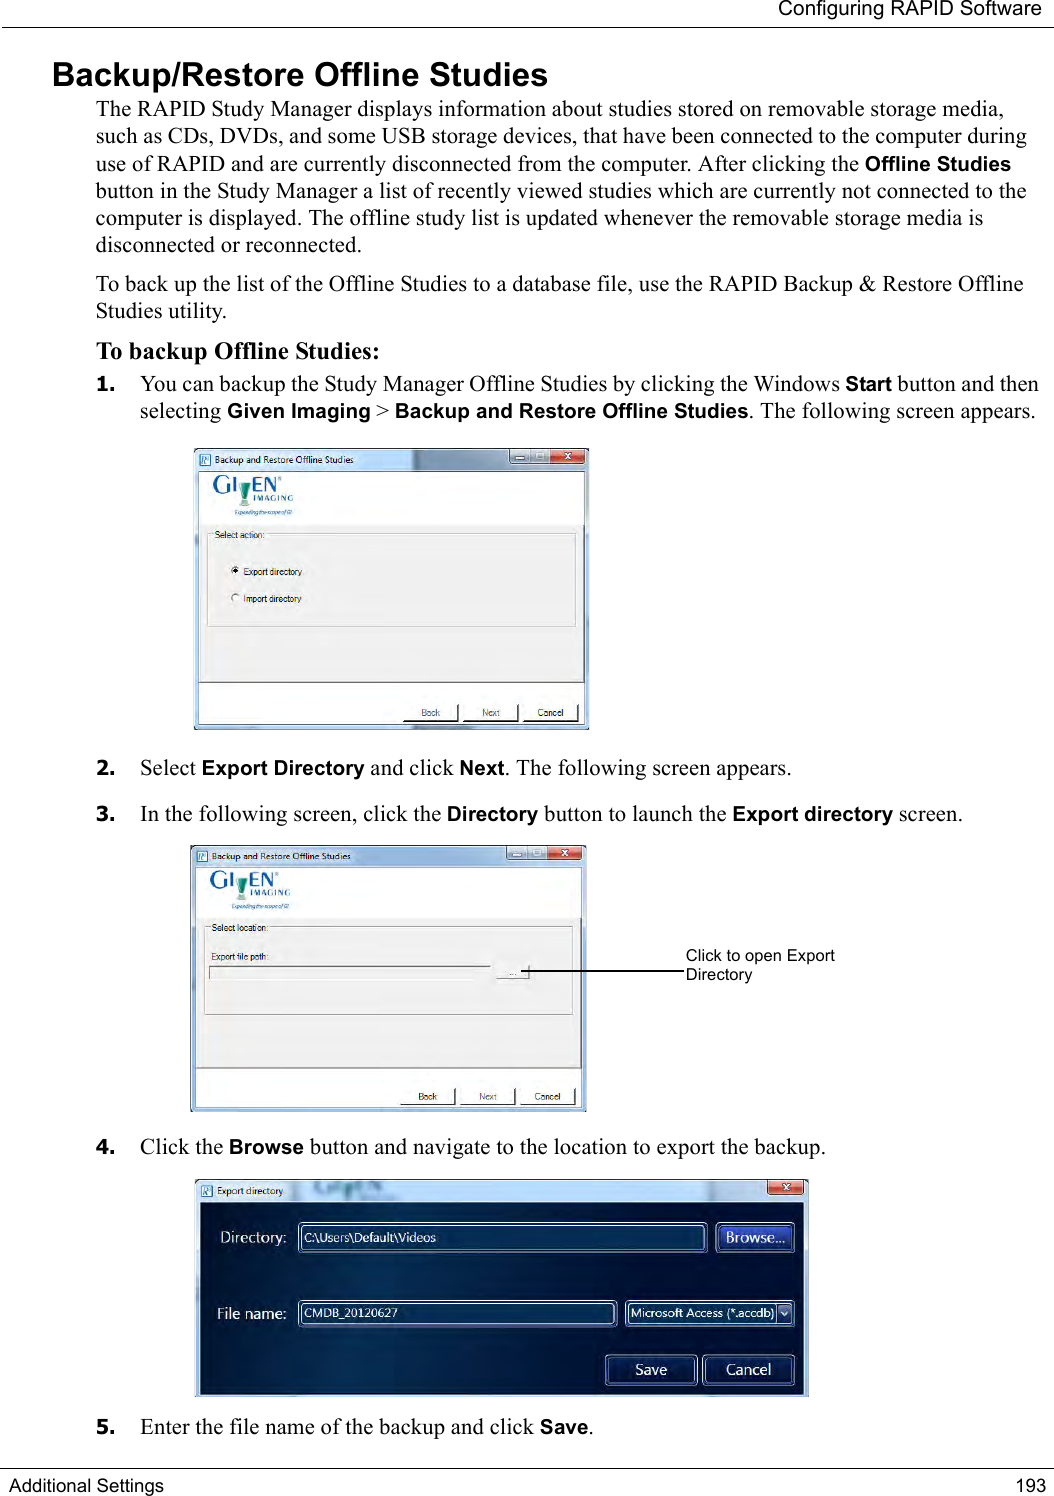
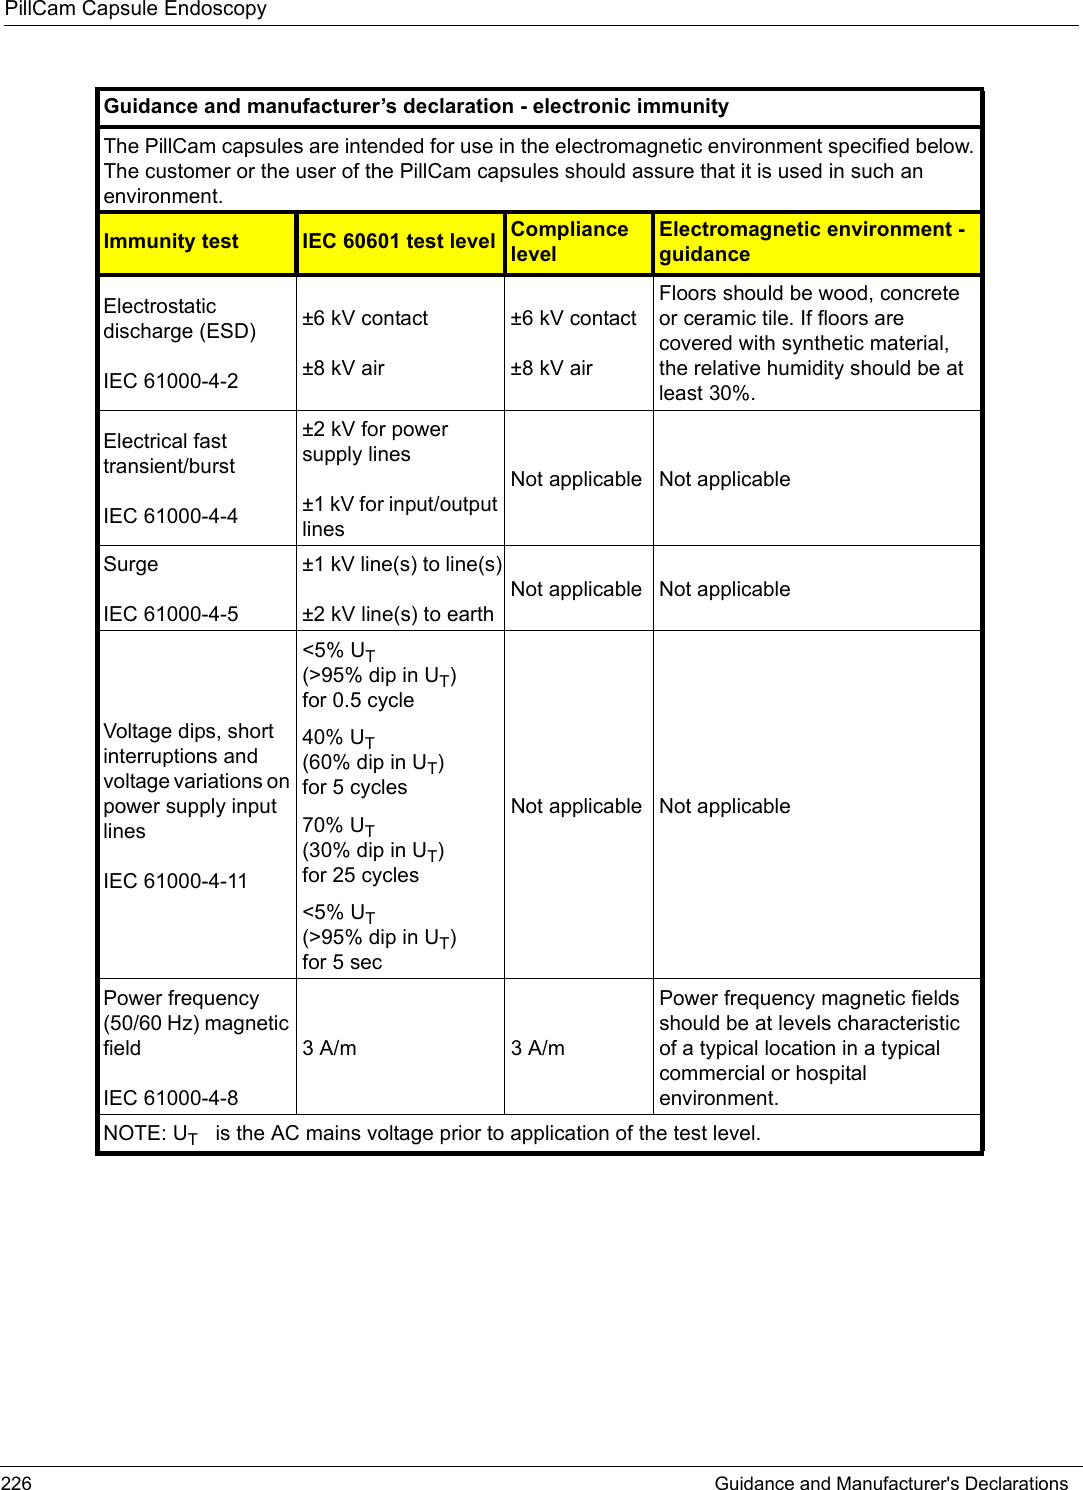
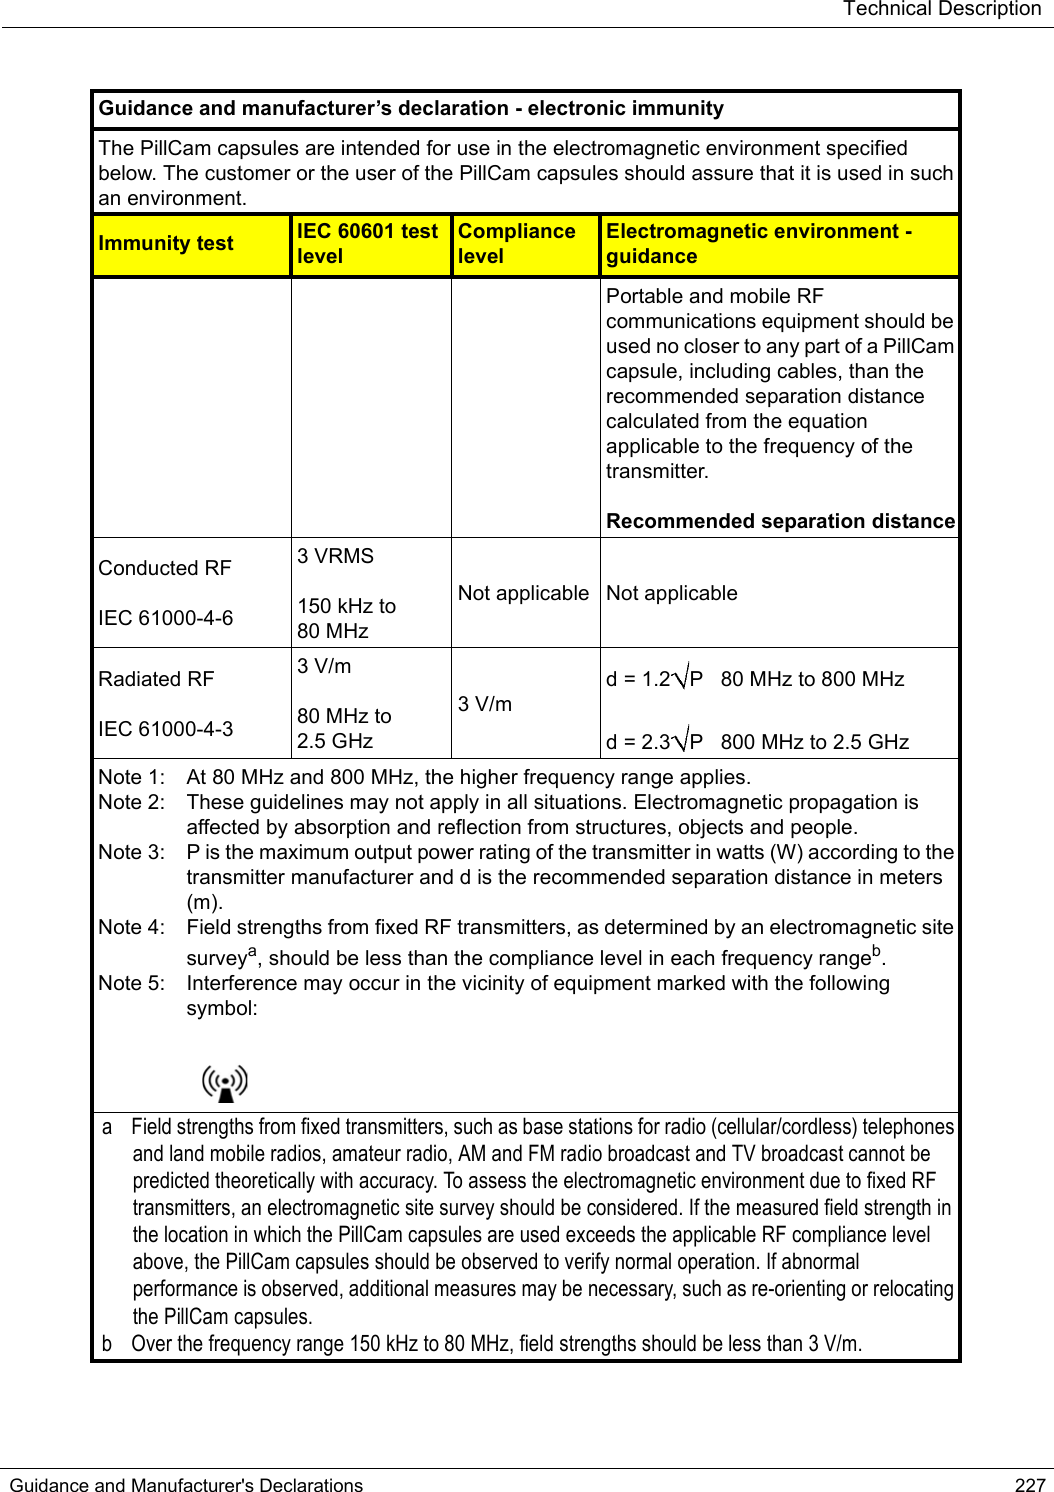
Given Imaging CAPDH-2 Endoscopy Capsule User Manual DOC xxxx 01 PillCam RAPID 8 5 EN
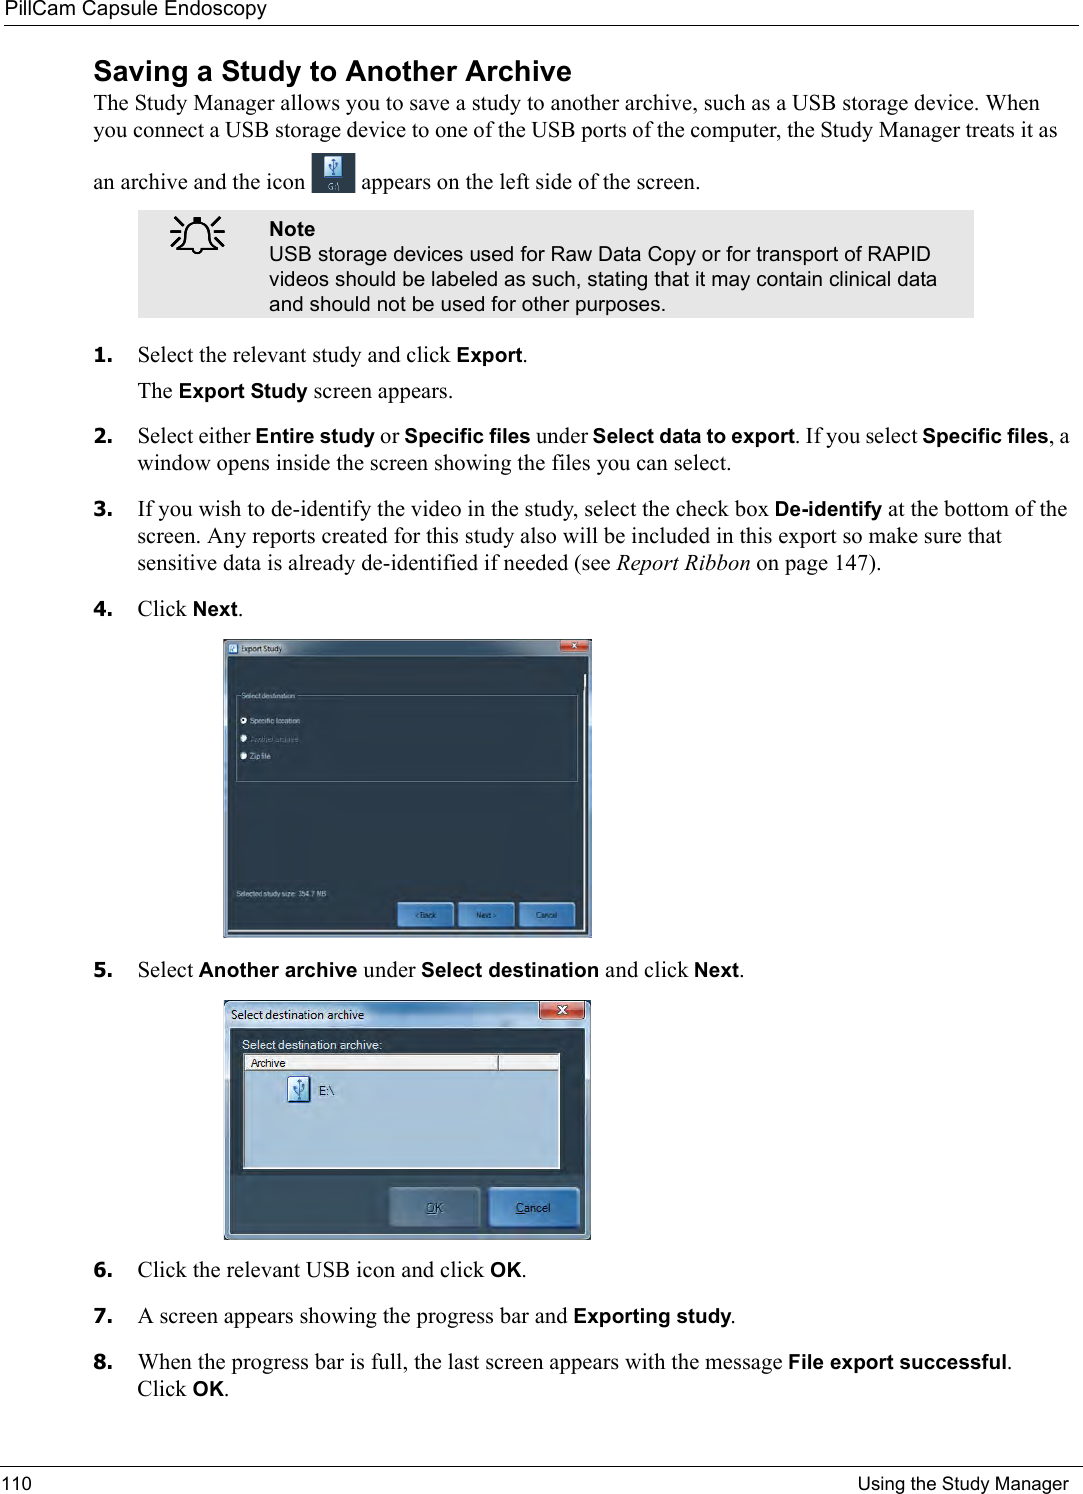
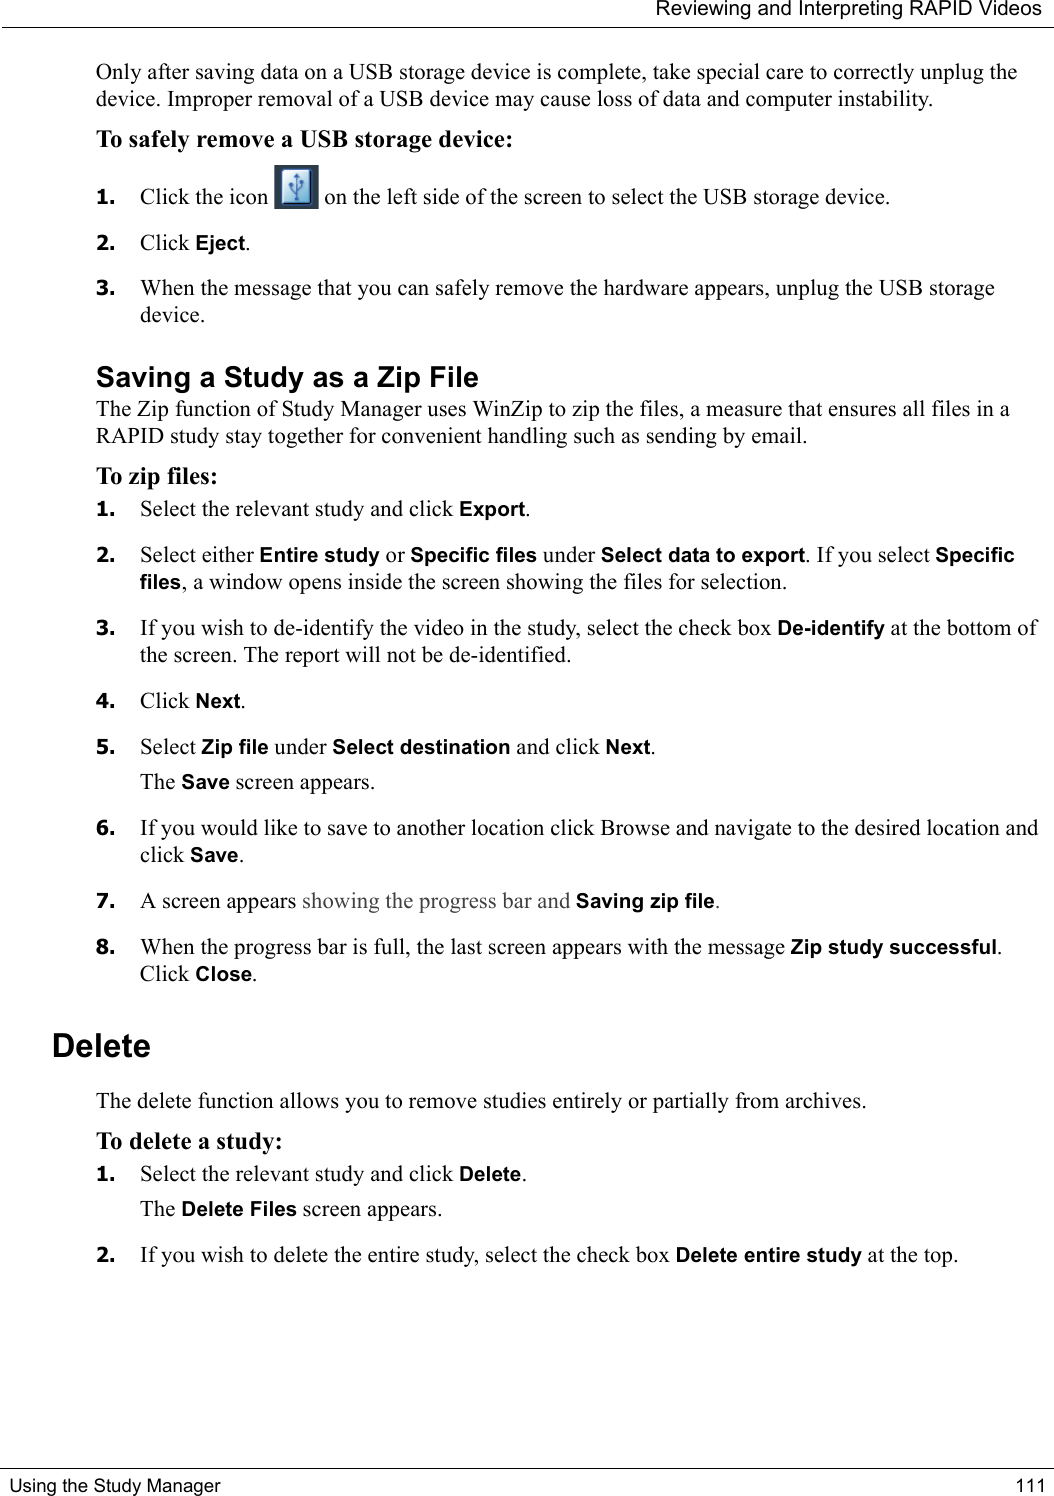
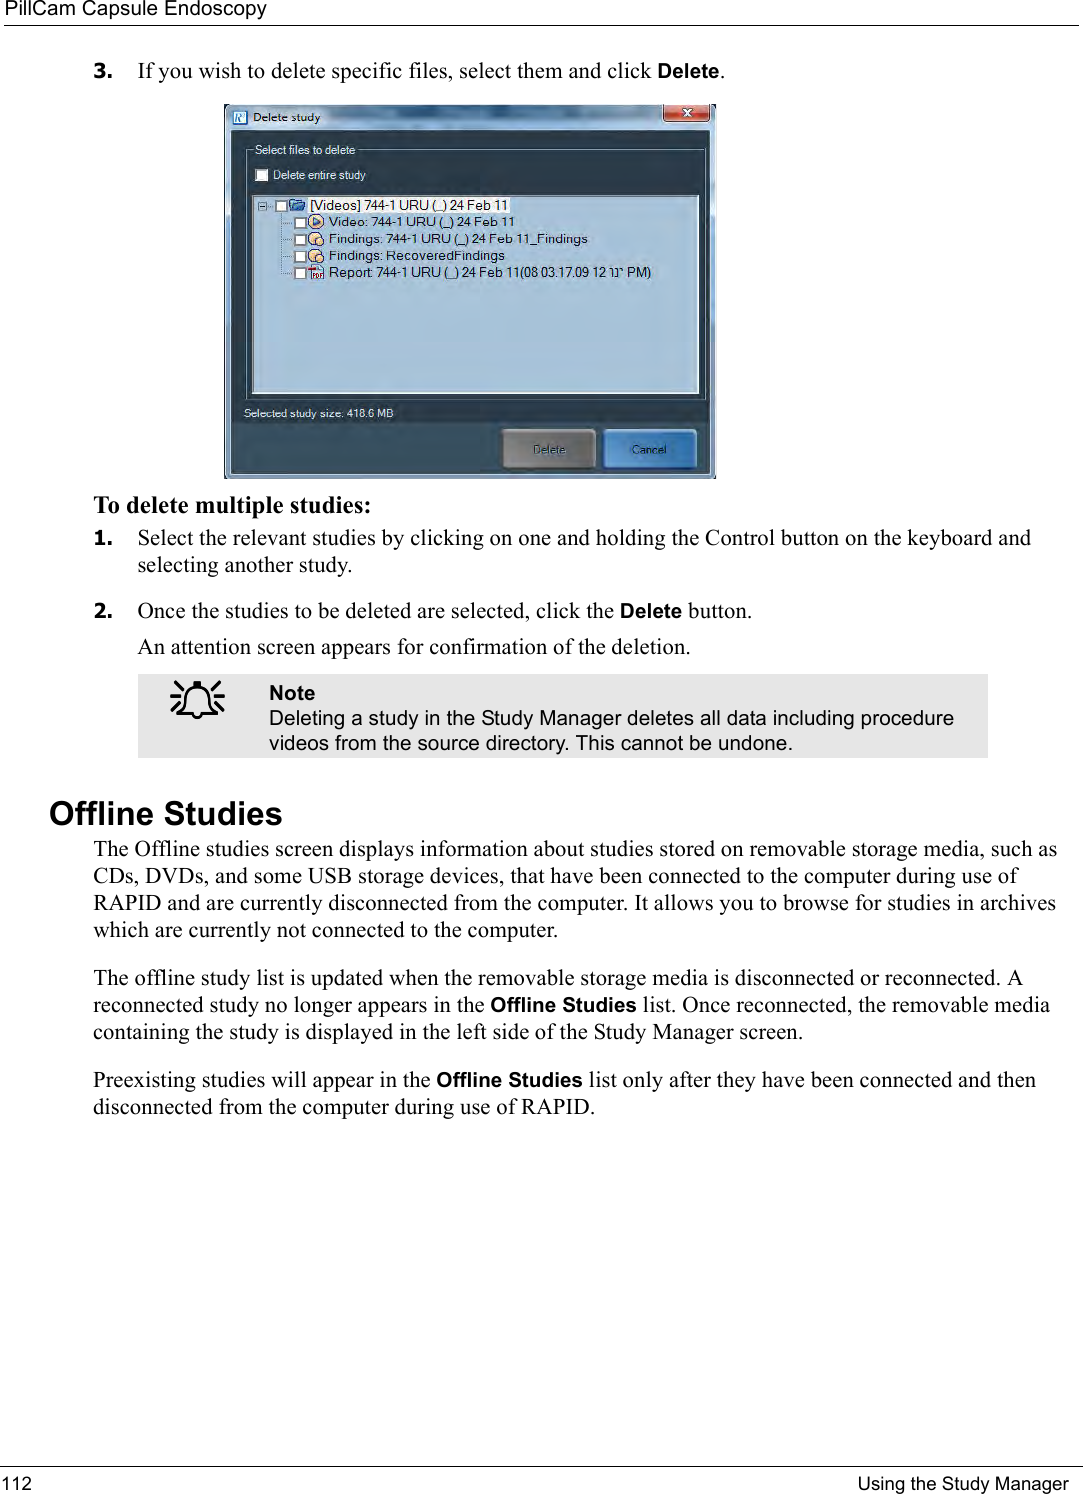
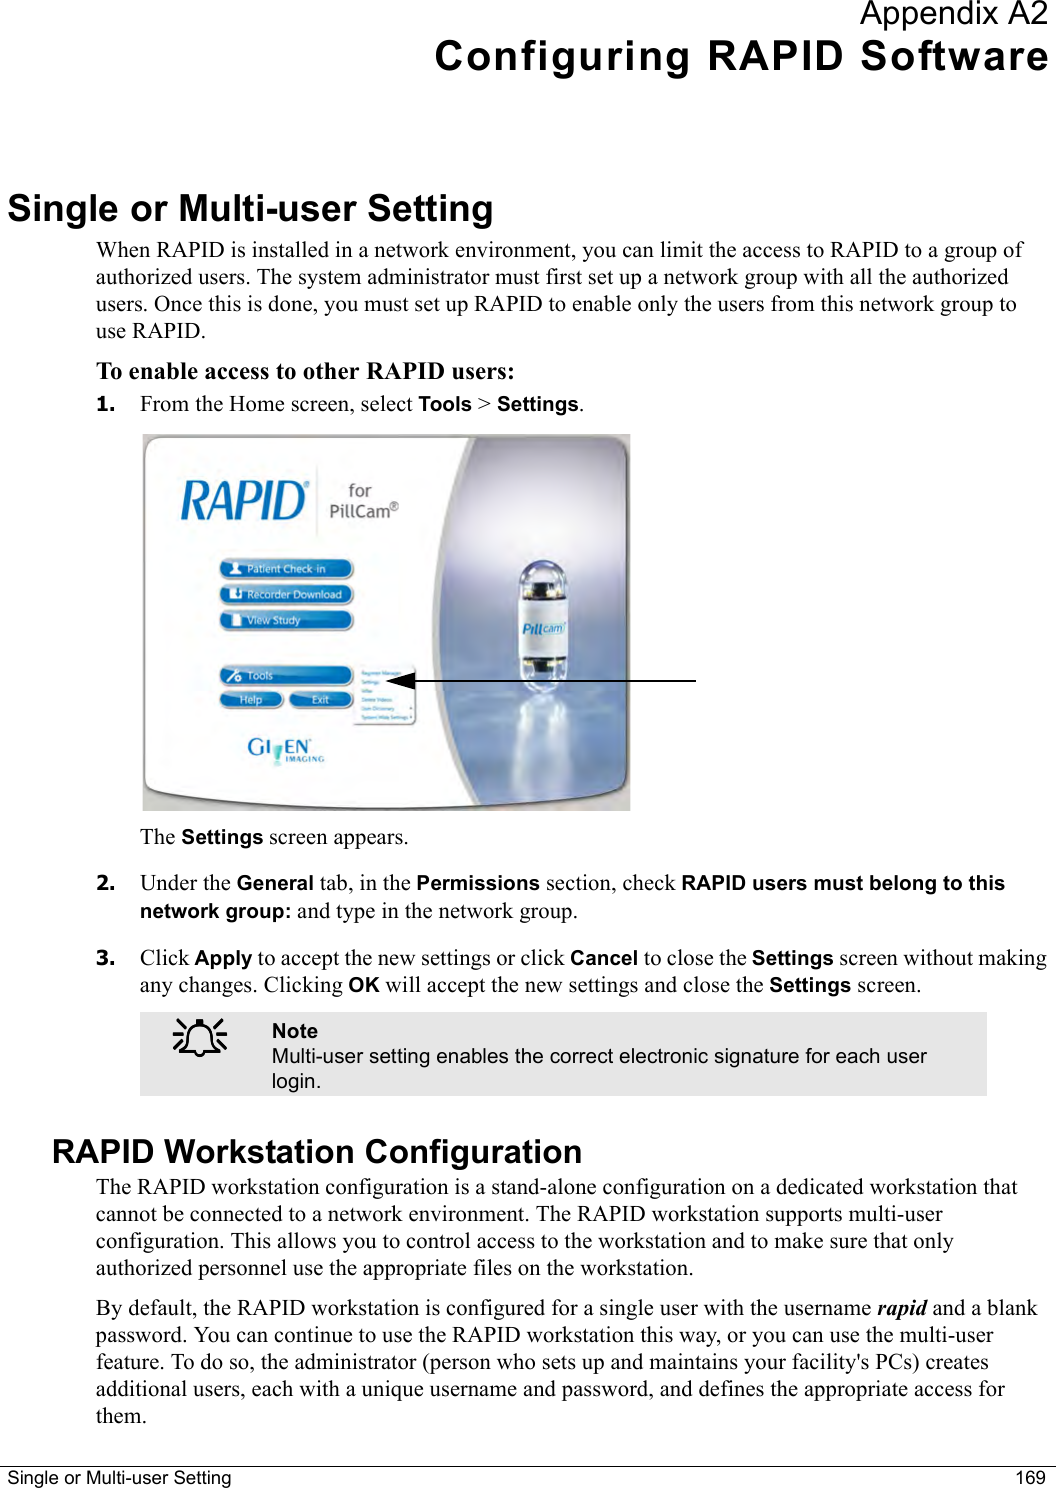
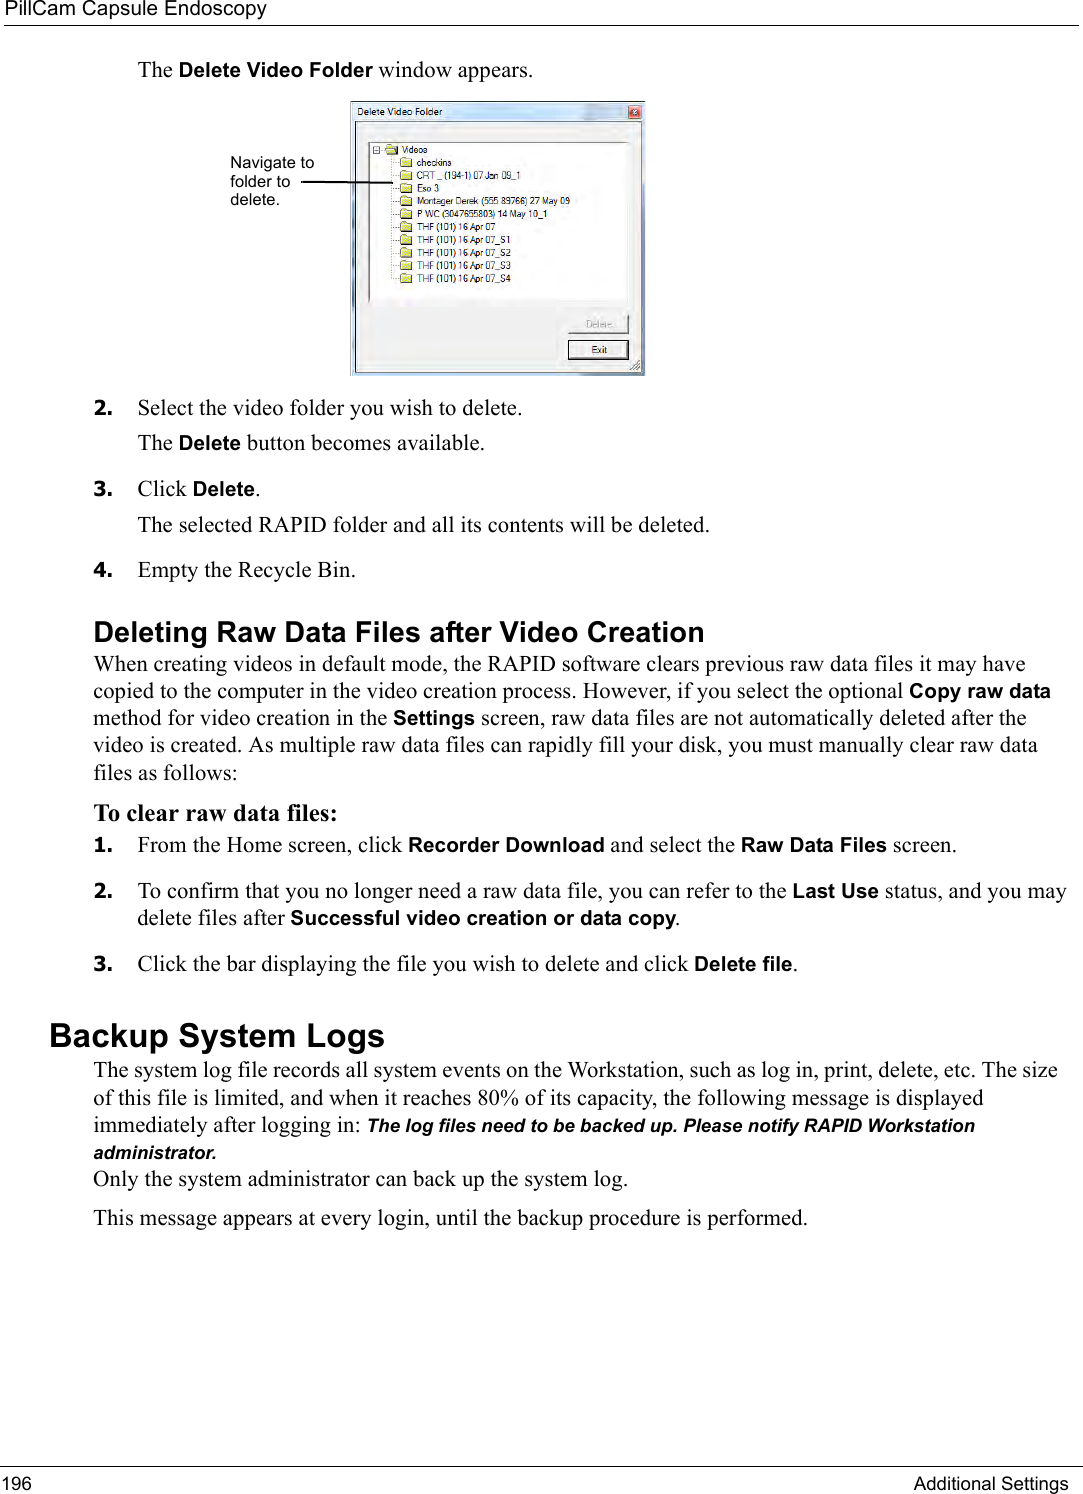
Given Imaging Limited Endoscopy Capsule DOC xxxx 01 PillCam RAPID 8 5 EN
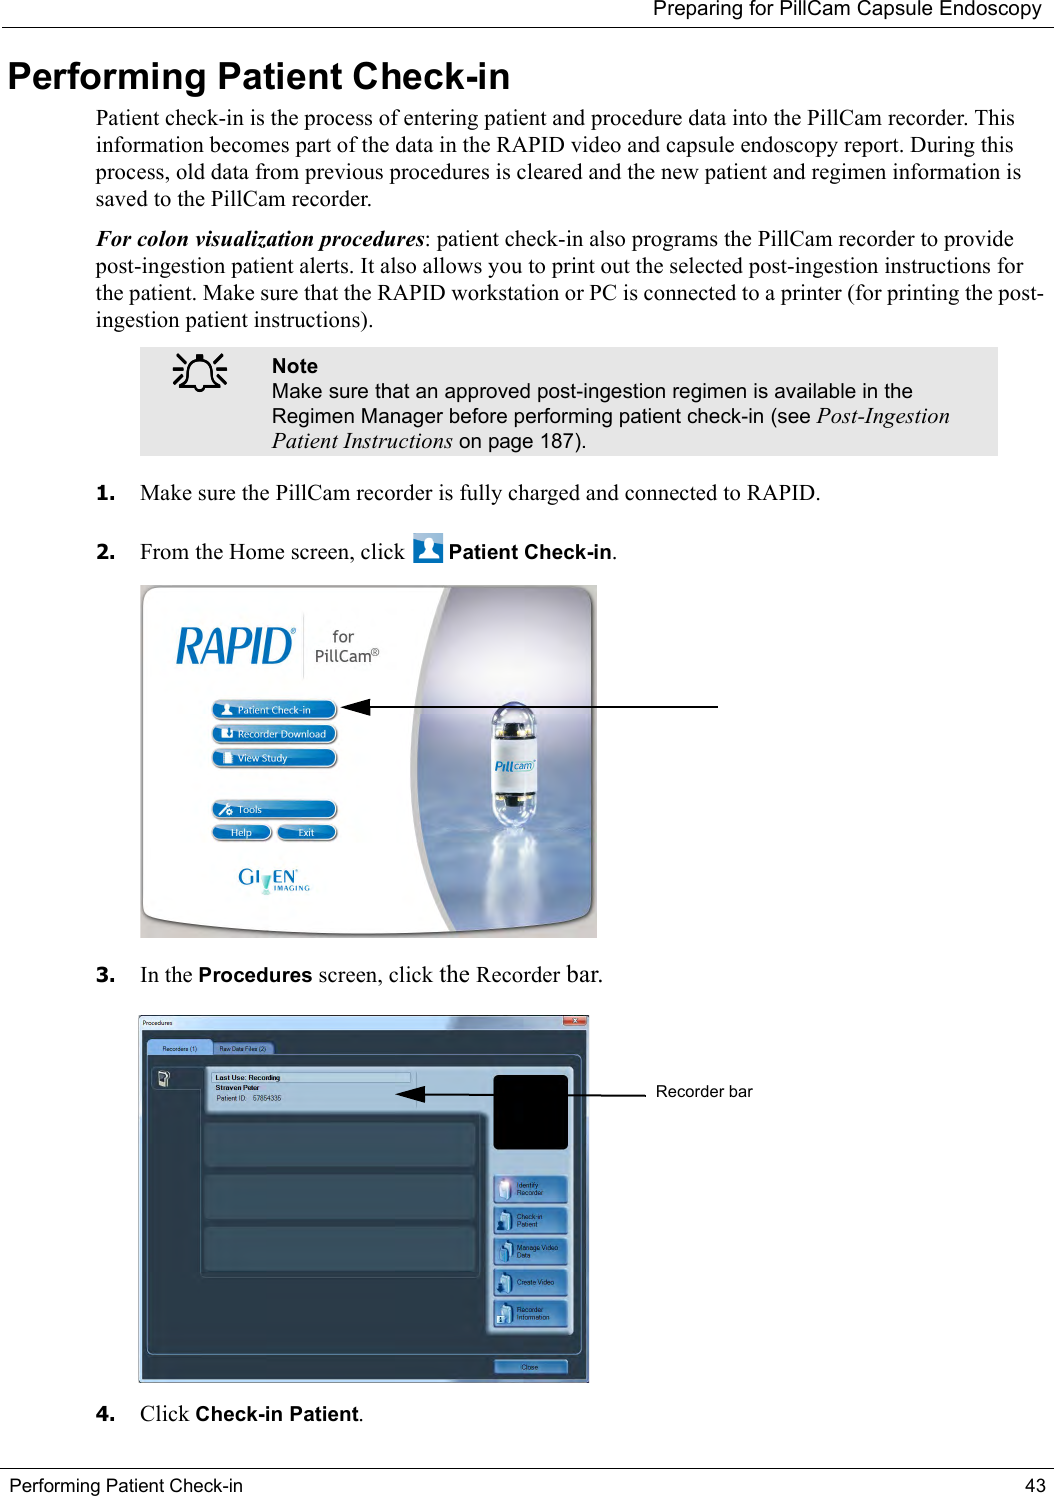
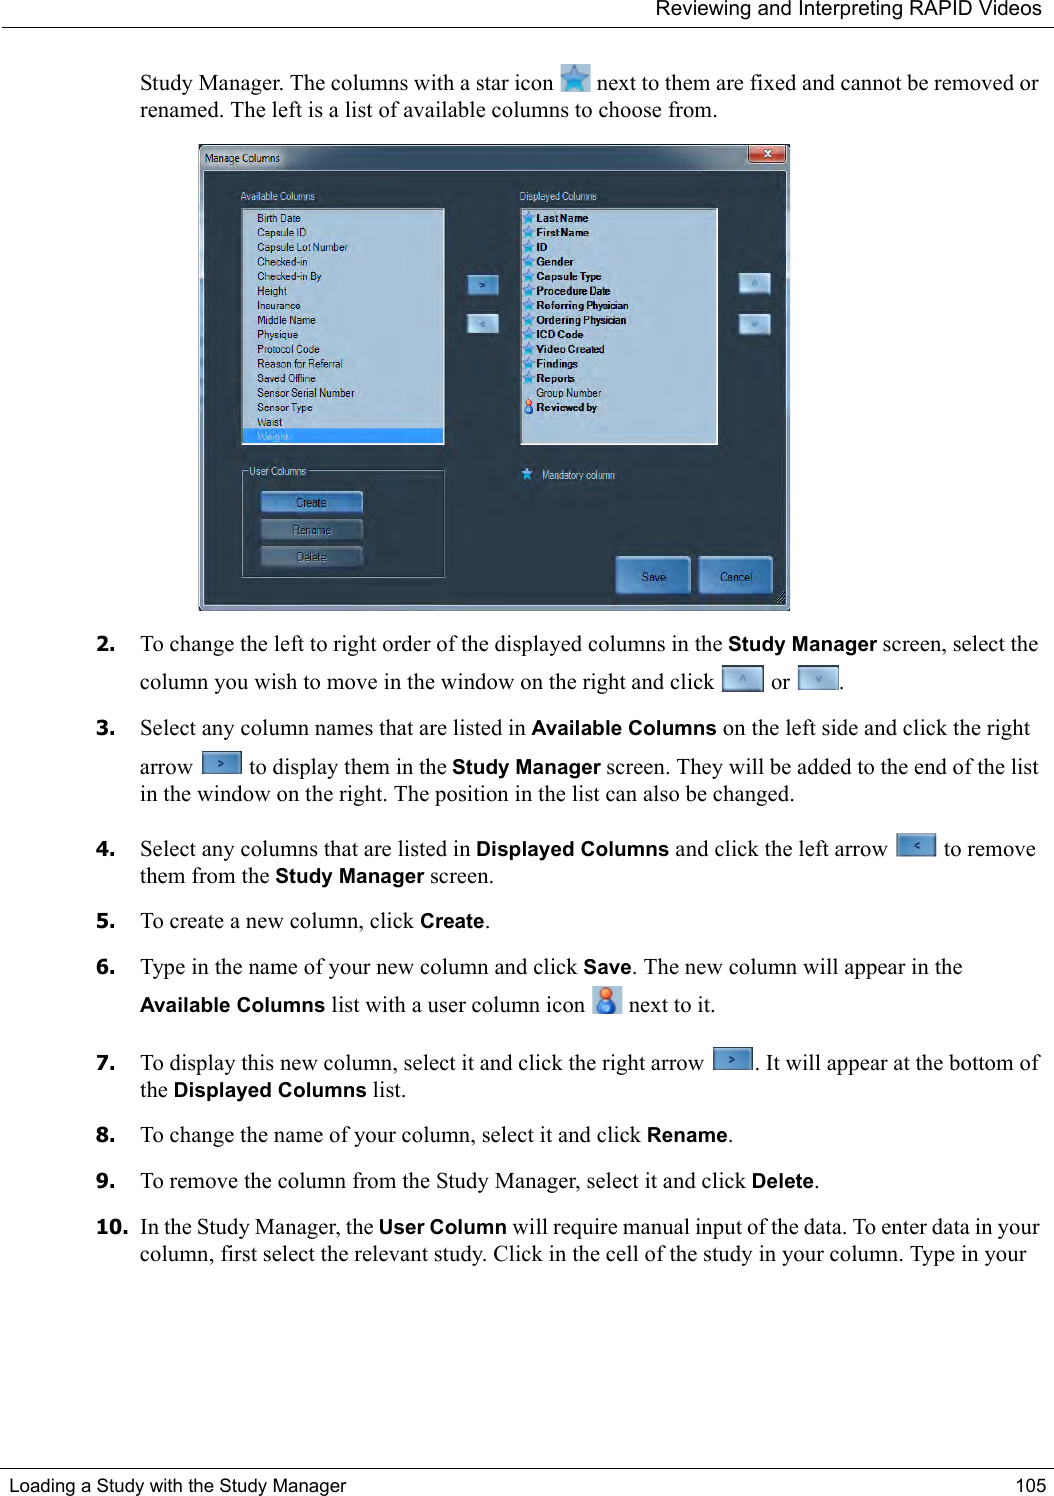
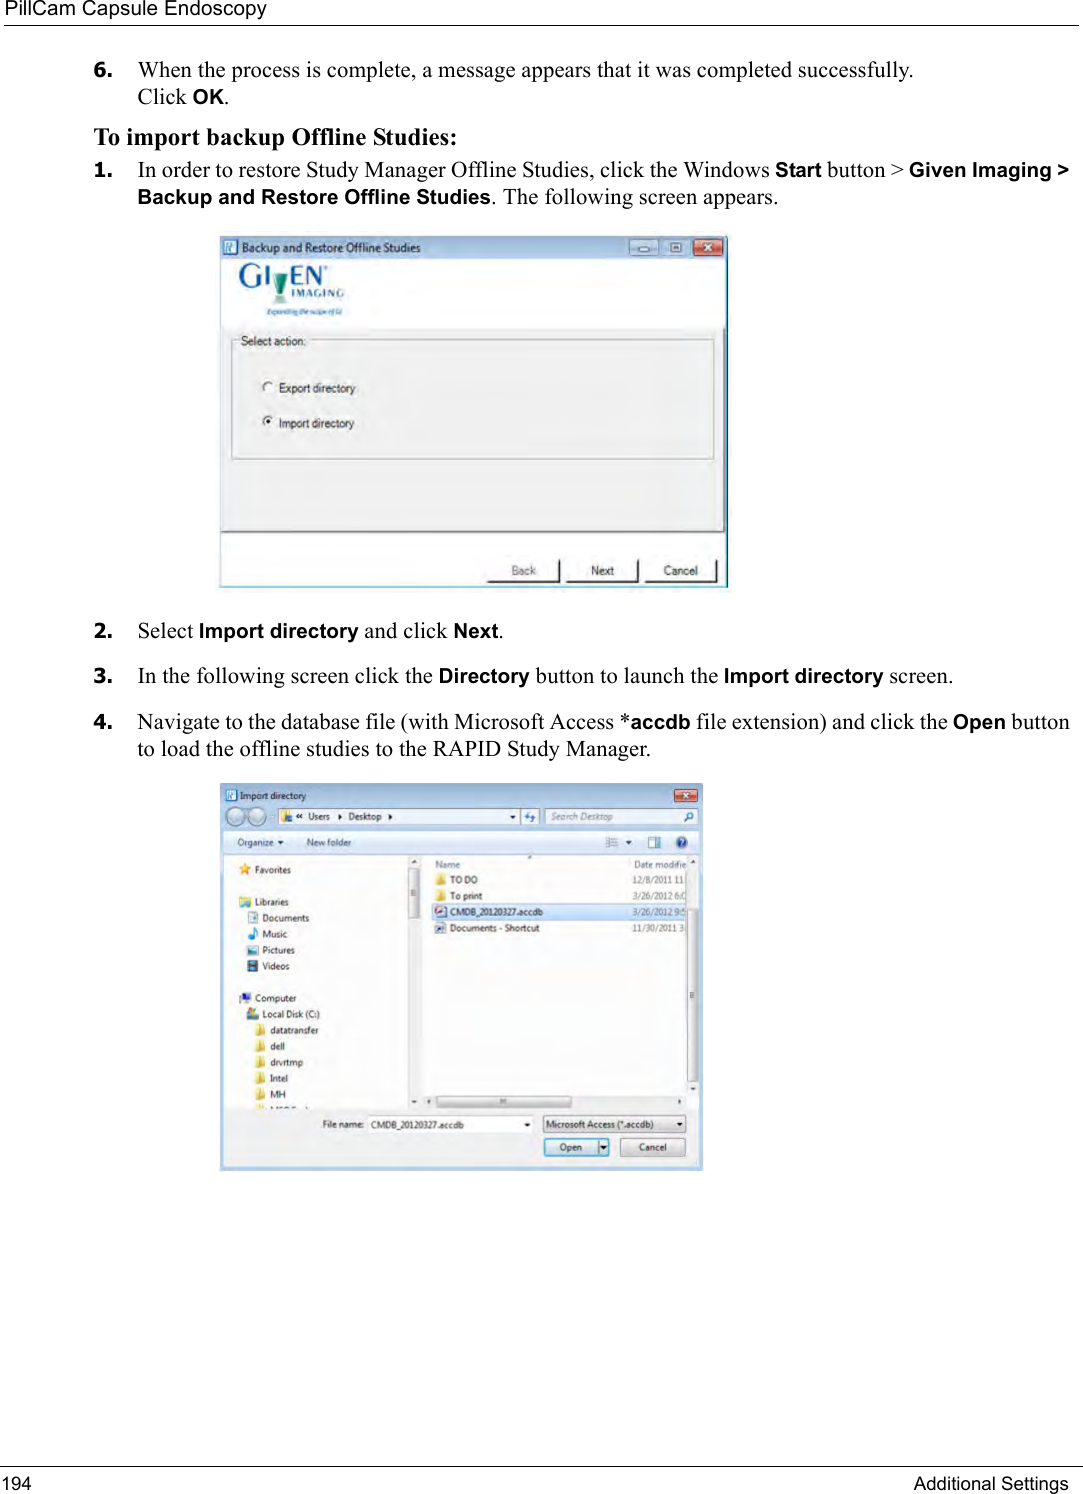
UserManual.wiki
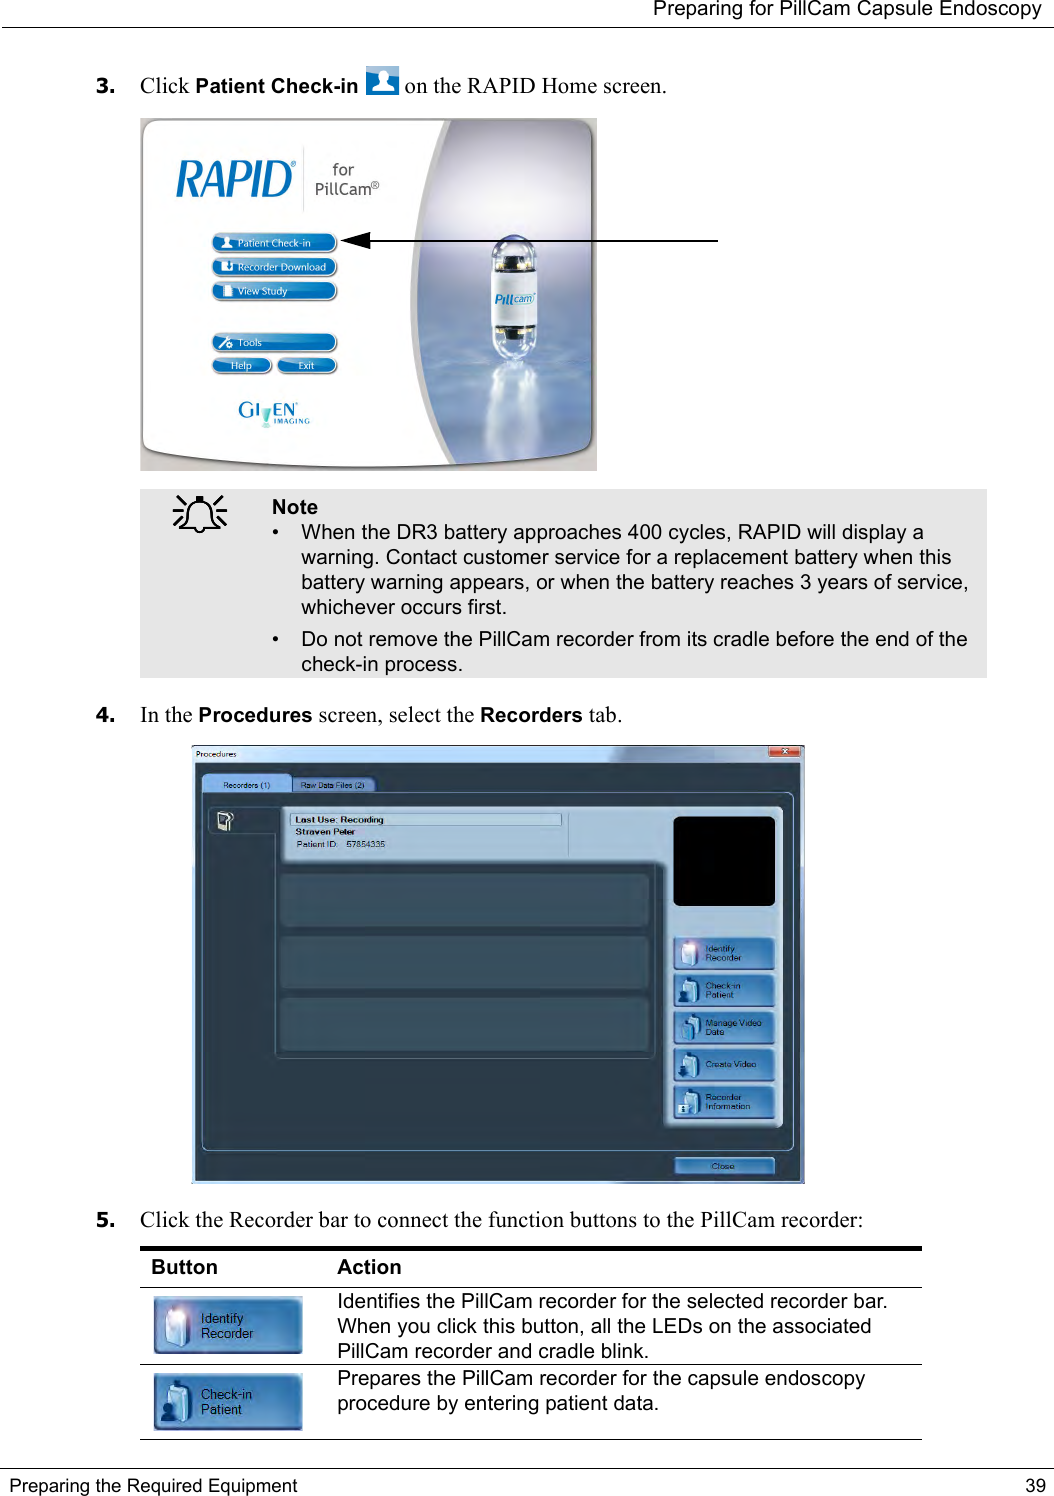
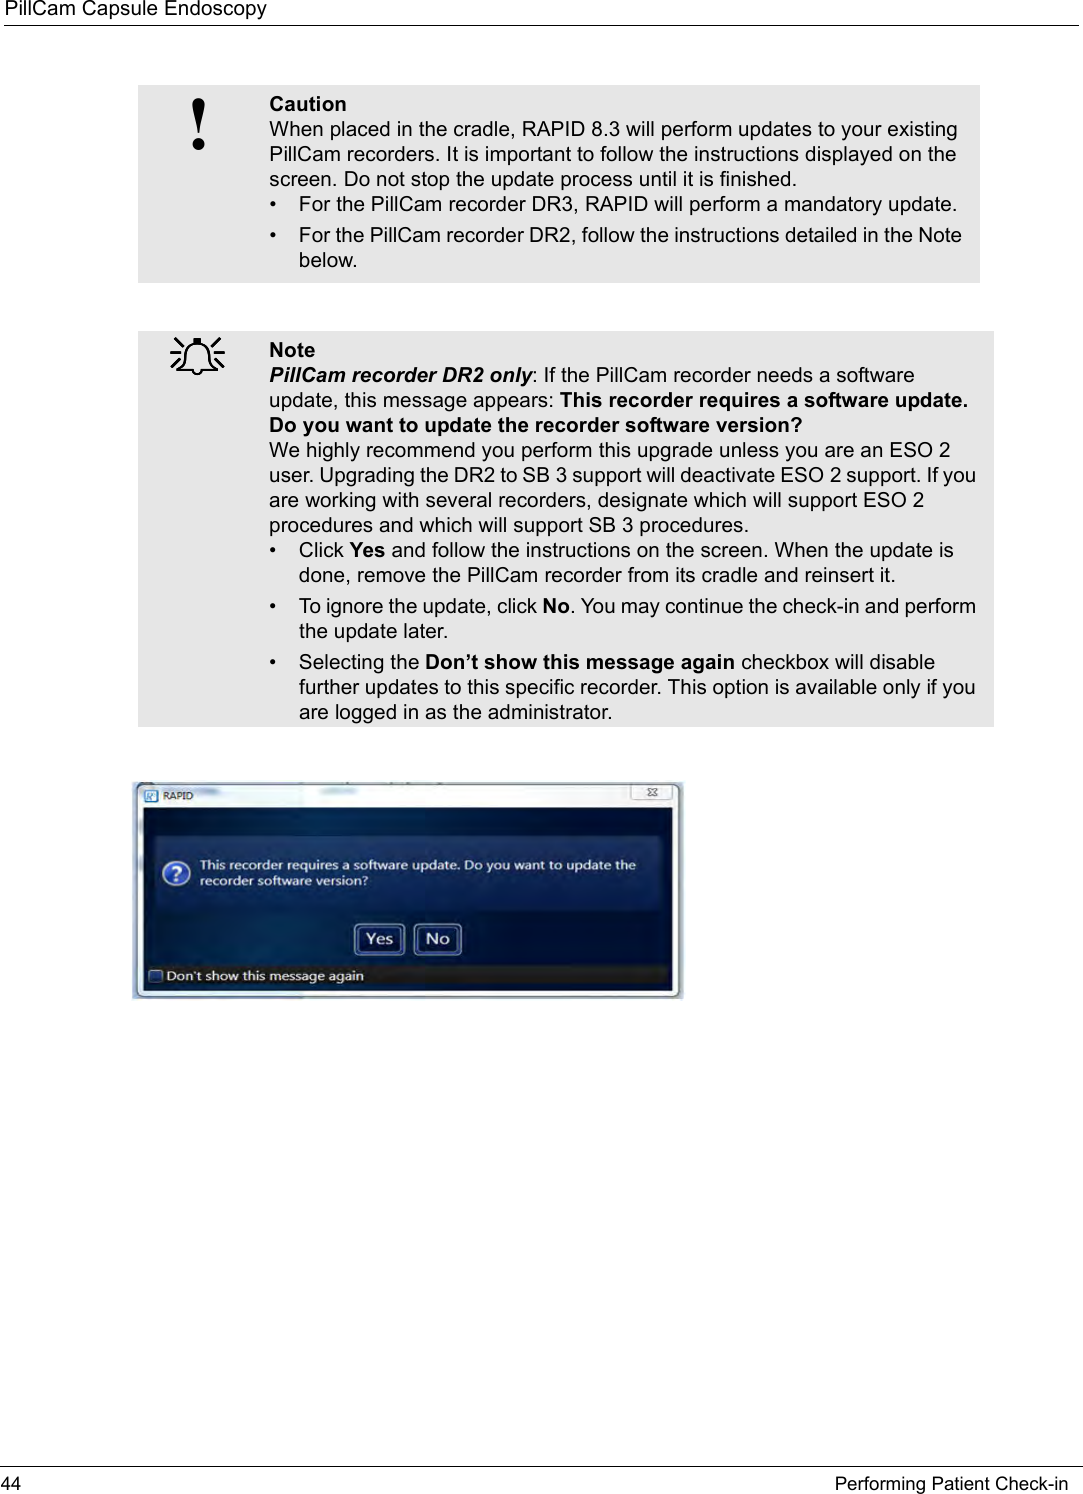
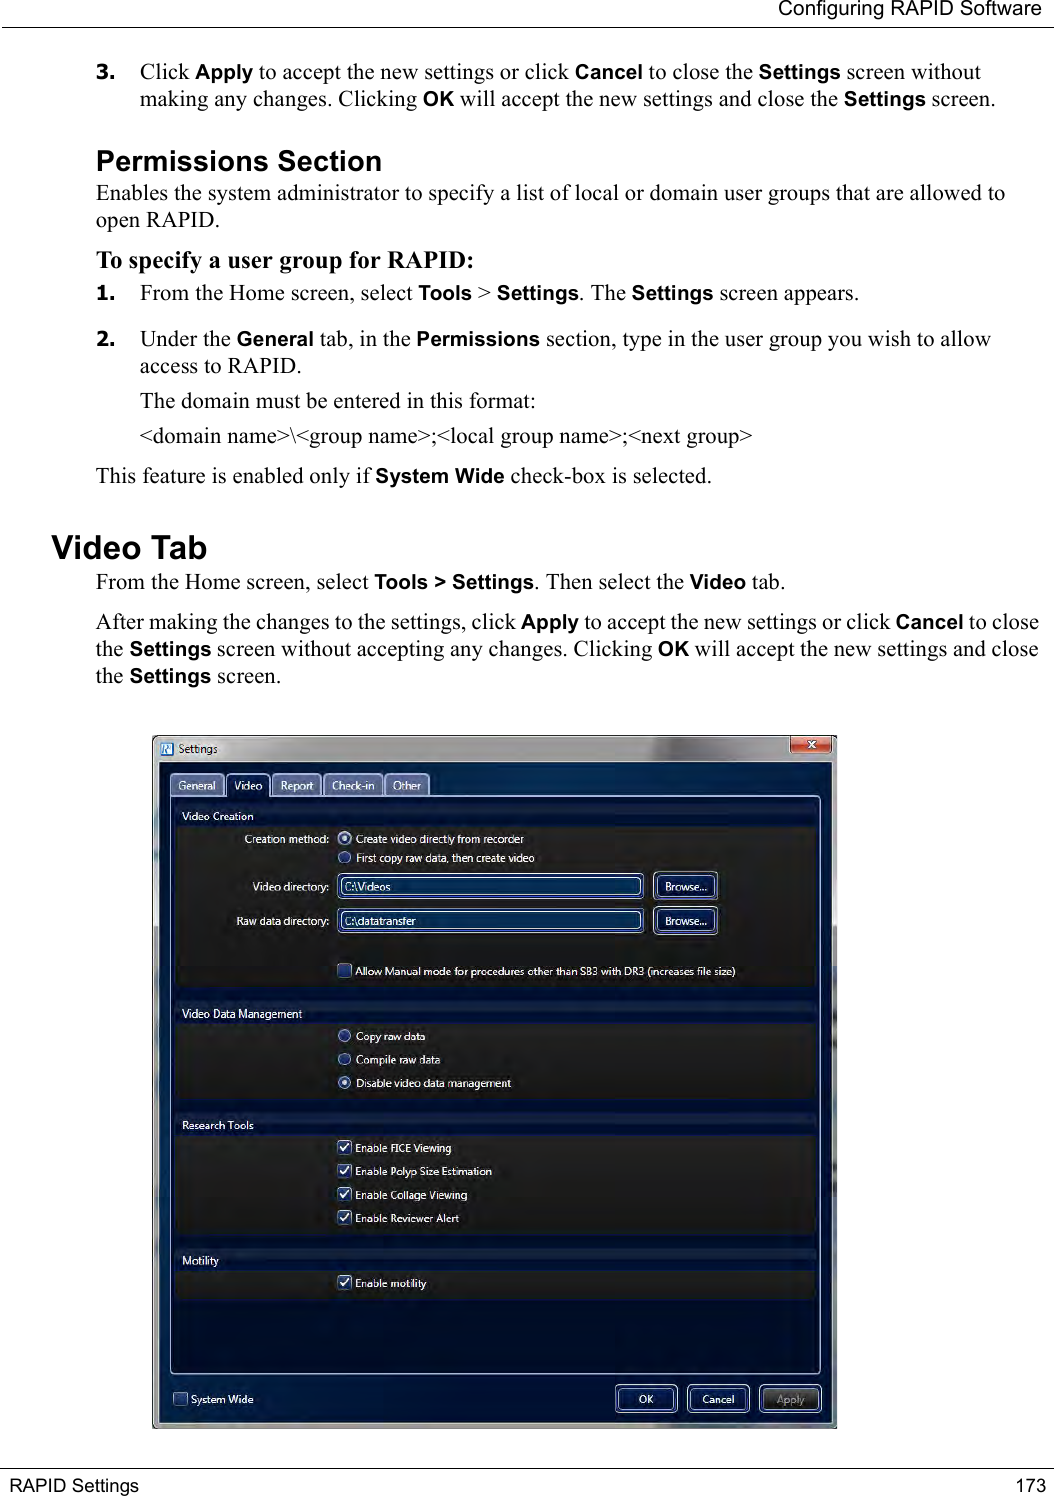
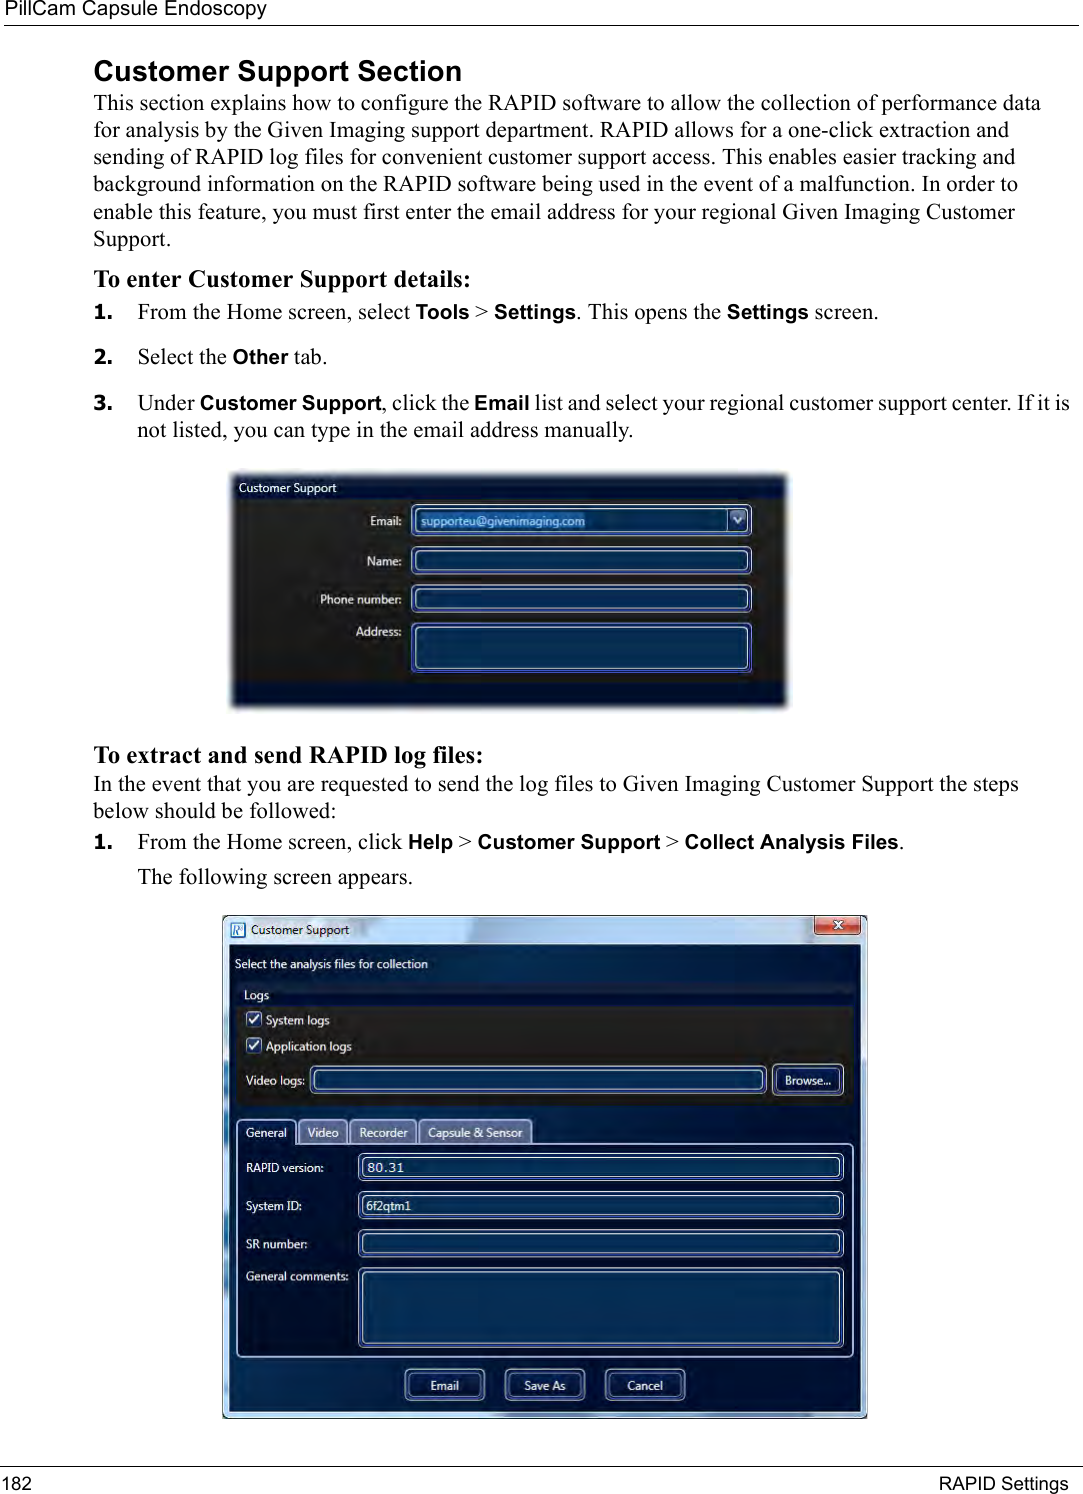
>
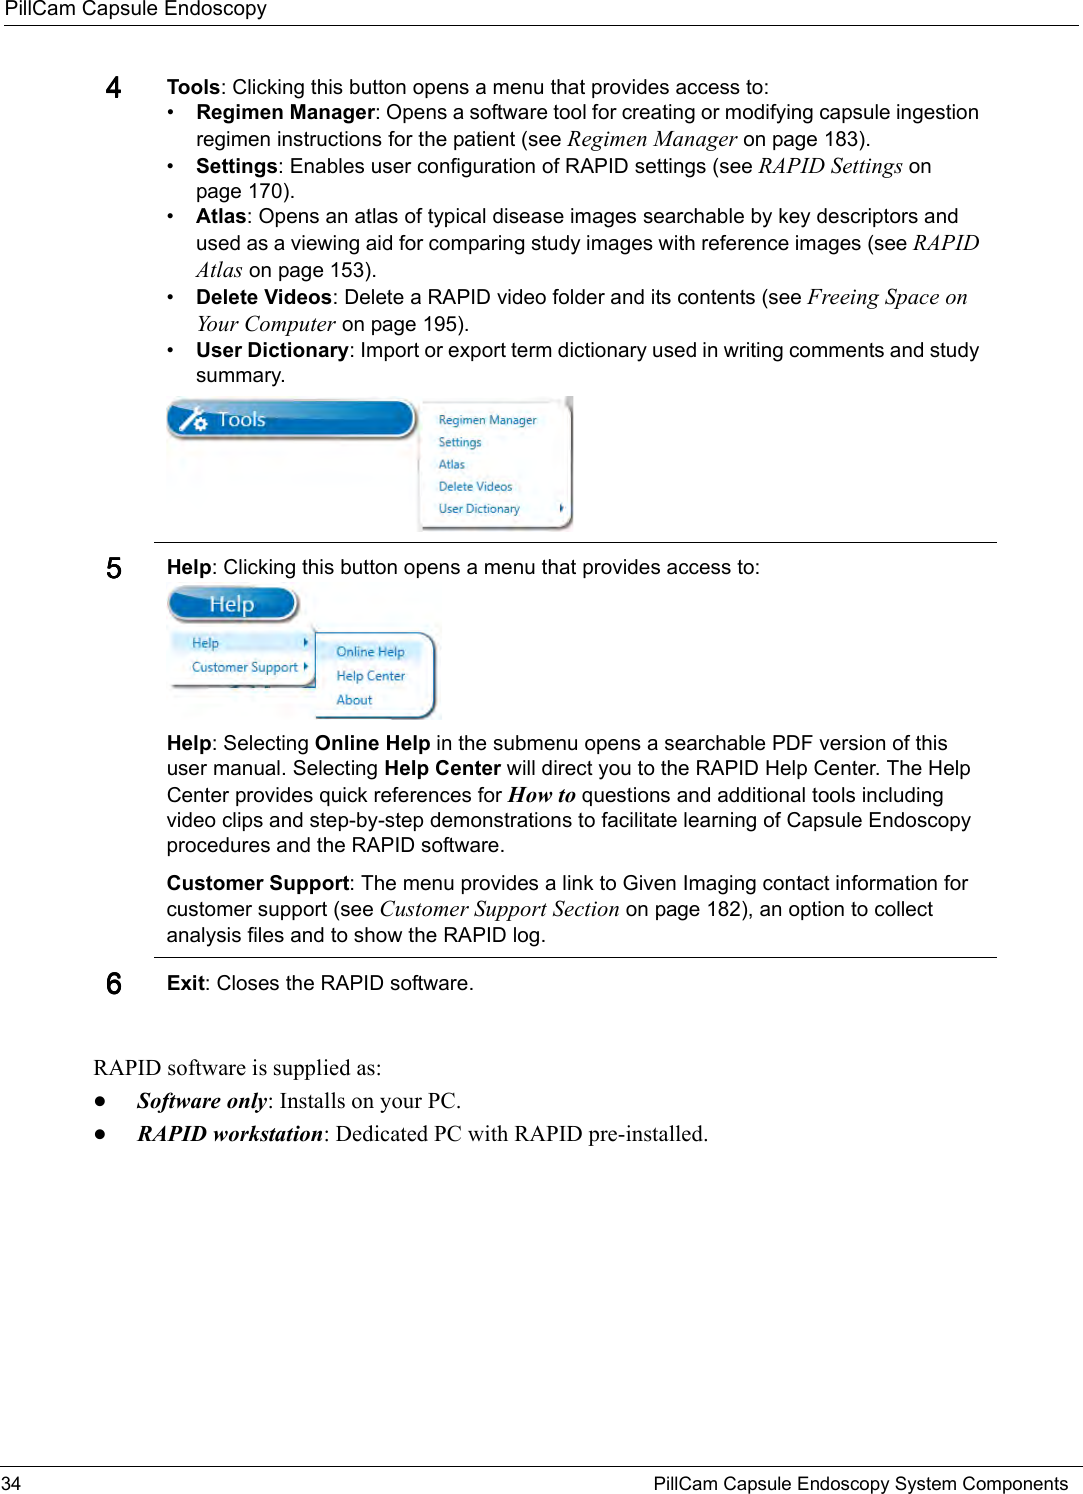
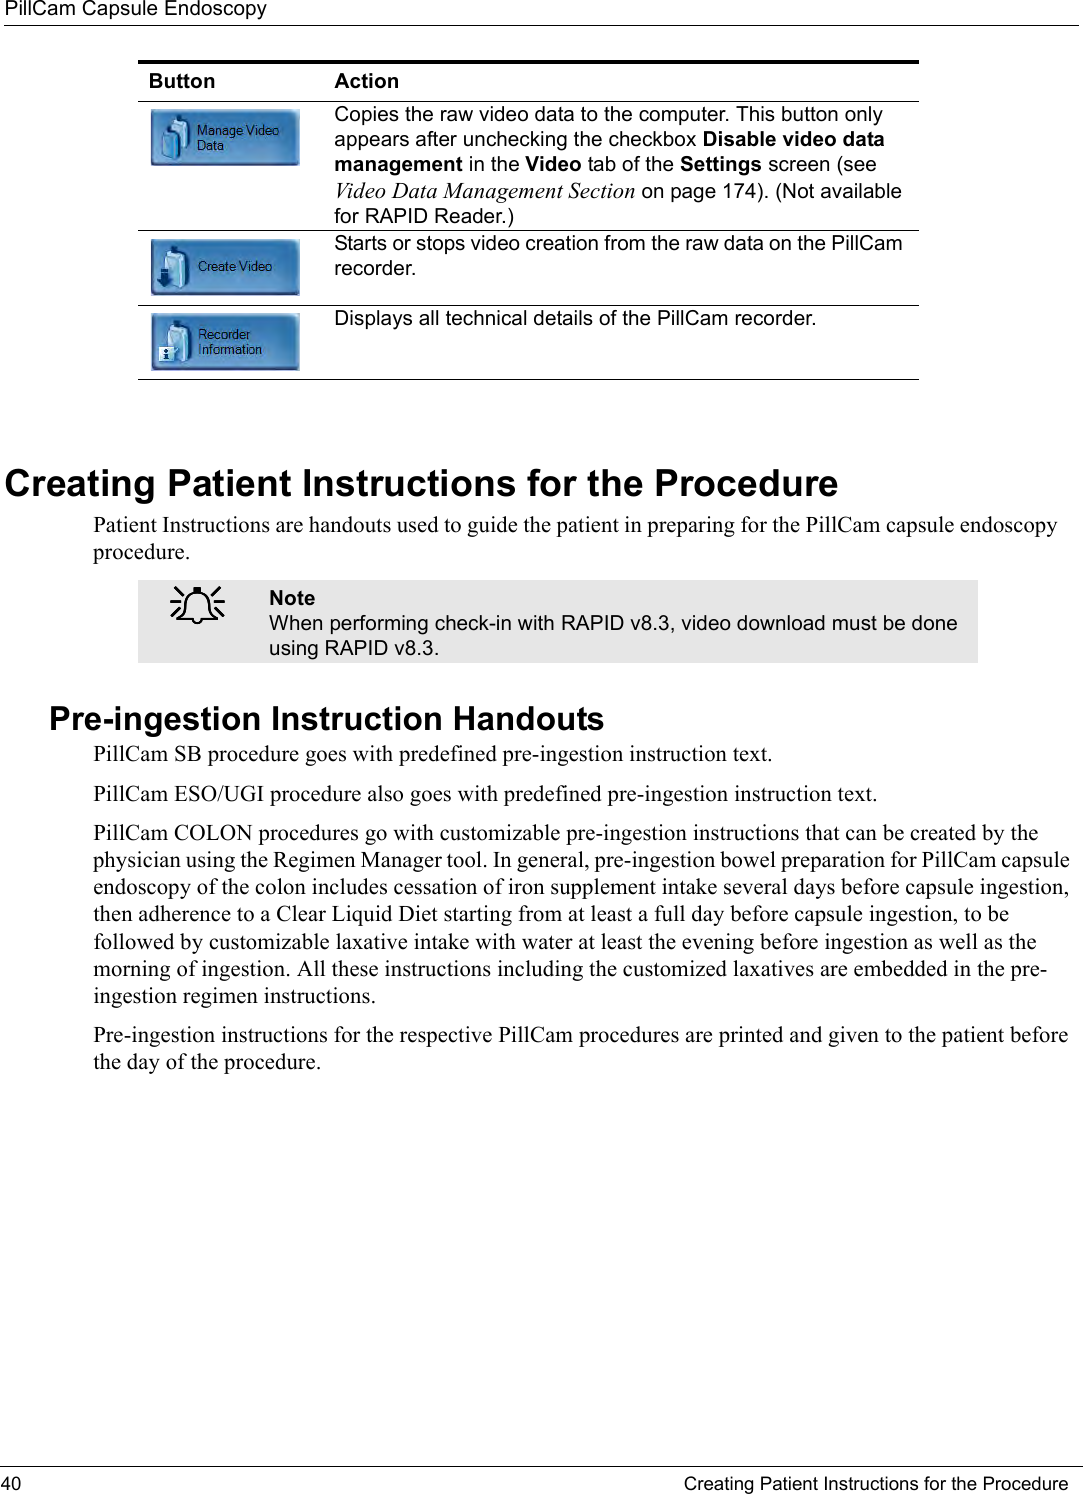
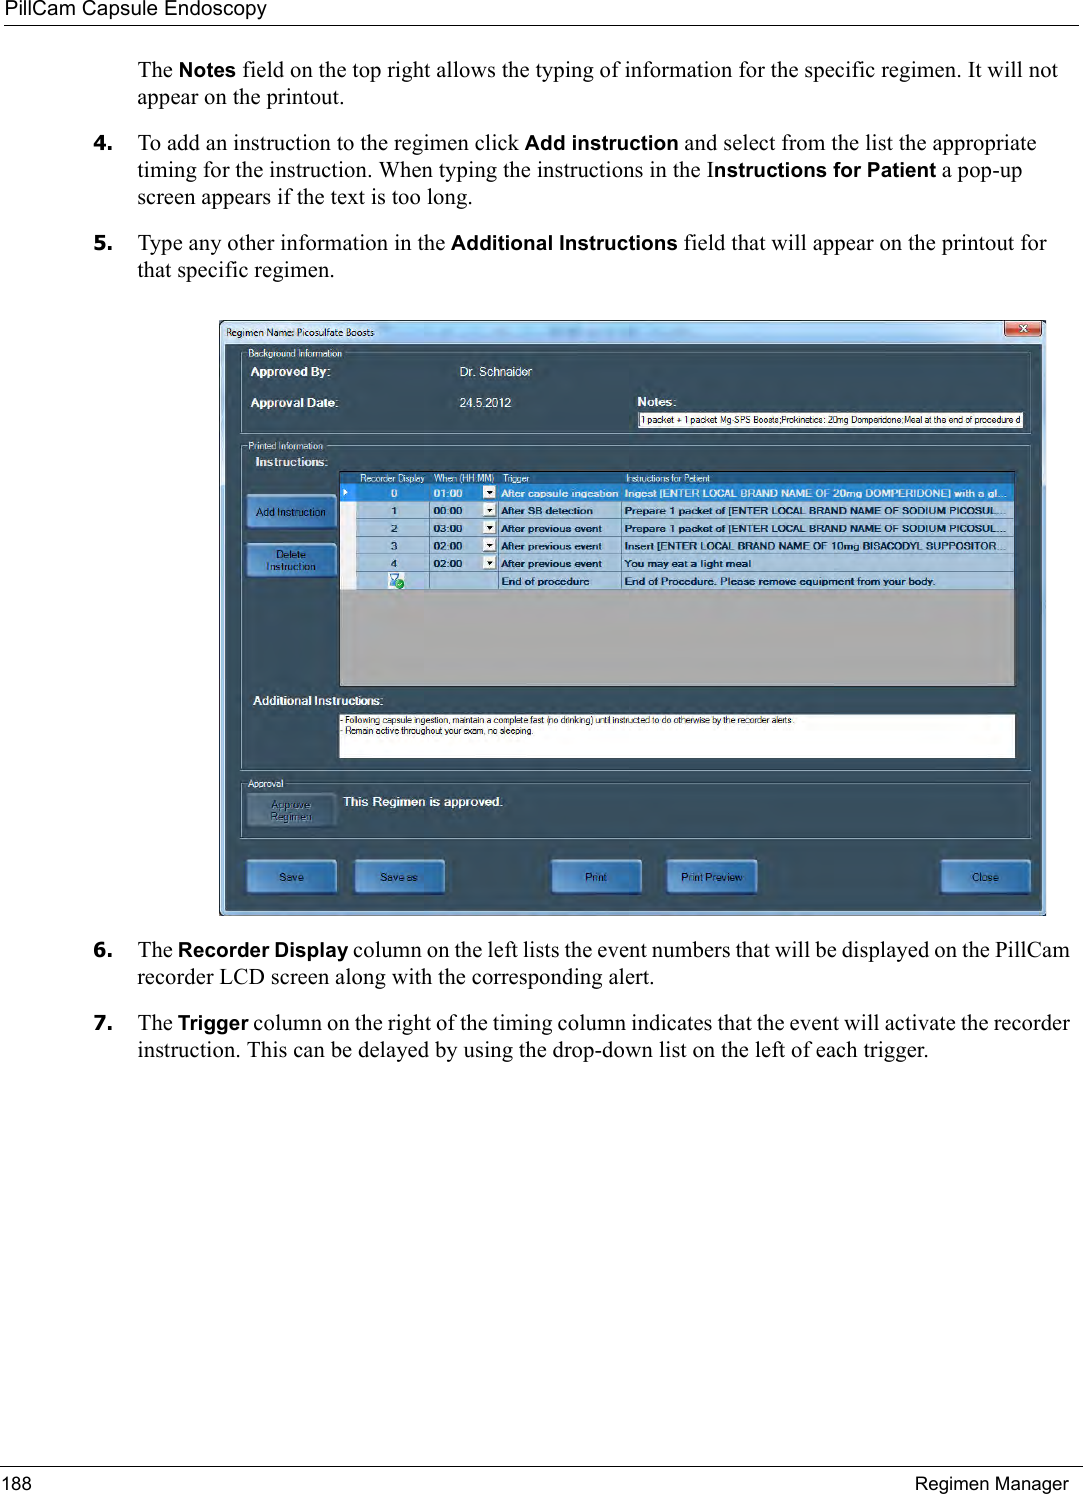
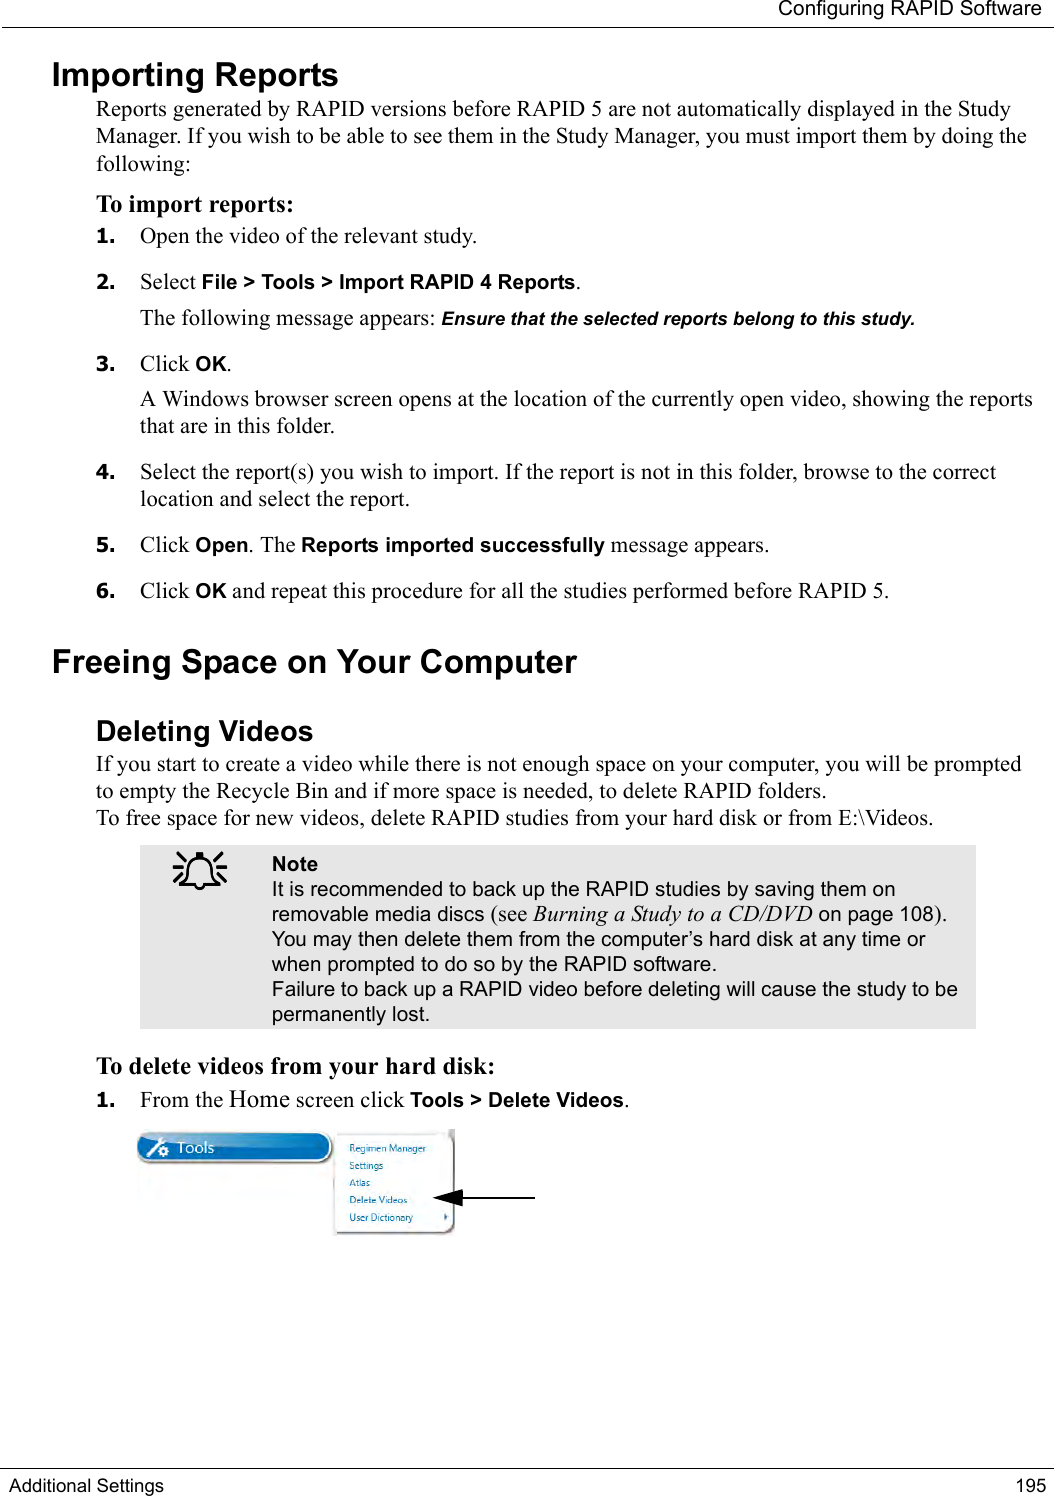
Given Imaging
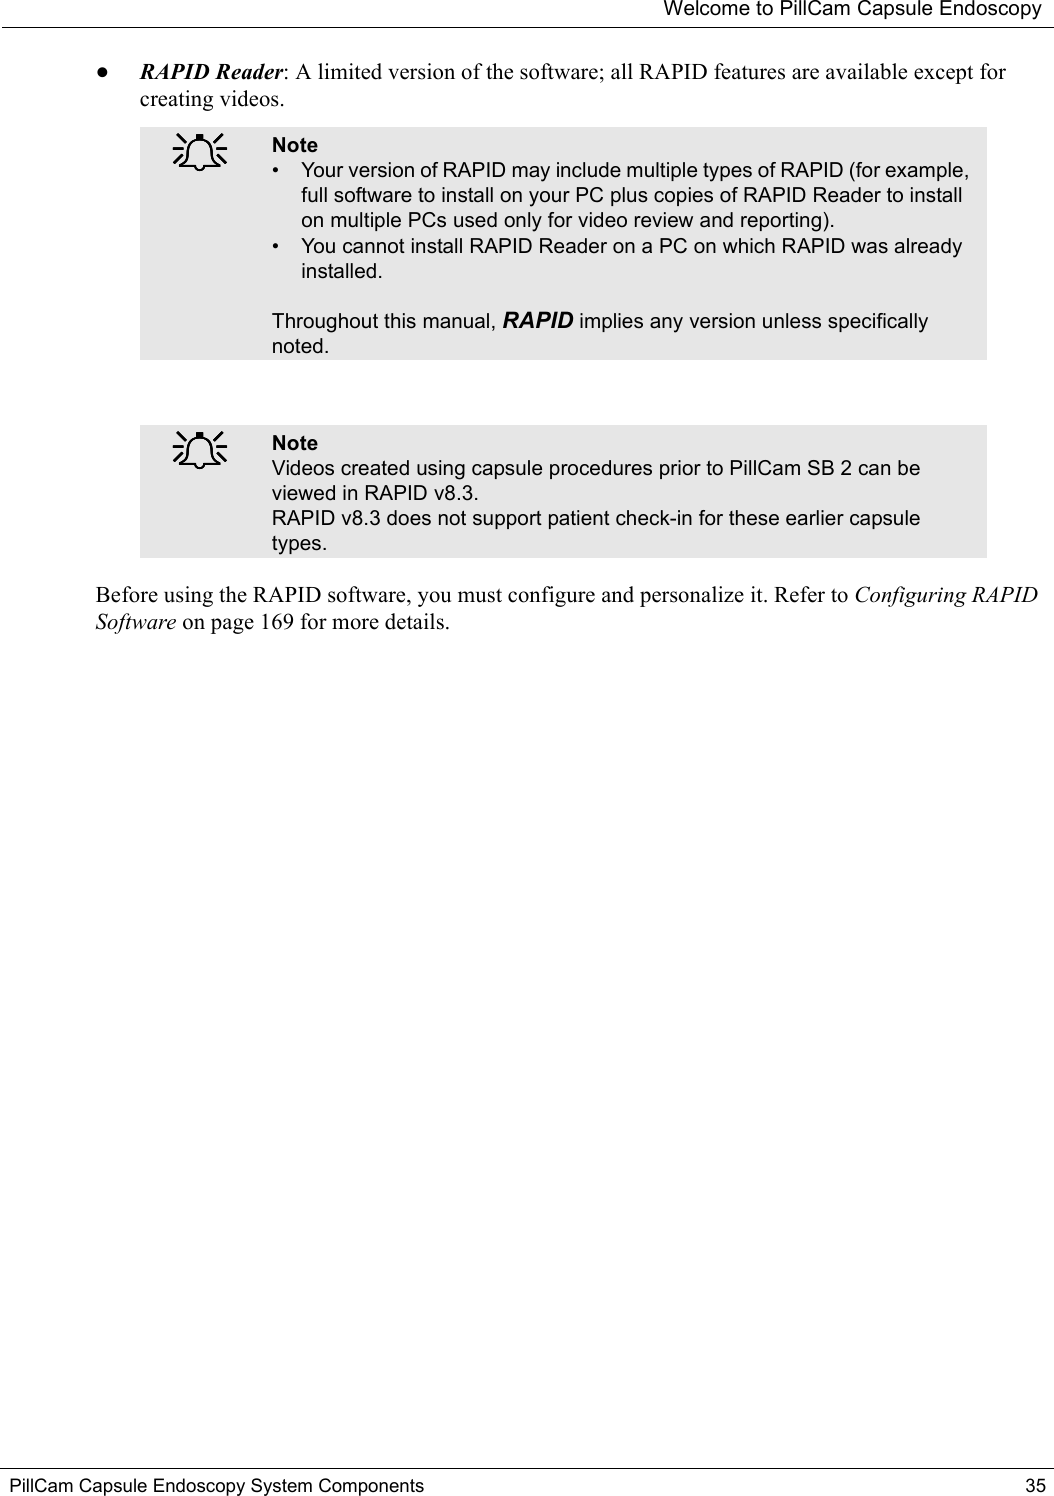
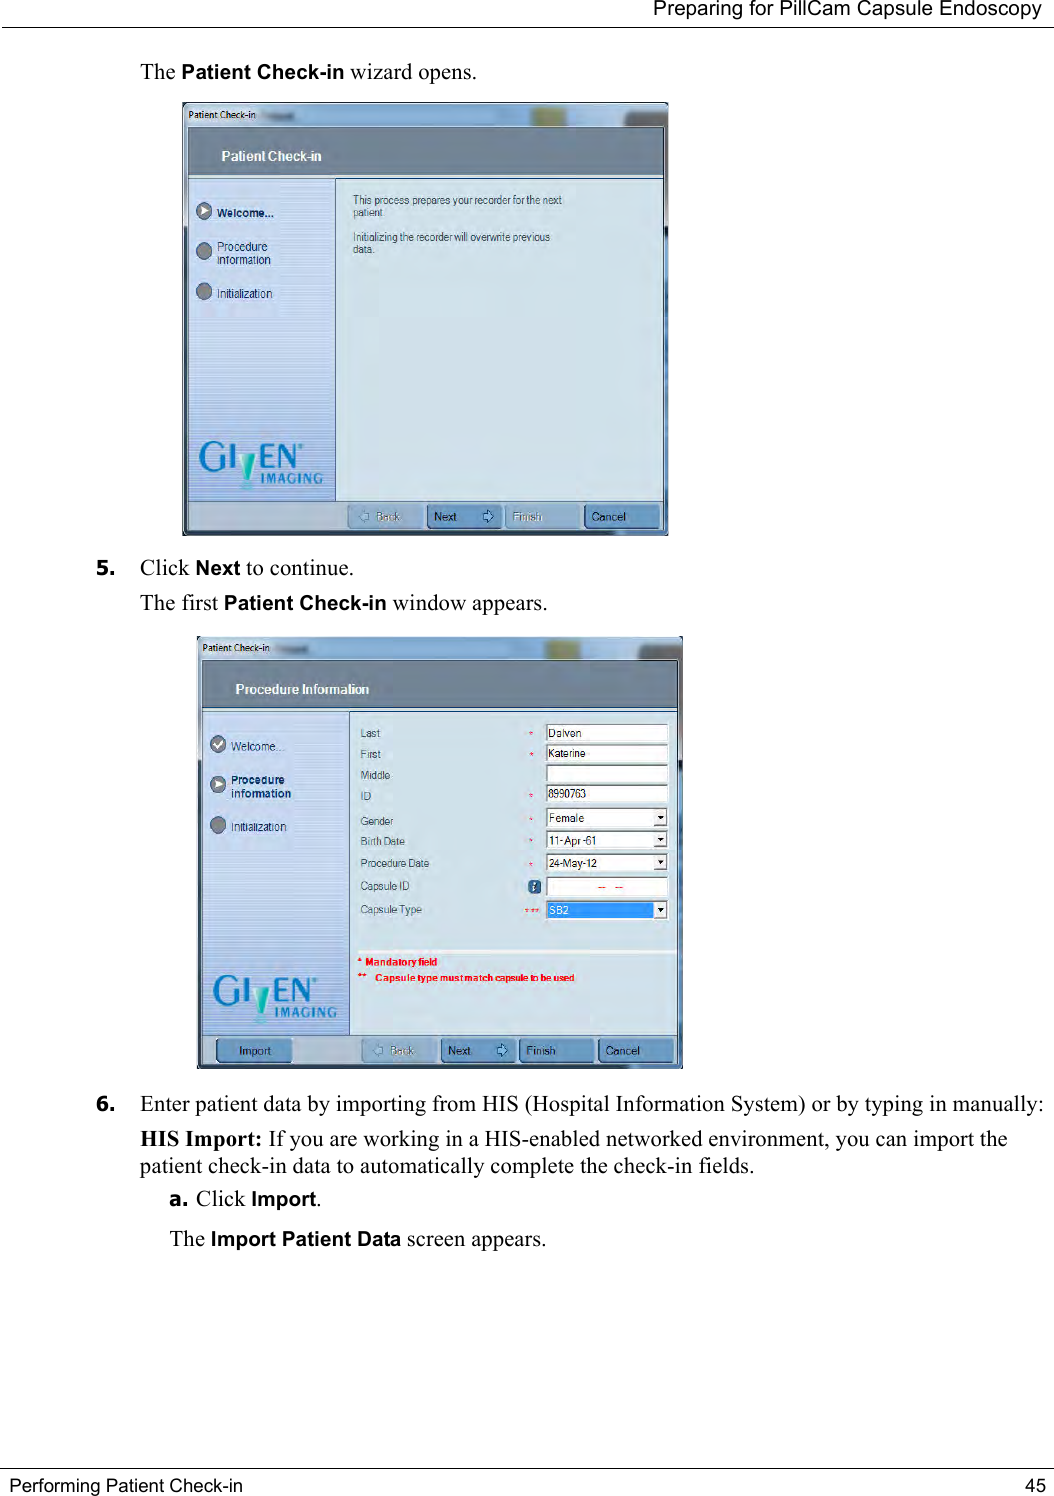
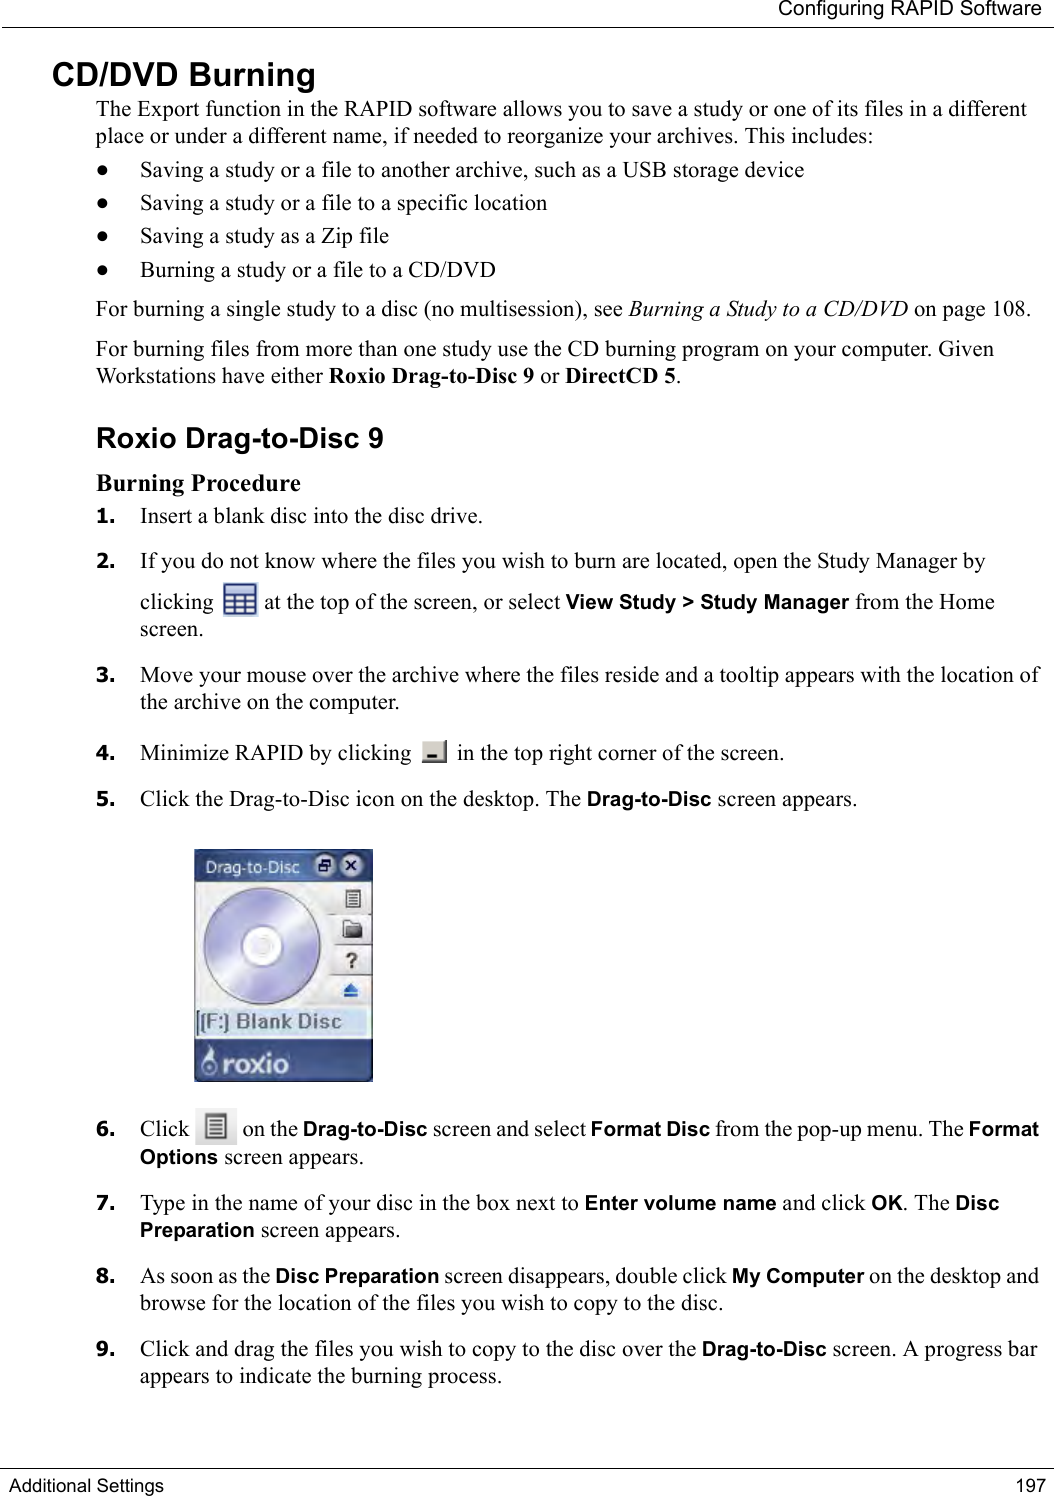
>
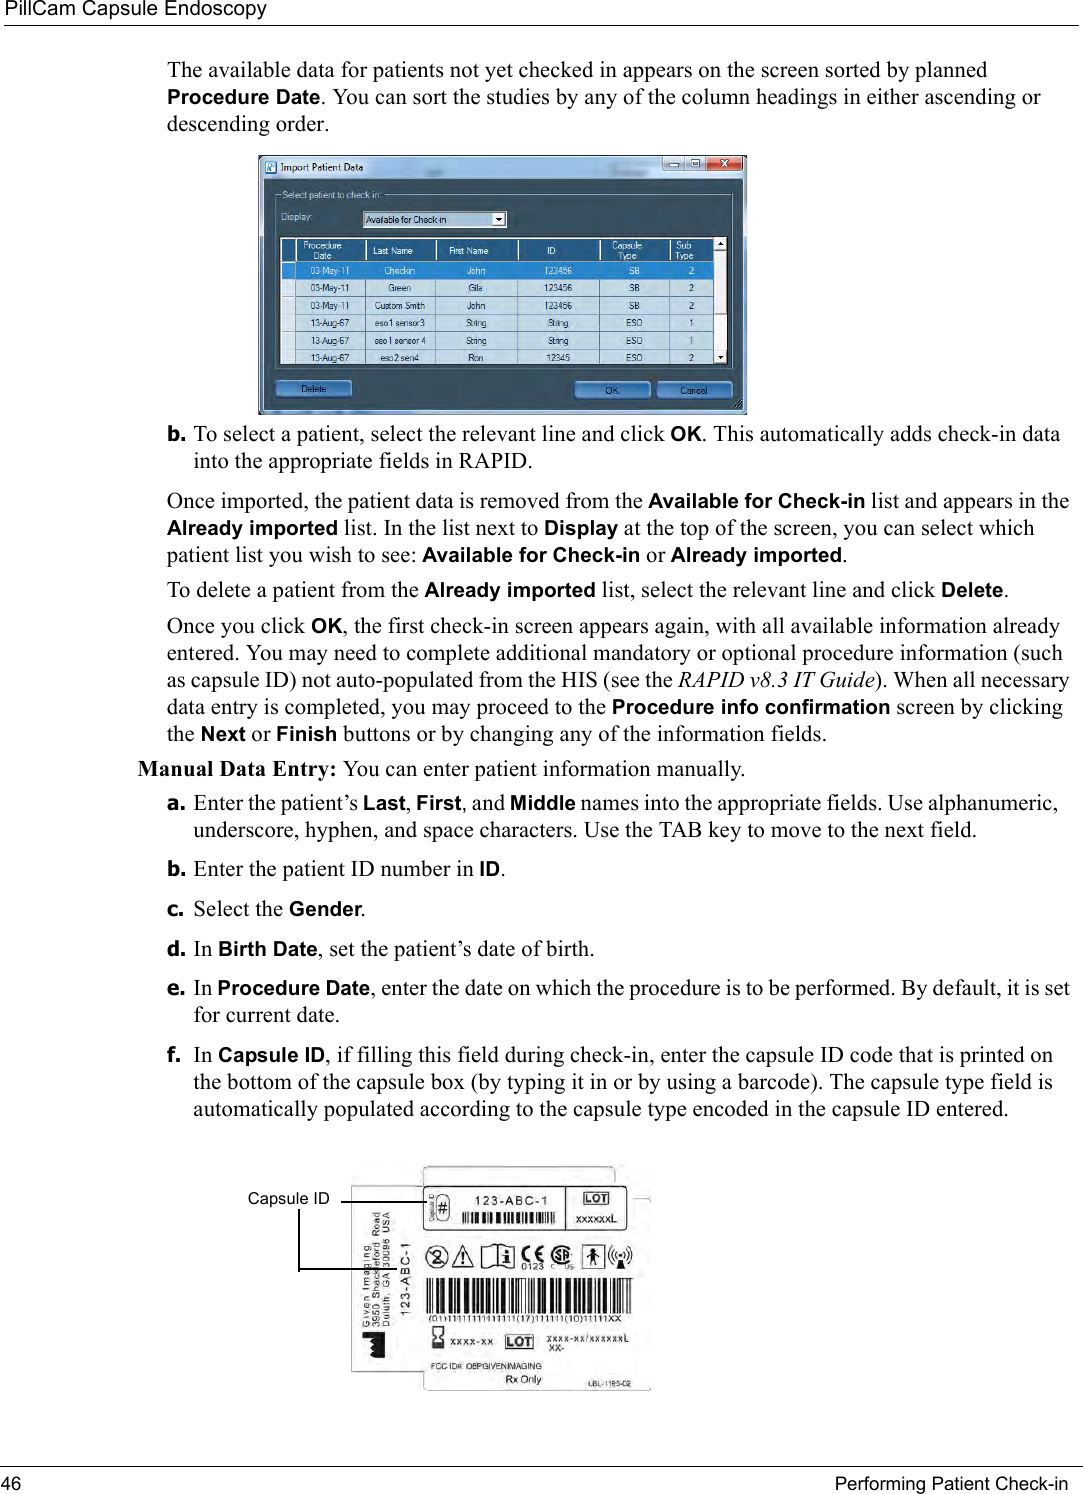
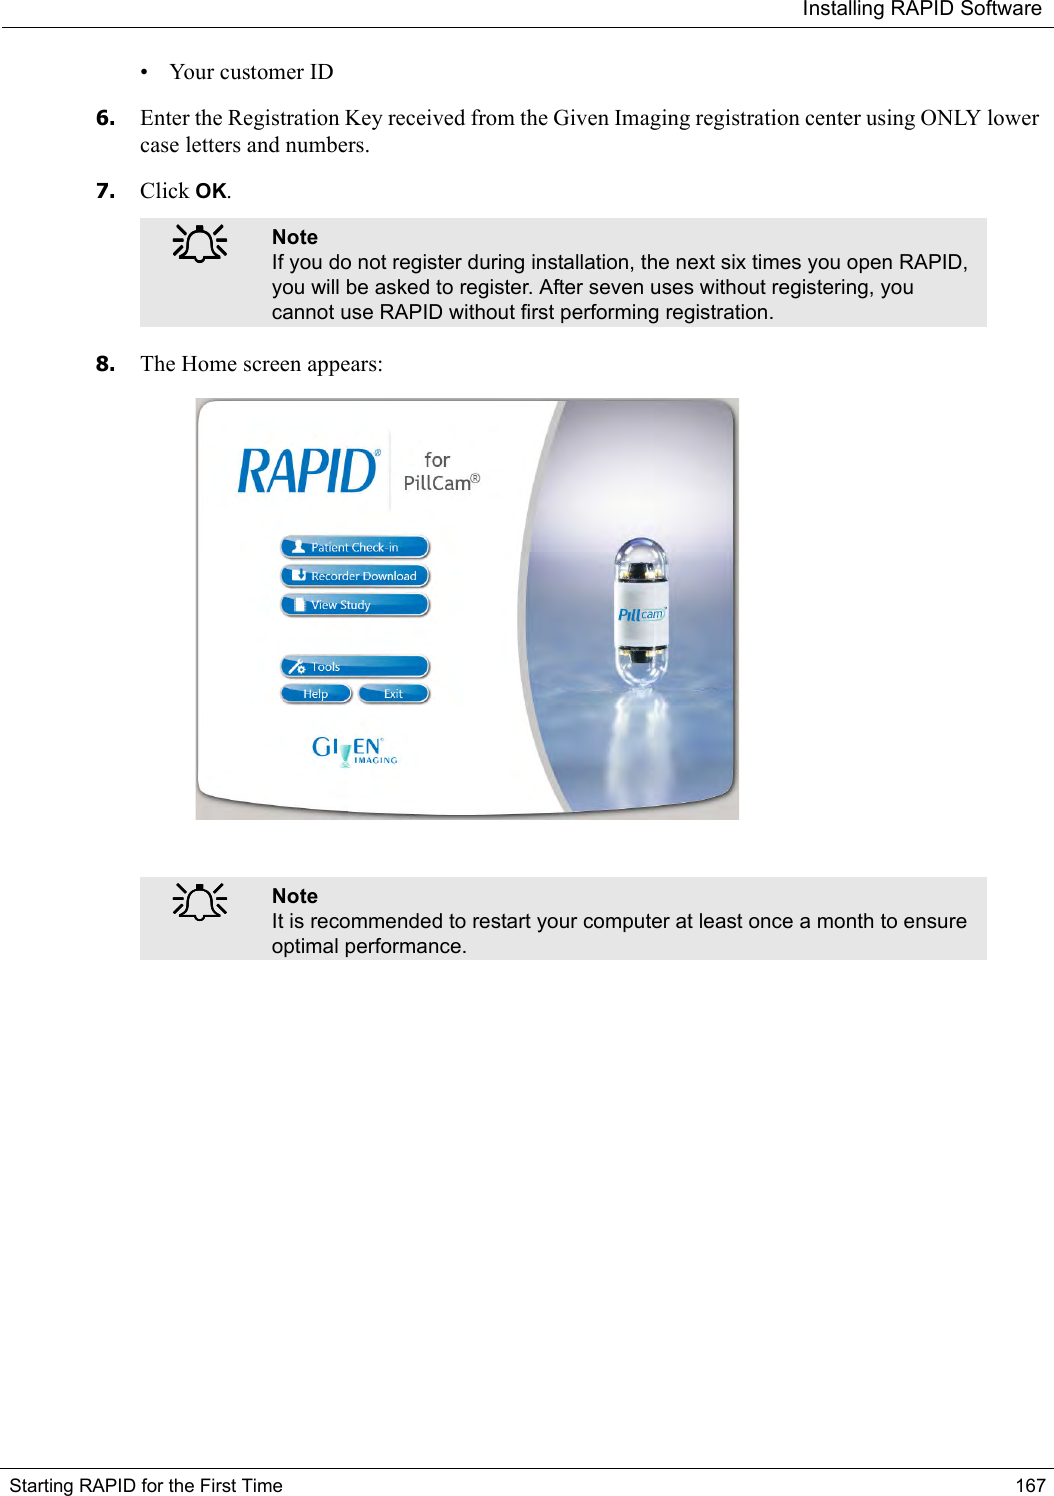
CAPDH-2 User Manual
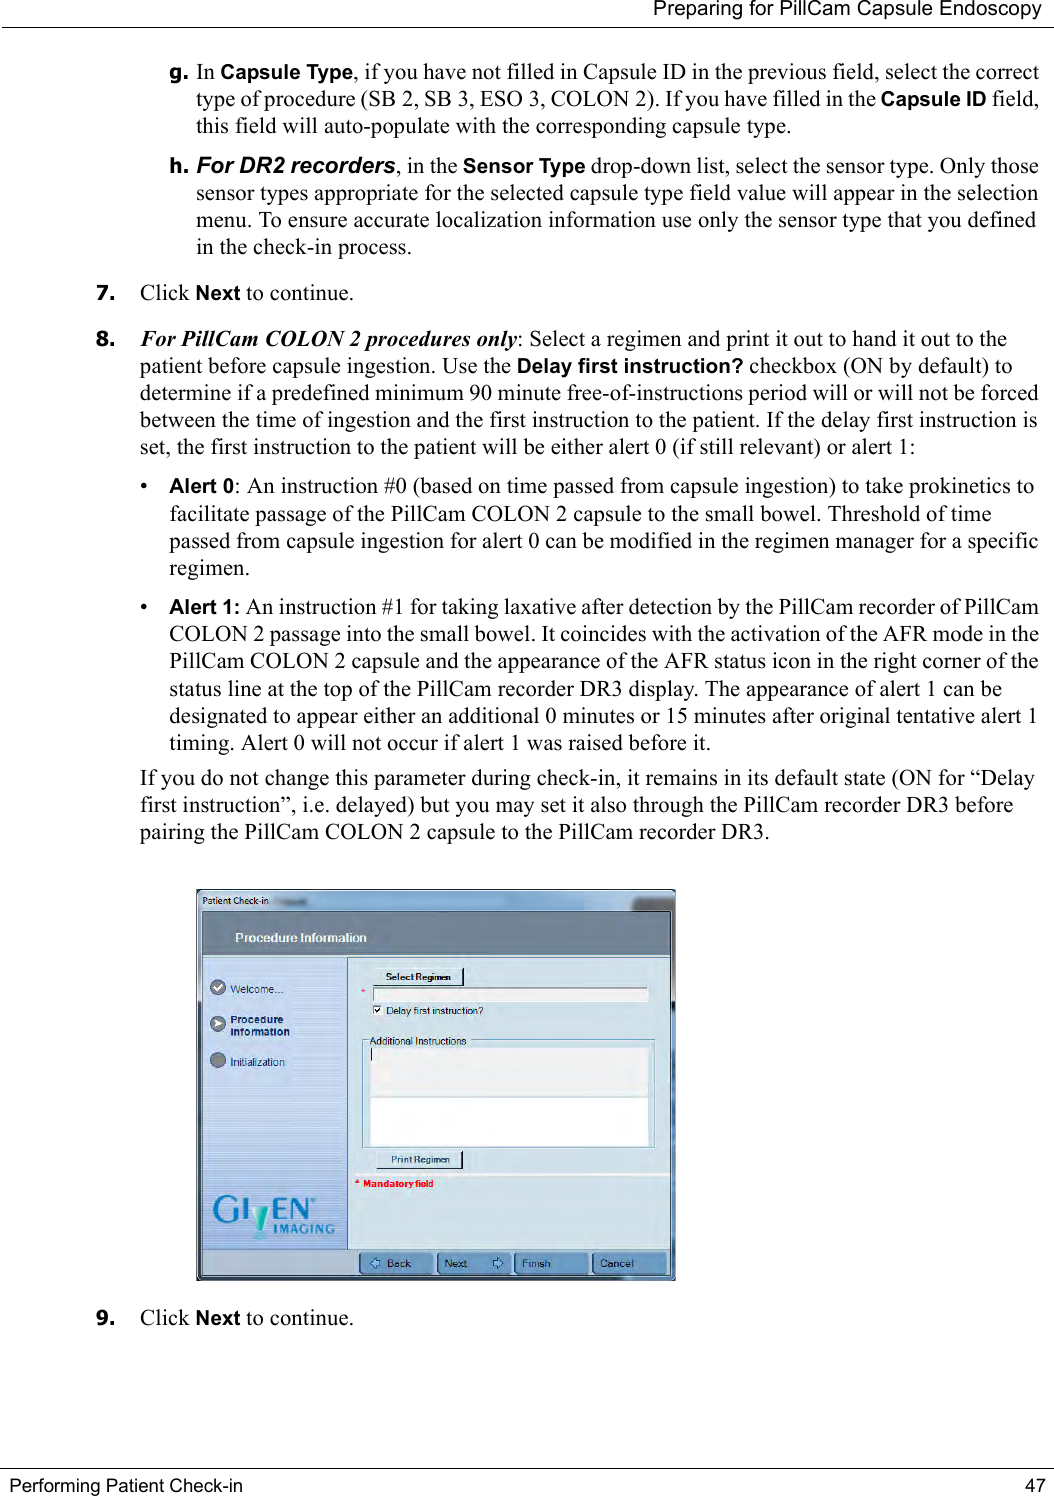
>
User Manual
Contents
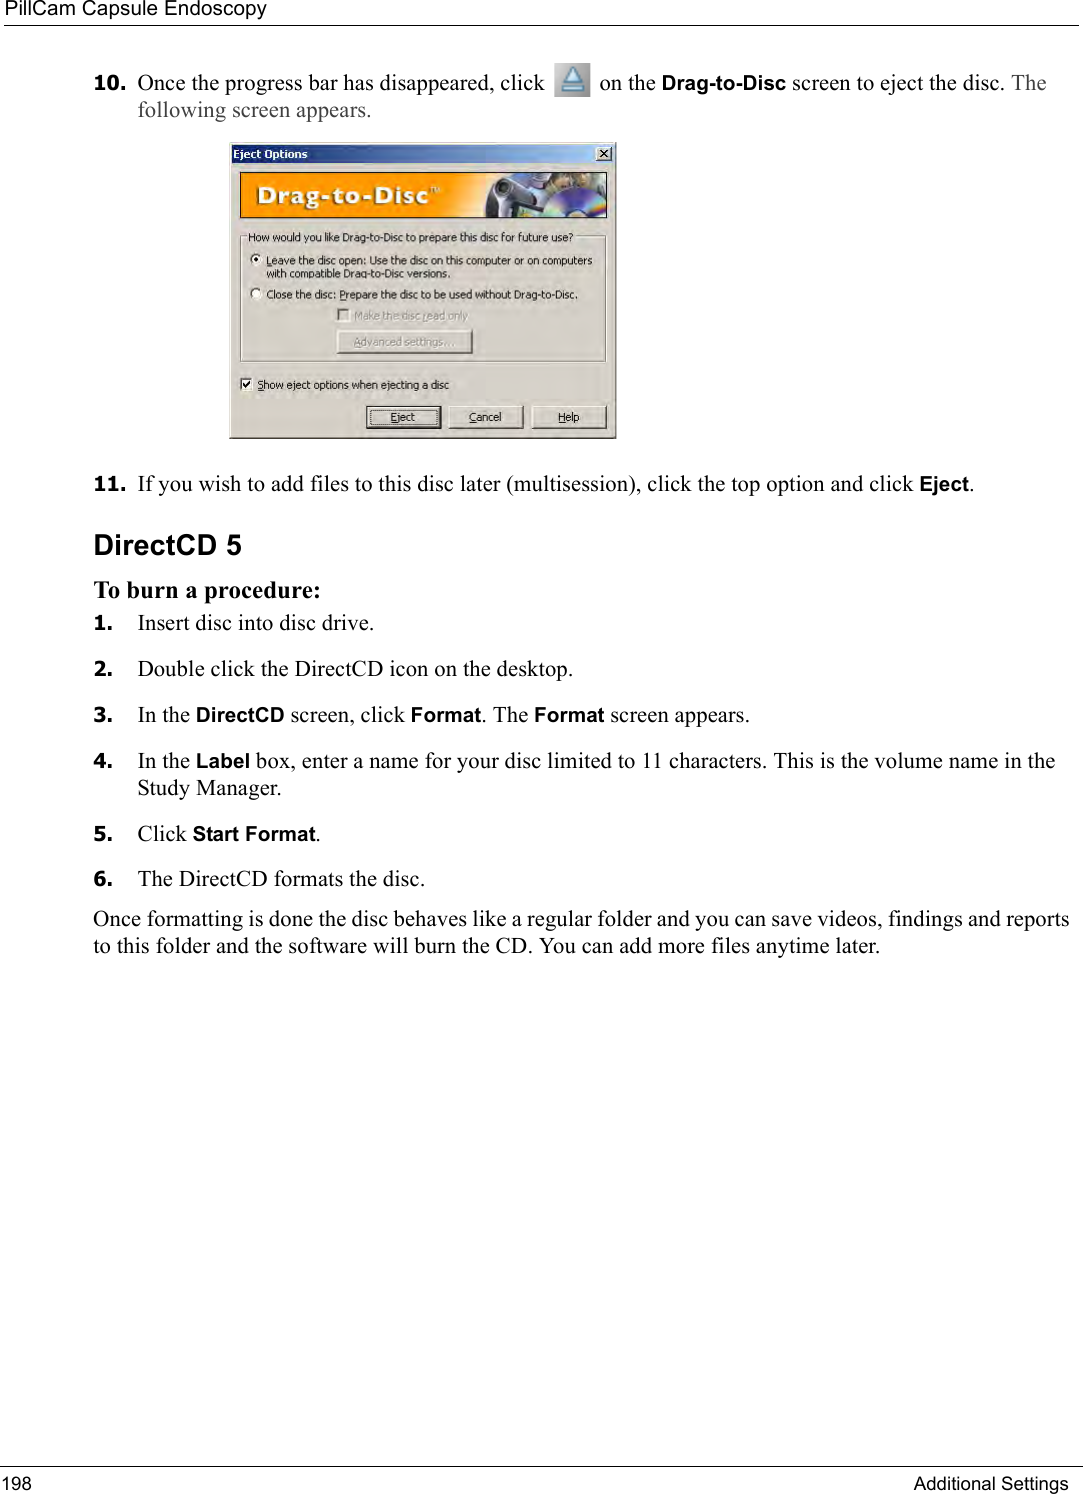
1.
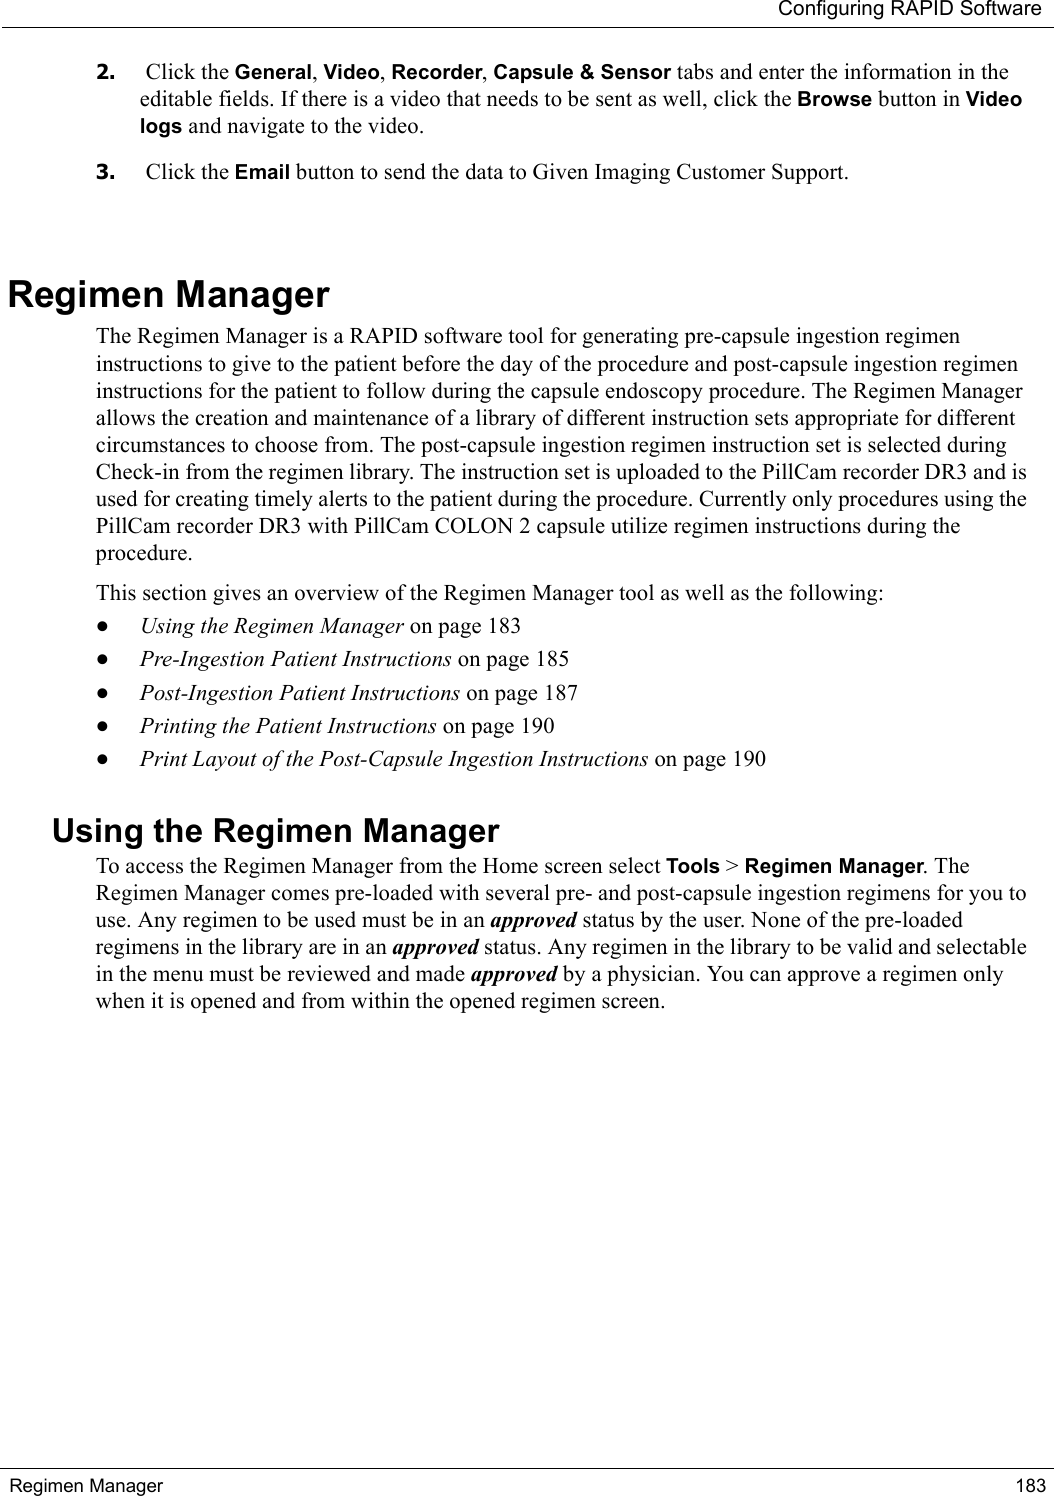
Compliance Statement
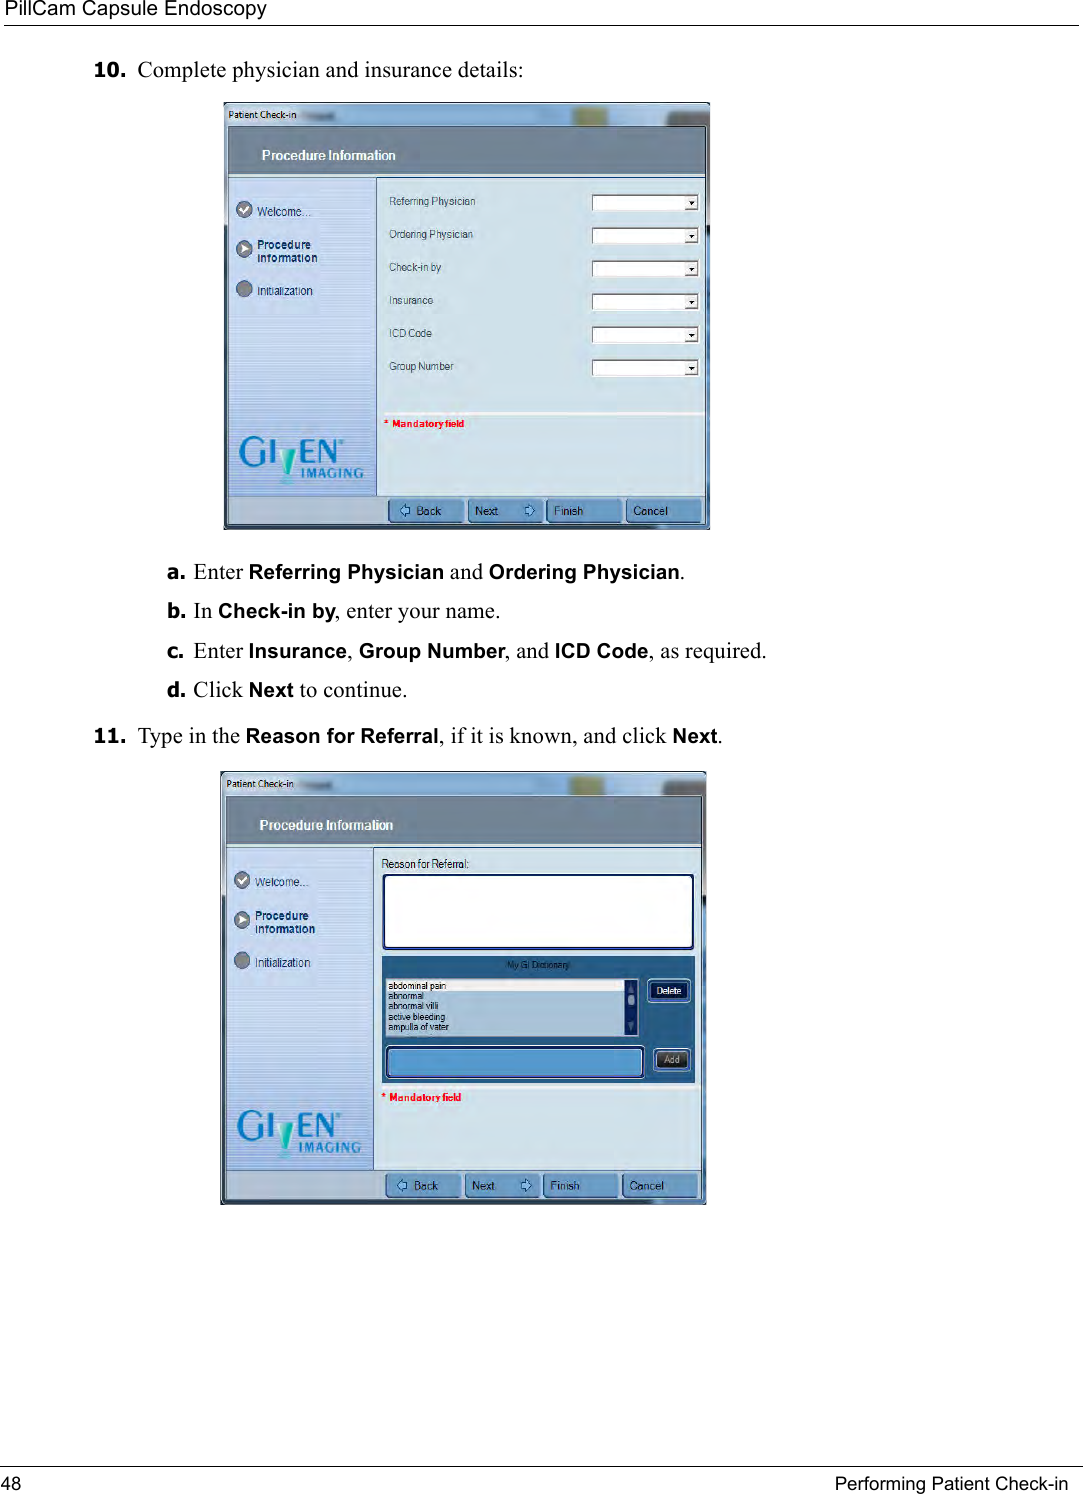
2.
User Manual
User Manual
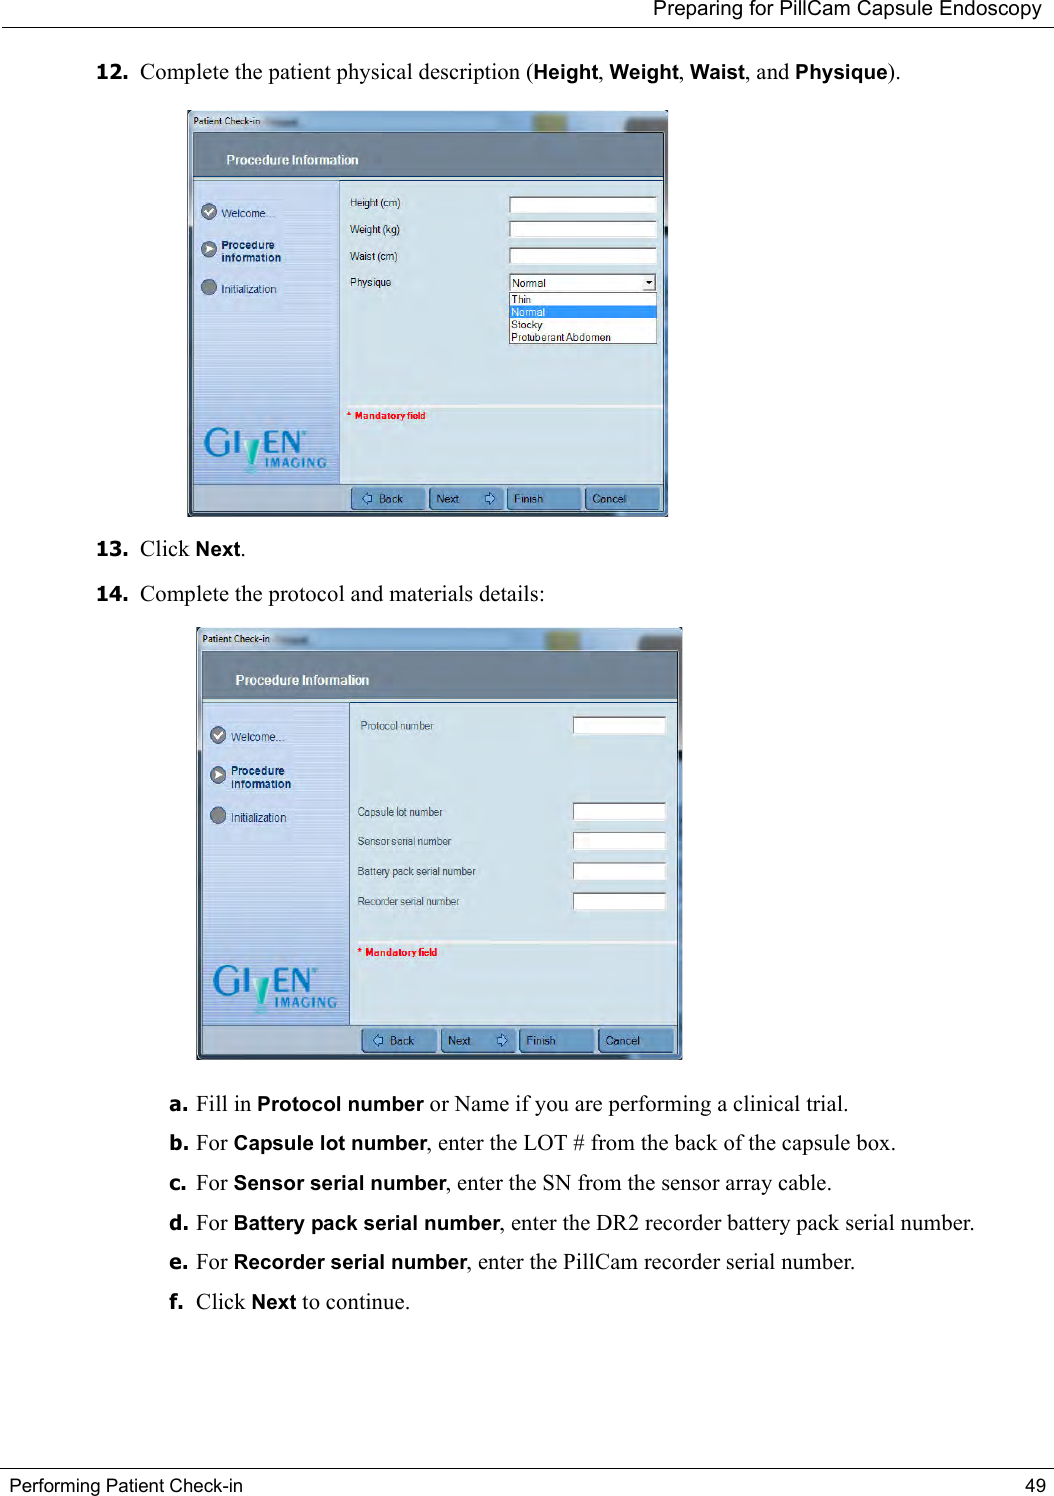
Navigation menu
Upload a User Manual
Namespaces
Wiki Guide
HTML
PDF
Info
Views
User Manual
Discussion / Help
Navigation


![PillCam Capsule Endoscopy6 Warningssystem be used to place the capsule directly in the duodenum. Placement of the capsule in the duodenum will decrease the risk of aspiration of the device [by vomiting] and gastric retention.•Examine both video streams when viewing the results of a COLON capsule endoscopy.•If intestinal fistulas, strictures, or stenosis are suspected, or the patient has had prior abdominal or pelvic surgery, the physician should consider performing an examination to ascertain patency for an object the size of the PillCam video capsule.•A thorough understanding of the technical principles, clinical applications and risks associated with the PillCam system is necessary before using this product. Read the entire manual before using the system for the first time.•To prevent the patient from being exposed to unforeseen risks during passage of any PillCam video capsule, make sure the patient thoroughly understands the procedure, and provide the patient with a copy of the Patient Instructions.•A patient with known or suspected delayed gastric emptying (whether disease related or drug induced) could be at increased risk for incomplete PillCam capsule endoscopy of the small bowel or colon.•When swallowing the capsule there is a possibility of choking on the capsule. If the patient exhibits any symptoms and/or clinical signs of choking (labored breathing, wheezing, involuntary coughing, etc.), the recommended first-aid procedure should be followed.•If a child has accidentally swallowed any unused or spent PillCam video capsule, seek medical attention.•Instruct the patient not to sit on bare metal surfaces, such as chairs with metal seating area, during the procedure.•Instruct the patient to contact the physician immediately if, after ingesting any PillCam video capsule, there is any abdominal pain, nausea, or vomiting.•Only one PillCam video capsule should be ingested at a time and only after confirmation that no other PillCam video capsules or ingestible diagnostic devices remain in the patient’s body.•If, contrary to instructions, a patient ingests more than one PillCam video capsule, instruct the patient to immediately contact the physician.•In patients with unsuspected strictures of the GI tract, any PillCam video capsule can potentially cause intestinal obstruction resulting in the need for hospitalization and surgery.•The safety of this device in pregnant women has not been established.•The safety of this device in patients with significant gastrointestinal diverticular disease is unknown.•Final diagnosis based on the RAPID video should be made only by physicians who are trained in the interpretation of capsule endoscopy images.Product Related:•If there is reasonable doubt concerning the integrity of the PillCam video capsule due to dropping, biting, or any other eventuality, the capsule should be deactivated by returning it to its box and it should not be used until consulting with an authorized Given Imaging representative.•Store all PillCam video capsules in a safe place, out of the reach of children and infants.•Do not use any PillCam video capsule after its expiration date.•Instruct the patient to avoid biting the PillCam video capsule prior to swallowing.](https://usermanual.wiki/Given-Imaging/CAPDH-2.User-Manual/User-Guide-3276426-Page-16.png)

![Indications, Contraindications, Warnings, CautionsBenefits and Risks—PillCam Capsule Endoscopy 9•PillCam capsule endoscopy offers a simple, safe and non-invasive alternative to traditional imaging procedures. •The PillCam patency capsule provides a simple and convenient means to verify functional patency of the GI tract in patients with known or suspected strictures. Risks•A normal or negative capsule endoscopy examination does not exclude the possibility of colon polyps or colon cancer.•PillCam capsule endoscopy is not for everyone. PillCam video capsules are contraindicated in patients with known or suspected gastrointestinal obstruction, strictures or fistulas, in patients with cardiac pacemakers or other implantable electromedical devices and in patients with swallowing disorders.•Capsule retention has been reported in less than two percent of all capsule endoscopy and patency procedures. Capsule retention is defined as having a capsule remain in the digestive tract for more than two weeks. •Causes of retention cited in the literature include: NSAID strictures, Crohn's disease, small bowel tumors, intestinal adhesions, ulcerations, and radiation enteritis. Summaries in published literature identify the overall risk of retention for capsule endoscopy to be 1.4%. The risk of retention for obscure bleeding is estimated to be 1.2%, for suspected Crohn's disease to be 2.6%, for known Crohn's the risk is higher at 5% and for neoplastic lesions the rate of retention is 2.1% as compared to healthy volunteers [1]. To verify passage of the capsule from the GI tract, an abdominal X-ray may be obtained at the discretion of the physician. The capsule can be removed using medical, endoscopic or surgical intervention. •There is an extremely rare risk of capsule aspiration while patients are attempting to swallow a PillCam video capsule or Patency capsule. •There is also a low risk of skin irritation from the sensor array sleeve adhesive or silicone exposure.•The PillCam SB video capsule may be administered by using transendoscopic delivery in patients who are either unable to ingest the capsule or are known to have slow gastric emptying time. If using transendoscopic delivery potential complications include, but are not limited to: perforation, hemorrhage, aspiration, fever, infection, hypertension, respiratory arrest, cardiac arrhythmia or arrest, due to the transendoscopic procedure.•PillCam patency capsules are contraindicated in patients with swallowing disorders. The PillCam patency scanner is contraindicated in patients with cardiac pacemakers or other implanted electromedical devices.•All medical procedures carry some risks. Information on this site should not be used as a substitute for talking with your doctor about diagnosis and treatment.References:[1] Liao et al., Indications and detection, completion, and retention rates of small-bowel capsule endoscopy: a systematic review, Gastrointestinal Endoscopy, 2010; 71:280-286](https://usermanual.wiki/Given-Imaging/CAPDH-2.User-Manual/User-Guide-3276426-Page-19.png)
![PillCam Capsule Endoscopy10 Essential PerformanceEssential PerformancePillCam Video Capsules ON-ModeData transmitting to PillCam recorder is considered to be essential performance of the PillCam capsules. The PillCam capsules shall transmit data continuously monitored by on-line image display as received by PillCam recorder.OFF-ModeNo unintentional transmissions are allowed.PillCam Recorder DR2 and PillCam Recorder DR3Data receiving by PillCam recorder is considered to be essential performance of the PillCam recorder DR2 and PillCam recorder DR3.Accuracy of the Device—SB The PillCam Capsule Endoscopy System with the PillCam SB 1 capsule was studied in a series of 20 subjects with hemoccult positive stool, iron-deficiency anemia, and/or subacute hematochezia or melena. All patients had undergone unrevealing colonoscopy, gastroscopy, enteroscopy, and small bowel X-rays prior to enrolling in the study. When compared to repeated push enteroscopy, the PillCam video capsule was able to detect a pathological abnormality in 12 (60%) of the patients whereas enteroscopy detected abnormalities in 7 (35%) of these patients. The 5 patients in whom lesions were found by the PillCam video capsule but not enteroscopy all had abnormalities in the distal jejunum or ileum, outside the reach of most standard enteroscopy examinations. The average length of insertion during enteroscopy was 2.3 meters. Specific findings detected by the imaging system included arterio-venous malformations (AVMs), mucosal erosions and ulcerations, and a submucosal tumor. In one case (5%), though the PillCam video capsule detected a small bowel AVM that was found by enteroscopy, one out of the two reviewing physicians did not detect the AVM when reviewing the RAPID video.Overall, the findings obtained from the PillCam Capsule Endoscopy System and standard enteroscopy agreed in 14 cases (70%). The two methods revealed similar pathologies in 6 of these patients. Both exams were normal in an additional 8 patients. [1]A total of 14 separate small bowel findings were eventually noted in 13 patients by either of the two imaging modalities or by laparoscopic surgery. The PillCam Capsule Endoscopy System was able to identify 12 of the 14 lesions (86%) while the enteroscopy detected 7 of the 14 lesions (50%). Both repeated enteroscopies, small bowel X-rays and the PillCam video capsule, failed to detect an ulcerated Meckel’s diverticulum found at surgery.PillCam video capsule localization is based on off-line processing of the strength of the radio frequency signals emitted from the PillCam video capsule as received by each of the eight sensors. The information helps estimate the relative two-dimensional location of the PillCam video capsule with respect to the umbilicus (e.g., abdominal quadrant).](https://usermanual.wiki/Given-Imaging/CAPDH-2.User-Manual/User-Guide-3276426-Page-20.png)
![Indications, Contraindications, Warnings, CautionsAccuracy of the Device—SB 11The localization software was studied in a series of 17 healthy subjects. Multiple fluoroscopic images (92 sets) were obtained at various times during the PillCam video capsule's passage through the small bowel. The location was assessed in two dimensions relative to the umbilicus and then compared to the position obtained from the localization software. When compared to the relative two-dimensional location determined fluoroscopically, approximately 87% (80/92) of the PillCam video capsule estimates were within 6cm (a “fist”). The mean error for PillCam video capsule localization was found to be 3.8 cm. [2]The Suspected Blood Indicator (SBI) feature is intended to mark frames suspected of containing fresh blood. The feature may be activated only after labeling the first duodenal image and marks frames contained only within the small bowel. The SBI feature should not serve as a substitute for a physician's complete viewing of the video but rather to provide supplemental information afterwards. All events marked by the SBI feature should be carefully reviewed by a physician. In a review of 27 patients with at least one red or bleeding lesion found by a physician on capsule endoscopy, the SBI feature correctly marked 439, or 88%, of the 498 individual lesions. In addition, a total of 561 false positive lesions were marked by the feature, giving a positive predictive value (PPV) of 44%. [3]References: [1] Clinical report presented in K010312[2] Clinical report presented in K020341[3] Clinical report presented in K022980](https://usermanual.wiki/Given-Imaging/CAPDH-2.User-Manual/User-Guide-3276426-Page-21.png)
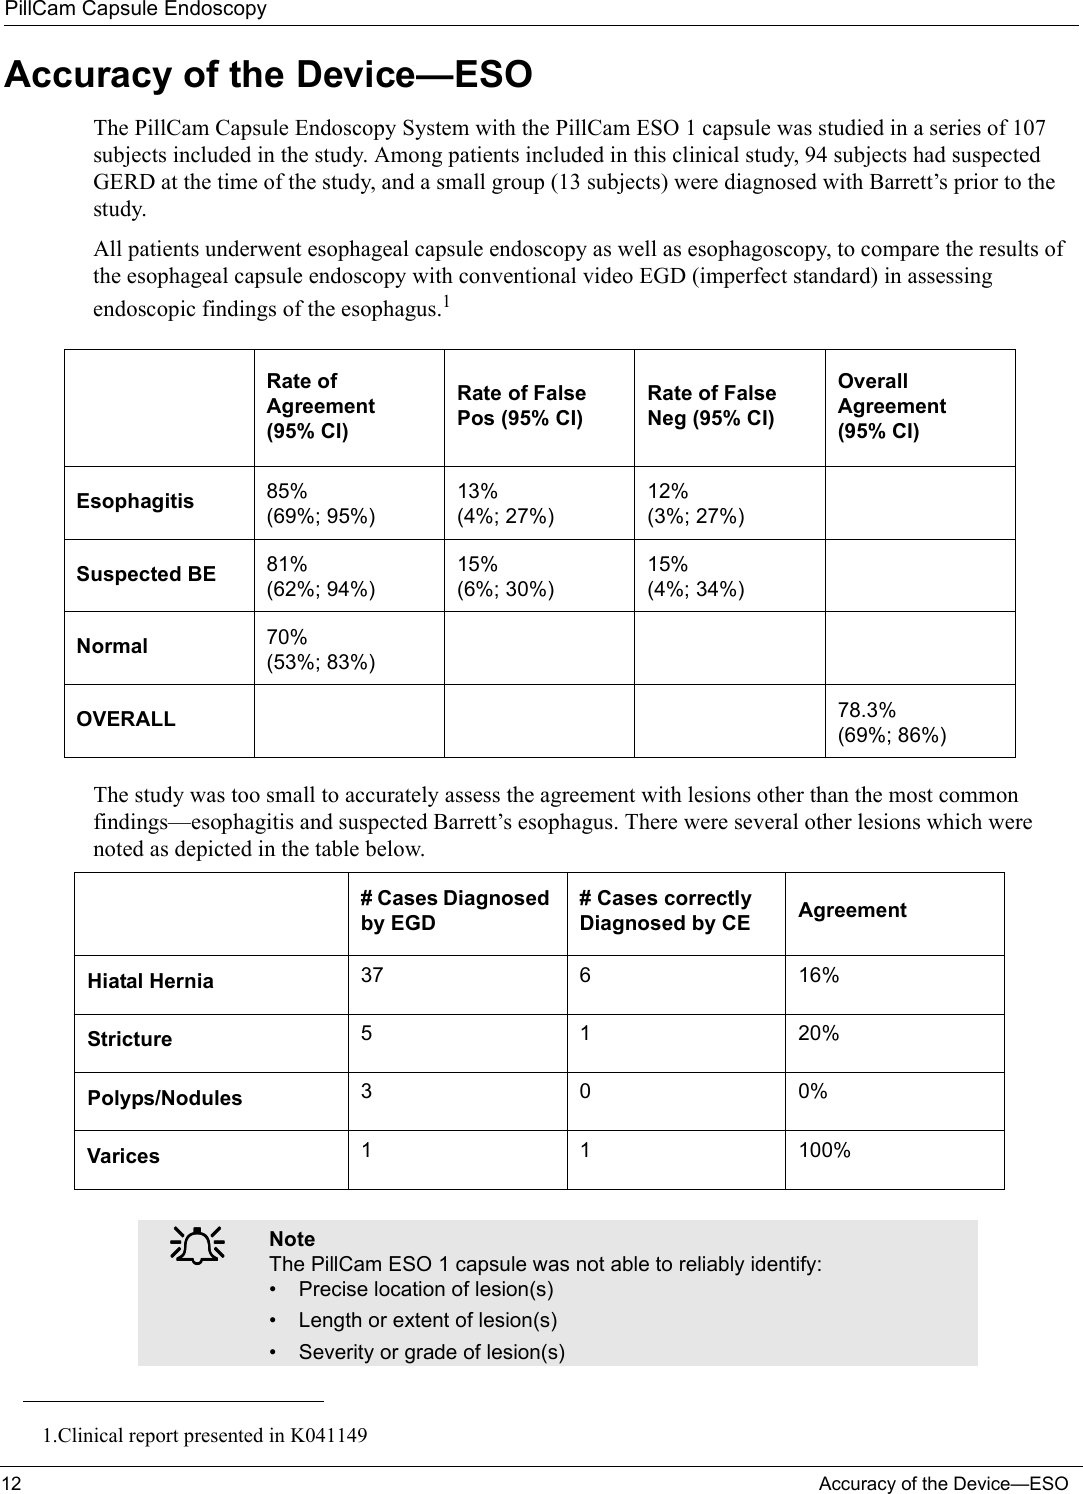
![Indications, Contraindications, Warnings, CautionsAccuracy of the Device—UGI 13Accuracy of the Device—UGIThe PillCam Capsule Endoscopy System with the PillCam UGI capsule was evaluated in adults with acute upper gastrointestinal hemorrhage who were hemodynamically stable presenting to the emergency departments of two academic medical centersThere were 49 patients enrolled in the clinical study of which 46 patients underwent an UGI capsule endoscopy (CE, PillCam ESO 2), and 47 patients underwent an upper endoscopy examination within 12 to 24 hours. One patient was unable to swallow the CE capsule. The results from the patients with completed CE examinations demonstrated the presence of blood in the upper gastrointestinal tract in 15 patients. The results of the EGD examination for the 15 patients with blood in the upper gastrointestinal tract included 8 (53%) patients with normal or non-clinically significant findings which included: •Normal: n = 2•Hiatal hernia: n = 1•Esophagitis: n = 2•Gastritis/Duodenitis: n = 3There were 16 (35%) patients that had no evidence of blood in the upper gastrointestinal tract at the time of the CE examination, but had clinically significant lesions identified at the time of upper endoscopy examination which included:•Mallory-Weiss tear: n = 1 •Esophageal varices: n = 1 •Gastric/Duodenal ulcers: n = 11 •Gastric masses: n = 3The results are summarized in the below table [1]:Diagnosis and detection of gross blood by capsule endoscopy compared to EGDNo PatientDetection of Gross blood by Capsule endoscopyDetection of Gross blood by EGDDiagnosis Based on CE FindingsDiagnosis Based on EGD Findings1 001SIT No No Gastric Ulcer in antrum Gastric Ulcer, Gastritis2 002GBA No No Duodenitis Duodenal Ulcer, gastritis3 003VSA Yes No Normal Normal4 004KAY Yes Yes Esophageal Varices Esophageal Varices5 005ZOV No No Gastric Ulcer Normal6 006ROY Yes No Coffee grounds Gastritis, duo-denitis](https://usermanual.wiki/Given-Imaging/CAPDH-2.User-Manual/User-Guide-3276426-Page-23.png)
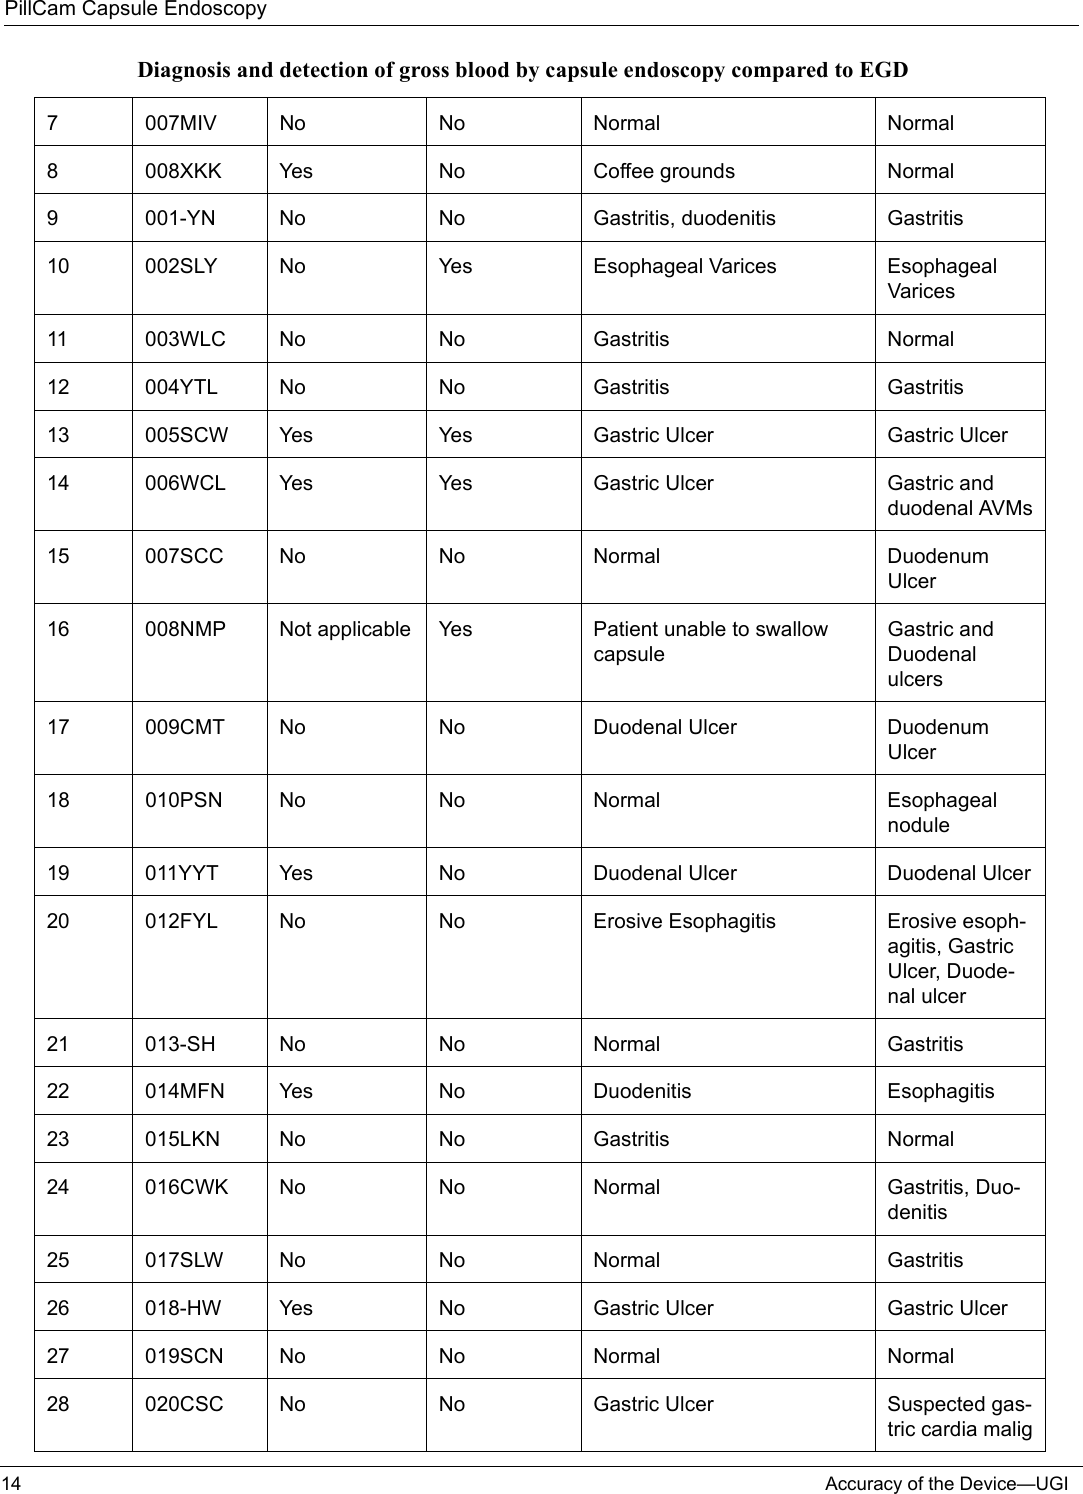
![PillCam Capsule Endoscopy16 Accuracy of the Device—UGIThe absence of blood when performing an evaluation with the PillCam UGI video capsule does not exclude the presence of a significant bleeding site in the acute upper gastrointestinal (esophagus, stomach and duodenum).Reference: [1] Gralnek IM1, Ching JY, Maza I, et al. Capsule endoscopy in acute upper gastrointestinal hemorrhage: a prospective cohort study. Endoscopy. 2013;45 (1):12-9.49 041K-L Yes No Normal GastritisDiagnosis and detection of gross blood by capsule endoscopy compared to EGD](https://usermanual.wiki/Given-Imaging/CAPDH-2.User-Manual/User-Guide-3276426-Page-26.png)


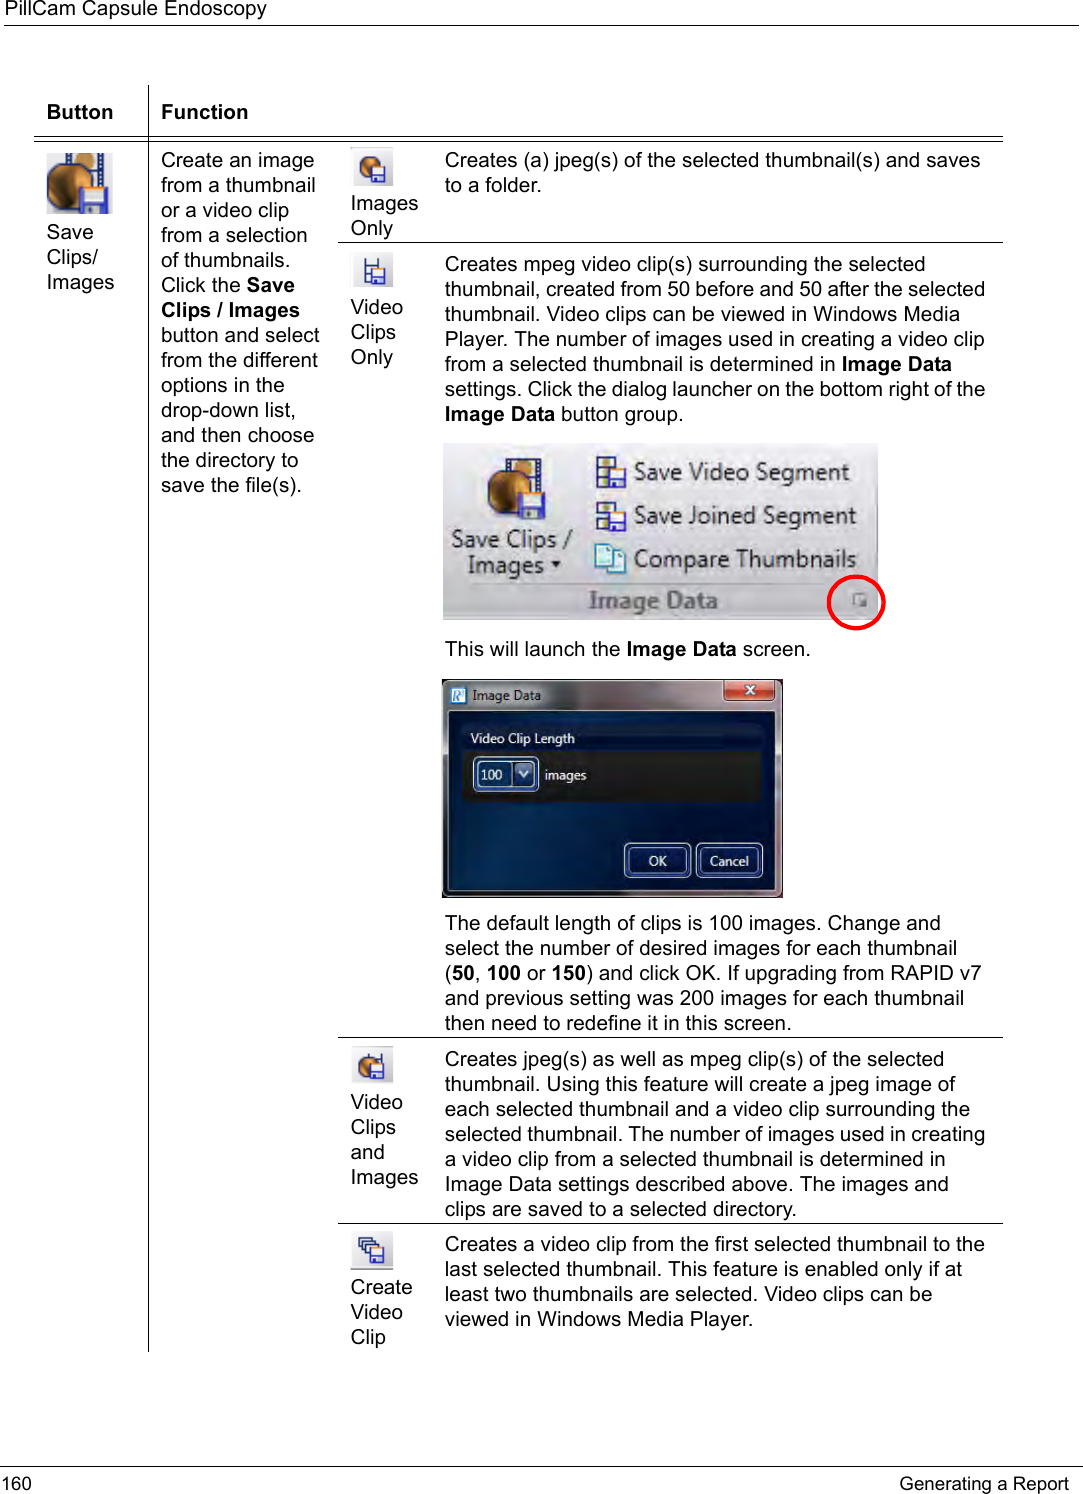


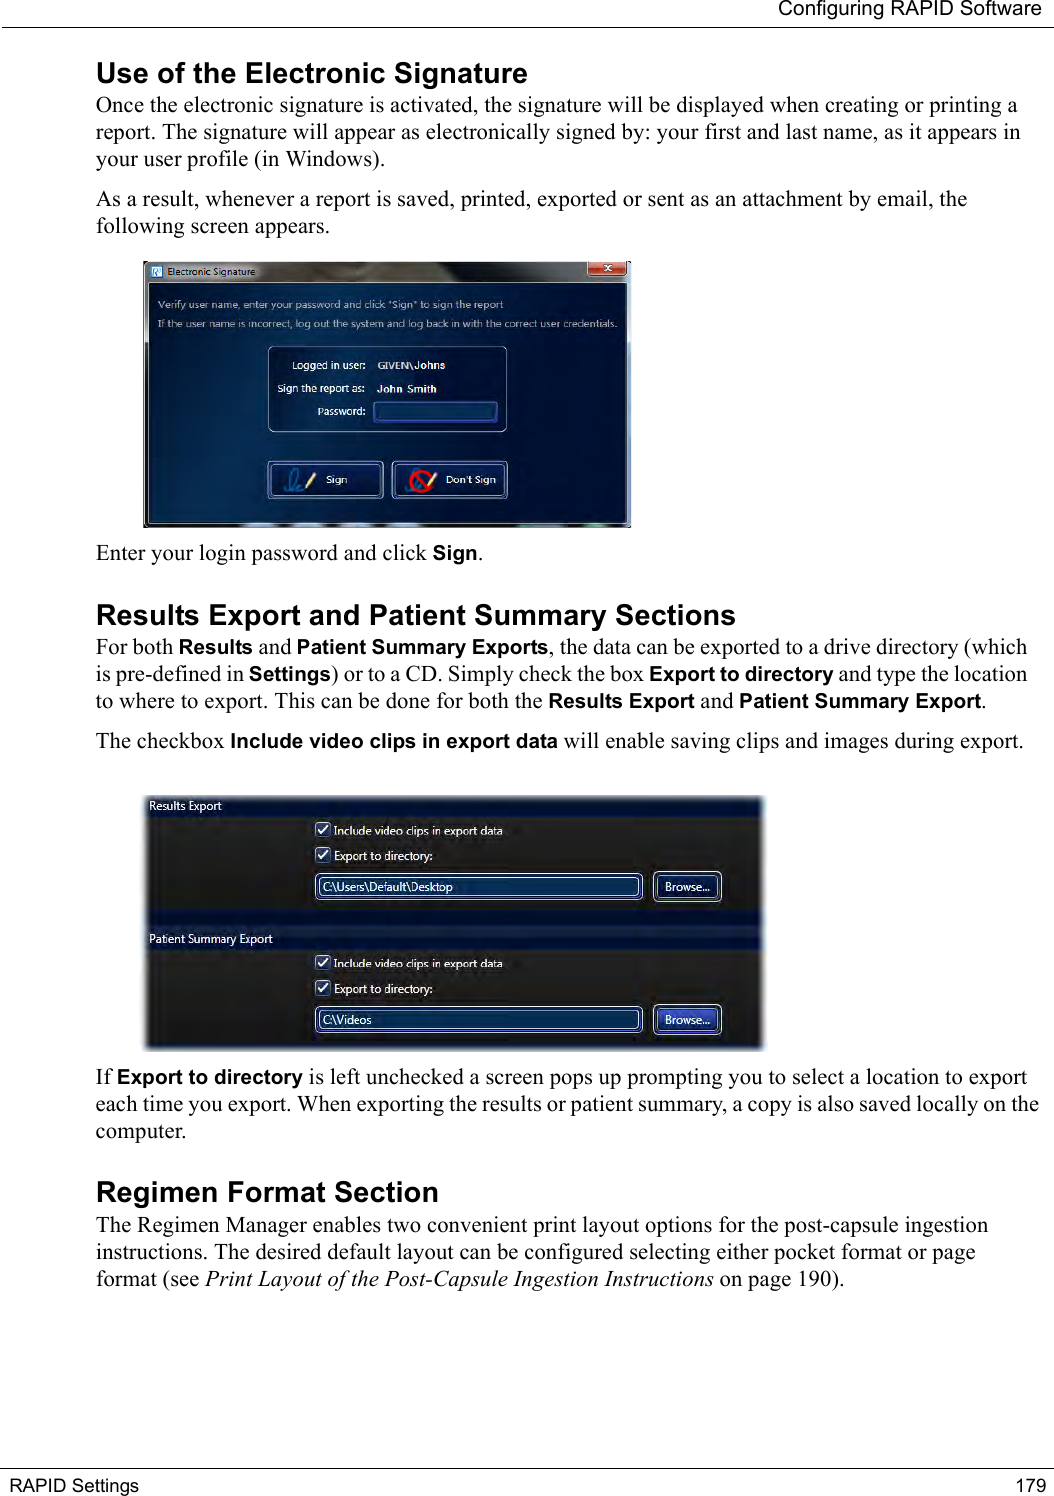


![PillCam Capsule Endoscopy186 Regimen Manager5. Type any other information in the Additional Instructions field that will appear on the printout for that specific regimen. 6. The regimens contain editable instructions in the Instructions for Patient column. Clicking the instruction will prompt an editor. Information represented in brackets [ ] is generic and is intended for completion by local staff with consideration to local names of the solution. Make any changes and click OK to save the updated instruction. 7. If you wish to include your instructions for a liquid diet, check the Clear liquid diet check box. This will display the list of Allowed and Not Allowed food or drink items. To modify these lists, click the Edit button. Make necessary edits and then click Save and Close.](https://usermanual.wiki/Given-Imaging/CAPDH-2.User-Manual/User-Guide-3276426-Page-196.png)
![Configuring RAPID SoftwareRegimen Manager 1898. The regimens contain editable instructions in the Instructions for Patient column. Clicking the instruction will prompt an editor. Information represented in brackets [ ] is generic and is intended for completion by local staff with consideration to local names of the solution. Make any changes and click OK to save the updated instruction.9. Any other important information can be entered in the Additional Instructions box. This information will appear in the patient printout.10. When you are finished, click Save. This adds the regimen you created to the library of regimens available.11. By default, the post-capsule ingestion regimen includes at least the following alerts and instructions: •Alert 0: An instruction #0 (based on time passed from capsule ingestion) to take prokinetics to facilitate passage of the PillCam COLON 2 capsule to the small bowel. Threshold of time passed from capsule ingestion for alert 0 can be modified in the regimen manager for a specific regimen. •Alert 1: An instruction #1 for taking laxative after detection by the PillCam recorder of PillCam COLON 2 passage into the small bowel. It coincides with the activation of the AFR mode in the PillCam COLON 2 capsule and the appearance of the AFR status icon in the right corner of the status line at the top of the PillCam recorder DR3 display. The appearance of alert 1 can be designated to appear either an additional 0 minutes or 15 minutes after original tentative alert 1 timing. Alert 0 will not occur if alert 1 was raised before it. • The End of Procedure (EOP) alert occurs when no more capsule images are received by the PillCam recorder or enough time has elapsed in the procedure. This may occur several minutes after capsule excretion or after the capsule battery was depleted without excretion in a long procedure. In general, additional alerts and instructions can be inserted between alert 1 and the EOP alert to reflect the physician's preference for post-ingestion instructions in a PillCam COLON 2 procedure. These instructions can be entered and edited, saved and approved through the Regimen Manager and be made ready to be selected in the Check-in for a PillCam COLON 2 procedure.֠֠֠֠NoteAlert times are designated by the PillCam recorder and the RAPID software. In rare cases, short delays may occur.](https://usermanual.wiki/Given-Imaging/CAPDH-2.User-Manual/User-Guide-3276426-Page-199.png)


![Technical DescriptionSystem Specifications 217System SpecificationsPillCam SB 2 Capsule֠֠֠֠Note• Specifications are subject to change without prior notice and without any obligation to users on the part of the manufacturer.• Specifications are rounded to the appropriate decimal place.PropertiesPhysical Dimensions Length: 26.3 mmDiameter: 11.4 mmWeight 2.9 gMaterial Biocompatible plasticOptical Illumination 4 white light emitting diodes# of imaging heads 1Field of view 156° (Optical field of view at 4.5 mm from top cover per ISO-8600-3)130° (Optical field of view from entrance pupil per FDA Method)Effective visibility Distance: 3 cmMin. detectable object At least 0.1 mmFrequency 434.1 MHzBand width 1.6 MHzModulation MSKERP [nW] 16Operational Frame rate either 2 or 4 fps (two capsule versions)Operating time > 8 hoursChemical safety Resistant to dissolution in pH=2 to pH=8Battery type Silver Oxide batteries Operating temperature20–40°CStorage temperature 0–40°C](https://usermanual.wiki/Given-Imaging/CAPDH-2.User-Manual/User-Guide-3276426-Page-227.png)
![PillCam Capsule Endoscopy218 System SpecificationsPillCam SB 3 CapsulePropertiesPhysical Dimensions Length: 26.2 mmDiameter: 11.4 mmWeight 3.0 gMaterial Biocompatible plasticOptical Illumination 4 white light emitting diodes# of imaging heads 1Field of view 156° ISO-8600-3Effective visibility 156° (Optical field of view at 4.5 mm from top cover per ISO-8600-3)136° (Optical field of view from entrance pupil per FDA Method) Min. detectable object At least 0.07 mmFrequency 434.1 MHzBand width 3.2 MHz @ 2.7 Mbps;6.5 MHz @ 5.4 MbpsModulation MSKERP [nW] ~20 Operational Frame rate 2 fps or 2–6 fps Operating time > 8 hoursChemical safety Resistant to dissolution in pH=2 to pH=8Battery type Silver Oxide batteries, Mercury FreeOperating temperature20–40°CStorage temperature 0–25°CDownlink communicationOperating frequency 13.6 MHzReceiver Bandwidth + 150 kHz](https://usermanual.wiki/Given-Imaging/CAPDH-2.User-Manual/User-Guide-3276426-Page-228.png)
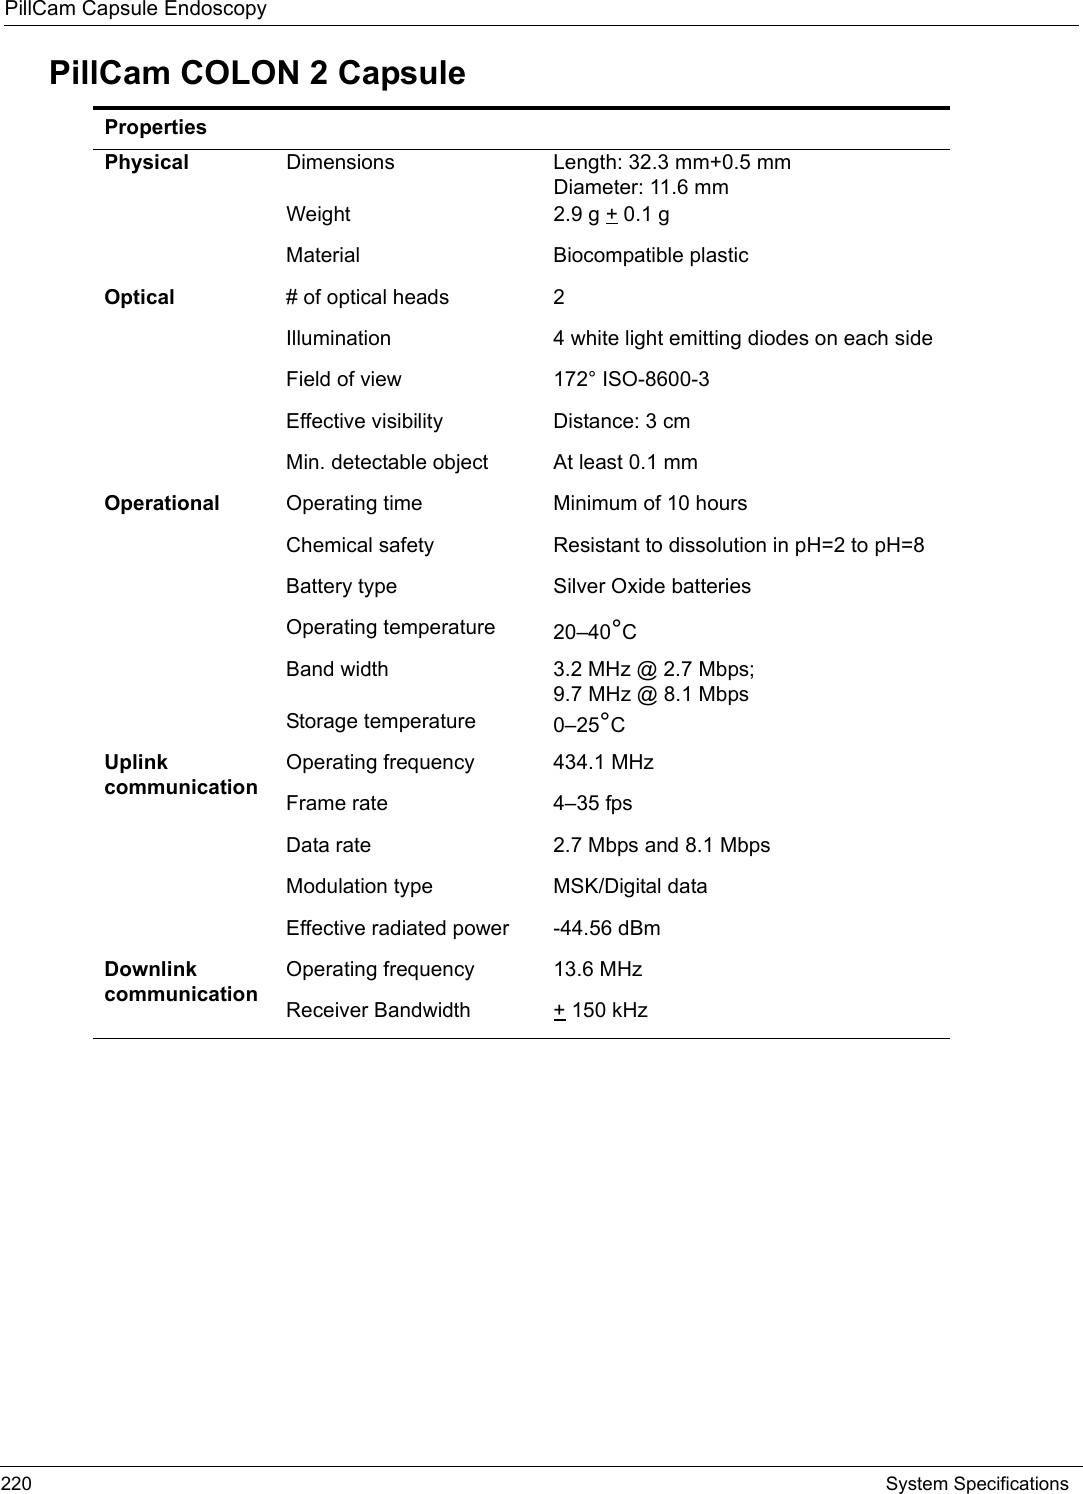
![Technical DescriptionSystem Specifications 219PillCam UGI CapsulePropertiesPhysical Dimensions Length: 32.3 mm+0.5 mmDiameter: 11.6 mmWeight 2.9 g + 0.1 gMaterial Biocompatible plasticOptical Illumination 4 white light emitting diodes on each side# of optical heads 2Field of view 172° ISO-8600-3Effective visibility Distance: 3 cmMin. detectable object At least 0.1 mmFrequency 434.1 MHz Band width 9.7 MHzModulation MSKERP [nW] 8Operational Frame rate 18–35 fpsOperating time 90 minChemical safety Resistant to dissolution in pH=2 to pH=8Battery type Mercury Free Silver Oxide batteries Operating temperature 20–40°CStorage temperature 0–25°C](https://usermanual.wiki/Given-Imaging/CAPDH-2.User-Manual/User-Guide-3276426-Page-229.png)
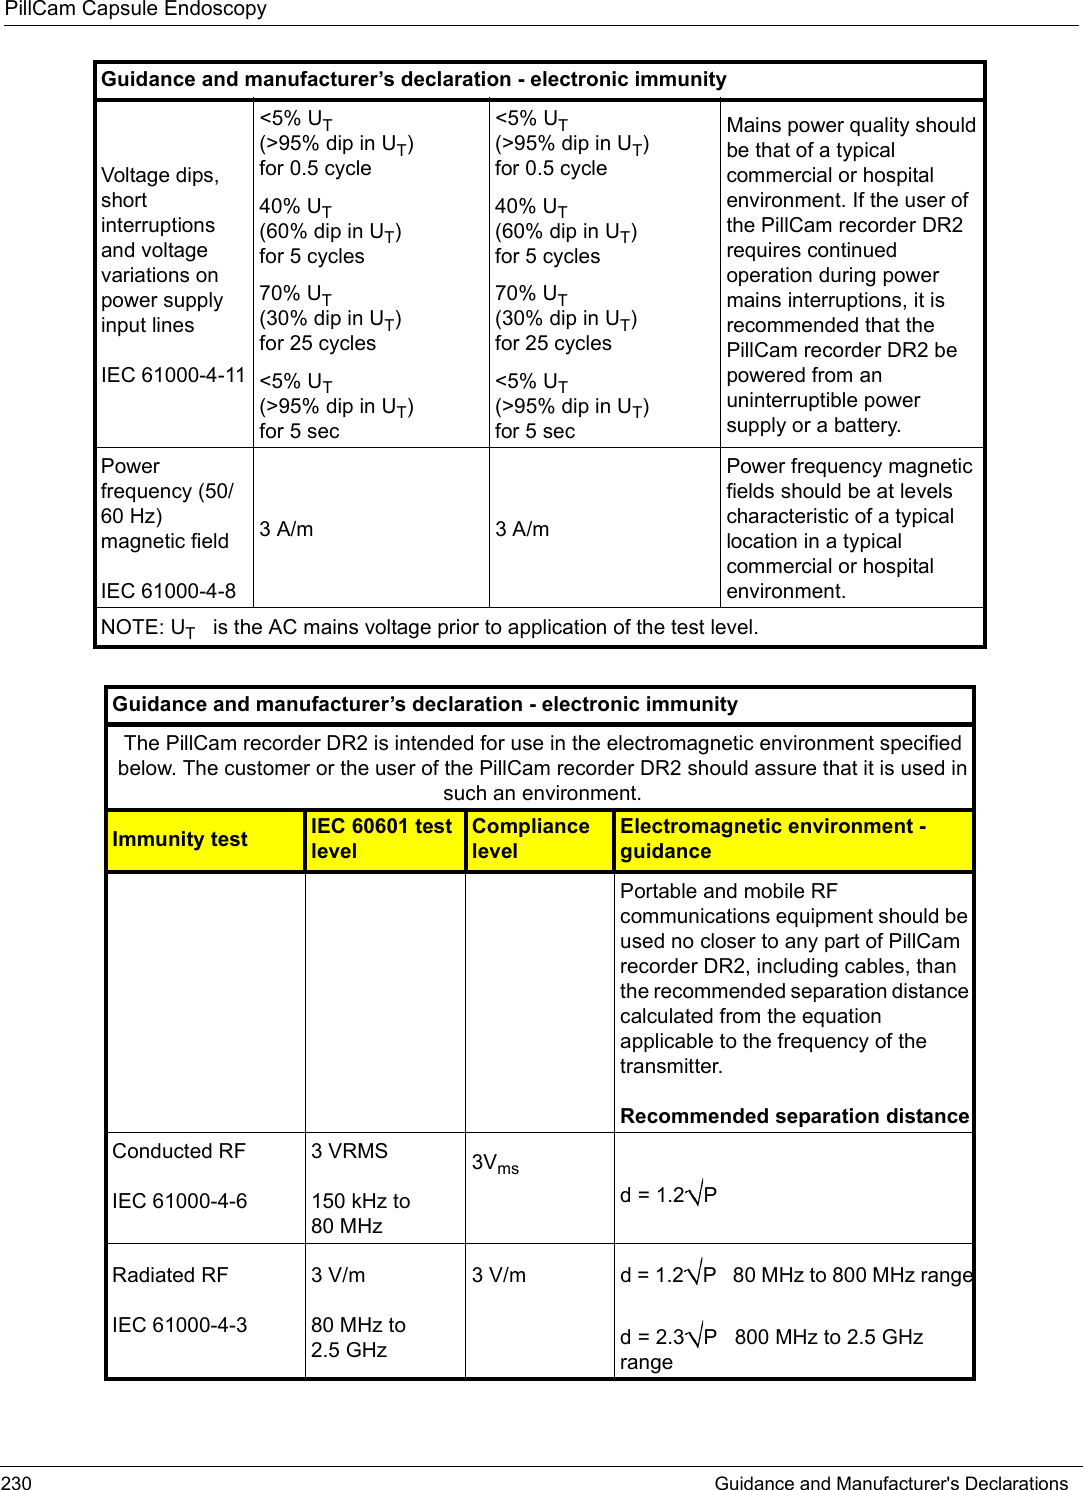
![PillCam Capsule Endoscopy222 System SpecificationsPillCam Recorder DR2/DR2C Cradle PillCam Recorder DR2PropertiesPhysical Software Proprietary firmwareRecording capacity PillCam recorder DR2: @ 2fps for 10 hours PillCam recorder DR2C: @ 4fps for 10 hoursWeight 500 g, including battery packOperational Power 6–10 V DC, 100–250 mA Battery type Internal, Li-Ion, 7.2 V, 4400 mAHBattery Pack weight 200 gOperating temp. 0–40°CStorage temp. 0–55°CStorage and Operating humidityUp to 85%Storage and Operating pressure790–520 mmHgPropertiesWeight 890 gSize (without battery inserted) 14 [D] x 165 [W] x 97 [H] mmColor BlackPower mains range 100 to 240 V](https://usermanual.wiki/Given-Imaging/CAPDH-2.User-Manual/User-Guide-3276426-Page-232.png)
![PillCam Capsule Endoscopy228 Guidance and Manufacturer's DeclarationsRecommended separation distances between portable and mobile RF communications equipment and the PillCam capsulesThe PillCam capsules are intended for use in an electromagnetic environment in which radiated RF disturbances are controlled. The customer or the user of the PillCam capsules can help prevent electromagnetic interference by maintaining a minimum distance between portable and mobile RF communications equipment (transmitters) and the PillCam capsules as recommended below, according to the maximum output power of the communications equipment.Rated maximum output power of transmitter [W]Separation distance according to frequency of transmitter [m]150 kHz to 80 MHzd = 1.2 P80 MHz to 800 MHzd = 1.2 P800 MHz to 2,5 GHzd = 2.3 P0.01 Not applicable 0.12 0.230.1 Not applicable 0.38 0.731 Not applicable 1.2 2.310 Not applicable 3.8 7.3100 Not applicable 12 23For transmitters rated at a maximum output power not listed above, the recommended separation distance d in meters (m) can be determined using the equation applicable to the frequency of the transmitter, where P is the maximum output power rating of the transmitter in watts (W) according to the transmitter manufacturer.Note 1: At 80 MHz and 800 MHz, the separation distance for the higher frequency range applies.Note 2: These guidelines may not apply in all situations. Electromagnetic propagation is affected by absorption and reflection from structures, objects and people.](https://usermanual.wiki/Given-Imaging/CAPDH-2.User-Manual/User-Guide-3276426-Page-238.png)
![Technical DescriptionGuidance and Manufacturer's Declarations 231Note 1: At 80 MHz and 800 MHz, the higher frequency range applies.Note 2: These guidelines may not apply in all situations. Electromagnetic propagation is affected by absorption and reflection from structures, objects and people.Note 3: P is the maximum output power rating of the transmitter in watts (W) according to the transmitter manufacturer and d is the recommended separation distance in meters (m). Note 4: Field strengths from fixed RF transmitters, as determined by an electromagnetic site surveya, should be less than the compliance level in each frequency rangeb.Note 5: Interference may occur in the vicinity of equipment marked with the following symbol: a Field strengths from fixed transmitters, such as base stations for radio (cellular/cordless) telephones and land mobile radios, amateur radio, AM and FM radio broadcast and TV broadcast cannot be predicted theoretically with accuracy. To assess the electromagnetic environment due to fixed RF transmitters, an electromagnetic site survey should be considered. If the measured field strength in the location in which the PillCam recorder DR2 is used exceeds the applicable RF compliance level above, the PillCam recorder DR2 should be observed to verify normal operation. If abnormal performance is observed, additional measures may be necessary, such as re-orienting or relocating the PillCam recorder DR2.b Over the frequency range 150 kHz to 80 MHz, field strengths should be less than 3 V/m.Recommended separation distances between portable and mobile RF communications equipment and the PillCam recorder DR2The PillCam recorder DR2 is intended for use in an electromagnetic environment in which radiated RF disturbances are controlled. The customer or the user of the PillCam recorder DR2 can help prevent electromagnetic interference by maintaining a minimum distance between portable and mobile RF communications equipment (transmitters) and the PillCam recorder DR2 as recommended below, according to the maximum output power of the communications equipment.Rated maximum output power of transmitter [W]Separation distance according to frequency of transmitter [m]150 kHz to 80 MHzd = 1.2 P80 MHz to 800 MHzd = 1.2 P800 MHz to 2,5 GHzd = 2.3 P0.01 Not applicable 0.12 0.230.1 Not applicable 0.38 0.731 Not applicable 1.2 2.310 Not applicable 3.8 7.3100 Not applicable 12 23For transmitters rated at a maximum output power not listed above, the recommended separation distance d in meters (m) can be determined using the equation applicable to the frequency of the transmitter, where P is the maximum output power rating of the transmitter in watts (W) according to the transmitter manufacturer.NOTE 1: At 80 MHz and 800 MHz, the separation distance for the higher frequency range applies.NOTE 2: These guidelines may not apply in all situations. Electromagnetic propagation is affected by absorption and reflection from structures, objects and people.Guidance and manufacturer’s declaration - electronic immunity](https://usermanual.wiki/Given-Imaging/CAPDH-2.User-Manual/User-Guide-3276426-Page-241.png)
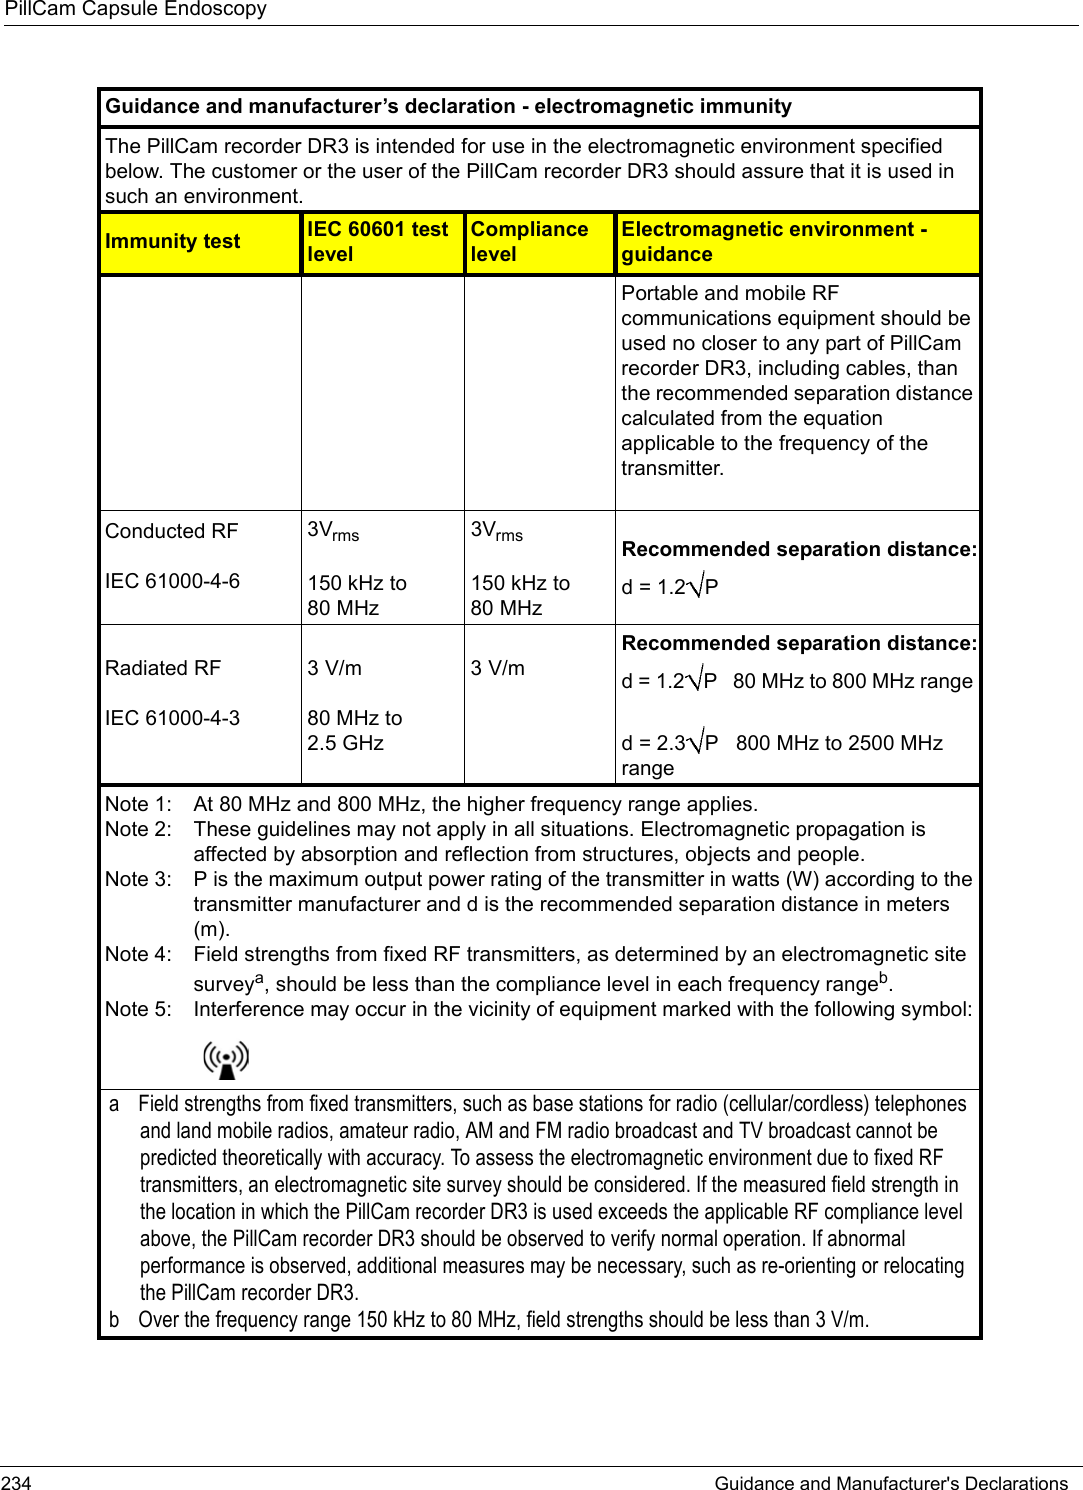
![Technical DescriptionGuidance and Manufacturer's Declarations 235Recommended separation distances between portable and mobile RF communications equipment and the PillCam recorder DR3The PillCam recorder DR3 is intended for use in an electromagnetic environment in which radiated RF disturbances are controlled. The customer or the user of the PillCam recorder DR3 can help prevent electromagnetic interference by maintaining a minimum distance between portable and mobile RF communications equipment (transmitters) and the PillCam recorder DR3 as recommended below, according to the maximum output power of the communications equipment.Rated maximum output power of transmitter [W]Separation distance according to frequency of transmitter [m]150 kHz to 80 MHzd = 1.2 P80 MHz to 800 MHzd = 1.2 P800 MHz to 2,5 GHzd = 2.3 P0.01 0.12 0.12 0.230.1 0.38 0.38 0.731 1.2 1.2 2.310 3.8 3.8 7.3100 12 12 23For transmitters rated at a maximum output power not listed above, the recommended separation distance d in meters (m) can be determined using the equation applicable to the frequency of the transmitter, where P is the maximum output power rating of the transmitter in watts (W) according to the transmitter manufacturer.Note 1: At 80 MHz and 800 MHz, the separation distance for the higher frequency range applies.Note 2: These guidelines may not apply in all situations. Electromagnetic propagation is affected by absorption and reflection from structures, objects and people.](https://usermanual.wiki/Given-Imaging/CAPDH-2.User-Manual/User-Guide-3276426-Page-245.png)