Global Sun Technology WLRT2454NMA40 AT&T; Plug&Share; 54Mbps Wireless Router User Manual ATT6800G UM d08 qxp
Global Sun Technology Inc AT&T; Plug&Share; 54Mbps Wireless Router ATT6800G UM d08 qxp
User Manual
Copyright © 2004 Advanced American Telephones. All Rights Reserved.
AT&T and the Globe Design are trademarks of AT&T Corp., licensed to Advanced
American Telephones. All marks are trademarks of their respective corporations.
Plug&Share™
Wireless Router
54 Mbps 802.11g
6800G
User Manual

Table of Contents
AT&T Plug&Share™54 Mbps Wireless Router 6800G 2
Table of Contents
GETTING STARTED ..................................................................4
About your new wireless network router ........................4
Package contents............................................................5
System requirements ......................................................5
Router controls, connections and indicator lights ..........6
Router installation ..........................................................7
THE SETUP WIZARD ................................................................8
Internet connection type..................................................8
Dynamic IP address screen............................................9
PPPoE screen ................................................................9
Static IP address screen ..............................................10
Wireless LAN connection screen..................................10
Setup completed ..........................................................10
WEP encryption ............................................................11
Security setup completed..............................................12
Close Wizard ................................................................12
SYSTEM SETTINGS ................................................................13
BASIC SETTINGS ....................................................................14
Basic Wizard screen ....................................................14
Basic wireless settings..................................................15
Basic ISP connection ....................................................17
Basic DHCP settings ....................................................21
ADVANCED SETTINGS ............................................................22
Virtual server ................................................................22
Multiple connection applications ..................................23
Filters ............................................................................24
Firewall rules ................................................................28
DMZ ..............................................................................29
Routing..........................................................................30
Wireless network performance ....................................33
ADMINISTRATOR SETTINGS ..................................................34
Set passwords ..............................................................34
Router settings..............................................................35
Backup settings ............................................................36
Restore default settings ................................................36
Other options ................................................................37

Table of Contents
AT&T Plug&Share™54 Mbps Wireless Router 6800G 3
STATUS SCREENS ..................................................................38
Router information ........................................................38
Activity logs ..................................................................39
Traffic statistics..............................................................40
Wireless client computers ............................................41
SHORTCUTS ............................................................................42
Parental control ............................................................42
Gaming applications ....................................................43
Personal web site..........................................................44
Personal FTP site ........................................................45
Internet telephony ........................................................46
FIRMWARE UPGRADES ..........................................................47
CONFIGURING THE WIRELESS NETWORK..........................48
Change network settings ..............................................48
File & print sharing for Windows®XP............................49
File & print sharing for Windows®2000 ........................56
File & print sharing for Windows®Me and 98 SE ........62
TROUBLESHOOTING ..............................................................68
GLOSSARY ..............................................................................71
TECHNICAL SPECIFICATIONS ..............................................76
CARE AND MAINTENANCE ....................................................76
IMPORTANT!
Use only the AC power adapter #00-7000-00-00 provided with
the product. Do not attempt to use any other AC power adapter.
If you need a replacement, please call 1-877-800-5400.
Before you begin
• During installation you may be required to enter a log-in
name, password or IP address for Internet access. Contact
your Internet service provider to obtain this information
before you begin.
• Please visit our web site to check for free firmware
upgrades that can maximize the performance and security
of your new wireless network adapter:
www.plugandshare.att.com
AT&T offers a full line of data networking
and broadband accessories.
Please visit us at
www.plugandshare.att.com
1-877-800-5400
Getting Started
AT&T Plug&Share™54 Mbps Wireless Router 6800G 4
About Your New Wireless Router
Your new AT&T Plug&Share™Wireless Router gives you the freedom to share files, programs, storage
devices, scanners, printers and even broadband Internet access among all the computers in your
network — without the inconvenience and expense of a tangle of network cabling.
Designed for fast, easy setup and use, your new router transfers data at up to 54 Mbps (megabits per
second). Built-in “firewall” capabilities help keep your network secure and protect your privacy.
The AT&T Plug&Share™Wireless Router can be used with computers equipped with Windows®XP, 2000,
Me or 98 SE operating systems and can also be integrated into a larger network.
Before you begin, please turn to the next page to check package contents and system requirements.
Then follow the step-by-step directions to install and configure the router for optimum performance on
your network.
Internet
Cable/DSL modem
Computer 1
Desktop or
laptop PC
Computer 2
Desktop or laptop PC
(wireless adapter required)
Computer 3
Desktop or laptop PC
(wireless adapter required)
Getting Started
AT&T Plug&Share™54 Mbps Wireless Router 6800G 5
Package Contents
Please check to make sure your package contains the following items:
Power
Wireless LAN
LAN 1
WAN
LAN 2
LAN 3
LAN 4
Plug&Share™
Wireless Router
Power adapter
Use ONLY the supplied
adapter. Do not attempt
to use any other power
adapter.
RJ45 Ethernet cable
Connects the router to the
host computer, which is the
computer you are using to
set up your router.
CD-ROM
Contains printable versions of this
User Manual, Quick Start Guide
and Safety & Warranty Information.
Quick
Start Guide
Safety &
Warranty
Information
System Requirements:
You must have a personal computer with the following applications & hardware:
• Windows®, MacIntosh®or Linux®(operating system independent)
• Latest version of Internet web browser (ex: Internet Explorer®5.5 or later)
• Intel®Pentium II (or higher)
• 64MB of RAM
• CD-ROM drive
• 10/100 Base-T Ethernet Port
• 5 MB of available hard-disk space (60 MB to load Adobe®Acrobat® Reader®)
• Cable modem or DSL modem with Broadband Service
Getting Started
AT&T Plug&Share™54 Mbps Wireless Router 6800G 6
Router Controls, Connections and Indicator Lights
LAN Ports 1- 4
RJ45 jacks for cable con-
nections to a local area
network. After installation
and setup, you will not
need cabling to wirelessly
share resources throughout
the network.
WAN Port
This port provides Internet
access when connected to
a DSL or cable modem.
(“WAN” stands for “Wide
Area Network.”)
Power
Plug in your power adapter
here, then plug it into an
electrical outlet.
Reset button
Make sure the router is plugged in and turned on, then
press and hold this button for 15 seconds to restore
factory programmed default settings. You will have to
run the Setup Wizard again if you use this feature
(see page 8).
Power
A steady light indicates that the
router is properly connected to
the power supply.
Wireless LAN
A steady light indicates that the
wireless connection is working
properly. The light blinks during
data transfer.
WAN
A steady light indicates the
router is properly connected to
your modem. The light blinks
during data transfer.
LAN1- LAN 4
A steady light indicates that
there is a connection to an
Ethernet-enabled computer on
one of the ports. The light blinks
during data transfer.
BACK FRONT
Getting Started
AT&T Plug&Share™54 Mbps Wireless Router 6800G 7
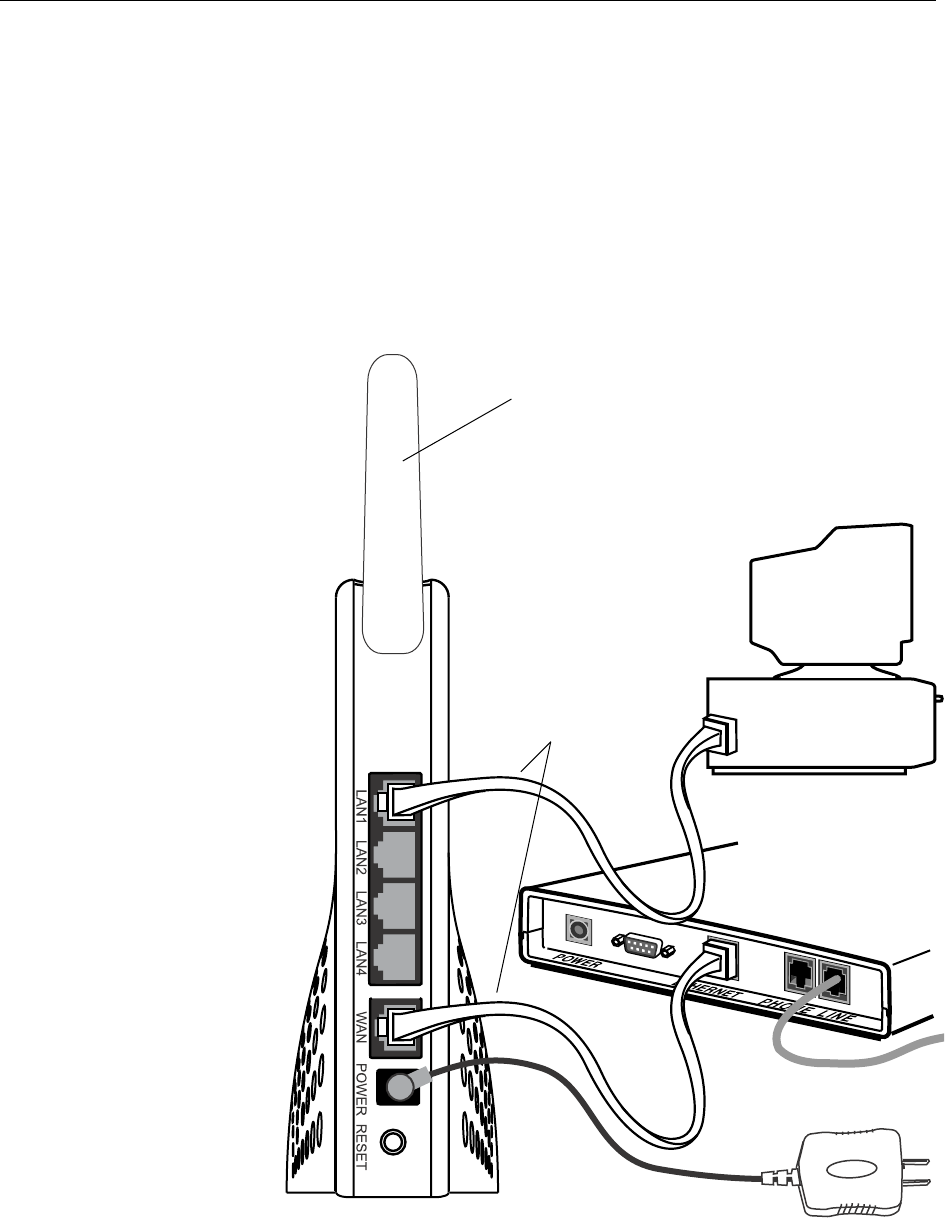
Modem
Computer
Power Adapter
Step 1: Make sure that you have Internet access
Before you begin, launch your web browser to make sure you can connect to the Internet. If you can
connect to web sites as usual, proceed to Step 2, below. If you cannot connect to the Internet, check
your modem connections, or consult the User Manual provided by your broadband/Internet service
supplier. You must have Internet access before installing the router.
Step 2: Connect router to your cable/DSL modem and to your computer
1 Connect power adapter
Connect the power adapter to
the router, then plug it into an
electrical outlet not controlled by
a wall switch.
2 Connect router to computer
Unplug the Ethernet cable from
your modem, then plug it into
the LAN 1 port of the router.
(You can use the other ports to
connect devices not equipped
for wireless networking).
3 Connect router to modem
Use the supplied Ethernet cable
to connect the modem to the
WAN port of the router. WAN
stands for Wide Area Network
(Internet).
4 Check lights & connections
Before proceeding, make sure
all connections match the
diagram at right. Check the front
of the router to make sure the
Power, WAN and LAN1 lights
are on (see page 6).
Rotate antenna to
fully upright position
Ethernet
Cables
Use only the AC power adapter #00-7000-00-00 provided with this product.
Do not attempt to use any other AC power adapter. If you need a replace-
ment, please call 1-877-800-5400.
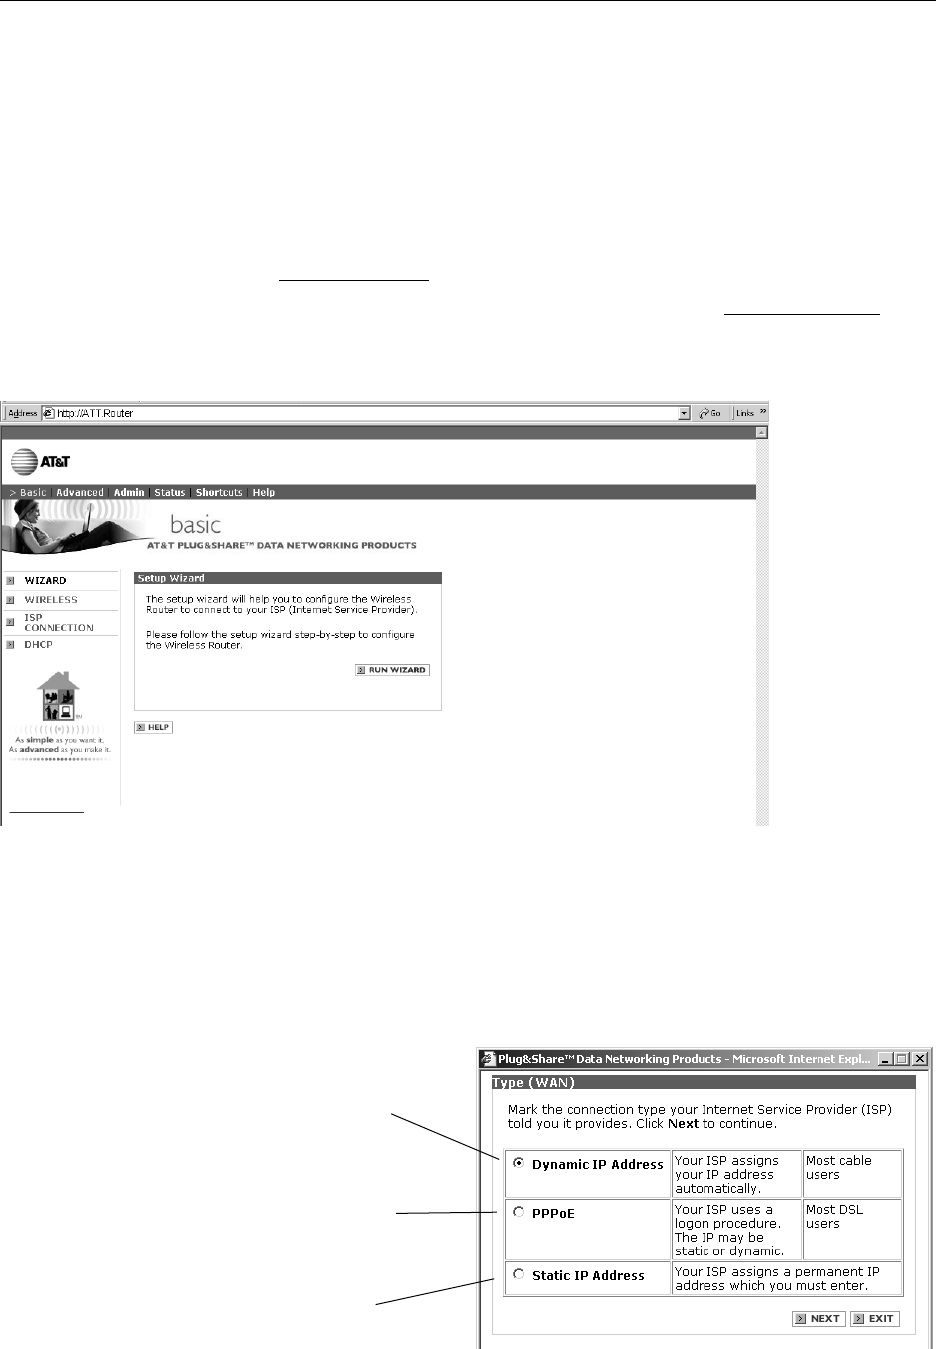
Setup Wizard
AT&T Plug&Share™54 Mbps Wireless Router 6800G 8
Step 3: Run the Setup Wizard
To configure your router for use, launch your web browser, then follow the steps below.
NOTE: The screens you will see are stored in the router; they are not web site pages. During setup,
ignore alerts that prompt you to re-connect to the Internet.
1In the address window, type http://ATT.Router (do NOT type www).
2Press Enter to display the Wizard screen. If this screen does not appear, type http://192.168.0.1 then
press Enter.
3Click the Run Wizard button to display the Internet Connection Type screen (see below).
Basic > Advanced > Admin > Status > Shortcuts > Help
Internet Connection Type
At this screen you must choose an Internet connection type (you will be allowed to choose only one). If
you are not sure which to choose, ask your Internet Service Provider.
After you make a selection, press Next to display a setup screen for the option you’ve chosen.
Dynamic IP Address
Cable modems usually require this setting.
Choose this setting if you don't have to log on to
the Internet when you've turned on your computer,
and if your ISP assigns your IP address.
PPPoE
DSL modems usually require this setting.
Choose this setting if you have to log on to the
Internet when you turn on your computer.
Static IP
This setting is rarely required. Contact your ISP
before choosing this option.
Wizard
Wireless
ISP Connection
DHCP
Setup Wizard
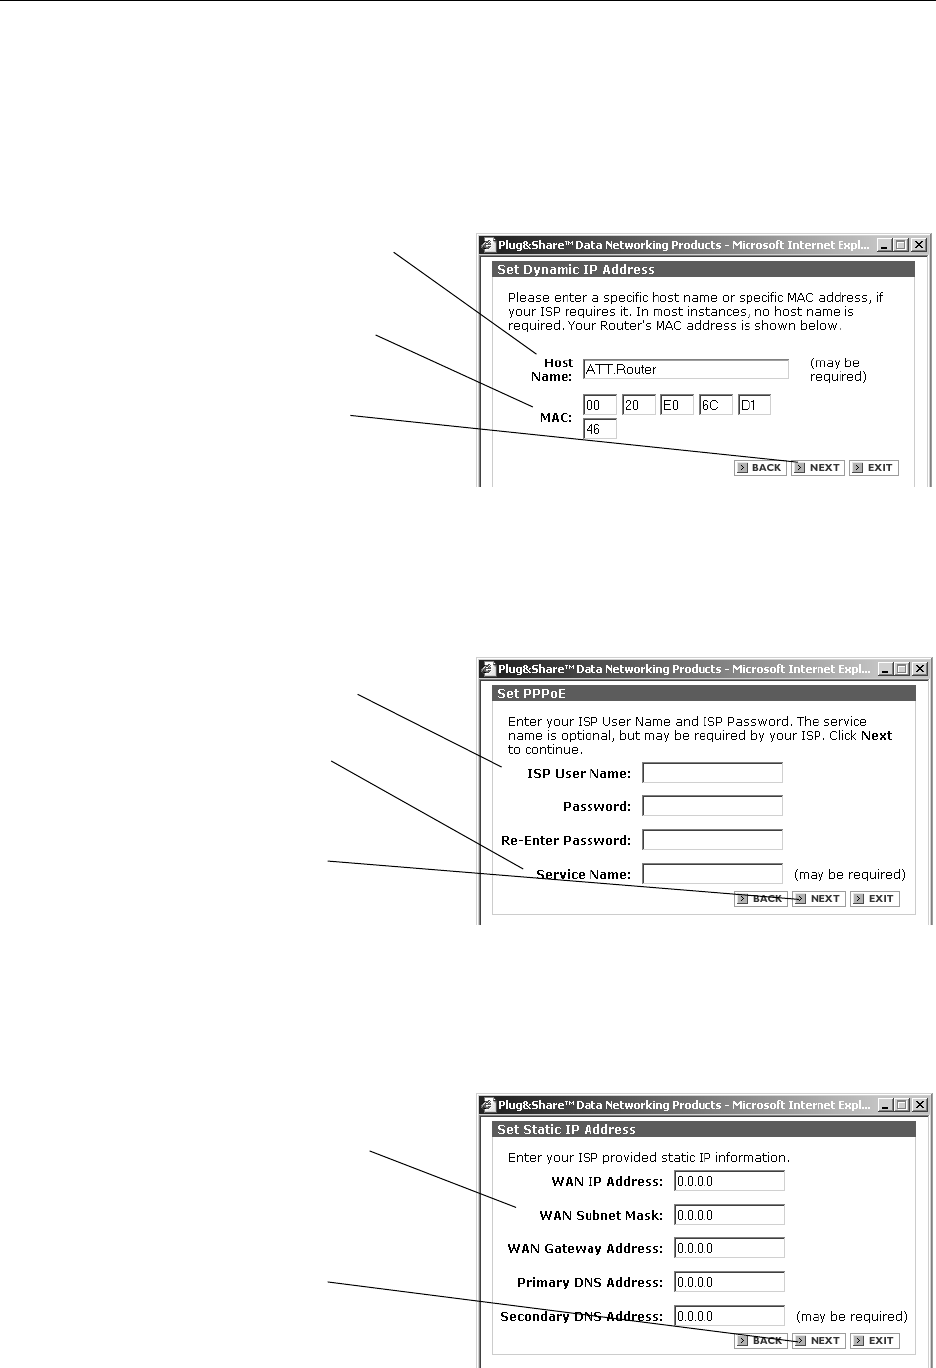
AT&T Plug&Share™54 Mbps Wireless Router 6800G 9
Set Dynamic IP Address
The following screen appears if you select Dynamic IP Address as your Internet connection type.
Basic > Advanced > Admin > Status > Shortcuts > Help
Set PPPoE
The following screen appears if you select PPPoE as your Internet connection type.
Host Name: If your ISP requires that you enter
a host name, enter it here.
MAC (Media Access Control): The address of
your computer’s network adapter should
appear here as the default. It is usually not
necessary to change it.
Click Next to display the Wireless LAN
Connection screen (see next page).
Enter the user name and password you use
for access to your Internet Service Provider.
If your ISP requires you to use a service
name, enter it here.
Click Next to display the Wireless LAN
Connection screen (see next page).
Set Static IP Address
The following screen appears if you select Static IP Address as your Internet connection type.
Delete anything that appears in these fields
when the screen is displayed, then enter the
WAN and DNS addresses provided by your
ISP.
Click Next to display the Wireless LAN
Connection screen (see next page).
Wizard
Wireless
ISP Connection
DHCP
Setup Wizard
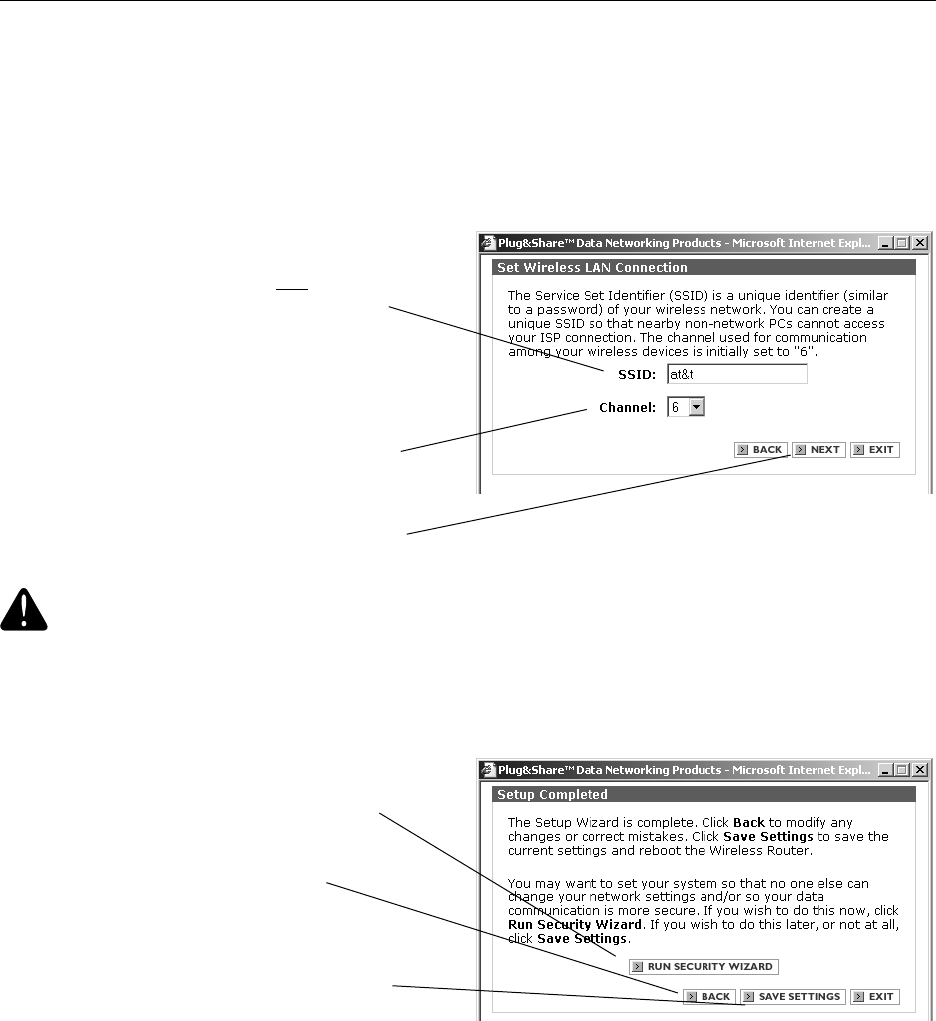
AT&T Plug&Share™54 Mbps Wireless Router 6800G 10
Set Wireless LAN Connection
This screen displays the default settings for your wireless network.
Basic > Advanced > Admin > Status > Shortcuts > Help
SSID (Service Set Identifier): This feature pro-
vides protection against unauthorized access to
your network. The default SSID is at&t. You
should change this name to any alphanumeric
(numbers and/or letters) identifier up to 32 char-
acters long. All wireless adapters on your net-
work must use the same SSID as your wireless
router and/or access point. The SSID is case
sensitive (i.e., “cat” and “Cat” are not the same).
Channel: Click to choose any channel from 1 to
11. (Default is 6.) All wireless devices on the
network must be set to the same channel.
Click Next to display the Setup Completed screen.
Setup completed
Click Run Security Wizard to provide privacy
for your wireless network and help protect
against unauthorized access (see next page).
Click Back if you want to change any
settings.
Click Save Settings to end the setup session
now. (See Close Wizard description, page 12.)
Wizard
Wireless
ISP Connection
DHCP
CAUTION: SSID and Channel number must be identical in all wireless network devices.
Setup Wizard
AT&T Plug&Share™54 Mbps Wireless Router 6800G 11
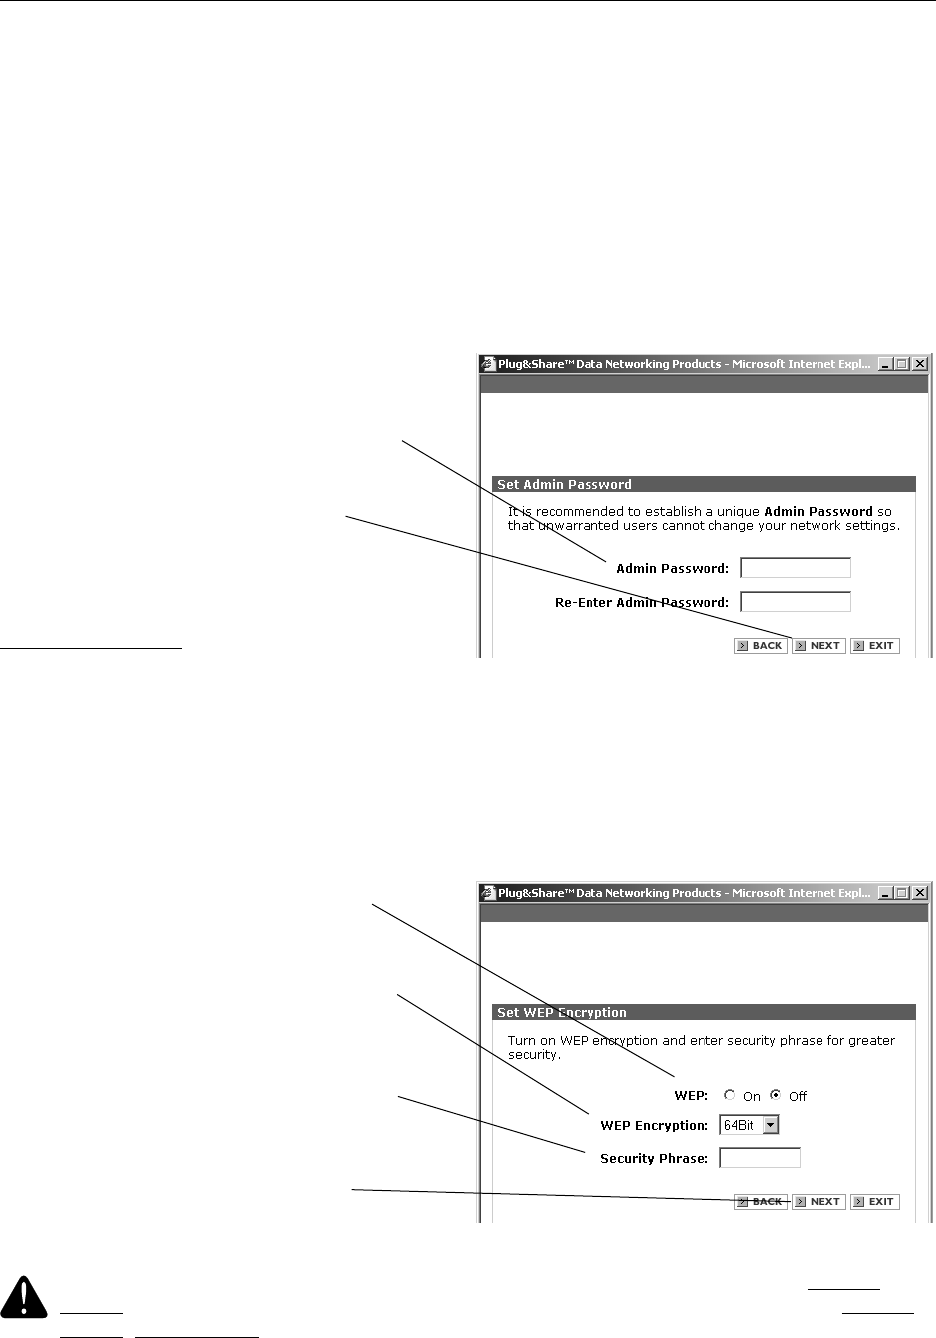
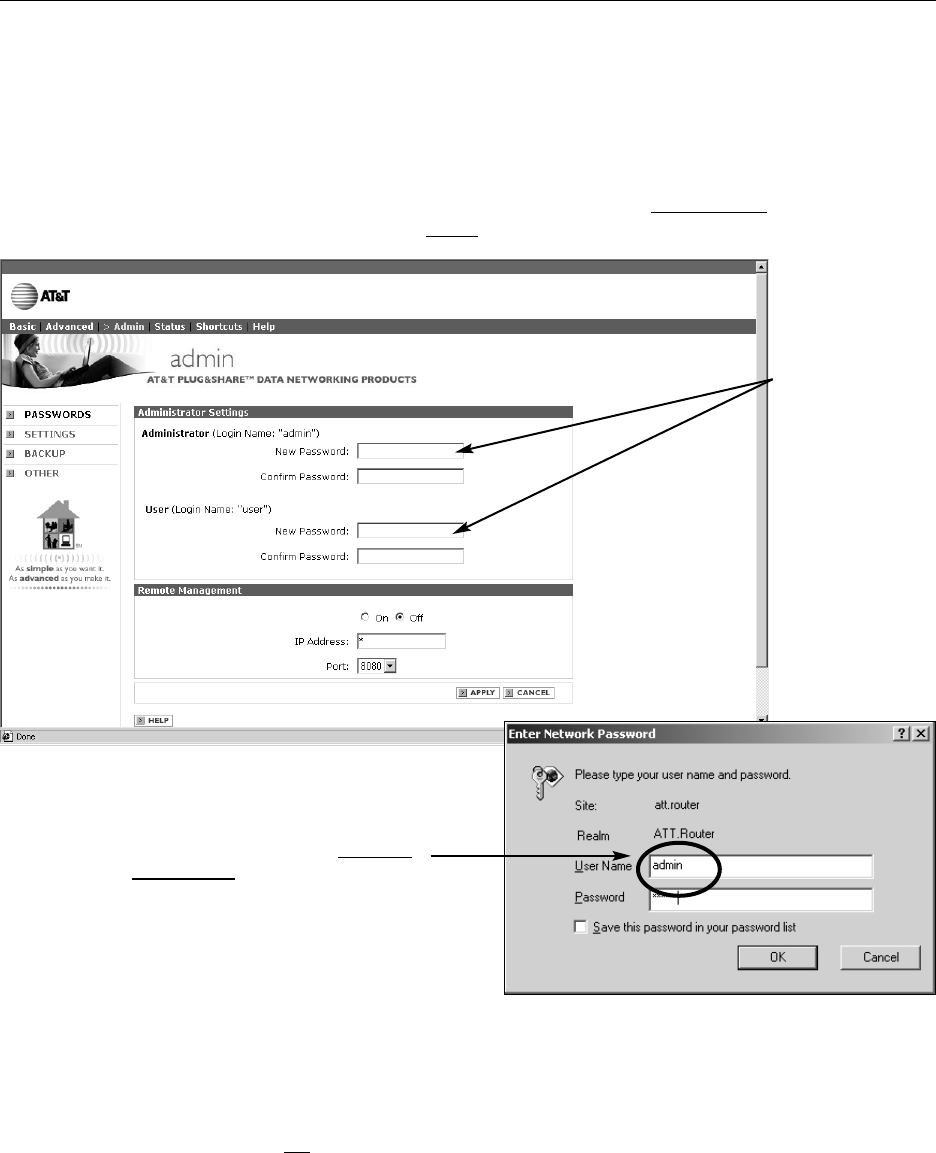
Security Wizard: Set Admin Password
An Admin Password is not required, but is recommended to prevent unauthorized tampering with the
router’s settings if others have access to your network. Only those who know the password will be
allowed to change settings (see page 34 for important information on password use).
NOTE: Be sure to write down your password and store it in a secure place. If you forget your password,
you will not have access to any settings until you reset the router to factory programmed default settings.
Basic > Advanced > Admin > Status > Shortcuts > Help
Set WEP Encryption
WEP (Wired Equivalent Privacy) helps protect your privacy by scrambling data that passes through your
network.
Enter your password twice. Symbols will
replace your key strokes on the screen. The
password can be up to 15 characters (letters,
numbers, spaces and other punctuation marks).
The password is case sensitive (i.e., “cat” and
“Cat” are not the same).
Click Next to display the WEP Encryption
screen.
NOTE: If you create an Admin Password, you
may be asked to enter your User Name
(Admin) and re-enter your password. To log in,
you must enter Admin in the User Name field
(see page 34).
WEP: Click On to activate WEP encryption.
WEP encryption: Select encryption strength
from the drop down menu (64, 128 or 152-bit).
Larger numbers will make your system more
secure, but may result in slower data transfer.
Security Phrase: Enter a security phrase in the
last text box. (You can use letters, numbers,
spaces, and punctuation marks. You must enter
five characters for 64-bit, 13 characters for 128-
bit, or 16 characters for 152-bit encryption.)
Click Next to display the Security Setup
Completed screen.
Wizard
Wireless
ISP Connection
DHCP
CAUTION: All WEP settings must be identical in all wireless network devices. WEP Security
Phrase must match the WEP settings used in all your wireless adapters (may be called Security
Phrase, Ascii/Hex Key or other term).
Setup Wizard
AT&T Plug&Share™54 Mbps Wireless Router 6800G 12
Test your connections
Click on the icon for your web browser. Your designated home page should appear. If your home page
does not appear, try the following:
• Reboot your computer.
• Turn off or unplug your modem for a few seconds, then turn it back on.
• If you still have no Internet access, please turn to the Troubleshooting section (page 68).
Note: After your initial setup is complete, you can use wireless adapters to connect other devices to your
network. The Ethernet cable is not necessary, and can be disconnected.
Basic > Advanced > Admin > Status > Shortcuts > Help
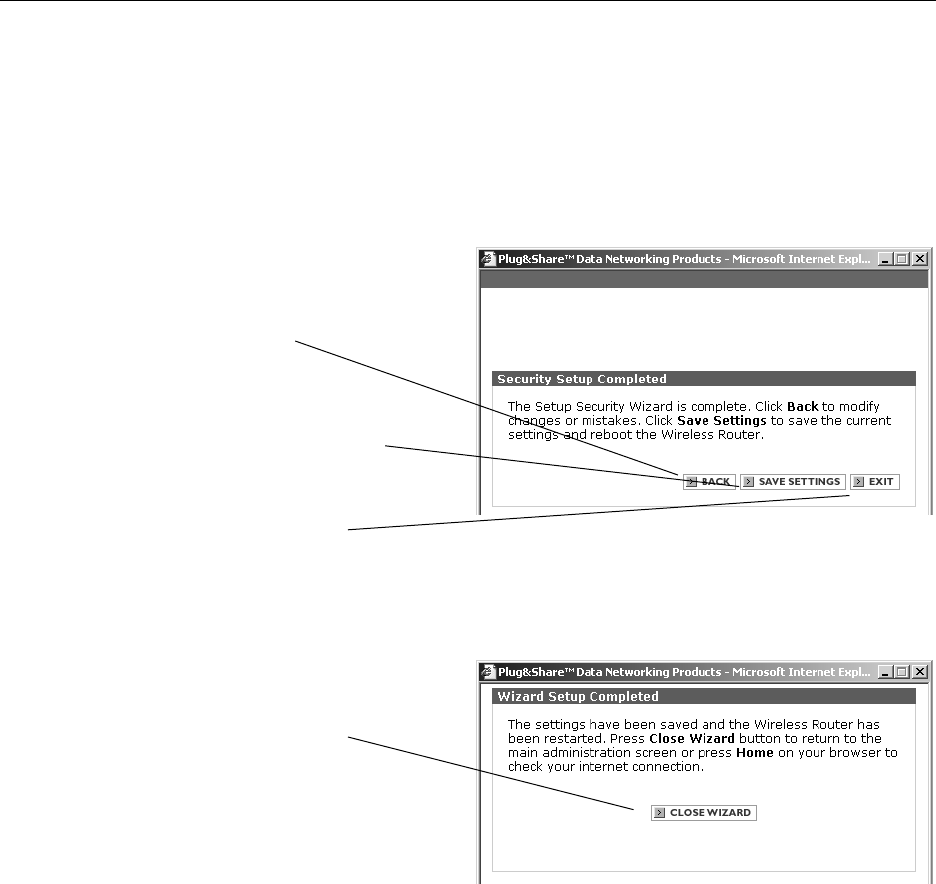
Security setup completed
Your setup is complete. For additional security protection, turn to the Wireless Settings section (page 15).
Click Back to change any settings
Click Save Settings to end the setup session
now. Your router will restart automatically and
the Close Wizard screen will appear.
Click Exit to return to the current settings.
Close Wizard
Click Close Wizard to allow access to
advanced administration screens.
To check your Internet connections, click the
Home button on your Internet web browser at
the top of your screen.
Wizard
Wireless
ISP Connection
DHCP

Basic System Settings
AT&T Plug&Share™54 Mbps Wireless Router 6800G 13
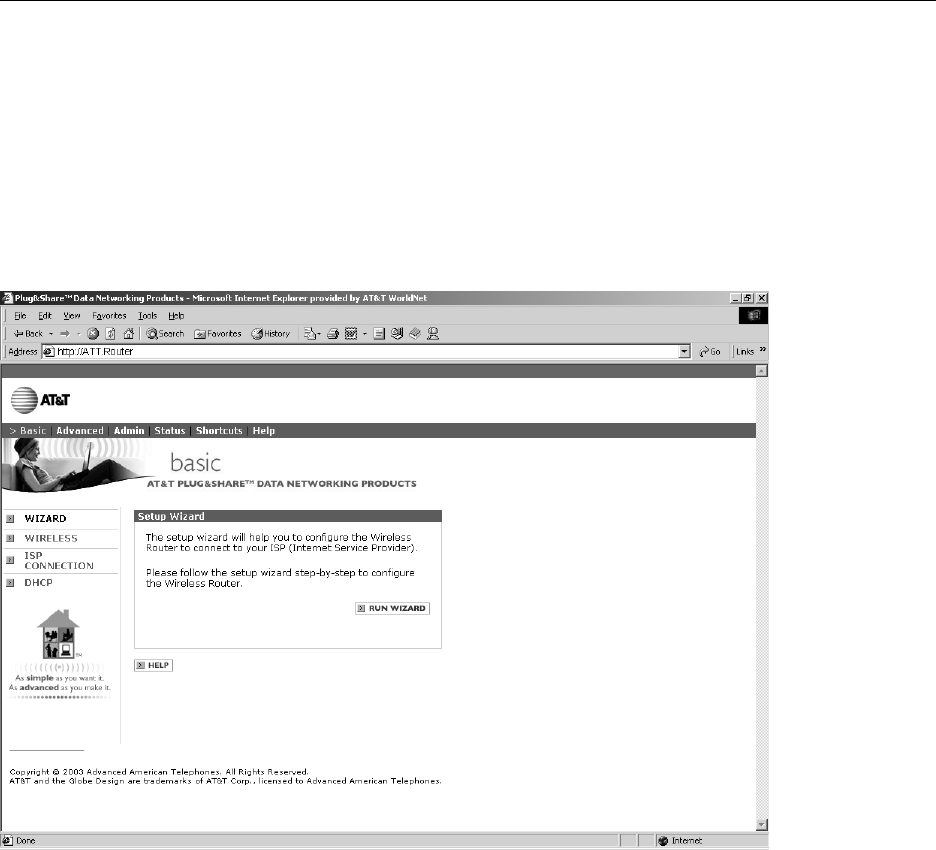
System settings
To change your network settings, launch your web browser, type http://ATT.Router in the address field,
then press Enter. If the router page does not appear, type http://192.168.0.1 then press Enter.
Click tabs in the blue menu bar at the top of the page to choose the type of settings you want to review
or change. For more information, click the Help button at the bottom of each page.
Basic settings
• Wizard (rerun the setup wizard)
• Wireless (view or change wireless security settings)
• ISP Connection (view or change the IP address and related information)
• DHCP (view or change the settings that control communication within your network)
Advanced settings
Do not change these settings unless you have advanced knowledge of network technology.
• Virtual Server (view or change remote user access settings)
• Multi-mode Applications (view or change settings for multiple connections, such as games)
• Filters (view or change access filters to control Internet access)
• Firewall (view or change settings to protect against unauthorized access to and from your network)
• DMZ (view or change list of computers allowed full access to the Internet)
• Routing (verify network addresses in the routing table)
• Performance (view or change wireless performance features, speed and security)
Administrator settings
These settings can help you protect against unauthorized access and manage your router firmware.
• Passwords (administer passwords and remote management)
• Settings (set router system time, IP Address, DNS and Plug & Play settings)
• Backup (save and restore system settings, or reboot router)
• Other (send and block ping tests, and set VPN pass-through)
Status screens
Status screens display reports of network activity and traffic.
• Router Info (view current firmware version, LAN, WAN, and wireless status)
• Activity (display and save the system activities)
• Traffic (view traffic statistics)
• WLAN (displays a list of wireless devices connected to the router)
Shortcuts
These mini-Wizards help you quickly set up basic functionality for several useful features.
• Parental Control (restrict access from certain computers)
• Gaming (change settings for compatibility with Internet gaming)
• Personal Web Site (use a computer on your network to host your web site)
• Personal FTP Site (use a computer on your network to host your FTP site)
• Internet Telephony (change settings for compatibility with Internet telephone services)
Help
Choose Help to find additional information about system settings, or to upload new router firmware.
• Firmware Upgrade (downloads new firmware if a more recent version is available)
Basic > Advanced > Admin > Status > Shortcuts > Help
Basic System Settings
AT&T Plug&Share™54 Mbps Wireless Router 6800G 14
Setup Wizard
Click Run Wizard for a simple, step-by-step configuration of your router settings. (It is usually not neces-
sary to do this after initial setup is complete.)
Basic > Advanced > Admin > Status > Shortcuts > Help
Wizard
Wireless
ISP Connection
DHCP
Basic System Settings
AT&T Plug&Share™54 Mbps Wireless Router 6800G 15
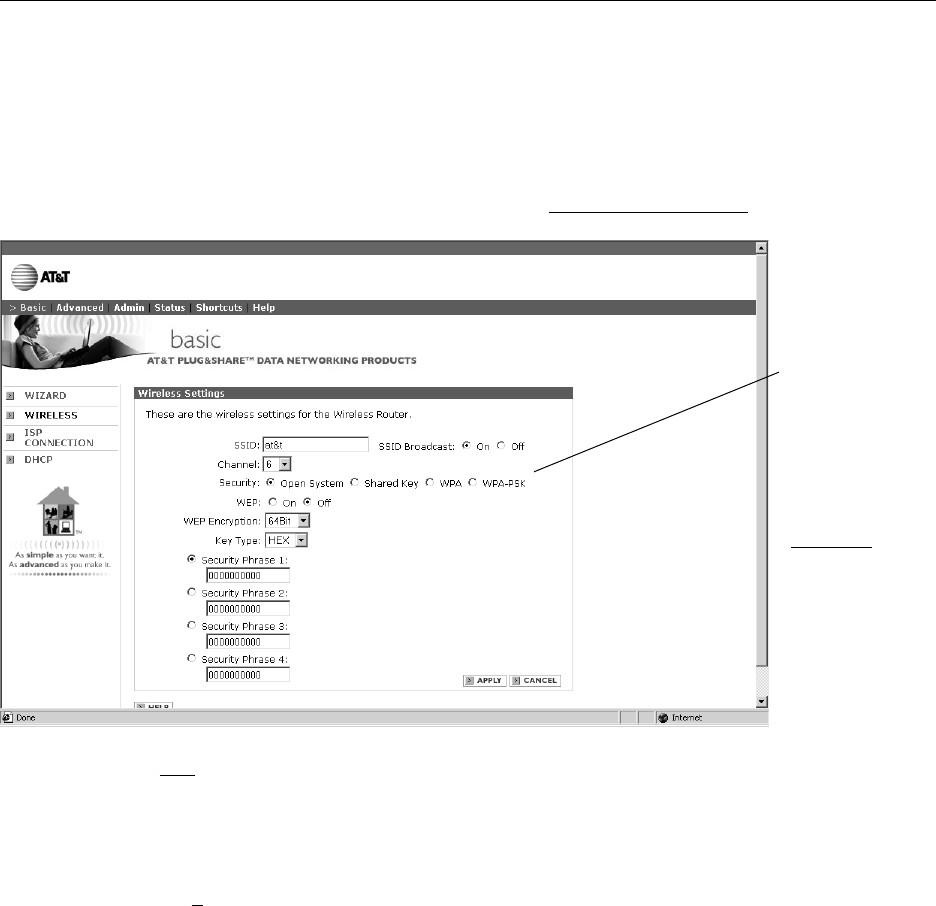
Wireless settings
Options on this page allow you to control security features that can protect your privacy. Remember that
all devices connected to the wireless network must share the same security settings.
Basic > Advanced > Admin > Status > Shortcuts > Help
•SSID: (Default at&t) The Service Set Identifier is the name of your wireless local area network. The
factory default name is "at&t". For privacy, you should change this to a unique name. If you leave the
default name, users of other wireless networks nearby may have access to your computers or your
Internet access (if they are using the same SSID). Remember that all computers on your network
must share the same SSID.
•Channel: (Default 6) The router uses radio signals to communicate with other devices on the network.
You can change the frequency by selecting a different channel. Remember that all computers on your
network must use the same channel. Devices using AT&T Plug&Share™wireless adapters will auto-
matically detect the channel used by the router and change to it.
You may have to change the channel if you are experiencing problems such as intermittent connec-
tion and disconnection. You can perform a site survey on your wireless adapter to find out which
channels are being used by other wireless networks nearby. If other networks use the same channel
(or an adjacent one), change yours to one as far away as possible from the others in use. (For example,
if other networks use channels 6, 9 and 11, try changing yours to channel 1.)
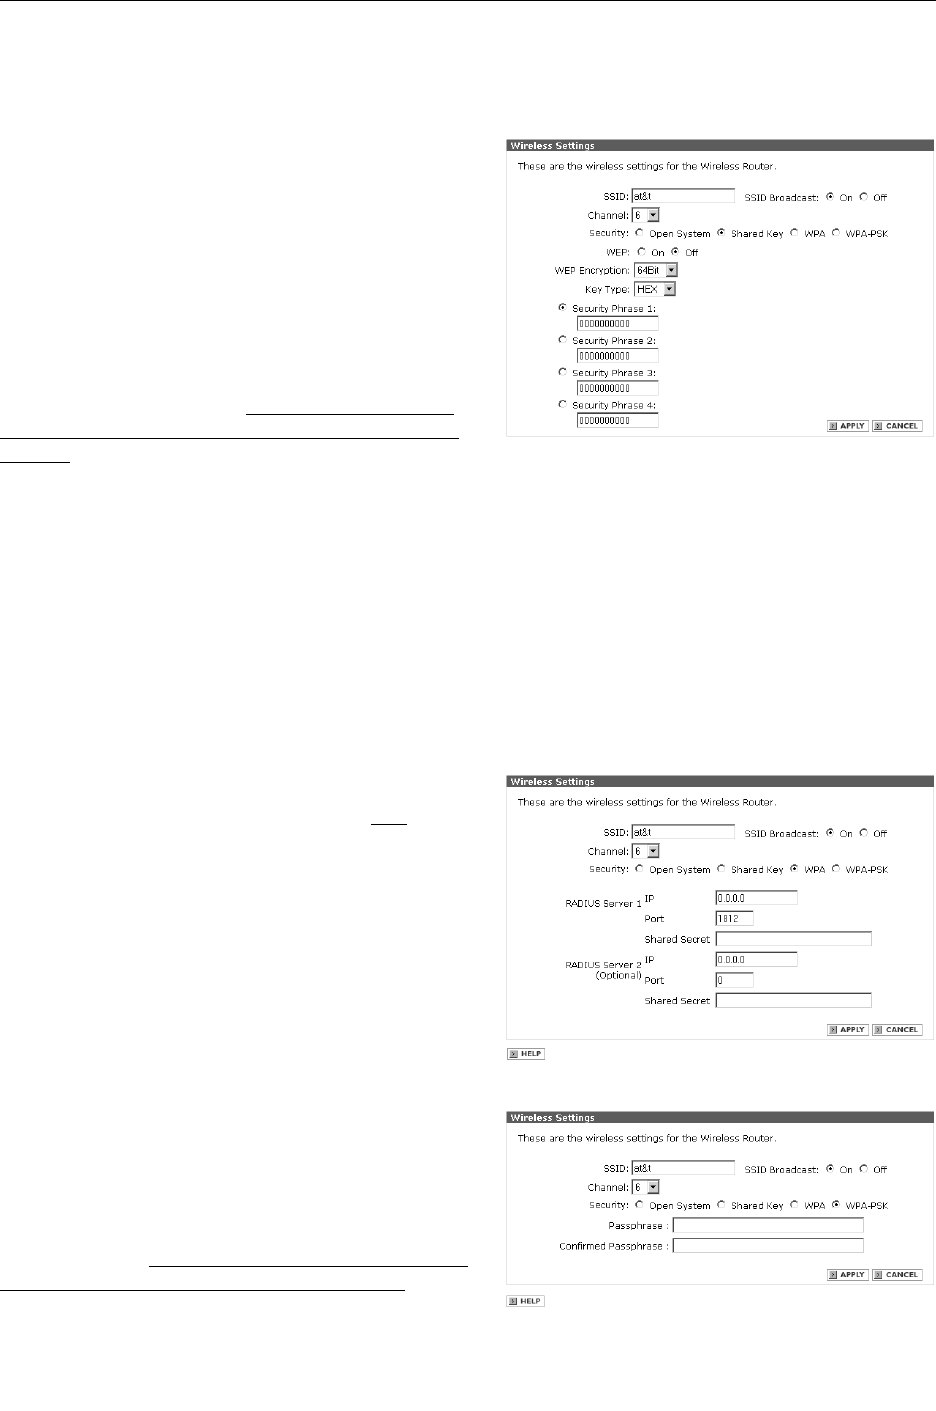
Security
Security options allow you to choose the type of encryption you prefer. Click a radio button to select one:
•Open System: No security. Not recommended.
•Shared Key: Moderate security (see page 16).
•WPA: Suitable only for large enterprise networks (see page 16).
•WPA-PSK: High security for home, home-office & small business (see page 16).
Wizard
Wireless
ISP Connection
DHCP
Click a radio
button to display
options for the
security type you
prefer.
NOTE: If you want
to enable security,
you should choose
WPA-PSK for the
highest level of
security protection.
Basic System Settings
AT&T Plug&Share™54 Mbps Wireless Router 6800G 16
Basic > Advanced > Admin > Status > Shortcuts > Help
Wizard
Wireless
ISP Connection
DHCP
Shared Key Security
(WEP: Wired Equivalent Privacy): Select this option
for a moderate level of security.
Phrase/Key: Enter a security phrase. If you choose
the Hex Key Format (see below), you must use hexa-
decimal digits (0-9, a-f). If you choose the ASCII Key
Format you can use letters, numbers, spaces, and
punctuation marks. For the ASCII Key Format you
must enter five characters for 64-bit, 13 characters for
128-bit or 16 characters for 152-bit encryption.
Whichever format you use, the security phrase you
enter must be shared by all wireless devices on the
network. You can create up to four different security
phrases, for different wireless networks. Remember
that security phrases are case sensitive (i.e., “cat”
and “Cat” are not the same).
Key Format: Choose ASCII or hexadecimal format. If
you choose ASCII, you can use names that you know
and can easily remember.
Length: Use the drop-down menu to choose a key
length (64, 128 or 152-bit). The higher the number,
the slower but more secure your system will be.
If you change any setting above, click the Apply button.
WPA Enterprise Security
(WiFi Protected Access) Select this option only if you
are using your router in a large enterprise network
environment such as a company or school.
Consult your network administrator for advice before
selecting this option.
WPA Personal Security
(WiFi Protected Access, Preshared Key) Select this
option for the highest level of security protection in a
home, home office or small business environment.
Passphrase: Enter a security phrase at least eight
characters long. The phrase you enter must must be
shared by all wireless devices on the network.
Remember that security phrases are case sensitive
(i.e., “cat” and “Cat” are not the same).
Enter your passphrase again to confirm, then click
the Apply button to activate WPA-PSK encryption.
Basic System Settings
AT&T Plug&Share™54 Mbps Wireless Router 6800G 17
ISP Connection Type
At this screen you must choose an Internet connection type compatible with your Internet Service
Provider (ISP). If you are unsure which to choose, contact your ISP. When you make a selection, the
screen will change to show options available for that connection type (see next page).
Basic > Advanced > Admin > Status > Shortcuts > Help
•Dynamic IP Address: Cable modems usually require this setting. Choose this setting if you don't have
to log on to the Internet when you've turned on your computer, and if your ISP assigns your IP
address.
•PPPoE: DSL modems usually require this setting. Choose this setting if you have to log on to the
Internet when you turn on your computer.
•Static IP Address: This setting is rarely required. Contact your ISP before choosing this option.
Wizard
Wireless
ISP Connection
DHCP
Basic System Settings
AT&T Plug&Share™54 Mbps Wireless Router 6800G 18
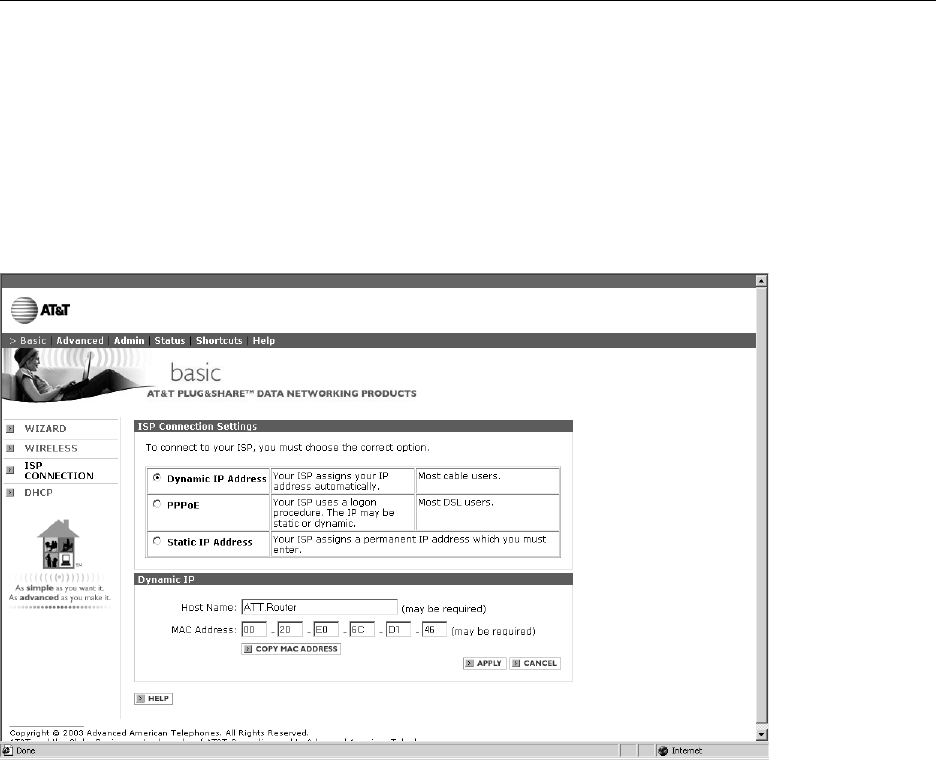
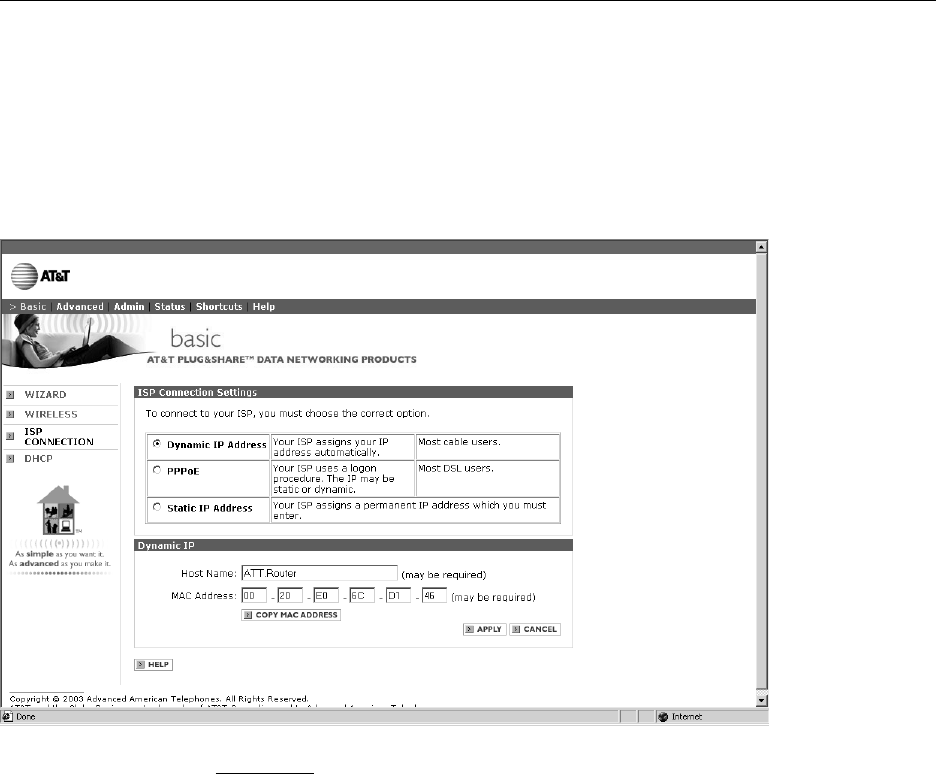
ISP Connection Type: Dynamic IP Address
This setting is usually required for use with cable modems. Choose this setting if you don’t have to log
on to the Internet when you turn on your computer (IP addresses are assigned by your ISP).
Basic > Advanced > Admin > Status > Shortcuts > Help
•Host Name: (Default ATT.Router) Enter a host name here if required by your Internet Service Provider.
•MAC Address: Enter a MAC (Media Access Control) number if required by your Internet Service
Provider. By default, the number used is the MAC address of the WAN interface in the router. You can
click the Copy MAC Address button to insert the MAC address of the Ethernet card in your computer.
Wizard
Wireless
ISP Connection
DHCP
Basic System Settings
AT&T Plug&Share™54 Mbps Wireless Router 6800G 19
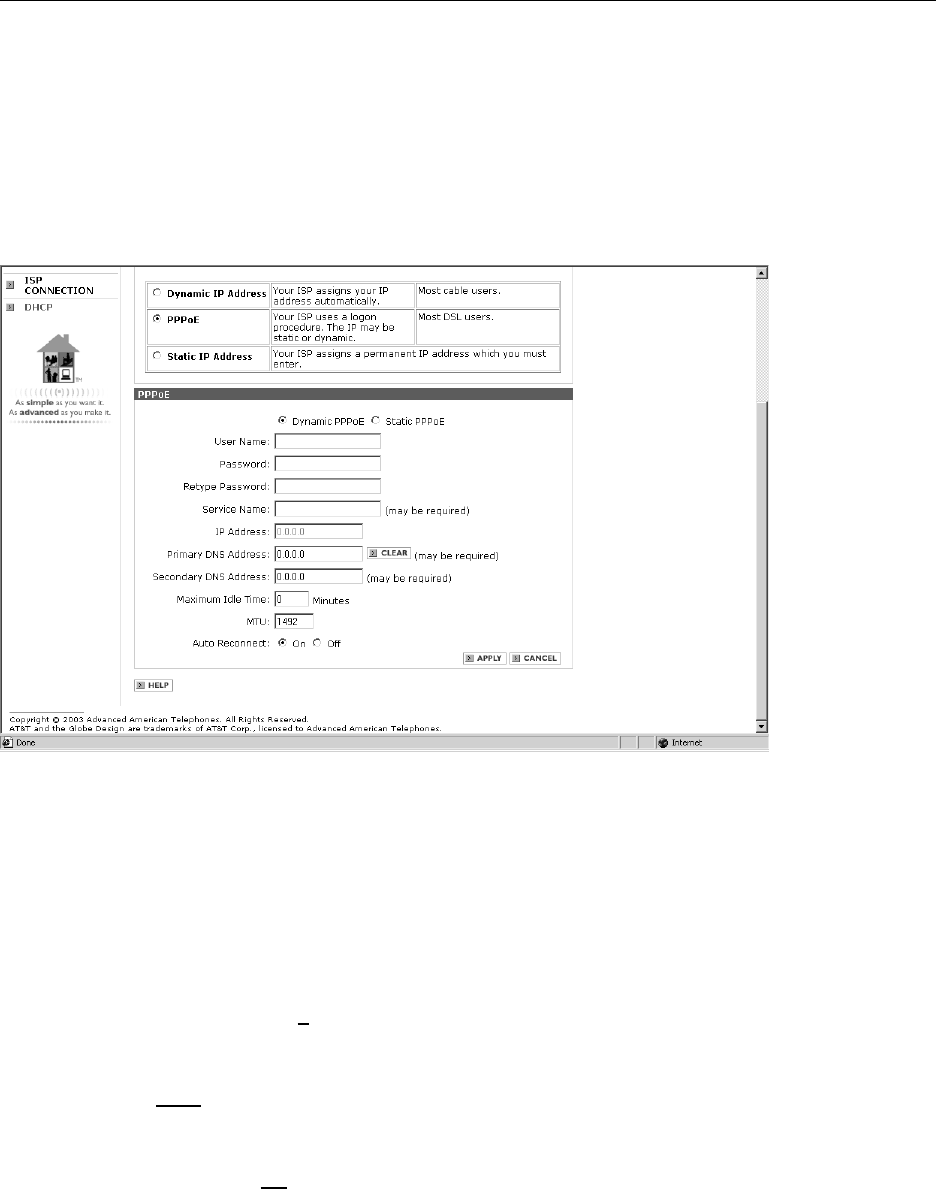
ISP Connection Type: PPPoE
PPPoE stands for “Point to Point Protocol over Ethernet,” often used by DSL service providers. Select
Dynamic PPPoE to obtain an IP address automatically for your PPPoE connection (the option most
often used). Select Static PPPoE to use a static IP address for your PPPoE connection.
Basic > Advanced > Admin > Status > Shortcuts > Help
•User Name: Enter the user name required by your ISP when you connect to the Internet.
•Password: Enter the password required by your ISP when you connect to the Internet.
•Service Name (optional):If your ISP uses a service name for the PPPoE connection, enter the
service name here. (Example: @att.net)
•IP Address: If you choose Static PPPoE, enter the static IP address for the PPPoE connection.
•Primary/Secondary DNS Address: If you choose Static PPPoE, ask your Internet Service Provider
for your primary and secondary DNS addresses (also called IP numbers) and enter them here.
•Maximum Idle Time: (Default 0) To avoid periodic disconnection from the Internet, leave this value
set to zero. To allow your computer to disconnect after a period of inactivity, enter the time in minutes.
(For example, enter 10 to disconnect 10 minutes after you’ve stopped using the computer.)
•MTU: (Default 1492) Data sent over networks is divided into “packets” of a certain size. MTU
(Maximum Transfer Unit) specifies the largest packet size to be used. This value typically does not
need to be changed. Do not change it unless advised to do so by your Internet Service Provider.
•Auto-reconnect: (Default On) If your computer remains connected to the Internet most or all of the
time, this setting will automatically re-establish your Internet connection whenever it is dropped.
Wizard
Wireless
ISP Connection
DHCP
Basic System Settings
AT&T Plug&Share™54 Mbps Wireless Router 6800G 20
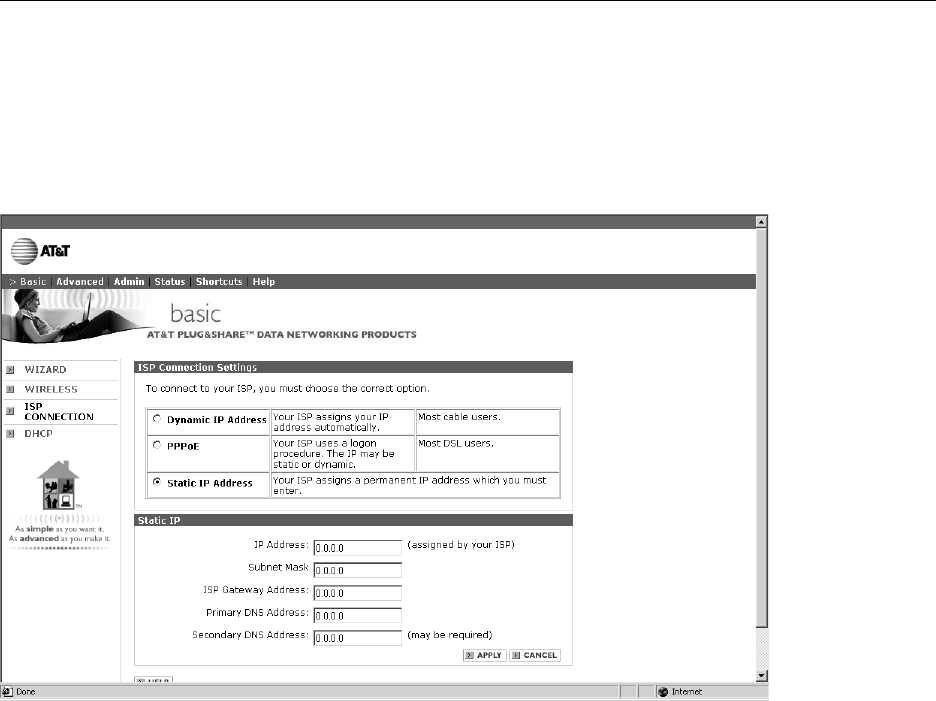
ISP Connection Type: Static IP Address
This connection type is rarely required. Contact your ISP before choosing this option.
Basic > Advanced > Admin > Status > Shortcuts > Help
•To set a static IP address: Contact your Internet Service Provider and obtain the IP address, subnet
mask, gateway address, and DNS (domain name server) numbers required, and enter them in the
fields on this screen. Remember that each number must be in the correct format (four sets of numbers
separated by periods, with no spaces).
Example: 192.168.100.100
Wizard
Wireless
ISP Connection
DHCP

Basic System Settings
AT&T Plug&Share™54 Mbps Wireless Router 6800G 21
Basic > Advanced > Admin > Status > Shortcuts > Help
•Starting IP address: The starting IP address for the DHCP server's IP assignment.
•Ending IP address: The ending IP address for the DHCP server's IP assignment.
•Lease Time: The length of time for the LAN IP address lease.
•DHCP Client Table: This is a list of all network computers, showing the host hame, IP address, MAC
address and expired time for each.
Wizard
Wireless
ISP Connection
DHCP
DHCP Server
When any device on your network is turned on, it must be assigned an IP address to communicate with
other devices on the network. DHCP (Dynamic Host Configuration Protocol) assigns these IP addresses
to devices on your network. Leave DHCP set to On and be sure that you have selected "Obtain an IP
address automatically" in the Internet Protocol (TCP/IP) Properties dialog box on your client computers.
Advanced System Settings
AT&T Plug&Share™54 Mbps Wireless Router 6800G 22
Basic > Advanced > Admin > Status > Shortcuts > Help
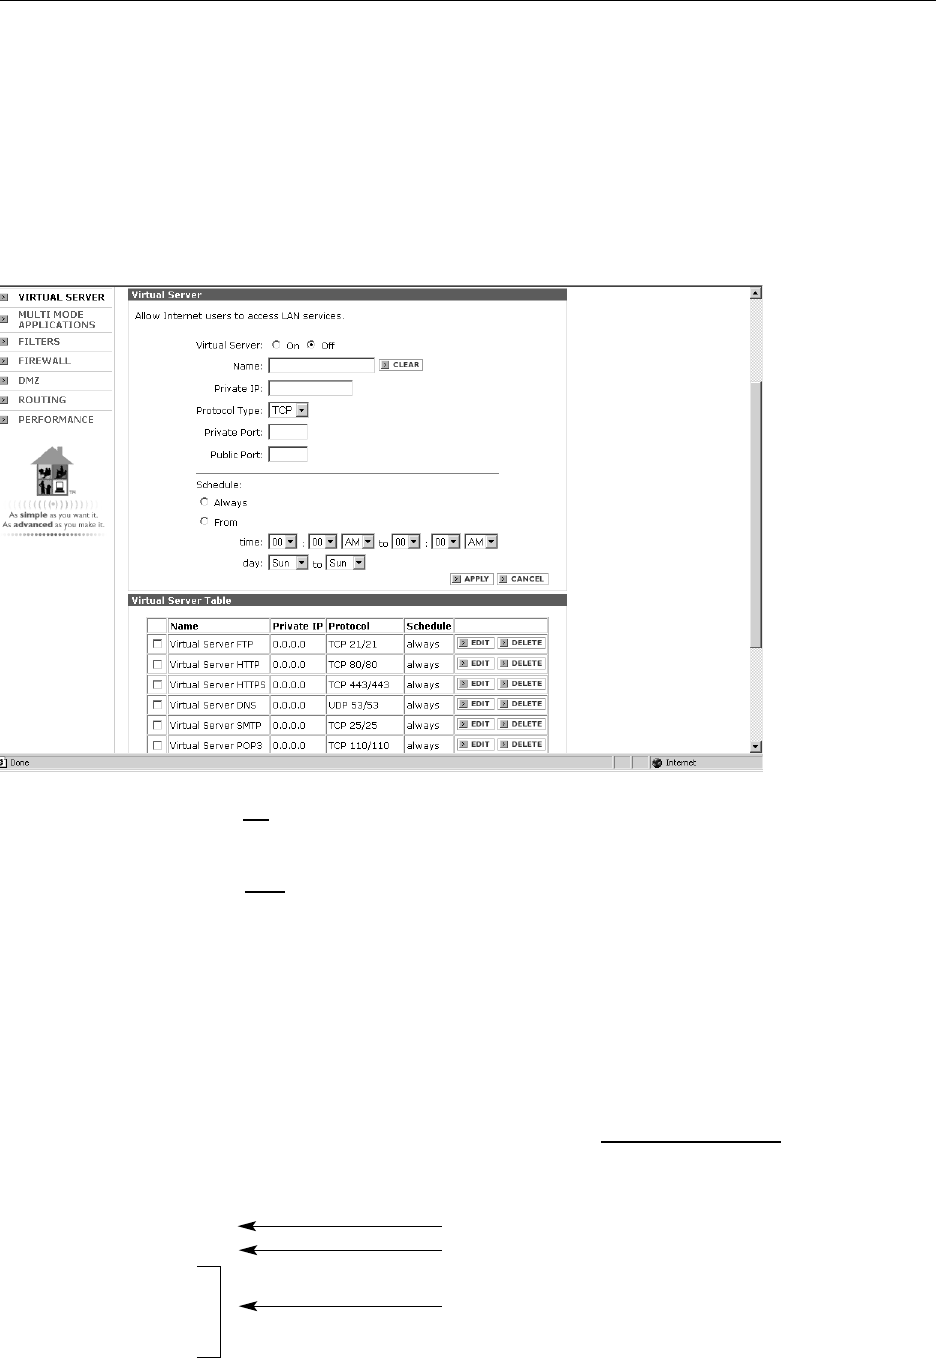
•Virtual Server: (Default Off) Click On to designate a local network computer as a server.
•Name: Enter a name for the computer to be designated as a server.
•Private IP: Enter the IP number of the computer to be designated as a server .
•Protocol Type: (Default TCP) The protocol used for the virtual service.
•Private Port: Enter the port number of the service used by the Private IP computer.
•Public Port: Enter the port number on the WAN side that will be used to access the virtual service.
•Schedule: Enter times when you want to allow access to the server (or click Always to allow
unlimited access).
You can create a new virtual server by entering the above fields, or use settings for several of the most
commonly used services by clicking an Edit button in the Virtual Server table at the bottom of the
screen. This will copy the proper settings into the fields above. You will only need to enter the IP address
of your server computer (you can find this number by displaying the DHCP screen; see page 21).
Example: To host a personal web site, click the Edit button beside Virtual Server HTTP, then enter a
name for your server and its IP address (from the DHCP screen shown on page 21).
Name: My Web Server
Private IP: 192.168.0.25
Protocol Type: TCP
Private Port: 80
Public Port: 80
Schedule: Always
Virtual Server
Multi-Mode Applications
Filters
Firewall
DMZ
Routing
Performance
Virtual Server
If you want to use a network computer as a virtual server (to host web sites or FTP sites, for example)
you can configure the router to direct incoming traffic to your server.
Enter a name here
Enter your server’s IP address here
Following fields are filled in automatically
Advanced System Settings
AT&T Plug&Share™54 Mbps Wireless Router 6800G 23
Basic > Advanced > Admin > Status > Shortcuts > Help
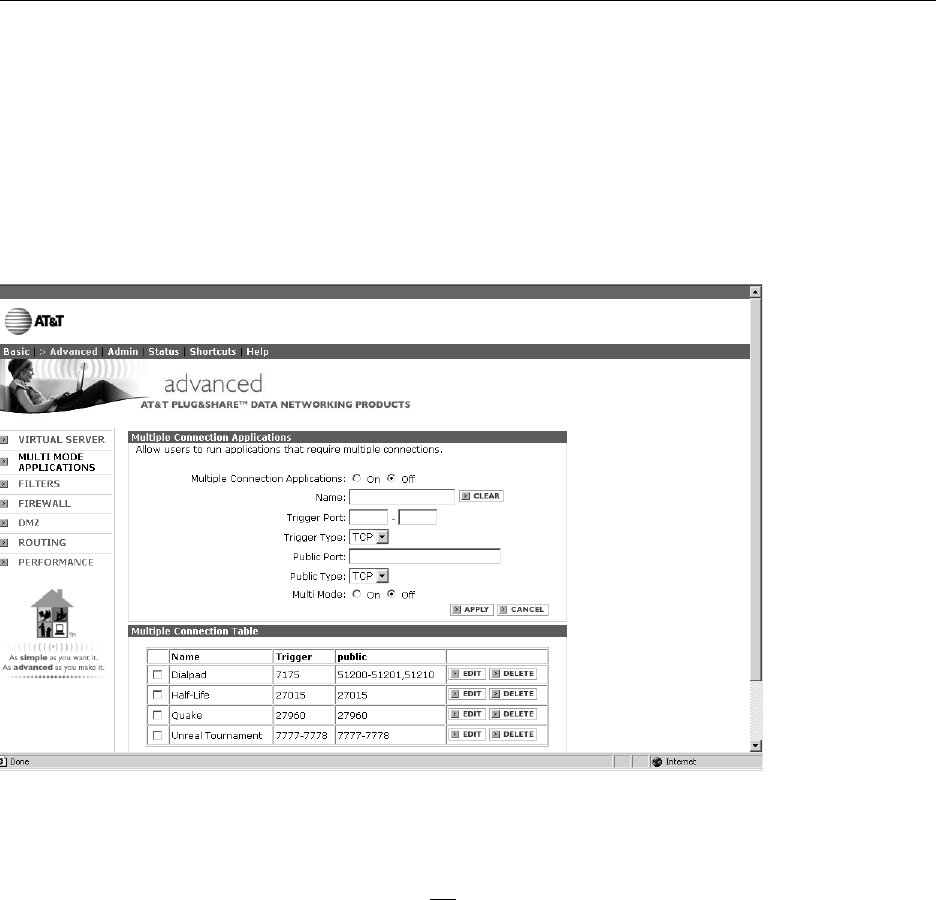
You can set up as many profiles as you like for applications that require multiple connections. You can
enter settings for several of the most commonly used applications by clicking an Edit button in the table
at the bottom of the screen. This will copy the proper settings into the fields above.
•Multiple Connection Applications: (Default Off) Click On to enable multiple connections.
•Name: Enter a name for this application.
•Trigger Port: Enter a port for use by this application. You can enter a single port or a range of ports.
•Trigger Type: Choose a protocol to be used by this application (usually TCP).
•Public Port: This is the port number on the WAN side that will be used to access the application. You
may define a single port or a range of ports. You can use a comma to add multiple ports or port
ranges.
•Public Type: Choose a protocol to be used by this application (usually TCP).
•Multi Mode: Select On to enable multiple connections.
When you are finished, click Apply to establish your new application. It will be added to the table of
applications at the bottom of the screen.
Virtual Server
Multi-mode Applications
Filters
Firewall
DMZ
Routing
Performance
Multiple Connection Applications
This option allows compatibility with applications that require multiple connections (video conferencing,
Internet telephony, gaming, etc.).
Advanced System Settings
AT&T Plug&Share™54 Mbps Wireless Router 6800G 24
Basic > Advanced > Admin > Status > Shortcuts > Help
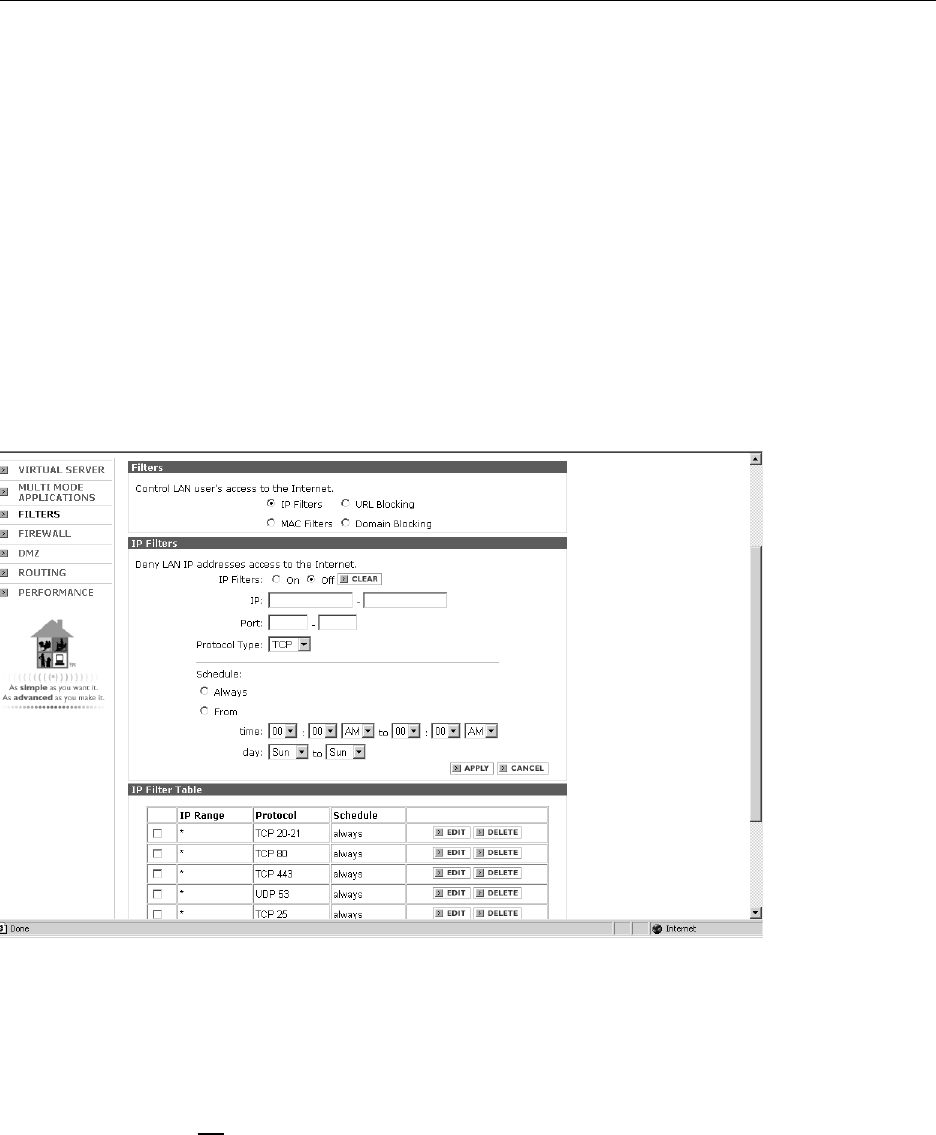
IP Filters
To add a new filter, fill in the fields above and click Apply. You can block access to several of the most
commonly used ports by clicking an Edit button in the IP Filter table at the bottom of the screen. This will
copy the proper settings into the fields above. You will only need to enter the IP address of the computer
to be affected by the filter (you can find this number by displaying the DHCP screen; see page 21).
•IP Filters: (Default Off) Click On to enable IP filters.
•IP: Enter the IP address of any network computer to block Internet access from that computer. To
block access for multiple computers, you can enter a range of IP addresses.
•Port: Enter a single port or a range of ports that will be denied Internet access. (Leave this field blank
to deny access to all ports.)
•Protocol Type: Choose a protocol type to block.
•Schedule: Enter times when Internet access will be blocked, or click Always to allow no Internet
access at any time.
When you are finished, click Apply to add a new filter to the list.
Virtual Server
Multi-Mode Applications
Filters
Firewall
DMZ
Routing
Performance
Filters
Filters allow you to control Internet access from networked computers. Options allow you to restrict
access to specific web sites, restrict access to all web sites except those you designate, or restrict
access to other computers on your local area network (LAN). There are four types of filters:
•IP filters: Prohibit Internet access by particular LAN IP addresses (see below).
•MAC filters: Prohibit Internet access or LAN access by specific computers (see page 25).
•URL blocking: Prohibit access to groups of web sites by key word (see page 26).
•Domain blocking: Prohibit access to web sites specified by name (see page 27).
Advanced System Settings
AT&T Plug&Share™54 Mbps Wireless Router 6800G 25
Basic > Advanced > Admin > Status > Shortcuts > Help
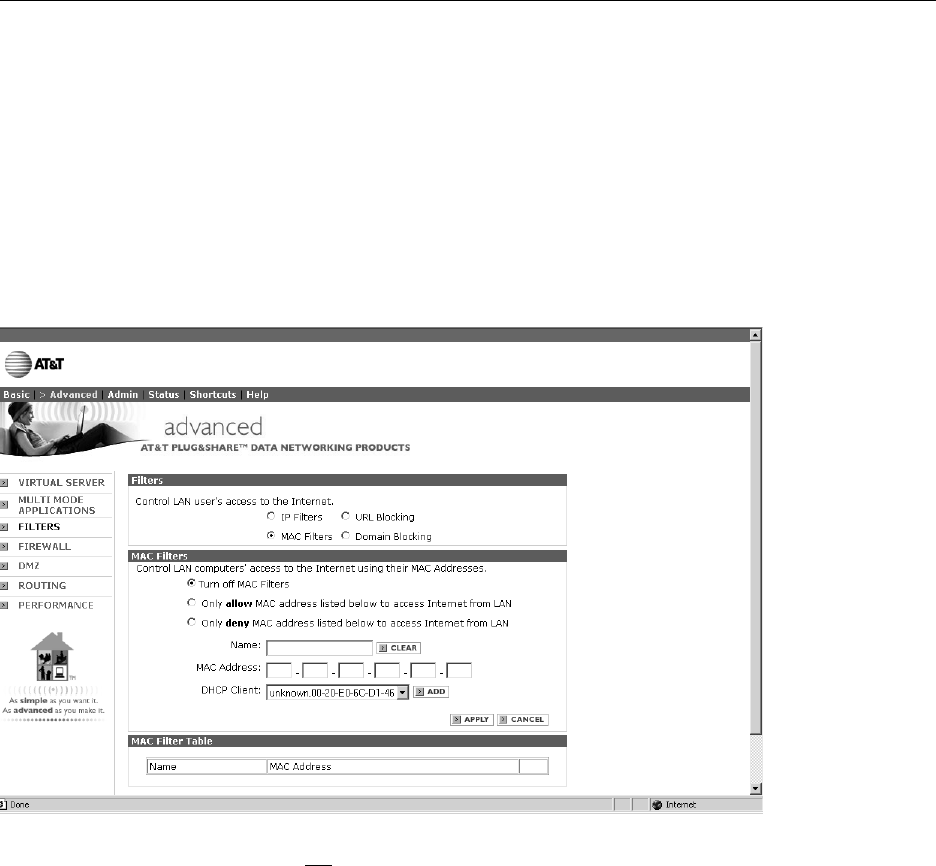
•Turn off MAC Filters: (Default On) Click another option below to enable MAC filters.
•Only Allow...: Click to allow Internet and LAN access to the computer you select (all others are denied
access).
•Only Deny...: Click to deny Internet and LAN access to the computer you select (all others are allowed
access).
•Name: Enter a name to identify the filter you are creating.
•MAC Address: This field displays the MAC address of a computer selected from the DHCP Client list
(see description below).
•DHCP Client: Computers assigned a number by the DHCP client are listed here. Click the drop-down
list, select a computer and click Add to designate a computer that will be affected by the filter you are
creating.
When you are finished, click Apply to add a new filter to the list.
Virtual Server
Multi-Mode Applications
Filters
Firewall
DMZ
Routing
Performance
MAC Filters
A MAC address is a unique serial number for each hardware adapter. This filter allows you to block Internet
and LAN access from network computers by specifying the computer’s MAC address (you can find this
address by displaying the DHCP screen; see page 21).

Advanced System Settings
AT&T Plug&Share™54 Mbps Wireless Router 6800G 26
Basic > Advanced > Admin > Status > Shortcuts > Help
•URL Blocking: (Default Off) Click On to activate blocking, or Off to disable blocking and allow access to
all web sites.
•Keyword: Enter a key word that commonly appears in the URL of sites you want to block, then click
Add. Access will be denied to all web sites whose addresses contain this keyword. You may enter as
many keywords as you like.
•Delete Keyword: To remove a keyword, highlight it, then click Delete. This will allow access to
web sites whose addresses contain this keyword.
When you are finished, click Apply to add a new filter to the list.
Example: To help prevent network computer users from visiting retail shopping web sites, you could enter
“shop” as a keyword. Access to sites with the word “shop” in the web site address would be denied.
Virtual Server
Multi-Mode Applications
Filters
Firewall
DMZ
Routing
Performance
URL Blocking
Use URL Blocking to prohibit access to groups of web sites by using key words. A URL (Uniform
Resource Locator) is the Internet address of a web site (usually beginning with “http://”). The key words
you enter will determine which web sites are blocked. If the key word you enter appears in any part of
the URL, access to that site will be denied.
Advanced System Settings
AT&T Plug&Share™54 Mbps Wireless Router 6800G 27
Basic > Advanced > Admin > Status > Shortcuts > Help
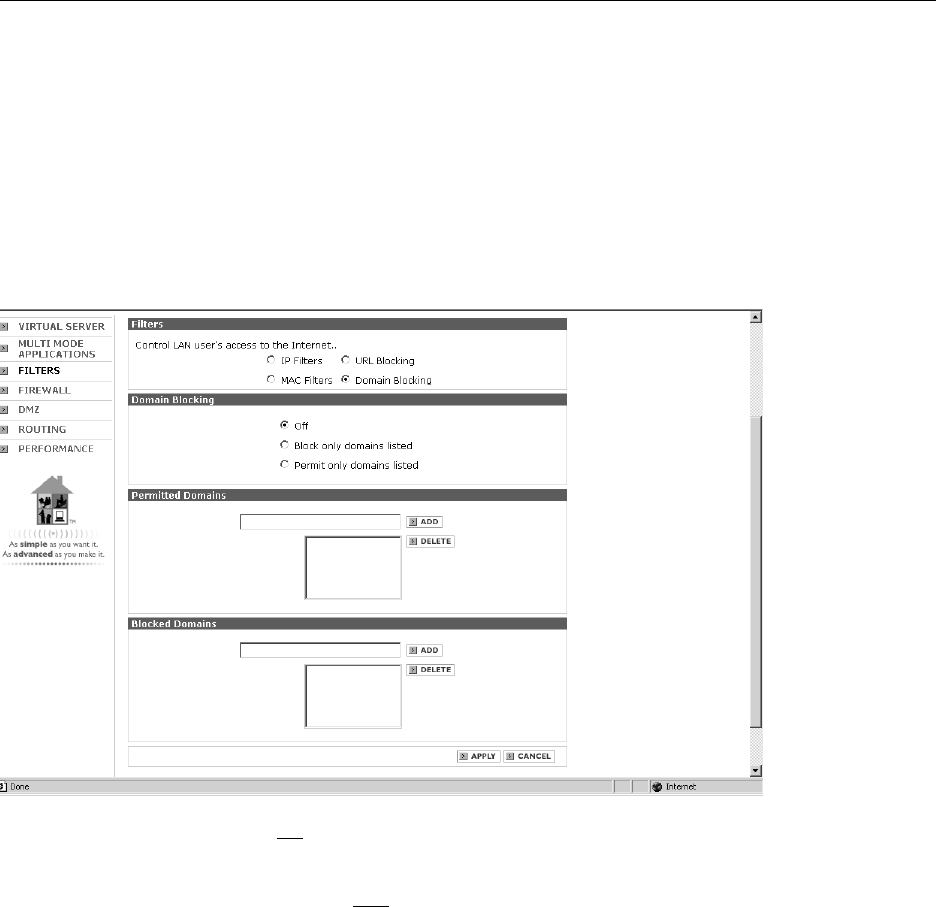
•Domain Blocking: (Default Off) Click another option below to enable domain blocking.
•Block Only...: Click to prohibit access to the sites you enter (all other sites are accessible).
•Permit Only...: Click to allow access only to the sites you enter (no other sites are accessible).
•Permitted Domains: Enter the full URL of an approved site, then click Add.
•Blocked Domains: Enter the full URL of a site you want to block, then click Add.
When you are finished, click Apply to add a new filter to the list.
Example: Households with young children may wish to allow access only to certain web sites. Click the
Permit Only option, then add approved site addresses to the “Permitted Domains” list. Access will be
denied to any site not listed here.
Virtual Server
Multi-Mode Applications
Filters
Firewall
DMZ
Routing
Performance
Domain Blocking
Use Domain Blocking to prohibit access to specific web sites. This option allows you to enter the full
name of each web site to be blocked. Domain blocking will allow or deny all types of access (http, ftp,
etc.) to each web site listed.
Advanced System Settings
AT&T Plug&Share™54 Mbps Wireless Router 6800G 28
Basic > Advanced > Admin > Status > Shortcuts > Help
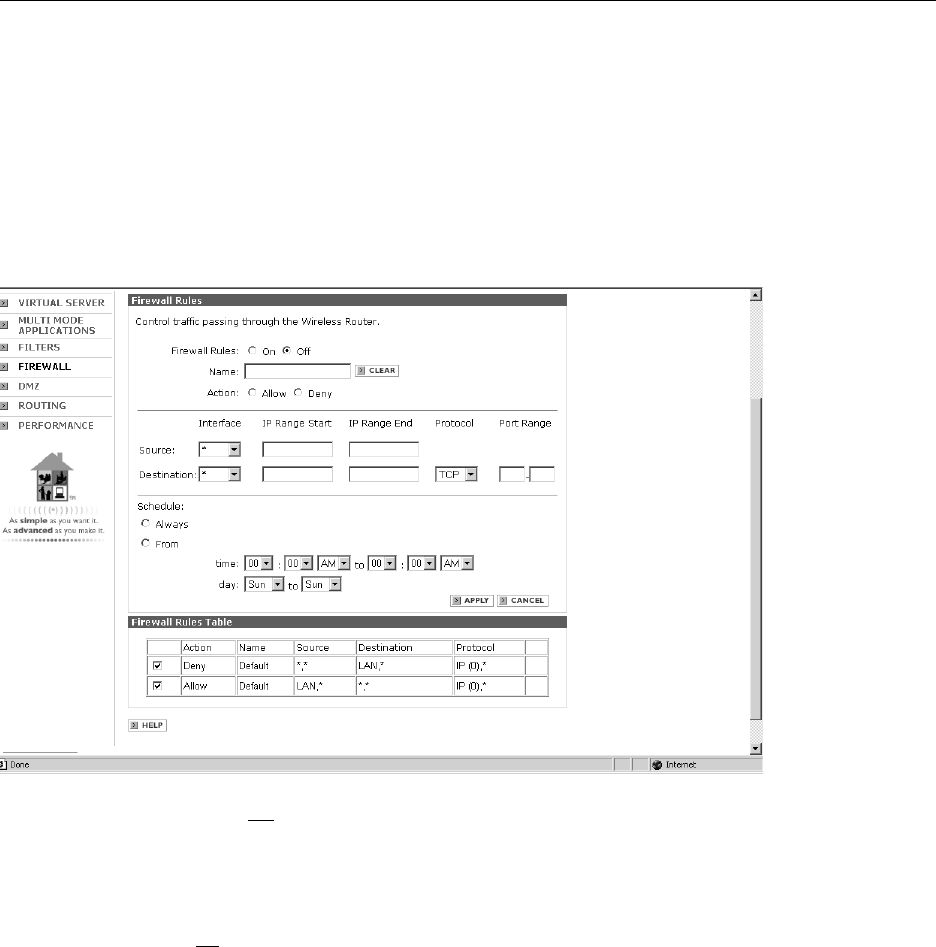
•Firewall Rules: (Default Off) Click On to enable firewall protection.
•Name: Enter a name to identify the firewall profile you are creating.
•Action: Click Allow to permit specified computers access to your network, or Deny to prohibit access
to them.
•Interface: (Default All) Choose LAN to protect against incursion from users of your local area net-
work, WAN to protect against incursion from others who may have access through the Internet, or *
(all) to select both.
•IP Range: Enter an IP address of a computer that will be allowed or denied access to your network.
To include multiple computers, you can enter a range of IP addresses.
•Protocol: Select a protocol type to be applied to this firewall profile.
•Port Range: Enter a port (or a range of ports) to be allowed or denied access to your network. If you
leave this field blank, all ports will be allowed or denied access.
•Schedule: Enter times when this firewall profile will be in effect, or click Always to provide continuous
protection.
When you are finished, click Apply to add a new firewall profile to the table at the bottom of the screen.
Virtual Server
Multi-Mode Applications
Filters
Firewall
DMZ
Routing
Performance
Firewall Rules
This feature can provide additional security protection by helping to prohibit unauthorized access to your
network.
Advanced System Settings
AT&T Plug&Share™54 Mbps Wireless Router 6800G 29
Basic > Advanced > Admin > Status > Shortcuts > Help
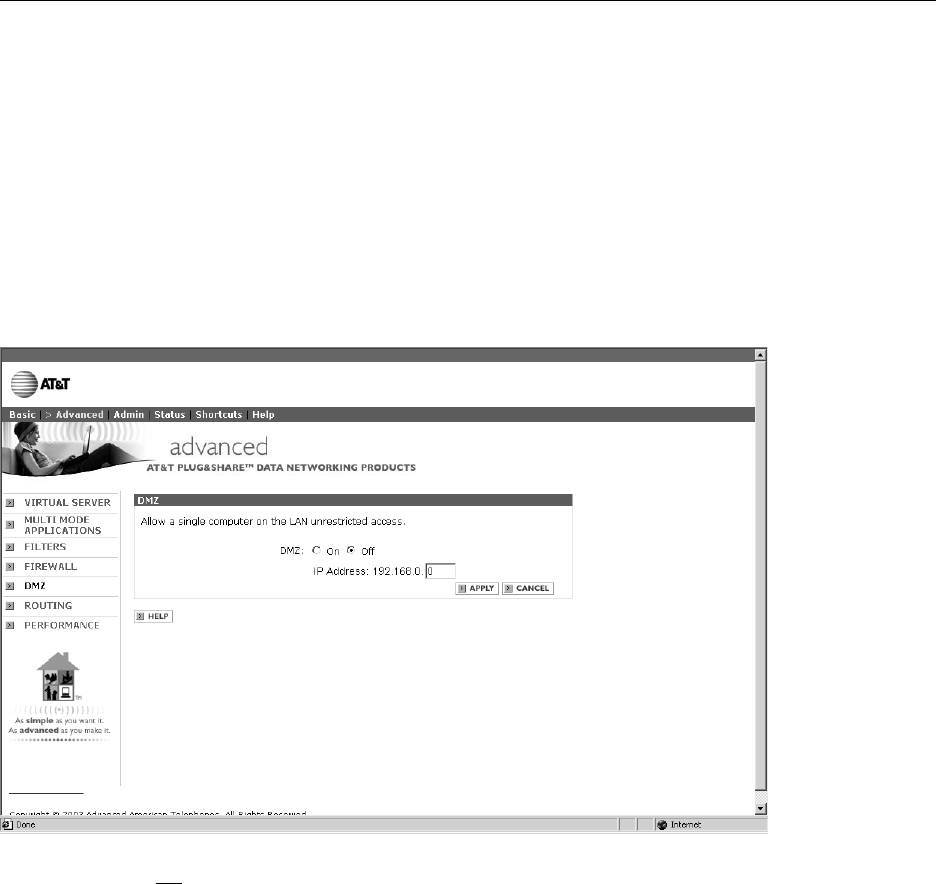
•DMZ: (Default Off) Click On to allow unrestricted Internet access to designated computers.
•IP Address: Enter the IP address of a computer to be allowed unrestricted Internet access.
When you are finished, click Apply.
Virtual Server
Multi-Mode Applications
Filters
Firewall
DMZ
Routing
Performance
DMZ
DMZ (Demilitarized Zone) is a feature that allows specified network computers unrestricted Internet
access. Computers designated as DMZ are not affected by other security measures (firewall protection,
parental controls, etc.).
Use this option with caution. Computers designated as DMZ may be vulnerable to security risks.
Advanced System Settings
AT&T Plug&Share™54 Mbps Wireless Router 6800G 30
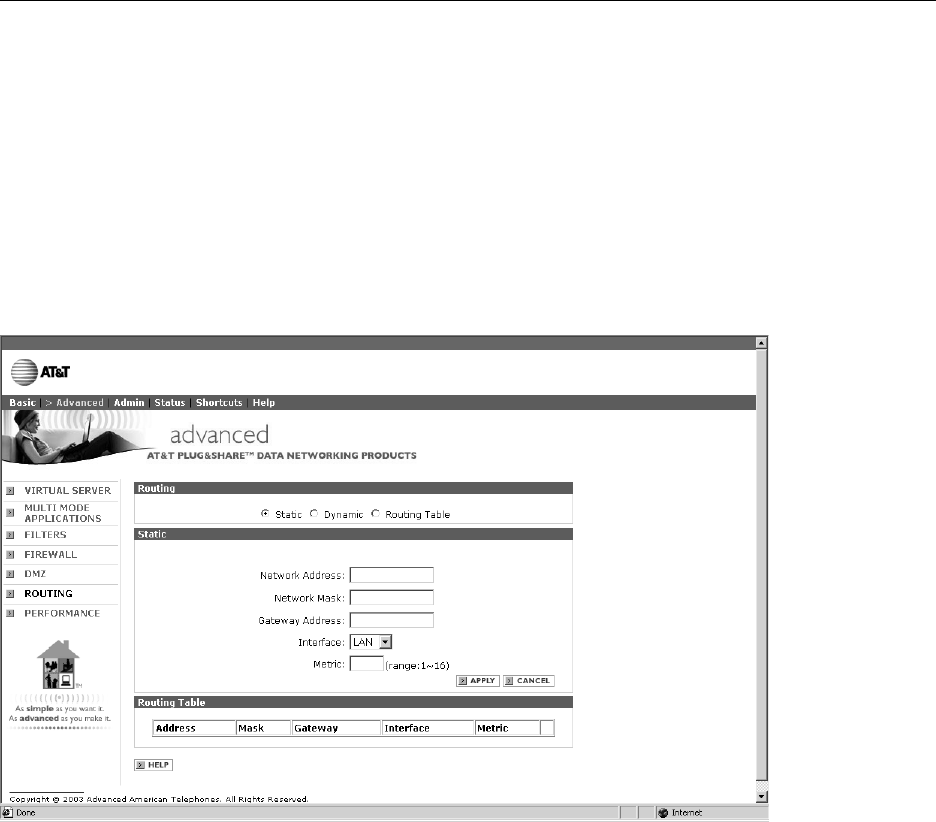
Basic > Advanced > Admin > Status > Shortcuts > Help
Static routing
Enter information at this screen to add a static (permanent) route to a subnetwork.
•Network Address: Enter the static IP address of the subnetwork. Your ISP or network administrator
may provide you with this information.
•Network Mask: Enter the network (or subnetwork) mask for your network. If you leave this field blank,
the network mask defaults to 255.255.255.0.
•Gateway Address: Enter the gateway address for your network. Your ISP or network administrator
may provide you with this information.
•Interface: Select the interface you use to connect to the subnetwork (LAN, if local area network, or
WAN, if wide area network).
•Metric: Enter the metric you want to apply to this route.
Virtual Server
Multi-Mode Applications
Filters
Firewall
DMZ
Routing
Performance
Routing
Options on this page should be changed only if necessary to manage very complex setups, such as a
network that is subdivided into several sub-networks. These options can control how your router manages
information between the subnetworks. Unless you are very skilled at network administration, do not
change the default settings.
Advanced System Settings
AT&T Plug&Share™54 Mbps Wireless Router 6800G 31
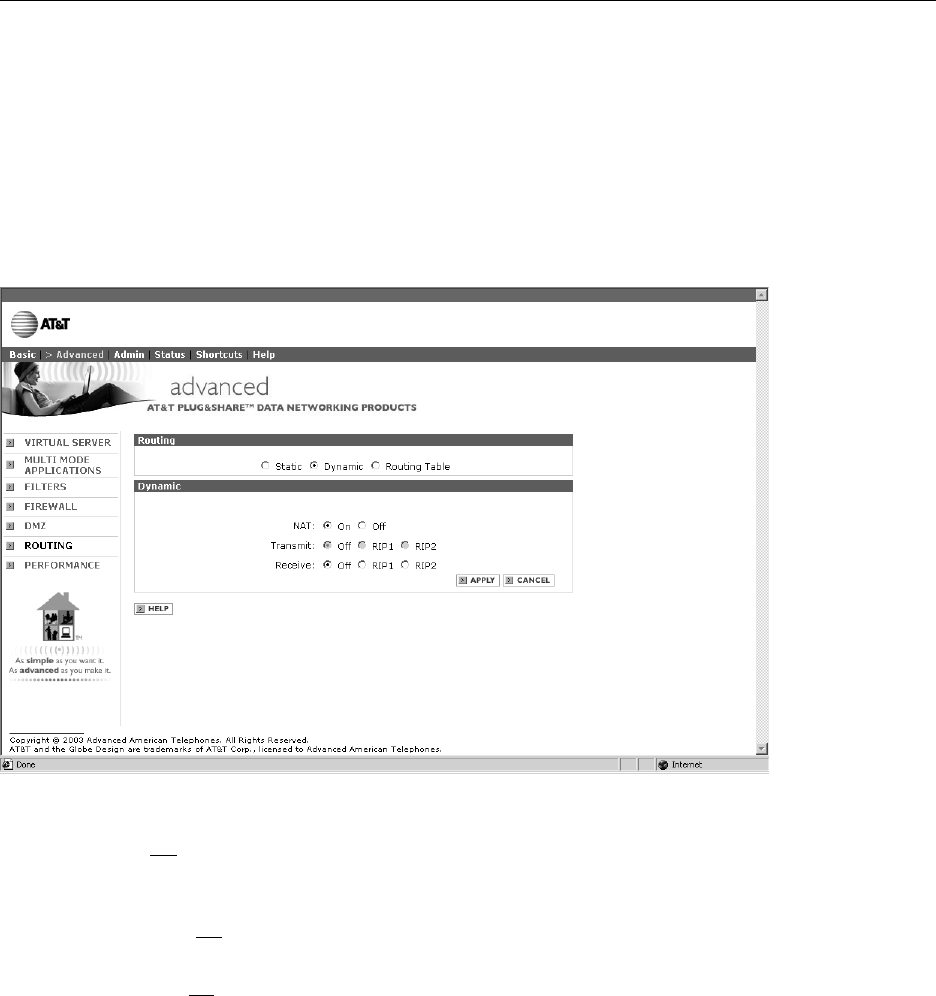
NOTE: Consult your Internet Service Provider (ISP) or network administrator before changing these settings.
•NAT: (Default On) NAT stands for Network Address Translation (also known as IP masquerading)
which enables your local area network to identify itself to the Internet with one address. You should
leave this setting on unless directed to do otherwise by your network administrator.
•Transmit: (Default Off) If you enable dynamic routing, you should choose RIP2 (Routing Information
Protocol 2) unless directed to do otherwise by your network administrator.
•Receive: (Default Off) If you enable dynamic routing, you should choose RIP2 unless directed to do
otherwise by your network administrator.
Basic > Advanced > Admin > Status > Shortcuts > Help
Virtual Server
Multi-Mode Applications
Filters
Firewall
DMZ
Routing
Performance
Dynamic Routing
Select this option to control how the router automatically builds routing information. Consult your network
administrator before doing so.
Advanced System Settings
AT&T Plug&Share™54 Mbps Wireless Router 6800G 32
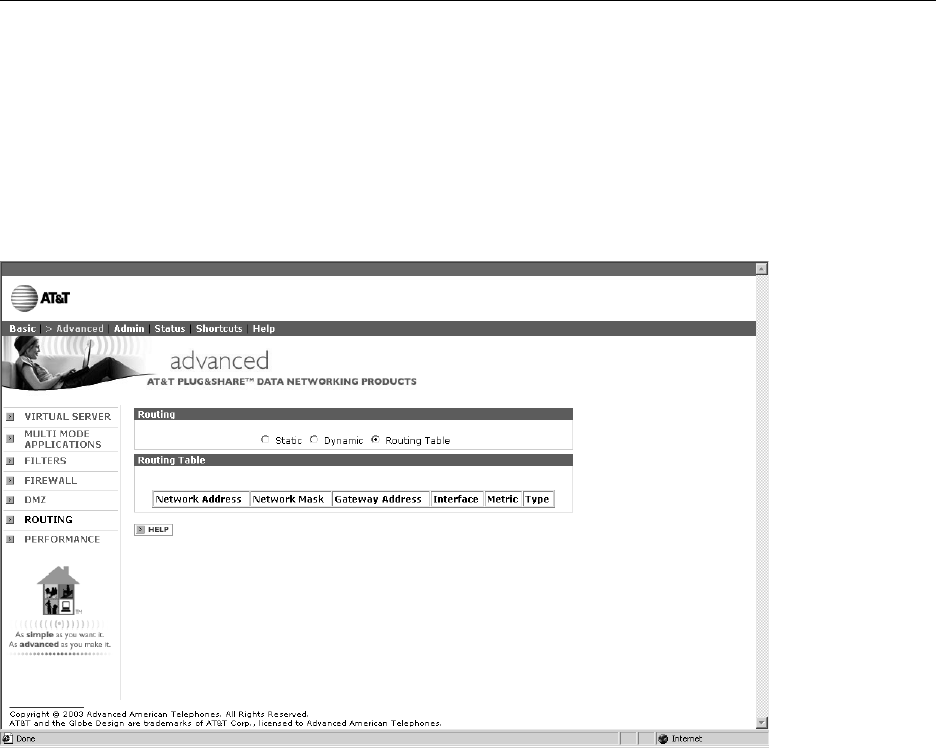
Basic > Advanced > Admin > Status > Shortcuts > Help
•Network Address: Displays the network IP address of the connected subnetwork.
•Network Mask: Displays the network mask of the connected subnetwork.
•Gateway Address: Displays the gateway address to connect the subnetwork.
•Interface: Displays whether the subnetwork is connected via a WAN or LAN.
•Metric: Displays the metric of the connected subnetwork.
•Type: Displays whether the subnetwork has a static or dynamic IP route.
Virtual Server
Multi-Mode Applications
Filters
Firewall
DMZ
Routing
Performance
Routing Table
This screen displays existing routes to various subnetworks.
Advanced System Settings
AT&T Plug&Share™54 Mbps Wireless Router 6800G 33
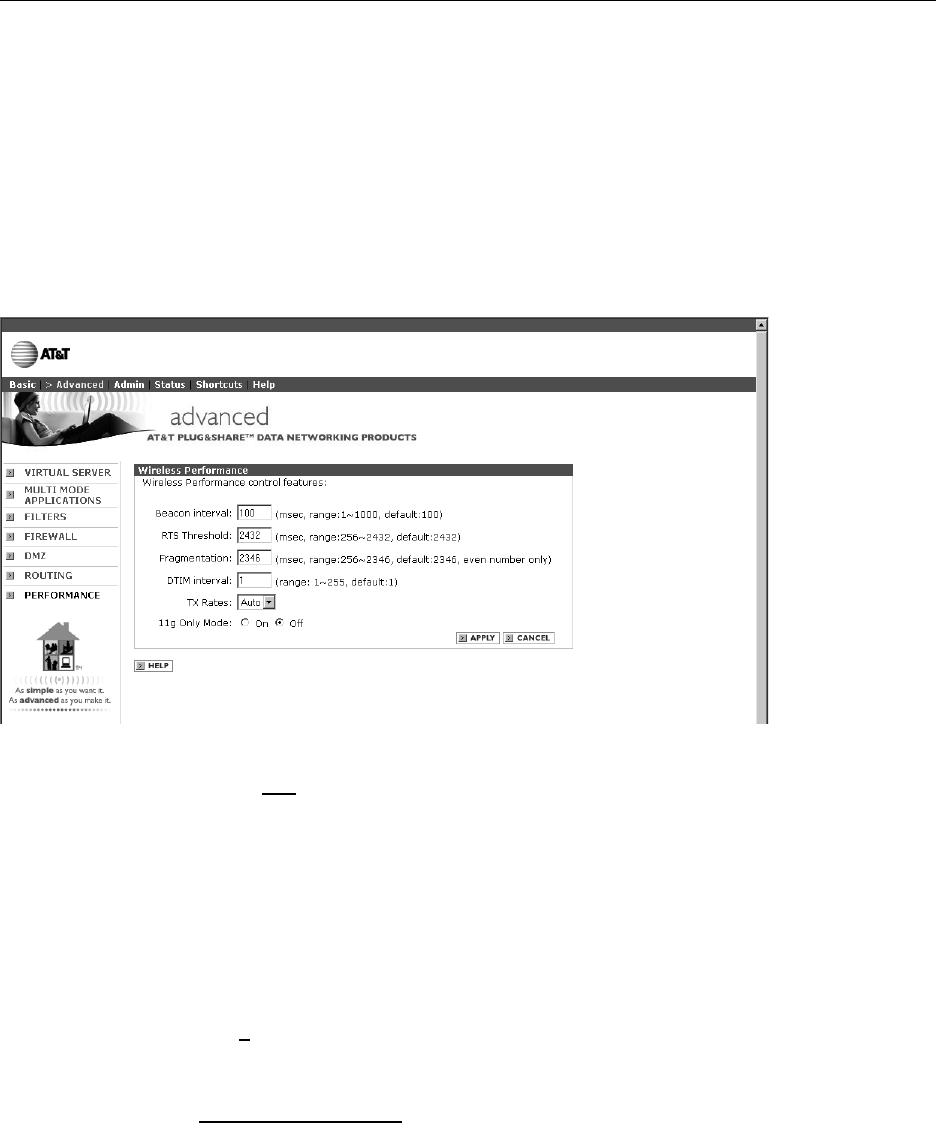
Basic > Advanced > Admin > Status > Shortcuts > Help
•Beacon interval: (Default 100) Beacons are packets sent by the router to synchronize a wireless net-
work. Higher numbers make performance more reliable; lower numbers increase speed. You can set a
beacon interval between 1 and 1000 milliseconds. You should not change this setting unless directed
to do so by a network administrator.
•RTS Threshold: (Default 2432) RTS (Request To Send) is a signal sent from the transmitting station
to the receiving station requesting permission to transmit data. You should not change this setting
unless directed to do so by a network administrator.
•Fragmentation: (Default 2346) A measure of data packet size during transmission. You should not
change this setting unless directed to do so by a network administrator.
•DTIM interval: (Default 3) Delivery Traffic Indication Message specifies the interval between notifica-
tions sent by your router to client computers. Higher numbers generate more frequent notifications.
You should not change this setting unless directed to do so by a network administrator.
•TX Rates: (Default 1-2-5.5-11-22-54 Mbps) TX stands for Transmission Rate. Choose a transmission
rate compatible with the slowest wireless adapter connected to your wireless network.
Virtual Server
Multi-Mode Applications
Filters
Firewall
DMZ
Routing
Performance
Wireless Performance
If excessive data errors occur repeatedly, you may be able to correct the problem by adjusting the settings
on this screen. The default settings usually work well, and any changes you make may degrade network
performance. Consult your network administrator before making any changes.
Administrator System Settings
AT&T Plug&Share™54 Mbps Wireless Router 6800G 34
Passwords
Passwords are not required, but you may want to use them to prevent unauthorized tampering with sys-
tem settings if others have access to your network. You can designate an Administrator (who can change
all router settings, including the passwords) and Users (who can view settings, but cannot change them).
Basic > Advanced > Admin > Status > Shortcuts > Help
Administrator settings
• Enter passwords for Administrator and User. Confirm by re-entering them in the fields below.
Remote Management (Default Off)
If turned on, this feature allows you to change router settings from a remote location (i.e., via the
Internet). A username and password is required for access to the browser-based management interface.
•IP Address: Enter the Internet IP address of a computer that has access to the router. You can use a
wildcard asterisk (*) to allow all Internet IP addresses access to your network.
•Port: Enter the port number used for access to the router.
Example: http://x.x.x.x:8080
(Where x.x.x.x is the WAN IP address of the router and 8080 is the port used for the web management
interface.)
Passwords
Settings
Backup
Other
NOTE: If you create an Admin
Password, you may be asked to enter
your User Name (Admin) and re-enter
your password. To log in, you must
enter Admin in the User Name field.
You must always log in as Admin
before reviewing or changing any router
settings.
NOTE: Write down
your passwords
and store them in a
secure place. If you
forget the Admin
password, you will
not have access to
any settings until
you reset the router
to factory default
settings.
Administrator System Settings
AT&T Plug&Share™54 Mbps Wireless Router 6800G 35
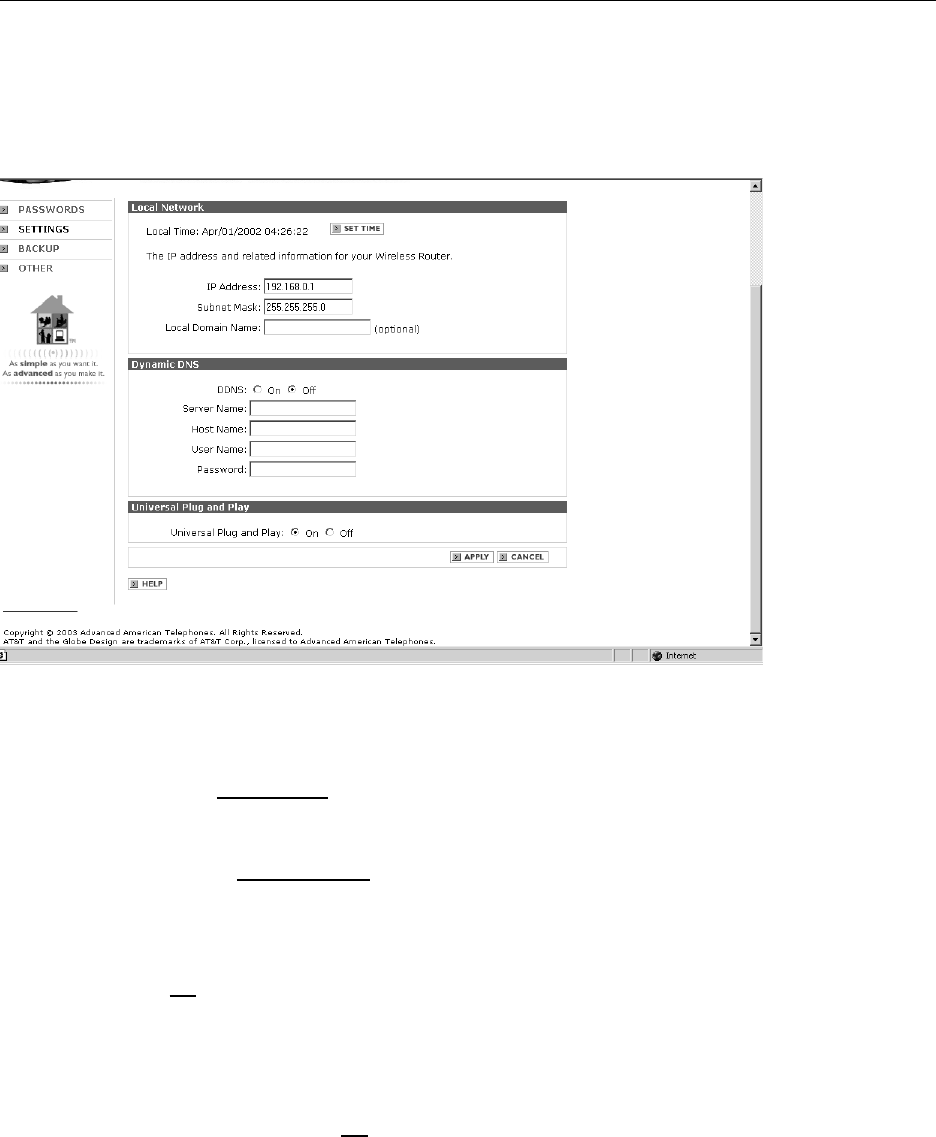
Settings
Basic > Advanced > Admin > Status > Shortcuts > Help
•Local Time: Click Set Time to set the date and time manually, or set the router to obtain time auto-
matically by connecting to a Network Time Protocol server (NTP). Correct time setting is important for
activities such as event scheduling and logging.
•IP Address: (Default 192.168.0.1.) The Internet Protocol (IP) address of your router is private and
cannot be seen on the Internet. You can change this number if needed, but it is usually not necessary
to do so.
•Subnet Mask: (Default 255.255.255.0.) The subnet mask (subnetwork mask) is an address used to
direct messages to a specified network segment (i.e., a subnet). You should not change this address
unless directed to do so by your network administrator.
•Local Domain Name (optional): If desired, you can enter a name here to identify your wireless network.
•DDNS: (Default Off) This stands for Dynamic Domain Name System. You should click On to enable
this feature if you host a web site or FTP site visited by users outside your local area network. This
will assure access to your site even if the IP address is changed by your Internet Service Provider.
•Names and password: If you enable DDNS, enter the name of the server hosting your site, and the
site host name, user name and password required for access.
•Universal Plug and Play: (Default On) This option makes the router compliant with the Universal
Plug and Play standard, which allows compatibility with equipment made by different manufacturers.
You should leave this feature turned on unless directed to turn it off by your network administrator.
Passwords
Settings
Backup
Other
Administrator System Settings
AT&T Plug&Share™54 Mbps Wireless Router 6800G 36
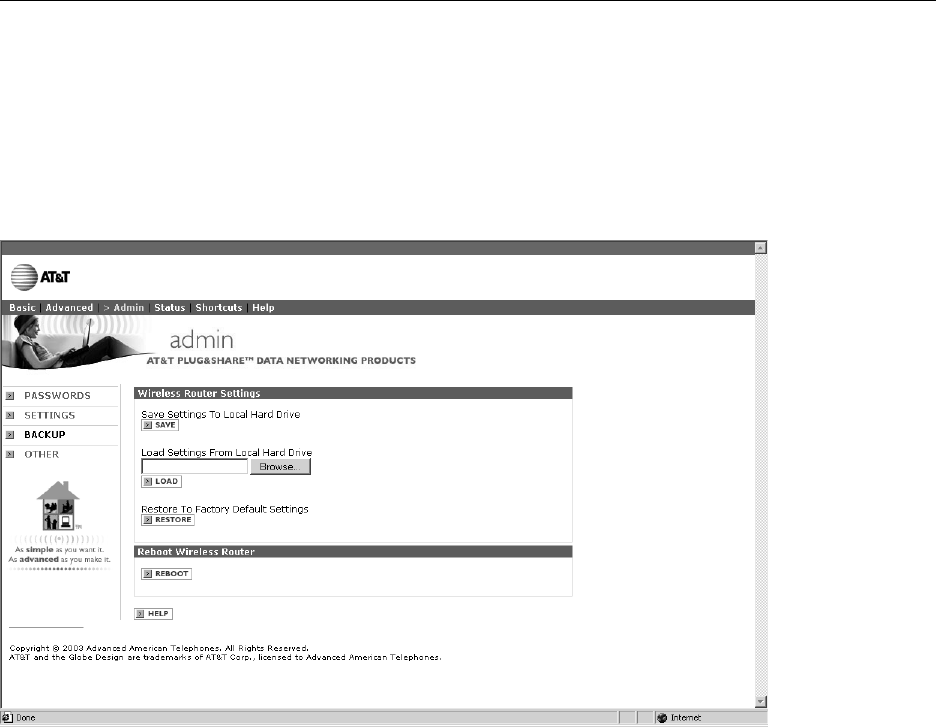
Basic > Advanced > Admin > Status > Shortcuts > Help
•Save Settings to Local Hard Drive: To back up your system settings, press Save, then choose a
location on your local hard drive where you want to keep the backup file.
•Load Settings from Local Hard Drive: To restore saved settings, click Browse to search the local
hard drive for the backup file you want to use. Highlight it, then click Load to restore saved settings.
•Restore to Factory Default Settings: Click Restore to reset the router to its original factory default
settings. You should not use this option unless directed to do so by your network administrator. It will
delete all changes you have made to all settings.
•Reboot: This option saves all current settings, then shuts down and restarts the router to reinitialize it.
Passwords
Settings
Backup
Other
Backup Router System Settings
At this screen you can back up all system settings by saving them in a file on your local hard drive, or
restore saved settings if the router becomes unstable and needs to be reset.
Administrator System Settings
AT&T Plug&Share™54 Mbps Wireless Router 6800G 37
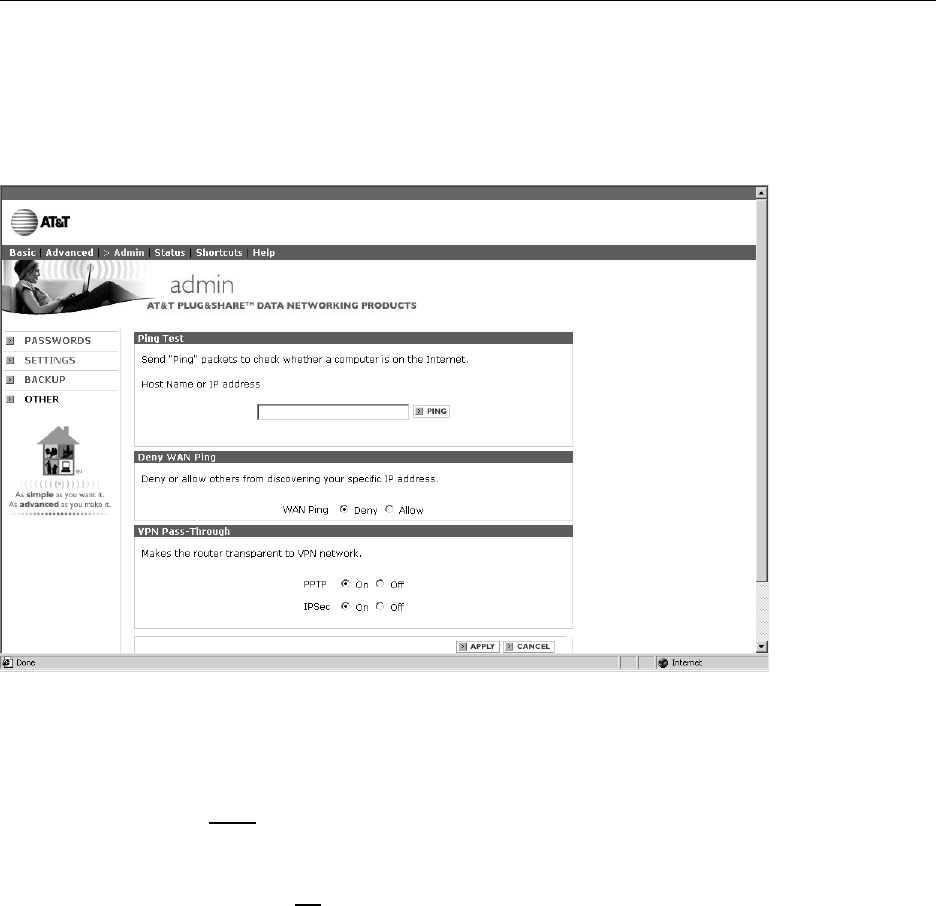
Other Options
Basic > Advanced > Admin > Status > Shortcuts > Help
Passwords
Settings
Backup
Other
•Ping Test: To check whether a computer is connected to the Internet or to your LAN, enter its host
name or IP address, then click Ping (“Packet Internet Groper”). If the computer is currently connected
to the Internet (or to your LAN) you will see a verification message (unless that computer is set to
deny Ping queries; see below).
•WAN Ping: (Default Deny) This option instructs your network to ignore Ping queries, to protect
against unauthorized access by others outside your network. You should leave this option set to Deny
unless instructed to do otherwise by your network administrator.
•VPN Pass-Through: (Default On) The router supports VPN (Virtual Private Network) pass-through for
both PPTP (Point-to-Point Tunneling Protocol) and IPSec (IP Security). Turning both of these On pre-
vents your router from blocking access to another network you may wish to use.
Status Screens
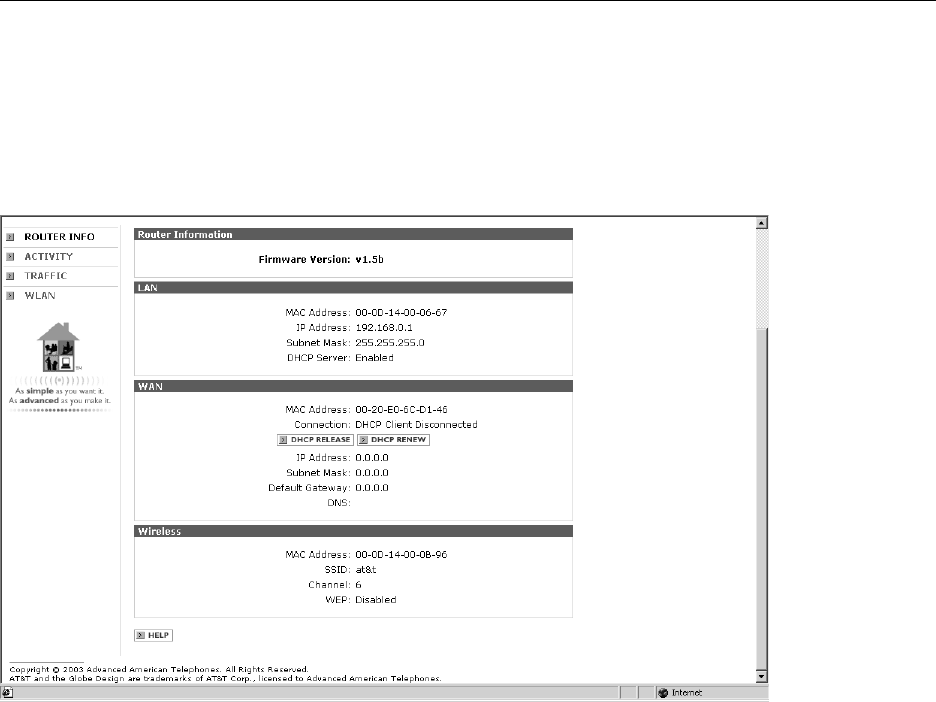
AT&T Plug&Share™54 Mbps Wireless Router 6800G 38
Router Information
This screen displays the current status of the router (see descriptions below).
Basic > Advanced > Admin > Status > Shortcuts > Help
Router Info
Activity
Traffic
WLAN
•Router Information: Displays the router’s current firmware version. (See page 47 to download a
more recent version if one is available.)
•LAN: Displays the status of your Local Area Network connections (MAC Address of the Ethernet LAN
connection, IP Address, Subnet Mask, and DHCP server setting).
•WAN: Displays the status of your Wide Area Network connections (MAC Address of the Ethernet
WAN connection, IP Address, Subnet Mask, Default Gateway, and DNS (Domain Name Server). The
connection type will be displayed if you are connected. If you have a dynamic connection, buttons
allow you to release or renew the IP Address assigned by your Internet Service Provider. If you have
a PPPoE connection, you will see options for connecting or disconnecting it.
•Wireless: Displays the MAC Address of the wireless connection, SSID, channel, and WEP Encryption
status.
Status Screens
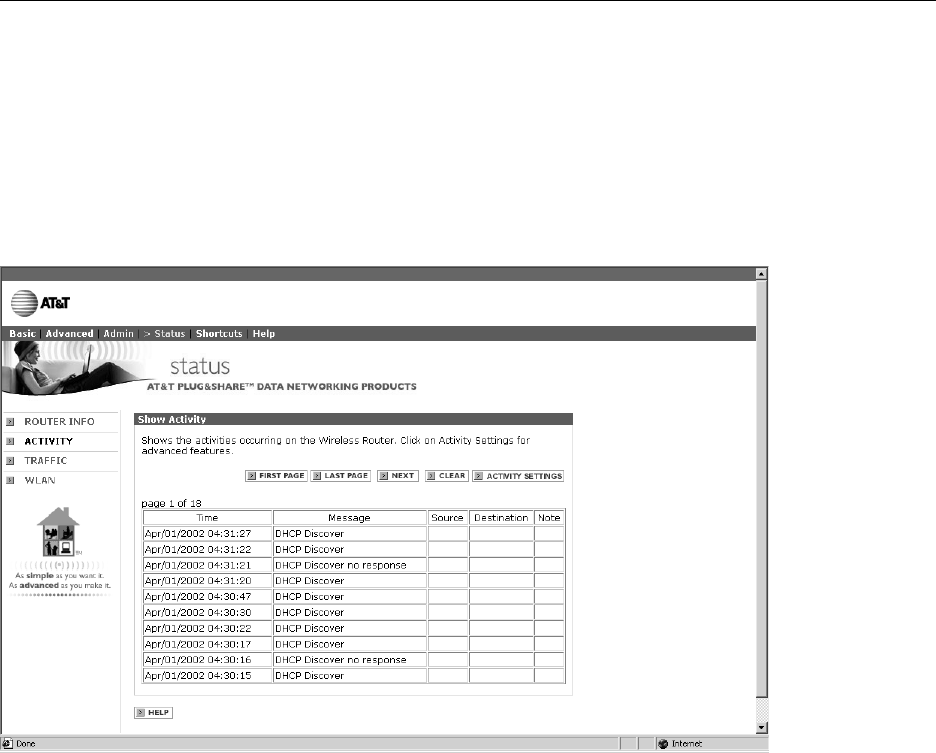
AT&T Plug&Share™54 Mbps Wireless Router 6800G 39
Basic > Advanced > Admin > Status > Shortcuts > Help
Router Info
Activity
Traffic
WLAN
•First Page: Go to the beginning of log entries.
•Last Page: Go to the end of log entries.
•Previous: Move back one page.
•Next: Move forward one log page.
•Clear: Delete all log entries.
•Activity Settings: Displays a page allowing you to save log entries, or automatically send them by
email to another location.
Activity
This screen displays a record of the most recent 200 network events. After 200 events are recorded, new
entries will overwrite older ones. Each time the router is reset or turned off, all entries are deleted. The
Activity Settings option allows you to keep a permanent record of these events (see below).
Status Screens
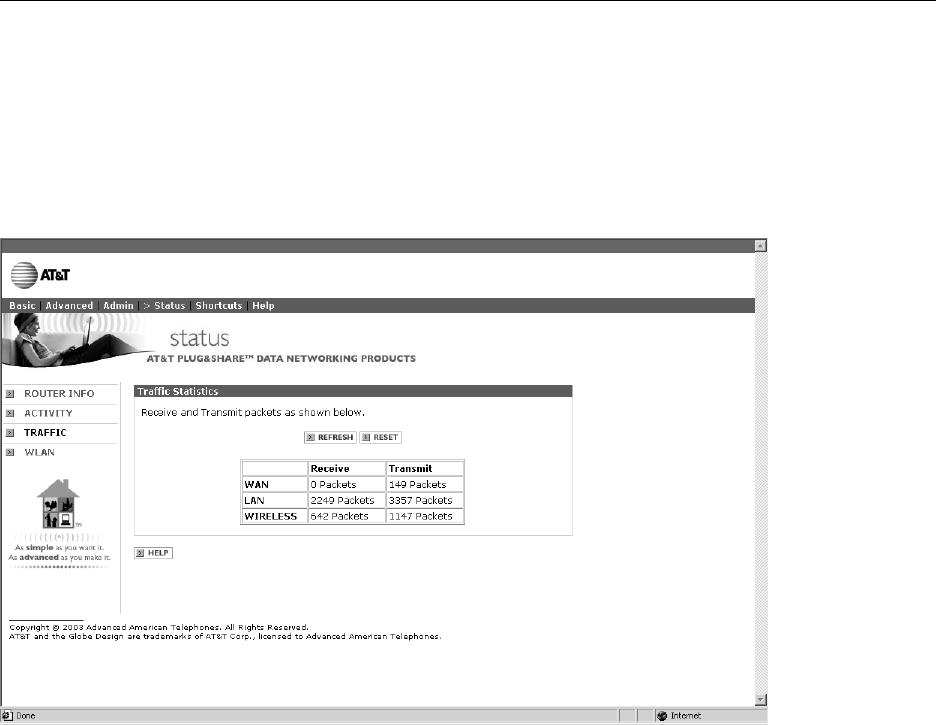
AT&T Plug&Share™54 Mbps Wireless Router 6800G 40
Basic > Advanced > Admin > Status > Shortcuts > Help
Router Info
Activity
Traffic
WLAN
•Refresh: Click to update the screen and see the most recent traffic statistics.
•Reset: Click to delete all recorded data.
Traffic Statistics
This screen displays a summary of traffic handled by your wireless network (volume of data sent and
received by your Local Area Network and Wide Area Network).
Status Screens
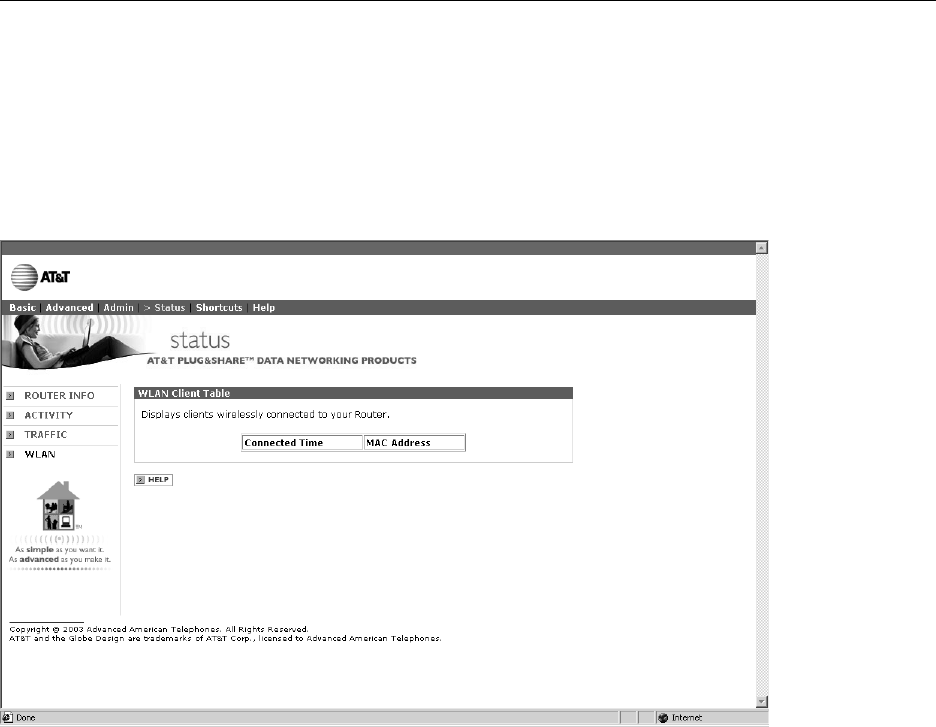
AT&T Plug&Share™54 Mbps Wireless Router 6800G 41
Wireless
This screen displays a list of all client computers currently connected to your wireless router.
Basic > Advanced > Admin > Status > Shortcuts > Help
Router Info
Activity
Traffic
WLAN
Shortcuts
AT&T Plug&Share™54 Mbps Wireless Router 6800G 42
Basic > Advanced > Admin > Status > Shortcuts > Help
Parental Control
Gaming
Personal Web Site
Personal FTP Site
Internet Telephony
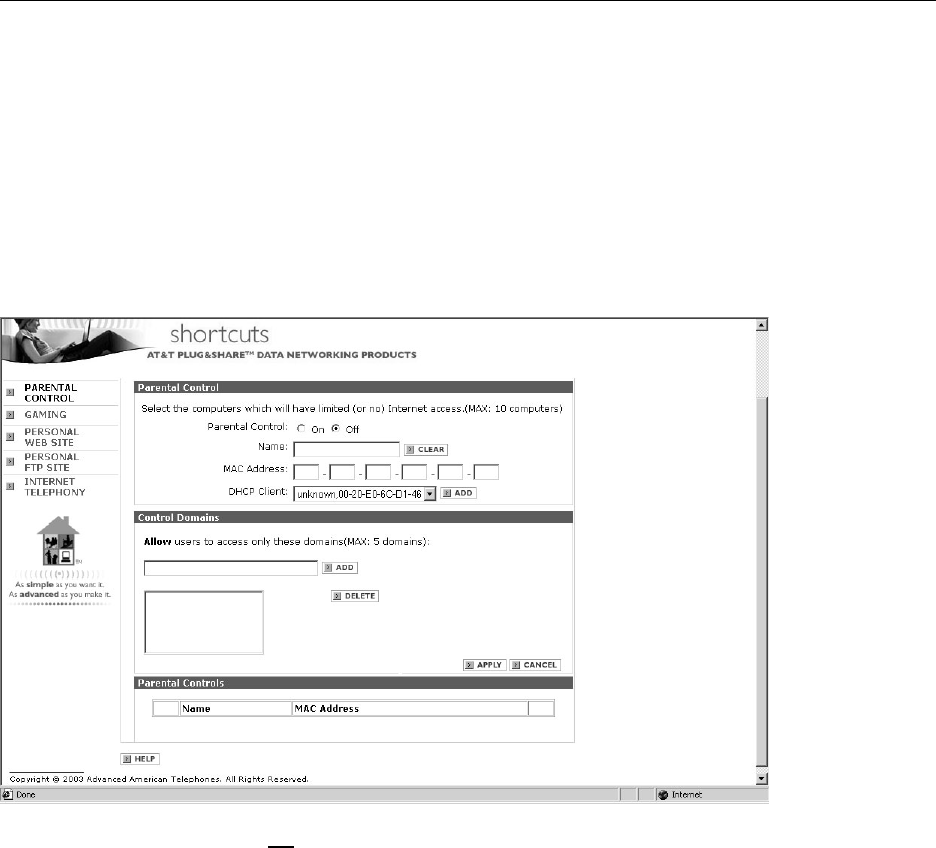
•Parental Control: (Default Off) Click On to activate Parental Control for the selected computer. To
select a computer, enter a computer name or MAC address, or click the drop-down menu to select a
computer from a list of DHCP Client computers. In the Name field, enter a name for this Parental
Control profile.
•Control Domains: Enter approved web site names here, then click the Add button after each entry.
You many enter up to 5 web sites. Users of this computer will be denied access to any sites not listed.
To remove a web site from the list, highlight it and click Delete. Click Apply when you are finished
modifying the list.
NOTE: If you want to prohibit all Internet access from this computer, delete all names from the Control
Domains field (leaving it empty), then click Apply.
•Parental Controls: The parental control profiles you have created are listed in the table at the bottom
of the page. To modify any existing profile, highlight the profile name and click the Edit button.
Parental Control
This option allows you to restrict Internet access from networked computers. You can completely deny
access to the Internet for a specific computer, or you can restrict access to a list of approved web sites
(for example, you might enter "childs_school.com" , "reference.com" and similar web sites to allow your
child to use the internet for homework).
Shortcuts
AT&T Plug&Share™54 Mbps Wireless Router 6800G 43
Basic > Advanced > Admin > Status > Shortcuts > Help
Parental Control
Gaming
Personal Web Site
Personal FTP Site
Internet Telephony
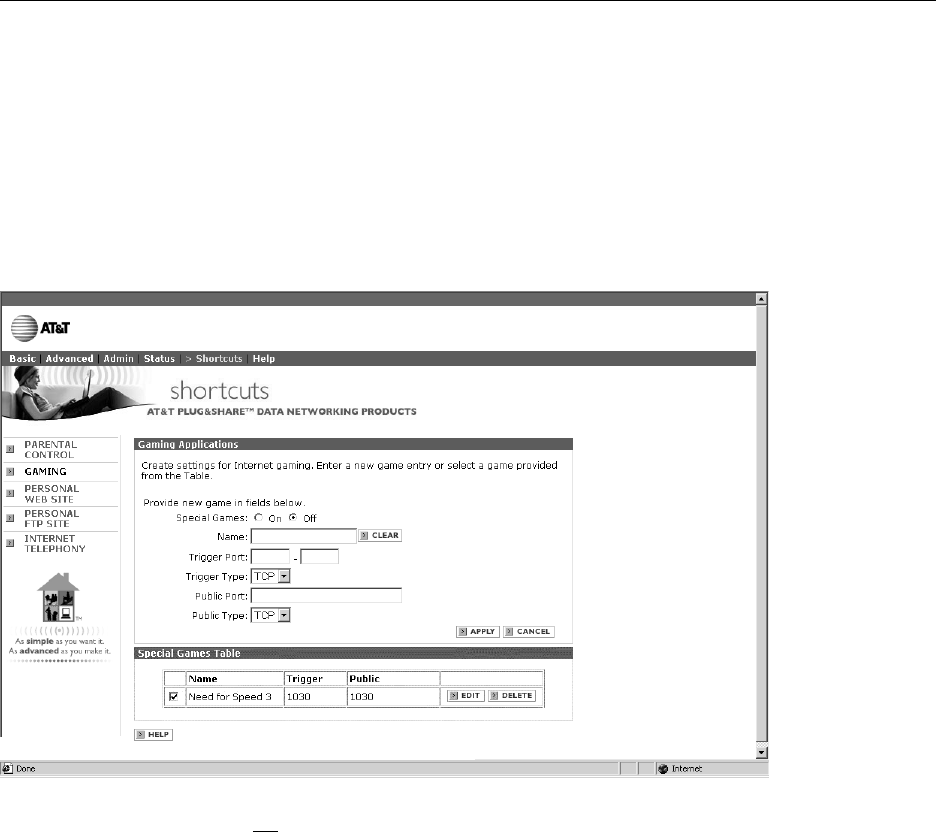
•Special Games: (Default Off) Click On to activate this feature. Click Off to prohibit access to games
requiring multiple connections. (Click the check box beside any game profile to allow or deny access to
an individual game.)
•Name: Enter a name to describe the game profile you are creating.
•Trigger Port: Enter a port for use by this application. You can enter a single port or a range of ports.
•Trigger Type: Select the protocol (TCP, UDP, or both) to be used for access to the game.
•Public Port: Enter a public port for use by this application.
•Public Type: Select the protocol (TCP, UDP, or both) to be used by the incoming communication.
•Apply: Click to add a new game profile to the table at the bottom of the screen.
•Cancel: Click to clear all fields and begin again.
•Special Games Table: Click the checkbox beside any listing to enable or disable a game profile. Click
anywhere on the line, then click Edit to change its attributes or Delete to remove it from the Special
Games Table.
Gaming
At this screen you can create profiles for Internet games that require multiple connections. These profiles
are sometimes necessary to allow interactive gaming, by preventing other settings (such as Network
Address Translation) from inhibiting the multiple connections.
Shortcuts
AT&T Plug&Share™54 Mbps Wireless Router 6800G 44
Basic > Advanced > Admin > Status > Shortcuts > Help
Parental Control
Gaming
Personal Web Site
Personal FTP Site
Internet Telephony
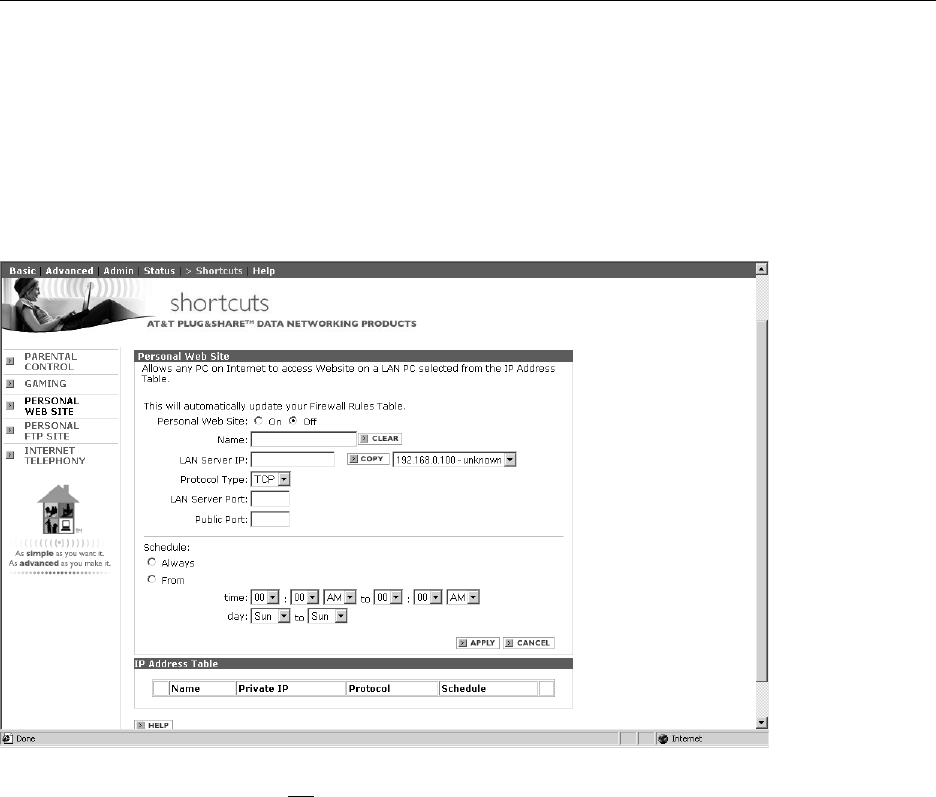
•Personal Web Site: (Default Off) Click On to allow access to the virtual server for the web site.
•Name: Enter a name to describe the virtual server.
•LAN Server IP: Enter the LAN IP address of the computer you want to use as a virtual server (or click
the drop-down menu to see a list of computers, highlight one, and click Copy to add it to the list).
•Protocol Type: Select the protocol (TCP or UDP) you want to use for the virtual server.
•LAN Server Port: Enter the port number of the computer used as a virtual server.
•Public Port: Enter the port number on the WAN that will be used to provide access to the virtual server.
•Schedule: Enter times when you want to allow access to the server, or click Always to allow access
at any time.
•Apply: Click to add the virtual server to the table below.
Personal Web Site
This option allows you to designate a network computer as a virtual server to host your personal web site.
You can create a profile for each site, so that site visitors will be directed to the server hosting that site.
Shortcuts
AT&T Plug&Share™54 Mbps Wireless Router 6800G 45
Basic > Advanced > Admin > Status > Shortcuts > Help
Parental Control
Gaming
Personal Web Site
Personal FTP Site
Internet Telephony
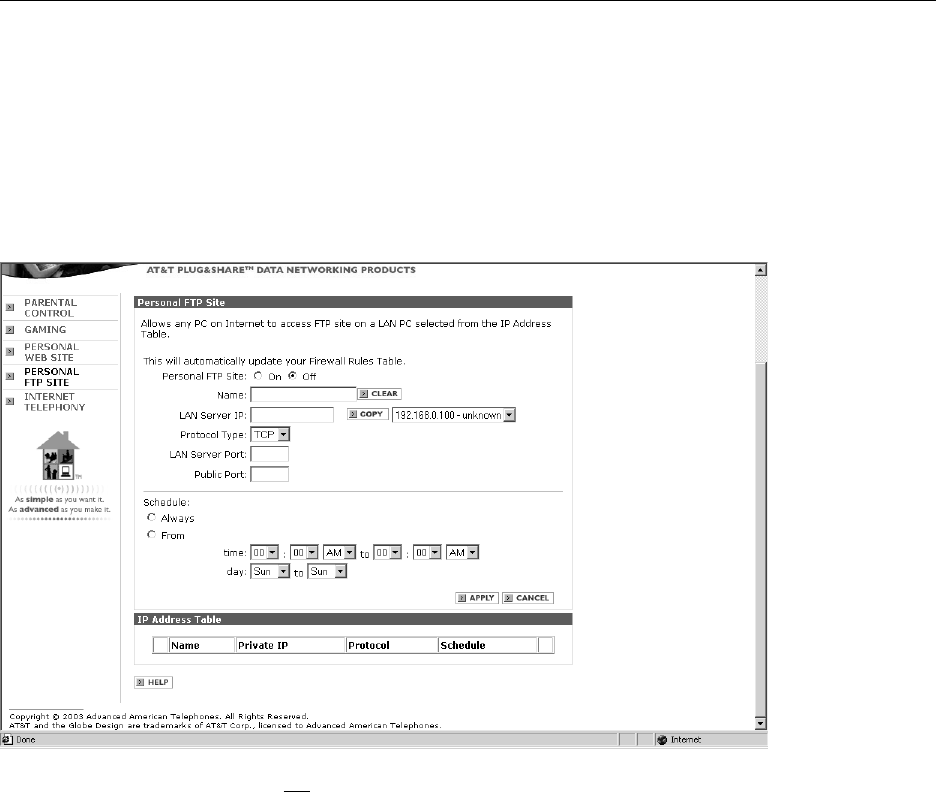
•Personal FTP Site: (Default Off) Click On to allow access to the virtual server for the FTP site.
•Name: Enter a name to describe the virtual server.
•LAN Server IP: Enter the LAN IP address of the computer you want to use as a virtual server (or click
the drop-down menu to see a list of computers, highlight one, and click Copy to add it to the list).
•Protocol Type: Select the protocol (TCP or UDP) you want to use for the virtual server.
•LAN Server Port: Enter the port number of the local computer that is being used as a virtual server.
•Public Port: Enter the port number on the WAN that will be used to provide access to the virtual server.
•Schedule: Enter times when you want to allow access to the server, or click Always to allow access
at any time.
•Apply: Click to add the virtual server to the table at the bottom of the screen.
Personal FTP Site
This option allows you to designate a network computer as a virtual server to host your personal FTP site.
You can create a profile for each site, so that site visitors will be directed to the server hosting that site.
Shortcuts
AT&T Plug&Share™54 Mbps Wireless Router 6800G 46
Basic > Advanced > Admin > Status > Shortcuts > Help
Parental Control
Gaming
Personal Web Site
Personal FTP Site
Internet Telephony
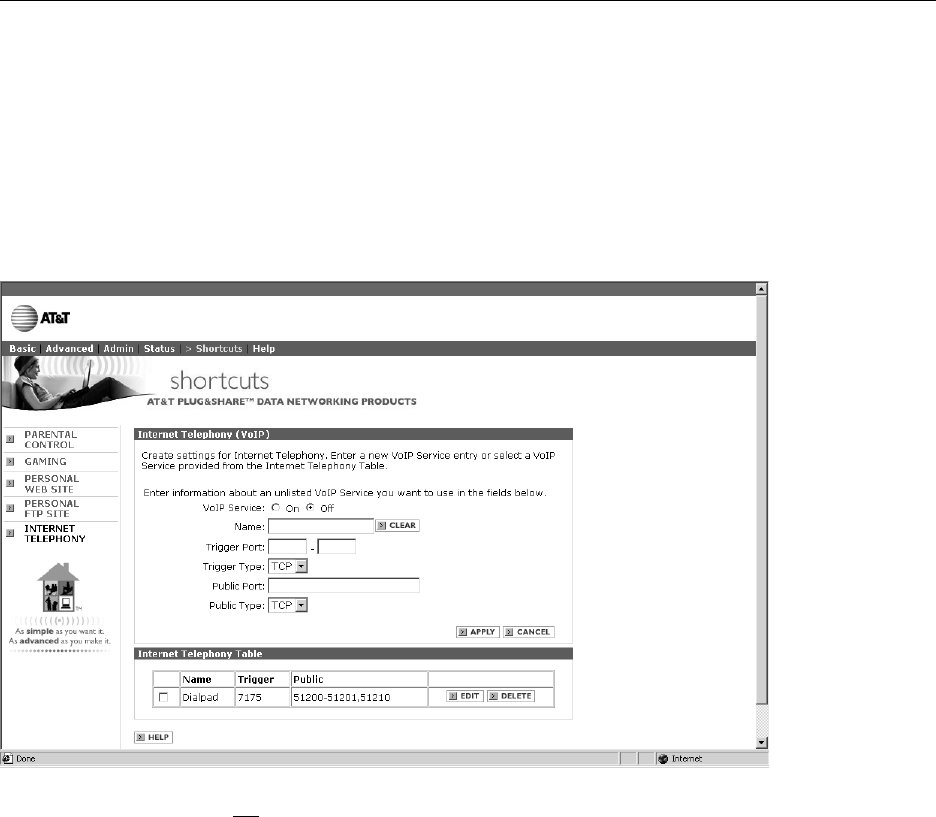
•VoIP Service: (Default Off) Click On to activate this feature and allow users to make and receive
Internet telephone calls. (Click the check box beside any VoIP profile to allow or deny access.)
•Name: Enter a name to describe the VoIP profile you are creating.
•Trigger Port: Enter a port for use by this application. You can enter a single port or a range of ports.
•Trigger Type: Select the protocol (TCP, UDP, or both) to be used for access this VoIP profile.
•Public Port: Enter a public port for use by this application.
•Public Type: Select the protocol (TCP, UDP, or both) that can be used by the incoming
communication.
•Apply: Click to add this VoIP profile to the table at the bottom of the screen.
Internet Telephony (VoIP)
At this screen you can create profiles for Internet telephone services that require multiple connections.
These profiles are sometimes necessary to allow Internet telephone use, by preventing other settings
(such as Network Address Translation) from inhibiting the multiple connections.
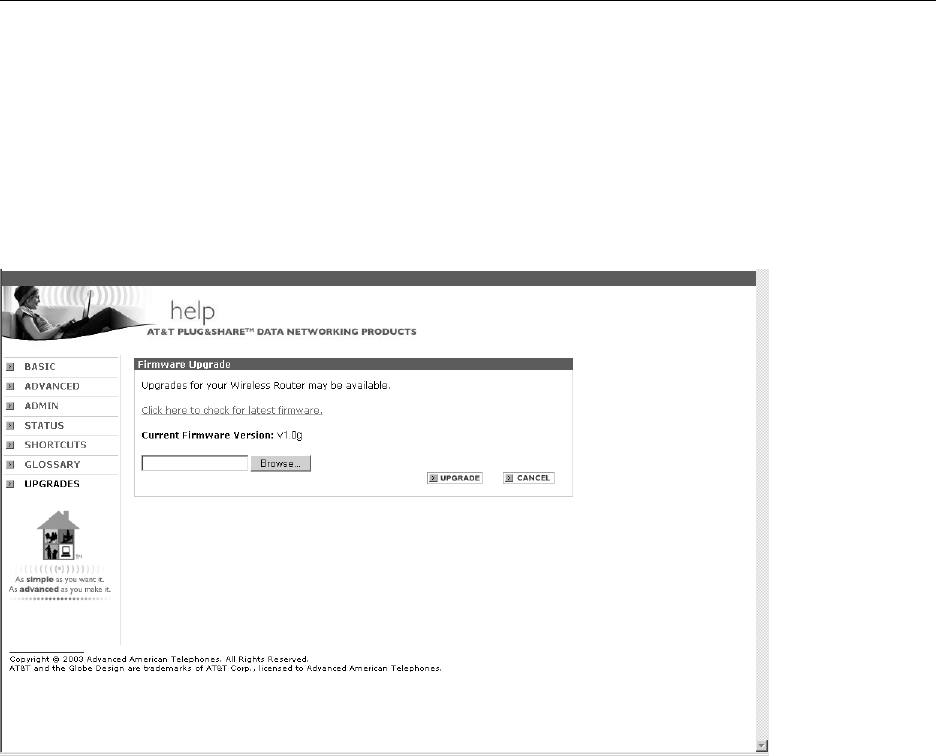
Upgrades
AT&T Plug&Share™54 Mbps Wireless Router 6800G 47
Basic > Advanced > Admin > Status > Shortcuts > Help
•Click here to check for latest firmware: Click this link to find out if new firmware is available. If so,
follow the instructions to download the new firmware to your local hard drive.
• Click Browse to search the local hard drive for the firmware to be used for the upgrade.
• Click Apply to complete the upgrade. The screen will display a notice that the router is restarting.
NOTE: Upgrading the firmware will not change any of your system settings, but you should save your
system settings before upgrading your firmware (see page 35).
Firmware Upgrade
At this screen you can check to see if a new firmware version is available, and install it. (Firmware controls
your router’s operation, and newer versions may give you more options or increase performance.)
Before downloading and installing new firmware, you should connect your computer to the router with an
Ethernet cable (see page 7).

AT&T Plug&Share™54 Mbps Wireless Router 6800G 48
Configuring the Wireless Network
Change Network Settings
After your wireless network is installed you can view or change settings at any time. Launch your
Internet browser and enter http://ATT.Router in the URL (web address) field. If the router page
does not appear, enter http://192.168.0.1
Choose the types of settings you want to view or change. Use the horizontal tabs to display
appropriate vertical buttons and click on the vertical buttons on the left of your screen to display
the desired screen.
Once you have changed settings on any screen, click Apply to apply the change to the router.
Configuring Windows®for File and Printer Sharing
Some configuration of Windows®is necessary to make full use of your wireless network. It will
take a few minutes, but it is a one-time process that you will not need to repeat.
Please turn to the pages listed for instructions on how to configure your operating system.
Windows®XP ............................Pages 49-55
Windows®2000 ........................Pages 56-61
Windows®Me/98 SE ................Pages 62-67
Caution
Before making any changes to your networking settings, please review this section carefully.
Failure to follow these instructions precisely may result in the inability to log into your network
or computer.
If your computer is part of a work environment, please contact your IT professional before
proceeding.
Configuring the Wireless Network — Windows®XP
AT&T Plug&Share™54 Mbps Wireless Router 6800G 49
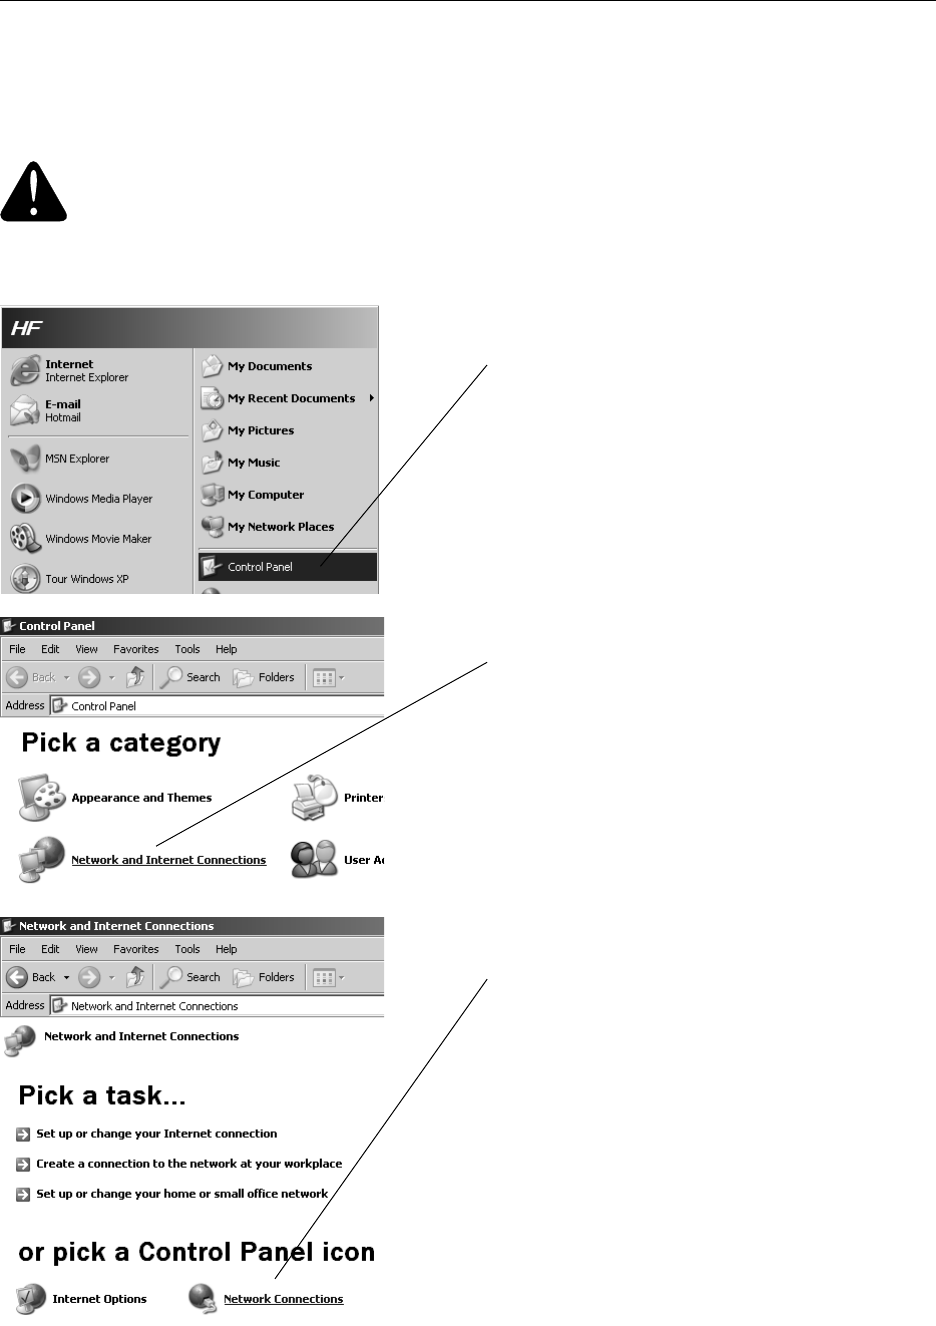
Configure Windows®XP for Network Sharing
Step 1
Click Start >Control Panel.
Step 2
Click Network and Internet Connections.
Step 3
Click Network Connections.
Windows®XP • Windows®2000 • Windows®Me/98 SE
Caution
Before making any changes to your networking settings, please review this section carefully.
Failure to follow these instructions precisely may result in the inability to log into your network or
computer. If your computer is part of a work environment, please contact your IT professional
before proceeding.
Configuring the Wireless Network — Windows®XP
AT&T Plug&Share™54 Mbps Wireless Router 6800G 50
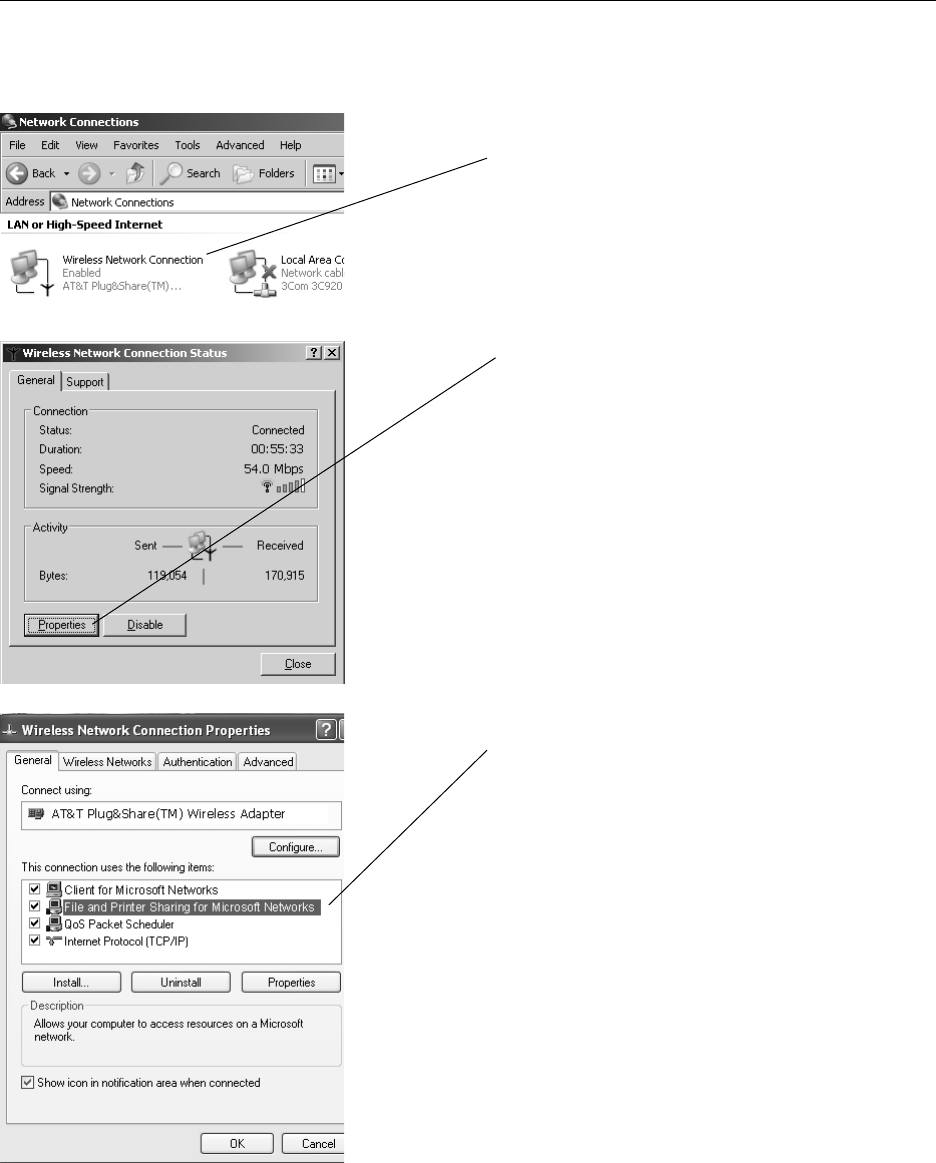
Step 6
Make sure File and Printer Sharing for
Microsoft Networks appears in this list, and
check it if it is unchecked.
If you do not see it in the list, click the Install
button and follow directions to install File and
Printer Sharing for Microsoft Networks.
Click OK when File and Printer Sharing is
installed and checked.
Step 4
Click Wireless Network Connection.
Step 5
Click the Properties button.
Windows®XP • Windows®2000 • Windows®Me/98 SE
Configuring the Wireless Network — Windows®XP
AT&T Plug&Share™54 Mbps Wireless Router 6800G 51
Step 7
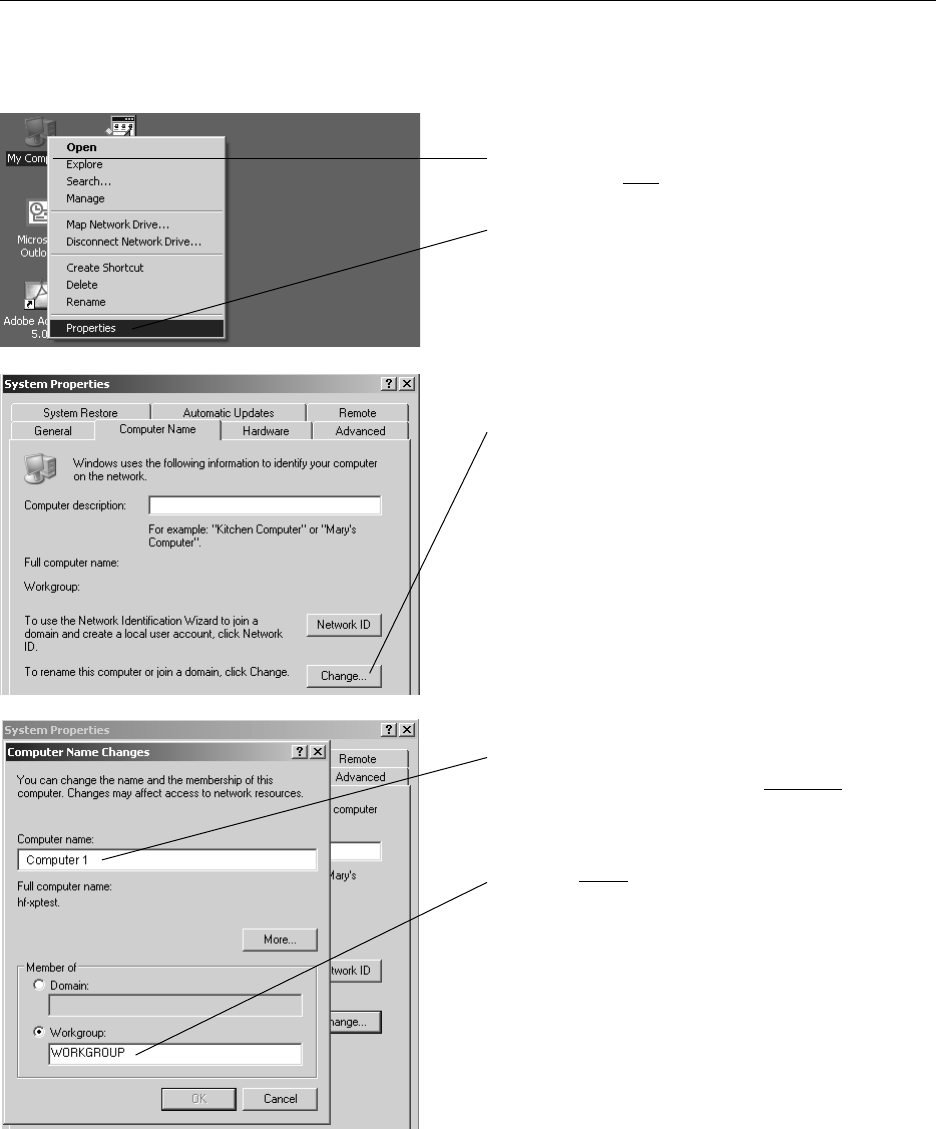
Highlight the My Computer icon on your desktop,
then click the right mouse button.
Scroll down to click on Properties.
Step 8
Click the Change button.
Step 9
Enter a unique name to identify your computer.
Each computer must have a different name.
Enter a workgroup name. All computers must
use the same workgroup. It may be easiest to
use the default name, “Workgroup.”
Windows®XP • Windows®2000 • Windows®Me/98 SE
Configuring the Wireless Network — Windows®XP
AT&T Plug&Share™54 Mbps Wireless Router 6800G 52
Step 10
When configuration is complete, you must re-
start Windows®.
When Windows®restarts you will be prompted
to enter a user name and password. Be sure
to record these in a safe place. You will be
required to enter them for access to the net-
work each time you restart Windows®.
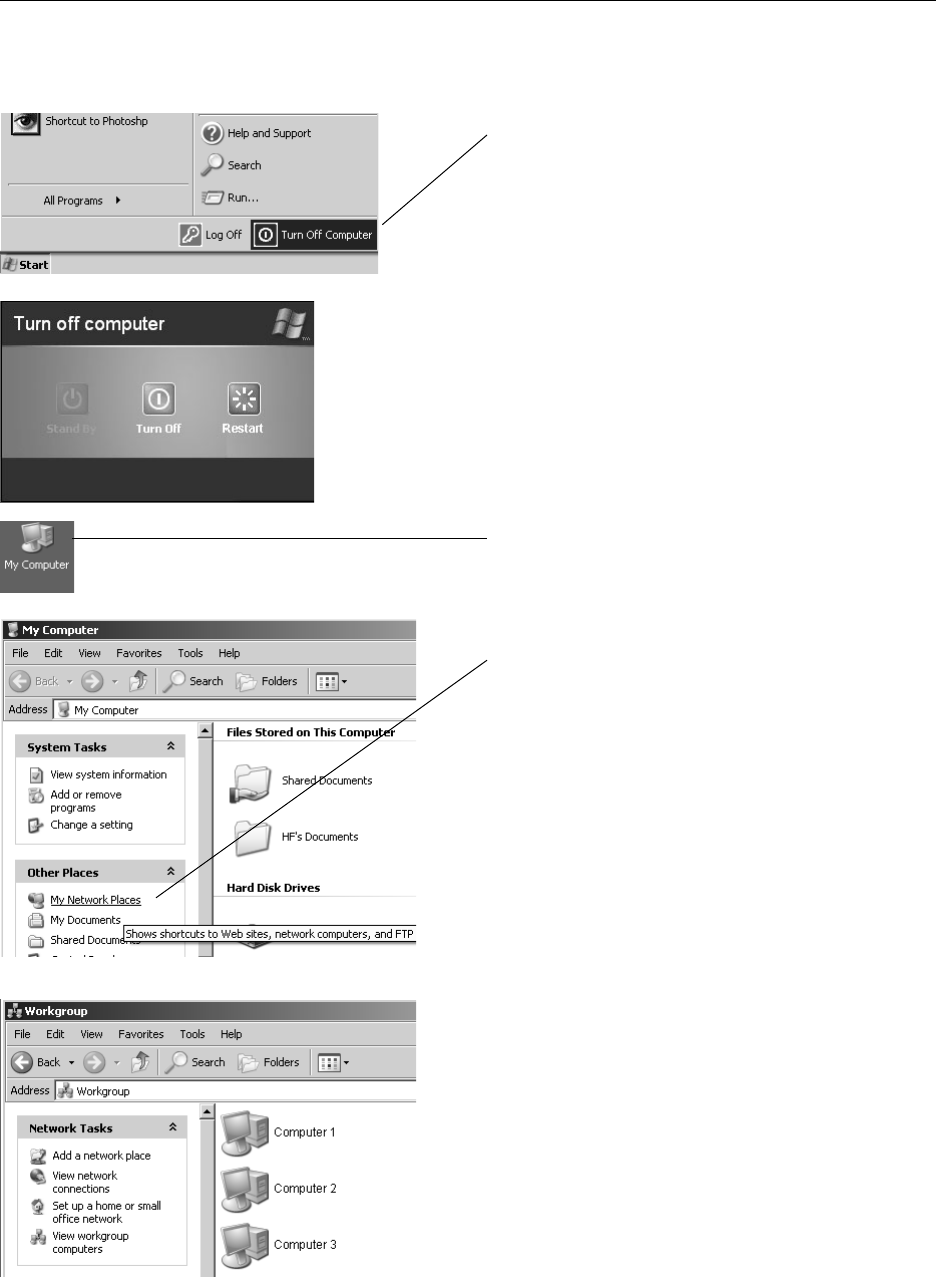
Step 11
To verify that configuration is complete, double-
click the My Computer icon on your desktop,
then double-click My Network Places.
In the next window displayed you should see
the names of all network computers.
If any computers do not appear, you will have to
follow the steps in this section on each computer
to configure them for network sharing. Make
sure each computer is assigned a different
name, and all share the same Workgroup name
you entered at Step 9.
Windows®XP • Windows®2000 • Windows®Me/98 SE
Configuring the Wireless Network — Windows®XP
AT&T Plug&Share™54 Mbps Wireless Router 6800G 53
Configure Windows®XP for Printer Sharing
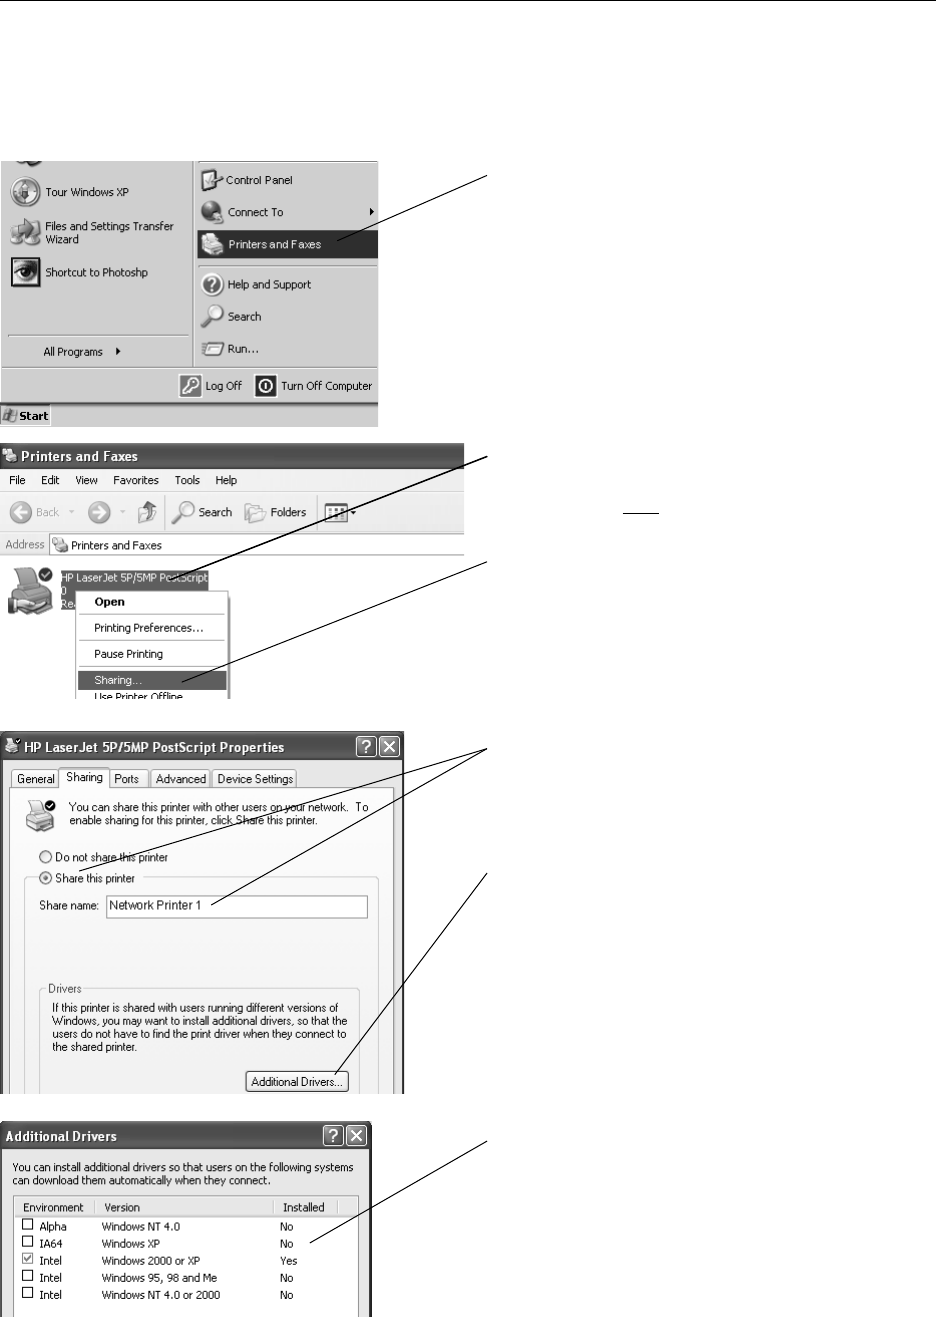
Step 1
Click Start > Printers and Faxes.
Step 2
Place the cursor on the printer you want to share,
then click the right mouse button.
Scroll down to select Sharing.
NOTE: If your printer is not listed in this window,
double-click Add a Printer, then follow the
instructions to set up your printer for use.
Step 3
Click the Share this printer button, then enter a
unique name for this printer.
To continue, click the Additional Drivers button.
Step 4
Check boxes for all operating systems that will use
this printer.
Click OK when finished.
Windows®XP • Windows®2000 • Windows®Me/98 SE
Configuring the Wireless Network — Windows®XP
AT&T Plug&Share™54 Mbps Wireless Router 6800G 54
Configure Windows®XP for File Sharing
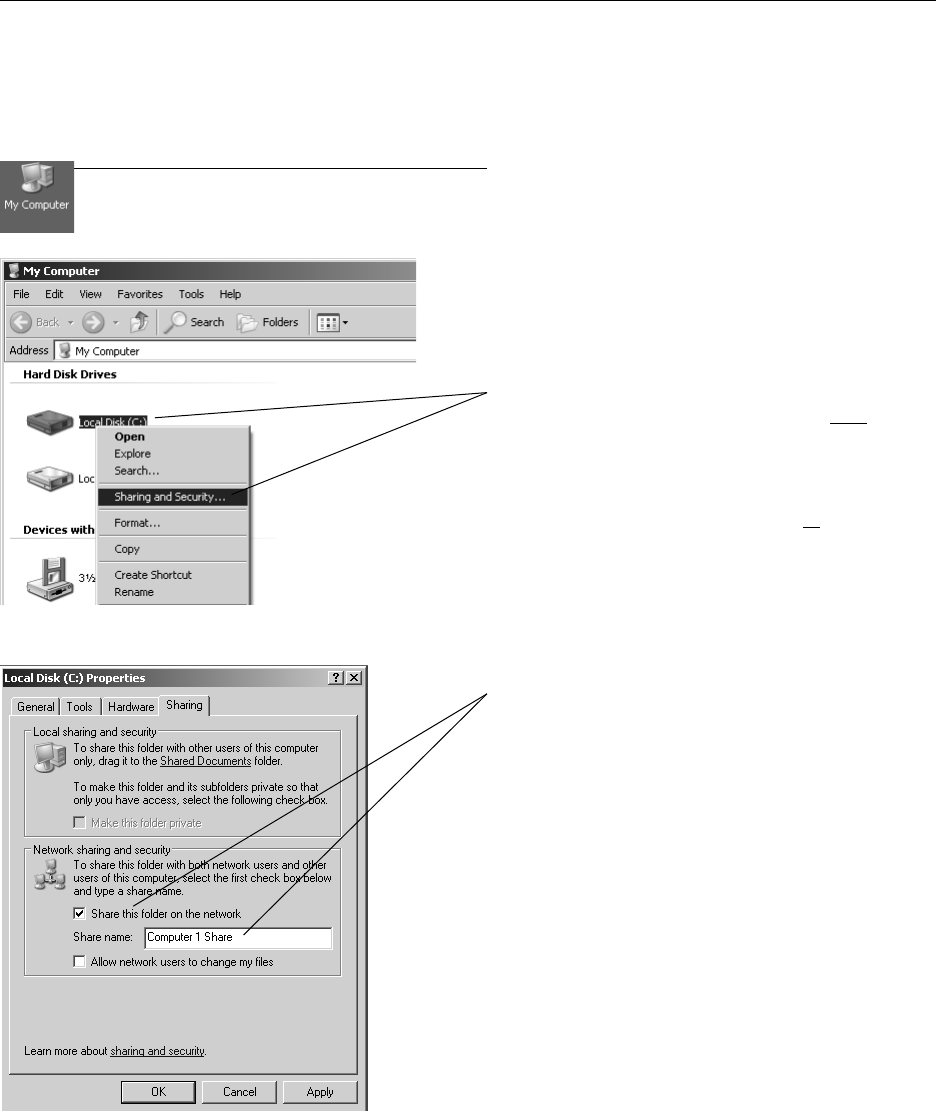
Step 1
Double-click the My Computer icon on your
desktop.
Step 2
Place the cursor on the disk drive you want to
share (usually Drive C:), then click the right mouse
button and scroll down to select Sharing and
Security.
NOTE: This will allow others access to all files on this
computer. To restrict access to certain folders, double-
click on the disk, highlight a folder you want to share,
then follow steps 2-3.
Step 3
Check the Share this folder on the Network
box, then enter a unique name for the drive or
folder you want to share.
NOTE: To protect your files with higher levels of
security, please refer to instructions provided with
your Windows®operating system.
Click OK when finished.
Windows®XP • Windows®2000 • Windows®Me/98 SE
Configuring the Wireless Network — Windows®XP
AT&T Plug&Share™54 Mbps Wireless Router 6800G 55
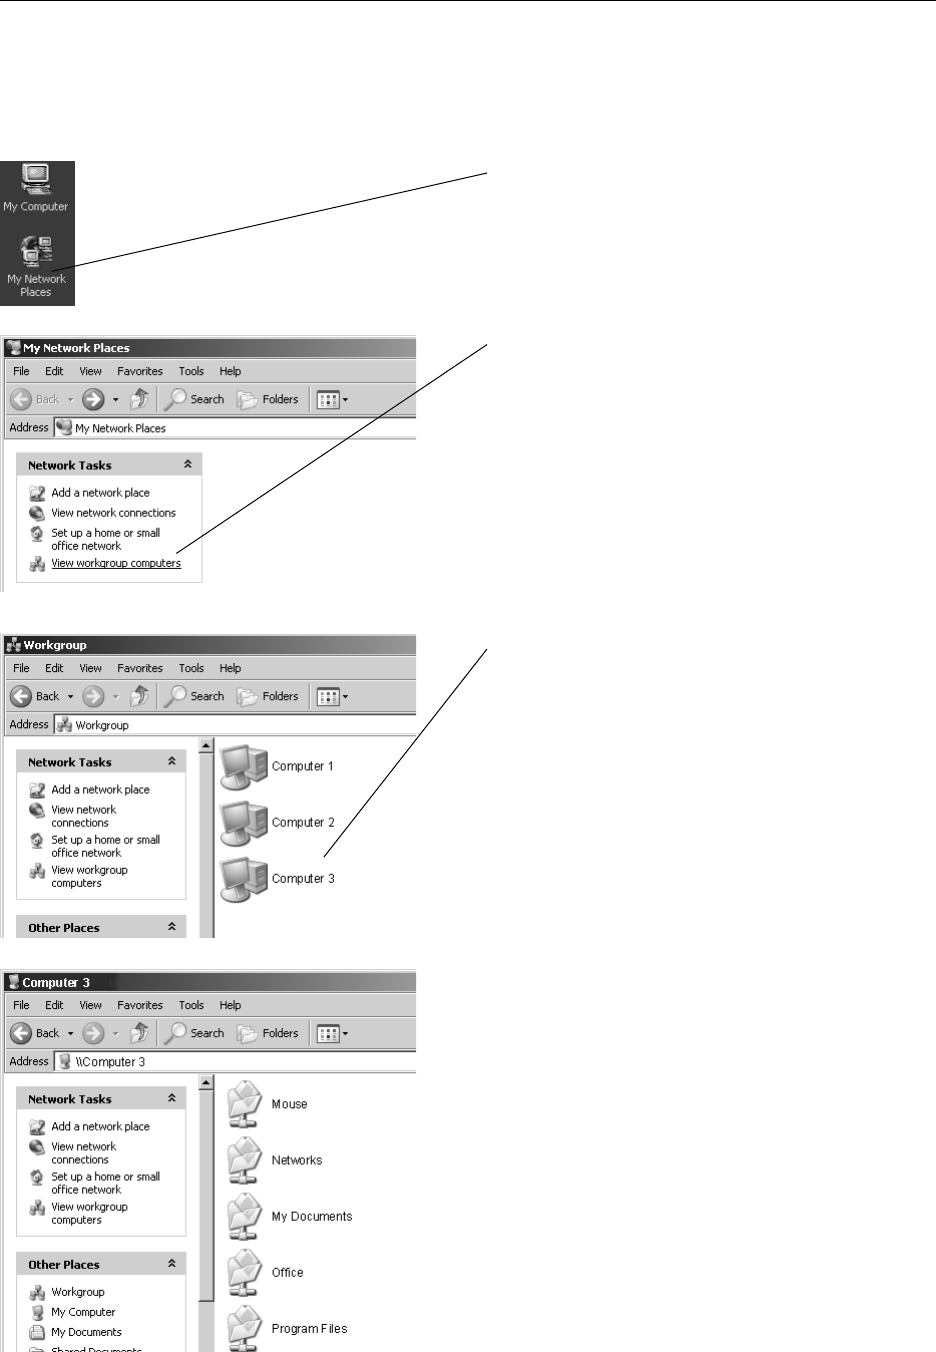
To Share Network Files in Windows®XP
Step 1
Double-click the My Network Places icon on
your desktop.
Step 2
Double-click View Workgroup Computers to
see a list of all computers connected to your
network.
Step 3
Double-click any icon to see a list of all shared
folders on that computer.
Step 4
Double-click any folder for access to any file in
that folder.
Windows®XP • Windows®2000 • Windows®Me/98 SE
Configuring the Wireless Network — Windows®2000
AT&T Plug&Share™54 Mbps Wireless Router 6800G 56
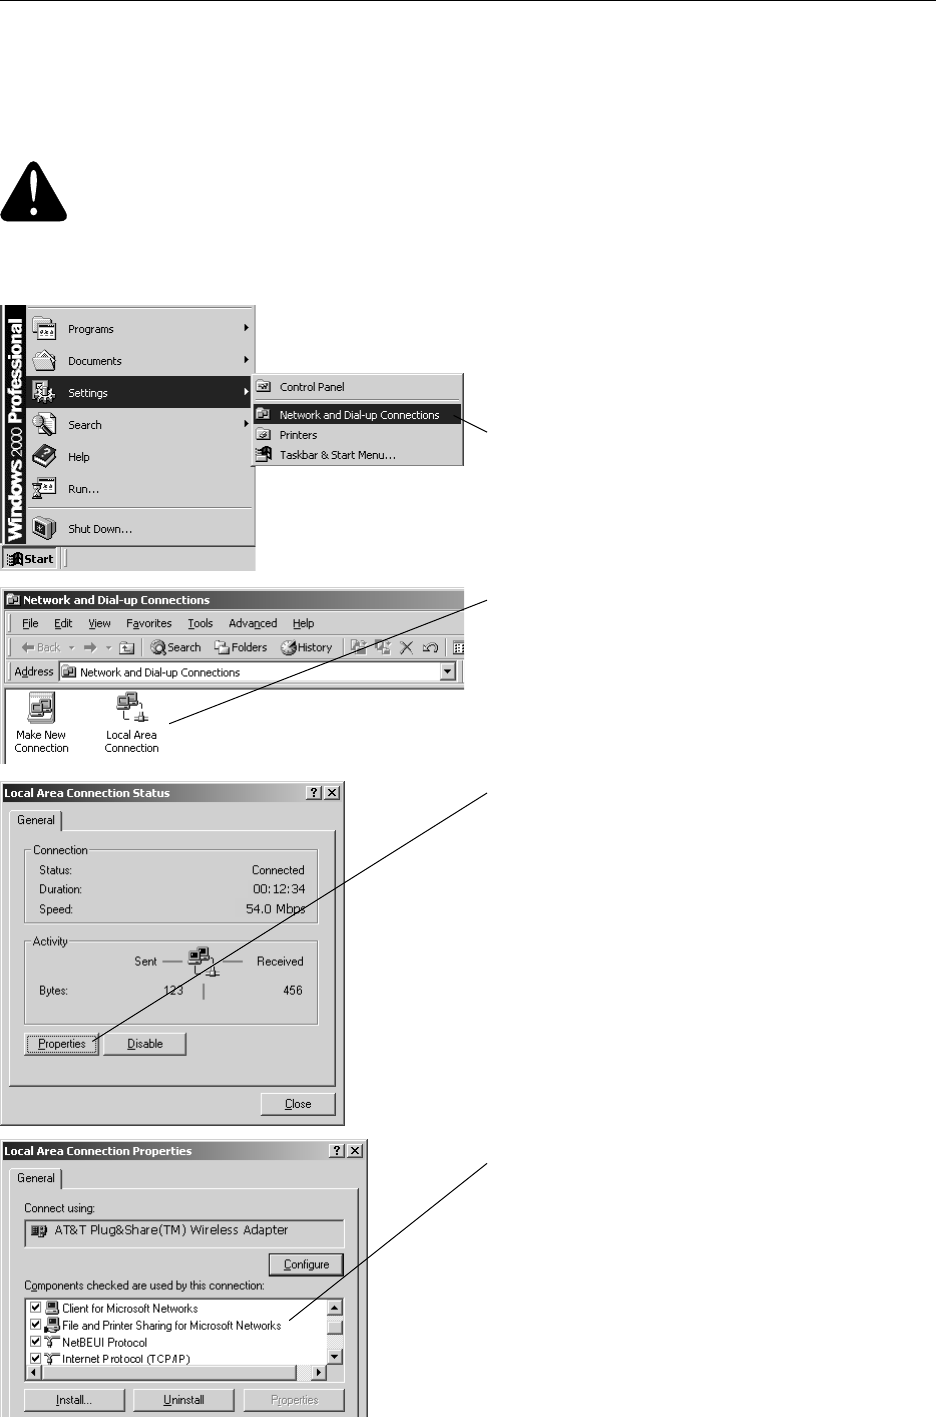
Configure Windows®2000 for Network Sharing
Step 1
Click Start >
Settings >
Network and Dial-up Connections.
Step 2
Double-click Local Area Connections.
Step 3
Click the Properties button.
Step 4
Make sure File and Printer Sharing for
Microsoft Networks appears in this list, and
check it if it is unchecked.
If you do not see it in the list, click the Install
button and follow directions to install File and
Printer Sharing for Microsoft Networks.
Click OK when File and Printer Sharing is
installed and checked.
Windows®XP • Windows®2000 • Windows®Me/98 SE
Caution
Before making any changes to your networking settings, please review this section carefully.
Failure to follow these instructions precisely may result in the inability to log into your network or
computer. If your computer is part of a work environment, please contact your IT professional
before proceeding.
Configuring the Wireless Network — Windows®2000
AT&T Plug&Share™54 Mbps Wireless Router 6800G 57
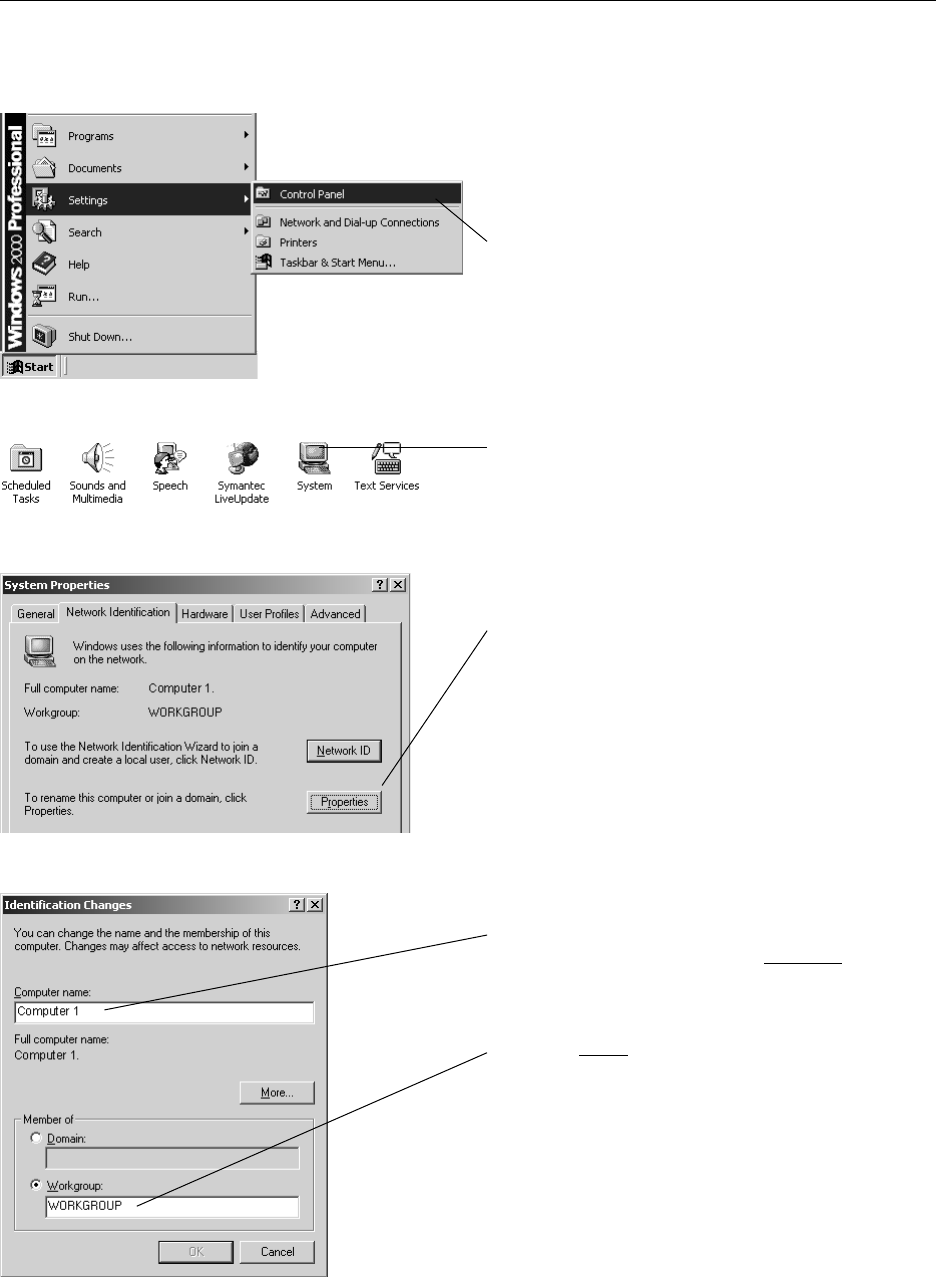
Step 5
Click Start >
Settings >
Control Panel.
Step 6
Double-click System.
Step 7
Click the Properties button.
Step 8
Enter a unique name to identify your computer.
Each computer must have a different name.
Enter a workgroup name. All computers must
use the same workgroup. It may be easiest to
use the default name, “Workgroup.”
Windows®XP • Windows®2000 • Windows®Me/98 SE
Configuring the Wireless Network — Windows®2000
AT&T Plug&Share™54 Mbps Wireless Router 6800G 58
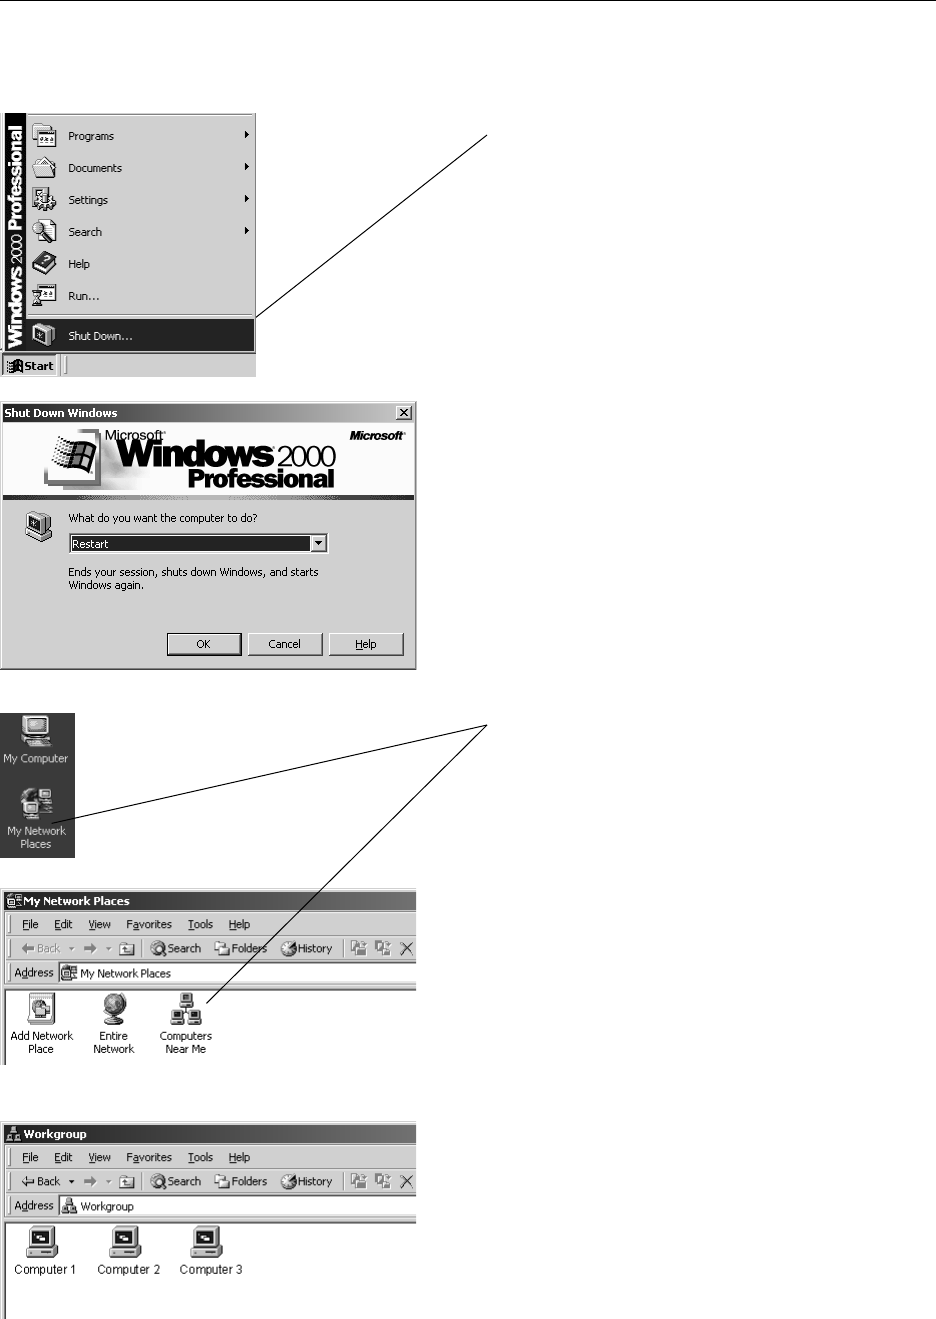
Step 9
When configuration is complete, you must
re-start Windows®.
When Windows®restarts you will be prompted
to enter a user name and password. Be sure
to record these in a safe place. You will be
required to enter them for access to the
network each time you restart Windows®.
Step 10
To verify that configuration is complete, double-
click the My Network Places icon on your
desktop, then double-click Computers Near Me.
In the next window displayed you should see
the names of all network computers.
If any computers do not appear, you will have to
follow the steps in this section on each computer
to configure them for network sharing. Make
sure each computer is assigned a different
name, and all share the same Workgroup name
you entered at Step 8.
Windows®XP • Windows®2000 • Windows®Me/98 SE
Configuring the Wireless Network — Windows®2000
AT&T Plug&Share™54 Mbps Wireless Router 6800G 59
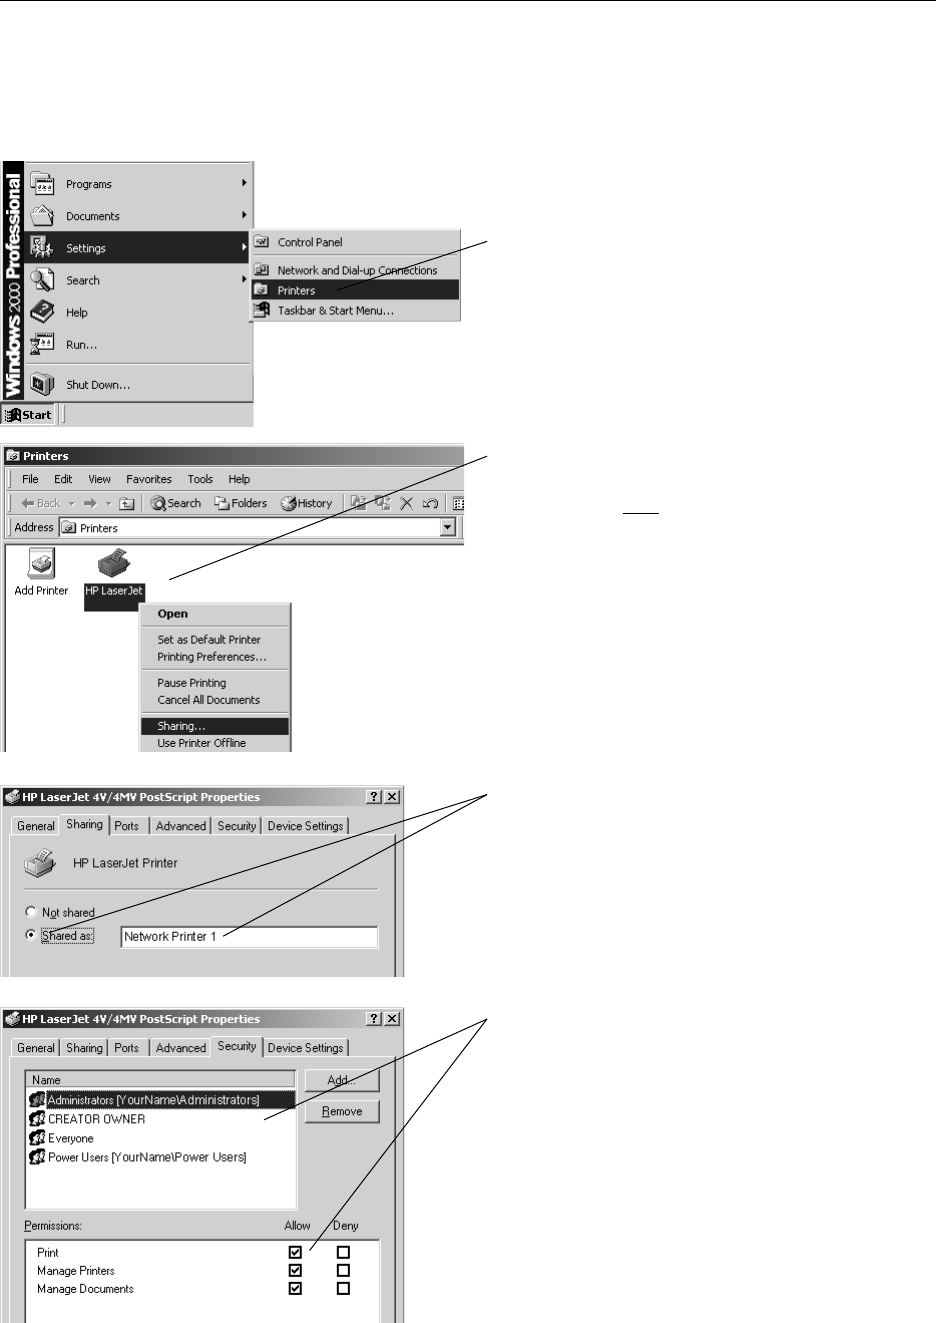
Configure Windows®2000 for Printer Sharing
Step 1
Click Start >
Settings >
Printers.
Step 2
Place the cursor on the printer you want to share,
then click the right mouse button.
Scroll down to select Sharing.
NOTE: If your printer is not listed in this window,
double-click Add Printer, then follow the instructions
to set up your printer for use.
Step 3
Click the Shared As button, then enter a unique
name for this printer.
To continue, click on the Security tab at the top of
this window.
Step 4
At this screen you can set permissions for each
user of the printer. Unless you have special needs
for security, it may be easiest to check Allow for all
permissions and all user names listed.
NOTE: To set more restrictive printer permissions,
please refer to instructions provided with your Windows®
operating system.
Click OK when finished.
Windows®XP • Windows®2000 • Windows®Me/98 SE
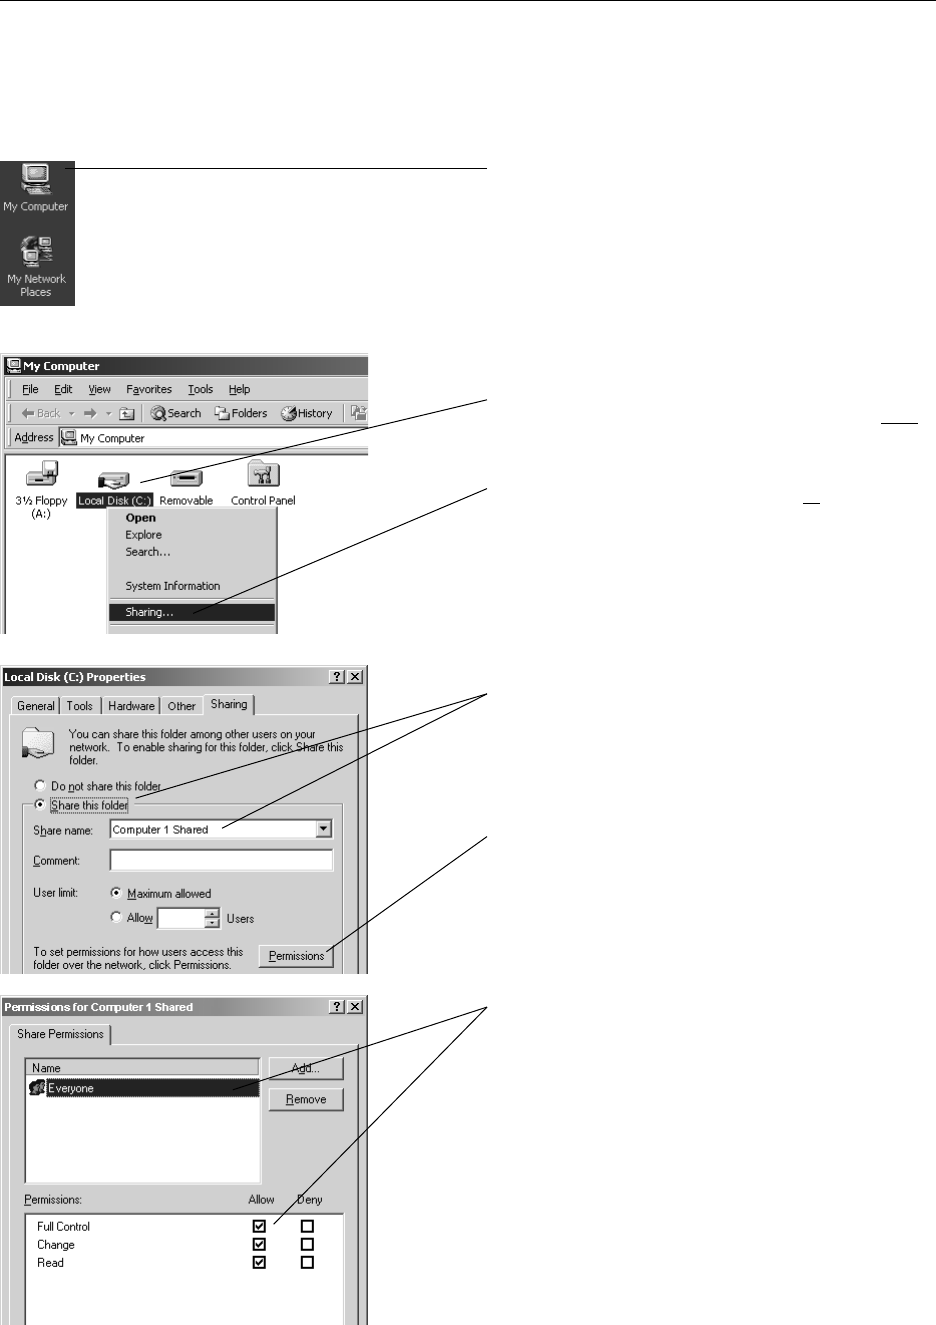
Configuring the Wireless Network — Windows®2000
AT&T Plug&Share™54 Mbps Wireless Router 6800G 60
Configure Windows®2000 for File Sharing
Step 1
Double-click the My Computer icon on your
desktop.
Step 2
Place the cursor on the disk drive you want to
share (usually Local Drive C:), then click the right
mouse button and scroll down to select Sharing.
NOTE: This will allow others access to all files on this
computer. To restrict access to certain folders, double-
click on the disk, highlight a folder you want to share,
then follow steps 2-4.
Step 3
Click the Share this folder button, then enter a
unique name for the drive or
folder you want to share.
To continue, click the Permissions button.
Step 4
At this screen you can set permissions for each
user of shared documents. Unless you have
special needs for security, it may be easiest to
check Allow for all permissions.
NOTE: To set more restrictive permissions, please
refer to instructions provided with your Windows®
operating system.
Click OK when finished.
Windows®XP • Windows®2000 • Windows®Me/98 SE
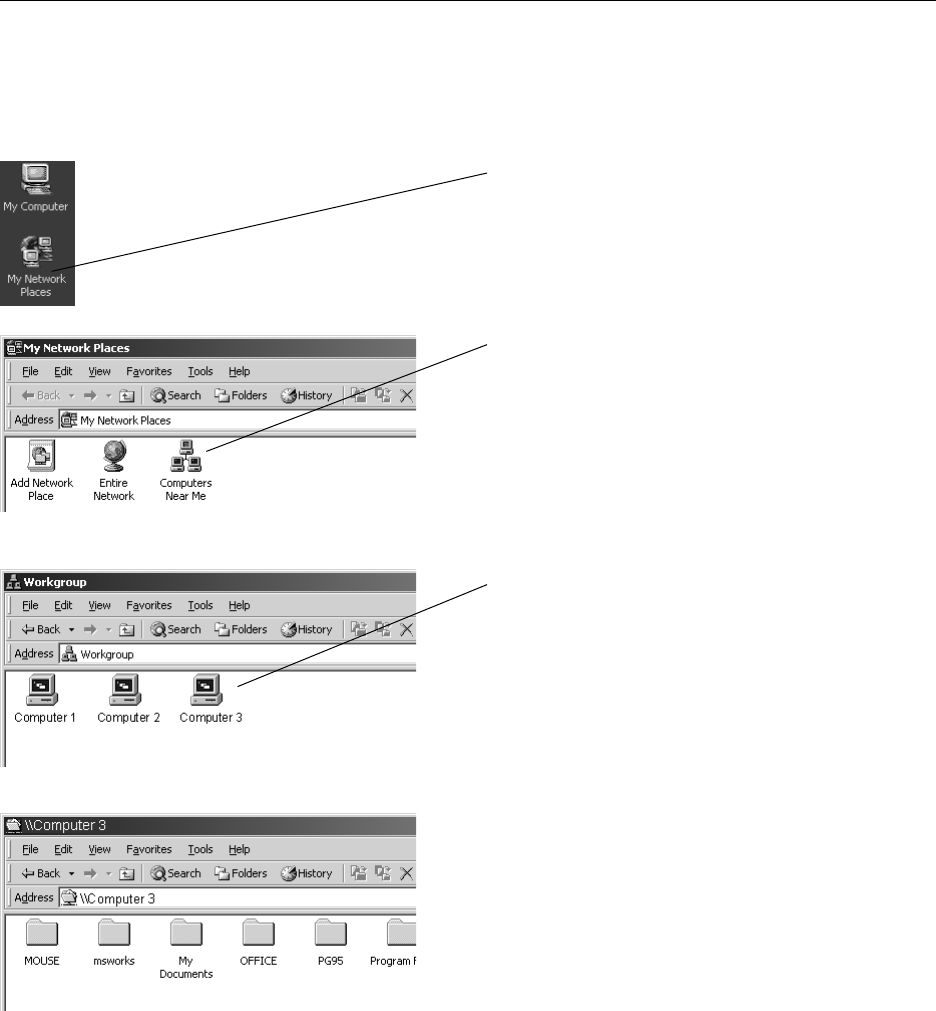
Configuring the Wireless Network — Windows®2000
AT&T Plug&Share™54 Mbps Wireless Router 6800G 61
To Share Network Files in Windows®2000
Step 1
Double-click the My Network Places icon on
your desktop.
Step 2
Double-click Computers Near Me to see a list
of all computers connected to your workgroup.
Step 3
Double-click any icon to see a list of all shared
folders on that computer.
Step 4
Double-click any folder for access to any file in
that folder.
Windows®XP • Windows®2000 • Windows®Me/98 SE
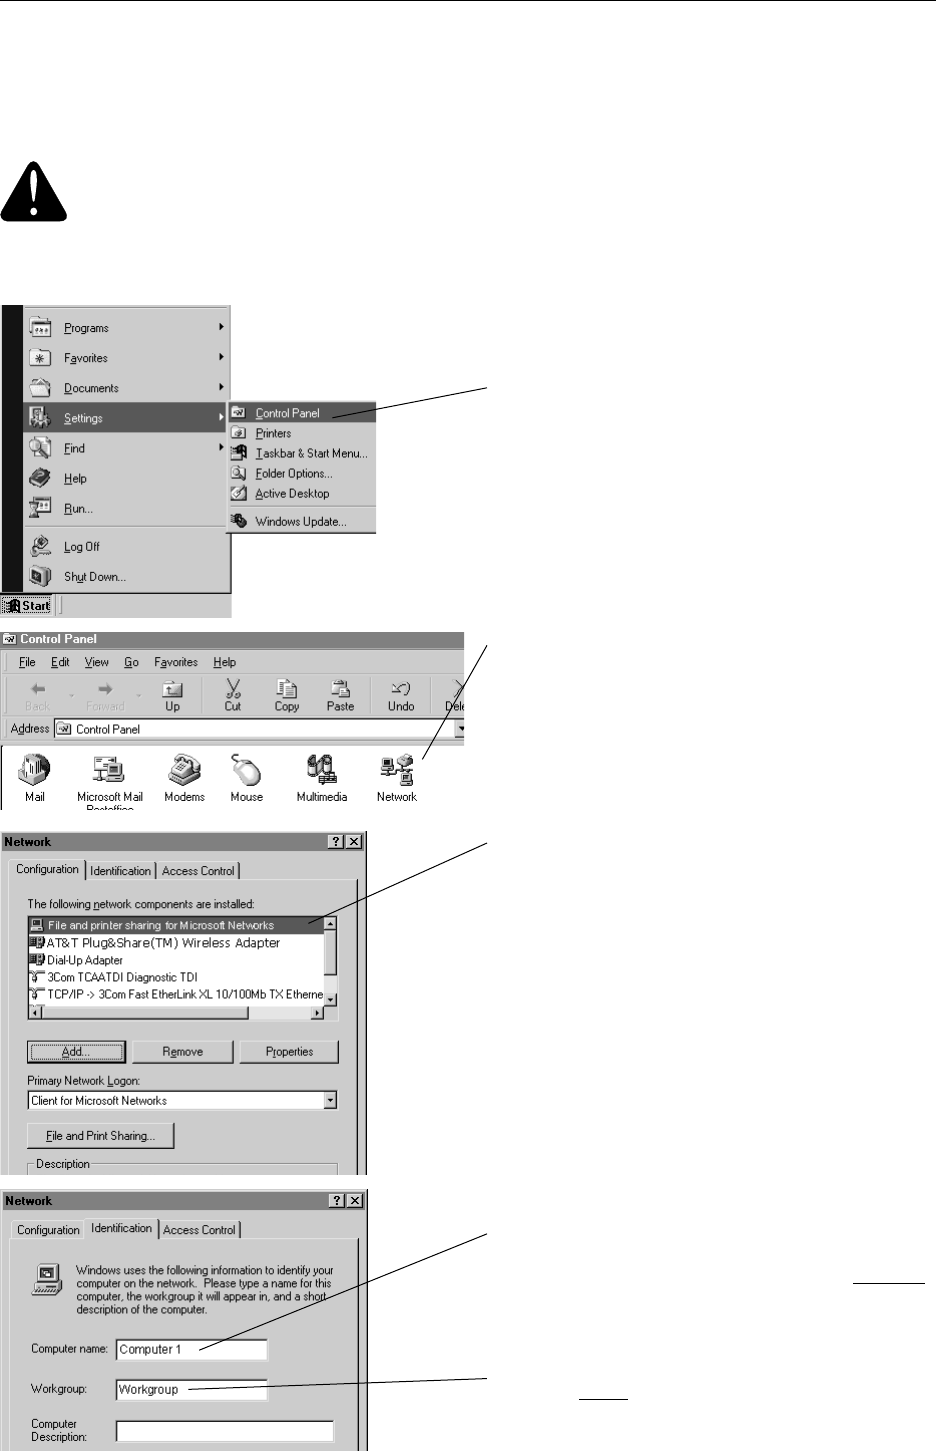
Configuring the Wireless Network — Windows®98 SE/Windows®Me
AT&T Plug&Share™54 Mbps Wireless Router 6800G 62
Configure Windows®98/Me for Network Sharing
Step 1
Click Start > Settings > Control Panel.
Step 2
Double-click Network.
Step 3
Scroll down to make sure File and Printer
Sharing for Microsoft Networks appears in this
list.
If you do not see it in the list, click the Add
button and follow directions to install File and
Printer Sharing for Microsoft Networks.
Step 4
Click the Identification tab at the top of this
screen, then enter a unique name to identify your
computer. Each computer must have a different
name.
Enter a workgroup name. All computers must
use the same workgroup. It may be easiest to
use the default name, “Workgroup.”
Windows®XP • Windows®2000 • Windows®Me/98 SE
Caution
Before making any changes to your networking settings, please review this section carefully.
Failure to follow these instructions precisely may result in the inability to log into your network or
computer. If your computer is part of a work environment, please contact your IT professional
before proceeding.
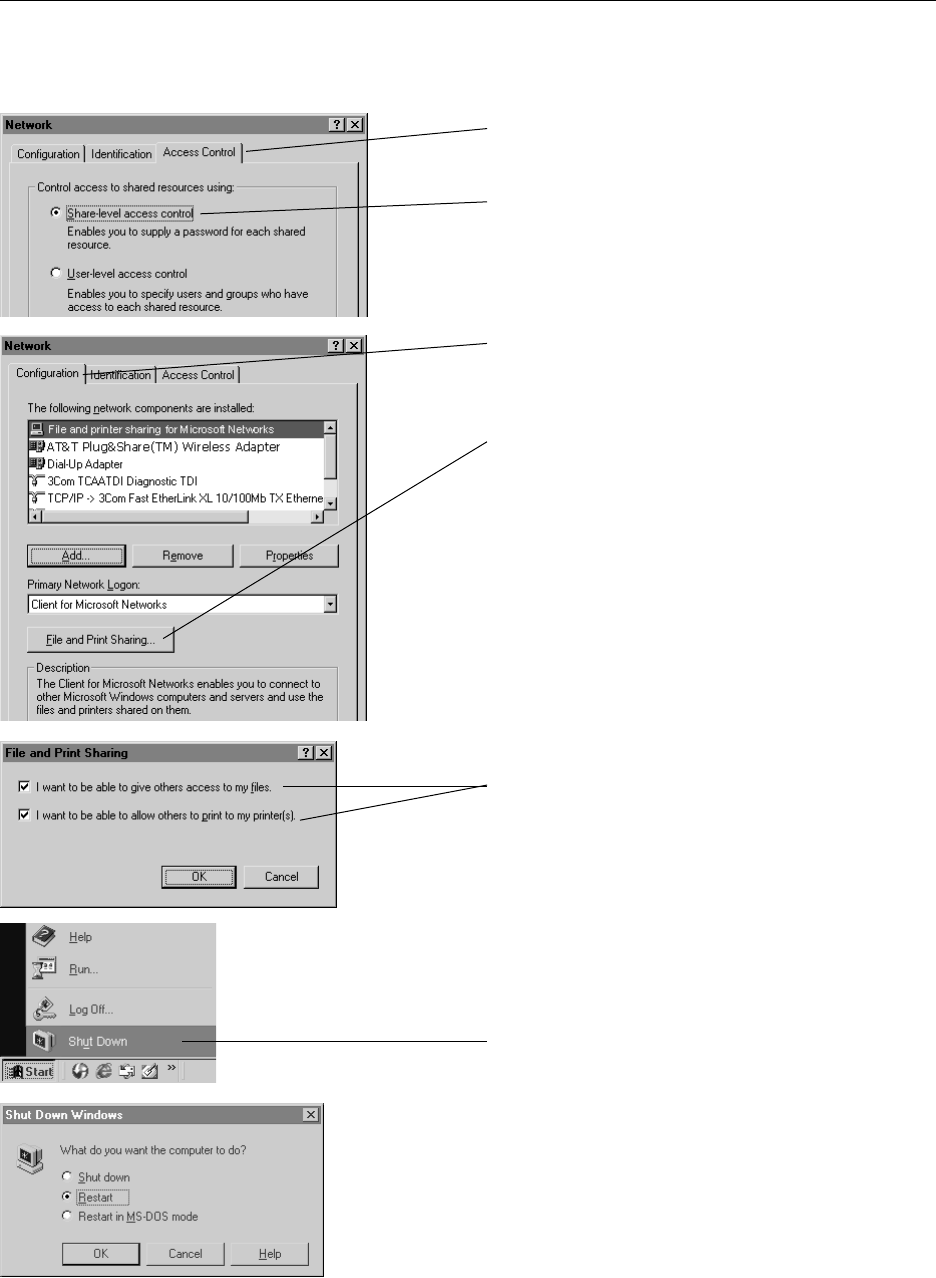
Configuring the Wireless Network — Windows®98 SE/Windows®Me
AT&T Plug&Share™54 Mbps Wireless Router 6800G 63
Step 5
Click the Access Control tab at the top of this
screen, then click on the Share- Level access
control button.
Step 6
Click the Configuration tab at the top of this
screen, then click the File and Print Sharing
button.
Step 7
Check the first option (I want to be able to give
others access to my files). Check the second
option if you want to share a printer connected
to this computer.
Click OK when finished.
Step 8
When configuration is complete, you must
re-start Windows®.
When Windows®restarts you will be prompted
to enter a user name and password. Be sure
to record these in a safe place. You will be
required to enter them for access to the
network each time you restart Windows®.
Windows®XP • Windows®2000 • Windows®Me/98 SE
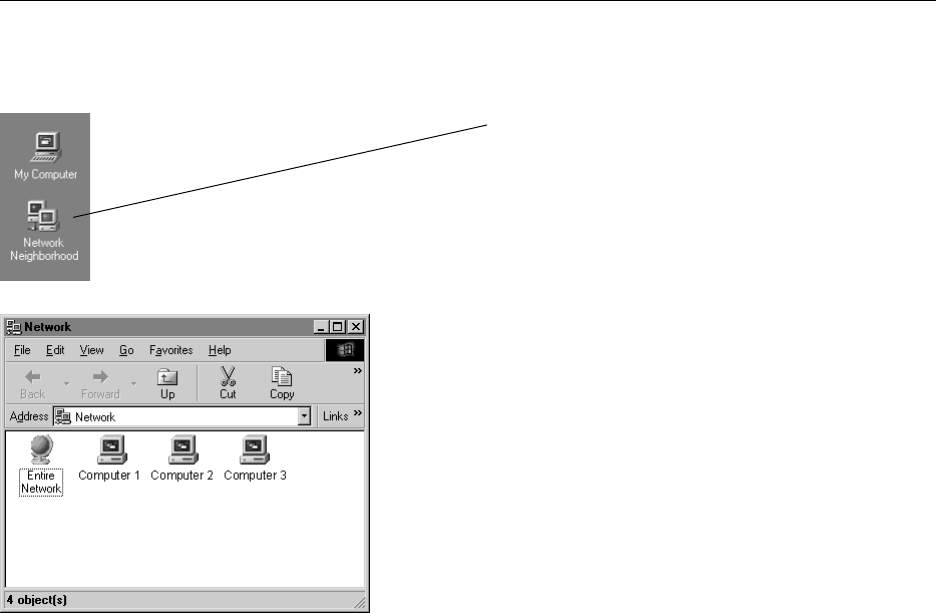
Configuring the Wireless Network — Windows®98 SE/Windows®Me
AT&T Plug&Share™54 Mbps Wireless Router 6800G 64
Step 9
To verify that configuration is complete, double-
click the Network Neighborhood icon on your
desktop.
In the next window displayed you should see
the names of all network computers.
If any computers do not appear, you will have to
follow the steps in this section on each computer
to configure them for network sharing. Make
sure each computer is assigned a different
name, and all share the same Workgroup name
you entered at Step 4.
Windows®XP • Windows®2000 • Windows®Me/98 SE
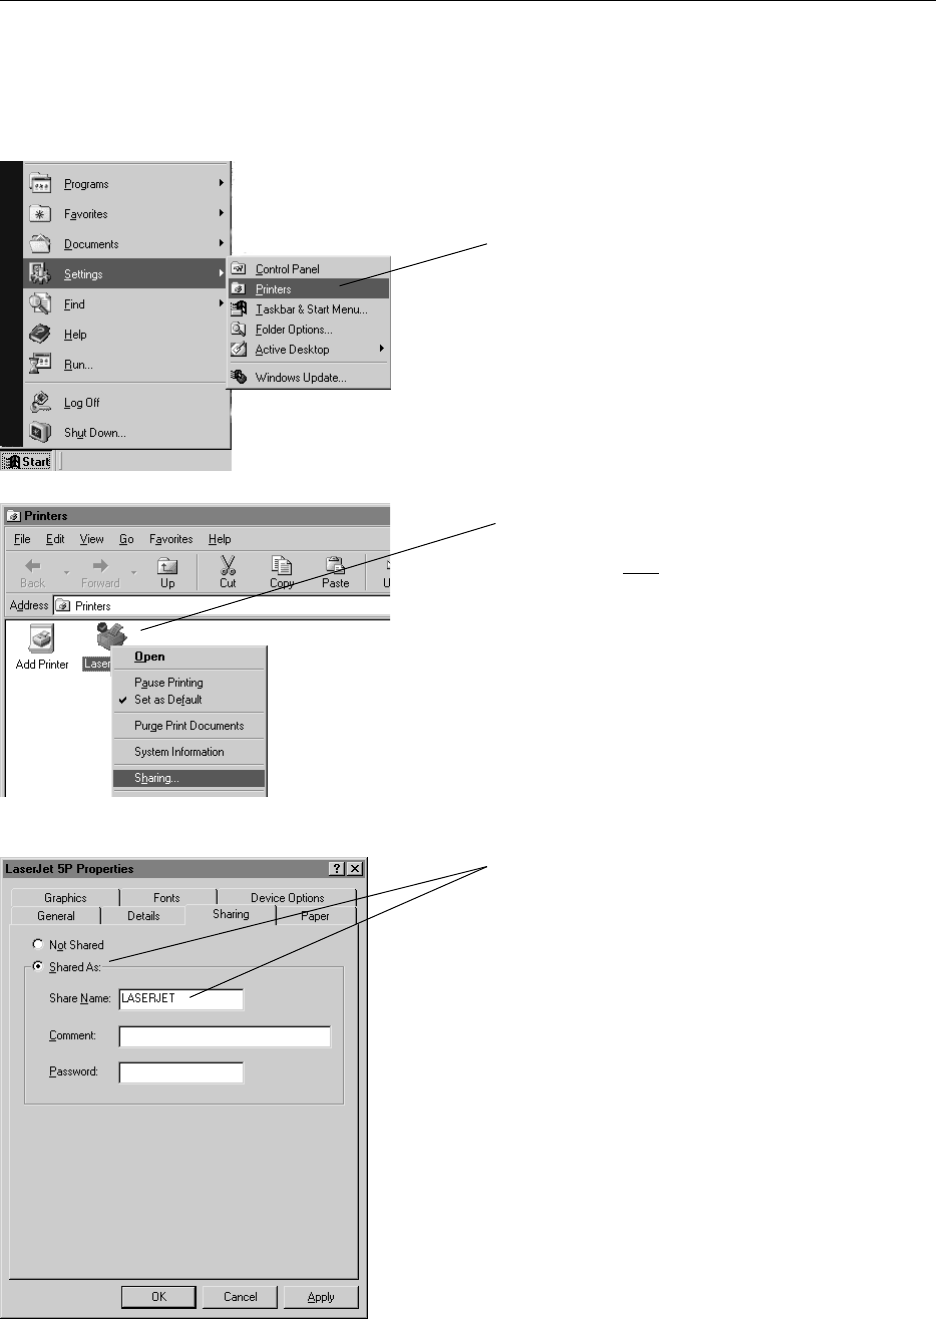
Configuring the Wireless Network — Windows®98 SE/Windows®Me
AT&T Plug&Share™54 Mbps Wireless Router 6800G 65
Configure Windows®98/Me for Printer Sharing
Step 1
Click Start > Settings > Printers.
Step 2
Place the cursor on the printer you want to share,
then click the right mouse button and scroll down
to select Sharing.
NOTE: If your printer is not listed in this window,
double-click Add Printer, then follow the instructions
to set up your printer for use.
Step 3
Click the Shared As button, then enter a unique
name for this printer.
To help you identify this printer, you can enter a
description in the Comment box.
To restrict access to this printer, you can enter a
password (please refer to instructions provided
with your Windows®operating system).
Click OK when finished.
Windows®XP • Windows®2000 • Windows®Me/98 SE
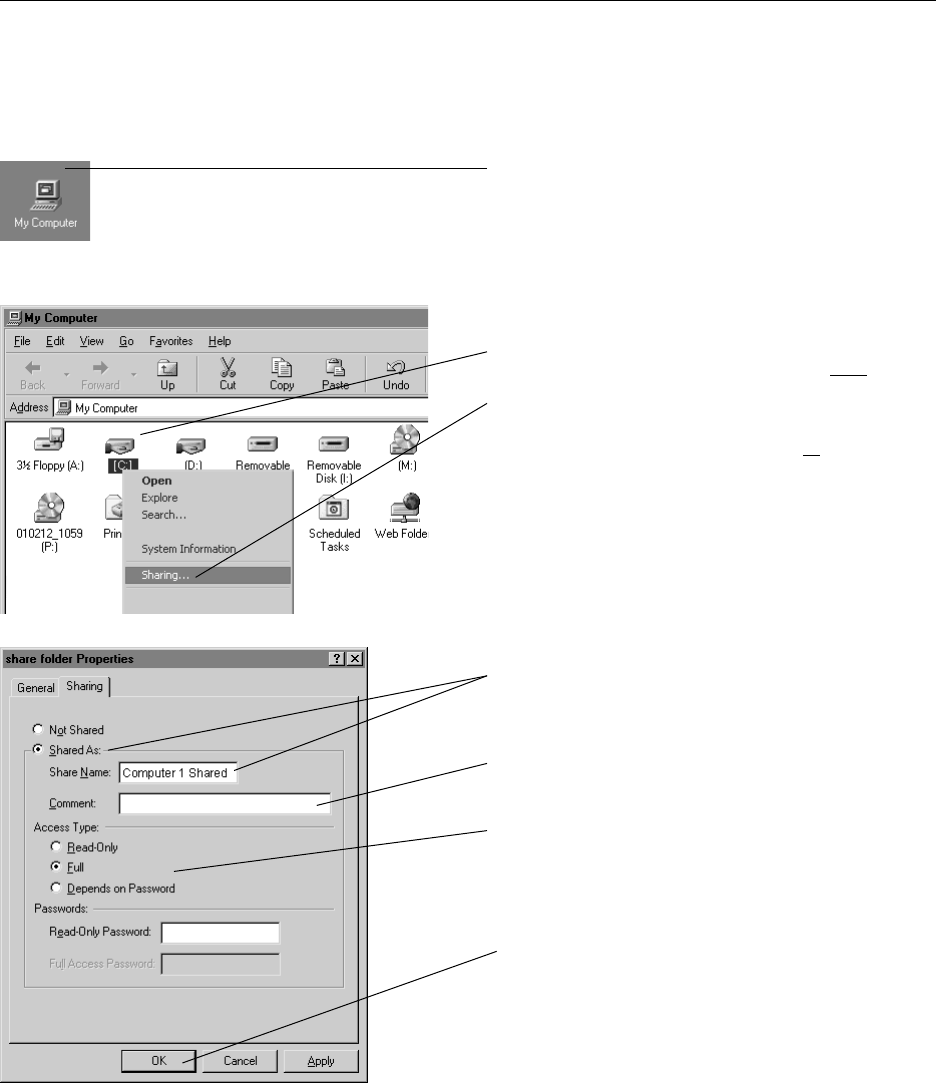
Configuring the Wireless Network — Windows®98 SE/Windows®Me
AT&T Plug&Share™54 Mbps Wireless Router 6800G 66
Configure Windows®98/Me for File Sharing
Step 1
Double-click the My Computer icon on your
desktop.
Step 2
Place the cursor on the disk drive you want to
share (usually Drive C:), then click the right mouse
button and scroll down to select Sharing.
NOTE: This will allow others access to all files on this
computer. To restrict access to certain folders, double-
click on the disk, highlight a folder you want to share,
then follow steps 2-3.
Step 3
Click the Shared As button, then enter a unique
name for the drive or folder you want to share.
To help you identify this shared resource, you can
enter a description in the Comment box.
Access Type options allow you to restrict
access to each shared resource (please refer to
instructions provided with your Windows®
operating system).
Click OK when finished.
Windows®XP • Windows®2000 • Windows®Me/98 SE
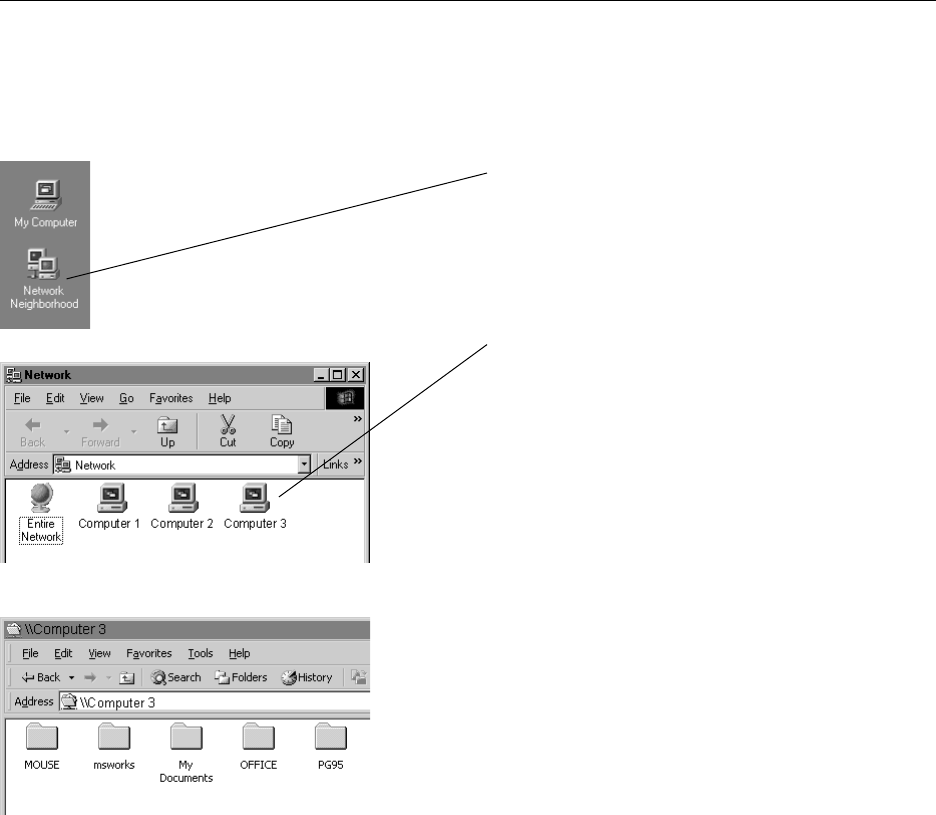
Configuring the Wireless Network — Windows®98 SE/Windows®Me
AT&T Plug&Share™54 Mbps Wireless Router 6800G 67
To Share Network Files in Windows®98/Me
Step 1
Double-click the Network Neighborhood icon on
your desktop.
Step 2
Double-click any icon to see a list of all shared
folders on that computer.
Step 3
Double-click any folder for access to any file in
that folder.
Windows®XP • Windows®2000 • Windows®Me/98 SE

Troubleshooting
AT&T Plug&Share™54 Mbps Wireless Router 6800G 68
No lights on the router
Problem Solution
• Make sure that both ends of the AC adapter are firmly
plugged in.
• Make sure the router is plugged into a working electrical
outlet not controlled by a wall switch.
• Unplug the router’s power adapter, wait 15 seconds, then
plug it back in.
• If these remedies do not work, reset the router (see page 69).
Troubleshooting
If your router does not work properly, try the following suggestions before seeking repair assistance.
No access to router • If this problem occurs during initial installation, make sure your
computer is connected to the router with an Ethernet cable.
• Make sure you are not typing "www."
• Try entering http://192.168.0.1 instead of http://ATT.Router.
• Has this computer ever been on a different network? If so,
see page 70.
• Reboot the router (see page 69).
• Restore saved router settings (see page 69).
• If these remedies do not work, reset the router (see page 69).
Cannot connect to Help • The Help screen opens in a separate window and may be
obscured by the application screen. Minimize your application
screen to see if the Help screen is behind it.
Internet pages not updating • Your browser may be displaying outdated screens stored in
memory. Go to a web site you haven’t visited recently to see
if you have Internet access. If you cannot display the page,
see "No access to router,” above.
Cannot remember password • If you cannot remember a password you entered for security
protection, you will have to reset the router (see page 69).
Cannot connect to the Internet • Verify that your modem is properly connected and powered.
• Turn off your modem, leave it off for 15 seconds, then turn it
back on, reboot your computer and check for Internet access.
• Confirm that the ISP account information has been entered
correctly. Type "http://ATT.Router" as the IP address on your
web browser. Click on the Run Wizard button on the Basic
tab. Enter the account information provided by your ISP on
the following screens.
• Disconnect your router, connect your PC directly to the
modem and verify that you can connect to the internet. If you
can connect, see page 70. If you cannot, contact your ISP.

Troubleshooting
AT&T Plug&Share™54 Mbps Wireless Router 6800G 69
Problem Solution
Other wireless devices
cannot connect to the router
• Check the Wireless icon (4 stacked bars) in the System Tray
at the bottom right corner of your screen. If there is an “X”
over the icon, see “No Access to Router” on previous page. If
the icon is white, try the following steps:
• Double-click on the Wireless icon. Click on the Site Survey
tab. Click the Refresh button. Select a router or access point,
then click Connect.
• If you still have no connection, click on the Wizard tab. Verify
that settings for SSID, Channel, and WEP (if enabled) are
identical for the router and the wireless adapter.
• If you still have no connection, click on the Configuration
tab. Verify that settings for SSID and Channel are identical for
the router and the wireless adapter.
• Make sure the router and adapter are close enough to
connect (150-300 feet without obstructions).
• Check the DHCP table to see if the adapter is listed (see
page 21).
• Ping adapter addresses in the DCHP table (see page 37).
• If these remedies do not work, reinstall the adapter software
from the original CD-ROM.
Corrective procedures (try these only if suggestions on previous pages have not worked)
To reboot the router
This procedure will restart the router
and restore all current settings.
• Type http://ATT.Router in the address field of your web browser,
then press Enter.
• Click on the Admin tab.
• Click on the Backup button on the left side of the screen,
and follow directions to backup your system settings.
• Click on the Reboot button at the bottom of the page.
• Click on the OK button to confirm your selection.
To restore saved router settings
This procedure will delete all
current settings and restore those
that were in place when you last
backed up router settings.
• Type http://ATT.Router in the address field of your web browser,
then press Enter.
• Click on the Admin tab.
• Click on the Backup button on the left side of the screen.
• Click on the Restore button at the bottom of the page,
browse and select the settings profile you want to restore.
• Click on the OK button to restore saved settings.
To reset the router
This procedure will delete all
current settings and restore
factory default settings.
• Make sure the router is plugged in and turned on, then use a
paper clip or a pen to press and hold the Reset button on the
back of the router for 15 seconds.
•Caution: Do this only as a last resort. This will delete all settings.
After doing so you will have to run the Setup Wizard to reconfigure
all router settings (see page 8).

Troubleshooting
AT&T Plug&Share™54 Mbps Wireless Router 6800G 70
Set Windows®to
automatically detect IP settings
Consult your network administrator
before attempting this change.
This procedure allows your computer to automatically detect IP
settings, which may allow you to connect to the Internet.
If your computer is new, it may not have an IP address, which
is required for Internet access. If you do not need a static IP
address for some special purpose, you can set your computer to
automatically detect the IP settings (see steps 1-6, below).
If your network uses static IP addresses, you should not
follow the procedure below. You will have to enter the IP
address assigned to you by your service provider.
If you use this computer on another network (perhaps at
your workplace), you should consult a technician familiar with
the network before attempting this change.
Record all settings before changing them in case you need
to restore them later.
1 Start Internet Explorer®. Whether you can connect to the
Internet or not, the browser screen will appear.
2 Select Tools.
3 Select Internet Options from the dropdown menu.
4 Select Connections.
5 Select LAN Settings.
6 Select Automatically detect settings.
Corrective procedures (continued from previous page)
If you still have difficulty operating this product, or if you
need more information or help, please visit our website at
www.plugandshare.att.com
or call our Customer Service Center at
1-877-800-5400.

Glossary
AT&T Plug&Share™54 Mbps Wireless Router 6800G 71
Access Point
Access points are the contact points (wireless
routers and transmitters) in a wireless LAN that
are connected to an Ethernet hub or server.
Users can roam within the range of access points
and their wireless device connections are passed
from one access point to the next.
Administrator
The network administrator is the person who
manages the LAN. The administrator's tasks
include ensuring network security, keeping soft-
ware, hardware, and firmware up-to-date, and
keeping track of network activity. Your router
Administrator is the person in control of access to
your router. The system starts out with all users
as administrators.
Authentication
Authentication refers to the verification of a
transmitted message's integrity.
Beacon Interval
Refers to the interval between packets sent by
routers for the purposes of synchronizing wireless
LANs.
Broadband
Usually refers to Internet connections that provide
faster data transfer than standard dial-up
connections (cable modem, DSL, T-1, etc.)
DDNS
Dynamic DNS (Domain Name System).
DHCP
DHCP (Dynamic Host Configuration Protocol) soft-
ware automatically assigns IP addresses to client
stations logging onto a TCP/IP network, which
eliminates the need to manually assign permanent
IP addresses.
DHCP Client
The DHCP client list shows all of the computers
attached to your local network. The list shows the
host name of the computer.
DMZ
DMZ (Demilitarized Zone) is a part of an network
that is located between a secure LAN and an
insecure WAN. DMZs provide a way for some
clients to have unrestricted access to the Internet.
DNS
DNS stands for Domain Name System. DNS
converts domain names to the IP addresses that
all machines on the Internet have. It translates
from name to address and from address to name.
Domain Name
The domain name is the "readable" version of an
Internet site address. A typical domain name has
the form "www.somedomainname.com" or
"www.somedomainname.org", etc.
DTIM
DTIM (Delivery Traffic Indication Message) pro-
vides client stations with information on the next
opportunity to monitor for broadcast or multicast
messages.
Filter
Filters only allow specified data to be transmitted
or received. For example, the router can filter
specific IP addresses so that users cannot con-
nect to those addresses.
Firewall
Firewalls are methods used to keep networks
secure from intruders and unauthorized access.
Firewalls use filters to prevent unwanted data
from being transmitted to and/or from a local net-
work. Firewalls are typically used to prevent out-
siders from accessing your private data
resources and for controlling what outside (WAN)
resources your users can access.
Firmware
Firmware refers to memory chips that retain their
content without electrical power (for example,
BIOS ROM). The router firmware stores all of the
router administration settings.
Fragmentation
Refers to the breaking up of data packets during
transmission.
FTP
FTP (File Transfer Protocol) is used to transfer
files over a TCP/IP network, and is typically used
for transferring large files or uploading the HTML
pages for a web site to the web server.
Glossary

Glossary
AT&T Plug&Share™54 Mbps Wireless Router 6800G 72
Gateway
Gateways are computers that convert protocols
enabling different networks, applications, and
operating systems to exchange information.
Host Name
The name given to a computer or client station
that acts as a source for information on the
network.
HTTP
HTTP (HyperText Transfer Protocol) is the com-
munications protocol used to connect to servers
on the World Wide Web. HTTP establishes a
connection with a web server and transmits
HTML pages to client browser (for example
Windows®IE). HTTP addresses all begin with the
prefix “http://” (for example,
http://www.somedomainname.com).
ICMP
ICMP (Internet Control Message Protocol) is a
TCP/IP protocol used to send error and control
messages over the LAN (for example, it is used
by the router to notify a message sender that the
destination node is not available).
IP
IP (Internet Protocol) is the protocol in the TCP/IP
communications protocol suite that contains a
network address and allows messages to be
routed to a different network or subnet. However,
IP does not ensure delivery of a complete message;
TCP provides the function of ensuring delivery.
IP Address
The IP (Internet Protocol) address refers to the
address of a computer attached to a TCP/IP net-
work. Every client and server station must have a
unique IP address. Clients are assigned either a
permanent address or have one dynamically
assigned to them via DHCP. IP addresses are
written as four sets of numbers separated by
periods (for example, 211.23.181.189).
ISP
An ISP (Internet Service Provider) is an
organization providing Internet access service via
modems, ISDN (Integrated Services Digital
Network), private lines or other means.
LAN
LANs (Local Area Networks) are networks that
serve users within specific geographical areas,
such as your home or in a company building.
LANs consist of a group of computers and related
devices that share a common communication link
(wired and/or wireless). A LAN allows you to
share data and resources among the devices on
the LAN.
MAC Address
A MAC address is a unique serial number for
hardware adapters, giving the adapter a unique
identification.
Metric
A number that indicates how long a packet takes
to get to its destination.
MTU
MTU (Maximum Transmission/Transfer Unit) is
the largest packet size that can be sent over a
network. Messages larger than the MTU are
divided into smaller packets.
NAT
NAT (Network Address Translation — also known
as IP masquerading) enables a LAN to present
itself to the Internet with one address. NAT con-
verts the address of each LAN node into one IP
address for the Internet (and vice versa). NAT also
provides a certain amount of security by acting as
a firewall by keeping individual IP addresses
hidden from the WAN.
Network Administrator
The network administrator is the person who man-
ages the LAN. The administrator's tasks include
ensuring network security, keeping software, hard-
ware, and firmware up-to-date, and keeping track
of network activity.
NTP
NTP (Network Time Protocol) is used to synchro-
nize the realtime clock in a computer. Internet pri-
mary and secondary servers synchronize to
Coordinated Universal Time (UTC).
Open System
Open authentication allows all clients to connect
to the network. After accessing the network, the
client may encrypt data to prevent it from being
easily seen by other users in the immediate area.

Glossary
AT&T Plug&Share™54 Mbps Wireless Router 6800G 73
Packet
A packet is a portion of data that is transmitted in
network communications. Packets are also
sometimes called frames and datagrams.
Packets contain not only data, but also the
destination IP address.
Passphrase
A Passphrase is used within the WPA-PSK mode
to enable a client to initiate authentication with a
router. If the passphrase is identical to the
passphrase on the router, the router allows the
client to access the network. The passphrase can
be between 8 and 63 characters.
Ping
Ping (Packet Internet Groper) is a utility used to
find out if a particular IP address is present online.
Port
Ports are the physical and/or logical communica-
tions pathways in and out of computers and net-
work devices (routers and switches). Most PCs
have serial and parallel ports, which are external
sockets for connecting devices such as printers,
modems, and mice. All network adapters also
use ports to connect to the LAN. Finally, applica-
tions that communicate over the Internet also
have ports; these are the endpoints of the appli-
cation and are given a specific "port number."
PPPoE
PPPoE (Point-to-Point Protocol Over Ethernet) is
a protocol used to communicate between two
computers using a serial interface, such as dial-
up Internet connections, over an Ethernet link.
Preamble
The Preamble Type refers to the radio preamble,
or header, which is transmitted at the beginning
of a packet of data. The preamble contains infor-
mation required for the access point and
adapters to transmit information. Since the
Preamble is attached to each packet of data, a
Short Preamble improves data throughput, but it
may cause connection problems with early wire-
less devices that only support long preambles.
The Long Preamble option ensures compatibility
with these early wireless devices.
Protocol
A protocol is a rule that governs the communica-
tion of data.
Radius Server
RADIUS (Remote Authentication Dial-in User
Service) Server must be configured to properly
authenticate client devices for access to the net-
work. The IP address and port number are based
on the configuration of the RADIUS server in your
enterprise network. The shared secret is a pass-
word that is used to identify the client in a
RADIUS authenticated network. The shared
secret can be from 22 to 128 characters long.
RIP
RIP (Routing Information Protocol) is a routing
protocol that is integrated in the TCP/IP protocol.
RIP finds a route that is based on the smallest
number of hops between the source of a packet
and its destination.
RTS
RTS (Request To Send) is a signal sent from the
transmitting station to the receiving station
requesting permission to transmit data.
Security Phrase
At least 1 and up to 4 unique Security Phrases
must be set when WEP is "On." The encryption
types for these Security Phrases may be either
Hexadecimal (HEX) or American Standard Code
for Information. Interchange (ASCII). ASCII
Security Phrases are subject to the following
character limitations: 64 Bit encryption: 5 charac-
ters; 128 Bit encryption: 13 characters; 152 Bit
encryption: 16 characters.
Server
Servers are typically powerful and fast computers
that store programs and data. The programs and
data are shared by client computers (worksta-
tions) on the network.
Shared Key
Shared Key authentication requires the client to
use the same WEP encryption key as that used
by the wireless router. When the client attempts
to connect to the network through the wireless
router the router sends a challenge text message
to the client to authenticate the client. The client
returns the challenge text message encrypted
using the WEP encryption key. The wireless
router decrypts the message using it's WEP key
and if the decrypted message is the same as the
original challenge text message, then it is
assumed that the client has the correct WEP key
and the client is allowed to access the network.

Glossary
AT&T Plug&Share™54 Mbps Wireless Router 6800G 74
SMTP
SMTP (Simple Mail Transfer Protocol) is the stan-
dard Internet e-mail protocol. SMTP is a TCP/IP
protocol defining message format and includes a
message transfer agent that stores and forwards
mail.
SNMP
SNMP (Simple Network Management Protocol) is
a widely used network monitoring and control
protocol. SNMP hardware or software components
transmit network device activity data to the work-
station used to oversee the network.
SSID
SSID (Service Set Identifier) is the name desig-
nated for a LAN. It serves as a simple security
measure used in Wireless LANs (WLANs). The
SSID is attached to packets sent over WLANs.
This identifier acts as a password when a wire-
less device attempts communication on the
WLAN. Because an SSID distinguishes WLANS
from each other, routers and wireless devices
trying to connect to a WLAN must use the same
SSID.
Subnet Mask
Subnet Masks (SUBNETwork masks) are used
by IP protocol to direct messages into a specified
network segment (i.e., subnet). A subnet mask is
stored in the client machine, server or router and
is compared with an incoming IP address to
determine whether to accept or reject the packet.
SysLog Server
A SysLog server monitors incoming System log
messages and decodes the messages for logging
purposes.
TCP
(Transmission Control Protocol) is the transport
protocol in TCP/IP that ensures messages over
the network are transmitted accurately and
completely.
TCP/IP
TCP/IP (Transmission Control Protocol/Internet
Protocol) is the main Internet communications
protocol suite. TCP ensures that data is com-
pletely sent and received at the other end. The IP
component of TCP/IP provides data routability,
meaning that data packets contain the destination
station and network addresses, enabling TPC/IP
messages to be sent to multiple networks within
the LAN or in the WAN.
Telnet
Telnet is a terminal emulation protocol commonly
used on the Internet and TCP- or IP-based net-
works. Telnet is used for connecting to remote
devices and running programs. Telnet is a high
level application protocol that uses the TCP/IP
communications protocol.
UDP
(User Datagram Protocol) is a protocol within
TCP/IP that is used to transport information when
accurate delivery isn't necessary (for example,
realtime video and audio where packets can be
dumped since there is no time for retransmitting
the data).
Virtual Servers
Virtual servers are client servers (such as web
servers) that share resources with other virtual
servers (i.e., it is not a dedicated server).
VoIP
(Voice Over Internet Protocol) is a method used
to deliver voice information over the Internet.
VoIP services allow telephone calls using your
PC or LAN.
WEP
WEP (Wired Equivalent Privacy) is the most com-
mon security protocol for wireless LANs, provid-
ing the "equivalent" security available in hard-
wired networks.

Glossary
AT&T Plug&Share™54 Mbps Wireless Router 6800G 75
Wireless LAN (WLAN)
Wireless LANs are local area networks that use
wireless communications for transmitting data.
Transmissions are usually in the 2.4 GHz band.
WLAN devices do not need to be lined up for
communications like infrared devices. WLAN
devices use routers which are connected to the
wired LAN and provide connectivity to the LAN.
The radio frequency of WLAN devices is strong
enough to be transmitted through non-metal walls
and objects, and can cover an area up to a
thousand feet. Laptops and notebooks use wire-
less LAN PCMCIA cards while PCs use plug-in
cards to access the WLAN.
WAN
WAN (Wide Area Network) is a communications
network that covers a wide geographic area such
as a country (contrasted with a LAN, which
covers a small area such as a company building).
WPA
WPA (WiFi Protected Access) is an enhanced
security specification to increase the level of
access control and data protection for wireless
data networks. WPA authentication requires that
an authentication server authenticate all client
adapters before being allowed access to a wire-
less network. This authentication mode is
designed for enterprise applications requiring
very high levels of security.
WPA-PSK
Authentication mode enables the user to
configure a type of client authentication used for
acquiring access to the wireless network. The
WPA-PSK mode has been designed for those
environments where high data security is desired,
but there is no authentication server. The client
initiates authentication by sending a password
called a passphrase to the wireless router. If the
passphrase is identical to the passphrase on the
wireless router, the wireless router allows the
client to access the network. The passphrase can
be between 8 and 63 characters.

Technical Specifications
AT&T Plug&Share™54 Mbps Wireless Router 6800G 76
Standards
• IEEE 802.11
• IEEE 802.11b
• IEEE 802.11g
• IEEE 802.3u
• IEEE 802.3
VPN Pass Through/Multi-Sessions
• PPTP
• L2TP
• IPSec
Advanced Firewall Features
• NAT with VPN Pass through
• MAC filtering
• IP filtering
• URL Filtering
• Domain Blocking
• Scheduling
Device Management
• Web-based (Internet Explorer® v5.5 or later)
Wireless Data Rates
With Automatic Fallback
• 54, 48, 36, 24, 18, 12, 11, 9, 6, 5.5, 2, 1 Mbps
Encryption
• WEP 64/128/152-bit RC4
Media Access Control
• CSMA/CA with ACK
Frequency Range
• 2.4GHz to 2.472GHz
Operating Range
• Indoors: Up to 300 feet (100m)
• Outdoors: Up to 980 feet (300m)
Modulation Technology
• OFDM (Orthogonal Frequency Division
Multiplexing
Modulation Techniques
• Barker (1 Mbps)
• Barker (2 Mbps)
• CCK (5.5 Mbps)
• OFDM (6 Mbps)
• OFDM (9 Mbps)
• CCK (11 Mbps)
• OFDM (12 Mbps)
• OFDM (18 Mbps)
• OFDM (24 Mbps)
• OFDM (36 Mbps)
• OFDM (48 Mbps)
• OFDM (54 Mbps)
Transmit Power
• 15dBm ± 2dB
External Antenna Type
• Omni-directional
Ethernet Cable
• RJ45 Ethernet cable
Operating Climate Range
• Temperature: 32° to 131°F (0° to 55°C)
• Humidity: 32% to 90% relative humidity
Storage Climate Range
• Temperature: -40° to 140°F (-40° to 60°C)
• Humidity: 15% to 90% relative humidity
Power Input
• External Power Supply DC 5V, 2.4A
Safety & Emissions
• FCC
•UL
Technical Specifications
Care and maintenance
Always unplug this product before cleaning. Use a damp cloth to clean the exterior housing only. Do not
use liquid cleaners or aerosol cleaners.
Periodically visit our web site to check for free firmware upgrades that can help maximize the perform-
ance and reliability of your wireless network:
www.plugandshare.att.com

Copyright © 2004 Advanced American Telephones. All Rights Reserved.
AT&T and the Globe Design are trademarks of AT&T Corp., licensed to Advanced
American Telephones. All marks are trademarks of their respective corporations.
Issue 1.8 AT&T 03/03/04
For customer service, please call
1-877-800-5400
or visit
www.plugandshare.att.com
for product information and firmware upgrades as they become available
Federal Communication Commission Interference Statement
This equipment has been tested and found to comply with the limits for
a Class B digital device, pursuant to Part 15 of the FCC Rules. These
limits are designed to provide reasonable protection against harmful
interference in a residential installation. This equipment generates,
uses and can radiate radio frequency energy and, if not installed and
used in accordance with the instructions, may cause harmful
interference to radio communications. However, there is no guarantee
that interference will not occur in a particular installation. If this
equipment does cause harmful interference to radio or television
reception, which can be determined by turning the equipment off and
on, the user is encouraged to try to correct the interference by one of
the following measures:
- Reorient or relocate the receiving antenna.
- Increase the separation between the equipment and receiver.
- Connect the equipment into an outlet on a circuit different from that
to which the receiver is connected.
- Consult the dealer or an experienced radio/TV technician for help.
This device complies with Part 15 of the FCC Rules. Operation is
subject to the following two conditions: (1) This device may not cause
harmful interference, and (2) this device must accept any interference
received, including interference that may cause undesired operation.
FCC Caution: Any changes or modifications not expressly approved by
the party responsible for compliance could void the user's authority to
operate this equipment.
IMPORTANT NOTE:
FCC Radiation Exposure Statement:
This equipment complies with FCC radiation exposure limits set forth
for an uncontrolled environment. This equipment should be installed
and operated with minimum distance 20cm between the radiator & your
body.
This transmitter must not be co-located or operating in conjunction with
any other antenna or transmitter.