Global411 Internet Services QA-ZBQI-W0NKQQ MS41p1 Adsl2+ Modem User Manual
Global411 Internet Services, LLC MS41p1 Adsl2+ Modem Users Manual
Users Manual
Quick Installation Guide
For MS41p1
Contents Table
Contents Table ........................................................................................ 1
Chapter I Introduction .......................................................................... 2
1.1 Overview ............................................................................................................................. 2
1.2 Features ............................................................................................................................... 2
Chapter II Hardware setup ................................................................... 3
2.1 Interface & Indicator Light Introduction ............................................................................. 3
2.1.1 MODEM Indicator Light & Interface Introduction ............................................. 3
2.1.2 Interface of splitter ................................................................................................ 4
2.2 Package checking ................................................................................................................ 4
2.3 Layout ................................................................................................................................. 4
Chapter III Configuration Instructions ................................................ 5
3.1 Before Configuration: ......................................................................................................... 5
3.2 Instructions to Configure Router Through Web Interface ................................................... 5
3.2.1 Web Log-In ............................................................................................................ 5
3.2.2 WEB Interface Descriptions ................................................................................ 6
3.3 Instructions on the Application of Common-use Function Modules ................................... 7
3.3.1 Save & Reboot ...................................................................................................... 7
3.3.2 LAN Setting ........................................................................................................... 7
3.3.3 DHCP Setting ........................................................................................................ 8
3.3.4 User Management Setting .................................................................................. 8
Chapter IV Typical Application Cases .................................................. 9
4.1 Single-user Log-on (supported both by Modem version and Router version) .................... 9
4.1.1 Dialing Mode (Dynamic IP) ................................................................................. 9
4.1.2 Special Line Mode (Static IP) .............................................................................. 9
4.2 Multi-user Log-on (supported only by Router version via its router feature) ................... 10
4.2.1 Dialing Mode (Dynamic IP) ............................................................................... 10
4.2.2 Special Line Mode (Static IP) ............................................................................ 13
Chapter I Introduction
1.1 Overview
The MS41p1 supports ADSL, ADSL2 and ADSL2+ over the existing copper lines,
with downstream transmission rate up to 24Mbps (ADSL2+) and upstream transmission
rate up to 1.024 Mbps. They can support PPPoA (RFC 2364 - PPP over AAL5), PPPoE
(RFC 2516 – PPP over Ethernet) and RFC 1483 encapsulation over ATM (bridged or
routed).
1.2 Features
Standards Compliance
◆ ANSI T1.413 Issue 2 compliant
◆ ITU-T G.992.1 (G.DMT) compliant: Up to 8Mbps downstream and 896Kbps upstream
data rate
◆ ITU-T G.992.2 (G.lite) compliant: Supports splitter-less implementation and up to
1.5M downstream and 512Kbps upstream data rate
◆ ITU-T G.992.3 compliant: Better performance on long lines, and improve
interoperability between chipset suppliers
◆ ITU-T G.992.5 Annex A compliant: Up to 24Mbps downstream and 1Mbps up stream
data rate
◆ ITU-T G.992.5 Annex M compliant: Up to 24Mbps downstream and 3Mbps up stream
data rate.
Hardware Features
◆ Compatible with various local telecom equipments: Huawei, ZTE, DTT, Alcatel,

Lucent, Ericsson and so on.
◆ Stable transmission speed even at a transmission distance of 5KM
◆ Supports 8 PVCs
Software Features
◆ Supports RFC 1483 protocol (MPOA), RFC 1577 protocol (IPOA),RFC 2364 protocol
(PPP over ATM) ,and RFC 2516 protocol
◆ Firmware upgrade and configuration over WEB
Operating Environment
◆ Operating: +0 ~ +50
◆ Non-operating: -40 ~ +85
Humidity
◆ Operating: 10%~95% RH
◆ Non-operating: 10%~95% RH
Standard Approval
◆ CE CLASS B.
◆ FCC PART 15 CLASS B
◆ FCC PART 68
◆ UL 1950
Chapter II Hardware setup
2.1 Interface & Indicator Light Introduction
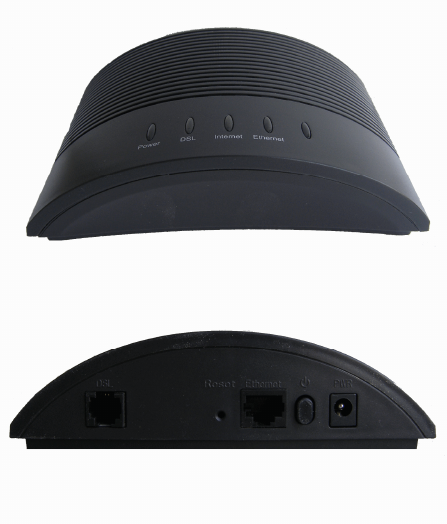
2.1.1 MODEM Indicator Light & Interface Introduction
Item Label State Introduction
Indicator
Light
DSL ON:MODEM synchronized to the DSLAM
Flash: MODEM not synchronized
Internet
OFF: in Bridge mode or ADSL disconnected
ON: in Router mode and ADSL connected,
can transmit IP packets
Ethernet ON: linked to network card of PC
Power ON:MODEM power on
Interface
Introduction
DSL Connect to the ADSL line or the ‘MODEM’
port of Splitter
Ethernet Connect to the NIC with a crossed network
line
PWR Connect to power adapter enclosed in the
package
Reset Restore default settings
Power switch
2.1.2 Interface of splitter
Label Introduction
LINE Connect to the ADSL line
MODEM Connect to ‘ADSL’ port of the MODEM
PHONE Connect to the phone
2.2 Package checking
First of all, please check out if the articles listed below present.
Item Quantity Remark
Power Adapter 1
Phone line 2
RJ45 Network Line 1
MODEM 1
Splitter 1
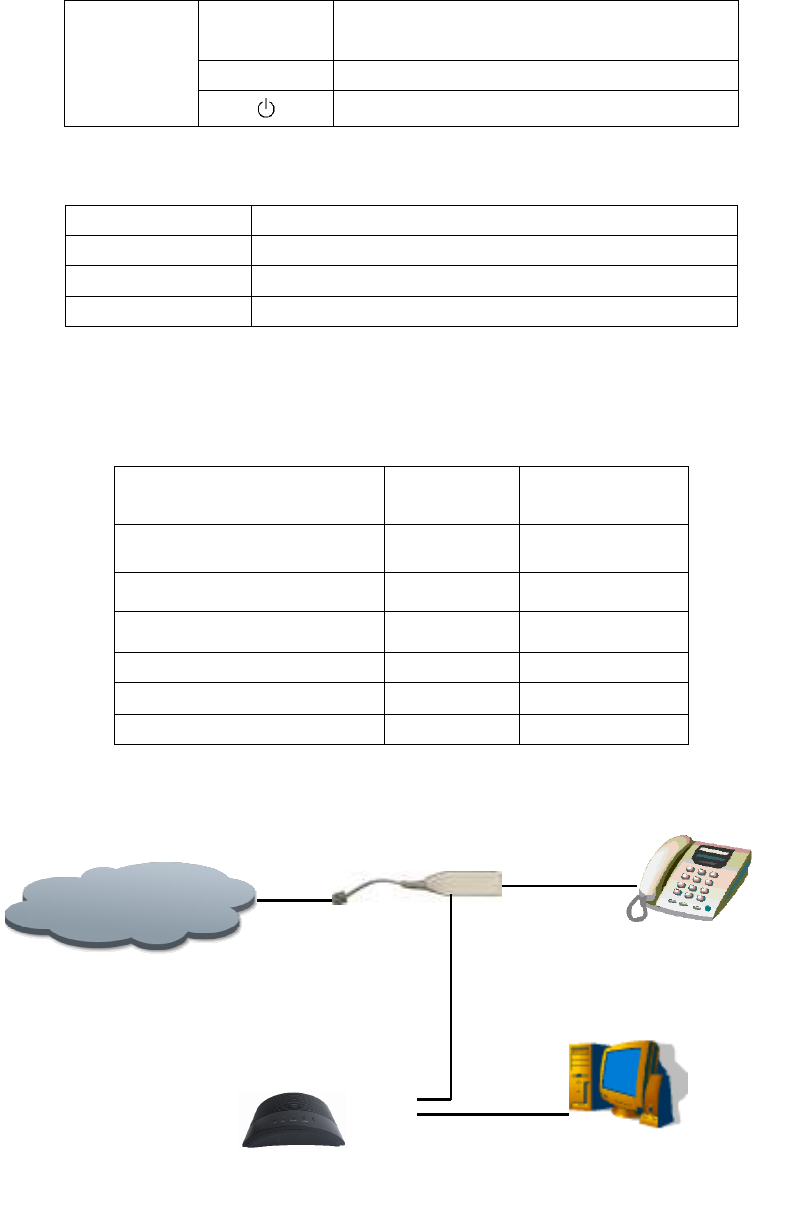
2.3 Layout
ADSL Line
Note: Splitter is needed to: -Filter out line noise, i.e.
- Prevent line noise when there is incoming / outgoing call;
- Prevent connection speed drop when using modem.
DSLAM
Internet
Splitter
Telephone / Fax Machine
RJ-45 Cable connect to NIC
MS41p1

Chapter III Configuration Instructions
This chapter introduces instructions on how to configure MS41p1 Router. All
the following instructions are aimed at Router version, please skip this chapter if
the product you purchased is Modem version in that Modem can be used directly
without further configuration.
3.1 Before Configuration:
Before installation of ADSL, please check the following facts with your brand-band
service provider:
(1) Internet Connection Mode
A.Static IP; B.PPPOE;C.PPPOA;
(2) If Static IP connection is adopted, the service provider needs to submit public
IP , subnet mask , gateway , and DNS .
(3) If PPPOE or PPPOA is adopted for connection, the service provider needs to
provide the info: username , password .
(4) Data encapsulation method:
A.LLC/SNAP B.VCMUX
(5) VPI= VCI=
(6) Debugging Code
A. T1.413 B. G.dmt C. G.lite
Note: The default is adaptation, which can negotiate and match the debug code of
the center automatically; thus no modification of setting is needed.
3.2 Instructions to Configure Router Through Web
Interface
Note: If the product you purchased is of Modem version, please use the device
directly without further configuration on ADSL.
3.2.1 Web Log-In
After the hardware installation, turn on the power to start. Please be sure your
computer can ping through the LAN port of ADSL(Default IP: 192.168.1.1), then start IE
software and type in http://192.168.1.1 on the address bar. Please enter username and
password after confirmation.
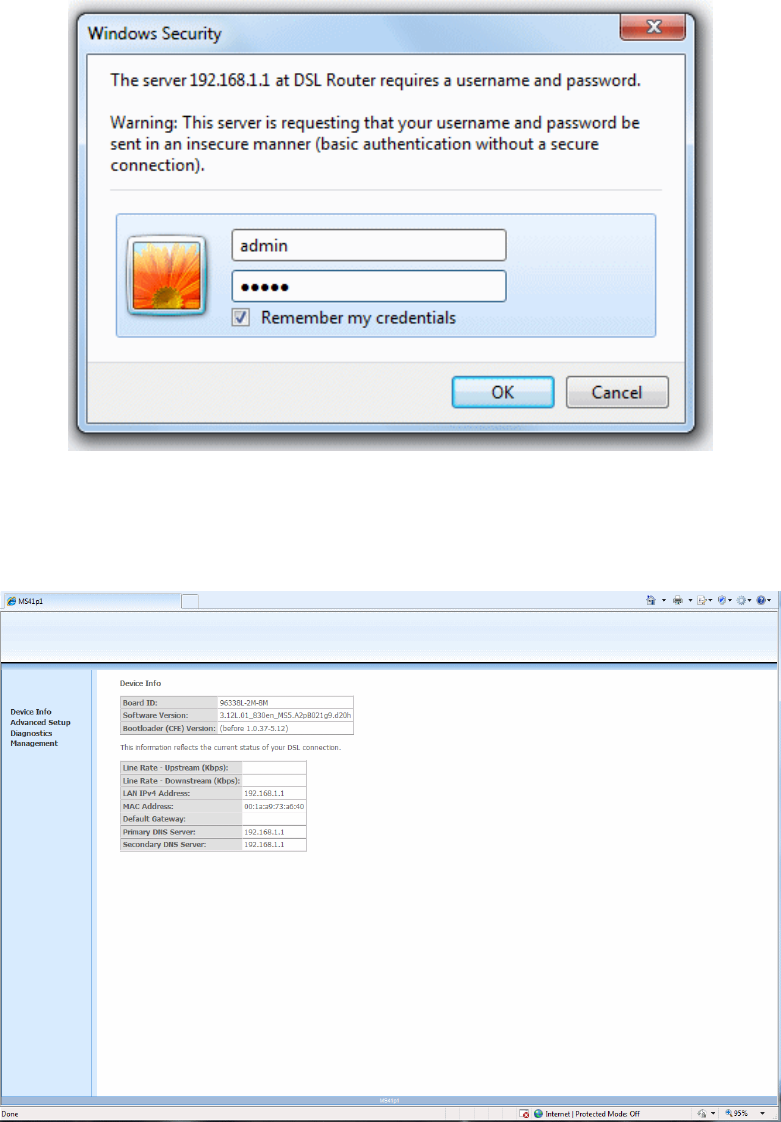
Please enter the correct username and password (the default username and
password are both admin.) to open the WEB management interface. The main page will
be displayed as follows after successful log-on (the actual display might differ with
software versions):
3.2.2 WEB Interface Descriptions
There are seven options on the main menu on the left side of the main page. Every
option can be processed to setup the systematic features, and user can configure each
function respectively in accordance with specific needs. The detailed descriptions are as
follows:
1) Device Info
Including “Summary”, “WAN” info, “Statistics”, “Router” info, “ARP” info and other
submenu items.
2) Advanced Setting
Including “WAN” setting, “LAN” setting, “Security”, “Routing”, “DSL” and other
items.
3) Diagnostics
To display the testing result of the status of each connection.
4) Management
Including “Setting”, “System Log”, “Access Control”, “Update Software”,
“Save/Reboot” and other items.
Please refer to the following instructions on the application of relevant configurations.
3.3 Instructions on the Application of Common-use
Function Modules
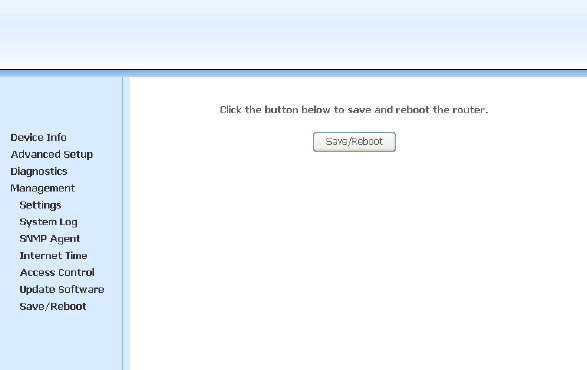
3.3.1 Save & Reboot
As usual, after some modifications on the settings, in order to validate these
modifications, we should save the changes and reboot the system to make them effective.
On some setting pages, you can click on “Save/Reboot” button on the bottom of the
page to save the setting modifications and restart the system; or else, you can enter
“Management”-> “Save/Reboot” page after modifications to save all the setting
changes and restart the system, the interface is displayed as below:
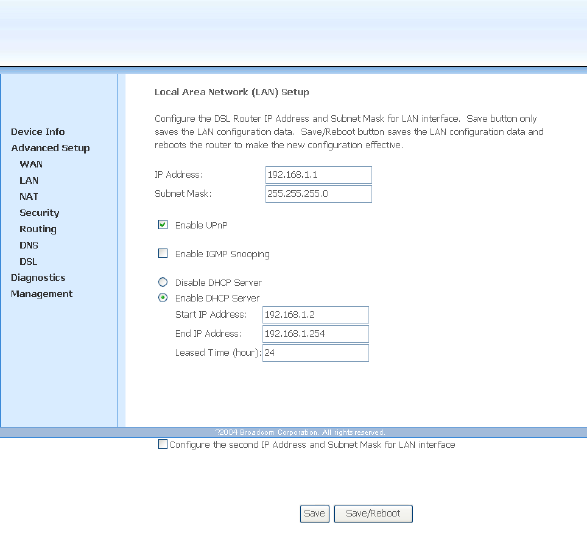
3.3.2 LAN Setting
1) Please select “Advanced Setting”—> “LAN” on the main page to enter the LAN
setting interface. On this page, you can setup the IP address and subnet mask for the
LAN port. Please press “Save” button to validate the modifications. The setting
interface is shown as below:
2) After the modification of IP address for LAN port, you should re-log on WEB
management interface via the new IP address.
3) If the new IP address does NOT belong to the same IP section as the original IP
address, you need to change the IP of PC web card to conform to the new IP section
in order to perform further WEB managing operations on ADSL device.
4) Please be sure to save the modification after resetting IP of ADSL port.
3.3.3 DHCP Setting
Please select “Advanced Setting” —> “LAN” on the main page to enter the LAN
setting page as shown as above:
1) DHCP modes: disable DHCP service, or enable DHCP service. Please refer to the
following setting if DHCP service is enabled.
2) DHCP Server Setting
Please select to enable DHCP service. Setup the address pool of the range of
starting IP and ending IP and expiration time.
Please be sure to save all the modifications after the setup.
3.3.4 User Management Setting
Please select “Management”——> “Access Control” ――> “Passwords” on the main
page as shown below to manage users with different priority. Also you can change
password on this page.
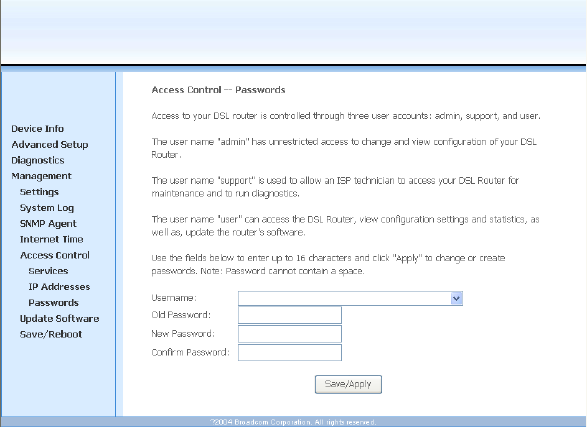
Draw down and select the username to be modified, then after the entry of the original
and new passwords, confirm the new password and click on “Save/Apply” button to
validate the new password.
Chapter IV Typical Application Cases
4.1 Single-user Log-on (supported both by Modem
version and Router version)
4.1.1 Dialing Mode (Dynamic IP)
4.1.1.1 ADSL Setting: No setting modification is required on the MS41p1, please adopt
the default settings;
4.1.1.2 Computer Setting: A special dialing software needs to be installed on user PC,
software such as EnterNet300, EnterNet500 or WinPoET, etc. (with exception of WinXP
OS); then enter onto dialing column the username and password provided by broad-band
service supplier, internet will be connected after successful dialing.
4.1.2 Special Line Mode (Static IP)
4.1.2.1 ADSL Setting: No setting modification is required on the MS41p1, please employ
the default setting;
4.1.2.2 Computer Setting: Please enter TCP/IP properties of PC Web Card and type in the
public IP, subnet mask, gateway and DNS provided by the broad-band service supplier.
Note: The default PVC connection parameters can meet the needs of the
majority of areas, so user is not required to reset the parameters; if the modification
of relevant parameters is desired, please delete the original default PVC connection
and then create a new connection. (A MER protocol (1/39) is included in the default
setting, which cannot be deleted or modified.)
Please refer to the following instructions to configure specific application
modes.
4.2 Multi-user Log-on (supported only by Router
version via its router feature)
4.2.1 Dialing Mode (Dynamic IP)
Description: Under this application, PPPOE(RFC2516) or PPPOA(RFC2364)protocol
must be supported by the center.
4.2.1.1 Parameter Configuration
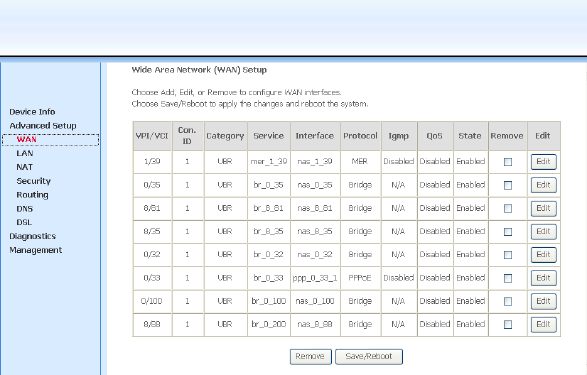
Please select “Advanced Setting”——> “WAN” on the main page to enter the WAN
setup page as shown below:
1)Please select the PVC to be setup and click on “Edit” button to perform the following
configurations:
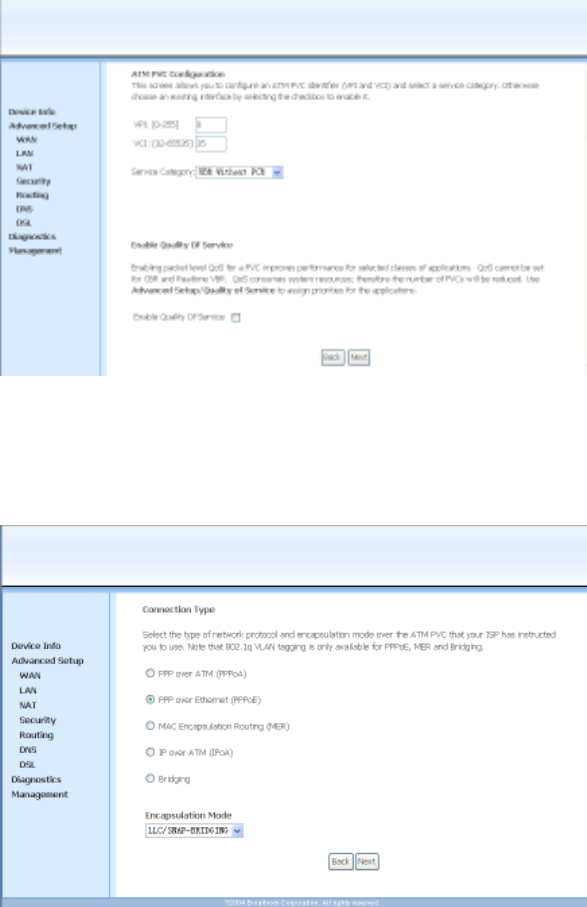
2)To setup VPI/VCI and service types, please refer to the requirements of network service
supplier. Supposedly, VPI:0, VCI:35, then the service type is “UBR without PCR”.
3)After the setup, please press “Next” to enter connection types and packaging setting
page. Suppose that PPPoE protocol and LLC packaging mode are employed in this case
as shown below::
4)Please press “Next” after the setup to enter the dialing username/password setting
page as shown below. Supposedly, the username and password are 8163/8163.
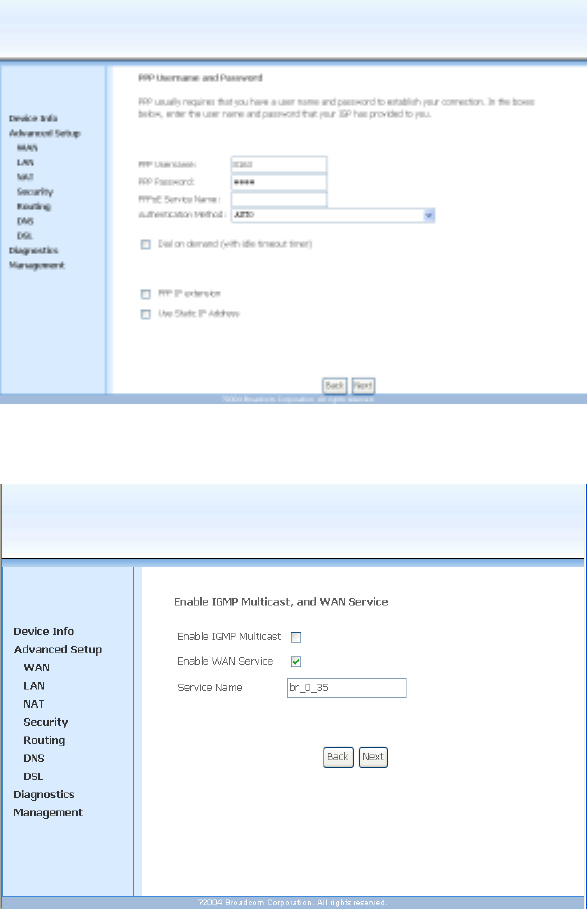
5)Please press “Next” after the setup to enable IGMP and WAN services, the service
name setting page is shown as below:
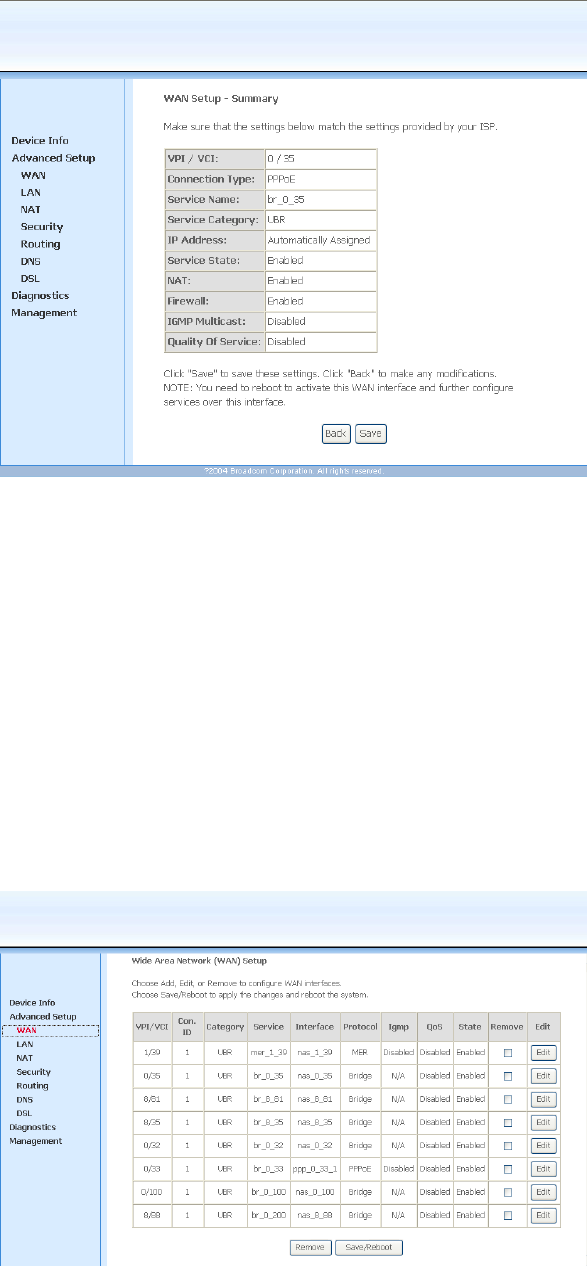
6)Please press “Next” after the setup to enter the main setting form as shown below. You
can check the correctness of the former settings, please press “Back” button for
modification if an error occurs. Please press “Save” button after confirmation and you will
be redirected to WAN setting page as shown below after saving all the changes:
4.2.1.2 Requirements to Configure Web Card of User’s PC:
LAN IP address, subnet mask and gateway (IP address of LAN port on ADSL) must
be preset. Please be noted that every IP address must be at the same IP section as
gateway. If DHCP server feature is enabled, then user only needs to start DHCP on PC
port to seek the LAN IP address automatically.
4.2.2 Special Line Mode (Static IP)
Descriptions: Under this application, 1483Bridge protocol must be supported by the
center.
4.2.2.1 Parameter Configuration:
Please select “Advanced Setting”——> “WAN” on the main page to enter the WAN
setting page as shown below:
1) Please select the PVC to be modified, and press “Edit” button to enter the setting
page.
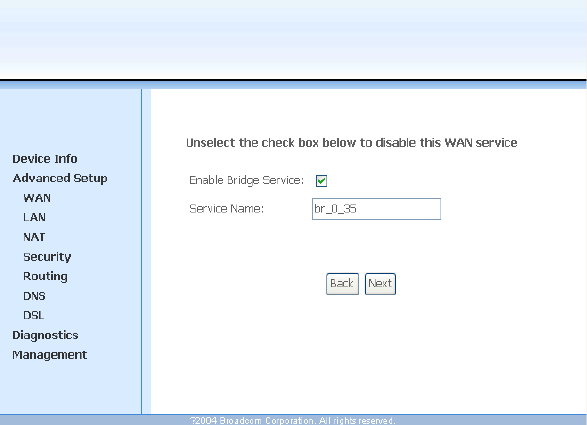
2)The basic setting methods and interface are identical with “4.2.1 Dialing Mode
(Dynamic IP).But they differ on the third step to setup the connection modes. Please
select “Bridge” mode on this and press “Next” to the server name setting as shown below:
Please press “Next” to enter the setting main form after the setup, and check the
correctness of the settings then press “Save” button to complete Bridge Connecting Mode
setting.
4.2.2.2 Requirements to Configure WEB Card of User’s PC:
LAN IP address, subnet mask and gateway (IP address of LAN port on ADSL) must
be preset. Please be noted that every IP address must be at the same IP section as
gateway. If DHCP server feature is enabled, then user only needs to start DHCP on PC
port to seek the LAN IP address automatically.

FCC STATEMENT
1. This device complies with Part 15 of the FCC Rules. Operation is subject to the following two
conditions:
(1) This device may not cause harmful interference.
(2) This device must accept any interference received, including interference that may cause
undesired operation.
2. Changes or modifications not expressly approved by the party responsible for compliance could
void the user's authority to operate the equipment.
NOTE: This equipment has been tested and found to comply with the limits for a Class B digital
device, pursuant to Part 15 of the FCC Rules. These limits are designed to provide reasonable
protection against harmful interference in a residential installation.
This equipment generates uses and can radiate radio frequency energy and, if not installed and
used in accordance with the instructions, may cause harmful interference to radio communications.
However, there is no guarantee that interference will not occur in a particular installation. If this
equipment does cause harmful interference to radio or television reception, which can be
determined by turning the equipment off and on, the user is encouraged to try to correct the
interference by one or more of the following measures:
Reorient or relocate the receiving antenna.
Increase the separation between the equipment and receiver.
Connect the equipment into an outlet on a circuit different from that to which the receiver is
connected.
Consult the dealer or an experienced radio/TV technician for help.
Global411 Internet Services, LLC
Model: MS41p1
Rating: 12VDC 500mA
Complies with FCC Part 15 & 68 Rules
US:HBTDL03BMS41P1
Jack Type: RJ11C REN: 03B
FCC Reg NO. : 0020330262
FCC ID:
::
:YZAQA-ZBQI-W0NKQQ
This device complies with Class B Part 15 of the FCC Rules.
Operation is subject to the following two conditions:
(1) This device may not cause harmful interference.
(2) This device must accept any interference received, including
interference that may cause undesired operation.
Made in China