GlobalSat WorldCom GH209 3 in 1 Training Watch User Manual GH 208
GlobalSat WorldCom Corporation 3 in 1 Training Watch GH 208
Contents
- 1. Users Manual GH-207
- 2. Users Manual GH-208
- 3. Users Manual GH-209
Users Manual GH-208
GH-208 GPS BLE 6.23.15 SL

TOC
2
Table of Contents
ABOUT GPS...................................................................................................................................................................... 3
ABOUT 3ATM WATER RESISTANCE......................................................................................................................... 3
ABOUT IPX7 WATER RESISTANCE ........................................................................................................................... 3
WHAT’S INCLUDED ....................................................................................................................................................... 5
GETTING START............................................................................................................................................................. 5
CHARGE YOUR WATCH................................................................................................................................................. 7
CONFIGURE YOUR WATCH FOR FIRST USE........................................................................................................... 9
CONFIGURE YOUR WATCH BEFORE WORKOUT.................................................................................................. 9
GO FOR A WORKOUT..................................................................................................................................................15
REVIEW YOUR WORKOUT........................................................................................................................................17
REVIEW YOUR DAILY WALKS ..................................................................................................................................20
DEVICE INFORMATION..............................................................................................................................................20
DEVICE CARE.................................................................................................................................................................22
TROUBLESHOOTING ..................................................................................................................................................23
GET MORE INFORMATION........................................................................................................................................23
APPENDIX ......................................................................................................................................................................24

TOC
3
Thank you for purchasing the Globalsat GH-208 GPS Training Watch! Let’s learn more about this
exciting product.
About GPS
GPS stands for Global Positioning System. For 3D fix, we need at least 4 satellites. Normally the
accuracy of GPS under open sky that means no tall building and clear sky is within 10 meters
per second. Therefore, if the device shift 10 meter at that second, the device may show 36 Km/h
instant speeds.
Nowadays, the GPS consumer product has built in adjust algorithm and assisted method to
extend capability of GPS.
About 3ATM Water Resistance
Suitable for daily use. Splash/rain resistant. NOT suitable for showering, bathing, swimming,
snorkeling, water related work and fishing.
R
EMARK
:
NOT
SUITABLE FOR DIVING
.
About IPX7 Water Resistance
Suitable for indoor/outdoor use in the presence of rain, snow or brief splashes of water. NOT
suitable for any immersion of more than 1 meter, regardless of duration of immersion, or any
immersion of more than 30 minutes, regardless of depth of immersion.

TOC
4
IMPORTANT SAFETY INSTRUCTIONS AND WARNINGS
A
LWAYS CONSULT YOUR PHYSICIAN BEFORE YOU BEGIN OR MODIFY ANY EXERCISE PROGRAM
.
1 To prevent risk of fire, chemical burn, electrolyte leak, and/or injury from the unit’s internal
Lithium-polymer battery:
1.1 Do not attempt to remove the case-back or exterior shell of the unit, or to remove its
non-user-replaceable battery.
1.2 Do not leave the unit exposed to a heat source or a high-temperature location (such as
in the sun or in an unattended vehicle). To prevent damage, store the unit out of direct
sunlight.
1.3 Do not puncture or incinerate the unit.
1.4 When storing the unit for an extended time, keep it in the 32 to 77°F (0 to 25°C)
temperature range.
1.5 Charge the unit only within the 32 to 113°F (0 to 45°C) temperature range.
1.6 Do not operate the unit outside the 14 to 140°F (-10 to 60°C) temperature range.
1.7 Contact your local waste disposal department to properly recycle or dispose of the unit
or its battery.
2 Use only the charging cable supplied.
3 This unit is not a medical device and is not recommended for use by persons with serious
heart conditions. Always consult your physician before beginning or modifying an exercise
program.
4 Do not attempt to read the unit’s display while moving: this is unsafe and distracting, and
could result in an accident or collision. Read the display only when you can safely do so.
5 Avoid extreme shock and harsh treatment, because it can degrade the life of the product.
6 Avoid press the key under water.
7 Do not store the watch where prolonged exposure to extreme temperatures can occur,
because it can cause permanent damage.
TOC
5
What’s Included
1 Globalsat GPS Training Watch GH-208
2 Clip Charging Cable
3 Bluetooth 4.0 Heart Rate Monitor Chest Belt (Optional)
4 Quick Start Guide
Getting Start
For first use, please follow these general steps to get started:
1 Charge your watch.
2 Configure your watch.
3 Pare BLE HRM belt (optional)
4 Go for a WORKOUT.
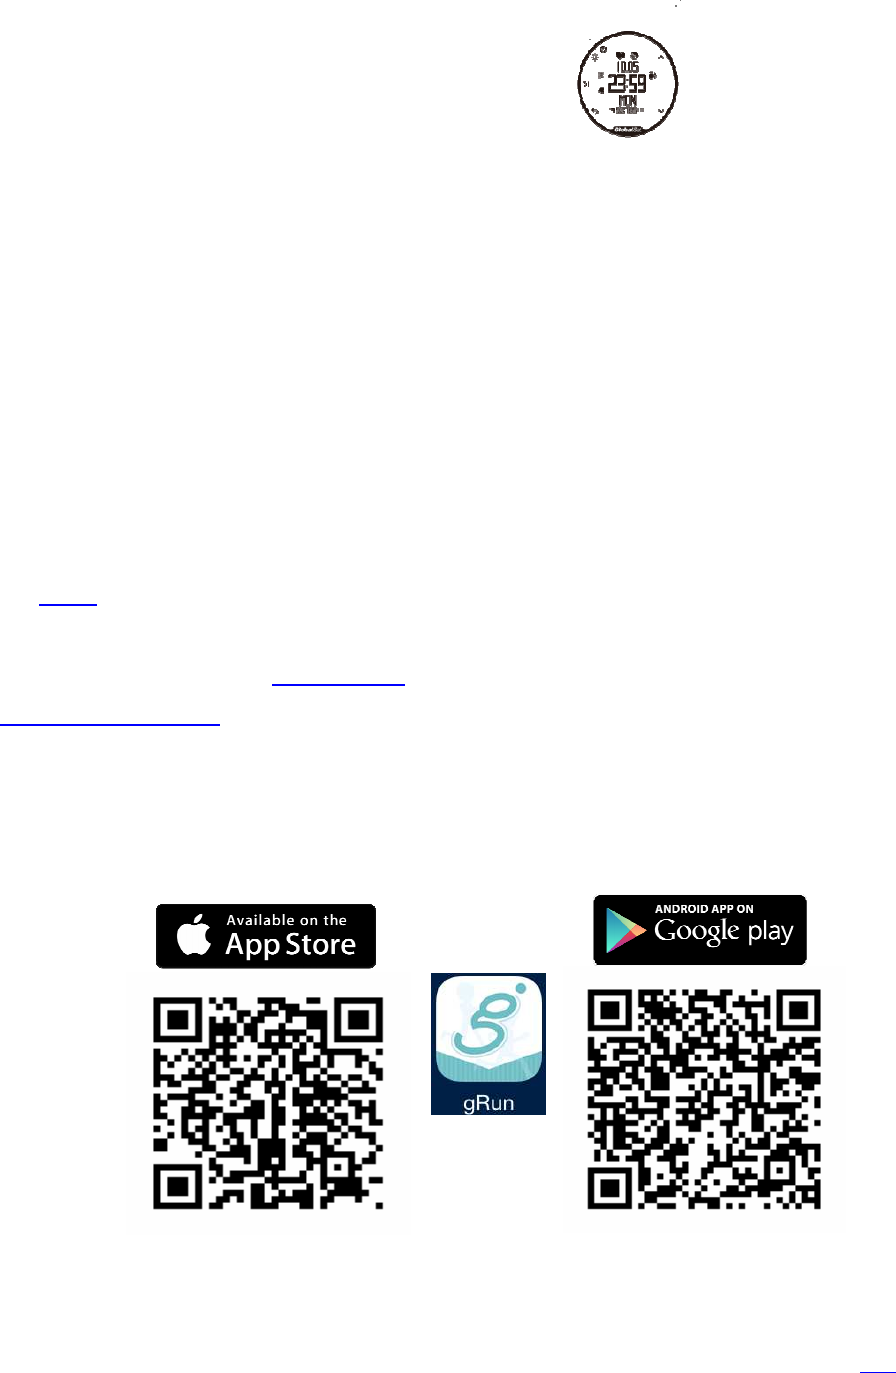
5 Get gRun on your smart phone
6 Upload your WORKOUT to gRun
7 Upload your WORKOUT to Sports4U.pro
8 Get more information
Download gRun
TOC
6
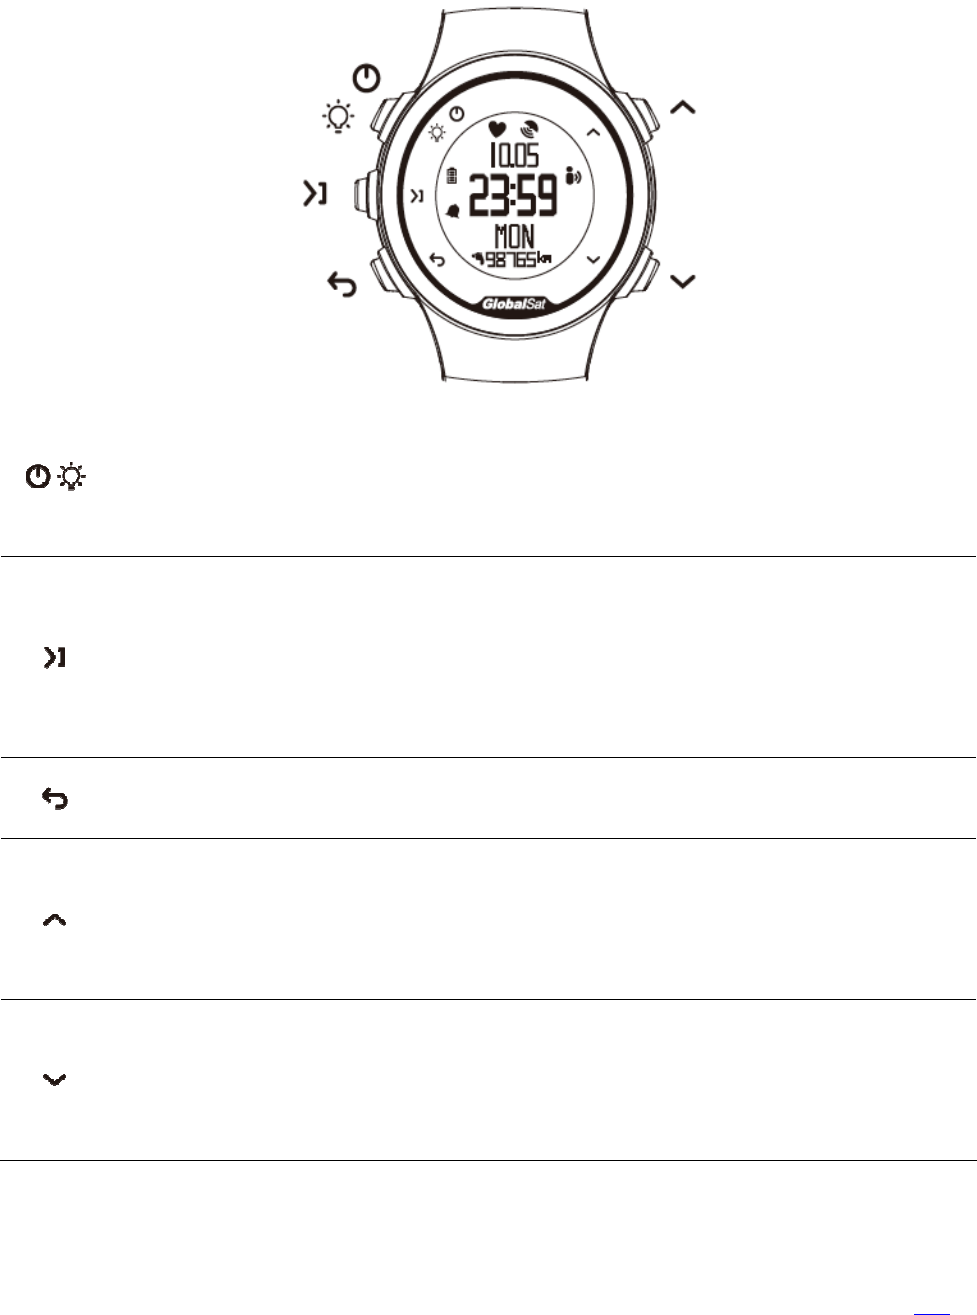
Keys
Power // Backlight
Push to turn backlight on / off.
Hold to turn watch on / off.
Under workout mode, hold to
finish
and
save
the workout,
after workout saved will turn off the watch.
Start // Pause // Save
Push to enter menu, select a highlighted menu, or confirm to
start a run or setting and returns to previous screen.
Push to bypass searching for HRM or fixing GPS.
Under workout mode, push to
pause
the run, push again and
hold to
finish
and
save
the workout.
Back // Resume
Push to return to previous menu.
Push to pause under workout
Up // Previous // Increase
Push to display seconds, step count and distance walked in mini
page under Time Mode.
Push to moves up in a screen, highlight previous item in a menu.
Push to switch page up under Workout Mode.
Down // next // Decrease
Push to display seconds, step count and distance walked in mini
page under Time Mode.
Push to moves up in a screen, highlight next item in a menu.
Push to switch page down under Workout Mode.
TOC
7
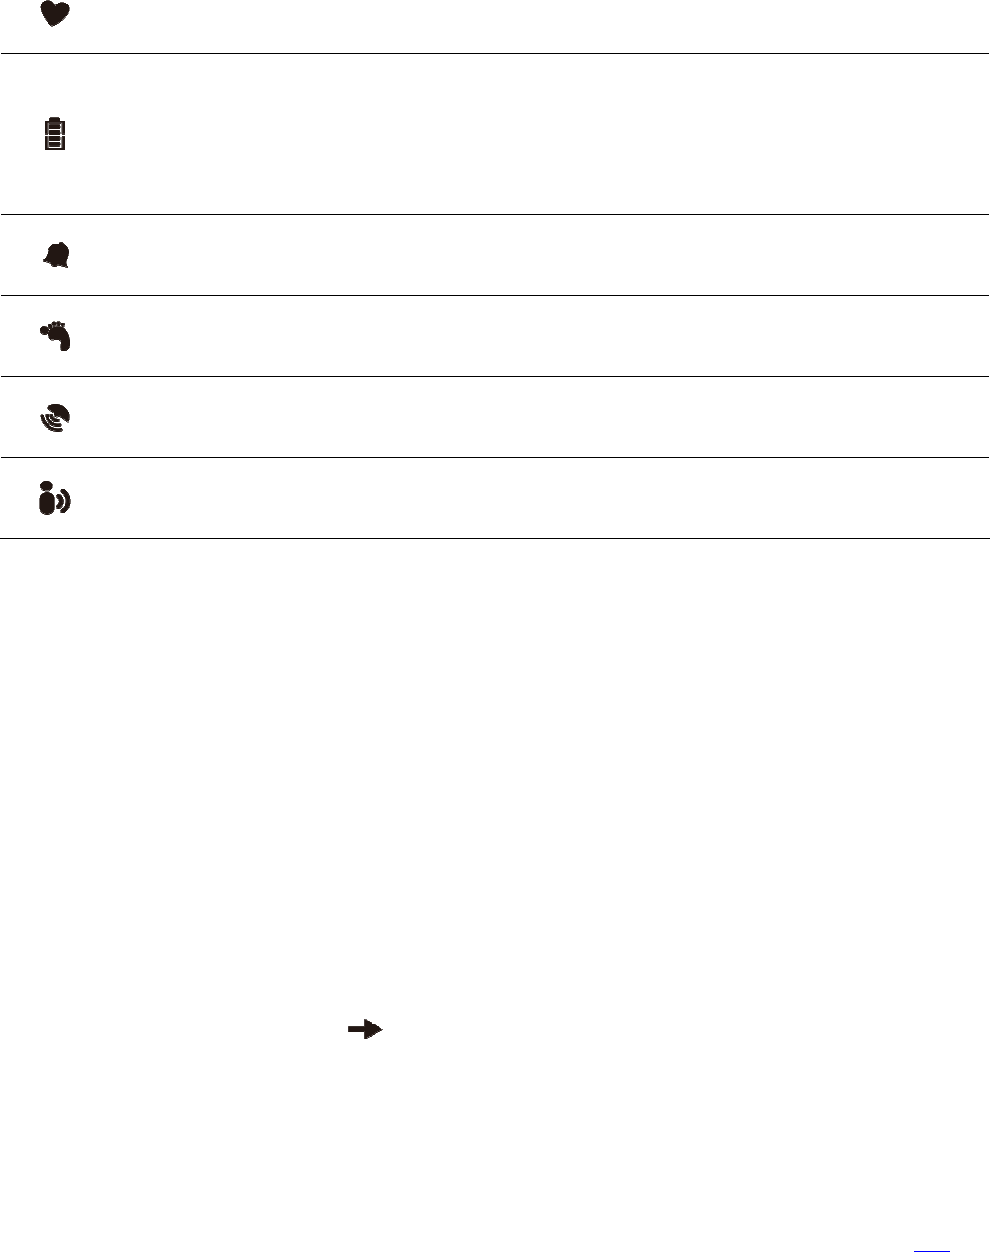
Icons
HR
BLE heart rate monitor belt connection status. Turn solid when HRM belt connected,
flashing if still searching for. Stop flashing in 5 min.
Battery
Displaying battery status, icon flashing and buzzer alert when battery down below
15%.
Icon flashing and buzzer alert again when battery down below 5%, and watch
automatically turn off.
Alarm
Alarm icon will display when clock configured.
Steps
Number after this icon will display steps count or switch by (Up or Down) to total
workout distance.
GPS
GPS status, stay solid when location fixed, flashing when device under positioning. Stop
searching by 30 sec, and recording by pedometer.
Phone
Phone connection status. Stays solid when connection alive, flashing and beep when
connection broken. Icon will turn off when the watch enter workout mode.
Charge your watch
Before you use the watch the first time, fully charge the battery using your computer or a
wall outlet as a power source.
1 Attach the charging cable clip to the watch so the clip’s pins align with the contacts on the
back of the watch.
TOC
8
2 If turn off the watch before charging will reduce charging time less than 2 hours.
3 Select a power source:
3.1 Computer: Insert the free end of the charging cable into a powered USB port on your
computer.
3.2 Wall outlet: Insert the free end of the charging cable into a USB power adapter, then
insert the adapter into a wall outlet.
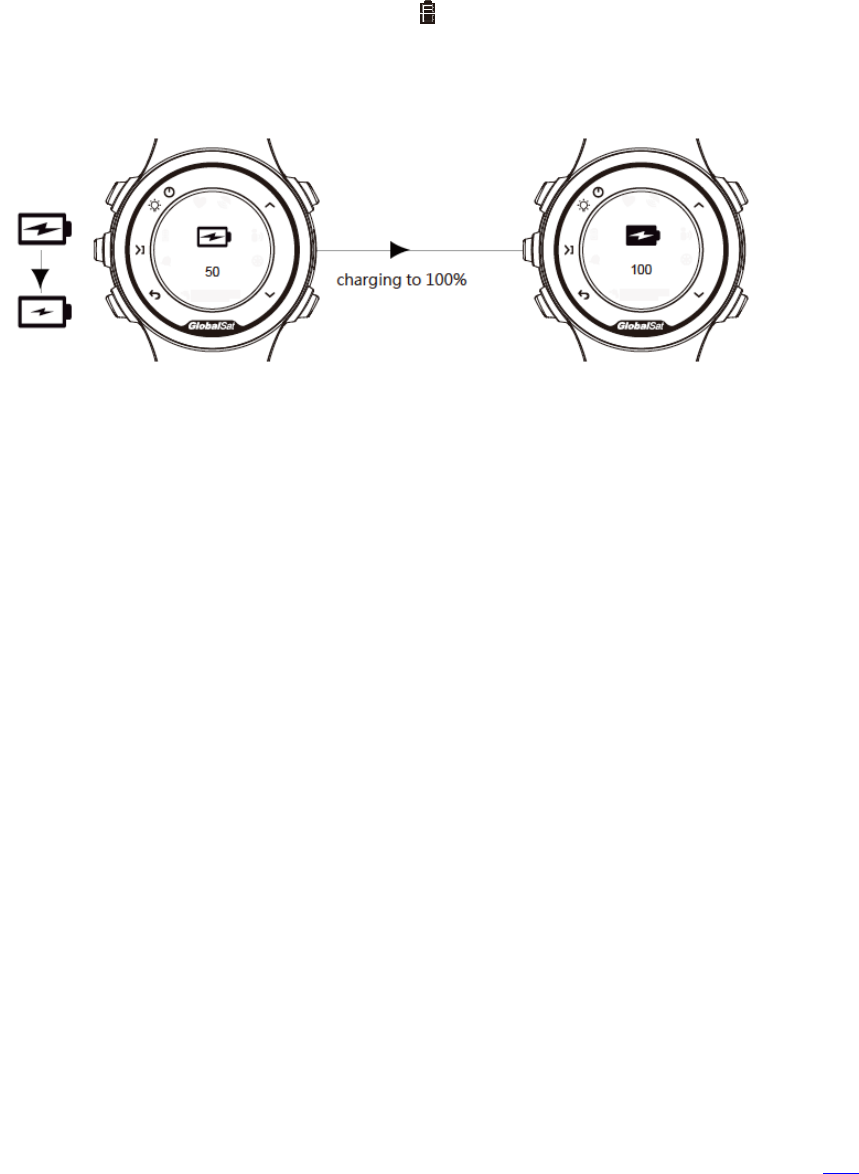
4 Let the battery charge at least 3 hours. The flashes during charging or the battery icon
in the center of screen turns solid static if your turn off as below.
When you connect the watch to a power source, the watch will turn on in charging screen. Charge the watch until the
battery icon stays still as above.
Maximizing battery life
Use this procedure to maximize the time range of your watch’s rechargeable battery:
1 Use your watch without recharging until the last battery indicator segment disappears and
the empty indicator begins flashing. If the watch display goes blank, you can still proceed
with this process as long as the display has been in the state for no more than one or two
days.
2 Fully charge the watch battery for at least 3 hours, until the battery level indicator no longer
blinking.
3 Repeat this procedure twice more.
NOTE: Repeat this procedure every two months if the watch is not used or recharged
regularly.

TOC
9
Configure your watch for First Use
The first time you power on the watch, you will set up language, units, date/time, time
format and personal profile.
1 Press and hold for more than 2 sec to power on the watch. The watch then begins
the first-time setup process.
1.1 If first-time setup does not begin, press to go to the main menu, then select
SETTINGS > ABOUT > RESET > OK! The watch then enters factory reset process and
turn power back on automatically.
2 Follow the instructions shown in the watch’s display, using , , and .
Configure your watch before workout
This section intends to assist you to customize your own GH-208. The sequence of items is
referring to the actual watch screen except PAIR due to its importance to the training
result.
1 GENERAL
1.1 Language
1.1.1 Currently offer English only. We will provide more language options for your
choice in near future.
1.2 ALARM
1.2.1 When you set up a time and turn alarm ON, you will receive buzzer alerts when
time is up. Also the vibration alert if you turn on alarm vibration (SETTINGS >
GENERAL > VIBRATION > ALARM > ON).
1.3 DATE, TIME
1.3.1 To choose 24H or 12H system.
1.3.2 Configure your local date and time.
1.4 SOUND
1.4.1 Turn ON in KEY, buzzer will beep when you push buttons.
1.4.2 Turn ON in WORKOUT, buzzer will beep in a unique sound when you push to
GO, PAUSE for a run.
1.5 VIBRATION
1.5.1 Vibration alert for ALARM, TARGET and NOTICE.
1.5.2 Turn ON for ALARM to vibrate when set up time is up.

TOC
10
1.5.3 Turn ON for TARGET to vibrate when you out of target zone that you’ve indicted.
1.5.4 Turn ON for NOTICE to vibrate when a notification received from your phone
(Incoming Calls, Message or Phone Lost).
1.6 UNITS
1.6.1 To choose English system (Inch/lb) or Metric system (cm/Kg).
1.7 DOZE MODE
1.7.1 Enable for power saving. The screen will doze whenever it stays idle (no key
interrupt) for total 5 min.
1.7.2 Screen should wake up when motion detected.
2 TARGET (Target Zone)
2.1 Default value is OFF that has no target zone alert during your workout.
2.2 There’re HR (heart rate), PACE and SPEED to be your training target zone.
2.3 You can preset each minimum and maximum value.
2.4 Choose one of them to be your target zone.
2.5 Whenever you are over or lower than your configured target zone, the watch will alerts
you by buzzer and vibrator (if you turn ON in SETTINGS > GENERAL > VIBRATION >
TARGET).
3 DISPLAY
3.1 GH-208 provides you 3 pages and 1 mini page.
3.2 Default settings:
3.2.1 Page 1: Chrono / Speed
3.2.2 Page2: Distance / Pace
3.2.3 Page3: HR / Calories
3.2.4 Mini Page: Time (Local time)
3.3 Selections: Chorno, Distance, Speed, Average Speed, Pace, Average Pace, Time, HR,
Average HR, Calories, OFF (Display empty).
3.4 Each page display allows you to show 2 values in your own preference.
3.5 For Mini page selection: Chorno, Speed, Avg speed, Pace, Avg pace, Time, HR, Avg HR,
Calories, Lap number, OFF.
4 Auto Lap
4.1 Go SETTINGS > AUTO LAP to choose Auto Lap by DISTANCE
4.1.1 Configure the distance you want to automatically count the lap.
TOC
11
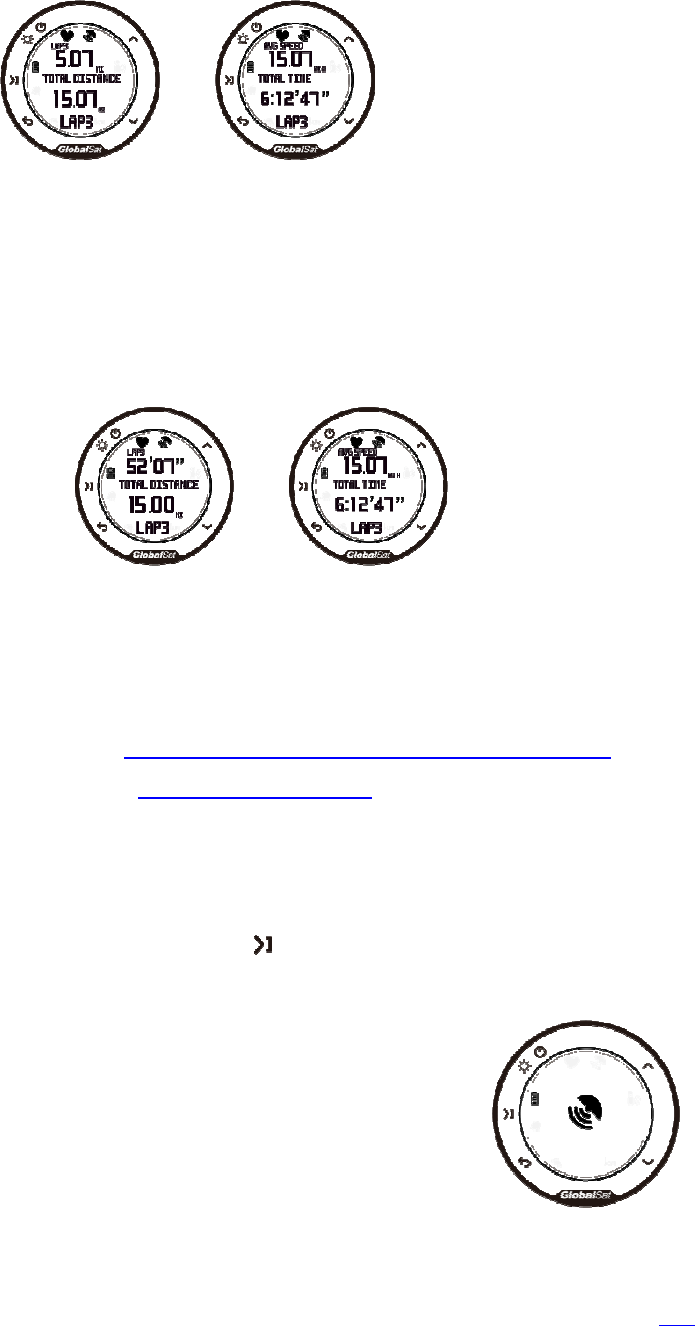
4.1.2 Once your run reach the distance you configured for a lap, the screen will display
like below for 4 seconds and go back to the page you’ve configured.
4.2 Go SETTING > AUTO LAP to choose Auto Lap by TIME
4.2.1 Configure the time you want to automatically count the lap.
4.2.2 Once your run reach the time you configured for a lap, the screen will display like
below for 4 seconds and go back to the page you’ve configured.
5 USER
5.1 To set up your own weight, height, gender and birthday for better calculations.
6 PAIR
6.1 For HRM paring, please go (Pair BLE Heart Rate Monitor (HRM) chest belt).
6.2 For Phone paring, please go (Pair with your phone).
7 CALI (Calibrate distance accumulation to calculate with your step count)
7.1 Thanks to incredible GPS accuracy, GH-208 is capable to learn your walking distance
for better step distance.
7.2 When you enter SETTINGS > CALI by , the watch will show you to walk 400M in
total to learn your actual walking distance.
7.3 You will see a GPS sign flasing on the screen while it’s acquired
GPS signal, please stand still under open sky without
interference (trees, buildings, etc…) where you can have a
400 meters to walk through.
7.4 When the positioning is done, GPS icon turns solid and stays in
the top of screen.
TOC
12
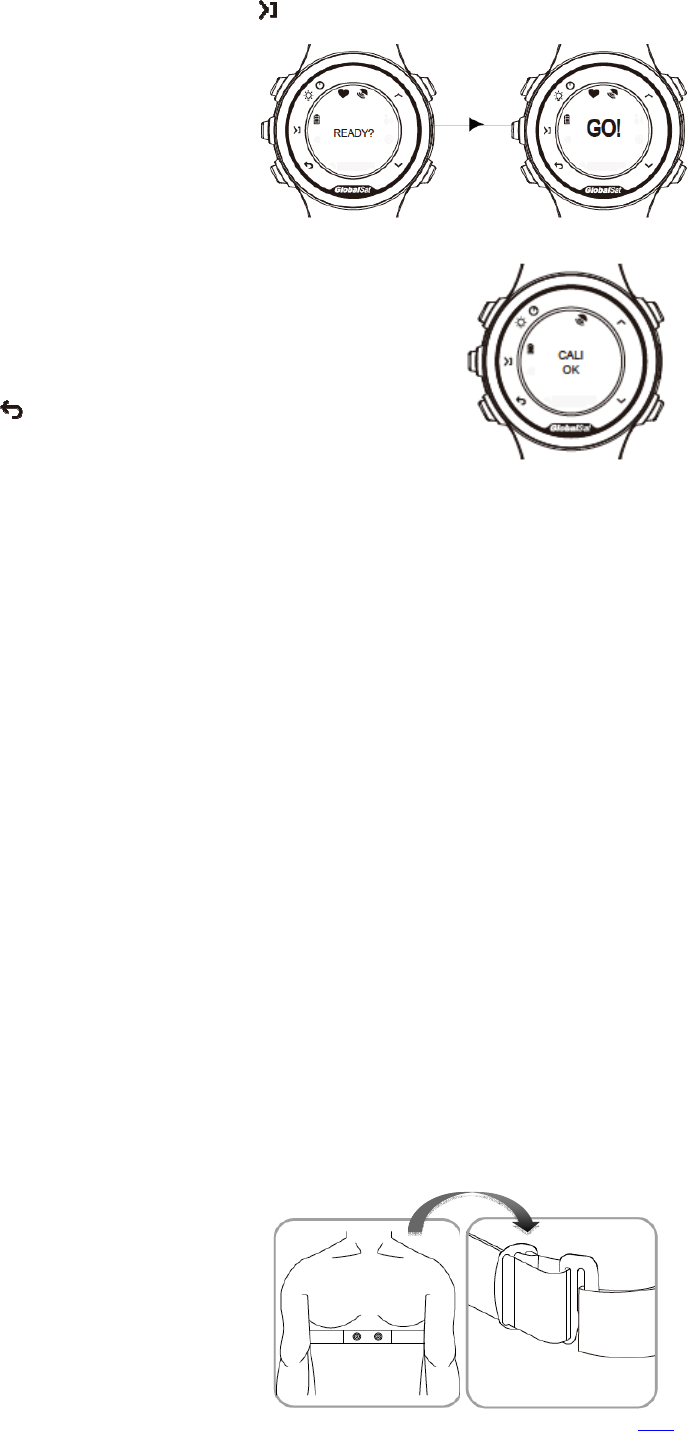
7.5 READY? will display on the screen, push to GO! for a walk to calibrate.
7.6 Every 10 meters, the watch will show
current distance you have reach on
the screen.
7.7 When you achieve 400 meters, the
screen will show you CALI OK on the
screen and return to SETTINGS menu.
NOTE: The calibration process could be failed if GPS signal
lost more than 10 seconds. FAILED, PLEASE RETRY message
will pop up. Go through step 7.3 to 7.7 to complete the
calibration or push to leave.
8 About
8.1 VERSION
8.1.1 FIRMWARE
8.1.1.1 Here shows you the main firmware version. Ex. F-0GH-2X-1501152, 150115
is the date of FW released which is 2015 Jan 15
th
.
8.1.2 BLE FW
8.1.2.1 Here shows you the BLE firmware version. Ex. F-BLE-29-1503271, 150327
is the date of FW released which is 2015 Mar 27
th
.
NOTE: To check firmware information, please refer to Get More Information.
8.2 RESET
8.2.1 Allow you to reset the watch back to factory setting.
8.2.2 Default value in DON’T!! in case incidentally trigger reset.
8.2.3 Even OK! Was pushed, double confirmation will reserve a second chance.
Pair BLE Heart Rate Monitor (HRM) chest belt
NOTE: if you don’t have a BLE Heart Rate Monitor, you can skip this section.
Wear the Bluetooth Low Energy (BLE) heart rate monitor directly on your skin, just below
your breastplate. It should be snug enough to stay in place during your run.
1 Wrap the strap around your chest, and
connect the strap hook to the loop.
2 Connect the heart rate monitor module to the
strap.
TOC
13
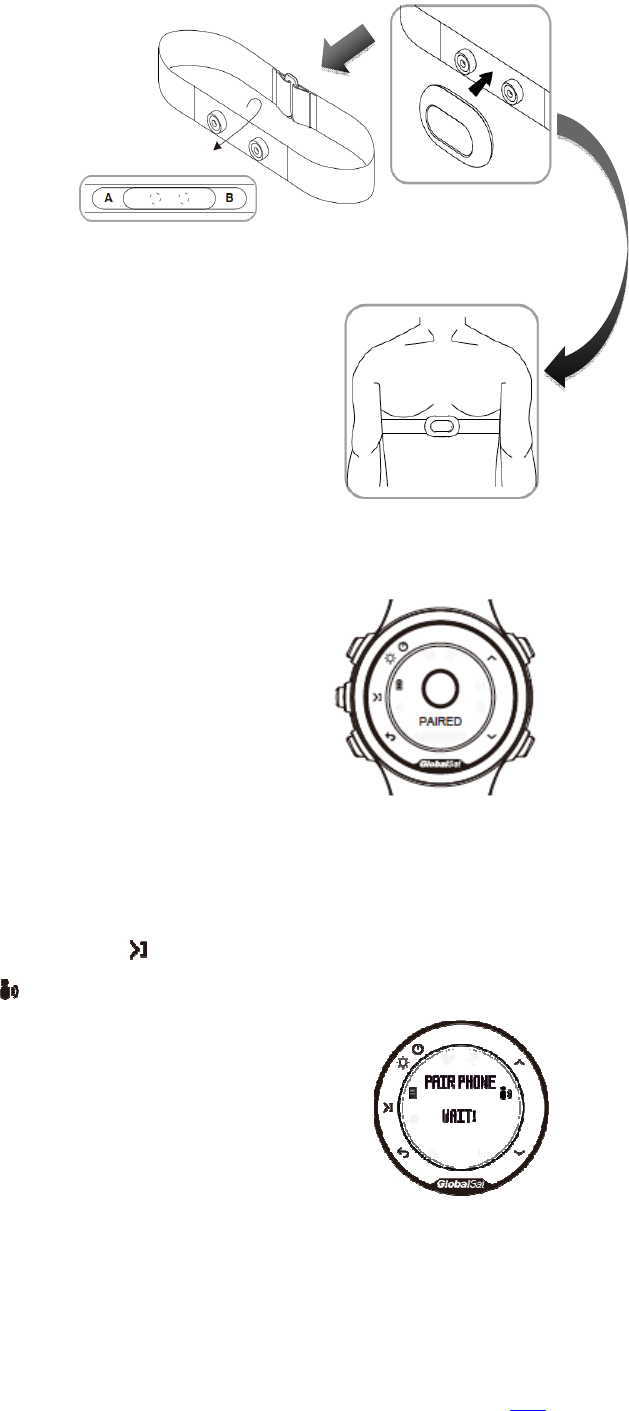
3 Wet the electrodes (Location A and B) on the back of
the strap to create a strong connection
between your chest and the
transmitter.
NOTE: Some heart rate monitors
have a contact patch. Wet the
contact patch.
4 Bring the watch in front of you and ensure the transmission range within (2m) of the heart
rate monitor.
TIP: If the heart rate data is erratic or does not appear, you
may have to tighten the strap on your chest or warm up for 5
to 10 min.
NOTE: Move away (20m) from other sensors while GH-208 is
trying to pair with your heart rate monitor
5 After you put on the heart rate monitor, it is on standby and ready to send data.
6 Go to your watch, enter SETTINGS > PAIR > HR SENSOR > ON,
start paring for 60 sec. Please follow the display instruction.
7 When you see PARIED on screen, your watch now paired and
remembers this HRM belt.
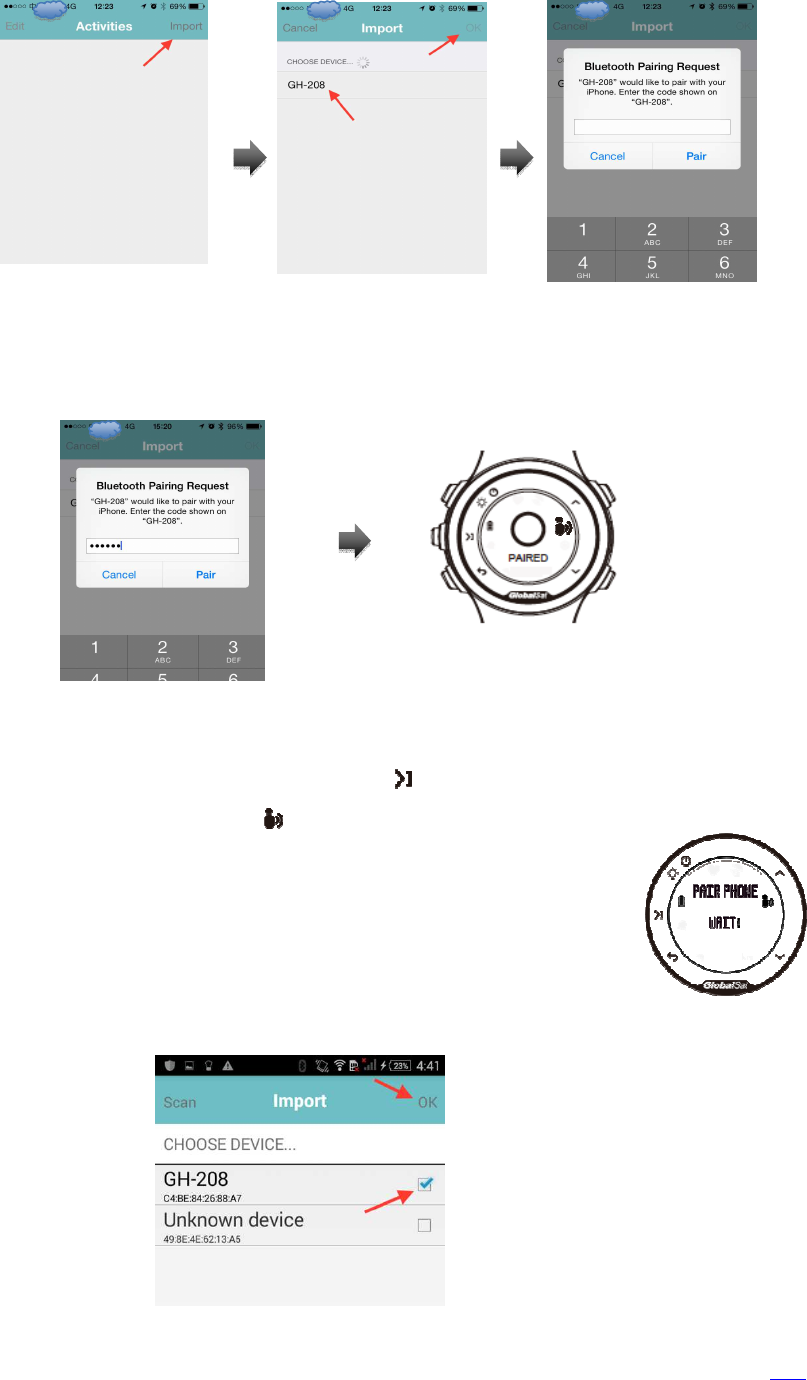
Pair with your phone
1. Pair with iPhone
1.1 Turn on your watch.
1.2 Enter SETTINGS > PAIR >PHONE, Push to broadcasting for phone pairing. You
will see WAIT! and flashing on the screen.
1.3 Turn on Bluetooth in your iPhone.
1.4 Enter gRun
1.5 Tap on Import which in the top right corner in the Activities
page. gRun will search for GH-208.
1.6 When gRun see your GH-208, tap on GH-208 and tap OK on the
top right corner.
TOC
14
1.7 There will be a number input dialogue pop up on iPhone screen.
1.8 Meanwhile, the watch will show you a 4 digits number.
1.9 Input this number in your gRun dialogue to pair. You will see screen on watch like
below. Leave phone pair setting on your watch at ON.
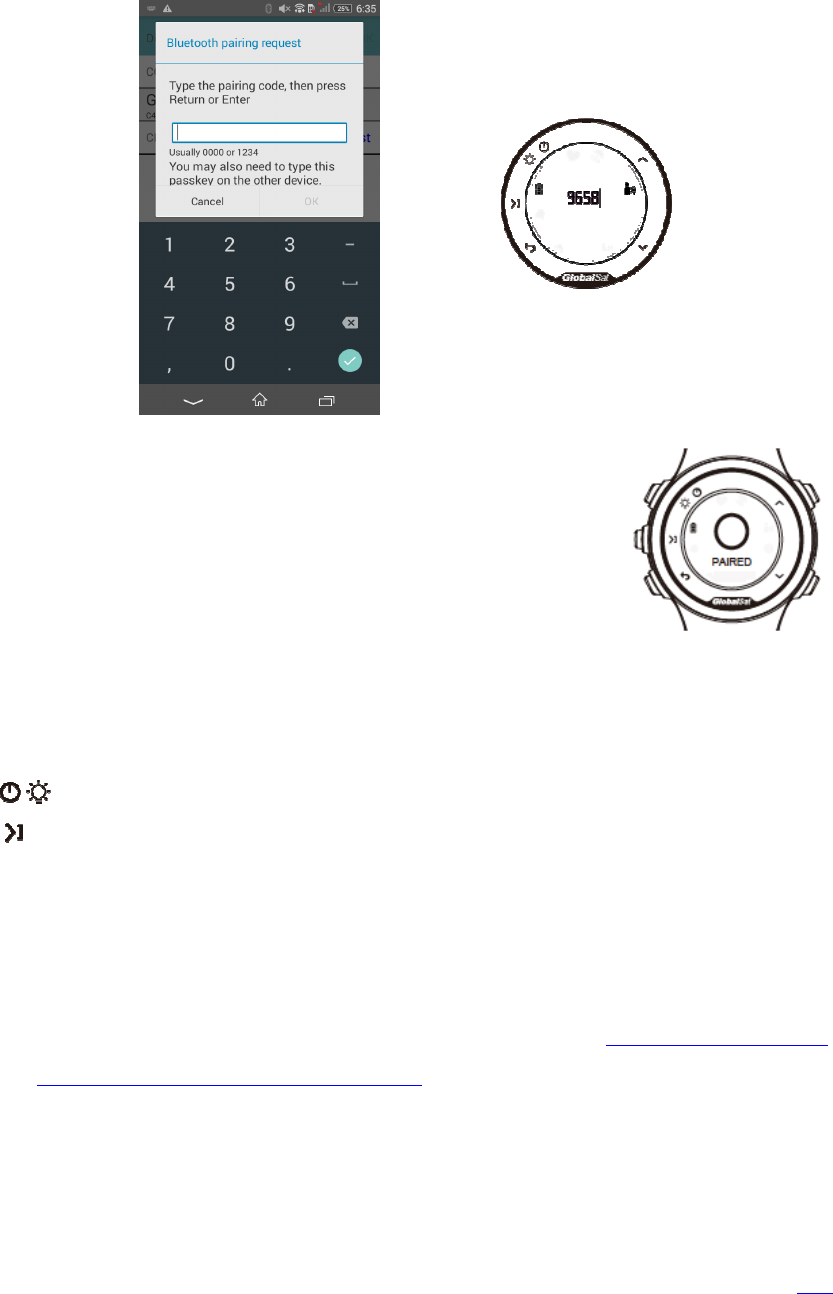
2. Pair with Android phone
2.1 Turn on your watch.
2.2 Enter SETTINGS > PAIR > PHONE, Push to broadcasting for phone pairing. You
will see WAIT! and flashing on the screen.
2.3 Turn on Bluetooth in your Android phone.
2.4 Enter gRun
2.5 Tap on Import which on the top right corner of the Activities
page. gRun will search for GH-208.
2.6 When gRun see your GH-208, check on GH-208 and tap OK on the top right corner.
TOC
15
2.7 There will be a number input dialogue pop up on Android phone screen. Check on
your watch screen, a 6 digits number will shows. Input this number in your Android
phone and tap on OK.
2.8 Watch will show you PAIRED when this process success.
Leave phone pair setting on your watch at ON.
NOTE: If you switch SETTINGS > PAIR > PHONE to OFF on your
watch, you will need to Forget or Unpaired device GH-208 at
your phone > Settings > Bluetooth, and go through this pairing
process again.
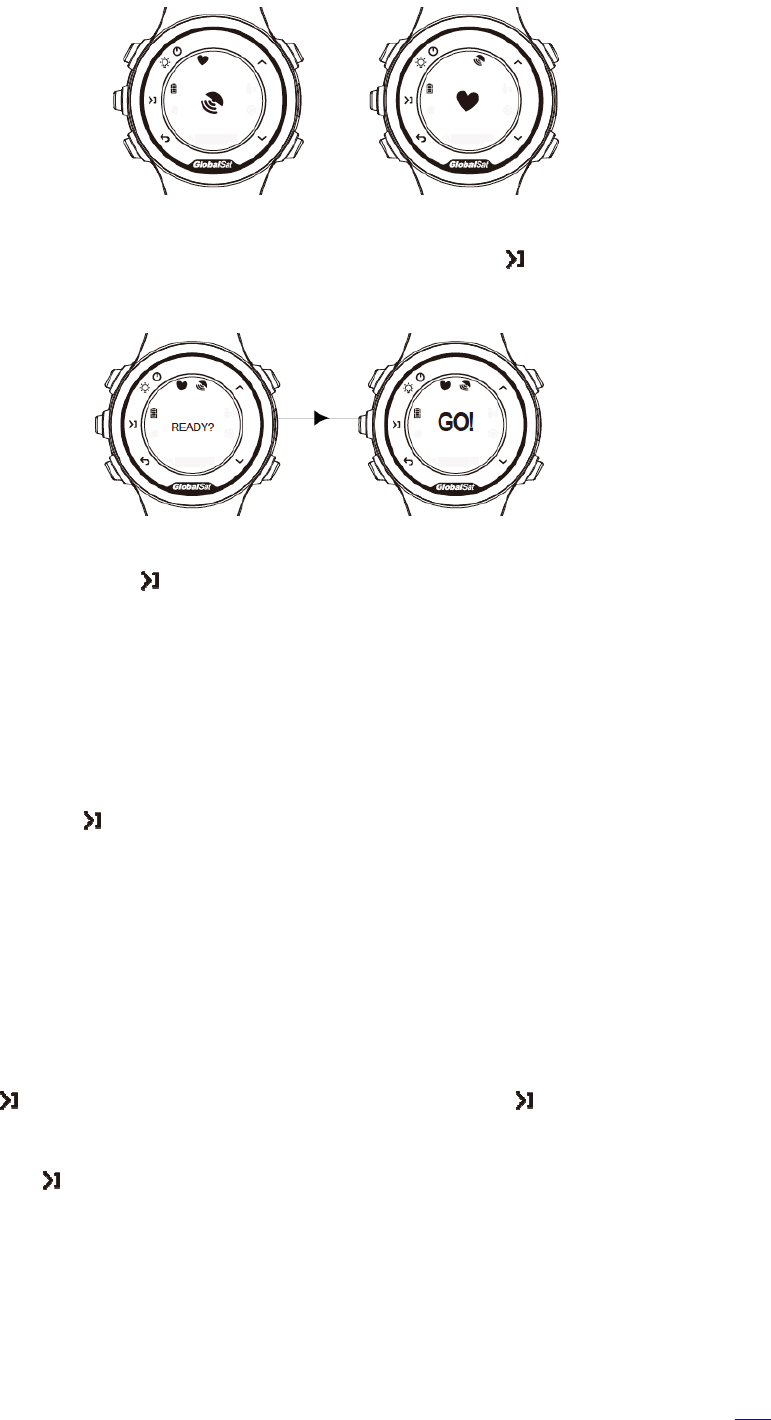
Go for a Workout
1 Hold to turn on the watch.
2 Push go WORKOUT to choose either run outdoor or indoor
2.1 If you are going to run OUTDOOR
NOTE: It may take 30 to 60 sec to locate satellite signals.
2.1.1 Go outside to find open sky area and hold your position.
2.1.2 Enter WORKOUT > OUTDOOR.
2.1.3 If you already have HRM belt paired and you wear on it. (Pair wireless 2.4GHz
Heart Rate Monitor (HRM) chest belt)
2.1.3.1 The watch will searching for both GPS and HRM belt.
TOC
16
2.1.3.2 When watch connect to your paired HRM belt and GPS fixed, you will see
READY? on the screen. If you are ready, push to see GO! and start your
run.
2.1.4 If GPS not yet located and/or HRM not yet connected, but you still want to ahead
for a run, push to let it search in background.
NOTE: If you don’t run with HRM belt and you don’t want to see HR BELT HASN’T BEEN
PAIRED. IGNORE? message when you start a run, go SETTINGS > PAIR > HR SENSOR to
select OFF.
2.1.5 If the watch indicates that a GPS was not fixed yet for long, move away from any
tall buildings or trees, hold your position. If you decide to go for a run anyway, you
can push to allow watch searching on the background. Your watch will
automatically switch to pedometer if GPS doesn’t fix within 30 sec.
2.2 If you go for INDOOR
2.2.1 Enter WORKOUT > INDOOR
2.2.2 Your watch will first searching for the HRM belt that you paired before. Or push
to run without HRM belt.
2.2.3 Automatically show you READY? If HRM belt linked.
TIP: Push to see READY? for you prepare to run, Push again to see GO! and
start chrono.
2.2.4 Push to GO! for a run.
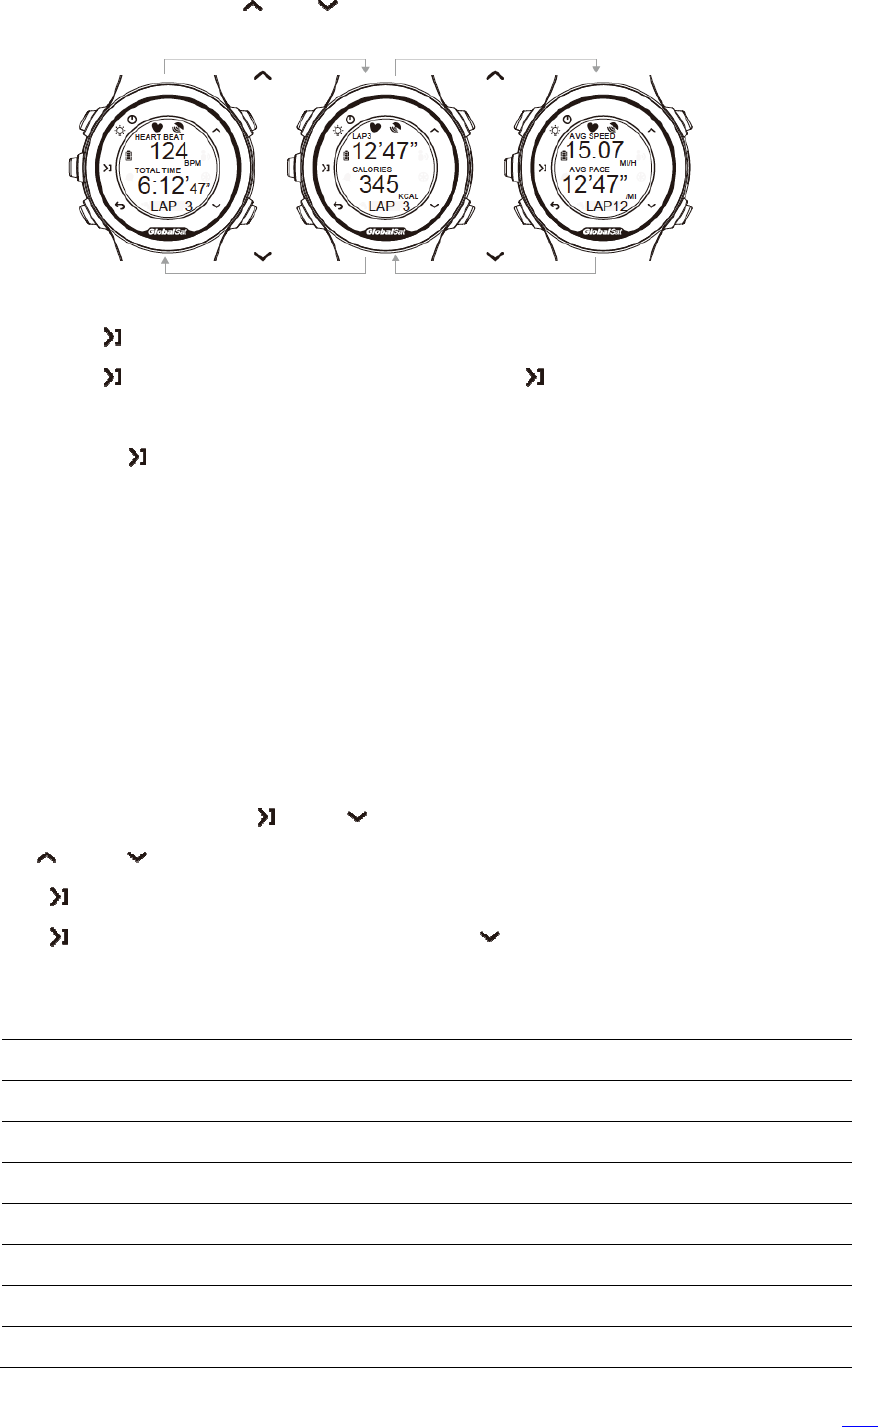
3 Checking your current workout
3.1 The stopwatch provides three pages to display real-time workout data. Each page
includes one or two field and a mini page. (Configure your watch)
TOC
17
3.2 During a run, push or to travel between pages.
4 Stop and save your workout
4.1 Push to pause your workout.
4.2 Push again to resume the workout or hold to trigger workout saving process
bar. When the saving bar fills up, workout saved and finished.
4.3 Release before bar fills up will return to workout pause status.
Review your WORKOUT
In the watch:
NOTE: The watch can store up to 50 workout data. You can enter HISTORY page to
review each saved data.
1 Open a workout data, push and to HISTORY > WORKOUT > ARCHIVE.
2 Use and to find the workout data you want to review.
3 Push to see confirm open the data.
4 Push to enter TRAIN INFO for detail info or to select DELETE to erase this workout
data.
Data Description
XX-XX-XX Date of workout saved (YY-MM-DD, Ex. 15-06-09 = 2015 9
th
June)
Time Total elapsed time of the workout
Distance* Total distance traveled during the workout
Avg Speed* Average speed over the entire workout
Avg Pace* Average minutes per mile or km
Lap* Number of laps in the workout (up to 99 laps)
Kcal** Estimated quantity of calories burned during the workout
Average HR Average heart rate per minute during entire workout (HRM belt required)
TOC
18
% time in target
zone*
Total time of within indicated target zone during entire workout. (Show in
percentage)
*If you run without GPS fixed, these data were generated by inner pedometer throughout simulated
algorithm.
**If you run without HRM belt connected, these data were generated by inner pedometer throughout
simulated algorithm.
In your Smart Phone
NOTE: You need to download gRun on your smart phone and pair with your watch first.
(Pair your phone)
1 iOS
1.1 Turn on your watch.
1.2 Turn on Bluetooth in your iPhone.
1.3 Enter gRun > Activities, your phone will connect to the watch automatically.
1.4 Tap on Import which on the top right corner of the Activities page.
1.5 Tap on Paired behind GH-208 already paired, then tap OK on the top right corner.
1.6 Wait for a while, you will see records list down on the data you want to upload to gRun.
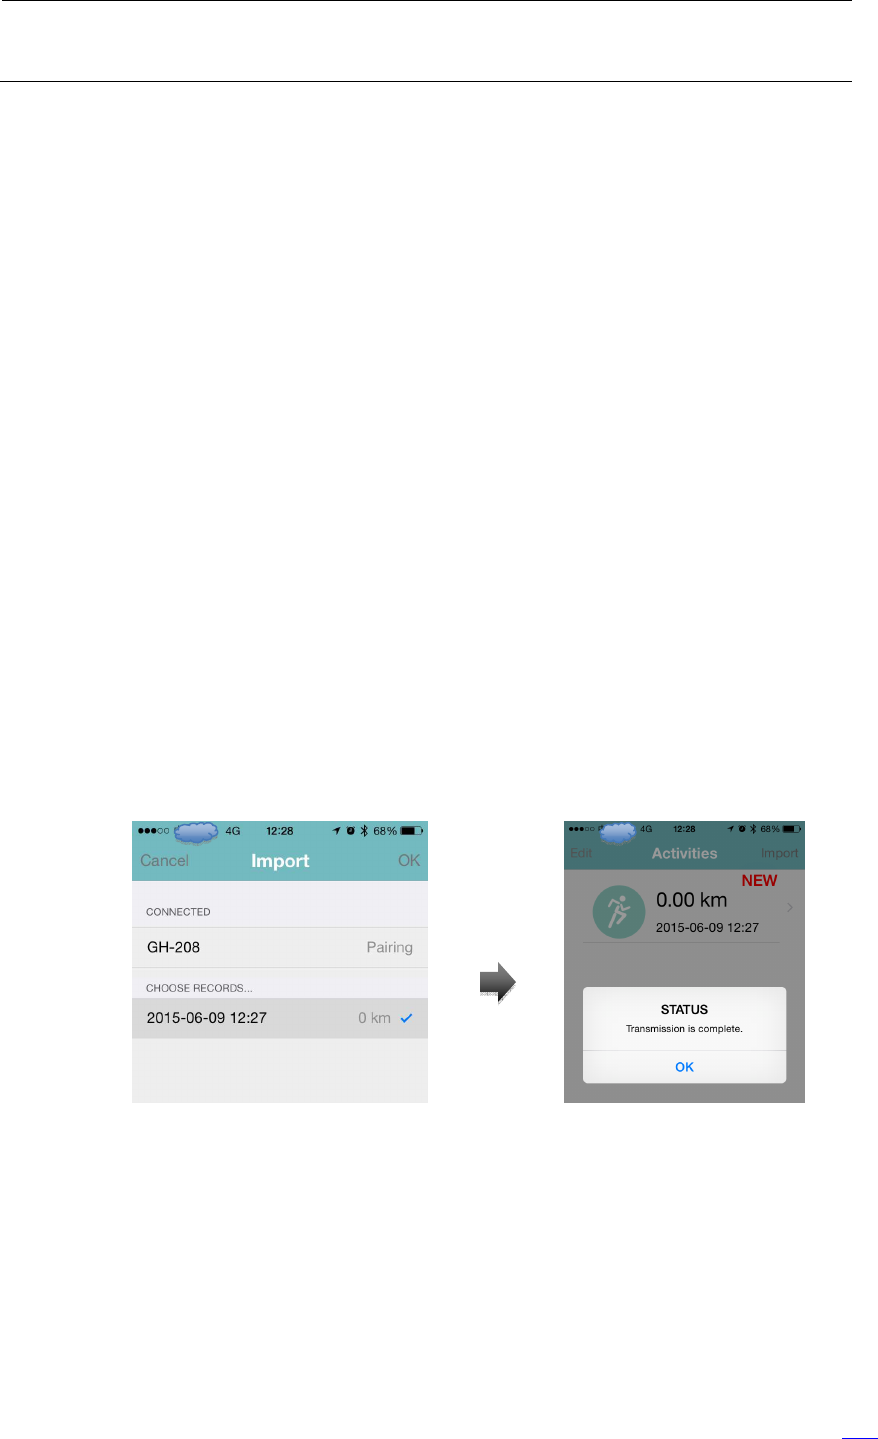
1.7 Now you can select your training record and transfer to gRun. Check on the record and
tap OK on top right corner.
1.8 After transmission completed, a STATUS message will pop up.
2 Android
2.1 Turn on your watch.
2.2 Turn on Bluetooth in your Android phone.
2.3 Enter gRun > Activities
2.4 Tap on Import which on the top right corner of the Activities page.
TOC
19
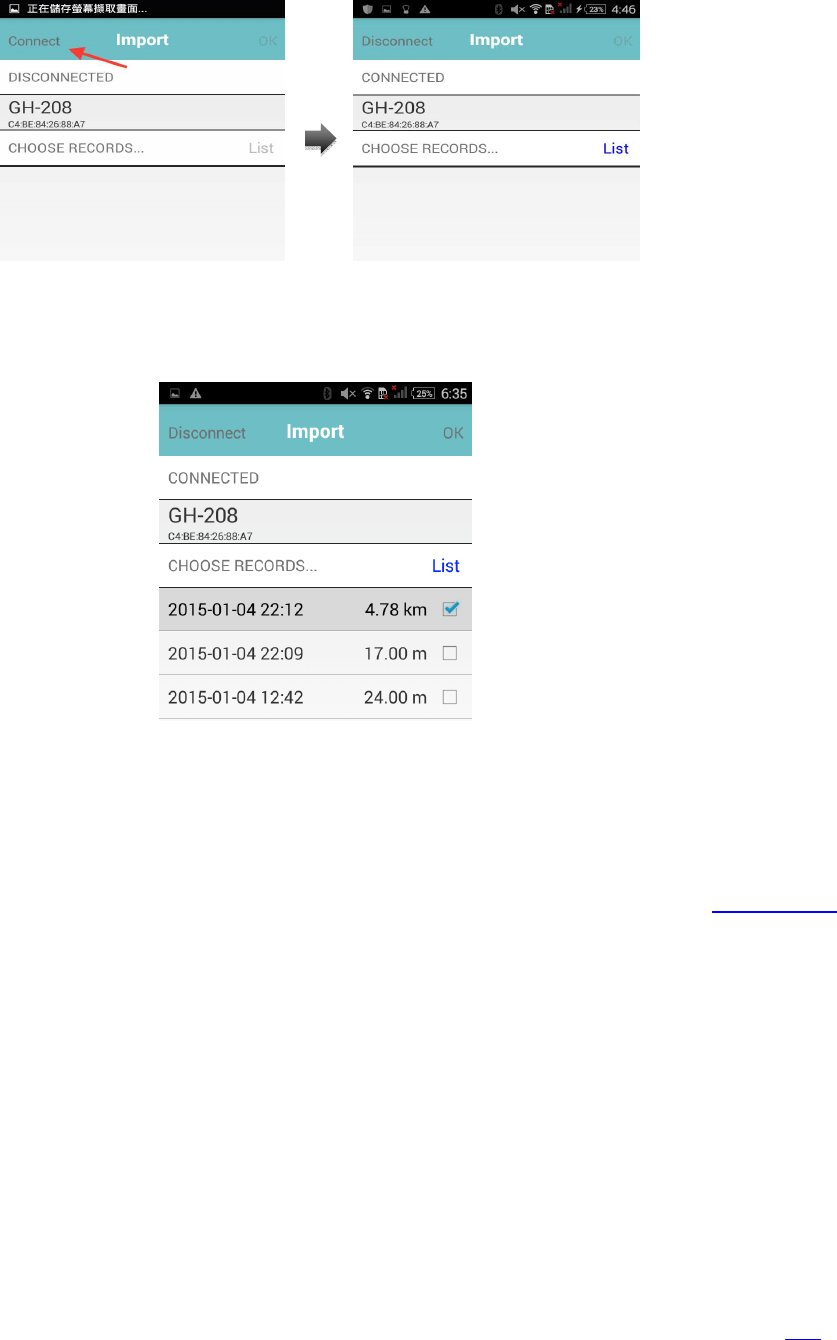
2.5 Select your GH-208 and tap on Connect that on the top left corner. After connected, tap
on highlight List and OK to fetch data list from GH-208.
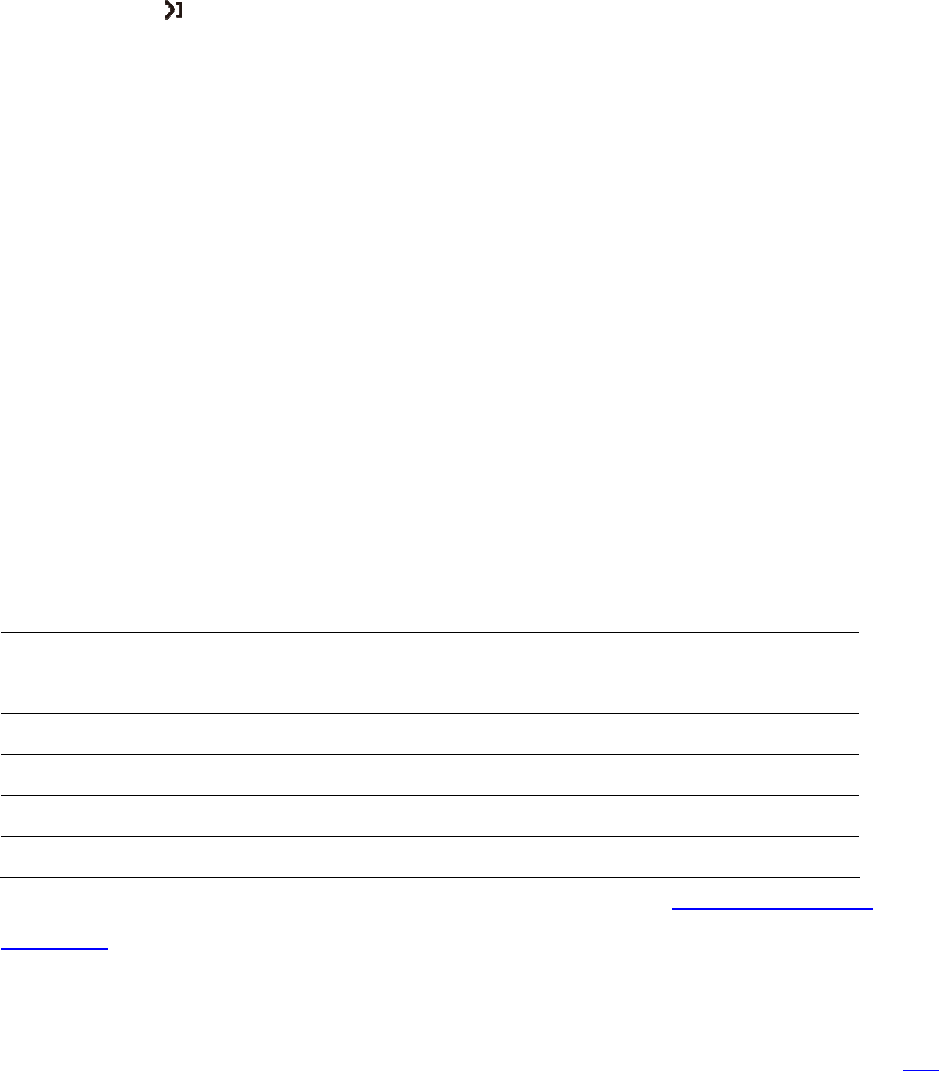
2.6 Checked the data you want to transfer and tap on OK in the top right corner.
2.7 After transmission completed, a STATUS message will pop up.
NOTE: The List and Data transfer may take minutes, please kindly wait.
In Sport4U.pro
1 You may register in gRun > Profile > Cloud Upload or go register on website Sport4U.pro .
2 Go to Download to find USB driver if you are using Windows system (not required for Mac)
and install it.
3 Download and install the PC Tool.
4 Connect your GH-208 to your PC or Laptop with the clip USB cable.
5 Run PC Tool to upload your data to Sport4U.pro.
6 Now you can review your data in Sport4U.pro.
TOC
20
Review your daily walks
GH-208 built-in pedometer upon own developed algorism counts your daily walks and steps
during your workout.
1 Go HISTORY > PEDOMETER to check your steps record and data management.
2 STEP LIST
2.1 Under step list, you will see steps data files by date up to 7 records.
2.2 The day 8
th
record will push day 1
st
out of list.
2.3 Push to check each data. Each data listing Total steps, Distance in Km or miles
depends on your setting and Calories in Kcal.
3 FEAT
3.1 Records all steps and distance you have taken since you start with this GH-208 till now.
This is more like your walking achievement.
3.2 You can reset to 0 by reset to factory setting in SETTINGS > ABOUT > RESET > OK!.
4 RESET
4.1 The RESET in here only works for the daily works. It can not clear your record in
FEAT.
Device Information
GH-208 Specifications
Battery type Rechargeable, built-in lithium-polymer battery
Battery life Up to 6 hours in workout mode
Up to 7 days in watch mode
Operating temperature range From 14 to 140°F (-10 to 60°C)
Charging temperature range From 32 to 113°F (0 to 45°C)
Radio frequency / protocol Wireless 2.4GHz communication protocol
Water rating 3 ATM*
*The device withstands pressure equivalent to a depth of 30m. See About 3ATM Water
Resistance

TOC
21
Heart Rate Monitor Specification
Battery type User-replaceable CR2032, 3 volt
Battery life Approximately 800 hours
Operating temperature range -10°C ~ +50°C / 14°F ~ 122°F
Radio frequency / protocol Bluetooth 4.0 (Bluetooth smart)
Water rating IPX7**
**The device withstands incidental exposure to water of up to 1 meter for up to 30 minutes. See
About IPX7 Water Resistance
Federal Communication Commission Interference Statement
This device complies with Part 15 of the FCC Rules. Operation is subject to the following two
conditions: (1) This device may not cause harmful interference, and (2) this device must accept
any interference received, including interference that may cause undesired operation.
This equipment has been tested and found to comply with the limits for a Class B digital device,
pursuant to Part 15 of the FCC Rules. These limits are designed to provide reasonable
protection against harmful interference in a residential installation. This equipment generates,
uses and can radiate radio frequency energy and, if not installed and used in accordance with
the instructions, may cause harmful interference to radio communications. However, there is
no guarantee that interference will not occur in a particular installation. If this equipment does
cause harmful interference to radio or television reception, which can be determined by turning
the equipment off and on, the user is encouraged to try to correct the interference by one of the
following measures:
- Reorient or relocate the receiving antenna.
- Increase the separation between the equipment and receiver.
- Connect the equipment into an outlet on a circuit different from that
to which the receiver is connected.
- Consult the dealer or an experienced radio/TV technician for help.
FCC Caution: Any changes or modifications not expressly approved by the party responsible for

TOC
22
compliance could void the user's authority to operate this equipment.
This transmitter must not be co-located or operating in conjunction with any other antenna or
transmitter.
Radiation Exposure Statement:
The product comply with the FCC portable RF exposure limit set forth for an uncontrolled
environment and are safe for intended operation as described in this manual. The further RF
exposure reduction can be achieved if the product can be kept as far as possible from the user
body or set the device to lower output power if such function is available.
Device Care
Cleaning the Watch
NOTE:
1. Do not use a sharp object to clean the watch.
2. Avoid chemical cleaners, solvents, and insect repellents that can damage plastic
components and finishes.
3. Thoroughly rinse the watch with fresh water after exposure to chlorine, salt water ,
sunscreen, cosmetics, alcohol, or other harsh chemicals. Prolonged exposure to these
substances can damage the case.
1 Wipe the watch using a cloth dampened with a mild detergent solution.
2 Wipe it dry.
Cleaning the Heart Rate Monitor
A build up of sweat and salt on the strap can decrease the ability of the heart rate monitor
to report accurate data.
Keep the transmitter strap in a cool and dry place to maximize the heart rate sensor
battery lifetime. Never put the strap in a washing machine or dryer.
1 Rinse the strap after every use.
2 Hand wash the strap occasionally, using a tiny amount of mild detergent, such as
TOC
23
dishwashing liquid.
Troubleshooting
Replace Heart Rate Monitor Battery
If you cannot link to your paired Heart Rate Monitor Belt, maybe the battery required
replacement.
1 Four screws are on the back of heart rate monitor module.
2 Remove four screws and you can replace the new CR2032 battery.
3 Keep the battery away from children.
Note:
1 Never put batteries in mouth.
2 Do not use a sharp object to remove battery.
3 If swallowed, contact your physician or local poison control center.
4 Replaceable coin cell batteries may contain perchlorate material.
5 Contact your local waste disposal department to properly recycle the battery.
6 Special handling may apply. See www.dtsc.ca.gov/hazardouswaste/perchlorate .
Reset the Watch
If your GH-208 stop responding, you may need to reset it. Your data or settings will not erase.
1 If the display stuck without responding, hold for 10 sec above to turn screen off.
2 If the watch doesn’t power on by 2 sec hold on and you are sure the battery charged,
hold for 10 sec to reset and power on.
Get More Information
1. Go to www.globalsat.com.tw
2. Go to Product / Sport Outdoor.
3. Select your product.
4. Or mail to service@globalsat.com.tw

TOC
24
Appendix
Heart Rate Zone Calculations
Zone % of Max Heart Rate Perceived Exertion Benefits
1 50 ~ 60% Relaxed, easy pace, rhythmic
breathing
Beginning-level aerobic
training, reduces stress
2 60 ~ 70%
Comfortable pace, slightly
deeper breathing, conversation
possible
Basic cardiovascular training,
good recovery pace
3 70 ~ 80% Moderate pace, more difficult
to hold conversation
Improved aerobic capacity,
optimal cardiovascular training
4 80 ~ 90%
Fast pace and a bit
uncomfortable, breathing
forceful
Improved anaerobic capacity
and threshold, improved speed
5 90 ~ 100%
Sprinting pace, unsustainable
for long period of time, labored
breathing
Anaerobic and muscular
endurance, increased power