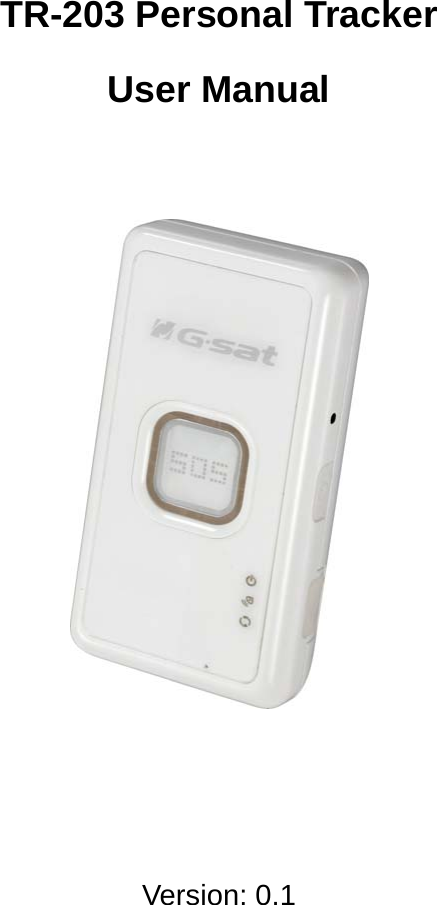
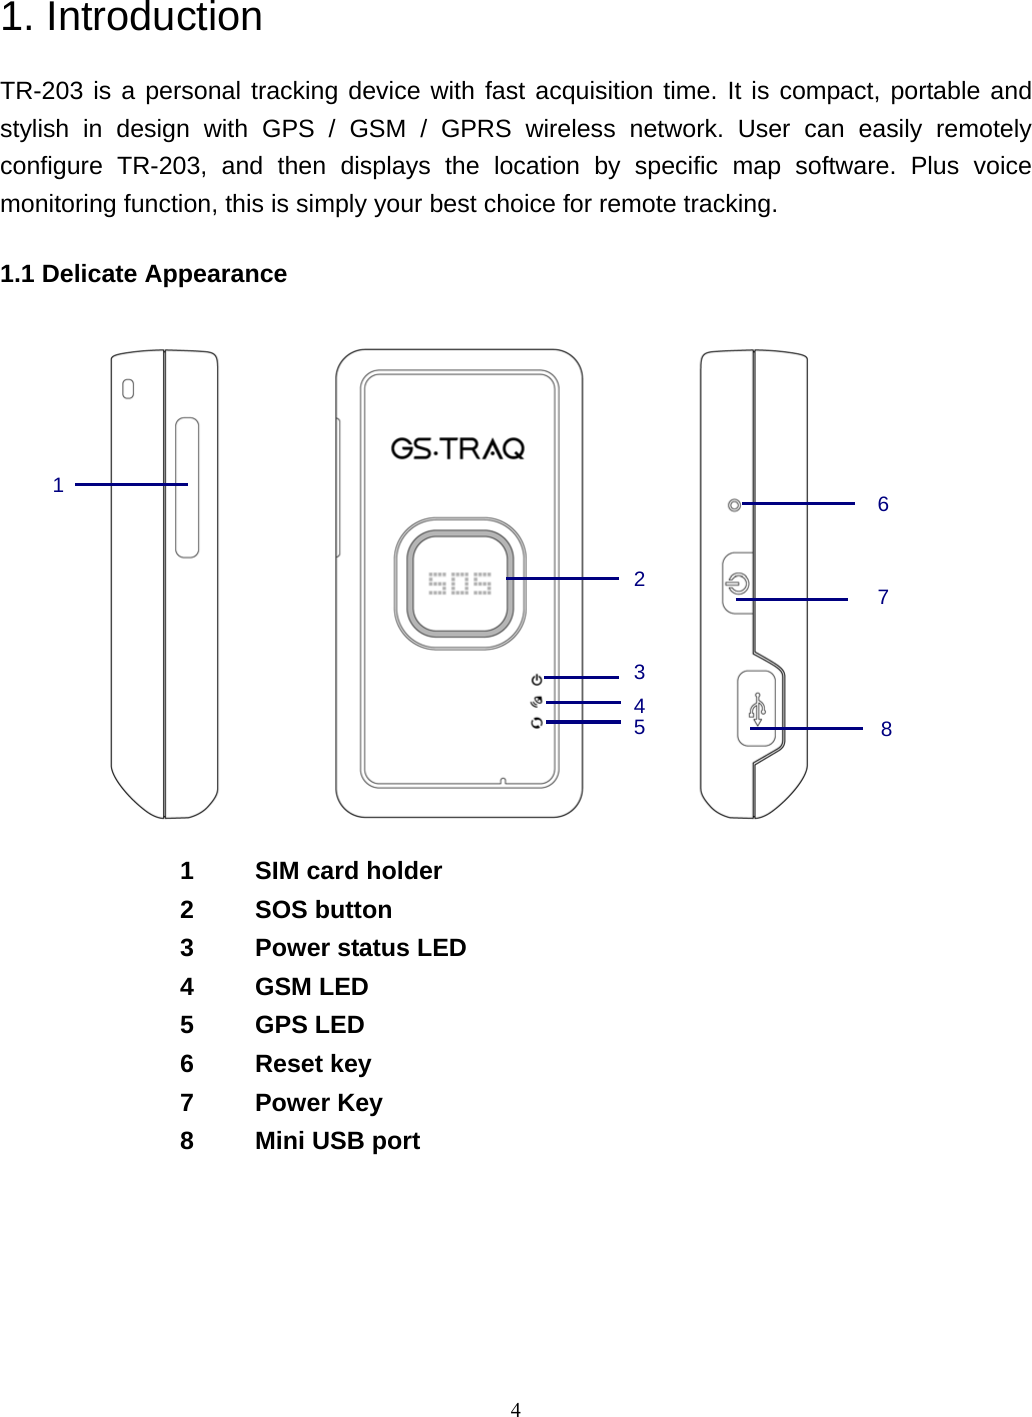
GlobalSat WorldCom TR203 GPS Tracker User Manual TR 203 Personal Tracker
GlobalSat WorldCom Corporation GPS Tracker TR 203 Personal Tracker
UserManual.wiki
>
GlobalSat WorldCom
>
TR203 User Manual
User guide
Navigation menu
Upload a User Manual
Namespaces
Wiki Guide
HTML
PDF
Info
Views
User Manual
Discussion / Help
Navigation


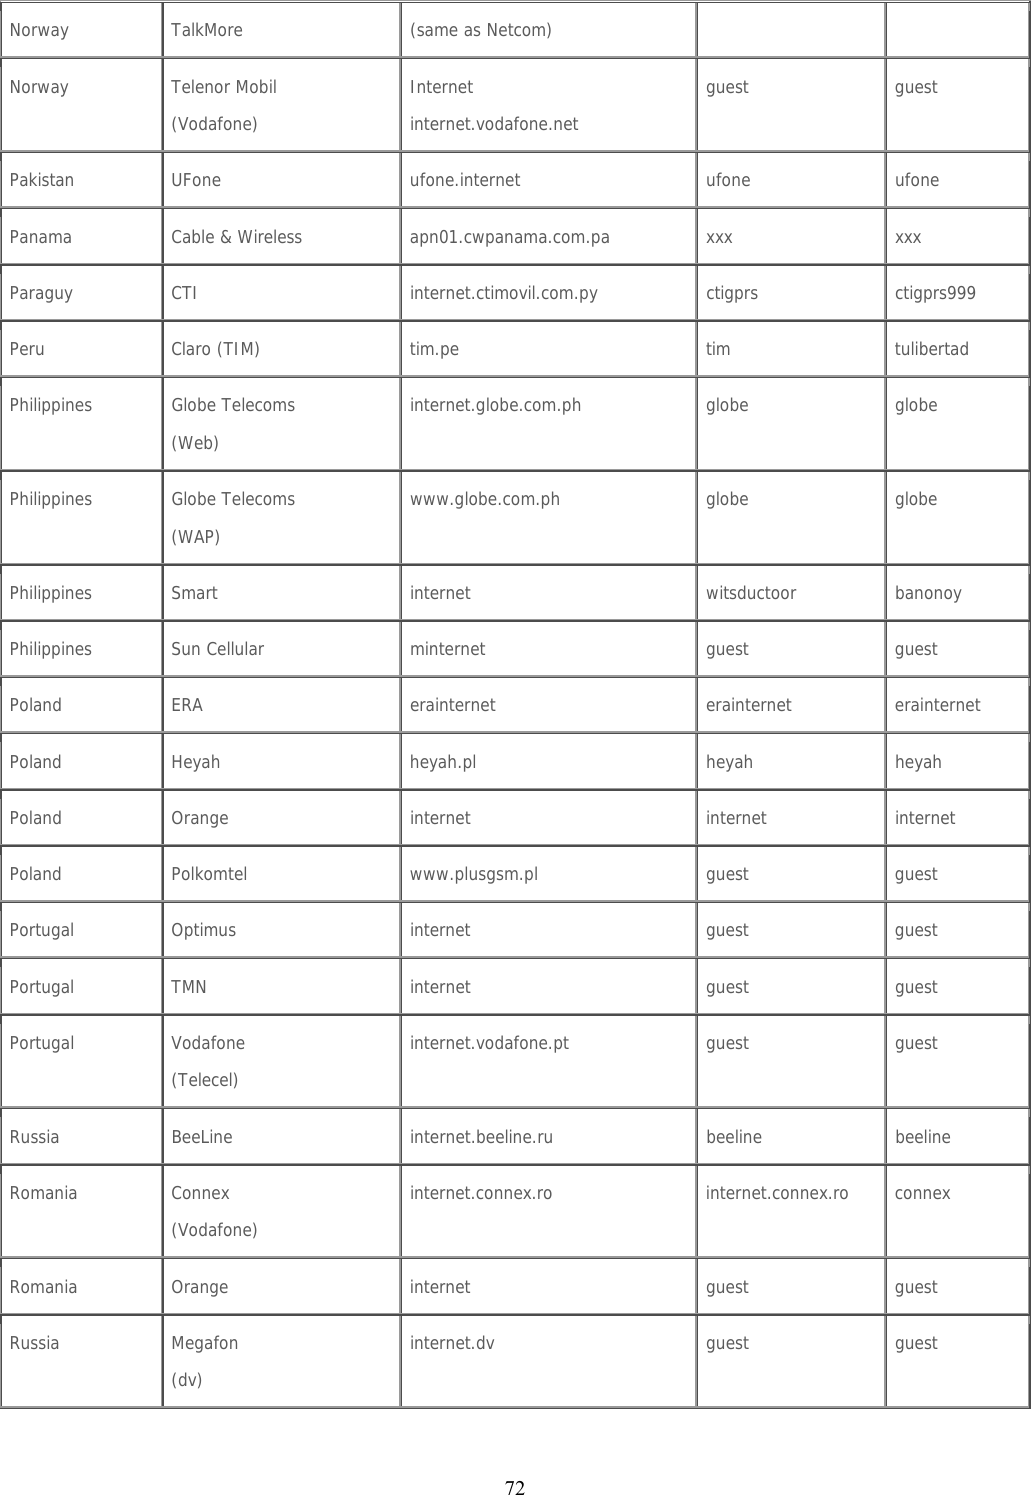
![Appendix Country Network APN User Name Password Albania Vodafone Twa guest guest Argentina CTI internet.ctimovil.com.ar guest guest Argentina Movistar internet.gprs.unifon.com.ar internet.unifon wap wap Argentina Personal gprs.personal.com [mobile number] adgj Australia Optus internet guest guest Australia Telstra telstra.internet guest guest Australia Telstra (data bundles) telstra.datapack [blank] Telstra Australia Telstra (pay by time) telstra.pcpack [blank] Telstra Australia Three 3netaccess a a Australia Vodafone vfinternet.au guest guest Austria Drei drei.at guest guest Austria Max Online gprsinternet GPRS [blank] Austria Max Online (Business) business.gprsinternet GPRS [blank] Austria Max Online (Metro) gprsmetro GPRS [blank] Austria Mobilkom A1 a1.net ppp@a1plus.at ppp Austria OneNet web.one.at web web Austria tele.ring web web@telering.at web Azerbaijan Azercell internet guest guest Bangladesh Grameen Phone gpinternet [blank] [blank] 63](https://usermanual.wiki/GlobalSat-WorldCom/TR203/User-Guide-1050200-Page-64.png)
![Belarus VELCOM web.velcom.by unlim.velcom.by web unlim web unlim Belgium Mobistar (personal) internet.be mobistar mobistar Belgium Mobistar (business) web.pro.be mobistar mobistar Belgium Orange orangeinternet guest guest Belgium Proximus (Internet) internet.proximus.be guest guest Belgium Proximus (intranet) intraprox.be guest guest Botswana Mascom Wireless internet.mascom guest guest Brazil Claro claro.com.br claro claro Brazil Oi gprs.oi.com.br guest guest Brazil Oi (WAP) wapgprs.oi.com.br oiwap oioioi Brazil TIM tim.br tim tim Brazil Velox wap.telcel.com iesgprs iesgprs2002 Bulgaria GloBul internet.globul.bg globul [none] Bulgaria M-Tel mms-gprs.mtel.bg mtel mtel Cameroon MTN Cameroon INTERNET guest guest Canada KORE Wireless apn.zerogravitywireless.com [blank] [blank] Canada Microcell (Fido) internet.fido.ca fido fido Canada Rogers AT&T internet.com wapuser1 wap Chile Entel PCS imovil.entelpcs.cl entelpcs entelpcs Chile Telefonica Movil web.tmovil.cl web web China China Mobile cmnet guest guest 64](https://usermanual.wiki/GlobalSat-WorldCom/TR203/User-Guide-1050200-Page-65.png)
![China China Unicom [none] guest guest Croatia T-Mobile web.htgpr 38591 38591 Croatia VIPNET START gprs0.vipnet.hr 38591 38591 Croatia VIPNET PRO gprs5.vipnet.hr 38591 38591 Croatia VIPNET 3G 3g.vip.hr 38591 38591 Colombia Movistar internet.movistar.com.co movistar movistar Congo Vodacom vodanet vodalive [blank] Costa Rica IceCelular icecelular guest guest Czech Republic Cesky Mobil (contract) internet guest guest Czech Republic Cesky Mobil (CM Prepay) cinternet guest guest Czech Republic Telefonica (contract) internet guest guest Czech Republic Telefonica (Go) gointernet guest guest Czech Republic Vodafone (contract) internet guest guest Czech Republic Vodafone (pre-pay) ointernet guest guest Czech Republic T-Mobile internet.t-mobile.cz guest guest Denmark 3 [none] guest guest Denmark Orange web.orange.dk guest guest Denmark Sonofon [none] guest guest Denmark TDC internet guest guest Dominican Republic Orange orangenet.com.do guest guest 65](https://usermanual.wiki/GlobalSat-WorldCom/TR203/User-Guide-1050200-Page-66.png)
![Egypt Click Vodafone internet.vodafone.net internet internet Egypt MobiNil mobinilweb guest guest Estonia EMT internet.emt.ee guest guest Estonia RLE internet guest guest Finland Dna internet guest guest Finland Elisa (Radiolinja) internet rlnet internet Finland Saunalahti internet.saunalahti guest guest Finland Sonera internet [blank] [blank] Finland Song internet.song.fi song@internet songnet France Bouygues ebouygtel.com guest guest France Bouygues (B2Bouygtel) b2bouygtel.com guest guest France Orange (contract) orange.fr orange orange France Orange MIB orange-mib mportail mib France Orange Mobicarte orange-acte orange orange France SFR websfr guest guest Germany D2 Vodafone web.vodafone.de guest guest Germany E-Plus internet.eplus.de eplus gprs Germany O2 (3G) surfo2 guest guest Germany O2 (GPRS) internet guest guest Germany Quam quam.de quam quam Germany T-Mobile D1 internet.t-mobile internet.t-d1.de t-mobile Ghana Areeba (formerly Spacefon) internet.spacefon.com guest guest 66](https://usermanual.wiki/GlobalSat-WorldCom/TR203/User-Guide-1050200-Page-67.png)
![Greece Cosmote internet guest guest Greece Telestet gnet.b-online.gr MSISDN, e.g. 3093XXXXXXX 24680 Greece TIM gint.b-online.gr web web Greece Vodafone internet.vodafone.gr guest guest Guatemala Comcel Wap.tigo.gt Wap Wap Guatemala PCS Digital ideasalo guest guest Guyana GT&T Cellink Plus wap.cellinkgy.com test test Hong Kong CSL hkcsl or internet guest guest Hong Kong New World internet guest guest Hong Kong Orange web.orangehk.com guest guest Hong Kong People internet guest guest Hong Kong SmarTone internet guest guest Hong Kong Sunday internet guest guest Hong Kong Three web-g.three.com.hk guest guest Hungary Pannon (normal) net guest guest Hungary Pannon (flat rate) netx guest guest Hungary Pannon (compressed) snet guest guest Hungary T-Mobile (subscription) internet [supplied] [supplied] Hungary T-Mobile (non-sub.) internet wap Wap Hungary T-Mobile (MMS) mms-westel mms [supplied] 67](https://usermanual.wiki/GlobalSat-WorldCom/TR203/User-Guide-1050200-Page-68.png)
![Hungary Vodafone (contract) (compr.) internet.vodafone.net guest guest Hungary Vodafone (contract) (un-comp.) standardnet.vodafone.net guest guest Hungary Vodafone (pre-pay) (comp.) vitamax.internet.vodafone.net guest guest Hungary Vodafone (pre-pay) (un-comp.) vitamax.snet.vodafone.net guest guest India AirTel airtelgprs.com guest guest India BPL bplgprs.com bplmobile [blank] India BSNL celloneportal guest guest India Hutch (normal) www guest guest India Hutch (Gujarat) web guest guest India Idea Cellular internet guest guest India MTNL Mumbai mmsmtnlmum mtnl mtnl123 India MTNL Mumbai (Plan 2) gprsmtnlmum mtnl mtnl123 Indonesia Excelcomindo www.xlgprs.net xlgprs proxl Indonesia IM3 www.indosat-m3.net wap.indosat-m3.net gprs im3 Indonesia Indosat (Matrix) satelindogprs.com indosatgprs guest guest Indonesia Telkomsel internet telkomsel wap wap123 68](https://usermanual.wiki/GlobalSat-WorldCom/TR203/User-Guide-1050200-Page-69.png)
![Ireland Meteor isp.mymeteor.ie my meteor Ireland O2 (contract) open.internet gprs gprs Ireland O2 (pre-pay) pp.internet gprs gprs Ireland Vodafone (contract) isp.vodafone.ie vodafone vodafone Ireland Vodafone (pre-pay) live.vodafone.com vodafone vodafone Israel Cellcom internetg guest guest Israel MTC-Vodafone apn01 guest guest Israel Orange orangeinternet guest guest Italy Blu INTERNET guest guest Italy H3G tre.it guest guest Italy TIM ibox.tim.it guest guest Italy Vodafone (Omnitel) web.omnitel.it guest guest Italy Wind internet.wind internet.wind.biz Wind Wind Jamaica Cable & Wireless wap guest guest Jamaica Digicel web.digiceljamaica.com wapuser wap03jam Japan Vodafone (J-Phone) vodafone ai@vodafone vodafone Jersey (See UK) Kazakhstan Beeline internet.beeline.kz internet.beeline [blank] Kenya Safaricom web.safaricom.com web web Laos ETL etlnet guest guest Latvia LMT internet.lmt.lv [blank] [blank] 69](https://usermanual.wiki/GlobalSat-WorldCom/TR203/User-Guide-1050200-Page-70.png)
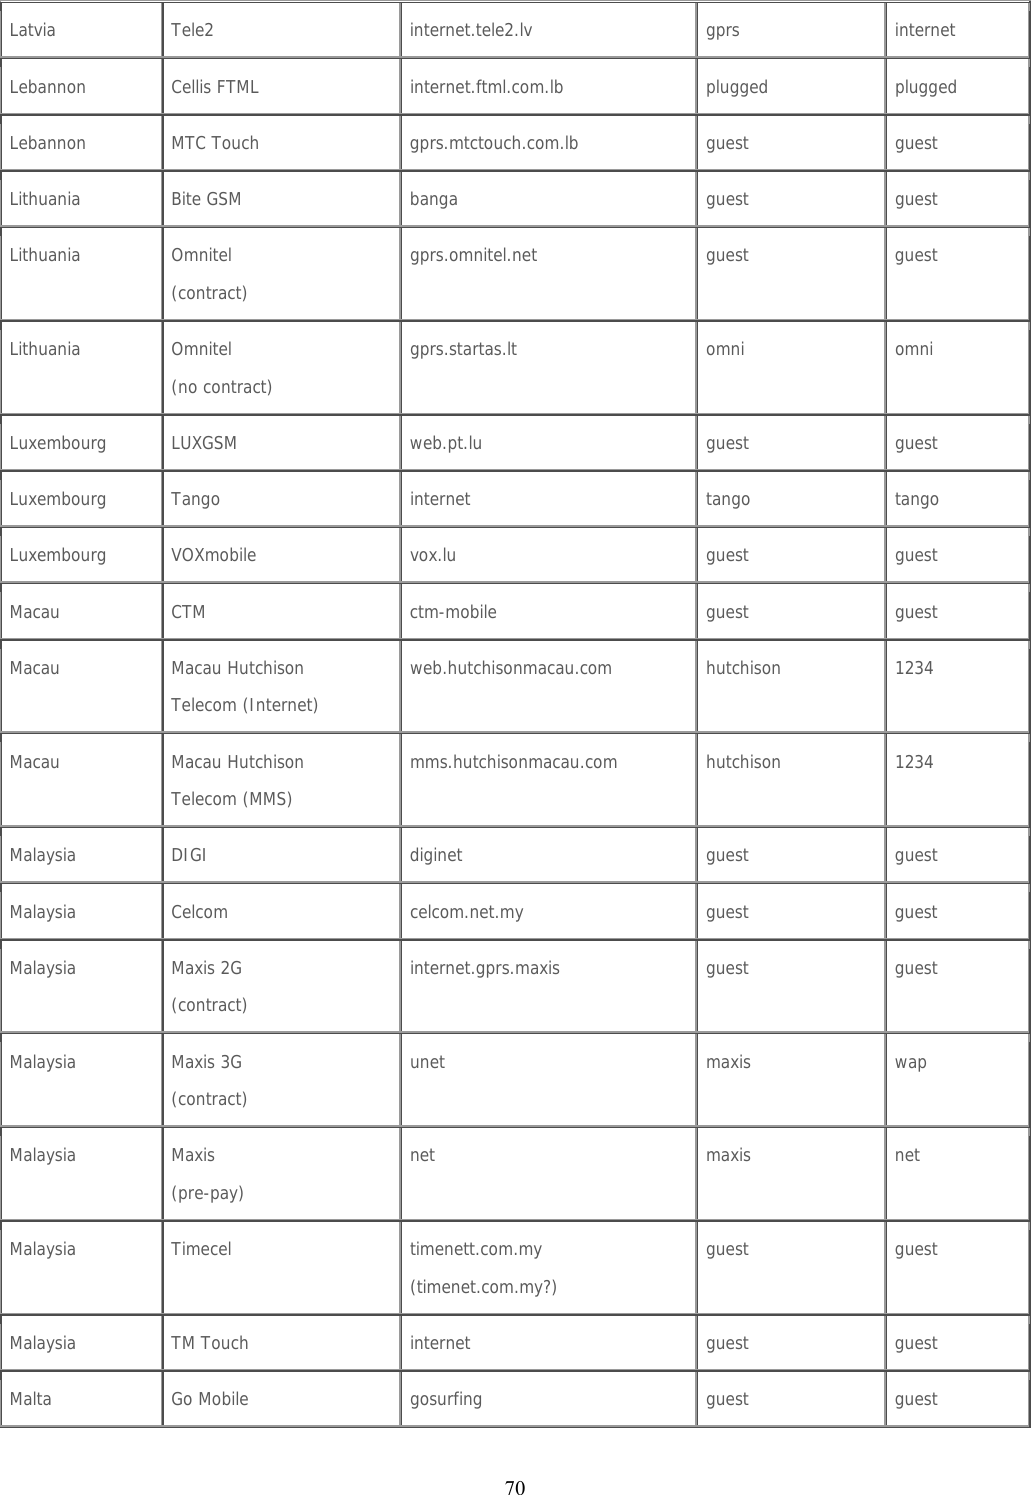
![(contract) Malta Go Mobile (pre-pay) rtgsurfing guest guest Mexico Telcel internet.itelcel.com webgprs webgprs2002 Moldavia Moldcell internet gprs gprs Morocco Maroc Telecom iam wac 1987 Morocco Medi Telecom wap.meditel.ma MEDIWAP MEDIWAP Netherlands KPN Mobile internet KPN gprs Netherlands O2 internet guest guest Netherlands T-Mobile (Ben) active internet guest guest Netherlands Telfort internet telfortnl password Netherlands Vodafone (normal) web.vodafone.nl vodafone vodafone Netherlands Vodafone (business) office.vodafone.nl vodafone vodafone New Zealand Vodafone (unrestricted) internet guest guest New Zealand Vodafone (restricted) www.vodafone.net.nz guest guest Nicaragua Alo Pcs internet.ideasalo.ni internet internet Nigeria Globacom (Internet) gprs wap [blank] Nigeria Globacom (WAP) glowap wap wap Nigeria MTN Nigeria web.gprs.mtnnigeria.net wap gprs Nigeria Vmobile wap.vmobile wap wap Norway Netcom internet.netcom.no netcom netcom 71](https://usermanual.wiki/GlobalSat-WorldCom/TR203/User-Guide-1050200-Page-72.png)
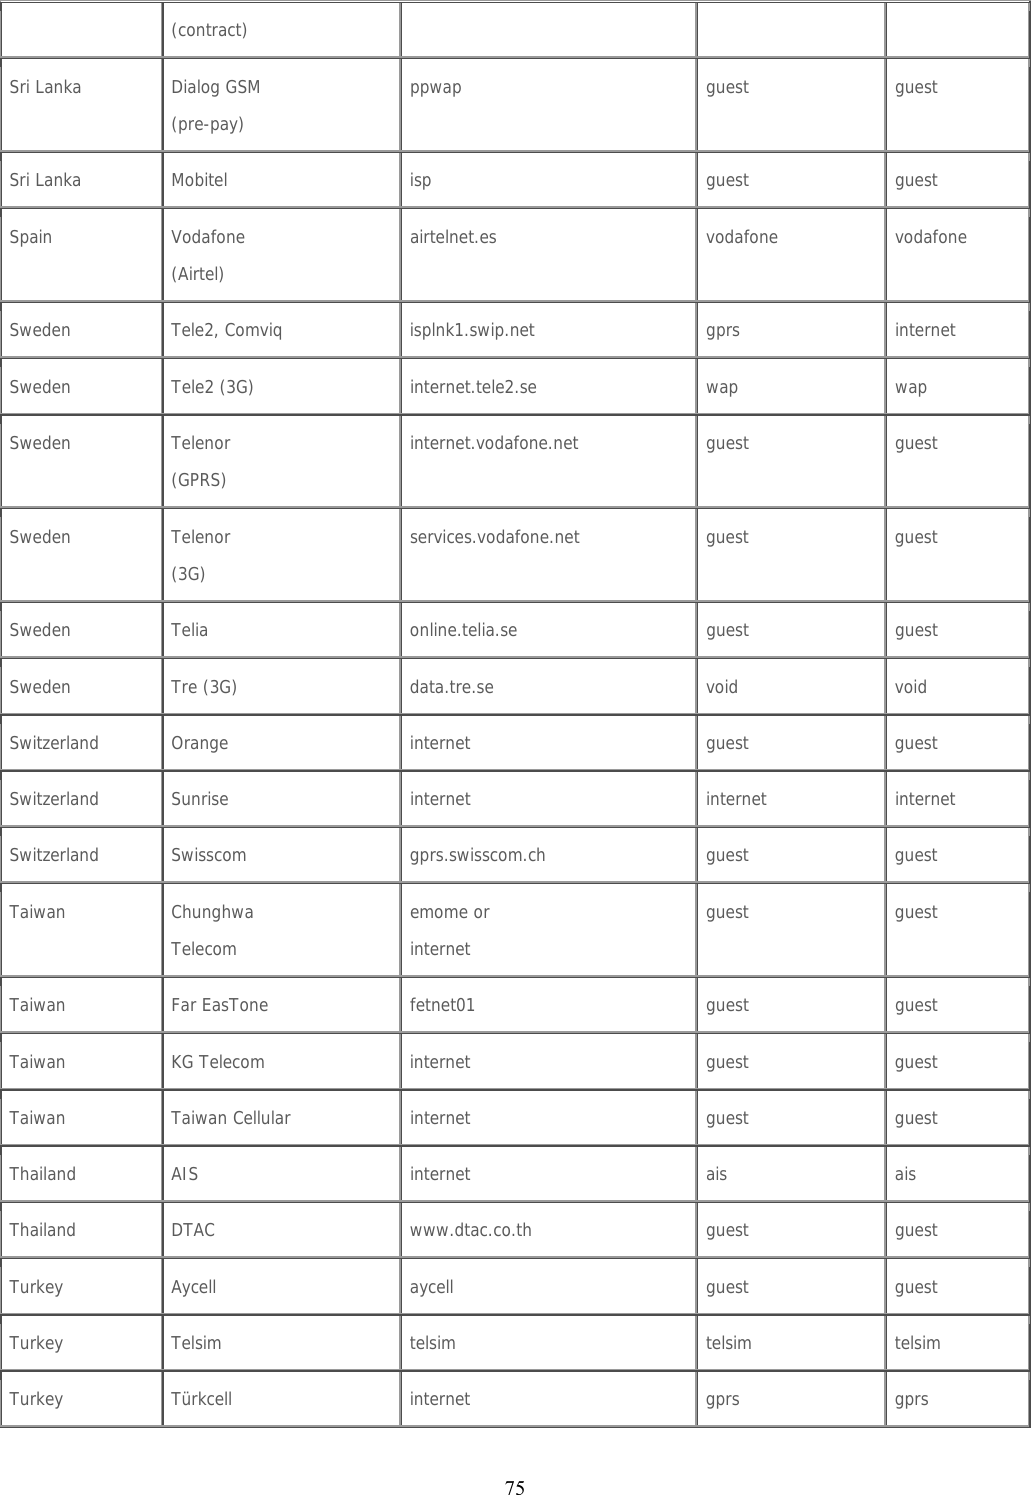
![Russia Megafon (kvk) internet.kvk guest guest Russia Megafon (ltmsk) internet.ltmsk guest guest Russia Megafon (Moscow) internet.msk gdata gdata Russia Megafon (mc) internet.mc guest guest Russia Megafon (NWGSM) internet.nw guest guest Russia Megafon (Siberia) internet.sib guest guest Russia Megafon (UGSM) internet.ugsm guest guest Russia Megafon (usi) internet.usi.ru guest guest Russia Megafon (Volga) internet.volga guest guest Russia Motiv (uses BeeLine) internet.beeline.ru beeline beeline Russia MTS internet.mts.ru internet.kuban mts mts Russia NCC internet ncc [supplied] Russia NTC internet.ntc guest guest Russia PrimTel internet.primtel.ru guest guest Saint Lucia Cable & Wireless internet guest guest Saint Vincent & the Grenadines Digicel wap.digiceloecs.com wapoecs wap03oecs Saudi Arabia STC jawalnet.com.sa guest guest 73](https://usermanual.wiki/GlobalSat-WorldCom/TR203/User-Guide-1050200-Page-74.png)
![SÈnÈgal Tigo wap.sentelgsm.com guest guest Serbia- Montenegro Mobtel Srbija internet mobtel gprs Serbia- Montenegro Telekom Srbija gprsinternet mts 064 Serbia- Montenegro Telekom Srbija (MMS service) mms mts 064 Serbia- Montenegro Telekom Srbija (WAP service) gprswap mts 064 Singapore M1 mobilenet guest guest Singapore SingTel internet guest guest Singapore Starhub shwapint guest guest Slovakia Eurotel internet guest guest Slovakia Globtel internet guest guest Slovakia Orange internet jusernejm pasvord Slovenia Mobitel (Internet) internet mobitel internet Slovenia Mobitel (Internet Pro) internetpro mobitel internet Slovenia Simobil [none] guest guest South Africa Cell-C internet guest guest South Africa MTN internet guest guest South Africa Vodacom internet guest guest South Africa Virgin Mobile vdata guest guest Spain Amena internet CLIENTE AMENA Spain Telefonica (Movistar) movistar.es movistar movistar Sri Lanka Dialog GSM www.dialogsl.com guest guest 74](https://usermanual.wiki/GlobalSat-WorldCom/TR203/User-Guide-1050200-Page-75.png)
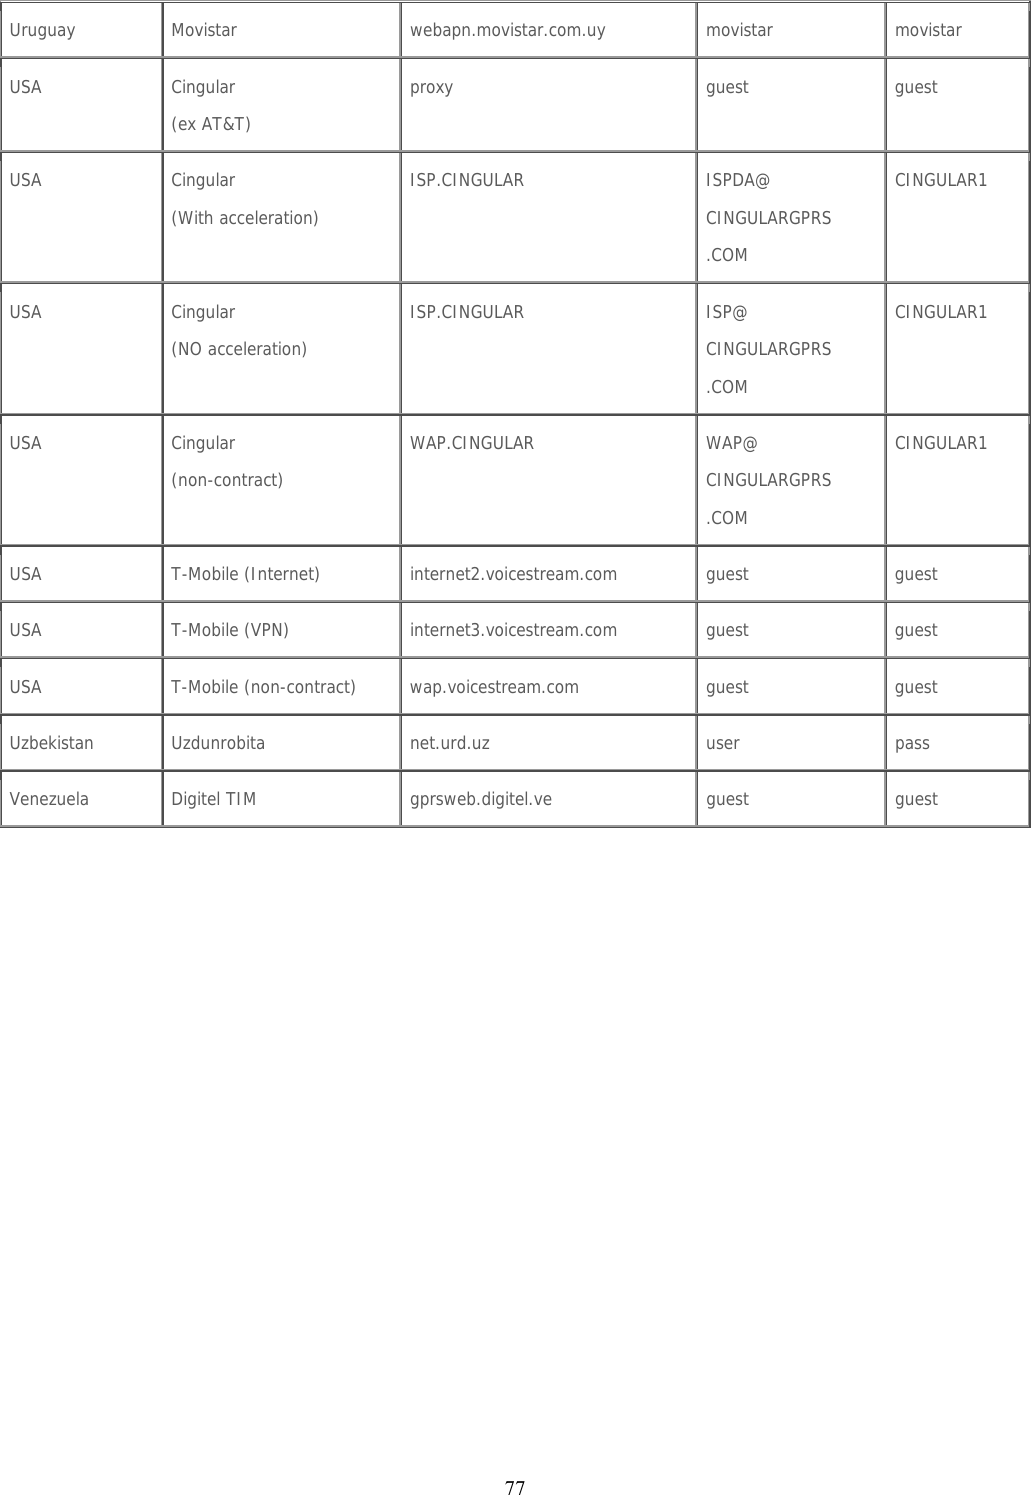
![UAE Etisalat mnet mnet mnet UK 3 three.co.uk guest guest UK Jersey Telecom pepper abc abc UK O2 (contract) mobile.o2.co.uk web password UK O2 (contract) -faster- mobile.o2.co.uk faster password UK O2 (pre-pay) payandgo.o2.co.uk payandgo payandgo UK Orange (Pay Monthly) orangeinternet user pass UK Orange (Pay and Go) orangewap Multimedia Orange UK T-Mobile general.t-mobile.uk user pass UK Virgin Mobile goto.virginmobile.com user [space] UK Vodafone (contract) internet web webs UK Vodafone (pre-pay) pp.vodafone.co.uk wap wap Ukraine Djuice www.djuice.com.ua igprs igprs Ukraine Jeans www.jeans.ua guest guest Ukraine Kyivstar www.kyivstar.net igprs internet Ukraine Mobi-GSM internet.urs guest guest Ukraine UMC www.umc.ua guest guest Uruguay ANCEL gprs.ancel guest guest Uruguay CTI internet.ctimovil.com.uy ctiweb ctiweb999 76](https://usermanual.wiki/GlobalSat-WorldCom/TR203/User-Guide-1050200-Page-77.png)