GlobalTop Technology ZGT01R ZigBee Ring User Manual
GlobalTop Technology Inc. ZigBee Ring Users Manual
Users Manual
ZigBee Emotion Ring
User Manual
Rev:01
ZigBee Ring
Zg-T01R
&
USB Dongle
Zg-C01U
4
1、Manufacturer Introduction
GlobalTop, located in Tainan Taiwan, is the professional in RF
system design and manufacture. With the strong RF system design
team, GlobalTop has variable RF product lines, like GPS, Lighting
control system and ZigBee products.
5
2、
、、
、Product Information
2.1Product spec and features
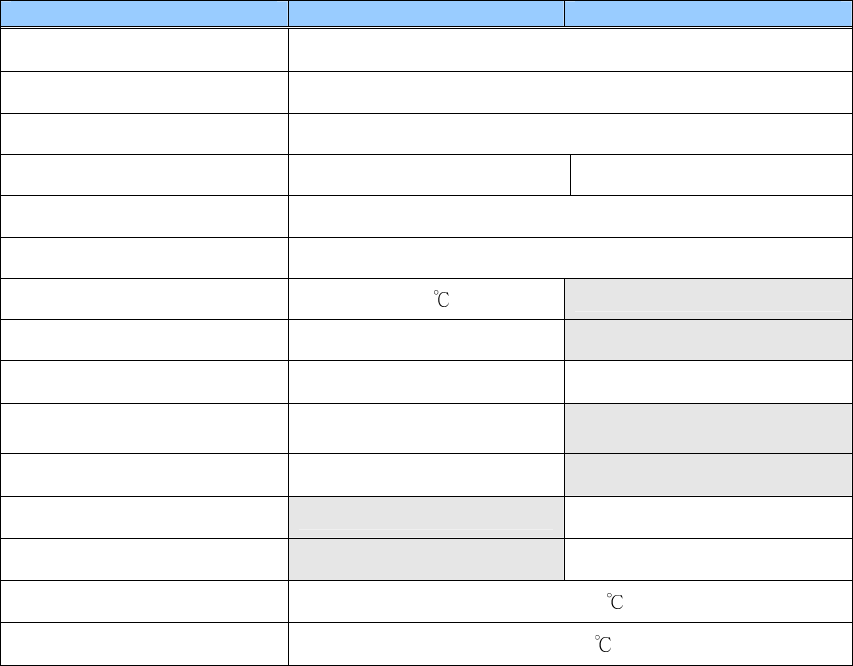
2.1.1 Hardware spec :
::
:
Emotion Ring USB Dongle
MAC
IEEE 802.15.4
Carrier Frequency
2.4 GHz
Modulation
DSSS
Output Power
-4.06 dBm -1.18 dBm
Sensitivity
-94 dBm
Communication Distance
10 Meters
Temperature Resolution
0.1
Temperature Sample Rate
1 Data/ Sec
Circuit Consumption
Max. 30mA Max. 50mA
Power Supply
DC input
(one AA battery )
Rechargeable Battery
20mAh
Max Connection
30
USB
USB2.0 Standard Type-A
Operating Temperature
+10 ~ +50
Storage Temperature
0 ~ +85
2.1.2 Contents in package and accessories :
::
:
One set includes 9 integrity items at least:
User manual * 1
PC software & USB Driver CD * 1
Relaxing learning guider CD * 1
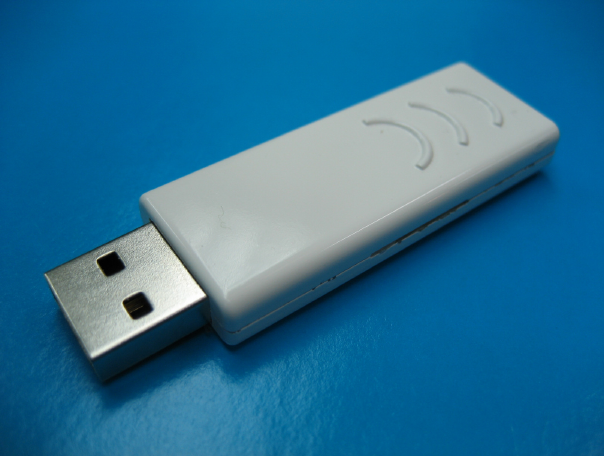
ZigBee USB receiver * 1
ZigBee emotion ring * 1
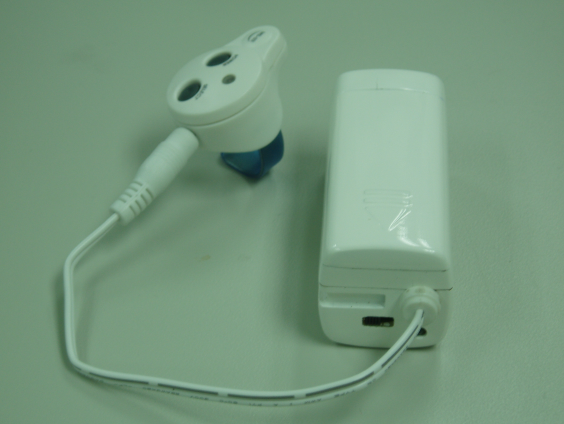
Charger * 1
Clear wiper * 1
2.2 The notice before using emotion ring and installing PC
software application:
1. Please take this training under professional supervision!
2. The relaxing CD may induce sleep. Please be cautious while driving or
operate the machine.
4
3. Please do not tear the MAC sticker on emotion ring and USB dongle.
4. You may not use the rechargeable battery in charger.
5. Please do not take this training in a windy place.
6. Parents accompanying children under age 12 while taking this training is
required.
7. It is not necessary to go internet online while installation.
8. It needs only once to setup USB dongle driver. You may un-install the
driver if you do not need it.
9. Strongly recommend to install this application using Microsoft Windows
XP.
5
3 、
、、
、ZigBee Emotion Ring
3.1 LED Indicator:
::
:
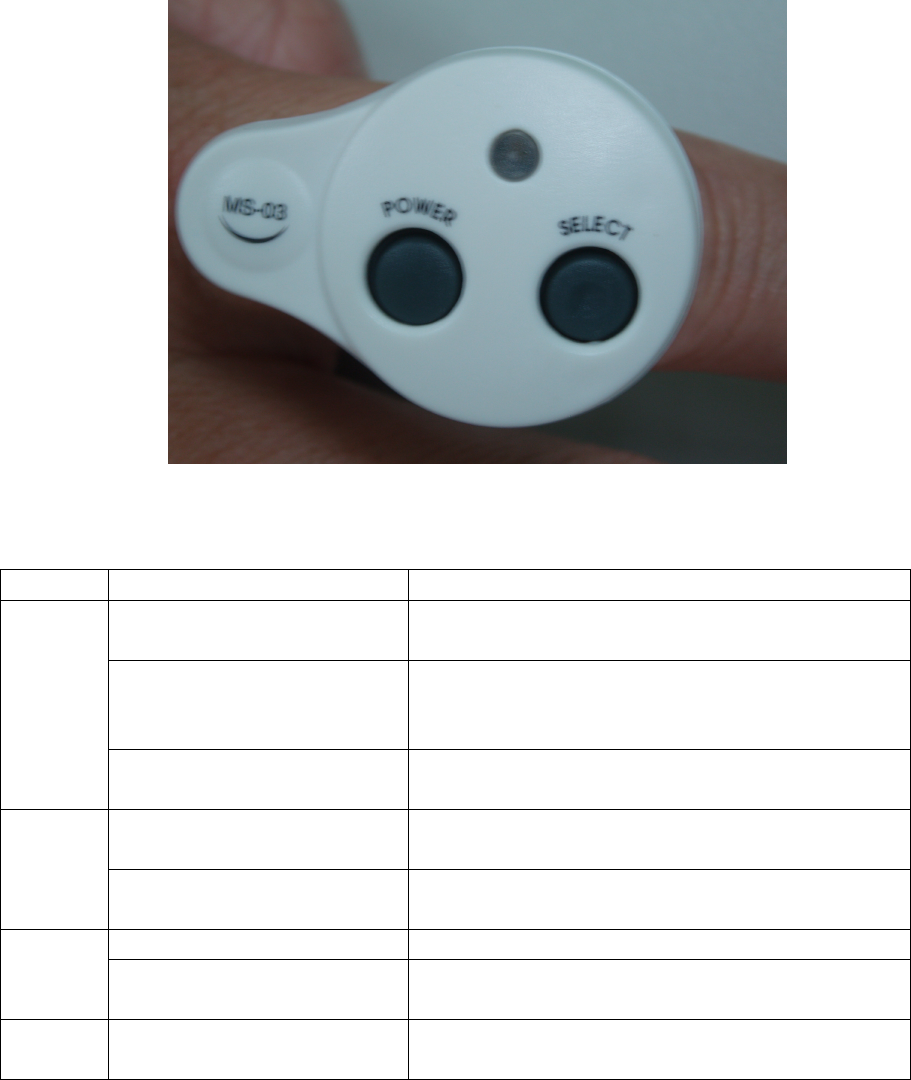
Four colors LEDs to indicate different status:
color LED Behavior Device Status
Steady for 1 second,
then dark.
Press Power button to turn on ZigBee Ring
Blinking 6 times in 4 secs
Press Power button and hold 4 secs to
turn off ZigBee Ring ( go into power
saving mode ).
Red
Blinking 3 times/sec The rechargeable battery is low voltages
( Need to be charged )
Steady Press SELECTION button to switch the
buzzer on/off.
Yellow
Blinking once/sec Temperature is the same or lower than
previous record with buzzer on
Speedy Blinking Search & try to link with ZigBee dongle Blue
Blinking once/sec Temperature is the same or lower than
previous record with buzzer off
Green
Blinking once Temperature is higher than the previous
record
3.2 POWER button:
::
:
Turn on: Press”POWER” button once. Red led will blink once
then blue led blink speedy to search USB receiver. After
connecting with USB receiver, the blue led will blink once per
second.
6
Turn off: Press”POWER” button and hold 4 seconds. The red led
will blink 6 times while you hold to press “POWER” button then
turn off the ring. But if you do not hold to press the “POWER”
button for 4 seconds, the ring will go back to working mode
after you releasing the “POWER” button.
3.3 SELECT button:
Press one to switch buzzer function on/off.
3.4 POWER+SELECT button:
Press POWER and SELECT simultaneously to do hardware reset.
7
4 、
、、
、ZigBee USB Receiver
4.1 Blue LED indicator:
::
:
Blinking speedy:
::
:Plug in the USB Dongle while system boot-up
and does not receive data from any emotion ring.
Blinking once per second :
::
:Receive emotion ring data.
8
5、
、、
、Charger
5.1 Suitable battery:
::
:
Require one AA battery.
To avoid the damage of ring, you MAY NOT use the
rechargeable battery in the charger.
5.2 Red LED indicator:
::
:
Steady:
::
:Indicating the battery ΄s engine is enough if the charger
not under charging process. Or indicating the ring’s battery is full if
the charger under charging process.
Off:
::
:The power switch is off or the battery’s engine is too low to go
the charging process (need to change new battery).
※
※※
※ Note! We recommend to go charging process for 5 hours to get
the ring engine full status at the first time. After that, to get full
status needs 2 hours.
9
6、
、、
、 Installation guide
Note : Please plug in ZigBee USB dongle before going to
installation porcess.
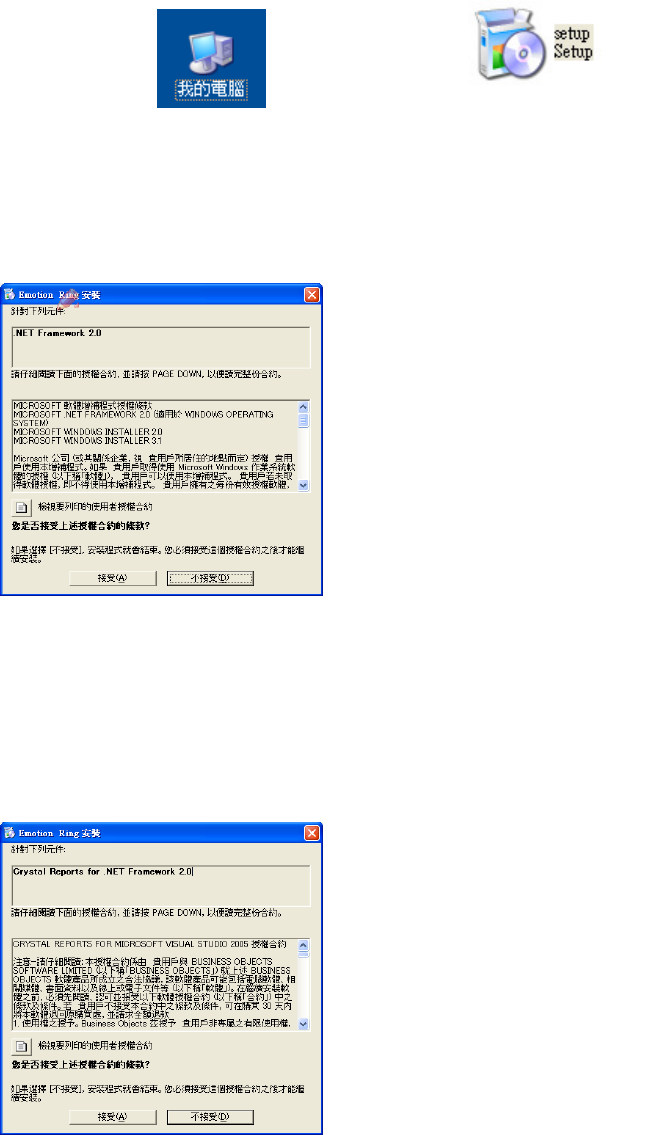
Step 1:
::
:Click “My Computer” to select the CD ROM and open the
folder.
Step 2:
::
:Execute “Setup”.
Step 3:
::
:Check if you accept the .NET Framework agreement. If
you accept this agreement, please click “Accept”. Otherwise
please click “Unacceptable” to terminate the installation process.
This process is performed only at the 1
st
installation.
Step 4:
::
:Check if you accept the “Crystal Reports for .NET
Framework 2.0” agreement. If you accept this agreement, please
click “Accept”. Otherwise please click “Unacceptable” to
terminate the installation process.
This process is performed only at the 1
st
installation.
10
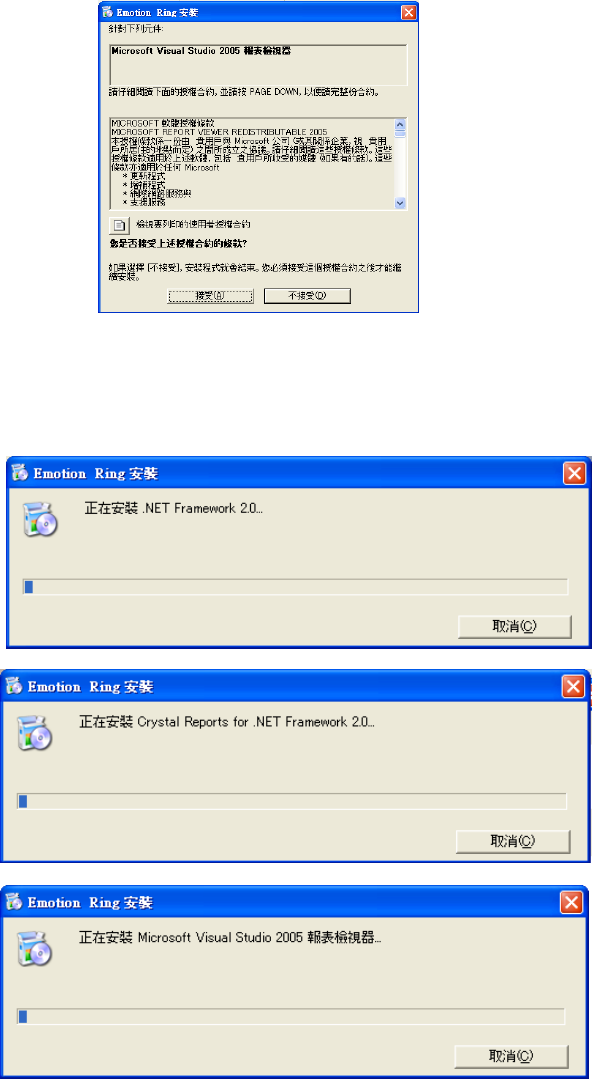
Step 5:
::
:Check if you accept the “Microsoft Visual Studio 2005”
agreement. If you accept this agreement, please click “Accept”.
Otherwise please click “Unacceptable” to terminate the
installation process.
This process is performed only at the 1
st
installation.
Step 6:
::
:The system will execute installation process for “.NET
Framework” 、”Crystal Reports for .NET Framework 2.0” and
“Microsoft Visual Studio 2005”.
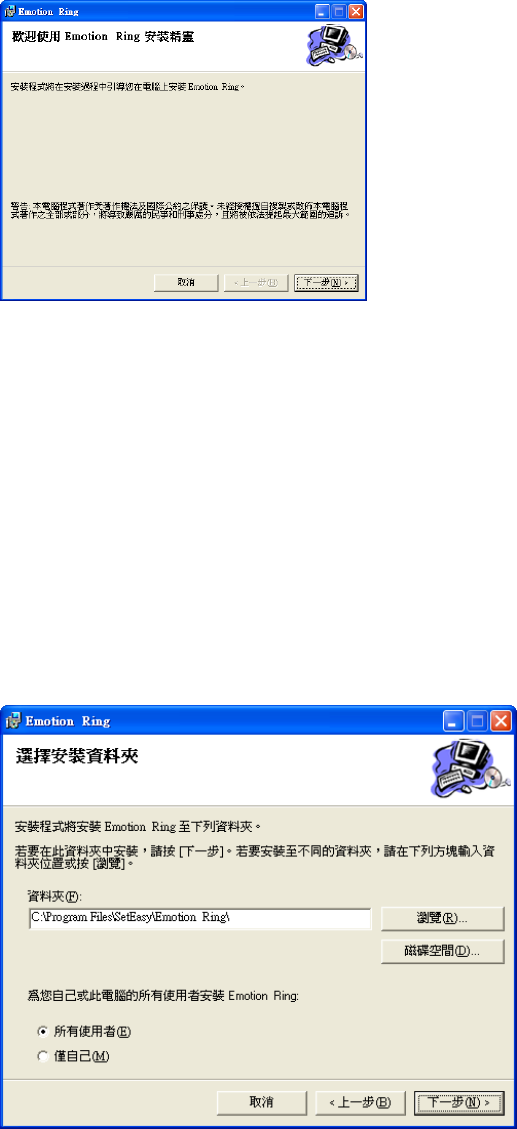
Step 7:
::
:After finishing the previous installation processes, system
will begin the “Finger Surface Temperature Monitor” installation
process. Please click “Next” to begin.
11
Step 8:
::
:Set the destination folder. If you have no special request,
system will create the folder automatically. Please click “Next”
after finishing continuing the process.
Everyone:Means everyone who logon this PC/NB can
execute this application.
Just me:Means just the one who logon this PC/NB using
my user id can execute this application.
。
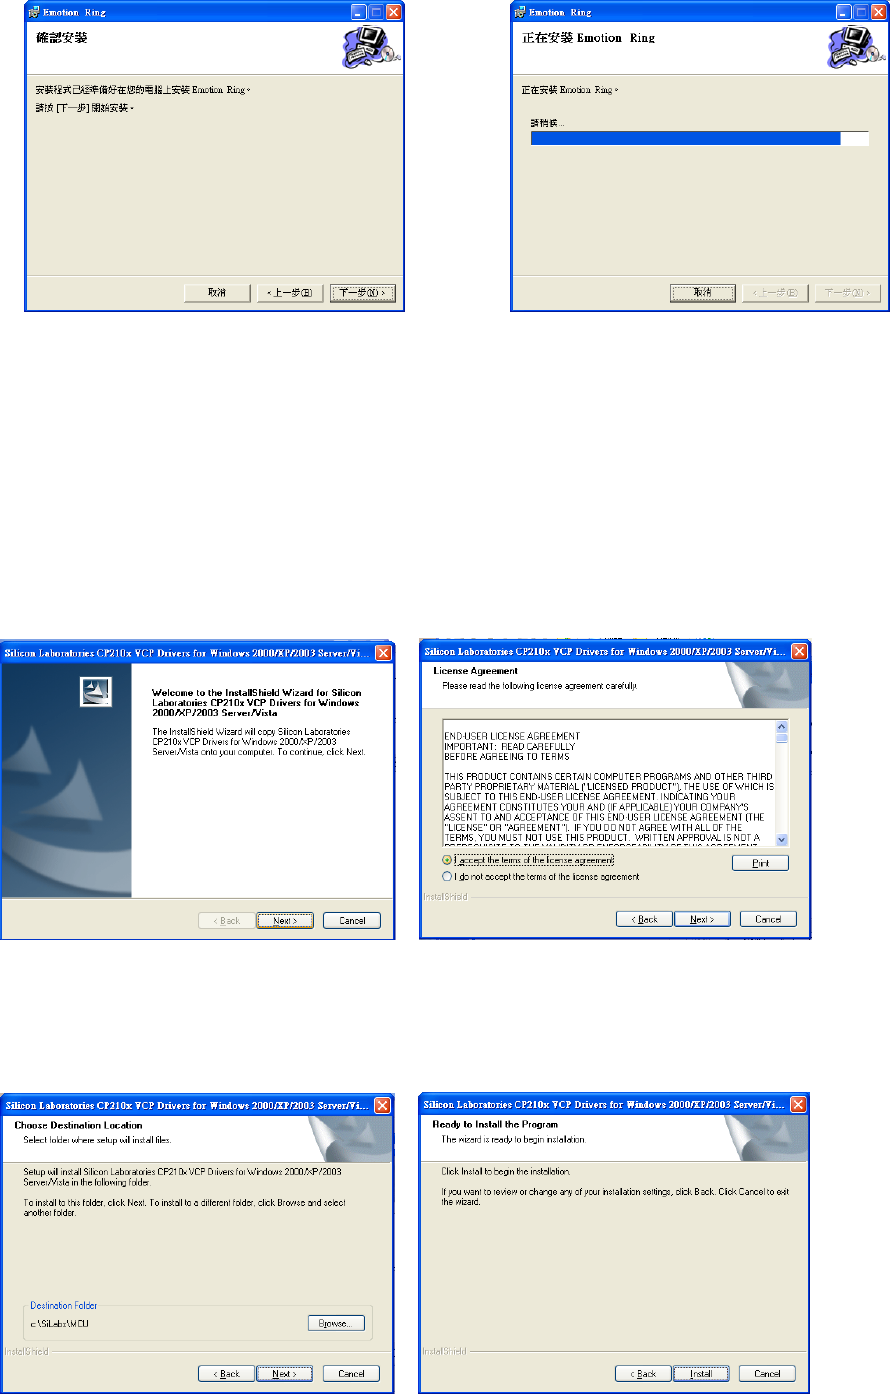
Step 9:
::
:Confirm before installation. Please click “Next” to go the
installation process.
Step 10:
::
:The system will execute installation process.
12
Step 11:
::
:System performs “CP210x VCP” driver installation process.
Please click “Next” to begin the installation.
Step 12:
::
:Check if you accept the “CP210x VCP” license
agreement. If you accept this agreement, please mark “I accept
the terms of the license agreement”. Otherwise please mark “I do
not accept the terms of the license agreement”. Then click
“Next” for next step.
Step 13:
::
:Choose Destination Location.
Step 14:
::
:Perform installation process to click “Install”.
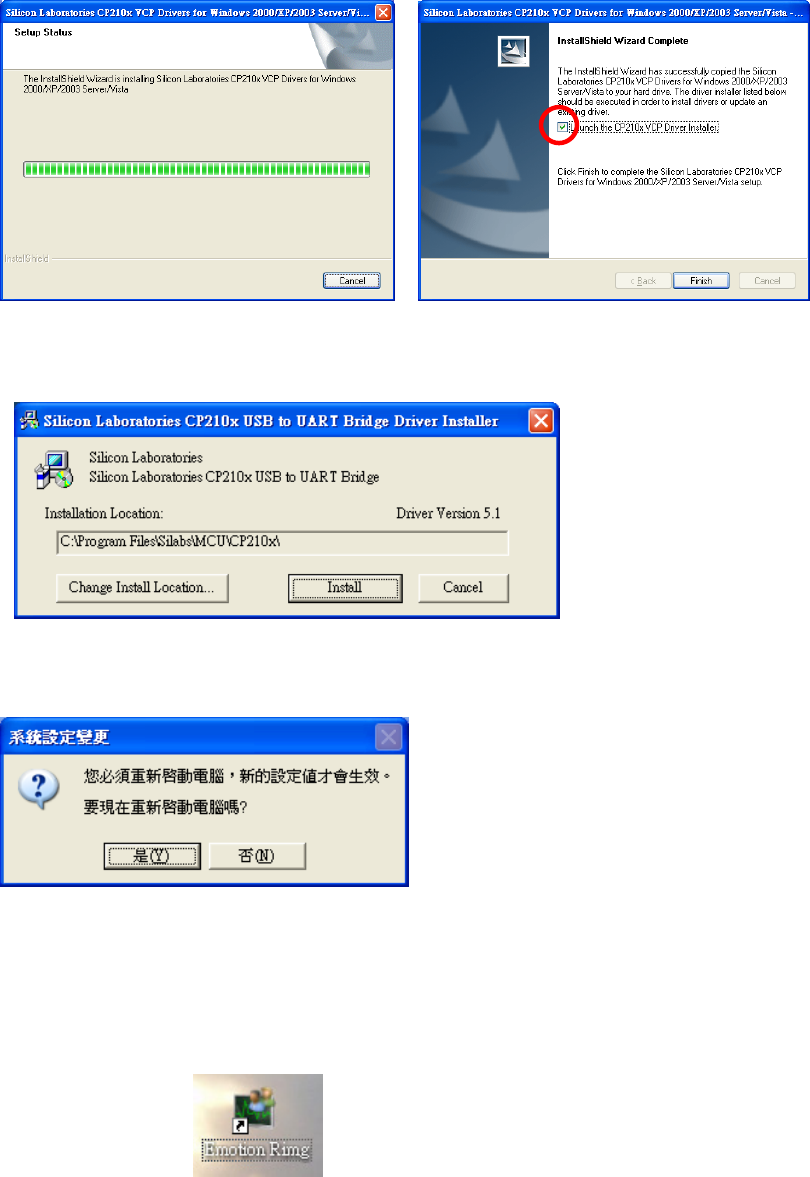
Step 15:
::
:Program is installing.
13
Step 16:
::
:Mark “Launch the CP210xVCP Drive Installer” then click
“Finish” to finish this process.
Step 17:
::
:System will popup another installation process. Please
click “Install”.
Step 18:
::
:Finishing the installation process, please click “Yes” to
restart your NB/PC.
Step 19:
::
:You may see the “Emotion Ring” shortcut icon on the
desktop after restart .
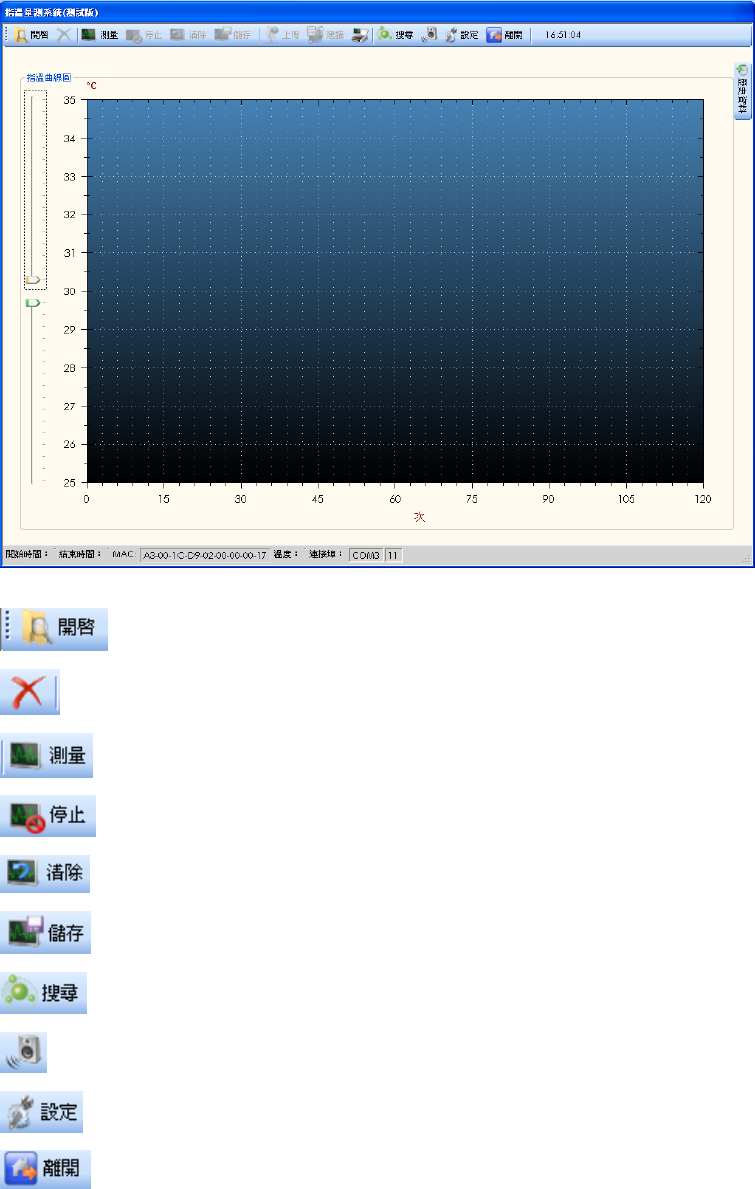
Step 20:
::
:You may execute the finger surface temperature monitor
program to click “Emotion Ring” icon.
14
7、User manual for Single User version
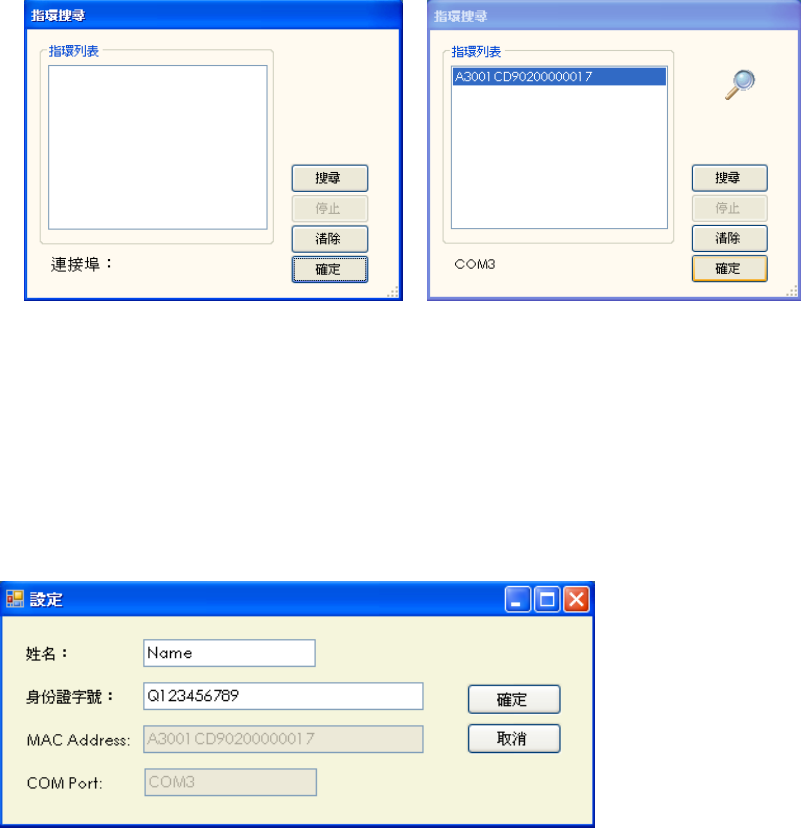
7.1The tool icons :
Open:Open the history training record.
Delete:Delete the current training record.
Start:Begin to monitor finger temperature.
Stop:Stop to monitor finger temperature.
Clear:Clear the current training record.
Save:Save the current training record.
Scan:scan the current working ring
Sound:Switch on/off the sound.
Setup:record personal profile.
Exit:Close the application window.
15
8.2 step by step to do the training:
::
:
Step 1:
::
:Plug the ZigBee USB dongle, then turn on emotion ring.
Open emotion ring application, and then check if the
MAC ID value on left screen is the same as the ring label
aside. If the answer is “yes”, then go to step 6. Others go
to step 2.
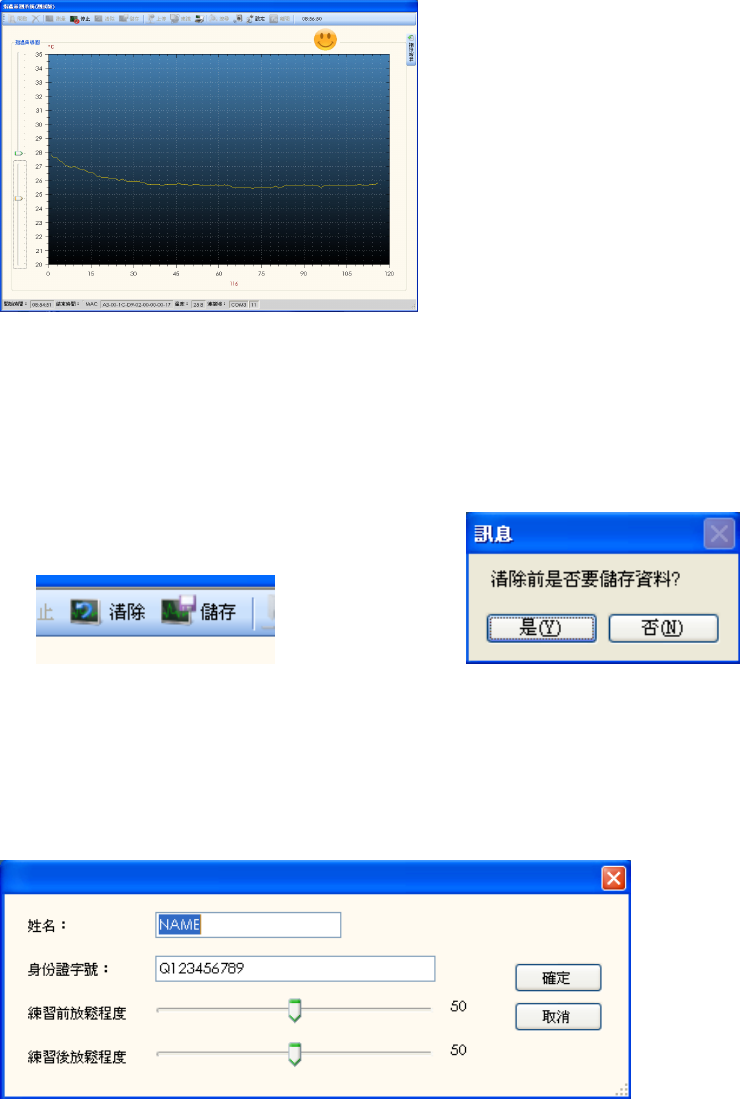
Step 2:
::
:Press “search” icon then popup a window as below.
Step 3:
::
:Press “search” button to find emotion ring. And then
press ”Stop” button after the ring MAC ID had been
identified. Press “OK” button to start training.
Step 4:
::
:Systems will popup a message box to ask if you want this
MAC ID as the default ring. If the NB/PC is for your private use,
you may choose “Yes”. Others choose “No”.
If you choose “Yes” , please go step 5.Others go step 6.
Step 5:
::
:Input your personal information: name & Id no. Then press
“OK” to close this window.
16
Step 6:
::
:Press “Start” to begin the finger temperature monitor
program. The yellow smile face means the finger temperature is
higher the previous second.
Step 7:
::
:Press “Stop” button to stop the train. You may choose to
save to clear the training data after stop the training.
Step 8:
::
:In case you choose to clear the training data, system will
popup another confirm message box to as you confirm again.
Step 9:
::
:In case you choose to save the training data, system will
popup another message box to ask you input some personal
profile. Also ask you to make the relaxed score both before and
after doing this training exercise.
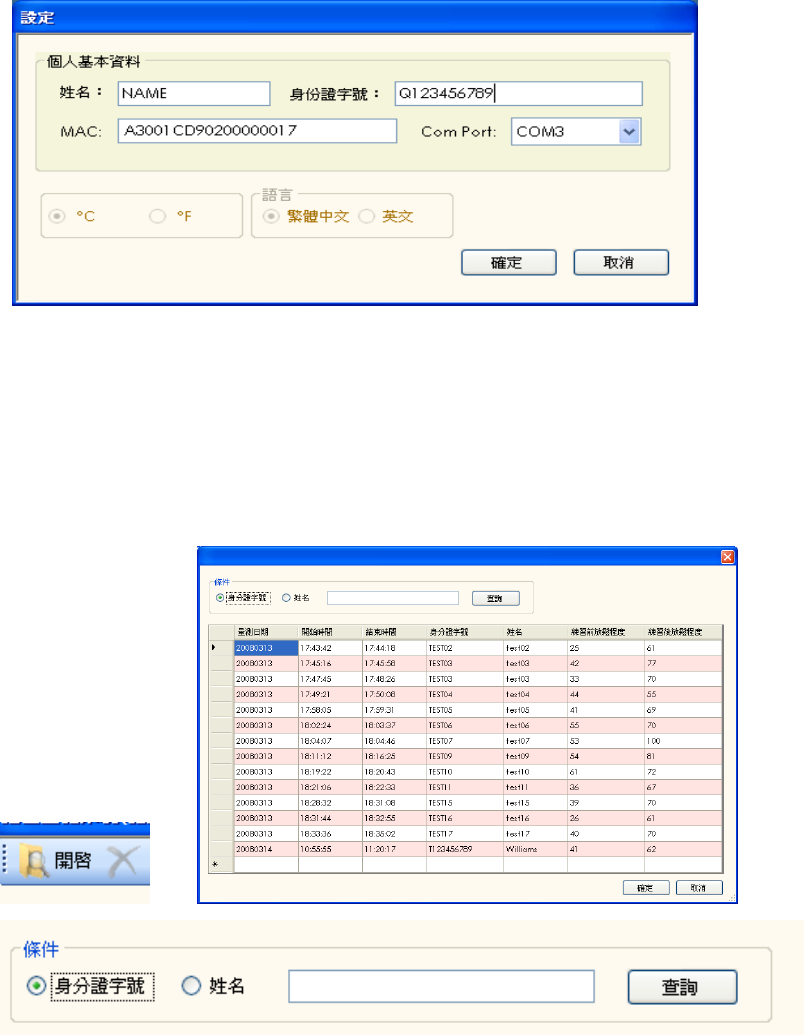
Step 10:
::
:To modify personal profile, please press “Configuration”
button
17
8.3 Inquiry History data
Press “History” button to choose one training record.
You also may use the id or name to search data.
FCC statement in User's Manual (for class B)
"Federal Communications Commission (FCC) Statement
This Equipment has been tested and found to comply with the limits for a class B digital device,
pursuant to Part 15 of the FCC rules. These limits are designed to provide reasonable protection
against harmful interference in a residential installation. This equipment generates, uses and can
radiate radio frequency energy and, if not installed and used in accordance with the instructions, may
cause harmful interference to radio communications. However, there is no guarantee that interference
will not occur in a particular installation. If this equipment does cause harmful interference to radio or
television reception, which can be determined by turning the equipment off and on, the user is
encouraged to try to correct the interference by one or more of the following measures:
- Reorient or relocate the receiving antenna.
- Increase the separation between the equipment and receiver.
- Connect the equipment into an outlet on a circuit different from that to
which the receiver is connected.
- Consult the dealer or an experienced radio/TV technician for help.
You are cautioned that changes or modifications not expressly approved by the party responsible for
compliance could void your authority to operate the equipment.
This Transmitter must not be co-located or operating in conjunction with
any other antenna or transmitter.
This device complies with Part 15 of the FCC Rules. Operation is subject to the following
two conditions: (1) This device may not cause harmful interference, and (2) this device
must accept any interference received, including interference that may cause undesired
operation.