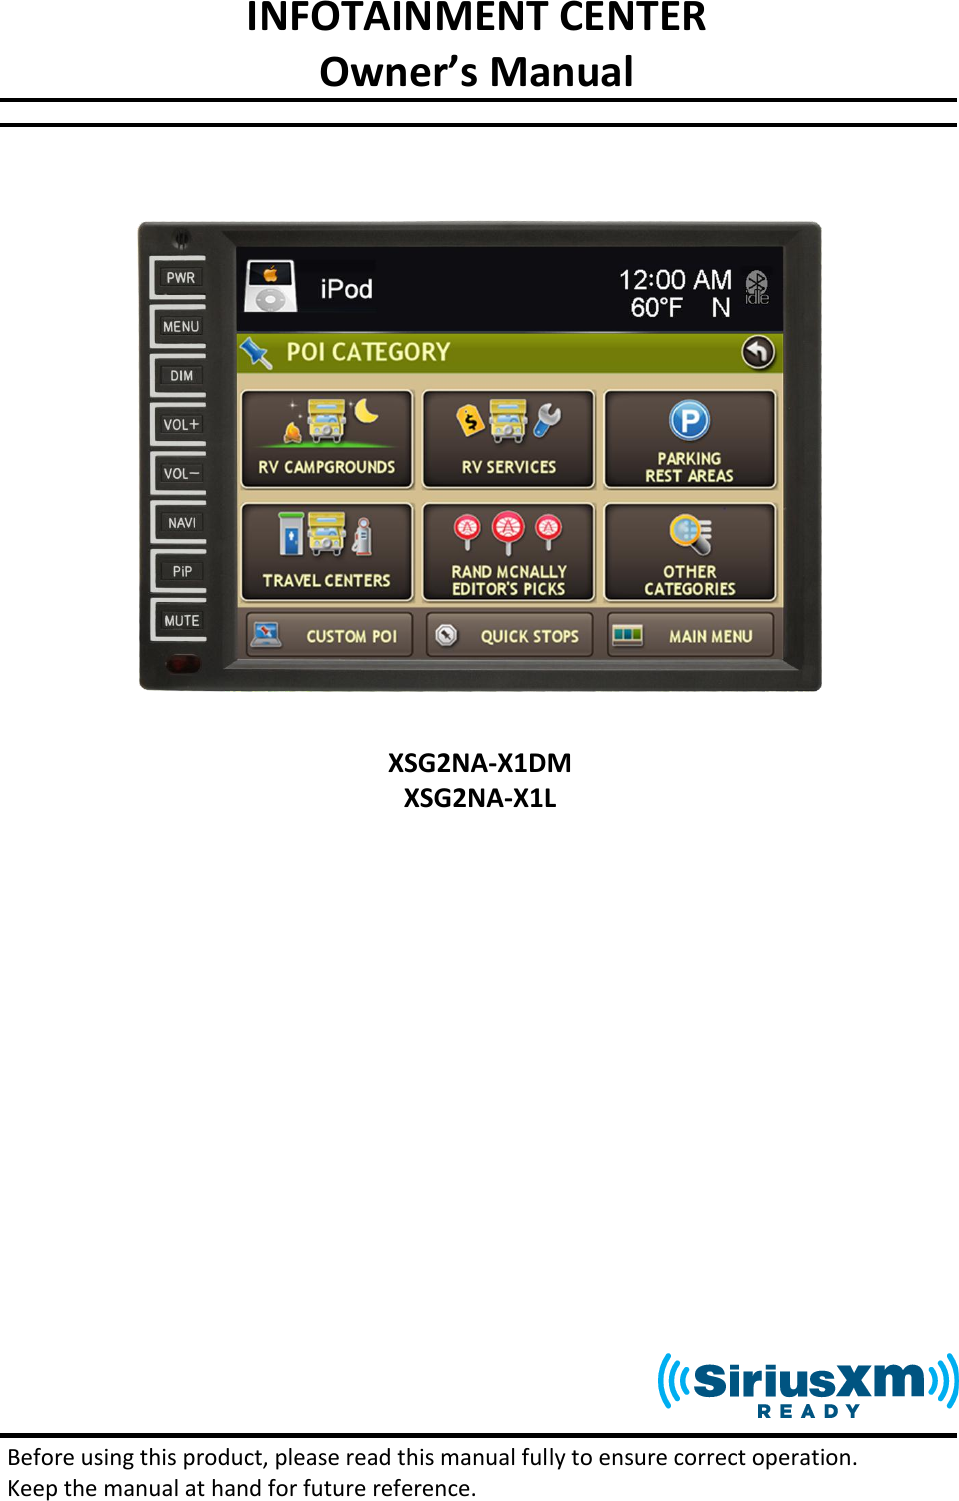
Glosys XSG2NA-X1L AVN(CAR AUDIO VIDEO NAVIGATION SYSTEM) User Manual XSG2NA X1 www xsna ca

Glosys Inc. AVN(CAR AUDIO VIDEO NAVIGATION SYSTEM) XSG2NA X1 www xsna ca

User Manual

INFOTAINMENT CENTER Owner’s Manual                         Before using this product, please read this manual fully to ensure correct operation.  Keep the manual at hand for future reference.  XSG2NA-X1DM XSG2NA-X1L
 2 THIS IS A DISCLAIMER OF LIABILITY AND DAMAGE RESPONSIBILITY AS REGARDS TO THE INFOTAINMENT CENTER MANUFACTURER  AND YOUR USE OF THE PRODUCT. YOU ASSUME TOTAL RESPONSIBILITY AND RISK FOR USING THIS SYSTEM.  Failure to properly focus on the operation of your motor vehicle can result in death, serious injury and property damage. The Infotainment Center should never be used at a time or in a manner that distracts you from properly focusing on operation of the motor vehicle in which it is installed.   Always operate the vehicle in a safe manner and in full compliance with speed limits, road safety signs and all other laws and devices which regulate operation of a motor vehicle.  Always remain aware of driving conditions at all times when using this system while operating a motor vehicle.  Operation of this unit, including its camera, navigation, audio and other features, can be distracting to your operation of the motor vehicle. While the system is intended to provide both entertainment and helpful vehicle and navigation information, it is not intended to, nor should you allow it to, distract you from properly focusing on operating the motor vehicle in which it is installed. It is up to you to minimize or prevent such distraction.  Learn how to use this system before placing the vehicle in operation. Minimize the amount of time spent viewing the screen of the unit while driving and use voice prompts whenever possible. Do not attempt to adjust settings of the system or resolve any malfunction with it while driving. Instead, pull off the road in a safe and legal manner, and then adjust its settings or deal with any malfunction.   In the event of serious malfunction, disable the unit (turn power off or remove power from the system) and contact a qualified service personnel.   Your optional navigation feature is intended to assist you with guidance to your destination. The navigation is NOT intended to replace, supersede or take precedence over any traffic signs, street signs, hazard signs, etc. IT IS YOUR RESPONSIBILITY TO ENSURE THE ROADS YOU ARE TRAVELLING ARE APPROPRIATE FOR THE VEHICLE YOU ARE DRIVING.  Do not enter destinations, change settings or access any functions requiring prolonged use of the controls of the unit while operating your motor vehicle. For safety, pull off the road before making any adjustments to the system or resolving any navigation discrepancies or questions.  If your Infotainment Center includes optional navigation features please refer to your navigation user manual for further specific information regarding its features, warnings, instructions and disclaimers.
 3  IMPORTANT SAFETY INFORMATION  Safety Information Read the operating instructions for the Infotainment Center and all other components of the system carefully before using the system. FAILURE TO OBSERVE THE INSTRUCTIONS GIVEN IN THIS MANUAL MAY CAUSE INJURY OR DAMAGE AND VOID THE WARRANTY.  Warnings  Observe the following warnings when using this unit: • The driver should neither watch the display nor operate the system while driving. Watching the display or operating the system will distract the driver from looking ahead of the vehicle and can cause accidents. Always stop the vehicle in a safe location and use the parking brake before watching the display or operating the system. While navigating please use voice prompts. • Use the proper power supply. This product is designed for operation with a negative grounded 12 V DC battery system. Never operate this product with other battery systems, especially not with a 24 V DC battery system. • Protect the DVD loader mechanism. Do not insert any foreign objects into the slot of this unit. Only insert appropriate CD or DVD products. • Do not disassemble or modify the unit. Do not disassemble or modify the unit, or attempt to repair the product yourself. This may cause serious injury or damage and your warranty will be null and void. If the product needs repair, consult your dealer or contact technical support (see page 5). • Do not use the unit when it is out of order. If the unit is out of order (no power, no sound) or in an abnormal state (has foreign objects in it, is exposed to water, is smoking, or smells), turn it off immediately and consult your dealer. • Refer installation to qualified personnel.       USA-Federal Communications Commission (FCC) This device complies with part 15 of the FCC Rules. Operation is subject to the following two conditions:  (1)  this  device  may  not  cause  harmful  interference;  and  (2)  this  device  must  accept  any  interference received, including interference that may cause undesired operation. This equipment has been tested and found to comply with the limits for a Class B digital device, pursuant to Part  15  of  FCC  Rules.  These  limits  are  designed  to  provide  reasonable  protection  against  harmful interference  in  a  residential  installation.  This  equipment  generates,  uses,  and  can  radiate  radio  frequency energy. If not  installed and used in accordance  with  the instructions, it may cause harmful  interference to radio  communications.  However,  there  is  no  guarantee  that  interference  will  not  occur  in  a  particular installation. If this equipment does cause harmful interference to radio or television reception, which can be determined by turning the equipment off and on, the user is encouraged to try and correct the interference by one or more of the following measures: - Reorient or relocate the receiving antenna. - Increase the distance between the equipment and the receiver. - Connect the equipment to outlet on a circuit different from that to which the receiver is connected. - Consult the dealer or an experienced radio/TV technician for help. Any changes or modifications not expressly approved by the party responsible for compliance could void the user’s authority to operate the equipment.
 4          Notes on Use: Video Sources and On-Screen Display • Your Infotainment Center is designed to only display video when the parking brake is fully engaged. • Never attempt to circumvent, defeat or bypass any of these safety features. These designs are intended to reduce driver distractions. • Failure to use the safety features as designed could lead to serious injury, death and property damages. Your manufacturer and partners will not be liable for any injury or loss.  Notes on Use: Liquid Crystal Panel • Do not cause impact to the liquid crystal panel. Only use your finger to gently touch the LCD panel. • Do not touch the liquid crystal fluid if the LCD is damaged or broken. The liquid crystal fluid may be    hazardous to your health or fatal. If the liquid crystal fluid from LCD contacts your body or clothing,   wash it off with soap immediately. • When the temperature is very cold or very hot, the image may appear unclear or may move slowly. • In order to protect the liquid crystal panel, keep it out of direct sunlight while the unit is not in use. • Sudden changes in the temperature inside the vehicle such as those which occur immediately after the vehicle’s air conditioner or heater has been turned on may cause condensation (droplets of water) to form and, as a result, the panel may not work properly. Do not use the unit while these symptoms are in evidence but leave the unit standing for about an hour and then resume or start use. • To clean the monitor, wipe only with a dry silicone cloth or soft cloth. Do not use a stiff cloth or volatile solvents such as paint thinner and alcohol.                       CAUTION: THIS DVD VIDEO RECORDER IS A CLASS 1 LASER PRODUCT. USE OF CONTROLS, ADJUSTMENTS OR PERFORMANCE OF PROCEDURES OTHER THAN THOSE SPECIFIED HEREIN MAY RESULT IN HAZARDOUS RADIATION EXPOSURE. DO NOT OPEN COVERS AND DO NOT REPAIR THE PLAYER YOURSELF. REFER SERVICING TO QUALIFIED PERSONNEL.  CAUTION: FOLLOW THE LAWS AND REGULATIONS OF YOUR STATE, PROVINCE OR COUNTRY FOR INSTALLATION.  CAUTION: TO REDUCE THE RISK OF ELECTRIC SHOCK, DO NOT REMOVE COVER (OR BACK). NO USER SERVICEABLE PARTS INSIDE. REFER SERVICING TO QUALIFIED SERVICE PERSONNEL.
 5 Customer Feedback  Your Infotainment Center has been designed specifically for use in Recreational Vehicles. This system has been designed to offer a rich and intuitive feature set that is simple to use and even easier to enjoy. We have engineered this system based off input from real RV’ers like you!  We want your feedback. Do you have comments on your Infotainment Center? Questions about operating the system, suggestions or concerns? Send us a note or talk to one of our Infotainment Specialists and give us your comments. You can find our contact information at the bottom of this page.  Product Registration  Please take a moment to fill out your Infotainment Center Registration Card and mail it to the address provided on it or contact us by phone or email at the address below.  By registering your product you will be kept up to date on any enhancements to the Infotainment Center. It will also help us expedite any service or support needs you may have.  River Park Inc. 21953 Protecta Drive Elkhart, IN  46516 1-800-442-7717 www.riverparkinc.com  For Technical and Warranty questions please contact our Technical Department at the number above or email us at navi@riverparkinc.com
 6   Contents 1 Features .............................................................................................................. 7 2 Main Unit Display ................................................................................................ 8 3 Setup ................................................................................................................. 10 3.1 General Settings ........................................................................................... 10 3.2 Video Setup .................................................................................................. 11 3.3 Audio Setup .................................................................................................. 11 4 Radio Operation ................................................................................................ 12 5 CD Player Operation ......................................................................................... 13 6 USB - MP3/WMA/MP4 Player Operation .......................................................... 14 7 DVD/VCD Player Operation .............................................................................. 15 7.1 DVD System Settings ................................................................................... 15 8 Bluetooth Operation .......................................................................................... 16 8.1 Bluetooth Setup ............................................................................................ 16 8.2 Pairing your Phone ....................................................................................... 16 8.3 Incoming Calls .............................................................................................. 18 8.4 Outgoing Calls .............................................................................................. 18 8.5 AV  (A2DP Audio Playback over Bluetooth) ................................................. 19 9 SiriusXM Satellite Radio .................................................................................... 20 9.1 Subscribing to SiriusXM Satellite Radio ....................................................... 20 9.2 Operating SiriusXM Satellite Radio .............................................................. 20 9.3 Tuning to a channel ...................................................................................... 21 9.4 Parental Control Channel Locking and Channel Skipping ............................ 21 9.4.1 Lock Code ........................................................................................... 21 9.4.2 Lock Mode/Unlock Mode ..................................................................... 21 9.4.3 Mature Channel Locking ...................................................................... 22 9.4.4 Channel Locking .................................................................................. 22 9.4.5 Channel Skip ....................................................................................... 22 9.5 Artist & Song  Alerts ..................................................................................... 22 9.5.1 Setting Alerts ....................................................................................... 22 9.5.2 Viewing & Managing Alerts .................................................................. 22 9.5.3 My Artists & My Songs Virtual Categories ........................................... 23 9.6 Replay .......................................................................................................... 23 9.7 SiriusXM Settings Menu ............................................................................... 23 9.8 Understanding SiriusXM Advisory Messages ............................................... 24 10 iPod and iPhone AV Interface ........................................................................... 25 11 Camera (Optional) ............................................................................................. 26 12 Navigation (Optional) ........................................................................................ 27 13 Premium Remote Control Accessory (Optional) ............................................... 28
 7 1  Features  10.4” Main Touch Screen LCD Display  Picture in Picture (PIP) Display   Audio Information Bar for Navigation Mode  GPS Navigation (Optional)  SiriusXMTM Satellite Radio Ready  AM/FM/RDS Stereo Radio  iPod/iPhone Interface and Control1  DVD R/RW, CD R/RW, VCD Compatible  MP3, WMA, MPEG Audio/Video File Compatible  Bluetooth Hands-Free Calling and Streaming Audio Player (A2DP)2  Rearview Camera Connectivity3  Auxiliary Monitor Support4  USB Input  ESP-Electronic Shock Protection for DVD, MP3, CD  High Power MOSFET Speaker Output 4 X 50W  Steering Wheel Control Compatible  Premium Remote Control (Optional Accessory)  Temperature Sensor/OS Display (Optional Accessory)  Compass Heading Display (Optional)   1 iPod/iPhone device not included 2 Compatible mobile phone required 3 Will connect to vehicle camera system composite video/audio output 4 Auxiliary monitor sold separately for XSG2NA-X1L model
 8 2 Main Unit Display The buttons located on the Infotainment Center front display are assigned the same reference here below.  PWR 1. Turn on the ignition to power up the Infotainment Center. When the Infotainment Center is started up, it will immediately go to the last mode (memory on playback) before it was turned off. 2. In order to put the unit in standby mode, please press the Power button (PWR). During standby, the display will show your vehicle logo, time, date and outside temperature. Press the Power button again to start up again. 3. In order to turn the unit off completely remove ignition key and/or ensure any auxiliary battery power to the system is turned off. Menu  1. Touch the Menu button to go to the Main Menu. 2.  When in the Main Menu, use the touch screen to select the desired functionality. 3.  You can also access the Main Menu from any screen by touching the  function icon in the top left of   the current screen.  NOTE: When viewing  video in full screen  please touch  the screen once  to bring up  the  screen  header which will display the function icon. Touch the icon to return to the Main Menu. DIM 1. Press to manually adjust the brightness of the LCD. -/+ VOLUME CONTROL  1. The volume level can be adjusted on the front of the Infotainment Center display by using the volume up and volume down buttons or by the steering wheel control buttons (optional). 2. The volume level can be muted completely by briefly pressing the  MUTE button on the front  of the Infotainment Center. The MUTE logo will appear the display. PIP (Picture in Picture) 1. Your Infotainment Center is equipped with PIP. This button will toggle between PIP and full screen of the active source (see page 11 for more details on this feature). NAVI 1. Press the NAVI button to go to the navigation system.  2. While  viewing  your  navigation  press  the  NAVI  button  to  return  to  your  active  source.  If  you  are running  a  navigational  route,  audio  voice  prompts  will  continue  to  be  heard  over  your  speakers according to the NAVI audio settings you have selected in the settings menu (see page 11). 3. To hear only your navigation audio voice prompts press and hold the NAVI button for 2 seconds. This will mute your current audio source until you leave the navigation screen. MUTE 1. Press to Mute all audio including navigation prompts
 9 Main Menu The  Infotainment  Center  is  designed  for  simple  maneuvering throughout.  The  screen  shown  on  the  right  is  the  MAIN  MENU screen.  From  here  you  can  choose  which  function  to  access  by touching the appropriate icon on the LCD display. To return back to the Main Menu or change the active source touch the icon in the top left corner of any screen. If  the  device  is  left  idle  on  the  Main  Menu  or  on  any  system settings  screen  the  video  will  revert  back  to  the  active  source (radio, etc.) after 15 seconds.   Information Bar The top area of the screen is the audio information bar. This  area  will  display  the  current  audio  source,  time,  Bluetooth connection status and optional TEMP/Compass information. To return back to the main menu touch the audio source icon.  To  view  the  information  bar  during  video  playback  or  manual camera view,  touch  the screen  once  to  display.  Touch the audio icon to return to the main menu.
 10 3 Setup 3.1 General Settings Access the System Settings by using the Settings icon in the Main Menu. The first screen shown  is  the  first  page  of  the  system  setup.  The  pages  of  the  Settings  menu  can  be changed by using the on-screen button in the top right corner. To exit the Settings menu at any time, press  the Settings icon in the top left of the screen.  System Settings page one (1/2):  AUX  Zone:  This  option  selects  the  AV  source  for  a  display connected  to  the  AV  output.  The  following  sources  can  be selected:  Current/DVD/CAM/NAV/AUX/OFF.  Audio  only  sources of  Radio/SIRIUSXM/iPod  may  be  selected.  Control  of  most functions must be done from the main screen. Beep  Tone:  Turn  ON/OFF audible  sound  when  touching  the LCD screen.  The  Beep  Tone  will  also  provide  warning  of  LCD  display closing and other cues. Rear  View:  This  option  selects  whether  a  rear  view  camera  is connected.  When  ON  the  display  will  automatically  switch  to camera mode when the reverse gear is engaged or a trigger signal is received. When no camera is connected, select OFF. NOTE: Please use all available safety features and procedures to ensure proper driving to avoid damage and/or injury. Standby Screen: Selecting ON, the Infotainment Center will display your clock when the unit is powered off by press and hold the PWR button while the vehicle remains on. Language: Here the language of the User Interface can be selected (English, Spanish, French). Auto Dim: Set to Auto, LCD will dim with your vehicle lighting, if equipped. Set to sensor, the LCD brightness will change based on the light levels within the driver area regardless of dash illumination. Temperature: Select units to display temperature (optional).   System Settings page two (2/2):   Compass Display: Select Direction or Bearing (Optional). Auto Clock Set: When ON displayed time is managed by GPS. Time  Set:  This  option  allows  setting  the  time  in  the  system displays.  Touch Adjustment: This option allows the user to calibrate the touch screen accuracy. Follow the on-screen directions step by step to complete the procedure. This procedure is only necessary when the accuracy of the touch screen is not good. Factory  Set:  With  this  option,  the  Infotainment  Center  can  be reset to factory default.  Note:  All  stored  settings,  presets,  SIRIUSXM  content  alerts, etc.,  will  be  erased and  return to  original  factory settings. Locked/Skipped channels, lock code in SIRIUSXM will remain unchanged.
 11 3.2 Video Setup By touching the VIDEO button, the settings for the video part of the Infotainment Center can be changed.   Video Settings page one (1/1):   Brightness: Sets the brightness level (-10 – +10). Contrast: Sets the contrast level (-10 – +10). Tint: Sets the tint level (-10 – +10). Color: Sets the color level (-10 – +10). Sharpness: Sets the sharpness level (-10 – +10) PIP:   This option  lets you  choose your video display  when in PIP (Picture  in  Picture)  mode.  Left  side  ALWAYS  displays  your navigation.  The  right  side  of  the  screen  allows  you  to  choose either:  ACTIVE  SOURCE  (radio,  etc),  CAMERA  (audio  will  still  be from active source), or AUX source.  Note: The Infotainment Center has a factory default for optimal LCD settings, however the level can be adjusted to set the display according to individual taste. 3.3 Audio Setup  By touching the AUDIO button, the settings for the Audio part of the Infotainment Center can be changed.   Audio Settings page one (1/2):   Treble: Sets the treble level (-10 – +10).  Mid: Sets the mid level (-10 – +10).  Bass: Sets the bass level (-10 – +10).  Equalizer: Here a selection can be made for the equalizer to fit a music style. The following options are available:  ROCK  CLASSIC  POP  LIVE  JAZZ  FLAT ( normal level ) Fader: Sets the fader level between front and rear (F10 – R10). 0 is the center level.   Center/Woofer  Volume:  Sets  the  volume  level  for  an  optional  center  speaker  when  connected  (MUTE  – MAX)Balance: Sets the balance level between left and right (L10 – R10). 0 is the center level.   Audio Settings page two (2/2):   Loudness: Sets the Loudness level (-10 - +10) NAV Volume: Sets the gain of navigation volume (-10 - +10).  This feature  will help  balance  the  navigation  audio  prompts with  the system volume level according to the individual user preference. NAV Audio Mix: This option allows setting the way of navigation voice  behavior  in  relation  to  the  normal  audio  playback.  The following options are available:   1. OFF: Navigation voice will not be audible.  2. MIX: Navigation voice will mix through normal audio. 3. FULL: Normal audio will be muted on the front speakers during navigation voice instructions.
 12 4 Radio Operation  Radio mode can  be  selected from the Main Menu by pressing the  Radio icon on  the LCD display.  The  Radio mode can be left at any time by pressing the Radio icon at the top left of the Radio screen.    The  radio  interface  contains  several  buttons  that  all  have  their specific purpose. Below  is  an  explanation  of  each  button and  its functionality.  This button allows the selection between the FM and AM bands. There are 3 FM and 2 AM ranges available, all with 6 available presets.   This button allows fine tuning or manual searching for radio stations.   This button starts automatic searching for the next radio station.   A/S means Auto Store and will store received stations in the memory. Six stations will be stored per radio band.  P/S means Program Scan and will go through all the frequencies stored in the memory and pauses for 10 seconds. To stay at a specific station, press the Seek button.  DX is the default mode. When LO is selected, the sensitivity of the radio receiver is reduced so that only the strongest signals are found when searching. Press the  button to switch between DX and          LO.  These six buttons can  be  used to switch to a  radio station in the memory by touching it once or       storing a station by holding it for 2 seconds.  AF means Alternative Frequencies. When this function is activated, the radio will search for other frequencies on  which  the same  station  is  present  to  offer  the best  reception.  The  AF  button  will        blink when activated.  PTY means Program Type. Some radio stations broadcast their program type. When the PTY button is pressed, use the TUNE and SEEK buttons to select the program type to search and listen to.  POP M ROCK M EASY M LIGHT M CLASSICS OTHER M JAZZ COUNTRY NATION M OLDIES FOLK M NEWS AFFAIRS INFO SPORT EDUCATE DRAMA CULTURE SCIENCE VARIED WEATHER FINANCE CHILDREN SOCIAL RELIGION PHONE IN TRAVEL LEISURE DOCUMENT   TA means Traffic Announcement and will interrupt any audio source when a traffic announcement message is relayed from a radio station supporting this functionality. When the volume is set lower then 10, a TA message will automatically raise the volume to 10.  REG means Regional and this functionality will support  the AF functionality by searching for local broadcasts to improve reception of local radio stations.  Note: The reception and audio quality is highly dependent on the strength of the incoming signal from the radio broadcasting.  When experiencing  difficulties  with getting  a  good reception,  moving the vehicle to  a  different location can improve the audio reception. When problems persist, please contact your dealer for a solution.
 13 5 CD Player Operation  CD/DVD mode can be selected from the Main Menu by pressing the DVD icon on the LCD display. The CD/DVD mode can be left at any time by pressing the Disc icon at the top left of the CD/DVD screen.    Disc Insert/Eject 1. Press the  EJECT button  located  beside the  DVD  slot.  Please see dealer for location of DVD slot. 2. Place the CD (label side up) into the  CD/DVD slot. Push  the disc in gently until the loader inserts the disc itself. 3. After inserting the disc, playback will start automatically and the CD mode’s playback is shown on the display.    Functions This button can be used to pause or start playing a track from the CD.  This button is used to stop playback. Press it once to pre-stop (resume when play is pressed again) and press twice to stop completely.  Press once to skip to previous track. Press and hold to reverse within a track.  Press once to skip to next track. Press and hold to fast forward within a track.  This button can be used to set how the CD player should play back the available tracks. The available options are RPT ALL (normal playback), RPT 1 (repeat one track) or RPT OFF.  This is the random option that will allow random playback of the available tracks. Press this button once to enable random playback, press again to return to normal playback.  Pressing the magnifying glass will bring up a keypad where the user can directly enter the track number to listen to.  The track list displayed on the right side can be used to navigate through the available tracks on the CD. By using the arrows next to the list, you can scroll through all the tracks on the CD. By pressing a track on the LCD screen, playback of the selected track will start.
 14 6 USB - MP3/WMA/MP4 Player Operation  USB mode can be selected from the Main Menu by pressing the  USB icon on the LCD display. The USB mode can be left at any time by pressing the USB icon at the top left of the USB screen.   To access and use the USB feature please connect your USB compatible device (USB stick, HD, etc.) first to the USB cable provided.  The MP3/WMA/MP4  files  can be accessed from USB memory or from a CD/DVD disc.   The  functions  of  play,  pause,  stop,  track  selection,  fast  forward, fast  reverse,  repeat  play,  random  play,  etc.  are  the  same  for MP3/WMA/MP4  and  CD  operation.  Please  see  the  CD  player operation  section  for  information  about  these  functions  (page 13).  When  a  CD/DVD  is  inserted,  the  playback  will  start automatically.  When  a  USB  memory  device  is  connected,  the playback has to be manually started by selecting the appropriate mode in the Main Menu.  In the MP3/WMA mode the following additional functionalities are available:  Track list: The track list supports the possibility to browse through all the available data and folders. Press stop first and the arrows next to the track list will become available to browse through the data.   This  is  the  icon  for  a  folder.  When  a  folder  is  selected,  the  track  list  will  show  the  content  of  the selected  folder.  In  the  top  of  the  track  list  the  folder  icon  can  be used  to  leave the  current  folder    and return to the root.   This is the icon for a JPEG image. The Infotainment Center also has the ability to show JPEG images (please see safety instructions). When a JPEG is selected, a slideshow will automatically be created of all the available images within a folder.  This is the icon for a MP3 file. When a file is selected from the track list, the playback of this file will be started automatically.  This is the icon for a WMA file. When a file is selected from the track list, the playback of this file will be started automatically.   This is the icon for Movie  files. When a  movie file is  selected, the playback  will start automatically (please see safety instructions).   Note: If a file cannot be found by the Infotainment Center, please make sure that the extensions of your files are  correct.  For  images,  the  only  accepted  format  is  JPEG.  For  music  files,  both  MP3  and  WMA  files  are compatible.  The  Infotainment Center  does support the playback of MP4  movie  files (with AVI  extension). The compatibility and performance of the playback is highly dependent on the specifications of the source file.
 15 7 DVD/VCD Player Operation (Please refer to the safety instructions in regard to video playback on page 3)  CD/DVD mode can be selected from the Main Menu by pressing the DVD icon on the LCD display. The CD/DVD mode can be left at any time by pressing the Disc icon at the top left of the CD/DVD screen.    Disc Insert/Eject 1. Press  the  EJECT  button  located  beside  the  DVD  slot. Please see dealer for location of DVD slot. 2.  Place the DVD (label side up) into the CD/DVD slot. Push the disc in gently until the loader inserts the disc itself. 3. After inserting the disc, playback will start automatically and the DVD mode’s playback is shown on the display.   While a DVD  is playing  full  screen, press  the display  once to see the  DVD  control  interface.  The  control  interface  allows  all  the settings for DVD playback. On the bottom all normal functions are available  (as  with  CD  player  operation)  with  the  added  MENU,  Audio,  Sub  Titles,  Angle  and  Chapter  Search buttons.    DVD Audio track selection can be made by pressing this icon and cycling through the audio tracks available on the DVD. Note: when a DTS audio track is selected, no audio will be available.  Some DVD’s support multiple angle views. Pressing this icon will switch between each available angle.  DVD’s will allow several subtitles to be blended into the video file. Press this icon to select subtitle.  Press to go to the DVD Main Menu   Press for Chapter Search. A keypad will be visible on the left side of the LCD screen. Enter the chapter number to jump to. Note: The options for these functions are dependent on the contents of the DVD. 7.1 DVD System Settings To access the DVD Settings in the System Settings Menu from the DVD Screen: 1. Touch the DVD icon in the top left corner of the screen to return to the Main Menu. a. If  you  are  watching  a  video  full  screen  please  touch  the  screen  once  to  bring  up  the  Icon header then perform step 1 above. 2. Select Settings icon. 3. Select DVD Set on left side.  DVD  Settings page:   Audio Language: This option sets the default audio language the DVD should start in (when available on the DVD).  Menu Language: Choose the language for menu display. Subtitle Language: This option sets the default subtitle language the DVD should start in (when available on the DVD).  DVD  Aspect:  The  following  options  are  available:  Pan  Scan–- Wide – Letterbox. Video System: The following options are available:  NTSC – PAL – AUTO. DRC: This option turns the Dynamic Range Control ON or OFF.
 16 8 Bluetooth Operation  Bluetooth mode can be selected from the Main Menu by pressing the Bluetooth icon on the LCD display. The Bluetooth mode can be left at any time by pressing the Bluetooth icon at the top left of the Bluetooth screen.    The Infotainment Center supports Bluetooth wireless connections. It can set up a wireless link with a Bluetooth mobile phone. The unit supports a hands-free profile and A2DP (Audio Advanced Distribution Profile).  Before using the Bluetooth functionality, please make sure your mobile phone is equipped with Bluetooth and turn it on in your phone menu. Please check your mobile phone user manual for instructions using Bluetooth. 8.1 Bluetooth Setup   To access the Bluetooth Setup, select the Bluetooth icon from the Main  Menu  and  press  found  in  the  bottom  left  corner  of the Bluetooth Screen.  Bluetooth Settings page one (1/1): Connecting Role: This is the profile setting for the connection role between the Infotainment Center and the mobile phone.  HF/HS:  Connecting  Hands-Free  or  Headset  (Default setting) AV:  Connecting  for  only  playing  audio  files  from  the mobile phone HF/HS + AV: connecting both HF/HS and AV Auto  Connect:  This  enables  the  Infotainment  Center  to  search and connect with any paired mobile phones after power up. You will  see  the  icon  flashing  in  the  top  right  hand  corner  while searching for devices when enabled. Auto Reception: This sets the automatic incoming call answering. Bluetooth  Gain: Setting the volume level of Bluetooth operation (-10 – +10). MIC Gain: Setting the sensitivity level of the microphone   (1–8). PIN Code: Customizable PIN code for mobile phone connection. 8.2 Pairing your Phone To  pair  your  compatible  mobile  phone  to  the  Infotainment  Center  please  have  your  user  manual  for  your mobile phone and follow the instructions below:  1. Go  to  the  Bluetooth  screen  by  selecting  the  Bluetooth icon from the Main Menu.  2. When  Bluetooth  is  accessed  for  the  first  time,  it  will show  NO  CONNECTION  on  the  screen.  Touch   to access the device list. 3. Touch   to start pairing mode. 4. Follow the pairing instructions for your mobile phone. 5. If  completed  successfully  your  phone  will  be  shown  in the device list. 6. If  your  mobile  phone  supports  phonebook  transfer, touch  . If the system does not automatically begin transfer please see your mobile phone user manual for further instructions.   The phones are shown by their unique addresses and if the phone supports it, the mobile phone’s name.
 17 Notes on Pairing:  1. If  PAIR  START  appears  temporarily,  the  pairing  cannot  start  due  to  an  active  connection.  Please disconnect any active mobile phones.  2. Only  when  PAIRING  is  displayed,  the  Infotainment  Center  becomes  visible  for  mobile  phones.  Use your mobile phone to search for the Infotainment Center to connect to your mobile phone.  3. When  connecting,  the  Infotainment  Center  will  identify  itself  to  your  phone  as  “XSG2”.  The  mobile phone will ask  for  a  PIN code. The  factory default code  is  “0  0  0  0” (this code  can  be changed, see Bluetooth settings). Once the mobile phone confirms that it has established a new paired connection, authorize the Infotainment Center to make an automatic connecting.   4. When  the  pairing  procedure  is  completed  successfully,  the  display  will  show  PAIR  OK.  When  PAIR FAIL appears on the display, repeat the pairing procedure.   5. Once the Bluetooth  pairing is completed between  your mobile phone and the  Infotainment Center, both  will  be  automatically  recognized  and  the  connection  can  be  made  automatically  from  that moment on.   6. If there are more mobile phones paired to the Infotainment Center and within range, the connecting priority is given to the last paired mobile phone.  7. In  case  that  pairing  fails  after  each  attempt,  please  turn  off  both  your  mobile  phone  and  the Infotainment Center. Turn both on again and repeat the procedure as above.  Notes on Phonebook Feature: 1. Phonebook function is matched with OPP (Object Push Profile) in user's mobile phone.   2. To update changes to the phonebook of a paired mobile phone, you must perform the phonebook download step again.  3. The contents in incoming call list, outgoing call list, and missed call list will be only call lists when system and mobile phone are paired.  4. Number of paired devices: max. 4 sets  5. Number of phonebook lists: names - max. 500, phone numbers - max. 1900  6. Incoming call list, outgoing call list, missed call list: max. 20 numbers per category  7. Letters of name: max. 26 letters (English)  8. Length of numbers: max. 20 numbers  Note: Performance of Bluetooth is highly dependent on the capabilities of the mobile phone in use. To maintain good connectivity ensure that your mobile phone’s battery is adequately charged.
 18 8.3 Incoming Calls While  the  mobile  phone  is  connected,  incoming  calls  will  be handled  by  the  Infotainment  Center.  When  an  incoming  call  is present, the LCD display will switch to Bluetooth mode and show the  phone  number  (when  available)  from  the  person  calling. Under  the  phone  number,  the  buttons  Accept  and  Reject  are present.   Press  to  accept  the  call.  The  Infotainment  Center  will accept the call and give the call audio over the normal car speakers.  Press  to  reject  the  call.  The  Infotainment  Center  will  close  the  connection  and  return  to  the previous operation. (Some phones may not support the reject mode.)  When a call is ended, the Infotainment Center will switch back to its last mode. This will be done automatically after 5  seconds  or  can  be  done  manually  by pressing the  NOW  button.  If  CANCEL  is  pressed,  the  Bluetooth mode will remain active. 8.4 Outgoing Calls Direct Dialing To  place  an  outgoing  call,  the  screen  will  show  a  numeric  pad where the phone number can be entered manually.   Press  the  Backspace  button  if  you  have  made  a dialing error  Press  the  Redial  button  to  redial  the  last  number called with the mobile phone.   Voice Dialing When  the mobile  phone  also supports  voice  dialing,  a  Voice  Dial  button  will also  be  available. The Infotainment Center will display Voice Dial on the screen and await a voice command when pressed.  Note: The Voice Dial functionality is highly dependent on the connected mobile phone. Please read the mobile phone’s user manual for instructions.  Phonebook Dialing Calls can be made by accessing your downloaded phonebook. 1. Press   to access your Phonebook. 2. Press the contact name on the right you wish to call. 3. Press the number you wish to call. 4. Press the green phone icon.  Note: Outgoing calls can also be made on the mobile phone itself. The Infotainment Center will still take over the outgoing call and switch to hands-free mode.
 19 8.5 AV  (A2DP Audio Playback over Bluetooth)  Some mobile phones also support the functionality of A2DP (Audio transfer protocol). The Infotainment Center uses this protocol to find audio files on the mobile phone and play the audio over the normal speakers. Some phones will also support the audio playback of certain apps, like internet radio, through the XSG2NA.  Press AV in the standard Bluetooth screen. The screen will change to a normal playback screen with the standard functionality:  - play or pause - stop - previous track - next track      Note: The A2DP functionality is highly dependent on the mobile phone used. For information on this protocol and its functions, please read the user manual of the mobile phone.
 20 9 SiriusXM Satellite Radio  Everything  worth listening  to is  on SiriusXM, getting over  130  channels,  including  the  most  commercial-free music,  plus  the  best  sports,  news,  talk  and  entertainment.  A  SiriusXM  Vehicle  Tuner  and  Subscription  are required.  For  more  information,  visit  www.siriusxm.com.  To  activate  SiriusXM  Canada  service  go  to www.xmradio.ca and click on “ACTIVATE RADIO” in the top right corner, or call 1-877-438-9677. When a SiriusXM Vehicle Connect Tuner is connected, press the SiriusXM icon in the main menu. SiriusXM mode can be left any time by pressing the SiriusXM icon at the top left of the screen.  This section describes the features and functions of the SiriusXM Satellite Radio. Before using the optional SiriusXM Satellite radio, you need to subscribe to the SIRIUSXM service either by phone or via the Internet (see Subscribing to SIRIUSXM Satellite Radio). 9.1 Subscribing to SiriusXM Satellite Radio To subscribe to the SiriusXM Satellite Radio service, follow these steps: 1. After installing your SiriusXM Connect Vehicle Tuner and antenna, power on your radio and select SiriusXM mode. You should be able to hear the SiriusXM preview channel on Channel 1. If you don’t hear the Preview channel, make sure your tuner is installed correctly as described in the tuner Installation Guide. 2. After you can hear the Preview channel, tune to Channel 0 to find the Radio ID of your tuner.  You will need this number to activate your subscription. Write the number down for reference. Note that the SiriusXM Radio ID does not include the letters I, O, S or F.  3. With the radio still turned on, the next step is to activate your service by: 1.  visiting the www.siriusxm.com website and click on ACTIVATE RADIO or 2.  calling SiriusXM Listener Care at 1-866-635-2349.  As part of the activation process, the SiriusXM satellites will send an activation message to your tuner. When your radio detects that the tuner has received the activation message, your radio will display: “Subscription Updated”. Once subscribed, you can tune to channels in your subscription plan. Note, the activation process usually takes 10 to 15 minutes, but may take up to an hour. Your radio will need to be powered on and receiving the SiriusXM signal to receive the activation message. 9.2 Operating SiriusXM Satellite Radio The display for the SiriusXM mode is laid out to provide you with the required information and icons to allow maximum enjoyment of your SiriusXM subscription.  Pressing the “FUNC” button will toggle between function buttons. CAT, CAT+, SCAN, P.DEL will change to ALERT, ALERT+, SKIP, LOCK. See below to learn more about each function.
 21    9.3 Tuning to a channel  Press once to tune to the next/previous channel. Press and hold to rapid tune. To  page  through  a  channel  or  category  list  press found to the right of the channel list.   The Infotainment Center will store up to 18 preset stations of your choice. Press to go to the next series of preset channels (3 Bands X 6 Presets).  These Preset buttons allow direct tuning to your favorite stored channels.  1. Press a preset button once to tune to a stored channel.  2. Press and hold a preset button for 2 seconds to store a new channel preset. 3. To delete a preset press and hold P. Del for 2 seconds  Press to display All Channel Mode or Category Browsing on channel list which is found on right side of screen. Category Browsing allows you to directly enter a Category to enter by selecting it from the list.  Press to bring up keypad to allow for Direct Channel Tuning.   1. Enter the channel number and press   SCAN will play 5 seconds of the next channel in your current channel list and proceed through subsequent channels 5 seconds each. To stop the Scan press SCAN, select channel from list, preset or other channel tuning options.   Press to add the current channel to your own virtual category “My Favorites”. Once the first channel is stored the “My Favorites” Category can be found in the Category list.  9.4 Parental Control Channel Locking and Channel Skipping The SiriusXM Parental Control feature allows you to control access to channels that you consider inappropriate for some listeners. When enabled, the Parental Control feature requires you to enter a lock code to tune to the locked channels. Information on setting up the lock code, setting up the channels to be locked, and the method to access the locked channels are described below.  9.4.1 Lock Code The Infotainment Center is delivered with a default Lock Code of “0000”. Please see page 24 to learn how to edit your lock code. Please remember your lock code. It will be required to access locked channels or change the Mature Channel Lock setting. If you have forgotten your lock code and require a reset please see page 5 for support contact information. 9.4.2 Lock Mode/Unlock Mode Your Infotainment Center will automatically start up with SiriusXM in Lock Mode. This will prevent the accidental tuning to channels that have been automatically locked under the optional Mature Channel Locking feature or user applied locked channels.  To enter Unlock Mode: 1.  Press and Hold LOCK Button for 2 seconds. When the keypad is displayed input your lock code and        press enter or; 2. Tune to a locked channel. When the keypad is displayed input your lock code and press enter. Once you have successfully entered the lock code SiriusXM will remain in Unlocked mode until the Infotainment Center is turned off, put into standby mode or you repeat step one above.
 22 9.4.3 Mature Channel Locking The Infotainment Center is set to default the Mature Channel Locking to OFF. This feature will automatically lock all mature themed channels determined by SiriusXM. If enabled, tuning to these channels requires you to enter your lock code first and enter Unlocked Mode.  Please see page 23 to learn how to turn Mature Channel Locking to ON. 9.4.4 Channel Locking  Channels can be locked to restrict access to certain channels. To lock a channel: 1. Tune to the channel you wish to lock. 2. Press Lock to bring up keypad. 3. Enter your lock code and press  4. Tune to another channel. 5. Channel is now locked  To remove a user defined locked channel: 1. Tune to the locked channel. You will need to be in unlocked mode. See page 21. 2. Press LOCK button. 3. Enter the lock code. 4. Channel is now unlocked.  9.4.5 Channel Skip    Channels can be ignored from certain channel tuning methods without locking by using the SKIP feature.  To Skip a channel:   1. Press SKIP when tuned to the specific channel.  2. Channel now has an “S” to the right of its name. While channel tuning, the system will skip over this channel. This skipped channel can only be accessed by direct tuning, selecting it by touching the LCD display or as a saved preset. To remove a skip command from a channel: 1. Tune to the skipped channel. 2. Press SKIP. 3. Channel is now returned to all channel lists and the “S” is now removed.  9.5 Artist & Song Alerts While listening to SiriusXM Satellite Radio, you can be alerted when your favorite songs or artists are playing on other channels. You can store up to 50 of your favorite Artists and 50 favorite songs.  The Infotainment Center will display an Alert message when a matching artist or song is found on another channel or you can choose either My Artists or My Songs categories to have access to all channels that have current alerts playing. When a new alert notification occurs you can choose to tune directly to it or ignore and continue listening on your current channel.  9.5.1 Setting Alerts Press to add an alert for a current playing song/artist. Select to save as Artist or Song. 9.5.2 Viewing & Managing Alerts Press to cycle through your saved Song and Artists alerts. Press a third time to return to channel list. To remove an alert select the alert to remove by touching the alert from the list. An “X” will appear to the right. Touch the “X” and the alert will be removed. Please see page 23 for instructions to clear all alerts
 23 9.5.3 My Artists & My Songs Virtual Categories When there are active alerts playing the Infotainment Center creates virtual categories called My Artists and My Songs. These categories only contain channels that are playing music that matches your alerts. Channels will be added and removed according to the alerts that are active. You can select channels to listen to from within these categories as you normally would. 9.6 Replay The Replay feature allows you to pause, rewind, and replay up to 60 minutes of live SiriusXM Satellite Radio.  The status bar shows you the current buffer capacity. Once full, the oldest track will be removed allowing the newest live track to be added. If you have paused playback and the paused track is about to be erased, the XSG2 will notify you will an audible beep. Playback will resume from the next track in the buffer.  Press to enter Replay Mode. Pressing the LIVE button when in Replay Mode will return you to the Main SiriusXM screen and live playback The top entry of your Replay list is “Go Live!”. Select this to list to the current live audio but remain on the Replay screen Press to Pause Playback Press to Skip to next or previous track in playback list. * Press to Fast Forward/Rewind through current playback. *  *Users will be notified by a longer audible beep if attempts to rewind/fast forward or skip past the beginning of the buffer or once reaching live playback.  9.7 SiriusXM Settings Menu There are many features that can be changed to customize your SiriusXM Radio experience. To enter the SiriusXM settings menu you must currently have SiriusXM selected. From there press the SiriusXM icon top left corner of display, Select Settings Icon. From the Settings page there is a SiriusXM option at bottom left. Selecting this button will display page 1 of 2 for SiriusXM settings. Page 1of 2: Unsubscribed Channels: Set to ON to view unsubscribed channels in channel list. Will be displayed as grey Content Alert: Change to off to disable alerts from being displayed. The saved alerts will not be erased Metadata Display: Choose to display Artist name, Song name in your channel guide or choose off and list only the channel names Replay Metadata Display: Choose to display the Replay list by song title or Artist Mature Channel Lock: to turn ON parental lock press OFF, enter correct lock code the press the arrow to change the state to ON. NOTE: Mature channels will be automatically locked at start up when ON. User defined locks will remain unchanged. Lock Code Edit: Press Edit, correctly enter lock code. Enter new lock code and once more to verify.   Page 2 of 2: (Press page button top right) Clear All Skip: Press to remove all channels marked as SKIP Clear All Locks: Press to remove all user defined locked channels. Entry of lock code is required when prompted. Clear All Alerts: Press to clear all saved Artist and Song Alerts.
 24   9.8 Understanding SiriusXM Advisory Messages  Check Antenna The radio has detected a fault with the SiriusXM antenna. The antenna cable is either disconnected or damaged. Verify that the antenna cable is connected to the SiriusXM Connect Vehicle Tuner. Inspect the antenna cable for damage and kinks. Replace the antenna if the cable is damaged. Check Tuner  The radio is having difficulty communicating with the SiriusXM Connect Vehicle Tuner. The tuner may be disconnected or damaged. Verify that the SiriusXM Connect Vehicle Tuner cable is securely connected to the radio SiriusXM mating connector/cable. If the problem persists, disconnect and reconnect the tuner and then contact SiriusXM at 1-877-438-9677. No Signal The SiriusXM Connect Vehicle Tuner is having difficulty receiving the SiriusXM satellite signal. Verify that your vehicle is outdoors with a clear view of the southern sky.  Verify that the SiriusXM magnetic mount antenna is mounted on a metal surface on the outside the vehicle. Move the SiriusXM antenna away from any obstructions. Inspect the antenna cable for damage and kinks. Replace the antenna if the cable is damaged. Consult the SiriusXM Connect Vehicle tuner installation manual for more information on antenna installation. Subscription Updated The radio has detected a change in your SiriusXM subscription status. Press “FUNC” to clear the message. No further action is required. Visit www.siriusxm.com or call SiriusXM at 1-877-438-9677 if you have questions about your subscription. Channel Not Available The channel that you have requested is not a valid SiriusXM channel or the channel that you were listening to is no longer available. You may also see this message briefly when first connecting a new SiriusXM Connect Vehicle tuner. Visit www.siriusxm.com for more information about the SiriusXM channel lineup. Channel Not Subscribed The channel that you have requested is not included in your SiriusXM subscription package or the channel that you were listening to is no longer included in your SiriusXM subscription package.  Visit www.siriusxm.com or call SiriusXM at 1-877-438-9677 if you have questions about your subscription package or would like to subscribe to this channel. Channel Locked The channel that you have requested is Locked by the radio Parental Control feature. See Section 9.4 on Page 21 for more information on the Parental Control feature and how to access locked channels.
 25 10 iPod and iPhone AV Interface   The Infotainment  Center  can  also  be  connected  to  your  Apple  iPod  or  iPhone.  When  the  iPod  is  connected, press the iPod icon in the Main Menu. The iPod mode can be left any time by pressing the iPod icon at the top left of the screen. To access and use the iPod feature please connect your iPod/iPhone device first to the iPod cable provided.  FUNCTIONS  Play or pause current playback.  Change the track list to find tracks based on categories. The following categories are available: Track, Playlist, Composer, Artist, Audio Book, Album, Podcast, and        Genre.  Go  to  previous  track.  Press  and  hold  to  fast  rewind current track.  Go to next track. Press and hold to fast forward  current track.  Off/Single Track/All Track repeat functions.  Off/Track/Album random playback order.  Access to all stored iPod video.   Note:  iPod  video  playback  requires  optional  iPod  video  cable. Please contact your dealer to inquire.  When  a  Podcaster  or  Audiobook  has  2  or  more  chapters available,  clicking  the  fast  rewind  or  fast  forward  button during  pause  moves  the  current  location  to  the beginning of the previous or next chapter. Hold the fast rewind or fast forward longer than 2 seconds to fast rewind or fast forward.  Note: All the functions are dependent on the version of iPod used.
 26 11 Camera (Optional)  The Infotainment Center can be connected to an optional rearview camera or camera control box (for multiple cameras) to enhance viewing around your vehicle while performing maneuvers. When connected, the camera AV source can be displayed in two ways:  Manual Viewing:  By  selecting  the  Camera  icon  from  the  Main  Menu  you can have full screen display of your rear camera.   If  you  have  multiple  cameras  connected  through  the optional  camera  management  module  you  can  choose which  camera  to  view  manually  on  screen  by  selecting from the icons displayed. (Left, Rear, Right)  If your rear camera  is  equipped with  a  microphone,  you can listen by pressing the Audio icon on screen.  You can also manually view your rear camera and navigation simultaneously using the Picture in Picture (PIP) feature. (Please see page 11, Video Settings for more details)  Automatic Viewing: The Infotainment Center can support automatic triggers to display cameras to assist you with reverse driving and  side  blind  spot  viewing.  While  driving,  if  a  turn  signal  or  reverse  gear  signal  is  seen  by  the  system  the display will change  to  full  screen  camera view, even  from  PIP function.  If  your  rear camera is  equipped with audio, you can press the Audio icon on the LCD display while the camera video is displayed to change the audio from the active source to the camera audio.  To turn off the camera audio press the icon again. Camera audio will also switch off once the trigger signal has ended and the Infotainment Center has returned to the active source.  Note: These features are for assistance only and are not intended to replace the use of mirrors and help from spotters. It is only a reference for you. Please use all available safety features and procedures to ensure proper driving to avoid serious injury/death and damage to property.
 27 12 Navigation (Optional)  The Infotainment Center is capable of providing navigation. If you have purchased this option  please see your Navigation Program User Manual for instructions on using the navigation software.  Your optional Navigation Program is stored on an SD card. This card is entered into the SD card slot found on the bottom of the LCD display housing. Press the Eject button to lower the  screen. Here you will see the SD card slot.  If  you  have  purchased  your  navigation  SD  Card  please  do  not  misplace  it.  This  card  also  contains  a  unique license and registration required to operate your navigation. You will need to purchase another license and SD card if you lose it.   Do not attempt to put any other SD cards or objects into the SD card slot. This may cause a malfunction of your Infotainment Center and will void all warranties.  The Display of your navigation comes with the new Audio Information Bar, displayed at the top of your screen. This  Audio  bar  will  continue  to  show you the  information  for  your  current  audio  source.  Pressing  the audio source icon in the top left corner of the screen will return you to your current audio source full screen.   Accessing Your Navigation Program: To access the navigation please select the NAV icon from the Main Menu or press the NAV button on the front bezel.   To  exit  navigation  press  the  NAV  button  again  or  touch  the  Audio  source  icon  on  the  top  left  of  your  LCD display. Both these actions will return you to your current audio Source.  While using  your  navigation  program  the  current  audio  source will  continue  to  heard,  with  navigation  voice prompts and audio alerts played as per the settings you have selected in the System Audio Set Up (page 11). To hear only your navigation audio voice prompts press and hold the NAV button for 2 seconds. This will mute your current audio source until you leave the navigation screen.  If  you  are  using  the  Premium  Remote  Control  accessory  to  operate  your  navigation  please  ensure  that  the Navigation is the current display (full screen) on the Infotainment Center. This is required even if the auxiliary monitor currently displays navigation as well.  NOTE: If there is an active navigation route running and you exit the navigation by pressing the NAV button, audio guidance will still be given.
 28 13 Premium Remote Control Accessory (Optional)  The Infotainment Center is compatible with the Premium Remote Control accessory.          Note: The Premium Remote requires 2 AAA batteries for use. Batteries not included.  To use the Premium Remote please reference the chart below view the functionality the remote will provide for each feature of your Infotainment Center. The remote will only control the current function on the main LCD display. **    No. Main 1 Power  2 Mute 3 Mode 4 Numeric 1 (Preset 1) 5 Numeric 2 (Preset 2) 6 Numeric 3 (Preset 3) 7 Numeric 4 (Preset 4) 8 Numeric 5 (Preset 5) 9 Numeric 6 (Preset 6) 10 Numeric 7  11 Numeric 8  12 Numeric 9  13 Directory 14 Numeric 0 15 Menu 16 Play/Pause 17 Reverse 18 Stop 19 Forward 20 Directional UP 21 Directional LEFT 22 Directional DOWN 23 Directional RIGHT 24 Confirmation 25 Seek (up and down) 26 Volume (up and down) 27 Picture In Picture 28 Navigation 29 Pick up 30 Setup Menu 31 Band 32 Repeat 33 Hang up 34 Random 35 Reverse (Rear Zone) 36 Play/Pause (Rear Zone) 37 Forward (Rear Zone) 38 Stop (Rear Zone) 39 Previous (Rear Zone) 40 Next ((Rear Zone) 41 Confirmation (Rear Zone) 42 Source Selection (Rear Zone)
 29 System (These functions are available with all features of the Infotainment Center) Key Function Description 1 Power Turns Power ON/OFF to Infotainment Center 3 Mode Return to Main Screen. Press again to cycle through options  2 Mute Toggle Mute ON/OFF 30 Setup Enter Setup Screens 28 Nav Toggle Nav Full Screen ON/OFF 26 Volume up System volume control Volume down     SiriusXM Radio Key Function Description 20-24 Directional UP/DOWN Search Channel Up/Down. LEFT/RIGHT Search Categories. OK to select. 25 Next (hold for Rapid Tuning) Tune Channel Up/Down Previous (hold for Rapid Tuning) 31 Band Go to next set of Preset Channels (3X6) 4-9 Numeric  (Preset *) Tune to saved Channel Preset (1-6) 15 MENU Press to see SIRIUS INFO 13 DIR Press to Direct Tune to a channel. Use Numeric keys to enter channel the press OK     iPod Key Function Description 20-24 Directional UP/DOWN Search Track list Up/Down. LEFT/RIGHT Track list page UP/DOWN. OK to select. 25 Next (hold for fast forward) Go to next Track Previous (hold for rewind) Go to previous Track 16 Play/Pause Play/Pause track playback 18 Stop Stop track playback 32 Repeat Toggles  repeat playback settings 34 Random Toggles  random playback settings 15 MENU Go to iPod menu     Bluetooth Key Function Description 29/33 Pick up/Hang up/Redial (BT) Pick up/Hang up/Redial 4-14 Numeric Dial phone numbers 25 Next Go to next Track Previous Go to previous Track 16 Play/Pause Play/Pause track playback 18 Stop Stop track playback          Cont’d
 30 Radio Key Function Description 25 Next  Tune/ Hold for Seek Previous 31 Band Go to next set of Preset Channels (3X6) 4-9 Numeric (Preset *) Tune to saved Channel Preset 1-6 10 Numeric 7 (Radio AF) Alternative Frequency ON/OFF 11 Numeric 8 (Radio PTY) Activate Program Type Tuning 12 Numeric 9 (Radio REG) Activate Regional Programming     USB/DVD/CD Key Function Description 20-24 Directional DVD Menu navigation 25 Next (hold for fast forward) Skip to next Previous (hold for rewind) skip to previous 16 Play/Pause Start/Pause playback 18 Stop Stop Playback 4-14 Numeric Enter chapter number 15 MENU Access DVD Menu 13 DIR Open chapter search keypad     Navigation Key Function Description 20-24 Directional Pan Map 15 MENU Main Menu 13 DIR Address search    ** Control of DVD Playback on the Auxiliary LCD Display is possible with the Premium Remote. Please change the switch position on the left side of the remote from Main to Aux. This will now control DVD features while viewing on an auxiliary display. Please remember to return the switch back to main when done.  This remote is IR. Please ensure there are no obstructions between the remote and the Infotainment Center. Please keep the front of the IR receiver cover clean. Always point the remote directly to the front of Infotainment Center for best performance.
 31
 32  2011 All rights reserved. No part of this manual may be reproduced, copied, transmitted, disseminated, transcribed, downloaded or  stored in any  storage  medium,  in  any  form  or  for  any  purpose  without  the  express  prior  written  consent  of  RiverPark  Inc.  Furthermore,  any unauthorized commercial distribution of this manual or any revision hereto is strictly prohibited. Information in this document is subject to change without notice. The Manufacturer reserves the right to change the content herein without the obligation to notify any person or organization of such changes. All  trademarks  used  herein  remain  the  exclusive  property  of  their  respective  owners.  Nothing  contained  in  this  manual  should  be construed  as  granting,  by  implication or  otherwise,  any  license  or  right  to  use  any  of  the  trademarks displayed  herein. Misuse  of  any trademarks or any other content in this manual is strictly prohibited.

Navigation menu