Go Video GV 6010/EPIC User Manual VCR Manuals And Guides L0511405
GO VIDEO VCR Manual L0511405 GO VIDEO VCR Owner's Manual, GO VIDEO VCR installation guides
User Manual: Go Video GV-6010/EPIC GV-6010/EPIC GO VIDEO VCR - Manuals and Guides View the owners manual for your GO VIDEO VCR #GV6010EPIC. Home:Electronics Parts:Go Video Parts:Go Video VCR Manual
Open the PDF directly: View PDF ![]() .
.
Page Count: 83
:i ¸ :: :/! ::
eo
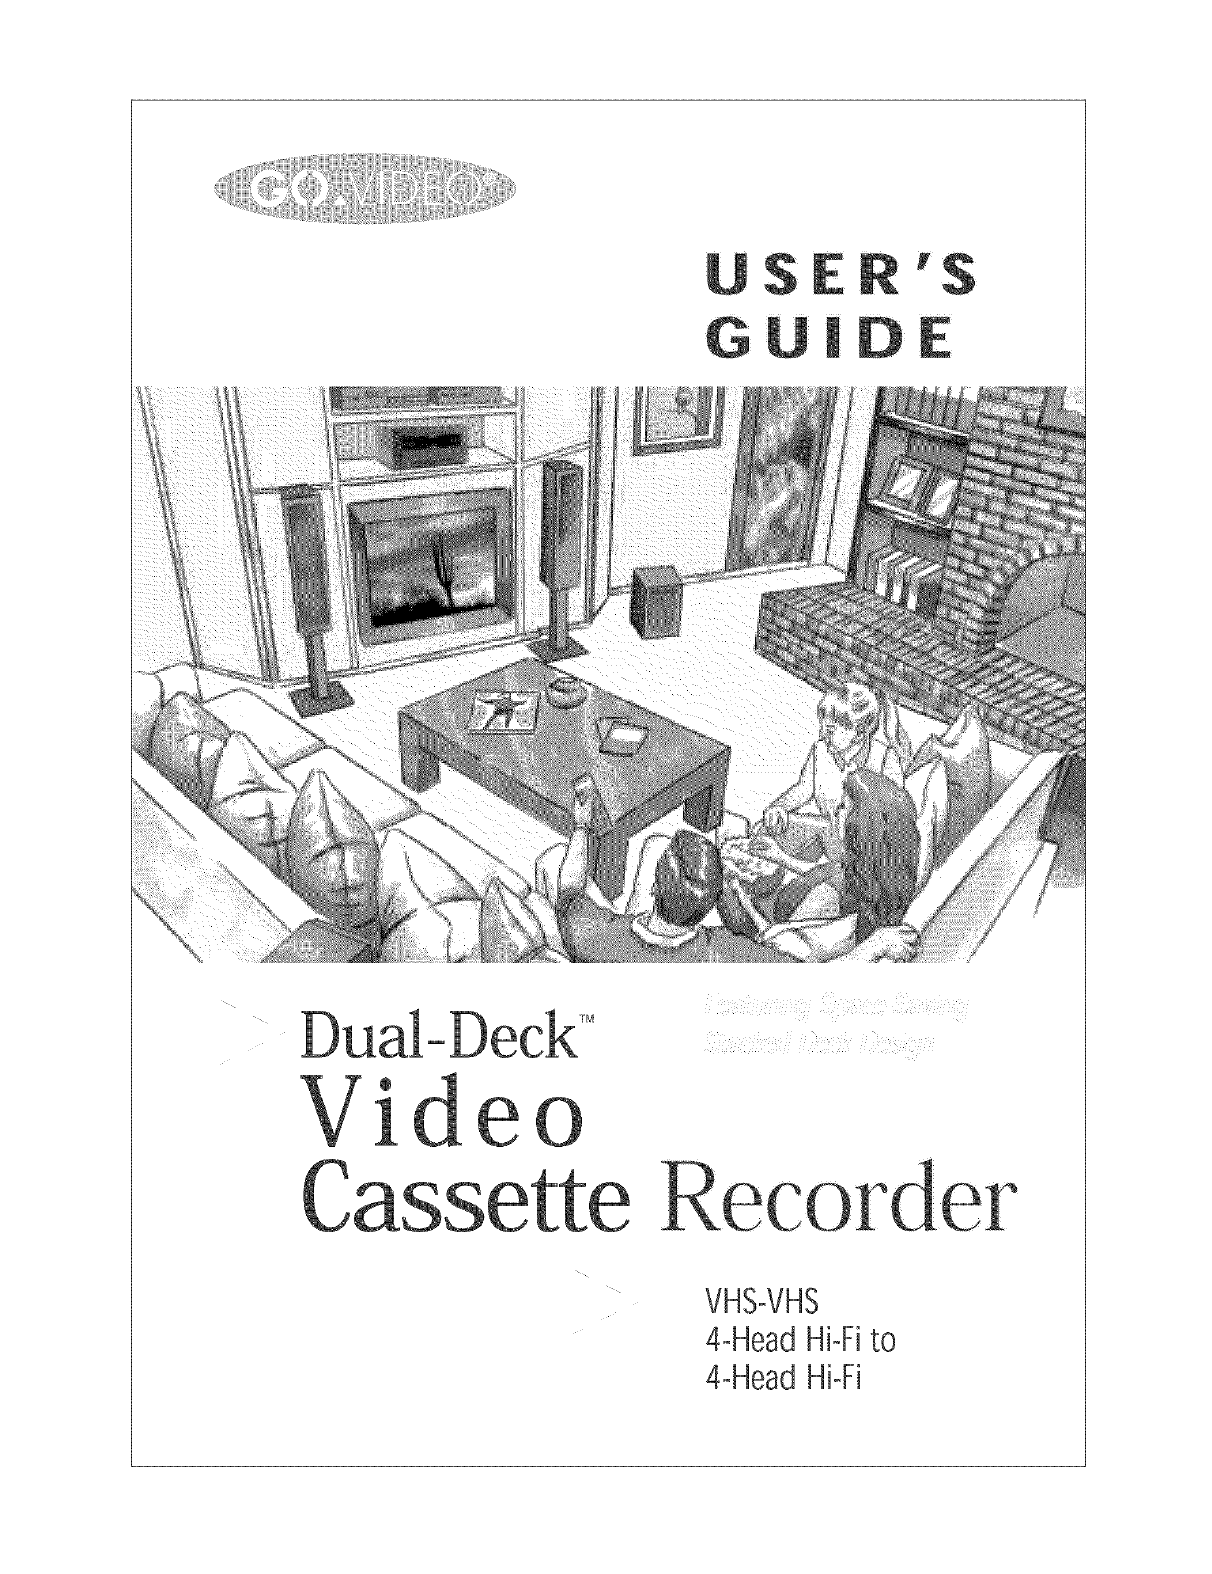
VHS-VHS
4-HeadHi-Fito
4-HeadHi-Fi
READ mNSTRUOTmON$. All the safety and
operating instructions should be read beflare the
tit]it is operated.
RETAmNmNSTRUCTJON$_ The safety and operating
instructions should be retained [br[uture reference.
S.
4.
HEED WARNINOS =All warnings oil the unit and it]
the operating instructiol]s should be adhered to,
FOLLOWINSTRUCTIONS=All operating and
maintenance instructions should be followed.
CLEANmP,_O=Unplug this video unit flora the wall
outlet befbre cleaning, l-)o not use liquid or aerosol
cleaners. Use a dry cloth fol dusting cabinet.
ATTACHMENTS =Do not use attachments not
recomntended by the video product manufacturer,
as tbev may be hazardous,
WATER&MOISTURE=Do not use this video unk
near watel fbr example, neat a bathtub, wash
bowl, kitchen sink, laundry tub, i!] a wet basement.
near a swimming poo]ot the ]ike.
ACCESSORIES=Do not place this video unit on
an unstable cart, stand, tripod, bracket or table.
The video unit rlmy fall. causing serious h0ury to
a child or adult, and serious darm*ge to the unit.
Use only with a cart, stand, tt ipod, bracket ol
table recommellded by the manufacttu er or sold
with the video unit. Any mounting of the unit
should follow the mamff_mturel's i!]stt uctiol]s and
shotl]dusea tttotmtil]gaccessoryrecommended by
the l]]at]tlfacttlrer.
8a, At] app]iance and cart combination should be moved
wit}] care, Qukk stops, excessive force, and uneven
sur[aces may cause the appliance and cart corl]bhta
tion to overturn,
10.
11.
12.
VENTILATION=Slots and openings h]the cabinet are
pt ovided for ventilation to ensme te]iable opel ation
of the video mlit and to protect it from overheating.
These openings must ]totbe blocked or covered. Nevel
place your VCR on a bed, sofa, rug ot other sh-nilat
sulface, oilor neat a radiator ot beat registel. This
video unit should not be placed it] atbuilt in instal
lation such as a bookcase or rack unless proper
ventilation is pl ovided or the rnantffacturer's
instructions have been adbel ed to.
POWER SOURCES =Thb video unit shotdd be
operated only fl'om the type of power source indk:ated
on tile real king label. ]f you a_e not sule of the type
of power supply to your home COl]SURyour appliance
dealer or bcal power compan> For video units
intended to be opel ated flora bat]el y power, or other
sources, refer to the operating instructions.
GROUNDINO OR POLARIZATION - This video unit
may be equipped with either a polal (zed 2wire AC
line plug (a plug having one blade wider thm] the
od]er) or a 3 wire grounding plug having a third
(gtoultding) pill
The 2 were polarized plug will fit into the power
outlet only one wap Tbis is a sa%ty feat]we. If you
are unable to insert the plug f\tlly into the outlet tW
revel sing the plug. If the plug still fails to fiL contact
your electrMam to replace your obsolete outlet. Do not
defeat tile saf>ty purpose of the polarized plug.
POWER=CORD PROTECTION =Power supply cords
should be routed so that they are not likely to be
walked on or pinched by items placed upon or against
them, paying particular attention to cords of plugs,
convenience receptacles, and the point where they
exit front the tit]it.
PORTABLE CART
WARNING
(Symbol provided by RETAC)
INTRODUCTION-SAFETYINSTRUCTIONS i
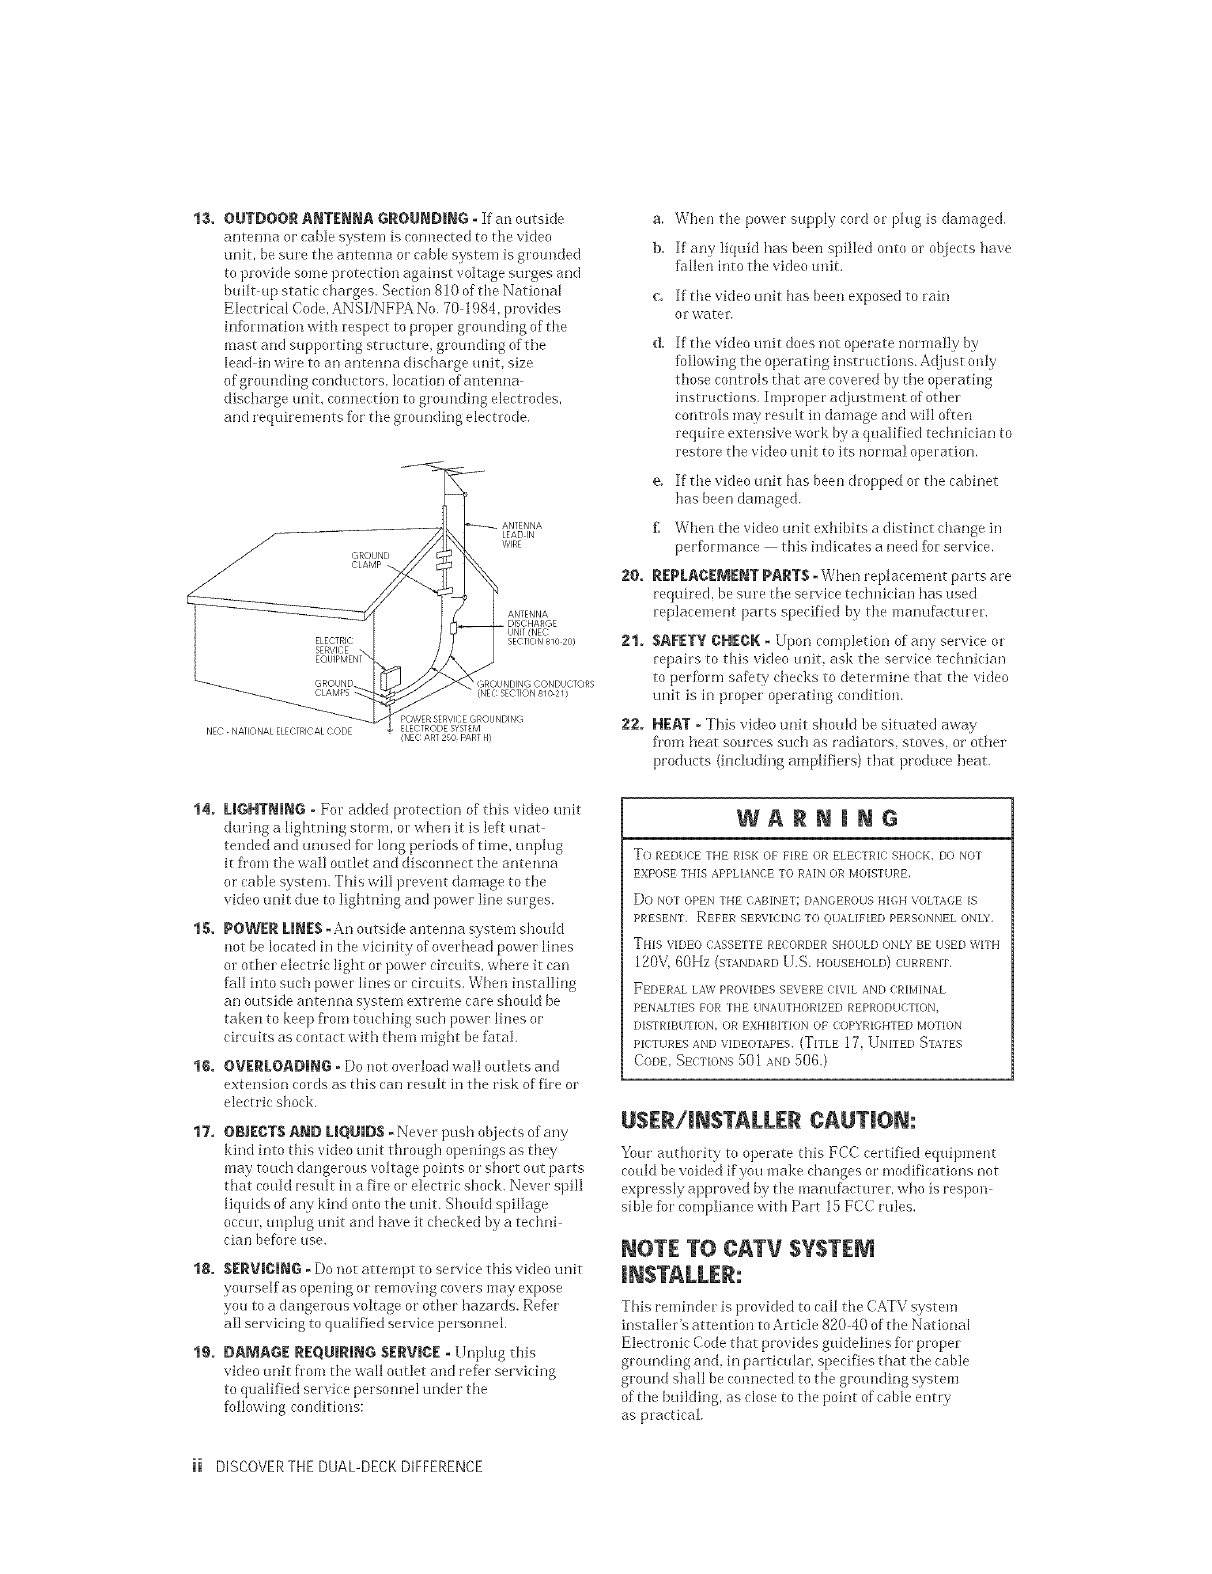
la. OUTDOORANTENNAGROUI_DIRG =E an outside
antenna o_ cEbie system [s connected to the video
unit, be sure the antenna or cable system is grounded
to provide some protection against voltage surges and
built up static chin ges. Section 810 of the National
E]ectrica[ Code, ANSIiNFPA No. 70 1984, provides
information with respect to p_opel g_ounding of the
rnast and suppol t[ng stH_cture, grounding of the
lead in wire to an antenna discharge unit, size
of g_ound[ng conductors, location of antenna
discharge unit, connection to grounding electrodes,
and requirements for the grounding electrode.
(',RC) IJN [)
C:LAIVIP
ELECTRIC
NEC NATIONAL ELEOTRICAL CODE
LEAD IN
WIRE
\ GRC)UNDING CONDUCTORS
NEC SECTION 810 21)
POWER SERVICEGROUNDING
ELECTRODESYSTEM
(NEC ART 250 PARTH)
20.
21°
22°
a, WheD the power supply cord or plug is damaged.
b, If any liquid has been spilled onto or objects have
fidlen into the video unit.
c. Kthevideounit has been exposed to rain
ol water.
[,
if the video unit does not operate normally by
followiDg the operating instructions. Adjust only
those controls that are covered by the operating
instructions, lmpl oper adjustrnent of other
colm'ols may result in damage and will often
require extensive work by a qualified technician to
restore the video unit to its normal operation.
[f the video trait has been dropped or the cabinet
has been damaged.
When the video tln[t exhibits a distinct change in
performance this indicates a need fbl service.
R4PLAC41Vl4NTPARTS =When replacement parts are
required, be sine die service technicDm has used
replacement parts specified by the manufactul er.
SAFETY CH4CR =Upon completion of any service or
repails to this video unit, ask die service technician
to perform safety checks to determine dlat die video
unit is in proper operating condition.
HEAT - This video unit sho(fld be situated away
fl'om heat sources such as radiators, stoves, or other
products (inclttding amplifiers) that prodr_ce he(it,
14. EIGHTNiNG - For added protection of this video unit
during a lightning storm, ol when it is left unat
tended and (mused for long periods of time, unplug
it fl'om the wall outlet and disconnect the antenna
or came system. This will prevent damage to the
video unit due to ]ightning and powe_ line sul ges.
15. POWER LINES -An outside antenna system should
not be located [n the vicinity of overhead power lines
ol other electric light or power drcuits, where [t can
fall into su(h power lines or circuits. When hlstall[ng
an outside ttntenna system extrerne cme shordd be
taken to kee t) fl'om touching such power lines or
circuits as contact with them might be fatal,
16. OVERLOADING -Donor overloadwal] outlets and
extension cords as dlis can resuk in the risk of fire or
elecu'[c shock.
17. OBJECTSAND LIQUIDS- Never push objects of any
kind into d_isvideo unit through openings as they
may touch dangerous voltage points or short out pales
that could result in a fire or electric shock. Never spi]]
liquids ofany kind onto the trait. Should spillage
occuLunplug UDitand have it checked bya techn[
ciaDbefbreuse.
18. S4RVJOI@G=Doriotattelnpt to service this video unit
yourself its opening ol rernoving covers may expose
you to a dangerous vo]tage or other hazards. Ref>r
all servicing to qualified service personnel.
19. DAMAGE REQUIRING SERVIC4 = E.Tnplugthis
video unit Dora d_e wall oudet and refer servicing
to qualified service pel sonne] under the
fo]lowing conditions:
WARNING
To REDDCE THE RISK OF FIRE OR ELECTRIC SHOCK, DO NOT
EXPOSE THIS APPLIANCE TO RAIN OR MOISTURE.
Do NOT (}PEN THE CABINET DANGEROUS HIGH VOLTAGE IS
PRESENT. REFER SERVICING TO QUALIFIED PERSONNEL ONLY.
THIS VIDE() CASSETTE RECORDER SHOULD ONLV BE USED WITH
120V, 00Hz (SZ_NDARD U.S. HODSEHOLD) EURREN'L
FEDERAL LA'v_,PROVIDES SEVERE CIVIL AND CRIMINAL
PENALTIES FOR THE DNAUTHORIZED REPRODDC_IION,
DISTRIBDTION, OR EXHIBKI'ION OF COPYRIGHTED MOTION
PICTURES AND VIDEOTAPES. (TITLE 17, UNITED _I_TES
CODE,SECTIONS501 &ND 406.)
USER/INSTALLER CAUTION:
Your authority to operate this FCC certified equipment
could be voided Kyou make changes or modi[k:ations not
expressly approved by the mantffactm er, who is respon
sible for compliance with Part 15FCC redes.
NOTE TO OATV SYSTEM
This reminder is provided to call the CATV system
instoller's attention to Article 820 40 of the National
Electronic Code that pt ovktes guidelines for propel
grounding and, [n particular, specifies that the cable
ground shall be connected to the gtounding system
of the bui]ding, as close to the point of (:able entry
as practical
ii DISCOVERTHEDUAL-DECK DIFFERENCE
0
GoAVideo is a registered trademark of
Go-Video, Inc. Copy rape, AmeriChmme,
Video Sequencing, and Dual-Deck VCR
are trademarks of Go- Video, inc. Aft
other trademarks remain the property
ot their respective companies.
]ntrodu¢ing the DuaUoDeck VCR
Dis(:over the Dual-Deck Differen(e .......................... 1
Features of Yon" Dtlal-De(k VCR ............................. 3
Chapter One
The Dt/al-Deck System .............................................. 7
Chapter Two
Operating Yon" Dt/al-Deck VCR ............................. 15
Chapter Three
Programming ¥ot/r Dtlal-De(k VCR ....................... 29
Chapter Feur
Connecting Your Dual-Deck VCR ........................... 4:_
. Basic Connections ................................................. 44
. Basic Cable Connections ....................................... 46
*Cable Converter Box Connections ....................... 47
*Monitor Connections ............................................. 51
. Conne(ting Other Video Eqt_ipment .................... 52
Appendix
A- Care ofYon" Dw_l-De(:k VCR ............................ 55
B - Glossary .............................................................. 59
C - Help/Commonly Asked Questions ..................... 63
Troubleshooting Charts
. No Menu is Visible ......................................... 67
. Poor Video Quality ......................................... 68
. Connecting VCR to TV] Monitor or Stereo ... 69
D - Customer Servile Infbrmation .......................... 71
At/thorized Go-Video Service/RepaF Centers .. 71
Warranty Statement .......................................... 72
E - Te(hni(al Specifications ..................................... 73
)ndex ..............................................................................75
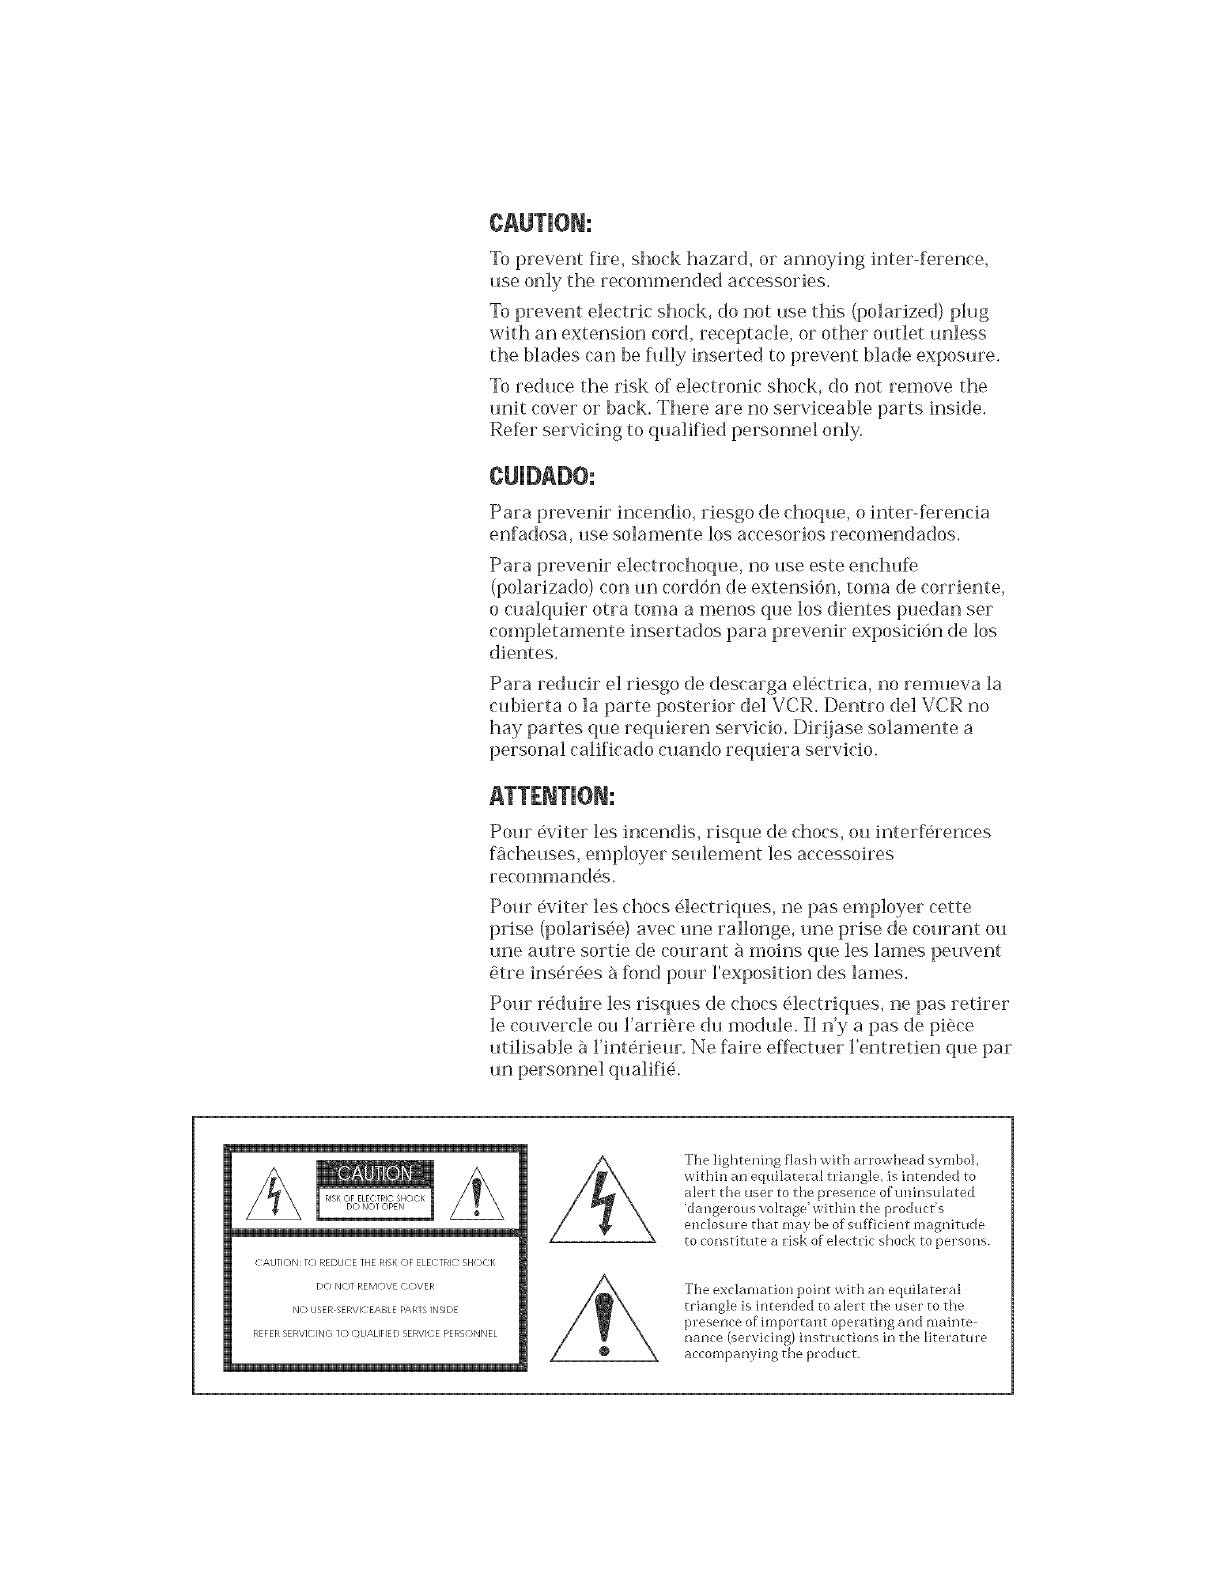
CAUTIGN:
To prevent fire, shock hazard, or annoying inter-ference,
use only the recommended accessories.
To prevent electric shock, do not use this (polarized) plug
with an extension cord, receptacle, or other outlet unless
the blades can be fi_lly inserted to prevent blade exposure.
To reduce the risk of electronic shock, do not remove the
trait cover or back. There are no serviceable parts inside.
Re_r servicing to q_alified personnel only.
Para prevenir incendio, riesgo de choque, o inter-ferencia
enfadosa, use solamente los accesorios recomendados.
Para prevenir electrochoqtm, no use este enchufe
(polarizado) con tan cord6n de extensi6n, toma de corrient<
o cualquier otra toma a menos qtm los dientes puedan ser
completamente insertados para prevenir exposici6n de bs
dientes.
Para redt_cir el riesgo de descarga el6ctrica, no remueva la
cubierta o la parle posterior del VCR. Dentro del VCR no
hay partes qtm requieren servicio. Dirijase solamente a
personal calificado cuando requiera servicio.
Pour _viter les incendis, risque de chocs, ou interf6rences
f5cheuses, employer seulement les accessoires
recommand_s.
Pour 5viler les chocs 51ectriques, ne pas employer cette
prise (polaris,.e) avec une rallonge, une prise de courant ou
une a_tre sortie de co,want a moins q_m les lames peuvent
_tre ins_r6es 'a f_)nd pour l'exposition des lames.
Po_r r_d_ire les risques de chocs 51ectriq_ms, ne pas retirer
le couvercle ou l'arri_re d_ module. H n'y a pas de piece
utilisable a l'intSrieur. Ne faire effectuer l'entretien que par
un personnel qualifiS.
<:AUTIC)N: T<) REDUCE THE RISK C)F ELE<:TRIC: SHOCK
DO NOT REM_-)VE (<)VER
N<) USER ERVF-EABLE PARTSINSIDE
REFER SERVICING T<) _-}UALIFIEDSERVI( E PERS< )NNEL
The lightening flash with arrowhead symbol
within an equilatera[ tl ]angle, is intended to
alert the user to the presence of tminsuJated
'dangel ous voltage' within the product's
enclosure that nlay be of sufficient magnitude
to consti_tute a lisk of ele(/t tic shock to pel sons.
The exclamation point _ith an equiJatera]
t_iangle is intended to ale_t the user to the
pl esence of]topoi t_mt opel g,ling and mainte
nance (servicing) il]structions it] the litel atul e
accompanying the pt oduct.
O
m
F_
O
F_
MaRe Picture Perfect Copies
with Hi=FiAudio of Any Video
Tape at the Touch of a Button
Go-Video's Dual-f)eck '_'VCRs do things that even two
VCRs wired together can't do. The secret behind this
marvel of American electronics is Go-Video's patented
AmeriChrome'' circuitry.
Enhanced AmeriChrome circuitry incorporates an
advanced microcontroller that synchronizes deck
speeds for optimum duplication resuRs. Using
Go-Video Dual-Deck VCRs, your video copies will
be indistinguishable from the originals. No matter
how many copies you make, each new tape will be
crisp and clean.
Gone are the days of tangled clumsy cables between
two VCR decks. Gone is the loss of picture quality from
those intervening cables that degrade the signal. Gone
is the flutter, roll and flashing of bad copies.
Go-Video Dual-Deck VCRs, with enhanced
AmeriChrome circuitry, allow you to make clear,
quality copies of any video tape %r your own personal
or home use at the touch of a button.
INTRODUCTION1
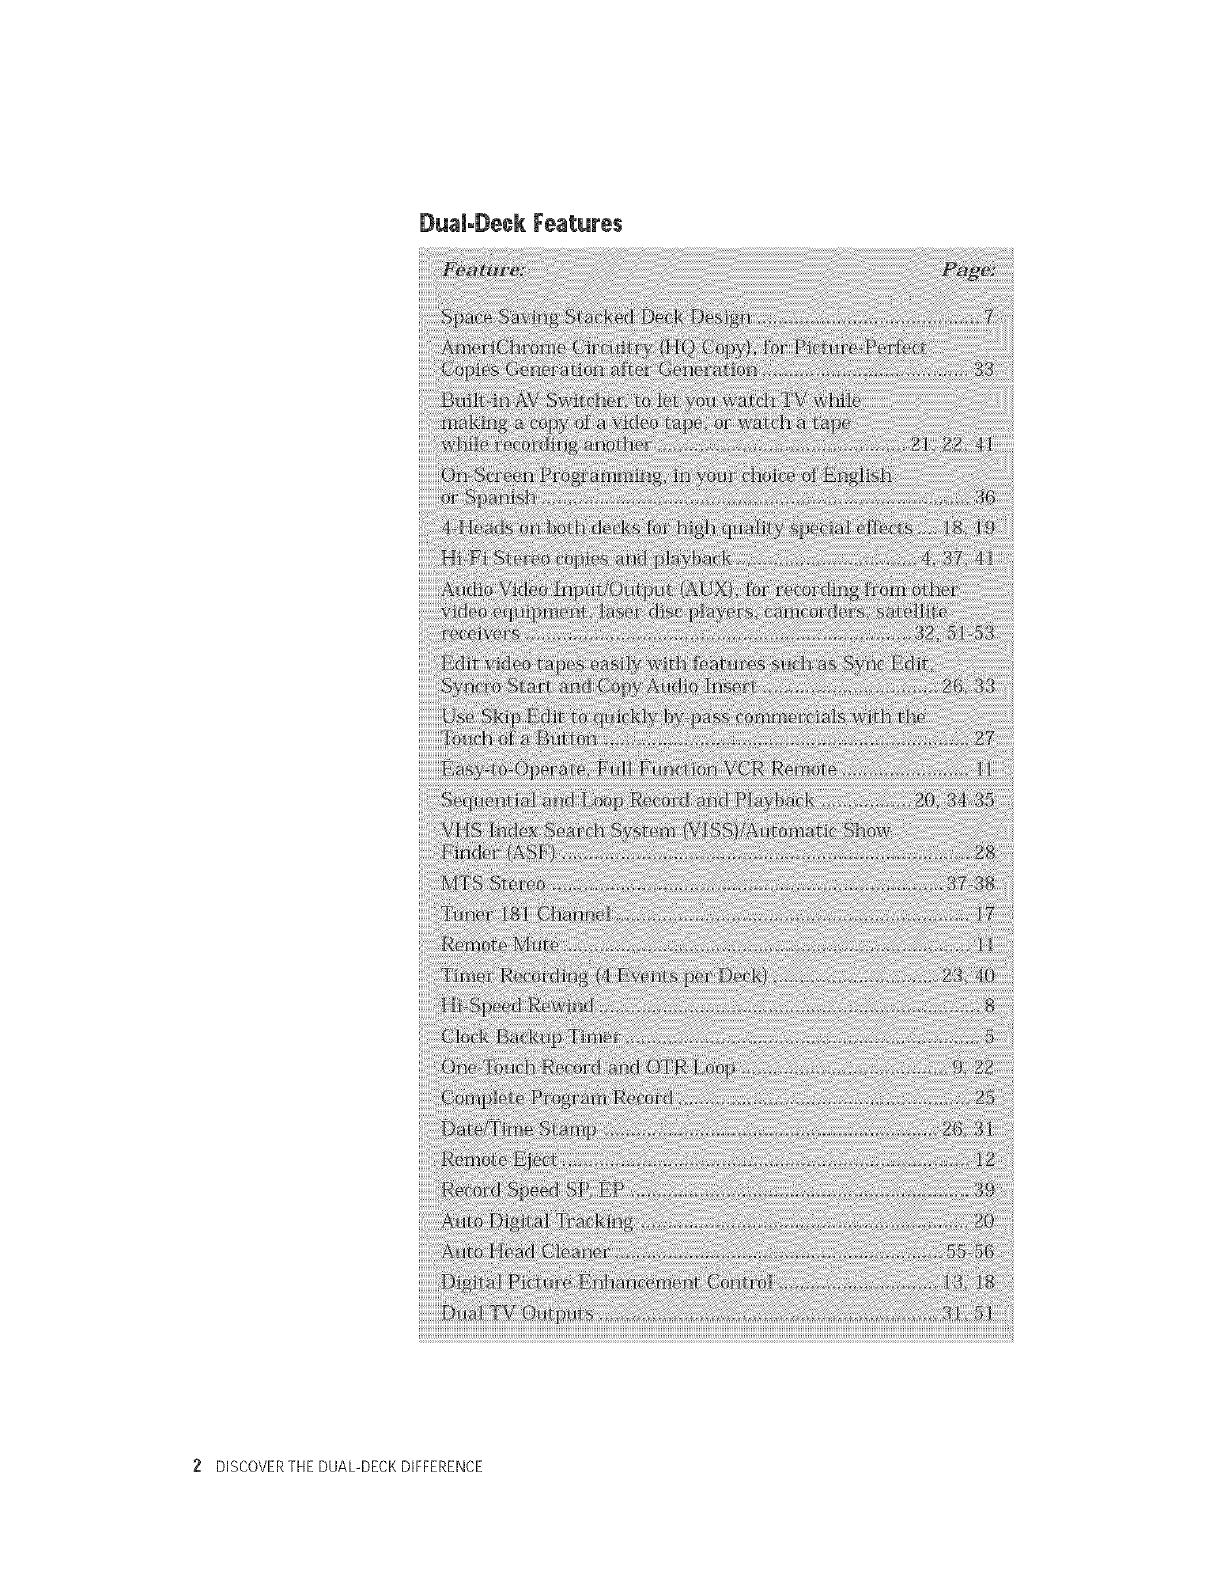
DuaUoDeck Features
2 DISCOVERTHEDUAL-DECKDIFFERENCE
O
m
O
D=
Make Quality Copiesof Any Video
at the Touch of a Button
The Dual-Deck VCR allows you to copy with just the
press of the COPY button. Patented AmeriChrome
circuitry maintains the high quality of your
original recording.
Watch aVideo Tape While You
Record aTV Show
Why miss your favorite TV sit-corn because the family
wants to watch a rented video? With your Go-Video
Du al-Deck VCR's special recording and playback
functions you can record that TV show WHILE you
watch a video tape.
Make CopiesDirectUy from
aVariety of Sources
Youcan make e×ceptional recordings from a variety
of accessories, such as laser disc players, satellite
receivers, camcorders, and other VCRs, using the
kont panel or rear panel audio and video inputs.
Never Again IVlissthe Last SIViinutes
of Your FavorRe IVlysteryVideo
The Du al-Deck's Complete Program Record feature
automatically selects the recording speed for the best
copy quality and time remaining on yore tape or TV
program. It will start recording in the high video
hnage quality SP mode, but switch automatically to
the EP mode if the programmed event is longer than
the tape remaining.
INTRODUCTION-FEATURESOFYOURDUAL-DECKVCR 3
Digitally Controlled Video
image Sharpness
Co-Video's digitally controlled Picture Enhancement
feat_re gives yo_ a greater depth of video image
control, allowing yo_J to sharpen or soften pict_re
details for optim_un performance.
Keep Track of Your Recordings
with Date and Time Stamp
YotJ can set the Dt_al-Deck VCR to record a date, time
and record sotJrce message on the tape at the start of a
timed or man_al recording event.
EasiUyLocate Tape Segments
with Automatic Show Finder (ASF)
Every time the Dt_al-Deck VCR enters record mode, an
index mark is placed on the tape. Use the VHS Index
Scan and Search System (VISS) to qt_ickly locate these
index marks dt_ring playback or while editing. Com-
bined with the Time/Date Stamp leatt_re, yot_ can
easily locate specific shows on a tape.
EUiminateGuesswork with
ReaUTime Count÷r
The f)_al-Deck VCR leat_lres a counter that indi-
cates tape position in real time: ho_rs, reinsures,
and seconds.
Make and PUaybackHioFiStereo Copies
Yo(J can connect yo(Jr D(Jal-Deck VCR to yo(Jr stereo
system and hear yo(Jr tapes and those TV programs
that are broadcast with M_['S SLereo So(_nd thro(_gh
yo_r stereo speakers. Or, if yo_ have a stereo TV
with separate a_dio inp_t jacks, yo_ can connect the
D_al-Deck VCR to yo_r stereo and TV and enjoy
stereo so_nd.
DISCOVERTHEDUAL-DECKDIFFERENCE
Record and Watch Your FavorRe Video
at Your ConveNence
The Timer Record Menu makes it easy to set the date
and time for the TV program you wish to record. You
can easily select different channel sources and speeds
for each timer event independently. The Dual-Deck
VCR automatically double checks your request and
reports errors that may prevent your selected pro-
gram hom recording, and will record a timed event
regardless of whether the power is on or off.
Record and Play BacR Tapes wRhout
Interruption wRh Video SeRuen¢ing
Exclusive Video Sequencing allows you to play or
record using both decks, in sequence, without inter-
ruption. This uninterrupted playback feature also
allows you to continually switch back and forth fiom
one tape to another.
Your Dual Deck VCR supports both loop and sequen-
tim modes. Loop mode allows you to start a tape in
either deck and when it finishes, a tape in the other
deck automatically starts. When that tape finishes,
any tape in the first deck will start and so on. Sequen-
tial mode allows you to start a tape in Deck One
and when it finishes, a tape in Deck Two will
Eliminate TracRing Noise Automatically
wRh DigRal Tracking
Your Dual-Deck VCR's Enhanced Automatic
Tracking feature quickly eliminates video noise
(white streaks) automatically.
Dual Video Outputs
Watch a show on one TV and a video tape
on another.
Dual, independently controlled, audio and video
outputs allow you to connect two monitors to your
Dual-Deck VCR. This [eature allows you to watch a
show on one monitor and a video tape on another or
set up a home editing suite' to monitor both Deck One
and Deck Two simuRaneousl>
INTRODUCTION_ FEATURESOFYOURDUALOECK VCR 5

Automatic Features
Auto Play/Rewind *When a tape with no
record safety tab is inserted into either deck, your
Dual-Deck VCR begins playing the tape. When
that tape has finished playing, it will automati-
cally rewind. You can turn these features on or off
in the Features menu.
Auto Power Off * While rewinding a tape, timer
recording, one-touch recording, copying a tape, or
_sing EZ-Copy, press the POWER button and your
Dual-Deck VCR will automatically turn off when
that fimction is completed. The Power indicator
will blink while this mode is active. If you press
the Power button while it is blinking, you will
cancel Auto Power Off.
Auto Power On * Power turns on when a tape
is inserted into either deck. The TV/VCR indicator
switches to VCR.
Auto Stop * Yotlr Dual-Deck VCR will stop if
a deck is leR in Record Pat_se for more than 5
minutes, and will begin ])laying again if ]eft in
Play Still 10r more than 5 mim_tes. This prevents
excessive wear on the tape.
Remote Eject *You can _ect tapes using your
Remote Control Press STOP/EJECT to eject a tape
FaiLSafe Timer * >mr Dual Deck VCR contains
Enhanced AmeriChrome circuitry which prevents
errors while programming the timer. If a potential
problem is detected in a timer event, the Dual Deck
VCR warns you with an On-Screen Display
message that is easy to understand.
6 DISCOVERTHEDUAL-DECKDIFFERENCE

_t
Front PaneJ 5uttons
and |ndicators
l B
Jl BI
L _O R _EO TVN_'R St_ R_ _y F_FO_ P_se R_ _S_f CS_ _ _,_ _
Package Contents:
Dual Deck VCR
• Full Function VCR Remote
2 AA F_atteries
One RF Cable
• User's Guide
Quick Reference Guide
• Warranty Registration Card
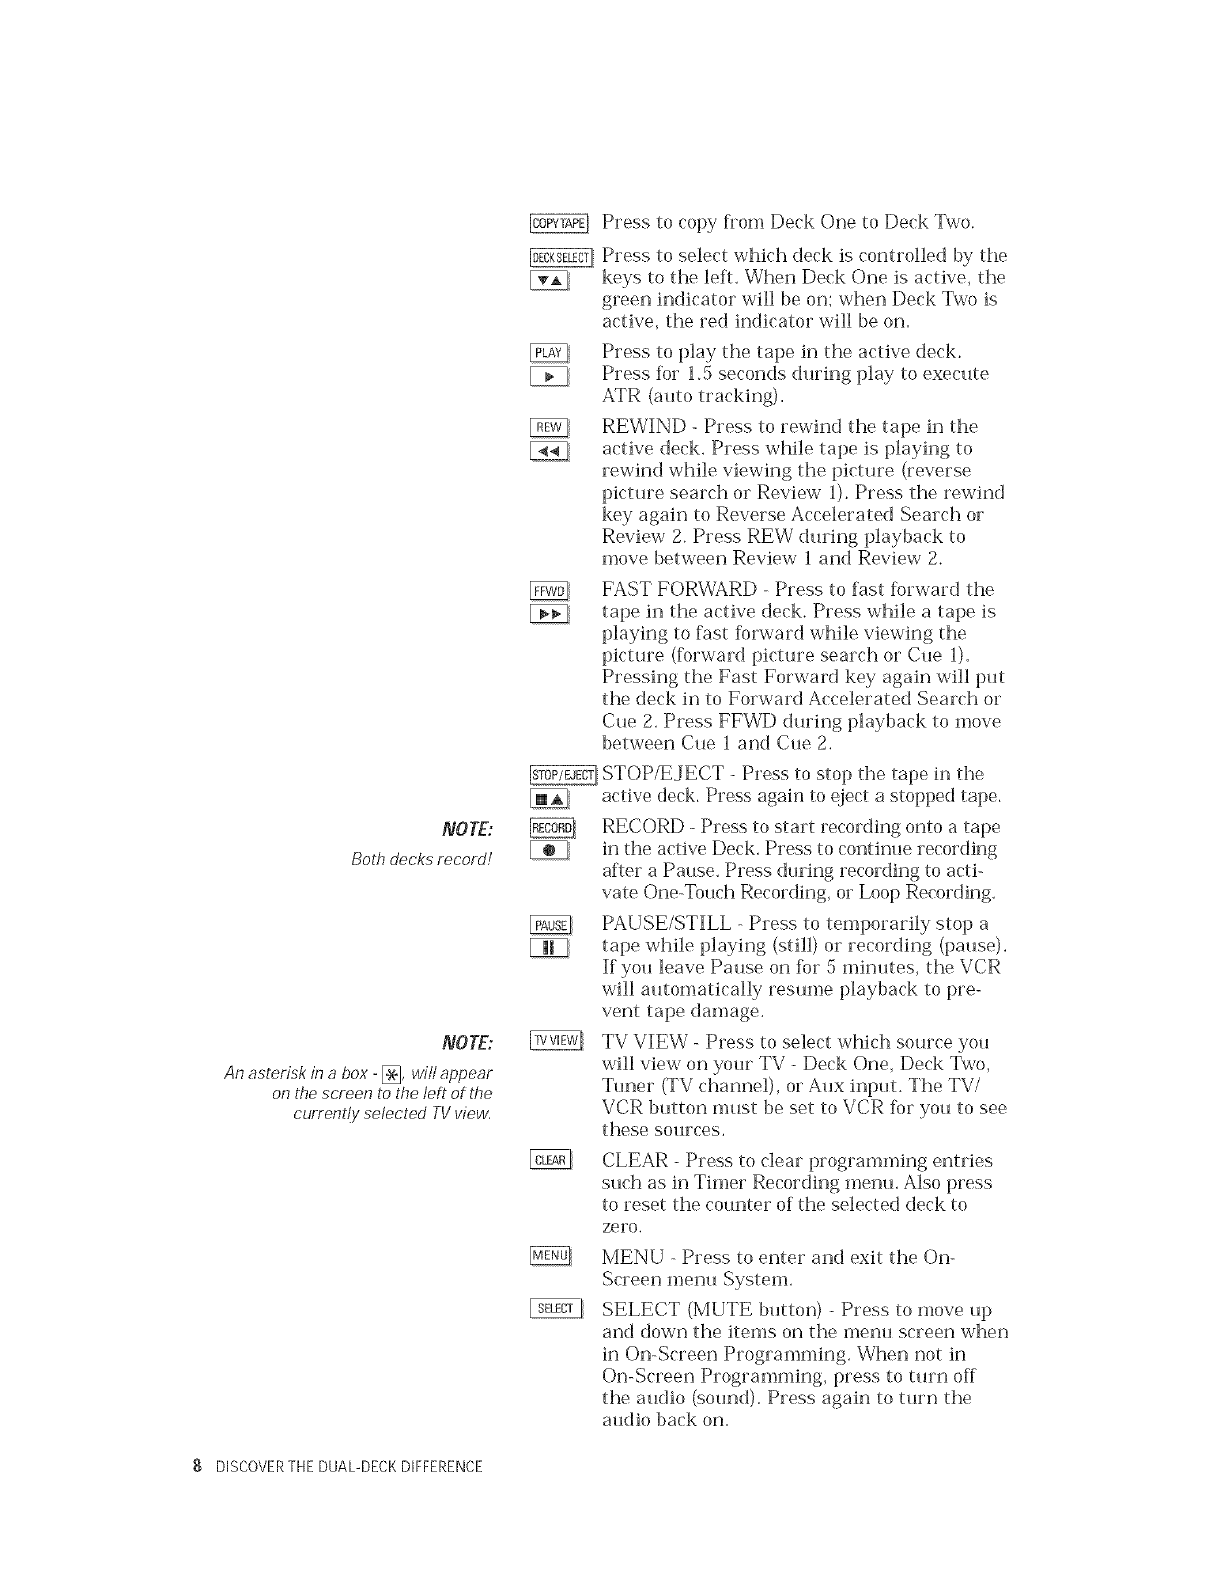
The Dual-Deck VCR has 18 keys on the Dont panel.
They are:
Press to turn yore VCR on and off or to set the
Auto Power OFF mode.
Press to switch control of the picture between
the TV and the VCR. This is the antenna
switch. When set to TV, the antenna signal
goes directly to the TV; when set to VCR, the
antenna signal goes through the VCR (your
TV must be tuned to channel 3 or 4).
Press (+) to increase channel nmnbers,
to go to the next higher channel stored in
Press (-) to decrease channel numbers,
to go to the next higher channel stored in
CHAPTER1 -THE DUAL-DECKSYSTEM 7
NOTE:
Bothdecksrecord!
NO TE:
An asterisk in abox - [_, wilt appear
on t,_escreen to the left of the
current!y selected TVview.
Press to copy from Deck One to Deck Two.
Press to select which deck is controlled by the
keys to the left. When Deck One is active, the
green indicator will be on; when Deck Two is
active, the red indicator will be on.
Press to play the tape in the active deck.
Press fl)r 1.5 seconds during play to execute
ATR (auto tracking).
REWIND - Press to rewind the tape in the
active deck. Press while tape is playing to
rewind while viewing the picture (reverse
picture search or Review l). Press the rewind
key again to Reverse Accelerated Search or
Review 2. Press REW during playback to
move between Review 1 and Review 2.
FAST FORWARD - Press to fast forward the
tape in the active deck. Press while a tape is
playing to fast forward while viewing the
picture (fl)rward picture search or Cue l).
Pressing the Fast Forward key again will put
the deck in to Forward Accelerated Search or
Cue 2. Press FFWD during playback to move
between Cue 1 and Cue 2.
STOP/EJECT - Press to stop the tape in the
active deck. Press again to _ect a stopped tape.
RECORD - Press to start recording onto a tape
in the active Deck. Press to continue recording
after a Pause. Press during recording to acti-
vate One-Touch Recording, or Loop Recording.
PAUSE/STILL - Press to temporarily stop a
tape while playing (still) or recording (pause).
If you leave Pause on for 5 minutes, the VCR
will automatically resume playback to pre-
vent tape damage.
TV VIEW - Press to select which source you
will view on your TV - Deck One, Deck Two,
Tuner (TV channel), or Aux input. The TV/
VCR button must be set to VCR for you to see
these Sotlrces.
CLEAR - Press to clear programming entries
such as in Timer Recording menu. Also press
to reset the counter of the selected deck to
zero.
MENU - Press to enter and exit the On-
Screen menu System.
SELECT (MUTE button) Press to move up
and down the items on the ment_ screen when
in On-Screen Programming. When not in
On-Screen Programming, press to turn off
the audio (sound). Press again to turn the
audio back on.
8DISCOVERTHEDUAL-DECKDIFFERENCE
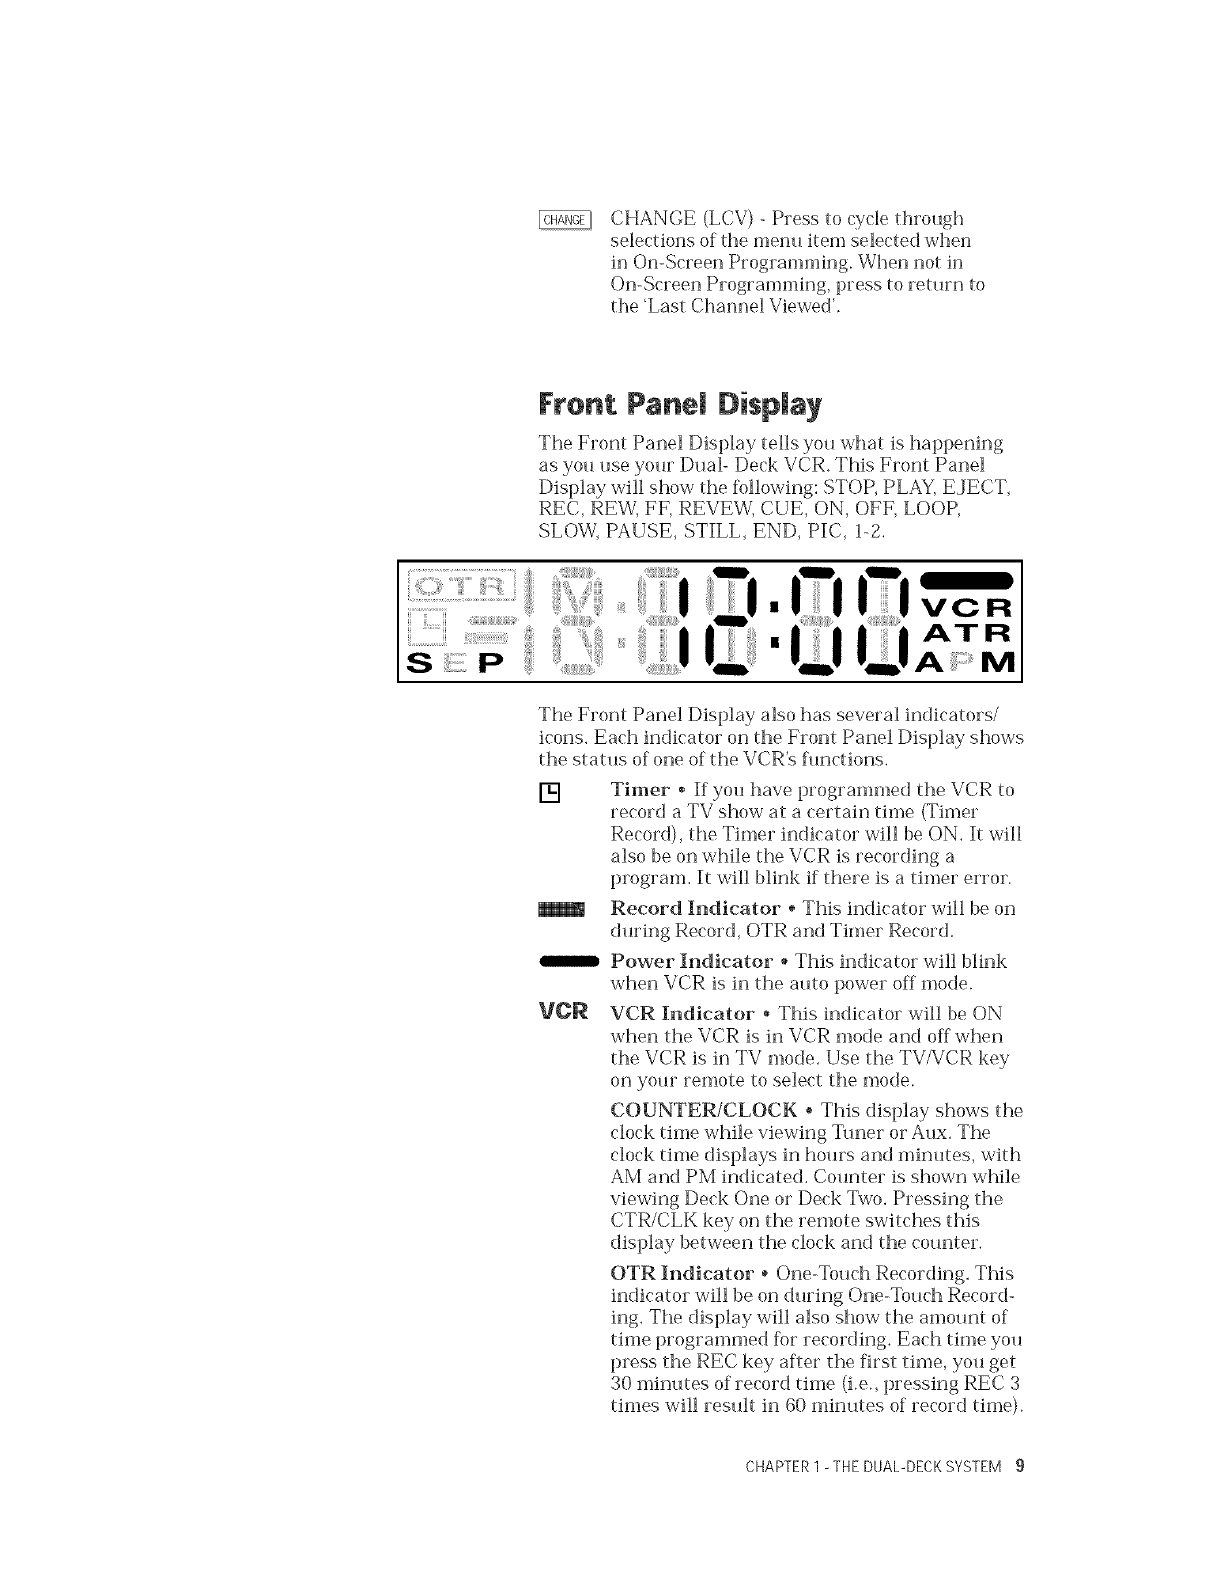
,CHANGE (LCV) - Press to cycle through
selections of the mentJ item selected when
in On-Screen Programming. When not in
On-Screen Programming, press to retm'n to
the 'Last Channel Viewed'.
S_i:!ii:i!i!!!i!!i!!i!!!i:iP
Front Pane| Display
The Front Panel Display tells you what is happening
as you use your Dual- Deck VCR. This Front Panel
Display will show the following: STOP, PLAY, EJECT,
REC, REW, FF, REVEW, CUE, ON, OFF, LOOP,
SLOW, PAUSE, STILL, END, PIG, 1-2.
i iiiii!
VC R
AT R
A::::::M
The Front Panel Display also has several indicators/
icons. Each indicator on the Front Panel Display shows
the status of one of the VCR's functions.
[]
VCR
Timer ° If you have programmed the VCR to
record a TV show at a certain time (Timer
Record), the Timer indicator will be ON, It will
also be on while the VCR is recording a
program. It will blink if there is a timer error.
Record Indicator * This indicator will be on
during Record, OTR and Timer Record.
Power Indicator * This indicator will blink
when VCR is in the auto power off mode.
VCR Indicator * This indicator will be ON
when the VCR is in VCR mode and offwhen
the VCR is in TV mode. Use the TV/VCR key
on your remote to select the mode.
COUNTER/CLOCK * This display shows the
clock time while viewing Tuner or Aux, The
clock time displays in hours and minutes, with
AM and PM indicated. Counter is shown while
viewing Deck One or Deck Two. Pressing the
CTR/CLK key on the remote switches this
display between the clock and the counter.
OTR Indicator * One-Touch Recording. This
indicator will be on during One-Touch Record-
ing. The display will also show the amount of
time programmed f_r recording. Each time you
press the REC key after the first time, you get
30 minutes of record time (i.e., pressing REC 3
times will restflt in 60 minutes of record time).
CHAPTER1 - THEDUAL-DECKSYSTEM 9
AM/PM , This indicator tells whether the time is
AM or PM,
SEP * This indicator shows the tape speed fl)r each
deck. If you are playing a tape, the tape speed is the
speed at which the tape was recorded. Tapes can be
played in three speeds, SP, EP and LP. Tapes can be
recorded in SP and ER
ATR, Auto Tracking, This indicator will be blinking
during automatic tracking, It will be on during play-
back unless tracking is adjusted manuall>
10 DISCOVERTHE DUAL-DECKDIFFERENCE

TVNCR OSD
Q
GO.VIDEO
NOTE:
Somebuttons have adua/ function.
Theaftemative tunction is
listed above the button.
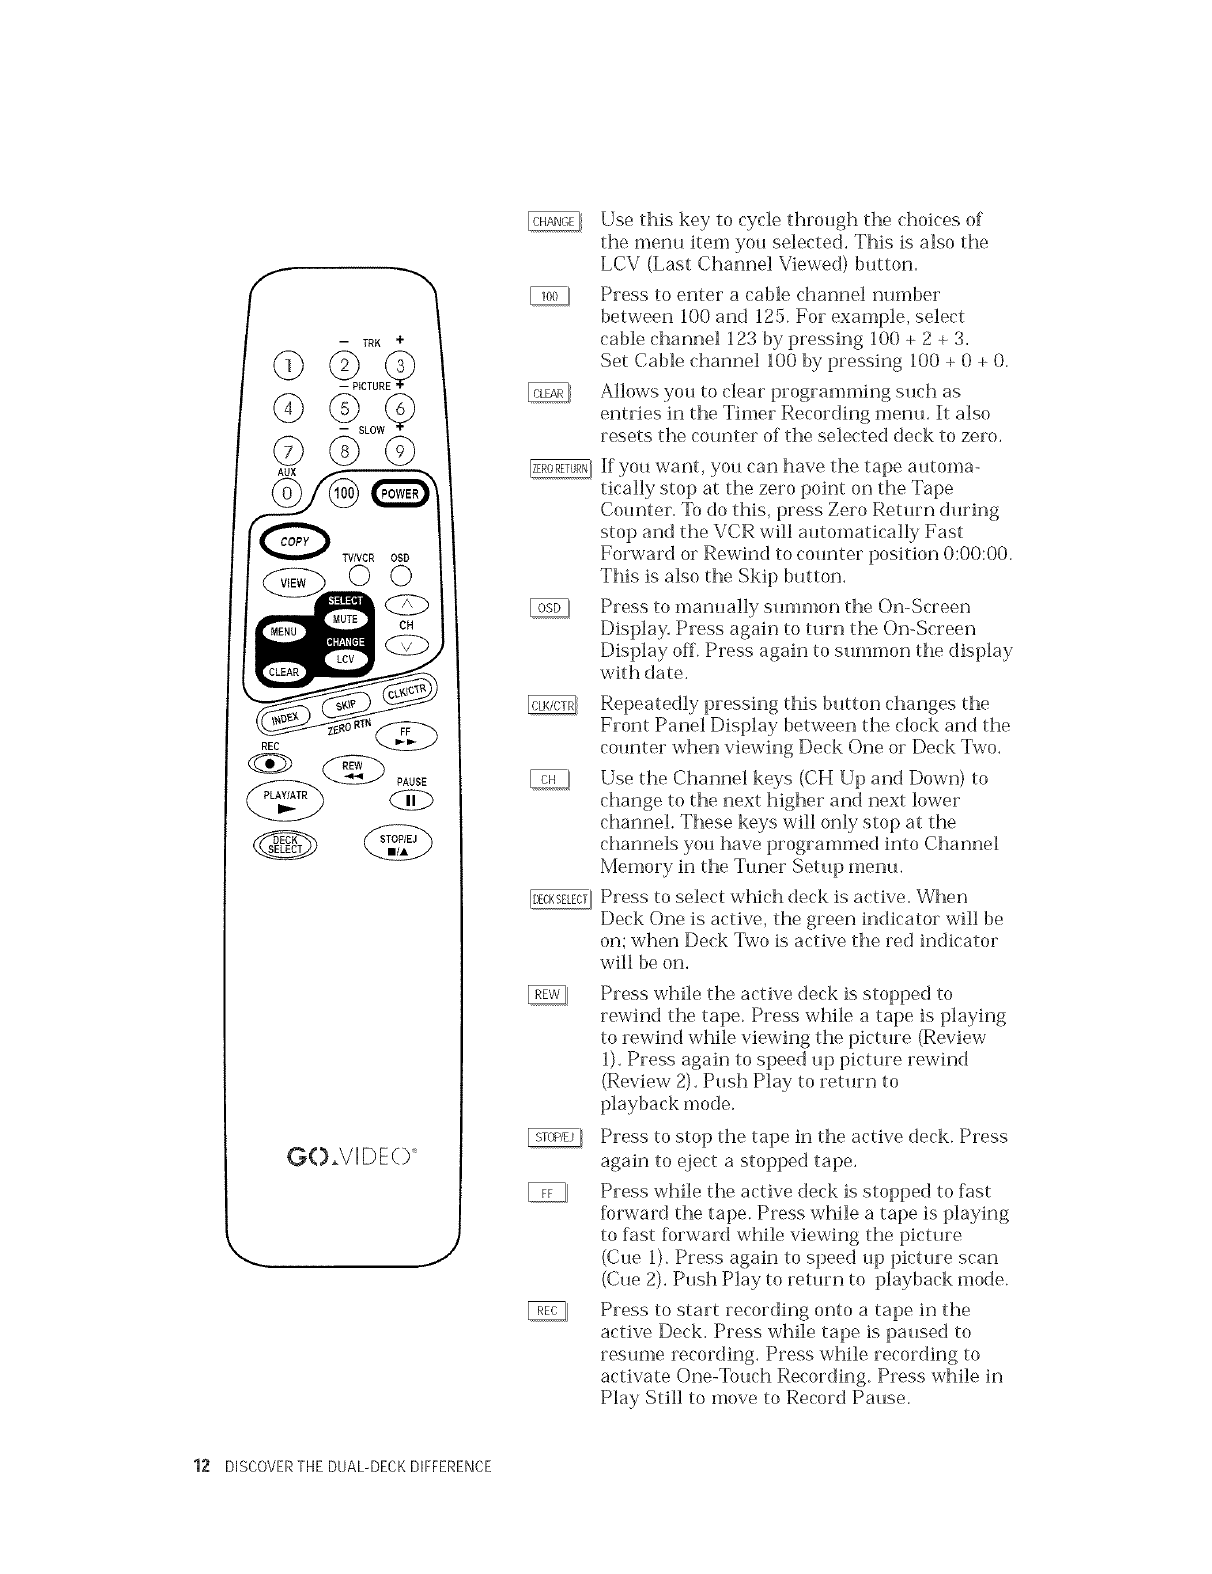
Remete Centrel
Before you begin, be sure to put the two supplied AA
batteries in the remote.
Your remote control makes it simple to operate
and program your Du al-Deck VCR. Take a moment
to learn where the buttons are located on the
remote control.
Press to turn your Dual-Deck VCR on and off
or to set the Auto Power OFF mode.
Press to copy tapes fiom Deck One to
Deck Two.
Press to play a tape in the active deck, If you
have manu ally a([)usted tracking using the
TRACKING keys, press this key %r 1.5
seconds to reactivate Automatic Tracking.
Press to begin an Index Scan or an Index
Search. Enter two numeric digits and then
press the Fast Forward or Rewind key to
initiate the search. In search, the VCR counts
to the desired mark and begins play. This can
be done either when the deck is playing or is
stopped. Press FF or REW without entering
digits to initiate a scan. In scan, the VCR stops
at each index mark, plays 5 seconds, and
moves on. Press while recording to place an
Index Mark on the tape. An Index Mark is also
automatically placed on a tape every time you
begin recording from stop.
Last Channel Viewed. If you have a certain
channel you want to come back to easily, enter
it using the nmnerical keys. Then you can flip
through other channels using the up and
down channel keys and easily return to this
channel by pressing the LCV button. This is
also the Change button.
Press to move up and down the items on
the menu screen when in On-Screen
Programming. This key is also used to move
you to the next selection in the Set Date/Time
and Timer Record menus. This is also the
Mute button.
Press to switch the antenna connection be-
tween your VCR and your TV. When in VCR
mode, VCR will appear on the Front Panel
Display. TV mode is the same as if your VCR
were tinned off.
Press to turn off the audio (sound). Press
again to turn the audio back on. This will not
affect recording. This is also the Select button.
CHAPTER1 -THE DUAL-DECKSYSTEM 11
TVNCR OSD
GO_VIDE() _
J
,
@
Use this key to cycle through the choices of
the menu item you selected. This is also the
LCV (Last Channel Viewed) button.
Press to enter a cable channel number
between 100 and 125. For example, select
cable channel 123 by pressing 100 + 2 + 3,
Set Cable channel 100 by pressing 100 + 0 + O.
Allows you to clear programming such as
entries in the Timer Recording menu. It also
resets the counter of the selected deck to zero.
If you want, you can have the tape automa-
tically stop at the zero point on the Tape
Counter. To do this, press Zero Return during
stop and the VCR will automatically Fast
Forward or Rewind to counter position 0:00:00.
This is also the Skip button.
Press to manually summon the On-Screen
Displa> Press again to turn the On-Screen
Display off. Press again to smnmon the display
with date.
Repeatedly pressing this button changes the
Front Panel Display between the clock and the
counter when viewing Deck One or Deck Two.
Use the Channel keys (CH Up and Down) to
change to the next higher and next lower
channel. These keys will only stop at the
channels you have programmed into Channel
Memory in the Tuner Setup menu.
Press to select which deck is active. When
Deck One is active, the green indicator will be
on; when Deck Two is active the red indicator
will be on.
Press while the active deck is stopped to
rewind the tape. Press while a tape is playing
to rewind while viewing the picture (Review
1). Press again to speed up picture rewind
(Review 2). Push Play to return to
playback mode.
Press to stop the tape in the active deck. Press
again to eject a stopped tape.
Press while the active deck is stopped to fast
forward the tape. Press while a tape is playing
to fast %rward while viewing the picture
(Cue 1). Press again to speed up picture scan
(Cue 2). Push Play to return to playback mode.
Press to start recording onto a tape in the
active Deck. Press while tape is paused to
resume recording. Press while recording to
activate One-Touch Recording. Press while in
Play Still to move to Record Pause.
12 DISCOVERTHE DUAL-DECKDIFFERENCE
-- TRK "F
G©@
-- PICTURE+
©@
GO2v'IDE O'
k. J
NO TE:
'00'= A UX(see page 22).
Press to temporarily stop a tape while record-
ing (pause) or while playing (still). Push while
in Still to Frame Advance.
Pressing these buttons slows the speed the
tape is playing, Successive pressings of the +
key on the remote steps up the speed of the
tape, Successive pressings of the - key on the
remote slows down the speed of the tape, Press
PLAY to resume normal speed. These are also
the @ and @ buttons.
During playback, pressing this key once
causes the tape to forward picture search for
60 seconds. Pressing it twice causes the
picture to forward picture search fl_r
120 seconds. Press up to 5 times to skip 5
minutes. This is also the Zero Return button.
During Copy, pressing this key once will edit
out the next 60 seconds of your copy tape.
Press twice to easily remove commercials
when copying TV shows. Press up to 5 times
to edit out 5 minutes.
Press to manually adjust the tracking while
playing a tape. These are also the @ and
@ buttons.
Press to enter and exit the On-Screen
menu System.
Digital Picture Enhancement. Press to a(_ust
picture sharpness. You can press this button 8
times, up or down tea(Oust sharpness. These
are also the @ and @ buttons,
Press to select which source you will view on
your TV - Deck One, Deck Two, Tuner (TV
channel), or Line input, The TV/VCR button
must be set to VCR for this button to work.
Press two digits to enter a desired channel.
Press '0' first for channels 1-9. Also used for
menu system programming.
CHAPTER1 -THE DUAL-DECKSYSTEM 13
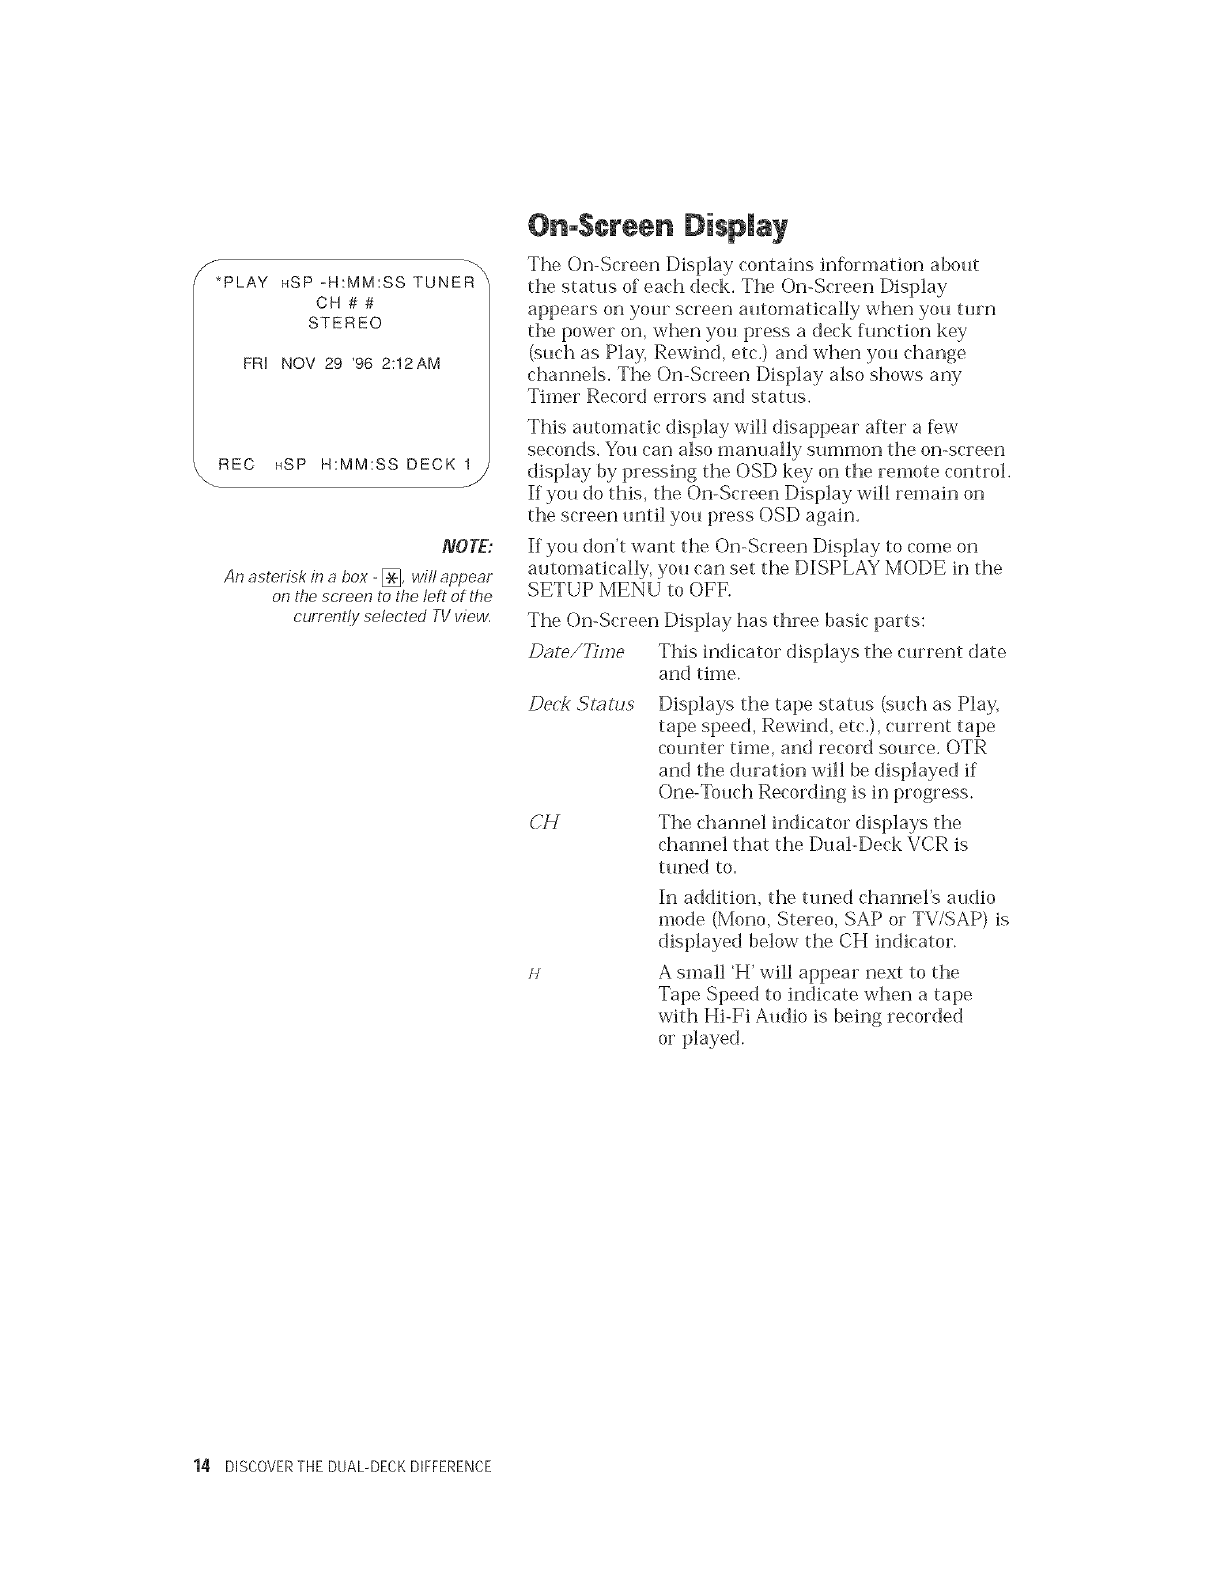
_**PLAYHSP=H:MM:SSTUNER
CH##
STEREO
FRINOV29'962:!2AM
REC HSPH:MM:SSDECK1
NO TE:
An asterisk in a box - [], wilt appear
on t,bescreen to the left of the
current!y selected TVview.
On-Screen Display
The ()n-Screen Display contains information about
the status of each deck. The On-Screen Display
appears on your screen automatically when you turn
the power on, when you press a deck function key
(such as Play, Rewind, etc.) and when you change
channels. The On-Screen Display also shows any
Timer Record errors and status.
This automatic display will disappear after a few
seconds. You can also manually summon the on-screen
display by pressing the OSD key on the remote control.
If you do this, the On-Screen Display will remain on
the screen until you press OSD again.
If you don't want the On-Screen Display to come on
automatically, you can set the DISPLAY MODE in the
SETUP MENU to OFF.
The On-Screen Display has three basic parts:
Dale/_q'me This indicator displays the current date
and time.
Deck _mZus
CH
Displays the tape status (such as Play,
tape speed, Rewind, etc.), current tape
counter time, and record source. OTR
and the duration will be displayed if
One-Touch Recording is in progress.
The channel indicator displays the
channel that the Dual Deck VCR is
tuned to.
H
In addition, the tuned channel's audio
mode (Mono, Stereo, SAP or TV/SAP) is
displayed below the CH indicator.
A small H' will appear next to the
Tape Speed to indicate when a tape
with Hi-Fi Audio is being recorded
or played.
14 DISCOVERTHE DUAL-DECKDIFFERENCE
¢N
NOTE:
You may program your menus
to be in Spanish. See the Set Clock/
Language menu. See page 30.
NOTE:
Thefirst time you press _J after
hooking upyour VCRor after a power
failure, the SETLANGtJAGEscreen wih'
automatically come up.At t,_attime,
choose your language preference (1 or
2) and press _l to proceed with
step 3. Until you set the (]ate and time,
pressing menu will display SET CLOCK/
LANGUAGEmenu, t,benthe FEATDRES
menu, and the DECKTWO menu
and DECKONEmenu.
FEATURES MENU
* SETUP MENU
2: COPY MODE HQ1
3: SPEED MATCHING ON
4: COPYAUD_O INSERT OFF
5: EZ-COPY OFF
6: PLAYBACK MODE NORM
7: RECORD MODE NORM
PRESS SELECT/CHANGE TO
SKTAND MENU WHEN DONEJ
/SETUP MENU
1 : SET CLOCK/LANGUAGE
2: TUNER SETUP MENU
3:AUTO PLAY/REWmND BOTH
4 : ON-SCREEN DISPLAY AUTO
5" DATE/TUME STAMP ON
6: SECOND TV VIEW AUTO
7: AUX INPUT FRONT
PRESS SELECT/CHANGE TO
SET AND MENU WHEN DONE
J
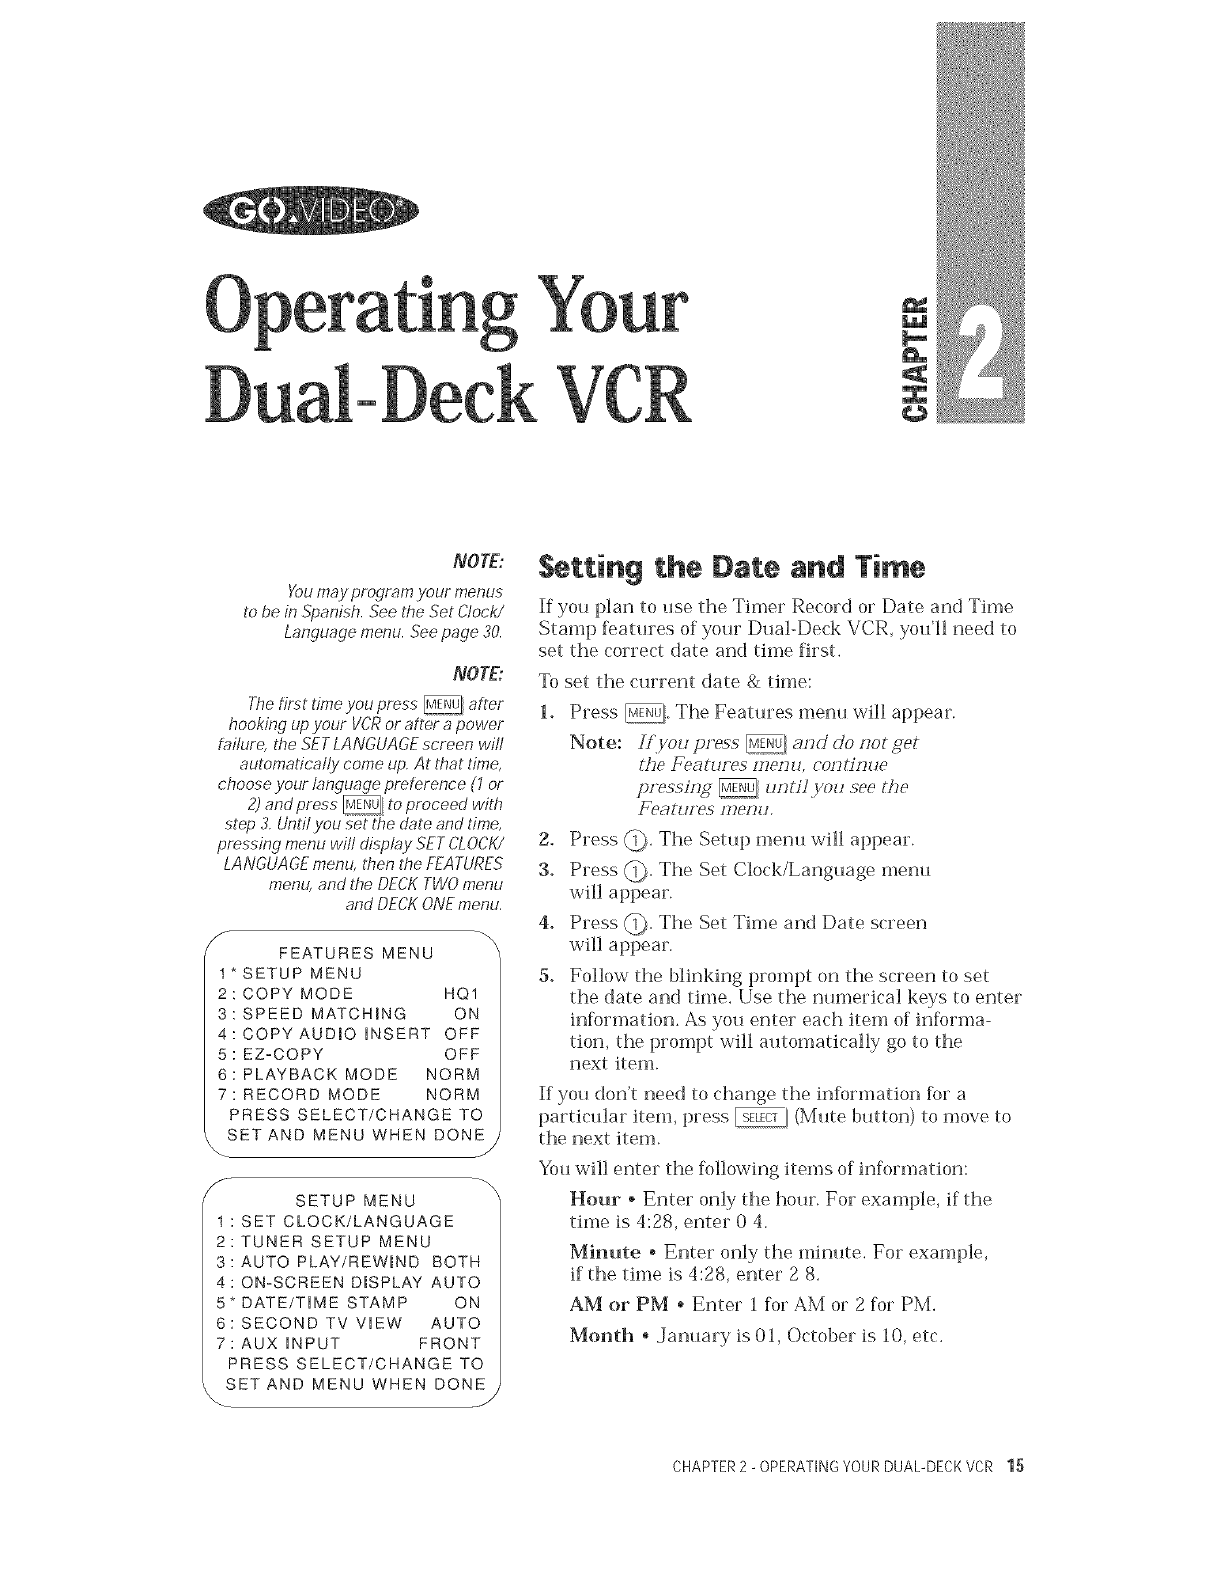
Setting the Date and Ti e
If you plan to use the Timer Record or Date and Time
Stamp features of your Dual-Deck VCR, you'H need to
set the correct date and thne first.
To set the current date & time:
Press _). The Features menu will appear.
Note: L<you gr_ss _] and do not g_r
the £_atur(_s menu, continue
pressing _untiJ.you see the
£%atur(_s menu.
2. Press @. The Setup menu will appear.
3. Press @. The Set Clock/Language menu
will appear.
4. Press (_). The Set Time and Date screen
will appear.
5. Follow the blinking prompt on the screen to set
the date and time, Use the nmnerica] keys to enter
information. As yot_ enter each item of informa-
tion, the prompt win automatically go to the
next item.
If you don't need to change the information for a
particular item, press _, (Mute button) to move to
the next item.
You will enter the following items of information:
Hour _ Enter only the hour. For example, ff the
thne is 4:28, enter 0 4.
Minute _ Enter only the minute. For example,
ff the time is 4:28, enter 2 8.
AM or PM . Enter i for AM or 2 for PM.
Month. Jammry is 01, October is 10, etc.
CHAPTER2 - OPERATINGYOURDUAL-DECKVCR 15
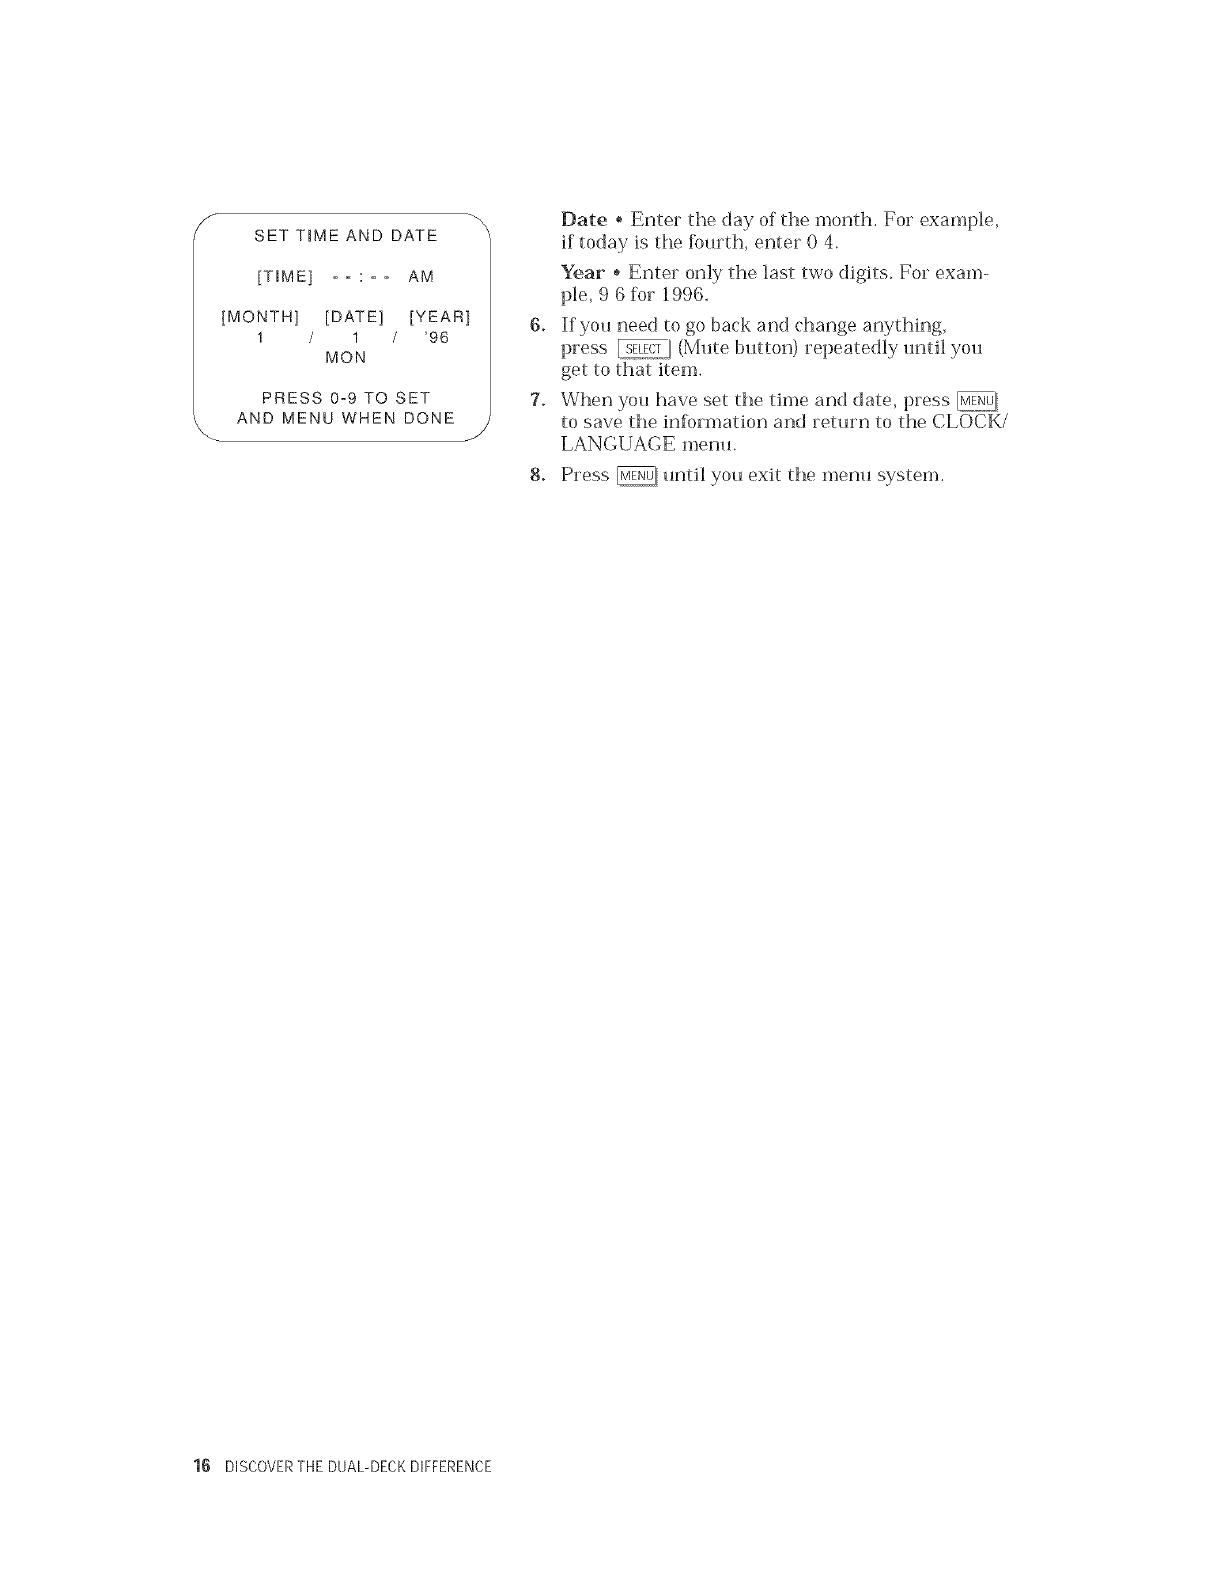
Y SETT_ME AND DATE
[TIME] : AM
[MONTH] [DATE] [YEAR]
1/1/ '96
MON
PRESS 0-9 TO SET
AND MENU WHEN DONE
6,
7.
J
8.
Date, Enter the day of the month. For example,
if today is the fourth, enter 0 4.
Year * Enter only the last two digits. For exam-
ple, 9 6 for 1996,
If you need to go back and change anything,
press _ (Mute button) repeatedly until you
get to that item.
When you have set the time and date, press _!
to save the information and return to the CLOCK/
LANGUAGE menu.
Press _I until you exit the menu system.
16 DISCOVERTHE DUAL-DECKDIFFERENCE

FEATURESMENU
*SETUPMENU
2: COPYMODE HQ1
3: SPEEDMATCHING ON
4: COPYAUDIOiNSERTOFF
5: EZoCOPY OFF
6: PLAYBACKMODE NORM
7: RECORDMODE NORM
PRESSSELECT/CHANGETO
SET AND MENU WHEN BONE j
SETUP MENU
: SET CLOCK/LANGUAGE
2:TUNER SETUP MENU
3:AUTO PLAY/REWIND BOTH
4 : ON-SCREEN DISPLAY AUTO
5" DATE/TIME STAMP ON
6: SECOND TV ViEW AUTO
7: AUX mNPUT FRONT
PRESS SELECT/CHANGE TO
SET AND MENU WHEN DONE,
J
f
TUNER SETUP MENU
CH_#
SAPIS AVAILABLE
*ANTENNA SOURCE TV
AUTO PROGRAM
ADD CHANNEL
DELETE CHANNEL
TUNER AUDIO STEREO
PRESS SELECT/CHANGE TO
SET AND MENU WHEN DONE
J
NOTE:
tn cases ot poor or weak video
reception, .your Tuner Setup menu may
not be visible. W/ten this happens, select
a strong local channel where the
menu wilt be visible again.
Setting Antenna
& £hanne| Memory
Once you have your Dual-Deck VCR hooked up to your
antenna or directly to a cable system without a cable
converter box, you'll need to set the antenna and the
channel memory. If you are using a cable converter
box, you will need to set your VCR's tuner channel to
receive only the ca ble converter box output channel.
Your Dual-Deck VCR comes with a 181 channel MTS
tuner capable of receiving both over-the-air and cable
broadcasts in stereo. Reception for channels 2-13 are
the same on regular broadcast or on cable TV. But
above channel 13, cable TV (CATV) reception is
different from broadcast TV.
1. Press _q on your remote control. The Features
menu will appear.
2. Press @. The Setup menu will appear.
3. Press @. The Tuner Setup menu will appear.
4. Set the ANTENNA SOURCE. Press CHANCE to
cycle between TV and CATV (cable). When the
desired option is on the screen, go to step 5.
5. Press _ (Mute button) to move to
AUTO PROGRAM.
6. Press _ (LCV button) to begin automatic
channel programming. The VCR will go through
all possible TV or cable channels, and will auto-
matically put the channels which you receive
into Channel Memory. This will take a few
minutes to complete.
7. If you wish, you can program certain channels into
Channel Memory or remove them fiom Channel
Memory manually. You can also select stereo
sound. To do this, see the TUNER SETUP menu
section of this manual. See page 35.
8. Press _J, to save the changes and to exit to
the SETUP menu.
9. Press _/until you exit the menu system.
CHAPTER2 - OPERATINGYOURDUAL-DECKVCR 17
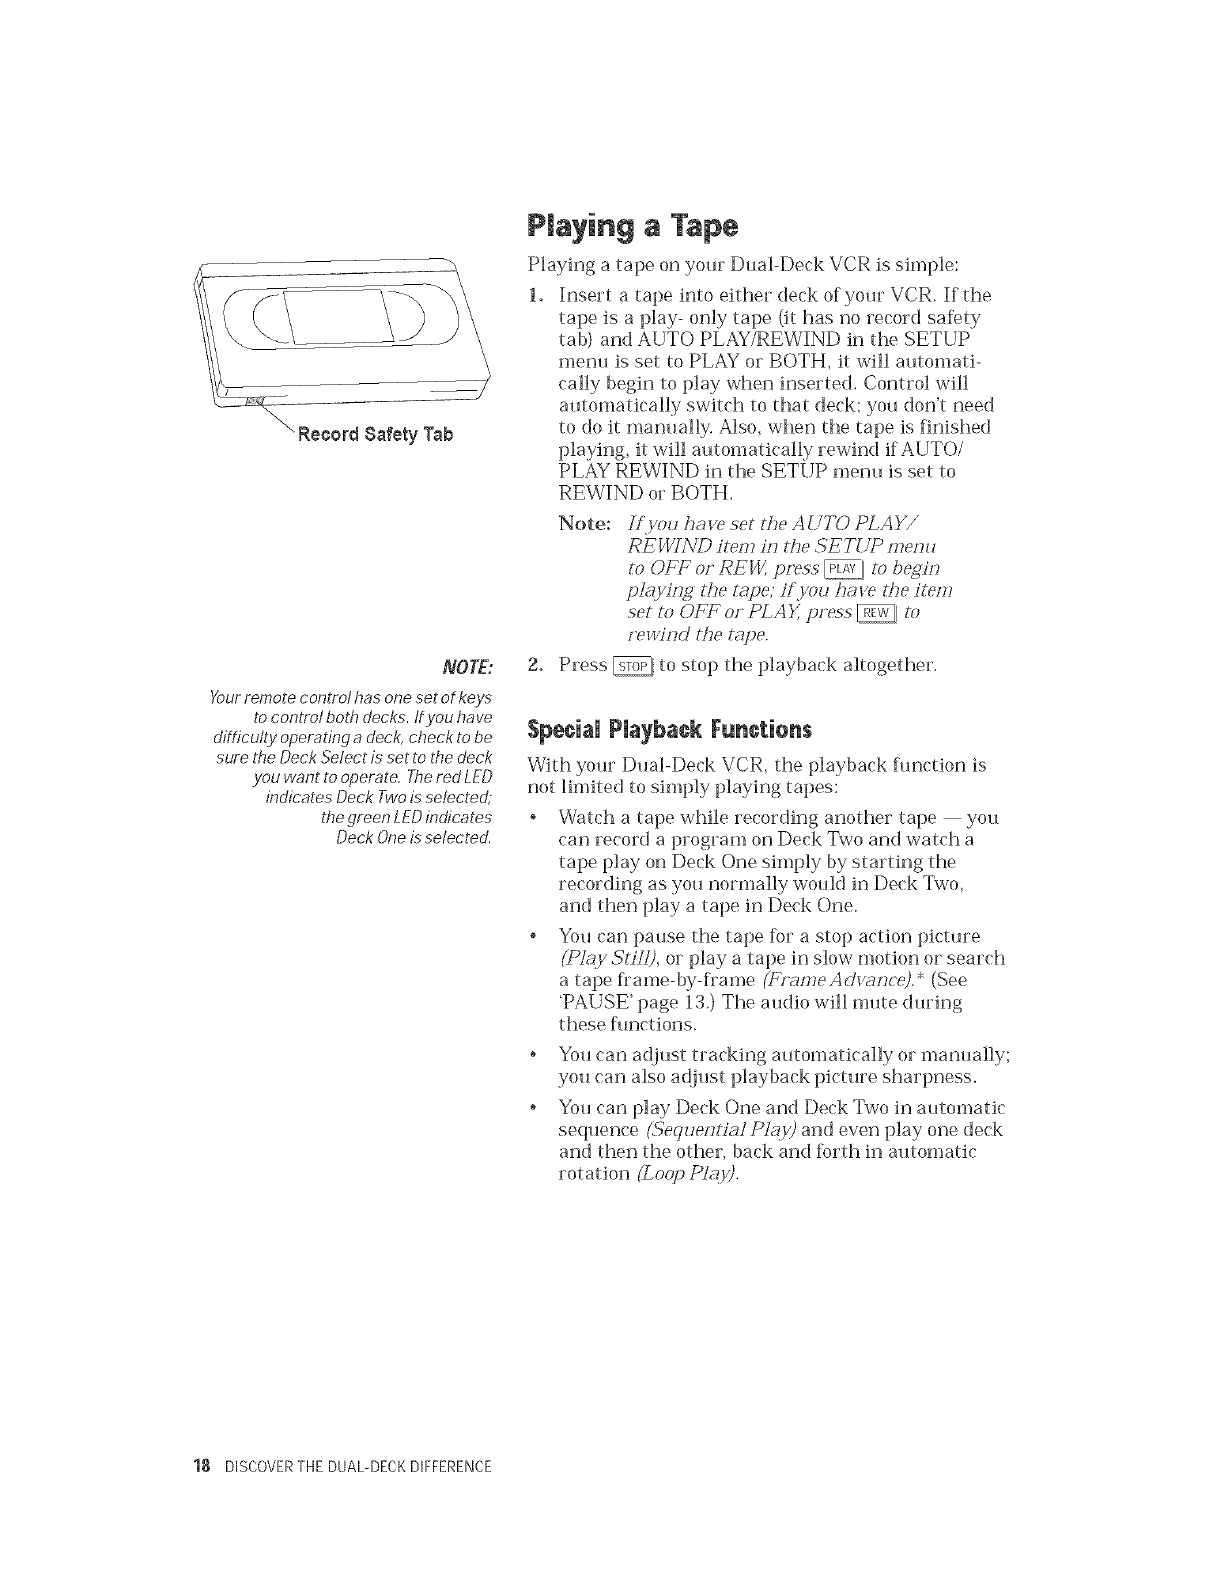
Record Safety Tab
NOTE:
Your remote control has one set of keys
to control both decks. #you have
difficulty operating a deck, check to be
sure the Deck Select is set to the deck
.you want to operate. The red LED
indicates Deck Two is selected,
t,Segreen LED indicates
Deck One is selected.
P|aying aTape
Playing a tape on yore Dual-Deck VCR is simple:
1. Insert a tape into either deck of your VCR. If the
tape is a play- only tape (it has no record safety
tab) and AUTO PLAY/REWIND in the SETUP
\ menu is set to PLAY or BOTH, it will automati-
cally begin to play when inserted. Control will
automatically switch to that deck; you don't need
to do it nmnually. Also, when the tape is finished
playing, it will automatically rewind if AUTO/
PLAY REWIND in the SETUP menu is set to
REWIND or BOTH.
2.
Note: Hlyou ha>e set tL,eAUTO PLAY/
REVCTND ilem in the SETUP menu
mOFFor RE'_ pzess_ m begin
pMying the tape; iF.you have the imm
set _o OFF o1"PLAX press _m
rewind the t_q_e.
Press _! to stop the playback altogether.
Spe¢iaUPUaybackFunctions
With your Dual-Deck VCR, the playback hmction is
not limited to simply playing tapes:
• Watch a tape while recording another tape you
can record a program on Deck Two and watch a
tape play on Deck One simply by starting the
recording as you normally would in Deck Two,
and then play a tape in Deck One.
•You can pause the tape for astop action picture
(PJqy $lilJ), or play a tape in slow motion or search
atape flame-by-frame (Frame A dwmce). * (See
'PAUSE' page 13.) The audio will mute during
these functions.
o
o
You can a(Oust tracking automatically or manually;
you can also a(Oust playback picture sharpness.
You can play Deck One and Deck Two in automatic
seqHence{_5'equenlia]Pldy)and even playone deck
and then the other, back and forth in automatic
rotation (Loop PMY).
18 DISCOVERTHE DUAL-DECKDIFFERENCE
While you are playing a tape, you can use the remote
control or liont panel keys to perform the following
functions:
* When you are using any special playback fimction,
press _! to resume normal playback, or _ to
stop the tape. Ym can also Pause, Rewind, Fast-
Forward, and Slow down the playback by pressing
the appropriate keys.
* Press _ to enter Play Still mode. The picture
will fieeze on the screen. PAUSE/STILL will
appear on the Front Panel Display. While in Play
Still mode, you can press _ again to advance
the picture one l_ame. If the deck remains in Play
Still for 5 minutes, it will automatically begin to
play again to prevent possible damage.
* Press _ or _ to enter Slow Motion playback.
The tape will play at slow speed. SLOW will appear
on the Front Panel Display. While in Slow Motion
playback, each time you press _] play slows
and @ buttons.
* Press _]to enter Forward Picture Search
(CUE 1). The tape will run at high speed and you
will be able to see the picture, CUE will appear on
the Front Panel Display.
* Press _ again to enter _Jet Search (CUE 2). The
tape will run at extra high speed and you will be
able to see the picture. You will see CUE blinking
on the Front Panel Display. Press _! to resume
playback.
* Press _to enter Reverse Picture Search
(REVIEW 1). The tape will run in reverse at high
speed and you will be able to see the picture.
REVIEW will appear on the Front Panel Display.
* Press _ again to enter Reverse ,Jet Search
(REVIEW 2). The tape will run in reverse at extra
high speed and you will be able to see the picture.
REVIEW will blink on the Front Panel Display.
Press _! to resume playback.
CHAPTER2- OPERATINGYOURDUAL-DECKVCR 19
SequentiaUand LoopNay
Withsequen_i_dpMy; your Dual-DeckVCR willplay
a tape in Deck One, then automatically activate
Deck Two to begin playing when the tape in Deck One
is through. 1-2 will appear on the Front Panel Display.
With/ooppk!y, your Dual-Deck VCR will play a tape in
Deck One, then automatically activate Deck Two to
begin playing. The tape in Deck One will rewind while
the tape is Deck Two is playing. When the tape in Deck
Two finishes, it will automatically rewind and the tape
in Deck One will play again. This process will continue
until you press _. LOOP will appear on the Front
To activate Sequential or Loop play:
1. Press _ to bring up the Features menu.
2. Press @ to highlight Playback Mode.
3. Use _ (LCV button) to cycle between SEQ,
LOOP and NORM.
4. When the desired choice is on the screen, press
_] twice to exit the menu system.
Occasionally, when you play a tape that was recorded
on a diflbrent VCR or on a VHS camcorder, visual
noise (white streaks) may appear on the screen. This
means the recorded tracks do not align precisely with
the playback heads on your VCR.
Your Dual-Deck VCR is equipped with an Automatic
Digital Tracking System. This system is activated
whenever you insert a tape to play_ You'll see ATR on
the on-screen display and the ATR indicator is on.
Sometimes, however, you may need to use the man-
ual tracking keys to adjust the picture. Press the
and out of the picture, When you do this, the Auto-
matic Digital Tracking System is disa bled. The ATR
indicator on the flont panel is off. It ('an be reactivated
by pressing _, on the remote control or front panel
for 1.5 seconds.
20 DISCOVERTHE DUAL-DECKDIFFERENCE
NOTE:
EP is 3 times longer than SR Speed
Matching in the Features menu
must be off for you to change copy
recording speed on Deck Two. tf Speed
Matching is o,*_,the recording speed
wilt automatically adjust to the same as
the current play speed in Deck One.
NOTE:
While usi,*_gthe Copy Tapefeature, you
can view a TVprogram while copying a
tape by pushing the TV/VCRkey to TV
and change channels onyour TVor use
ViEWto select Tunerand then select the
channel on.your VCR.
NOTE:
OptL_numresults wifl be obtained when
using HQ1if the soume type is in SP
or any tape with Copy Guard.
For soume tapes in EP or LP wit,_out
CoRyGuard use HQ2for best results.
Toperform special effects copy such
as 'still' and 'stow' HQ Copy must
be set to HQ2.
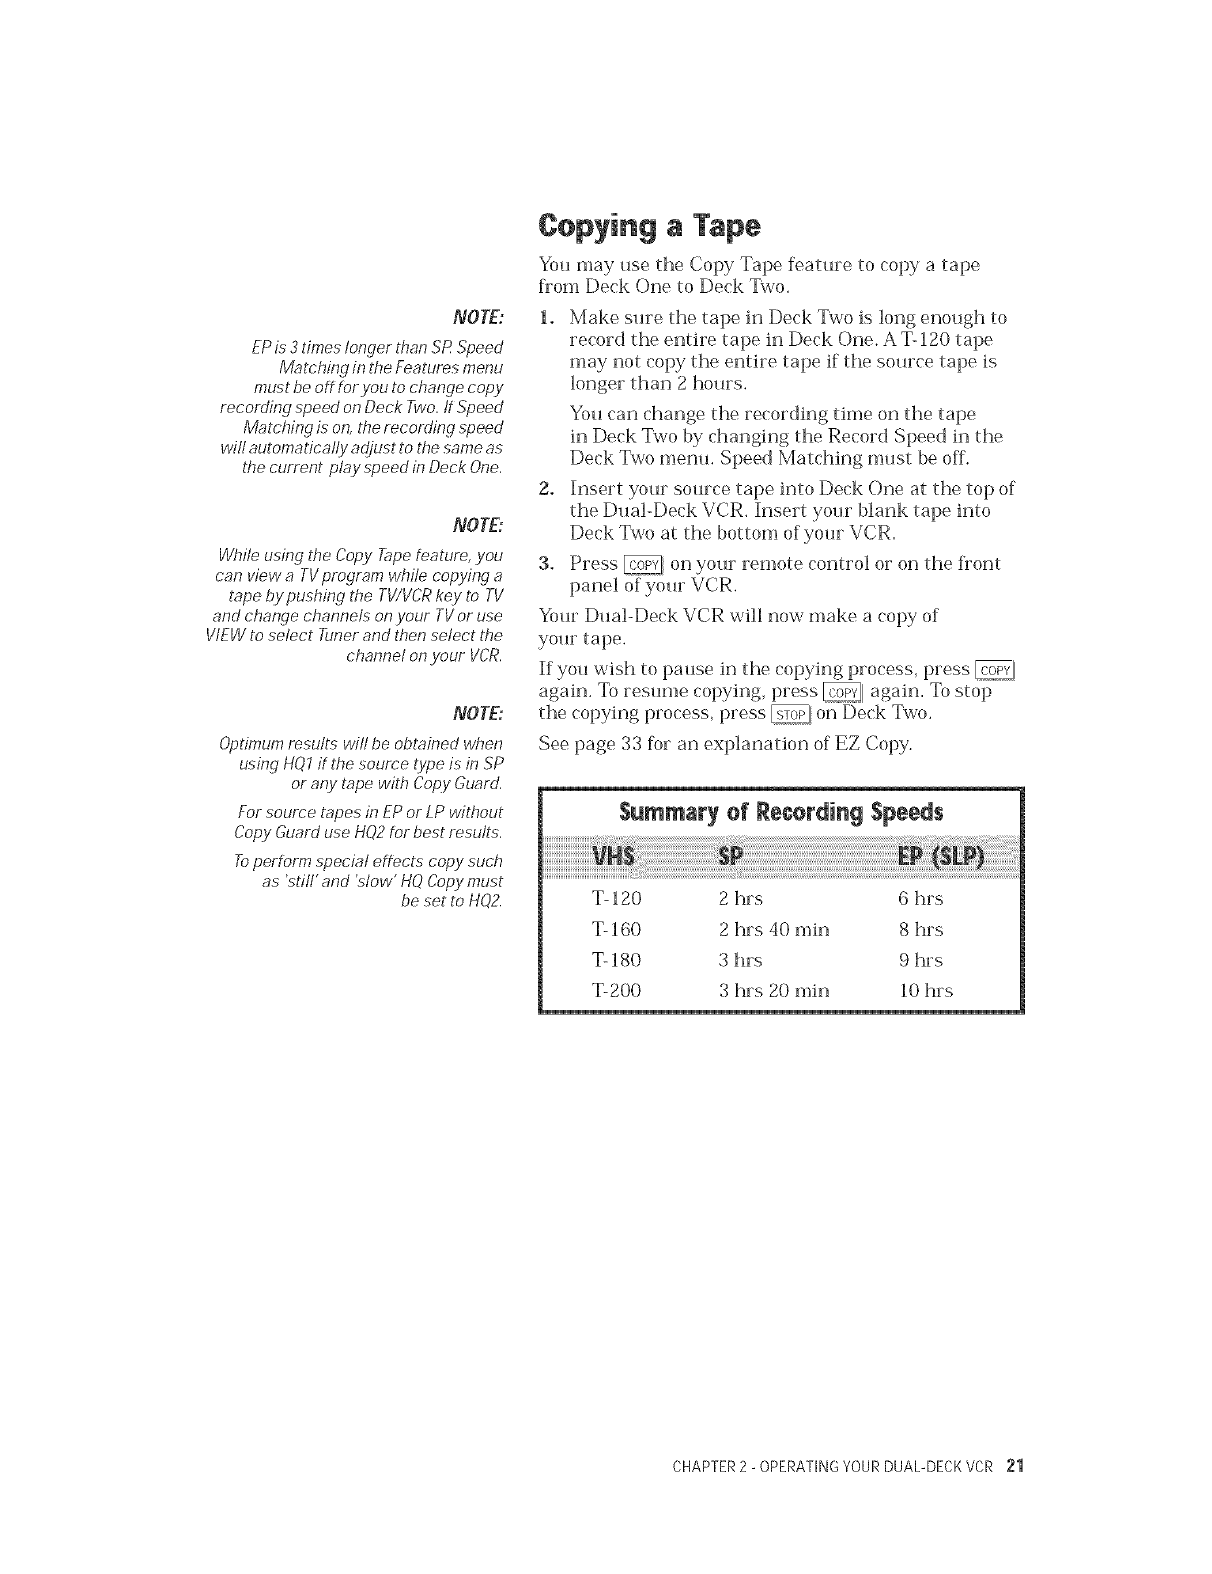
Copying a Tape
You may use the Copy Tape feature to copy a tape
from Deck One to Deck Two.
L Make sure the tape in Deck Two is long enough to
record the entire tape in Deck One. A T-120 tape
may not copy the entire tape if the source tape is
longer than 2 hours.
You can change the recording thne on the tape
in Deck Two by changing the Record Speed in the
Deck Two menu. Speed Matching must be off.
2. Insert your source tape into Deck One at the top of
the Dual-Deck VCR. Insert your blank tape into
Deck Two at the bottom of your VCR.
3. Press _ on your remote control or on the fiont
panel of your VCR.
Your Dual-Deck VCR will now make a copy of
your tape.
If you wish to pause in the copying process, press _,
again. To resume copying, press _ again. _b stop
the copying process, press _ on Deck Two.
See page 33 for an explanation of EZ Copy.
T-120 2 hrs 6 hrs
T-160 2 hrs 40 rain 8 hrs
T-180 3 hrs 9 hrs
T-200 3 hrs 20 rain 10 hrs
CHAPTER2 - OPERATINGYOURDUAL-DECKVCR 21
NOTE:
The@,key does not function during
LoopRecord to prevent accidental
termination of the recording. Loop
Record must be stopped by pressing the
@key on the active Deck to restore
normal _, key operation.
Recording a TV Program
You ('an record TV shows onto a tape in either Deck
One or f)eck Two.
1. Insert a blank tape into the Deck. Make sure it is
long enough to tape the whole program. You can
change the length of the tape by changing the
Recording Speed in the Deck One or Two menu.
2. On the Dual-Deck VCR (or cable converter box
is you have one), select the channel you want
to record.
3. Press @] to begin recording on the active deck.
While you are recording the TV show, you can:
Pause the recording by pressing _. and start
recording again by pressing _.
One-Touch Recording (OTR) , Use to record in 30
n)inute incren)ents. Each time you press _ after
the first time, you add another 30 minutes to the
record time. For example, if you press @] three
times, the VCR will record for 60 mimJtes. The Front
Panel Display will show the length of recording time
programmed. After the elapsed tin)e, the deck will
stop. Or if the _ key is pressed dming OTR, the
VCR will tmn off after recording is complete.
Loop Record * Kee t) pressing _ until you see
9:30 on the Front Panel Display. Press once more
and you will begin Loop Record. The tape will record
until it reaches the end of the tape. The tape will then
automaticafiy rewind and begin recording again.
Watch a different channel by pressing _], then using
yore TV's tuner to select the new channel.
AUX, Press '0' button twice to enable AUX IN. Audio/
Video Line Input (see pages 32 and 48) to watch or
record input fion) other video somces laser disc,
satellite receiver, camcorder or other VCRs, etc.
Record TV Program While Playing aVideo
Tape *If you want to record a TV progran) while
already playing a tape, change the record source to the
desired setting (see page 38) and start recording. You
('an then change the view to continue watching the
tape on the other Deck.
22 DISCOVERTHE DUAL-DECKDIFFERENCE
NOTE:
You must have the VCRis clock set to
t,_e correct date and time tor Timer
Recording to work. tf the clock is
not set, t,Patmenu will automatically
come up before you can
program a Timer Recording.
/DECK TWO/ONE MENU
1:RECORD SPEED SP
2:TAPE LENGTH T120
3*TIMER RECORDING
4:RECORD SOURCE AUTO
5:HbFmAUDmO ON
PRESS SELECT/CHANGE TO
SET AND MENU WHEN DONE
\_ j
f
DECK 2 TmMER RECORDING
10:20PM 12/1!'96(WED)
t
2
3
4
CHOOSE EVENT[I-4]
t234
PRESS 1-4 TO SET EVENT
AND MENU WHEN DONE
DECK 2 TIMER RECORDIN
10:20PM 12/11'96(WED)
1 c 1 ........ AM --AM A
2
3
4
CHOOSE CHANNEL/AUX
PRESS 0-9/100 TO SET
ERASE=[CLEAR] END=[MENU]
\/
DECK 2 TIMER RECORDmNG
10:20PM 12/11'96(WED)
1 0118 DATE ---AM ---AM A
2
3
4
ONCE=[1] BAreLY=[2]
WEEKLY=J3] ALWAYS=[4]
PRESS 1-4 TO SET
ERASE=[OLEAR] END=[MENUI
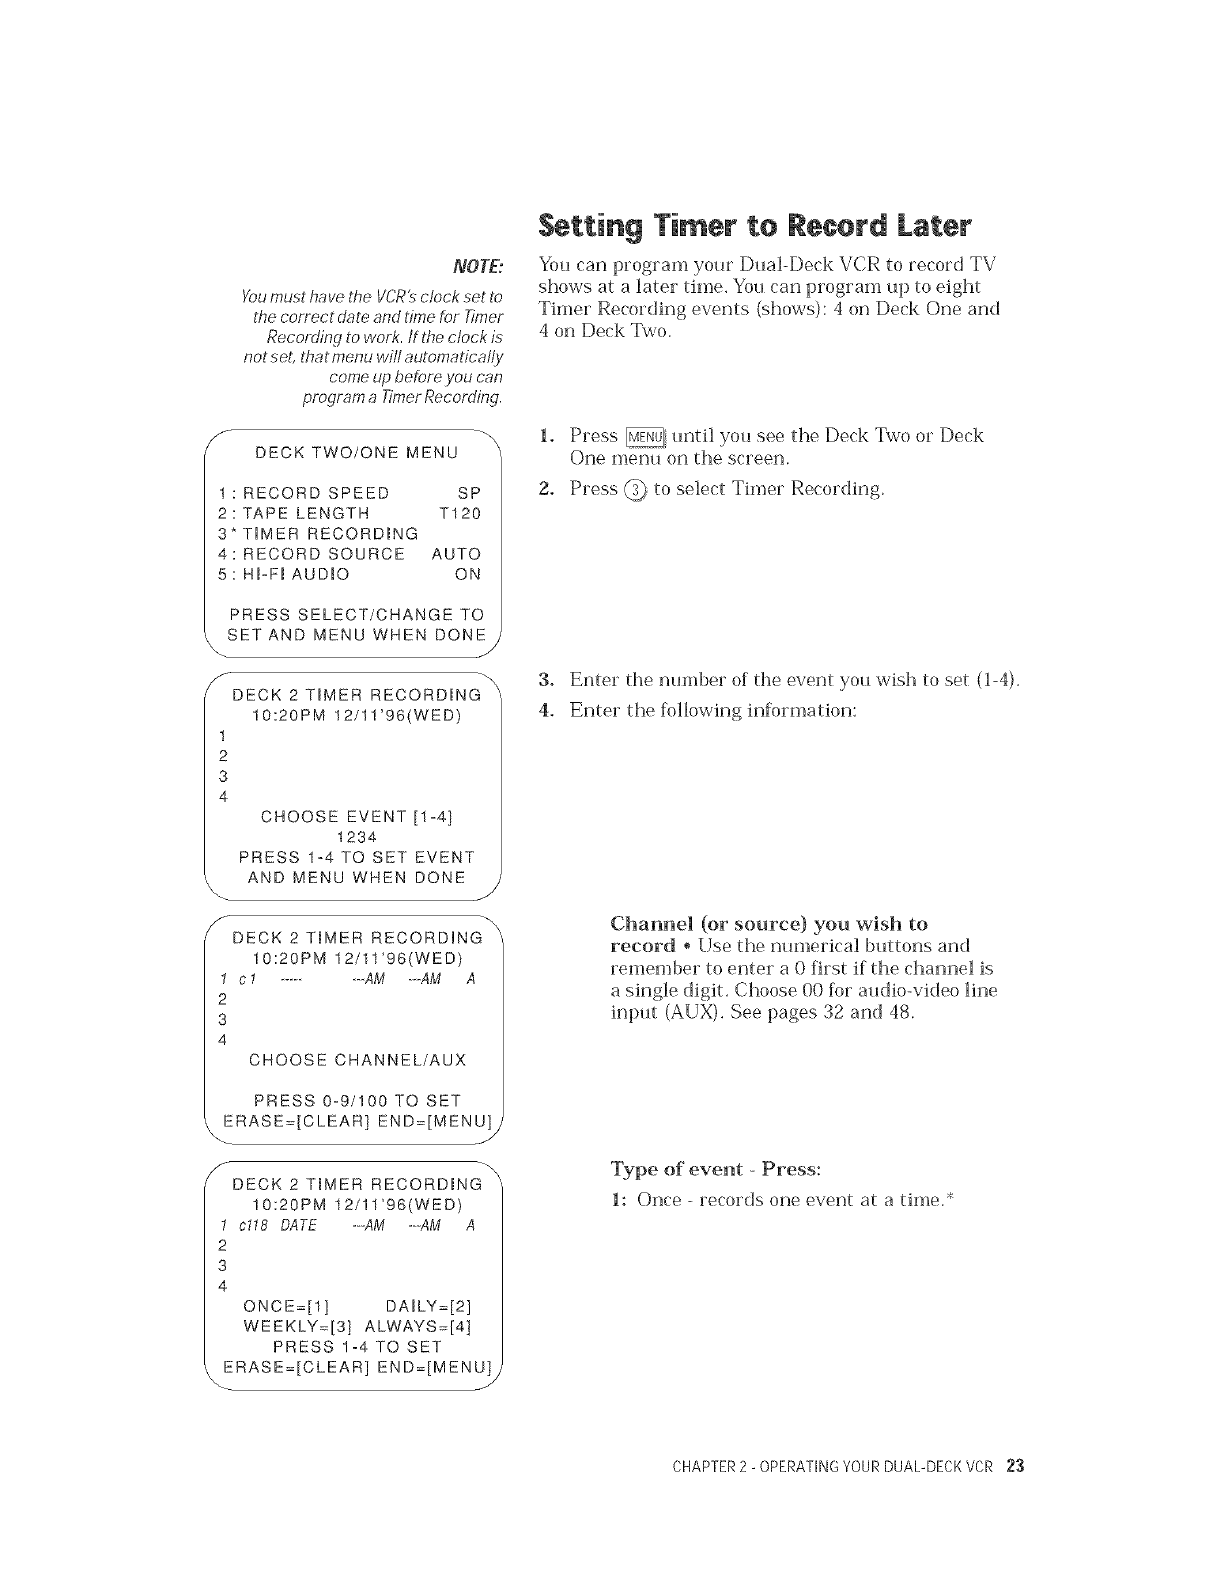
Setting Timer to Record Later
You can program your Dual-Deck VCR to record TV
shows at a later time. You can program up to eight
Timer Recording events (shows): 4 on Deck One and
4 on Deck Two.
1. Press _ until you see the Deck Two or Deck
One merit1 on the screel].
2. Press @ to select Timer Recording.
3. Enter the number of the event you wish to set (1-4).
4. Enter the following information:
Channel (or source) you wish to
record * Use the m]merical buttons and
remember to enter a 0 first if the channel is
a single digit. Choose O0 f_r audio-video line
input (AUX). See pages 32 and 48.
Type of event - Press:
1: Once - records one event at a time.*
CHAPTER2 -OPERATINGYOURDUAL-DECKVCR 23
DECK 2 TmMER RECORDING
10:20PM 12/11'96(WED)
1 c118 11 ---AM ---AM A
2
3
4
ENTER START DATE
PRESS 0=9 TO SET
ERASE=[CLEAR] END=[MENUI
DECK 2 TIMER RECORDING _
10:20PM !2/11'96(WED)
1 c118 MO _ ..... AM ---AM A
2
3
4
ENTER START HOUR
PRESS 0-9 TO SET
ERASE=[CLEAR] END=[MEN_
rDECK 2 TIMER RECORDmN
10:20PM !2/11'96(WED)
t c118 ---AM ---AM A
2
3
4
SUN=I MON=2 TUE=3 WED=4
THU=5 FRm=6 SAT=7
PRESS 1_7 TO SET
ERASE=[CLEAR] END=[MENU]
\ J
DECK 2 TIMER RECORD_NL_ _
10:20PM 12/11'96(WED)
1 c118 _SA ..... At,l] ---AM A
2
3
4
ENTER START HOUR
PRESS 0-9 TO SET
_ERASE=[CLEAR] END=[MENU_
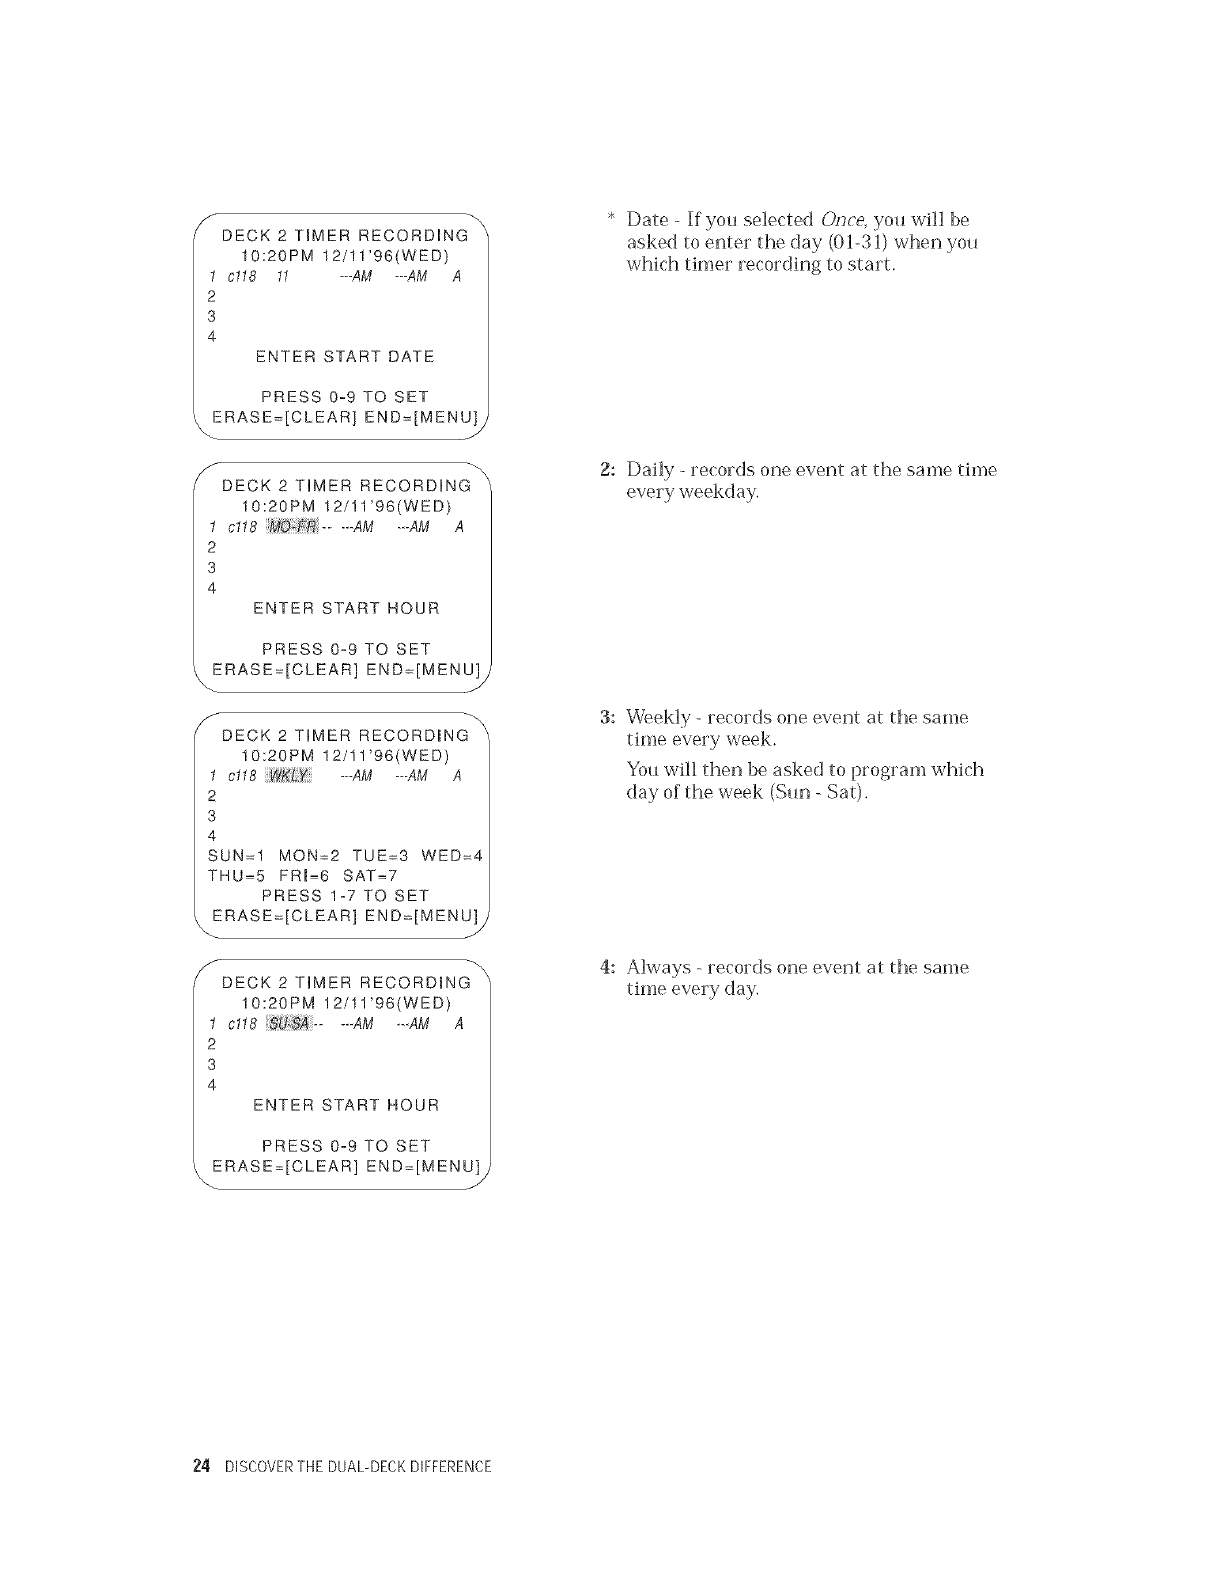
* Date - If you selected Once, you will be
asked to enter the day (01-31) when you
which timer recording to start.
2: Daily - records one event at the same time
every weekday.
3: Weekly - records one event at the same
time every week.
You will then be asked to program which
day of the week (Sun - Sat).
4: Always - records one event at the same
time every day.
94 DISCOVERTHE DUAL-DECKDIFFERENCE
DECK 2 TmMER RECORDIN
10:20PM 12/11'96(WED)
1 c118 WKLYFR..... AM ---AM A
2
3
4
ENTER START HOUR
PRESS 0-9 TO SET
ERASE=[CLEAR] END=[MEN U)
DECK 2 TmMER RECORDING
10:20PM 12/11'96(WED)
1 c118 _KLYFR 12:24AM 1:56AMA
2
3
4
ENTER RECORD SPEED
SP=[1] EP=[2] AUTO=t3]
PRESS I-3 TO SET
ERASE=[CLEAR] END=[MENU]
SDECK 2 TIMER RECORDING
10:20PM 12/11'96(WED)
1 118 MO-FR 2:00AM 2:30AMEP
2 5 SU-SA 10:00PMII:00PM SP
3 AUX WKLYSU 8:15AM 9:25AMSP
4 45 15 6:00PM 7:00PMA
CHOOSE EVENT [1-4]
1234
PRESS 1-4 TO SET EVENT
AND MENU WHEN DONE J
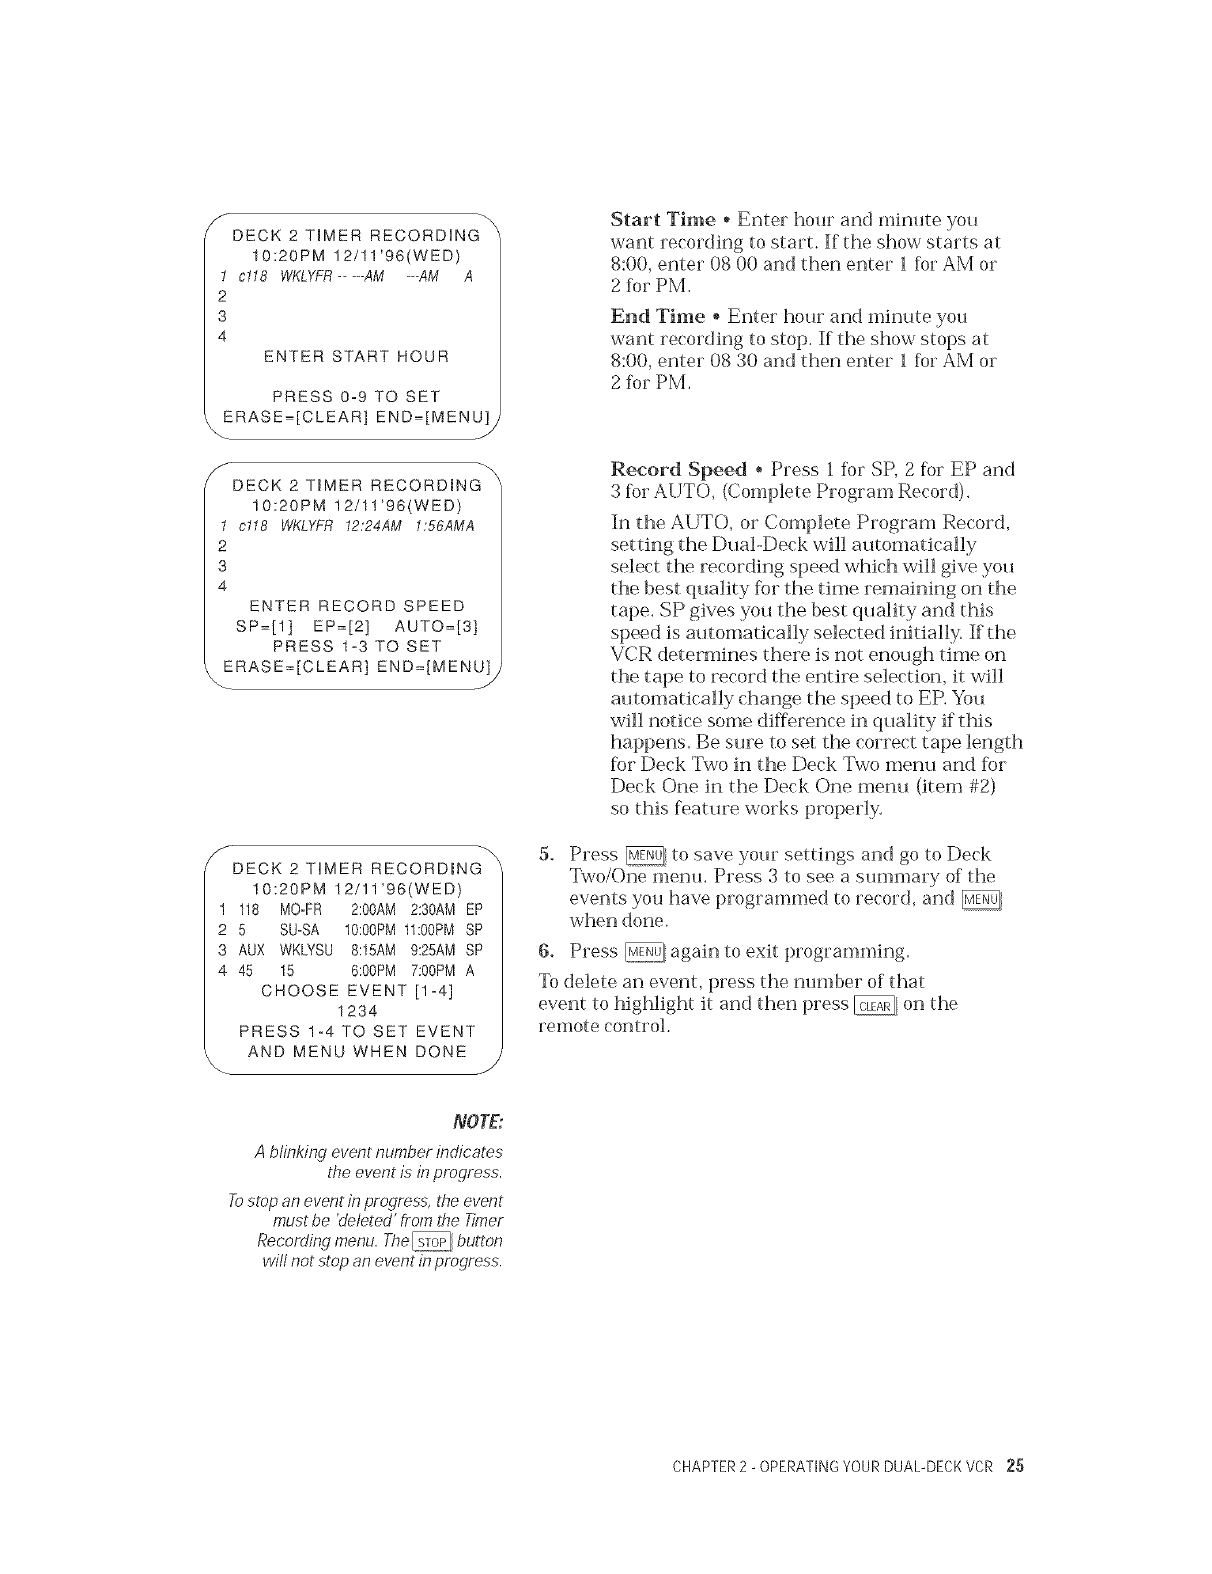
Start Time. Enter hmw and mim_te yo_J
want recording to start. If the show starts at
8:00, enter 08 O0and then enter i _i)rAM or
2_br PM.
End Time _ Enter hmJr and minute yot_
want recording to stop. If the show stops at
8:00, enter 08 30 and then enter 1 [br AM or
2 %r PM.
Record Speed _ Press 1 f_)r SP, 2 R)r EP and
3 R)r AUTO, (Complete Program Record).
In the AUTO, or Complete Program Record,
setting the DLlal-Deck will mltomatically
select the recording speed which will give yotl
the best qtlality tier the time remaining on the
tape. SP gives yoL1 the best qtmlity and this
speed is mltomatically selected initially. If the
VCR determines there is not enotlgh time on
the tape to record the entire selection, it will
gmtomatically change the speed to EP. Yotl
will notice some difference in qtlality if this
happens. Be stwe to set the correct tape length
_br Deck Two in the Deck Two mentl and _br
Deck One in the Deck One rneml (item #2)
so this fbattlre works properly.
Press _ to save yotJr settings and go to Deck
Two/One metal Press 3 to see a stmmlary of the
events ymJ have programmed to record, and
when done.
6. Press _ again to exit programming.
To delete an event, press the ntmlber of that
event to highlight it and then press @ on the
remote control.
NOTE:
A blinking event number indicates
t,ge event is in progress.
Tostop an event in progress, the event
must be 'deleted' from the Timer
Recording menu. T,ge_ button
will not stop an event in progress.
CHAPTER2 - OPERATINGYOURDUAL-DECKVCR 25
_- FEATURES MENU
1" SETUP MENU
2: COPY MODE HQ1
3: SPEED MATCHING ON
4: COPYAUDJO iNSERT OFF
5: EZ-COPY OFF
6: PLAYBACK MODE NORM
7: RECORD MODE NORM
PRESS SELECT/CHANGE TO
SETAND MENU WHEN DONE
J
/SETUP MENU
1 : SET CLOCK/LANGUAGE
2: TUNER SETUP MENU
3: AUTO PLAY/REWHD BOTH
4: ON-SCREEN DmSPLAY AUTO
5" DATE/TRME STAMP ON
6: SECOND TV ViEW AUTO
7: AUX iNPUT FRONT
PRESS SELECT/CHANGE TO
,SET AND MENU WHEN DONE _
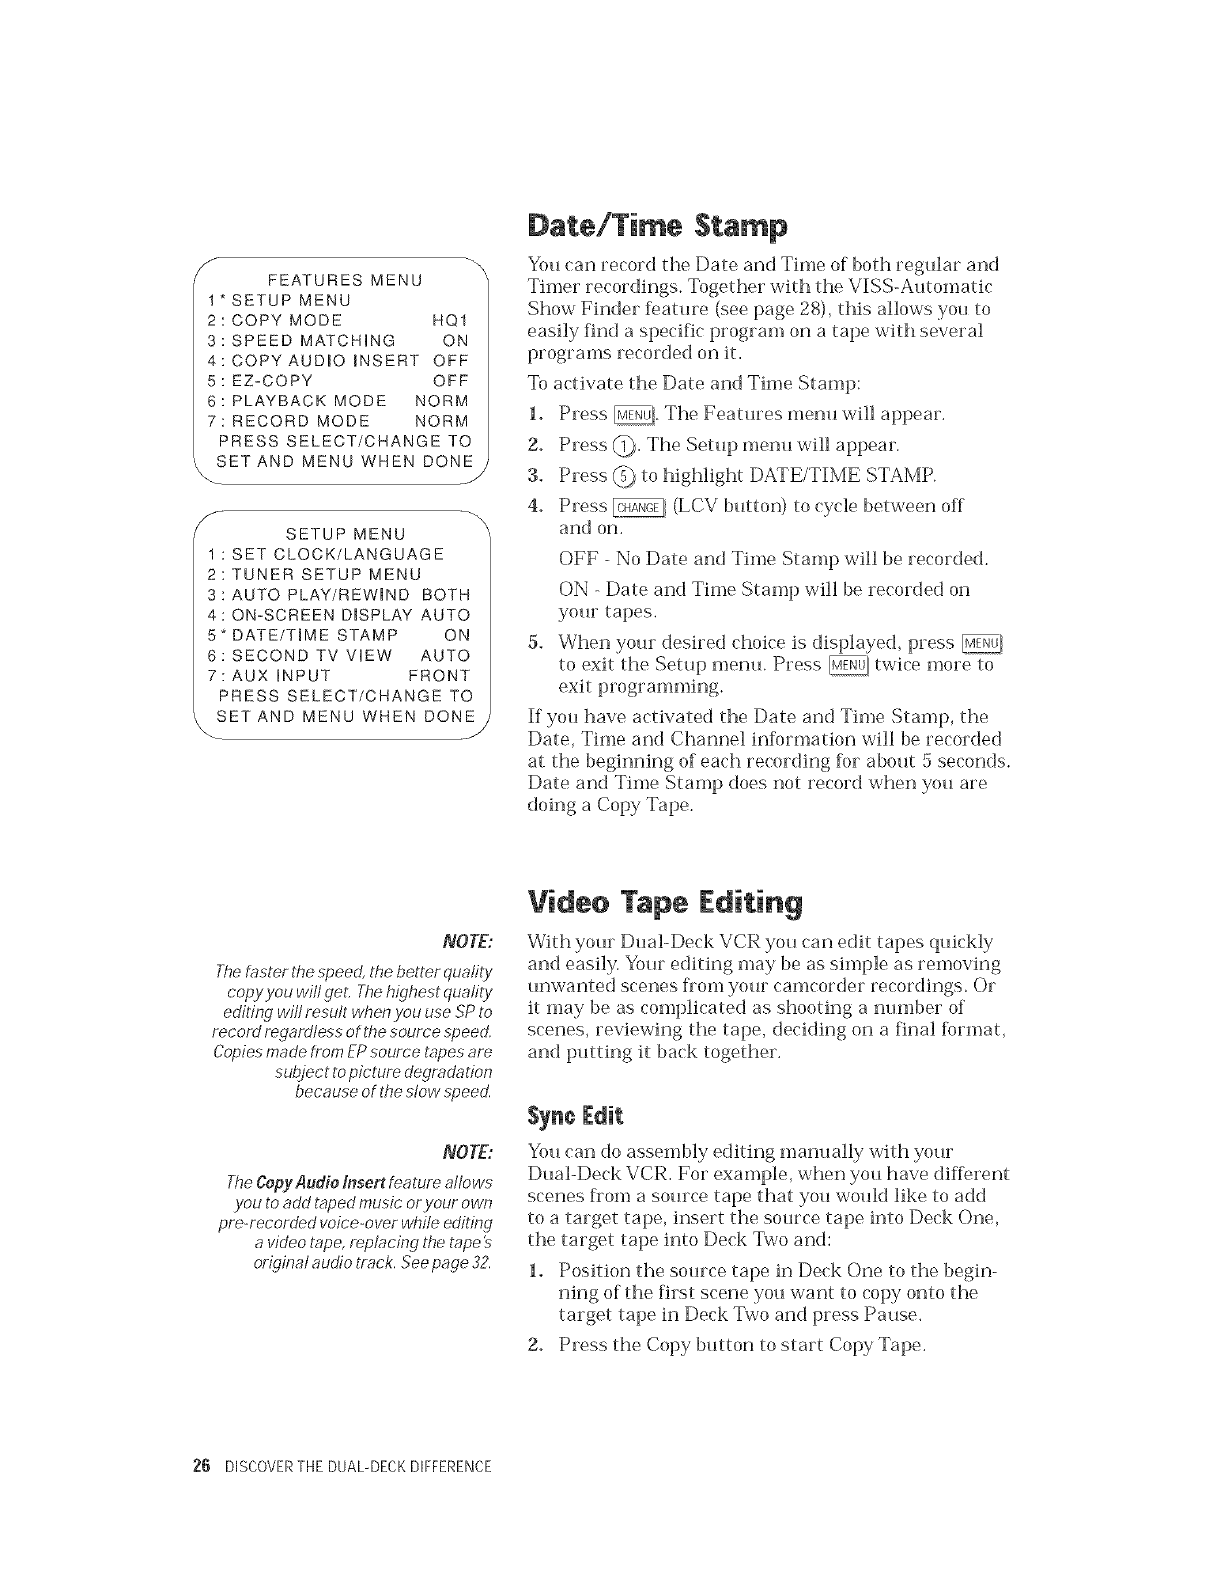
Date/Time Stamp
You can record the Date and Thne of both regular and
Timer recordings. Together wRh the VISS-Automatic
Show Finder [eature (see page 28), this allows yoH to
easily find a specific program on a tape wRh several
programs recorded on it.
To activate the ]-)ate and Time Stamp:
L Press _/. The Features menu will appear.
2. Press (_. The Setup menu will appear.
3. Press @ to highlight DATE/TIME STAMP.
4. Press _ (LCV button) to cycle between off
and on.
OFF No Date and Time Stamp will be recorded.
ON - Date and Time Stamp will be recorded on
your tapes.
5. When your desired choice is displayed, press
to exit the Setup menu. Press _ twice more to
If you have activated the Date and Time Stamp, the
Date, Time and Channel information will be recorded
at the beginning of each recording for about 5 seconds.
Date and Time Stamp does not record when you are
doing a Copy Tape.
NOTE:
The faster the speed, the better quality
copy you will geL The highest quality
editing will result when you use SP to
record regardless of the source speed.
Copies made from EP source tapes are
subject to picture degradation
because of the stow speed.
NOTE:
TheCopyAudio Insert feature allows
you to add taped music oryour own
pre-recorded voice-over while editing
a video tape, replacing the tape's
original audio track. Seepage 32.
Videe Tape Editin 9
With your Dual-Deck VCR you can edit tapes quickly
and easily. Your editing may be as simple as removing
unwanted scenes fiom your camcorder recordings. Or
it may be as complicated as shooting a number of
scenes, reviewing the tape, deciding on a final format,
and putting it back together.
Syac Edit
You can do assembly editing manually with your
Dual-Deck VCR. For example, when you have different
scenes from a source tape that you would like to add
to a target tape, insert the sotlrce tape into Deck One,
the target tape into Deck Two and:
1. Position the source tape in Deck One to the begin-
ning of the first scene you want to copy onto the
target tape in Deck Two and press Pause.
2. Press the Copy button to start Copy Tape.
2t} DISCOVERTHE DUAL-DECKDIFFERENCE
NOTE:
Oun:ng Copy Tape, pressing the Copy
button pauses the copying process. To
resume copying, press t,_e Copy Tape
button again. Tostop Copy Tape,
press Deck Two Stop.
NOTE:
Whenassembling several scenes on one
target tape,you can make more accurate
edits bYfirst ptaying the target tape to 2
second'_atter the end of a scene, press
Pause, t,ffenRecord to put Deck Twointo
Record Pause. W,benyou then re-start
CoEy Tapethe target tape will be in
position for t,ffebest edit.
3. Press Deck Select to select Deck One. At the end of
the scene press Stop, (Deck Two will automatically
pause), If desired, you can now change the source
tape in Deck One at this time. Using Play, Fast
Forward or Rewind, locate the next scene you want
to edit in. When the tape is positioned at the
beginning of the edit scene, press Pause.
4. Press the Copy Tape button and the VCR will
automatically perform the synchronized edit.
5. To add the next scene, start over with Step 3.
You might find manual editing easier if you program
both AUTO PLAY in the Set-up menu and EZ-COPY in
the Features menu to OFF, and perform your edit with
the On-Screen Display turned on.
SNp EdR
During Copy Tape, you can quickly by-pass commer
cials by pressing the Skip button one to five times, The
Dual-Deck will atJtomaticaHy edit out the next one to
five mim_tes then resmne copying the tape.
NOTE:
For making quality edits, turn on
HQ Copy (Features menu) to get better
quality tape copy and edits. 'Glitches'
may occur during a manual assembly
edit, usually at the end of a scene that is
being recorded over old material. This
happens because the VCR% full erase
head (which erases the video, audio, and
control tracks) is always a tew seconds
behind the recording heads. You may see
a vibrating rainbow ot color in the middle
of t,ge picture, and sound can become
unstable for a few seconds.
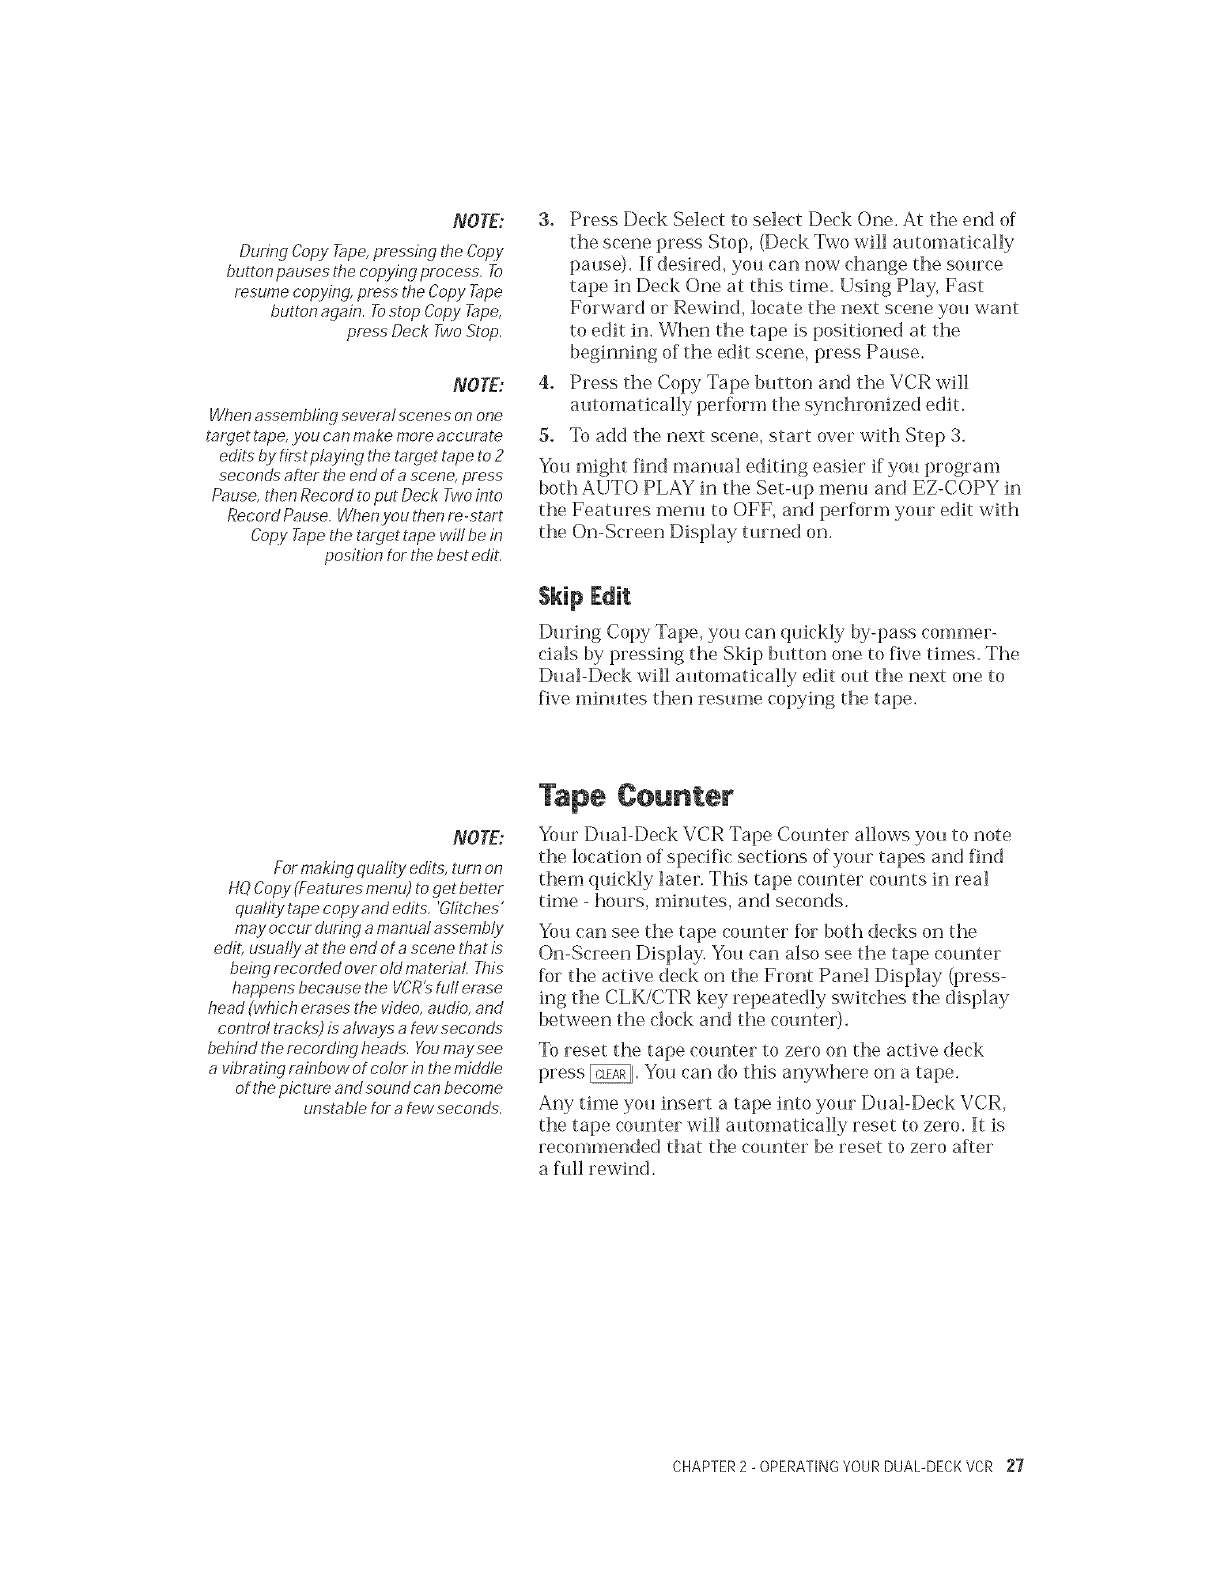
Tape Counter
Your Dual-Deck VCR Tape Counter allows you to note
the location of specific sections of your tapes and find
them quickly later. This tape counter counts in real
time - hours, minutes, and seconds.
You can see the tape counter lk_rboth decks on the
On-Screen Display. You can also see the tape counter
for the active deck on the Front Panel Display (press-
ing the CLK/CTR key repeatedly switches the display
between the clock and the counter).
To reset the tape counter to zero on the active deck
press @. You can do this anywhere on a tape.
Any time you insert a tape into your Dual-Deck VCR,
the tape counter will automatically reset to zero. It is
recommended that the counter be reset to zero aRer
a f@l rewind.
CHAPTER2- OPERATINGYOURDUAL-DECKVCR 27
NOTE:
The Dual-Deck VCR may miss an Index
mark if the mark is very close to @e
current location, or it is at the beginning
of t,be tape, or if it is within 5 minutes
of anot,ber V/SS mark.
Youcan also place Index marks during
a recording bypressing INDEX.
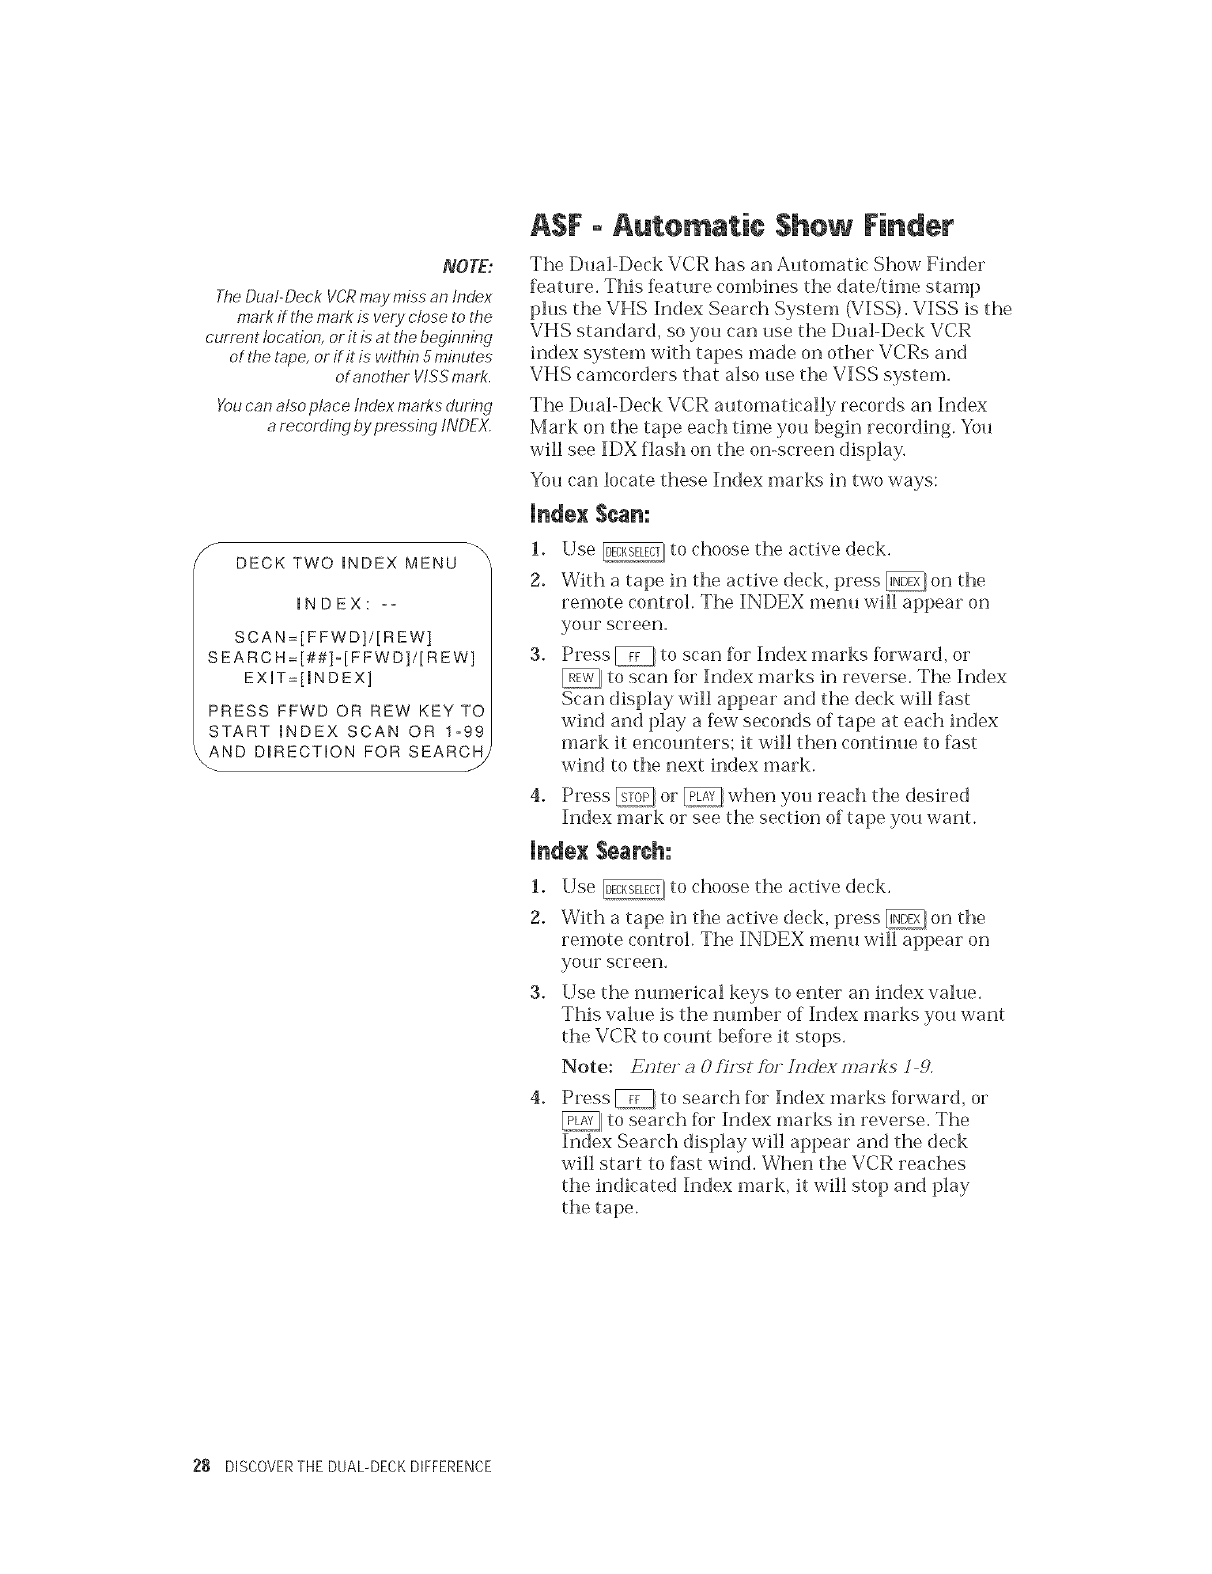
Y DECK TWO _NDEX MENU
INDEX: --
SCAN=[FFWD]/[REW]
SEARC H=[##]-[F FWD]/[R EW]
EXUT=[mNDEX]
PRESS FFWD OR REW KEY TO
START mNDEX SCAN OR 1-99
_AND D_RECTION FOR SEARCH/
ASF -Automatic $hew Finder
The Dual-Deck VCR has an Automatic Show Finder
feature. This feature combines the date/time stamp
plus tile VHS Index Search System (VISS). VISS is tile
VHS standard, so you can use tile Dual-Deck VCR
index system with tapes made on other VCRs and
VHS camcorders that also use the VISS system,
Tile Du al-Deck VCR automatically records an Index
Mark on tile tape each time you begin recording. You
will see IDX flash on the on-screen display,
You ('an locate these Index marks in two ways:
Index Scan:
1. Use _] to choose the active deck.
2. With atape in the active deck, press _ on the
remote control. The INDEX menu will appear on
yollr screen,
3. Press _ to scan %r Index marks %rward, or
_[ to scan %r Index marks in reverse. Tile Index
Scan display will appear and the deck will fast
wind and play a few seconds of tape at each index
mark it encounters; it will then continue to fast
wind to tile next index mark.
4, Press _ or _ when you reach tile desired
Index mark or see the section of tape you want.
Index Search:
1. Use _, to choose tile active deck.
2. With a tape in tile active deck, press @, on tile
remote control. Tile INDEX menu will appear on
your screen.
3° Use tile numerical keys to enter an index value.
This value is the number of Index marks you want
the VCR to count before it stops.
Note: E(Jte/ a 0 fi(tst ?bf/Hclex maF!(s ] 9,
4, Press _J to search for Index marks forward, or
to search for Index marks in reverse. The
Index Search display will appear and tile deck
will start to fast wind, When tile VCR reaches
tile indicated Index mark, it will stop and play
tile tape.
28 DISCOVERTHE DUAL-DECKDIFFERENCE
@
D,,
ca
NOTE:
tf menu background color is blue,
pressing _J 1 to 2 times wilt exit
programming. If menu background
is green, pressing @Jl 3 to 5 times
witl exit programming
NOTE:
tf you press _while viewing
a Deck, the menu for that Deck
wif! appear instead. Toget to the
Features menu, press _again.
NOTE:
lf you get the Features menu,
and want the Deck Oneor Two
menu, press _again.
On-Screen Menu System
The On-Screen Menu System allows you to easily set
up your Dual-Deck VCR to:
• Make Recordings (including timer recordings)
•Copy Tapes
• Set the antenna
•Set the channel memory
•Set the clock
•Change automatic f>atures
Many of the menu items come pre-programmed to the
most common setting. Some settings you may never
need to change. However, as you learn more about
your Dual-Deck VCR, you may decide to change some
of the settings.
To use the On-Screen menu System:
• Press _! on the remote control. The Features
menu will appear. Press _J again when you wish
to exit on-screen programming and save your
changes. Pressing this key will automatically step
you out of the menu system.
• _ (Mute button): Use this key while in the On-
Screen menu to move to the menu item you wish to
select. The asterisk indicates the various menu
Reins and item number will blink. This key is also
used to move you to the next selection in the set
Date/Time and Timer Record menus.
* _ (LCV button): Use this key to cycle through
the choices of the menu item you selected.
, _: Use this key to erase any timer events you
CHAPTER3 - PROGRAMMING YOURDUAL-DECKVCR 29
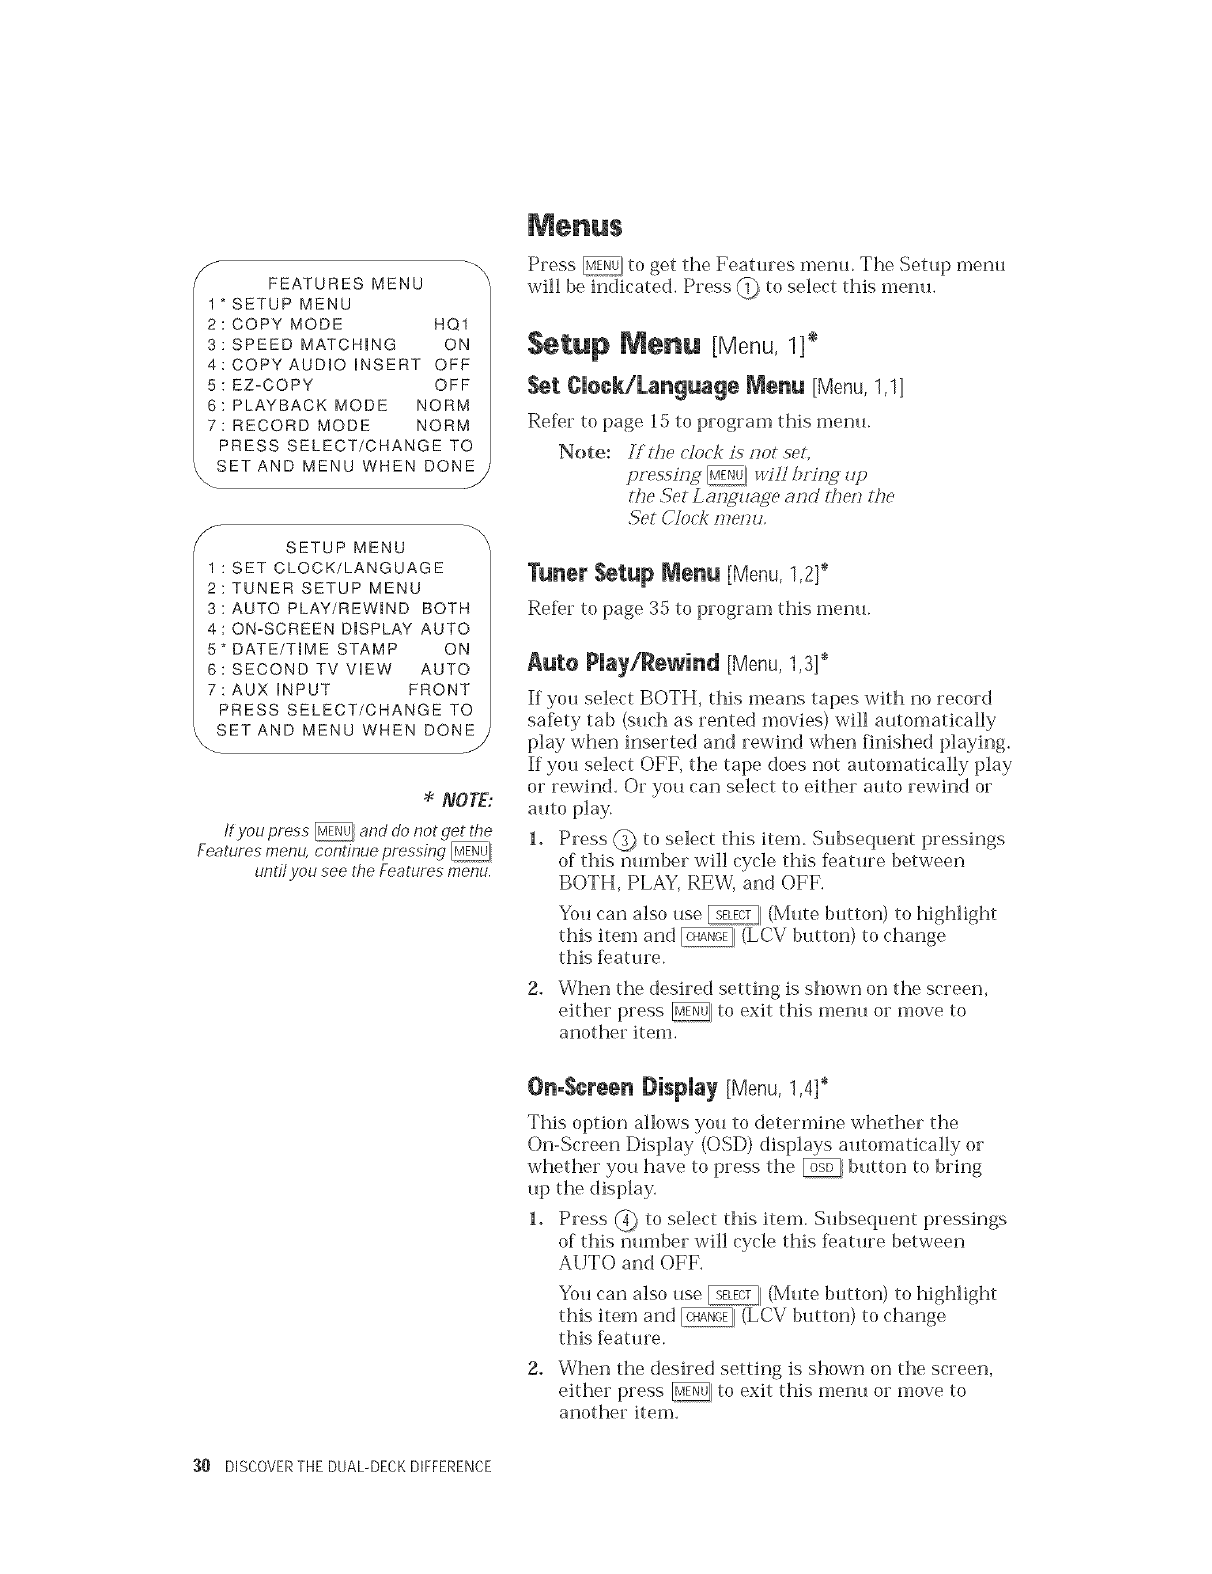
_- FEATURES MENU
1*SETUP MENU
2: COPY MODE HQ1
3: SPEED MATCH(NG ON
4: COPY AUDIO iNSERT OFF
5: EZoCOPY OFF
6: PLAYBACK MODE NORM
7: RECORD MODE NORM
PRESS SELECT/CHANGE TO
t SET AND MENU WHEN DONE
\J
SETUP MENU
1 : SET CLOCK/LANGUAGE
2: TUNER SETUP MENU
3: AUTO PLAY/REWHD BOTH
4: ONoSCREEN D(SPLAY AUTO
5*DATE/T(ME STAMP ON
6: SECOND TV ViEW AUTO
7:AUX iNPUT FRONT
PRESS SELECT/CHANGE TO
SET AND MENU WHEN DONE _
NOTE:
tf you press _and do not get the
Features menu, continue pressing _
until you see the Features menu.
Press _ to get the Features metal The Setup n_enu
will be indicated. Press (_ to select this menu.
SetUp Menu [Menu, 1]*
Set £Ueek/Language Menu [Menu,1,1]
Refer to page 15 to program this menu.
Note: Sf the dock is s_ot set,
gressin, g _:,_4tl t)s'islg zLp
tL,e Set Lm;_uage m_d :hes_ the
Set Clock s77es_u,
Tuner Setup Nenu [Menu,1,2}_
Re_r to page 35 to program this metal
Auto Play/Rewind [Menu,1,3}*
If you select BOTH, this means tapes with no record
saf)ty tab (such as rented movies) will automatically
play when inserted and rewind when finished playing.
If you select OFF, the tape does not automatically play
or rewind. Or you can select to either auto rewind or
auto play.
1. Press @_ to select this Rein. Subsequent pressings
of this nmnber will cycle this feature between
BOTH, PLAY, REW, and OFF.
You can also use _1 (Mute button) to highlight
this item and _ (LCV button) to change
this feature.
2. When the desired setting is shown on the screen,
either press _ to exit this metal or move to
another item.
OnoScreen l)isNay {Menu,1,4]*
This option allows you to determine whether the
On-Screen Display (OSD) displays automatically or
whether you have to press the _ button to bring
tap the display.
1. Press @ to select this item. Subsequent pressings
of this number will cycle this [)ature between
AUTO and OFF.
You can also use _1 (Mute button) to highlight
this item and _ (LCV button) to change
this feature.
2. When the desired setting is shown on the screen,
either press _, to exit this metal or move to
another item.
30 DISCOVERTHE DUAL-DECKDIFFERENCE
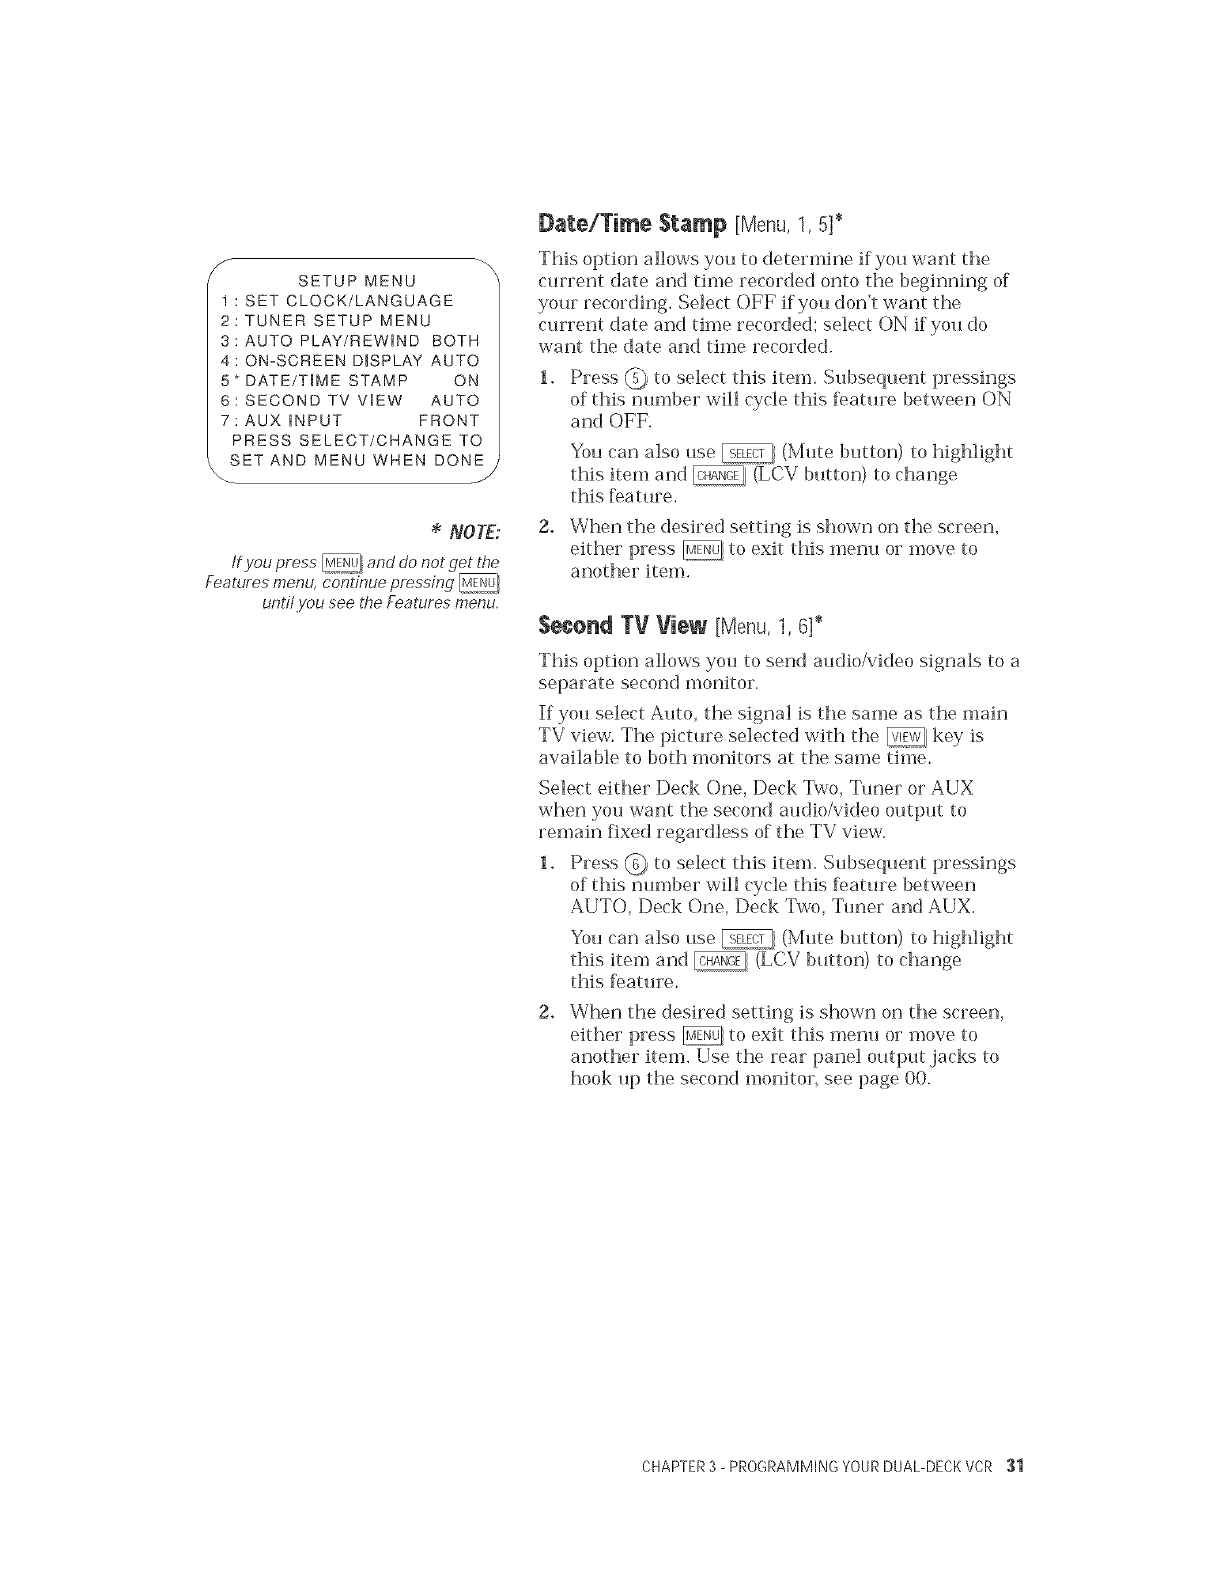
Y SETUP MENU __
1 : SET CLOCK/LANGUAGE
2: TUNER SETUP MENU
3:AUTO PLAY/REWIND BOTH
4: ON-SCREEN DmSPLAYAUTO
5*DATE/TmME STAMP ON
6: SECOND TV ViEW AUTO
7:AUX iNPUT FRONT
PRESS SELECT/CHANGE TO
SET AND MENU WHEN DONE,
J
"_NOTE:
If you press _! and do not get the
Features menu, continue pressing
until you see the Features menu.
Date/Time Stamp [Menu, 1, 5]*
This option allows you to determine if you want the
current date and time recorded onto the beginning of
your recording. Select OFF if you don't want the
cmrent date and time recorded; select ON if you do
want the date and time recorded,
1. Press @ to select this item. Subsequent pressings
of this number will cycle this feature between ON
and OFF.
You can also use _ (Mute button) to highlight
this item and @, (LCV button) to change
this feature.
2. When the desired setting is shown on the screen,
either press _, to exit this menu or move to
another item.
Second TV View [Menu,1,6]*
This option allows you to send audioNideo signals to a
separate second monitor.
If you select Auto, the signal is the same as the main
TV view. The picture selected with the _ key is
available to both monitors at the same time.
Select either Deck One, Deck Two, Tuner or AUX
when you want the second audio/video output to
remain fixed regardless of the TV view.
1. Press @ to select this item. Subsequent pressings
of this number will cycle this feature between
AUTO, Deck One, Deck Two, Tuner and AUX.
You can also use _} (Mute button) to highlight
this item and _, (LCV button) to change
this feature.
2. When the desired setting is shown on the screen,
either press _ to exit this menu or move to
another item. Use the rear panel output jacks to
hook up the second monitor, see page 00.
CHAPTER3 -PROGRAMMING YOURDUAL-DECKVCR 31

fSETUP MENU
: SET CLOCK/LANGUAGE
2:TUNER SETUP MENU
3:AUTO PLAY/REWIND BOTH
4: ON-SCREEN DUSPLAY AUTO
5" DATE/T_ME STAMP ON
6: SECOND TV V_EW AUTO
7: AUX _NPUT FRONT
PRESS SELECT/CHANGE TO
SET AND MENU WHEN DONE
J
NOTE:
tf you press _and do not get the
Features menu, continue pressing
untit you see the Features menu,
AUX Input [Menu, 1, 7]*
This option allows you to select the incoming signal if
you have already selected AUX for your record source
or TV view. If you select Front, the incoming signal
will be from the flont panel jacks; If you select the
Rear, the incoming signal will be fiom the rear
audio/video ,jacks.
1. Press @ to select this item. Subsequent pressings
of this number will cycle this feature between front
and rear.
You can also use _/(Mute button) to highlight
this item and _, (LCV button) to change
this feature.
2. When the desired setting is shown on the screen,
either press @. to exit this menu or move to
another item.
:32 DISCOVERTHE DUAL-DECKDIFFERENCE
f
FEATURES MENU
t* SETUP MENU
2: COPY MODE HQ1
3: SPEED MATCHING ON
4: COPYAUD_O iNSERT OFF
5: EZ=COPY OFF
6: PLAYBACK MODE NORM
7: RECORD MODE NORM
PRESS SELECT/CHANGE TO
SET AND MENU WHEN DONE
NOTE:
lf you press @and do not get the
Features menu, continue pressing
until you see the Features menu.
NOTE:
tf t,bis feature is OFF,check the
record speed on Deck Two before
copying a tape to be sure it is
set as .you want it.
Features menu
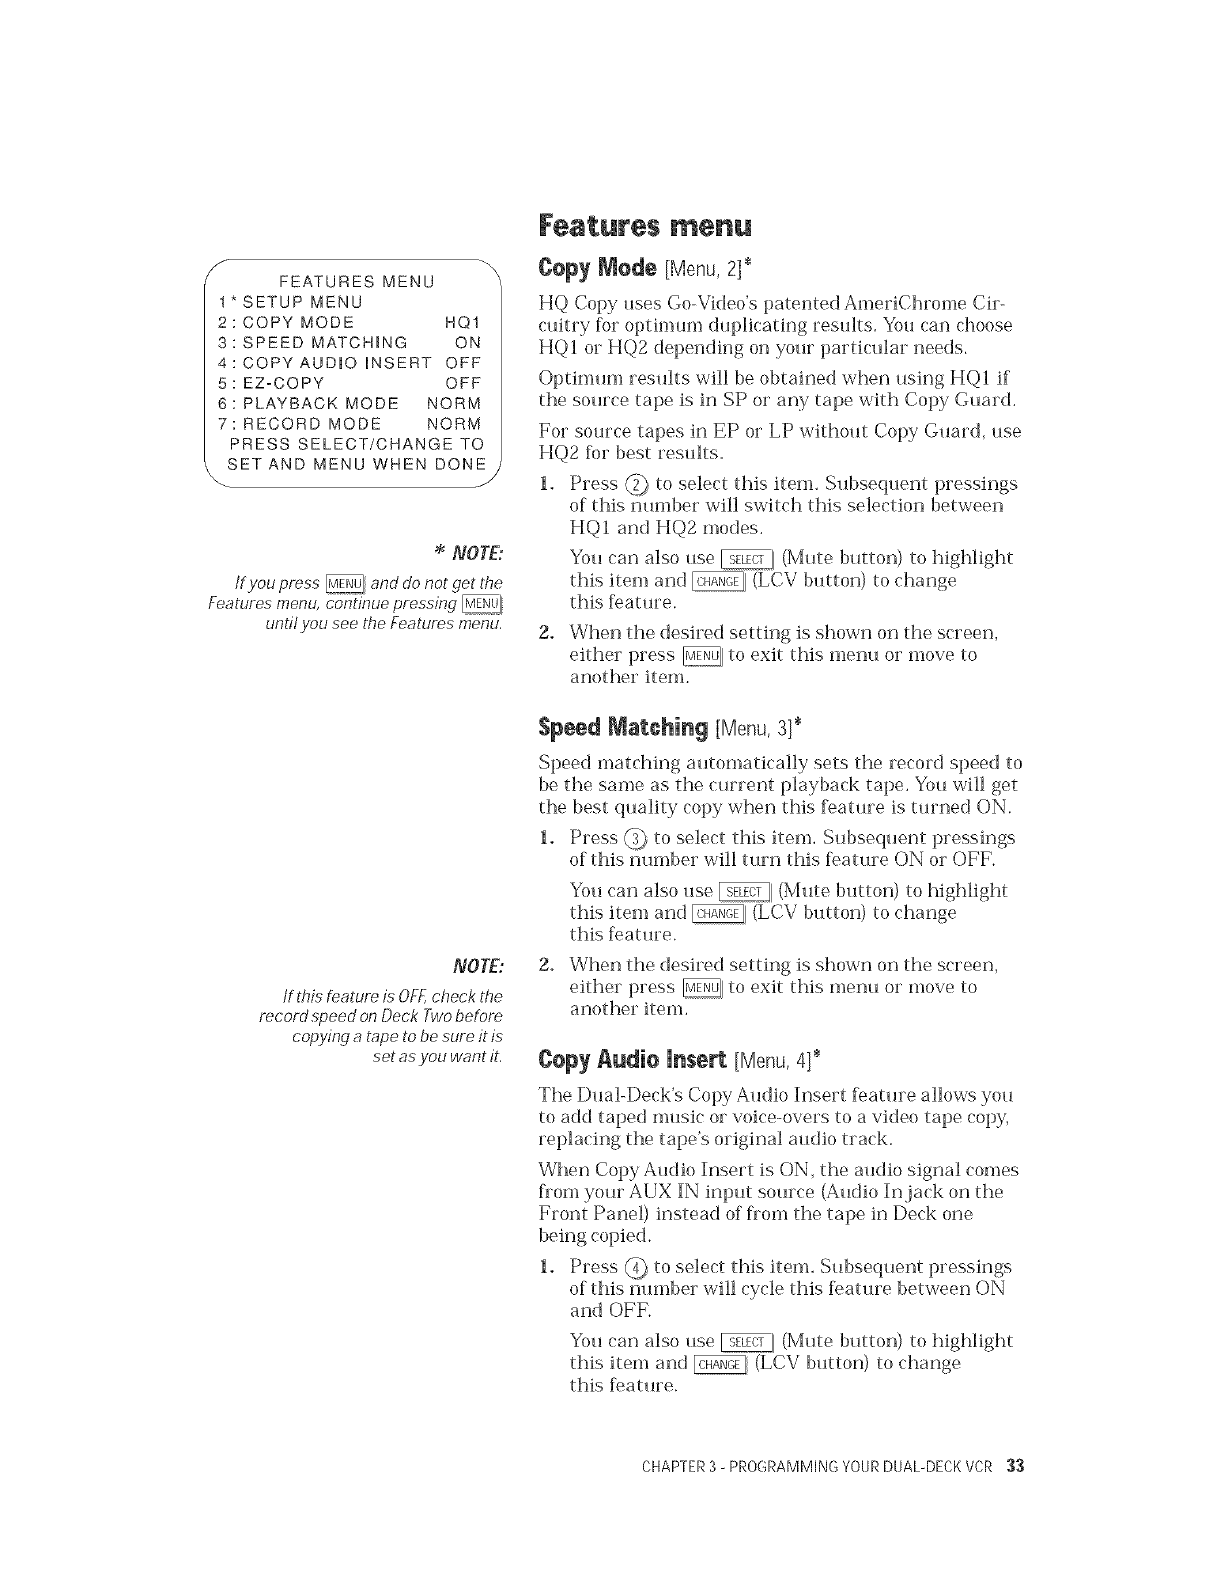
Cepy Mede [Menu, 2]*
HQ Copy uses Go-Video's patented AmeriChrome Cir-
cuitry fi)r optimum duplicating resuks. You can choose
HQI or HQ2 depending on your particular needs.
Optimum results will be obtained when using HQI if
the source tape is in SP or any tape with Copy Guard.
For source tapes in EP or LP without Copy Guard, use
HQ2 for best results.
1. Press _ to select this item. Subsequent pressings
of this number will switch this selection between
HQI and HQ2 modes.
You can also use _ (Mute button) to highlight
this item and _ (LCV button) to change
this f>ature.
2. When the desired setting is shown on the screen,
either press _, to exit this mem_ or move to
another item.
Speed Matching [Menu, 3]*
Speed matching automatically sets the record speed to
be the same as the current playback tape. You will get
the best quality copy when this f>ature is turned ON.
1. Press _ to select this item. Subsequent pressings
of this number will turn this f>ature ON or OFF.
You can also use _ (Mute button) to highlight
this item and @, (LCV button) to change
this feature.
2. When the desired setting is shown on the screen,
either press _] to exit this menu or move to
another item.
¢epy Audio insert [Menu,4]*
The Dual-Deck's Copy Audio Insert leature allows you
to add taped music or voice-overs to a video tape copy,
replacing the tape's original audio track.
When Copy Audio Insert is ON, the audio signal comes
fiom your AUX IN input sotJrce (Audio In jack on the
Front Panel) instead of fiom the tape in Deck one
being copied.
1. Press _ to select this item. Subsequent pressings
of this nmnber will cycle this f>ature between ON
and OFK
You can also use _ (Mute button) to highlight
this item and @ (LCV button) to change
this feature.
CHAPTER3 -PROGRAMMING YOURDUAL-DECKVCR 33
NOTE:
Copy Audio Insert, EZ-Copy, Playback
Mode and Record Mode automatically
reset to OFF and Normal when the
VCR power is turned oft to prevent
accidental use.
2. When the desired setting is shown on the screen,
either press _, to exit this menu or move to
another item.
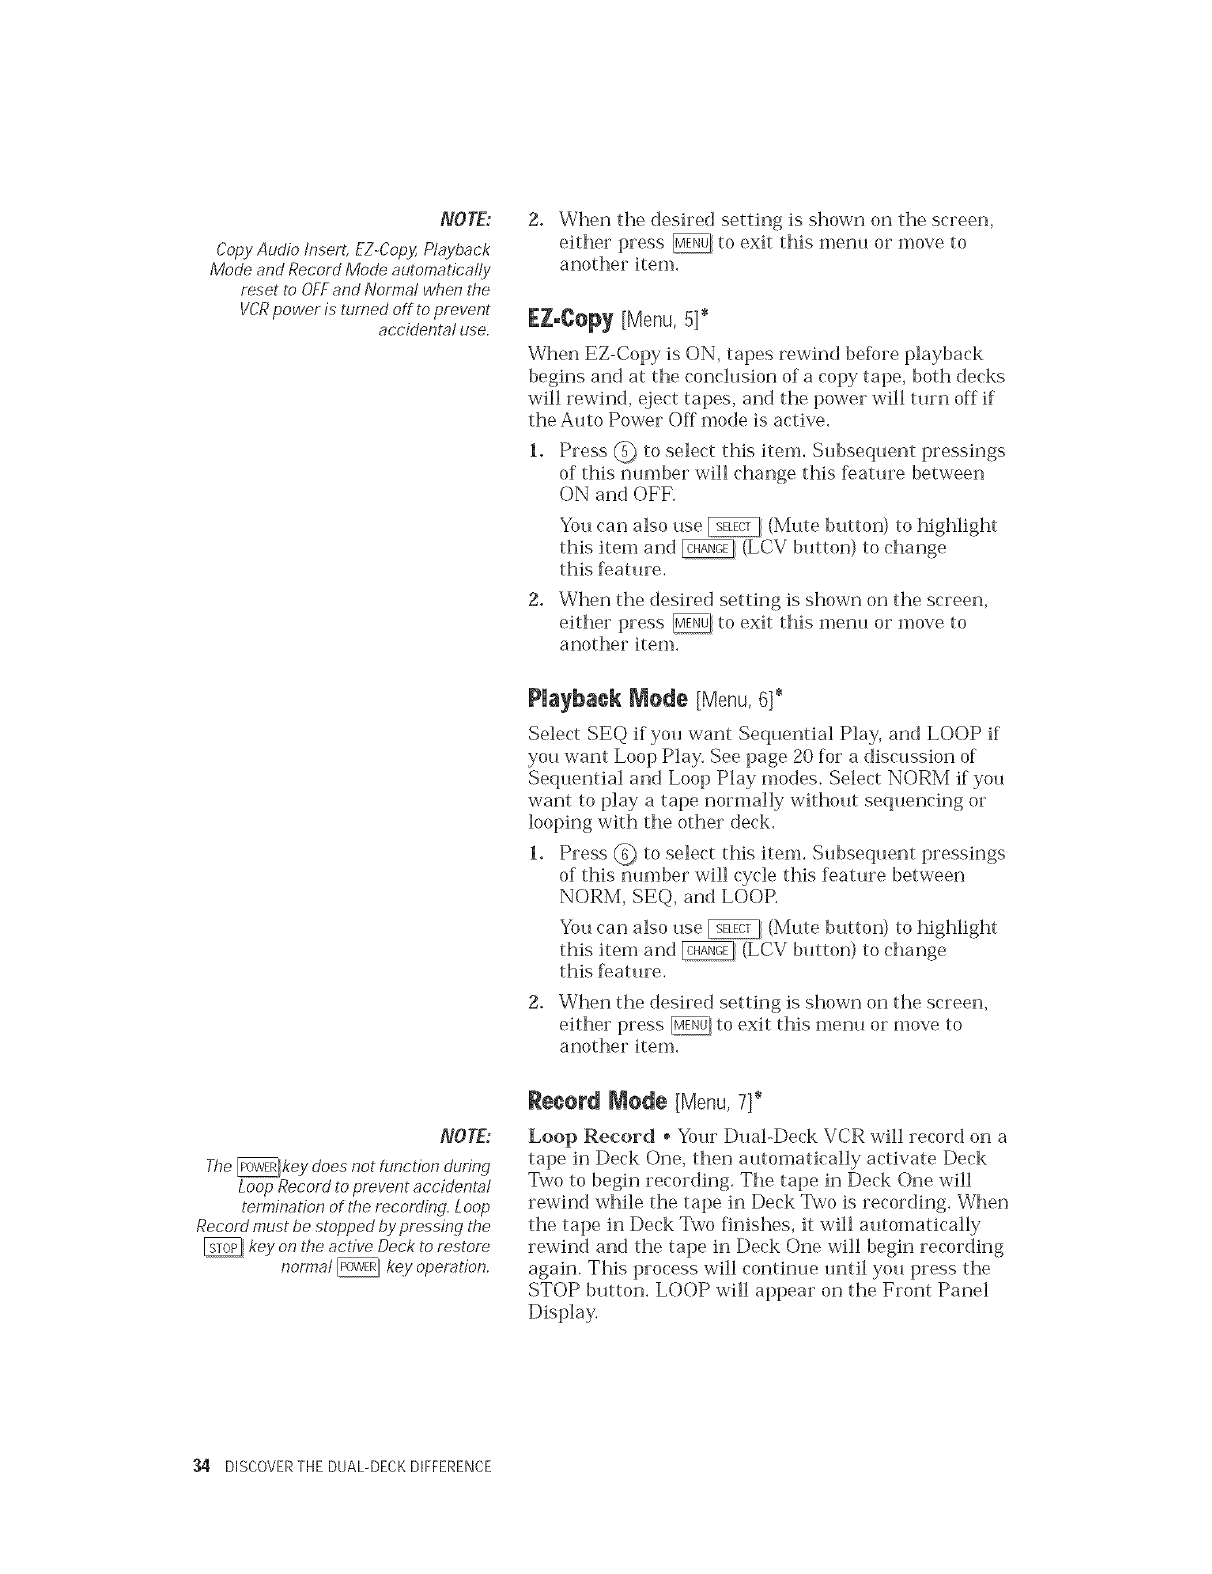
[Z-Cepy [Menu,5]*
When EZ-Copy is ON, tapes rewind belbre playback
begins and at the conclusion of a copy tape, both decks
will rewind, _ect tapes, and the power will turn off if
the Auto Power Off mode is active.
1. Press @ to select this item. Subsequent pressings
of this number will change this feature between
ON and OFF,
You can also use _ (Mute button) to highlight
this item and @, (LCV button) to change
this feature.
2. When the desired setting is shown on the screen,
either press _, to exit this menu or move to
another item,
Playback Mode [Menu,6]*
Select SEQ if you want Sequential Play, and LOOP if
you want Loop Play. See page 20 for a discussion of
Sequential and Loop Play modes. Select NORM if you
want to play a tape normally without sequencing or
looping with the other deck.
1. Press @ to select this item. Subsequent pressings
of this number will cycle this feature between
NORM, SEQ, and LOOP.
You can also use _ (Mute button) to highlight
this item and _ (LCV button) to change
this feature.
2. When the desired setting is shown on the screen,
either press _. to exit this menu or move to
another item,
NOTE:
The@key does not function during
Loop Record to prevent accidental
termination of the recording. Loop
Record must be stopped by pressing the
kEtyon the active Deck to restore
normal _key operation.
Recetd Mede [Menu,7]*
Loop Record * Your Dual-Deck VCR will record on a
tape in Deck One, then automatically activate Deck
Two to begin recording. The tape in Deck One will
rewind while the tape in Deck Two is recording. When
the tape in Deck Two finishes, it will automatically
rewind and the tape in Deck One will begin recording
again. This process will continue until you press the
STOP button, LOOP will appear on the Front Panel
Display.
34 DISCOVERTHE DUAL-DECKDIFFERENCE
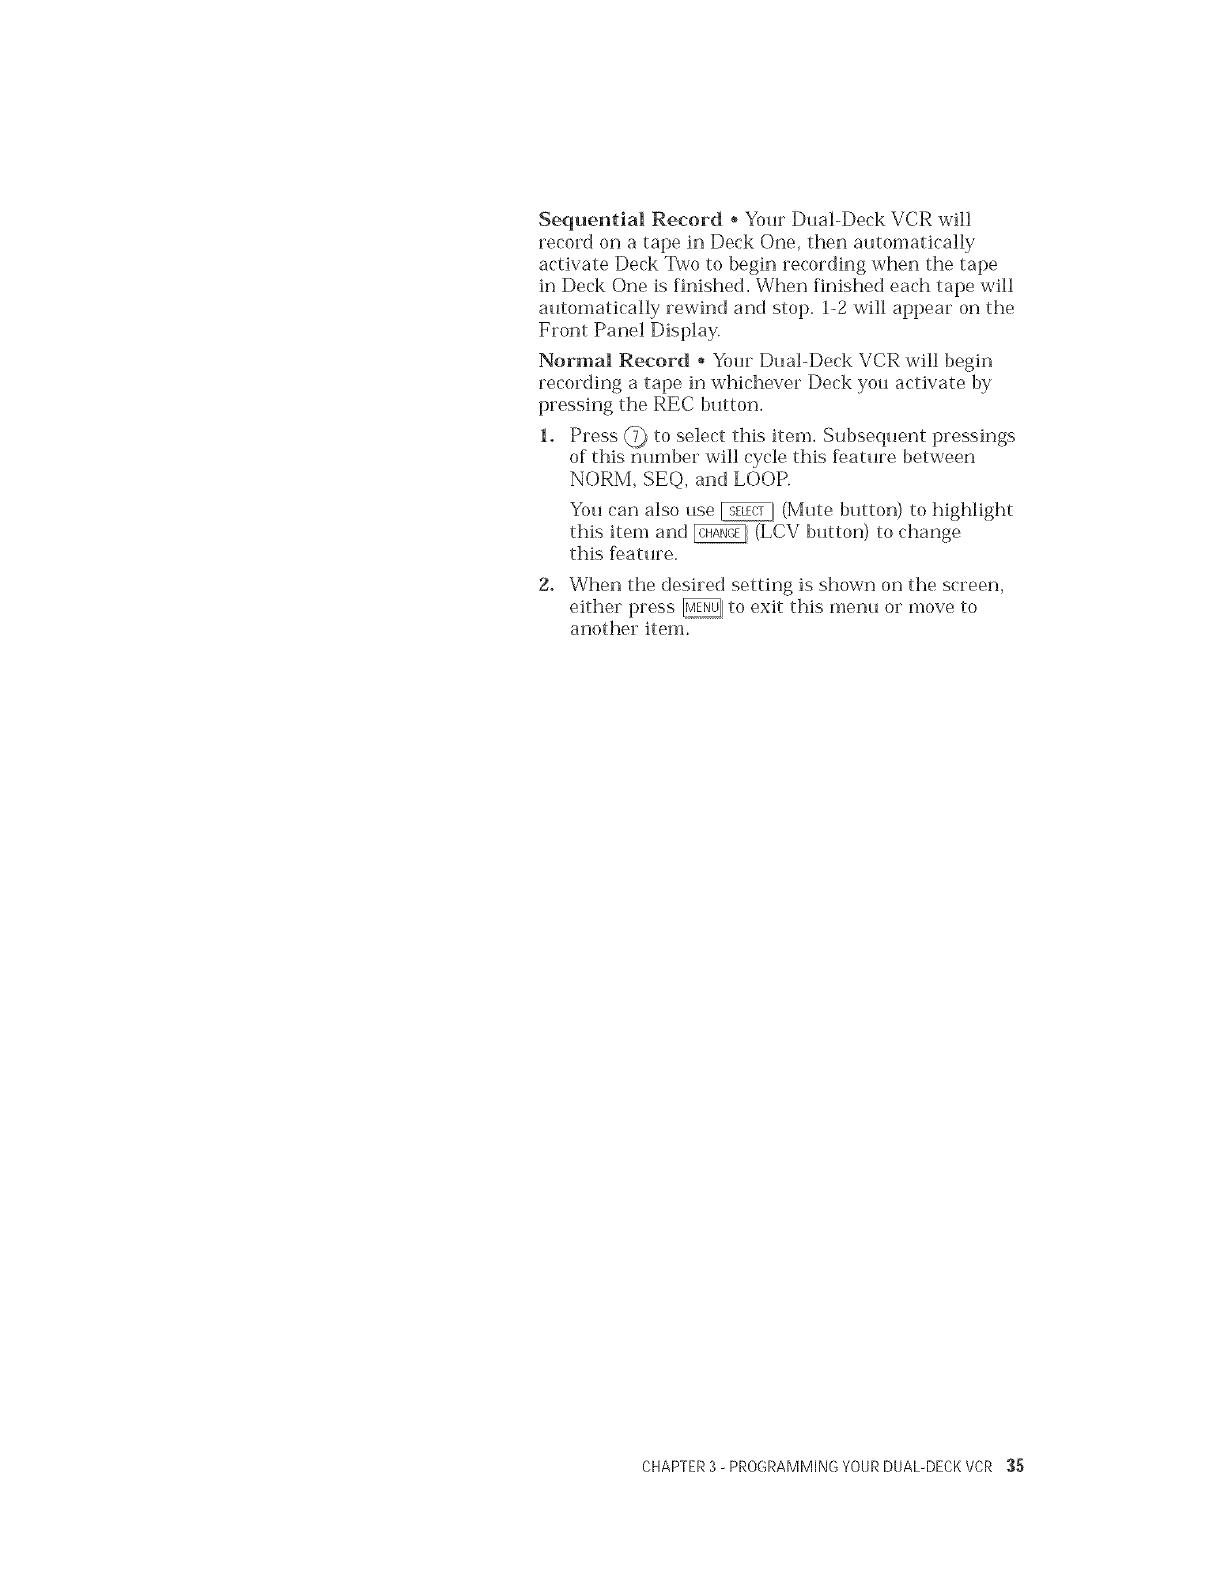
Sequential Record _ Your Dual-Deck VCR will
record on a tape in Deck One, then automatically
activate Deck Two to begin recording when the tape
in Deck One is finished, When finished each tape will
automatically rewind and stop. 1-2 will appear on the
Front Panel Display.
Normal Record * Your Dual-Deck VCR will begin
recording a tape in whichever Deck you activate by
pressing the REC button.
1. Press _ to select this item. Subsequent pressings
of this nmnber will cycle this Dature between
NORM, SEQ, and LOOP.
You can also use _ (Mute button) to highlight
this item and _ (LCV button) to change
this f>ature.
2. When the desired setting is shown on the screen,
either press _, to exit this menu or move to
another item.
CHAPTER3 - PROGRAMMING YOURDUAL-DECKVCR :35
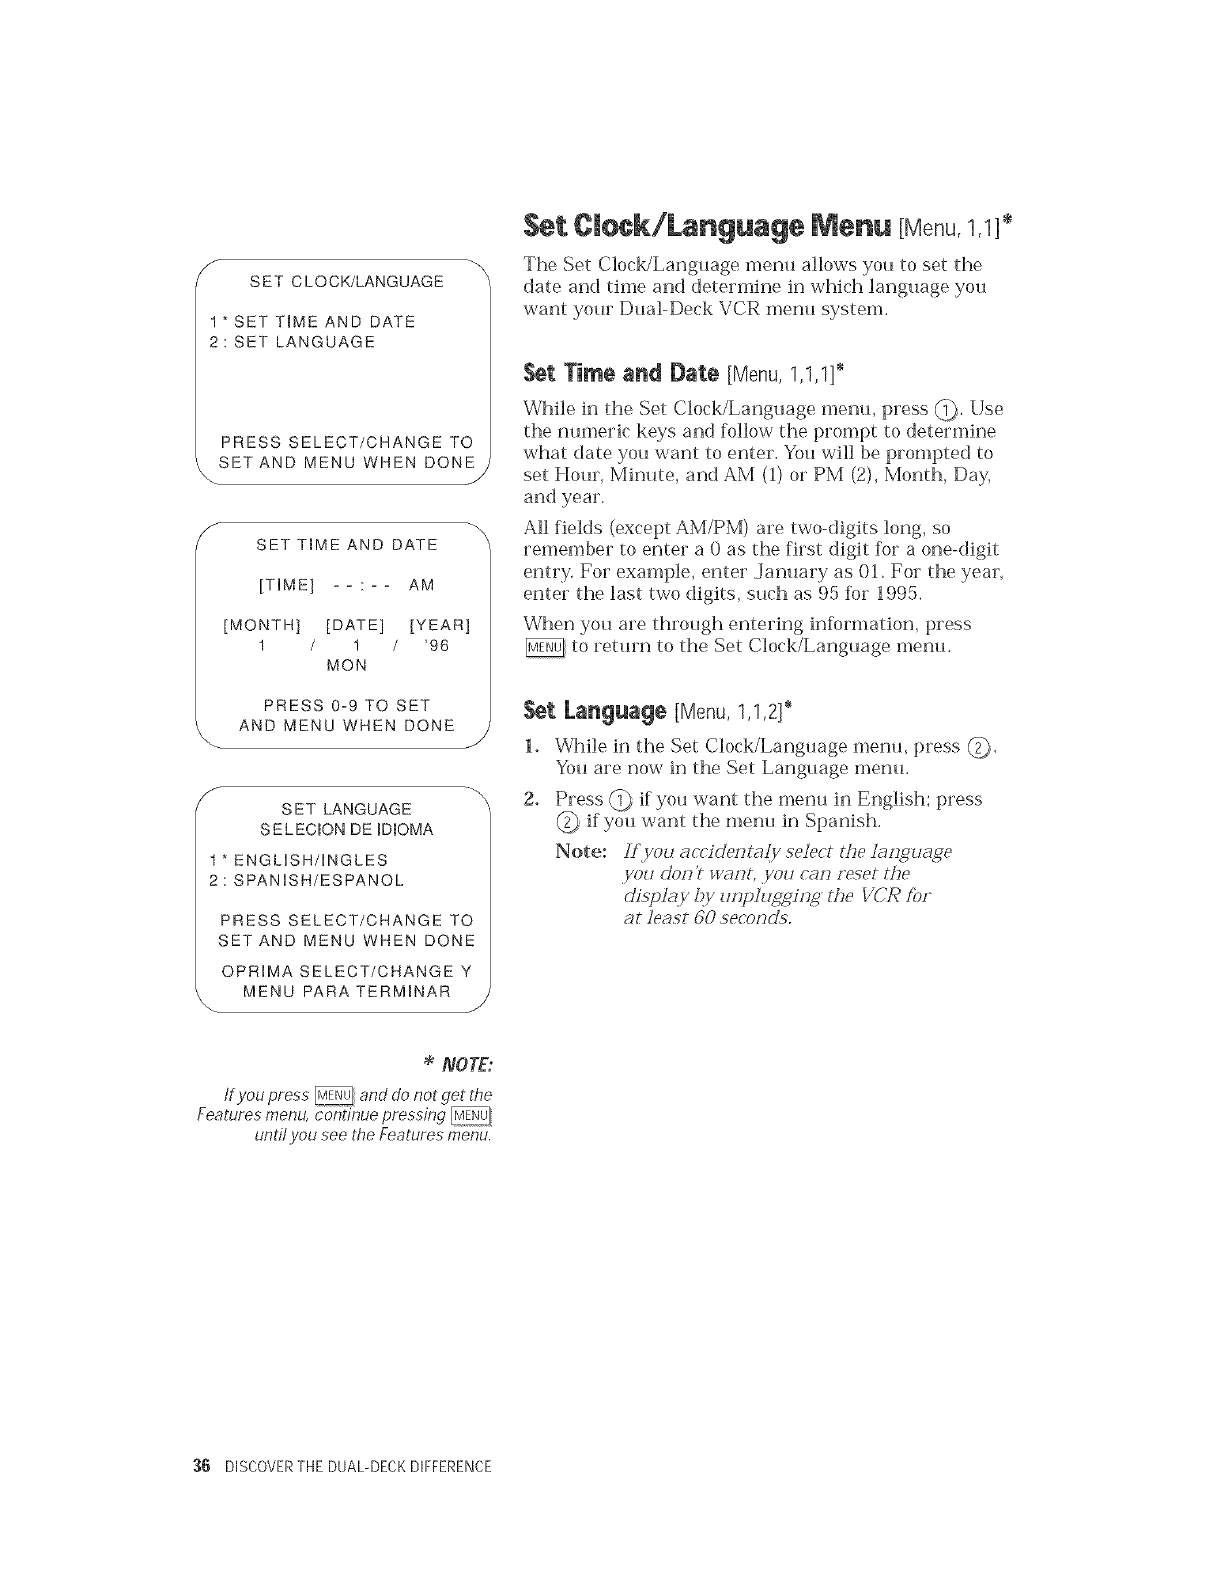
f
SET CLOCK/LANGUAGE
1*SET TIME AND DATE
2: SET LANGUAGE
PRESS SELECT/CHANGE TO
_.SETAND MENU WHEN DONE
J
f _
SET T_ME AND DATE
[TIME] : AM
[MONTH] [DATE] [YEAR]
1/1/'96
MON
PRESS 0-9 TO SET
AND MENU WHEN DONE --
/
f
SET LANGUAGE
SELEC_ON DE ID_OMA
1" ENGLISH/INGLES
2: SPANISH/ESPANOL
PRESS SELECT/CHANGE TO
SET AND MENU WHEN DONE
OPRIMA SELECT/CHANGE Y
MENU PARA TERM_NAR --
/
Set C|eek/Language Menu [Menu,1,1]*
The Set Clock/Language menu alk>ws you to set the
date an(] time and determine in which language you
want your Dual-Deck VCR menu system.
Set Time and Date [Menu,1,1,1]_
While in the Set Clock/Language menu, press @. Use
the numeric keys and follow the prompt to determine
what date you want to enter. You will be prompted to
set Hour, Minute, and AM (1) or PM (2), Month, Day,
and year.
All fields (except AM/PM) are two-digits long, so
remember to enter a 0 as the first digit for a one-digit
entry. For example, enter .January as 01. For the year,
enter the last two digits, such as 95 for 1995.
When you are through entering information, press
to return to the Set Clock/Language menu.
Set, [.anguage [Menu, 1,1,2] _
1. While in the Set Clock/Language menu, press _.
You are now in the Set Language menu.
g° Press _ if you want the menu in English; press
if you want the menu in Spanish.
Note: Lf_you acr'idezff _@/ select tL,e }aiJgu_ge
,you doll? w_wlt, ,you cazJ reset the
ciispi_.y ,!)y uHpIug_/zJg the VCR f_)r
at least 60 sed_)zJ(}5,
NOTE:
If you press _and do not get the
Features menu, continue pressing
undl you see the Features menu.
:36 DISCOVERTHE DUAL-DECKDIFFERENCE
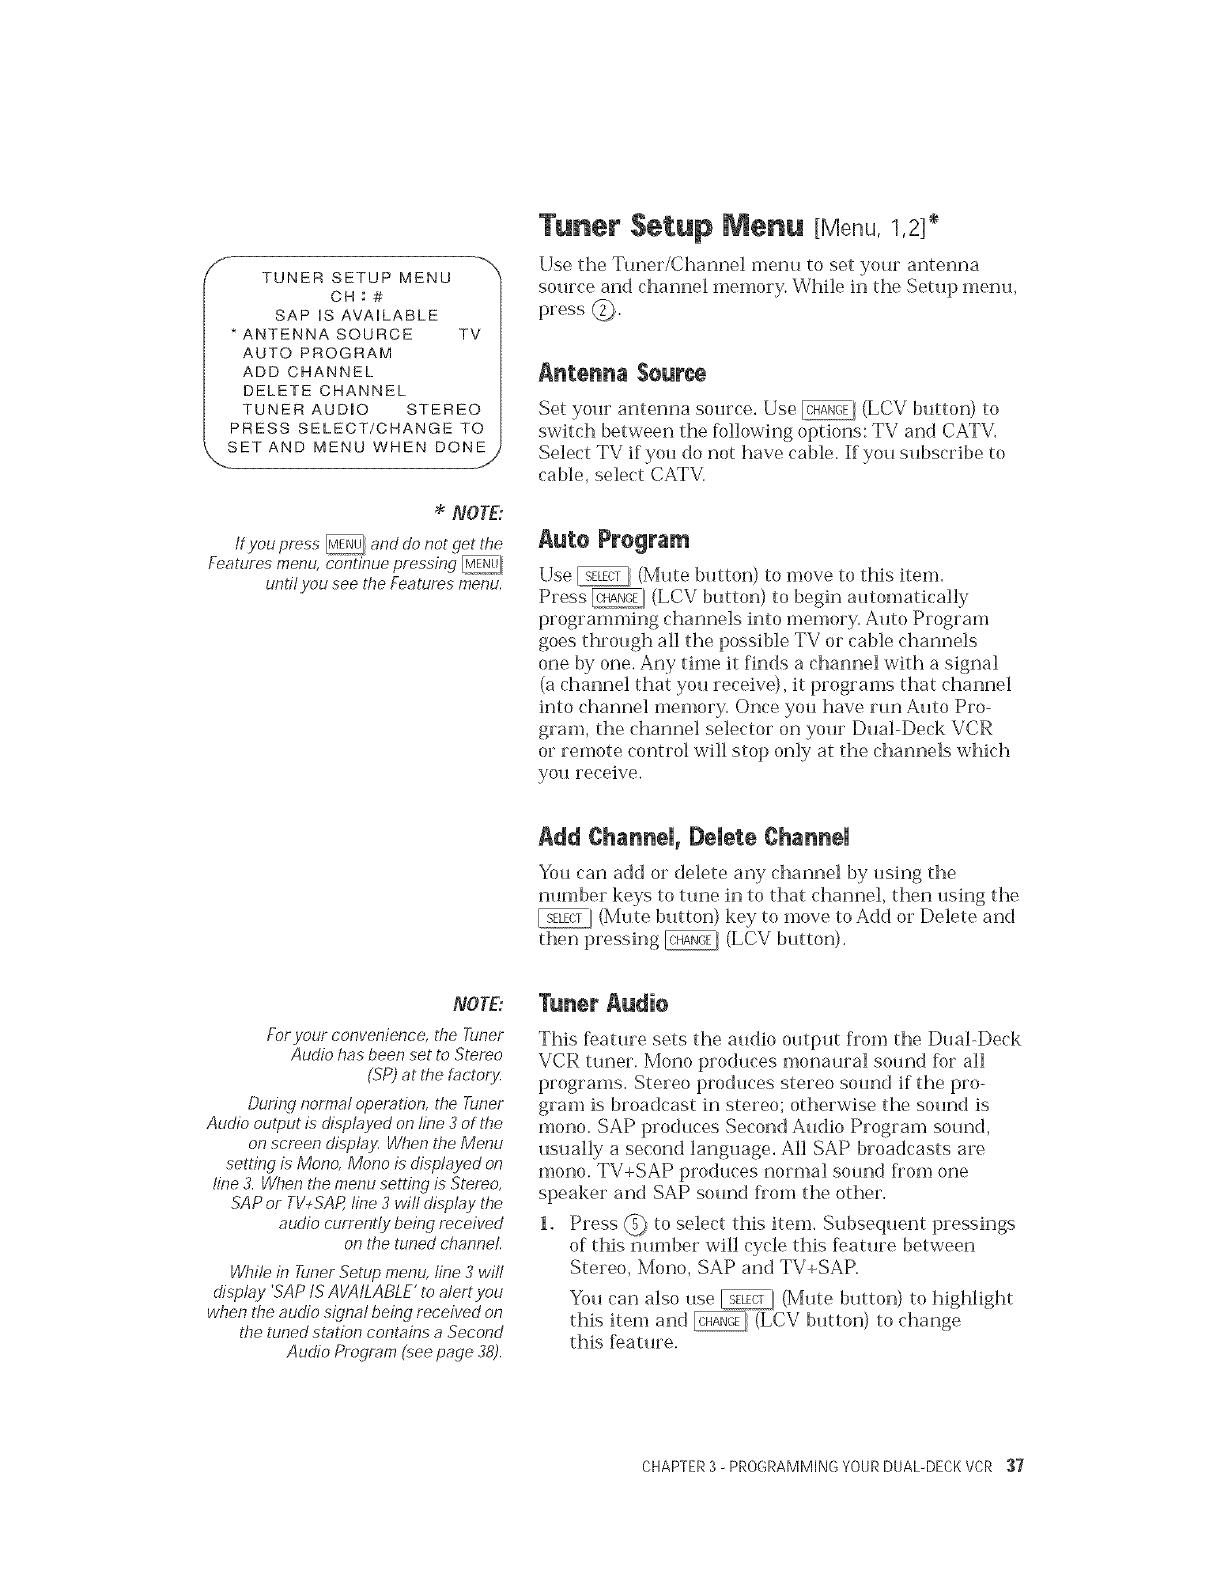
TUNER SETUP MENU
OH:#
SAP iS AVAILABLE
*ANTENNA SOURCE TV
AUTO PROGRAM
ADD CHANNEL
DELETE CHANNEL
TUNER AUDIO STEREO
PRESS SELECT/CHANGE TO
SET AND MENU WHEN DONE
NOTE:
tf you press _and do not get the
Features menu, continue pressing
untit you see the Features menu.
Tuner Setup Menu [Menu,1,2]*
Use theTuner/Channelmenu tosetyour antenna
sourceand channelmemory. While intheSetupmenu,
press @.
Anteana Source
Set your antenna source, Use _ (LCV button) to
switch between the %llowing options: TV and CATV,
Select TV if you do not have cable. If you subscribe to
cable, select CATV.
Aute Pregram
Use _, (Mute button) to move to this item.
Press _J (LCV button) to begin autonmtically
programming channels into memory. Auto Program
goes through all the possible TV or cable channels
one by one. Any time it finds a channel with a signal
(a channel that you receive), it programs that channel
into channel memory. Once you have run Auto Pro-
gram, the channel selector on your Dual-Deck VCR
or remote control will stop only at the channels which
you receive.
Add ChannN, Delete ChannN
You can add or delete any channel by using the
number keys to tune in to that channel, then using the
(Mute button) key to move to Add or Delete and
then pressing @, (LCV button).
NOTE:
For your convenience, the Tuner
Audio has been set to Stereo
(SP) at the tactory.
During normal operation, the ;tuner
Audio output is displayed on line 3 of the
on screen display. When t,be Menu
setting is Mono, Mono is displayed on
line 3. When the menu setting is Stereo,
SAP or TV+SAR line 3 wifl display the
audio current,!y being received
on the tuned channel.
While in Tuner Setup menu, line 3 will
display 'SAP tS AVAILABLE' to alert you
when the audio signal being received on
t,be tuned station contains a Second
Audio Program {<_eepage 38).
Tuaer Audio
This feature sets the audio output from the Dual-Deck
VCR tuner. Mono produces monaural sound for all
programs. Stereo produces stereo smmd if the pro-
gram is broadcast in stereo; otherwise the sound is
mono. SAP produces Second Audio Program sound,
usually a second language. All SAP broadcasts are
mono. TV+SAP produces normal sound fiom one
speaker and SAP sound fiom the other.
1. Press @ to select this item. Subsequent pressings
of this number will cycle this feature between
Stereo, Mono, SAP and TV+SAP.
You can also use _J (Mute button) to highlight
this item and _ (LCV button) to change
this feature.
CHAPTER3- PROGRAMMING YOURDUAL-DECKVCR 37
2. When the desired setting is shown on the screen, either
press _, to exit this menu or move to another Rein,
Secondary Audio Programmlng (SAP)
Some TV and cable channels broadcast a Second Audio
Program, usually another language, along with the regular
audio. All Second Audio Program broadcasts are monaural.
When you tune your Dual-Deck VCR to a channel with a
Secondary Audio Program, SAP will appear on the Front
Panel Display (whether or not you have SAP selected).
When you have selected SAP or TV+SAP lbr your Tuner
Audio, SAP will appear on the Front Panel Display. If you
have selected SAP or TV+SAP and the broadcast does not
contain a Secondary Audio Program, normal stereo audio
will be heard. Sometimes the SAP signal will be present, but
there will be no audio broadcast.
:38 DISCOVERTHE DUAL-DECKDIFFERENCE
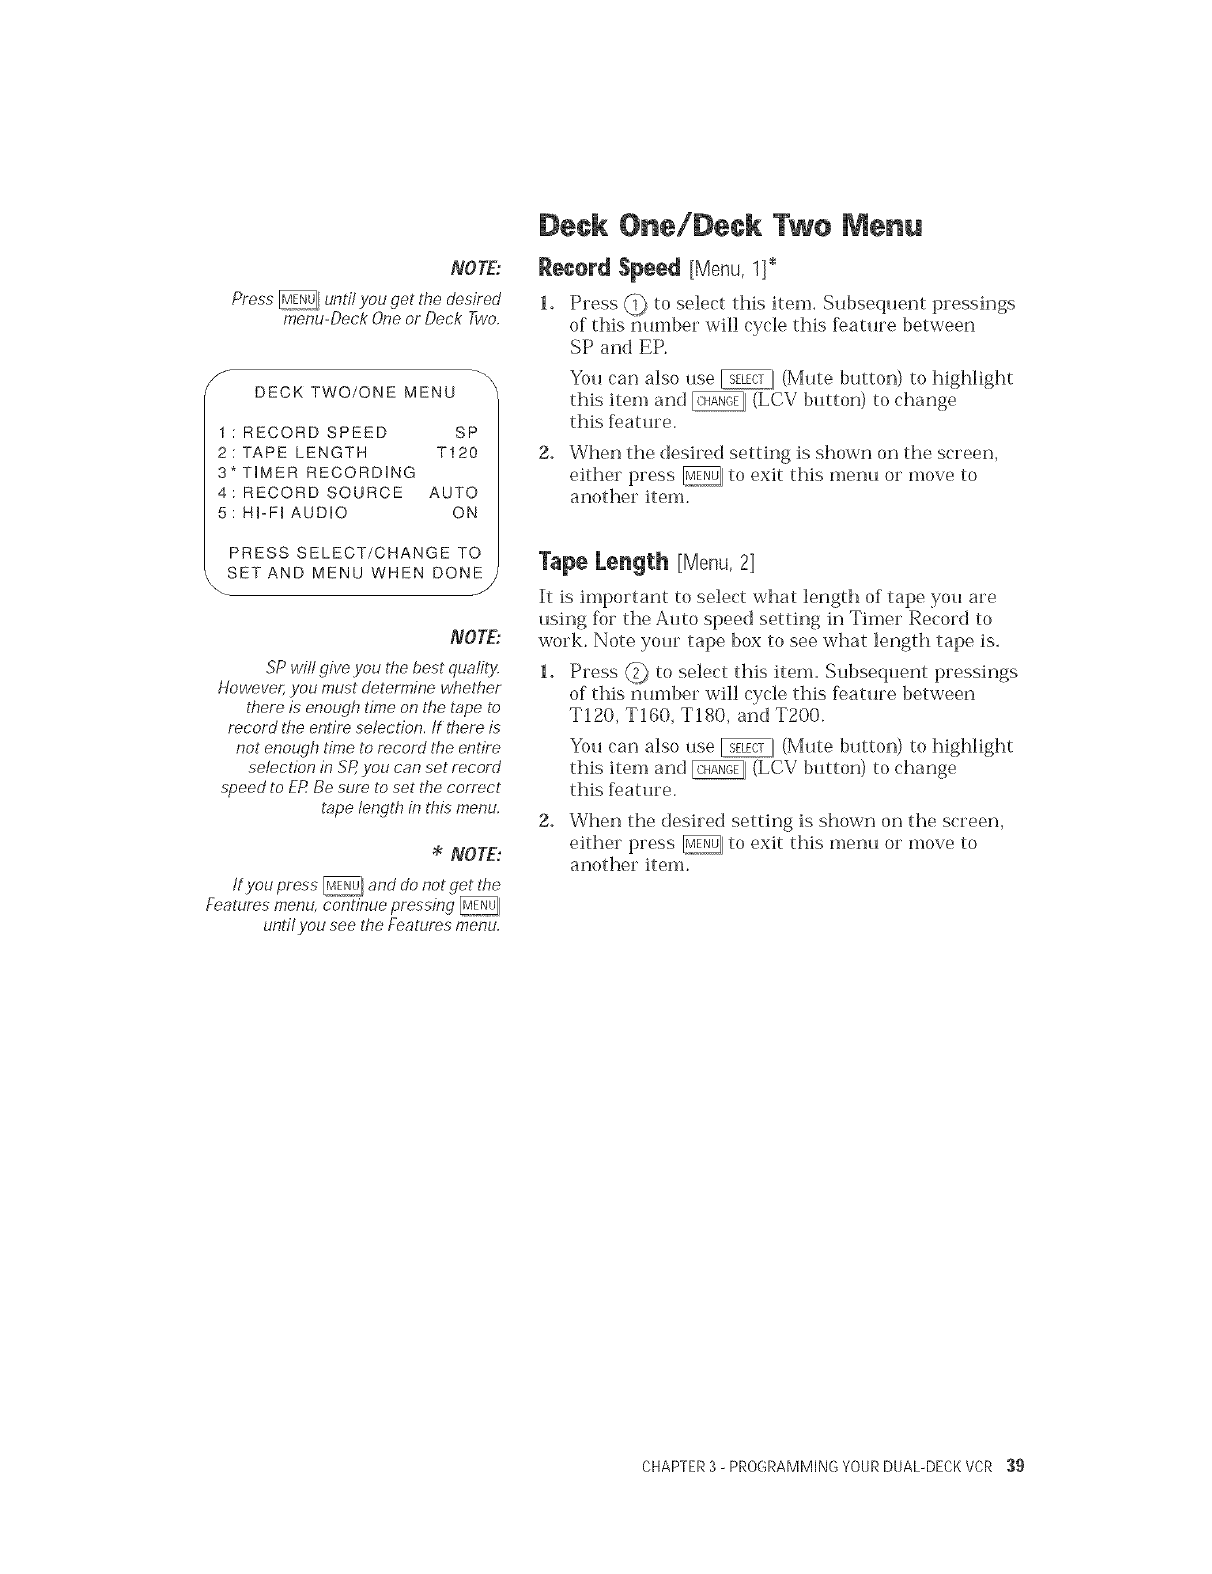
NO TE:
Press _until you get the desired
menu-Deck Oneor Deck Two.
f
DECK TWO/ONE MENU
I : RECORD SPEED SP
2:TAPE LENGTH T120
3*TIMER RECORDING
4: RECORD SOURCE AUTO
5: HI-FI AUDIO ON
PRESS SELECT/CHANGE TO
SET AND MENU WHEN DONE
_ /
NOTE:
SP will give you the best quality.
However, you must determine whether
there is enough time on the tape to
record the entire selection, tf there is
not enough time to record the entire
selection in SR you can set record
speed to ER Be sure, to set the correct
tape lengt,b in this menu.
NOTE:
tt you press _J and do not get the
Features menu, continue pressing
untit you see the Features menu.
Deck One/Deck Two Menu
Record Speed [Menu,1]*
1. Press (!) to select this item, Subsequent pressings
of this number will cycle this feature between
SP and EP.
You can also use _ (Mute button) to highlight
this item and _ (LCV button) to change
this feature.
2. When the desired setting is shown on the screen,
either press _, to exit this menu or move to
another Rein.
Tape Length [Menu,21
It is important to select what length of tape you are
using f_)r the Auto speed setting in Timer Record to
work. Note your tape box to see what length tape is.
1. Press @ to select this item. Subsequent pressings
of this number will cycle this feature between
T120, T160, T180, and T200.
You can also use _ (Mute button) to highlight
this item and _ (LCV button) to change
this feature.
2. When the desired setting is shown on the screen,
either press _, to exit this menu or move to
another Rein.
CHAPTER3 - PROGRAMMING YOURDUAL-DECKVCR 39
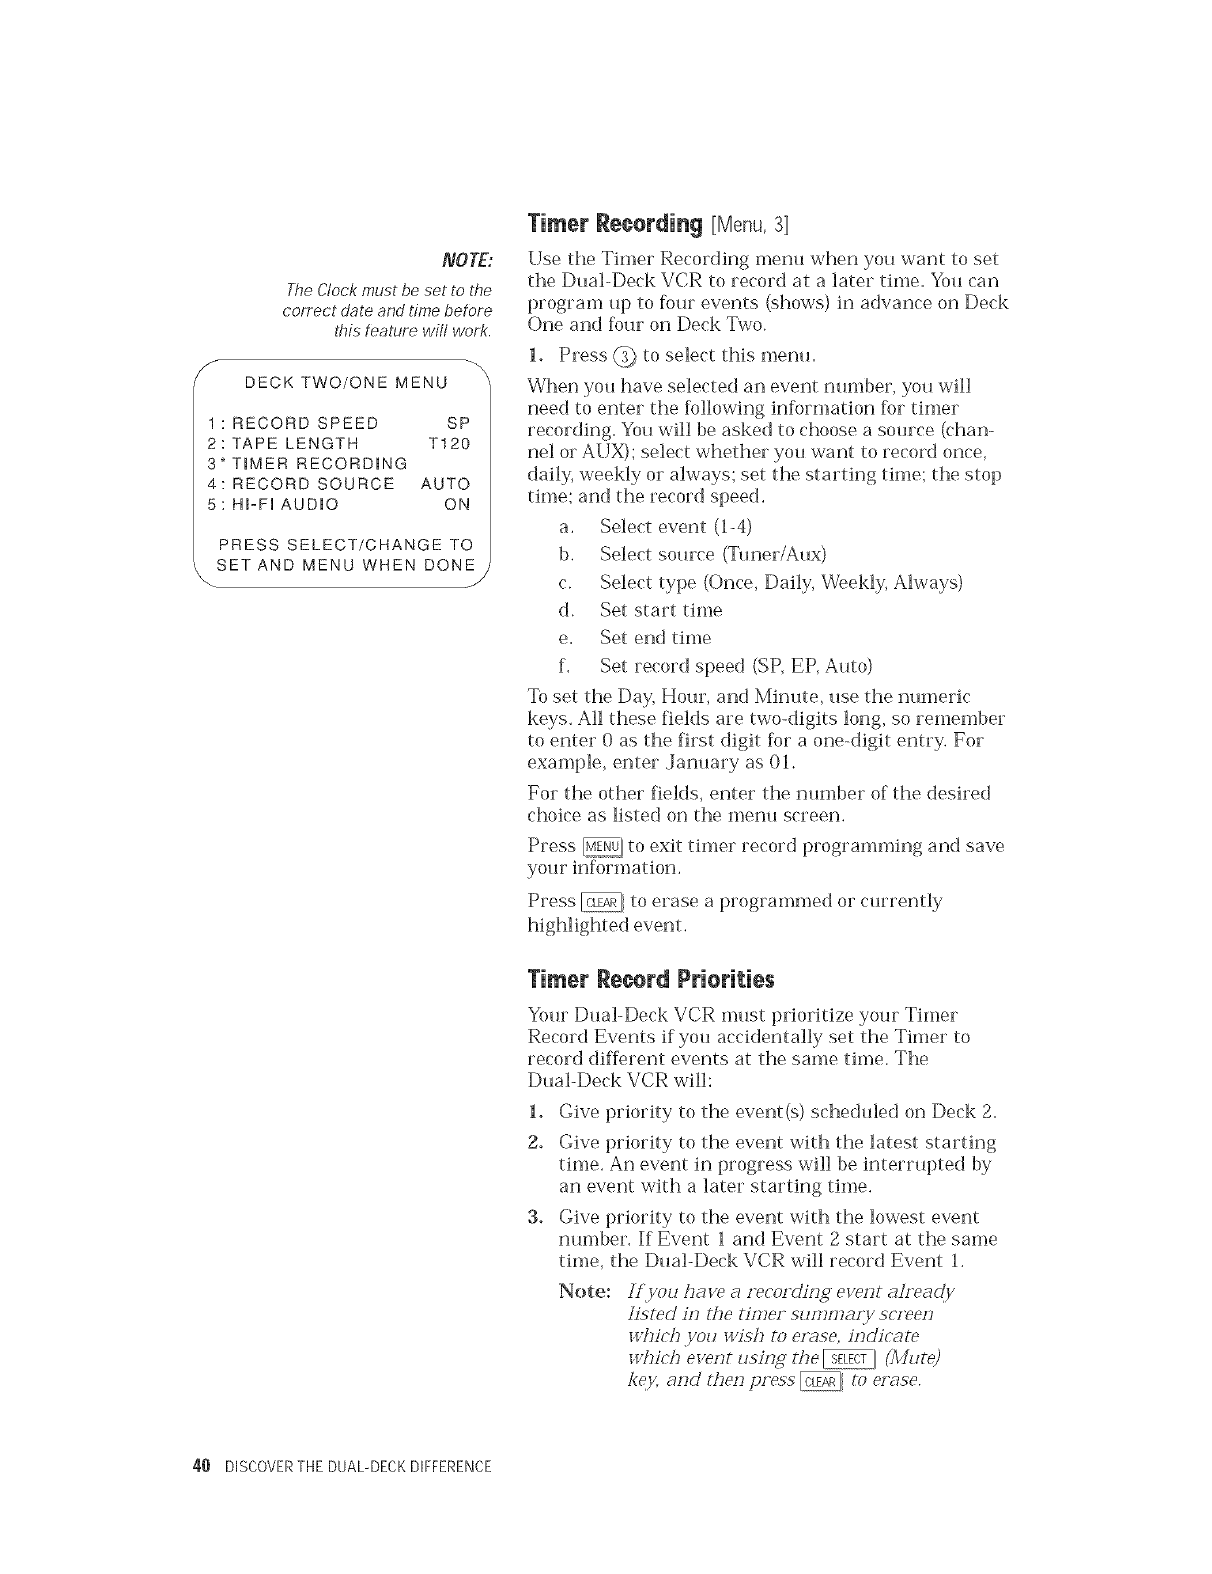
NO TE:
TheClock must be set to the
correct date and time before
this feature wilt work.
Y DECK TWO/ONE MENU
1 : RECORD SPEED SP
2: TAPE LENGTH T120
3" TIMER RECORDING
4: RECORD SOURCE AUTO
5: HFFI AUDIO ON
PRESS SELECT/CHANGE TO
SET AND MENU WHEN DONE
J
Timer Recording [Menu,3[
Use the Timer Recording menu when you want to set
the Dual-Deck VCR to record at a later time. You can
program up to four events (shows) in advance on Deck
One and four on Deck Two.
1. Press @ to select this metal
When you have selected an event nmnber, you will
need to enter the following information for timer
recording. You will be asked to choose a source (chan-
nel or AUX); select whether you want to record once,
daily, weekly or always; set the starting time; the stop
time; and the record speed.
a. Select event (14)
b. Select source (Tuner/Aux)
c. Select type (Once, Daily, Weekly, Always)
d. Set start time
e, Set end time
f. Set record speed (SP, EP, Auto)
To set the Day, Hour, and Minute, use the numeric
keys. All these fields are two-digits long, so remember
to enter 0 as the first digit for a one-digit entry. For
example, enter ,January as 01.
For the other fields, enter the number of the desired
choice as listed on the n_enu screen.
Press _{ to exit tinmr record programming and save
your information.
Press @ to erase a programmed or currently
Timer Record Priorities
Your Dual-Deck VCR must prioritize your Timer
Record Events if you accidentally set the Timer to
record different events at the same time. The
Dual-Deck VCR will:
1. Give priority to the event(s) scheduled on Deck 2.
2. Give priority to the event with the latest starting
time. An event in progress will be interrupted by
an event with a later starting time.
3. Give priority to the event with the lowest event
number. If Event i and Event 2 start at the same
time, the Dual-Deck VCR will record Event 1.
Note: !?iyou ha:<e a recor&izJg event aheady
]istdd izl the timer sun?maly srv'eezl
whir'lJ you _v_:shm e,'_se, izJdicom
which e>ent usiHg fi_e _(Mute)
key, and then press @to erase.
40 DISCOVERTHE DUAL-DECKDIFFERENCE
DECKTWO/ONEMENU
t :RECORDSPEED SP
2: TAPELENGTH T120
3*TIMERRECORDRNG
4: RECORDSOURCEAUTO
5: HFF_AUDIO ON
PRESSSELECT/CHANGETO
SETANDMENUWHENDONE
Reeerd $euree [Menu,4]
Press @ to select this item. Subseqtmnt pressings
of this number will cycle this feature between
AUTO, Deck One, TUNER, and AUX on Deck Two.
(Deck One record sources are TUNER and AUX.)
You can also use _ (Mute button) to highlight
this item and _ (LCV button) to change
this f>ature.
2. When the desired setting is shown on the screen,
either press _, to exit this menu or move to
another Rein.
If AUTO is selected, the current view is automatically
selected when the _ key is pressed.
ff Deck One is selected, you will record the tape
playing in Deck One or Tuner if Deck One is stopped.
TUNER records the channel you select on your VCR.
When AUX is selected, the incoming signal is fiom the
kont or rear panel jacks and this is what is recorded
when you press the @ key.
NOTE:
Hi-Fi Audio automatically resets to ON
when the W'R power is turned off to
prevent accidental omission of the Hi-Fi
Audio track during Copy _pe. tf Hi-Fi
Audio is set to OFF during Copy Tape, the
original monaural linear audio track will
be copied to both t,be linear and Hi-Fi
audio tracks on the duplicate tape.
Hi-Fi Audi@ [Menu, 5]
When you Select ON, this means that during tape
playback you will hear the Hi-Fi audio track on your
tape; if you select OFF, you will hear the monaural
linear audio track on your tape. This feature is usehfl
when playing a tape with voice-over narration.
1. Press @ to select this item. Subsequent pressings
of this nmnber will cycle this feature between ON
and OFF.
You can also use _ (Mute button) to highlight
this Rein and @ (LCV button) to change
this feature.
2. When the desired setting is shown on the screen,
either press _, to exit this menu or move to
another item.
CHAPTER3 - PROGRAMMING YOURDUAL-DECKVCR 41
42 DISCOVERTHEDUAL-DECKDIFFERENCE
To determine the hookup
you need:
1. If you don't have a ('able
system, (_se the Basic
Connections.
2. IfyotJ have a cable system
but no converter box, use
the Basic Cable Connections.
3_ If you have a cable system
with a converter box (some
or all channels are scrambled
or premimn), tJse Cable
Converter Box HooktJp (or
Alternative Ca ble Converter
Box Hookup).
Your exact hookup will depend on whether or not you
subscribe to ('able, and whether you have a cable
converter box or other equipment. However, the basic
idea is the same.
The signal (whether antenna, cable, or satellite)
coming into yo_r ho_Jse needs two things for the
program to appear on your TV: cables and tuners.
FL'ts_, the signal travels through a cable.
Secr)nd, the signal goes to a device with a tuner such
as your TV or VCR. The t_mer selects the one channel
that yo_J are watching fiom the many channels that
yo_ have available.
ARer yo_ have chosen the desired channel with this
tuner, the device may convert the signal into the
audio and video that yo_ see on yo_Jr television
screen, or it may rebroadcast the signal, on a 1)re-set
channel, to another device.
For ex_m/;]e, a cable may go into a device with a tuner
(a cable box or VCR) and have a cable going fiom this
device into another tuner s_ch as your TV. This
means that the channel selected on the first tuner
(Cable box or VCR) is the one that the second tuner
(TV) will pick up. This is why yotJ select your TV
channels _Jsing yo_Jr VCR remote control. The signal is
coming to the VCR which tunes in the channel yo_J
select and sends that channel to the TV. This is also
why, if you have a ('able converter box, you select TV
channels using the cable converter box.
When one t_mer sends a signal f_}r a channel to the
next t_mer, the first tuner always _Jses a particular
channel of its own to broadcast on. For example, yo_Jr
VCR uses either channel 3 or 4. If your VCR is set to
broadcast on channel 3, you must set your TV to
channel 3 to receive this signal.
So, to watch TV channel 12, yo_J wo_Jld tune in channel
12 on your VCR and channel 3 or yo_Jr TV. Your con-
verter box, if you have one, works the same way.
CHAPTER4 -CONNECTINGYOURDUAL-DECKVCR 4:3
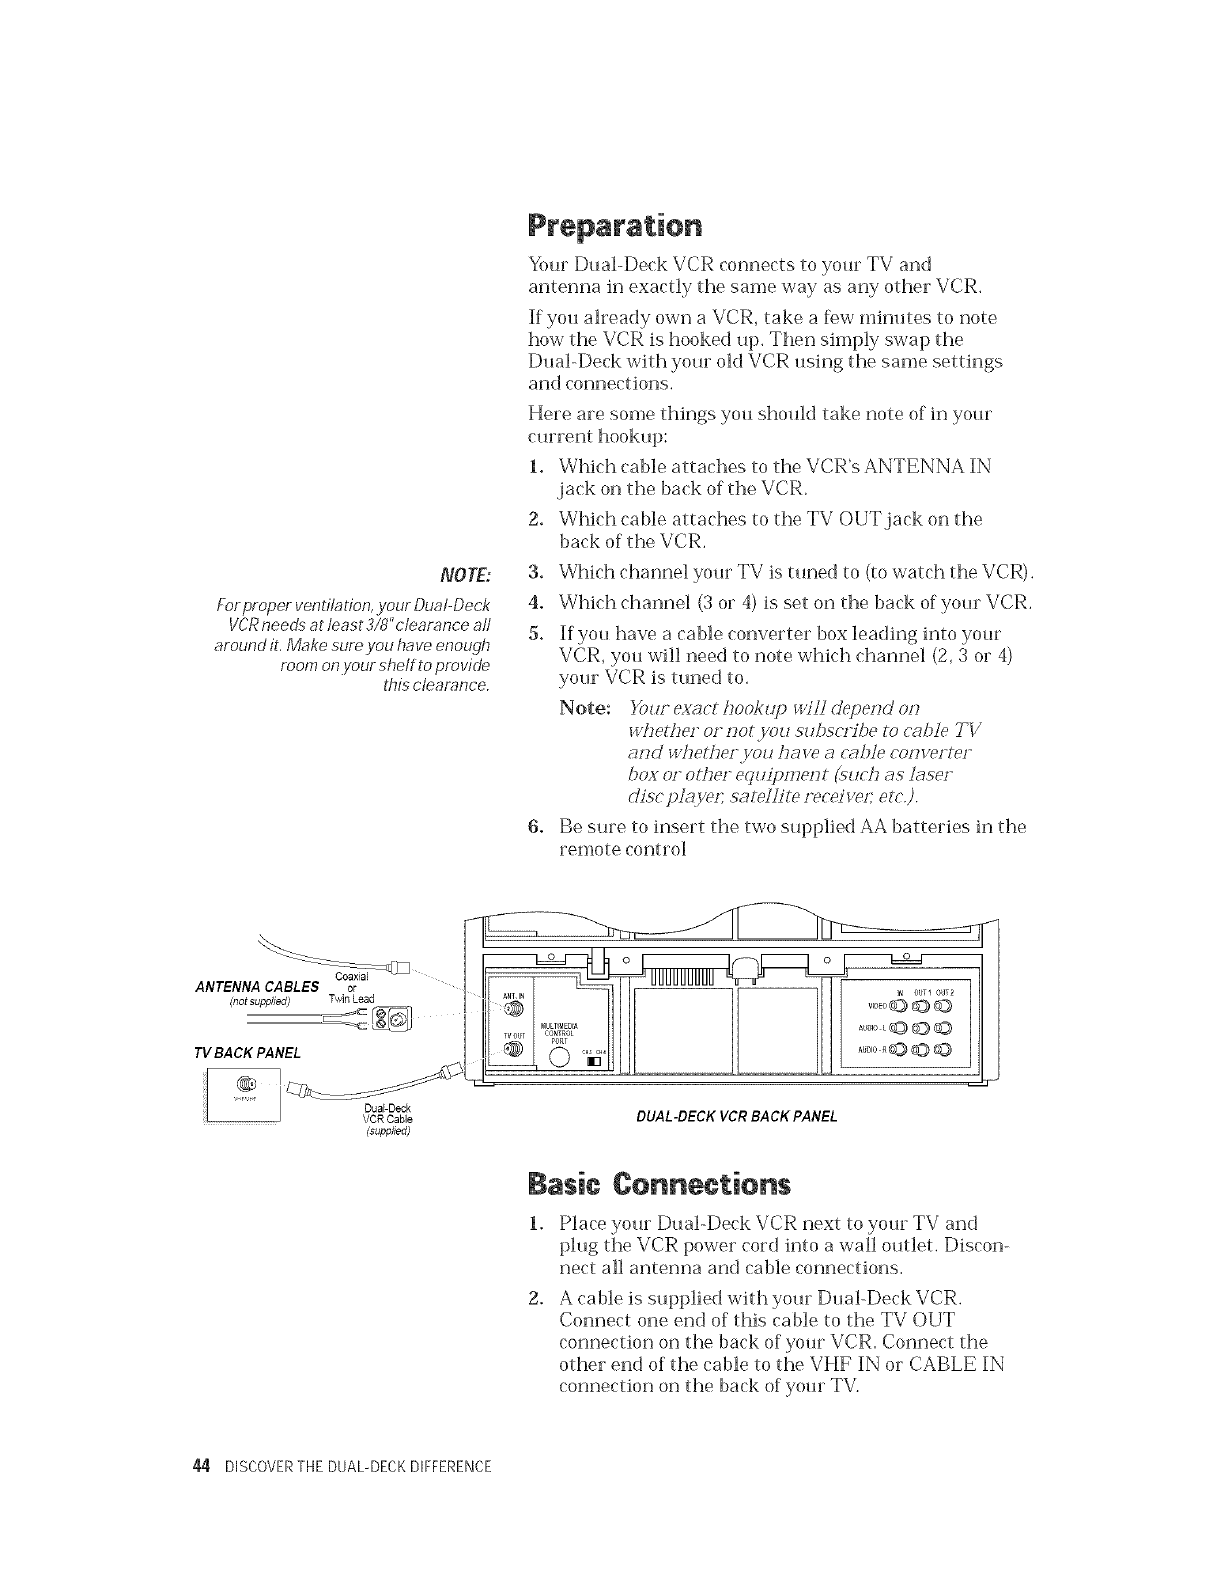
NOTE:
For proper ventilation, your Dual-Deck
VCR needs at least 3/8"clearance aft
around it. Make sure you have enough
morn on your shelfto provide
this clearance.
Your Dual-Deck VCR connects to your TV and
antenna in exactly the same way as any other VCR.
If you already own a VCR, take a few minutes to note
how the VCR is hooked up. Then simply swap the
Dual-Deck with your old VCR using the same settings
and connections.
Here are some things you should take note of in your
current hookup:
1. Which cable attaches to the VCR's ANTENNA IN
.jack on the back of the VCR.
2. Which cable attaches to the TV OUT jack on the
back of the VCR.
3. Which channel your TV is tuned to (to watch the VCR).
4. Which channel (3 or 4) is set on the back of your VCR.
5. If you have a cable converter box leading into your
VCR, you will need to note which channel (2, 3 or 4)
your VCR is tuned to.
Note: }Our exact L,ookup _,itl cl_t)eHd oll
whetlle_ oz ¢?otyou subsc,'Tbeto c_bJe TV
ol,,d whetL,ecyou have a r'z#decon,<elm1
box of o,_/le,'"equiI;meHt puc']l as lase,'
clisc pMye£ satel/ite recdve£ etc,),
6. Be sure to insert the two supplied AA batteries in the
remote control
_LD
ANTENNA CABLES or
(not supplied} Twin Lead
TV BACK PANEL
(supplied)
L UUUUUUUUU
co,Not
PORT
, © "ia
DUAL-DECK VCR BACK PANEL
Basic (}onnections
2.
Place your Dual-Deck VCR next to your TV and
plug the VCR power cord into a wall outlet. Discon-
nect all antenna and cable connections.
A cable is supplied with your Dual-Deck VCR.
Connect one end of this cable to the TV OUT
connection on the back of your VCR. Connect the
other end of the cable to the VHF IN or CABLE IN
connection on the back of your TV.
44 DISCOVERTHE DUAL-DECKDIFFERENCE
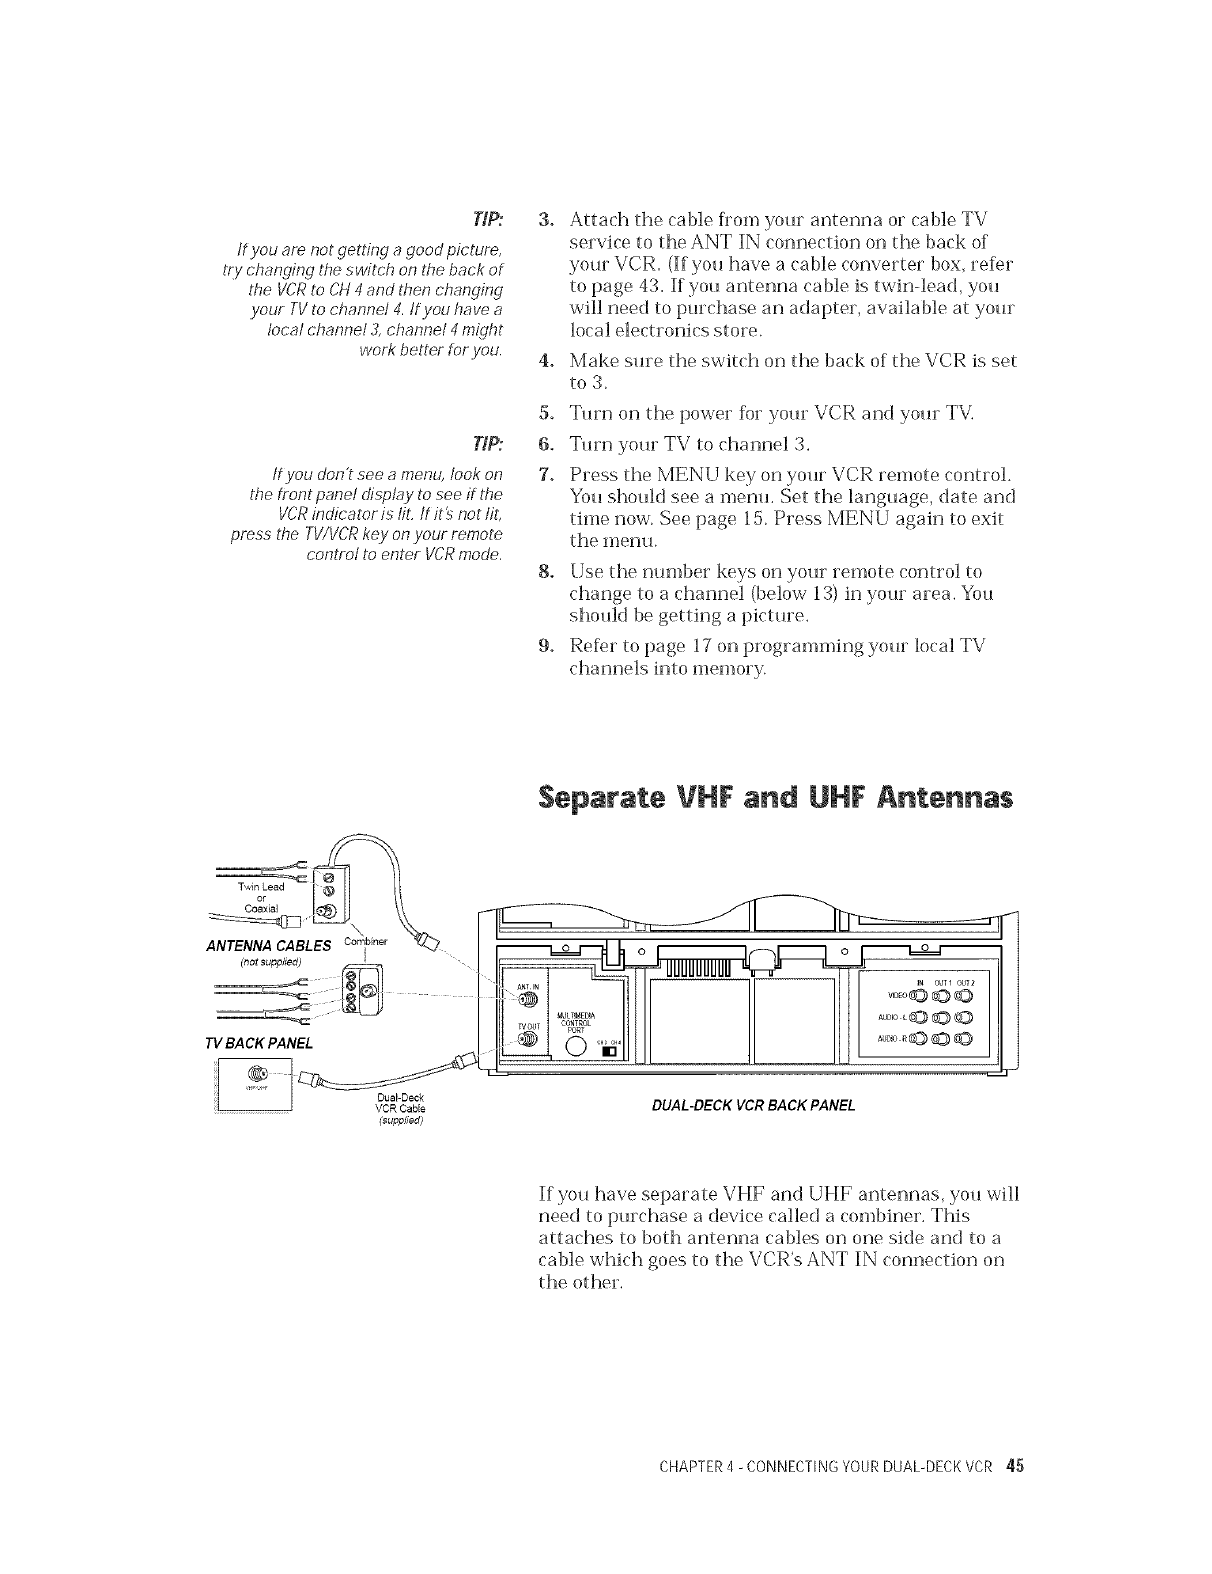
TIP:
tf you are not getting a good picture,
try changing the switch on the back of
the VCR to CH 4 and then changing
.your TVto channel 4. tf you have a
local channel 3, channel 4might
work better tor you.
TIP:
tf you don't see a menu, look on
t,be front panel display to see if the
VCR indicator is fiL lf it_ not tit,
press the TWVCR key on.your remote
control to enter VCR mode.
4.
Attach the cable fiom your antenna or cable TV
service to the ANT IN connection on the back of
your VCR. (Kyou have a cable converter box, refer
to page 43. If you antenna cable is twin-lead, you
will need to purchase an adapter, available at your
local electronics store.
Make sure the switch on the back of the VCR is set
to 3.
5. Turn on the power for your VCR and your TV.
6. Turn your TV to channel 3.
7. Press the MENU key on your VCR remote control.
You should see a menu. Set the language, date and
time now. See page 15. Press MENU again to exit
the menu.
8. Use the number keys on your remote control to
change to a channel (below 13) in your area. You
should be getting a picture.
9. Refer to page 17 on programming your local TV
channels into memory.
or
Coaxial I_ %
ANTENNA CABL biner
(not supplied) I
TV BACK PANEL
VCR CaNe
(supplied)
Separate VHF and UHF Antennas
III II
",ul II lu' 2
DUAL-DECK VCR BACK PANEL
If you have separate VHF and UHF antennas, you will
need to purchase a device called a combiner. This
attaches to both antenna cables on one side and to a
cable which goes to the VCR's ANT IN connection on
the other.
CHAPTER4 - CONNECTINGYOURDUAL-DECKVCR 45
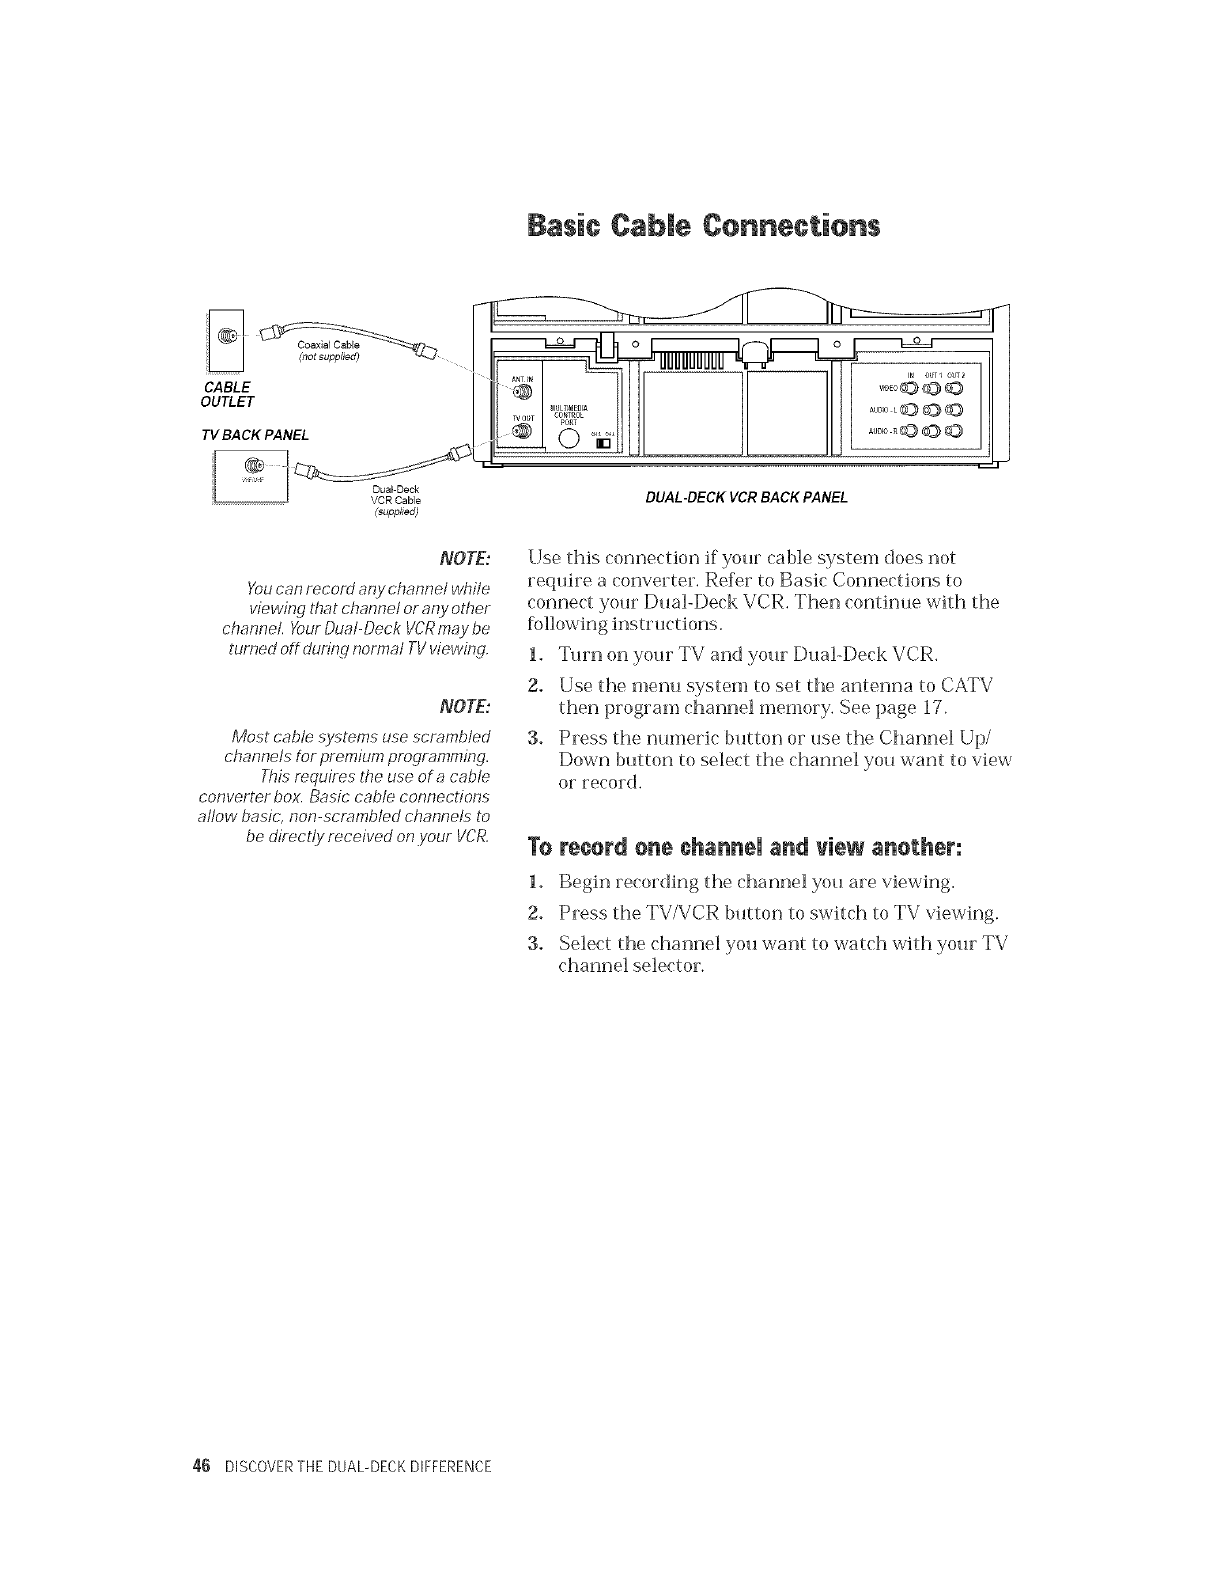
5asic CaNe Connections
CABLE
OUTLET
73/BACK PANEL
VCR Cable
(supplied)
NOTE:
Youcan record any channel while
viewing that channel or any other
channel. YourDual-Deck VCRmay be
turned otf during normal TVviewing.
NOTE:
Most cable systems use scrambled
channels for premium programming.
This requires the use of a cable
converter box. Basic cable connedions
aflow basic, non-scrambled channels to
be direct!y received on.your VCR.
DUAL-DECK VCR BACK PANEL
Use this connection if your ca ble system does not
require a converter. Refer to Basic Connections to
connect your Dual-Deck VCR. Then continue with the
1. Turn on your TV and your Dual-Deck VCR.
2. Use the menu system to set the antenna to CATV
then program channel memory. See page 17.
3. Press the numeric btJtton or use the Channel Up/
Down button to select the channel you want to view
or record.
To record one channel and view another:
1. Begin recording the channel you are viewing.
2. Press the TV/VCR button to switch to TV viewing.
3. Select the channel you want to watch with your TV
channel selector.
46 DISCOVERTHE DUAL-DECKDIFFERENCE
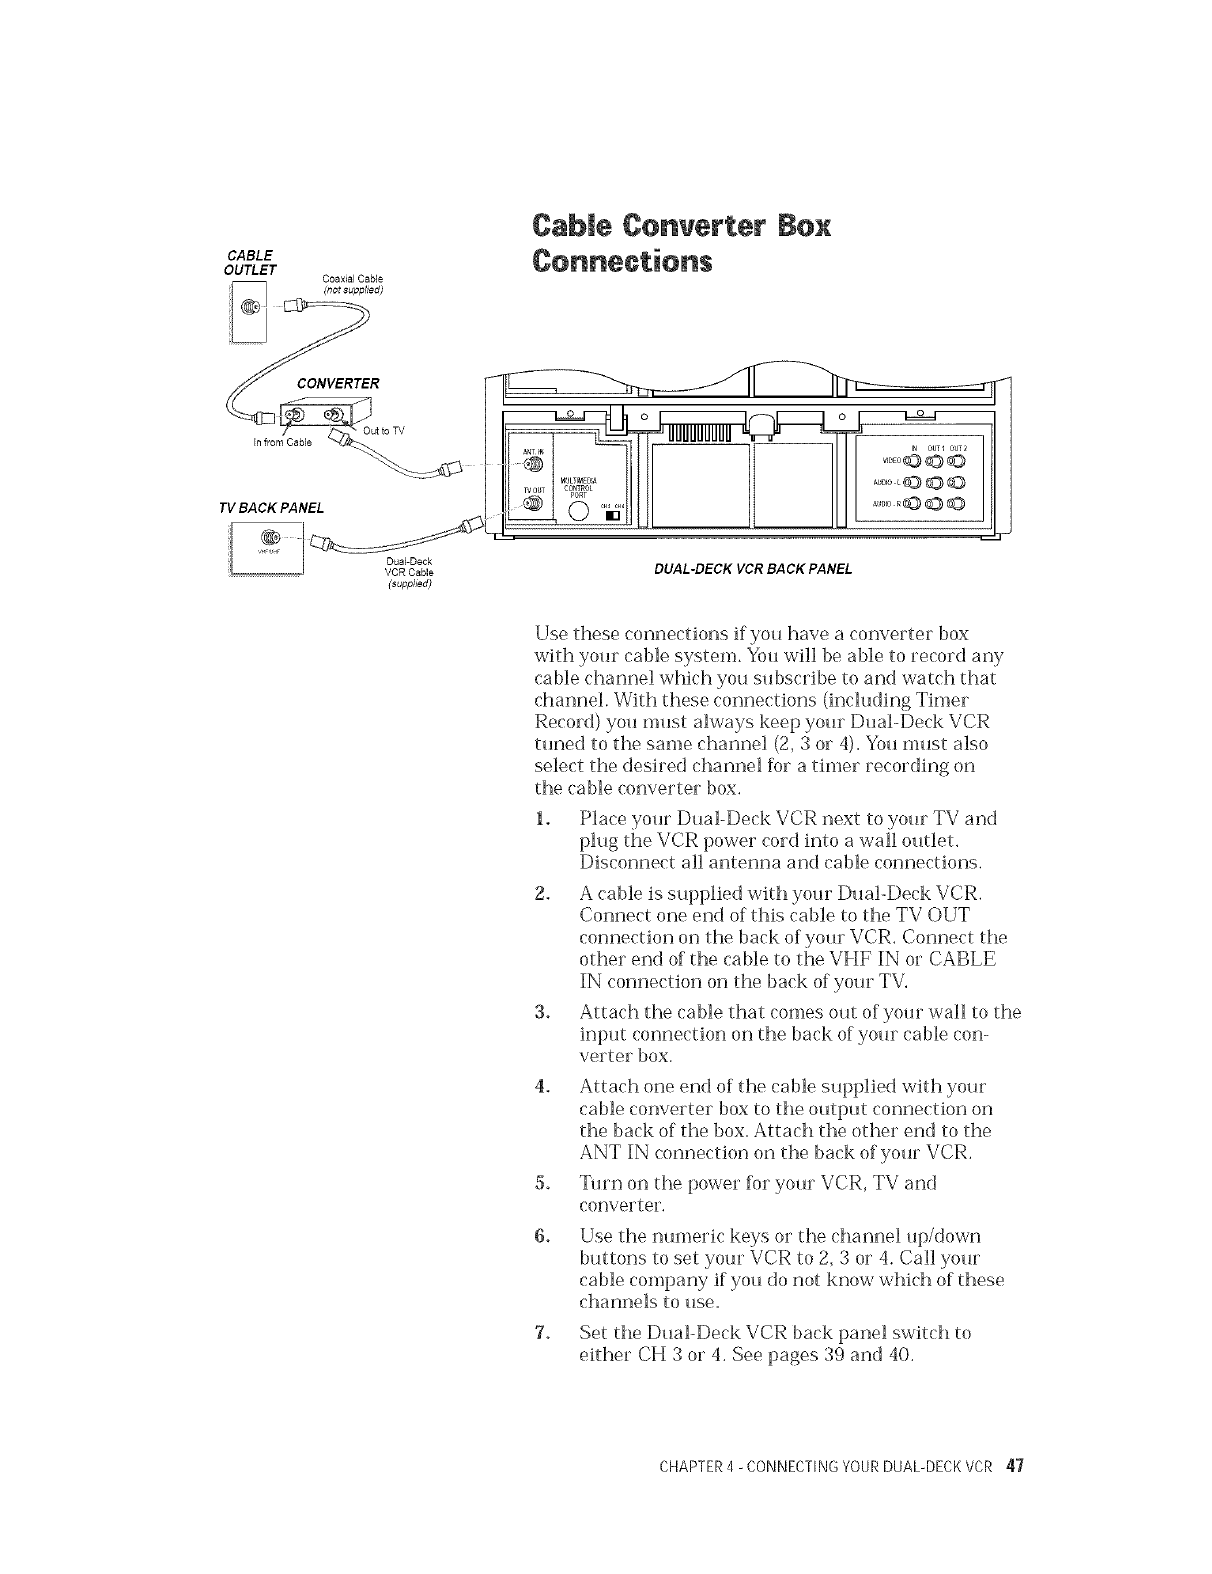
CABLE
OUTLET Coaxial CaNe
TV BACK PANEL
VCR Cable
(supphed)
CaNe Converter Box
@.................. <3© ©
WO[_T COt4'rRot
mT
DUAL-DECK VCR BACK PANEL
Use these connections if you have a converter box
with your cable system. You will be able to record any
cable channel which you subscribe to and watch that
channel. With these connections (including Timer
Record) you must always keep your Dual-Deck VCR
tuned to the same channel (2, 3 or 4). You must also
select the desired channel Dr a timer recording on
the cable converter box.
1. Place your Dual-Deck VCR next to your TV and
plug the VCR power cord into a wall outlet.
Disconnect all antenna and cable connections.
2. A cable is supplied with your Dual-Deck VCR.
Connect one end of this cable to the TV OUT
connection on the back of your VCR. Connect the
other end of the cable to the VHF IN or CABLE
IN connection on the back of your TV.
3. Attach the cable that comes out of your wall to the
_nput connection on the back of your cable con-
verter box.
4. Attach one end of the cable supplied with your
cable converter box to the output connection on
the back of the box. Attach the other end to the
ANT IN connection on the back of your VCR.
5. Turn on the power R_r your VCR, TV and
converter.
Use the numeric keys or the channel up/down
buttons to set your VCR to 2, 3 or 4. Call your
cable company if you do not know which of these
channels to use.
7. Set the Dual-Deck VCR back panel switch to
either CH 3 or 4. See pages 39 and 40.
CHAPTER4 - CONNECTINGYOURDUAL-DECKVCR 47
NOTE:
tf you don?see a menu,, took on the
front panel display to see if the VCR
indicator is fit. tf itls not fit, press the
TV/VCR key on.your remote control
to enter VCR mode.
8,
9.
Set your TV to the same channel used in step
7above.
Press the MENU key on your remote. You should
see a menu. Set the language and clock at this
time, see page 30. Press MENU again until you
10.
11.
Use your cable converter box to select a channel.
You should get a picture.
You are now ready to use your cable box with your
VCR and TV, You may want to check the TUNER
SETUP menu. The Antenna Source should be set
to TV and the Channel Memory should be set %r
the cable box channel 2, 3 or 4 only. See pages 17
and 35.
4t} DISCOVERTHE DUAL-DECKDIFFERENCE
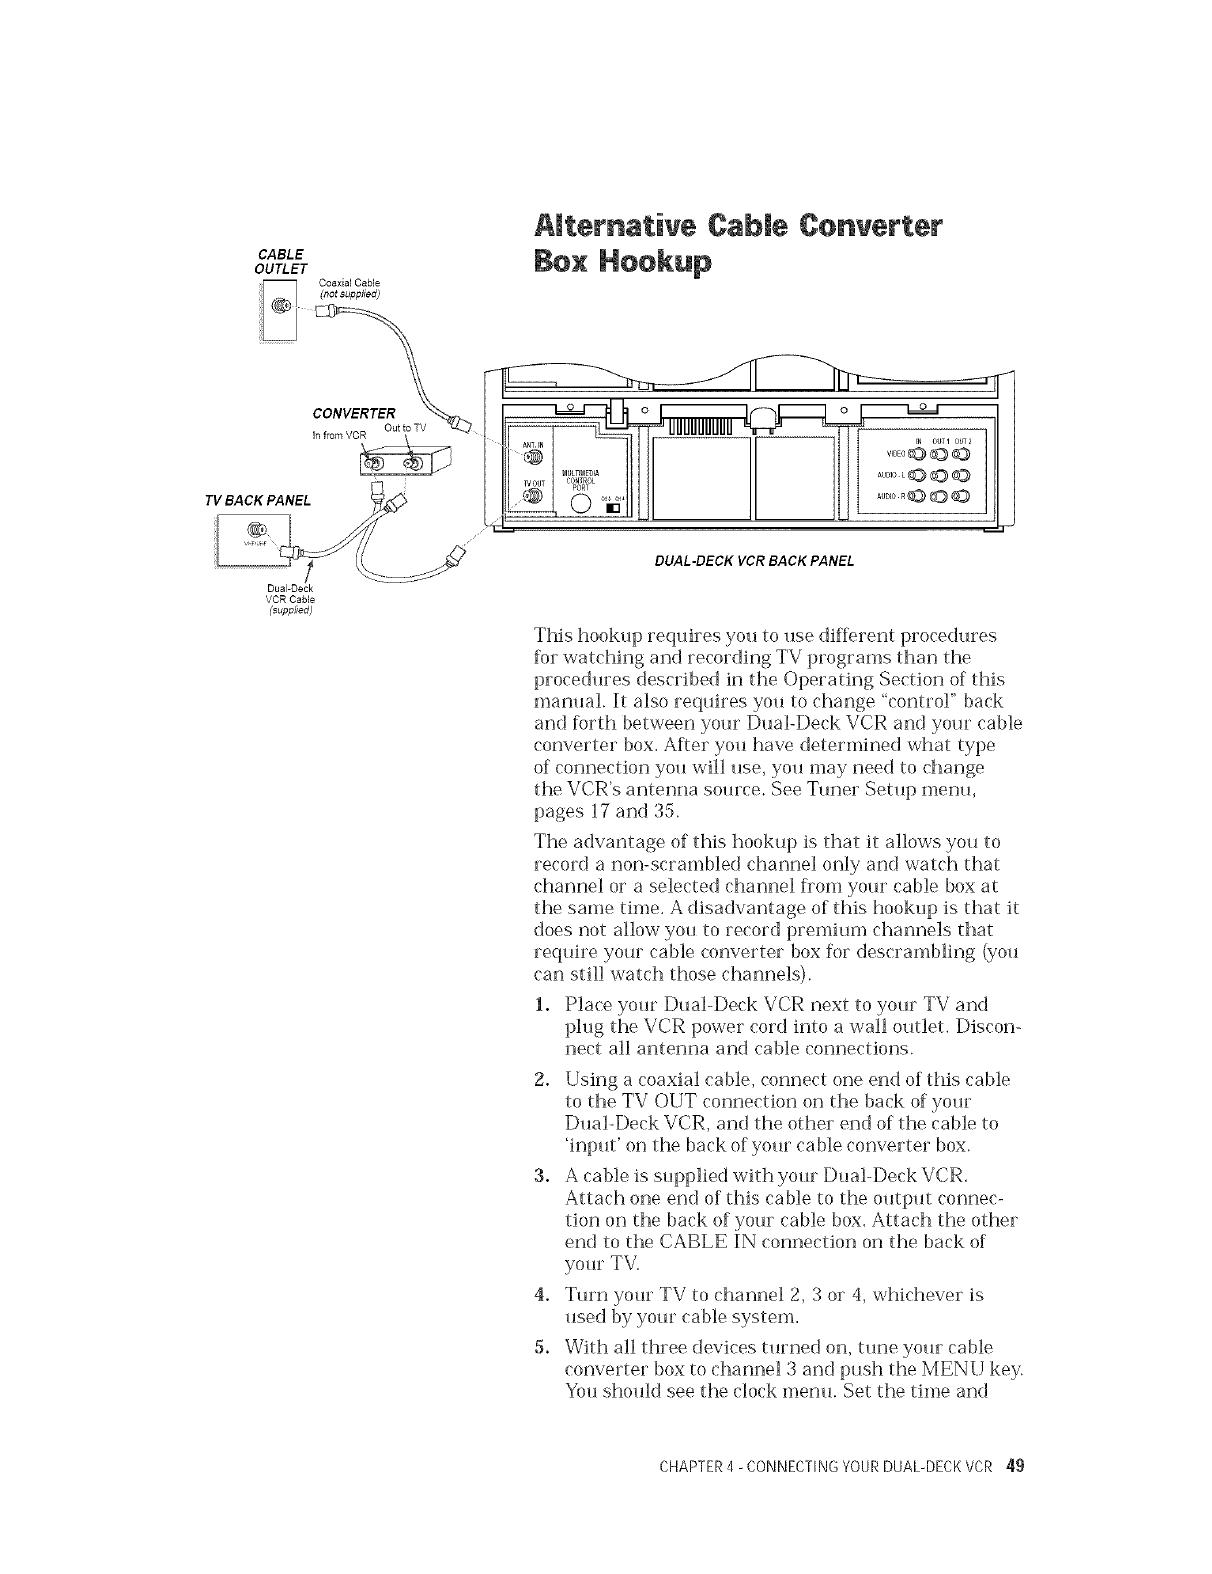
CABLE
OUTLET
Coaxial Cable
(notsupplied)
AJtemative CaNe Converter
Sex Hookup
CONVERTER
Out to TV
TV BACK PANEL
Dual-Deck
VCR CaNe
(supplied)
DUAL-DECK VCR BACK PANEL
This hookt_p reqtdres yot_ to use different procedt_res
%r watching and recording TV programs than the
procedtwes described in the Operating Section of this
mantlal. It also requires you to change "control" back
and %rth between yotJr Dt_al-Deck VCR and yot_r cable
converter box. After you have determined what type
of connection you will rise, you may need to change
the VCR's antenna source. See Tuner Setup menu,
pages 17 and 35.
The advantage of this hookt_p is that it allows you to
record a non-scrambled channel only and watch that
channel or a selected channel fiom your cable box at
the same time. A disadvantage of this hookup is that it
does not allow yot_ to record premium channels that
reqtfire your cable converter box for descrambling (you
can still watch those channels).
1. Place yot_r Dual-Deck VCR next to yot_r TV and
phJg the VCR power cord into a wall otJtlet. Discon-
nect all antenna and cable connections.
2. Using a coaxial cable, connect one end of this cable
to the TV OUT connection on the back of yotw
DtJal Deck VCR, and the other end of the cable to
'inpt_t' on the back of your cable converter box.
3. A cable is stJpplied with your Dual-Deck VCR.
Attach one end of this cable to the otJtput connec-
tion on the back of yot_r cable box. Attach the other
end to the CABLE IN connection on the back of
your TV.
4. Turn your TV to channel 2, 3 or 4, whichever is
t_sed by your cable system.
5. With all three devices turned on, tune yotlr cable
converter box to channel 3 and push the MENU key.
Yot_shotfld see the clock metal Set the time and
CHAPTER4 - CONNECTINGYOURDUAL-DECKVCR 49
6,
7.
date at this time, see page 34. Press MENU again
until you exit the menu system.
Attach a coaxial cable to the outlet in your wall and
the other end to the ANT IN connecUon on the back
of your VCR.
Use the menu System to set the antenna and
channel memory, see pages 17 and 35.
With TV/VCR on VCR and the cable box set on 3 or
4, you should see the channel that the VCR is tuned
to. With TV/VCR on TV you should see the channel
that the ('able converter box is tuned to.
To view any basic or premium ¢harmeh
1. Set your Dual-Deck VCR's TV/VCR selector to TV
(or turn off your VCR).
2. Set the TV to channel 2, 3 or 4, whichever is used
by your ('able system box.
3. Select the desired channel to view on the cable
converter box.
To record and view a basic channel:
1. Set the TV/VCR selector to VCR on your Dual-Deck
VCR.
2. Set the TV to channel 2, 3 or 4, which ever is used
by yore' cable system box.
3. Set the cable box to channel 3 or 4, whichever is
used as yore VCR output.
4. On the Dual-Deck VCR, select the desired channel
to view. Start the recording (see page 22).
To record a basic channel while watching any
other basic or premium charmeh
1. Set the TV?VCR selector to VCR on your Dual-Deck
VCR.
2. Set the TV to channel 2, 3 or 4, whichever is used
by your cable system.
3. Set the cable box to channel 3 or 4, whichever is
used as your VCR output.
4. Set the Dual-Deck VCR to the basic channel you
wish to record. Start the recording (see page 22).
5. Set the TV/VCR selector on the VCR to TV.
g. Select the basic or premuim channel on the cable
box and watch it on your TM
50 DISCOVERTHE DUAL-DECKDIFFERENCE
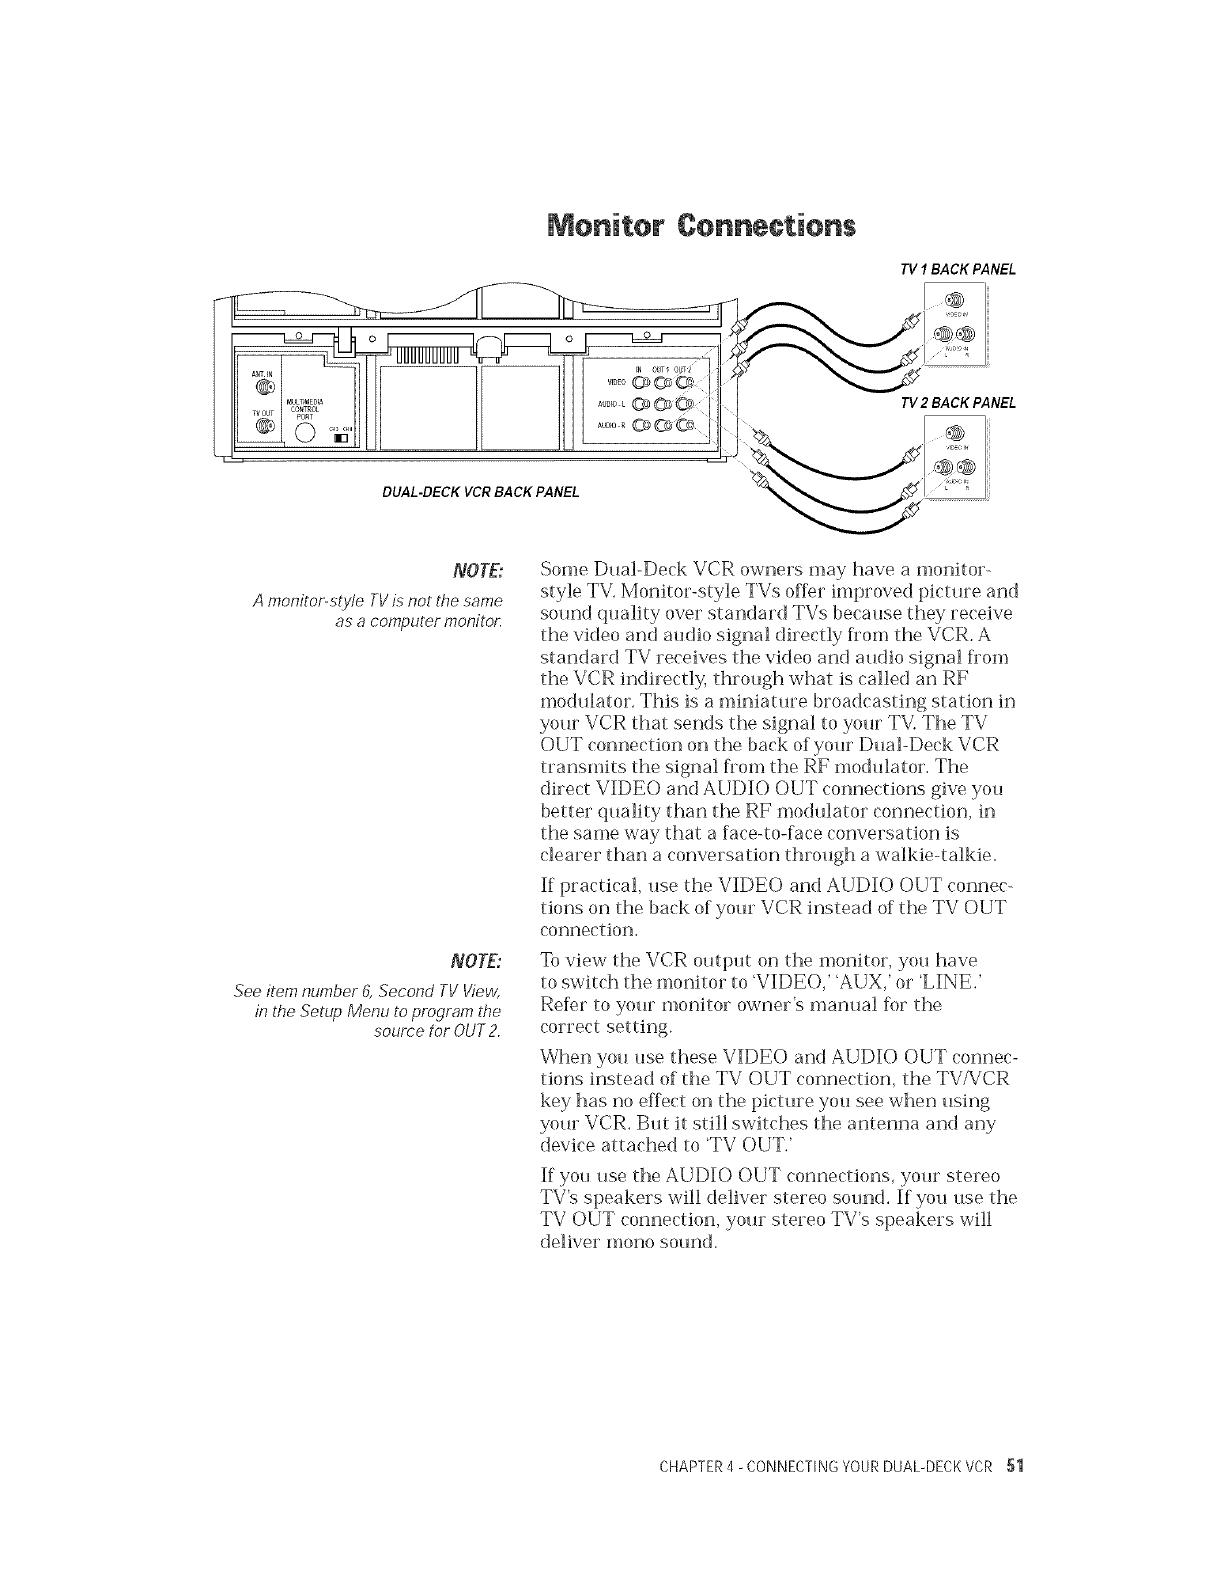
Monitor Connections
TV 1BACK PANEL
TV 2BACK PANEL
DUAL-DECK VCR BACK PANEL
NOTE:
Amonitor-style TYis not the same
as a computer monito_
NOTE:
See item number 6, Second TVView,
in the Setup Menu to program the
source for OUT2.
Some Dual-Deck VCR owners may have a monitor-
style TV. Monitor-style TVs offer improved picture and
sound quality over standard TVs because they receive
the video and audio signal directly fiom the VCR. A
standard TV receives the video and audio signal fiom
the VCR indirectly, through what is called an RF
modulator. This is a miniature broadcasting station in
your VCR that sends the signal to your TV. The TV
OUT connection on the back of your Dual-Deck VCR
transmits the signal from the RF modulator. The
direct VIDEO and AUDIO OUT connections give you
better quality than the RF modulator connection, in
the same way that a face-to-face conversation is
clearer than a conversation through a walkie-talkie.
If practical, use the VIDEO and AUDIO OUT connec-
tions on the back of your VCR instead of the TV OUT
connection.
To view the VCR output on the monitor, you have
to switch the monitor to 'VIDEO,"AUX,' or LINE.'
Refer to your monitor owner's manual R)r the
correct setting.
When you use these VIDEO and AUDIO OUT connec-
tions instead of the TV OUT connection, the TV/VCR
key has no effect on the picture you see when using
your VCR. F_ut it still switches the antenna and any
device attached to TV OUT.'
If you use the AUDIO OUT connections, your stereo
TV's speakers will deliver stereo sound. If you use the
TV OUT connection, your stereo TV's speakers will
deliver mono sound.
CHAPTER4 - CONNECTINGYOURDUAL-DECKVCR 51
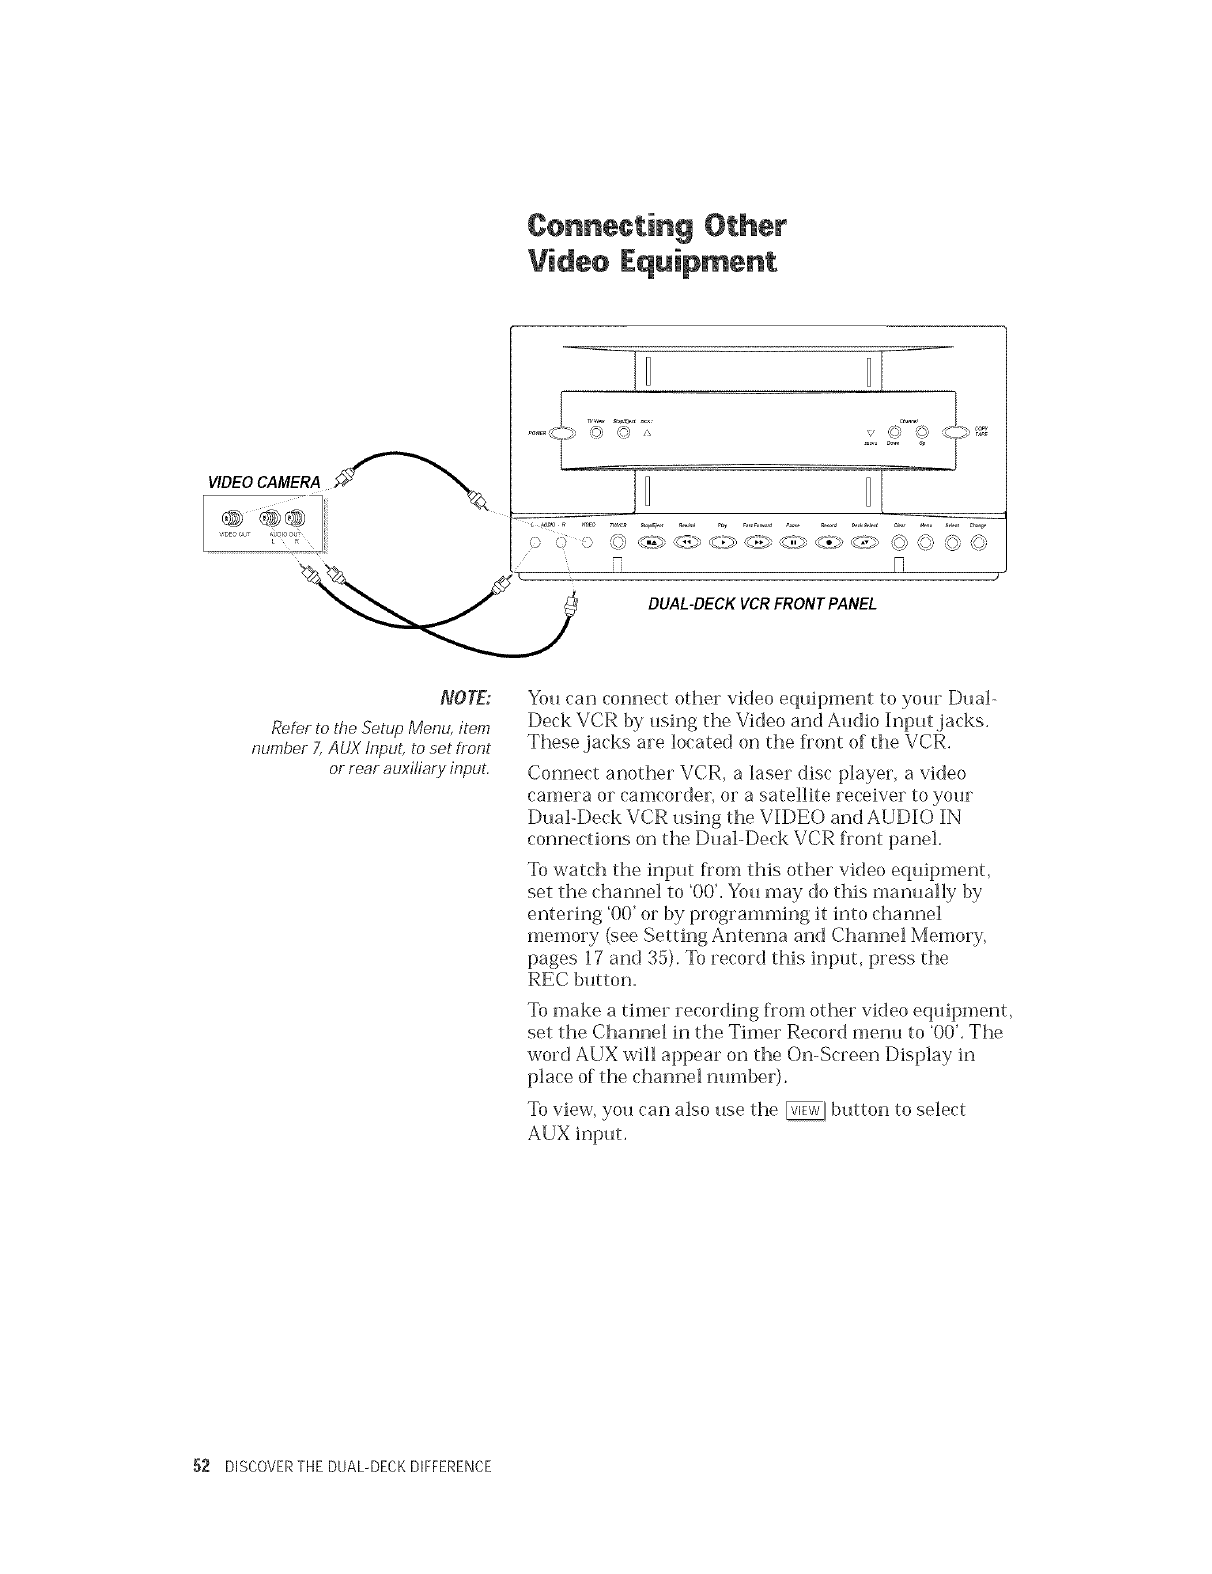
Connecting Other
Videe Equipment
DUAL-DECKVCRFRONTPANEL
NOTE:
Refer to the Setup Menu, item
number 7, AUX input, to set tront
or rear auxi/iary input,
You can connect other video equipment to your Dual-
Deck VCR by using the Video and Audio Input jacks.
These jacks are _ocated on the fiont of the VCR.
Connect another VCR, a laser disc player, a video
camera or camcorder, or a satellite receiver to your
Dual-Deck VCR using the VIDEO and AUDIO IN
connections on the Dual-Deck VCR front panel.
To watch the input from this other video equipment,
set the channel to 00'. You may do this manually by
entering '00' or by programming it into channel
memory (see Setting Antenna and Channel Memory,
pages 17 and 35). To record this _nput, press the
REC button.
To make a timer recording from other video equipment,
set the Channel in the Timer Record menu to 00'. The
word AUX will appear on the On-Screen Display in
place of the channel number).
To view, you can also use the @ button to select
52 DISCOVERTHE DUAL-DECKDIFFERENCE
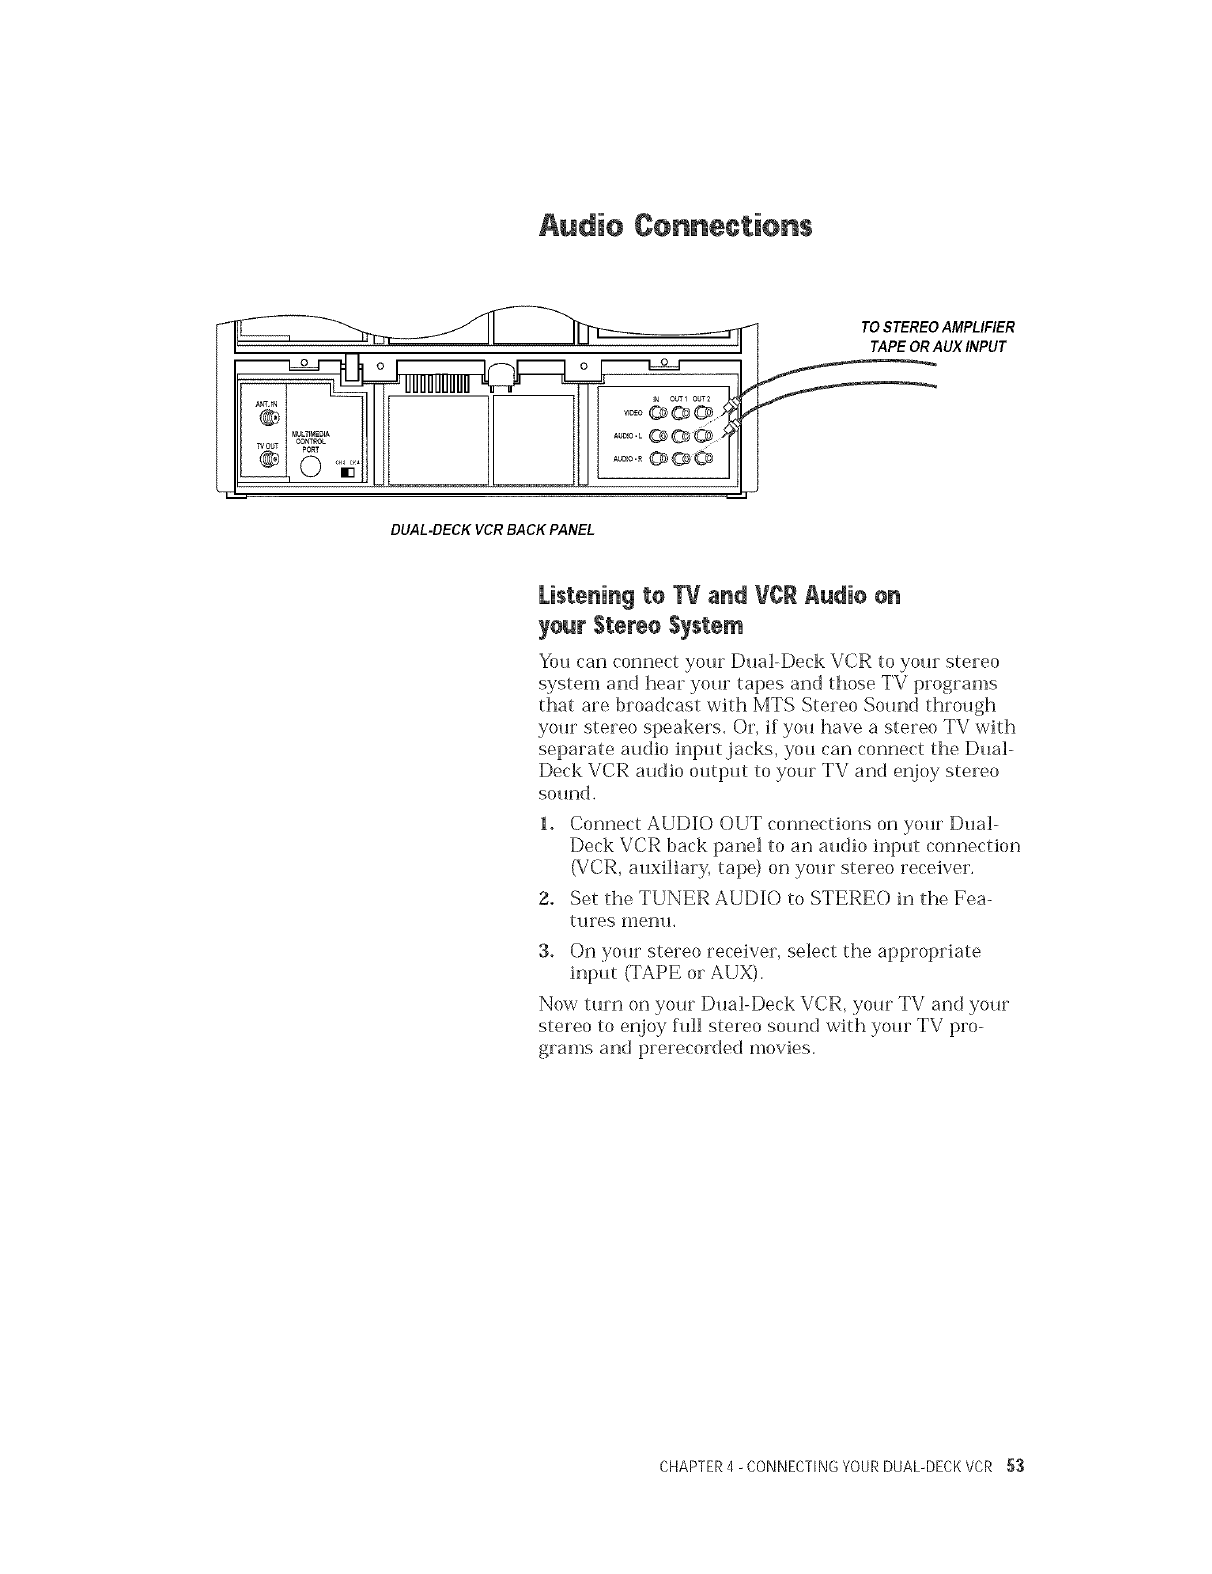
Audio Connections
_LTIME:_A
DUAL-DECK VCR BACK PANEL
TO STEREOAMPLIFIER
TAPEORAUX INPUT
Listening to TV and VCR Audio on
your Stereo System
Yo_Jcan connect yo_Jr D_Jal-Deck VCR to yo_Jr stereo
system and hear yo_Jr tapes and those TV programs
that are broadcast with MTS Stereo So_md thro_Jgh
yo_Jr stereo speakers. Or, if you have a stereo TV with
separate m_dio input jacks, you can connect the D_Jal-
Deck VCR audio output to your TV and enjoy stereo
sound.
1. Connect AUDIO OUT connections on your Dual-
Deck VCR back panel to an a_Jdio input connection
(VCR, auxiliary, tape) on your stereo receiver,
2. Set the TUNER AUDIO to STEREO in the Fea-
t_Jres metal
3. On yotJr stereo receiver, select the appropriate
input (TAPE or AUX).
Now turn on your D_Jal-Deck VCR, your TV and your
stereo to enjoy fifil stereo so_md with your TV pro-
grams and prerecorded movies.
CHAPTER4 - CONNECTINGYOURDUADDECK VCR 53
Computer Contro| Port
ControUYour DuabDeck from Your Computer
Your VCR has a multimedia control port that will
allow you to control your Dual-Deck from your IBM or
compatible PC (personal computer). This requires an
optional hardware interface and software package
which is available directly from Go-Video. Complete
connection and operating instructions are included in
that package. For additional inf_rmation, please
contact our customer service staff at 602-922-0896
(Mon. thru FrL 8 am-4 pm MST) or send your inquiry
via E-Mail (custsvc@govideo.com).
54 DISCOVERTHE DUAL-DECKDIFFERENCE
X
m
W
_L
PUacementof Your DuaU.DecRVCR
o
o
o
Placeyour Dual-DeckVCR withinthreefeet,(to
use thes_ppliedcable)butnoton topofyourTV.
Placeyour Dual-DeckVCR ina horizontal
positiononly.
Do notplaceyo_JrDual-DeckVCR inextremely
hot,cold,humid ordtJstyplaces.See Environment'
in the Technical Specifications section of this
Guide f_r specifications.
Do not place your Dual-Deck VCR near appliances
with electric motors.
Do not put anything on top of your Dual-Deck
VCR. Keep liquids and food away from your
Dual-Deck VCR.
CUeaningthe DuabDeck VCR Cabinet
Dust the s(Mace (Jsing a soft cloth_ Use the (hJsting
attachment of your va('mm_ occasionally to remove
dust from the ventilation holes on the side.
CUeaningthe Video Heads
Your' new Go-Video Dual-Deck VCR features a
built-in video head cleaner, and was designed and
engineered to give you many years of trou ble-ffee
operation. However careful maintenance of your
Dual-Deck VCR's video heads will still be required
to assme you of continued clear video image quality.
Video tape naturaliy degrades over time and with _Jse.
When you play a video tape on yo_Jr VCR, it deposits
small amounts of dirt and oxide (a chemical used in
the manufacture of video tapes,) on your VCR's video
tape heads. Your Dual-Deck VCR's Automatic Head
APPENDIX A- CAREOF YOURDUAL-DECKVCR 55
NOTE:
DO NOT attempt to open your Dual-Deck
VCR and clean the video heads yourselL
Cleaning by any other means than a
head-cleaning tape or trained
protessionat wilt void your warmn(y
Cleaner will catch normal residue, but with heavy
VCR use, or the playing of old, well-used or damaged
video tapes, the accumulation of dirt over time will
cause blurs or streaks in the video and video copy
image. It left unchecked this dirt build-up can also
eventually degrade or even ruin the video tape heads
To avoid unnecessary repair service charges and
maintain your Du al-Deck VCR's qu ality video image
and copy performance, we recommend that you:
*Use only high-qualityvideo tapes.
. Periodically clean the Dual-Deck's video heads at
home with a quality wet', non-a brasive head-
cleaning tape. (Tape head cleaners look like blank
tapes. Wet head-cleaning tapes require that you
add a liquid cleaning agent before you insert them
into your VCR. Dry head-cleaning tapes are
abrasive and may cause wear on heads.)
. With heavy rental tape use, you should consider
scheduling an annual proDssional video head-
cleaning (and replacement of the Du al-Deck's
Automatic Head Cleaner) at your local authorized
Go-Video service center.
Care ef Videetapes
Do not expose tapes to direct sunlight, extreme heat or
extreme cold. Do not disassemble any cassette. Do not
touch the tape. Rewind tapes after use and store in
protective cases. Remove the record safety tab to
prevent recording over previous recordings.
Humidity Requirements
If your Dual-Deck VCR is suddenly moved flom a cold
to a warm place, moisture may fibrin inside the unit.
Be[i_re operating, allow at least 2 hours after plugging
in the power cord for your Dual-Deck VCR to dry
completely. Failure to do so may cause damage to
your Dual-Deck VCR and the tape. See Environment'
in the Technical Specifications section of this Guide
for specifications.
56 DISCOVERTHE DUAL-DECKDIFFERENCE
Servke and Warranty
Never open yore Dual-Deck VCR cabinet or touch the
inside pa_ts. To do so is dangerous and may cause
damage. Do not try to disassemble yore Dual-Deck
VCR - there a*e no use>serviceable pa*ts inside.
Se*vicing of yore Dual-Deck VCR should be done by an
authorized service center. For service inR_rmation, see
the Custome* Se*vice and Wa*Tanty section of this
guide, on page 71.
EnergyConservation
Save energy. If you will not be using yore Dual-Deck
VCR for a long pe*iod of time, tmpfug the
efect,icaf cord.
ShippingYourDuabDecR VCR
Ca,efuffy pack yore Dual-Deck VCR in the original
packing materials and ca*ton for shipping.
APPENDIX A- CAREOF YOURDUAL-DECKVCR 57
58 DISCOVERTHEDUAL@ECKDIFFERENCE
X
m
w
_L
ACTIVE DECK
ALWAYS
AMERICHROME COPY
ATR
AUDIO COPY INSERT
AUTO
CATV
CH MEMORY
CLEAR
CHANNEL
COUNTER
COPYTAPE
CTR
The deck you have control of To see which deck that
is, look at the LEDs on the front panel of the VCR.
Use the Deck Select key to control which deck
is active. Green : Deck One and Red = Deck Two.
A Timer Recording Event which starts every day of the
week (Sunday - Saturday).
Special circuitry which gives particularly high quality
tape duplication, This is also called HQ Copy.
Auto tracking. Automatically adjusts the tracking for
better picture q_lality. Pressing the PLAY key for 1.5
seconds initiates this feature.
The ability to record new audio flom the audio input
.jacks on the flont panel when copying a tape.
A preset automatic f>ature.
Cable television channel assignments.
During At, to Programming, in the Ttmer Setup
menu, the VCR selects the channels it can tune in, to
add to the channel list used.
A button on the remote control which allows you
to clear programming entries in the Timer Recording
menu. It also resets the counter to zero for the
active deck,
Two buttons on the remote control and on the front
panel which allow you to change to the next higher or
next lower channel. If you use these buttons, the VCR
will only stop at the channels you have programmed
into Channel Memory in the Tuner Setup menu.
A display that describes the relative position of the
tape in hours, minutes and seconds.
A key that initiates the duplicating of a tape in Deck
One to a tape in Deck Two.
The counter key on the remote control.
APPENDIX B-GLOSSARY 59
DAILY
EVENT
FF
HI-FI
HQ COPY
INDEX
LCV
LOOP PLAY
LOOPRECORD
MENU
MUTE
OSD
A Timer Recording Event which starts every weekday
(Monday - Friday).
A particular television program which is programmed
to be recorded in the Timer Recording menu.
Button on the remote control and on the fiont panel
which will fast forward your tape. Press while the
active deck is stopped to fast %rward the tape. Press
while a tape is playing to fast forward while viewing
the pkture. Press again while a tape is playing to
speed tap pkture scan.
This indicator on the front panel display will be on
when a tape wRh HiFi Audio is playing (if HiFi
Audio is turned on - Deck One or Deck Two menus).
Synchronizes the decks fbr optimmn copying quality.
A button on the remote control which allows you to
begin an Index Scan or an Index Search. This can be
done either when the deck is playing or is stopped. If
you press this button during record an index mark will
be placed on the tape. An Index Mark is also automati-
cally placed on a tape every time you begin recording
from stop or sync edit.
Last Channel Viewed. If you have a certain channel
you want to come back to easily, enter it using the
numerkal keys. Then you can look at other channels
and easily return to this channel by pressing this
button on the remote control.
You can start a tape in either deck and when it
finishes playing, a tape in the other deck automati-
cally starts playing; when that tape finishes, the tape
in the first deck will start playing and so on. See
Playback Mode in the Features menu.
In Loop Record, the deck will record until it reaches
the end of the tape, then rewind automatically and
Press this button on the remote control to enter, save
and exit the On-Screen Menu System.
Press this button on the remote control to turn off the
audio (sound). Press again to turn the audio back on.
This will not eff)ct recording.
A button on the remote control which will m anu ally
summon the On-Screen Display. Press again to turn
the display off. Press again to show OSD with date
and time in%rmation. Refer to the Setup menu fbr
programming whether this display automatically
con]es on or not.
6_} DISCOVERTHE DUAbDECK DIFFERENCE
OTR
PAUSE
PLAY
POWER
RECORD SAFETY TAB
REW
SAP
SLOW
SP, LP, EP
One _fbuch Recording. Each time you press REC after
the first time, yotJ add 30 minutes to the record time.
For Loop Recording on the same tape (see page 22),
press tmtil you see 9 rain. 30 sec. on fiont panel
display; then press once more.
Press this button to temporarily stop a tape while
playing (still) or recording (pause). It you leave Pause
on fl)r 5 minutes, the VCR will automatically begin to
play to prevent tape damage.
Press to play the tape in the active deck. Press and
hold 1.5 seconds for ATR.
Press on either the remote control or the Dont panel
of the VCR to turn your Dual-Deck VCR on and off,
The indicator light is on when the VCR is on and off
when the VCR is off. If the POWER key is pressed
while timer recording, copying a tape or rewinding,
the power light will blink. This indicates that the VCR
is in a power-off mode and that when the current ftmc-
tion is complete, the VCR will automatically turn off.
VHS tapes have a record saDty tabs to protect you
fiom accidentally recording over your tapes. You
break this tab off to prohibit recording. If you later
wish to record on that tape, you can put a small piece
of tape over the opening.
Press this button on the remote control while the
active deck is stopped to rewind the tape. Press while
the tape is playing to rewind while viewing the
picture. Press again while a tape is playing to speed
up picture rewind.
Secondary Audio Program. This indicator on the fiont
panel will be on if the TV program being broadcast
has a Secondary Audio Program signal. This audio
can be selected via the tuner audio selection in the
Tuner Setup menu.
You can start a tape in Deck One and when it finishes
playing, a tape in Deck Two will automatically play.
See Playback Mode in the Features menu.
Pressing these buttons slows the speed the tape is
playing. Successive pressing of the _] key on the
remote control steps tip the speed of the tape. Succes-
sive pressing of the _, key on the remote control
slows down the speed of the tape. Press PLAY to
resmne normal speed.
This indicator on the fiont panel display shows the
tape speed fl_r the selected deck. Ifyou are playing a
tape, the tape speed is the speed at which the tape was
recorded. If you are recording, you can set the tape
speed - see Record Speed in the Deck Two menu.
APPENDIX B-GLOSSARY 61
STOP/EJECT
TRACKING
TUNER
TV/VCR
VIEW
VCR
WEEKLY
ZERO RETURN
Press this button on the remote control to stop the
tape in the active deck. Press again to eject a
stopped tape.
Occasionally, when you play a tape that was recorded
on a different VCR or camcorder, white streaks
appear if the recorded tracks do not align precisely
with the playback heads on the VCR. Pressing the
Tracking buttons on the remote control allows you to
manually adjust the tracking while playing a tape.
Device used to receive signals coming into your
television which selects the one channel you want to
watch flom all the diflerent channels which you
have available. The Dual Deck VCR has a 181 channel
tuner. See pages 17 and 35 %r a detailed explanation.
Press to switch control of the picture between the TV
and the VCR. This is the antenna switch. When set to
TV, the antenna signal goes directly to the TV bypass-
ing the VCR; when set to VCR, the antenna signal
goes through the VCR. When the VCR power is off,
it is the same as TV mode.
The signal chosen to be seen on the TV or monitor
(Deck One, Deck Two, Tuner, AUX).
This indicator will be on when the VCR is in VCR
mode and off when the VCR is in TV mode.
Weekly Timer Recording Event which repeats every
seven days at the same time,
From stop, press this button and the currently active
deck will %rward or return to counter time (00:00:00)
and stop.
62 DISCOVERTHE DUAL-DECKDIFFERENCE
X
m
W
_L
"i'm not getting apicture/'
Make sure that the TV/VCR selection is set to VCR.
(Is the VCR icon on the front panel display on?) You
('an select TV/VCR flom the remote control or use the
button on the flont panel of the VCR. Also make sure
your TV is set to the same channel (3 or 4) as the
switch on the back of yore VCR.
If using Audio/Video out jack on the VCR, make sme
the TV is set to Line/AUX/AV in.
"The picture is bad/'
If the picture is bad while watching the VCR and your
TV is set to channel 3 or 4 (see above), try a(Ousting
the fine tuning on your TV. Or try changing the
output channel of the VCR (if set to 3 change to 4,
and if set to 4 change to 3). Then make sure your TV
is set to the same channel.
If the picture is bad while watching TV on a channel
(as opposed to watching the VCR with the TV set on
channel 3 or 4), make sure the VCR is in TV mode.
If the picture is bad while playing a tape, try a(0ust-
ing the tracking control. Use the ATR (Automatic
Tracking) button or the TRACKING _! keys
on the remote control. Or, the video heads might
be dirty; try cleaning the heads with a non-abrasive
head cleaning tape. Remember, you ('an always
check to make sure the tape is OK by playing it in
the other deck.
See the Poor Video Quality' troubleshooting flow chart
on page 62.
APPENDIX C- HELP-COMMONLYASKED QUESTIONS 63
"l can't record from my TW'
"l can't timer record/'
When the VCR is in VCR mode and your TV is set
to channel 3 or 4, you should be able to view the
desired channel on your TV. If you have a cable
converter box, make sure the VCR is tuned to the
cable converter box output channel.
Make sure that your Dual-Deck VCR's clock is set to
the proper time. Double check the AM/PM setting. If
you have a cable converter box, make sure the timer
record channel setting in the TIMER RECORD menu
is set to the cable converter box output channel (2, 3
or 4) and the cable box is set to the channel you want
to record.
"My remote ¢ontrN isn't worRing."
There are several things which could cause yore
remote control not to function properly. First, make
sure you are aiming the remote control directly at the
VCR. Make stlre there are no obstacles between the
remote control and the VCR so the 'beam' is not
obstructed. Also, the signal fl'Oil* the remote can be
obstructed if a very strong light source, such as
sunlight, falls on the front panel of the VCR. Finally,
make sure the batteries in yore remote control are
fresh and installed properi>
"When 1use Cepy Tape, my tapes are reeerded at
aspeed ether than what was set."
In the COPY TAPE menu, check to see if Speed
Matching is on. When this feature is on, the recording
speed of a copy will be set to the speed of the somce
tape. If you want to change the speed at which the
tape is being copied, turn this _eature off.
"When 1use ¢epy Tape er put a tape
inte reeerd, the tape ejects."
Make sure there is a Record Safety Tab on your tape.
If the tab is missing, yolJ can place a small piece of
transparent tape over the hole. This will allow you to
copy or record onto the tape.
64 DISCOVERTHE DUAL-DECKDIFFERENCE

"Sometimes the tape begins to Nay or
rewind when l don't want it to/_
This Dual-Deck VCR can automatically play a tape
(with no record safety tab in place) whenever you load
it, and it will automatically rewind the tape when it
reaches the end. AUTO PLAY/REWIND can be turned
on or off via the AUTO PLAY/REWIND selection in the
SET UP menu.
Also, when EZ COPY in the FEATURES menu is on,
both decks will automatically rewind befi_re recording
when you start a copy tape procedure. This process can
be disabled by pushing the STOP key on Deck Two.
"Ny On°Screen Display hasa message
that says ERROR."
This means the VCR has had difficulty with the tape
mechanism. To reset, turn the power off and then on
again. If this does not clear the error, unph_g the VCR
fiom the wall outlet and inspect both tape slots %r
%reign o_ects, orjammed or crooked tapes. If this
does not help, constflt a service center.
"Ny VCRdoesn't worR/'
A strong static electricity shock or other un%reseen
circumstances can cause the control system of your
Dual-Deck VCR to lock _@.To reset the control system,
first unpfiJg the power cord from the wall outlet %r 20
seconds and phJg it in again. If this doesn't restore all
operations to normal, _mplug it again 10r 15 minutes.
You will then need to reset the clock (if the clock is still
set, you haven't unplugged it long enough). If these
steps do not correct the problem, the Dual-Deck VCR
must be serviced by an authorized service center.
"Why aren't the Counters moving?"
If the VCR is playing an unrecorded or blank tape, the
counter cannot operate. The VCR relies on the control
track that is always recorded on to the video tape to
provide counter in%rmation.
APPENDIX C- HELP-COMMONLYASKED QUESTIONS 65
"Why can't I get a Menu or an On°Screen DispUay?"
If" the VCR is playing an unrecorded or blank tape,
the VCR cannot produce on-screen data to be dis-
played. Stopping the tape, or recording on it, will
allow the on-screen display to resmne.
See the No Menu is Visible' troubleshooting flow chart
on page 61.
"Why do I get ablue screen?"
If the VCR's tuner cannot receive a normal synchro-
nized signal, it will put a blue screen in its place.
Double check your antenna connections.
"The Power indicator is blinking."
Your Dual-Deck VCR is in Auto Power Off mode. If you
press the power button while rewinding a tape, timer
recording, One-Touch recording, copying a tape, or
using EZ-Copy, your VCR will automatically turn off
when that flmction is completed. Repeatedly pressing
the power button will turn Auto Power mode on and off.
"Copy on the Front Panel DispUayis blinking."
Any pause (interruption) in the Copy Tape process
will cause this button to blink. See Sync Edit,
page 27.
66 DISCOVERTHE DUAL-DECKDIFFERENCE
No Menu is Visibme
Is the VCR On?
4
Arethe batteries
properlyinstalled
in your remote
control, and
are they fresh?
YES
5
UsingtheTVremote,
selectCH3
andpushtheVCR
menubutton.Is
themenuvisible?
]YES
Problemsolved!
Enjoy!
NO
NO
2
Pleaseturn the
VCR "Off",
wait 5 seconds,
turn it back "On"
3
Pushthe menu
button Is the
menu visible?
r.--_-_Es> Problemsolved!
Enjoy!
6
UsingtheTVremote,
selectOH4 Is I _>
themenuvisible? I
t
T
Youmayhavea
weakvideereception_>
signal.Tuneto a
strongerstation
Isthemenavisible?I
8
Verifythat the VCR
andcablingare
connectedto theTV
repeatthesteps Is
the menuvisible?
INO
10
Contactyour
authorizedGo-Video
ServiceCenter
or Go-VideoDirect
at (602)922-0896.
YES
i1'
UsingtheTV
remote,activatethe
_"_ 'AUX_or"Line'
YES (Vid)in/out Pushthe
VCRsmenubutton
Isthemenuon?
12
Contactyour
authorizedGo-Video
ServiceCenter
orGo-VideoDirect
at (602)922-0896
APPENDIX C- HELP-COMMONLYASKED QUESTIONS 67
Poor Video Quality
YES
2a
TurntheVCR"On"
Tunethe TVto CH3 <_,,_"_'_'_
or4 to matchthe
VCRoutputchannel
UsingtheVCR
remote,depressthe
display(DSP)key
YES
3a
,sthe --._.O>
OSD present?
YES
5a
Playatapein
DeckOne.Is the _/
videoOK?
8a
Playa tapein
DeckTwo. Isthe _z-
videoOK?
11a
Changechannels
usingthenumber "_'--7/"
buttonson the
VCRremote,is the
pic urequaiiy OK?
YES
3b
Re-connectthe
cableorantennato
the'Ant Input'of
the VCR
4a
Contactyour
authorizedGo-Video
ServiceCenter
orGo-VideoDirect
at (602)922-0896
6a
Usinga quality,
commercialtape
headcleaner,dean
thehead Bthe
picturequalitygood?
9a
Usingaquality,
commerdaltape
headcleaner,dean
thehead Bthe
picturequalitygood?
12a
ffyou areusingan
outsideantenna,the
gaincouldbe
marginal,thentry
purchasinga
signalamplifieror
if CATV,callyour
cablecompany
Nol
Try connectingthe
"<yE<"_S antennadirectlyto I
the TV Isthe
picturegood? I
4b
Checkforlooseor
faultycaningand
repairorreplace
asnecessaryIsthe
picturesill aproblems
7;I
Contactyour
N'_O _> authorizedGo-Video
ServiceCenter
orGo-VideoDirect
at (602)922-0896
lOa
Contactyour
N'_'_O _> authorizedGo-Video
ServiceCenter
orGo-VideoDirect
at (602)922-0896
5b
,,_/ ContactyourTV
YES-- servicecenteror
cablecompany
Note:
Checkyour video
tape by playing it on
both decks. If the
video is not good in
ei@er deck, the
tape maybe bad.
68 DISCOVERTHE DUAL-DECKDIFFERENCE

Connecting Yeur VCR to Yeur TV,
Menitor er Steree System
lYES NO
2
Doyouwanttolisten
inStereoordoyou
wantthebestquality
videotransfer
betweenyourVCR
andiV?
4
Doyouwantto
useaStereoor
SurroundSound
AudioSystem?
6
UseRCACablesto
connecttheAudio
OutputsoftheVCR
totheStereo/Surround
System.Connectthe
VideoOutputsofthe
VCRtotheVideoIn
ontheTV,andfrom
theVideoOutputof
theReceiverback
toyourTV.
NO
NO
YES
3
ConnecttheAntenna
CabletotheVCR's
/_/_ ANTIN.Connectthe
coaxcabletoTV's
ANTiNandtothe
VCR'sOUTTOTV.
UseRCACables
toconnectthe
)_' Audio/VideoOutputs
oftheVCRtothe
Audio/VideoInputs
ofyourTV.
APPENDIX C- HELP-COMMONLYASKED QUESTIONS 69
70 DISCOVERTHEDUAL@ECKDIFFERENCE
X
m
w
_L
Congratulations on your purchase of a Go-Video
Dual-Deck VCR.
Record the serial nmnber Dora the back of your VCR
here. Attach your sales receipt and/or a copy of your
charge slip Rw rderence.
Serial Number:
Purchase Date:
Note: It i8 impoFt#h'Jt thg_tyou Fe,gister
your Dual Deck VCR wi#r Co- Video,
hrc, _register,your Duat Dec/; VCR,
complete tire Wg_Frag(y registr:_tiorr
c_ud _rrd malt it Or,
Customer $uppert Services
If you encounter a technical problem with your
Dual-Deck VCR an([ are not able to fin([ your answer
in this manual, you are welcome to call our customer
support staff at 602-922-0896 or at our E-Marl address
(custsvc@govideo.com) on Monday-Friday 8:00 am
to 4:00 pm MST.
ORen your questions can be answered on the
phone when you call To make this easier, please
call only while you are in flont of your equipment
with it turned on and ready. Also, please have your
unit serial number available.
See Dual-Deck Warranty on page 64.
Authorized Ge.Video Service Centers
For your convenience, Go-Video has developed an
extensive network of Dual-Deck VCR Service Centers
across North America. For a list of the Authorized
Go-Video Service Centers in your local area, call
Go-Video Customer Service at (602) 922-0896.
APPENDIX D _CUSTOMERSERVICEINFORMATION 71

DUAL.DECKVCR LiMiTED WARRANTY
WHO PROVIDES THE LIMITED WARRANTY
Dining the W_FFalKyperiod, d_e Go Video Warra_Ky Administrator will honor Dual Derk
VCR service fur ,qOdays lab@, 1year parts fi"omthe origh_al date of consumer purclmse.
See below f%rCommercial, hldustriat oi"Educational use coverage. Dual Deck VCR
remote corm dis are warr_mted fior90 days flora the date of pul chase.
WHO IS PROTECTED
This w_lrranty protects the origil_a[ eoi_sumel owner ofthis Go Video product
WHAT IS COVERED AND HOW LONG
This warran%' cove_s internal opera@_g parts and se_vke/]abor to repair oi"re@ace
covered parts in this Go Video product fol 90 clays labor, 1year parts, fi'om the date of
purchase, defined as [uHows: (1) Original Consumer Retail Purehase; (2) Fi]st Rental
Pul chase AgreemelK: oi"(3) First Lease Pul chase Agreement @be"Warl anty Period").
Labol and replacement parts supplied during t!_eWarranty Period are covered only fol
the remailling portion of the oNghml War! alKy Period. The Go Video \¥arHmty Adminis
trator shah have no liabili ty fi)rse] vice trade] this warranty if non E)EM (()r[gh_al
Equipment Mamd_letul er) replacement parts ale used h_d_e rep_dl ofyour Go Video
product.
WHAT THE OWNER MOST DO IF SERVICE IS REQUIRED
If servk:e trader t!_s warranty is requil ed, contact the Go Video Warranty Administrator
at (602) 922 08{t(;.
OTHER WARRANTY COVERAGE
Commercial, Industrial or Educational use has the same warr_mty (ovel age as stated h_
this warranty.
WHAT ARE THE EXCEPTIONS
Th_swarranty does not cover: (1)Normal maintenalK:e serviee, such as video head
cleaning. (2) Damage fl'om misuse, abuse, neglect or accident, namra! disasters oi"Acts
of God. (3) Cabinetr> decorative parts, A/( adapters, knobs oi"buttons. (4)The fore@l
country use of riffs product. (5) Go Video product which has been eleen onically oi"
mechal_icatly modified in any way or ineo_pol ated hKo other products. (6)Installation
and set up service adjustments. (7) Owner insn uct_on. Your Owner's Guide provides
infurmation regarding operating instruetioi_s and user controls. For additional
infol matioll, contact your authorized Go Video detder.
Go Video is not responsible for any shippil_g, handling oi"insurallee charges.
This Exclusive Limited Warranty excludes at!]incidelKal and eonsequentia[ damages.
Some states do not allow the exdusiol_ ofhlddelKal and eonsequential damages, so the
above exclusion may not apply to you.
ALL IMPLIED WARRANTIES INCLUDING IMPLIED WARRANTIES OF MER
CHANTABILITY AND FITNESS FOR A PARTICULAR PURPOSE ARE LIMITED IN
DURATION TO THE DURATION OF THIS WARRANTY PERIOD. Some states do not
allow ]imitatiolls oll bow long all implied warr_mty lasts, so the above limitatiot_ may not
apply to you.
This Exclusive Limited Warranty gives you specific legal rights and you may also have
other rights which xary f]'omstate to state.
For questions contact:
GO-VIDEO WARRANTY ADiVIINBTRATOR
7835 EAST McCLAIN DRIVE, SCOTTSDALE, AZ 85260 1732
(602) 922 0896 _ E Mail: custsvc_govideo.com
72 DISCOVERTHE DUAL-DECKDIFFERENCE
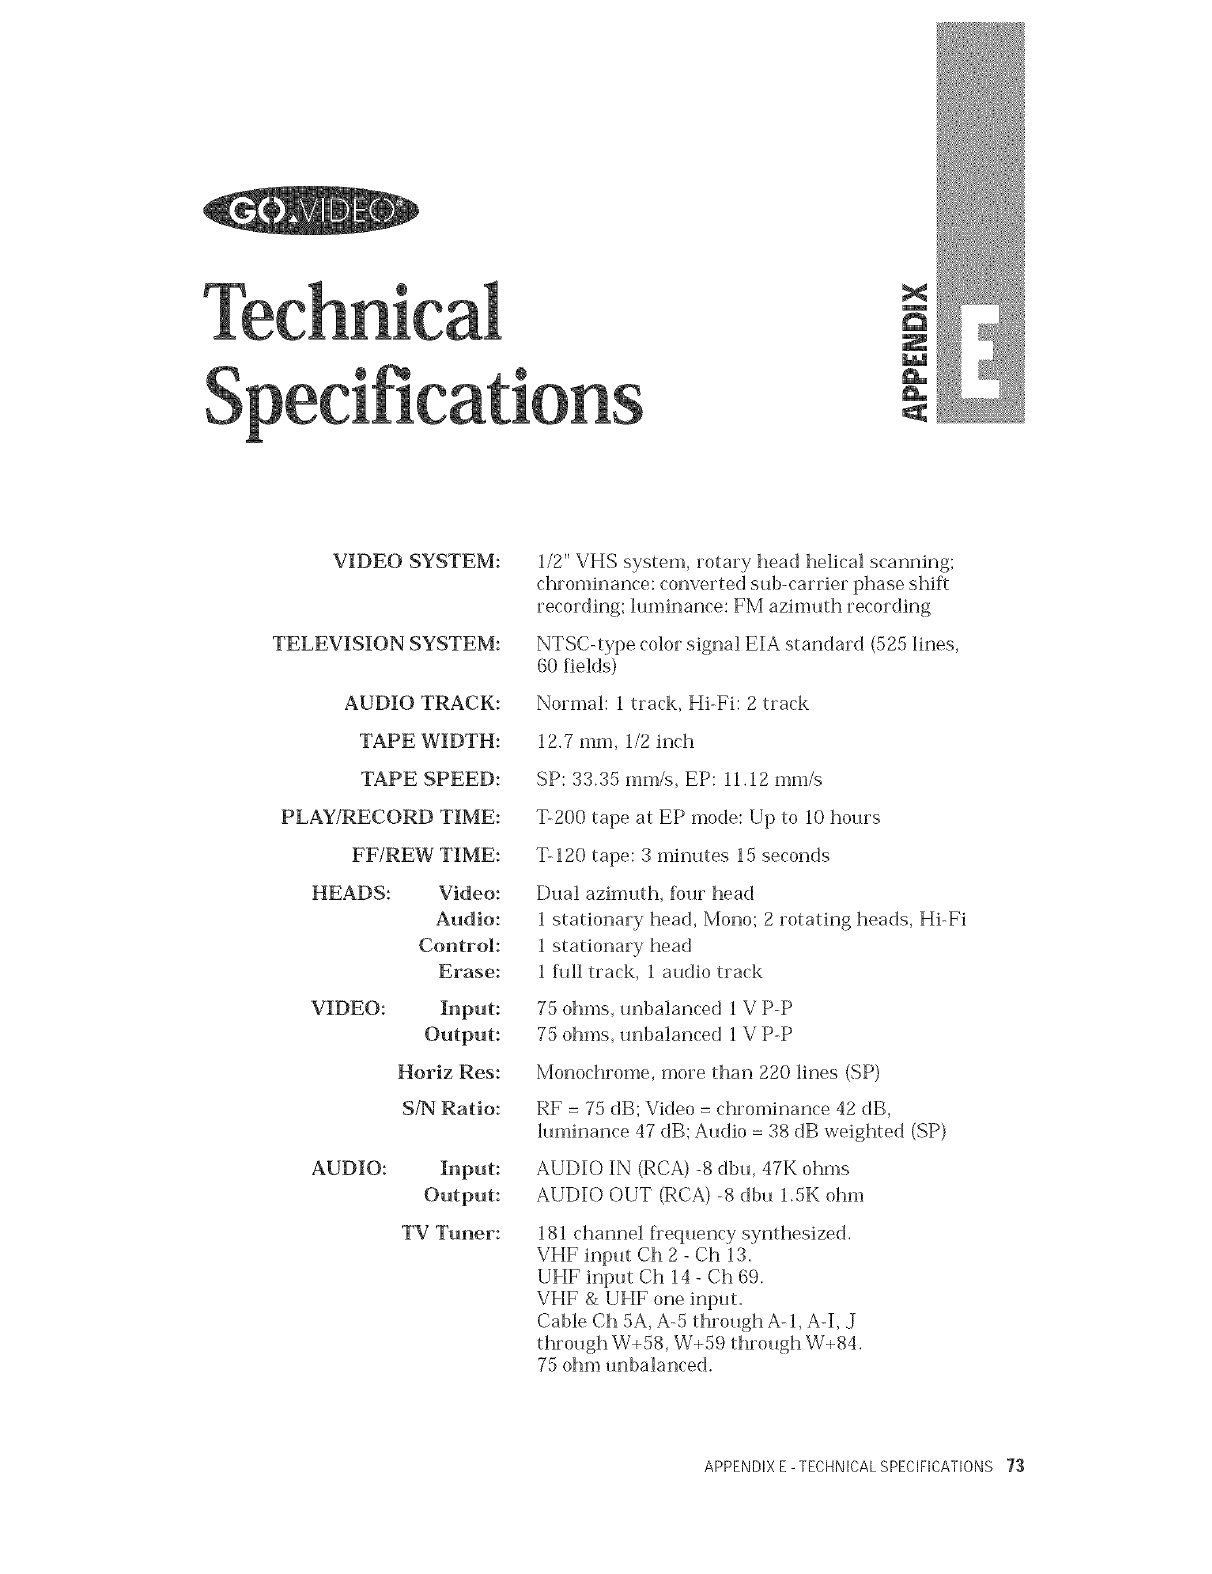
@X
m
w
_L
VIDEO SYSTEM:
TELEVISION SYSTEM:
AUDIO TRACK:
TAPE WIDTH:
TAPE SPEED:
PLAY/RECORD TIME:
FF/REW TIME:
HEADS: Video:
Audio:
Control:
Erase:
VIDEO:
Horiz Res:
S/N Ratio:
AUDIO:
TV Tuner:
1/2" VHS system, rotary head helical scanning;
chrominance: converted sub-carrier phase shift
recording: luminance: FM azimuth recording
NTSC-type color signal EIA standard (525 lines,
60 fields)
Normal: 1 track, HiFi: 2track
12.7 ram, 1/2 inch
SP: 33.35 ram/s, EP: 11.12 mm/s
T-200 tape at EP mode: Up to 10 hours
T-120 tape: 3 minutes 15 seconds
Dual azimuth, %ur head
1 stationary head, Mono; 2rotating heads, HiFi
1 stationary head
1 hill track, 1 audio track
75 ohms, unbalanced 1 V P-P
75 ohms, unbalanced 1 V P-P
Monochrome, more than 220 lines (SP)
RF : 75 dB; Video = chrominance 42 dB,
h_minance 47 dB; Audio = 38 dB weighted (SP)
AUDIO IN (RCA) -8 dbu, 47K ohms
AUDIO OUT (RCA) -8 dbu 1.SK ohm
181 channel fiequency synthesized.
VHF input Ch 2- Ch 13.
UHF input Ch 14 - Ch 69.
VHF & UHF one input.
Cable Ch 5A, A-5 through A-l, Aq, d
through W+58, W+59 through W+84.
75 ohm unbalanced.
APPENDIX E - TECHNICAL SPECIFICATIONS 73
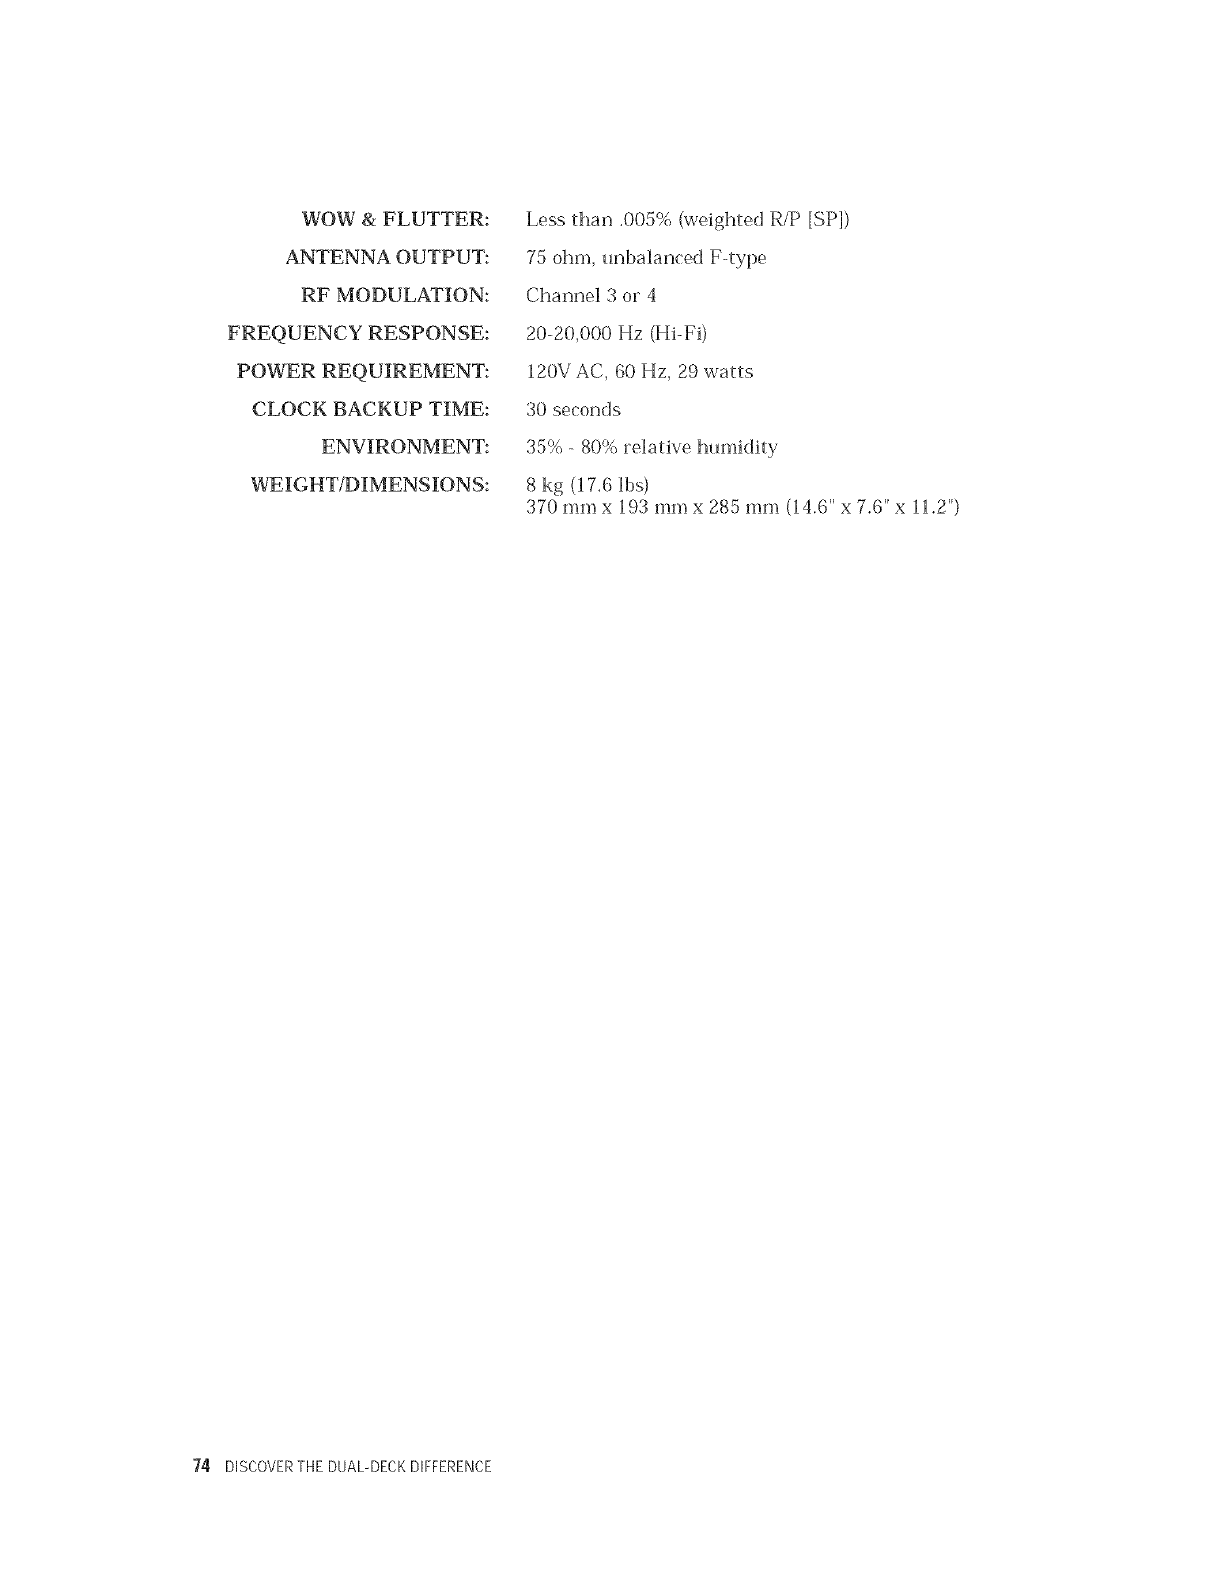
WOW & FLUTTER:
ANTENNA OUTPUT:
RF MODULATION:
FREQUENCY RESPONSE:
POWER REQUIREMENT:
CLOCK BACKUP TIME:
ENVIRONMENT:
WEIGHT/DIMENSIONS:
Less than .005% (weighted R/P [SP])
75 ohm, unbManced Ftype
Channel 3 or 4
20-20,000 Hz (Hi-Fi)
120V AC, 60 Hz, 29 watts
30 seconds
35% - 80% relative hmnidRy
8 kg (17.6 lbs)
370 minx 193 minx 285 mm (14.6" x 7.6"x 11.2")
74 DISCOVERTHE DUAL-DECKDIFFERENCE
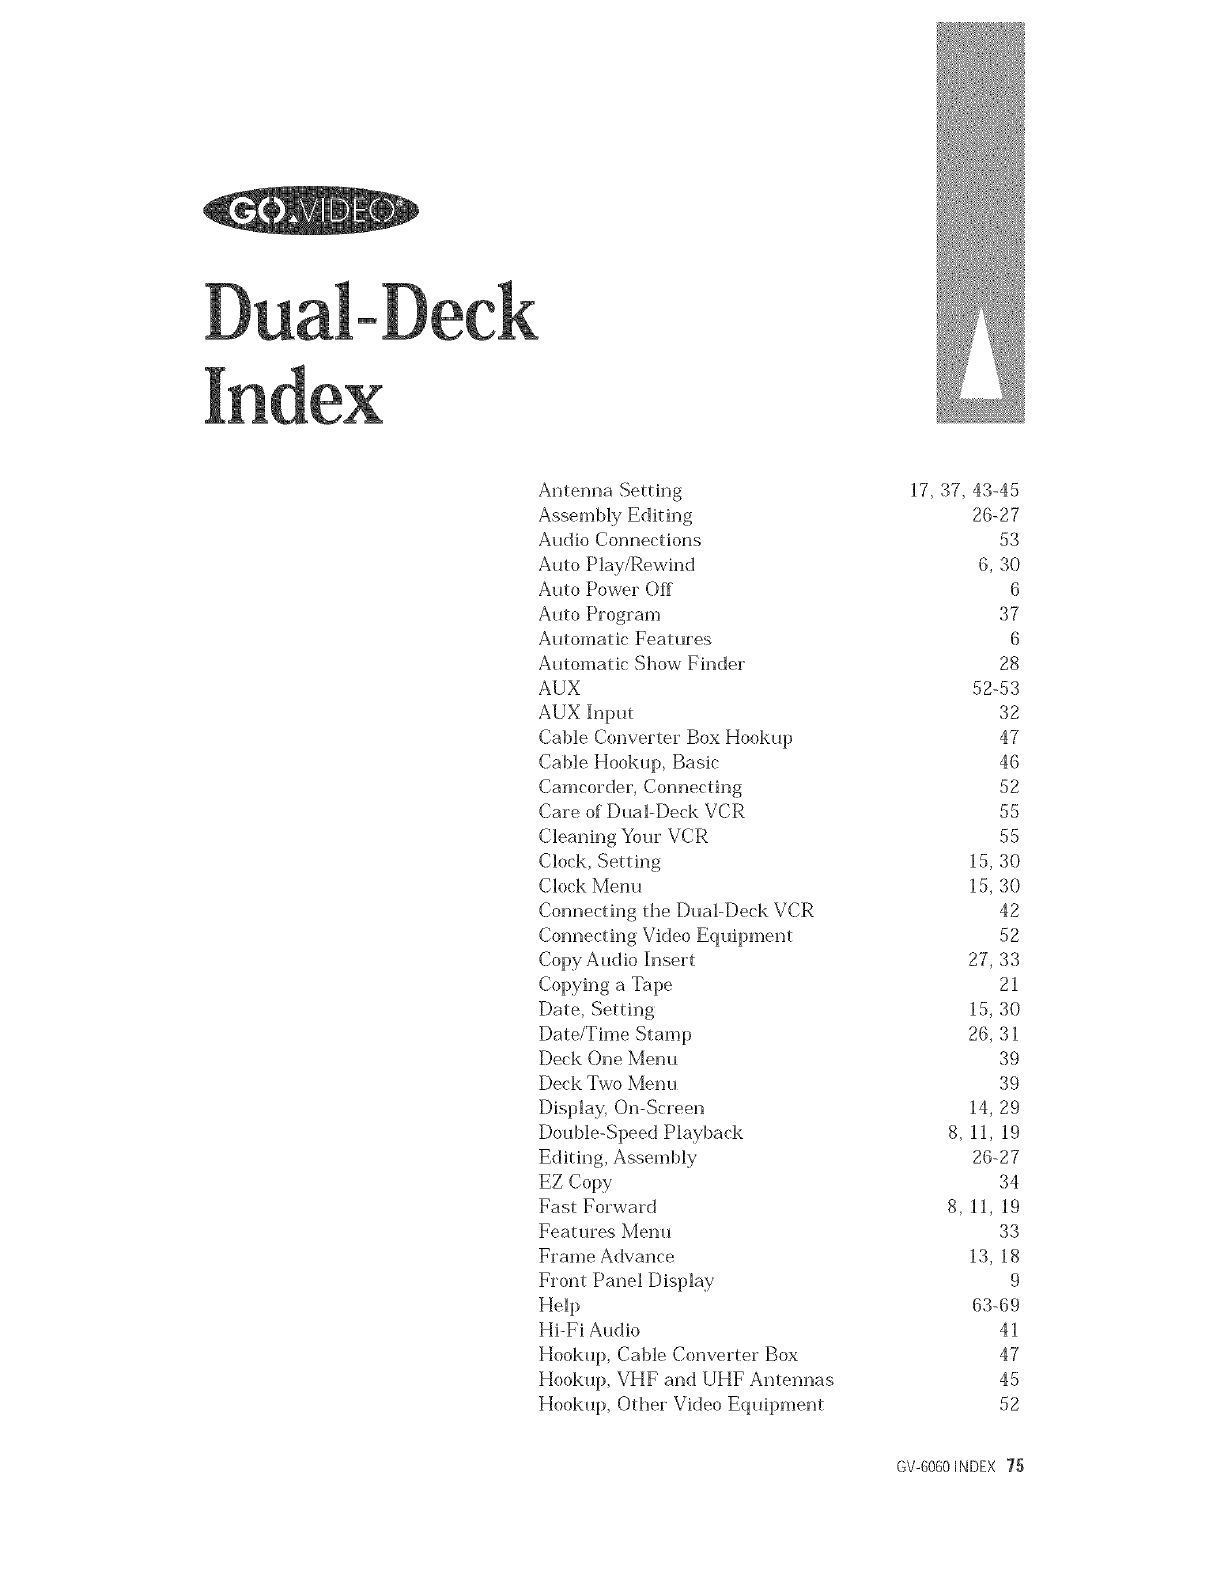
Antenna Setting
Assembly Editing
Audio Connections
Auto Play/Rewind
Auto Power Off
Auto Program
Automatic Features
Automatic Show Finder
AUX
AUX Inp_)t
Cable Converter Box Hookup
Cable Hookup, Basic
Camcorder, Connecting
Care of Dual-Deck VCR
Clock, Setting
Clock Menu
Connecting the Dual-Deck VCR
Connecting Vide() Equipment
Copying a Tape
Date, Setting
Date/Time Stamp
Deck One Menu
Deck Two Menu
Display, On-Screen
Double-Speed Playback
Editing, Assembly
EZ Copy
Fast Forward
Feat m'es Menu
Frame Advance
Front Panel Display
Hells
HiFi Audio
Hookup, Cable Converter Box
Hookup, VHF and UHF Antennas
Hookup, Other Vide() Equipment
17, 37, 43-45
26-27
53
6, 30
6
37
6
28
52-53
32
47
46
52
55
55
15, 30
15, 30
42
52
27, 33
21
15, 30
26, 31
39
39
14, 29
8, 11, 19
26-27
34
8, 11, 19
33
13, 18
9
63-69
41
4'7
45
52
GV-6060INDEX 75
Hookup, Cable
Hookup, Basic Antenna
Hookup, Basic Cable
HQ Copy
Index Marks
Index Search
Index Scan
Jet Search
Language Menu
Laser Disc Player
Loop Play
Loop Record
Menu System
On-Screen Display
On-Screen Menu System
One Touch Recording (OTR)
Playback Mode
Playing a Tape
Record Mode
Record Som'ce
Recording, Timer
Recto'cling kom TV
Recording Speed
Remote Control
Reverse Pictm'e Search
Reverse Jet Search
Sa%ty
Satellite Receiver
Second TV View
Sequential Play
Service
Skip Search
Slow Motion
Speed Matching
Sync Edit
Tape Length
Tape C(mnter
Technical Specifk'ations
Time, Setting
Timer Record Menu
Timer Record Event
Tracking
Trou bleshooting
Tuner Audio
VHS Index Search System
Vide() Camera
Zero Return
46
17, 43-45
46
33
ll, 28
ll, 28
ll, 28
8, ll, 19
15, 36
52
20
22, 34-35
29-41
14, 29, 30
14, 29, 30
9,22
34
18
34-35
41
23
22
21
11
8, ll, 19
8, ll, 19
inside fi'ont cover, i, ii
52
31, 51
20
71
13, 27
13, 18
33
27
21, 25, 39
27
73
15, 30
40
23, 40
20
63-69
3738
37-38
28
52
72
12
76 DISCOVERTHE DUAL-DECKDIFFERENCE


7835 East McClain Drive
Scottsdale, Arizona 85260o1732
USA
(602) 998°3400
E-Mai[: custsvc@govideo.com
F# 1128 PRINTED 6/96
